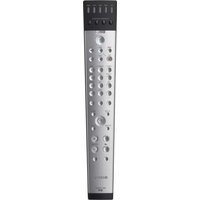
RM-VZ800T - Remote control SONY - Free user manual and instructions
Find the device manual for free RM-VZ800T SONY in PDF.


| Product Type | Universal Remote Control (Integrated Remote Commander) |
| Brand | Sony |
| Model | RM-VZ800T |
| Dimensions (W x H x D) | Approx. 40 x 235 x 31 mm (1 5/8 x 9 3/8 x 1 1/4 in) |
| Weight | Approx. 99 g (3.5 oz) (not including batteries) |
| Power Source | Two R6 (size AA) batteries |
| Battery Life | Approx. 1 year (based on 300 presses per day) or up to 6 months under normal use |
| Operating Distance | Approx. 10 m (32.8 ft), varies by component |
| Preset Components (Sony) | TV, VCR, SAT, DVD, AMP (factory preset for Sony brands) |
| Preset Components (Other Brands) | Most major brands via code setup (up to 4-digit codes) |
| Learning Function | Yes, can learn IR signals from other remotes (up to 16 steps per macro) |
| System Control (Macro) | Yes, up to 16 commands per SYSTEM CONTROL button (A-D) or Component Select button |
| Volume Control | Factory preset: TV volume for visual components, AMP volume for audio; can be reconfigured |
| Hold Function (Child Lock) | Yes, locks all buttons to prevent accidental operation |
| Reset to Factory Settings | Yes, erases all learned signals and code settings |
| Component Select Buttons | TV, VCR, SAT, DVD, AMP (with LED indicators) |
| Player Control Buttons | Play, Stop, Rewind, Fast Forward, Pause, Record |
| Teletext Support | Yes, with colored Fastext buttons (red, green, yellow, blue) |
| Maintenance | Clean with soft cloth slightly moistened with water or mild detergent; avoid solvents |
| Safety | Keep out of reach of children; avoid heat, moisture, and direct sunlight; use Hold function to prevent misuse |
| Warranty & Support | Refer to manual; CE marking valid in EEA countries |
Frequently Asked Questions - RM-VZ800T SONY
User questions about RM-VZ800T SONY
0 question about this device. Answer the ones you know or ask your own.
Ask a new question about this device
Download the instructions for your Remote control in PDF format for free! Find your manual RM-VZ800T - SONY and take your electronic device back in hand. On this page are published all the documents necessary for the use of your device. RM-VZ800T by SONY.
USER MANUAL RM-VZ800T SONY
Integrated Remote Commander
Operating Instructions GB
Disposal of Old Electrical & Electronic Equipment (Applicable in the European Union and other European countries with separate collection systems)
This symbol on the product or on its packaging indicates that this product shall not be treated as household waste. Instead it shall be handed over to the applicable collection point for the recycling of electrical and electronic equipment. By ensuring this product is disposed of correctly, you will help prevent potential negative consequences for the environment and human health, which could otherwise be caused by inappropriate waste handling of this product. The recycling of materials will help to conserve natural resources. For more detailed information about recycling of this product, please contact your local Civic Office, your household waste disposal service or the shop where you purchased the product.
Features
The RM-VZ800T Remote Commander provides centralised control of all your AV components from a single remote commander and saves the trouble of operating different AV components with different remote control devices. The following are its main features.
Centralised control of Sony AV components with this one remote commander
This Commander is preset at the factory to operate Sony brand components, so you can use it out of the box as a control centre for your Sony AV components.
Remote control signals for non-Sony components are also preset
This Commander is preset for most major brands components including Sony. You can remote control your components by setting the type and code number of each component (page 8).
Learning function for programming various other remote control signals
This Commander has a Learning function, to “learn” the remote control signals needed to operate other non-preset components or functions. (To “teach” such signals to this Commander, use the remote control supplied with the non-preset components.) (page 14) In addition, the Commander can “learn” remote control signals (infrared signals only) of non-Audio Visual components such as air-conditioners, lights, etc. (Some specific appliances or functions may not be available.) (page 22)
Reassigning new components
You can assign Component Select buttons to freely operate other components. This is useful when you have more than two of the same kind of AV component (only if a Component Select button is free.) (page 30)
You can only assign TVs to the TV Component Select button.
Table of Contents
Getting Started
Installing the Batteries 6
When to replace the batteries .... 6
Location of Controls 7
Basic Operations
Setting the Code for non-Sony Preset Audio and Visual Components — Setting component codes ....8
Setting a component code 8
Checking if the code number works 10
Setting a Component Code by the Search Function 11
Operating Your Components with the Remote Commander ....12
To control the volume 13
Notes on operating your components 13
Programming Signals of Another Remote Control — Learning Function... 14
For accurate Learning .... 17
Programming remote control signals to the Component Select buttons .. 18
Changing or erasing the function of a "learned" button 20
Notes on programming the signals for an air-conditioner 22
Advanced Features
Controlling the Volume of Visual Components Connected to an Audio System 23
Adding an Extra Function to the Component Select Buttons ....25
Programming the Power-On command of the selected component just by pressing that Component Select button (for Sony components only) ... 25
Executing a Series of Commands — System Control Functions .....26
To clear programmed commands 28
Programming a Series of Commands on the Component Select Buttons .. 29
To clear programmed commands 30
Assigning Other Components to the Component Select Buttons .... 30
Copying the settings of a Component Select button to another button .... 31
Using Other Functions
Locking the Controls — Hold Function 32
Erasing All Settings — To reset the Commander to its factory settings .... 33
Additional Information
Precautions 34
Maintenance ....34
Specifications 34
Troubleshooting 35
Appendices
Table of Preset Functions 37
TV 37
VCR 38
CBL (Cable box) 38
SAT 39
DVD 40
CD 41
MD 41
DAT 41
DECK 42
AMP 42
Index 43
Installing the Batteries
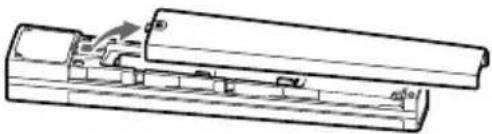
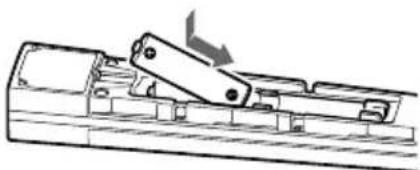
Open the battery compartment lid and insert two R6 (size AA) batteries (not supplied). Be sure to match up the + and - indications on the batteries with the + and - indications on the battery compartment.
1 Slide open and detach the lid.
natural_image
Technical line drawing of a mechanical assembly with no visible text or symbols2 Insert the batteries negative side first through the clamp within each compartment as shown below.
natural_image
Mechanical assembly diagram showing a lever mechanism with a directional arrow (no text or labels)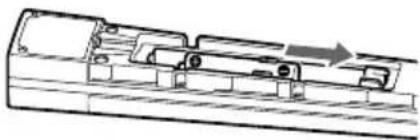
natural_image
Technical line drawing of a mechanical component with internal parts and directional arrow (no text or symbols)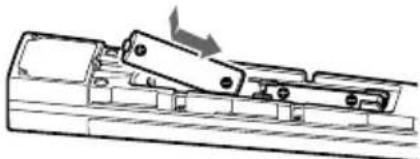
natural_image
Mechanical assembly diagram showing a lever mechanism with a rotating arrow (no text or labels)When to replace the batteries
Batteries for remote control operation (two R6 (size AA) batteries)
Under normal conditions, the batteries will last up to six months. If the Commander does not operate properly, the batteries might be drained. When this happens, replace the batteries with new ones.
Note
Do not take more than one hour to replace the batteries. Otherwise, your setting of the code numbers (page 8) and "learned" remote control signals (page 14) will be erased.
Notes on batteries
- Do not use an old battery with a new one or mix different types of batteries together.
- If the electrolyte inside the battery should leak, wipe the contaminated area of the battery compartment with a cloth and replace the old batteries with new ones. To prevent the electrolyte from leaking, remove the batteries when you plan not to use the Commander for a long period of time.
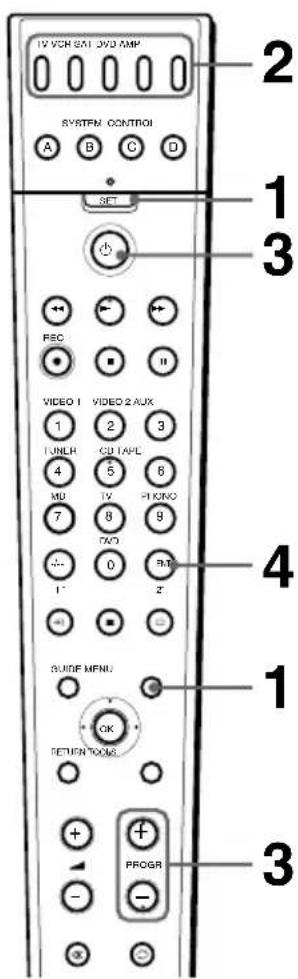
Location of Controls
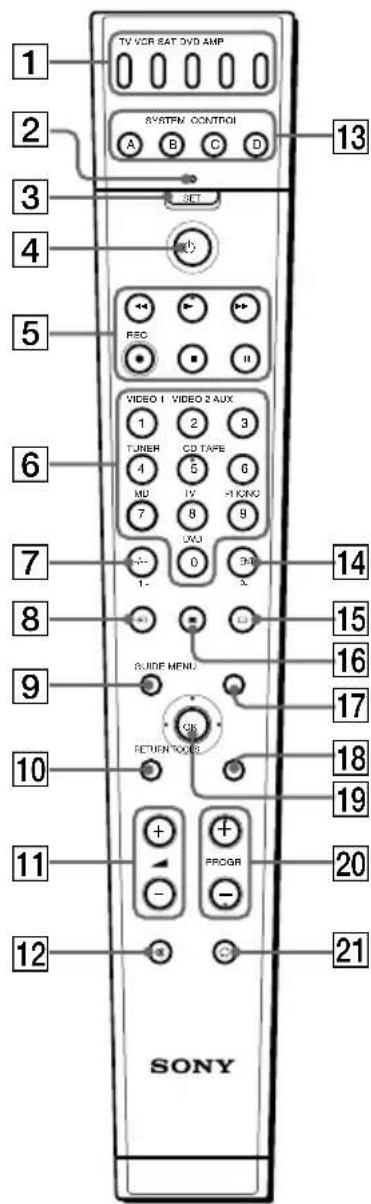
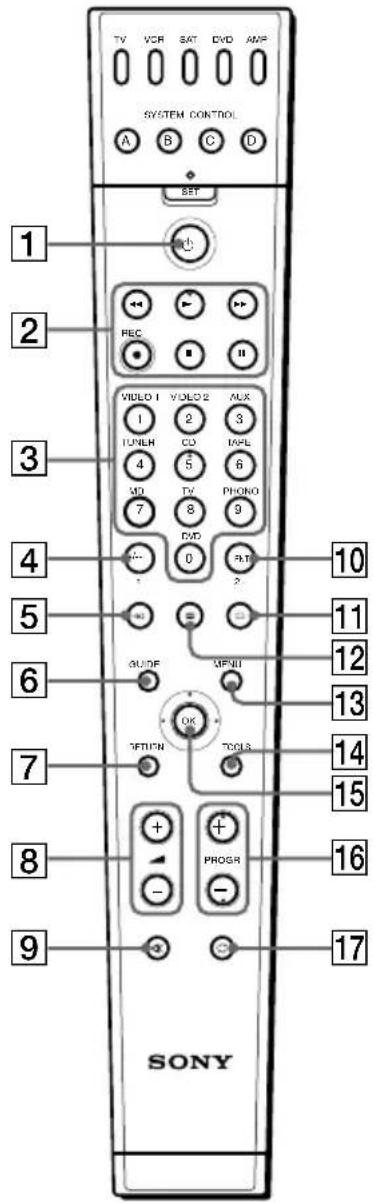
1 Component Select buttons
Light or flash during operation.
2 SET indicator
3 SET button
4 (power) button
5 Player Control buttons
6 Number buttons
7 -/-- button
8 → (input select) button
9 GUIDE button
10RETURN button
11 (volume) +/- buttons*
12 (muting) button*
13 SYSTEM CONTROL buttons
14ENT (enter) button
15 □ (TV) button
16 ≡ (Teletext) button
17 MENU button
18TOOLS button
19Joystick
20 PROGR (programme) +/- buttons
21 (recall) button
About tactile dots
The number 5 button, PROGR + button, PROGR - button, and the ▶ button each have a tactile dot for ease of use.
* Note on the ▲ +/- and ☒ buttons
The Commander controls or mutes the TV's volume when you select a visual component. The Commander controls or mutes the amplifier's volume when you select an audio component. You can also change this setting (page 23).
Note
The function of the control buttons varies depending on settings/operating modes. The "Table of Preset Functions" (page 37) shows how the Commander generally operates for each component in the factory preset mode.
Setting the Code for non-Sony Preset Audio and Visual Components — Setting component codes
The Commander is preset at the factory to operate Sony brand AV components (see the table below). If you are using the Commander with a factory-set Sony components, skip the following procedures.
You can use the Commander with other major brand preset AV components also. To use with other AV components, or Sony components which do not function with the Commander, you need to follow the procedures to set the correct codes for each component.
| Component Select Button | Preset component(s) | Factory setting |
| TV | TV TV/VCR Combo | Sony TV |
| VCR | VCR | Sony VHS VCR |
| SAT | Satellite tuner | Sony satellite tuner |
| DVD | DVD player | Sony DVD player |
| AMP | Amplifier | Sony amplifier |
Note
An analogue cable box, a CD player, an MD player and a cassette deck can be set to any of the above Component Select buttons. You can assign Component Select buttons to freely set signals of your desired components. For further information, see "Assigning Other Components to the Component Select Buttons" (page 30). For the functions of buttons as for each component, see "Table of Preset Functions" (page 37).
Setting a component code
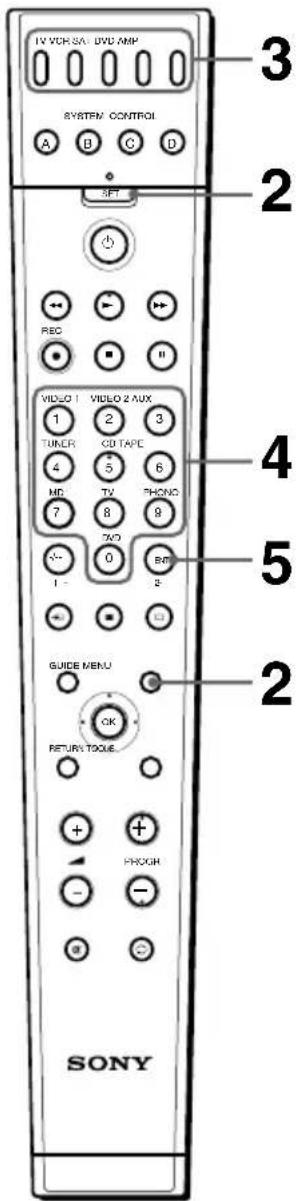
Example: To set up a Philips' TV
1 See the tables in the supplied "Component code numbers," and find the four-digit component code number for the desired component.
If more than one code number is listed, use the number that is listed first.
For example, to set up a Philips' TV, you would use the code number 8086.
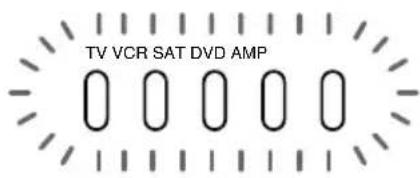
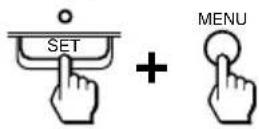
2 Press and while holding SET, press MENU.
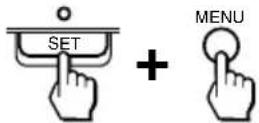
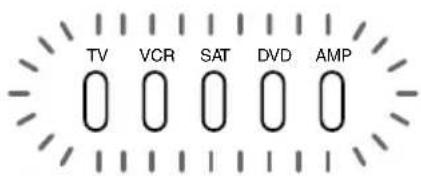
All Component Select buttons flash.
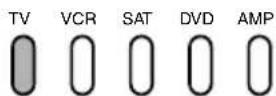
3 Press the Component Select button for the desired component.

The selected Component Select button lights up, and all other button lights turn off.
4 Press the Number buttons to enter the four-digit component code number.
5 Press ENT.
The Component Select button light turns off.
If the Component Select button flashes five times before turning off, it means that the setup is incomplete. Start over from Step 2.
Notes
- If you press a component code number that is not on the table in the supplied "Component code numbers," or if you press a button in the wrong order, the Component Select button flashes five times, and then turns off. Check the component code number, and try setting it again.
- If you don't input anything into the Commander within 20 seconds between each step, the setup procedure will be cancelled. To set the code, start over from Step 2.
- If you press SET while setting the component code, all code numbers will be lost, and the setup procedure will be cancelled. Start over from Step 2.
To cancel setup, press SET.
Setting the Code for non-Sony Preset Audio and Visual Components — Setting component codes (continued)
Checking if the code number works
1 Power on the component with its power switch.
2 Press the corresponding Component Select button for the component you have set up.
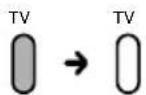
The Component Select button lights up when you press it, and turns off when you release it.
3 Aim the Commander at the component and press ⏻. The selected Component Select button lights up when you press a function button, and turns off when you release it.
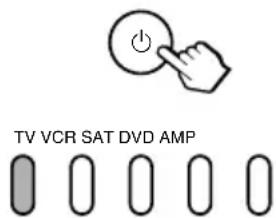
The component should power off.
4 If you have succeeded, check that the Commander is operating the other functions of your component, such as programme and volume control. See page 12 for details.
If the Commander does not seem to be working
Try repeating the setup procedures using the other codes listed for your component, or try setting the code number using the Search function (page 11).
Note on the ▲+/- and ☐× buttons
When you operate a visual component, the TV button lights up to indicate that the Commander is controlling or muting the TV's volume.
TV

When you operate an audio component, the AMP button lights up to indicate that the Commander is controlling or muting the amplifier's volume.
AMP

It is recommended that you first set the TV and AMP codes before setting up any other components.
Note on buttons that have already "learned" remote control signals
If another signal has already been programmed on a button using the Learning function (page 14), that “learned” signal will continue to work even after you set the component code number. To use it as a preset function button, you must first erase its “learned” signal (page 20).
Setting a Component Code by the Search Function
You can find a code number available for a component that doesn't have one in the supplied "Component code numbers."
Before starting the Search function
Set each component to the following status so that the Search function works effectively. TV, AMP: Power-on CD player*, MD player*, cassette deck*: Power-on with a playback source (disc, cassette tape, etc.) Other components: Power-off
* If any of these components are assigned to any of the Component Select buttons (page 30), you can set a component code using the Search function.
1 Press and while holding SET, press MENU.
All Component Select buttons flash.
2 Press the Component Select button for the desired component.

The selected Component Select button lights up, and all other buttons turn off.
TV VCR SAT DVD AMP
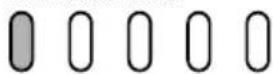
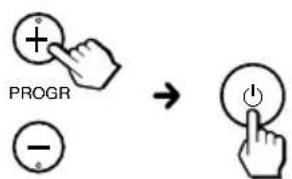
3 Press PROGR + or PROGR – and ⏻ in turn until the component reacts as described in the following. TV, AMP: Powers off VCR, SAT, DVD: Powers on CD player, MD player, cassette deck: Plays back
Setting a Component Code by the Search Function (continued)
Press PROGR + to go to the next code number.
Press PROGR – to go back to the previous code number.
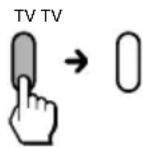
The Component Select button flashes three times after the numbers have turned one cycle.
One cycle means, for example, the four-digit code numbers beginning from "8" are cycled through.
4 Press ENT.

The Component Select button turns off.
TV TV
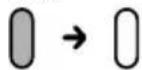
If the Component Select button flashes five times before turning off, it means that the setup is incomplete. Start over from Step 1.
5 Check if the code number works by following the instructions on page 10.
Notes
- If you don't input anything into the Commander within 20 seconds between each step, the setup procedure will be cancelled. To set the code, start over from the beginning.
- If you press any button other than PROGR +/- and ⏻ while setting the component code, all code numbers will be lost, and the setup procedure will be cancelled. Start over from the beginning.
To cancel setup, press SET.
Operating Your Components with the Remote Commander
When you operate a non-Sony component, make sure you set the component code first (page 8).
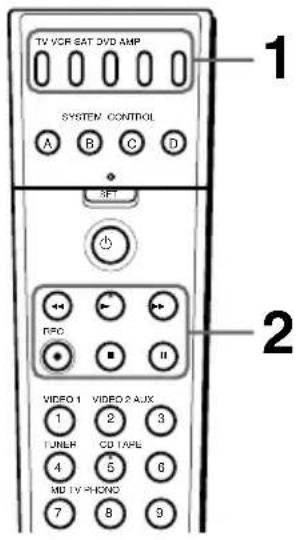
Example: To operate a video cassette recorder
1 Press the desired Component Select button. The Component Select button lights up when you press it, and turns off when you release it.
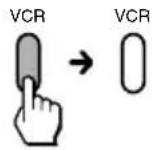
2 Press any Player Control button.
See "Table of Preset Functions" (page 37) for the functions of buttons for each component.
Note
The remote control signals may be different for some components or functions. In this case, programme the remote control signals with the Learning function (page 14). Note, however, that components and functions that do not support the remote control of infrared signals will not work with this Commander.
To control the volume
Press ▲+/- to control the volume. Press ☐× to mute the sound.
When you select a visual component, the TV's volume will be controlled (TV Component Select button lights up), and when you select an audio component, the amplifier's volume will be controlled (AMP Component Select button lights up). You can change this setting also (page 23).
Notes
- If you used the Learning function (page 14) to programme the ▲+/- or ☒× buttons to send a signal to any other component, that signal will be transmitted instead of the volume or muting of the TV or amplifier when you select that component.
- If you used the Learning function (page 14) to programme the ▲+/- or ☑× buttons for the TV or AMP to send a signal to any other component, that signal will be transmitted only when you select TV or AMP. When you select another component, the preset volume control signals for TV or AMP will be transmitted.
- If you have assigned another component to the TV or AMP buttons (page 30), the volume of the TV or amplifier cannot be controlled even if you select another component.
Notes on operating your components
When you use a double cassette deck
1 If the remote control for your deck has a Deck A/B select control, the ⏻ button on your Commander has the corresponding function.

2 If you cannot select Deck A/B with the ⏻ button, first set the number code for either one of the decks, and
- set the function controls for the other deck to other free buttons (for example, the Number buttons) using the Learning function (page 14),
or
- assign the other deck to another Component Select button (page 30).
Programming Signals of Another Remote Control — Learning Function
To operate components or functions which do not work even if you set a component code number, use the following Learning procedure to "teach" any of the programmable buttons of the Commander to operate the functions of another remote control. You can also use the Learning function to change the signals of individual buttons after setting the component code number (page 8). It is recommended that you make a note of the "learned" key functions. (It is possible to make a note on the back of the supplied "Component code numbers.")
Notes
- Some specific remote control signals may not be "learned."
- You can also use a display monitor for computer display (including a built-in tuner type), if the Commander is "learned."
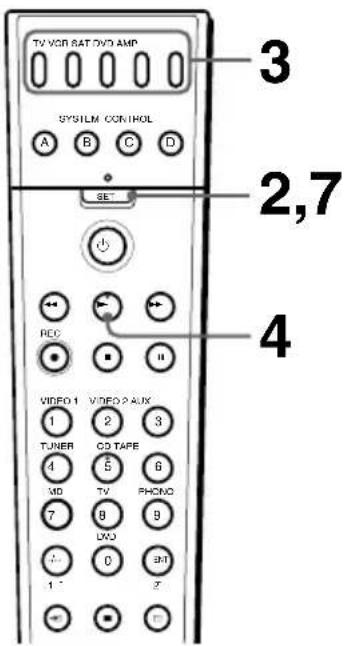
Example: To programme the ▶ (Play) signal of your video cassette recorder to the VCR ▶ (Play) button of the Commander
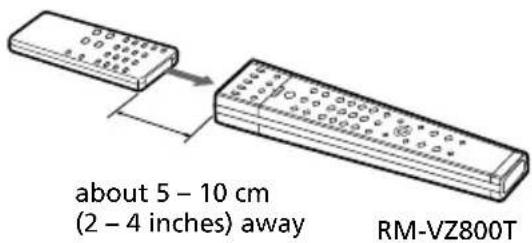
1 Place the RM-VZ800T head to head with your component's remote control.
Remote control for your component
2 Press and hold SET for over 3 seconds.
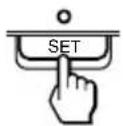
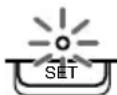
The SET indicator lights up, and all Component Select buttons flash.
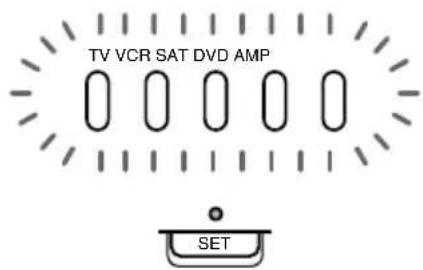
3 Press the Component Select button for the component whose signals are to be "learned."
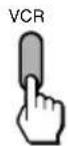
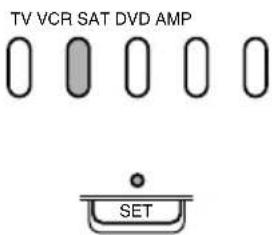
Both the SET indicator and the selected Component Select button light up, and all other buttons turn off.
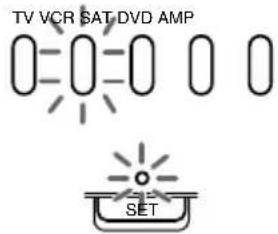
4 Press the button on the Commander you want to "teach."

Both the SET indicator and the selected Component Select button flash (Learning function standby).
If another signal has already been "learned" by that button
The SET indicator flashes twice, and the Commander takes no action returning to its state after the Component Select button was pressed in Step 3. Either “teach” to another free button, or clear the already “learned” function (page 20) and start over from the beginning.
Programming Signals of Another Remote Control — Learning Function (continued)
5 Press and hold the button on the other remote control, until both the SET indicator and the Component Select button light up again.
During data transfer, only the SET indicator stays lit, and the Component Select button turns off.
After data transfer is complete, the Commander returns to its state in Step 3.
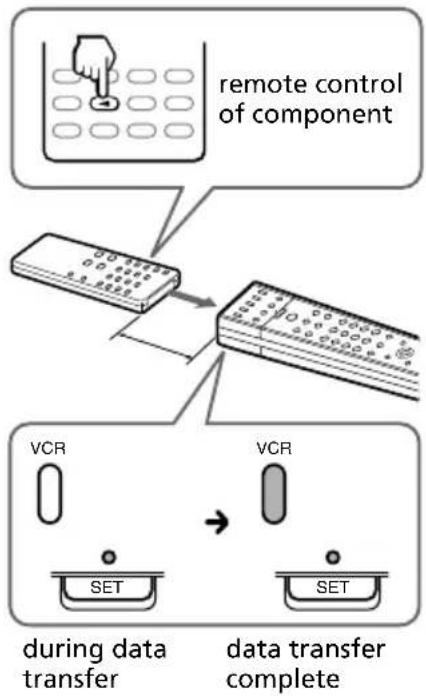
flowchart
graph TD
    A["remote control of component"] --> B["controller"]
    B --> C["Data Transfer"]
    C --> D["VCR"]
    C --> E["VCR"]
    D --> F["during data transfer"]
    E --> G["data transfer complete"]
If the SET indicator flashes five times
It means that "learning" is incomplete. Repeat steps 4 and 5.
6 Repeat Steps 4 and 5 to "teach" functions to other buttons.
To "teach" another component's remote control signal
After positioning the two remote commanders as in Step 1 on page 14, press the corresponding Component Select button, and then follow Steps 4 and 5 to perform Learning.
7 Press SET to finish setting.
Notes
- If you do not perform Learning steps within 20 seconds at any point during the process, Learning mode ends.
- If you do not perform Step 5 within 10 seconds after Step 4, the learning procedure returns to Step 3. Repeat Step 4 while the Component Select button lights.
To cancel setup, press SET.
If the Commander does not seem to be working
If the "learned" button does not operate properly, "teach" once again. (For example, if the volume becomes very loud after pressing ▲ + only once, noise may have interfered during the Learning procedure.)
If you set a component code after "learning" a signal
If you have programmed any signal on a button by the Learning function, that signal will work even after you set a component code.
Note on the REC ● signal
You can only "teach" to one button at a time. Therefore you cannot teach a sequential button operation (for example REC ● + ▶) to a single button on the Commander. In this case, "teach" the functions of each button on your component to the Commander.
When you "teach" signals to +/- or ✗
- If you used the Learning function to programme the ▲+/- or ☐× buttons to send any signal to components other than the TV or AMP, that signal will be transmitted only by pressing ▲+/- or ☐× when you select that component.
- If you used the Learning function to programme the +/- or × buttons to send any signal to the TV or AMP, that signal will be transmitted only after you select TV or AMP. When you select other components, the "learned" signal will be transmitted.
To "teach" the signals for an air-conditioner
See "Notes on programming the signals for an air-conditioner" on page 22.
For accurate Learning
- Do not move the remote units during the Learning procedure.
- Be sure to keep holding down the "learning" button until your Commander reacts as described.
- Use fresh batteries in both remote units.
- Avoid Learning in places subject to direct sunlight or a strong fluorescent light. (Noise may interfere during the Learning procedure.)
- The remote control detector area may differ depending on each remote unit. If Learning does not work, try changing the positions of the two remote control units.
- When you teach signals of an interactive signal exchange system remote control unit (supplied with some of Sony's amplifiers) to the Commander, the response signal of the main unit may interfere with the learning of the Commander. In such a case, move to a place where the signals will not reach the main unit (e.g. other rooms, etc.).
IMPORTANT
Be sure to place the Commander out of the reach of small children or pets, and lock the controls using the Hold function (page 32). Components such as air conditioners, heaters, electric appliances, and electric shutters or curtains receiving an infrared signal can be dangerous if misused.
Programming Signals of Another Remote Control — Learning Function (continued)
Programming remote control signals to the Component Select buttons
You can "teach" one operating procedure to a Component Select button, so that when you press the Component Select button, the operation is also automatically done.
For example, if it is necessary to switch the input selection of an amplifier to DVD when you use a DVD player, "teach" an input select signal to the DVD button. After "learning," the input selection of an amplifier is automatically switched to DVD just by pressing DVD. (For this operation, an amplifier should first be turned on.)
Example: To "teach" the DVD input remote control signal of your amplifier to the DVD Component Select button of the Commander
1 Follow Steps 1 to 2 (page 14).
2 Press and hold the Component Select button for the component whose signals are to be "learned" for over 3 seconds.

Then, SET indicator and all other Component Select buttons light.
TV VCR SAT DVD AMP
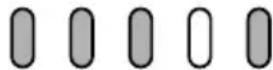
When the SET indicator lights up, you can release the Component Select button. Both the SET indicator and the selected Component Select button flash (Learning function standby).
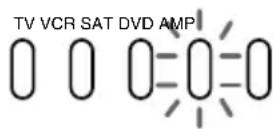
If another signal has already been "learned" by that button
The SET indicator flashes twice, and the Commander takes no action, returning to its state after SET was pressed and held in Step 2. Either “teach” to another free button, or clear the already “learned” function (page 20) and start over from the beginning.
3 Press and hold the button on the other remote control, until the SET indicator lights and all the Component Select buttons flash again.
During data transfer, only the SET indicator stays lit, and the Component Select button turns off.
If the SET indicator flashes five times
It means that "learning" is incomplete. Repeat Steps 2 and 3.
4 Repeat Steps 2 and 3 to "teach" remote control signals to other buttons.
5 Press SET to finish "learning."
Notes
- If you do not perform Learning steps within 20 seconds at any point during the process, Learning mode ends.
- If you do not perform Step 3 within 10 seconds after Step 2, the Learning procedure returns to Step 1. Repeat from Step 2 while the Component Select button lights.
To cancel "learning," press SET.
Programming Signals of Another Remote Control — Learning Function (continued)
Changing or erasing the function of a "learned" button
To change the "learned" function, clear it first and perform Learning again.
To clear the "learned" function of a single button
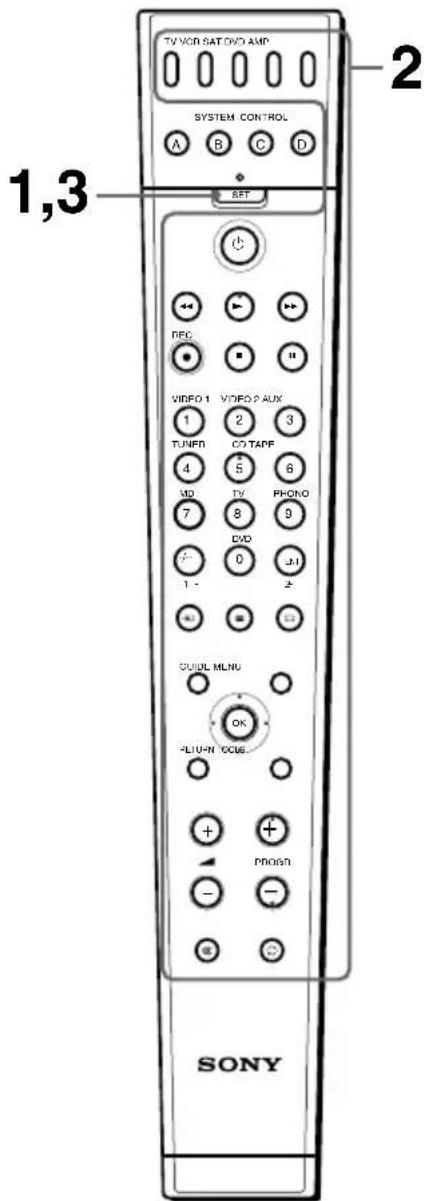
Example: To erase the "learned" function from the Number button 1 in VCR mode
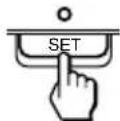
1 Press and hold SET for over 3 seconds.
The SET indicator lights up, and all Component Select buttons flash.
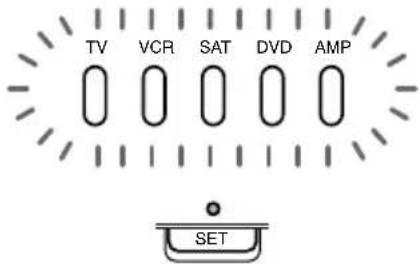
2 While holding the desired Component Select button pressed, press the button you want to erase.
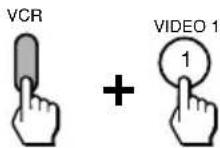
When erasing of "learned" function is completed, the selected Component Select button light turns off.
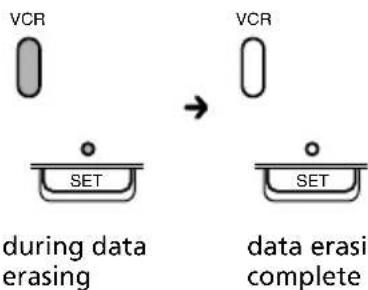
Note
Be sure to press the button you want to erase while pressing the Component Select Button. If you release the Component Select button, the Commander changes to Learning mode.
3 Press SET to finish setting.
To cancel erasing, press SET.
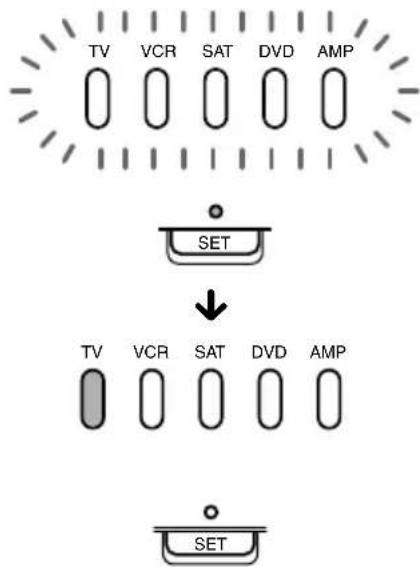
To erase the learned function of the Component Select button that is TV, VCR, SAT, DVD or AMP
Example: To erase the function "learned" by the TV button
1 While holding SET pressed for over 3 seconds, press and hold the TV Component Select button.
flowchart
graph TD
    A["TV"] --> B["SET"]
    C["VCR"] --> D["SET"]
    E["SAT"] --> F["SET"]
    G["DVD"] --> H["SET"]
    I["AMP"] --> J["SET"]
    B --> K["↓"]
    F --> K
    H --> K
    J --> K
When erasing of a "learned" function is completed, the SET indicator light turns off.
To clear all function signals "learned" for a specific Component Select button
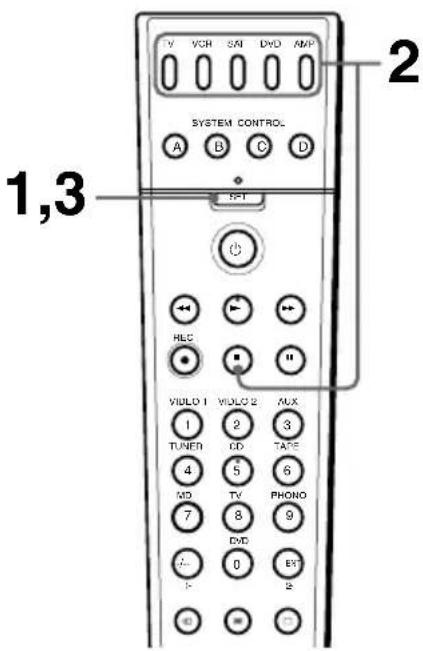
Example: To erase all functions "learned" by the VCR button
1 Press and hold SET for over 3 seconds.
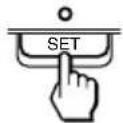
The SET indicator lights up, and all Component Select buttons flash.
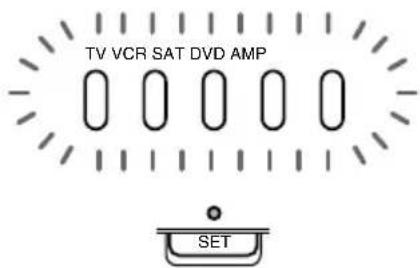
Programming Signals of Another Remote Control — Learning Function (continued)
2 While holding ■ pressed, press the Component Select button you want to erase.
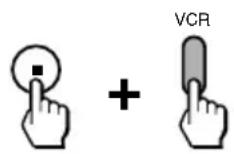
When erasing of a “learned” function has completed, all the other Component Select button lights turn off.
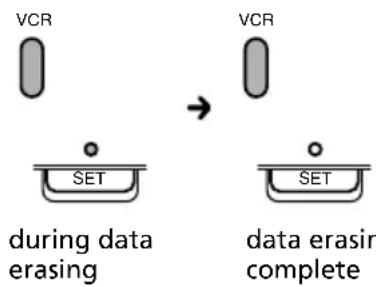
Notes
- With this operation, you can only erase the "learned" functions of all buttons for a specific component.
- To erase a single "learned" function of a Component Select button, see page 20.
3 Press SET to finish setting.
To cancel erasing, press SET.
Notes on programming the signals for an air-conditioner
About seasonal adjustments
If you change the settings of the air-conditioner for the season, you have to programme the remote control signals of the new settings on the Commander.
If the power-on/off operation does not work correctly
If the Commander can only operate "ON" with one button and "OFF" with another, while your air-conditioner's remote control can operate "ON/OFF" with a single button, programme the signal on two buttons of the Commander as follows.
1 Clear the "learned" power-on/off signal on the programmed button of the Commander.
2 Reprogramme only the power-on signal of the air-conditioner on the button of the Commander by following the steps of "Programming Signals of Another Remote Control-Learning Function" (page 14).
3 Programme the power-off signal of the air-conditioner on another button of the Commander.
The two buttons of the Commander have been programmed with the power-on signal and the power-off signal of the air-conditioner respectively, so that you can operate the air-conditioner with the Commander.
Controlling the Volume of Visual Components Connected to an Audio System
The Commander is factory preset based on the assumption that you hear the sound of your visual components from your TV speakers, and that you hear sound of your audio components from the loudspeakers connected to your amplifier.
For example, to control the volume while using a VCR, you don't need to press the TV button to control the TV volume.
The following table shows the factory setting of which volume would be controlled for each component.
| Component Select button | Controls the volume of |
| TV | TV |
| VCR | TV |
| SAT | TV |
| DVD | TV |
| AMP | amplifier |
However, if your visual components are connected to an audio system, you may want to hear TV or VCR sound from the loudspeakers via your amplifier, not from your TV speakers. In this case, you need to change the factory preset so that you can control the volume of your visual components without first having to switch to the amplifier.
To change the Factory Preset of the Volume Control
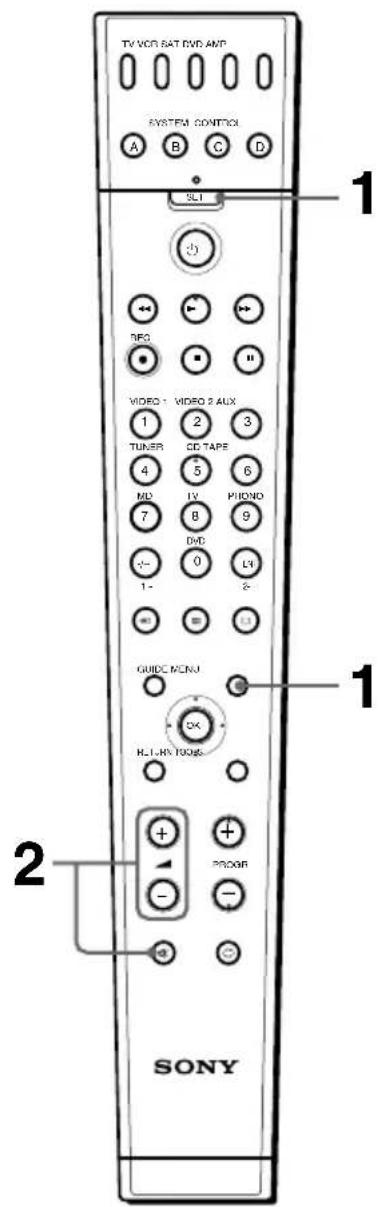
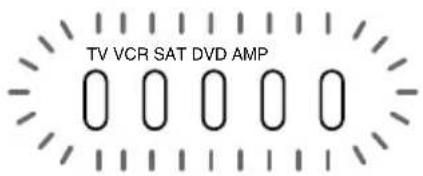
1 Press and while holding SET, press MENU. All Component Select buttons flash.
Controlling the Volume of Visual Components Connected to an Audio System (continued)
2 While holding ☑ pressed, press ▲ + or ▲ -.
To set all volume controls to AMP
Press ▲ + while holding ☑ pressed.
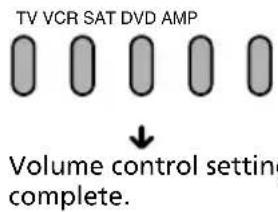
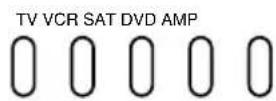
All Component Select buttons light up when you press these buttons, and then turn off when you release them.
Press and while holding ▲ +, press ☑.
To set only the audio components' volume controls to AMP
Press ▲ – while holding ☑ pressed.
Only AMP lights up when you press these buttons, and then turns off when you release them.
Press and while holding ▲ -, press ☑.
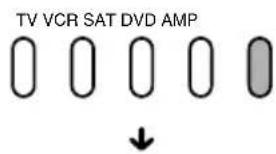
Volume control setting complete.
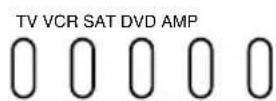
Visual components are: TV, video cassette recorder, analogue cable box, satellite tuner, DVD player Audio components are: CD player, MD player, cassette deck, amplifier
To cancel setting, press SET.
Notes
- If you used the Learning function to programme the ▲+/- or ☐× buttons to send a signal to a component, the procedure above will not change the function of the ▲+/- and ☐× buttons.
- If you set a Learning function for sending an amplifier's volume control signal on a Component Select button other than TV, the priority of sending the signal is also set as follows from highest to lowest priority: AMP button→VCR button→SAT button→DVD button. For example, if you "teach" the AMP button and the VCR button to send the amplifier's volume signal, when you adjust the volume, the signals on AMP button are sent to the amplifier first. If you "teach" the AMP button to send signals of other than for an amplifier, the signals are sent to the amplifier from the VCR button.
Adding an Extra Function to the Component Select Buttons
Programming the Power-On command of the selected component just by pressing that Component Select button (for Sony components only)
When using Sony components, you can programme the Power-On signal for each component on a Component Select button. You can select the desired component and power it on by just pressing that Component Select button.
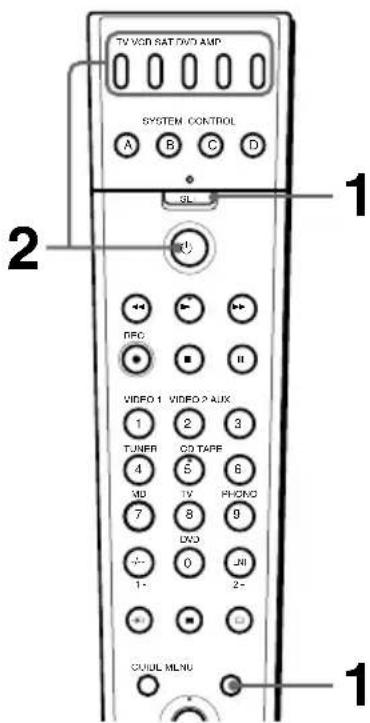
Example: To programme the TV button
1 Press and while holding SET, press MENU.
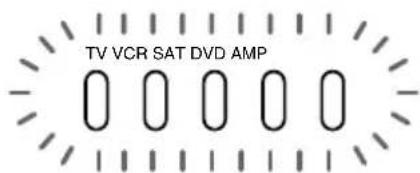
All Component Select buttons flash.
2 While holding ⏻ pressed, press the desired Component Select button. When you first press ⏻, only the Component Select buttons that have already been set with the Power-On command light up.
Example: If the Power-On command has been programmed on the VCR and DVD buttons, these buttons light up when you first press ⏻.
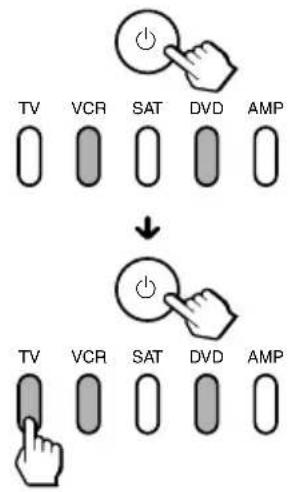
flowchart
graph TD
    A["TV"] --> B["VCR"]
    B --> C["SAT"]
    C --> D["DVD"]
    D --> E["AMP"]
    F["Power"] --> G["Down Arrow"]
    G --> H["Power"]
    I["Power"] --> J["Down Arrow"]
    J --> K["Power"]
To cancel setting, press SET.
To clear the Power-On command
Repeat the same procedure, pressing the desired Component Select button that lights up when you press ⏻.
Notes
- If the component code of a non-Sony brand has been set on a Component Select button, you cannot programme the Power-On function on it. If you change the component code (page 8) after setting the Power-On function, the Power-On function is cleared. (The Component Select button flashes twice to indicate that you cannot set this function.)
- Even if you used the Learning function (page 14) to programme a signal on a Component Select button, you can programme the Power-On function on that button but it cannot be used. If you clear the "learned" function on that button, you can use the Power-On function.
Executing a Series of Commands — System Control Functions
With the System Control function, you can programme a series of operating commands, and execute them by pressing just one button. You can programme up to 16 consecutive operation steps on each of the SYSTEM CONTROL buttons (A - D).
If you have set the System Control function for a Component Select button (page 29), the execution of the programmed commands begins when you press the Component Select button for more than 2 seconds.
When executing the programmed commands, each remote commander signal is transmitted.
Example: when you watch a video, and you can set a series of operations you want to set as follows:
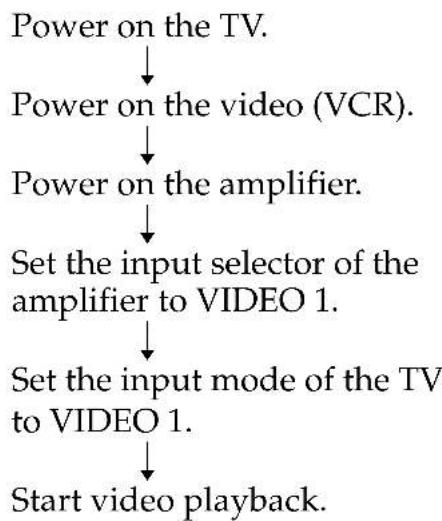
flowchart
graph TD
    A["Power on the TV."] --> B["Power on the video (VCR)."]
    B --> C["Power on the amplifier."]
    C --> D["Set the input selector of the amplifier to VIDEO 1."]
    D --> E["Set the input mode of the TV to VIDEO 1."]
    E --> F["Start video playback."]
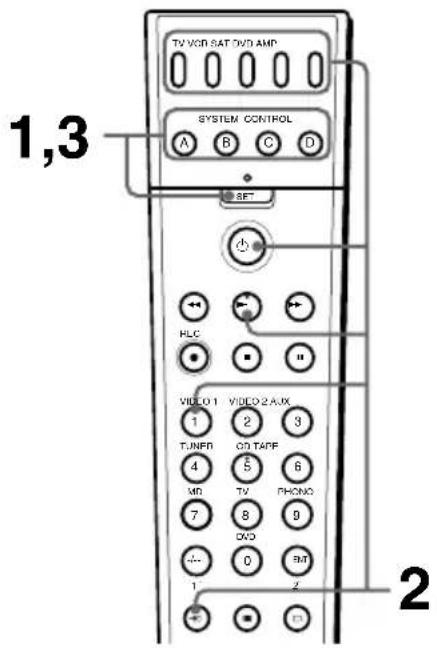
Example: To programme the procedure above to the SYSTEM CONTROL B button
1 Press and while holding SET, press the SYSTEM CONTROL B button.
The SET indicator light turns on.
If a System Control function (System Control Macro) has already been set on the button, the SET indicator flashes twice. The setting procedure is automatically cancelled.
2 Set the System Control function.
With this example, press buttons in sequence as below:
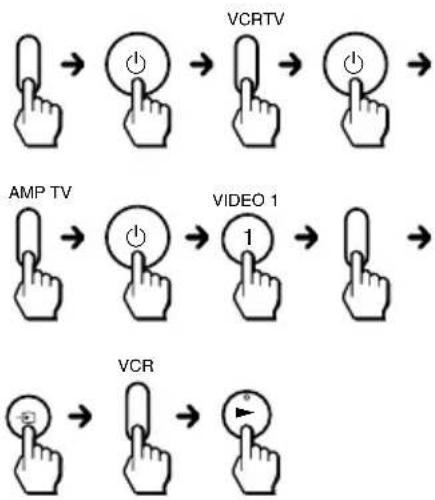
flowchart
graph TD
    A["Hand with finger icon"] --> B["Icon: Power Pulse"]
    B --> C["Hand with finger icon"] --> D["Icon: Power Pulse"]
    D --> E["Hand with finger icon"] --> F["AMP TV"]
    F --> G["Hand with finger icon"] --> H["Icon: Power Pulse"]
    H --> I["Hand with finger icon"] --> J["VIDEO 1"]
    J --> K["Hand with finger icon"] --> L["Hand with finger icon"]
    L --> M["Hand with finger icon"] --> N["VCR"]
    N --> O["Hand with finger icon"] --> P["Video 1"]
You can programme up to 16 consecutive steps on each of the SYSTEM CONTROL buttons (A - D), including the first step to select a Component Select button.
3 Press SET to complete the programming.
The SYSTEM CONTROL button light turns off.
To programme a new series of operations for those buttons which already have a control programme have already been set
Erase the programme (page 28).
Notes
- If you interrupt the procedure at any point for over 20 seconds, the setting mode ends and the series of commands will be programmed up to that point. In this case, clear the programme (page 28) and start again from Step 1 to set the entire program from the beginning. You cannot continue programming once the setting mode ends.
- If a SYSTEM CONTROL button has already "learned" a remote control signal (page 14), you can programme a System Control function (System Control Macro), but the function will not work until you clear the Leaning function. To clear the Learning function, see "Changing or erasing the function of a "learned" button" on page 20.
- If you change the component code number (page 8) or programme a new signal by using the Learning function (page 14) on a key or a button that has been programmed with a series of commands of using the System Control function, the new signal will be transmitted when you press the corresponding SYSTEM CONTROL button.
- While in setting mode, you cannot clear any operation step you have programmed. If you have programmed an incorrect operation by mistake, start again from Step 1.
- If you try to programme more than 16 steps, the System Control setting mode ends, and the 16 steps you have programmed are registered. If you want to programme the steps again, clear the programme (page 28) and start again from Step 1.
Executing a Series of Commands — System Control Functions (continued)
Tips for programming the System Control functions
The following information helps you to programme a consecutive operation steps.
About the order of operation steps
Some of the components may not accept consecutive remote control signals. For example, some TVs generally may not respond to the next signal right after the Power-on signal. So, a series of commands such as TV Power-on and input select may not work properly.
In this case, insert other signals to other components like such as in the example below:
TV Power-on→VCR Power-on→ VCR playback→TV input select
Changing the interval between operation steps
While you are setting a programme, you can insert a 0.4 second interval before the next step is executed by pressing the same Component Select button again. In the example above, if you press AMP→①→AMP→1 in Step 2, you can insert a 0.4 second interval after the AMP power-on signal is transmitted.
To clear programmed commands
1 Press and while holding SET, press and hold for more than 3 seconds the SYSTEM CONTROL button you want to clear.
Programming a Series of Commands on the Component Select Buttons
As with the SYSTEM CONTROL buttons, you can also programme a series of operating commands for the Component Select buttons (up to 16 steps).
To execute the commands programmed on a Component Select button by the System Control function, press the button for more than 2 seconds.
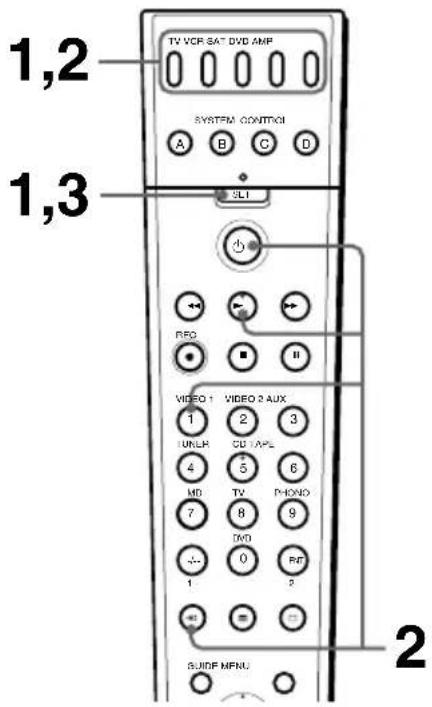
Notes
- When you press the button for less than 2 seconds, it works as a normal Component Select button, and the programmed function does not work.
- See also "Tips for programming the System Control functions" on page 28.
Example: To programme the procedure on page 26 for the VCR Component Select button
1 Press and while holding SET, press the VCR Component Select button. The SET indicator and the VCR Component Select button lights turn on.
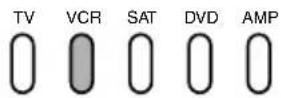
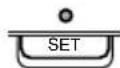
If a Control Programme function (Component Macro) has already been set on the button, the button flashes twice. The setting procedure is automatically cancelled.
2 Set the Control Programme function.
With this example, press the buttons in sequence as below:
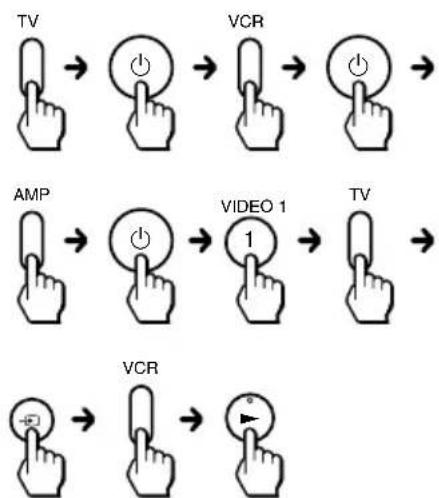
flowchart
graph TD
    A["TV"] --> B["Power Icon"]
    B --> C["VCR"]
    C --> D["Power Icon"]
    D --> E["AMP"]
    E --> F["Power Icon"]
    F --> G["VIDEO 1"]
    G --> H["1"]
    H --> I["TV"]
    I --> J["AMP"]
    J --> K["VCR"]
    K --> L["+/-"]
You can programme up to 16 consecutive steps on each of the Component Select buttons, including the first step to select a Component Select button.
3 Press SET to complete the programming.
The VCR Component Select button light turns off.
Programming a Series of Commands on the Component Select Buttons (continued)
To clear programmed commands
1 Press and while holding SET, press and hold for more than 3 seconds the Component Select button you want to clear.
Notes
- You can programme a Control Programme function (Component Macro) for a Component Select button on which the Power-On function (page 25) has been programmed. In this case, the Power-On function is executed when you press the Component Select button, or when you select another component while the consecutive Control Programme is being executed.
- If the procedure is interrupted at any point for over more than 20 seconds, the setting mode ends and the series of commands will be programmed up to that point. In this case, clear the programme (page 30) and start again from Step 1 to set the entire programme from the beginning. You cannot continue programming once the setting mode ends.
- If a Component Select button has already “learned” a remote control signal (page 14), you can programme a Control Programme function (Component Macro), but the function will not work until you clear the “Learned” Function. To clear the “Learned” Function, see “Changing or erasing the function of a “learned” button” on page 20.
- While you are setting a programme, you can insert a 0.4 second interval before the next step is executed by pressing the same Component Select button again. In the example above, if you press AMP ⏻ AMP 1 in Step 2, you can insert a 0.4 second interval after the AMP power-on signal is transmitted.
Assigning Other Components to the Component Select Buttons
You can assign another component to any of the Component Select buttons not being used.
Once if you set a Component Select button to a different type of component, the entered component's code number becomes effective.
Notes
- To use the original component setting, set the component code number again (page 8).
- If you enter a new brand's component code number without clearing the previous "learned" functions on that Component Select button, the "learned" functions remain effective. Erase the functions you do not use frequently.
- You can only assign TVs to the TV Component Select button.
Copying the settings of a Component Select button to another button
You can copy the entire settings of a Component Select button to another Component Select button. The settings of the component code (page 8) and the "learned" function (page 14) are copied to a new button.
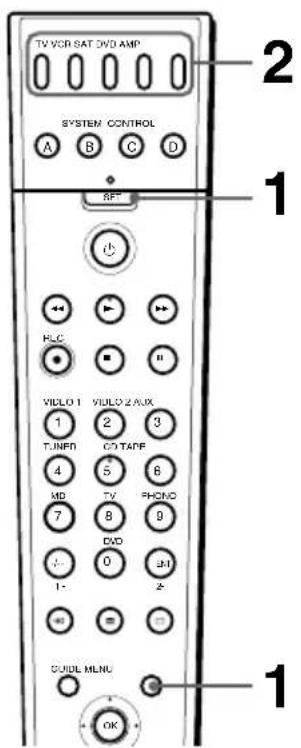
Example: To copy the settings of the DVD button to the SAT button
1 Press and while holding SET, press MENU. All Component Select buttons flash.
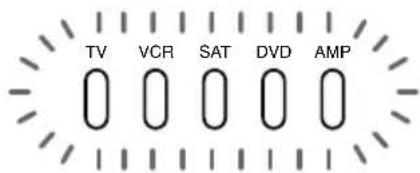
2 Press and hold for over 3 seconds the desired Component Select button to which you want to copy a setting from another Component Select button.
While holding down this button, the other Component Select buttons flash. Then, when you press the Component Select button which holds the setting you want to copy, all Component Select buttons light up. When copying is complete, any Component Select buttons other than the two buttons pressed, turn off.
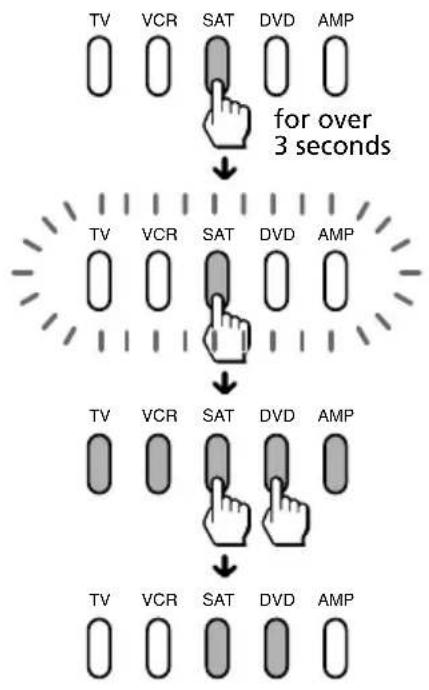
flowchart
graph TD
    A["TV"] --> B["for over 3 seconds"]
    C["VCR"] --> B
    D["SAT"] --> B
    E["DVD"] --> B
    F["AMP"] --> B
    B --> G["TV"]
    B --> H["VCR"]
    B --> I["SAT"]
    B --> J["DVD"]
    B --> K["AMP"]
    G --> L["TV"]
    G --> M["VCR"]
    G --> N["SAT"]
    G --> O["DVD"]
    G --> P["AMP"]
    L --> Q["TV"]
    L --> R["VCR"]
    L --> S["SAT"]
    L --> T["DVD"]
    L --> U["AMP"]
To cancel setting, press SET.
Notes
- You cannot copy the settings to a Component Select button on which any "learned" function (page 14) has been programmed.
- Since you can only operate a TV using the TV Component Select button, and you cannot copy other Component Select button settings (other than for a TV) to the TV Component Select button.
- You cannot copy the Control Programme function (Component Macro) to another Component Select button.
To return the setting of the Component Select button to the original component setting
Clear the "learned" function (page 20) and perform the original component setting following the procedure on page 31.
Locking the Controls — Hold Function
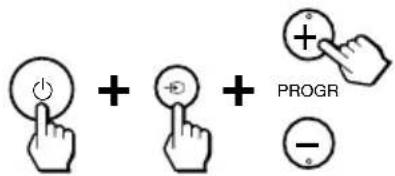
To prevent accidental operation, you can lock all the buttons with the Hold function.
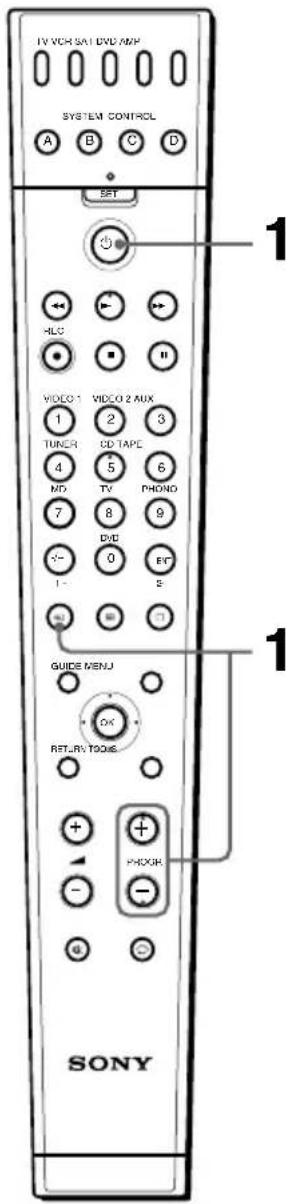
1 Press and while holding ⏻, press ⬇ and PROGR +.
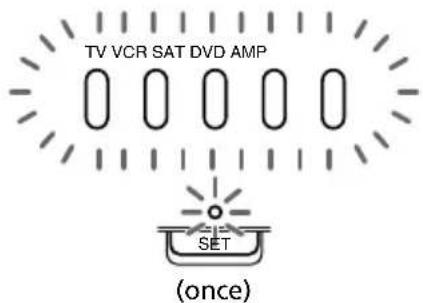
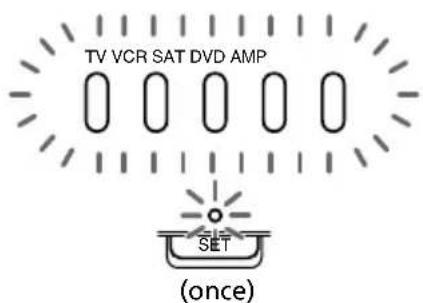
The SET indicator and all the Component Select buttons flash once, and the Hold function is set.
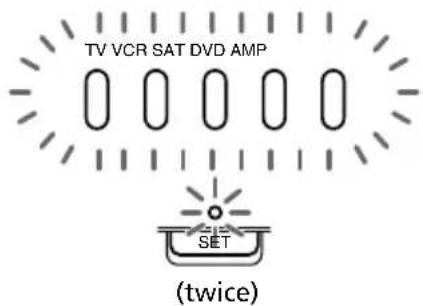
While the Hold function is on, no function can be operated. (The SET indicator and all the Component Select buttons flash twice.)
To unlock the control
Press and while holding ⏻, press ⏱ and PROGR –.
The SET indicator and all the Component Select buttons flash once, and the Hold function is cleared.
Erasing All Settings — To reset the Commander to its factory settings
You can erase all remote control signals programmed by the "learned" function to reset the Commander to its factory settings.
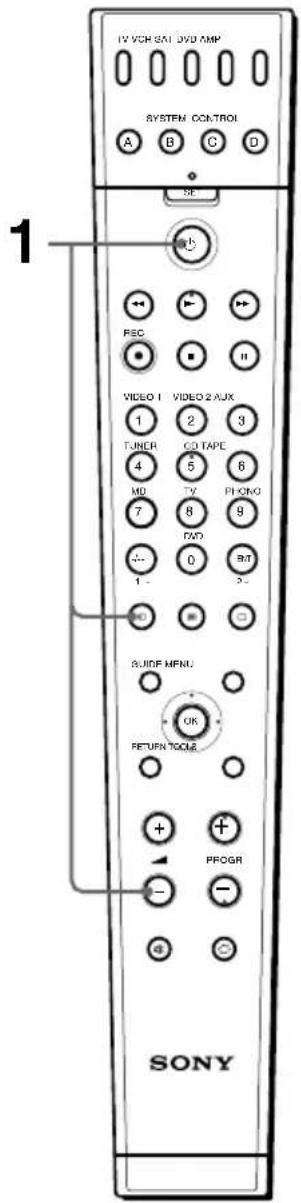
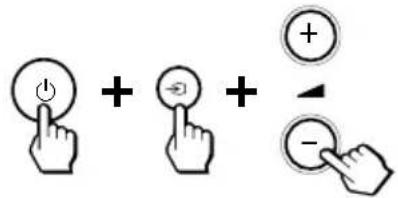
1 While holding ⏻ pressed, press ⭕ and ▲-.
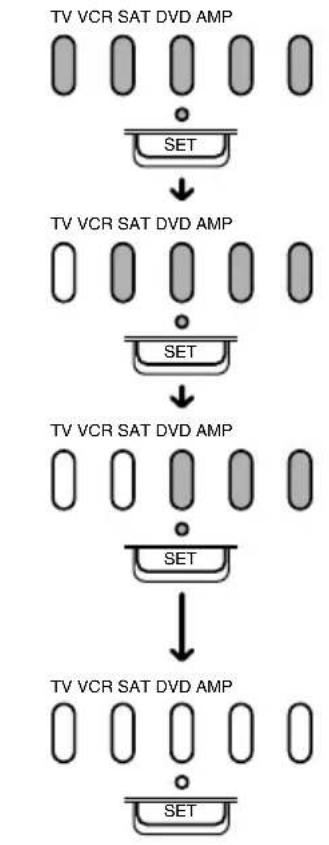
The SET indicator and all Component Select buttons light up. Then the Component Select buttons turn off one by one from the left, followed by the SET indicator. When the SET indicator turns off at last, all settings are cleared, and Commander returns to its original state.
flowchart
graph TD
    A["TV VCR SAT DVD AMP"] --> B["SET"]
    B --> C["TV VCR SAT DVD AMP"]
    C --> D["SET"]
    D --> E["TV VCR SAT DVD AMP"]
    E --> F["SET"]
    F --> G["TV VCR SAT DVD AMP"]
    G --> H["SET"]
Precautions
- Do not drop the unit or give a shock to the unit, or it may cause a malfunction.
- Do not leave the unit in a location near heat sources, or in a place subject to direct sunlight, excessive dust or sand, moisture, rain or mechanical shock.
- Do not put foreign objects into the unit. Should any liquid or solid object fall into the unit, have it checked by qualified personnel before operating the unit any further.
- Do not expose the remote control detectors of your components to direct sunlight or other strong illumination. Too much light there can interfere with remote control operations.
- Be sure to place the Commander out of the reach of small children or pets. Components such as air conditioners, heaters, electric appliances, and electric shutters or curtains receiving an infrared signal can be dangerous if misused.
Maintenance
Clean the surface with a soft cloth slightly moistened with water or a mild detergent solution. Do not use any type of solvent such as alcohol, benzene or thinner as they may damage the finish of the surface.
Specifications
Operating distance
Approx. 10 m. (32.8 ft) (varies depending on components of different manufacturers)
Power requirements
Two R6 (size AA) batteries
Battery life
Approx. 1 year (if buttons on the Remote Commander are pressed about 300 times a day) (varies depending on frequency of use)
Dimensions
$$ \begin{array}{l} \text { Approx. } 4 0 \times 2 3 5 \times 3 1 \mathrm{mm}. \ (1 ^ {5} / _ {8} \times 9 ^ {3} / _ {8} \times 1 ^ {1} / _ {4} \mathrm{in}) (\mathrm{w} \times \mathrm{h} \times \mathrm{d}) \end{array} $$
Mass
Approx. 99 g (3.5 oz) (not including batteries)
Design and specifications are subject to change without notice.
CE
The validity of the CE marking is restricted to only those countries where it is legally enforced, mainly in the countries EEA (European Economic Area).
Troubleshooting
If you have problems setting up or using the Remote Commander, first check the batteries (page 6), then check the items below.
| Symptom | Remedy |
| You cannot operate the components. | Go closer to the component. The maximum operating distance is approximately 10 m. (32.8 ft).Check that you are aiming the Commander directly at the component, and that there are no obstructions between the Commander and the component.Power on the components first, if necessary.Make sure you have pressed the correct Component Select button. In case of SAT or DVD, make sure the desired component is selected.Check that the component has infrared remote capability. For example, if your component didn't come with a remote commander, it probably isn't capable of being controlled by a remote commander.You have assigned a different component on the Component Select button. Check the component assigned to that button and the component code. |
| You cannot control the volume. | If your visual components are connected to an audio system, make sure you've set up the Commander as described in "Controlling the Volume of Visual Components Connected to an Audio System" (page 23).You have assigned another component on the TV or AMP button (page 30). In this case, the volume cannot be controlled when you select components other than TV or AMP. |
| The Component Select buttons flash by a constant interval when you press a button. | Batteries are weakened.Replace them with new ones. |
| You cannot operate the components even after setting the component code numbers. | Set the component code correctly. If the code that is listed first for your component doesn't work, try all the codes for your component in the order in which they are listed in the supplied "Component code numbers."Some features may not be preset. If some or all of the buttons do not function correctly even after you have set the component codes, then use the Learning function to programme the remote control signals for the component (page 14).The component may be operated with a code number that is not listed in the "Component code numbers." See "Setting a Component Code by the Search Function" (page 11) and try setting a code number again with the Search function. |
| The Commander fails to learn the remote control signals. | When you teach signals of an interactive signal exchange system remote control unit (supplied with some of Sony's amplifiers) to the Commander, the response signal of the main unit may interfere with the learning of the Commander. In such a case, move to a place where the signals will not reach the main unit (e.g. other rooms, etc.). |
| You cannot operate a component even after you programmed the remote control signals with the Learning function. | Make sure that the Remote Commander has "learned" the correct signals. If not, see "For accurate Learning" (page 17) and try the Learning procedure again (page 14). |
| The SET indicator flashes five times during the Learning procedure. | Learning has not succeeded. See “For accurate Learning” (page 17) and try the Learning procedure again (page 14).There are no available buttons for “learning.” Clear infrequently used Learned functions (page 20), then carry out learning operations. |
| A Component Select button flashes five times during setting. | The component codes cannot be set. See the supplied “Component code numbers” and try setting the component codes again (page 8). |
| The SET indicator flashes twice during the Learning procedure. | A selected Component Select button or another button to be set has any remote control signals programmed by Learning function (page 14). Clear the “learned” signals (page 20) or select another button which has no “learned” signals, and try setting again. |
| All Component Select buttons flash twice. | The Hold function is on. Unlock the Hold function (page 32). |
| After programming the Power-On command of a component, the Component Select button does not function correctly. | A Learning function has already been set on the Component Select button. If a Learning function has been set (page 14), you can programme the Power-On function on the Component Select button (page 25) but the Power-On setting will not work until you clear the “learned” function. Erase the “learned” function after the setting the Power-On function. This function is for the Sony components only. |
| The System Control function or Control Programme function does not work properly. | When you programme a System Control function or Control Programme function, make sure to follow the correct steps (pages 26, 29).Change the direction the Remote Commander is aimed. If the problem persists, position the programmed components closer together.If the remote control receivers of the components are too far apart, or if something is blocking the signals between them, some of the components may not operate in sequence even after you press the programmed button. If some of the components do not operate correctly because of the above or any other reason, position the components back to the way they were before you set the System Control function or Control Programme function. Failure to do this can result in incorrect operation when you use these functions again.Some components may not always be powered on by the System Control function or Control Programme function. This is because the power of the component turns on and off alternately when receiving the power on/off signal. In this case, check the operating component’s power on/off state before using the System Control function.If you change the AV brands’ component code number (page 8) set on a Component Select button that has been programmed for a series of commands by the Control Programme function, the new signal will be transmitted when you press the corresponding Component Select button.The intervals between steps may be too short. Depending on the components, you may need to insert an interval between consecutive controls. You can insert an interval by changing the order of pressing the buttons. (You can insert an interval between steps when programming the Component Select button.)If a SYSTEM CONTROL button or a Component Select button has already “learned” a remote control signal (page 14), you can programme a System Control function (System Control Macro) or a Control Programme function (Component Macro), but the function will not work until you clear the Learned Function. To clear the Learned function, see “Changing or erasing the function of a “learned” button” on page 20. |
Table of Preset Functions
Note
There may be some components or functions that cannot be operated with this Commander.
TV
| KEY DISPLAY | FUNCTION |
| 1 | To turn on and off. |
| 2RED(◀◀),GREEN(▶),YELLOW(▶▶),BLUE(■) | Fastext buttons |
| 34101-9,0,ENT,-/--,1-,2-. | To change programmes.For example,to changeto programme 5,press 0and 5 (or, press 5 andENT). |
| KEY DISPLAY | FUNCTION |
| 5→ | To change the input mode. |
| 6GUIDE | To exit the mode |
| 8▲+/- | Volume up: +Volume down: - |
| 9※ | To mute the volume on the TV. Press again to turn muting off. |
| 11○ | To turn on.To return from Teletext to TV. |
| 12≡ | To switch to Teletext. |
| 13MENU | To call up the MENU display. |
| 14TOOLS | To switch to WIDE. |
| 15 | Joystick |
| ↑ | To move the cursor upward. |
| ↓ | To move the cursor downward. |
| → | To move the cursor to the right. |
| ← | To move the cursor to the left. |
| OK | To enter the selection of the MENU display. |
| 16PROGR +/- | Programme up: +Programme down: - |
| 17 | To operate JUMP, FLASHBACK or CHANNEL RETURN function on the TV depending on the setting of the TV's manufacturer. |
Using Fastext
With Fastext you can access pages with one key stroke.
When a Fastext page is broadcast, a colour-coded menu will appear at the bottom of the screen.
The colours of this menu correspond to the red, green, yellow and blue keys on the Remote Commander.
Press the key which corresponds to the colour-coded menu.
The page will be displayed after some seconds.
Table of Preset Functions (continued)
| VCR | |
| KEY DISPLAY | FUNCTION |
| 1 | To turn on and off. |
| 2 | To rewind. |
| 2 | To play. |
| 2 | To fast-forward. |
| 2 REC | To record, press ▶ while pressing REC ●*. First release ▶, then release REC ●. |
| 2 | To stop. |
| 2 | To pause. |
| 3 4 101-9, 0, ENT,-/--, 1-, 2-. | To change programmes. For example, to change to programme 5, press 0 and 5 (or, press 5 and ENT). |
| 5 (ANT/SW) | To switch the aerial output. |
| 11 (INPUT SELECT) | To change the input mode. |
| 12 | To expose the on-screen display. |
| 13 MENU | To call up the MENU display. |
| 15 | Joystick |
| ↑ | To move the cursor upward. |
| ↓ | To move the cursor downward. |
| → | To move the cursor to the right. |
| ← | To move the cursor to the left. |
| OK | To enter the selection of the MENU display. |
| 16 PROGR +/- | Programme up: + |
| Programme down: - | |
* In order to avoid recording by mistake, the REC ● button does not work by itself.
| CBL (Cable box) | |
| KEY DISPLAY | FUNCTION |
| 1 | To turn on and off. |
| 3 4 101 - 9, 0, ENT | To change programmes.For example, to changeto programme 5, press 0and 5 (or , press 5 andENT.) |
| 16 PROGR +/- | Programme up :+ |
| Programme down :- | |
| 17 | To operate JUMP,FLASHBACK orCHANNEL RETURNfunction. |
SAT
| KEY DISPLAY | FUNCTION |
| 1↓ | To turn on and off. |
| 2RED(◀), GREEN(▶), YELLOW(▶), BLUE(■) | Fastext buttons |
| 34101-9,0,ENT,-/-- | To change programmes. For example, to change to programme 5, press 0 and 5 (or, press 5 and ENT). |
| 5→(INPUT) | To switch the output of the SAT receiver to the TV. (When you connect a TV cable or aerial to the receiver, the output switches between a TV and SAT programme.) |
| 6GUIDE | To bring up Master Guide. |
| 7RETURN (EXIT) | To exit the mode. |
| 12≡(TELETEXT) | To switch to teletext. |
| 13MENU | To call up the MENU display. |
| 14TOOLS (EPG) | To show or hide the EPG display. |
| 15 | Joystick |
| ↑ | To move the cursor upward. |
| ↓ | To move the cursor downward. |
| → | To move the cursor to the right. |
| ← | To move the cursor to the left. |
| OK | To bring up the Station Index when a programme guide is not displayed. To select the channel that is highlighted. |
| 16PROGR+/- | Programme up: + |
| Programme down:- | |
| 17 | To return to the last tuned station. |
Using Fastext
With Fastext you can access pages with one key stroke.
When a Fastext page is broadcast, a colour-coded menu will appear at the bottom of the screen.
The colours of this menu correspond to the red, green, yellow and blue keys on the Remote Commander.
Press the key which corresponds to the colour-coded menu.
The page will be displayed after some seconds.
Table of Preset Functions (continued)
| DVD | |
| KEY DISPLAY | FUNCTION |
| 1 | To turn on and off. |
| 2 | To rewind. |
| 2 | To play. |
| 2 | To fast-forward |
| 2REC | To record, press ▶ while pressing REC ●*. First release ▶, then release REC ●. |
| 2■ | To stop. |
| 2II | To pause. |
| 31-9,0 | Number buttons: To set items selected from the screen. |
| 4-/-- (+10) | To select numbers 10 and above. |
| 5(AUDIO) | To change the sound. |
| 6GUIDE (CLEAR) | To clear the selected characters from the screen. |
| 7RETURN | To return to the last previous screen. |
| 10ENT | To enter the setting. To set items selected from the screen. |
| 11(SUBTITLE) | To switch the subtitle. |
| 12 | To show the current play status on the screen. |
| 13MENU (DVD MENU) | To display the DVD menu. |
| 14TOOLS (A/B) | To decide the distance between A and B |
| To select the deck | |
| KEY DISPLAY | FUNCTION | |
| 15 | Joystick | |
| ↑ | To move the cursor upward. | |
| ↓ | To move the cursor downward. | |
| → | To move the cursor to the right. | |
| ← | To move the cursor to the left. | |
| OK | To execute items selected from the screen. | |
| 16 | PROGR + (▶▶▶) | To proceed to the next location or song |
| Programme up | ||
| 16 | PROGR - (◀◀◀) | To proceed to the previous location or song |
| Programme down | ||
| 17 | (TITLE) | To display the title menu. |
* In order to avoid recording by mistake, the REC ● button does not work by itself.
CD
| KEY DISPLAY | FUNCTION |
| 1↓ | To turn on and off. |
| 2◀◀ | To rewind. |
| 2▶ | To play. |
| 2▶▶ | To fast-forward. |
| 2REC ● | To record, press ▶while pressing REC ●.First release ▶, then release REC ●. |
| 2■ | To stop. |
| 2■■ | To pause. |
| 31-9,0 | To select the track number. 0 selects track 10.To select track numbers above 10, see the descriptions on the +10 button below. |
| 4-/-- (+10) | To select numbers 10 and above. |
| 10ENT | To enter the setting. |
| 16PROGR + (▶▶▶) | To select the next track. |
| 16PROGR - (▶◀◀) | To select the previous track. |
| 17○(D.SKIP) | To select next disk. |
MD
| KEY DISPLAY | FUNCTION |
| 1↓ | To turn on and off. |
| 2◀◀ | To rewind. |
| 2▶ | To play. |
| 2▶▶ | To fast-forward. |
| 2REC ● | To record, press ▶while pressing REC ●.First release ▶, then release REC ●. |
| 2■ | To stop. |
| 2■■ | To pause. |
| 31-9,0 | To select the track number. 0 selects track 10.To select track numbers above 10, see the descriptions on the +10 button below. |
| 4-/-- (+10) | To select numbers 10 and above. |
| 10ENT | To enter the setting. |
| 16PROGR + (▶▶▶) | To select the next track. |
| 16PROGR - (▶◀◀) | To select the previous track. |
| 17○(D.SKIP) | To select the next disc. |
DAT
| KEY DISPLAY | FUNCTION |
| 1↓ | To turn on and off. |
| 2◀◀ | To rewind. |
| 2▶ | To play. |
| 2▶▶ | To fast-forward. |
| 2REC ● | To record, press ▶while pressing REC ●.First release ▶, then release REC ●. |
| 2■ | To stop. |
| 2■■ | To pause. |
| 31-9,0 | To select a programme number. |
| 10ENT | To enter the setting. |
| 16PROGR + (▶▶) | To proceed to the next song. |
| 16PROGR - (◀◀) | To proceed to the previous song. |
| DECK | |
| KEY DISPLAY | FUNCTION |
| 1 ⏻ | To turn on and off. |
| 2 ◀◀ | To rewind. |
| 2 ▶ | To play. |
| 2 ▶▶ | To fast-forward. |
| 2 REC ● | To record, press ▶while pressing REC ●.First release ▶, then release REC ●. |
| 2 ■ | To stop. |
| 2 ▪ | To pause. |
| 4 -/-- (◀) | To reverse. |
| 10 ENT (◀) | To reverse. |
| 13 MENU (●) | To record, press the joystick upward while pressing MENU. First release the joystick, then release MENU.* |
| 15 [IMAGE] | Joystick |
| ↑ (▶) | To play.* |
| ↓ (■) | To stop.* |
| → (▶▶) | To fast-forward.* |
| ← (◀◀) | To rewind.* |
| OK (■) | To pause.* |
| 17 (A/B) | To select the tape deck: Deck A or B (dual cassette deck only). |
* Activated when using a double cassette deck (for deck A of Sony component)
| AMP | |
| KEY DISPLAY | FUNCTION |
| 1↓ | To turn on and off. |
| 31 | To select the input source:VIDEO 1 |
| 32 | To select the input source:VIDEO 2 |
| 33 | To select the input source:AUX |
| 34 | To select the input source:TUNER |
| 35 | To select the input source:CD |
| 36 | To select the input source:TAPE |
| 37 | To select the input source:MD |
| 38 | To select the input source:TV |
| 39 | To select the input source:PHONO |
| 30 | To select the input source:DVD |
| 5→(INPUT) | To change the input select cyclically. |
| 8▲+/- | Volume up:+Volume down:- |
| 9※ | To mute the volume on the AMP. Press again to turn muting off. |
| 16PROGR+/- | Presetting or tuning frequency up:+Presetting or tuning frequency down:- |
| 17→(SHIFT) | To shift band or preset select. |
* The operation is possible when using the built-in HDD type STB or in Video-on-demand mode.
Index
A, B
Batteries 6
C, D
Changing 20
Clearing/Changing learned signal 20, 21 Power-On command 25
Code number 8,11
Component Select buttons assigning other components 30 copying settings 31 programming a series of commands 29 programming a signal 14 setting Power-On function 25
Copying settings of Component Select buttons 31
E
Erasing 33
F, G, H, I, J, K
Factory setting 33
L
Learning Function 14 Locking control of Commander 32
M
※ (muting) button 10, 13, 24
N, O
Number buttons 9, 20, 31
P, Q, R
Power-On function setting 25 Preset components 8 PROGR (programme) button 11
s
System Control Functions 26
T, U
Troubleshooting 35
V, W, X, Y, Z
▲ (volume) buttons 10, 13, 17, 24, 33 Volume Control 10, 13, 23
VCR (Videorecorder) 38
CBL (Kabeltuner) 38
SAT (Satellitentuner) 39
DVD (DVD-Gerät) 40
CD (CD-Gerät) 41
MD (MD-Gerät) 41
DAT (DAT-Deck) 41
DECK (Kassettendeck) 42
AMP (Verstärker) 42
Index 43
natural_image
Technical line drawing of a mechanical assembly with no visible text or symbolsnatural_image
Mechanical assembly diagram showing a lever mechanism with a directional arrow (no text or labels)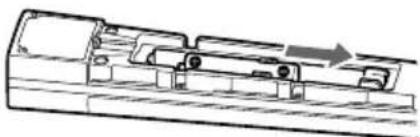
natural_image
Technical line drawing of a mechanical component with internal parts and an arrow indicating motion (no text or symbols)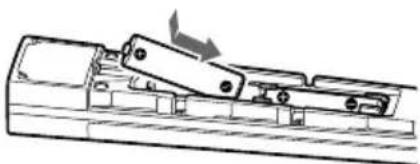
natural_image
Technical line drawing of a mechanical assembly with no visible text or symbolsflowchart
graph TD
    A["Power"] --> B["Down Arrow"]
    B --> C["Power"]
    D["TV"] --> E["Arrow to Top"]
    F["VCR"] --> G["Arrow to Bottom"]
    H["SAT"] --> I["Arrow to Bottom"]
    J["DVD"] --> K["Arrow to Bottom"]
    L["AMP"] --> M["Arrow to Bottom"]
flowchart
graph TD
    A["Hand with finger icon"] --> B["Icon with +"]
    B --> C["Hand with finger icon"]
    C --> D["Icon with +"]
    D --> E["Hand with finger icon"]

    F["AMP TV"] --> G["Hand with finger icon"]
    G --> H["Icon with +"]
    H --> I["Hand with finger icon"]
    I --> J["Hand with finger icon"]

    K["VIDEO 1"] --> L["Hand with finger icon"]
    L --> M["Icon with +"]
    M --> N["Hand with finger icon"]
    N --> O["Hand with finger icon"]

    P["VCR"] --> Q["Hand with finger icon"]
    Q --> R["Icon with +"]
    R --> S["Hand with finger icon"]
2 Halten Sie die
flowchart
graph TD
    A["TV VCR SAT DVD AMP"] --> B["SET"]
    B --> C["TV VCR SAT DVD AMP"]
    C --> D["SET"]
    D --> E["TV VCR SAT DVD AMP"]
    E --> F["SET"]
    F --> G["TV VCR SAT DVD AMP"]
    G --> H["SET"]
PROGR (Programm), Taste 11
5

- Integrated Remote Commander
- Disposal of Old Electrical & Electronic Equipment (Applicable in the European Union and other European countries with separate collection systems)
- Features
- Centralised control of Sony AV components with this one remote commander
- Remote control signals for non-Sony components are also preset
- Learning function for programming various other remote control signals
- Reassigning new components
- Table of Contents
- Getting Started
- Basic Operations
- Advanced Features
- Using Other Functions
- Additional Information
- Appendices
- Installing the Batteries
- When to replace the batteries
- Batteries for remote control operation (two R6 (size AA) batteries)
- Note
- Notes on batteries
- Location of Controls
- About tactile dots
- Setting the Code for non-Sony Preset Audio and Visual Components — Setting component codes
- Notes
- Setting the Code for non-Sony Preset Audio and Visual Components — Setting component codes (continued)
- Checking if the code number works
- If the Commander does not seem to be working
- Note on the ▲+/- and ☐× buttons
- Note on buttons that have already "learned" remote control signals
- Setting a Component Code by the Search Function
- Before starting the Search function
- Setting a Component Code by the Search Function (continued)
- Press ENT.
- Check if the code number works by following the instructions on page 10.
- Operating Your Components with the Remote Commander
- Example: To operate a video cassette recorder
- To control the volume
- Notes on operating your components
- When you use a double cassette deck
- Programming Signals of Another Remote Control — Learning Function
- If another signal has already been "learned" by that button
- Programming Signals of Another Remote Control — Learning Function (continued)
- If the SET indicator flashes five times
- To "teach" another component's remote control signal
- Press SET to finish setting.
- If you set a component code after "learning" a signal
- Note on the REC ● signal
- When you "teach" signals to +/- or ✗
- To "teach" the signals for an air-conditioner
- For accurate Learning
- IMPORTANT
- Programming remote control signals to the Component Select buttons
- Example: To "teach" the DVD input remote control signal of your amplifier to the DVD Component Select button of the Commander
- Changing or erasing the function of a "learned" button
- To clear the "learned" function of a single button
- Example: To erase the "learned" function from the Number button 1 in VCR mode
- Example: To erase the function "learned" by the TV button
- Example: To erase all functions "learned" by the VCR button
- Press SET to finish setting.
- Notes on programming the signals for an air-conditioner
- About seasonal adjustments
- If the power-on/off operation does not work correctly
- Controlling the Volume of Visual Components Connected to an Audio System
- Controlling the Volume of Visual Components Connected to an Audio System (continued)
- To set all volume controls to AMP
- To set only the audio components' volume controls to AMP
- Adding an Extra Function to the Component Select Buttons
- Programming the Power-On command of the selected component just by pressing that Component Select button (for Sony components only)
- To clear the Power-On command
- Executing a Series of Commands — System Control Functions
- Example: To programme the procedure above to the SYSTEM CONTROL B button
- To programme a new series of operations for those buttons which already have a control programme have already been set
- Executing a Series of Commands — System Control Functions (continued)
- Tips for programming the System Control functions
- About the order of operation steps
- Changing the interval between operation steps
- To clear programmed commands
- Programming a Series of Commands on the Component Select Buttons
- Example: To programme the procedure on page 26 for the VCR Component Select button
- Programming a Series of Commands on the Component Select Buttons (continued)
- Assigning Other Components to the Component Select Buttons
- Copying the settings of a Component Select button to another button
- To return the setting of the Component Select button to the original component setting
- Locking the Controls — Hold Function
- To unlock the control
- Erasing All Settings — To reset the Commander to its factory settings
- Precautions
- Maintenance
- Specifications
- Operating distance
- Power requirements
- Battery life
- Dimensions
- Mass
- CE
- Troubleshooting
- Table of Preset Functions
- Using Fastext
- Index
- A, B
- C, D
- E
- F, G, H, I, J, K
- L
- M
- N, O
- P, Q, R
- s
- T, U
- V, W, X, Y, Z
- 5
Brand : SONY
Model : RM-VZ800T
Category : Remote control