
IAN 93714 - Inline skates CRIVIT - Free user manual and instructions
Find the device manual for free IAN 93714 CRIVIT in PDF.

| Product Type | Inline Skates (Fitness Skates) |
| Model | IAN 93714 |
| Brand | CRIVIT |
| Sizes Available | 38-39 |
| User Weight Limit | 20-100 kg |
| Wheel Size | 84 x 22 mm |
| Bearing Rating | ABEC 7 |
| Intended Use | Fitness skating, not for street hockey or aggressive skating |
| Brake Type | Heel brake (replaceable stopper) |
| Closure System | Quick-release fastener, ratchet strip, Velcro, fast lacing closure |
| Material | Soft boot, aluminum frame |
| Safety Features | Reflective clothing recommended, protective gear required |
| Maintenance | Clean and dry after use, lubricate bearings externally, replace worn parts |
| Spare Parts Available | Replaceable stopper (article 01001), rollers (article 01002), ball bearings |
| Warranty | 3 years from date of purchase |
| Country of Origin | Germany (distributed by DELTA-SPORT) |
| Included Accessories | User guide, 2 Allen keys, replacement stopper |
| Certification | Class A |
| Special Feature | HeiQ® Pure dynamiq for odor control and thermal regulation |
Frequently Asked Questions - IAN 93714 CRIVIT
User questions about IAN 93714 CRIVIT
0 question about this device. Answer the ones you know or ask your own.
Ask a new question about this device
Download the instructions for your Inline skates in PDF format for free! Find your manual IAN 93714 - CRIVIT and take your electronic device back in hand. On this page are published all the documents necessary for the use of your device. IAN 93714 by CRIVIT.
USER MANUAL IAN 93714 CRIVIT
natural_image
Black and white photo of a modern roller skates with visible branding (no text or symbols on the skates themselves)
natural_image
Black and white photo of a modern roller skates with visible branding (no text on the skates themselves)Instructions for use
natural_image
Line drawing of a speed skater in motion, no text or symbols present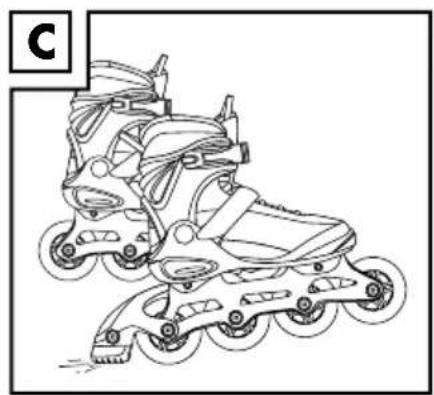
natural_image
Line drawing of a rollerblading skates with no text or symbols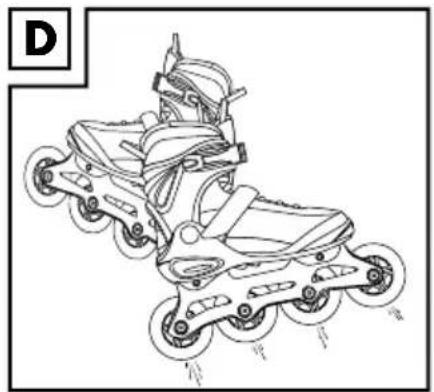
natural_image
Line drawing of a roller skates with wheels and seat (no text or symbols)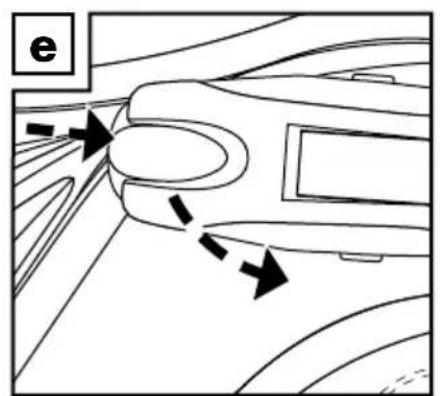
natural_image
Diagram of a car interior showing airflow direction with arrows indicating movement (no text or symbols)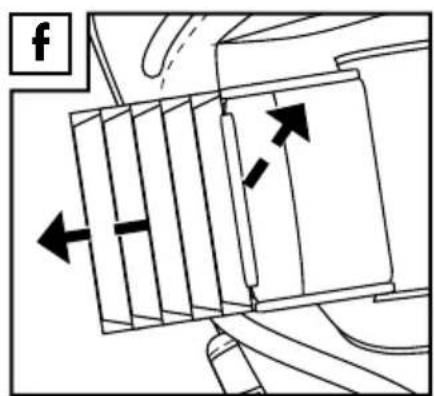
natural_image
Diagram of a mechanical or electrical component with directional arrows indicating movement or force (no text or symbols present)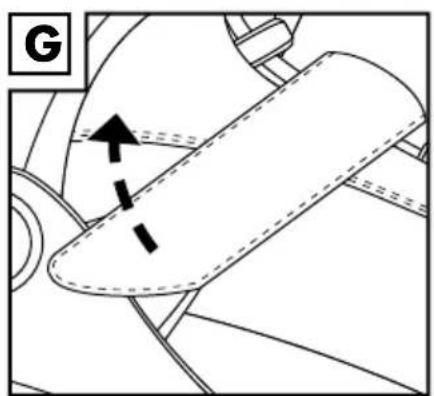
natural_image
Technical diagram showing a mechanical component with dashed lines and arrows indicating motion or force direction (no text or symbols)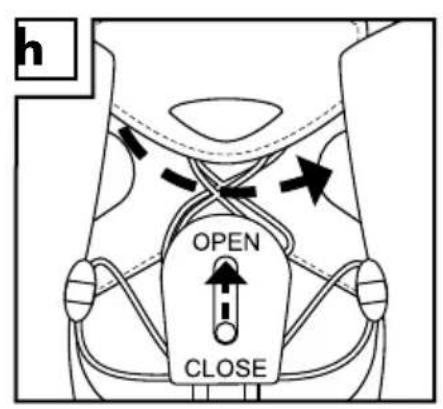
natural_image
Diagram of a mechanical device with arrows indicating motion or force direction (no text or symbols)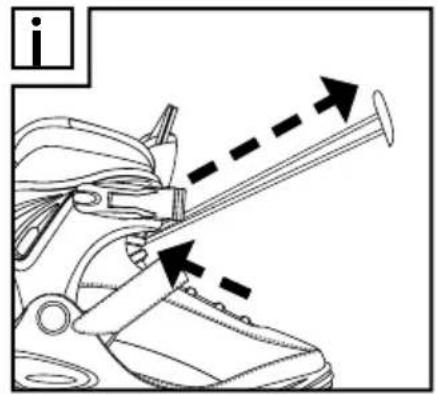
natural_image
Diagram of a shoe seatbelt mechanism with arrows indicating movement direction (no text or symbols)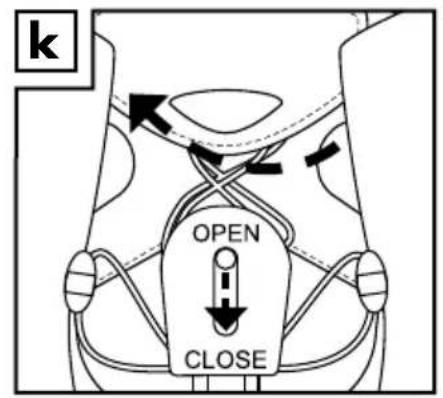
natural_image
Diagram of a vehicle's seatbelt mechanism showing a directional arrow (no text or symbols present)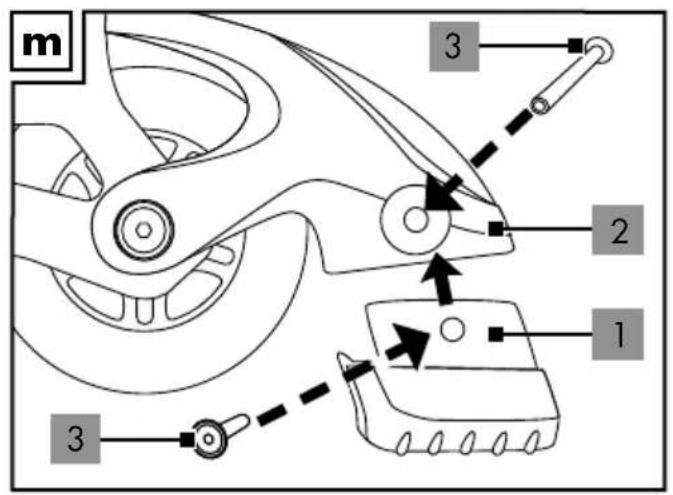
SI
Obseg dobave / Opis delov 5
Tehnični podatki 5
Scope of delivery/names of parts ....10
Technical Data 10
Correct use 10
HeiQ® Pure dynamic 10
Safety notes 10
Skating tips 11
Removing the skates 11 - 12
Putting the skates on 12
Maintenance 12-13
Care, Storage 13
Trouble-shooting 13-14
Disposal Information ....14
3 Years Warranty 14

Prisrčne čestitke!
Zavora na peti (sl. C):
With your purchase you have decided on a high-quality product. Get to know the product before you start to use it. Carefully read the following operating instructions. Use the product only as described and only for the given areas of application. Keep these instructions safe. When passing the product on to a third party, always make sure that the documentation is included.
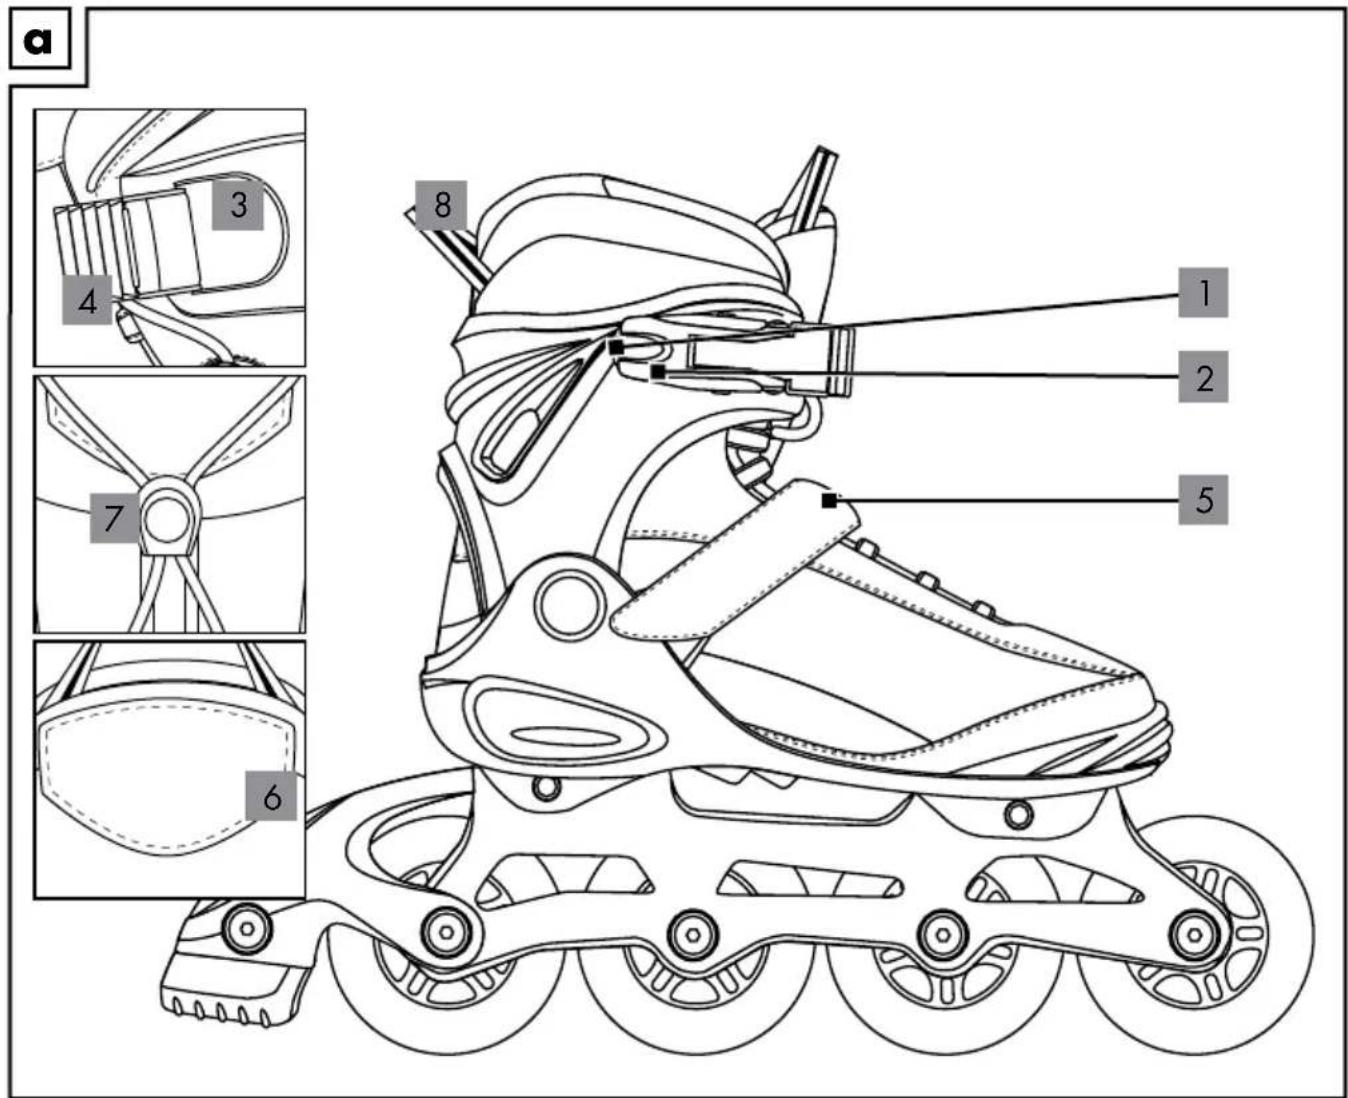
Scope of delivery/ names of parts (figure A)
1 x User guide
1 x Soft boot inline skates
1 x Replacement stopper
2 x Allen key
(1) Pressure sliders
(2) Quick-release fastener
(3) Rocker fastener
(4) Ratchet strip
(5) Velcro fastener
(6) Tongue Velcro fastener
(7) Slide on the fast lacing closure
(8) Pulling aid
Technical data
Sizes: 38-39
class A, 20-100 kg
rollers: 84 x 22 mm
ball bearings: ABEC 7
Correct use
These inline skates are designed as fitness skates for private use and are not suitable for street hockey or aggressive skating.
HeiQ® Pure dynamiq
PURE Textile freshness
Experience the feeling of lasting freshness through the power of silver, keeping you odour-free all day lang.
ADAPTIVE Thermal control
Feel good all over The textile will cool you down when you're hot, and keep you dry longer in cold weather Cools and minimises perspiration.

Safety notes
Risk of injury!
• Always pay attention to other road users and follow the road traffic regulations.
- Choose the right surface for inline skating. Surfaces should be smooth, clean, and dry.
- Make sure that screws and bolts are secure before skating.
- Ensure that screws and bolts retain their self-locking properties.
- Do not modify the inline skates in such a way that poses risk to your safety.
- Remove sharp edges that may form during skating.
• Always wear suitable protective equipment (helmet, protectors for your hands, wrists, elbows, and knees).
- Avoid areas with heavy traffic.
- Remain vigilant at all times and be careful.
- Avoid excessive speeds. As a rule of thumb: never skate faster than you can run.
- Exchange the brakes, rollers, and ball bearings regularly if they are worn.
• Always wear reflective clothing so that you are visible to others.
- Do not use this article barefoot.
Risk of injury!
- Look after your inline skates.
- Avoid water, oil, potholes, and very rough surfaces.
Skating tips
Note: we recommend skating in skate parks and taking a skating course with an instructor.
First attempts
Initial position:
Keep your feet shoulder-width apart and bend your knees slightly to avoid falling backwards.
Accelerating:
As a beginner, start by taking small steps forwards with your toes pointing outwards at an angle.
Rolling:
If you take a few steps in succession you will then have enough momentum to place your skates next to one another and roll. Bend your knees slightly while doing this.
How to fall
Important! Practise falling initially onto a soft surface using protective equipment without your inline skates. Always try to fall forwards, and never backwards! Fall onto your protective knee pads. Then catch yourself using the elbow and wrist protectors. Spread your fingers in order to avoid injury.
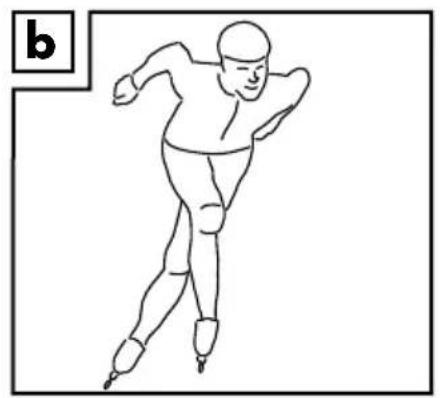
Mastering curves
At low speeds:
Shift your weight as in riding a bicycle. Move your weight onto your left foot for a left curve and onto your right foot for a right curve.
At high speeds:
Cross your feet as in ice-skating (figure B)
Braking techniques
Note:
Practise various braking techniques on a smooth surface without traffic or pedestrians. Avoid slopes until you are confident about braking.
Heel brake (figure C):
If your inline skates are fitted with brakes then remember to use them. Lift the point of the skate where the brake is mounted and push the brake into the ground. Shift your weight forwards slightly and bend your knee. The braking effect can be intensified if you bend your knee more and shift your weight further forwards, while increasing at the same time the pressure on the skate you are braking with.
T-stopping (figure D):
If your inline skates are not fitted with a brake or if you have removed the brake, then we recommend using the 'T-stop' technique. However this is only suitable for advanced skaters! To brake using the 'T-stop' technique, shift your entire weight onto one foot. Now move the other skate behind the front skate at a right angle. Then shift your weight from the front to the inside of the rollers of your back skate and brake with increasing pressure.
Removing the skates
Prepare the skates for wear following delivery Important!
Ensure that your inline skates fit correctly. The outer boot should not become deformed when you close the quick-release fastener. Do not use force to close the quick-release fastener. If your outer boot is deformed then this is either a sign that the tension is incorrect or that you may have purchased inline skates in the wrong size.
Note!
To find the right tension for your foot, pull the rocker fastener upwards at an angle and move the ratchet strip to the correct position for you.
- Press the pressure slider (1) on the quick-release fastener (2) in the direction of the arrow and open the quick-release fastener (see figure E).
- Pull the rocker fastener (3) upwards at an angle and pull the ratchet strip (4) out of the opening on the rocker fastener (see figure F).
- Open the Velcro fastener (5) (see figure G).
- Open the tongue Velcro fastener (6) (see figure H).
- Set the slider on the fast lacing closure (7) to OPEN and loosen the fast lacing system (see figure H).
Putting the skates on:
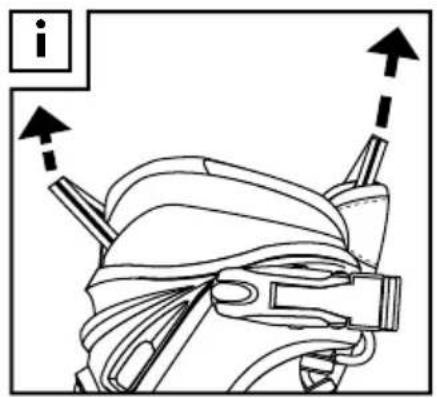
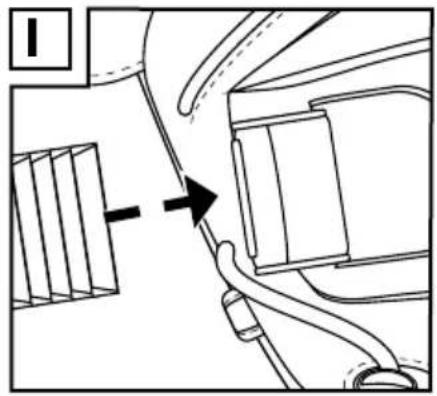
- Pull the inline skate on using the pulling aid (8) (see figure 1).
- Pull the fast-lacing system tight and slide the fastener on the fast-lacing closure back (see figure J).
- Set the slider on the fast-lacing closure to CLOSE, place the laces for the fast-lacing closure under the tongue Velcro closure and then close it (see figure K).
- Close the Velcro closure.
- Slide the ratchet strip into the correct opening under the rocker fastener and set it at the right tension (see figure L).
- Close the fast closure system ('CLICK').
Maintenance
Changing the brake (figure M) Note:
worn brakes do not function correctly. An angle of more than 40 degrees between the frame and the surface is a sign of worn brakes. If the distance between the brake block and the ground becomes too large (more than 17 mm), then the brake block must be exchanged.
- Unscrew the brake block (3) on the inline skate with the enclosed Allen key.
- Pull the brake block screws out and remove the brake block (1) from the brake block mounting (2).
- Attach the new brake block back onto the brake block mounting securely using the brake block screws.
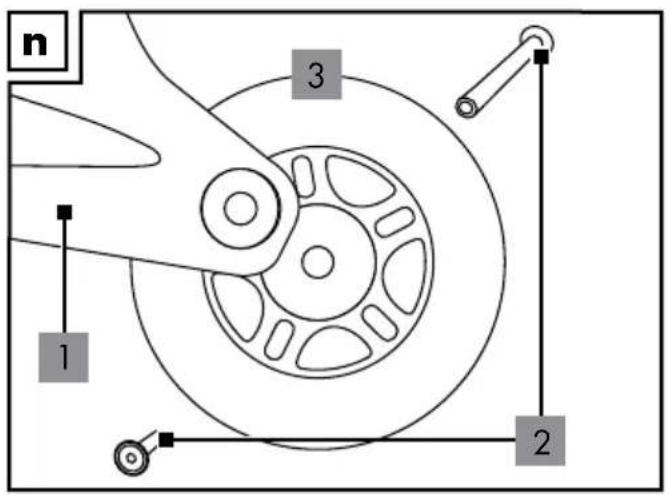
Changing the rollers (figure N) Important!
-
Please observe the chapter on technical data:
Rollers with a different diameter could change the handling characteristics and could mean a risk to the user in some circumstances. You should therefore not use the skates if the rollers cannot be fitted perfectly. Never install larger rollers then those originally used in the inline skates. -
Please observe the following with regard to the axle bolts:
Self-sealing lacquer must be re-applied to the screw thread after the screw connection has been released. We recommend always doing this step as a precautionary measure. Self-sealing lacquer is available from DIY stores or specialist retailers.
Rollers become worn. The wear depends on many factors such as skating style, surfaces, the size and weight of the user, weather conditions, the roller material and its degree of hardness. It is therefore necessary to exchange them every so often.
- Unscrew the axle bolts (2) on the inline skate from the frame (1) using the two Allen keys supplied.
- Remove the axle bolts and remove the roller (3).
- Install the new roller into the frame and fix it with the axle bolts.
After changing the rollers:
If the roller scrapes on the side after the exchange, or if it touches the edge of the frame, please do not use the roller! Please ensure that all screws are still secure after the first few minutes of use and that nothing has become detached or loosened.
Re-install the rollers in order to ensure that they are running smoothly and no sounds are emitted from the bearings.
Important!
New rollers make the inline skates taller. This changes the distance to the ground therefore also the braking characteristics. For this reason, you must adjust or exchange the brake block.
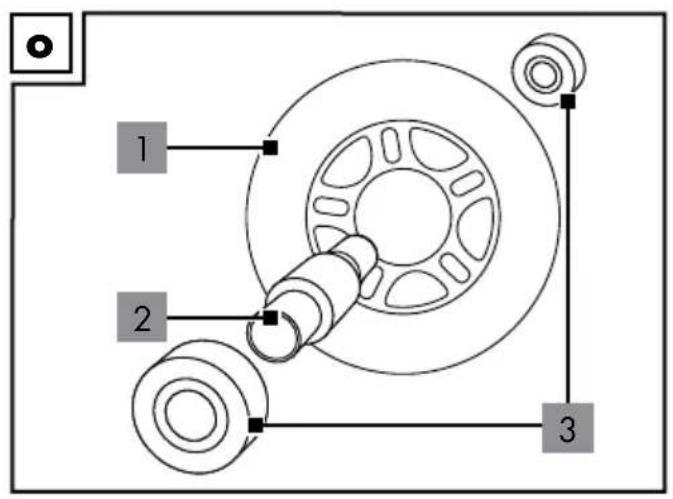
Changing the ball bearing (figure O)
Note:
The quality of the ball bearing and its maintenance are extremely important for the smooth running of the inline skates.
- Remove the roller (1) as described above (pages 12-13).
- Push a bearing (3) out by pressing on a spacer (2) with an Allen key and then remove the spacer.
-
Push the other bearing out by pressing on it with an Allen key.
-
Push in a new bearing. Turn the roller around, insert the spacer, and then push in a second new bearing.
- Re-attach the roller to the frame, as described in the paragraph 'exchanging the rollers'.
Care, storage
Inline skates are pieces of technical sports and leisure equipment and they therefore become worn depending on the skill and style of each skater. We recommend that you clean and dry the inline skates thoroughly after use. Remove any small stones and other objects that may have become trapped in your rollers. Remove any sharp edges that may have formed during skating. Always keep the inline skates in a dry place.
- Clean your ball bearings with a dry cloth after skating. Wet or damp ball bearings must be dried using a clean cloth. Lubricate the bearings from the outside with a suitable bearing grease to prevent the formation of external rust.
- Bearings are usually closed and cannot be lubricated inside. Worn ball bearings must be replaced.
Trouble-shooting
- Rollers or ball bearings are noisy
Smooth surfaces extend the life of the rollers. Try harder rollers for harder surfaces and for use in difficult conditions.
- Rollers wear quickly
Do not fasten the axle bolts too tightly.
- Skate pulls to the left or right
This can depend on the user. Exchange the rollers that show signs of one-sided wear.
• The brake is not working properly
Change the brake if the angle between the brake and the ground is greater than 40 degrees, i.e. if the distance between the brake block and the ground becomes too great (more than 17 mm). Rounded brakes need to be changes for new blocks.
- Brake problems
Always keep sufficient distance. The faster you skate the longer your braking distance. Ensure that you understand the braking techniques and practise them on a level ground.
- Ankles get twisted frequently
Make sure the laces are tight enough.
- Problems with the foot bed
You may not be accustomed this kind of movement. Check the areas that are causing you problems and re-adjust the inline skates. Try wearing thick socks.
Disposal Information
Please dispose of the product and packaging in an environmentally friendly manner, separating different materials for recycling as required! Dispose of this item through an authorised disposal company or through your local waste disposal facilities - ask your local authority for information if further guidance is required. Ensure that you comply with all regulations currently in force.
3-year warranty
The product was produced with great care and under constant supervision. You receive a three-year warranty for this product from the date of purchase. Please retain your receipt.
The warranty applies only to material and workmanship and does not apply to misuse or improper handling. Your statutory rights, especially the warranty rights, are not affected by this warranty.
With regard to complaints, please contact the following service hotline or contact us by e-mail. Our service employees will advise as to the subsequent procedure as quickly as possible. We will be personally available to discuss the situation with you.
Any repairs under the warranty, statutory guarantees or through goodwill do not extend the warranty period. This also applies to replaced and repaired parts.
Repairs after the warranty are subject to a charge.
IAN: 93714
GB Service Great Britain
Tel.: 0871 5000 720
(£ 0.10/Min.)
E-Mail: deltasport@lidl.co.uk
You can also find spare parts for your product at: www.delta-sport.com, category Service - Lidl Spare Parts Service

Fersenbremse (Abb. C):
Additional parts for our products are delivered against advance payment by bank transfer or Paypal. Please be sure to state the article number together with your name and postcode in the reference fi eld when sending a payment.
Bank transfer:
Please send your Paypal payment to: ake@delta-sport.com
Our postal address:
SERVICE.DELTA-SPORT.COM
HÜTTMANNSWEG 11 • 24641 HÜTTBLEK GERMANY
Here is how you order: Under "sender/purchaser", enter in capital letters your name, address, and telephone number (in case of any queries).
Sender/purchaser
(please fi ll out completely in capital letters)
Surname, given name
House number, street
Town, postcode
Telephone number
Alternatively, you can order all articles directly from our on-line store: service.delta-sport.com
| QuantityArticle NUnit price | Total | |||
| x | 7,00 €01001 | € | ||
| 01002 | x | 10,00 € | € | |
| Post and packaging | ||||
| 5,00 € | ||||
| Total | ||||
| € | ||||
| SignatureDate and place | ||||
| 93714_stopper | |
| Article No. 01001 | 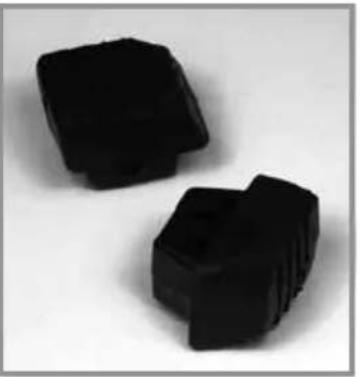 |
| 93714_rollers | |
| Article No. 01002 | 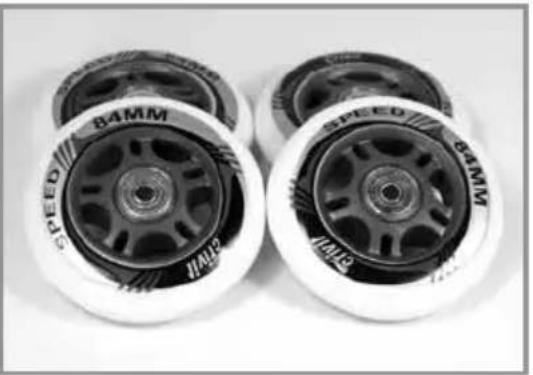 |
Bestellkarte


93714, Softboot-Inlineskates Delta-Sport Nr. DI-1736
natural_image
Two black plastic components on a plain background (no text or symbols visible)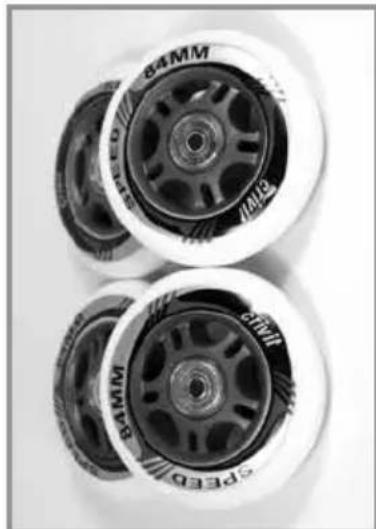
natural_image
Close-up of four white roller rollers with visible branding and model numbers (84MM, 94MM, 104M), no text or symbols on the rollers themselves.93714_Stopper
Artikel-Nr. 01001
93714_Rollen
Artikel-Nr. 01002
DELTA-SPORT HANDELSKONTOR GMBH
Wragekamp 6 • D-22397 Hamburg
Version: 02/2014