
FCO 105/1 X - Oven CANDY - Free user manual and instructions
Find the device manual for free FCO 105/1 X CANDY in PDF.


| Product Type | Built-in Electric Oven and Hob Combination |
| Model | Candy FCO 105/1 X |
| Brand | Candy |
| Oven Dimensions (HxWxD) | 595 x 595 x 580 mm (approx.) |
| Hob Type | Solid Hotplate or Vitroceramic (depending on variant) |
| Number of Hob Burners | 4 |
| Oven Capacity | Approx. 65 L (estimated) |
| Power Supply | 220-240 V~, 50/60 Hz (single-phase or multi-phase) |
| Total Power Rating | Up to 8.5 kW (varies by configuration) |
| Oven Functions | Defrost, Static (Lower & Upper), Fan Assisted, Grill, Grill + Fan, Lower Heat, Upper Heat |
| Temperature Range | 50°C to 250°C (max 250°C for grill) |
| Interior Light | Yes, replaceable bulb (300°C resistant) |
| Cleaning | Manual cleaning; optional catalytic self-cleaning panels |
| Safety Features | Auto shut-off? (not explicit), child lock (not explicit), overheat protection |
| Shelves Included | 2 wire shelves (one flat, one tray holder), drip tray, pizza set (optional) |
| Installation Type | Built-in under worktop or in cabinet |
| Net Weight | Approx. 35 kg (estimated) |
| Energy Class | Not specified in manual, assumed class A |
| Repairability | Replaceable oven light, accessible parts; recommended authorized service |
| Included Accessories | Oven shelves, drip tray, fixing screws, sealing putty (for hob) |
| Warranty | Standard manufacturer warranty (details not provided) |
Frequently Asked Questions - FCO 105/1 X CANDY
User questions about FCO 105/1 X CANDY
0 question about this device. Answer the ones you know or ask your own.
Ask a new question about this device
Download the instructions for your Oven in PDF format for free! Find your manual FCO 105/1 X - CANDY and take your electronic device back in hand. On this page are published all the documents necessary for the use of your device. FCO 105/1 X by CANDY.
USER MANUAL FCO 105/1 X CANDY
BUILT-IN OVEN AND HOB
USER'S MANUAL
GB
natural_image
Line drawing of three electronic devices: a four-circled pot, a multi-circled pot with four rings, and a multi-circled box (no text or symbols)CONTENTS
GB
Safety Instructions ....3
-
Introduction Of Product ....4
-
General Warnings....5
2.1 Declaration Of Compliance 5
2.2 Safety Hints 5
2.3 Installation 5
2.4 Fitting The Oven Into The Kitchen Unit....5
2.5 Important....5
2.6 Connecting To The Power Supply....5
-
Oven Equipment....6
-
Useful Tips....6
4.1 Shelf Safety System....6
4.2 Grilling....6
4.3 Cooking Time....6
4.4 Cleaning And Maintenance 6
4.5 Service Centre....6
- Preparation For Installation And Use....7
5.1 Choosing A Place For The Oven....7
5.2 Oven And Hob Installation....7
5.2.1. Installation Steps....8
5.2.2. Fixing the solid hotplate hob 8
5.2.3. Fixing the vitroceramic hob....8
5.2.4. Fixing the oven....8
5.2.5. Warning....8
5.3 Wiring And Safety Of The Built-in Combined Oven....9
5.4 Vitroceramic Hob Without Control Knob "PVS"....9
- Using The Oven....10
6.1 Control Panels....10
6.2 Using The Cooktop Burners....11
6.3 Using The Oven....11
6.4 Functions....12
- Cleaning And Maintenance....13
7.1 General....13
7.2 Cleaning The Oven....13
7.3 Cleaning The Solid Hotplate Hob....13
7.4 Cleaning The Vitroceramic Hob....13
7.5 Maintenance....13
- Service And Transportation....13
8.1 Requirements Before Contacting To Service....13
8.2 Information Related To Transport....13
INHALT
DE
2.3 Installation....16
2.4 Einbau In Den Schrank....16
2.5 Wichtig....16
WARNING: The appliance and its accessible parts become hot during use. Care should be taken to avoid touching heating elements.
- Children under 8 Year of age must be kept away from the appliance unless they are continuously supervised.
- This appliance can be used by children aged from 8 years and above and persons with reduced physical, sensory or mental capabilities or lack of experience and knowledge if they have been given supervision or instruction concerning use of the appliance in a safe way and understand the hazards involved.
• Children must not play with the appliance. - Cleaning and user maintenance shall not be made by children without supervision.
- During use the appliance becomes hot. Care should be taken to avoid touching heating elements inside the oven.
WARNING: Accessible parts may become hot during use. Young children must be kept away.
- Do not use harsh abrasive cleaners or sharp metal scrapers to clean the oven door glass since they can scratch the surface, which may result in shattering of the glass.
- The oven must be switched off before removing the guard, after cleaning, the guard must be replaced in accordance with the instructions.
- Only use the temperature probe recommended for this oven.
- Do not use a steam cleaner for cleaning operations.
- WARNING: Avoid possibility of electric shock - ensure the appliance is switched off before replacing the lamp.
- The means for disconnection must be incorporated in the fixed wiring in accordance with the wiring rules.
- The instructions state the type of cord to be used, taking into account the temperature of the rear surface of the appliance.
- If the supply cord is damaged, it must be replaced by a special cord or assembly available from the manufacturer or its service agent.
- CAUTION: In order to avoid a hazard due to inadvertent resetting of the thermal cutout, this appliance must not be supplied through an external switching device, such as a timer, or connected to a circuit that is regularly switched on and off by the utility.
CAUTION: Accessible parts may be hot when the grill is in use. Young children must be kept away. - Excess spillage must be removed before cleaning.
- During self-cleaning pyrolytic operation the surfaces may get hotter than usual and children MUST be kept away.
1. INTRODUCTION OF PRODUCT
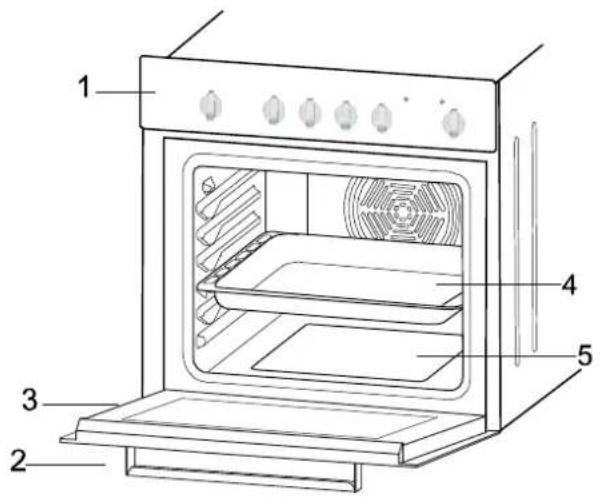
text_image
Technical diagram of an oven with numbered parts labeled 1 to 5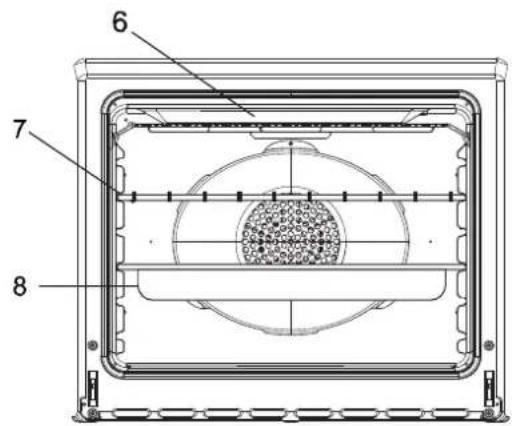
text_image
6 7 8Figure 1 Figure 2
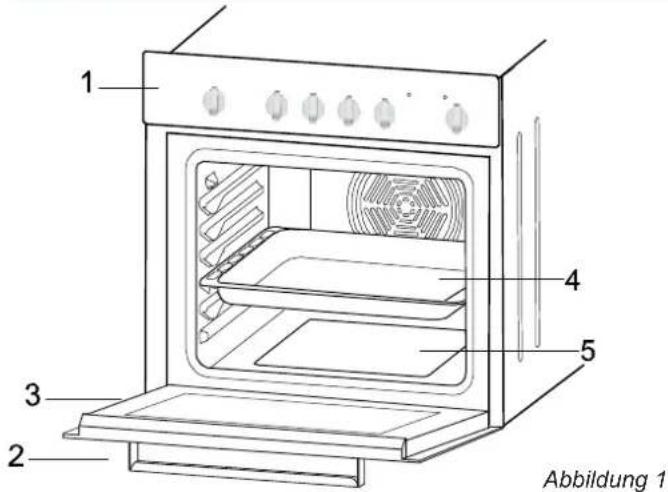
MAIN PARTS
- Control Panel
- Oven Door Handle
- Oven Door
- Tray
- Lower Heating Element
- Upper Heating Element
- Grid
- Racks
Table 1
| Hob - Oven Combination Possibility | FCO 105 W | FCO 105 N FCO | 105 C FCO | 405 X |
| PCV 64 C | √ | √ | √ | √ |
| PCE 64 X | √ | √ | √ | √ |
VITROCERAMIC HOB: PCV 64 C 4 HP HOP: E XPC 64
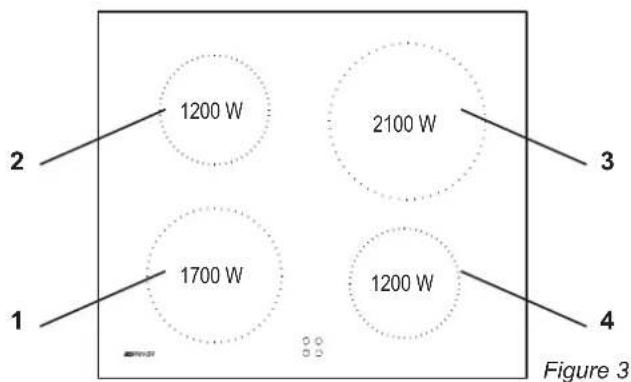
text_image
1200 W 2100 W 1700 W 1200 W Figure 3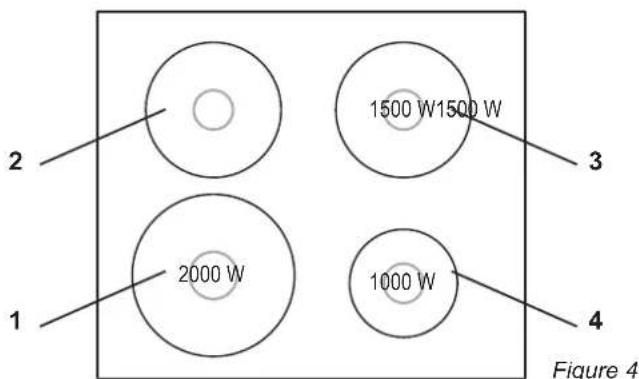
text_image
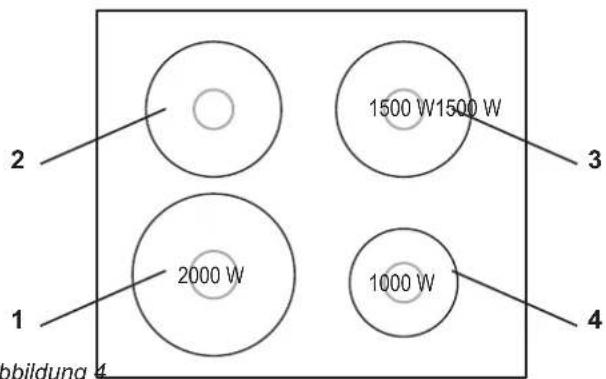
2 1 2000 W 1500 W1500 W 3 1000 W 4 Figure 4MAIN PARTS
- ∅ 190 Radiant Zone (1700W)
- ∅ 155 Radiant Zone (1200W)
- ∅ 220 Radiant Zone (2100W)
- ∅ 155 Radiant Zone (1200W)
- Vitroceramic Surface
- Lower Casing
MAIN PARTS
- ∅ 180 Rapid Solid Hotplate (2000W)
- ∅ 145 Solid Hotplate Burners (1500W)
- ∅ 180 Solid Hotplate Burners (1500W)
- ∅ 145 Solid Hotplate Burners (1000W)
- Cooktop
- Lower Casing
2. GENERAL WARNINGS
Thank you for choosing one of our products. To get the most out of your oven we recommend that you:
- Read the notes in this manual carefully: they contain important instructions on how to install, use and service this oven safely.
- Keep this booklet in a safe place for easy, future reference.
When the oven is first switched on it may give out acrid smelling fumes. This is because the bonding agent for insulating panels around the oven has been heated up for the first time.
This is a completely normal, if it does occur you merely have to wait for the fumes to clear before putting the food into the oven.
An oven by its very nature becomes very hot. Especially the glass of the oven door.
2.1 DECLARATION OF COMPLIANCE
The parts of this appliance that may come into contact with foodstuffs comply with the provisions of EEC Directive 89/109.
CE Appliance complies with European Directives 73/23/EEC and 89/336/EEC, replaced by 2006/95/EC and 2004/108/EC, and subsequent amendments.
When you have unpacked the oven, make sure that it has not been damaged in any way. If you have any doubts at all, do not use it: contact a professionally qualified person. Keep packing materials such as plastic bags, polystyrene, or nails out of the reach of children because they are dangerous for children.
2.2 SAFETY HINTS
•The oven must be used only for the purpose for which it was designed: it must only be used for cooking food. Any other use, e.g. as a form of heating, is an improper use of the oven and is therefore dangerous.
•The manufacturers cannot be held responsible for any damage caused by improper, incorrect or unreasonable use. When using any electrical appliance you must follow a few basic rules.
- Do not pull on the power cable to remove the plug from the socket.
- Do not touch the oven with wet or damp hands or feet.
- Do not use the oven unless you are wearing something on your feet.
- Do not allow children or irresponsible people to use the oven unless they are carefully supervised.
- It is not generally a good idea to use adapters, multiple sockets for several plugs and cable extensions.
- If the oven breaks down or develops a fault switch it off at the mains and do not touch it.
- If the cable is at all damaged it must be replaced promptly.
When replacing the cable, follow these instructions. Remove the power cable and replace it with one of the H05RRF, H05VV-F, H05V2V2-F type. The cable must be able to bear the electrical current required by the oven. Cable replacement must be carried out by properly qualified technicians. The earthing cable (yellow-green) must be 10 mm longer than the power cable.
Use only an approved service centre for repairs and ensure that only original parts are used. If the above instructions are not adhered to the manufacturers cannot guarantee the safety of the oven.
2.3 INSTALLATION
Installation is the customer's responsibility. The manufacturers have no obligation to carry this out. If the assistance of the manufacturer is required to rectify faults arising from incorrect installation, this assistance is not covered by the guarantee.
The installation instructions for professionally qualified personal must be followed. Incorrect installation may cause harm or injury to people, animals or belongings. The manufacturer cannot be held responsible for such harm or injury.
2.4 FITTING THE OVEN INTO THE KITCHEN UNIT
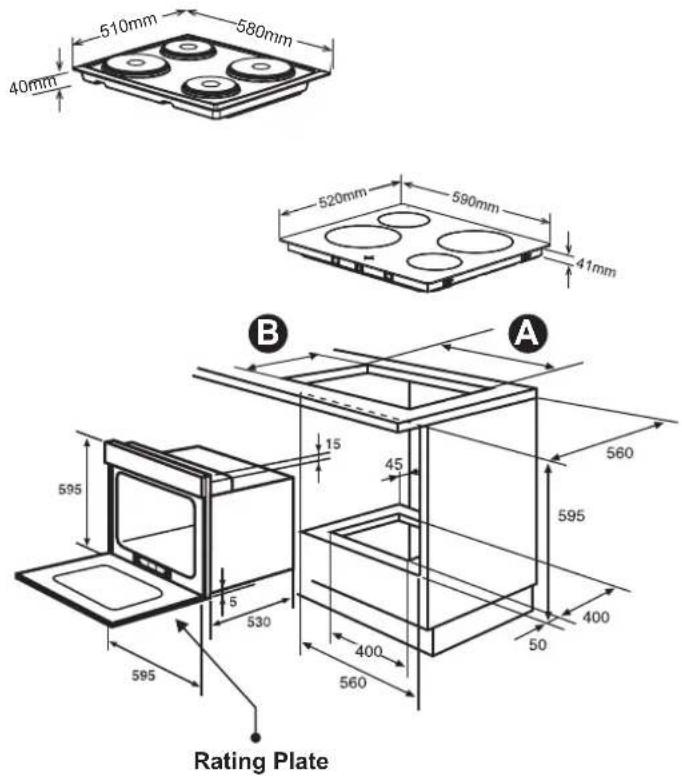
Fit the oven into the space provided in the kitchen unit; it may be fitted underneath a work top or into an upright cupboard. Fix the oven in position by screwing into place.(Figure 11).
To locate the fixing holes, open the oven door and look inside. To allow adequate ventilation, the measurements and distances indicated in the diagram on last page must be adhered to when fixing the oven.
Note: For ovens that are combined with a hob unit the instructions contained in the manual for the hob unit must be followed.
2.5 IMPORTANT
If the oven is to work properly, the kitchen housing must be suitable. The panels of the kitchen unit that are next to the oven must be made of a heat resistant material. Plastics or glues that cannot withstand such temperatures will melt and deform the unit. Once the oven has been lodged inside the unit, the electrical parts must be completely insulated. This is a legal safety requirement. All guards must be firmly fixed into place so that it is impossible to remove them without using special tools.
Remove the back of the kitchen unit to ensure an adequate current of air circulates around the oven. The hob must have a rear gap of at least 45 mm.
2.6 CONNECTING TO THE POWER SUPPLY
Plug into the power supply. Ensure first that there is a third contact that acts as earthing for the oven. The oven must be properly earthed.
If the model of oven is not fitted with a plug, fit a standard plug to the power cable. It must be able to bear the power supply indicated on the specifications plate. The earthing cable is yellowgreen. The plug must be fitted by a properly qualified person. If the socket and the plug are incompatible the socket must be changed by a properly qualified person. A properly qualified person must also ensure that the power cables can carry the current required to operate the oven.
An ON/OFF switch may also be connected to the power supply. The connections must take account of the current supplied and must comply with current legal requirements. The yellow-green earthing cable must not be governed by the ON/OFF switch. The socket or the ON/OFF switch used for connecting to the power supply must be easily accessible when the oven has been installed.
Important: During installation, position the power cable in such a way that it will not be subjected to temperatures of above 50^ C at any point.
The oven complies with safety standards set by the regulatory bodies. The oven is safe to use only if it has been adequately earthed in compliance with current legal requirements on wiring safety. You must ensure that the oven has been adequately earthed.
The manufacturers cannot be held responsible for any harm or injury to persons, animals or belongings caused by failure to properly earth the oven.
The cabling and wiring system must be able to bear the maximum electric power required by the oven. This is indicated on the specifications plate. If you are in any doubt at all, use the services of a professionally qualified person.
3. OVEN EQUIPMENT (according to the model)
It is necessary to do an initial cleaning of the equipment before the first use of each of them. Wash them with a sponge. Rinse and dry off.
The simple shelf can take moulds and dishes.
The tray holder shelf is especially good for grilling things. Use it with the drip tray.
The special profile of the shelves means they stay horizontal even when pulled right out. There is no risk of a dish sliding or spilling.

natural_image
Two wire mesh plates, one flat and one tilted, with no text or symbols present.Figure 5
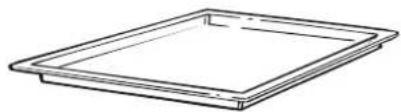
The drip tray catches the juices from grilled foods. It is only used with the Grill, Rotisserie, or Fan Assisted Grill; remove it from the oven for other cooking methods.
Never use the drip tray as a roasting tray as this creates smoke and fat will spatter your oven making it dirty.
natural_image
Simple line drawing of a rectangular tray or container (no text or symbols)Figure 6
The pizza set is designed for pizza cooking. In order to obtain the best results the set must be used together with Pizza function.
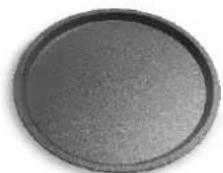
Figure 7
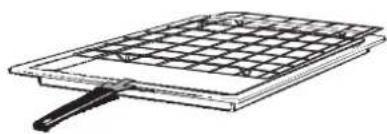
The tray holder
The tray holder shelf is ideal for grilling. Use it in conjunction with the drip tray. A handle is included to assist in moving the both accessories safely. Do no leave the handle inside the oven.
natural_image
Line drawing of a grating or pan with a handle, no text or symbols presentFigure 8
4. USEFUL TIPS
4.1 SHELF SAFETY SYSTEM

natural_image
Abstract black line drawing of a stylized upward and downward arrow within a grid-like structure (no text or symbols)The oven features a new shelf safety system.
This allows you to pull out the oven shelves when inspecting the food without danger of food spillages or shelves falling accidentally out of the oven.
To remove the shelves pull out and lift.
Figure 9
4.2 GRILLING
Grilling makes it possible to give food a rich brown colour quickly. For browning we recommend that you insert the grill onto the fourth level, depending on the proportions of the food (see fig. page 12).
Almost all food can be cooked under the grill except for very lean game and meat rolls.
Meat and fish that are going to be grilled should first be lightly doused with oil.
4.3 COOKING TIME
For recommended cooking times and temperatures the first time you use the oven, refer to the tables on page 12. You may then wish to vary these times and settings in the light of your own experience.
4.4 CLEANING AND MAINTENANCE
Clean the stainless steel and enamelled surfaces with warm, soapy water or with suitable brand products. On no account use abrasive powders that may damage surfaces and ruin the oven's appearance. It is very important to clean the oven each time that it is used. Melted fat is deposited on the sides of the oven during cooking. The next time the oven is used this fat could cause unpleasant odours and might even jeopardise the success of the cooking. Use hot water and detergent to clean; rinse out thoroughly.
To make this chore unnecessary all models can be lined with catalytic self-cleaning panels: these are supplied as an optional extra (see the section SELF-CLEANING OVEN WITH CATALYTIC LINING).
Use detergents and abrasive metal pads like «brillo pads» for the stainless steel grills.
The glass surfaces as the top, oven door and warming compartment door must be cleaned when they are cold. Damage that occurs to them because this rule was not adhered to are not covered by the guarantee.
To replace the interior light:
- switch off the mains power supply and unscrew bulb. Replace with an identical bulb that can withstand very high temperatures
4.5 SERVICE CENTRE
Before calling the Service Centre
If the oven is not working, we recommend that:
you check that the oven is properly plugged into the power supply. If the cause of the fault cannot be detected:
disconnect the oven from the mains, do not touch the oven and call the after sales service.
Before calling the Service Centre remember to make a note of the serial number on the specifications plate (see fig. page 7).
The oven is supplied with a guarantee certificate that ensures that it will be repaired free of charge by the Service Centre
5. PREPARATION FOR INSTALLATION AND USE
Manufactured with best quality parts and materials, this modern, functional and practical oven will meet your needs in all respects. Make sure to read this manual to obtain successful results and not to experience any problems in the future. The information given below contain rules that are necessary for correct positioning and service operations. They should be read without fail especially by the technician who will install the appliance.
5.1 CHOOSING A PLACE FOR THE OVEN
There are several points to pay attention to when choosing a place for your oven. Make sure to take into account our recommendations below in order to prevent any problems and dangerous situations, which might occur later!
- When choosing a place for the oven, attention should be paid that there are no flammable or combustible materials in the close vicinity, such as curtains, oilcloth etc., Which quickly catch fire.
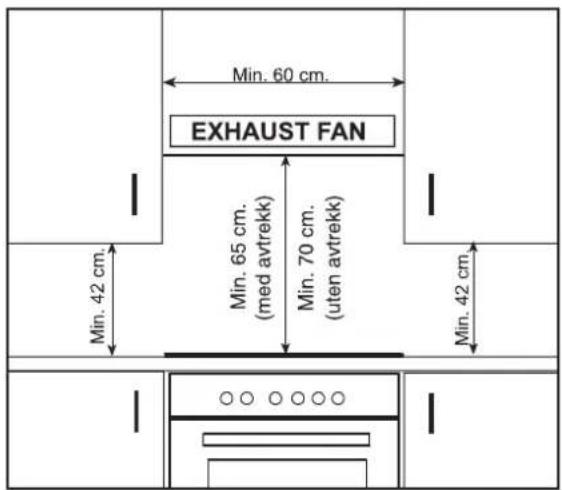
- Required changes to wall cabinets and exhaust fans above the built-in combined product as well as minimum height from the oven board are show in Figure 10.
Accordingly, the exhaust fan should be at a minimum height of 65 cm from the worktop. If there is no exhaust fan the height should not be less than 70 cm.
text_image
Min. 60 cm. EXHAUST FAN Min. 42 cm. Min. 65 cm. (med avtrekk) Min. 70 cm. (uten avtrekk) Min. 42 cm.Figure 10
5.2 OVEN and HOB INSTALLATION
Figure 11 - Regular Installation of Oven
text_image
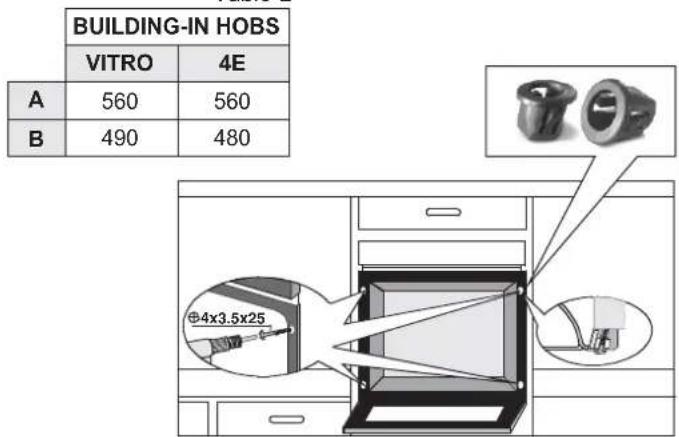
510mm 580mm 40mm 520mm 590mm 41mm B A 560 15 45 595 595 400 530 400 560 50 595 Rating PlateTable 2
text_image
BUILDING-IN HOBS VITRO 4E A 560 560 B 490 4805.2.1. Installation Steps
- Place the hob into the opening on worktop. The size of opening is given in Figure 11.
Fordetails, see the headings either Fixing the solid hotplate hob or Fixing the vitroceramic hob.
.2. Connect the hob to the oven using the plug given on the hob. The socket for plug is placed on the rear panel of oven. - Connect the oven to the electrical supply.
- Place the oven into its built-in niche. Either placement in Figure 11 is applicable depending on the size of cabinet opening. For details, see the heading Fixing the oven.
5.2.2. Fixing the solid hotplate hob
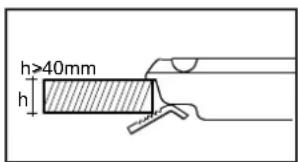
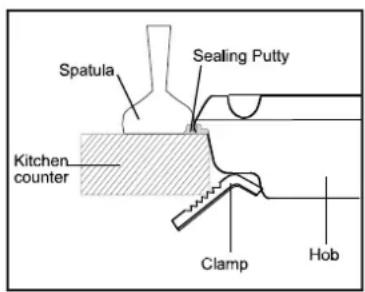
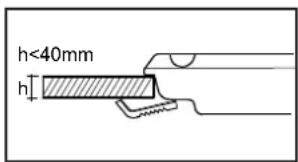
In order to prevent leakage of any liquids on the counter, a special sealing putty is supplied together with your oven. Apply this putty around the clearance on the kitchen counter. Extend the five-piece putty by stretching and apply it around the clearance. Place the hob on it, as indicated in the Figure 11. Make sure to fit all four clamps by using one screw for each as shown in the Figure 12. In case the thickness of the kitchen counter is less than 40mm, use the clamp as shown in the Figure 14. After fitting your hob into its place, neatly remove the excess sealing putty around the sides with the help of a spatula Figure 13.
text_image
h≥40mm hFigure 12
text_image
Spatula Sealing Putty Kitchen counter Clamp HobFigure 13
text_image
h<40mm hFigure 14
5.2.3. Fixing the vitroceramic hob
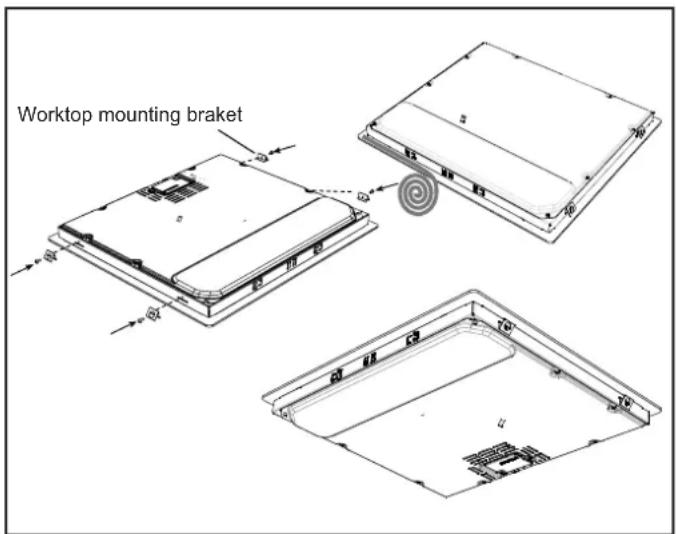
- Apply the one-sided self-adhesive sealing tape supplied all the way round the lower edge of the cooking surface along the outer edge of the glass ceramic panel. Do not stretch it.
- Screw the 4 worktop mounting brackets on the side walls of product.
- Place the hob into the opening on the worktop.
text_image
Worktop mounting bracketFigure 15
5.2.4. Fixing the oven
Fit the oven into the space provided in the kitchen unit; it may be fitted underneath a work top or into an upright cupboard. Fix the oven in position by screwing into place, using the two fixing holes in the frame. To locate the fixing holes, open the oven door and look inside.
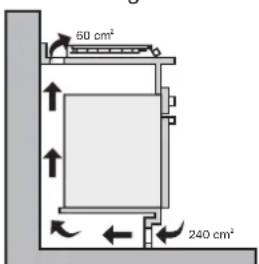
To allow adequate ventilation, the measurements and distances indicated in the diagram on last page must be adhered to when fixing the oven.
The dimensions and material of the cabinet in which the oven will be installed must be correct and resistant to increases in temperature. In a correct installation, contact with electrical or insulated parts must be prevented. Insulating parts need to be fitted in a way to ensure that they cannot be removed by using any kind of tool. Installing the appliance in the close vicinity of a refrigerator or a deep-freezer is not recommended. Otherwise, the performance of the above-mentioned appliances will be negatively affected due to emanating heat.
5.2.5. Warning
Warning regarding the installation of built-in oven without cooling fan.
Prior inserting the oven, it is necessary to remove the rear kitchen element panel in the area of the oven opening.
Equally, the front part of the element must have an opening.
- When a cooktop burner knob is brought to another position than the "0" position, the operation light will be on.
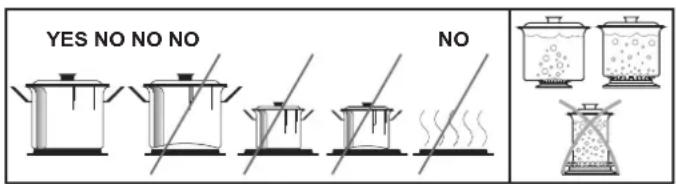
- Use only pots which fit the burner diameter.
- Before placing the pot on the burner, be sure that its bottom is not wet.
- Never operate a cooktop burner while empty. Pot temperature may be high when the appliance is in use. Therefore, it is recommended that you keep children and pets away from the hob both during and after operation.
- In case you notice any crack on the ceramic glass, it must be immediately switched off and replaced by the Authorised Service.
• After use (in order to ensure its continuously effective operation and long service life), hotplates need to be thoroughly cleaned using appropriate cleaning materials. In order to prevent any formation of rust and preserve their initial appearance, it is recommended to clean the hotplates rubbing them with a piece of cloth that is slightly damped by oil. Never use steam cleaners. - In order to prevent waste of energy, the pots to be used should not be smaller or larger than the burner surfaces.
• Take the necessary measures so that small children will not come close to the burner surface in any way, as it will be hot in operating position. - Due to the flammable nature of hot oil, operations such as frying should be performed with the container lids closed.
- Do not cut anything, bread etc., on the glass. Do not use pots with aluminium bottoms. Avoid placing too heavy materials on your hob.
- Do not place materials such as plastic, aluminium on the ceramic glass surface. If for any reason there should be a plastic or aluminium material melted on it, clean it up with a spatula immediately.
- Do not wipe the ceramic surface with materials such as dish cloth or sponge. Residues of detergents may lead to fire as well as cause the glass colour to fade.
text_image
60 cm² 240 cm²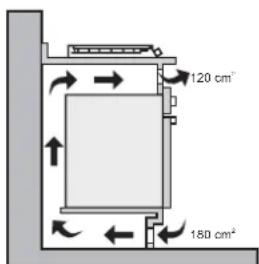
text_image
120 cm' 180 cm²Figure 16
5.3 WIRING AND SAFETY OF THE BUILT-IN COMBINED OVEN
- Before making the connection, make sure that the installation is protected by a suitable fuse, see table, and that it is fitted with wires of a large enough section to supply the appliance normally.
- Turn over the hob, glass side against the work top, taking care to protect the glass.
- Open the cover in the following sequence;
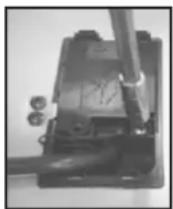
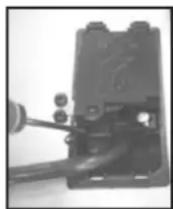
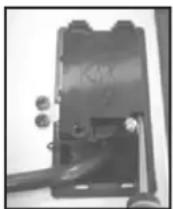
Figure 17 Figure 18 Figure 19
- Unscrew the cable clamp "1",
• Find the two tabs located on the sides, - Put the blade of a flat screw-driver in front of each tab "2" e "3", push in and press,
- Remove the cover.
To release the power supplying cord.
- Remove the screws retaining the terminal block which contains the shunt bars and the conductors of the supply cord,
- Pull out the supply cord.
•Operations to be carried out to make a mew connection:
-Choose the power supply cable in accordance with the recommendations in the table.
-Pass the power supply cable in to the clamp. -Strip the end of each conductor of the supply cord on a 10 mm length, by taking in account the requested length of the cord for the connection to the terminal block.
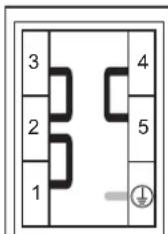
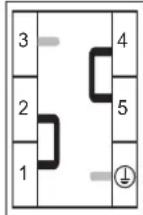
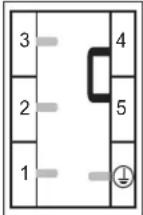
-According to the installation and with the help of shunt bars which you should have recovered in the first operation, fix the conductor as shown on the chart.
-Fix the cover
-Screw the cable clamp.
Note: make sure the terminal board screws are tight.
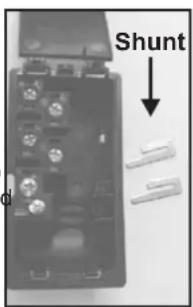
text_image
ShuntFigure 20
text_image
3 2 1 4 5L1: Phase shunt 1-2 and shunt 2-3
N: Neutral shunt 4-5
T: Earth
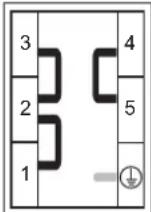
L1: Phase shunt 1-2 and shunt 2-3
L2: Phase shunt 4-5
T: Earth

L1: Phase shunt 1-2
L2: Phase shunt 3
L3: Phase shunt 4-5
T: Earth

L1: Phase L2: Phase L3: Phase
N: Neutral shunt 4-5
T: Earth
| MONOPHASE TWO-PHASE THREE-PHASE THREE-PHASE | ||||
| 220 - 240 V~ 220 | 240 V2~ 220 - | 240 V3~ 380 - 415 V3N~ | VOLTAGE | |
| 3 G 2.5 mm ^2 | 3 G 2.5 mm ^2 | 4 G 1.5 mm ^2 | 5 G 1.5 mm ^2 | CABLE-SECTION |
| HO5VV-F | HO5VV-F | HO5VV-F | HO5VV-F | CABLE-TYPE |
Figure 21
5.4 VITROCERAMIC HOB WITHOUT CONTROL KNOB
Connection to the electrical circuit, on the oven or glass ceramic hob, should be made via the oven.
The ceramic hob without controls, has been developed to be used only in conjunction with specific separate control units or built in ovens with integral hob controls.
A detailed table (supplied with ovens with integral hob control or with independent control units) shows clearly how the hobs are to be connected to the specified units.
Under no circumstances must the hob be connected with any other control or oven not specified in the list.
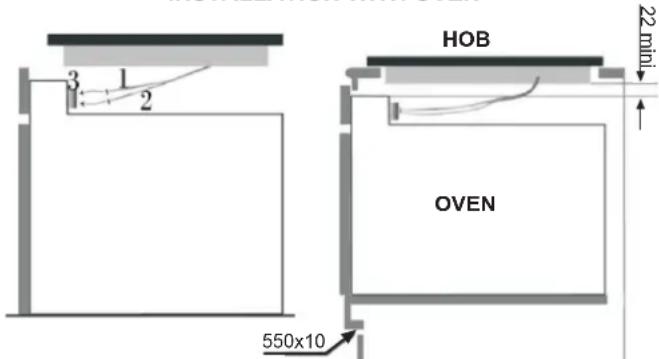
To proceed with the connection, it is necessary to joint male connectors ① and ② of the hob with the "female" connectors ③ of the oven or of the control panel.
INSTALLATION WITH OVEN
text_image
HOB 22 mini OVEN 550x10Figure 22
Bult-in oven "apertures": Refer to the instruction booklet concerned.
This connection can be made before or after the oven is screwed into place.
6. USING THE OVEN
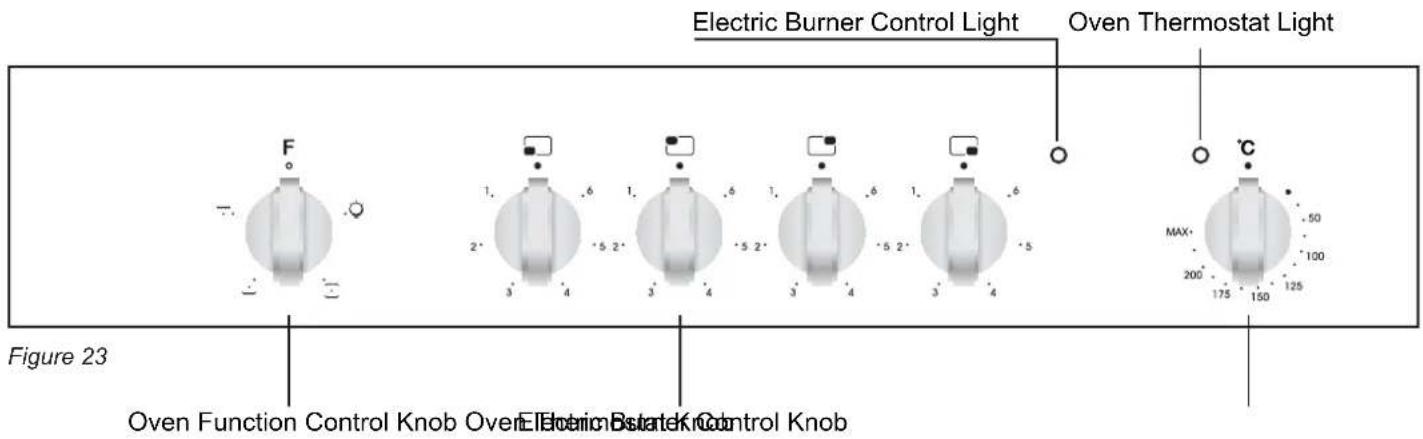
6.1 CONTROL PANELS
text_image
Electric Burner Control Light Oven Thermostat Light Figure 23 F 1. 2' 3' 4' 5' 6' 7' 8' 9' 10' 11' 12' 13' 14' 15' 16' 17' 18' 19' 20' MAX 200 175 150 125 50 100 Electric Bstrate Control Knob
text_image
F o ± (·) - 1. 2* 3 .6 .5 2* 4 1. 3 .6 .5 2* 3 .6 .5 2* 3 .6 .5 3 .6 .5 3 .6 .5 3 .6 .5 3 .6 .5 3 .6 .5 3 .6 .5 3 .6 .5 3 .6 .5 3 .6 .5 3 .6 .5 3 .6 .5 3 .6 .5 3 .0 MAX: 200° 175° 150° 125° .50° 100° 0°Figure 24
6.2 USING THE COOKTOP BURNERS
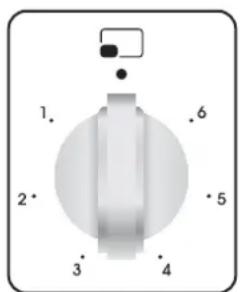
The hob part of the product is controlled via the on the control panel (Figure 25).
Stage "0" means off position. The remaining 6 stages indicate the following types of use:
text_image
1. 2. 3. 4 5 6Figure 25
1.....Heat Maintenance Position
2.3....Heating in Low Temperature Position
4.5.6.Cooking, Frying and Boiling Position
The upper part of the Solid hotplate is covered with a heat-resistant protective material.
At first run, in order to harden the protective layer by burning it, bring the electric burner button to position "3" and run the burner for 5 minutes. While using the electric burners, attention should be paid that the pots used have smooth even bottoms. You can obtain maximum performance from your hob if you use pots with suitable diameters and even bottoms. Using pots with small diameters on burners with large diameters is not recommended. Because that will cause heat loss and lead to a waste of energy.
text_image
YES NO NO NO NOFigure 26
Resistance of the vitroceramic glass to heat and extreme changes of temperature is very high. A redness will be noticed on the heated surface with time. When any heating unit is run, you may hear a weak sound; this is normal and it has to do with the technical structure of the system.
It does not pose any problems in terms of quality. In case sharp-edged pots should rub against or roughly placed on the vitroceramic glass, the sur face may become damaged. It is recommended that you pay attention to this.
6.3 USING THE OVEN
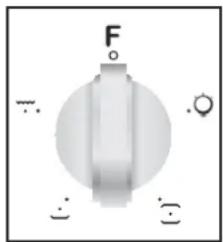
First, you need to adjust the oven function (Figure 27 and 28) and then set the oven temperature to desired value (Figure 29).
Otherwise, the oven will not operate.
When the temperature inside your oven reaches the value you set, the thermostat will cut the circuit and the thermostat light will go off. When the temperature falls below the set value, the thermostat will again be turned on and the thermostat light will be on.
text_image
F a b c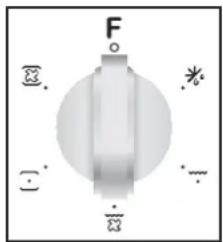
text_image
F ⊗. *. [·] -. 1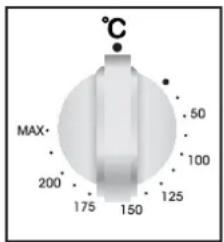
text_image
C MAX 50 100 200 175 150 125Figure 27 Figure 28 Figure 29
Table 3
| Symbol | EXPLANATION | Energy Class according to CENELEC EN 50304 |
| Light | — | |
| The oven light, red warning light and the fan will be turned on. Performs the function of defrosting the frozen foods. | — | |
| The oven's thermostat and warning light and the lower and upper heating elements will be switched on. | B (convection) for FCO 405 XFCO 105 XFCO 105 NFCO 105 W | |
| The oven's thermostat and warning light, the fan and the turbo heater will be switch on. | B (forced air) only for FCO 405 X | |
| The oven's thermostat and warning light, the grill heater function will be switched on. | — | |
| The oven's thermostat and warning light, the upper heating element, the grill heater, the fun function will be switched on. | — | |
| The oven's upper heating element will be switched on. | — | |
| The oven's lower heating element will be switched on. | — |
6.4 FUNCTIONS
Availability of the functions explained below vary depending on the product model.
Defrost Function

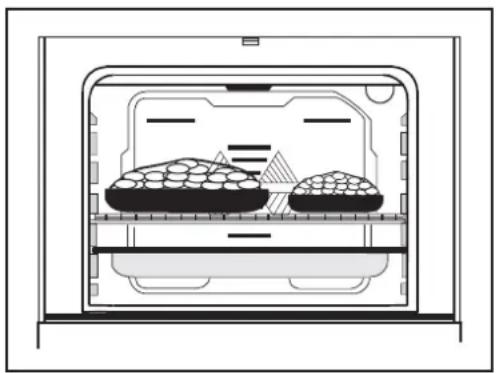
You can start the defrost operation by putting the frozen oven and bringing the button to the indicated mark. This function does not cook/bake the food; it only helps defrost it within a short time. Put the food to be defrosted on the wire rack that you will place on the third rack support from the bottom (Figure 30). To collect the water to accumulate due to the melting ice, insert an oven tray into the lower rack.
natural_image
Diagram of a food storage or processing unit with two large dishes inside, no text or symbols presentFigure 30
Lower-Upper Heating Element Function (Static Cooking):

In this type of cooking which is described as the traditional method, the heat emanating evenly from the lower and upper resistors into the oven ensures even cooking of the lower and upper side of the food that you are cooking. Adjust the thermostat knob of your oven to a temperature recommended on the cooking table for the cooking operation you will perform. A preheating of the oven for about 10 minutes is recommended. Leave the food to cook, which is placed in a suitable container, for the recommended duration. This position is a preferred function in making cakes, sponge cakes, pastry, baked pasta, lasagne, pizza.
After the cooking/baking, turn off the oven function control knob and the thermostat. Take the cooked/baked food out of the oven, place it on a safe place and ensure that the oven completely cools off by keeping the oven door open. As the oven will be hot, stay away from the oven and keep your children away as well.
Fan and the Lower - Upper Heating Element Function (Static Cooking With Fan)

This is the position where the air coming from the lower or heating elements is circulated into the oven by the fan. Adjust the thermostat knob of your oven to a temperature recommended on the cooking table for the cooking operation you will perform. Turn the oven so it will point to the symbol of this function, adjust the oven timer to the recommended time for the cooking and preheat the oven for about 10 minutes. The food placed in a suitable container is put into the oven and the operation is started. This position is a position where usually very good results are obtained in baking pastry. All parts of the foods will be cooked evenly in this position.
Suitable for cooking with one tray.
After the cooking/baking, turn off the oven function control knob and the temperature setting. Take the cooked/baked food out of the oven, place it on a safe place and ensure that the oven completely cools off by keeping the oven door open. As the oven will be hot, stay away from the oven and keep your children away.
Grill Function

This function is used for grills, roast chicken and roast on For grills; put the foods on the grid, and on the highest rack. After placing the oven tray on the third . Rack, you can start the grill operation. The tray placed on the thrid rack will ensure that the oil dropping from the foods will be collected.
When grilling, the oven door must be closed and the oven temperature should be adjusted to 190^ C.
Turn your oven's thermostat knob so it will point to this temperature value. After a preheating period of 5 minutes, put your foods into the oven.
After the cooking, turn off the oven function control knob and the thermostat.
Take the cooked/baked food out of the oven, place it on a safe place and ensure that the oven completely cools off by keeping the oven door open. As the oven will be hot, stay away from the oven and keep your children away.
Grill and Fan Function

At this function; ensuring complete frying by working the fan, grill and upper heating element perform the n.
For grills; put the foods on the grid, and place the grid on the highest rack. After placing the oven tray on the third rack, you can start the grill operation. The tray placed on the third rack will ensure that the oil dropping from the foods will be collected.
When grilling, the oven door must be closed and the oven temperature should be adjusted to 190^ C.
Turn your oven's thermostat knob so it will point to this temperature value. After a preheating period of 5 minutes, put your foods into the oven.
After the cooking, turn off the oven function control knob and the thermostat knob.
Take the cooked/baked food out of the oven, place it on a safe place and ensure that the oven completely cools off by keeping the oven door open. As the oven will be hot, stay away from the oven and keep your children away.
Lower Heating Function

At this cooking, the best is spreaded from the lower heating element. Lower heating function is appropriate for heating the food instead of cooking.
Upper Heating Function

In this type of cooking, the heat emanating from upper heating element cooks the upper side of the food. Upper heating function is appropriate for frying the upper side of already cooked food and heating the food.
Table 4
| DISHES | LOWER - UPPER | LOWER-UPPER FAN | GRILL | ||||||
| Thermostat pos. (°C). | Rack pos. | Cooling period (dk) | Thermostat pos. (°C). | Rack pos. | Cooling period (dk) | Thermostat pos. (°C). | Rack pos. | Cooling period (dk) | |
| Layered pastry | 170 - 190 | 2-3 | 35 - 45 | 170 - 190 | 2-3 | 25 - 35 | |||
| Cake | 170 - 190 | 2-3 | 30 - 40 | 150 - 190 | 2-3-4 | 25 - 35 | |||
| Cookie | 170 - 190 | 2-3 | 30 - 40 | 150 - 190 | 2-3-4 | 25 - 35 | |||
| Grilled meatballs | 200 | 5 | 10 - 15 | ||||||
| Watery food | 175 -200 | 3 | 40 - 50 | 175 -200 | 3 | 40 - 50 | |||
| Chicken | 200 | 2-3 | 45 - 60 | 200 | 2-3 | 45 - 60 | 200 | 50 - 60 | |
| Chop | 200 | 4-5 | 15 - 25 | ||||||
| Beefstake | 200 | 5 | 15 - 25 | ||||||
| Two-tray cake | |||||||||
| Two-tray pastry | |||||||||
7. CLEANING AND MAINTENANCE
7.1 GENERAL
Before starting to clean your oven, be sure that all control knobs are off and your appliance is cooled off. Unplug the appliance. Do not use cleaning materials containing particles that might scratch the enamelled and painted parts of your oven. Use cream cleaners or liquid cleaners, which do not contain particles. As they might harm the surfaces, do not use caustic creams, abrasive cleaning powders, rough wire wool or hard tools. In the event the excess liquids spilling over your oven should burn, it may cause a damage to the enamel. Immediately clean up the spilt liquids.
7.2 CLEANING THE OVEN
Make sure to unplug the oven before starting to clean it. You will obtain best results if you clean the oven interior while the oven is slightly warm. Wipe your oven with a soft piece of cloth dampened with soap water after each use. Then wipe it again, this time with a wetted cloth, and wipe it dry. A complete cleaning may be necessary from time to time, using a liquid cleaning material. Do not clean using dry and powder type cleaners. For products with catalytic enamel frames, the rear and side walls of the inner frame do not require cleaning. However; depending on usage, it is recommended that you replace them after a certain period of time.
7.3 CLEANING THE SOLID HOTPLATE HOB
Hobs should be cleaned wiping with a dampened cloth. Cleaning of the stainless steel parts should be done only with water and such parts should be wiped dry with a soft cloth or chamois. Gaps and corners should be cleaned using liquid detergents or lukewarm vinegar.
7.4 CLEANING THE VITROCERAMIC HOB
Unplug the appliance before starting the cleaning.
Wait for the vitroceramic glass to completely cool off before starting the cleaning.
Make sure that the cleaning materials you will use do not contain particles that might scratch the glass Use cream detergents or liquid detergents.
The vitroceramic surface should be wiped with cold water and wiped dry with a soft piece of cloth until no cleaning material is left on the surface.
You can use the cleaning spatula, if supplied together with your product, for the cleaning of spilt foods and residues.
Dessert type of foods should be cleaned immediately after they spill without waiting for the vitroceramic glass to cool off.
Scrubbing with steel cleaning wires may harm the vitroceramic glass surface. Formations of dust on the surface should be cleaned up using a dampened cloth.
Changes in colour which might occur on the ceramic glass surface do not affect the functional structure or permanence of the vitroceramic. The reason for the changes in colour is not the change in the material; it may be because the burnt residues on the surface are not cleaned up or the pots used have worn the glass surface or because unsui table cleaning materials were used.
The cleaning spatula should always be used prior to chemical cleaning substances. With this spatula, you can clean up the tiniest of dirtis on the vitroceramic surface Dirts that are difficult to remove such as melted plastic, heavy oils, sweet substances, can be removed easily with the spatula. As the spatula includes a razor, it is dangerous and must be kept out of reach of children. During cleaning with the spatula, pay attention not to scrape off the sillicon adhesives found on the sides of the glass.
7.5 MAINTENANCE
Replacing the Oven Light Bulb
It is recommended that you leave this operation to the Authorised Service.
Unplug the oven first and make sure that it is cold. After removing the lid infront of the light, take the bulbout. Insert the new bulb resistant to 300^ C, which you will find at Authorised Services, into the place of the bulb you have removed. Then fit the light protecting lid back into its place. After that, your oven will be ready for use.
8. SERVICE AND TRANSPORTATION
8.1 REQUIREMENTS BEFORE CONTACTING TO SERVICE
If the oven does not operate ;
The oven may be plugged off, there has been a black out.
If the oven does not heat ;
The temperature may be not adjusted with oven's temperature control switch.
If the oven light does not operate does not light;
The electricity should be controlled.
It should be controlled whether the ulb is defective.
Cooking (If lower-upper part does not cook equally);
Control the shelf locations, cooking period and temperature values according to the manual. In case of the product doesn't work properly and malfunctioning causes cannot be found, switch off the product. Please do not tamper with it and call the Technical Service.
It is important to communicate to Authorized Technical Service the product model and it's serial number that can be found on the rating label.
8.2 INFORMATION RELATED TO TRANSPORT
If you need any transport ;
Keep the original packaging of product and carry it with its original packaging when needed.
Follow the transport signs on the packaging.
If the original packaging is not available;
Take measure for the external surfaces (glass and painted surfaces) of oven and hob against possible blows.
1. IHR NEUES HAUSHALTSGERÄT
text_image
1 2 3 4 5 Abbildung 1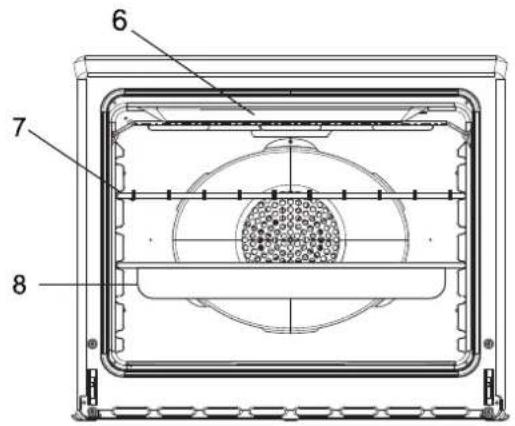
text_image
6 7 8Abbildung 2
HAUPTKOMPONENTEN
pie
| Label | Value | |---|---| | 1 | 1200 W | | 2 | 1200 W | | 3 | 2100 W | | 4 | 1200 W | | 1 (bottom) | 1700 W |4 HP : E XKOCHFELD PC 64
text_image
2 1 2000 W 1500 W1500 W 1000 W 3 4 bildung 4natural_image
Two wire mesh metal sheets, one flat and one rectangular with slats (no text or symbols)Figure 5
natural_image
Simple line drawing of a rectangular tray or container (no text or symbols)Abbildung 6
natural_image
Line drawing of a rectangular grid-patterned object with a handle, resembling a food griddle or pan (no text or symbols)Abbildung 8
L1: Phase shunt 1-2 and shunt 2-3
L1: Phase shunt 1-2 and shunt 2-3
L2: Phase shunt 4-5 T: Erdung
L1: Phase shunt 1-2
L2: Phase shunt 3
L3: Phase shunt 4-5 T: Erdung
L1: Phase
L2: Phase L3: Phase
text_image
1. 2' 3' 4 5 6 1. 2' 3' 4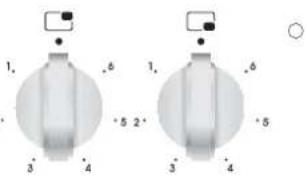
text_image
1. .6 1. .6 +5 2+ .5 3 4 3 4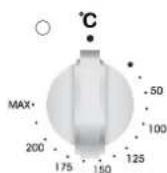
Abbildung 24
6.2 KOCHPLATTEN VERWENDEN
text_image
RICHIG FALSCH FALSCH FALSCH FALSCH FALSCH FALSCH FALSCHAbbildung 26
natural_image
Diagram of a food delivery container with two scoops and a tray, no text or symbols presentAbbildung 30
This appliance is marked according to the European directive 2002/96/EC on Waste Electrical and Electronic Equipment (WEEE). By ensuring this product is disposed of correctly, you will help prevent potential negative consequences for the environment and human health, which could otherwise be caused by inappropriate waste handling of this product.
The symbol on the product or on its packaging indicates that this product may not be treated as household waste. Instead it shall be handed over to the applicable collection point for the recycling of electrical and electronic equipment. By ensuring this product is disposed of correctly, you will help prevent potential negative consequences for the environment and human health, which could otherwise be caused by inappropriate waste handling of this product. For more detailed information about recycling of this product, please contact your local city office, your household waste disposal service or the shop where you purchased the product.