
FS1620 - Fan BLACK & DECKER - Free user manual and instructions
Find the device manual for free FS1620 BLACK & DECKER in PDF.


| Product type | Pedestal fan |
| Brand | Black & Decker |
| Model | FS1620 |
| Maximum height | 130 cm |
| Grille diameter | 40 cm |
| Weight | 5 kg |
| Power supply | 220-240 V, 50 Hz |
| Power | 50 W |
| Number of speeds | 3 |
| Oscillation | Yes, automatic |
| Tilt | Manually adjustable |
| Control type | Rotary knobs |
| Protective grille | Yes, removable |
| Blade material | ABS plastic |
| Cable length | 1.5 m |
| Noise level | 55 dB (max) |
| Maintenance | Clean the grille with a damp cloth; do not immerse |
| Safety | Non-slip base, protective grille |
| Available spare parts | Fan blade, grille, motor, stand |
| Repairability | Repairability index: 7/10 |
Frequently Asked Questions - FS1620 BLACK & DECKER
User questions about FS1620 BLACK & DECKER
0 question about this device. Answer the ones you know or ask your own.
Ask a new question about this device
Download the instructions for your Fan in PDF format for free! Find your manual FS1620 - BLACK & DECKER and take your electronic device back in hand. On this page are published all the documents necessary for the use of your device. FS1620 by BLACK & DECKER.
USER MANUAL FS1620 BLACK & DECKER
natural_image
Line drawing of a standard office desk fan with mesh grille and base mount (no text or symbols)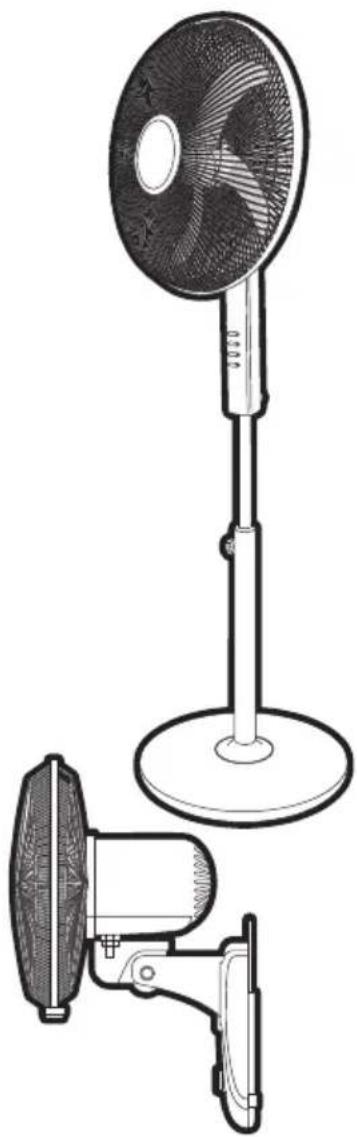
natural_image
Technical line drawing of a standing fan with a mounted base and a side-mounted device (no text or symbols)FD1620
FW1620
FS1620
FS1620R
FD1620
Desk Fan
Intended use
Your BLACK+DECKER FD1620 desk fan, FW1620 wall fan, FS1620 Pedestal fan and FS1620R Pedestal fan with remote control have been designed to create a flow of air.
This appliance is intended for indoor household use only. This appliance is not intended to be used in:
- Staff kitchen areas in shops, offices and other working environments;
- Farm houses;
- By clients in hotels, motels and other residential type environments;
- Bed and breakfast type environments;
Thank you for choosing BLACK+DECKER. We hope that you will enjoy using this product for many years.

Safety instructions
Warning! When using mains-powered appliances, basic safety precautions, including the following, should always be followed to reduce the risk of fire, electric shock and personal injury.
- Read all of this manual carefully before using the appliance.
- In order to avoid a hazard due to inadvertent resetting of the thermal cut-out, this appliance must not be supplied through an external switching device, such as a timer, or connected to a circuit that is regularly switched on and off by the utility.
- The intended use is described in this manual. The use of any accessory or attachment or the performance of any operation with this appliance other than those recommended in this instruction manual may present a risk of personal injury.
- Retain this manual for future reference.
Using your appliance
• Always take care when using the appliance.
- Do not use outdoors.
- Do not operate the appliance if your hands are wet. Do not operate the appliance if you are barefoot.
- Guide the power supply cord neatly so it does not hang over the edge of a worktop and cannot be caught accidentally or tripped over.
- Never pull the power supply cord to disconnect the plug from the socket. Keep the power supply cord away from heat, oil and sharp edges.
- If the supply cord is damaged, it must be replaced by the manufacturer, its service agent or similarly qualified persons in order to avoid a hazard.
- Disconnect the appliance from the power supply when not in use and before cleaning.
Warning! Long hair and loose clothing can be sucked into the back of the fan.
Warning! Never allow the back of the fan to be covered with curtains or other obstructions.
Safety of others
- This appliance is not intended for use by persons (including children) with reduced physical, sensory or mental capabilities, or lack of experience and knowledge, unless they have been given supervision or instruction concerning use of the appliance by a person responsible for their safety.
- Children should be supervised to ensure that they do not play with the appliance.
After use
- Switch off, remove the plug from the socket and let the appliance cool down before leaving it unattended and before changing, cleaning or inspecting any parts of the appliance.
- When not in use, the appliance should be stored in a dry place. Children should not have access to stored appliances.
Inspection and repairs
- Switch off the appliance before cleaning, changing accessories or approaching parts which move in use.
- Always allow the motor to stop turning before removing any cover or accessory.
- Before use, check the appliance for damaged or defective parts. Check for breakage of parts, damage to switches and any other conditions that may affect its operation.
- Do not use the appliance if any part is damaged or defective.
- Have any damaged or defective parts repaired or replaced by an authorised repair agent.
- Before use, check the power supply cord for signs of damage, ageing and wear.
- Do not use the appliance if the power supply cord or mains plug is damaged or defective.
- If the power supply cord or mains plug is damaged or defective it must be repaired by an authorised repair agent in order to avoid a hazard. Do not cut the power supply cord and do not attempt to repair it yourself.
- Never attempt to remove or replace any parts other than those specified in this manual.
- Do not attempt to repair the appliance. Take it to your nearest BLACK+DECKER-owned or authorised Service Centre for repair.
- Ensure that the fan is switched off and disconnected from the mains supply before removing the guard.
Electrical safety
Before use, check that the mains voltage corresponds to the voltage on the rating plate.

This appliance is double insulated in accordance with EN 60335; therefore no earth wire is required.
- Appliance plugs must match the outlet. Never modify the plug in any way.
- Do not use any adapter plugs with earthed (Class 1) appliances. Unmodified plugs and matching outlets will reduce the risk of electric shock.
- To avoid the risk of electric shock, do not immerse the cord, plug or appliance in water or other liquid.
Mains plug replacement
If a new mains plug needs to be fitted:
- Safely dispose of the old plug.
- Connect the brown lead to the live terminal in the new plug.
- Connect the blue lead to the neutral terminal.
- If the product is class I (earthed), connect the green/yellow lead to the earth terminal
Note! If your product is class II double insulated (only 2 wires in the cord set), no connection is to be made to the earth terminal. Follow the fitting instructions supplied with good quality plugs.
Any replacement fuse must be of the same rating as the original fuse supplied with the product.
Warning! The above section on mains plug replacement is for authorized service centre persons.
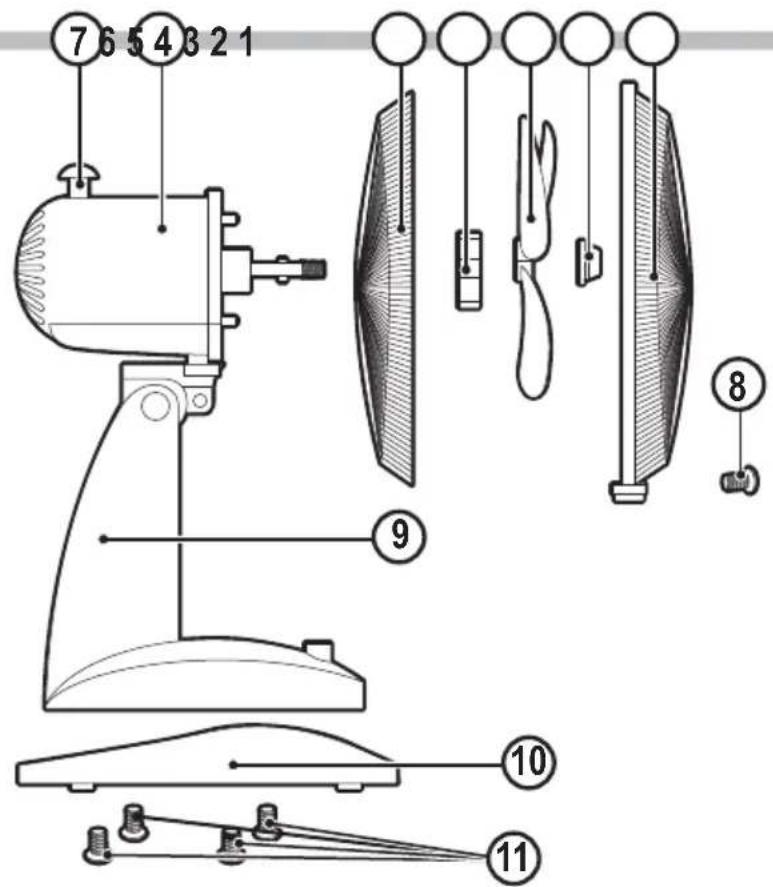
FD1620 Desk Fan
Features
- Front guard
- Blade cap
- Fan blade
- Guard nut
- Rear guard
- Fan head
- Oscillating knob
- Guard screw
- Fan unit
- Base
- Screw
Assembly
Note: Make sure your fan is switched off before connecting to or disconnecting from power supply.
Warning! Never use the fan without the guard in place or if the guard is damaged.
Fitting the fan to the base
- Remove four screws(10) from the fan unit.
- Insert the fan unit into the base, re-fit the four screw into the fan unit.
Fitting the fan blade and guard
- Remove the guard nut from the motor shaft by turning it anti-clockwise.
- Place the rear guard by positioning it on the location pins on the fan unit. Ensure that the rear guard is in the correct orientation.
- Secure the guard on to the fan unit by re-fitting the guard nut. Tighten the guard nut by turning it clockwise.
- Secure the fan blade on the motor shaft by fitting the blade cap. Tighten the blade cap by turning it anti-clockwise.
- Place the front guard onto the rear guard by positioning the top clip on the uppermost part of the rear guard. Push the top clip down and press the rim of the front guard onto the rear guard ensuring a tight fit all the way round.
- Close the bottom clip. Tighten the bottom clip screw by turning it clockwise.
Use
Warning! Never use the fan without the guard in place or if the guard is damaged.
Switching on and off
- Your fan has three speed control to keep the desired air flow through your room.
- 0 - Off
• 1 - Low - 2 - Medium
• 3 - High - To switch on, press the button to set the desired speed. The fan will start.
- To switch off, press the "0" button.
Oscillation
- The fan can be set to oscillate by pushing Oscillating Knob downwards. To stop the oscillating feature, pull up the Oscillation Knob.
Adjusting the angle of the fan
The angle of the fan can be adjusted up and down.
- Tilt the head of the fan to the desired angle.
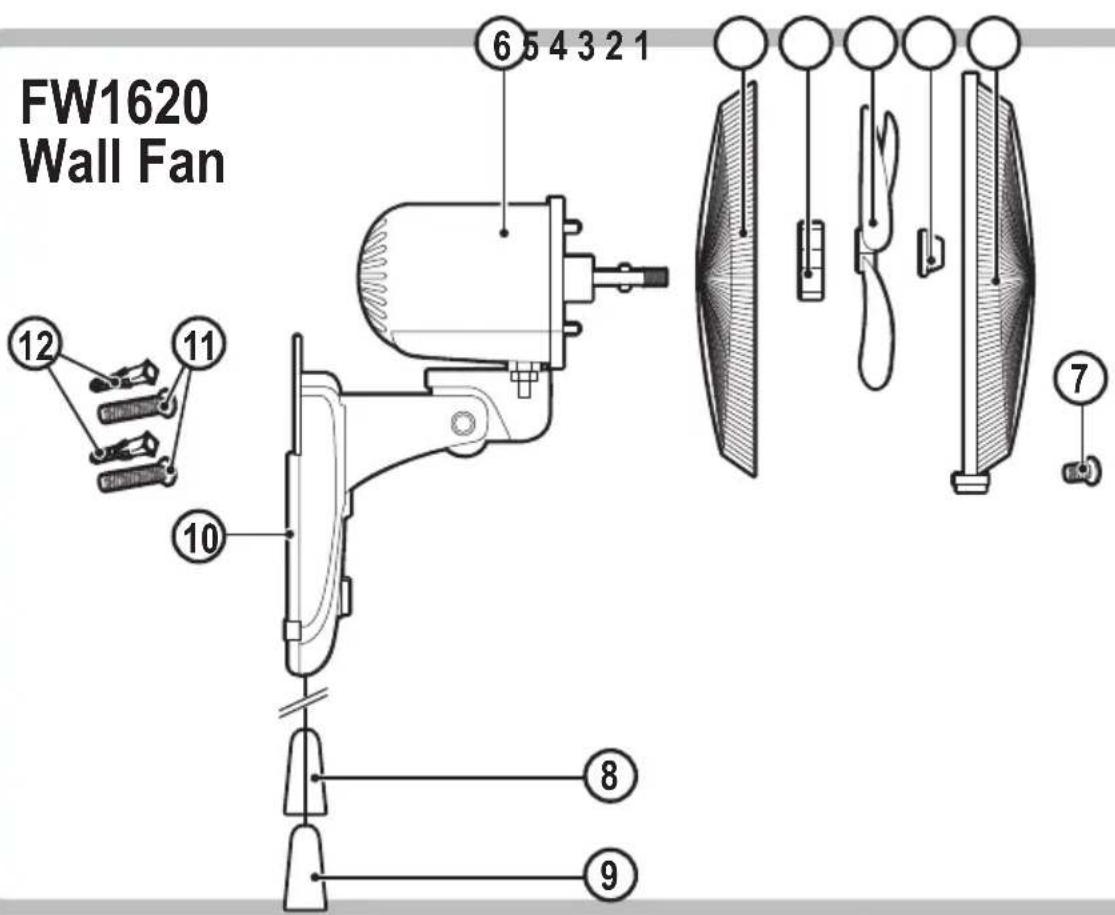
FW1620 Wall Fan
Features
- Front guard
- Blade cap
- Fan blade
- Guard nut
- Rear Guard
- Fan Unit
- Guard Screw
- Speed Pull Cord
- Oscillation Pull Cord
- Wall mount bracket
- Wall screw
- Wall plugs
Assembly
Note: Make sure your fan is switched off before connecting to or disconnecting from power supply.
Warning! Never use the fan without the guard in place or if the guard is damaged.
Wall mounting
When fixing to a wall, make sure that the fixing method is suitable for the wall type and is appropriate to the weight of the fan.
Warning! Before drilling into walls, check for the location of wiring and pipes.
- Mark the location of the screw holes(within reach of an electrical outlet).
- Secure the wall mount bracket using screws and wall plugs.
- Hang the fan on the wall by placing the wall mount bracket into the screw.
- The fan should installed so that the blades are more than 2.3m above the floor.
Fitting the fan blade and guard
- Remove the guard nut from the motor shaft by turning it anti-clockwise.
- Place the rear guard by positioning it on the location pins on the fan unit. Ensure that the rear guard is in the correct orientation.
- Secure the guard on to the fan unit by re-fitting the guard nut. Tighten the guard nut by turning it clockwise.
- Secure the fan blade on the motor shaft by fitting the blade cap. Tighten the blade cap by turning it anti-clockwise.
- Place the front guard onto the rear guard by positioning the top clip on the uppermost part of the rear guard. Push the top clip down and press the rim of the front guard onto the rear guard ensuring a tight fit all the way round.
- Close the bottom clip. Tighten the bottom clip screw by turning it clockwise.
Use
Warning! Never use the fan without the guard in place or if the guard is damaged.
Switching on and off
- Your fan has three speed control to keep the desired air flow through your room.
• 0 - Off
• 1 - Low
• 2 - Medium
• 3 - High - To switch on, turn the knob to the desired speed. The fan will start.
- To switch off, turn the knob to the "0" button.
- The speed can also be adjusted by pulling the right hand cord. Each pull of the cord will advance the speed by one setting until the fan returns to the off position.
Oscillation
The fan can oscillate when in use to circulate air around a greater area.
- Pull the left hand cord to start oscillation.
- Pull the left hand cord again to stop oscillation.
Adjusting the angle of the fan
- The angle of the fan can be adjusted up and down.
- Hold the fan unit and tilt the head of the fan to the desired angle.
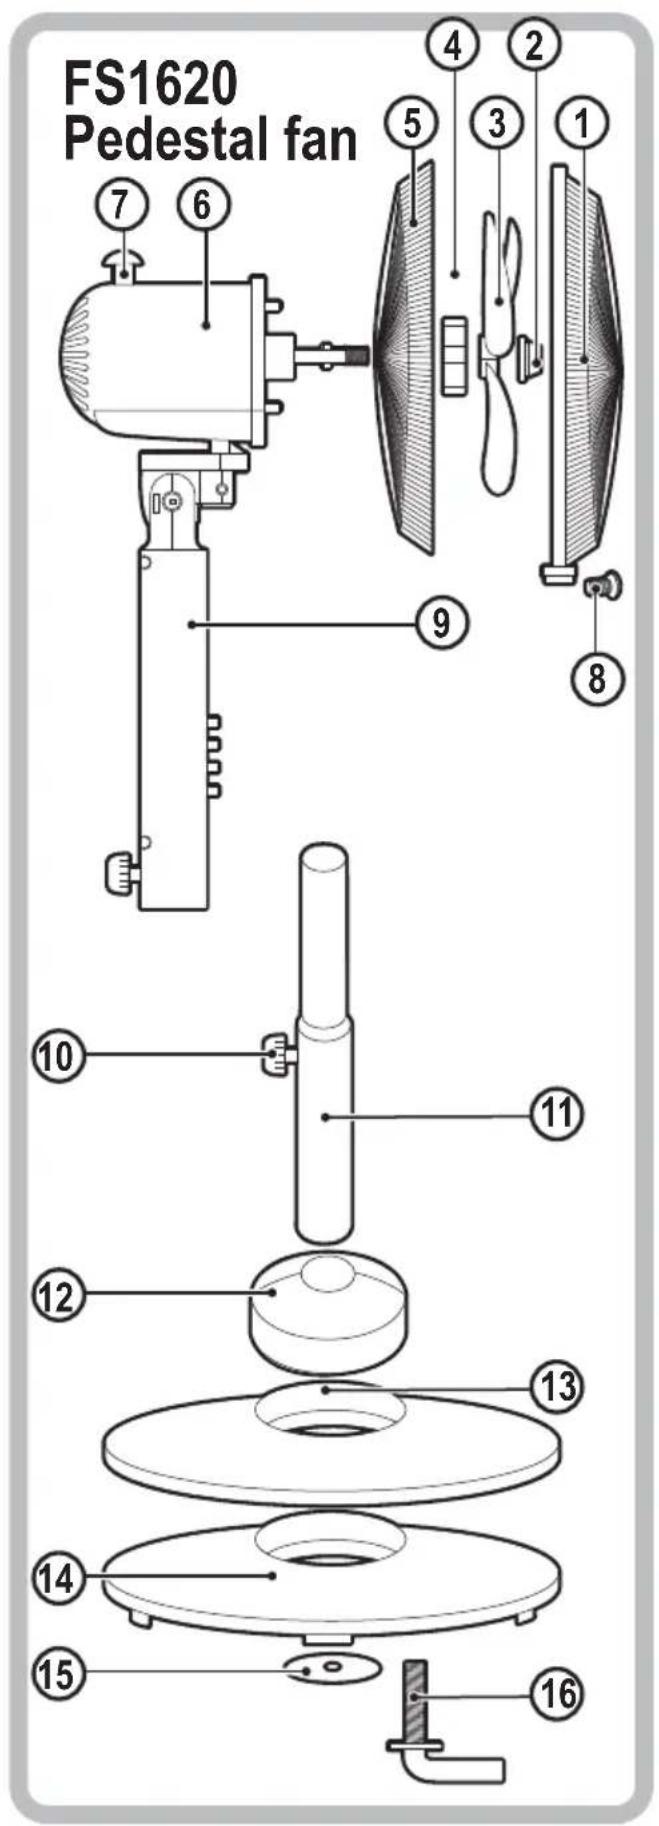
FS1620 Pedestal Fan
Features
- Front Guard
- Blade Cap
- Fan Blade
- Guard Nut
- Rear Guard
- Fan Head
- Oscillating Knob
- Guard Screw
- Fan unit
- Set Screw
- Support Tube
- Base Cover
- Round Base
- Base
- Washer
- Screw
Assembly
Note: Make sure your fan is switched off before connecting to or disconnecting from power supply.
Warning! Never use the fan without the guard in place or if the guard is damaged.
Assembling the base and stand
- Remove the washer (15) and screw (16) from the support tube by turning it anti-clockwise.
- Place the support tube into the base. Re-insert the screw into the support tube from underneath. Tighten the screw by turning it clockwise.
Fitting the fan to the stand
- Remove the screw from the bottom of the fan unit by turning it anti-clockwise.
- Place the fan unit onto the top of the support tube. Re-insert the screw into the fan unit. Tighten the screw by turning it clockwise.
Fitting the fan blade and guard
- Remove the guard nut from the motor shaft by turning it anti-clockwise.
- Place the rear guard by positioning it on the location pins on the fan unit. Ensure that the rear guard is in the correct orientation.
- Secure the guard on to the fan unit by re-fitting the guard nut. Tighten the guard nut by turning it clockwise.
- Secure the fan blade on the motor shaft by fitting the blade cap. Tighten the blade cap by turning it anti-clockwise.
- Place the front guard onto the rear guard by positioning the top clip on the uppermost part of the rear guard. Push the top clip down and press the rim of the front guard onto the rear guard ensuring a tight fit all the way round.
- Close the bottom clip. Tighten the bottom clip screw by turning it clockwise.
Use
Warning! Never use the fan without the guard in place or if the guard is damaged.
Switching on and off
- Your fan has three speed control to keep the desired air flow through your room.
- 0 - Off
• 1 - Low
• 2 - Medium
• 3 - High - To switch on, press the button to set the desired speed. The fan will start.
- To switch off, press the "0" button.
Oscillation
- The fan can be set to oscillate by pushing Oscillating Knob downwards. To stop the oscillating feature, pull up the Oscillation Knob.
Adjusting the angle of the fan
The angle of the fan can be adjusted up and down.
- Tilt the head of the fan to the desired angle.
Adjusting the height of the fan
- Loosen the screw at the top of the support tube by turning it anti-clockwise.
- Lift the fan to the desired height.
- Tighten the screw at the top of the support tube by turning it clockwise.
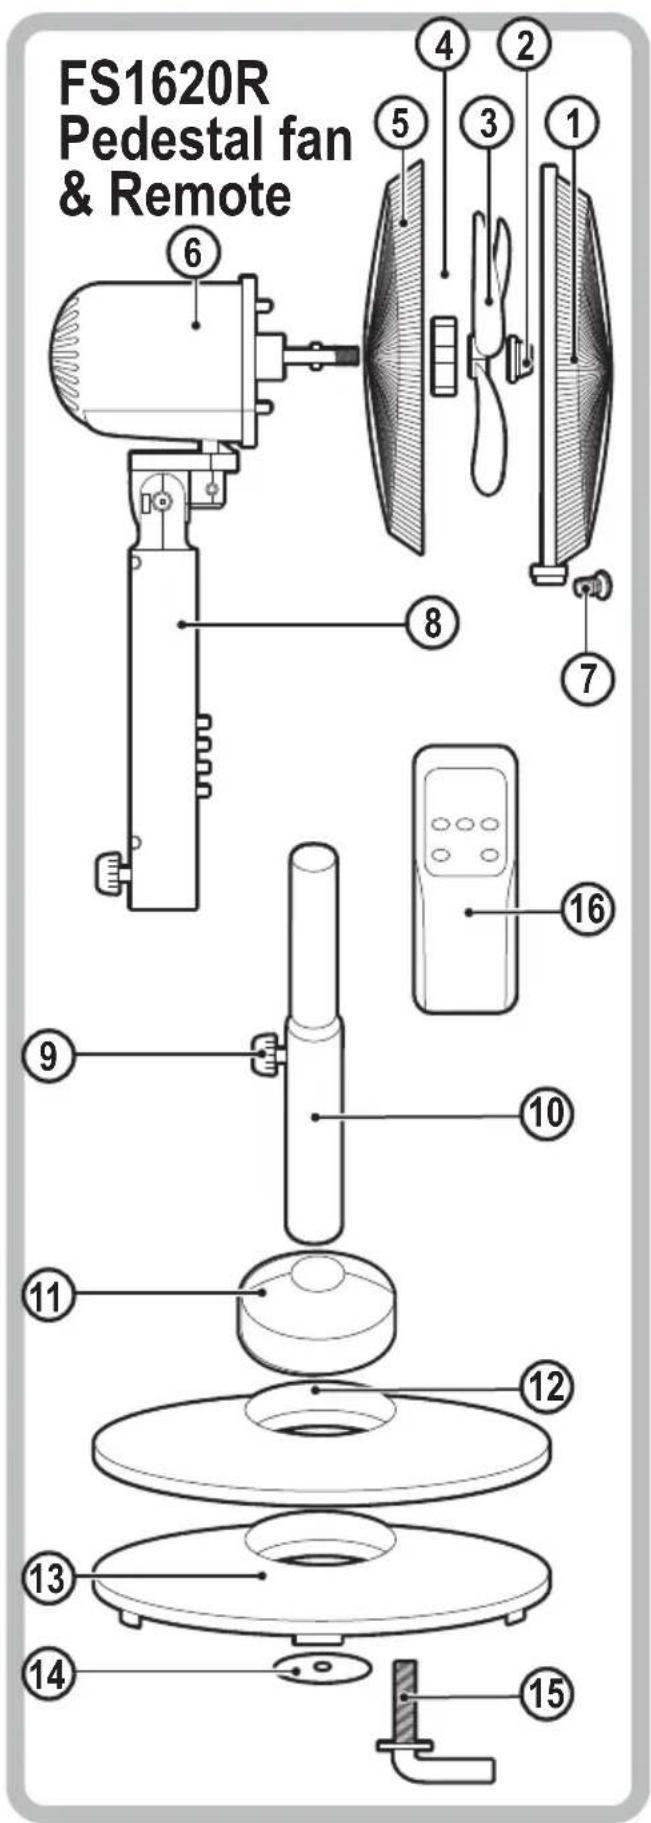
FS1620R Pedestal Fan with remote Control
Features
- Front Guard
- Blade Cap
- Fan Blade
- Guard Nut
- Rear Guard
- Fan Head
- Guard Screw
- Fan unit
- Set Screw
- Support Tube
- Base Cover
- Round Base
- Base
- Washer
- Screw
- Remote Control
Assembly
Note: Make sure your fan is switched off before connecting to or disconnecting from power supply.
Warning! Never use the fan without the guard in place or if the guard is damaged.
Assembling the base and stand
- Remove the flat washer (14) and screw (15) from the support tube by turning it anti-clockwise.
- Place the support tube into the base. Re-insert the screw into the support tube from underneath. Tighten the screw by turning it clockwise.
Fitting the fan to the stand
- Remove the screw from the bottom of the fan unit by turning it anti-clockwise.
- Place the fan unit onto the top of the support tube. Re-insert the screw into the fan unit. Tighten the screw by turning it clockwise.
Fitting the fan blade and guard
- Remove the guard nut from the motor shaft by turning it anti-clockwise.
- Place the rear guard by positioning it on the location pins on the fan unit. Ensure that the rear guard is in the correct orientation.
- Secure the guard on to the fan unit by fitting the guard nut. Tighten the guard nut by turning it clockwise.
- Secure the fan blade on the motor shaft by fitting the blade cap. Tighten the blade cap by turning it anti-clockwise.
- Place the front guard onto the rear guard by positioning the top clip on the uppermost part of the rear guard. Push the top clip down and press the rim of the front guard onto the rear guard ensuring a tight fit all the way round.
- Close the bottom clip. Tighten the bottom clip screw by turning it clockwise.
Use
Warning! Never use the fan without the guard in place or if the guard is damaged.
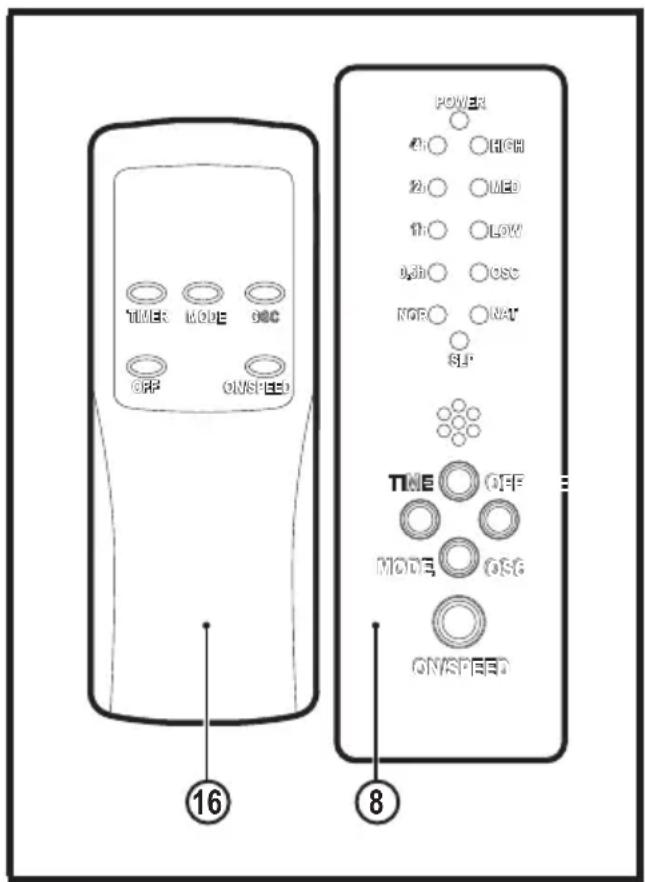
Note: All controls can be operated from the fan unit or from the remote control.
Switching on and off
Your fan has three speed control to keep the desired air flow through your room.
| Symbol Speed Press Button | ||
| LOW Low 1 | Time | |
| MED Medium 2 Times | ||
| HIGH High 3 | Times | |
- To switch on, press the "ON/SPEED" button the required number of times to set the desired speed. The fan will start.
- To switch off, press the "OFF" button.
Oscillation
The fan can oscillate when in use to circulate air around a greater area.
- Press the "OSC" button to start oscillation.
Timer
The timer can be used to set the running time of the fan.
| Symbol Press Button | |
| 0.5 Hour 1 Time | |
| 1 Hour | 2 Times |
| 1.5 Hours | 3 Times |
| 2 Hours | 4 Times |
| 2.5 Hours | 5 Times |
| 3 Hours | 6 Times |
| 3.5 Hours | 7 Times |
| 4 Hours | 8 Times |
| 4.5 Hours | 9 Times |
| 5 Hours | 10 Times |
| 5.5 Hours | 11 Times |
| 6 Hours | 12 Times |
| 6.5 Hours | 13 Times |
| 7 Hours | 14 Times |
| 7.5 Hours | 15 Times |
Press the TIME button the required number of times to set the run time. The fan will automatically stop when the run time is reached.
Mode
| Mode Press Button | |
| NOR = Normal Press ON/SPEED button 1 time | |
| NAT = Natural Press MODE button 1 time | |
| SLP = Sleep Press MODE button 2 times | |
| NOR = Normal Press MODE button 3 times | |
- When the ON/SPEED button is pressed, the NOR mode indicator lights up red.
- Press the MODE button the required number of times to set the MODE.
- NOR Mode (the NOR mode indicator lights up red.): You can adjust the speed settings yourself at any time.
- NAT Mode (the NAT mode indicator lights up red.)
- If the HIGH speed is selected, the speed switches between high-medium-slow-off.
- If you have selected MED speed, the speed switches between medium-slow-off.
- In the LOW mode the speed switches between slow-off.
- SLP Mode( the SLP mode indicator lights up red.)
- If the HIGH speed is selected: the fan operates as in "NAT mode" for first 30 minutes on the HIGH speed setting. It then opreates for 30 minutes as in "NAT mode" on the MED speed setting. For the remaining time, the fan works as in "NAT mode" on the LOW speed setting.
- On the MED speed setting: the fan works as in "NAT mode" for the first 30 minutes on the MED speed setting. For the remaining time, the fan works as in "NAT mode" on the LOW speed setting.
- If the LOW speed setting is selected: Switch between slow speed and shutdown of the fan as in "NAT mode".
Adjusting the angle of the fan
The angle of the fan can be adjusted up and down.
- Tilt the head of the fan to the desired angle.
Adjusting the height of the fan
- Loosen the screw at the top of the support tube by turning it anti-clockwise.
- Lift the fan to the desired height.
- Tighten the screw at the top of the support tube by turning it clockwise.
Cleaning and maintenance
Warning! Before cleaning and maintenance, switch the appliance off and remove the plug from the socket.
Warning! Allow the unit to thoroughly cool down before attempting to clean it.
- Do not immerse the appliance into liquid.
- Never use dilutent or benzene, chemical wiping cloths,
plastic brush or metal brush.
- The basket and pan can be washed in hot soapy water. Rinse & dry thoroughly after cleaning.
- Use a damp cloth to wipe the outside of the body (1) and the internal cavity.
- Keep the power cord, control panel clean and dry, otherwise it may cause problems.
Caution: NEVER immerse the appliance in water or any liquids. Make sure the appliance is thoroughly dried before use.
Protecting the environment
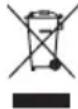
Separate collection. This product must not be disposed of with normal household waste.
Should you find one day that your Black+Decker product needs replacement, or if it is of no further use to you, do not dispose of it with other household waste. Make this product available for separate collection.
- Black+Decker provides a facility for recycling Black+Decker products once they have reached the end of their working life. This service is provided free of charge. To take advantage of this service please return your product to any authorised repair agent who will collect them on our behalf.
- You can check the location of your nearest authorised repair agent by contacting your local Black+Decker office at the address indicated in this manual. Alternatively, a list of authorized Black+Decker repair agents and full details of our after-sales service and contact are available on the Internet at: www.2helpU.com.
Technical data
| FD1620 | ||
| Input voltage V | AC | 220 - 240 |
| Power input W 60 | ||
| FW1620 | ||
| Input voltage V | AC | 220 - 240 |
| Power input W 55 | ||
| FS1620 | ||
| Input voltage V | AC | 220 - 240 |
| Power input W 60 | ||
| FS1620R | ||
| Input voltage V | AC | 220 - 240 |
| Power input W 60 |
Warranty
Black+Decker is confident of the quality of its products and offers an outstanding warranty.
This warranty statement is in addition to and in no way prejudices your statutory rights.
If a Black+Decker product becomes defective due to faulty materials, workmanship or lack of conformity, within 24 months from the date of purchase, Black+Decker warranty to replace defective parts, repair products subjected to fair wear and tear or replace such products to ensure minimum inconvenience to the customer unless:
The product has been used for trade, professional or hire purposes;
The product has been subjected to misuse or neglect;
The product has sustained damage through foreign objects, substances or accidents;
Repairs have been attempted by persons other than authorised repair agents or Black+Decker service staff.
To claim on the warranty, you will need to submit proof of purchase to the seller or an authorised repair agent. You can check the location of your nearest authorised repair agent by contacting your local Black+Decker office at the address indicated in this manual.
Alternatively, a list of authorised Black+Decker repair agents and full details of our after-sales service and contacts are available on the Internet at: www.2helpU.com.
Usage prévu
Names & Addresses for BLACK + DECKER Service Concessionaries
ALGERIA: Sarl Outillage Corporation, DW, B&D Pet, HHD, 08, Rue Med Boudiaf (ex TELLA Achen) Cheraga, Alger, Tel: 00213-0-21375130/ 00213-0-21375131, Fax: 00213-0-21369667, Email: hakim.merdjadi@outillage-dz.com;
nefissa.merdjadi@outillage-dz.com; sidahmed.merdjadi@outillage-dz.com. AZERBAIJAN: Kontakt - NN LLC, HHD, M.Qashqay 43, Baku Azerbaijan Az1000, Tel: 00994 12 408 20 50, Mob: +994503442204, Fax: 00994 12 411 70 90, eganjaly@hotmail.com. BAHRAIN: Alfouz Services Co. WLL, Tubli, DW, B&D PET, HHD, P.O. Box 26562, Tubli, Manama, Tel: +973-17783562/ 17879987, Fax: 17783479, Email: alfouz@batelco.com.bh. EGYPT: Anasia Egypt for Trading S.A.E. (Mentrade), HHD, P.O. Box 2443, 9, Mostafa Refaat Street, Sheraton Heliopolis 11361, Cairo, Tel: 00202 22684159, Fax: 00202 22684169, Email: wael.salah@anasia.com; nevien.elbeshbishy@anasia.com. ETHIOPIA: Seif Tewfik Sherif, DW, B&D PET, HHD, Arada Sub City, Kebele 01/02, Global Insurance Bldg, 2nd Flr, Room 43, P.O. Box 2525, Addis Ababa, Tel: 00-251-11-1563968/ 1563969, Fax: 00-251-11-1558009, Email: seif@ethionet.et; nawanag@ethionet.et; seifudint@hotmail.com. IRAQ: Financial Links, B&D PET, HHD, Kazzaz Building Arasat Al-Hindia, Block No: 629, Street: 31, Building No: 1, Baghdad, Iraq, Tel: 00964-(0)780-195-2223/ +964-(0)781-3763044, Email: info@financiallinks-truevalue.com. JORDAN: Bashiti Hardware (Palestine), B&D pet, HHD, "93 King Abdullah, 2nd St., Opp ELBA House, P.O. Box 3005, Amman 11953, Tel: 00962-6-5349098, ext.11, Fax: 00962-6-5330731, Email: manal@bashitihardware.com; info@bashitihardware.com;
rami@bashitihardware.com. KENYA: Zylog Enterprises Ltd. (T/A Leading Concepts), HHD, IPS Building, Kaunda Street, P.O. Box 40877-00100, Nairobi, Tel: 00254-20-6905000, Fax: 00254-20-6905111, Email: admin@alibhaishariff.co.ke;
leading@alibhaishariff.co.ke; info@alibhaishariff.co.ke. LEBANON: Aces Service Centre (Est. F.A.Ketaneh SA), HHD, P.O. Box 90-102, Nahr El Mot, Seaside Highway, Pharaon Building, Beirut, Tel: 00961-1-898989/ + 961-(1)-262626, Fax: 0096-1-1245880, Email: Nissrine.hajj@aces.com.lb; Nassim.aziz@Aces.com.lb; Johnny.sailian@Aces.com.lb; Paul.tahan@aces.com.lb. LIBYA: North Africa Trading (El Ghoul Brothers), DW, B&D Pet, HHD, P.O. Box 348, 7 October Street 11, Benghazi, Tel: 00218-061-3383994, Fax: 00218-092-7640688, Email: nagte.ly@gmail.com; CC: nagte.dpt@gmail.com; elghol@technpower.com. North Africa Trading ( El Ghoul Brothers), DW, B&D Pet, HHD, AlBarniq Dewalt Center, Mokhazin-elsukar St., EIFallah, Tripoli, Tel: 00218-021-3606430, Fax: 00218-092-6514813, Email: nagte.ly@gmail.com; cc: (nagte.dpt@gmail.com; elghol@technpower.com. Homeworld Co., HHD, Senidal St. Amr Ibn Elaas Road, Benghazi, Libya, P.O. Box 18182, Salmany, Tel: 00218-61-9094183, ext. 103, Fax: 00218.61.9094123, ext. 108, Email: nagte.ly@gmail.com. MAURITIUS: J.M. Goupille & Co.Ltd. The Brandhouse Ltd., HHD, Rogers Industrial Park 1, Riche Terre, Mauritius, Tel: 00230-2069450/ +230-207-1700, Fax: 00230-2483188/ 00230-2069474, Email: claims(service.centre@goupille.mu; stephanie.bijou@gmail.com; beatrice.li@gmail.com; sharon.laprovidence.jmg@gmail.com, tim.moszuti@goupille.mu; Cc.
Jfrancois.dromart@goupille.mu; mario.catherine@goupille.mu; gerard.gouges@goupille.mu. MOROCCO: UATS, HHD, "No. 37, Lotissement KADIRIA, km 10 Route, Eljadida, LISASSFA, Casablanca, Morocco, Tel: 00212-522652602, Fax: 00212-522652603, Email: farah1406@yahoo.fr; noureddine.uats@gmail.com. OMAN: Oman Marketing & Service Co.(Omasco), Wattayah/ Muscat, HHD, B&D PET, P.O. Box 2734, Behind Honda Showroom, Wattayah, Oman, Tel: +968 24560232/ 24560255, Fax: 24560993, Email: npservice@omasco.com.om; Cc. ashok.balan@omasco.com.om, damodaran.pillai@omasco.com.om; unnikrishnan@omasco.com.om. Oman Marketing & Service Co.(Omasco), Sohar, HHD, B&D PET, Al Ohi, Sohar, Oman, Tel: +968 26846379, Fax: 26846379, Email: sooraj.neeran@omasco.com.om. Oman Marketing & Service Co.(Omasco), Salalah, HHD, B&D PET, Sanaya, Salalah, Oman, Tel: +968 23212290, Fax: 23210936, Email: rajagopal.pr@omasco.com.om. Omar Mohammed Ali Bawain Trading Co., Salalah, Al-Awqadain, PC 217, P.O.Box 112, Salalah, Sultanate of Oman, Tel: +968 23214874, Fax: 23214874/ 23211878, Email: jithin@omartrad.com. PAKISTAN: Ammar Service & Spares, B&D PET, HHD, Office No 6068, 6th Floor Central Plaza, Behind Gul Plaza Marston Road, Karachi, Tel: 0092-21-32426905/ 021-32775252, Fax: 0092-21-32427214, Email: babji93@yahoo.com. QATAR: Al Muftah Service Centre, Doha, HHD, B&D PET, Al Wakrah, Road, P.O. Box 875, Doha, Qatar, Tel: +974 44650880/ 44650110/ 44446868, Fax: 44441415/ 44662599, Email: service@almuftah.com; almuftah@almuftah.com. SAUDI ARABIA: Fawaz Ebrahim Al Zayani Trading Est., Dammam, DW, B&D PET, HHD, P.O. Box 76026, Al Raka: 31952, Tel: +966-3-8140914, Fax: 8140824, Email: dewaltdammam@hotmail.com; (vinoderakatyil@yahoo.com); Website: www.fawazalzayanigroup.com. Fawaz Ebrahim Al Zayani Trading Est., Makkah, DW, B&D PET, HHD, 4753-Wali Alahed, Makkah, 9130-24353 Tel: +966-12-8140914/ 581121778, Fax: 128140914, Email: meraj2515@gmail.com. Banaja Trading Co. Ltd., Riyadh, HHD, P.O. Box 566, Riyadh-11421, Tel: +966-1-4124444, Fax: 4033378, Email: jijophilip@hotmail.com. Banaja Trading Co. Ltd, Jeddah, HHD P.O. Box 366, Jeddah-21411, Tel: +966-2-6511111, Fax: 6503668, Email: afouad@banaja.com; jijophilip@hotmail.com. SOUTH AFRICA: Benray Tool Wholesalers C.C., B&D PET, HHD, 460 Koeberg Road, Cape Town, South Africa, Tel: 021-551-7244, Fax: 021-552-6395, Email: dewaltct@benray.co.za. Stanley Black & Decker-RSA, BED, PET, HHD, 199 Winze Drive Stormill Ext 9 Roodepoort Tel: (2711) 472-0454, Fax: (2711) 472-0482, Email: service@sbdinc.co.za; vincent.roets@sbdinc.co.za; jacquesvincent.roets@sbdinc.com. SRI LANKA: Delmege Forsyth & Co. Ltd, DW, B&D Pet, HHD, Delmege Forsyth & Co. Ltd, Lifestyle Cluster, 101, Vinayalankara Mawatha, Colombo 10, Sri Lanka, Tel: +94-11-2688462/ +94-11-2, Email: dgeservice@delmege.com; Samith.lifestyle@delmege.com cc: Jayantha.lifestyle@delmege.com. TUNISIA: Societe Tunisienne De Maintenance (STM), B&D Pet, HHD, Rue De La Physique. Nouvelle Zone Industrielle Ben Arous.2013 Ben Arous, TUNISIA. Tel: +216-79-389687, Fax: +216-71-385154, Email: importa@stqu.com. UAE: (Abu Dhabi) Galaxy Equipment Trading, Abu Dhabi, DW, B&D PET, HHD, Madinath Zayed (Baada Zaid), Abu Dhabi P.C. 58910, Tel: +971-2-8844279, Fax: 8844297, Email: galaxyeq@eim.ae; galaxyeq@emirates.net.ae. Light House Electrical, Abu Dhabi, DW, B&D PET, HHD, P.O. Box 120, Abu Dhabi, Tel: +971-2-6726131, Fax: 6720667, Email: dewalt_lhe@hotmail.com. Light House Electrical, Musaffah, DW, B&D PET, HHD, P.O. Box 120, Abu Dhabi, Tel: +971-2-5548315, Fax: 5540461, Email: dewalt_lhe@hotmail.com. (Al Ain) Zillion Equipment and Spare Parts Trading LLC. Al Ain, DW, B&D PET, HHD, P.O. Box 19740, Opp. Bin Sadal/ Trimix Redymix Sanaiya, Al Ain Tel: +971-3-7216690, Fax: 7216103, Email: zilliontrdg@gmail.com. (Dubai) BLACK & DECKER (OVERSEAS) GmbH, Dubai, DW, B&D PET, HHD, P.O. Box 5420, Dubai, Tel: +971-4-8127400/ 8127406, Fax: 2822765, Email: service.mea@sbdinc.com. (Ras Al Khaimah) Mc Coy Middle East LLC, Ras Al Khaimah, DW, B&D PET, HHD, P.O. Box 10584, Ras Al Khaimah, Tel: +971-7-2277095, Fax: 2277096, Email: mccoyrak@gmail.com. (Sharjah) Mc Coy Middle East LLC, Sharjah, DW, B&D PET, HHD, P.O. Box 25793, Sharjah, Tel: +971-6-5395931, Fax: 5395932, Email: mccoy@emirates.net.ae; mccoydewalt@gmail.com. UGANDA: Anisuma Investment & Service Ltd. (Jacky's Electronics), HHD,J.R Comples,Ware house No.5 Plot No.101. 3rd Industrial Area,Jinja Rd,Kampala,Tel: 00256-414237106,Mob: 00256 779429501Email:
ha.service.uganda@anisuma.com. YEMEN: Middle East Trading Co. (METCO) DW, B&D Pet, HHD, 5th Flr. Hayel Saeed Anam Bldg. Al-Mugamma St. Taiz, Yemen, Tel: +00967-4-213455, Fax: 00967-4-219869, Email: metco@metcotrading.com; sami@metcotrading.com. Middle East Trading Co. (METCO) DW, B&D Pet, HHD, Mualla Dakka, Aden, Tel: 00967-2-222670, Fax: 00967-2-222670, metco@metcotrading.com; sami@metcotrading.com. Middle East Trading Co. (METCO), DW, B&D Pet, HHD, Hayel st., Sana'a, Yemen, Tel: 00967-1-204201, Fax: 00967-1-204204, Email: metco@metcotrading.com; sami@metcotrading.com.
| >100% |
WARRANTY REGISTRATION CARD
YOUR NAME/الإسم
YOUR ADDRESS العئوان


- Intended use
- Safety instructions
- Using your appliance
- Safety of others
- After use
- Inspection and repairs
- Electrical safety
- Mains plug replacement
- FD1620 Desk Fan
- Features
- Assembly
- Fitting the fan to the base
- Fitting the fan blade and guard
- Use
- Switching on and off
- Oscillation
- Adjusting the angle of the fan
- FW1620 Wall Fan
- Wall mounting
- FS1620 Pedestal Fan
- Assembling the base and stand
- Fitting the fan to the stand
- Adjusting the height of the fan
- FS1620R Pedestal Fan with remote Control
- Timer
- Cleaning and maintenance
- Protecting the environment
- Warranty
- Usage prévu
- Names & Addresses for BLACK + DECKER Service Concessionaries
- WARRANTY REGISTRATION CARD
Brand : BLACK & DECKER
Model : FS1620
Category : Fan