
Floodlight Security System - Camera SWANN - Free user manual and instructions
Find the device manual for free Floodlight Security System SWANN in PDF.


| Product Type | Outdoor surveillance camera with LED floodlight |
| Brand | Swann |
| Model | Floodlight Security System (SWWHD-FLOCAM) |
| Power supply | 100-240 V AC, 1.0 A, 50/60 Hz, 30 W |
| Connectivity | Wi-Fi 2.4 GHz (single band) |
| Motion detection | True Detect™ passive infrared detector |
| Night vision | Infrared LEDs |
| Viewing angle | Not specified, adjustable tilt |
| Video resolution | Not specified (likely HD) |
| Audio | Not specified (likely microphone and speaker) |
| Siren | Yes, built-in |
| LED floodlight | Built-in, adjustable direction |
| Mounting | On standard junction box, vertical mount |
| Recommended installation height | 2.4 meters (8 feet) minimum |
| Protection rating | Not specified (outdoor, weather-resistant) |
| App | SAFE by Swann (iOS/Android) |
| Voice assistant | Not specified |
| Maintenance and cleaning | Clean with a soft, dry cloth; do not use abrasive products |
| Safety instructions | Cut power before installation; do not use with a dimmer; installation by a licensed electrician recommended |
| Spare parts and repairability | Not specified (no user-serviceable parts) |
Frequently Asked Questions - Floodlight Security System SWANN
User questions about Floodlight Security System SWANN
0 question about this device. Answer the ones you know or ask your own.
Ask a new question about this device
Download the instructions for your Camera in PDF format for free! Find your manual Floodlight Security System - SWANN and take your electronic device back in hand. On this page are published all the documents necessary for the use of your device. Floodlight Security System by SWANN.
USER MANUAL Floodlight Security System SWANN
Floodlight Security System
IMPORTANT SAFETY INSTRUCTIONS
- Install the product in accordance with local and national electrical codes. If you have any doubts or questions about the electrical connections or if you need an electrical junction box installed, contact a licensed electrician. In certain jurisdictions, this product needs to be installed by a licensed electrician. Check with local authorities for applicable requirements.
- The product must be mounted on a flat vertical surface capable of supporting the full weight of the product.
- Ensure the voltage marked on the product is the same as the electrical power supply to be used.
- Do not connect to a dimmer switch or timer.
- Always turn off electricity at the main circuit breaker or fuse box before installation. Failing to do so could result in serious injury, electrical shock, and/or risk of fire.
- Do not rely on wall switch alone to turn off the power.
- Do not open or disassemble the product. There are no user-serviceable parts inside.
PRE-INSTALLATION CHECK
WI-FI COVERAGE AVAILABILITY
- Before you begin the installation of the product, it is important that you confirm the availability of Wi-Fi as well as the signal level at the desired installation location.
- Note that Wi-Fi quality can vary significantly at different locations around the home due to environmental factors such as home construction type and wireless interference from other electronic devices.
TO CHECK WI-FI COVERAGE
1 Connect your phone to the 2.4GHz Wi-Fi network band of your wireless router.
Note: The Swann Floodlight Security System will only connect to a 2.4GHz network.
2 Place your phone where you are planning to install the floodlight unit. If you have Wi-Fi connection on your phone, the camera will also likely be able to obtain Wi-Fi connection. Check the Wi-Fi icon on your phone. We recommend a minimum of 1 bar showing on your phone's Wi-Fi icon as shown below. Further testing should be performed if the Wi-Fi signal strength is only 1 bar.
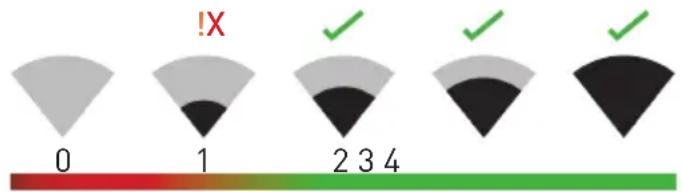
Number of bars indicate
Wi-Fi signal strength
ExcellentGoodFairPoorNo connection
PRE-INSTALLATION CHECK
3 To avoid any potential Wi-Fi connection issues later, try playing a video on a media streaming service app, for example, YouTube™ or Netflix™, through your phone. If possible, temporarily pause activities like online gaming and video streaming on other devices connected to your network while you perform testing, as this can affect the connection speed and quality.
4 If you don't experience any video streaming issues (buffering, stuttering, etc), you can proceed with the installation of the product. There are also Wi-Fi surveying and speed tools available online that can enable you to analyze and measure the quality of your Wi-Fi connection including download and upload speeds (minimum internet upload speed of 1 Mbps is recommended for optimal video streaming). For more information, visit support.swann.com.
5 If you still have any concerns about your Wi-Fi coverage, consult a licensed electrician on connecting the Floodlight wiring to a temporary plug and running an extension cord to a wall outlet so you can power the camera onsite to test Wi-Fi pairing and stream live feed directly via the SAFE by Swann app. For camera pairing instructions, see step 10 on page 9.
WI-FI WEAK OR OUT OF RANGE
- If you're getting a weak Wi-Fi signal or you can't connect to Wi-Fi at all on your phone at the installation site, we recommend moving your router closer, installing a Wi-Fi extender (which can help improve signal reception) or selecting another location.
- Do not proceed with the installation of this product until you have thoroughly tested and confirmed the availability of reliable Wi-Fi connection at your desired location.
GET THE APP
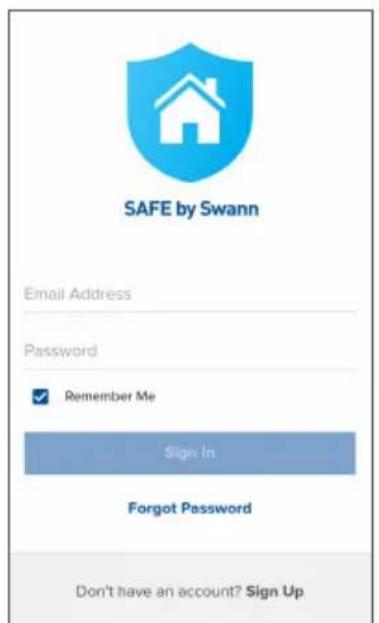
1 Download the latest version of the SAFE by Swann app from the Apple App Store® or Google Play™ Store on your iOS or Android device. Simply search for "SAFE by Swann".


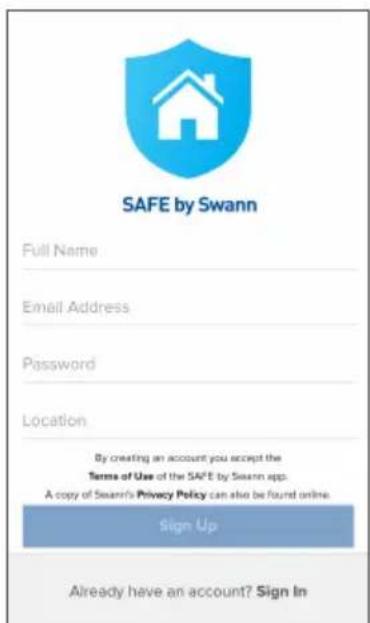
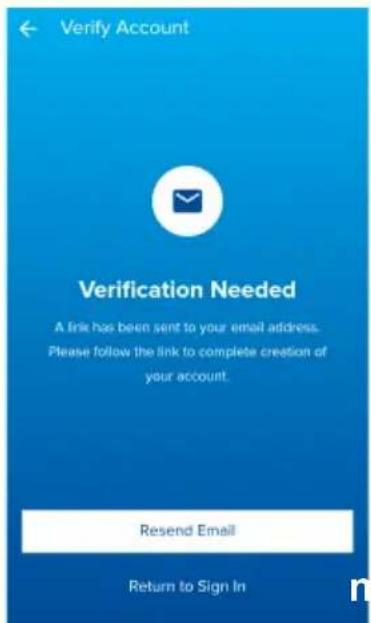
2 Open the app, create your SAFE by Swann account, and sign in. You will need to activate your account by confirming the email sent to the email account you provided before you can sign in.
INSTALLATION EXAMPLE DIAGRAM
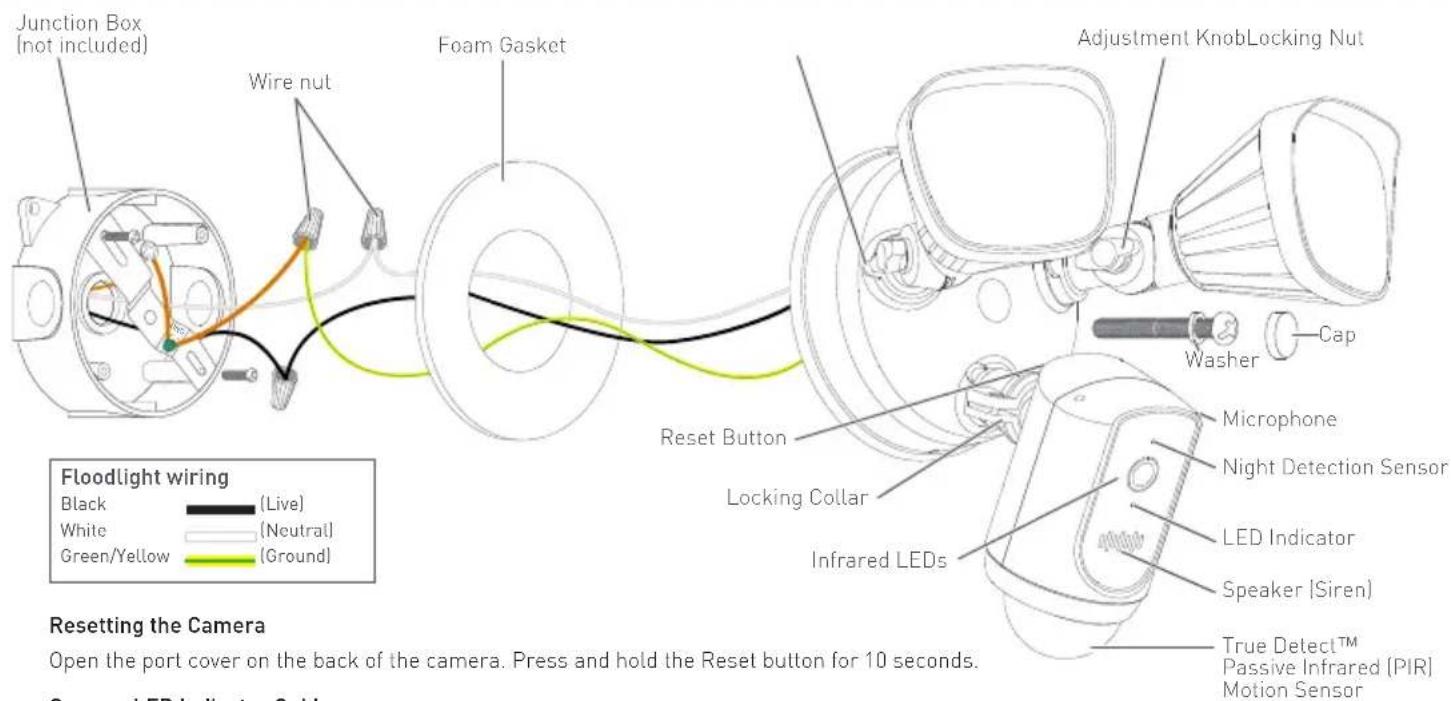
Camera LED Indicator Guide
| Blinking Blue | Wi-Fi Pairing Mode | Solid Red | Live streaming/Motion recording |
| Fast Blinking Blue | Connecting to Wi-Fi | Blinking Purple | Low Wi-Fi signal |
INSTALLATION INSTRUCTIONS
This unit is designed to be mounted on a standard wiring junction box and requires connection to a 100-240VAC power supply. For optimum results, install the unit at least 2.4m (8ft) above the ground.
Read "IMPORTANT SAFETY INSTRUCTIONS" and "PRE-INSTALLATION CHECK" and make sure the installation site is Wi-Fi ready before installing the unit.
IMPORTANT! TURN POWER OFF AT CIRCUIT BREAKER OR FUSE BOX.
When installing the unit refer to the Installation Example Diagram on page 6.
1 If you're replacing an old floodlight, disassemble it along with any existing mounting bracket from your junction box and disconnect the wire connections.
CAUTION: Before handling any wiring, use a circuit tester to confirm that the power is off.
2 Attach the provided mounting bracket to your junction box using the provided screws. The side of the mounting bracket marked "GND" should be facing out.
3 Peel the backing off the adhesive foam gasket and stick it to the back of the floodlight unit.
INSTALLATION INSTRUCTIONS
4 Connect individual supply wires from the junction box to the floodlight unit using the provided wire nuts. Pair the black supply wire with the black floodlight wire, the white supply wire with the white floodlight wire, and the bare or green supply wire with the green/yellow floodlight wire. Make sure the ground wire is also screwed to the "GND" threaded hole of the mounting bracket with the green ground screw.
| LIVE (HOT) | NEUTRAL GROUND (EARTH) | |
| Black | White | / Bare copper or green |
Power circuit wiring color codes
If wiring colors do not match — a common issue in older homes — contact a licensed electrician who will be able to help you check and identify the electrical wiring. Do not guess the wires. Incorrect wire connection will damage the unit and could cause fire or injury.
5 After wires are connected, carefully tuck them inside the junction box.
6 Place the floodlight unit (make sure the "UP" arrow on the back is pointing up) against the junction box aligning with the center hole of the mounting bracket and lock it securely with the provided long bracket screw and washer.
7 Insert the provided screw cap firmly into the center mounting hole on the floodlight unit.
INSTALLATION INSTRUCTIONS
8 Apply silicone weather sealant (not included) around the mounting surface of the floodlight unit and junction box for moisture seal. Installation is complete. Remove the protective film from the camera.
9 Turn the electricity back on and allow the camera to power up. This can take up to a minute. When the camera starts blinking blue, it is ready to be paired with your Wi-Fi network.
10 Pair the camera and test for correct operation. From the SAFE by Swann app, select Pair Camera >Swann Floodlight Camera and follow the on-screen instructions to complete the camera setup.
TIP If you have a light switch that controls the floodlight unit, remember not to turn off the switch as this will also turn off the camera. The camera needs to be powered at all times to stay connected to your Wi-Fi. Put a sticker label on the light switch so that people know not to turn it off.
For more details on using your Swann Floodlight security system such as live streaming, activity recording and playback, and camera configuration including floodlight and siren settings, see the SAFE by Swann manual which is available via the SAFE by Swann app menu.
TIPS
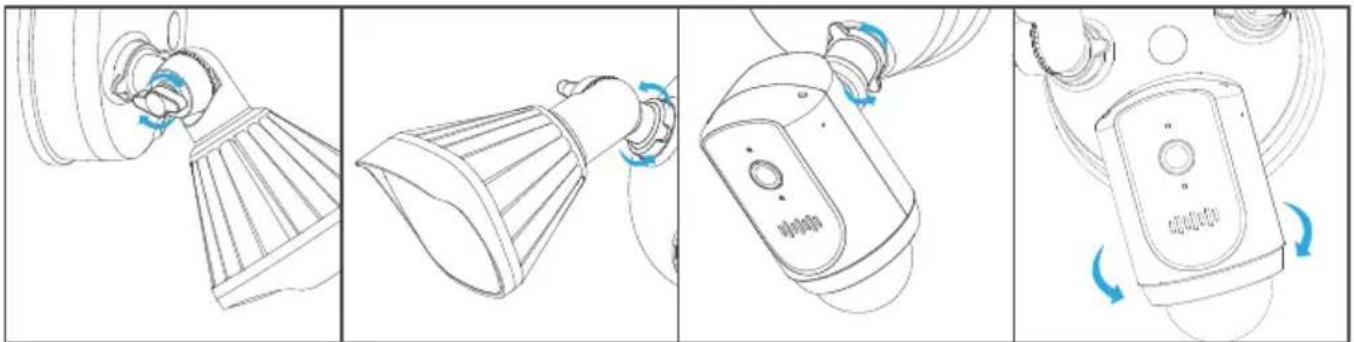
Angle Adjustments
To adjust the direction of the lamps and the camera, loosen the corresponding adjustment knob or locking nut/collar.
natural_image
Four-step diagram showing a hand holding a fan blade, then adjusting the blade with blue arrows indicating rotation (no text or symbols)Motion Detection
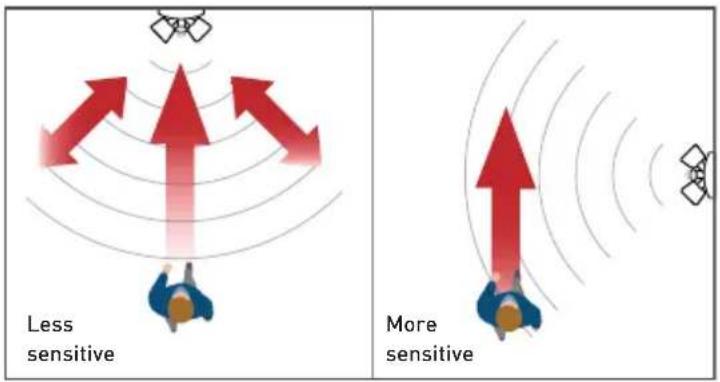
- The camera's motion sensor is more sensitive to the movement of heat across the coverage area and less sensitive to movement directly towards or away from it.
- Position the camera tilted downwards so that the likely approach path occurs across the coverage area (see figure on right). When walking directly towards or away from the motion sensor the detection range will be reduced. Note that detection range may also alter with changes in ambient temperature.
SUPPORT

Want more information?
We're here to help! Visit our Support Center at support.swann.com. You can register your product for dedicated technical support, download guides, find answers to commonly asked questions, and more. You can also email us at any time via: tech@swann.com

My Setup Notes
Wi-Fi Router Information
Wi-Fi Network Name (2.4 GHz SSID):
Wi-Fi Security Key/Password:
(case-sensitive)
Wi-Fi Extender Information (if any)
Wi-Fi Network Name (2.4 GHz SSID):
Wi-Fi Security Key/Password:
(case-sensitive)
Internet Speed Test:
DOWNLOAD
UPLOAD Mbps
____Mbps
Weather resistance: IP65
The light source of this luminaire is not replaceable; when the light source reaches its end of life the whole luminaire shall be replaced.
FCC Statement
This equipment has been tested and found to comply with the limits for Class B digital device, pursuant to part 15 of the FCC Rules. These limits are designed to provide reasonable protection against harmful interference in a residential installation. This equipment generates, uses and can radiate radio frequency energy and, if not installed and used in accordance with the instructions, may cause harmful interference to radio communications. However, there is no guarantee that interference will not occur in a particular installation. If this equipment does cause harmful interference to radio or television reception, which can be determined by turning the equipment off and on, the user is encouraged to try to correct the interference by one or more of the following measures: • Reorient or relocate the receiving antenna • Increase the separation between the equipment and the receiver • Connect the equipment into an outlet on a circuit different from that to which the receiver is connected • Consult the dealer or an experienced radio/TV technician for help.
This device complies with Part 15 of the FCC Rules. Operation is subject to the following two conditions:
(1) this device may not cause harmful interference, and
(2) this device must accept any interference received, including interference that may cause undesired operation.
FCC RF Radiation Exposure Statement Caution: To maintain compliance with the FCC's RF exposure guidelines, place the product at least 20cm from nearby persons. The device must not be co-located or operating in conjunction with any other antenna or transmitter.
WARNING: Changes or modifications to this unit not expressly approved by the party responsible for compliance could void the user's authority to operate the equipment.
ISED Statement
This device contains license-exempt transmitter[s]/receiver[s] that comply with Innovation, Science and Economic Development Canada's license-exempt RSS[s]. Operation is subject to the following two conditions: [1] this device may not cause interference, and [2] this device must accept any interference, including interference that may cause undesired operation of the device.
This Class B digital apparatus complies with Canadian ICES-003.
ISED RF Radiation Exposure Statement Caution: To maintain compliance with the ISED's RF exposure guidelines, place the product at least 20cm from nearby persons.
© Swann Communications 2019
- Floodlight Security System
- IMPORTANT SAFETY INSTRUCTIONS
- PRE-INSTALLATION CHECK
- WI-FI COVERAGE AVAILABILITY
- TO CHECK WI-FI COVERAGE
- WI-FI WEAK OR OUT OF RANGE
- GET THE APP
- INSTALLATION EXAMPLE DIAGRAM
- INSTALLATION INSTRUCTIONS
- IMPORTANT! TURN POWER OFF AT CIRCUIT BREAKER OR FUSE BOX.
- TIPS
- Angle Adjustments
- Motion Detection
- SUPPORT
- Want more information?
- My Setup Notes
- Wi-Fi Router Information
- Wi-Fi Extender Information (if any)
- FCC Statement
- ISED Statement
Brand : SWANN
Model : Floodlight Security System
Category : Camera