
AVH-Z7150BT - Uncategorized PIONEER - Free user manual and instructions
Find the device manual for free AVH-Z7150BT PIONEER in PDF.

| Type | Multimedia DVD receiver with 7-inch touchscreen |
| Dimensions (Chassis) | 178 mm x 50 mm x 160 mm |
| Dimensions (Nose) | 188 mm x 58 mm x 32 mm |
| Weight | 1.9 kg |
| Rated Power Source | 14.4 V DC (10.8 V to 15.1 V allowable) |
| Maximum Current Consumption | 10.0 A |
| Display | 7.0-inch wide TFT active matrix, 16:9 aspect ratio, 1,152,000 pixels (2,400 x 480) |
| Maximum Power Output | 50 W x 4 ch/4 Ω or 50 W x 2 ch/4 Ω + 70 W x 1 ch/2 Ω (subwoofer) |
| Continuous Power Output | 22 W x 4 (50 Hz to 15 kHz, 5% THD, 4 Ω load, both channels driven) |
| Preout Output Level (max) | 4.0 V |
| Equalizer | 13-band graphic equalizer (50 Hz to 12.5 kHz), ±12 dB |
| Disc Playback | DVD-Video, Video-CD, CD, CD-R/RW, DVD-R/RW, DVD-R DL (Region 4) |
| USB | USB 1.1/2.0 (full/high speed), up to 1.5 A, FAT16/32, NTFS; supports MP3, WMA, AAC, FLAC, WAV, MPEG-4, DivX, etc. |
| Bluetooth | Bluetooth 4.1 certified, hands-free phoning and audio streaming (A2DP, AVRCP, HFP) |
| FM Tuner | Frequency range 76 MHz to 108 MHz (varies by region), usable sensitivity 12 dBf |
| AM Tuner | Frequency range 530 kHz to 1,640 kHz (10 kHz steps) or 531 kHz to 1,602 kHz (9 kHz steps) |
| Compatible Smartphone Integration | Apple CarPlay, Android Auto, AppRadio Mode +, Spotify |
| Rear View Camera Input | Yes (optional camera required) |
| Security | Detachable front panel; RESET button for restoring factory settings |
| Operating Temperature Range | -10 °C to +60 °C (power off) |
| Included Accessories | Remote control (with battery), microphone, mounting sleeve, trim ring, power cord, speaker leads |
Frequently Asked Questions - AVH-Z7150BT PIONEER
User questions about AVH-Z7150BT PIONEER
0 question about this device. Answer the ones you know or ask your own.
Ask a new question about this device
Download the instructions for your Uncategorized in PDF format for free! Find your manual AVH-Z7150BT - PIONEER and take your electronic device back in hand. On this page are published all the documents necessary for the use of your device. AVH-Z7150BT by PIONEER.
USER MANUAL AVH-Z7150BT PIONEER
Thank you for buying this Pioneer product.
Please read through these instructions so you will know how to operate your model properly. After you have finished reading the instructions, keep this document in a safe place for future reference.

Important
The screen shown in the examples may differ from actual screens, which may be changed without notice for performance and function improvements.

Precaution 3
Important safety information 3
To ensure safe driving.... 4
When using a display connected to rear monitor output....4
To avoid battery exhaustion 4
Rear view camera 4
Handling the USB connector....4
In case of trouble 5
Visit our website....5
Protecting the LCD panel and screen....5
Notes on internal memory.... 5
About this manual....5
Protecting your unit from theft.... 5

parts and controls...... 6
Main unit....6
Remote Control....7

Basic operation 8
Notes on using the LCD panel 8
Opening and closing the LCD panel.... 8
Turning the LCD panel horizontally.... 8
Adjusting the LCD panel slide position 8
Adjusting the LCD panel angle....8
Resetting the microprocessor 9
Preparing the remote control....9
Starting up the unit.... 10
Using the touch panel 10
Top menu screen.... 11
Bluetooth
Bluetooth connection 12
Bluetooth settings 12
Switching the connected Bluetooth device..... 13
Hands-free phoning....13
Bluetooth audio....16
AppRadio
Using AppRadio Mode +..... 17
Starting procedure 17
Using the keyboard 18
Using the audio mix function.... 18
AV source
Supported AV source....19
Displaying the AV operation screen.... 19
Selecting a source....19
Changing the display order of source 19
Adjusting the range of favourite source icons
area....20
iPod/iPhone or
smartphone connection for AV source.... 20
iPod/iPhone with a Lightning connector..... 20
iPhone with a 30-pin connector .... 21
Smartphone (Android™ device).... 21
Radio
Starting procedure 22
Basic operation 22
Searching by PTY information.... 23
Storing the strongest broadcast frequencies
(BSM) 23
Radio settings.... 23
■TV tuner 24
Starting procedure.... 24
Basic operation.... 24
Digital TV 25
Starting procedure.... 25
Basic operation.... 25
DTV settings.... 25
Disc.... 26
Inserting and ejecting a disc 26
Basic operation.... 26
■ Compressed files...... 28
Inserting and ejecting media 28
Starting procedure.... 29
Basic operation.... 29
■ iPod 32
Connecting your iPod 32
Basic operation.... 32
■Spotify ^ 34
Listening to Spotify.... 34
Basic operation.... 35
AUX 37
Starting procedure.... 37
Basic operation.... 37
■AV input 38
Starting procedure.... 38
MIXTRAX.... 38
MIXTRAX EZ operation.... 38
Starting procedure.... 38
MIXTRAX settings 39
■ Settings...... 39
Displaying the setting screen.... 39
System settings 39
Theme settings 44
Audio settings.... 44
Video settings 47
Favourite menu...... 49
Creating a shortcut 49
Selecting a shortcut.... 49
Removing a shortcut.... 49
■Other functions ...... 50
Setting the time and date....50
Changing the wide screen mode 50
Restoring this product to the default settings....50
■Apple CarPlay 51
Using Apple CarPlay 51
Setting the driving position 51
Starting procedure 51
Adjusting the volume 51
■Android Auto™......52
Using Android Auto....52
Setting the driving position 52
Starting procedure 53
Adjusting the volume 53
Setting the auto-launch function....53
■Appendix for Apple CarPlay and Android Auto.... 54
Error messages.... 54
Detailed information regarding connected iPod
devices 54
Using app-based connected content 54
■Connection....55
Precautions....55
Important safeguards 55
Precautions before connecting the system..... 55
Before installing this product 56
To prevent damage 56
Notice for the blue/white lead 56
This product 56
Power cord 56
Speaker leads....57
Power amp (sold separately)....57
iPod/iPhone and smartphone 57
IPod/IPhone with Lightning connector 58
iPhone with 30-pin connector 58
Smartphone (Android device)....58
Camera 58
External video component and the display ..... 59
■Installation....59
Contents
Precautions before installation 59
Before installing....59
Installation notes 59
DIN front/rear-mount 60
Installing the microphone 61
Mounting on the sun visor....61
Installation on the steering column.... 61
Adjusting the microphone angle.... 61
Installing the TV aerial....61
Assembling the TV aerial 61
Mounting the TV aerial 61
Appendix......62
Troubleshooting.... 62
Error messages....63
Handling and care of discs 65
Playable discs 65
Detailed information for playable media.... 66
Bluetooth 68
WMA 68
FLAC 68
DivX 68
AAC 68
Google™, Google Play, Android....68
MIXTRAX....69
Detailed information regarding connected iPod
devices 69
Using app-based connected content.... 69
Spotify ^a 69
Notice regarding video viewing.... 69
Notice regarding DVD-Video viewing 69
Notice regarding MP3 file usage 69
Using the LCD screen correctly....70
Specifications 70
Precaution
CAUTION
USE OF CONTROL OR ADJUSTMENT OR PERFORMANCE OF PROCEDURES OTHER THAN THOSE SPECIFIED HEREIN MAY RESULT IN HAZARDOUS RADIATION EXPOSURE.
CAUTION
This product is a Class 1 laser product classified under the safety standard, IEC 60825-1:2007, and contains a class 1M laser module. To ensure continued safety, do not remove any covers or attempt to gain access to the inside of the product. Refer all servicing to qualified personnel.
CLASS 1 LASER PRODUCT
CAUTION—CLASS 1M VISIBLE AND INVISIBLE LASER RADIATION WHEN OPEN, DO NOT VIEW DIRECTLY WITH OPTICAL INSTRUMENTS.

WARNING
Slots and openings in the cabinet are provided for ventilation to ensure reliable operation of the product, and to protect it from overheating. To prevent fire hazard, the openings should never be blocked or covered with items (such as papers, floor mat, cloths).

CAUTION
This product is evaluated in moderate and tropical climate condition under the Audio, video and similar electronic apparatus - Safety requirements, IEC 60065.
Important safety information

WARNING
- Do not attempt to install or service this product by yourself. Installation or servicing of this product by persons without training and experience in electronic equipment and automotive accessories may be dangerous and could expose you to the risk of electric shock, injury or other hazards.
- Do not allow this product to come into contact with liquids. Electrical shock could result. Also, damage to the product, smoke, and overheating could result from contact with liquids.
- If liquid or foreign matter should get inside this product, park your vehicle in a safe place, turn the ignition switch off (ACC OFF) immediately and consult your dealer or the nearest authorised Pioneer Service Station. Do not use this product in this condition because doing so may result in a fire, electric shock, or other failure.
-
If you notice smoke, a strange noise or odour from this product, or any other abnormal signs on the LCD screen, turn off the power immediately and consult your dealer or the nearest authorised Pioneer Service Station. Using this product in this condition may result in permanent damage to the system.
-
Do not disassemble or modify this product, as there are high-voltage components inside which may cause an electric shock. Be sure to consult your dealer or the nearest authorised Pioneer Service Station for internal inspection, adjustments or repairs.
Before using this product, be sure to read and fully understand the following safety information: - Do not operate this product, any applications, or the rear view camera option (if purchased) if doing so will divert your attention in any way from the safe operation of your vehicle. Always observe safe driving rules and follow all existing traffic regulations. If you experience difficulty in operating this product, pull over, park your vehicle in a safe location and apply the handbrake before making the necessary adjustments.
- Never set the volume of this product so high that you cannot hear outside traffic and emergency vehicles.
- To promote safety, certain functions are disabled unless the vehicle is stopped and the handbrake is applied.
- Keep this manual handy as a reference for operating procedures and safety information.
- Do not install this product where it may (i) obstruct the driver's vision, (ii) impair the performance of any of the vehicle's operating systems or safety features, including air bags or hazard lamp buttons or (iii) impair the driver's ability to safely operate the vehicle.
- Please remember to fasten your seat belt at all times while operating your vehicle. If you are ever in an accident, your injuries can be considerably more severe if your seat belt is not properly buckled.
- Never use headphones while driving.
To ensure safe driving
WARNING
- LIGHT GREEN LEAD AT POWER CONNECTOR IS DESIGNED TO DETECT PARKED STATUS AND MUST BE CONNECTED TO THE POWER SUPPLY SIDE OF THE HANDBRAKE SWITCH. IMPROPER CONNECTION OR USE OF THIS LEAD MAY VIOLATE APPLICABLE LAW AND MAY RESULT IN SERIOUS INJURY OR DAMAGE.
- Do not take any steps to tamper with or disable the handbrake interlock system which is in place for your protection. Tampering with or disabling the handbrake interlock system could result in serious injury or death.
- To avoid the risk of damage and injury and the potential violation of applicable laws, this product is not for use with a video image that is visible to the driver.
- In some countries the viewing of video image on a display inside a vehicle even by persons other than the driver may be illegal. Where such regulations apply, they must be obeyed. If you attempt to watch video image while driving, the warning "Viewing of front seat video source while driving is strictly prohibited." will appear on the screen. To watch video image on this display, stop the vehicle in a safe place and apply the handbrake. Please keep the brake pedal pushed down before releasing the handbrake.
When using a display connected to rear monitor output
The video output terminal (rear monitor output) is for connection of a display to enable passengers in the rear seats to watch video images.
WARNING
NEVER install the rear display in a location that enables the driver to watch video images while driving.
To avoid battery exhaustion
Be sure to run the vehicle engine while using this product. Using this product without running the engine can drain the battery.
WARNING
Do not install this product in a vehicle that does not have an ACC wire or circuitry available.
Rear view camera
With an optional rear view camera, you are able to use this product as an aid to keep an eye on trailers, or backing into a tight parking spot.
WARNING
• SCREEN IMAGE MAY APPEAR REVERSED.
- USE INPUT ONLY FOR REVERSE OR MIRROR IMAGE REAR VIEW CAMERA. OTHER USE MAY RESULT IN INJURY OR DAMAGE.
CAUTION
The rear view mode is to use this product as an aid to keep an eye on the trailers, or while backing up. Do not use this function for entertainment purposes.
Handling the USB connector
CAUTION
- To prevent data loss and damage to the storage device, never remove it from this product while data is being transferred.
- Pioneer cannot guarantee compatibility with all USB mass storage devices and assumes no responsibility for any loss of data on media players, iPhone, smartphone, or other devices while using this product.
In case of trouble
Should this product fail to operate properly, contact your dealer or nearest authorised Pioneer Service Station.
Visit our website
Visit us at the following site:
In Mexico
http://www.pioneer-mexico.com/
In Singapore
http://www.pioneer.com.sg/
In Malaysia
http://www.pioneer.my/
In Thailand
http://www.pioneer-thailand.com/
In Philippines
http://www.pioneer.ph/
In Vietnam
http://www.pioneer.vn/
In Indonesia
http://www.pioneer.co.id/
In Australia
http://www.pioneer.com.au/
In Israel
http://www.pioneerisrael.co.il/
In Middle East/Africa
http://www.pioneer-mea.com/en/
In Latin
http://www.pioneer-latin.com/en/about-pioneer.html
In Hong Kong
http://www.pioneerhongkong.com.hk/ct/index.php
In Taiwan
• We offer the latest information about PIONEER CORPORATION on our website.
- Pioneer regularly provides software updates to further improve its products. Please check the support section of the Pioneer website for all available software updates.
Protecting the LCD panel and screen
- Do not expose the LCD screen to direct sunlight when this product is not used. This may result in LCD screen malfunction due to the resulting high temperatures.
- When using a mobile phone, keep the aerial of the mobile phone away from the LCD screen to prevent disruption of the video in the form of spots, coloured stripes, etc.
- To protect the LCD screen from damage, be sure to touch the touch panel keys only with your finger and do so gently.
Notes on internal memory
- The information will be erased by disconnecting the yellow lead from the battery (or removing the battery itself).
- Some of the settings and recorded contents will not be reset.
About this manual
This manual uses diagrams of actual screens to describe operations. However, the screens on some units may not match those shown in this manual depending on the model used.
Meanings of symbols used in this manual
| Z0000BT | This indicates model names that are supported by the described operations. |
| This indicates to touch the appropriate soft key on the touch screen. | |
| This indicates to touch and hold the appropriate soft key on the touch screen. |
Protecting your unit from theft
The front panel can be detached to deter theft.
Important
- Handle the front panel with care when removing or attaching it.
- Avoid subjecting the front panel to excessive shock.
- Keep the front panel out of direct sunlight and high temperatures.
- If removed, replace the front panel on the unit before starting up your vehicle.
- To avoid damaging the device or vehicle interior, remove any cables and devices attached to the front panel before detaching it.
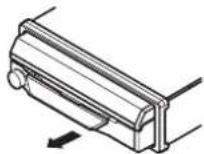
Removing the front panel
1 Pinch the top and bottom of its right side and pull the front panel out.
Take care not pinch it too tightly or to drop it, and also avoid contact with water or other fluids to prevent permanent damage.
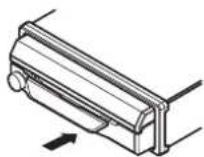
Re-attaching the front panel
1 Slide the front panel to the left.
The front panel and the head unit are connected on the left side. Make sure that the front panel has been properly connected to the head unit.
2 Press the right side of the front panel until it is firmly seated.
If you can't attach the front panel to the head unit successfully, try again. Forcing the front panel into place may result in damage.
Parts and controls
Main unit
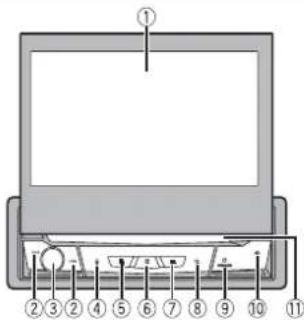
| 1 | LCD screen | |
| 2 | return to the previous track (chapter) or go to the next track (chapter).Press and hold to perform fast reverse or fast forwards.Press to answer or end a call. | |
| 3 | Volume/SRC/OFF | Press to cycle through all the available sources.Press and hold to turn the source off. |
| 4 | Press to activate the voice recognition mode such as Siri when the iPhone is connected to the unit via Bluetooth or USB. | |
| 5 | Press to switch between the Application screen and the AV operation screen.Press and hold to switch to the camera view mode.NOTETo activate the camera view mode with this button, set [Back Camera Input] to [On] (page 40). | |
| 6 | Press to display the top menu screen.Press and hold to power off. To power back on, press any button. | |
| 7 | Press to display the menu bar (page 11).Press and hold to mute or unmute. | |
| 8 | Press to display the top menu screen or back to previous screen.Press and hold to turn off the display. | |
| 9 | OPEN/CLOSE Press to open the LCD panel.To close the LCD panel, press again. | |
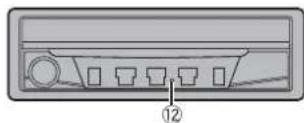
| 10 | ||
| 11 | Disc-loading slot | Refer to Inserting and ejecting a disc (page 26). |
| 12 | RESET Press to reset the microprocessor (page 9). | |
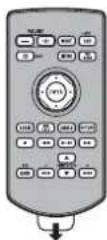
Remote Control

| 1 | Volume (+/-) | |
| 2 | MODE Press to switch between the Application screen and the AV operation screen. Press and hold to switch to the camera view mode. NOTE To activate the camera view mode with this button, set [Back Camera Input] to [On] (page 40). | |
| 3 | SRC Press to cycle through all the available sources. Press and hold to turn the source off. | |
| 4 | TOP MENU Press to return to the top menu during DVD playback. | |
| 5 | MENU Displays the DVD menu during DVD playback. | |
| 6 | Thumb pad Use to select a menu on the DVD menu. | |
| 7 | MUTE | |
| 8 | AUDIO SUBTITLE ANGLE | Press to change the audio language, subtitle language or viewing angle during DVD playback. |
| 9 | BAND/ESC Press to select the tuner band when tuner is selected as a source. Press to switch between media file types when playing the following types of data:DiscUSB | |
| 10 | RETURN Press to | return to the specified point and start playback from there. |
| 11 | ▶/II | Press to pause or resume playback. |
| ◀◀ or ▶◀ audio: | Press and hold to perform fast reverse or fast forwards.For video: Press to perform fast reverse or fast forwards. | |
| I◀◀ or ▶◀ is to | return to the previous track (chapter) or go to the next track (chapter).Press to answer or end a call. | |
| ■ | Press to stop playback.If you resume playback, playback will start from the point where you stopped.Press the button again to stop playback completely. | |
| 12 | FOLDER/P.CH | Press to select the next or previous title or folder.Press to recall radio station frequencies assigned to preset channel keys.Press to answer or end a call. |

Basic operation
Notes on using the LCD panel

WARNING
- Keep hands and fingers clear of this product when opening, closing, or adjusting the LCD panel. Be especially cautious of children's hands and fingers.
- Do not use with the LCD panel left open. It may result in injury in the event of an accident.

CAUTION
- Do not open or close the LCD panel forcefully. It may cause a malfunction.
- Do not operate this product until the LCD panel has completely opened or closed. If this product is operated while the LCD panel is opening or closing, the LCD panel may stop at that angle for safety
- Do not place glass or can on the open LCD panel.
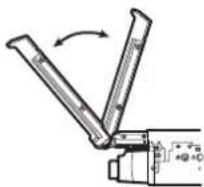
Opening and closing the LCD panel
The LCD panel will open or close automatically when the ignition switch is turned on or off. You can turn off the automatic close/open function.
- Do not close the LCD panel by force with your hands. That will cause a malfunction.
- The automatic close/open function will operate the display as follows.
- When the ignition switch is turned OFF while the LCD panel is opened, the LCD panel will close after six seconds.
- When the ignition switch is turned ON again (or turned to ACC), the LCD panel will open
automatically. -
Removing or attaching the front panel will automatically close or open the LCD panel.
Protecting your unit from theft on (page 5). -
When the ignition switch is turned OFF after the LCD panel has been closed, turning the ignition switch ON again (or turning it to ACC) will not open the LCD panel. In this case, press OPEN/CLOSE to open the LCD panel.
- When closing the LCD panel, check to make sure that it has closed completely. If the LCD panel has stopped halfway, leaving it like this could result in damage.
1 Press OPEN/CLOSE to open the LCD panel.
To close the LCD panel
Press OPEN/CLOSE again.
Setting the automatic open function
To prevent the display from hitting the gearstick of an automatic vehicle when it is in the P (park) position, or when you do not wish the display to open/close automatically, you can set the automatic open function to manual mode.
1 Press

2 Touch


The system setting screen appears.
3 Touch [Auto Flap].
4 Touch the item.
[On]
The LCD panel will open or close automatically when the ignition switch is turned on or off.
[Off]
You have to press OPEN/CLOSE to open/close the LCD panel.
Turning the LCD panel horizontally
When the LCD panel is upright and hinders the operation of the air conditioner, the panel can be turned horizontally temporarily.

ss and hold OPEN/CLOSE to display the flap menu.

ch to flip the LCD panel down to the horizontal position.
NOTES
• To return to the original position, press and hold OPEN/CLOSE.
- The LCD panel returns to the original position automatically, indicated with a beeping sound 10 seconds after operation.
Adjusting the LCD panel slide position
You can adjust the LCD panel slide position so that the panel is set back or forwards.

ss and hold OPEN/CLOSE to display the flap menu.

ouch - C (slide to the back) or + C (slide to the front) to move the LCD panel.
Adjusting the LCD panel angle

important
- If you can hear the LCD panel knocking against your vehicle's console or dashboard, touch from the flap menu to temporarily level the LCD panel.
- When adjusting the LCD panel angle, be sure to adjust from the flap menu. Forcibly adjusting the LCD panel by hand may damage it.

1 Press and hold OPEN/CLOSE to display the flap menu.
2 Touch (tilt down) or (tilt up) to adjust the LCD panel to an easily viewable angle.
NOTE
As the set angle is saved, the LCD panel will automatically be adjusted to the same position the next time the LCD panel is opened.
Resetting the microprocessor
CAUTION
- Pressing the RESET button resets settings and recorded contents to the factory settings.
- Do not perform this operation when a device is connected to this product.
- Some of the settings and recorded contents will not be reset.
- The microprocessor must be reset under the following conditions:
– Prior to using this product for the first time after installation. - If this product falls to operate properly.
- If there appears to be problems with the operation of the system.
1 Turn the ignition switch OFF.
2Press RESET with a pen tip or other pointed tools.
Settings and recorded contents are reset to the factory settings.
Preparing the remote control
Remove the insulation sheet before use.
How to replace the battery
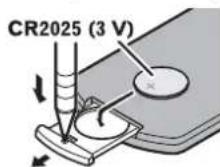
Insert the CR2025 (3 V) battery with the plus (+) and minus (-) poles orientated properly.
WARNING
- Do not ingest the battery, Chemical Burn Hazard.
(The remote control supplied with) This product contains a coin/button cell battery. If the coin/button cell battery is swallowed, it can cause severe internal burns in just 2 hours and can lead to death.
Keep new and used batteries away from children.
If the battery compartment does not close securely, stop using the product and keep it away from children.
If you think batteries might have been swallowed or placed inside any part of the body, seek immediate medical attention. - Batteries (battery pack or batteries installed) must not be exposed to excessive heat such as sunshine, fire or the like.
CAUTION
- Remove the battery if the remote control is not used for a month or longer.
- There is a danger of explosion if the battery is incorrectly replaced. Replace only with the same or equivalent type.
- Do not handle the battery with metallic tools.
- Do not store the battery with metallic objects.
- If the battery leaks, wipe the remote control completely clean and install a new battery.
- When disposing of used batteries, please comply with governmental regulations or environmental public institutions' rules that apply in your country/area.
- "Perchlorate Material – special handling may apply. See www.dtsc.ca.gov/hazardouswaste/perchlorate. (Applicable to California, U.S.A.)"
Using the remote control
Point the remote control in the direction of the front panel to operate.
NOTE
The remote control may not function properly in direct sunlight.
Important
- Do not store the remote control in high temperatures or direct sunlight.
- Do not let the remote control fall onto the floor, where it may become jammed under the brake or accelerator.
Starting up the unit
1 Start the engine to boot up the system.
The [Select Program Language] screen appears.
NOTE
From the second time on, the screen shown will differ depending on the previous conditions.
2Touch the language.
3Touch

Z7150TV
The [Speaker Mode Settings] screen appears. Skip to step 6.
Z7150BT
The [Location Setting] screen appears.
4 Touch the item to select the using location.
5Touch

The [Speaker Mode Settings] screen appears.
6Touch the speaker modes.
[Standard Mode]
4-speaker system with front and rear speakers, or a 6-speaker system with front and rear speakers and subwoofers.
[Network Mode]
3-way system with a high range speaker, middle range speaker and subwoofer (low range speaker) for reproduction of high, middle and low frequencies (bands).
WARNING
Do not use the unit in standard mode when a speaker system for 3-way network mode is connected to the unit. This may cause damage to the speakers.
7 Touch [OK].
Initial Legal Disclaimer screen appears.
8Touch [OK].
The top menu screen appears.
NOTE
Once the speaker mode is set, the setting cannot be changed unless this product is restored to the default settings. Restore the default settings to change the speaker mode setting (page 50).
Switching the speaker mode
To change the speaker mode, you need to restore this product to the default settings.
1 Restore the default setting (page 50).
Using the touch panel
You can operate this product by touching the keys on the screen directly with your fingers.
NOTE
To protect the LCD screen from damage, be sure to touch the screen only with your finger gently.
Common touch panel keys

: Returns to the previous screen.
: Close the screen.
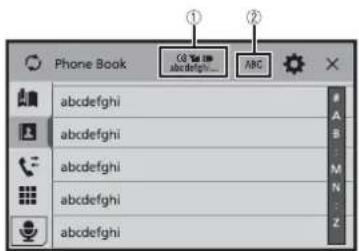
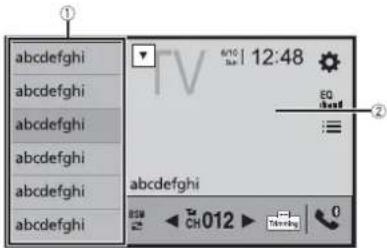
Operating list screens
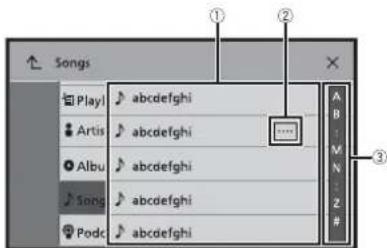
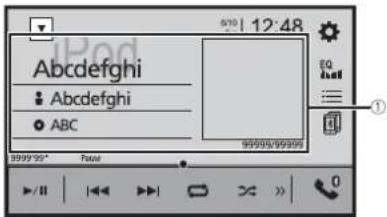
①
Touching an item on the list allows you to narrow down the options and proceed to the next operation.
| 2 | Appears when all characters are not displayed on the display area.If you touch the key, the rests are scrolled for display.NOTEThis function is available only when you stop your vehicle in a safe place and apply the handbrake. |
| 3 | Appears when items cannot be displayed on a single page.Drag the side bar, the initial search bar or the list to view any hidden items. |
| Operating the time bar | |
| 1 | You can change the playback point by dragging the key.The playback time corresponding to the position of the key is displayed while dragging the key. |
| Operating the menu bar |
| 1 Press |
| The menu bar pops up on the screen. |
| NOTEThe menu bar availability may vary depending on the activating source. | |
| Switches the dimmer duration by day or night.NOTEWhen AppRadio Mode + is on, AppRadio Mode + SideControlBar is displayed. | |
| Switches between playback and pause. | |
| Skips files forwards or backwards. | |
| Performs fast reverse or fast forwards. | |
| Displays setting menu screen (page 39). | |
| Closes the menu bar. |
| Top menu screen | |
| 1 | Favourite source iconsTIPSWhen you connect the external navigation system to this unit, the navigation mode key is displayed at the middle of the right side of the display.If you select [Power OFF], you can turn off almost all functions.An incoming call is received (only for hands-free phoning via Bluetooth).A rear view camera image is input when the vehicle is in reverse.A button on this unit is pressed.The ignition switch is turned off (ACC OFF), then turned on (ACC ON). |
| 2 | AV operation keyDisplays the current source.TIPWhen the last source is displayed behind the key, you can switch the source by touching the key. |
| Setting the time and date (page 50) | |
| Settings (page 39) and Favourite menu (page 49) | |
| Connected device keyDisplays connected device.Switches the source or application with connected devices such as AppRadio Mode +, external navigation system, etc.TIPWhen a device with a compatible application is connected, the favourite application key appears. Once the key appears, you can adjust the range of the favourite application key area with the following steps.1Touch and hold . 📄appears at the top right of the favourite application key.2Drag to the desired position.To finish the adjusting, touch any place of the display except for the favourite application key.NOTEThis function is available only when you stop your vehicle in a safe place and apply the handbrake. | |
| AV source (page 19) | |
| Hands-free phoning (page 13) | |
Bluetooth
Bluetooth connection
1 Turn on the Bluetooth function on the device.
2Press 3Touch then
The Bluetooth screen appears.
4Touch [Connection].
5Touch
The unit starts to search for available devices, then displays them in the device list.
6Touch the Bluetooth device name.
After the device is successfully registered, a Bluetooth connection is established by the system. Once the connection is established, the device name is displayed on the list.
NOTES
- If five devices are already paired, [Memory Full] is displayed. Delete a paired device first (page 13).
- If your device supports SSP (Secure Simple Pairing), a six-digit number appears on the display of this product. Touch [Yes] to pair the device.
- If you try to connect an unconnected mobile phone while two mobile phones are already connected, the first one of the two connected mobile phones will be disconnected and the unconnected mobile phone will be connected instead.
- The Bluetooth connection can also be made by detecting this product from the Bluetooth device. Before registration, make sure that [Visibility] in the [Bluetooth] menu is set to On. For details on Bluetooth device operations, refer to the operating instructions supplied with the Bluetooth device.
- Two mobile phones can be connected to this product at the same time (page 13).
TIPS
Bluetooth settings
1Press
2Touch then

CAUTION
Never turn this product off and disconnect the device while the Bluetooth setting operation is being processed.
Menu Item Description
| [Connection] Connect, disconnect, or delete registered Bluetooth device manually. Touch delete registered device. To connect a registered Bluetooth device manually, touch the name of the device. To disconnect the device, touch the name of the connected device in the list. NOTE Connect the Bluetooth device manually in the following cases: Two or more Bluetooth devices are registered, and you want to manually select the device to be used. You want to reconnect a disconnected Bluetooth device. Connection cannot be established automatically for some reason. | |
| [Auto Connect] [On] [Off] | Select [On] to connect the last connected Bluetooth device automatically. NOTE If two Bluetooth devices were connected the last time, the two devices are connected to this product automatically in the order that they are registered in the device list. |
| [Visibility] [On] [Off] | Select [On] to make this product visible to the other device. |
| [PIN Code Input] Change the PIN code for Bluetooth connection. The default PIN code is "0000". 1Touch [0] to [9] to input the pin code (up to 8 digits). 2Touch | |
[Device Information] Displaying the device name and address of this product.
[Bluetooth Memory Clear] Touch [Clear] then [OK] to clear the Bluetooth memory.
Switching the connected Bluetooth device
After registering and connecting the Bluetooth devices to this product, you can switch among the devices using the switch devices key in the phone function and some audio sources.
- You can register up to five Bluetooth devices on this product (page 12).
- You can connect one of the registered devices to this product. In cases where the registered device is equipped with a phone function, a total of two devices can be connected at the same time when using the phone function. If two of the five
registered devices are already connected, you can connect the remaining third device to use the audio function only from the switch devices key on the audio source screen.
- The icon for the mobile phone currently being used is displayed on the Phone menu screen. If you connect two mobile phones to this product at the same time, you can switch between the mobile phones using the switch devices key. The contents of the phone menu are memorised for each connected mobile phone (page 13).
- The switch devices key will appear for some audio sources. The audio source may automatically switch to another source depending on the selected device.
Hands-free phoning
To use this function you need to connect your mobile phone to this product via Bluetooth in advance (page 12).

CAUTION
For your safety, avoid talking on the phone as much as possible while driving.
Making a phone call
1 Press

2 Touch

The phone menu screen appears.
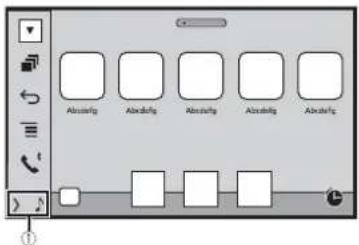
3 Touch one of the call icons on the phone menu screen.
| 1 | The following items are displayed.· Name of the current mobile phone· List number of the current mobile phone· Reception status of the current mobile phone· Battery status of the current mobile phoneTIPIf you connect two mobile phones to this product at the same time, you can switch between the mobile phones using the switch devices key. |
| 2 | Switches the search language to English or system language.NOTEIt may not appear depending on the system language setting. |
| Synchronises the contacts on this product's phone book with the contacts on your phone manually. | |
| Using preset dial list (page 14) | |
| Using phone bookSelect a contact from the phone book. Touch the desired name on the list then select the phone number.TIPS· The contacts on your phone will be automatically transferred to this product.· Update the phone book manually.NOTES· [Visibility] of the [Bluetooth] screen should be on (page 13).· If two mobile phones are automatically connected to this product with the Bluetooth device auto connect function, the phone book of the second phone is displayed. | |
| Using call historyMake a phone call from the received call , of tissed call . | |
| Direct phone number inputEnter the number keys to enter the phone number then touch make a call. | |
| To end the call | |
| 1 Touch | |
Using the preset dial lists
▶Registering a phone number
You can easily store up to six phone numbers per device as presets. 1 Press
| 2 Touch | |
| 3 Touch | |
| On the [Phone Book] screen, touch the desired name to display the contact's phone number. | |
| 4 Touch | |
| ▶Dialling from the preset dial list | |
| 1 Touch | |
| 2 Touch the desired entry on the list to make a call.The dial screen appears and dialling starts. | |
| ▶Deleting a phone number | |
| 1 Press | |
| 2 Touch | |
| 3 Touch | |
| 4 Touch | |
| 5 Touch [Yes]. | |
Receiving a phone call
1 Touch to answer the call. Touch to end the call.
TIPS
- Touch while getting a call waiting, switch to the talking person. - Touch while getting a call waiting to reject the call.
NOTE
When two phones are connected at the same time, if an incoming call is received on the second phone while you are talking on the first phone, the dial confirmation screen for the second phone will be displayed.
Voice recognition function (for iPhone)
By connecting your iPhone to this product, you can use the voice recognition function (Siri Eyes Free Mode) on this product.
NOTES
- When an iPhone is used, Siri Eyes Free Mode is available with this product. - In this chapter, iPhone and iPod touch will be referred to as "iPhone".
The voice recognition function launches and the voice control screen appears.
TIPS
- You can also launch the voice recognition function by pressing
- If two mobile phones are automatically connected to this product with the Bluetooth device auto connect function, the voice recognition function (Siri Eyes Free Mode) will be set on the second phone.
- If you want to use the voice recognition function (Siri Eyes Free Mode) on another connected iPhone, touch with numbered to the other iPhone. The iPhone that you switch to will be set as the current device.
Minimising the dial confirmation screen
1 Touch

TIP
To display the dial confirmation screen, touch again.
NOTES
• The dial confirmation screen cannot be minimised on the AV operation screen.
- AV sources cannot be selected even if the dial confirmation screen is minimised while talking on the phone or receiving an incoming call.
Phone settings
1 Press

2 Touch


| Menu Item Description | |
| [Auto Answer] [On] [Off] | Select [On] to answer an incoming call automatically. |
| [Ring Tone] [On] [Off] | Select [On] if the ring tone does not come out from the car speakers. |
| [Invert Name] Select [Yes] to change the order of the first and last names in the phone book. | |
Setting the private mode
During a conversation, you can switch to private mode (talk directly on your mobile phone).
1 Touch or to turn private mode on or off.
NOTES
- If two mobile phones are connected to this product and the first phone is set to private mode, you can receive incoming calls on the second phone while maintaining the call in progress on the first phone.
- When two mobile phones are connected to this product and private mode of the first phone is turned off, if an incoming call on the second phone is answered while a call is in progress on the first phone or while dialling or receiving a call on the first phone, the call, dialling, or receiving on the first phone is ended.
Adjusting the other party's listening volume
This product can be adjusted to the other party's listening volume.
1 Touch to switch between the three volume levels.
Notes for hands-free phoning
▶General notes
- Connection to all mobile phones featuring Bluetooth wireless technology is not guaranteed.
- The line-of-sight distance between this product and your mobile phone must be 10 metres or less when sending and receiving voice and data via Bluetooth technology.
- With some mobile phones, the ring sound may not be output from the speakers.
- If private mode is selected on the mobile phone, hands-free phoning may be disabled.
▶ Registration and connection
- Mobile phone operations vary depending on the type of mobile phone. Refer to the instruction manual that came with your mobile phone for detailed instructions.
- When phone book transfer does not work, disconnect your phone and then perform pairing again from your phone to this product.
▶Making and receiving calls
- You may hear a noise in the following situations:
- When you answer the phone using the button on the phone.
- When the person on the other end of the line hangs up the phone.
- If the person on the other end of the line cannot hear the conversation due to an echo, decrease the volume level for hands-free phoning.
- With some mobile phones, even after you press the accept button on the mobile phone when a call comes in, hands-free phoning may not be performed.
- The registered name will appear if the phone number is already registered in the phone book. When the same phone number is registered under different names, only the phone number will be displayed.
The received call and dialled number histories
- You cannot make a call to the entry of an unknown user (no phone number) in the received call history.
- If calls are made by operating your mobile phone, no history data will be recorded in this product.
- If there are more than 1 000 phone book entries on your mobile phone, not all entries may download completely.
- Depending on the phone, this product may not display the phone book correctly.
- If the phone book in the phone contains image data, the phone book may not be transferred correctly.
- Depending on the mobile phone, phone book transfer may not be available.
▶ Phone book transfers
Bluetooth audio
Before using the Bluetooth audio player, register and connect the device to this product (page 12).
NOTES
- Depending on the Bluetooth audio player connected to this product, the available operations with this product may be limited to the following two levels:
A2DP (Advanced Audio Distribution Profile): Only playing back songs on your audio player is possible. - A2DP and AVRCP (Audio/Video Remote Control Profile): Playing back, pausing, selecting songs, etc., are possible.
- Depending on the Bluetooth device connected to this product, the available operations with this product may be limited or differ from the descriptions in this manual.
- While you are listening to songs on your Bluetooth device, refrain from operating the phone function as much as possible. If you try operating, the signal may cause noise for song playback.
- When you are talking on the Bluetooth device connected to this product via Bluetooth, it may pause playback.
1Press
2Touch then
The system setting screen appears.
3 Touch [AV Source Settings].
4 Confirm that [Bluetooth Audio] is turned on.
5Press
6Touch AV
The AV source screen appears.
7 Touch [Bluetooth Audio].
The Bluetooth audio playback screen appears.
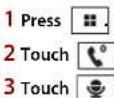
Basic operation
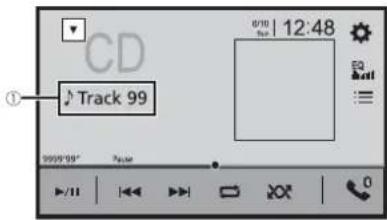
Bluetooth audio playback screen
| 1 | Track number indicator |
| Switches between playback and pause. | |
| Skips files forwards or backwards.- By pressingthen touch oryoucanalso skip files forwards or backwards.- By pressingthen touch and hold oryoucanalso perform fast reverse or fast forwards. | |
| Sets a repeat play range. | |
| Plays files in random order. | |
| Selects a file or folder from the list to playback.NOTEThis function is available only when the AVRCP version of the Bluetooth device is 1.4 or higher. | |
| Switches among the Bluetooth devices when the devices are connected to this product via Bluetooth (page 13). |
AppRadio Mode +
You can operate iPhone or smartphone applications with finger gestures such as tapping, dragging, scrolling, or flicking on the screen of this product.
NOTES
- The compatible finger gestures vary depending on the application for an iPhone or a smartphone.
- Even though an application is not compatible with AppRadio Mode +, depending on the application an image may be displayed. But you can not operate the application. To use AppRadio Mode +, install the AppRadio app on the iPhone or smartphone in advance. For details about the AppRadio app, visit the following site:
http://pioneer-mexico.com.mx/ - Be sure to read Using app-based connected content (page 69) before you perform this operation.
• Copyright protected files such as DRM cannot be played. - AppRadio Mode + may be referred to as AppRadio Mode.

WARNING
Certain uses of the iPhone or smartphone may not be legal while driving in your jurisdiction, so you must be aware of and obey any such restrictions. If in doubt as to a particular function, only perform it while the car is parked. No feature should be used unless it is safe to do so under the driving conditions you are experiencing.
Using AppRadio Mode +
Important
- Pioneer is not liable for any issues that may arise from incorrect or flawed app-based content.
- The content and functionality of the supported applications are the responsibility of the App providers.
- In AppRadio Mode +, functionality through the product is limited while driving, with available functions determined by the App providers.
- Availability of AppRadio Mode + functionality is determined by the App provider, and not determined by Pioneer.
- AppRadio Mode + allows access to applications other than those listed (subject to limitations while driving), but the extent to which content can be used is determined by the App providers.
Starting procedure
When connecting an iPhone or a smartphone to this product, the settings are automatically configured according to the device to be connected. For details of the available connection, refer to iPod/iPhone or smartphone connection for AV source (page 20).
TIPS
- Touch the desired application icon after the AppRadio app is launched.
- If you connect your device to this product while an AppRadio Mode + compatible application is already running, the application operation screen will appear on this product.
- The desired application is launched, and the application operation screen appears.
- Press go back to the top menu screen.
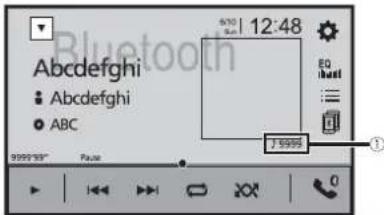
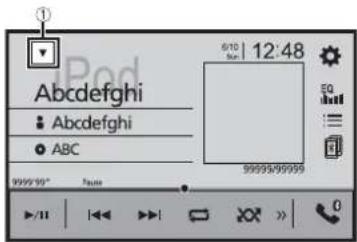
AppRadio Mode +
| 1 | Displays the current source. |
| Displays the launcher application screen. | |
| Displays the previous screen. | |
| Displays the menu screen. |
- Press then touch to hide the AppRadio Mode + SideControlBar.
- Press then touch again to display the AppRadio Mode + SideControlBar again.
- and are not available depending on the type of device.
For iPhone users
1 Connect your iPhone.
Refer to iPod/iPhone with Lightning connector (page 58).
2 Press
3 Touch
4 Touch [AppRadio Mode].
5 Touch desired icon in the tab. The AppRadio app is launched.
For smartphone (Android) users
NOTES
- [USB MTP] is set to [Off] to use AppRadio Mode + (page 40).
• The video playback capability depends on the connected Android device.
1 Unlock your smartphone and connect it to this product via USB.
Refer to Smartphone (Android device) (page 58).
2 Press
3 Touch
4 Touch [AppRadio Mode].
5 Touch desired icon in the tab.
The AppRadio app is launched.
Using the keyboard
When you tap the text input area of an application for iPhone, a keyboard will be displayed on the screen. You can input desired text directly from this product.
NOTE
This function is only available in AppRadio Mode + on the iPhone.
CAUTION
For your safety, the keyboard functionality is only available when the vehicle is stopped and the handbrake is engaged.
1 Start up the AppRadio Mode +.
2 Touch the text input area on the application operation screen. A keyboard for entering text appears.
TIP
You can select the keyboard language (page 42).
Using the audio mix function
You can output the audio mixing AV source and an application for iPhone or smartphone when AppRadio Mode + is used.
NOTE
Depending on the application or AV source, this function may not be available.
1 Start up the AppRadio Mode +.
2Press VOL (+/-).
The audio mix menu will be displayed on the screen.
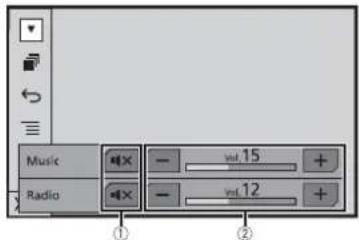
| 1 | Touch to mute. Touch again to cancel mute. |
| 2 | Adjusts the audio volume. |
TIP
The AV operation screen and the Application screen can be switched by pressing
AV source
Supported AV source
You can play or use the following sources with this product.
• Radio
• CD
• ROM (compressed audio or video files on discs)
• DVD-Video
• USB
The following sources can be played back or used by connecting an auxiliary device.
• iPod
- Spotify ^s
- Bluetooth® audio
• TV
- AV input (AV)
• AUX
Displaying the AV operation screen
1 Press then touch the AV operation key.
The AV operation screen appears.
①
Displays the source list.
Selecting a source
Source on the AV source selection screen
1 Press then touch. AV
2 Touch the source icon.
When you select [Source OFF], the AV source is turned off.
Source on the source list
1 Press then touch AV operation key.
2 Touch ▼
3 Touch the source key.
When you select [Source OFF], the AV source is turned off.
Changing the display order of source
NOTE
This function is available only when you stop your vehicle in a safe place and apply the handbrake.
Changing the display order of source icons
1 Press then touch. AV
2 Touch and hold the source icon and drag the icon to the desired position.
Changing the display order of source keys
1 Press then touch AV operation key.
2 Touch ▼.
3 Touch
4 Drag the source key to the desired position.
Adjusting the range of favourite source icons area
NOTE
This function is available only when you stop your vehicle in a safe place and apply the handbrake.
1Press
2Touch and hold. AV
appears at the top left of the favourite source icons.
3Drag to the desired position.
To finish the adjusting, touch any place of the display except for the favourite source icons area.
iPod/iPhone or smartphone connection for AV source
When using an iPod/iPhone or a smartphone with this product, the settings are automatically configured according to the device to be connected. This section describes source compatibility for each device with the connection.
NOTES
- Operation methods may vary depending on the iPod/iPhone model or smartphone and its software version.
- Depending on the software version of iPod/IPhone or the version of smartphone OS, it may not be compatible with this unit.
iPod/iPhone with a Lightning connector
These are the methods to connect an iPod/iPhone with a Lightning connector to this product. The available sources vary depending on the connection method.
- Connecting via Bluetooth (page 21)
- Connecting via CD-IU52* (page 21)
* Sold separately
Compatible iPod/iPhone models
- iPhone 7,7 Plus
- iPhone SE
- iPhone 6, 6 Plus, 6s, 6s Plus
- iPhone 5, 5c, 5s
• iPod touch 5th, 6th generation
• iPod nano 7th generation
Depending on the iPod models, it may not be compatible with some AV sources. For details about iPod/iPhone compatibility with this product, refer to the information on our website.
TIP
You can connect and control an iPod/iPhone compatible with this product by using separately sold connector cables.
Connecting via Bluetooth
The following sources are available when an iPod/iPhone is connected to the unit via Bluetooth.
• iPod
- Spotify
- Bluetooth audio
1 Connect an iPod/iPhone with this product via Bluetooth (page 12).
2 Press ■ then AVtouch
3 Touch compatible desired source.
Connecting via CD-IU52
The following sources are available when an iPod/iPhone with a Lightning connector is connected to the unit via CD-IU52 (sold separately).
• iPod
- Spotify
1 Connect an iPod/iPhone to USB port of this product by CD-IU52.
2 Press ■ then AVtouch
3 Touch compatible desired source.
The unit automatically configures connection with connected device.
- AppRadio Mode +
1 Connect an iPod/iPhone to USB port of this product by CD-IU52.
2 Press then touch.
3 Touch [AppRadio Mode].
4 Touch desired icon in the tab.
iPhone with a 30-pin connector
These are the methods to connect an iPhone with a 30-pin connector to this product. The available sources vary depending on the connection method.
- Connecting via Bluetooth (page 21)
- Connecting via CD-IU51* (page 21)
* Sold separately
Compatible iPhone model
- iPhone 4s
For details about iPhone compatibility with this product, refer to the information on our website.
TIP
You can connect and control an iPhone compatible with this product by using separately sold connector cables.
Connecting via Bluetooth
The following sources are available when an iPhone is connected to the unit via Bluetooth.
- iPod
- Spotify
- Bluetooth audio
1 Connect an iPhone with this product via Bluetooth (page 12).
2 Press then touch. AV
3 Touch compatible desired source.
Connecting via CD-IU51
The following sources are available when an iPhone with a 30-pin connector is connected to the unit via CD-IU51 (sold separately).
- iPod
- Spotify
1 Connect an iPhone to USB port of this product by CD-IU51.
2 Press then touch. AV
3 Touch compatible desired source.
Smartphone (Android™ device)
These are the methods to connect a smartphone to this product. The available sources vary depending on the connection method.
- Connecting via Bluetooth (page 22)
- Connecting via CD-MU200* (page 22)
* Sold separately
Compatible smartphones
Compatibility with all smartphones is not guaranteed. For details about smartphone compatibility with this product, refer to the information on our website.
Connecting via Bluetooth
The following sources are available when a smartphone is connected to the unit via Bluetooth.
- Spotify
- Bluetooth audio
1 Connect a smartphone with this product via Bluetooth (page 12).
2 Press then touch

3 Touch compatible desired source.
Connecting via CD-MU200
The following sources are available when a smartphone is connected to the unit via CD-MU200.
- AppRadio Mode +
1 Connect a smartphone to USB port of this product by CD-MU200.
2 Press then touch.

3 Touch [AppRadio Mode].
4 Touch desired icon in the tab.
Radio
Starting procedure
1 Press the touch. AV
2 Touch [Radio].
The Radio screen appears.
Basic operation
Radio screen
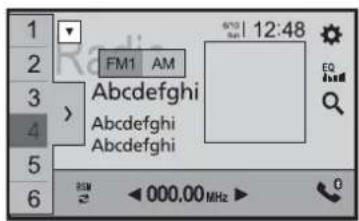
| Recalls the preset channel stored to a key from memory. | |
| Stores the current broadcast frequency to a key. | |
| Displays the preset channel list.Select an item on the list ([1] to [6]) to switch to the preset channel. | |
| FM1 AM | Selects the FM1, FM2, FM3, or AM band. |
| Performs BSM (best stations memory) function (page 23). | |
| Manual tuning | |
| Seek tuning or non stop seek tuningReleasing the key in a few seconds skips to the nearest station from the current frequency. Keep holding the key for long seconds to perform, performs non stop seek tuning. | |
| Searches for a broadcast by PTY information (page 23). |
TIPS
- By pressing then touch or ,you can also switch the preset channels.
- By pressing then touch and hold or and releasing it, you can also perform seek tuning.
Searching by PTY information
You can tune into a station using PTY (Programme Type Identification) information.
NOTE
This function is available when the FM tuner is selected.
1 Touch

2Touch

3Touch

TIP
If you touch [Cancel], the searching process is cancelled.
Storing the strongest broadcast frequencies (BSM)
The BSM (best stations memory) function automatically stores the six strongest broadcast frequencies under the preset channel keys [1] to [6].
NOTES
- Storing broadcast frequencies with BSM may replace those you have already saved.
- Previously stored broadcast frequencies may remain stored if the number of frequencies stored has not reached the limit.
1 Touch to begin search.
While the message is displayed, the six strongest broadcast frequencies will be stored under the preset channel keys in the order of their signal strength.
To cancel the storage process
1 Touch [Cancel].
Radio settings
1Press

2Touch

the

The system setting screen appears.
3 Touch [AV Source Settings].
4Touch [Radio settings].
The menu items vary according to the source.
| Menu Item Description | |
| [Local] [Off]FM: [Level1] [Level2] [Level3] [Level4]AM: [Level1] [Level2] | Local seek tuning allows you to only tune into radio stations with sufficiently strong signals. NOTEThe FM [Level4] (AM [Level2]) setting allows reception of only stations with the strongest signals. |
| [FM Step] [100kHz] [50kHz][AM Step] [9kHz] [10kHz] | You can switch the seek tuning step for the FM band, and the seek/manual tuning step for the AM band. NOTEFor the FM band, the manual tuning step is fixed to 50 kHz. |
| [Regional] [On] [Off] | Switches whether the area code is checked during the Auto PI search. |
| [Alternative FREQ]*1 [On] [Off] | Allow the unit to retune to a different frequency providing the same station. NOTEThis menu is available only when [Location Setting] is [Australia] (page 41). |
| [Auto PI] [On] [Off] | Searches for the same PI (Programme Identification) code broadcast station from all frequency bands automatically when the broadcasting station contains RDS data. NOTEEven if you set to [Off], the PI search is automatically performed when the tuner cannot get a good reception. |
| [Alarm Interrupt]*2 [On] [Off] | The alarm broadcast can be received from the last selected frequency, interrupting the other sources. |
| [TA Interrupt]*2[On] [Off] | Receives the traffic announcement from the last selected frequency, interrupting the other sources. |
| [News Interrupt]*2[On] [Off] | Interrupt the currently selected source with news programmes. |
*1 AVH-Z7150BT
*2 This function is available only when you receive the FM band.
TV tuner
Z7150BT
You can watch the TV by connecting the TV tuner such as GEX-1550DTV (sold separately) to this product. For details of connection, refer to the TV tuner operation manual.
NOTE
The following description is different from the TV tuner operation manual.
Starting procedure
1 Press the touch.

2Touch [TV].
The TV screen appears.
Basic operation
TV screen (Example)
①
Switches the screen mode (page 50). [Full]—[Normal]
TIP
By pressing then touch or you can also switch the preset channels.
Digital TV
Z7150TV
Starting procedure
1 Press theM touch .

2Touch [TV].
The TV screen appears.
Basic operation
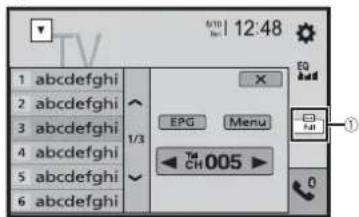
Digital TV screen
①
②


Recalls the preset service.
Hides the tuner control keys.
To display the keys again, touch anywhere on the screen.
Updates the preset service list information.
Touching [Cancel] interrupts the search process.
Switches the services upward or downward.
Reception status of the digital TV.

Displays the Electronic Programme Guide (EPG). To receive the information, touch the programme.
TIPS
- By pressing then touch or you can also switch the preset channels.
- When you start to use this source, preset service list information is automatically updated.
DTV settings
1Press

2Touch


The system setting screen appears.
3Touch [AV Source Settings].
4Touch [DTV Settings].
Menu Item Description
| [Parental Control] [Off] [Under 10 years] [Under 12 years] [Under 14 years] [Under 16 years] [Under 18 years] | Enter the current passcode then touchset this function (the default passcode is 0000), then touch the item to set the lock rating.To edit the passcode, follow instructions.1Enter the passcode.2Touch [Edit Code].3Enter the new passcode then touch .4Enter the new passcode again.5Touch |
| [Subtitle] [On] [Off] | Set to display the subtitle. |
| [Sound Output Settings] [Main] [Sub] [Main + Sub] | Switches the sound output. |

Disc
Inserting and ejecting a disc
You can play a normal music CD, Video-CD, or DVD-Video using the built-in drive of this product.
WARNING
Keep hands and fingers clear of this product when opening, closing, or adjusting the LCD panel. Be especially cautious of children's hands and fingers.
CAUTION
Do not insert anything other than a disc into the disc-loading slot.
Insert the disc
1 Insert a disc into the disc-loading slot.
The source changes and then playback will start.
NOTE
If the disc is already set, select [Disc] as the playing source.
Ejecting a disc

Basic operation
TIPS
- By pressing ☐ then touch 🎯 or 🎯, you can also skip files/chapters forwards or backwards.
- By pressing ☐ then touch and hold 🎋 or 🌘, you can also perform fast reverse or fast forwards.
- If a Video-CD with PBC (playback control) On is being played, appears.
- You can set the screen size for the video image (page 50).
Audio source
Audio source screen
| 1 | Track number indicator |
 | Switches between playback and pause. |
 | Skips files forwards or backwards. |
 | Sets a repeat play for the current disc/the current track. |
 | Plays or does not play tracks in random order. |
 | Selects a track from the list.Touch a track on the list to play back. |
Video source
CAUTION
For safety reasons, video images cannot be viewed while your vehicle is in motion. To view video images, stop in a safe place and apply the handbrake.
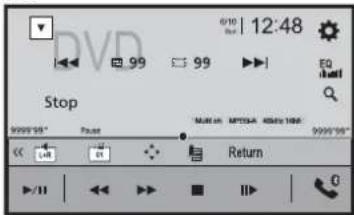
Video source screen 1

| 1 | Hides the touch panel keys.To display the keys again, touch anywhere on the screen. |
| Performs fast reverse or fast forwards.Touch again to change the playback speed. | |
| Stops playback. | |
| Performs frame-by-frame playback. | |
| Performs slow-motion playback.Each time you touchchanges the speed in four steps in the following order: 1/16 -> 1/8 -> 1/4 -> 1/2 | |
| MENU | TOP MENUDisplays the DVD menu.NOTEThis function may not work properly with some DVD disc content. In that case, use touch panel keys to operate the DVD menu. |
| Sets a repeat play for all files/the current chapter/the current title. | |
| Switches the audio/subtitle language. | |
| Displays the hidden function bar.TIPYou can also display the hidden function bar by flicking the bar from the right to the left. |
| Searches for the part you want to play.Touch [Title], [Chapter], [10Key], or [Track] then input the desired number from [0] to [9].To start playback from the number you registered, touchTIPSTo cancel an input number, touch [C].For DVD-Videos, you can select [Title], [Chapter] or [10Key].For Video-CDs, you can select [Track] or [10Key].* | |
| Skips files/chapters forwards or backwards. |
* PBC (playback control) only
Video source screen 2
| Displays the hidden function bar.TIPYou can also display the hidden function bar by flicking the bar from the left to the right. | |
| Selects the audio output from [L+R], [Left], [Right], [Mix].This function is available for Video-CDs and DVDs recorded with LPCM audio. | |
| Changes the viewing angle (Multi-angle).This function is available for DVDs featuring multi-angle recordings. | |
| Displays the DVD menu keypad.If items on the DVD menu appear, the touch panel keys may overlay them. If so, select an item using these touch panel keys.Touch ⚪ ⚫ ⚪ ⚪ ⚪ ⚪ ⚪ ⚪ ⚪ ⚪ ⚪ ⚪ ⚪ ⚪ ⚪ ⚪ ⚪ ⚪ ⚪ ⚪ ⚪ ⚪ ⚪ ⚪ ⚪ ⚪ ⚪ ⚪ ⚪ ⚪ ⚪ ⚪ ⚪ ⚪ ⚪ ⚪ | |
 | Resumes playback (Bookmark).This function is available for DVD-Video. You can memorise one point as a Bookmark for a disc (up to five discs). To clear the bookmark on the disc, touch and hold this key. |
 | Returns and begins playback from the specified point.This function is available for DVD-Video and Video-CDs featuring PBC (playback control). |
Compressed files
Inserting and ejecting media
You can play compressed audio, compressed video, or still image files stored in a disc or an external storage device.

WARNING
Keep hands and fingers clear of this product when opening, closing, or adjusting the LCD panel. Be especially cautious of children's hands and fingers.

CAUTION
Do not insert anything other than a disc into the disc-loading slot.
Insert a disc
1 Insert a disc into the disc-loading slot. The source changes and then playback will start.
NOTE
If the disc is already set, select [Disc] as the playing source.
Ejecting a disc
1 Press

Plugging a USB storage device
1 Pull out the plug from the USB port of the USB cable. 2 Plug a USB storage device into the USB cable.
NOTES
• This product may not achieve optimum performance with some USB storage devices.
• Connection via a USB hub is not possible.
- A USB cable is required for connection.
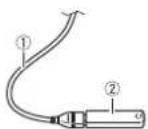
| 1 | USB cable |
| 2 | USB storage device |
Unplugging a USB storage device
1 Pull out the USB storage device from the USB cable.
NOTES
- Check that no data is being accessed before pulling out the USB storage device.
- Turn off (ACC OFF) the ignition switch before unplugging the USB storage device.
Starting procedure
For Disc
1 Insert the disc (page 28).
TIP
If the disc is already set, select [Disc] as the playing source.
For USB
1 Press then touch. AV
2 Plug the USB storage device into the USB cable (page 28).
3 Touch [USB].
Playback is performed in order of folder numbers. Folders are skipped if they contain no playable files.
Basic operation
TIPS
- By pressing □ then touch 🏠 or 📌, you can also skip files/chapters forwards or backwards.
- By pressing ☐ then touch and hold 🏠 or 🚗 on the audio or video file, you can also perform fast reverse or fast forwards.
- You can set the screen size for the video and image files (page 50).
Audio source
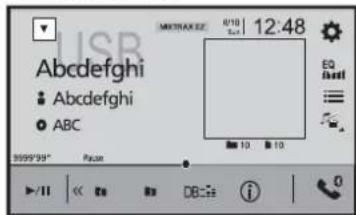
Audio source screen 1 (Example: USB)

| 1 | Displays the link search screen.Touch the song to play back followed by touching the song information, after switching to Music Browse mode (page 30).TIPIf you touch the artwork, the list of songs in the album is displayed.NOTEThis function is available for the USB storage device only. |
| Switches between playback and pause. | |
| Skips files forwards or backwards. | |
| Sets a repeat play range for all files/the current folder/the current file. | |
| Plays files or does not play in random order. | |
| Displays the hidden function bar.TIPYou can also display the hidden function bar by flicking the bar from the right to the left. | |
| Switches the following media file types.[Music]: Compressed audio files[Video]: Compressed video files[CD-DA]: Audio data (CD-DA)[Photo]: Image files | |
| Selects a file from the list.Touch a file on the list to playback.TIPTouching a folder on the list shows its contents. You can play a file on the list by touching it.NOTEWhen you play compressed audio files stored in a USB storage device, you can search for a file using Music Browse (page 30). | |
| MIXTRAX EZ | Displays the MIXTRAX screen (page 38). |
Audio source screen 2 (Example: USB)
| Displays the hidden function bar.TIPYou can also display the hidden function bar by flicking the bar from the left to the right. | |
| Selects the previous folder or the next folder. | |
| Constructs the database for using the Music Browse mode (page 30). |
| i | Switches the current music information display. |
| Selecting a file using Music Browse mode | |
| You can select files to play back using the category list if the files contain tag information. NOTESThis function is available for the USB storage device only.Music Browse mode cannot be held once the power is turned off.1 Touchto create a database.Music Browse mode will be available after the database has been created.2 Touch:3 Touch the desired category to display the file list.4 Touch the item.Refine the item until the desired song title or file name is displayed on the list.5 Touch the desired song title or file name to play back.If the selection made with Music Browse has been cancelled, you can switch to MusicBrowse mode again by touching the [Tag] tab on the file/folder list screen andtouching the desired track.TIPOnce the database is created in the USB storage, there is no need to create the database again as longas the same contents are saved. To enter the Music Browse mode directly, touchand then touch[Tag] before selecting the song. | |


CAUTION
For safety reasons, video images cannot be viewed while your vehicle is in motion. To view video images, stop in a safe place and apply the handbrake.
Video source screen (Example: Disc)
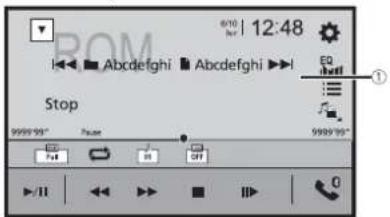
| 1 | Hides the touch panel keys.To display the keys again, touch anywhere on the screen. |
| Switches between playback and pause. | |
| Performs fast reverse or fast forwards.Touch again to change the playback speed. | |
| Stops playback. | |
| Performs frame-by-frame playback. | |
| Performs slow-motion playback. | |
| Sets a repeat play range for all files/the current folder/the current file. | |
| Switches the audio/subtitle language. | |
| Switches the following media file types.[Music]: Compressed audio files[Video]: Compressed video files[CD-DA]: Audio data (CD-DA)[Photo]: Image files |
| Selects a file from the list.Touch a file on the list to playback.TIPTouching a folder on the list shows its contents. You can play a file on the list by touching it. | |
| Skips files forwards or backwards. |
Still image source
TIPS
• Image files are not displayed in the rear display.
- By pressing □ then touch and hold ▶ or ▶ on the still image file, you can search through 10 image files at a time. If the file currently being played is the first or last file in the folder, the search is not performed.
Still image screen
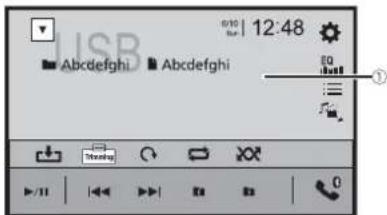
| 1 | Hides the touch panel keys.To display the keys again, touch anywhere on the screen. |
 | Switches between playback and pause. |
| Skips files forwards or backwards. | |
 | Selects the previous folder or the next folder. |
 | Saves the current images as the wallpaper. Touch the following items then touch [Yes] to overwrite the image. [As AV Screen]: Saves the image as the wallpaper for the AV screen. [As HomeScreen]: Saves the image as the wallpaper for the top menu screen. [As Both]: Saves the image as the wallpaper for both the AV screen and top menu screen. NOTE If you save the new image, the current wallpaper is overwritten except for the preset image. | |
 | Rotates the displayed picture 90° clockwise. | |
 | Sets a repeat play range for all files/the current folder. | |
 | Plays all files in the current repeat play range or does not play them in random order. | |
 | Switches the following media file types. [Music]: Compressed audio files [Video]: Compressed video files [CD-DA]: Audio data (CD-DA) [Photo]: Image files | |
 | Selects a file from the list. Touch a file on the list to playback. TIP Touching a folder on the list shows its contents. You can play a file on the list by touching it. |
iPod
Connecting your iPod
When connecting an iPod to this product, the settings are automatically configured according to the device to be connected. For details of the available connection, refer to iPod/iPhone or smartphone connection for AV source (page 20).
NOTES
- Depending on the generation or version of the iPod, some functions may not be available.
- Do not delete the Apple Music® app from your iPod, since some functions may not be available.
1Connect your iPod.
2Press the touch.
3 Touch [iPod].
Basic operation
TIPS
- By pressing then touch or you can also skip files forwards or backwards.
- By pressing ☐ then touch and hold 🎋 or 🌘, you can also perform fast reverse or fast forwards.
Audio source
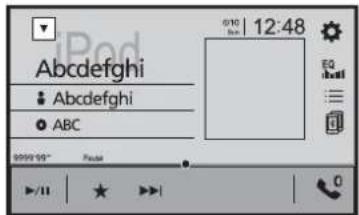
Audio source screen 1
| 1 | Displays the link search screen.Select a song from the list related to the song currently playing.TIPIf you touch the artwork, the list of songs in the album is displayed.NOTEThis function is not available while playing Apple Music Radio. |
| Switches between playback and pause. | |
| Skips files forwards or backwards. | |
| Sets a repeat play range for all in the selected list/the current song. | |
| Plays songs within the selected list/album randomly. | |
| Displays the hidden function bar. | |
| Switches among connected devices. | |
| Selects a song from the list.Touch the category then the title of the list to playback of the selected list.TIPS• If you use English as the system language, the alphabet search function isavailable. Touch the initial search bar to use this function.You can play playlists created with the MusicSphere application. The applicationis available on our website.When you touch Apple Music Radio station in the list screen, Apple Music Radioscreen appears (page 33).NOTES• Depending on the generation or version of the iPod, some functions may not beavailable.• Only 16 000 songs in the iPod are available in the list if the iPod has more than 16000 songs. Available songs depend on the iPod. |

Audio source screen 2
| 1 | Changes the audiobook speed.Normal—Fast—Slow |
| Displays the hidden function bar. |
Apple Music® Radio source
Important
Apple Music Radio may not be available in your country or region. For details about Apple Music Radio, visit the following site: http://www.apple.com/music/
NOTE
This function is only available when using the iPod function with an iPhone 7, iPhone 7 Plus, iPhone SE, iPhone 6s, iPhone 6s Plus, iPhone 6, iPhone 6 Plus, iPhone 5s, iPhone 5, iPhone 5c, iPhone 4s or iPod touch (5th, 6th generation).
Apple Music Radio screen
| ▶/II | Switches between playback and pause. |
 | Displays the pop-up menu for Apple Music Radio.• Touch [Play More Like This] to play back songs similar to the current song.• Touch [Play Less Like This] to set it not to play back the current song again.• Touch [Add to iTunes Wish List] to add the current song to the iTunes wish list. |
| NOTEThis function may not be used depending on your Apple Music account status. | |
 | Skips tracks forwards. |
Spotify®
To enjoy Spotify as you drive, first download the Spotify app to your iPhone or smartphone. You can download it from the iTunes App Store or Google Play. Choose a free account or a paid Premium account, either in the app or at spotify.com. A Premium account gives you more features like offline listening. If you have Spotify already, please update the app so you have the latest version then connect your phone to your car. Now you can take your music on the road.
WARNING
Certain uses of the iPhone or smartphone may not be legal while driving in your jurisdiction, so you must be aware of and obey any such restrictions. If in doubt as to a particular function, only perform it while the car is parked. No feature should be used unless it is safe to do so under the driving conditions you are experiencing.
Important
- Confirm the requirements to access Spotify using Pioneer car audio/video (page 20).
- To use Spotify, you need to connect to the Internet via 3G, EDGE, LTE (4G), or a Wi-Fi network. If the data plan for your iPhone or smartphone does not provide for unlimited data usage, additional charges from your carrier may apply.
- For information on the countries and regions where Spotify can be used, take a look at https://www.spotify.com/us/select-your-country/.
Limitations:
- Depending on the availability of the Internet, you may not be able to receive the Spotify service.
- The Spotify service is subject to change without notice. The service could be affected by any of the following: firmware version of the iPhone or smartphone, firmware version of the Spotify application, changes to the Spotify music service.
- Certain functions of the Spotify service are not available when accessing the service through Pioneer car audio/video products.
- Spotify is a music service not affiliated with Pioneer. More information is available at https://support.spotify.com/.
- The Spotify application is available for most iPhone and smartphone, please visit https://support.spotify.com/ for the latest compatibility information.
Listening to Spotify
Update the firmware of the Spotify application to the latest version before use.
1 Unlock the mobile device and connect it to this product.
- iPhone via USB or Bluetooth
• Smartphone via Bluetooth
2Press

3Touch


4Touch [AV Source Settings].
5 Confirm that [Spotify] Is turned on.
6Press the touch.

7 Touch [Spotify].
NOTES
- For details on Bluetooth connection, see page 12.
- For details on USB connection for iPhone, refer to iPod/iPhone with Lightning connector (page 58) or iPhone with 30-pin connector (page 58).
Basic operation
Playback screen 1 (Track)
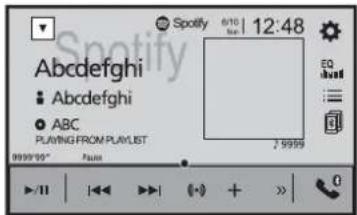
| Switches between playback and pause. | |
| Skips tracks forwards or backwards.TIPBy pressingthen touch,yocan skip tracks forwards. | |
| Switches to radio mode. | |
| Saves or deletes the current song information to or from Your Music. |
| Displays the hidden function bar.TIPYou can also display the hidden function bar by flicking the bar from the right to the left. | |
| Switches among connected devices. | |
| Selects a track or station from the list.Your Music: Selects a track or station from the list of saved song information.Browse: Selects a track from the category list.Radio: Selects a station from the station list.Recently Played: Selects a track from recently played. |
Playback screen 2 (Track)
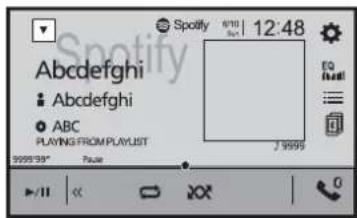
| Displays the hidden function bar.TIPYou can also display the hidden function bar by flicking the bar from the left to the right. | |
| Sets a repeat play range. | |
| Plays tracks in random order. |
Playback screen 1 (Radio mode)
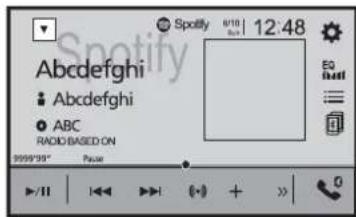
| Switches between playback and pause. | |
| Skips tracks forwards or backwards.TIPBy pressingthen touch,yourcan skip songs forwards. | |
| Starts new radio mode. | |
| Saves or deletes the current song information to or from Your Music. | |
| Displays the hidden function bar.TIPYou can also display the hidden function bar by flicking the bar from the right to the left. | |
| Switches among connected devices. | |
| Selects a track or station from the list.Your Music: Selects a track or station from the list of saved song information.Browse: Selects a track from the category list.Radio: Selects a station from the station list.Recently Played: Selects a track from recently played. |
Playback screen 2 (Radio mode)
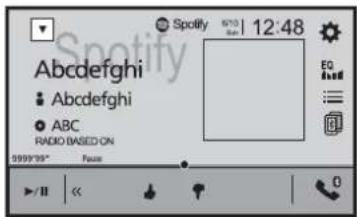
| Displays the hidden function bar.TIPYou can also display the hidden function bar by flicking the bar from the left to the right. | |
| Gives a Thumbs Up to the playing track. | |
| Gives a Thumbs Down to the playing track and skips to the next track. |
AUX
You can display the video image output by the device connected to video input.

CAUTION
For safety reasons, video images cannot be viewed while your vehicle is in motion. To view video images, stop in a safe place and apply the handbrake.
NOTE
A Mini-jack AV cable (CD-RM10) (sold separately) is required for connection. For details, refer to External video component and the display (page 59).
Starting procedure
1Press

2Touch


3 Touch [Input/Output settings].
4 Confirm that [AUX Input] is turned on.
5Press


6Touch [AUX].
The AUX screen appears.
Basic operation
AUX screen
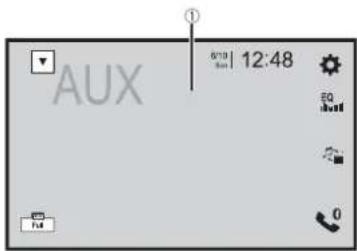
| 1 | Hides the touch panel keys.To display the keys again, touch anywhere on the screen.TIPYou can set the screen size for the video image (page 50). |
| Switches between the video input and audio input. |

AV input
You can display the video image output by the device connected to video input. For details, refer to External video component and the display (page 59).
CAUTION
For safety reasons, video images cannot be viewed while your vehicle is in motion. To view video images, stop in a safe place and apply the handbrake.
Starting procedure
1Press

2Touch


3 Touch [Input/Output settings].
4Touch [AV Input].
5Touch [On].
6Press


7 Touch [AV].
The image is displayed on the screen.
MIXTRAX
MIXTRAX is an original technology for creating non-stop mixes of selections from your audio library, complete with DJ effects.
MIXTRAX EZ operation
You can use this unit to play USB audio files.
MIXTRAX EZ is used to add a variety of sound effects between songs for arranging the pauses between songs.
It allows you to enjoy listening to music non-stop.
NOTES
- This function is only available when a file on a USB storage device is being played.
- Depending on the file/song, sound effects may not be available.
- Depending on the file/song, non-stop playback may not be available.
Starting procedure
1 Touch

(Example: USB)
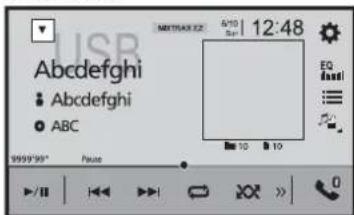
| MIXTRAX EZ | Activates the MIXTRAX mode. |
| Switches between playback and pause. | |
| Selects a track. |
MIXTRAX settings
1 Press

2Touch


The system setting screen appears.
3 Touch [AV Source Settings].
4Touch [MIXTRAX Settings].
| Menu Item Description | |
| [Short Playback Mode][Off] [60s] [90s] [120s][150s] [180s] [Random] | Specify the playback portion. |
| [Display Effect][On] [Off] | Set the effect display for MIXTRAX. |
| [Cut-In Effect][On] [Off] | Set the effect tone that sounds when you skip tracks forwards or backwards. |
| [Effect Setting][Standard] [Simple][Custom] | Set and play back the MIXTRAX effect that you want. |
| [Flash Pattern] The flashing colour changes with the changes in the sound and bass levels. |
| [Sound1] to [Sound6] The flash pattern changes according to the sound level. |
| [L-Pass1] to [L-Pass6] The flash pattern changes according to the bass level. |
| [Random1] The flash pattern changes randomly according to the sound level mode and low pass mode. |
| [Random2] The flash pattern changes randomly according to the sound level mode. |
| [Random3] The flash pattern changes randomly according to the low pass mode. |
| [Off] Set the flash pattern to off. |
Settings
You can adjust various settings in the main menu.
Displaying the setting screen
1Press

2Touch

3 Touch one of the following categories, then select the options.
System settings (page 39)
Theme settings (page 44)
Audio settings (page 44)
Video settings (page 47)
Bluetooth settings (page 12)
System settings
The menu items vary according to the source.
[AV Source Settings]
| Menu Item Description | |
| [MIXTRAX Settings] (page 39) | |
| [Radio settings] (page 23) | |
| [DTV Settings]* | (page 25) |
| [Bluetooth Audio][On] [Off] | Setting Bluetooth audio source activation. |
| [Spotify][On] [Off] | Setting Spotify source activation. |
* AVH-Z7150TV
| [Beep Tone] | |
| Menu Item Description | |
| [Beep Tone][On] [Off] | Select [Off] to disable the beep sound when the button ispressed or the screen is touched. |
| [Auto Mix] | |
| Menu Item Description | |
| [Auto Mix][On] [Off] | Select whether to perform mixing the sound output fromAppRadio Mode + and AV source sound automatically. |
| [Input/Output settings] | |
| Menu Item Description | |
| [USB MTP][On] [Off] | Select whether or not to activate USB MTP (Media TransferProtocol) connection. |
| [AppRadio Mode Sound] Set where the sound for AppRadio Mode + is output whenit is used with a smartphone. | |
| [AVH] The sound is output from the speakers of this unit. | |
| [Smartphone] The sound is output from the speakers of the smartphone. | |
| NOTEWith an iPhone, the sound is always output from the speakers ofthis unit. | |
| [AV Input][On] [Off] | Select AV input source (page 38). |
| [AUX Input][On] [Off] | Set to [On] for AUX source (page 37). |
| [Camera settings] | |
A separately sold rear view camera (e.g. ND-BC8) is required for utilising the rear view camera function. (For details, consult your dealer.)
▶Rear view camera
This product features a function that automatically switches to the full-screen image of the rear view camera installed on your vehicle when the gearstick is in the REVERSE (R) position.
▶Camera for Camera View mode
Camera View can be displayed at all times. Note that with this setting, the camera image is not resized to fit, and that a portion of what is seen by the camera is not viewable. To display the camera image, touch [Camera View] on the AV source selection screen (page 19).
NOTE
To set the rear view camera as the camera for Camera View mode, set [Back Camera Input] to [On] (page 40).
CAUTION
Pioneer recommends the use of a camera which outputs mirror reversed images, otherwise the screen image may appear reversed.
- Immediately verify whether the display changes to the rear view camera image when the gearstick is moved to REVERSE (R) from another position.
- When the screen changes to full-screen rear view camera image during normal driving, switch to the opposite setting in [Camera Polarity].
- If you touch 📋 while the camera image is displayed, the displayed image turns off temporarily.
Menu Item Description
| [Back Camera Input] [On] [Off] | Setting rear view camera activation. |
| [Camera Polarity] Setting the polarity of the rear view camera. | |
| [Battery] The polarity of the connected lead is positive. | |
| [Ground] The polarity of the connected lead is negative. | |
| NOTEThis function is available when [Back Camera Input] is set to [On]. | |
| [Parking Assist Guide] [On] [Off] | You can set whether to display the parking assist guidelines on the rear view camera images when backing up your vehicle. |
Menu Item Description
| [Parking Assist Guide Adjust] | Adjusting the guidelines by dragging or touching ▲▼◀◀▶▶▶▶▶▶▶▶▶▶▶▶▶▶▶▶▶▶▶▶▶▶▶▶▶▶▶▶▶▶▶▶▶▶▶▶▶▶▶▶▶▶▶▶▶▶▶▶▶▶▶▶▶▶▶▶▶▶▶▶▶▶▶▶▶▶▶▶▶▶▶▶▶▶▶▶▶▶▶▶▶▶▶▶▶▶▶▶▶▶▶▶▶▶▶▶▶▶▶▶> |
| Touch [Default] to reset the settings. | |
| CAUTIONWhen adjusting the guidelines, be sure to park the vehicle in a safe place and apply the handbrake.Before getting out of the car to place the markings, be sure to turn the ignition switch off (ACC OFF).The range projected by the rear view camera is limited. Also, the vehicle width and distance guidelines displayed on the rear view camera image may differ from the actual vehicle width and distance. (The guidelines are straight lines.)The image quality may deteriorate depending on the usage environment, such as at night or in dark surroundings. | |
| NOTESThis setting is available only when you stop your vehicle in a safe place and apply the handbrake.Using packing tape or similar tape place markings as shown below before setting up the guidelines so that the guidelines can be overlaid to the markings. | |
| 2 m50 cmMarkings25 cmMarkings25 cmRear bumper |
[Demo Mode]
| Menu Item Description | |
| [Demo Mode] [On] [Off] | Setting the demo mode. |
[System Language]
| Menu Item Description |
| [System Language] Select the system language. |
| NOTESIf the embedded language and the selected language setting are not the same, the text information may not display properly.Some characters may not be displayed properly. |
[Auto Flap]
| Menu Item Description | |
| [Auto Flap] | Select whether or not to open/close the LCD panel |
| [On] [Off] | automatically when the ignition switch is turned on or off. |
[Location Setting]
| Menu Item Description | |
| [Location Setting] | Select the using location. |
| [South America] | |
| [Australia] | |
[Steering Wheel Control]
| Menu Item Description | |
| [Steering Wheel Control] [With Adapter] [W/o Adapter] | Select [With Adapter] or [W/o Adapter] according to your wired remote control. |
| NOTESThis setting is available only when you stop your vehicle in a safe place and apply the handbrake.Depending on your vehicle, this function may not work properly.In this case, contact your dealer or an authorised PIONEER Service Station.Please use a PIONEER wiring harness for each car model when [With Adapter] mode is engaged, otherwise select [W/o Adapter]. | |
[Restore Settings]
Menu Item Description
[All Settings] Touch [Restore] to restore the settings to the default settings.
CAUTION
Do not turn off the engine while restoring the settings.
NOTES
- This setting is available only when you stop your vehicle in a safe place and apply the handbrake.
- The source is turned off and the Bluetooth connection is disconnected before the process starts.
[Keyboard]
Menu Item Description
[Keyboard] You can use the keyboard in AppRadio Mode + by setting the language of the keyboard for iPhone.
NOTES
- Set the same system language setting as the iPhone to operate this function properly.
- This function is only available in AppRadio Mode + on the iPhone.
[Touch panel calibration]
If you feel that the touch panel keys on the screen deviate from the actual positions that respond to your touch, adjust the response positions of the touch panel screen.
NOTES
- Do not use sharp pointed tools such as ballpoint or mechanical pens. They may damage the screen.
- Do not turn off the engine while saving the adjusted position data.
• This setting is available only when you stop your vehicle in a safe place and apply the handbrake.
Menu Item Description
[Touch panel calibration] 1Touch [Yes].
2Touch two corners of the screen along the arrows then touch the centres of the two [+] marks at the same time twice.
3Press
The adjustment results are saved.
4Press = once again.
Proceed to 16-point adjustment.
5Gently touch the centre of the [+] mark displayed on the screen.
The target indicates the order.
- When you press the previous adjustment position returns.
- When you press and hold, the adjustment is cancelled.
6Press and hold.
The adjustment results are saved.
[Dimmer Settings]
NOTE
This setting is available only when you stop your vehicle in a safe place and apply the handbrake.
Menu Item Description
[Dimmer Trigger] Setting the dimmer brightness.
[Auto] Switches the dimmer to on or off automatically according to your vehicle's headlight turning on or off.
[Manual] Switches the dimmer to on or off manually.
[Time] Switches the dimmer to on or off at the time you adjusted.
[Day/Night]
[Day/Night] Setting the dimmer duration by day or night. You can use this function when [Dimmer Trigger] is set to [Manual].
[Day] Turns the dimmer function to off.
[Night] Turns the dimmer function to on.
Menu Item Description
| [Dimmer Duration] Adjust the time that the dimmer is turned on or off by dragging the cursors or touching ▶. ▶You can use this function when [Dimmer Trigger] is set to [Time]. |
| TIPSEach touch of ▶ md▶the cursor backwards or forwards in the 15 minute width.When the cursors are placed on the same point, the dimmer available time is 0 hours.When the cursor for off time setting is placed on the left end and the cursor for on time setting is placed on the right end, the dimmer available time is 0 hours.When the cursor for on time setting is placed on the left end and the cursor for off time setting is placed on the right end, the dimmer available time is 24 hours. |
| NOTEThe time display of the dimmer duration adjusting bar depends on the clock display setting (page 50). |
[Picture Adjustment]
You can adjust the picture for each source and rear view camera.
![PIONEER AVH-Z7150BT - [Picture Adjustment] - 1](/content/2026/05/814541/images/42e61ee5d183f542aca80a80a77af6facbf88b3555406016555f906cb7d3adeb.jpg)
CAUTION
For safety reasons, you cannot use some of these functions while your vehicle is in motion. To enable these functions, you must stop in a safe place and apply the handbrake.
To adjust following menu, touch 🔊, to adjust
| Menu Item Description | |
| [Brightness] [-24] to [+24] | Adjust the black intensity. |
| [Contrast] [-24] to [+24] | Adjust the contrast. |
| [Colour]* [-24] to [+24] | Adjust the colour saturation. |
| [Hue]* [-24] to [+24] | Adjust the tone of colour (which colour is emphasised, red, or green). |
| [Dimmer] [+1] to [+48] | Adjust the brightness of the display. |
| [Temperature] [-3] to [+3] | Adjust the colour temperature, resulting in a better white balance. |
* With some pictures, you cannot adjust [Hue] and [Colour].
NOTES
- The adjustments of [Brightness], [Contrast], and [Dimmer] are stored separately when your vehicle's headlights are off (daytime) and on (nighttime).
- [Brightness] and [Contrast] are switched automatically depending on the setting of [Dimmer Settings].
- [Dimmer] can be changed the setting or the time to switch it to on or off (page 42).
• The picture adjustment may not be available with some rear view cameras.
• The setting contents can be memorised separately.
[System Information]
Menu Item Description
| [Firmware Update] | CAUTIONThe USB storage device for updating must contain only the correct update file.Never turn this product off, disconnect the USB storage device while the firmware is being updated.You can only update the firmware when the vehicle is stopped and the handbrake is engaged.1Download the firmware update files into your computer.2Connect a blank (formatted) USB storage device to your computer then locate the correct update file and copy it onto the USB storage device.3Connect the USB storage device to this product (page 28).4Turn the source off (page 19).5Display the [System] setting screen (page 39).6Touch [System Information].7Touch [Firmware Update].8Touch [Continue].Follow the on-screen instructions to finish updating the firmware.NOTESThis product will reset automatically after the firmware update is completed if the update is successful.If an error message appears on the screen, touch the display and perform the above steps again. |
| [Licence] | Displaying the open source licence. |
Theme settings
The menu items vary according to the source.
| Menu Item Description | |
| [Background] [Home] [AV] | Select the wall paper from the preset items in this product or original pictures via the external device. The wall paper can be set from selections for the top menu screen and AV operation screen. |
| Preset Display Select the desired preset background display. | |
| custom)*1 Displays the background display image imported from the external storage device. | |
| (off) Hides the background display. | |
| [Illumination]*2 Select an illumination colour from the colour list or create a defined colour. | |
| Coloured Keys Select the desired preset colour. | |
| (custom) Displays the screen to customise the illumination colour. To customise the defined colour, touch then touch or to adjust the brightness and the level of red, green and blue to create favourite colour. To store the customised colour in the memory, touch and hold [Memo], and the customised colour will be available at the next illumination setting by pressing TIP You can also adjust the colour tone by dragging the colour bar. | |
| (rainbow) Shifts gradually between the preset colours in sequence. | |
[Theme]*2 Select the theme colour.
| [Clock] Select the style of the clock from the preset image. | |
| Preset Images | Select the desired preset style for the clock. |
| OFF (off) Hides the clock display. | |
*1 Refer to Still image source (page 31).
*2 You can preview the top menu screen or the AV operation screen by touching [Home] or [AV] respectively.
Audio settings
The menu items vary according to the source. Some of the menu items become unavailable when the volume is set to mute.
| Menu Item Description | |
| [Graphic EQ] [Super Bass] [Powerful] [Natural] [Vocal] [Flat] [Custom1] [Custom2] | Select or customise the equaliser curve.Select a curve that you want to use as the basis of customising then touch the frequency that you want to adjust.TIPSIf you make adjustments when a curve [Super Bass], [Powerful], [Natural], [Vocal], or [Flat] is selected, the equaliser curve settings will be changed to [Custom1] mandatorily.If you make adjustments when the [Custom2] curve is selected for example, the [Custom2] curve will be updated.[Custom1] and [Custom2] curves can be created common to all sources.If you trail a finger across the bars of multiple equaliser bands, the equaliser curve settings will be set to the value of the touched point on each bar. |
| [Fader/Balance] | Touch ▲ or ▼ to adjust the front/rear speaker balance.Set [Front] and [Rear] to [0] when using a dual speaker system.Touch ▶ or ▶ to adjust the left/right speaker balance.TIPYou can also set the value by dragging the point on the displayed table.NOTEOnly the balance can be adjusted when [Network Mode] is selected as the speaker mode. |
| [Mute Level] | Select mute or attenuate the AV source volume and iPhone or smartphone application volume when the navigation outputs the guidance voice. |
| [ATT] | The volume becomes 20 dB lower than the current volume. |
| [Mute] | The volume becomes 0. |
| [Off] | The volume does not change. |
| [Source Level Adjuster][-4] to [+4] | Adjust the volume level of each source to prevent radical changes in volume when switching between sources other than FM.Touch or to adjust the source volume after comparing the FM tuner volume level with the level of the source.TIPIf you directly touch the area where the cursor can be moved, the SLA (source level adjustment) setting will be changed to the value of the touched point.NOTESSettings are based on the FM tuner volume level, which remains unchanged.This function is not available when the FM tuner is selected as the AV source. |
| [Subwoofer][On] [Off] | Select enable or disable rear subwoofer output from this product. |
| [Speaker Level]Listening position*1*2[Off] [Front-L] [Front-R][Front] [All]Standard Mode*3[Front Left] [Front Right][Rear Left] [Rear Right][Subwoofer]Network Mode*3[High Left] [High Right][Mid Left] [Mid Right][Subwoofer]Speaker output level[-24] to [10] | Adjust the speaker output level of the listening position.1Touch on to select the listening position then select the output speaker.2Touch on to adjust the selected speaker output level.NOTEThis function is available when [Subwoofer] is set to [On]. |
| [Crossover]*4 Select a speaker unit (filter) to adjust the HPF or LPF cutoff frequency and the slope for each speaker unit (page 47). | |
| [Subwoofer Settings]*4 Select the subwoofer phase (page 47). | |
| [Listening Position]*1[Off] [Front Left] [Front Right] [Front] [All] | Select a listening position that you want to make as the centre of sound effects. |
| Menu Item Description | |
| [Time Alignment][On] [Off]Listening position*1*2[Off] [Front-L] [Front-R][Front] [All]Standard Mode*3*5[Front Left] [Front Right][Rear Left] [Rear Right][Subwoofer]Network Mode*3*5[High Left] [High Right][Mid Left] [Mid Right][Subwoofer]Distance[0] to [350] | Select or customise the time alignment settings to reflect the distance between the listener's position and each speaker. You need to measure the distance between the head of the listener and each speaker unit.1Touch on to select the listening position then select the alignment speaker.2Touch on to input the distance between the selected speaker and listening position.TIPIf you touch [TA On], the time alignment is turned off mandatorily.NOTEThis function is available only when the listening position setting is set to [Front-L] or [Front-R]. |
| [Auto EQ][On] [Off] | Set the auto-adjusted equaliser to suit the vehicle's acoustics. To use this function, the Auto EQ measurement must be done in advance (page 46). |
| [A-EQ&TA Measurement] | Measures and adjusts the vehicles acoustics, equaliser, and time alignment automatically to suit the vehicle interior (page 46). |
| [Save Settings] Save to recall | the following current sound settings by touching [OK]; bass boost, slope, subwoofer phase, speaker level, Graphic EQ, HPF/LPF, listening position, crossover, time alignment.TIPWhen you touch [Cancel], return to the [Audio] setting screen. |
| [Load Settings][Initial Settings] [Sound Setting] [Auto EQ&TA Setting] | Load the sound settings.NOTES• [Sound Setting] is available only when you have already saved the sound settings (page 45).• [Auto EQ&TA Setting] is available only when you have already performed Auto EQ measurement (page 46). |
| [Bass Boost][0] to [6] | Adjust the bass boost level. |
| [Rear Speaker Output][Rear] [Subwoofer] | Select the rear speaker output.NOTEThis function is available when [Standard Mode] is selected as the speaker mode. |
| [Loudness][Off] [Low] [Mid] [High] | Compensates for deficiencies in the low-frequency and high-frequency ranges at low volume. |
Menu Item Description
| [Automatic Level Control] Corrects automatically the audio level difference between the music files or the sources. | |
| [Off] Turns the auto level control setting off. | |
| [Mode1] Corrects a little the audio level difference between the music files or the sources (for the narrow dynamic range audio signal). | |
| [Mode2] Corrects widely the audio level difference between the music files or the sources (for the wide dynamic range audio signal). | |
| [Sound Retriever][Off] [Mode1] [Mode2] | Enhances compressed audio and restores rich sound automatically.TIP[Mode2] has a stronger effect than [Mode1]. |
*1 [All] is not available when [Network Mode] is selected as the speaker mode.
*2 If you change the listening position setting, the output levels of all the speakers will change in conjunction with the setting.
*3 To use this function, the vehicle's acoustics must be measured in advance.
*4 This function is not available when adjusting the High speaker.
*5 This function is available only when the listening position setting is set to [Front Left] or [Front Right].
Adjusting the equaliser curve automatically (Auto EQ)
By measuring the vehicle's acoustics, the equaliser curve can be adjusted automatically to suit the vehicle interior.
WARNING
A loud tone (noise) may be emitted from the speakers when measuring the vehicle's acoustics. Never perform Auto EQ measurement while driving.
CAUTION
- Thoroughly check the conditions before performing Auto EQ as the speakers may be damaged if this is performed under the following conditions:
When the speakers are incorrectly connected. (For example, when a rear speaker is connected as a subwoofer output.) - When a speaker is connected to a power amp delivering output higher than the speaker's maximum input power capability.
- If a microphone for acoustical measurement (sold separately) is not placed in the appropriate location, the measurement tone may become loud and measurement may take a long time, resulting in battery drainage. Be sure to place the microphone in the specified location.
▶ Before operating the Auto EQ function
- Perform Auto EQ in a quiet place with the vehicle engine and air conditioning switched off. Also, cut the power of car phones or mobile phones in the vehicle, or remove them in advance. Surrounding sounds may prevent correct measurement of the vehicle's acoustics.
- Be sure to use the microphone for acoustical measurement (sold separately). Using other microphones may prevent measurement, or result in incorrect measurement of the vehicle's acoustics.
• To perform Auto EQ, the front speakers must be connected. - When this product is connected to a power amp with input level control, Auto EQ may be impossible if the power amp's input level is set below the standard level.
- When this product is connected to a power amp with an LPF (low pass filter), turn the LPF off before performing Auto EQ. Also, set the cutoff frequency for the built-in LPF of an active subwoofer to the highest frequency.
- The distance has been calculated by a computer to provide optimum delay to ensure accurate results. Do not change this value.
- The reflected sound within the vehicle is strong and delay occurs.
- The LPF on active subwoofers or external amps delay the lower sounds.
- If an error occurs during measurement, check the following before measuring the vehicle's acoustics.
- Front speakers (left/right)
- Rear speakers (left/right)
-Noise - Microphone for acoustical measurement (sold separately)
- Low battery
▶ Performing Auto EQ
CAUTION
Do not turn off the engine while the measurement is in progress.
NOTES
• Auto EQ changes the audio settings as follows:
- The fader/balance settings return to the centre position (page 44).
- Previous settings for Auto EQ will be overwritten.
1 Stop the vehicle in a quiet place, close all doors, windows, and sun roof, and then turn the engine off.
If the engine is left running, engine noise may prevent correct Auto EQ.
NOTE
If driving restrictions are detected during measurement, the measurement is cancelled. 2 Fix the microphone for acoustical measurement (sold separately) in the centre of the headrest of the driver's seat, facing forwards.
The Auto EQ may differ depending on where you place the microphone. If desired, place the microphone on the front passenger seat and perform Auto EQ.
3 Disconnect the iPhone or smartphone device.
4 Turn on the ignition switch (ACC ON).
If the vehicle's air conditioner or heater is turned on, turn it off.
5 Switch the AV source to [Source OFF] (page 19).
6 Press
7 Touch

8 Touch [A-EQ&TA Measurement].
9 Connect the microphone for acoustical measurement (sold separately) with this product.
Plug the microphone into the AUX input jack on the back panel of this product.
NOTE
Use an extension cable (sold separately) if the cord of the microphone (sold separately) is not long enough.
10 Touch [Front Left] or [Front Right] to select the current listening position.
11 Touch [Start].
A 10-second countdown starts.
NOTE
The Bluetooth connection is disconnected before the process starts.
12Exit the vehicle and keep the doors closed until the countdown finishes.
When the countdown finishes, a measurement tone (noise) is emitted from the speakers and Auto EQ measurement begins.
13 Wait until the measurement is completed.
When Auto EQ is completed, a message is displayed.
NOTE
The measurement time varies depending on the type of vehicle.
TIP
To stop the measurement, touch [Stop].
14Store the microphone carefully in the glove box or another safe place.
If the microphone is subjected to direct sunlight for an extended period, high temperatures may cause distortion, colour change, or malfunction.
Adjusting the cutoff frequency value
You can adjust the cutoff frequency value of each speaker.
The following speakers can be adjusted:
[Standard Mode]: Front, Rear, Subwoofer.
[Network Mode]: High, Mid, Subwoofer.
NOTE
[Subwoofer Settings] is available only when [Subwoofer] is [On].
1 Press

2 Touch


3 Touch [Crossover] or [Subwoofer Settings].
4 Touch
5 Drag the graph line to set the cutoff position.
6 Drag the lowest point of the graph to set the cutoff slope.
The following items can also be set.
| Switches the subwoofer phase between normal and reverse position. | |
| LPF/HPF | Switches the LPF/HPF setting to [On] or [Off]. When it is turned off, the high-pass filter or low-pass filter of each speaker can also be turned on by touching the graph lines. |

Video settings
The menu items vary according to the source.
[DVD Set up]
This setting is available when the selected source is [Disc], [CD], [Video CD] or [DVD].
| Menu Item Description | |
| [Subtitle Language]*1*2*3 Set a subtitle language preference. When you select [Others], a language code input screen is shown. Input the four-digit code of the desired language then touch | |
| [Audio Language]*1*2*3 Set an audio language preference. When you select [Others], a language code input screen is shown. Input the four-digit code of the desired language then touch | |
| [Menu Language]*1*2*3 Set a menu language preference. When you select [Others], a language code input screen is shown. Input the four-digit code of the desired language then touch . | |
| [Multi Angle] [On] [Off] | Set to display the angle icon on the screen. |
Menu Item Description
| [TV Aspect] Set the aspect ratio suitable for your rear display 16:9 (wide screen display) or 4:3 (regular display). (We recommend use of this function only when you want to fit the aspect ratio to the rear display.)NOTESWhen using a regular display, select either [Letter Box] or [Pan Scan]. Selecting [16:9] may result in an unnatural image.If you select the TV aspect ratio, this product's display will change to the same setting.When playing discs that do not have a panscan system, the disc is played back with [Letter Box] even if you select the [Pan Scan] setting. Confirm whether the disc package bears the mark.The TV aspect ratio cannot be changed for some discs. For details, refer to the disc's instructions. |
| [16:9] Displays the wide screen image (16:9) as it is (initial setting). |
| [Letter Box] Makes the image in the shape of a letterbox with black bands on the top and bottom of the screen. |
| [Pan Scan] Cuts the image short on the right and left sides of the screen. |
Menu Item Description
| [Parental] Set restrictions so that children cannot watch violent or adult-oriented scenes. You can set the parental lock level in steps as desired.1Touch [0] to [9] to input a four-digit code number.2TouchRegisters the code number, and you can now set the level.3Touch any number between [1] to [8] to select the desired level.The lower the level is set, the tighter the restriction is applied.4TouchSets the parental lock level.NOTESWe recommend keeping a record of your code number in case you forget it.The parental lock level is recorded on the disc. You can confirm it by looking at the disc package, the included booklet, or the disc itself. You cannot use parental lock with discs that do not feature a recorded parental lock level.With some discs, parental lock operates to skip certain scenes only, after which normal playback resumes. For details, refer to the disc's instructions. | |
| [DVD Auto Play][On] [Off] | Set to display the DVD menu automatically and start playback from the first chapter of the first title when a DVD disc with a DVD menu is inserted.NOTESome DVDs may not operate properly. If this function is not fully operable, turn this function off and start playback. |
*1 You can switch the language by touching the switch languages key during playback.
*2 The setting made here will not be affected even if the language is switched during playback using the appropriate key.
*3 If the selected language is not available, the language specified on the disc is displayed.
[Time Per Photo Slide]
| Menu Item Description | |
| [Time Per Photo Slide] [5sec] [10sec] [15sec] [Manual] | Select the interval of image file slideshows on this product. |
[Video Signal Setting]
| Menu Item Description | |
| [AV] [Auto] [PAL] [NTSC] [PAL-M] [PAL-N] [SECAM] | Select the suitable video signal setting when you connect this product to an AV equipment. |
| [AUX] [Auto] [PAL] [NTSC] [PAL-M] [PAL-N] [SECAM] | Select the suitable video signal setting when you connect this product to an AUX equipment. |
| [Camera] [Auto] [PAL] [NTSC] [PAL-M] [PAL-N] [SECAM] | Select the suitable video signal setting when you connect this product to a rear view camera. |
| [TV]* [Auto] [PAL] [NTSC] [PAL-M] [PAL-N] [SECAM] | Select the suitable video signal setting when you connect this product to a TV tuner. |
* AVH-Z7150BT
Favourite menu
Registering your favourite menu items in shortcuts allows you to quickly jump to the registered menu screen by a simple touch on the [Favourites] screen.
NOTE
Up to 12 menu items can be registered in the favourite menu.
Creating a shortcut
1Press then touch.

2 Touch the star icon of the menu item.
The star icon for the selected menu is filled in.
TIP
To cancel the registration, touch the star icon in the menu column again.
Selecting a shortcut
1Press the touch.

2Touch ★.
3 Touch the menu item.
Removing a shortcut
1Press the touch.

2Touch ★
3 Touch and hold the favourite menu column.
The selected menu item is removed from the [Favourites] screen.
TIP
You can also remove a shortcut by touching and holding the registered menu column.
Other functions
Setting the time and date
1 Touch the current time on the screen.
2 Touch or ▲ to set the correct time and date.
You can operate the following items: Year, month, date, hour, minute.
TIPS
- You can change the time display format to [12hour] or [24hour].
- You can change the order of date display format: Day-month, Month-day.
Changing the wide screen mode
You can set the screen mode for AV screen and image files.
1 Touch the screen display mode key.
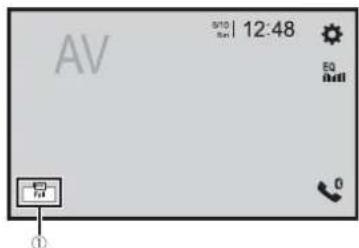
①
Screen display mode key
2Touch the desired mode.
[Full] Displays 16:9 Images on the full screen without changing the ratio.
NOTES
- Images other than 16:9 images for DVD may be displayed in the full screen with the ratio change. - Enlarges and displays images of USB sources keeping the ratio of the original source image.
| [Zoom] Displays the images enlarging them vertically. |
| [Normal] Displays images without changing the 4:3 aspect ratio. |
| NOTESFor USB sources, 4:3 aspect ratio may not be displayed.Devices connected with USB MTP are not supported. |
| [Trimming] An image is displayed across the entire screen with the horizontal-to-vertical ratio left as is. If the screen ratio differs from the image, the image may be displayed partly cut off either at the top/bottom or sides. |
| NOTE[Trimming] is for image files only. |
TIPS
- Different settings can be stored for each video source.
- When a video is viewed in wide screen mode that does not match its original aspect ratio, it may appear different.
• The video image will appear coarser when viewed in [Zoom] mode.
NOTE
Image files can be set to either [Normal] or [Trimming] in wide screen mode.
Restoring this product to the default settings
You can restore settings or recorded content to the default settings from [Restore Settings] in the [System] menu (page 42).
Apple CarPlay
You can operate iPhone applications with finger gestures such as tapping, dragging, scrolling, or flicking on the screen of this product.
Compatible iPhone models
iPhone 7, iPhone 7 Plus, iPhone SE, iPhone 6s, iPhone 6s Plus, iPhone 6, iPhone 6 Plus, iPhone 5s, iPhone 5c, iPhone 5
NOTE
The compatible finger gestures vary depending on the application for the iPhone.

WARNING
Certain uses of the iPhone may not be legal while driving in your jurisdiction, so you must be aware of and obey any such restrictions. If in doubt as to a particular function, only perform it while the car is parked. No feature should be used unless it is safe to do so under the driving conditions you are experiencing.
Using Apple CarPlay
Important
Apple CarPlay may not be available in your country or region.
For details about Apple CarPlay, visit the following site:
http://www.apple.com/ios/carplay
- The content and functionality of the supported applications are the responsibility of the App providers.
- In Apple CarPlay, usage is limited while driving, with availability of functions and content determined by the App providers.
- Apple CarPlay allows access to applications other than those listed that are subject to limitations while driving.
- PIONEER IS NOT RESPONSIBLE AND DISCLAIMS LIABILITY FOR THIRD PARTY (NON-PIONEER) APPS AND CONTENT, INCLUDING WITHOUT LIMITATION ANY INACCURACIES OR INCOMPLETE INFORMATION.
Setting the driving position
To achieve optimum usability of Apple CarPlay, set the driving position setting correctly according to the vehicle. The setting will be applied the next time an Apple CarPlay compatible device is connected to this product.
1Press

2Touch


The system setting screen appears.
3 Touch [Driving Position].
4Touch the item.
[Left]
Select for a left-hand drive vehicle.
[Right]
Select for a right-hand drive vehicle.
Starting procedure
1 Connect an Apple CarPlay compatible device to this product via USB.
2Press

3Touch

4Touch [Apple CarPlay].
5 Touch Apple CarPlay icon in the tab.
The application screen appears.
TIP
You can use Siri function by pressing once Apple CarPlay is activated.
NOTES
- If an Apple CarPlay compatible device has been connected and another screen is displayed, touch [Apple CarPlay] on the top menu screen to display the Application menu screen.
- The Bluetooth connection with the Apple CarPlay compatible device will be terminated automatically if Apple CarPlay is turned on. While Apple CarPlay is turned on, only a Bluetooth audio connection will be possible for devices other than the device connected via Apple CarPlay.
- Hands-free phoning via Bluetooth wireless technology is not available while Apple CarPlay is on. If Apple CarPlay is turned on during a call on a mobile phone other than an Apple CarPlay compatible device, the Bluetooth connection will be terminated after the call ends.
- Refer to iPod/iPhone with Lightning connector (page 58) for details on connecting a device to this product.
Adjusting the volume
You can adjust the guidance volume separately from the main sound volume when Apple CarPlay is used.
1 While Apple CarPlay is activated, press VOL (+/-).
The volume menu will be displayed on the screen.
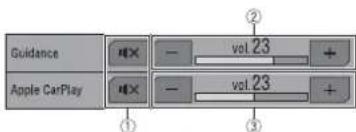
| 1 | Touch to mute. Touch again to cancel mute. |
| 2 | Touch [+]/[-] to adjust the guidance volume. |
| 3 | Displays the main sound volume. To adjust the main sound volume, press VOL (+/-) on the unit or touch [+]/[-] . |
NOTE
The volume menu is displayed for four seconds. If the menu disappears, press VOL (+/-) again. The menu reappears.
Android Auto™
You can operate Android applications with finger gestures such as tapping, dragging, scrolling, or flicking on the screen of this product.
Compatible Android devices
Requires the Android Auto app on Google Play and an Android compatible smartphone running Android 5.0 Lollipop or higher.
NOTES
- [USB MTP] is set to [Off] to use Android Auto (page 40).
- The compatible finger gestures vary depending on the application for the smartphone.

WARNING
Certain uses of the smartphone may not be legal while driving in your jurisdiction, so you must be aware of and obey any such restrictions. If in doubt as to a particular function, only perform it while the car is parked. No feature should be used unless it is safe to do so under the driving conditions you are experiencing.
Using Android Auto

Important
Android Auto may not be available in your country or region.
For details about Android Auto, please refer to the Google support site: http://support.google.com/androidauto
- The content and functionality of the supported applications are the responsibility of the App providers.
- In Android Auto, usage is limited while driving, with availability of functions and content determined by the App providers.
- Android Auto allows access to applications other than those listed that are subject to limitations while driving.
- PIONEER IS NOT RESPONSIBLE AND DISCLAIMS LIABILITY FOR THIRD PARTY (NON-PIONEER) APPS AND CONTENT, INCLUDING WITHOUT LIMITATION ANY INACCURACIES OR INCOMPLETE INFORMATION.
Setting the driving position
To achieve optimum usability of Android Auto, set the driving position setting correctly according to the vehicle. The setting will be applied the next time an Android Auto compatible device is connected to this product.
1Press

2Touch


The system setting screen appears.
3 Touch [Driving Position].
4Touch the item.
[Left]
Select for a left-hand drive vehicle.
[Right]
Select for a right-hand drive vehicle.
Starting procedure
1 Connect an Android Auto™ compatible device to this product via USB.
2Press
3Touch
4Touch [Android Auto].
5 Touch Android Auto icon in the tab. The application screen appears.
TIP
You can use voice recognition function by pressing once Android Auto is activated.
NOTES
- When the device for Android Auto is connected to this unit, the device is also connected via Bluetooth at the same time. If five devices are already paired, the message confirming whether to delete the registered device is displayed. If you want to delete the device, touch [Agree]. If you want to delete other device, touch [BT Settings] and delete the devices manually (page 13).
- If Android Auto is turned on during a call on a mobile phone other than the Android Auto compatible device, the Bluetooth connection will switch to the Android Auto compatible device after the call.
• Refer to Smartphone (Android device) (page 58) for details on connecting a device to this product.
Adjusting the volume
You can adjust the guidance volume separately from the main sound volume when Android Auto is used.
1 While Android Auto is activated, press VOL (+/-). The volume menu will be displayed on the screen.
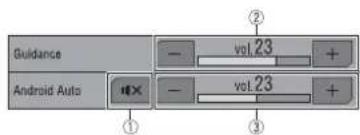
| 1 | Touch to mute. Touch again to cancel mute. |
| 2 | Touch [+]/[-] to adjust the guidance volume. |
| 3 | Displays the main sound volume. To adjust the main sound volume, press VOL (+/-) on the unit or touch [+]/[-] . |
NOTE
The volume menu is displayed for four seconds. If the menu disappears, press VOL (+/-) again. The menu reappears.
Setting the auto-launch function
If this function is set to on, Android Auto will launch automatically when an Android Auto compatible device is connected to this product.
NOTE
Android Auto will launch automatically only when an Android Auto compatible device is correctly connected to this product.
1Press

2Touch


3 Touch [Android Auto Auto-launch] to switch [On] or [Off].
Appendix for Apple CarPlay and Android Auto
Error messages
When problems occur with this product, an error message appears on the display. Refer to the table below to identify the problem, then take the suggested corrective action. If the error persists, record the error message and contact your dealer or your nearest Pioneer service centre.
Apple CarPlay
Attempting to connect to Apple CarPlay.
- Communication failed and the system is trying to connect.
- Wait for a while. Then, perform the actions below if the error message is still displayed.
- Restart the iPhone.
- Disconnect the cable from the iPhone, and then connect the iPhone again after a few seconds.
-Turn the ignition switch to OFF and then to ON.
If the error message is still displayed after performing the above action, please contact your dealer or an authorised Pioneer Service Station.
Android Auto
Android Auto has stopped.
- The connected device is not compatible with Android Auto.
-Check if the device is compatible with Android Auto.
• The startup of Android Auto failed for some reasons.
-Disconnect the cable from the smartphone, and then connect the smartphone again after a few seconds.
- Restart the smartphone.
-Turn the ignition switch to OFF and then to ON.
If the error message is still displayed after performing the above action, please contact your dealer or an authorised Pioneer Service Station.
- The time set in this product is not correct. - Check if the time is correctly set.
Bluetooth pairing failed. Please pair your Android phone manually.
- The Bluetooth pairing failed for some reasons.
–Pair this product with the device manually.
To use Android Auto, please stop your car and check your Android phone.
The default settings are displayed on the screen of the Android Auto compatible device or images are not output from the Android Auto compatible device.
-Park your vehicle in a safe place, and follow the instructions displayed on the screen. If the error message is still displayed after performing on-screen instructions, please reconnect the device.
Detailed information regarding connected iPod devices
- Pioneer accepts no responsibility for data lost from an iPod, even if that data is lost while using this product. Please back up your iPod data regularly.
- Do not leave the iPod in direct sunlight for extended amounts of time. Extended exposure to direct sunlight can result in iPod malfunction due to the resulting high temperature.
- Do not leave the iPod in any location with high temperatures.
- Firmly secure the iPod when driving. Do not let the iPod fall onto the floor, where it may become jammed under the brake or accelerator.
- For details, refer to the iPod manuals.
ios
iOS is a trademark on which Cisco holds the trademark right in the US and certain other countries.
iPhone and iPod
Made for

iPod

iPhone
"Made for iPod" and "Made for iPhone" mean that an electronic accessory has been designed to connect specifically to iPod or iPhone, respectively, and has been certified by the developer to meet Apple performance standards.
Apple is not responsible for the operation of this device or its compliance with safety and regulatory standards.
Please note that the use of this accessory with iPod or iPhone may affect wireless performance, iPhone, iPod, iPod classic, iPod nano, and iPod touch are trademarks of Apple Inc., registered in the U.S. and other countries.
Lightning
Lightning is a trademark of Apple Inc.
Apple CarPlay

Works with Apple CarPlay
Apple CarPlay is a trademark of Apple Inc. Use of the Apple CarPlay logo means that a vehicle user interface meets Apple performance standards. Apple is not responsible for the operation of this vehicle or its compliance with safety and regulatory standards. Please note that the use of this product with iPhone or iPod may affect wireless performance.
Using app-based connected content
Important
Requirements to access app-based connected content services using this product:
- Latest version of the Pioneer compatible connected content application(s) for the smartphone, available from the service provider, downloaded to your smartphone.
• A current account with the content service provider.
- Smartphone Data Plan. Note: if the Data Plan for your smartphone does not provide for unlimited data usage, additional charges from your carrier may apply for accessing
app-based connected content via 3G, EDGE and/or LTE (4G) networks.
- Connection to the Internet via 3G, EDGE, LTE (4G) or Wi-Fi network.
- Optional Pioneer adapter cable connecting your iPhone to this product.
Limitations:
- Access to app-based connected content will depend on the availability of cellular and/or Wi-Fi network coverage for the purpose of allowing your smartphone to connect to the Internet.
• Service availability may be geographically limited to the region. Consult the connected content service provider for additional information. - Ability of this product to access connected content is subject to change without notice and could be affected by any of the following: compatibility issues with future firmware versions of smartphone; compatibility issues with future versions of the connected content application(s) for the smartphone; changes to or discontinuation of the connected Content application(s) or service by its provider.
- Pioneer is not liable for any issues that may arise from incorrect or flawed app-based content.
• The content and functionality of the supported applications are the responsibility of the App providers.
• In Apple CarPlay and Android Auto, functionality through the product is limited while driving, with available functions determined by the App providers. - Availability of Apple CarPlay and Android Auto functionalities is determined by the App provider, and not determined by Pioneer.
• Apple CarPlay and Android Auto allow access to applications other than those listed (subject to limitations while
driving), but the extent to which content can be used is determined by the App providers.
Connection
Precautions
Your new product and this manual
- Do not operate this product, any applications, or the rear view camera option (if purchased) if doing so will divert your attention in any way from the safe operation of your vehicle. Always observe safe driving rules and follow all existing traffic regulations. If you experience difficulty in operating this product, pull over, park your vehicle in a safe location and apply the handbrake before making the necessary adjustments.
- Do not install this product where it may (i) obstruct the driver's vision, (ii) impair the performance of any of the vehicle's operating systems of safety features, including airbags, hazard lamp buttons, or (iii) impair the driver's ability to safely operate the vehicle. In some cases, it may not be possible to install this product because of the vehicle type or the shape of the vehicle interior.
Important safeguards

WARNING
Pioneer does not recommend that you install this product yourself. This product is designed for professional installation only. We recommend that only authorised Pioneer service personnel, who have special training and experience in mobile
electronics, set up and install this product. NEVER SERVICE THIS PRODUCT YOURSELF. Installing or servicing this product and its connecting cables may expose you to the risk of electric shock or other hazards, and can cause damage to this product that is not covered by warranty.
Precautions before connecting the system

WARNING
Do not take any steps to tamper with or disable the handbrake interlock system which is in place for your protection. Tampering with or disabling the handbrake interlock system could result in serious injury or death.

CAUTION
- Secure all wiring with cable clamps or electrical tape. Do not allow any bare wiring to remain exposed.
- Do not directly connect the yellow lead of this product to the vehicle battery. If the lead is directly connected to the battery, engine vibration may eventually cause the insulation to fail at the point where the wire passes from the passenger compartment into the engine compartment. If the yellow lead's insulation tears as a result of contact with metal parts, short-circuiting can occur, resulting in considerable danger.
-
It is extremely dangerous to allow cables to become wound around the steering column or gearstick. Be sure to install this product, its cables, and wiring away in such so that they will not obstruct or hinder driving.
-
Make sure that the cables and wires will not interfere with or become caught in any of the vehicle's moving parts, especially the steering wheel, gearstick, handbrake, sliding seat tracks, doors, or any of the vehicle's controls.
- Do not route wires where they will be exposed to high temperatures. If the insulation heats up, wires may become damaged, resulting in a short circuit or malfunction and permanent damage to the product.
- Do not shorten any leads. If you do, the protection circuit (fuse holder, fuse resistor or filter, etc.) may fail to work properly.
- Never feed power to other electronic products by cutting the insulation of the power supply lead of this product and tapping into the lead. The current capacity of the lead will be exceeded, causing overheating.
Before installing this product
- Use this unit with a 12-volt battery and negative earthing only. Failure to do so may result in a fire or malfunction.
- To avoid shorts in the electrical system, be sure to disconnect the (−) battery cable before installation.
To prevent damage

WARNING
- When speaker output is used by 4 channels, use speakers over 50 W (Maximum input power) and between 4 Ω to 8 Ω (impedance value). Do not use 1 Ω to 3 Ω speakers for this unit.
- When rear speaker output is used by 2 of subwoofer, use speakers over 70 W (Maximum input power).
*Please refer to connection for a connection method.
The black cable is earth. When installing this unit or power amp (sold separately), make sure to connect the earth wire first. Ensure that the earth wire is properly connected to metal parts of the car's body. The earth wire of the power amp and the one of this unit or any other device must be connected to the car separately with different screws. If the screw for the earth wire loosens or falls out, it could result in fire generation of smoke or malfunction.
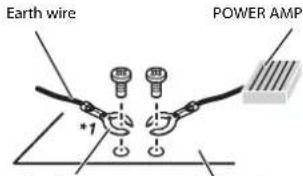
Other devices (Another electronic device in the car) Metal parts of car's body
*1 Non supplied for this unit
- When replacing the fuse, be sure to only use a fuse of the rating prescribed on this product.
- This product cannot be installed in a vehicle without ACC (accessory) position on the ignition switch.

ACC position

No ACC position
• To avoid short-circuiting, cover the disconnected lead with insulating tape. It is especially important to insulate all
unused speaker leads, which if left uncovered may cause a short circuit.
- For connecting a power amp or other devices to this product, refer to the manual for the product to be connected. - The graphical symbol placed on the product means direct current.
Notice for the blue/white lead
- When the ignition switch is turned on (ACC ON), a control signal is output through the blue/white lead. Connect to an external power amp's system remote control terminal, the auto-aerial relay control terminal, or the aerial booster power control terminal (max. 300 mA 12 V DC). The control signal is output through the blue/white lead, even if the audio source is switched off.
This product
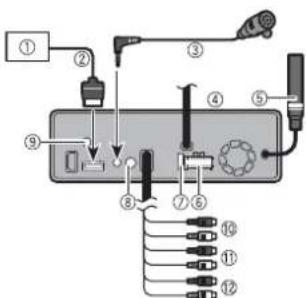
① Pioneer navigation system
Contact your dealer to inquire about the connectable navigation unit.
② RGB cable (supplied with Navigation system)
③ Microphone 3 m
④ This product
⑤ Aerial jack
⑥ Power supply
⑦ Fuse (10 A)
⑧ Wired remote input
Hard-wired remote control adapter can be connected (sold separately).
⑨ TV aerial jack (AVH-Z7150TV)
⑩ Front output (STD)/High range output (NW)
⑪ Rear output (STD)/Middle range output (NW)
⑫ Subwoofer output (STD)/Low range output (NW)
Power cord
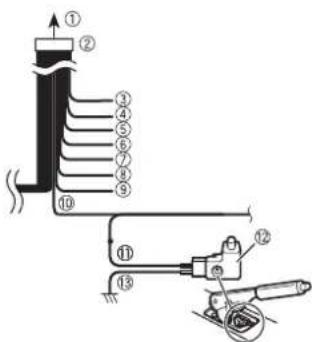
① To power supply
② Power cord
③ Yellow
To terminal supplied with power
regardless of ignition switch position.
④ Red
To electric terminal controlled by
ignition switch (12 V DC) ON/OFF
⑤ Orange/white
To lighting switch terminal.
⑥ Black (earth)
To vehicle (metal) body.
⑦ Violet/white
Of the two lead wires connected to the back lamp, connect the one in which the voltage changes when the gear shift is in the REVERSE (R) position. This connection enables the unit to sense whether the car is moving forwards or backwards.
⑧ Yellow/black
If you use an equipment with Mute function, wire this lead to the Audio Mute lead on that equipment. If not, keep the Audio Mute lead free of any connections.
⑨ Blue/white
Connect to system control terminal of the power amp (max. 300 mA 12 V DC).
Light green
Used to detect the ON/OFF status of the handbrake. This lead must be connected to the power supply side of the handbrake switch.
⑪ Power supply side
⑫ Handbrake switch
⑬ Earth side
Speaker leads
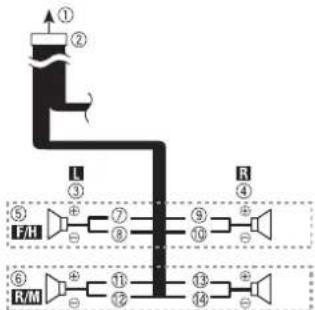
flowchart
graph TD
    A["①"] --> B["②"]
    B --> C["L"]
    C --> D["③"]
    D --> E["④"]
    E --> F["⑤ F/H"]
    F --> G["⑥ R/M"]
    G --> H["⑦"]
    H --> I["⑧"]
    I --> J["⑨"]
    J --> K["⑩"]
    K --> L["⑪"]
    L --> M["⑫"]
    M --> N["⑬"]
    N --> O["⑭"]
    O --> P["⑮"]
    P --> Q["⑯"]
    Q --> R["⑰"]
Perform these connections when using a subwoofer without the optional amplifier.
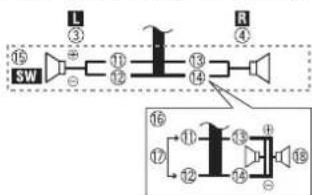
flowchart
graph LR
    SW -->|L ③| Channel1
    SW -->|R ④| Channel2
    Channel1 -->|16 ①6| Channel3
    Channel1 -->|17 ⑰7| Channel4
    Channel2 -->|18 ⑱8| Channel5
    Channel3 -->|19 ⑲9| Channel6
    Channel4 -->|20 ⑳10| Channel7
    Channel5 -->|21 ⑰11| Channel8
    Channel6 -->|22 ⑱12| Channel9
    Channel7 -->|23 ⑲13| Channel10
    Channel8 -->|24 ⑳14| Channel11
    Channel9 -->|25 ⑰15| Channel12
    Channel10 -->|26 ⑱16| Channel13
    Channel11 -->|27 ⑲17| Channel14
    Channel12 -->|28 ⑳18| Channel15
    Channel13 -->|29 ⑰19| Channel16
    Channel14 -->|30 ⑱20| Channel17
    Channel15 -->|31 ⑲21| Channel18
    Channel16 -->|32 ⑳22| Channel19
① To power supply
② Power cord
③ Left
④ Right
⑤ Front speaker (STD) or high range speaker (NW)
⑥ Rear speaker (STD) or middle range speaker (NW)
⑦ White
⑧ White/black
⑨ Grey
10 Grey/black
⑪ Green
⑫ Green/black
⑬ Violet
⑭ Violet/black
⑮ Subwoofer (4 Ω)
16 When using a subwoofer of 2 Ω, be sure to connect the subwoofer to the violet and violet/black leads of this unit. Do not connect anything to the green and green/black leads.
⑰ Not used.
⑱ Subwoofer (4 Ω) × 2
NOTES
- When a subwoofer is connected to this product instead of a rear speaker, change the rear output setting in the initial setting. The subwoofer output of this product is monaural. For details, refer to [Rear Speaker Output] (page 45).
- With a two-speaker system, do not connect anything to the speaker leads that are not connected to speakers.
Power amp (sold separately)
Without internal amp

Important
The speaker leads are not used when this connection is in use.
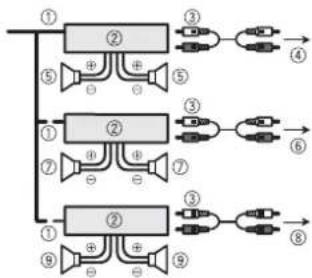
flowchart
graph TD
    A["①"] --> B["②"]
    B --> C["③"]
    B --> D["④"]
    A --> E["⑤"]
    E --> F["⊕"]
    F --> G["⊕"]
    B --> H["⑥"]
    H --> I["③"]
    H --> J["⑥"]
    A --> K["⑦"]
    K --> L["⊕"]
    L --> M["⊕"]
    K --> N["⑧"]
    N --> O["③"]
    N --> P["⑥"]
    A --> Q["⑨"]
    Q --> R["⊕"]
    R --> S["⊕"]
    Q --> T["⑨"]
With internal amp
Important
Front speaker and Rear speaker signals (STD) or middle range speaker and high range speaker signals (NW) are output from the speaker leads when this connection is in use.
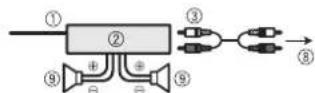
① System remote control Connect to Blue/white
② Power amp (sold separately)
③ Connect with RCA cable (sold separately)
④ To Rear output (STD)
To middle range output (NW)
⑤ Rear speaker (STD)
Middle range speaker (NW)
⑥ To Front output (STD)
To high range output (NW)
⑦ Front speaker (STD)
High range speaker (NW)
To subwoofer output (STD)
To low range output (NW)
⑨ Subwoofer (STD)
Low range speaker (NW)
NOTE
Select the appropriate speaker mode between standard mode (STD) and network mode (NW). For details, refer to Starting up the unit (page 10).
iPod/iPhone and smartphone
NOTES
- For details on how to connect an external device using a separately sold cable, refer to the manual for the cable.
- For details concerning the connection, operations and compatibility of iPhone, refer to iPod/iPhone or smartphone connection for AV source (page 20).
- For details concerning the connection and operations of smartphone, refer to iPod/iPhone or smartphone connection for AV source (page 20).
iPod/iPhone with Lightning connector
Connecting via the USB port
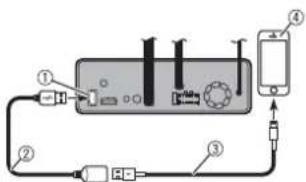
① USB port
② USB cable 1.5 m
③ USB interface cable for iPod/iPhone (CD-IU52) (sold separately)
④ iPhone with Lightning connector
iPhone with 30-pin connector
Connecting via the USB port
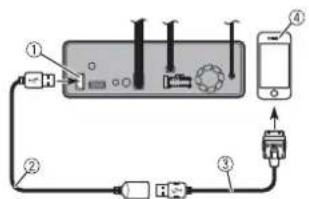
① USB port
② USB cable 1.5 m
③ USB interface cable for iPod/iPhone (CD-IU51) (sold separately)
④ iPhone with 30-pin connector
Smartphone (Android device)
Connecting via the USB port
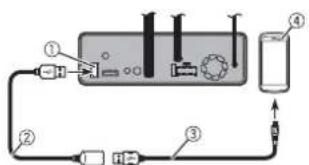
① USB port
② USB cable 1.5 m
③ USB - micro USB cable (Type USB A - micro USB B) (supplied with CD-MU200 (sold separately))
USB Type-C cable (Type USB A - USB C) (supplied with CD-CU50 (sold separately))
④ Smartphone
NOTE
The length of Type USB A - micro USB B cable cannot exceed 2 m and Type USB A - USB C cannot exceed 4 m according to the USB cable standard. When using a cable other than the above conditions, the main unit function may not operate properly.
Camera
About rear view camera
When you use the rear view camera, the rear view image is automatically switched from the video by moving the gearstick to REVERSE (R). Camera View mode also allows you to check what is behind you while driving.
WARNING
USE INPUT ONLY FOR REVERSE OR MIRROR IMAGE REAR VIEW CAMERA. OTHER USE MAY RESULT IN INJURY OR DAMAGE.
CAUTION
• The screen image may appear reversed.
- With the rear view camera you can keep an eye on trailers, or back into a tight parking spot. Do not use for entertainment purposes.
- Objects in rear view may appear closer or more distant than in reality.
• The image area of full-screen images displayed while backing or checking the rear of the vehicle may differ slightly.
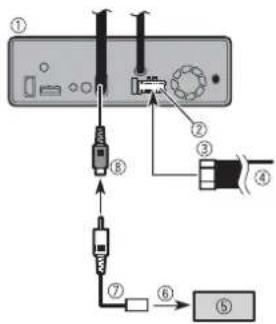
① This product
② Power supply
③ Power cord
④ Violet/white (REVERSE-GEAR SIGNAL INPUT)
Refer to Power cord on page 56.
⑤ Rear view camera (ND-BC8) (sold separately)
⑥ To video output
⑦ RCA cable (supplied with ND-BC8)
⑧ Brown (REAR VIEW CAMERA IN)
NOTES
- Connect only the rear view camera to REAR VIEW CAMERA IN. Do not connect any other equipment.
- Some appropriate settings are required to use rear view cameras. For details, refer to [Camera settings] (page 40).
External video component and the display
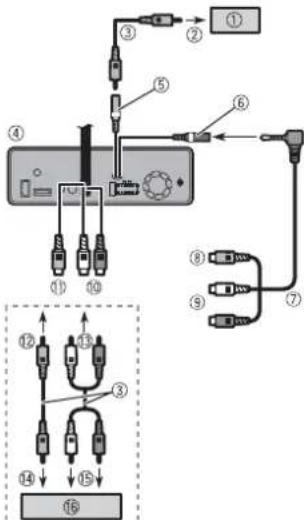
① Rear display with RCA input jacks
② To video input
③ RCA cables (sold separately)
④ This product
⑤ Yellow (REAR MONITOR OUTPUT)
⑥ AUX input
⑦ Mini-jack AV cable (CD-RM10) (sold separately)
⑧ Yellow
⑨ Red, white
⑩ Red, white (AUDIO INPUT, L IN)
⑪ Yellow (VIDEO INPUT)
⑫ To Yellow
⑬ To Red, white
⑭ To video output
⑮ To audio outputs
⑯ External video component (sold separately)
NOTE
The appropriate setting is required to use the external video component. For details, refer to AV input (page 38).
WARNING
NEVER install the rear display in a location that enables the driver to watch the video source while driving.
This product's rear video output is for connection of a display to enable passengers in the rear seats to watch the video source.
Installation
Precautions before installation

CAUTION
Never install this product in places where, or in a manner that:
- Could injure the driver or passengers if the vehicle stops suddenly.
- May interfere with the driver's operation of the vehicle, such as on the floor in front of the driver's seat, or close to the steering wheel or gearstick.
• To ensure proper installation, be sure to use the supplied parts in the manner specified. If any parts are not supplied with this product, use compatible parts in the manner specified after you have the part compatibility checked by your dealer. If parts other than supplied or compatible ones are used, they may damage internal parts of this product or they may work loose and the product may become detached. - Do not install this product where it may (i) obstruct the driver's vision, (ii) impair the performance of any of the vehicle's operating systems or safety features, including airbags, hazard lamp buttons or (iii) impair the driver's ability to safely operate the vehicle.
- Never install this product in front of or next to the place in the dashboard, door, or pillar from which one of your vehicle's airbags would deploy. Please refer to your vehicle's owner's manual for reference to the deployment area of the frontal airbags.
Before installing
- Consult with your nearest dealer if installation requires drilling holes or other modifications of the vehicle.
- Before making a final installation of this product, temporarily connect the wiring to confirm that the connections are correct and the system works properly.
Installation notes
- Do not install this product in places subject to high temperatures or humidity, such as:
- Places close to a heater, vent or air conditioner.
- Places exposed to direct sunlight, such as on top of the dashboard.
- Places that may be exposed to rain, such as close to the door or on the vehicle's floor.
- Install this product horizontally on a surface within 0 to 30 degrees tolerance (within 5 degrees to the left or right). Improper installation of the unit with the surface tilted more than these tolerances increases the potential for errors in the vehicle's location display, and might otherwise cause reduced display performance.
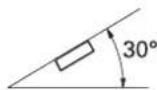
- When installing, to ensure proper heat dispersal when using this unit, make sure you leave ample space behind the rear
panel and wrap any loose cables so they are not blocking the vents.
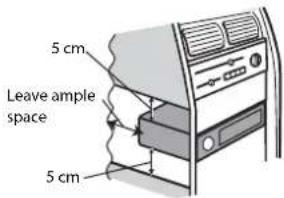
- The cords must not cover up the area shown in the figure below. This is necessary to allow the amplifiers to radiate freely.
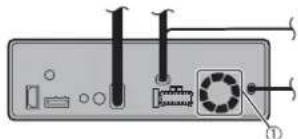
① Do not cover this area.
- Make sure you leave enough gap between the dashboard and the LCD panel of this unit so the LCD panel can be opened and closed without contacting with the dashboard.
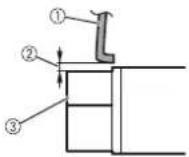
① Dashboard
② Leave gap
③ LCD panel
DIN front/rear-mount
This unit can be properly installed using either front-mount or rear-mount installation. Use commercially available parts when installing.
DIN Front-mount
1 Decide the position of the side brackets. When installing in a shallow space, change the position of side brackets (small).
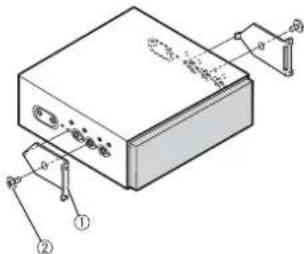
① Side bracket (small)
② Flush surface screw (5 mm × 6 mm)
2 Install the unit into the dashboard. Insert the mounting sleeve into the dashboard. And then secure the mounting sleeve by using a screwdriver to bend the metal tabs (90") into place.
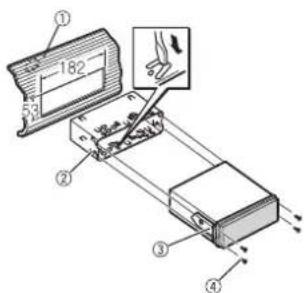
① Dashboard
② Mounting sleeve
③ Side bracket
④ Screw (2 mm × 3 mm)
DIN Rear-mount
1 Determine the appropriate position where the holes on the bracket and the side of the unit match.
When installing in a shallow space, use the following screw holes.

① Use binding screws (4 mm × 3 mm) only.
2 Tighten two screws on each side.
Use any of binding screws (4 mm × 3 mm), binding screws (5 mm × 6 mm) or flush surface screws (5 mm × 6 mm),
depending on the shape of screw holes in the bracket.
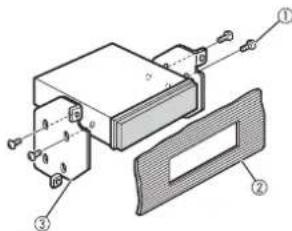
① Screw
② Dashboard or console
③ Factory radio mounting bracket
NOTE
In some types of vehicles, discrepancy may occur between the unit and the dashboard. If this happens, use the supplied frame to fill the gap.
Removing the unit
Extend top and bottom of the trim ring outwards to remove the trim ring. And then loosen the screws (2 mm × 3 mm) to remove the mounting sleeve.
- When reattaching the trim ring, push the trim ring onto the unit until it clicks. (If the trim ring is attached upside down, the trim ring will not fit properly.)
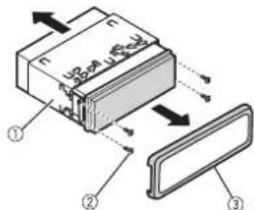
① Mounting sleeve
② Screw (2 mm × 3 mm)
③ Trim ring
Installing the microphone
• Install the microphone in a place where its direction and distance from the driver make it easiest to pick up the driver's voice.
- Be sure to turn off (ACC OFF) the product before connecting the microphone.
- Depending on the vehicle model, the microphone cable length may be too short when you mount the microphone on the sun visor. In such cases, install the microphone on the steering column.
Mounting on the sun visor
1 Fit the microphone lead into the groove.
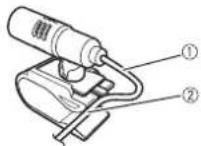
① Microphone lead ② Groove
2 Attach the microphone clip to the sun visor.
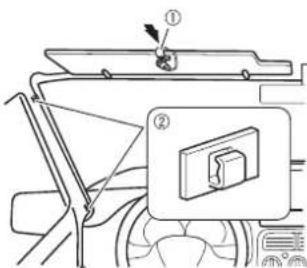
① Microphone clip
② Clamps
Use separately sold clamps to secure the lead where necessary inside the vehicle.
Install the microphone on the sun visor when it is in the up position. It cannot recognise the driver's voice if the sun visor is in the down position.
Installation on the steering column
1 Detach the microphone base from the microphone clip by sliding the microphone base while pressing the tab.

① Tab
② Microphone base
2 Mount the microphone on the steering column.
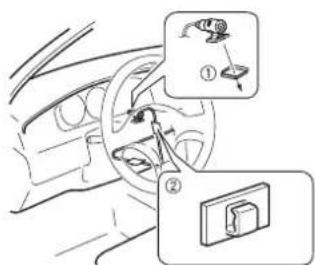
① Double-sided tape
② Clamps
Use separately sold clamps to secure the lead where necessary inside the vehicle.
NOTE
Keeping it away from the steering wheel.
Adjusting the microphone angle

Installing the TV aerial
Z7150TV
CAUTION
This TV aerial is dedicated for inside of the vehicle. Do not install it outside of the vehicle.
Assembling the TV aerial
1 Screw the rod to the aerial
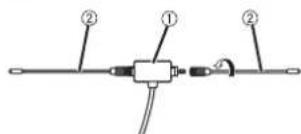
① Aerial
② Rod
Mounting the TV aerial
1 Check the installation location.
2 Remove the sheet from the back of TV aerial, and attach the TV aerial to the windscreen.
NOTES
- Wipe the humidity, dust, dirt and oil from the installation location.
- Attach the TV aerial within the following allowable area.

Allowable area for installation

① Windscreen with ceramic line
② Windscreen without ceramic line
③ Allowable area for installation: Within 25 mm
④ Windscreen
Appendix
Troubleshooting
If you have problems operating this product, refer to this section. The most common problems are listed below, along with likely causes and solutions. If a solution to your problem cannot be found here, contact your dealer or the nearest authorised Pioneer service facility.
Common problems
A black screen is displayed, and operation is not possible using the touch panel keys.
→[Power OFF] mode is on. - Press any button on this product to release the mode.
Problems with the AV screen
CD or DVD playback is not possible.
→The disc is inserted upside down.
- Insert the disc with the label upward.
→The disc is dirty.
- Clean the disc.
→The disc is cracked or otherwise damaged.
→The files on the disc are in an irregular file format.
- Check the file format.
→The disc format cannot be played back.
- Replace the disc.
→The loaded disc is a type this product cannot play.
- Check what type of disc it is.
The screen is covered by a caution message and the video cannot be shown.
→The handbrake lead is not connected or the handbrake is not applied.
-Connect the handbrake lead correctly, and apply the handbrake.
→The handbrake interlock is activated.
- Park your vehicle in a safe place and apply the handbrake.
No video output from the connected equipment.
→The [AV Input] or [AUX Input] setting is incorrect.
-Correct the settings.
The audio or video skips.
→This product is not firmly secured.
- Secure this product firmly.
No sounds are produced. The volume level will not rise.
→Cables are not connected correctly.
- Connect the cables correctly.
→The system is performing still, slow motion, or frame-by-frame playback with DVD-Video.
- There is no sound during still, slow motion, or frame-by-frame playback with DVD-Video.
→The system is paused or performing fast reverse or forwards during the disc playback.
- For the media other than music CD (CD-DA), there is no sound on fast reverse or forwards.
The icon is displayed, and operation is impossible.
→The operation is not compatible with the video configuration.
- The operation is not possible. (For example, the DVD playing does not feature that angle, audio system, subtitle language, etc.)
Random playback in Music Browse mode is released in the USB storage device.
→Random playback in Music Browse mode is cancelled after the ignition switch is turned off (ACC OFF). – Switch to Music Browse mode again and turn on random playback.
The picture stops (pauses) and product cannot be operated.
→The reading of data is impossible during disc playback. - Stop playback once, then restart.
The picture is stretched, with an incorrect aspect ratio.
→The aspect setting is incorrect for the display. – Select the appropriate setting for that image.
A parental lock message is displayed and DVD playback is not possible.
→The parental lock is on. - Turn the parental lock off or change the level.
The parental lock for DVD playback cannot be canceled.
→The code number is incorrect. - Input the correct code number.
Playback is not with the audio language and subtitle language settings selected in [DVD Set up].
→The DVD playing does not feature dialogue or subtitles in the language selected in [DVD Set up]. – Switching to a selected language is not possible if the language selected in [DVD Set up] is not recorded on the disc.
The picture is extremely unclear/ distorted and dark during playback.
→The disc features a signal to prohibit copying. (Some discs may have this.) –Since this product is compatible with the copy guard analogue copy protect system, the picture may suffer from horizontal stripes or other imperfections when a disc with that kind of protection signal is viewed on some displays. This is not a malfunction.
iPod cannot be operated.
→The iPod is frozen. - Reconnect the iPod with the USB interface cable for iPod/iPhone. - Update the iPod software version. →An error has occurred. - Reconnect the iPod with the USB interface cable for iPod/iPhone. - Park your vehicle in a safe place, and then turn off the ignition switch (ACC OFF). Subsequently, turn the ignition switch to on (ACC ON) again. - Update the iPod software version. →Cables are not connected correctly. - Connect the cables correctly.
Sound from the iPod cannot be heard.
→The audio output direction may switch automatically when the Bluetooth and USB connections are used at the same time. - Use the iPod to change the audio output direction.
Problems with the phone screen
Dialing is impossible because the touch panel keys for dialing are inactive.
→Your phone is out of range for service. -Retry after re-entering the range for service.
→The connection between the mobile phone and this product cannot be established. - Perform the connection process. →Of the two mobile phones connected to this product at the same time, if the first phone is dialling, ringing or a call is in progress, dialling cannot be performed on the second phone. - When the operation on the first of the two mobile phones is completed, use the switch devices key to switch to the second phone and then dial.
Problems with Application screen
A black screen is displayed.
→While operating an application, the application was ended on the smartphone side. - Press 📄 display the top menu screen. →The smartphone OS may be awaiting screen operation. - Stop the vehicle in a safe place and check the screen on the smartphone
The screen is displayed, but operation does not work at all.
→An error has occurred. - Park your vehicle in a safe place, and then turn off the ignition switch (ACC OFF). Subsequently, turn the ignition switch to on (ACC ON) again. - When an Android device is connected, disconnect the Bluetooth connection from this product and then reconnect it.
The smartphone was not charged.
→Charging stopped because the temperature of the smartphone rose due to prolonged use of the smartphone during charging.
- Disconnect the smartphone from the cable, and wait until the smartphone cools down.
→More battery power was consumed than was gained from charging. -This problem may be resolved by stopping any unnecessary services on the smartphone.
Sound from AppRadio Mode + of the Android device cannot be heard from the speakers of this unit.
→Depending on the Android device, the sound from AppRadio Mode + may not be output from the speakers of this unit. - Switch to [Smartphone] in the [AppRadio Mode Sound] settings (page 40).
Error messages
When problems occur with this product, an error message appears on the display. Refer to the table below to identify the problem, then take the suggested corrective action. If the error persists, record the error message and contact your dealer or your nearest Pioneer service centre.
Common
AMP Error
→This product fails to operate or the speaker connection is incorrect; the protective circuit is activated. –Check the speaker connection. If the message fails to disappear even after the engine is switched off/on, contact your dealer or an authorised Pioneer Service Station for assistance.
Spotify
Skip limit reached.
→Skip limit reached.
- Do not exceed the skip limit.
- Spotify limits the total number of skips per hour.
Check USB
→The USB connector or USB cable has short-circuited.
- Check that the USB connector or USB cable is not caught in something or damaged.
→The connected USB storage device consumes more than maximum allowable current.
- Disconnect the USB storage device and do not use it. Turn the ignition switch to OFF, then to ACC or ON and then connect a compliant USB storage device.
No Spotify
→The Spotify application is not installed in the connected device.
- Install the Spotify application in your mobile device.
Update App
→The Spotify application is out of date.
- Update to the latest Spotify application.
Please Log-in
→You are not logged in to the Spotify application.
- Please log in to the Spotify application.
No Signal
→The connected device is out of area.
- Connect the device to a network.
Disc
Error-02-XX/FF-FF
→The disc is dirty.
-Clean the disc.
→The disc is scratched.
- Replace the disc.
→The disc is loaded upside down.
- Check that the disc is loaded correctly.
→There is an electrical or mechanical
error.
- Press the RESET button.
Different Region Disc
→The disc does not have the same region
number as this product.
- Replace the DVD with one bearing the correct region number.
Unplayable Disc
→This type of disc cannot be played on
this product.
- Replace the disc with one that can be
played on this product.
Unplayable File
→This type of file cannot be played on this
product.
Select a file that can be played.
Skipped
→The inserted disc contains DRM
protected files.
The protected files are skipped.
Protect
→All the files on the inserted disc are
embedded with DRM
Replace the disc
TEMP
→The temperature of this product is
outside the normal operating range.
- Wait until this product returns to a
temperature within the normal
operating limits.
Your device is not authorized to play this DivX protected video.
→This product's DivX registration code has not been authorised by the DivX VOD contents provider.
Video frame rate not supported
→DivX file's frame rate is more than 30 fps.
- Select a file that can be played.
Audio Format not supported
→This type of file is not supported on this product.
- Select a file that can be played.
USB storage device
Error-02-9X/-DX
→Communication failed.
- Turn the ignition switch OFF and back
ON.
- Disconnect the USB storage device.
- Change to a different source. Then,
return to the USB storage device.
Unplayable File
→There is no playable file in the USB
storage device.
- Check that the files in the USB storage
device are compatible with this
product.
→Security for the connected USB storage device is enabled.
- Follow the USB storage device
instructions to disable security.
Skipped
→The connected USB storage device
contains DRM protected files.
- The protected files are skipped.
Protect
→All the files on the connected USB
storage device are embedded with
DBM
- Replace the USB storage device.
Incompatible USB
→The connected USB storage device is not supported by this product.
- Disconnect your device and replace it with a compatible USB storage device.
Check USB
→The USB connector or USB cable has short-circuited.
- Check that the USB connector or USB cable is not caught in something or damaged.
→The connected USB storage device consumes more than maximum allowable current.
- Disconnect the USB storage device and do not use it. Turn the ignition switch to OFF, then to ACC or ON and then connect a compliant USB storage device.
HUB Error
→The connected USB hub is not supported by this product.
– Directly connect the USB storage device to this product.
No Response
→This product cannot recognise the connected USB storage device.
- Disconnect the device and replace it with another USB storage device.
USB was disconnected for device
protection. Do not re-insert this USB memory into the unit. Please restart the unit.
→The USB connector or USB cable has short-circuited.
- Check that the USB connector or USB cable is not caught in something or damaged.
→The connected USB storage device consumes more than maximum allowable current.
- Disconnect the USB storage device and do not use it. Turn the ignition
switch to OFF, then to ACC or ON and then connect a compliant USB storage device.
→The USB interface cable for iPod/iPhone has short-circuited.
- Confirm that the USB interface cable for iPod/iPhone or USB cable is not caught in something or damaged.
Your device is not authorized to play this DivX protected video.
→This product's DivX registration code has not been authorised by the DivX VOD contents provider.
Audio Format not supported
→This type of file is not supported on this product.
- Select a file that can be played.
iPod
Error-02-6X/-9X/-DX
→iPod failure.
- Disconnect the cable from the iPod. Once the iPod's main menu is displayed, reconnect the iPod and reset it.
Error-02-67
→The iPod firmware version is old. - Update the iPod version.
Bluetooth
Error-10
→The power failed for the Bluetooth module of this product.
- Turn the ignition switch to OFF and then to ON.
If the error message is still displayed after performing the above action, please contact your dealer or an authorised Pioneer Service Station.
Handling and care of discs
Some basic precautions are necessary when handling your discs.
Built-in drive and care
- Use only conventional, fully circular discs. Do not use shaped discs.
- Do not use cracked, chipped, warped, or otherwise damaged discs as they may damage the built-in drive.
- Use 12-cm discs. Do not use 8-cm discs or an adapter for 8-cm discs.
- When using discs that can be printed on label surfaces, check the instructions and the warnings of the discs. Depending on the discs, inserting and ejecting may not be possible. Using such discs may result in damage to this equipment.
- Do not attach labels, write on or apply chemicals to the surface of the discs.
- Do not attach commercially available labels or other materials to the discs.
- To clean a disc, wipe it with a soft cloth, moving outward from the centre.
- Condensation may temporarily impair the built-in drive's performance.
- Playback of discs may not be possible because of disc characteristics, disc format, recorded application, playback environment, storage conditions and so on.
- Road shocks may interrupt disc playback.
- Read the precautions for discs before using them.
Ambient conditions for playing a disc
- At extremely high temperatures, a temperature cutout protects this product by switching it off automatically.
- Despite our careful design of the product, small scratches that do not affect actual operation may appear on the disc surface as a result of mechanical wear, ambient conditions for use or handling of the disc. This is not a sign of the malfunction of this product. Consider it to be normal wear and tear.
playable discs
DVD-Video

• BY trademark of DVD Format/Logo Licensing Corporation.
- It is not possible to play DVD Audio discs. This DVD drive may not be able to play all discs bearing the marks shown above.
CD

AVCHD recorded discs
This unit is not compatible with discs recorded in AVCHD (Advanced Video Codec High Definition) format. Do not insert in AVCHD discs. If inserted, the disc may not be ejected.
Playing DualDisc
- DualDiscs are two-sided discs that have a recordable CD for audio on one side and a recordable DVD for video on the other.
- Playback of the DVD side is possible with this product. However, since the CD side of DualDiscs is not physically compatible with the general CD standard, it may not be possible to play the CD side with this product.
- Frequent loading and ejecting of a DualDisc may result in scratches to the disc.
- Serious scratches can lead to playback problems on this product. In some cases, a DualDisc may become stuck in the disc-loading slot and will not eject. To prevent this, we recommend you refrain from using DualDisc with this product.
- Please refer to the manufacturer for more detailed information about DualDiscs.
Dolby Digital
This product will down-mix Dolby Digital signals internally and the sound will be output in stereo.
• Manufactured under license from Dolby Laboratories. Dolby, Dolby Audio and the double-D symbol are trademarks of Dolby Laboratories.

Detailed information for playable media
Compatibility
Common notes about disc compatibility
• Certain functions of this product may not be available for some discs.
- Compatibility with all discs is not guaranteed.
- It is not possible to play DVD-RAM discs.
- Playback of discs may become impossible with direct exposure to sunlight, high temperatures, or depending on the storage conditions in the vehicle.
DVD-Video discs
- DVD-Video discs that have incompatible region numbers cannot be played on this DVD drive. The region number of the player can be found on this product's chassis.
DVD-R/DVD-RW/DVD-R SL (Single Layer)/DVD-R DL (Dual Layer) discs
- Unfinalised discs which have been recorded with the Video format (video mode) cannot be played back.
• Discs which have been recorded with the Video Recording format (VR mode) cannot be played back.
• DVD-R DL (Dual Layer) discs which have been recorded with Layer Jump recording cannot be played back. - For detailed information about recording mode, please contact the manufacturer of media, recorders, or writing software.
CD-R/CD-RW discs
- Unfinalised discs cannot be played back.
- It may not be possible to playback CD-R/CD-RW discs recorded on a music CD recorder or a computer because of disc
characteristics, scratches or dirt on the disc, or dirt, scratches or condensation on the lens of the built-in drive.
- Playback of discs recorded on a computer may not be possible, depending on the recording device, writing software, their settings, and other environmental factors.
- Please record with the correct format. (For details, please contact manufacturer of media, recorders, or writing software.)
- Titles and other text information recorded on a CD-R/CD-RW disc may not be displayed by this product (in the case of audio data (CD-DA)).
- Read the precautions with CD-R/CD-RW discs before using them.
Common notes about the USB storage device
- Do not leave the USB storage device in any location with high temperatures.
- Depending on the kind of the USB storage device you use, this product may not recognise the storage device or files may not be played back properly.
- The text information of some audio and video files may not be correctly displayed.
- File extensions must be used properly.
- There may be a slight delay when starting playback of files on an USB storage device with complex folder hierarchies.
- Operations may vary depending on the kind of an USB storage device.
- It may not be possible to play some music files from USB because of file characteristics, file format, recorded application, playback environment, storage conditions, and so on.
USB storage device compatibility
- For details about USB storage device compatibility with this product, refer to Specifications (page 70).
- Protocol: bulk
- You cannot connect a USB storage device to this product via a USB hub.
- Partitioned USB storage device is not compatible with this product.
- Firmly secure the USB storage device when driving. Do not let the USB storage device fall onto the floor, where it may become jammed under the brake or accelerator.
- There may be a slight delay when starting playback of audio files encoded with image data.
- Some USB storage devices connected to this product may generate noise on the radio.
- Do not connect anything other than the USB storage device.
The sequence of audio files on USB storage device.
For USB storage device, the sequence is different from that of USB storage device.
Handling guidelines and supplemental information
• This product is not compatible with the Multi Media Card (MMC).
• Copyright protected files cannot be played back.
Common notes about DivX files
Notes specific to DivX files
- Only DivX files downloaded from DivX partner sites are guaranteed for proper operation. Unauthorised DivX files may not operate properly.
- This product corresponds to a DivX file display of up to 1590 minutes 43 seconds. Search operations beyond this time limit are prohibited.
- For details on the DivX video versions that can be played on this product, refer to Specifications (page 70).
- For more details about DivX, visit the following site: http://www.divx.com/
DivX subtitle files
- Srt format subtitle files with the extension ".srt" can be used.
- Only one subtitle file can be used for each DivX file. Multiple subtitle files cannot be associated.
- Subtitle files that are named with the same character string as the DivX file before the extension are associated with the DivX file. The character strings before the extension must be exactly the same. However, if there is only one DivX file and one subtitle file in a single folder, the files are associated even if the file names are not the same.
- The subtitle file must be stored in the same folder as the DivX file.
- Up to 255 subtitle files may be used. Any more subtitle files will not be recognised.
- Up to 64 characters can be used for the name of the subtitle file, including the extension. If more than 64 characters are used for the file name, the subtitle file may not be recognised.
• The character code for the subtitle file should comply with ISO-8859-1. Using characters other than ISO-8859-1 may cause the characters to be displayed incorrectly. - The subtitles may not be displayed correctly if the displayed characters in the subtitle file include control code.
- For materials that use a high transfer rate, the subtitles and video may not be completely synchronised.
- If multiple subtitles are programmed to display within a very short time frame, such as 0.1 seconds, the subtitles may not be displayed at the correct time.
Media compatibility chart
General
• Maximum playback time of audio file stored in the disc: 60 h
• Maximum playback time of audio file stored on an USB storage device: 7.5 h (450 minutes)
CD-R/-RW
File system: ISO 9660 level 1 and level 2, Romeo, Joliet
Maximum number of directory: No limit Maximum number of folders: 700
Maximum number of files: 999
Playable file types: MP3, WMA, AAC, DivX, MPEG1, MPEG2, MPEG4
DVD-R/-R SL/-R DL/DVD-RW
File system: ISO 9660 level 1 and level 2, Romeo, Joliet
Maximum number of folders: 700
Maximum number of files: 3 500
playable file types: MP3, WMA, AAC, DivX, MPEG1, MPEG2, MPEG4
USB storage device
File system: FAT16/FAT32/NTFS
Maximum number of directory: 8
Maximum number of folders: 1 500
Maximum number of files: 15 000
playable file types: MP3, WMA, AAC, WAV,
FLAC, DivX, H.264, H.263, MPEG-2, MPEG-4, VC-1, FLV, MKV, JPEG, PNG, BMP
MP3 compatibility
- Ver. 2.x of ID3 tag is prioritised when both Ver. 1.x and Ver. 2.x exist.
- This product is not compatible with the following: MP3i (MP3 interactive), mp3 PRO, m3u playlist
CD-R/-RW, DVD-R/-R SL/-R DL/DVD-RW
File extension: .mp3
Bit rate: 8 kbps to 320 kbps (CBR), VBR
Sampling frequency: 16 kHz to 48 kHz ID3 tag: ID3 tag Ver. 1.0, 1.1, 2.2, 2.3
USB storage device
File extension: .mp3
Bit rate: 8 kbps to 320 kbps (CBR), VBR
Sampling frequency: 8 kHz to 48 kHz
ID3 tag: ID3 tag Ver. 1.0, 1.1, 2.2, 2.3, 2.4
WMA compatibility
- This product is not compatible with the following: Windows Media™ Audio 9.2 Professional, Lossless, Voice
CD-R/-RW, DVD-R/-R SL/-R DL/DVD-RW
File extension: .wma
Bit rate: 5 kbps to 320 kbps (CBR), VBR Sampling frequency: 8 kHz to 48 kHz
USB storage device
File extension: .wma
Bit rate: 8 kbps to 320 kbps (CBR), VBR Sampling frequency: 32 kHz to 48 kHz
WAV compatibility
- The sampling frequency shown in the display may be rounded.
- WAV files on the CD-R/-RW, DVD-R/-RW/-R SL/-R DL cannot be played.
USB storage device
File extension: .wav
Format: Linear PCM (LPCM)
Sampling frequency: 16 kHz to 48 kHz
AAC compatibility
- This product plays back AAC files encoded by iTunes.
CD-R/-RW, DVD-R/-R SL/-R DL/DVD-RW
File extension: .m4a
Bit rate: 8 kbps to 320 kbps (CBR)
Sampling frequency: 11.025 kHz to 48 kHz
USB storage device
File extension: .m4a
Bit rate: 16 kbps to 320 kbps (CBR)
Sampling frequency: 8 kHz to 48 kHz
FLAC compatibility
USB storage device
File extension: .flac
Sampling frequency: 8 kHz to 192 kHz
DivX compatibility
- This product is not compatible with the following: DivX Ultra format, DivX files
without video data, DivX files encoded with LPCM (Linear PCM) audio codec
- Depending on the file information composition, such as the number of audio streams, there may be a slight delay in the start of playback on discs.
- If a file contains more than 4 GB, playback stops before the end.
- Some special operations may be prohibited because of the composition of DivX files.
- Files with high transfer rates may not be played back correctly. The standard transfer rate is 4 Mbps for CDs and 10.08 Mbps for DVDs.
CD-R/-RW, DVD-R/-R SL/-R DL/DVD-RW
File extension: .avi/.divx
Profile (DivX version): Home Theater Profile Maximum image size: 720 pixels × 576 pixels
Video files compatibility (USB)
- Files may not be played back properly depending on the environment in which the file was created or on the contents of the file.
- This product is not compatible with packet write data transfer.
- This product can recognise up to 32 characters, beginning with the first character, including extension for the file and folder name. Depending on the display area, this product may try to display them with a reduced font size. However, the maximum number of the characters that you can display varies according to the width of each character, and of the display area.
- Folder selection sequence or other operations may be altered, depending on the encoding or writing software.
- Regardless of the length of blank section between the songs of original recording, compressed audio discs play with a short pause between songs.
.avi
Format: MPEG-4/DivX/H.264/H.263
Compatible video codec: MPEG-4 (Simple Profile/Advanced Simple Profile)/DivX (Home Theater Profile)/H.264 (Base Line Profile/Main Profile/High Profile)/H.263 (Baseline Profile 0/3)
Maximum resolution: 1 920 pixels × 1 080 pixels (MPEG-4/H.264/H.263)
Maximum resolution: 720 pixels × 576 pixels (DivX)
Maximum frame rate: 30 fps
- Files may not be able to be played back depending on the bit rate.
.mp4
Format: MPEG-4/H.264/H.263
Compatible video codec: MPEG-4 (Simple Profile/Advanced Simple Profile)/H.264 (Base Line Profile/Main Profile/High Profile)/H.263 (Baseline Profile 0/3)
Maximum resolution: 1 920 pixels × 1 080 pixels
Maximum frame rate: 30 fps
- Files may not be able to be played back depending on the bit rate.
.3gp
Format: H.263
Compatible video codec: H.263 (Baseline Profile 0/3)
Maximum resolution: 1 920 pixels × 1 080 pixels
Maximum frame rate: 30 fps
- Files may not be able to be played back depending on the bit rate.
.mkv
Format: MPEG-4/H.264/VC-1
Compatible video codec: MPEG-4 (Simple Profile/Advanced Simple Profile)/H.264
(Base Line Profile/Main Profile/High
Profile)/VC-1 (Simple Profile/Main Profile/Advanced Profile)
Maximum resolution: 1 920 pixels × 1 080 pixels
Maximum frame rate: 30 fps
- Files may not be able to be played back depending on the bit rate.
.mov
Format: MPEG-4/H.264/H.263
Compatible video codec: MPEG-4 (Simple Profile/Advanced Simple Profile)/H.264
(Base Line Profile/Main Profile/High Profile)/H.263 (Baseline Profile 0/3)
Maximum resolution: 1 920 pixels × 1 080 pixels
Maximum frame rate: 30 fps
- Files may not be able to be played back depending on the bit rate.
.flv
Format: H.264
Compatible video codec: H.264 (Baseline Profile/Main Profile/High Profile)
Maximum resolution: 1 920 pixels × 1 080 pixels
Maximum frame rate: 30 fps
- Files may not be able to be played back depending on the bit rate.
.m4v
Format: MPEG-4/H.264/H.263
Compatible video codec: MPEG-4 (Simple Profile/Advanced Simple Profile)/H.264 (Base Line Profile/Main Profile/High Profile)/H.263 (Baseline Profile 0/3)
Maximum resolution: 1 920 pixels × 1 080 pixels
Maximum frame rate: 30 fps
- Files may not be able to be played back depending on the bit rate.
.asf
Format: VC-1
Compatible video codec: VC-1 (Simple Profile/Main Profile/Advanced Profile)
Maximum resolution: 1 920 pixels × 1 080 pixels
Maximum frame rate: 30 fps
- Files may not be able to be played back depending on the bit rate.
.wmy
Format: VC-1
Compatible video codec: VC-1 (Simple Profile/Main Profile/Advanced Profile)
Maximum resolution: 1 920 pixels × 1 080 pixels
Maximum frame rate: 30 fps
- Files may not be able to be played back depending on the bit rate.
.divx
Format: DivX
Compatible video codec: DivX (Home Theater Profile)
Maximum resolution: 720 pixels × 576 pixels
Maximum frame rate: 30 fps
- Files may not be able to be played back depending on the bit rate.
Example of a hierarchy
NOTE
This product assigns folder numbers. The user cannot assign folder numbers.
Bluetooth

Bluetooth®
The Bluetooth ^® word mark and logos are registered trademarks owned by the Bluetooth SIG, Inc. and any use of such marks by PIONEER CORPORATION is under license. Other trademarks and trade names are those of their respective owners.
WMA
Windows Media is either a registered trademark or trademark of Microsoft Corporation in the United States and/or other countries.
• This product includes technology owned by Microsoft Corporation and cannot be used or distributed without a license from Microsoft Licensing, Inc.
FLAC
Copyright © 2000-2009 Josh Coalson Copyright © 2011-2013 Xiph.Org Foundation
Redistribution and use in source and binary forms, with or without modification, are permitted provided that the following conditions are met:
- Redistributions of source code must retain the above copyright notice, this list of conditions and the following disclaimer.
– Redistributions in binary form must reproduce the above copyright notice, this list of conditions and the following disclaimer in the documentation and/or other materials provided with the distribution.
- Neither the name of the Xiph.org Foundation nor the names of its contributors may be used to endorse or promote products derived from this software without specific prior written permission.
THIS SOFTWARE IS PROVIDED BY THE COPYRIGHT HOLDERS AND CONTRIBUTORS "AS IS" AND ANY EXPRESS OR IMPLIED WARRANTIES, INCLUDING, BUT NOT LIMITED TO, THE IMPLIED WARRANTIES OF MERCHANTABILITY AND FITNESS FOR A PARTICULAR PURPOSE ARE DISCLAIMED. IN NO EVENT SHALL THE FOUNDATION OR CONTRIBUTORS BE LIABLE FOR ANY DIRECT, INDIRECT, INCIDENTAL, SPECIAL, EXEMPLARY, OR CONSEQUENTIAL DAMAGES (INCLUDING, BUT NOT LIMITED TO, PROCUREMENT OF SUBSTITUTE GOODS OR SERVICES; LOSS OF USE, DATA, OR PROFITS; OR BUSINESS
INTERRUPTION) HOWEVER CAUSED AND ON ANY THEORY OF LIABILITY, WHETHER IN CONTRACT, STRICT LIABILITY, OR TORT (INCLUDING NEGLIGENCE OR OTHERWISE) ARISING IN ANY WAY OUT OF THE USE OF THIS SOFTWARE, EVEN IF ADVISED OF THE POSSIBILITY OF SUCH DAMAGE.
DivX
DIVX.
DivX® Home Theater Certified devices have been tested for high-quality DivX Home Theater video playback (including .avi, .divx). When you see the DivX logo, you know you have the freedom to play your favorite videos.
DivX ^® , DivX Certified ^® and associated logos are trademarks of DivX, LLC and are used under license.
This DivX Certified ^® device can play DivX ^® Home Theater video files up to 576p (including .avi, .divx).
Download free software at www.divx.com to create, play and stream digital video.
AAC
AAC is short for Advanced Audio Coding and refers to an audio compression technology standard used with MPEG-2 and MPEG-4. Several applications can be used to encode AAC files, but file formats and extensions differ depending on the application which is used to encode. This unit plays back AAC files encoded by iTunes.
Google™, Google Play, Android
Google, Google Play, Android and Android Auto are trademarks of Google Inc.
MIXTRAX
MIXTRAX is a trademark of the PIONEER CORPORATION.
Detailed information regarding connected iPod devices
- Pioneer accepts no responsibility for data lost from an iPod, even if that data is lost while using this product. Please back up your iPod data regularly.
- Do not leave the iPod in direct sunlight for extended amounts of time. Extended exposure to direct sunlight can result in iPod malfunction due to the resulting high temperature.
- Do not leave the iPod in any location with high temperatures.
- Firmly secure the iPod when driving. Do not let the iPod fall onto the floor, where it may become jammed under the brake or accelerator.
- For details, refer to the iPod manuals.
iPhone and iPod
Made for

iPod

iPhone
"Made for iPod" and "Made for iPhone" mean that an electronic accessory has been designed to connect specifically to iPod or iPhone, respectively, and has been certified by the developer to meet Apple performance standards.
Apple is not responsible for the operation of this device or its compliance with safety and regulatory standards.
Please note that the use of this accessory with iPod or iPhone may affect wireless performance. iPhone, iPod, iPod classic, iPod nano, and iPod touch are trademarks of Apple Inc., registered in the U.S. and other countries.
Lightning
Lightning is a trademark of Apple Inc.
App Store
App Store is a service mark of Apple Inc.
ios
iOS is a trademark on which Cisco holds the trademark right in the US and certain other countries.
iTunes
iTunes is a trademark of Apple Inc., registered in the U.S. and other countries.
Apple Music
Apple Music is a trademark of Apple Inc., registered in the U.S. and other countries.
Using app-based connected content
Important
Requirements to access app-based connected content services using this product:
- Latest version of the Pioneer compatible connected content application(s) for the smartphone, available from the service provider, downloaded to your smartphone.
- A current account with the content service provider.
- Smartphone Data Plan.
Note: if the Data Plan for your smartphone does not provide for unlimited data usage, additional charges from your carrier may apply for accessing app-based connected content via 3G, EDGE and/or LTE (4G) networks. - Connection to the Internet via 3G, EDGE, LTE (4G) or Wi-Fi network.
- Optional Pioneer adapter cable connecting your iPhone to this product.
Limitations:
- Access to app-based connected content will depend on the availability of cellular and/or Wi-Fi network coverage for the purpose of allowing your smartphone to connect to the Internet.
• Service availability may be geographically limited to the region. Consult the connected content service provider for additional information. - Ability of this product to access connected content is subject to change without notice and could be affected by any of the following: compatibility issues with future firmware versions of smartphone; compatibility issues with future versions of the connected content application(s) for the smartphone; changes to or discontinuation of the connected Content application(s) or service by its provider.
Spotify®

Spotify®
SPOTIFY and the Spotify logo are among the registered trademarks of Spotify AB. Compatible mobile digital devices and premium
subscription required, where available, see https://www.spotify.com.
Notice regarding video viewing
Remember that use of this system for commercial or public viewing purposes may constitute an infringement on the author's rights as protected by the Copyright Law.
Notice regarding DVD-Video viewing
This item incorporates copy protection technology that is protected by U.S. patents and other intellectual property rights of Rovi Corporation. Reverse engineering and disassembly are prohibited.
Notice regarding MP3 file usage
Supply of this product only conveys a license for private, non-commercial use and does not convey a license nor imply any right to use this product in any commercial (i.e. revenue-generating) real time broadcasting (terrestrial, satellite, cable and/or any other media), broadcasting/streaming via internet, intranets and/or other networks or in other electronic content distribution systems, such as pay-audio or audio-on-demand applications. An independent license for such use is required. For details, please visit http://www.mp3licensing.com.
Using the LCD screen correctly
Handling the LCD screen
- When the LCD screen is subjected to direct sunlight for a long period of time, it will become very hot, resulting in possible damage to the LCD screen. When not using this product, avoid exposing it to direct sunlight as much as possible.
- The LCD screen should be used within the temperature ranges shown in Specifications on page 70.
- Do not use the LCD screen at temperatures higher or lower than the operating temperature range, because the LCD screen may not operate normally and could be damaged.
- The LCD screen is exposed in order to increase its visibility within the vehicle. Please do not press strongly on it as this may damage it.
- Do not push the LCD screen with excessive force as this may scratch it.
- Never touch the LCD screen with anything besides your finger when operating the touch panel functions. The LCD screen can scratch easily.
Liquid crystal display (LCD) screen
- If the LCD screen is near the vent of an air conditioner, make sure that air from the air conditioner is not blowing on it. Heat from the heater may break the LCD screen, and cool air from the cooler may cause moisture to form inside this product, resulting in possible damage.
- Small black dots or white dots (bright dots) may appear on the LCD screen.
These are due to the characteristics of the LCD screen and do not indicate a malfunction.
- The LCD screen will be difficult to see if it is exposed to direct sunlight.
- When using a mobile phone, keep the aerial of the mobile phone away from the LCD screen to prevent disruption of the video in the form of disturbances such as spots or coloured stripes.
Maintaining the LCD screen
- When removing dust from or cleaning the LCD screen, first turn this product off and then wipe the screen with a soft dry cloth.
- When wiping the LCD screen, take care not to scratch the surface. Do not use harsh or abrasive chemical cleaners.
LED (light-emitting diode) backlight
A light emitting diode is used inside the display to illuminate the LCD screen.
- At low temperatures, using the LED backlight may increase image lag and degrade the image quality because of the characteristics of the LCD screen. Image quality will improve with an increase in temperature.
- The product lifetime of the LED backlight is more than 10 000 hours. However, it may decrease if used in high temperatures.
- If the LED backlight reaches the end of its product lifetime, the screen will become dimmer and the image will no longer be visible. In that case, please consult your dealer or the nearest authorised Pioneer Service Station.
Specifications
General
Rated power source: 14.4 V DC (10.8 V to 15.1 V allowable)
Earthing system: Negative type Maximum current consumption:
10.0 A
Dimensions (W × H × D): DIN Chassis:
178 mm × 50 mm × 160 mm Nose:
188 mm × 58 mm × 32 mm
Chassis: 178 mm × 50 mm × 165 mm
170 mm × 46 mm × 27 mm
Weight: 1.9 kg
Display
Screen size/aspect ratio: 7.0 inch wide/16:9 (effective display area: 154.1 mm × 85.9 mm)
Pixels: 1 152 000 (2 400 × 480)
Display method: TFT Active matrix driving
Colour system: PAL/NTSC/PAL-M/PAL-N/SECAM compatible
Durable temperature range: -10 °C to +60 °C (Power off)
Audio
Maximum power output: - 50 W × 4 ch/4 Ω - 50 W × 2 ch/4 Ω + 70 W × 1 ch/2 Ω (for subwoofer)
Continuous power output: 22 W × 4 (50 Hz to 15 kHz, 5 %THD, 4 Ω LOAD, Both Channels Driven)
Load impedance: 4 Ω (4 Ω to 8 Ω [2 Ω for 1 ch] allowable)
Preout output level (max): 4.0 V
Equaliser (13-Band Graphic Equaliser):
Frequency: 50 Hz/80 Hz/125 Hz/200 Hz/315 Hz/ 500 Hz/800 Hz/1.25 kHz/2 kHz/3.15 kHz/5 kHz/8 kHz/12.5 kHz
Gain: ±12 dB (2 dB/step)
Frequency: 25 Hz/31.5 Hz/40 Hz/50 Hz/63 Hz/80 Hz/100 Hz/125 Hz/160 Hz/200 Hz/250 Hz
Slope: -6 dB/oct, -12 dB/oct, -18 dB/oct, -24 dB/oct, OFF
Subwoofer/LPF:
Frequency: 25 Hz/31.5 Hz/40 Hz/50 Hz/63 Hz/80 Hz/100 Hz/125 Hz/160 Hz/200 Hz/250 Hz
Slope: -6 dB/oct, -12 dB/oct, -18 dB/oct, -24 dB/oct, -30 dB/oct, -36 dB/oct, OFF
+10 dB to -24 dB (1 dB/step) Phase: Normal/Reverse
Time alignment: 0 to 140 step (2.5 cm/step)
Bass boost: Gain: +12 dB to 0 dB
Speaker level: +10 dB to -24 dB (1 dB/step)
HPF (High):
Frequency: 1.25 kHz/1.6 kHz/2 kHz/2.5 kHz/3.15 kHz/4 kHz/5 kHz/6.3 kHz/8 kHz/10 kHz/ 12.5 kHz
Slope: -6 dB/oct, -12 dB/oct, -18 dB/oct, -24 dB/oct
HPF (Mid):
Frequency: 25 Hz/31.5 Hz/40 Hz/50 Hz/63 Hz/80
Hz/100 Hz/125 Hz/160 Hz/200 Hz/250 Hz
Slope:
-6 dB/oct, -12 dB/oct, -18 dB/oct, -24 dB/oct, OFF
LPF (Mid):
Frequency:
1.25 kHz/1.6 kHz/2 kHz/2.5 kHz/3.15
kHz/4 kHz/5 kHz/6.3 kHz/8 kHz/10 kHz/12.5 kHz
Slope:
-6 dB/oct, -12 dB/oct, -18 dB/oct, -24 dB/oct, -30 dB/oct, -36 dB/oct, OFF
Subwoofer:
Frequency:
25 Hz/31.5 Hz/40 Hz/50 Hz/63 Hz/80
Hz/100 Hz/125 Hz/160 Hz/200 Hz/250 Hz
Slope:
-12 dB/oct, -18 dB/oct, -24 dB/oct, -30 dB/oct, -36 dB/oct, OFF
Gain:
+10 dB to -24 dB (1 dB/step)
Phase: Normal/Reverse
Time alignment:
0 to 140 step (2.5 cm/step)
Bass boost:
Gain: +12 dB to 0 dB
Speaker level:
+10 dB to -24 dB (1 dB/step)
DVD drive
System:
DVD-V, VCD, CD, MP3, WMA, AAC, DivX,
MPEG player
Usable discs:
DVD-VIDEO, VIDEO-CD, CD, CD-R, CD-
RW, DVD-R, DVD-RW, DVD-R DL
Region number: 4
Signal Format:
Sampling frequency:
8 kHz/16 kHz/32 kHz/44.1 kHz/48 kHz
Number of quantization bits:
16 bit/20 bit/24 bit; linear
Frequency response:
5 Hz to 22 000 Hz (with DVD, at
sampling frequency 48 kHz)
Signal-to-noise ratio:
91 dB (1 kHz) (IHF-A network) (RCA
level)
Output level:
Video:
1.0 V p-p/75 Ω (±0.2 V)
Number of channels: 2 (stereo)
MP3 decoding format:
MPEG-1 & 2 & 2.5 Audio Layer 3
WMA decoding format:
Ver. 7, 7.1, 8, 9, 9.1, 9.2 (2 ch audio)
(Windows Media Player)
AAC decoding format:
MPEG-4 AAC (iTunes encoded only):
.m4a (Ver. 12.5 and earlier)
DivX decoding format:
Home Theater Ver. 3, 4, 5.2, 6 (Except
ultra and HD):
.avi, .divx
MPEG video decoding format:
MPEG-1, MPEG-2, MPEG-4 (part2), MS-
MPEG-4 (ver. 3)
USB
USB standard spec:
USB 1.1, USB 2.0 full speed, USB 2.0 high
speed
Max current supply: 1.5 A
USB Class:
MSC (Mass Storage Class), MTP (Media
Transfer Protocol)
File system: FAT16, FAT32, NTFS
MP3 decoding format:
MPEG-1 & 2 & 2.5 Audio Layer 3
WMA decoding format
Ver. 7, 7.1, 8, 9, 10, 11, 12 (2 ch audio)
(Windows Media Player)
AC decoding format:
MPEG-4 AAC (iTunes encoded only) (Ver.
12.5 and earlier)
FLAC decoding format:
Ver. 1.3.0 (Free Lossless Audio Codec)
WAV signal format (MSC Mode only): Linear PCM
Sampling frequency:
Linear PCM:
16 kHz/22.05 kHz/24 kHz/32 kHz/44.1
kHz/48 kHz
JPEG decoding format (MSC Mode only):
.jpeg, .jpg, .jpe
Pixel Sampling: 4:2:2, 4:2:0
Decode Size:
BMP decoding format (MSC Mode only):
.bmp
Decode Size:
MAX: 1 920 (H) × 936 (W)
Base Line Profile, Main Profile, High
Profile
H.263 video decoding format:
Base Line Profile 0/3
VC-1 video decoding format:
Simple Profile, Main Profile, Advanced
Profile
DivX:
Home Theater
MPEG4 video decoding format:
Simple Profile, Advanced Simple Profile
MPEG2 video decoding format:
Main Profile
Bluetooth
Version:
Bluetooth 4.1 certified
Output power:
+4 dBm Max. (Power class 2)
Frequency band:
2 400 MHz to 2 483.5 MHz
FM tuner
Frequency range:
(AVH-Z7150TV)
76 MHz to 108 MHz
(AVH-Z7150BT)
76 MHz to 108 MHz (South America)
87.5 MHz to 108 MHz (Australia)
Usable sensitivity:
12 dBf (1.1 μV/75 Ω, mono, S/N: 30 dB)
Signal-to-noise ratio: 72 dB (IEC-A network)
AM tuner
Frequency range:
530 kHz to 1 640 kHz (10 kHz)
Frequency range:
531 kHz to 1 602 kHz (9 kHz)
Usable sensitivity
28 μV (S/N: 20 dB)
Signal-to-noise ratio:
62 dB (IEC-A network)
TV tuner
(AVH-Z7150TV)
Colour System: ISDB-T
Reception Channel:
Ch 14 to Ch 69
Sensitivity:
less than -95 dBm
Aerial input: 50 Ω
Aerial terminal type:
1 ch (SMA plug type)
Video Format:
AVC/H.264, BP@L1.3, 320 × 240
Audio Format:
Specifications and design are subject to possible modifications without notice due to improvements.
Índice
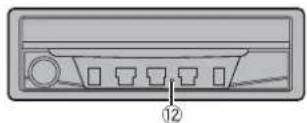
| 1 | Pantalla LCD |
| 2 | |
| 3 | Volume/SRC/OFF |
| 4 | |
| 5 |
Works with Apple CarPlay
natural_image
Diagram showing two mechanical components with bolts and a base, no text or symbols present① Puerto USB
① Tablero
② Manguito de montaje
③ Soporte lateral
④ Tornillo (2 mm × 3 mm)
① Use solo tornillos dobles (4 mm × 3 mm).
① Manguito de montaje
② Tornillo (2 mm × 3 mm)
③ Anillo embellecedor
① Aéreo
② Vara
Copyright © 2000-2009 Josh Coalson
Copyright © 2011-2013 Xiph.Org Foundation
PAL/NTSC/PAL-M/PAL-N/SECAM
kHz/5 kHz/8 kHz/12,5 kHz
-6 dB/oct, -12 dB/oct, -18 dB/oct, -24
dB/oct, DESACTIVADO
Subwoofer/LPF:
Frecuencia:
25 Hz/31,5 Hz/40 Hz/50 Hz/63 Hz/80
Hz/100 Hz/125 Hz/160 Hz/200 Hz/250
Hz
Pendiente:
-6 dB/oct, -12 dB/oct, -18 dB/oct, -24
dB/oct, -30 dB/oct, -36 dB/oct,
DESACTIVADO
Ganancia:
+10 dB a -24 dB (1 dB/paso)
kHz/4 kHz/5 kHz/6,3 kHz/8 kHz/10 kHz/
12,5 kHz
Pendiente:
-6 dB/oct, -12 dB/oct, -18 dB/oct, -24
dB/oc
HPF (Medio):
Frecuencia:
25 Hz/31,5 Hz/40 Hz/50 Hz/63 Hz/80
Hz/100 Hz/125 Hz/160 Hz/200 Hz/250
Hz
Pendiente:
-6 dB/oct, -12 dB/oct, -18 dB/oct, -24
dB/oct, DESACTIVADO
LPF (Medio):
Frecuencia:
1,25 kHz/1,6 kHz/2 kHz/2,5 kHz/3,15
kHz/4 kHz/5 kHz/6,3 kHz/8 kHz/10 kHz/12,5 kHz
Pendiente:
-6 dB/oct, -12 dB/oct, -18 dB/oct, -24
dB/oct, -30 dB/oct, -36 dB/oct,
DESACTIVADO
Subwoofer:
Frecuencia:
25 Hz/31,5 Hz/40 Hz/50 Hz/63 Hz/80
Hz/100 Hz/125 Hz/160 Hz/200 Hz/250
Hz
Pendiente:
-12 dB/oct, -18 dB/oct, -24 dB/oct, -30
dB/oct, -36 dB/oct, DESACTIVADO
Ganancia:
+10 dB a -24 dB (1 dB/paso)
8 kHz/16 kHz/32 kHz/44,1 kHz/48 kHz
16 bits/20 bits/24 bits; lineal
16 kHz /22,05 kHz/24 kHz/32 kHz/44,1 kHz/48 kHz

- Important
- Precaution 3
- parts and controls...... 6
- Basic operation 8
- Bluetooth
- AppRadio
- AV source
- iPod/iPhone or
- smartphone connection for AV source.... 20
- Radio
- Contents
- Appendix......62
- Precaution
- CAUTION
- WARNING
- Important safety information
- To ensure safe driving
- When using a display connected to rear monitor output
- To avoid battery exhaustion
- Rear view camera
- Handling the USB connector
- In case of trouble
- Visit our website
- Protecting the LCD panel and screen
- Notes on internal memory
- About this manual
- Protecting your unit from theft
- Removing the front panel
- Re-attaching the front panel
- Parts and controls
- Main unit
- Basic operation
- Notes on using the LCD panel
- Opening and closing the LCD panel
- Setting the automatic open function
- Turning the LCD panel horizontally
- NOTES
- Adjusting the LCD panel slide position
- Adjusting the LCD panel angle
- NOTE
- Resetting the microprocessor
- Preparing the remote control
- Using the remote control
- Starting up the unit
- 3Touch
- Z7150TV
- Z7150BT
- 5Touch
- [Standard Mode]
- [Network Mode]
- Touch [OK].
- 8Touch [OK].
- Switching the speaker mode
- Using the touch panel
- Common touch panel keys
- Operating list screens
- ①
- Bluetooth connection
- TIPS
- Bluetooth settings
- Switching the connected Bluetooth device
- Hands-free phoning
- Making a phone call
- Using the preset dial lists
- ▶Registering a phone number
- Receiving a phone call
- Voice recognition function (for iPhone)
- Minimising the dial confirmation screen
- TIP
- Phone settings
- Setting the private mode
- Adjusting the other party's listening volume
- Notes for hands-free phoning
- ▶General notes
- ▶ Registration and connection
- ▶Making and receiving calls
- The received call and dialled number histories
- ▶ Phone book transfers
- Bluetooth audio
- AppRadio Mode +
- Using AppRadio Mode +
- Starting procedure
- For iPhone users
- For smartphone (Android) users
- Using the keyboard
- Using the audio mix function
- Supported AV source
- Displaying the AV operation screen
- Selecting a source
- Source on the AV source selection screen
- Source on the source list
- Changing the display order of source
- Changing the display order of source icons
- Changing the display order of source keys
- Adjusting the range of favourite source icons area
- iPod/iPhone or smartphone connection for AV source
- iPod/iPhone with a Lightning connector
- Compatible iPod/iPhone models
- Connecting via Bluetooth
- Connecting via CD-IU52
- iPhone with a 30-pin connector
- Connecting via CD-IU51
- Smartphone (Android™ device)
- Connecting via CD-MU200
- Searching by PTY information
- Storing the strongest broadcast frequencies (BSM)
- To cancel the storage process
- Radio settings
- TV tuner
- Digital TV
- DTV settings
- Disc
- Inserting and ejecting a disc
- Insert the disc
- Ejecting a disc
- Audio source
- Video source
- Compressed files
- Inserting and ejecting media
- Insert a disc
- Plugging a USB storage device
- Unplugging a USB storage device
- For Disc
- For USB
- Still image source
- iPod
- Connecting your iPod
- Audio source screen 2
- Apple Music® Radio source
- Apple Music Radio screen
- Spotify®
- Limitations:
- Listening to Spotify
- AUX
- AV input
- MIXTRAX
- MIXTRAX EZ operation
- MIXTRAX settings
- Settings
- Displaying the setting screen
- System settings
- ▶Rear view camera
- ▶Camera for Camera View mode
- [Restore Settings]
- Menu Item Description
- [Keyboard]
- [Touch panel calibration]
- [Touch panel calibration] 1Touch [Yes].
- 3Press
- [Dimmer Settings]
- [Day/Night]
- [Picture Adjustment]
- [System Information]
- Theme settings
- Audio settings
- Adjusting the equaliser curve automatically (Auto EQ)
- ▶ Before operating the Auto EQ function
- ▶ Performing Auto EQ
- Adjusting the cutoff frequency value
- Video settings
- [DVD Set up]
- Favourite menu
- Creating a shortcut
- Selecting a shortcut
- Removing a shortcut
- Other functions
- Setting the time and date
- Changing the wide screen mode
- 2Touch the desired mode.
- Restoring this product to the default settings
- Apple CarPlay
- Compatible iPhone models
- Using Apple CarPlay
- Setting the driving position
- Adjusting the volume
- Android Auto™
- Compatible Android devices
- Using Android Auto
- Setting the auto-launch function
- Appendix for Apple CarPlay and Android Auto
- Error messages
- Attempting to connect to Apple CarPlay.
- Android Auto
- Android Auto has stopped.
- Bluetooth pairing failed. Please pair your Android phone manually.
- To use Android Auto, please stop your car and check your Android phone.
- Detailed information regarding connected iPod devices
- ios
- iPhone and iPod
- Lightning
- Using app-based connected content
- Connection
- Precautions
- Your new product and this manual
- Important safeguards
- Precautions before connecting the system
- Before installing this product
- To prevent damage
- Notice for the blue/white lead
- This product
- Power cord
- Power amp (sold separately)
- Without internal amp
- With internal amp
- iPod/iPhone and smartphone
- iPod/iPhone with Lightning connector
- iPhone with 30-pin connector
- Smartphone (Android device)
- Camera
- About rear view camera
- External video component and the display
- NEVER install the rear display in a location that enables the driver to watch the video source while driving.
- Installation
- Precautions before installation
- Before installing
- Installation notes
- DIN front/rear-mount
- DIN Front-mount
- DIN Rear-mount
- Removing the unit
- Installing the microphone
- Mounting on the sun visor
- Installation on the steering column
- Adjusting the microphone angle
- Installing the TV aerial
- Assembling the TV aerial
- Mounting the TV aerial
- Allowable area for installation
- Appendix
- Troubleshooting
- Common problems
- Problems with the AV screen
- Random playback in Music Browse mode is released in the USB storage device.
- The picture stops (pauses) and product cannot be operated.
- The picture is stretched, with an incorrect aspect ratio.
- A parental lock message is displayed and DVD playback is not possible.
- The parental lock for DVD playback cannot be canceled.
- Playback is not with the audio language and subtitle language settings selected in [DVD Set up].
- The picture is extremely unclear/ distorted and dark during playback.
- iPod cannot be operated.
- Sound from the iPod cannot be heard.
- Problems with the phone screen
- Dialing is impossible because the touch panel keys for dialing are inactive.
- Problems with Application screen
- A black screen is displayed.
- The screen is displayed, but operation does not work at all.
- The smartphone was not charged.
- Sound from AppRadio Mode + of the Android device cannot be heard from the speakers of this unit.
- Common
- AMP Error
- Spotify
- Skip limit reached.
- Check USB
- No Spotify
- Update App
- Please Log-in
- No Signal
- Error-02-XX/FF-FF
- Different Region Disc
- Unplayable Disc
- Unplayable File
- Skipped
- Protect
- TEMP
- Your device is not authorized to play this DivX protected video.
- Video frame rate not supported
- Audio Format not supported
- USB storage device
- Error-02-9X/-DX
- Incompatible USB
- HUB Error
- No Response
- USB was disconnected for device
- Handling and care of discs
- Built-in drive and care
- Ambient conditions for playing a disc
- playable discs
- DVD-Video
- CD
- AVCHD recorded discs
- Playing DualDisc
- Dolby Digital
- Detailed information for playable media
- Compatibility
- Common notes about disc compatibility
- DVD-Video discs
- DVD-R/DVD-RW/DVD-R SL (Single Layer)/DVD-R DL (Dual Layer) discs
- CD-R/CD-RW discs
- Common notes about the USB storage device
- USB storage device compatibility
- Handling guidelines and supplemental information
- Common notes about DivX files
- Notes specific to DivX files
- DivX subtitle files
- Media compatibility chart
- General
- CD-R/-RW
- DVD-R/-R SL/-R DL/DVD-RW
- MP3 compatibility
- CD-R/-RW, DVD-R/-R SL/-R DL/DVD-RW
- WMA compatibility
- WAV compatibility
- AAC compatibility
- FLAC compatibility
- DivX compatibility
- Video files compatibility (USB)
- .avi
- .mp4
- .3gp
- .mkv
- .mov
- .flv
- .m4v
- .asf
- .wmy
- .divx
- Example of a hierarchy
- Bluetooth®
- WMA
- FLAC
- DivX
- DIVX.
- AAC
- Google™, Google Play, Android
- App Store
- iTunes
- Apple Music
- Notice regarding video viewing
- Notice regarding DVD-Video viewing
- Notice regarding MP3 file usage
- Using the LCD screen correctly
- Handling the LCD screen
- Liquid crystal display (LCD) screen
- Maintaining the LCD screen
- LED (light-emitting diode) backlight
- Specifications
- Display
- Audio
- DVD drive
- USB
- FM tuner
- AM tuner
- Índice
- Subwoofer/LPF:
Brand : PIONEER
Model : AVH-Z7150BT
Category : Uncategorized