
VW249M - Dishwasher ETNA - Free user manual and instructions
Find the device manual for free VW249M ETNA in PDF.

| Product Type | Built-in Dishwasher |
| Brand | Etna |
| Model | VW249M |
| Dimensions (H x W x D) | 81.5 cm x 59.6 cm x 55.5 cm |
| Weight | Approximately 45 kg |
| Energy Efficiency Class | Class A++ |
| Annual Energy Consumption | 262 kWh/year |
| Water Consumption per Cycle | 10 liters |
| Number of Place Settings | 12 place settings |
| Noise Level | 44 dB(A) |
| Programs | ECO 50°C, Auto, Intensive, Quick 30 min, Glass, Pre-rinse |
| Drying System | Heat exchanger drying with condensation |
| Water Supply | Cold water only |
| Power Supply Voltage | 220-240 V ~ 50 Hz |
| Rated Power | 2100 W |
| Water Pressure Range | 0.3 - 10 bar |
| Salt and Rinse Aid Indicator | Yes |
| Half Load Function | Yes |
| Delay Start | Up to 24 hours |
| Safety Features | Aquastop, child lock, overflow protection |
| Maintenance | Clean filters and spray arms regularly, descale as needed |
| Spare Parts Availability | At least 10 years after purchase |
| Color | White |
Frequently Asked Questions - VW249M ETNA
User questions about VW249M ETNA
0 question about this device. Answer the ones you know or ask your own.
Ask a new question about this device
Download the instructions for your Dishwasher in PDF format for free! Find your manual VW249M - ETNA and take your electronic device back in hand. On this page are published all the documents necessary for the use of your device. VW249M by ETNA.
USER MANUAL VW249M ETNA
INSTRUCTIONS FOR USE
GEBRAUCHSANLEITUNG

DISHWASHER
GESCHIRRSPÜLER
VW249M
EN User instruction EN 3 - EN 23
Contact a registered installer to fit your appliance (see “Installation instructions”). Do not connect the appliance to the electrical mains until the installation is complete.
This appliance is intended to be used in household and similar applications such as:
▶staff kitchen areas in shops, offices and other working environments;
farmhouses;
▶by clients in hotels, motels and other residential type environments;
▶bed and breakfast type environments.
For EN60335-1:
- This appliance can be used by children aged from 8 years and above and persons with reduced physical, sensory or mental capabilities or lack of experience and knowledge if they have been given supervision or instruction concerning use of the appliance in a safe way and understand the hazards involved. Children shall not play with the appliance. Cleaning and user maintenance shall not be done by children without supervision.
For IEC60335-1:
- This appliance is not intended for use by persons (including children) with reduced physical, sensory or mental capabilities, or lack of experience and knowledge, unless they have been given supervision or instruction concerning use of the appliance by a person responsible for their safety.
- Packaging material could be dangerous for children!
- This appliance is for indoor household use only.
- To protect against the risk of electrical shock, do not immerse the unit, cord or plug in water or other liquid.
- Please unplug before cleaning and performing maintenance on the appliance.
- Use a soft cloth moistened with mild soap, and then use a dry cloth to wipe it again.
Earthing Instructions
- This appliance must be earthed. In the event of a malfunction or breakdown, earthing will reduce the risk of an electric shock by providing a path of least resistance of electric current. This appliance is equipped with an earthing conductor plug.
- The plug must be plugged into an appropriate outlet that is installed and earthed in a ccordance with all local codes and ordinances.
-
Improper connection of the equipment-earthing conductor can result in the risk of an electric shock.
-
Check with a qualified electrician or service representative if you are in doubt whether the appliance is properly grounded.
- Do not modify the plug provided with the appliance, if it does not fit the outlet.
- Have a proper outlet installed by a qualified electrician.
- Do not abuse, sit on, or stand on the door or dish rack of the dishwasher.
- Do not operate your dishwasher unless all enclosure panels are properly in place.
- Open the door very carefully if the dishwasher is operating, there is a risk of water squirting out.
- Do not place any heavy objects on or stand on the door when it is open. The appliance could tip forward.
When loading items to be washed:
- Locate sharp items so that they are not likely to damage the door seal;
▶Warning: Knives and other utensils with sharp points must be loaded in the basket with their points facing down or placed in a horizontal position.
- Some dishwasher detergents are strongly alkaline. They can be extremely dangerous if swallowed. Avoid contact with the skin and eyes and keep children away from the dishwasher when the door is open.
- Check that the detergent powder is empty after completion of the wash cycle.
- Do not wash plastic items unless they are marked “dishwasher safe” or the equivalent.
- For unmarked plastic items not so marked, check the manufacturer's recommendations.
- Use only detergent and rinse agents recommended for use in an automatic dishwasher.
- Never use soap, laundry detergent, or hand washing detergent in your dishwasher.
- The door should not be left open, since this could increase the risk of tripping.
- If the supply cord is damaged, it must be replaced by the manufacturer or its service agent or a similarly qualified person in order to avoid a hazard.
- During installation, the power supply must not be excessively or dangerously bent or flattened.
- Do not tamper with controls.
- The appliance needs to be connected to the main water valve using new hose sets. Old sets should not be reused.
- To save energy, the appliance will go to standby mode automatically when there is no operation during some time.
CONTENTS
Your dishwasher
Introduction 4
Description
Control panel 5 Interior 6
Operation
Switching on 7 Cycle selection table 9 Regeneration salt (water softener) 10 Reset 11 Setting the water hardness 11 Rinse agent reservoir 11 Dishwasher detergents 13
Loading
Loading the baskets 15 Damage to glassware and other crockery 17
Maintenance
Filter system 18 Cleaning the spray arms 19 Cleaning the door 19
Errors
What should I do, if... 20 Interference table 20 Error codes 22
Appendix
Disposal 23
YOUR DISHWASHER
Introduction
You have opted to purchase an Etna dishwasher.
Optimum user comfort and easy operation were paramount during the development of this product.
This manual describes how you can get the most out of your dishwasher. It provides you with information on how to operate the appliance, as well as background information about how it works.
You will furthermore also find maintenance tips.
The safety instructions that are relevant during the installation are included in the installation guide. This is intended for the installation technician.
Read this manual before using the appliance.
Keep this manual in a safe place so that the next possible user can also benefit from it.
Control panel
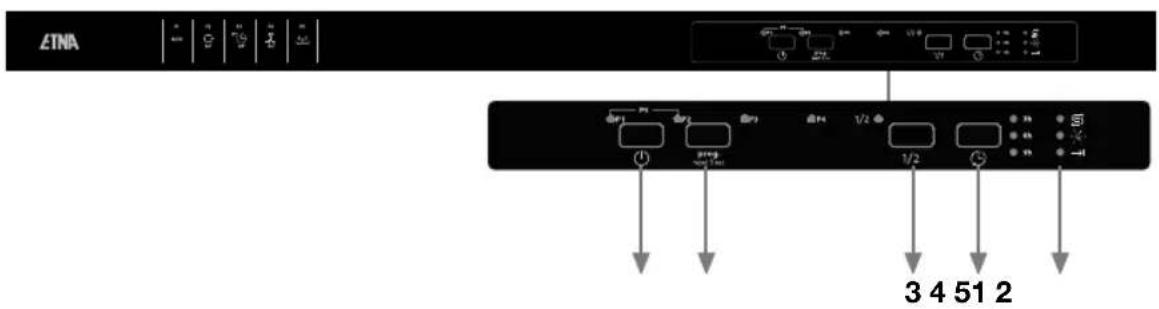
- On/Off button
- Program button
- Half load button
- Delayed start button
- Salt/Rinse aid/End program indicators
Interior
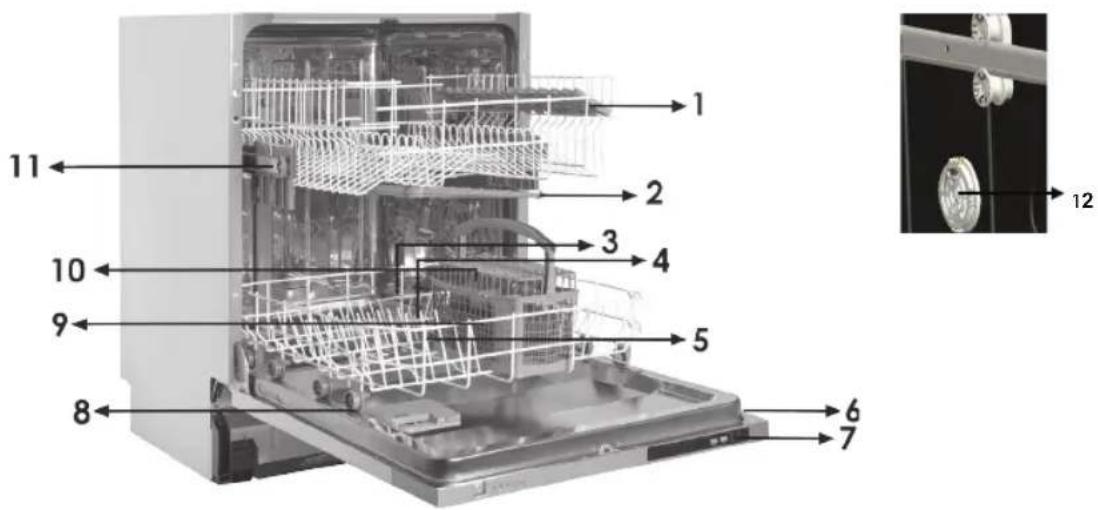
- upper basket
- upper spray arm
- lower basket
- lower spray arm
- filters
- type plate
- operating panel
- detergent and rinse aid reservoir
- cutlery basket
- salt reservoir
- guide rail top basket
- active drying unit
Switching on
- Open the door of the dishwasher.
- Press the 'on-off' button to switch on the device. The check light End Program is on.
- Select the desired program (see 'program selection table'). Select a cycle using the programming button. The check light that is part of the selected program is on.
- Close the door of the dishwasher. The dishwasher will automatically start running the selected cycle.
Half load
Press the Half Load button to reduce the duration of the selected program and therefore decrease your energy and water consumption. When Half Load option is selected, the half load indicator lights up.
Delayed start time
If you want the dishwasher to switch on at a later time, you can use the 'delayed start' button. You can choose between a delay time of 3, 6 or 9 hours. Each press of the button changes the delay time.
The indicator of the selected delay time is on. Then select the desired program and close the door of the dishwasher.
Indicators
- Salt.
The indicator shows that you have to fill the salt container with regeneration salt. - Rinse aid.
The indicator shows that you have to fill the rinse aid reservoir. - End program.
The indicator shows that the washing program has finished. In addition, you will hear a sound signal five times.
Changing a wash cycle
- Open the door.
- Press the program button to select a new program. The check light that is part of the selected program is on.
- Close the door of the dishwasher. The dishwasher will automatically start running the selected cycle.
Stopping a wash cycle
- Open the door.
- Press and hold the programming button for 3 seconds.
The 'End Program' indicator is flashing. - Close the door of the dishwasher.
The machine pumps out for about 30 seconds Following the end of this, a sound signal will click 5 times and the indicator shows that the program has finished.

Note! A cycle that has already begun can only be changed in the start-up phase. After this, the detergent will be sprayed all over the dishes or the machine may have already pumped out the water. In that instance, you must refill the detergent compartment (see section on Dishwasher detergent).

Warning!
Opening the door fully during the wash cycle is dangerous. You may be splashed with hot water from the machine.
Following the end of the wash cycle
After the washing program has finished, the 'End program' indicator is flashing and a sound signal will click 5 times. Open the door of the dishwasher Switch off the device with the on/off button.
Wait a few minutes before unloading the dishwasher. The dishes and cutlery will still be very hot immediately following the end of the cycle. There is a chance that dishes may break as a result of the heat. Moreover, the dishes dry better when allowed to stand for a few minutes.

Flood protection switch
Your dishwasher is fitted with a safety switch that prevents too much water from running into the appliance. The safety switch closes the inlet valve and instructs the dishwasher to pump out the surplus water. If there is water in machine (due to too much water being fed in previously, or as a result of a leak), this must first be removed before the appliance is switched on again.
Cycle selection table
| Program Cycle | cycle selection information | Description of cycle | Detergent pre/main | Time (min.) | Energy (KWh) | Water (L) | Water Half Load (L) |
| Ecc(WATT) | This is the standard program, it is suitable to clean normally soiled tableware and it is the most efficient programme in terms of its combined energy and water consumption for that type of tableware. | Prewash Main wash (50 °C) Hot rinse (55 °C) Dry | 5/25 gr. 205 | 0.907 | (2)0.923(3) | 12.0 12.0 | |
| Intensive P265° | Heavily soiled dishes, such as dishes pans, casseroles, plates plates with dried-on leftover food. | Prewash (40 °C) Main wash (65 °C) Cold Rinse Hot rinse (70 °C) Dry | 5/25 gr. 117 | 1.700 17.2 | 12.9 | ||
50 minutes P3 | Daily dishes in 50 minutes. For day-to-day dishes, such as lightly soiled or normal plates and pans. | Main wash (65 °C) Cold Rinse Hot rinse (70 °C) Dry | 25gr. 50 1.100 | 12.0 12.0 | |||
| Quick [SXBA] | Lightly soiled dishes, such as glasses, crystal and fragile porcelain. No drying. | Main wash (40 °C) Cold Rinse Hot rinse (50 °C) | 25 gr. 30 0.740 | 12.4 - | |||
| Prewash P5 | To rinse dishes that you plan to wash later that day. | Prewash 15 0.020 4 | 5 - |
(1) This program is the test cycle.
The information for comparability test in accordance with EN 50242/EN 60436.
(2) According to standard EN 50242
(3) According to standard EN 60436
Regeneration salt (water softener)
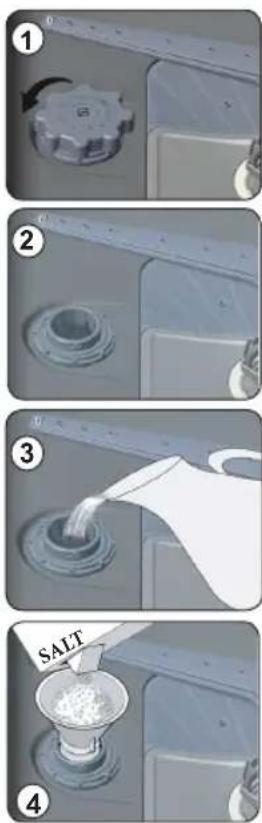
This machine is equipped with a water softener. To use the water softener, fill the dishwasher with salt.
- After first having removed the bottom basket, loosen the cap of the reservoir (1 and 2).
- Prior to filling the reservoir for the first time, pour one litre of water in it (3).
- Place the funnel in the reservoir opening. Pour about 2 kg of salt in it (4). It is normal for a little water to flow out of the opening when doing this. Note! Clear up any spilled salt and always run a full cycle immediately afterwards to prevent damage to the bottom.
- Carefully tighten the cap of the reservoir.
Note! Always fill the salt reservoir and adjust the water hardness setting before using the dishwasher. Refill the salt reservoir when the water softener indicator (2) lights up. It is possible that the light will remain lit for a short while after the salt reservoir is filled. It will go out automatically when enough salt has been dissolved in the water.
Setting the salt consumption
Adjust the salt consumption according to the table below:
| Water hardness level | German hardness dH | French hardness dF | English hardness dE | Indicator |
| 1 0-5 | 0-9 0-6 P1-9h | LEDs are on | ||
| 2 6-11 | 10-20 7-14 | P2-9h LEDs are on | ||
| 3 12-1 | 7 21-30 15-21 | 1 1/2-9h LEDs are on | ||
| 4 18-22 | 31-40 22-28 | 3h-9h LEDs are on | ||
| 5 23-31 | 41-55 29-39 | 6h-9h LEDs are on | ||
| 6 32-50 | 56-90 40-63 | P1-6h-9h LEDs are on |

Your local water authority can inform you how hard your mains water is. Adjustments can then be made according to the above table.
The standard water hardness is set at level 3.
OPERATION
Reset
Open the door of the dishwasher
The indicator of the program selected last is flashing.
Press and hold the programming button for more than 3 seconds.
The ‘End Program’ indicator is flashing. The indicator of the program selected last turns off
Close the door of the dishwasher.
The machine pumps out for about 30 seconds. Following the end of this, a sound signal will click 5 times and the indicator shows that the program has finished.
Switch off the dishwasher with the on/off button.
Setting the water hardness
Press the program button and keep it pressed.
Switch on the dishwasher simultaneously with the on/off button.
Keep the program button pressed until the indicators P1-P2-P3-P4-P5 and the indicator 'End program' light up and then turn off.
Set the desired water hardness by repeatedly pressing the program button.
After selecting the desired setting, press the on/off button.
The set value is stored in the memory.
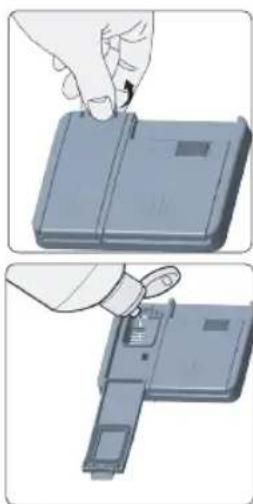
Rinse aid reservoir
Rinse aid is added during the final rinse. Rinse aid prevents traces of water droplets being left behind on the clean dishes. Moreover, it ensures that the dishes dry quicker, since the water drains off more easily.
natural_image
Two-step illustration showing a hand inserting a component into a device, with no visible text or symbols.Filling the rinse-aid and setting
To fill the rinse aid compartment, open the rinse-aid compartment cap. Fill the compartment with rinse aid to the MAX level and then close the cap.
Be careful not to overfill the rinse aid compartment and wipe up any spills.
In order to change the rinse aid level, follow the below steps before turning on the machine:
-
Push the programme button and hold it down.
-
Turn on the machine.
-
Hold down the programme button until all leds blink twice. Rinse aid set follows water hardness set.
-
The machine will display the current setting.
-
Set the level by pushing the programme button.
-
Switch off the machine to save the setting.
The factory setting is "4".
- If the dishes are not drying properly or are spotted, increase the level. If blue stains form on your dishes, decrease the level.
| Level | Brightener Dose Indicator |
| 1 | Rinse-aid not dispensed P1-9h LEDs are on |
| 2 | 1 dose is dispensed P2-9h LEDs are on |
| 3 | 2 doses are dispensed 1/2-9h LEDs are on |
| 4 | 3 doses dispensed 3h-9h LEDs are on |
| 5 | 4 doses dispensed 6h-9h LEDs are on |
Dishwasher detergents
The chemicals in the dishwasher detergents remove the dirt, break it down and make sure that the dirt is drained from the dishwasher. Most dishwasher detergents available in stores are suitable for this purpose.

Warning!
Dishwasher detergent is a corrosive product. It should therefore be kept out of the reach of children. If swallowed, consult a doctor immediately and take the packaging with you.
Concentrated detergent
Based on their chemical composition, 2 different types of concentrated detergent can be distinguished:
- Conventional alkaline detergents with corrosive ingredients.
- Low-alkaline concentrated detergents with natural enzymes.
The use of concentrated dishwasher detergent in combination with “normal” wash programs produces less contamination and is good for your dishes: these wash programs are specifically geared to the dirt-dissolving characteristics of the enzymes in the concentrated dishwasher agent. This means that “normal” wash cycles with concentrated detergent achieve the same results as an intensive wash cycle.
Dishwasher tablets
Dishwasher tablets from different manufacturers dissolve at different rates. This means that, during short wash cycles, certain types of dishwasher tablet do not fully dissolve, as a result of which their cleaning action is reduced. Dishwasher tablets should therefore chiefly be used in combination with long wash cycles, so that the dish washer tablet has time to fully dissolve.
When you switch from dishwashing tablets to a traditional dishwashing agent, you have to make sure that the salt reservoir and the rinse agent reservoir are completely filled.
Detergent compartment
Your dishwasher uses less detergent and rinse agent than conventional dishwashers. Generally speaking, just one measuring spoon of detergent powder is needed for a normal wash cycle. Use more detergent if your dishes are more heavily soiled. Fill the soap compartment immediately prior to starting the cycle. Filling it prior to this may result in the detergent becoming damp and therefore not fully dissolving.

Note! The table on page 9 shows the amount of detergent required for the different cycles. These are averages. A different dosage may be necessary, depending on the hardness of the water and how soiled the dishes are.
Filling

natural_image
Exterior view of a white plastic electronic device with buttons and ventilation slots (no text or symbols visible)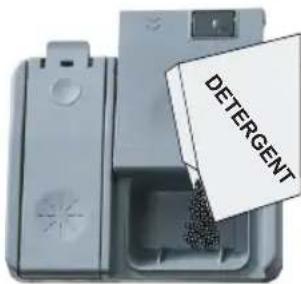
- Press the release catch if the lid is closed.
The lid will slide open. - Fill the detergent compartment immediately prior to starting a wash cycle.
The markings in the detergent compartment indicate the dosage.
- The container has a capacity of maximum 45 gr. Fill up the container with 25 gr. of the detergent for very dirty dishes and 15 gr. for normal dishes.

Use only detergents that are specifically designed for dishwashers. Store the detergent in a cool and dry place. Only fill the detergent compartment with detergent when you are running a wash cycle immediately afterwards.
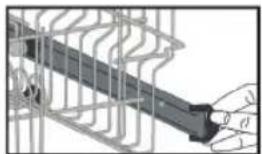
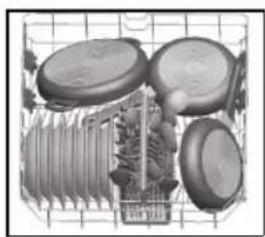
Loading the baskets

natural_image
Electrical insulator assembly diagram with multiple components arranged in a grid (no text or labels visible)Using the upper basket
The upper basket is designed for fragile, light dishes, such as glasses, cups and saucers, plates, small bowls and shallow (not particularly dirty) pans.
Place the dishes in the basket in such a way as to ensure they cannot move when sprayed. The height of the top basket can be adjusted.
natural_image
Illustration of a hand holding a cable or connector inside a wire cage (no text or symbols visible)Height adjustment upper basket
Top basket of your machine is in upper position. When it is in this position, you can place big items such as pans, etc. on lower basket. When you take top basket to lower position, you can place and wash big sized plates on the top basket.
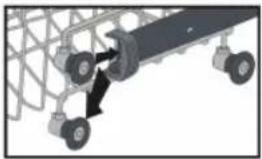
natural_image
Mechanical assembly diagram showing a conveyor belt system with pulleys and a wheel (no text or symbols)-
Open the basket retaining parts at the end of top basket rails by turning them to the sides.
-
Take the basket out.
-
Change the position of the wheels; reinstall the basket to the rail.
-
Close basket retainer parts.
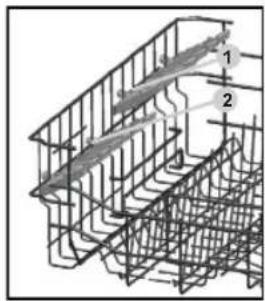
Height Adjustable Rack
The height adjustable racks enable glasses and cups to be placed on or under the racks. The racks can be adjusted to 2 different heights. Cutlery and utensils can also be placed on the racks horizontally.
natural_image
Cross-sectional illustration of a mechanical component with threaded parts and internal structure (no text or symbols)Using the lower basket
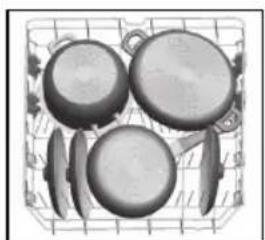
We advise you to place large objects that are hardest to clean in the bottom basket: pots, pans, pan lids, oven dishes and bowls. Casserole dishes and pan lids should preferably be placed at the side of the basket. This will ensure that they do not obstruct the spray arm when it is turning.
natural_image
Illustration of kitchen utensils arranged in a grid (no text or symbols)- Saucepans, serving dishes etc. must always be placed upside down in the basket.
- Deep bowls should be tilted, with the opening facing downwards to allow water to escape.
- The lower basket can be adjusted to allow for larger, or more, pots and pans.
Cutlery basket
The cutlery basket is used in the bottom basket. Cutlery should be placed in the cutlery basket with the handles pointing down. Long kitchen utensils such as wooden spoons have to be in a position lying down (horizontal) on the middle rack in the top basket.

Warning!
Take care to ensure that no objects are sticking through the bottom of the cutlery basket, as this will obstruct the spray arm.
Cutlery/crockery unsuitable for the dishwasher
- Cutlery with a wooden, porcelain or mother of pearl handle
- Plastic objects that are not heat-resistant
- Cutlery with glued elements that are not heat-resistant
- Glued cutlery or crockery
- Pewter or copper objects
- Lead crystal glassware
• Steel objects that are prone to rust - Wooden dishes
- Objects manufactured from synthetic fibres
Cutlery/crockery with limited suitability for use in the dishwasher
- Certain types of glass can become dull after undergoing a large number of wash cycles
• Silver and aluminium may tarnish after use in the dishwasher - Glazed patters may fade as a result of regular washing

Note! Do not place any objects soiled with cigarette ash, candle wax, varnish or paint in the dishwasher. When buying new kitchen utensils, ensure that they are suitable for the dishwasher.
Do not overload the dishwasher. There is only room for 12 standard settings. Do not place cooking utensils that are unsuitable for dishwashers inside. This is essential to ensure good washing results and a low energy consumption.
Placing cutlery and crockery in the dishwasher
Before placing the dishes in the dishwasher, you must:
- Remove any large bits of leftover food.
- Leave caked and burnt on leftover food to soak for a while.

When inserting the dishes, take care to ensure that:
- The spray arm is not obstructed by the dishes.
- Hollow objects are placed with the opening facing downwards, to ensure that that cannot hold the water.
Plates and cutlery must not cover each other
- Glassware items must not touch, otherwise damage can occur.
- Place large objects that are difficult to clean in the lower basket.
- The upper basket is specially designed for lighter objects, such as glasses and coffee and tea cups.

Warning!
- Long knives standing upright in the cutlery basket can cause injury!
- Long and/or sharp items of cutlery, such as carving knives, should be laid (placed horizontally) in the upper basket.
Damage to glassware and other crockery
Potential causes:
- Type of glass or manufacturing process. Chemical composition of the dishwasher detergent.
• Water temperature and duration of the wash cycle.
Proposed solution:
- Use glassware and porcelain crockery produced by manufacturers that state that it is suitable for dishwashers.
- Use a milder/less corrosive dishwasher detergent. If needed, ask detergent manufacturers for more information.
- Select a wash cycle with a lower temperature.
- Remove glassware and cutlery from the dishwasher as soon as possible after the cycle has finished, to prevent damage.
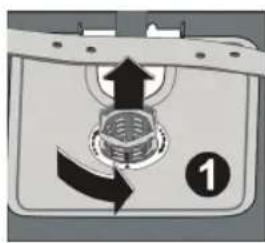
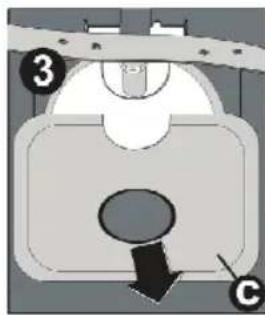
Filter system
natural_image
Diagram of a device with directional arrows indicating motion or flow, no readable text or symbols present.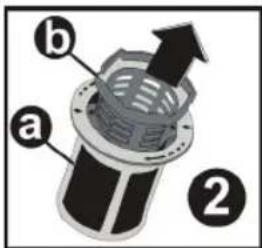
Depending on usage, the filters may require regular rinsing under a tap. The filtration system consists of three components: the large filter, the coarse filter and the fine filter.
a. Fine filter: This filter prevents waste and leftover food from entering the drainage pump and ensures that said leftovers are not spread over the dishes again during the cycle.
b. Coarse filter: Larger articles, such as leftover bones or pieces of glass that could block the drain, are trapped in the coarse filter. In order to remove the waste from the filter, you must lightly squeeze the lips on top of the filter together and then pull the filter upwards.
c. Large filter: Leftover food and waste that lands on this filter is rinsed through to the coarse filter by a special jet on the lower spray arm.
Clean the filter group
In order to ensure the dishwasher operates at maximum efficiency, the whole filter section must be cleaned.
The filter group efficiently removes food remains from the water and makes sure that the washing water can continue circulating during the washing program. It is therefore a good idea to remove larger food remnants from the filter section after each wash cycle, by cleaning the half-round filter and filter housing under running water.
- Remove the filter section by grasping the handle and pulling upwards. All components in the filter section must be cleaned at least once per month.
- Use a dishwashing brush to clean the coarse and fine filter. Put the filter section back together again according to the illustration opposite and then re-fit the whole filter section back into the tub of the dishwasher.

Never use the dishwasher without the filter section. Incorrect fitting of the filter section will result in the dishwasher no longer delivering maximum performance. Damage to cutlery and dishes is a further possible consequence.
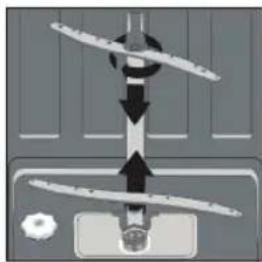
Cleaning the spray arms
natural_image
Diagram showing a mechanical or fluid system with directional arrows and a central component (no text or symbols)It is essential that you clean the spray arms on a regular basis. In the longer term, waste can block the nozzles and the bearings in the spray arms. Clean the spray arms as follows:
- Loosen and turn the nut of the top spray arm to the left to remove the arm.
- Next remove the spray arm.
- Pull the bottom spray arm upward from the retainer.
- Clean the spray arms in warm, soapy water, using a soft brush to clean the nozzles.
- Rinse the spray arms thoroughly before fixing back in place.
Cleaning the door
Clean the edge of the door, including the sealing rubber, with a soft, damp cloth. Take care to ensure that water does not enter the door locking mechanism or electrical components. Spray-type cleaning products should not be used, nor aggressive cleaning products such as scourers. These cleaning products can damage the finish.
What should I do, if...
If the appliance is not functioning well, this does not always mean that it is faulty. Try to resolve the fault yourself first. If the recommendations below does not solve your problem, telephone our service department.

Note!
Disconnect the appliance from the power supply before beginning repairs. Preferably by pulling out the plug from the wall socket.
Interference table
| Problem | Potential causes | Solution |
| The dishwasher is not working. | Fuse is faulty or the earthing switch has been activated. | Replace the fuse or reset the isolating switch.Remove other appliances that are connected to the same group. |
| The power supply is not switched on | Make sure that the dishwasher is switched on and the door closed.Make sure that the plug is correctly inserted into the socket. | |
| The water pressure is too low. | Check whether the dishwasher is correctly connected to the water mains and that the tap is open. | |
| The drainage pump does not shut off. | The water is running over. | The system is designed so that it can automatically detect overflowing water. In that instance, the appliance shuts off the circulation pump and switches on the drainage pump. |
| Noise. | Some noises are normal. | Noise of rotating pump/washing noises; the detergent compartment opening. |
| Cutlery is rattling in cutlery basket or something small has fallen out of the basket. | Ensure that everything is loaded securely in the dishwasher. | |
| The motor makes an unusual noise. | The pump is blocked. Contact an installer. | |
| Contamination of the tub. | Poor quality detergent. | Only use detergent suitable for dishwashers to prevent contamination. |
| Blocked filters | Open the door and clean the filters. Run the pre-wash cycle. | |
| Rinse agent has been spilled. | Always wipe up spilled rinse agent immediately. |
ERRORS
| Problem | Potential causes | Solution |
| Dishes not dry. | The rinse agent reservoir is empty. | Ensure that the rinse agent reservoir is filled. |
| Dishes and flat objects are not clean. | Incorrect cycle. | Select a higher cycle. |
| Baskets are incorrectly loaded. | Make sure that the detergent compartment and spray arms are not obstructed by large dishes/pans. | |
| Spotting and scaling on glasses and flat dishes. | Extremely hard water. Incoming water temperature is low. The dishwasher is overloaded.Baskets are incorrectly loaded. Old or damp detergent. Rinse agent reservoir is empty.Incorrect detergent dosage. | To remove spotting from glass objects:Remove all metal objects from the dishwasher.Use the prescribed quantity of detergent.Select the longest cycle. Allow the dishwasher to run for approximately 18 to 22 minutes. It should by then have reached the main wash cycle. Open the door carefully and pour 2 cups of white vinegar into the base. Close the door and allow the dishwasher to complete its cycle. If vinegar does not work: Repeat the above steps, but use a quarter cup (60 ml) of citric acid crystals in place of white vinegar. |
| Cloudy stains on the glassware. | Combination of soft water and too much detergent. | Use less detergent and choose the glass cycle, which you can use to clean glassware. |
| Yellow or brown scale on the inside of the tub. | Traces of iron in the water may cause spotting to the tub of the dishwasher. | Contact a manufacturer of water softeners for a special filter. |
| White scale on the inside of the tub. | Hard water. | Increase salt consumption setting |
| Dishwasher detergent is left in the detergent compartment. | The detergent compartment is blocked by dishes. | Load the baskets so that the dishes no longer block the detergent compartment.Clean the upper spray arm. |
| Steam. | When opening the door. | This is possible at the end of the cycle. |
| Black or grey stains on the dishes. | Aluminium cooking utensils have scraped the dishes. | Aluminium can tarnish. |
| Water remains under the filters. | This is normal. | A small amount of water around the drain on the rear of the tub base keeps the seal flexible. |
| The dishwasher is leaking. | Rinse agent reservoir too full or rinse agent is leaking. | Take care not to overfill the rinse agent reservoir. Spilled rinse agent can lead to foam/ flooding. Wipe up spilled rinse agent with a damp cloth. |
| The dishwasher is not standing level. | Adjust the dishwasher so that it is standing level. |
Error codes
| P1 P2 | 1/2 3h 6h | interference type solution | ||||
| * * * | * | Insufficient water supply | Make sure that the water faucet is completely open and that there is no crack in the supply hoseCheck if the supply hose is cloggedRestart the dishwasherPlease contact the service department if the problem persists | |||
| * * * | Pressure system failure | Please contact the service department | ||||
| * * * | Flooding safety enabled | Close the water faucet and contact the service department | ||||
| * * * | The dishwasher is not pumping out | Check if the drainage hose is connectedCheck the bottom filter and filter groupRestart the dishwasher and terminate the last selected programPlease contact the service department if the problem persists | ||||
| * * * | * | Heating error • Please | contact the service department | |||
| * * * | Flooding sound signal activated | Turn off the dishwasher and close the water faucetPlease contact the service department | ||||
| * | * | Interference in the electronics | Please contact the service department | |||
| * * * | Temperature in the machine is too high | Please contact the service department | ||||
| * * * | Interference of heating sensor | Please contact the service department | ||||
| * * * | High voltage failure • | Please contact the service department | ||||
| * * * | Low voltage failure • | Please contact the service department | ||||

Should the appliance become overfilled or exhibit excessive leaking, shut off the inlet tap and alert the service department.
Disposal
Dispose of packaging and device
This device is manufactured with durable materials. This appliance must be disposed of responsibly at the end of its service life. The government can provide you with information about this.
The packaging of the appliance is recyclable. The following can be used:
- cardboard;
• polyethylene film (PE);
• CFK-free polystyrene (PS-hard foam);
The materials should be disposed of in a responsible manner and in accordance with government regulations.
natural_image
Symbol of a trash bin with no visible text or numbers, crossed by two diagonal lines (no text or symbols present)The symbol of a crossed out garbage can is placed on the product to point to the obligation to process electrical household equipment separately. This means that the appliance may not be included with normal domestic refuse at the end of its service life. The device has to be brought to a centre for separated waste collection or to a point of sale that provides this service.
Processing household devices separately prevents possible negative consequences for the environment and the health caused by inappropriate processing. It ensures that the material that appliance consists of, can be recovered to obtain a significant saving of energy and raw materials.

Note! The packaging material may be hazardous for children.
Declaration of conformity
We hereby declare that our products satisfy the applicable European directives, orders and regulations, as well as the requirements stated in the referenced standards.
natural_image
Two-step illustration showing a hand holding a device, before and after disassembly (no text or symbols present)natural_image
White electronic device with ventilation slots and a control panel (no visible text or symbols)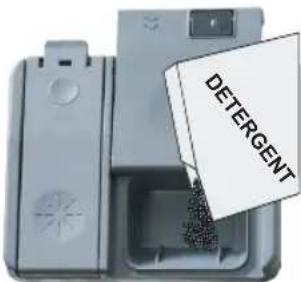
natural_image
Grid of industrial equipment with cylindrical components and insulators (no visible text or symbols)natural_image
Illustration of a hand holding a cable or connector inside a wire cage (no text or symbols visible)natural_image
Mechanical assembly diagram showing a conveyor belt system with pulleys and a wheel (no text or symbols)natural_image
Technical line drawing of a structural framework with labeled components (no text or symbols present)natural_image
Exploded view of a mechanical component with multiple cylindrical parts and a central housing (no visible text or symbols)natural_image
Illustration of kitchen utensils arranged in a grid (no text or symbols)natural_image
Diagram of a mechanical device with directional arrows and a numbered label (1), no readable text or symbols present.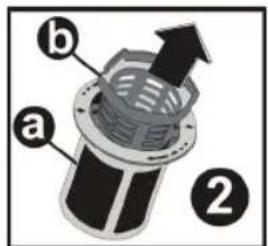

natural_image
Diagram showing a mechanical or fluid system with directional arrows and a central circular component (no text or symbols)Tür reinigen
natural_image
Symbol of a trash bin with crossed lines indicating no waste or restriction (no text or numbers present)842242
842242 / VER 1 / 29-10-2020