Mobile I/O 2882 - Hi-Fi System Metric Halo - Free user manual and instructions
Find the device manual for free Mobile I/O 2882 Metric Halo in PDF.


User questions about Mobile I/O 2882 Metric Halo
0 question about this device. Answer the ones you know or ask your own.
Ask a new question about this device
Download the instructions for your Hi-Fi System in PDF format for free! Find your manual Mobile I/O 2882 - Metric Halo and take your electronic device back in hand. On this page are published all the documents necessary for the use of your device. Mobile I/O 2882 by Metric Halo.
USER MANUAL Mobile I/O 2882 Metric Halo
natural_image
Abstract 3D logo design featuring a stylized letter 'M' with coiled ribbon elements (no text or symbols)METRIC HALO
text_image
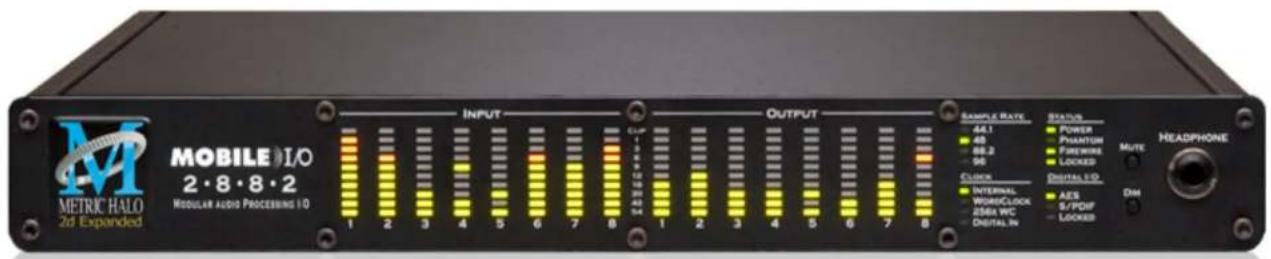
METRIC HALO 2d Expanded MOBILELO 2·8·8·2 MODULAR AUDIO PROCESSING I/O INPUT OUTPUT SAMPLE RATE 44.1 45 68.2 95 CLOCK INTERNAL WORKCLOCK 256A WC DIGITAL IN STATUS POWER PHANTUM FIREWIRE LOCKED DIGITAL ELD AES S/PDF LOCKED MUTE DIM HEADPHONEMobile I/O 2882 Quick Start Guide
2882 Quick Start Guide
Metric Halo
\Revision: 1531 \
Publication date \Date: 2011-08-08 12:42:12 -0400 (Mon, 08 Jun 2011) \
Copyright © 2011 Metric Halo
Table of Contents
- Mobile I/O 2882 Quick Start Guide .... 5
Prepare the unit for use 5
Connect the 2882 to your computer 6
Take a listen 6
The MIO Console 6
The Mixer window 8
The 2882 and surround 9
Unleash the DSP 11
Additional Resources 11
List of Figures
1.1.Mobile I/O 2882 5
1.2. 2882 Routing 6
1.3. Template selection pane 7
1.4. Console window 7
1.5. Mixer window 8
1.6. Surround mixer 9
1.7. Configuring the Monitor Controller 10
1.8. The configured Monitor Controller 11
1. Mobile I/O 2882 Quick Start Guide
text_image
MOBILE 1.0 2 • 6 • 8 • 2Figure 1.1: Mobile I/O 2882
Prepare the unit for use
Unpack the 2882 and make sure all the parts are there:
• One Mobile I/O 2882 unit
• One IEC Power Cord appropriate for your area
• One 24-volt 48-watt world-ready external power supply
• One 30" IEEE 1394 9-pin to 6-pin FireWire Cable
• One 4.5 meter IEEE 1394 9-pin to 6-pin FireWire Cable
- Two Rack Ears w/ fasteners
- Rubber feet
• MIO Software CD-ROM
• Warranty/Registration Card
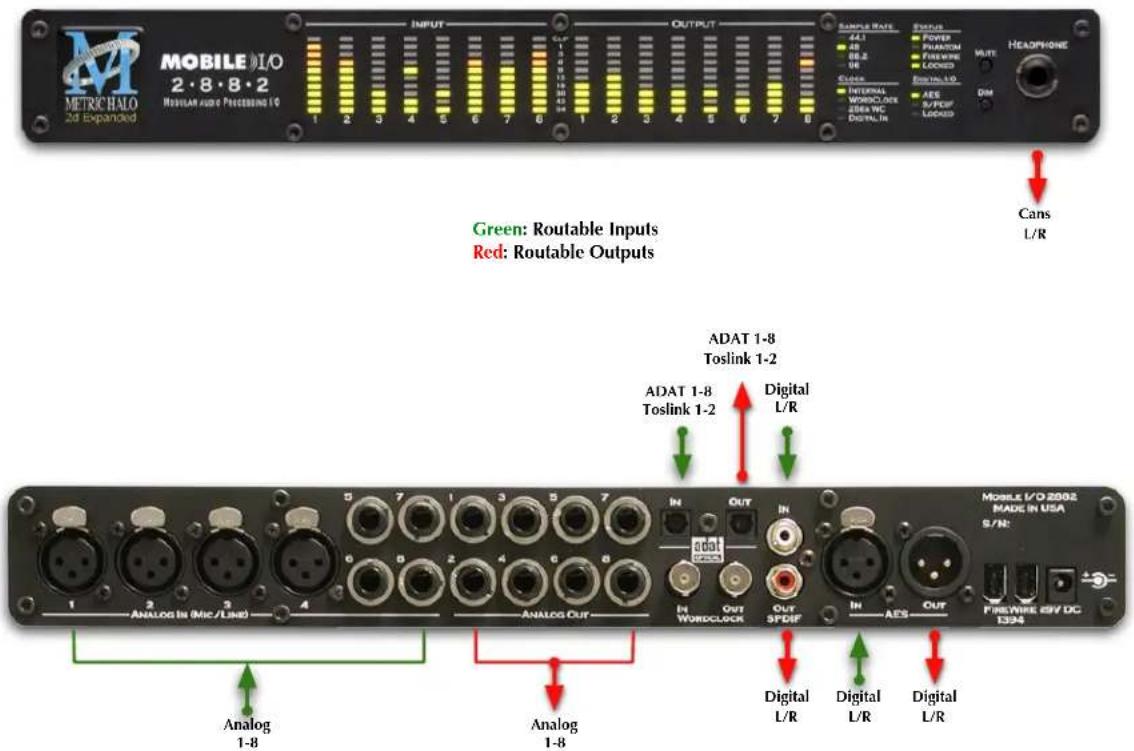
Bask in the look and feel of the 2882! Connect the power supply, and connect your monitors to Analog Out 1/2. Many people find it useful to put a pad between their amps or powered monitors and the 2882's outputs; this allows the 2882 to work at full digital resolution without overdriving the amplifiers.
text_image
MOBILE I/O 2.8.8.2 METRIC HALO 2d Expanded INPUT OUTPUT SAMPLE STATE 44.1 48 68.2 06 Cycles INTERNAL WORDLOCK 2BRA TIC DIGITAL IN ENGLISH POWER PHAVOTOM FILTERED LOCKED RUNNING L/R AES S/PDF LOCKED MUTI HEADPHONE DIM Green: Routable Inputs Red: Routable Outputs Cans L/R ADAT 1-8 Toslink 1-2 ADAT 1-8 Toslink 1-2 Digital L/R IN OUT IN Wordclock OUT SPDRF IN AES OUT Analog In (Mic/Like) Analog 1-8 Analog 1-8 Digital L/R Digital L/R Digital L/R Mobile I/O 2002 MADE IN USA S/N: FIRSTWIRE 29V DC 1394Figure 1.2: 2882 Routing
Connect the 2882 to your computer
Go to your computer and install the MIO Console and driver from the included disc (this will require a restart). Connect the Firewire cable between the 2882 and your computer, then go to the System Preferences and select it as the system's sound input and output.
Take a listen
Now we're ready to listen. DON'T LAUNCH MIO CONSOLE YET! Open iTunes, turn its volume slider down and play some music. Bring the volume up to a comfortable level, and try the Dim and Mute buttons.
The MIO Console
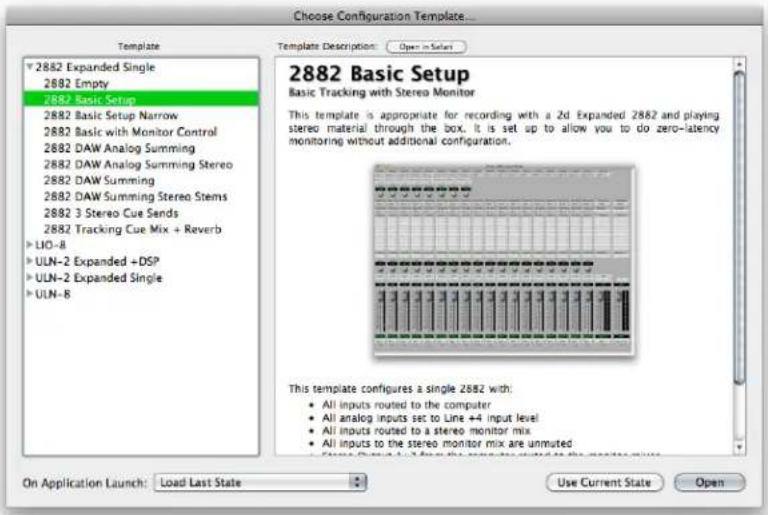
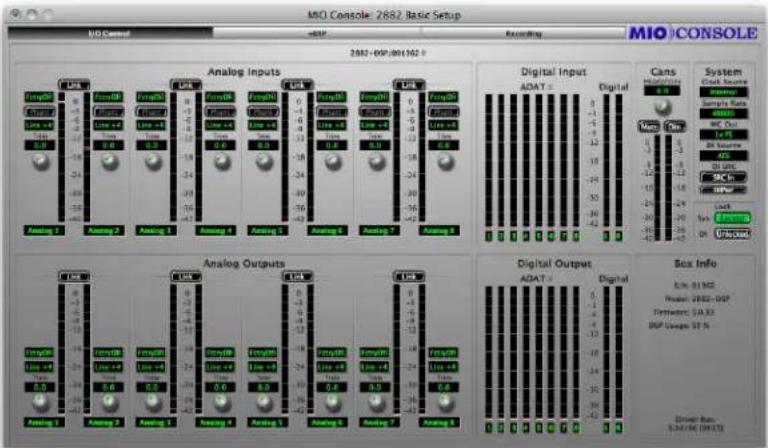
Once you've listened for a while, quit iTunes and launch the MIO Console. You'll be asked to select a template; select "2882 Basic Setup" which will give us a simple starting point. Take a look at the panel on the right- it outlines what the templates do.
text_image
Choose Configuration Template... Template 2882 Expanded Single 2882 Empty 2882 Basic Setup 2882 Basic Setup Narrow 2882 Basic with Monitor Control 2882 DAW Analog Summing 2882 DAW Analog Summing Stereo 2882 DAW Summing 2882 DAW Summing Stereo Stems 2882 3 Stereo Cue Sends 2882 Tracking Cue Mix + Reverb LIO-8 ULN-2 Expanded +DSP ULN-2 Expanded Single ULN-8 Template Description: Open in Select 2882 Basic Setup Basic Tracking with Stereo Monitor This template is appropriate for recording with a 2d Expanded 2882 and playing stereo material through the box. It is set up to allow you to do zero-latency monitoring without additional configuration. This template configures a single 2882 with: All inputs routed to the computer All analog inputs set to Line +4 input level All inputs routed to a stereo monitor mix All inputs to the stereo monitor mix are unmated On Application Launch: Load Last State Use Current State OpenFigure 1.3: Template selection pane
Next open the application's preferences. Turn off "Legacy Support" (this is for older boxes), and turn on "Use Open GL for rendering" if your computer supports it. Hit OK, then quit and relaunch MIO Console.
You're now presented with the Mixer window. We'll come back to this in a bit; for now go to the "Window" menu and select "MIO Console: 2882 Basic Setup".
text_image
MIO Console: 2882 Basic Setup MIO Control -ADAT Recording MIO CONSOLE 2882-059/001162 # Analog Inputs LPLW Length 0 Length 1 Length 2 Length 3 Length 4 Length 5 Length 6 Length 7 Length 8 Digital Input ADAT # Digital Cans System Clock Source Signal Rate DC Out InR DI Source DI UK DC In INP Lock F1.1.1.1.1.1.1.1.1.1.1.1.1.1.1.1.1.1.1.1.1.1.1.1.1.1.1.1.1.1.1.1.1.1.1.1.1.1.1.1.1.1.1.1.1.1.1.1.1.1.1. Analog 1 Analog 2 Analog 3 Analog 4 Analog 5 Analog 6 Analog 7 Analog 8 Analog Outputs LPLW Length 0 Length 1 Length 2 Length 3 Length 4 Length 5 Length 6 Length 7 Length 8 Digital Output ADAT # Digital Box Info U.S. QI MO Model: 2882-DSP Performance: SAA32 DIP Usage: SS % Driver Rate: S-DA-MG (DW/TS)Figure 1.4: Console window
There are a few important things to look at here. To the right, the "System" column lets you set the clock source, sample rate and whether the wordclock output is 1x or 256x rate. In the "Lock" column you can see if the 2882 is receiving a valid clock on the selected source.
Toward the top of the window you will see the text "2882/xxx" where "xxx" is the serial number of the box. By clicking on this you will get a menu of options for removal of offline boxes (you shouldn't have any at this point).
The I/O Control tab has metering and control for the analog I/O. You can link stereo pairs, set operating levels and gain. The I/O Control tab is synchronized with the Front Panel; changes in one place are reflected in the
other. There is also metering for digital I/O. If you click on the +DSP tab, you have access to a "Virtual" DSP area. Next is the "Recording" tab. Any channel that is assigned to a "FW" channel via a direct out or bus output is available for recording via MIO Console's record engine. Since the template you loaded has these assignments made, they are shown here. More detailed instructions on the Record Panel are available in the documentation.
The Mixer window
text_image
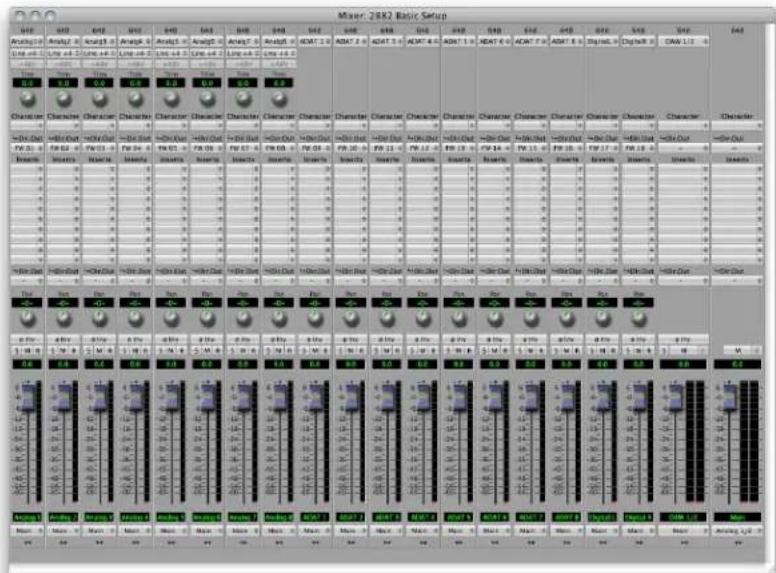
Mixer 28K2 Basic Setup D44 Analyst: Anal# 0 Line: 1.5 Channel: Channel 0 Channel: Channel 0 Character: Character 0 Channel: Channel 0 Character: Channel 0 Character: Channel 0 Character: Channel 0 Character: Channel 0 Character: Channel 0 Character: Channel 0 Character: Channel 0 Character: Channel 0 Character: Channel 0 Character: Channel 0 Character: Channel 0 Character: Channel 0 Character: Channel 0 Character: Channel 0 Character: Channel 0 Character: Channel 0 Character: Channel 1 Character: Channel 1 Character: Channel 1 Character: Channel 1 Character: Channel 1 Character: Channel 1 Character: Channel 1 Character: Channel 1 Character: Channel 1 Character: Channel 1 Character: Channel 1 Character: Channel 1 Character: Channel 1 Character: Channel 1 Character: Channel 1 Character: Channel 1 Character: Channel 1 Character: Country Channel: Channel 1 Channel: Channel 1 Channel: Channel 1 Channel: Channel 1 Channel: Channel 1 Channel: Channel 1 Channel: Channel 1 Channel: Channel 1 Channel: Channel 1 Channel: Channel 1 Channel: Channel 1 Channel: Channel 1 Channel: Channel 1 Channel: Channel 1 Channel: Channel 1 Channel: Channel 1 Channel: Channel 1 Channel: Country Channel: Country Channel: Country Channel: Country Channel: Country Channel: Country Channel: Country Channel: Country Channel: Country Channel: Country Channel: Country Channel: Country Channel: Country Channel: Country Channel: Country Channel: Country Channel: Country Channel: Country Channel: Country Channel: Country Channel: Country Channel: Country Channel: Country Channel: Country Channel: Country Channel: Channel 1 Channel: Channel 1 Channel: Channel 1 Channel: Channel 1 Channel: Channel 1 Channel: Channel 1 Channel: Channel 1 Channel: Channel 1 Channel: Channel 1 Channel: Channel 1 Channel: Channel 1Figure 1.5: Mixer window
The Mixer window presents you with a familiar interface to the 2882. At the top of every channelstrip is a pulldown list of available sources. For analog inputs you can select the input type, enable phantom power and set gain. Below the head-amp area is the Character menu. This lets you select any of our DSP based circuit emulations for your inputs, busses and outputs. Some are very subtle, so you may want to try different Characters on different signals. Next is a pre-insert direct out. This lets you route the channelstrip to any unused analog or digital output, as well as to "FW" channels. The FireWire channels allow you to return audio from the 2882 to your computer.
Below Character are the insert slots. Here you can insert plugins, route to sends (additional busses), call up macros (pre-made DSP processors) and instantiate graphs. A graph is a "DSP playground" where you can build your own signal processing chains and save them for later recall. You'll notice that there is another direct out under the inserts- this one is post-insert. Any signal routed from this direct out has all of your inserted processing applied, whereas the pre-insert direct out doesn't.
The pan control reconfigures depending on the type of channel and the bus that it is assigned to:
• There are no pan controls on a channel assigned to a mono bus.
- Mono input channels will have a pan knob when assigned to stereo or LCR busses.
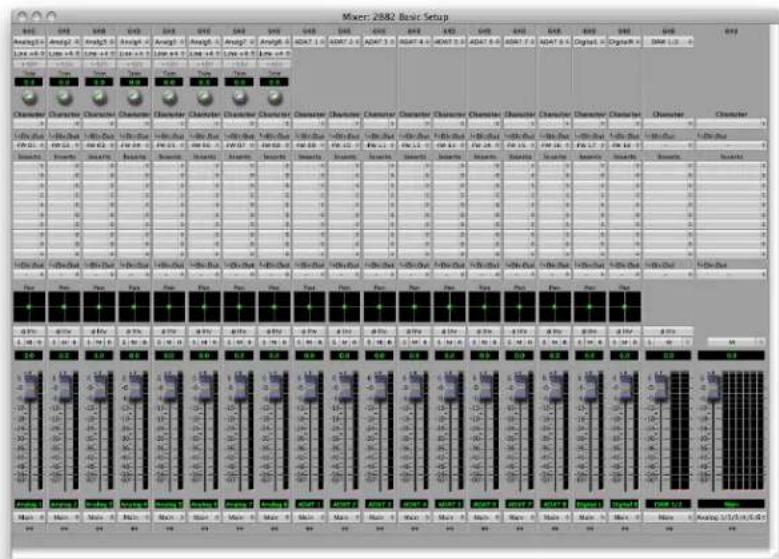
- Mono input channels assigned to LCRS through 7.1 busses will have joysticks. Right clicking on the joystick will allow you to hard assign the input channel to a specific output channel, i.e. Center.
- Multichannel inputs (stereo and above) have no pan control.
Every input channel has a phase reverse button, as well as solo, mute and record enable (active if assigned to FW). The names of the faders can be changed in the "Configure Mixer" pane available from the Mixer menu. Finally, the pulldown menu at the bottom of the strip lets you assign the input to any available bus.
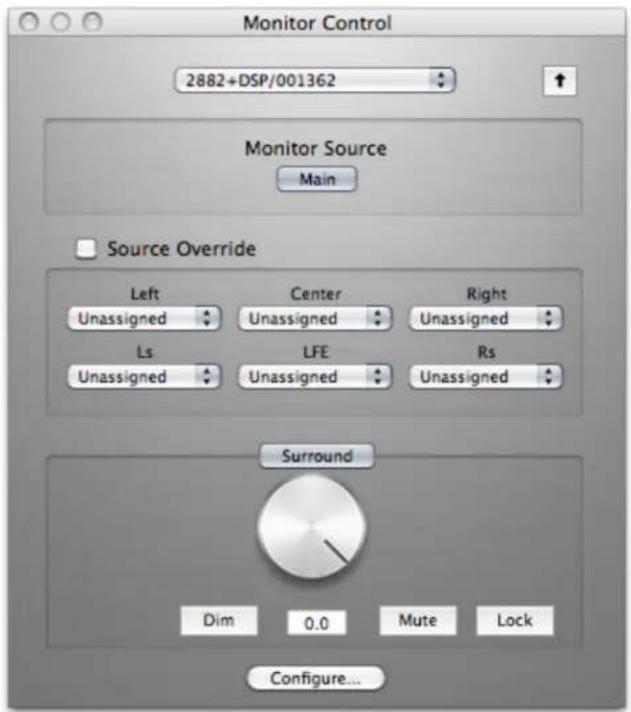
If you go to the Window menu and select "Show Monitor Control Window" the software Monitor Controller will appear. It is highly flexible, and controls the analog level control in the 2882. There is a wealth of knowledge in the MIO Console documentation (available from the Help menu) on how to set up and use the Monitor Controller.
You should now be in a good position to fire up a native DAW and put the 2882 through its paces. Select the 2882 as your audio interface in your DAW's hardware configuration; the analog inputs will be available on inputs 1-8, ADAT will be available on 9-16 and AES/Spdif digital inputs will be available on 17-18 (as determined by the FW channel assignments). Send your DAW's signal to outputs 1/2 and it will come into the 2882 on DAW 1/2. By using the FW channels to send audio to your DAW and the DAW input returns from your computer you have a virtual patchbay to route audio between your DAW and the 2882.
The 2882 and surround
If you're working in surround, it's easy to configure the 2882 for monitoring and processing. Go to the Mixer menu and select "Configure Mixer". At the top of the pane you'll see the "Main" bus, which is stereo and a Master. Master busses are routed to outputs, while Aux busses are routed back into Master busses (for returns, subgroups, etc.). If you click on the bus type you can change it from "Stereo" to whatever width you need; let's say you're working in 5.1. Select "5.1" and hit configure. Voila! All the mono channels now have joysticks instead of pan knobs, and the Main bus is automatically routed to Analog 1-6. Your DAW is still coming in on two channels, but that's easy to change. Go to the top of the DAW 1/2 channelstrip and click on the assignment pulldown. You have the choice of a mono channel, or a 6 channel strip. By selecting DAW 1-6, your audio will come into the 2882 as positioned by your host. Your other choice would be to make this channel mono, and add five more channelstrips via the Mixer menu. This way you can position your audio with the MIO Mixer.
text_image
Mixer 2082 Basic Setup A100 A101 A102 A103 A104 A105 A106 A107 A108 A109 A110 A111 A112 A113 A114 A115 A116 A117 A118 A119 A120 A121 A122 A123 A124 A125 A126 A127 A128 A129 A130 A131 A132 A133 A134 A135 A136 A137 A138 A139 A140 A141 A142 A143 A144 A145 A146 A147 A148 A149 A150 A151 A152 A153 A154 A155 A156 A157 A158 A159 A160 A161 A162 A163 A164 A165 A166 A167 A168 A169 A170 A171 A172 A173 A174 A175 A176 A177 A178 A179 A180 A181 A182 A183 A184 A185 A186 A187 A188 A189 A190 A191 A192 A193 A194 A195 A196 A197 A198 A199 A200 A201 A202 A203 A204 A205 A206 A207 A208 A209 A210 A211 A212 A213 A214 A215 A216 A217 A218 A219 A220 A221 A222 A223 A224 A225 A226 A227 A228 A229 A230 A231 A232 A233 A234 A235 A236 A237 A238 A239 A240 A241 A242 A243 A244 A245 A246 A247 A248 A249 A250 A251 A252 A253 A254 A255 A256 A257 A258 A259 A260 A261 A262 A263 A264 A265 A266 A267 A268 A269 A270 A271 A272 A273 A274 A275 A276 A277 A278 A279 A280 A281 A282 A283 A284 A285 A286 A287 A288 A289 A290 A291 A292 A293 A294 A295 A296 A297 A298 A299 BPM 5/3/4 Box Box Box Box Box Box Box Box Box Box Box Box Box Box Box Box Box Box Box Box Box Box Box Box Box Box Box Box Box Box Box Box Box Box Box Box Box Box Box Box Box Box Box Box Box Box Box Box Box Box box box box box box box box box box box box box box box box box box box box box box box box box box box box box box box box box box box box box box box box box box box box box box box box box box box boxesFigure 1.6: Surround mixer
To make it easier to monitor in surround, let's use the Monitor Controller. Click on the assignment pulldown at the bottom of the Main bus and select "N/C" to remove the assignment to the analog outs. Now hold down the shift key and click the pulldown again; the Main bus was "multed" to the headphones in the template which means it was routed to Analog 1/2 and the Cans at the same time. Now that we're working in surround, the Cans aren't as useful. By holding down Shift and clicking on the Cans-Digital 4 line, we clear the mult. Now click on the pulldown one more time and select "Add to Monitor Controller". Go to the Window menu and select "Show Monitor Control Window".
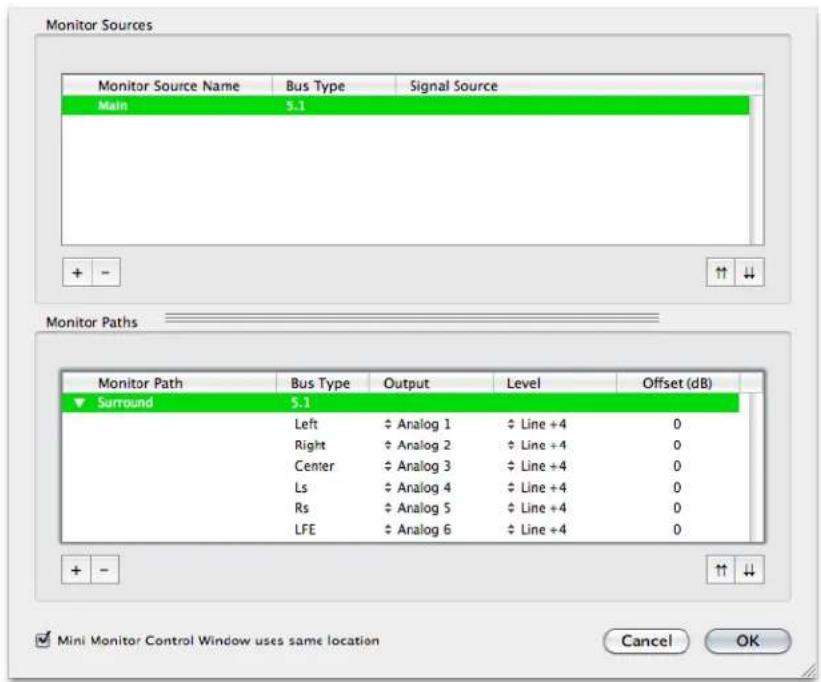
The Monitor Controller shows the Main bus is the Monitor Source, but we need to define an output. Click the "Configure" button to open the MC pane. Click "+" under Monitor Paths and you'll have the option to add a Monitor Output. Give the path a name (like "Surround") and select 5.1 as the bus type. Now you can assign your output channels. If you want to select your outputs sequentially, a shortcut is to hold down the Option key when selecting the first channel. For example, hold down Option and click the assignment for the Left channel and select Analog 1. The rest of the channels will fill in automatically.
text_image
Monitor Sources Monitor Source Name Bus Type Signal Source Main 5.1 Monitor Paths Monitor Path Bus Type Output Level Offset (dB) Surround 5.1 Left ↔ Analog 1 ↔ Line +4 0 Right ↔ Analog 2 ↔ Line +4 0 Center ↔ Analog 3 ↔ Line +4 0 Ls ↔ Analog 4 ↔ Line +4 0 Rs ↔ Analog 5 ↔ Line +4 0 LFE ↔ Analog 6 ↔ Line +4 0 + - ↑ ↑ ↓ Mini Monitor Control Window uses same location Cancel OKFigure 1.7: Configuring the Monitor Controller
Choose "OK" and you now have a surround monitor controller!
text_image
Monitor Control 2882+DSP/001362 Monitor Source Main Source Override Left Center Right Unassigned Unassigned Unassigned Ls LFE Rs Unassigned Unassigned Unassigned Surround Dim 0.0 Mute Lock Configure...Figure 1.8: The configured Monitor Controller
Unleash the DSP
Every 2882 is based on the 2d processing card and may be purchased with an optional +DSP license. The +DSP can be added by the user at any time; if you purchased a unit with the +DSP license, it is preinstalled in the hardware and ready to go. This gives you powerful processing in the box, and the ability to work with processing and monitoring whose latency is equivalent to the converter overhead.
There are two ways to access the DSP:
- You can insert processes directly in the mixer strip inserts; this works well for standalone processes like eq, compressors, etc.
- Insert a graph. +DSP ONLY This lets you chain plugins together, use them in parallel, and create configurations that would be difficult (or impossible) with other platforms.
You should definitely check out the following processes:
- MIOStrip: Gating, EQ and compression powerhouse.
- Character: The sound of different analog circuits and devices available on any input, output or bus. Some can be subtle, so stack them across an entire mix. Try SoftSat on your main bus; you'll like it.
- Haloverb: Great sounding reverb, doesn't use any CPU from your host. What's not to love?
This should get you started with the 2882!
Additional Resources
Where is the manual?
Full documentation can be found in the Help menu; selecting "MIO Console Help" will open the "Mobile I/O Users Guide" pdf in Preview, where it can be read and printed.
The 2882 is an exceptionally deep product, and there are many features, applications and workflows to discover. We have published a series of technical notes and tutorial movies that go in depth about the Mobile I/O platform. Please take a look at them to learn more about the 2882: http://www.mhsecure.com/technotes