
Impressa IP60 - Printer PRIMERA - Free user manual and instructions
Find the device manual for free Impressa IP60 PRIMERA in PDF.


| Product Type | Digital Photo Printer |
| Brand | Primera |
| Model | Impressa IP60 |
| Dimensions (W x H x D) | 12.7 x 8.31 x 15.07 inches (323 x 211 x 383 mm) |
| Weight | 8 lbs (3.6 kg) |
| Power Requirements | 100-240 VAC, 50/60 Hz, 60 watts; 12 VDC, 5.0 A |
| Print Method | Thermal inkjet |
| Maximum Print Resolution | Up to 4800 DPI |
| Print Speed (4x6) | 7 seconds |
| Max Print Width | 6 inches (152.4 mm) |
| Supported Media | Roll-fed photo paper (glossy, luster, luster with repositionable adhesive) with Smart Chip, 3-inch core |
| Ink Cartridge | Single high-capacity CMY cartridge (Part #53494) |
| Data Interface | USB 2.0 |
| Operating Systems | Windows 7, 8, 10; Mac OS X 10.9+ (coming soon) |
| Included Software | Primera Snap, Primera PrintHub |
| Certifications | UL, UL-C, CE, FCC Class A |
| Safety Warnings | Moving parts; do not expose to rain/moisture; perchlorate material (special handling) |
| Maintenance | Replace ink filters every 25 cartridges (Kit SKU 57342); clean cartridge nozzles; align print head |
| Accessories | Power adapter, power cord, cut waste bin, photo tray, travel case (SKU 057340) |
| Media Sensing | Fixed see-through sensor; Smart Chip for media identification and remaining length |
Frequently Asked Questions - Impressa IP60 PRIMERA
User questions about Impressa IP60 PRIMERA
0 question about this device. Answer the ones you know or ask your own.
Ask a new question about this device
Download the instructions for your Printer in PDF format for free! Find your manual Impressa IP60 - PRIMERA and take your electronic device back in hand. On this page are published all the documents necessary for the use of your device. Impressa IP60 by PRIMERA.
USER MANUAL Impressa IP60 PRIMERA
natural_image
Line drawing of a printer with paper feed and paper slot (no text or symbols)Impressa® IP60
Digital Photo Printer
User's Manual
© 2018 All rights reserved
For the most recent version of this manual please visit
http://www.primera.com/
Notices: The information in this document is subject to change without notice. NO WARRANTY OF ANY KIND IS MADE WITH REGARD TO THIS MATERIAL, INCLUDING, BUT NOT LIMITED TO, THE IMPLIED WARRANTIES OF MERCHANTABILITY AND FITNESS FOR A PARTICULAR PURPOSE. No liability is assumed for errors contained herein or for incidental or consequential damages in connection with the furnishing, performance, or use of this material. This document contains proprietary information that is protected by copyright. All rights are reserved. No part of this document may be photocopied, reproduced, or translated into another language without prior written consent.
Trademark Acknowledgments: Windows is a registered trademark of Microsoft Corporation. All other trademarks are the property of their respective owners.
Printing History
Edition 1.0, 110818, Copyright 2018, All rights reserved.
FCC Compliance Statement: This device complies with part 15 of the FCC rules. Operation is subject to the following two conditions: (1) this device may not cause harmful interference, and (2) this device must accept any interference received, including interference that may cause undesired operation.
For Users in the United States: This product is intended to be supplied by a UL listed Direct Plug-In Power Supply marked "Class 2" or a UL listed ITE Power Supply marked "LPS" with output rated 12VDC, 5A or higher. This equipment has been tested and found to comply with the limits for a Class A digital device, pursuant to Part 15 of the FCC Rules. In a domestic environment this product may cause radio interference, in which case the user may be required to take adequate measures. This equipment generates, uses, and can radiate radio frequency energy and, if not installed and used in accordance with the instructions, may cause harmful interference to radio communications. However, there is no guarantee that interference will not occur in a particular installation. If this equipment does cause harmful interference to radio or television reception, which can be determined by turning the equipment off and on, the user is encouraged to try to correct the interference by one or more of the following measures:
- Re-orient or relocate the receiving antenna.
- Increase the separation between the equipment and receiver.
- Connect the equipment into an outlet on a circuit different from that to which the receiver is connected.
- Consult the dealer or an experienced radio/TV technician for help.
Use of shielded cables is required to comply with the Class A limits of Part 15 of the FCC Rules. You are cautioned that any changes or modifications not expressly approved in this manual could void your authority to operate and/or obtain warranty service for this equipment.
For Users in Canada: This digital apparatus does not exceed the Class A limits for radio noise for digital apparatus set out on the Radio Interference Regulations of the Canadian Department of Communications. Le present appareil numerique n'emet pas de bruits radioelectriques depassant les limites applicables aux appareils numeriques de la class A prescrites dans le Reglement sur le brouillage radioelectrique edicte par le ministere des Communications du Canada.
Product Disposal
Do not dispose of the printer or supplies in the same manner as normal household waste. Consult your local authorities for disposal and recycling options.
Battery Notice
This product contains Perchlorate material. Special handling may apply. For more information, go to http://www.dtsc.ca.gov/hazardouswaste/perchlorate/
WARNING
THE PRINT AREA CONTAINS HAZARDOUS MOVING PARTS. KEEP FINGERS AND OTHER BODY PARTS AWAY.
CAUTION!
TO PREVENT FIRE OR SHOCK HAZARD, DO NOT EXPOSE THE UNIT TO RAIN OR MOISTURE. TO REDUCE THE RISK OF ELECTRIC SHOCK, DO NOT REMOVE EXTERIOR PANELS. NO USER-SERVICEABLE PARTS INSIDE. REFER SERVICING TO QUALIFIED SERVICE PERSONNEL. OPERATE THE UNIT WITH ONLY THE PROPER ELECTRICAL SPECIFICATIONS AS LABELED ON THE PRINTER AND AC ADAPTER.
CAUTION!
USE OF CONTROLS OR ADJUSTMENTS OR PERFORMANCE OF PROCEDURES OTHER THAN THOSE SPECIFIED HEREIN MAY RESULT IN HAZARDOUS RADIATION.
CAUTION!
RISK OF EXPLOSION IF BATTERY IS REPLACED BY AN INCORRECT TYPE. DISPOSE OF USED BATTERIES ACCORDING TO THE INSTRUCTIONS.
Interactive Feature in this PDF Document
There are interactive features that allow you to jump to different locations within the document. Each listing in the Table of Contents is interactive. Place the cursor on either the text or the page number. A small hand with a pointing finger icon appears. Click to jump to that page. If you want to return to the Table of Contents, move the icon to the top of the page and click on the arrow marked TOC. Navigating from the Index (if there is one) is similar. Place the icon on one of the listings or page numbers, click on it, and it will move to that page. Returning to the Index can be done by clicking on the arrow marked Index.
Table of Contents
Section 1: Getting Started....1
A. Choosing a Good Location....1
B. Transporting the Printer 1
C. Unpacking and Inspection 2
D. Identifying the Parts....3
E. Installing/Removing the Photo Tray ....6
F. Installing/Removing the Cut Waste Bin......7
Section 2: Photo Paper......8
A. Paper and Roll Specifications 8
B. Installing Photo Paper......10
C. Removing a Roll of Paper....14
Section 3: Primera PrintHub (PC)....15
A. Monitoring Ink Levels 16
B. Using the Cost Estimator....16
C. Replacing Ink Cartridges/Ink Low Warning......18
Section 4: Printing from a PC ....21
A. Printing from Primera Snap....21
B. Printer Settings......27
C. Adjusting Print Alignment and Cut Strip Size 30
Section 5: Printing from a Mac ....32
Section 6: Troubleshooting and Maintenance....33
A. Solving Print Quality Problems....33
B. Poor Print Quality - Cleaning the Cartridge 34
C. Interpreting the Printer's Indicator Lights....38
D. Solving Paper Feed Alignment Problems 39
E. Printer Maintenance 40
F. Technical Support 42
Section 7: Technical Specifications....43
Index 44
Section 1: Getting Started
THANK YOU...
for choosing an Impressa IP60 Photo Printer. The IP60 will print stunning photographs directly onto a variety of approved media. This User's Manual is your complete step-by-step guide to quickly and easily setting up and printing with your new printer!
A. CHOOSING A GOOD LOCATION
- Place the printer on a flat surface in a location with adequate air circulation to prevent internal heat build up.
- Do not place the printer near heat sources such as radiators or air ducts, or in a place subject to direct sun light, excessive dust, mechanical vibration or shock.
- Allow for adequate clearance in front of the printer to accommodate the printed photo paper as it is leaving the printer.
- Allow for adequate overhead and rear clearance for opening the top cover to allow easy access to the photo paper and ink cartridge. The printer will require an additional 12 inches (30.5 cm) of overhead space and 1 inch (2.5 cm) of rear space to open the cover.
B. TRANSPORTING THE PRINTER
- When transporting the printer please leave the cartridge installed in the printer.
• Primera recommends using the traveling case with wheels and custom cut-outs available at Primera.com: SKU 057340
- Disconnect the power cord when transporting the printer.
- If you choose to remove the cartridge before shipping, please follow this procedure: With the printer powered on, remove the cartridge, wait ten seconds for the cartridge cap to retract. Power off the printer.
C. UNPACKING AND INSPECTION
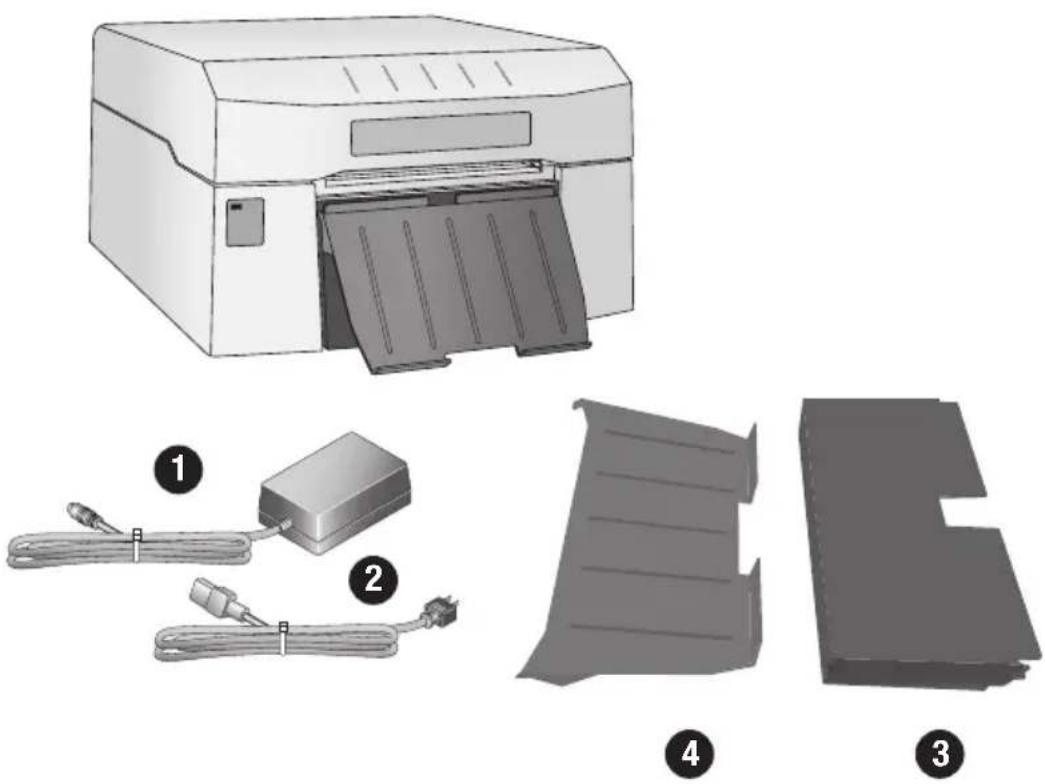
While unpacking your printer, inspect the carton to ensure that no damage has occurred during shipping. Make sure that all supplied accessories are included with your unit.
The following items are included in the supply box:
- Power Adapter
- Separate Power Cord
- Cut Waste Bin
- Photo Tray
Note: A USB cable, Cartridge (Part Number 53494) and media are not included. The USB cable used must be 6'(2 M) or less.
D. IDENTIFYING THE PARTS
This illustration shows the front of the printer with its LED indicator lights.
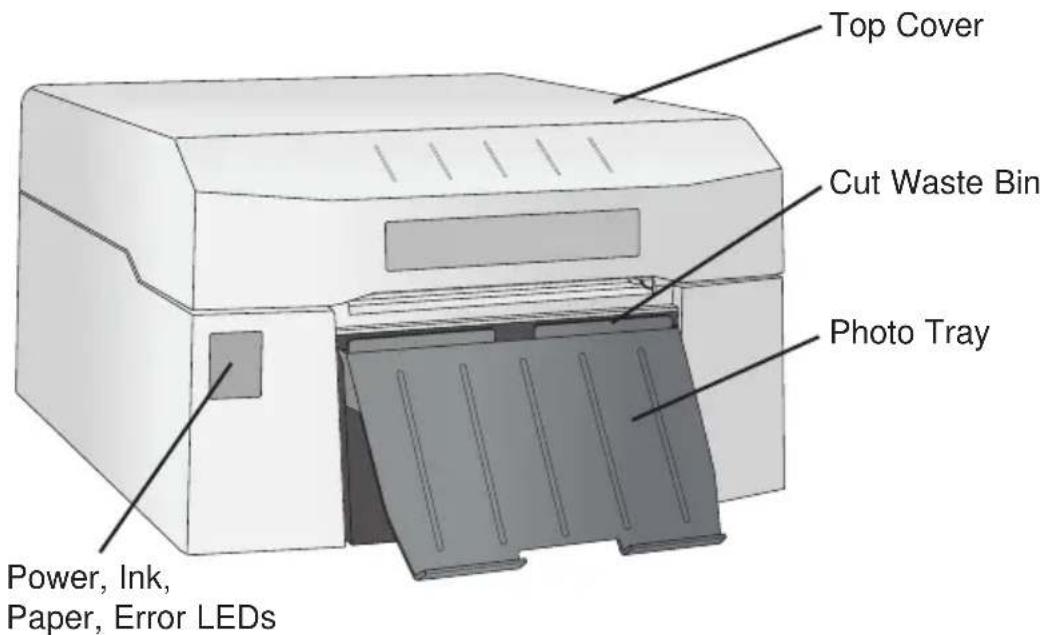
The Power LED will illuminate when the printer is plugged in and switched on.
The Ink LED will illuminate when the ink cartridge is low or not installed.
The Paper LED will illuminate when the media is not installed or is empty.
The Error LED will illuminate when there is an error that requires viewing in the Primera PrintHub software. Open the software to view the error message.
The Cut Waste Bin holds all of the strips cut from between photos. Empty it when you change the paper.
The Photo Tray should be used for 4x6 or 2x6 photos.
The Top Cover can be opened to access/change the photo paper and ink cartridge.
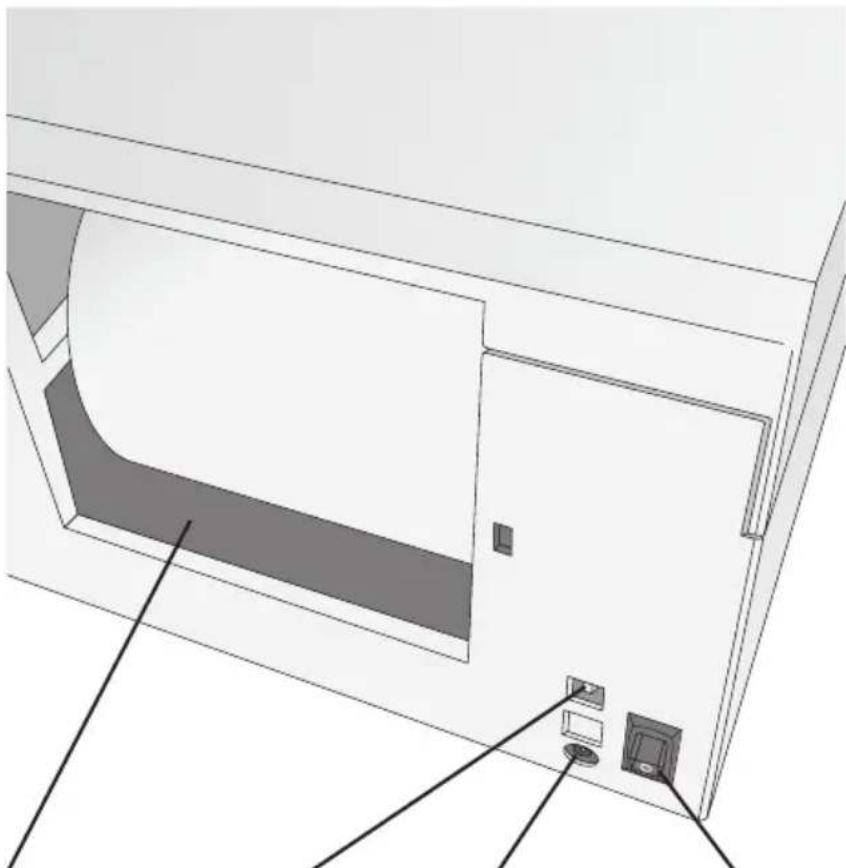
This illustration shows the input ports, power switch, and media loop opening found on the rear panel of the printer.
natural_image
Technical line drawing of a door frame with labeled components (no text or symbols)Media Loop Opening Power PortUSB Port Power Switch
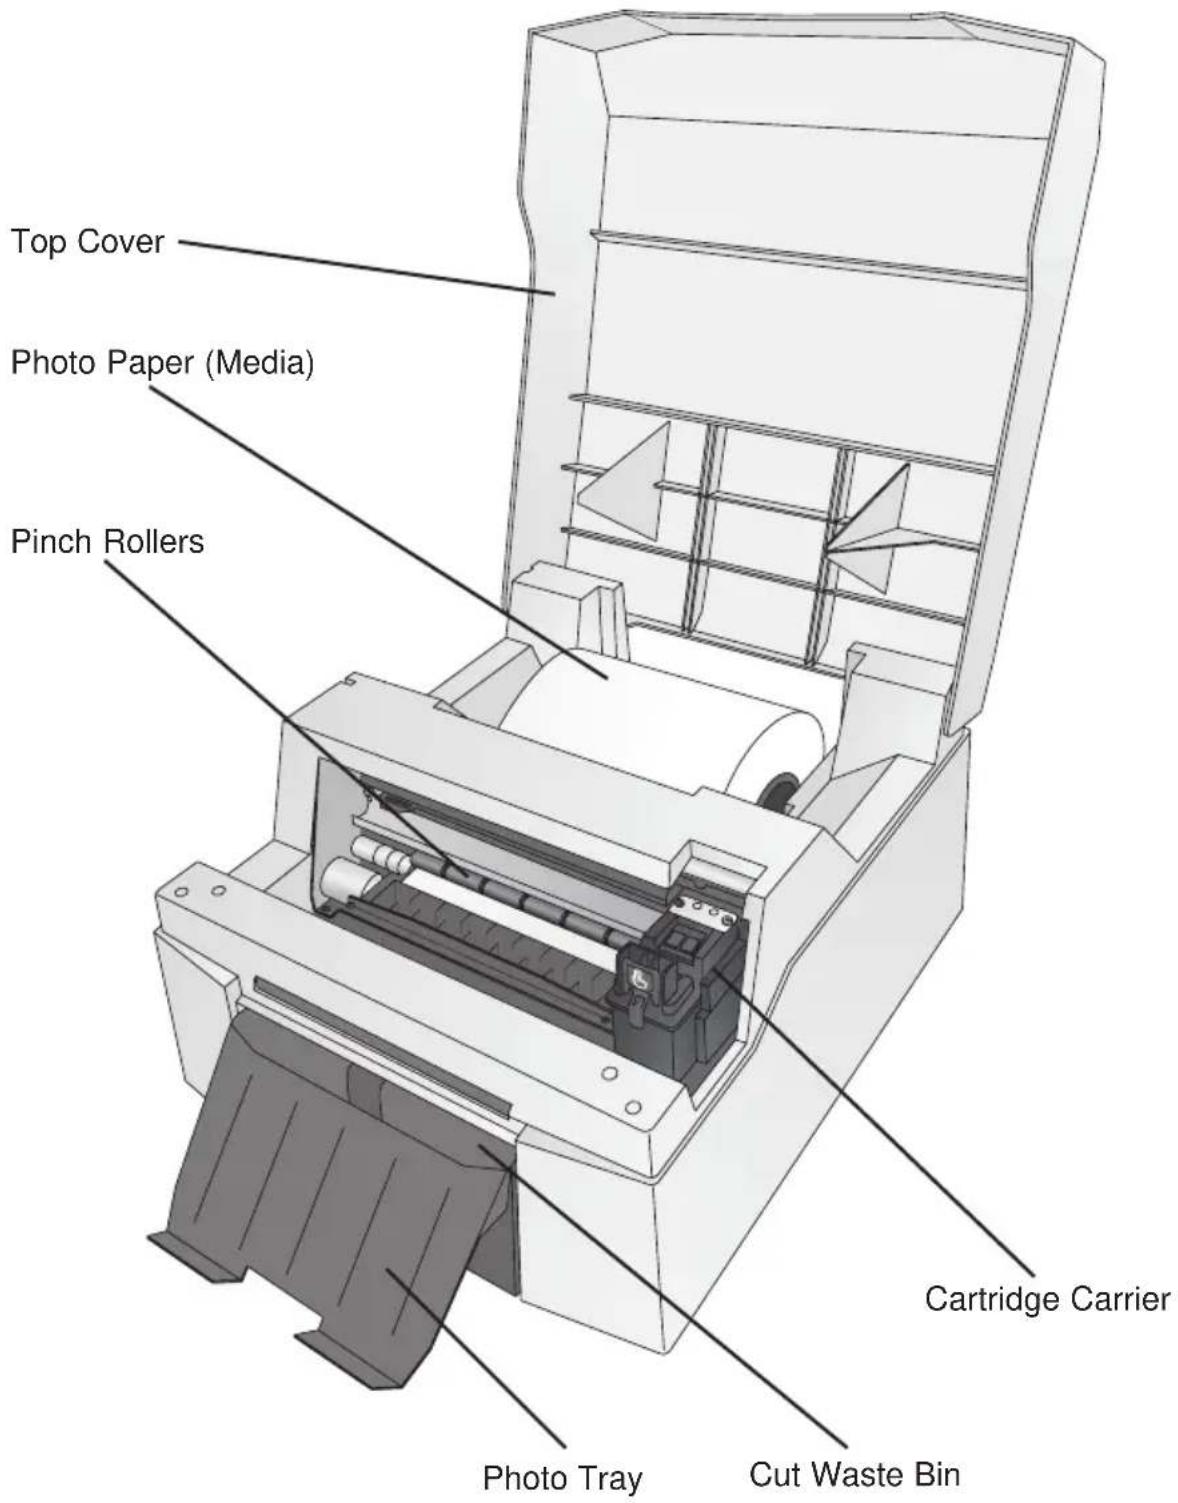
This illustration shows the interior of the printer.
E. INSTALLING/REMOVING THE PHOTO TRAY
- The photo tray is used to hold 4x6 or 2x6 photos after printing.
- If you are printing larger photos, remove the photo tray to prevent feed and cut problems.
To remove the photo tray, lift up until the pegs are clear of the waste cut bin and then pull out. You may have to hold down the cut waste bin in order to remove the photo tray since the photo tray snaps into place.
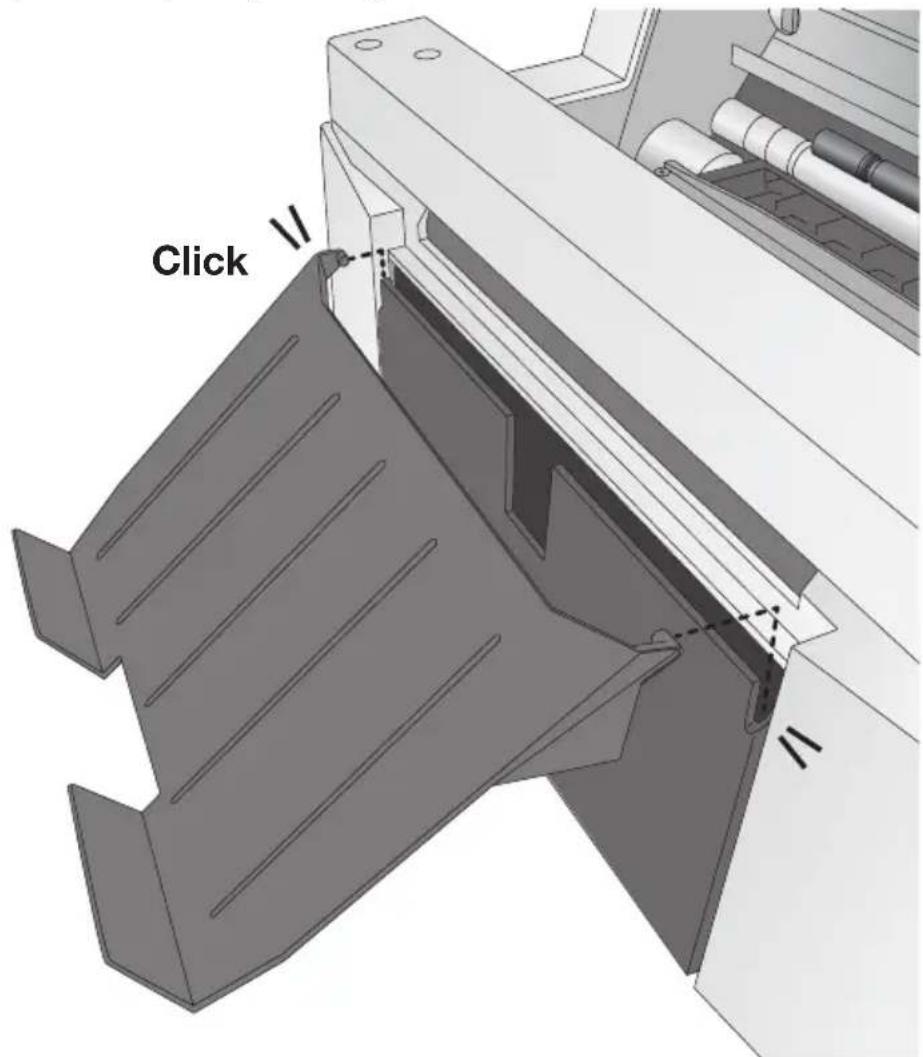
To install the photo tray, first make sure the cut waste bin is installed, then lower the tray until the pegs are secured behind the front lip of the cut waste bin. The pegs will snap into place.
F. INSTALLING/REMOVING THE CUT WASTE BIN
The cut waste bin captures the strips of paper cut from between photos before and after a photo is printed. This bin should be emptied every time you finish a roll of photo paper.
To remove the cut waste bin, first remove photo tray. Remove the cut waste bin by lifting up and pulling out.
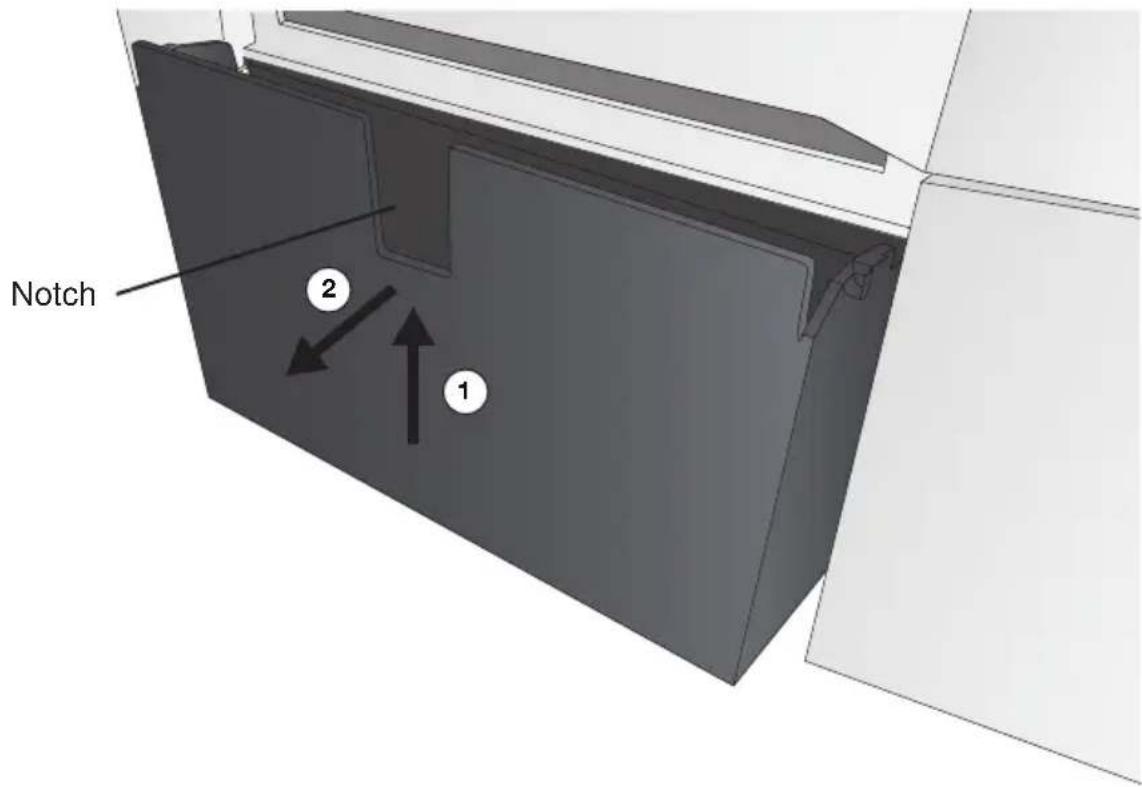
Note: When emptying the cut waste bin, the photo tray and the cut waste bin can be removed together since they snap together.
To install the cut waste bin, make sure the notch is facing out, then push in and down.
Section 2: Photo Paper
The IP60 accepts ONLY Primera photo paper which contains a Smart Chip that identifies the media and the remaining paper. This has several advantages:
- The ink cartridge and driver settings are calibrated to work specifically with the installed paper.
- It keeps track of the length of paper remaining.
• The software will notify you when a roll of paper is empty.
A. PAPER AND ROLL SPECIFICATIONS
There are several types of paper available:
- Glossy
- Luster
• Luster with repositionable adhesive
Every type of paper can be used to print these standard sizes and more:
- 6W x 4H (Portrait)
- 6W x 2H (Photo Strips)
- 6W x 8H (Landscape)
- 6W x 12H (Landscape)
- 6W x 18-24H (Panoramic Landscape)
Roll Specifications
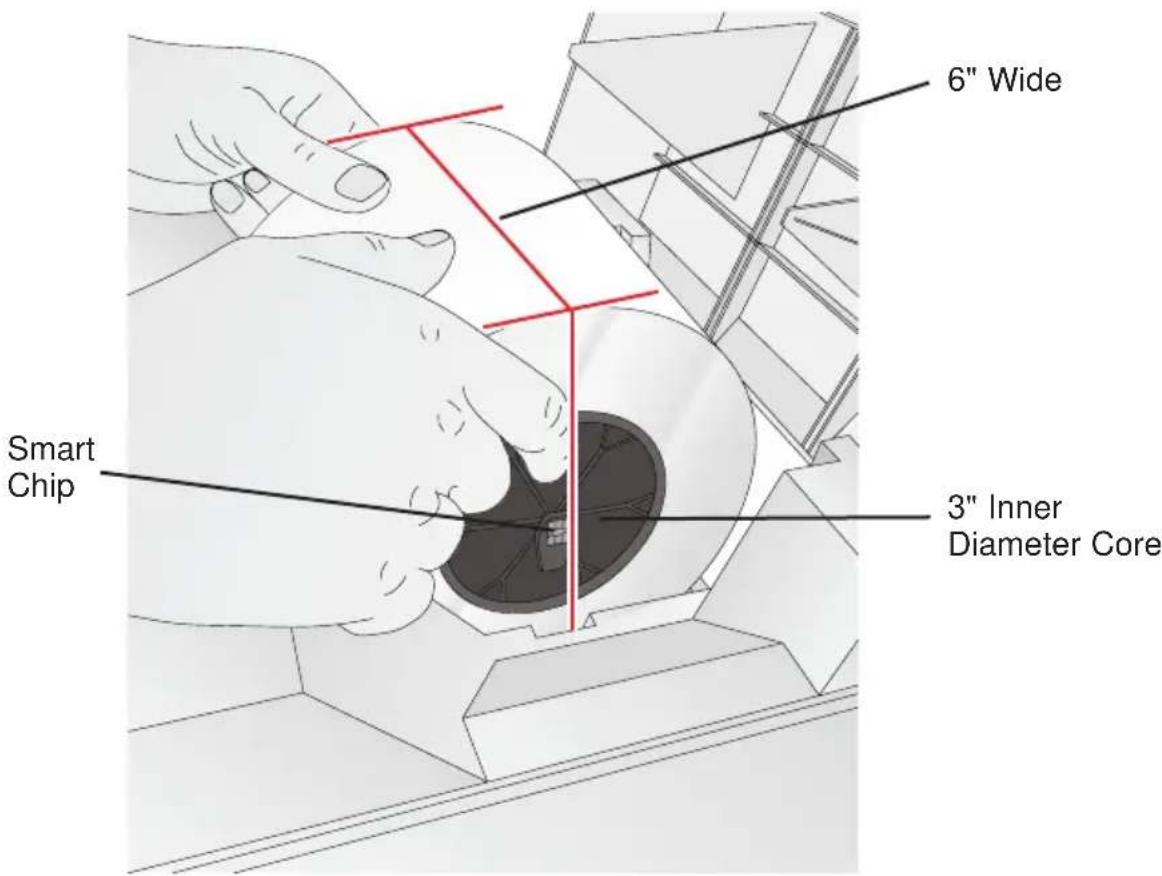
B. INSTALLING PHOTO PAPER
-
Plug in the power cable and switch on the printer.
-
Open the top cover of the IP60.
-
Locate a roll of photo paper.
-
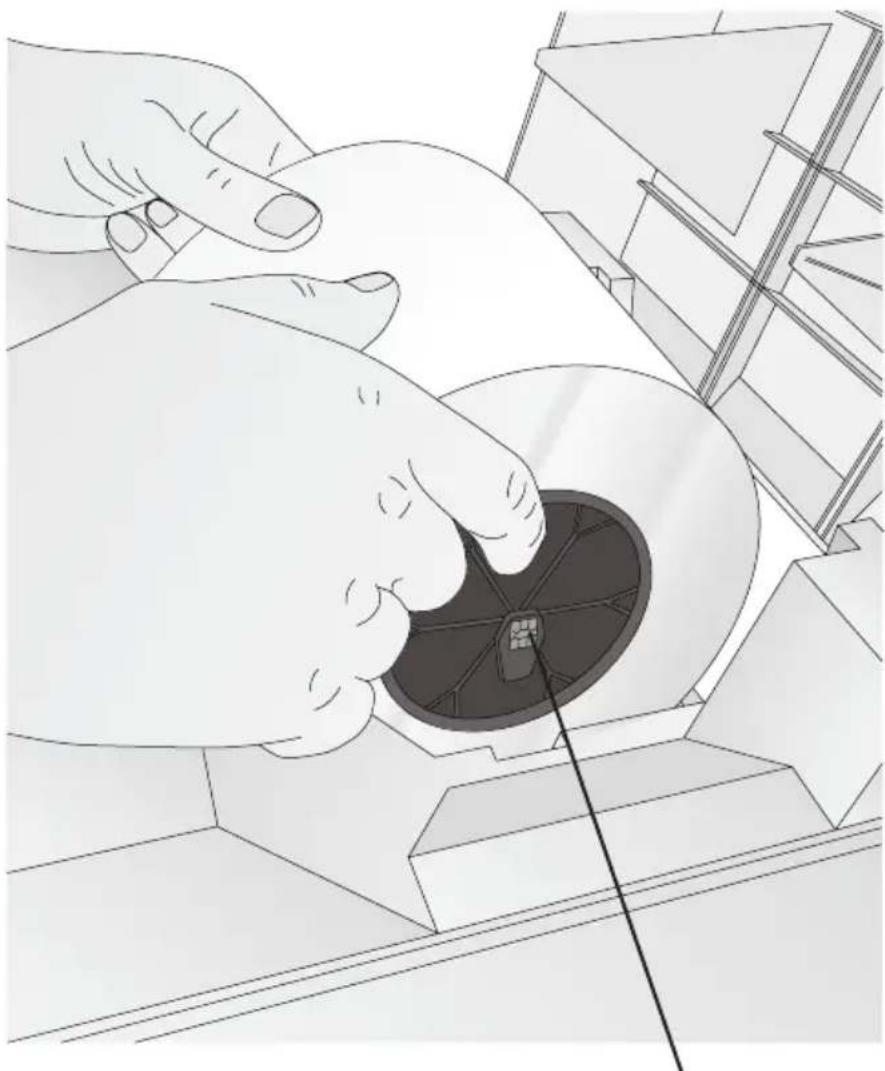
Grasp the roll with both hands as shown, taking care not to touch the smart chip. (It must hang freely.) Place the roll into the roll area in the back of the printer. Make sure the smart chip is on the right side.
natural_image
Illustration of hands operating a mechanical component with a central circular component (no text or symbols visible)Smart Chip
- The smart chip will orient itself automatically for installation. Insert it into the corresponding slot on the right side of the printer and insert the pin on the left side of the roll into the slot on the left side of the printer. Push down on the roll slightly to ensure that it is fully seated at both ends.
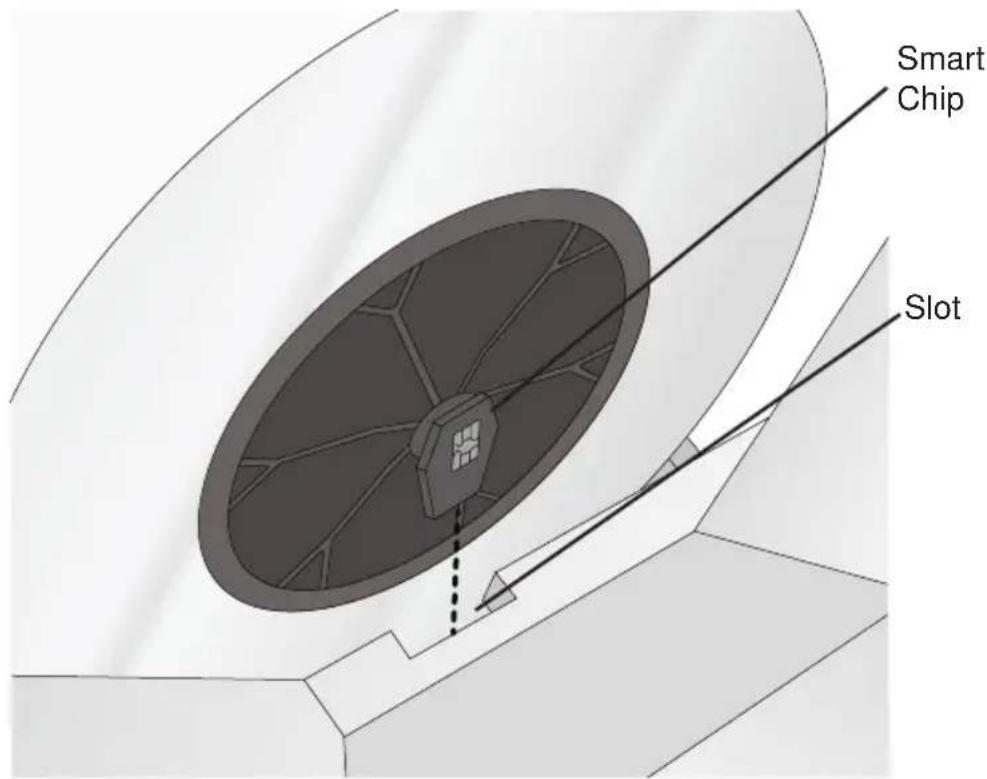
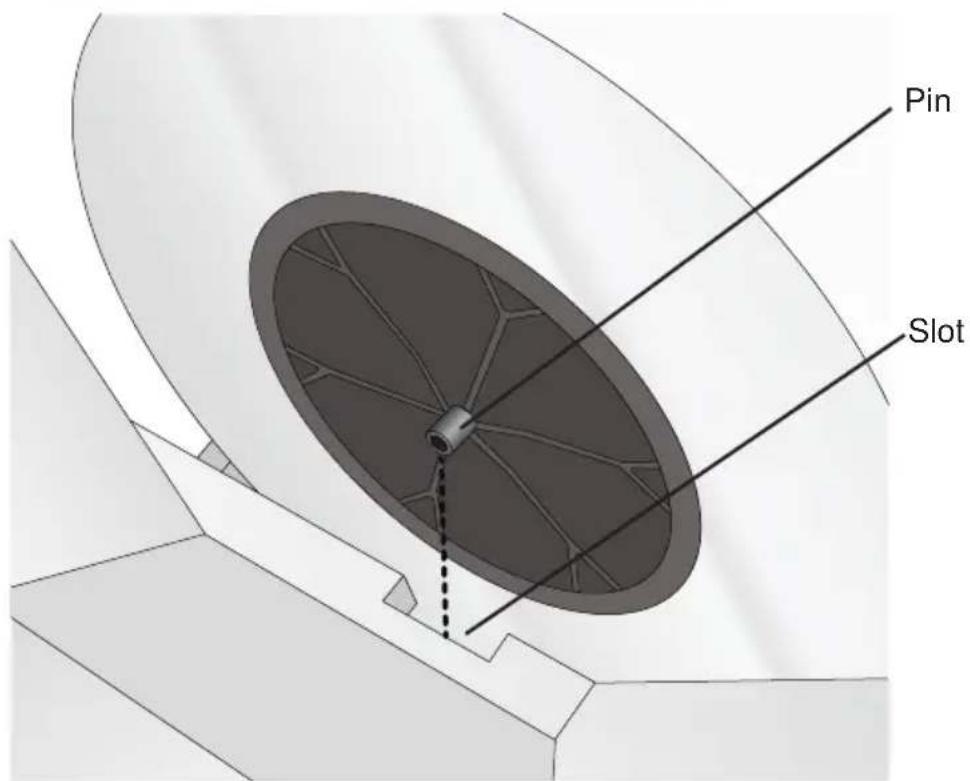
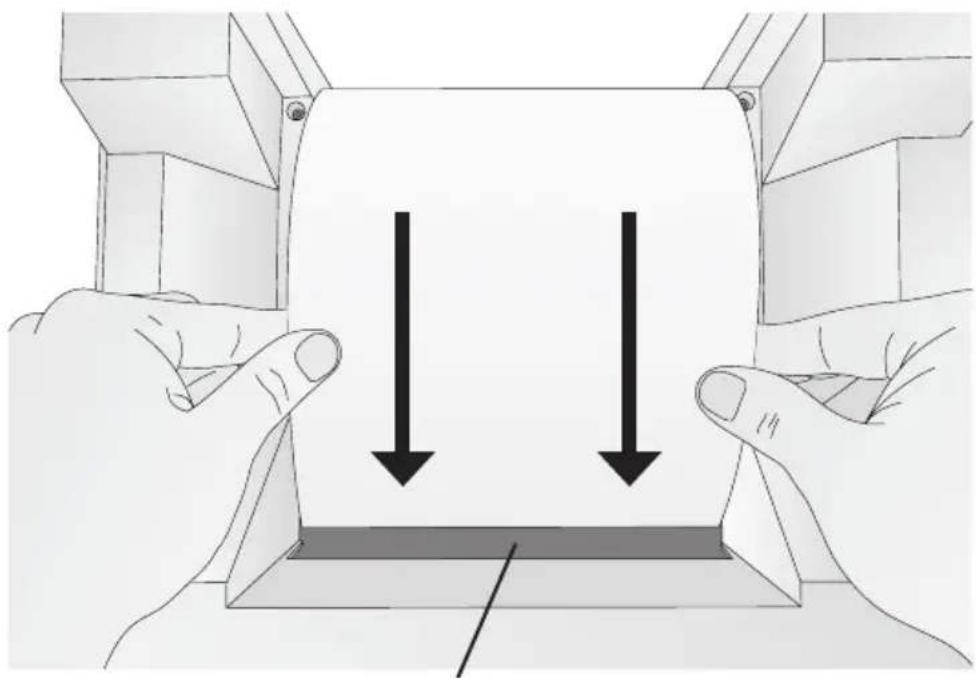
- Once the roll is installed, place your index fingers on each side of the roll. Use your thumbs to slowly turn the roll forward and guide the leading edge of the paper into the feed area, using your index fingers as guides to keep the paper aligned with the roll. Keep feeding the paper forward until the printer grabs the paper and feeds it forward.
natural_image
Illustration of two hands holding a rectangular object with two downward arrows indicating compression or disassembly (no text or symbols present)Feed Area
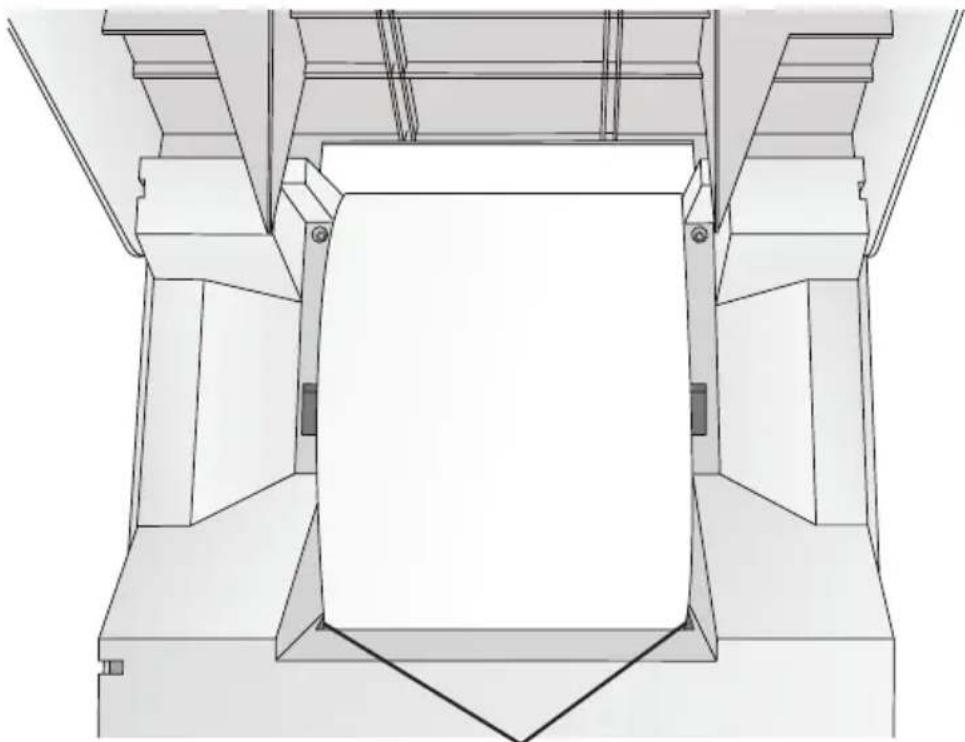
- Once the printer detects the paper it automatically feeds it forward, cuts off a small strip, and reserves it so it is ready for printing. At this point check the alignment! There are two ways to check alignment.
First, there should be an equal space on the left and the right side of the paper in the feed area.
natural_image
Technical line drawing of a mechanical assembly with symmetrical components and a central rectangular block (no text or symbols)Equal gap on each side
Second, check the alignment of the paper relative to the pinch rollers in the print area. The amount of paper visible should be equal across the width of the paper.
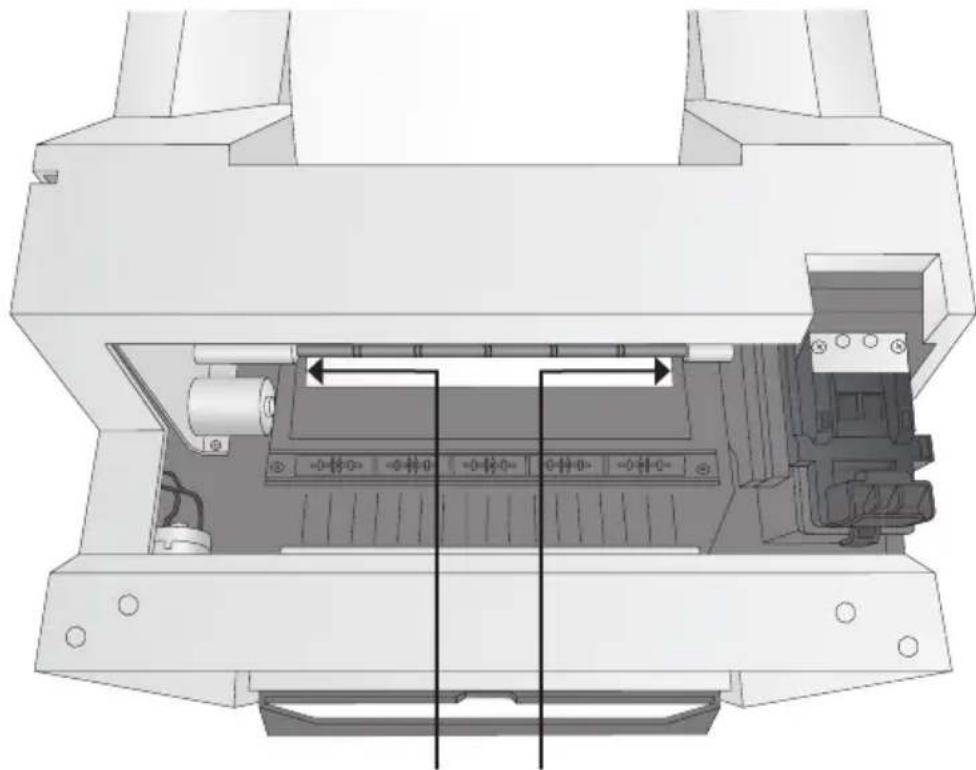
natural_image
Technical diagram of a mechanical assembly with internal components and alignment arrows (no text or symbols)Equal amount of visible paper on each side
-
If the paper is not centered in the feed area or not aligned with the pinch rollers, follow the instructions in the next section to unload the paper. Then repeat the loading process. Repeat until the paper is aligned.
-
Close the Cover. When the cover is closed it pressed the pin on the left side and the smart chip on the right side into the corresponding slots. This is especially important when the paper is nearly empty and the roll becomes lighter.
C. REMOVING A ROLL OF PAPER
When the paper roll is nearly empty you will receive an empty roll message. At that point you will need to remove the paper from the feed area and remove the roll. You may also find it necessary to remove the paper from the feed area if the paper is out of alignment. Follow these instructions to remove the paper and the roll.
- Open the top cover.
- Place your index fingers on each side of the roll. Use your thumbs to slowly turn the roll backward until the leading edge of the roll is out of the feed area.
- If you are installing a new roll, lift the roll out of the printer and discard it or recycle the cardboard core and (acetal) plastic core holders at your local recycling facility.
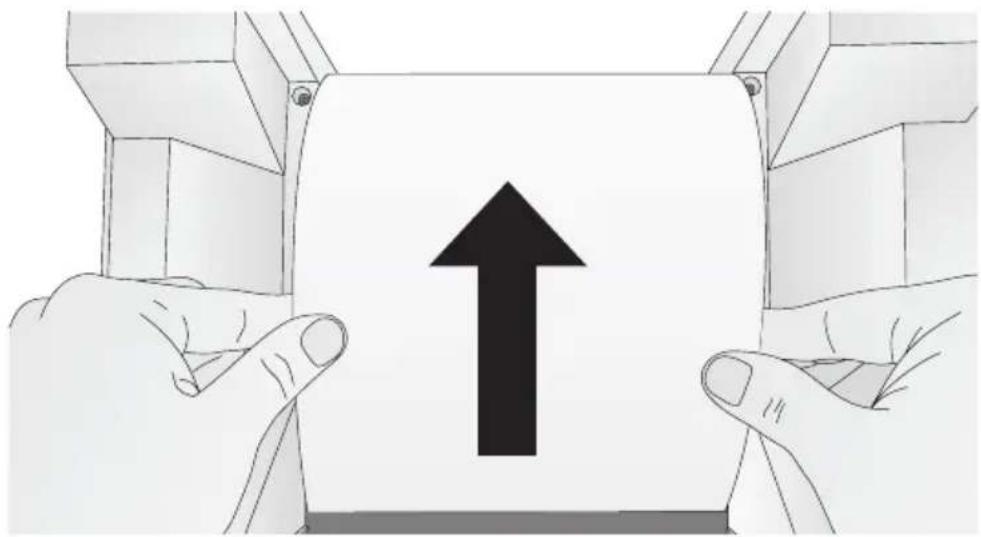
natural_image
Illustration of two hands holding a document with an upward arrow, no text or symbols presentImportant Note: There may be several feet of unprinted paper at the end of each roll. This is to ensure a proper slack loop can be maintained and there will be no feeding problems. Extra paper is added to each roll to ensure the stated length of each roll is present.
Section 3: Primera PrintHub (PC)
Primera PrintHub is used to interact with the printer for gathering ink levels, maintenance, alignment, cost calculation and several other functions. You can use it to manage these functions on multiple Impressa Photo Printers.
PrintHub automatically installs with your printer driver and can be accessed through the printer driver preferences or as a program on your Windows start menu.
-
Connect the printer to your computer via USB and turn on the power. The PrintHub accesses most of the information it uses from the printer itself so the printer must be turned on and communicating for the program to be useful.
-
Go to: Start - Programs - Primera Technology - Primera PrintHub.
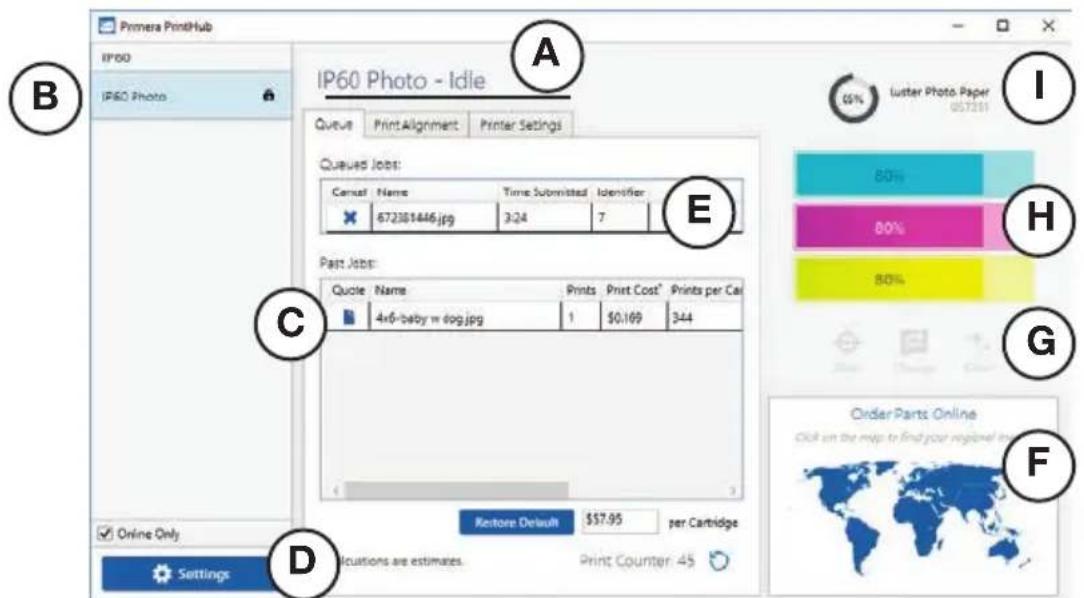
A. Adjust alignment, sensor mode, output mode and advanced settings.
B. If you have multiple Primera printers connected, they will be listed here.
C. Past jobs will show the last 5 jobs along with cost information. Click the document icon to view a cost report.
D. Application Settings
E. Print Queue shows any jobs currently printing.
F. Order Link
G. Frequent Activities
H. Current Ink Levels
I. Displays the amount of paper remaining. Hover your mouse to view the exact remaining feet.
A. MONITORING INK LEVELS
Ink levels can be monitored at any time by using PrintHub. Immediately after printing starts, PrintHub will display the ink levels in the upper right corner of the application. Ink is displayed in 10% increments, for example: 100% to 90% to 80% etc.
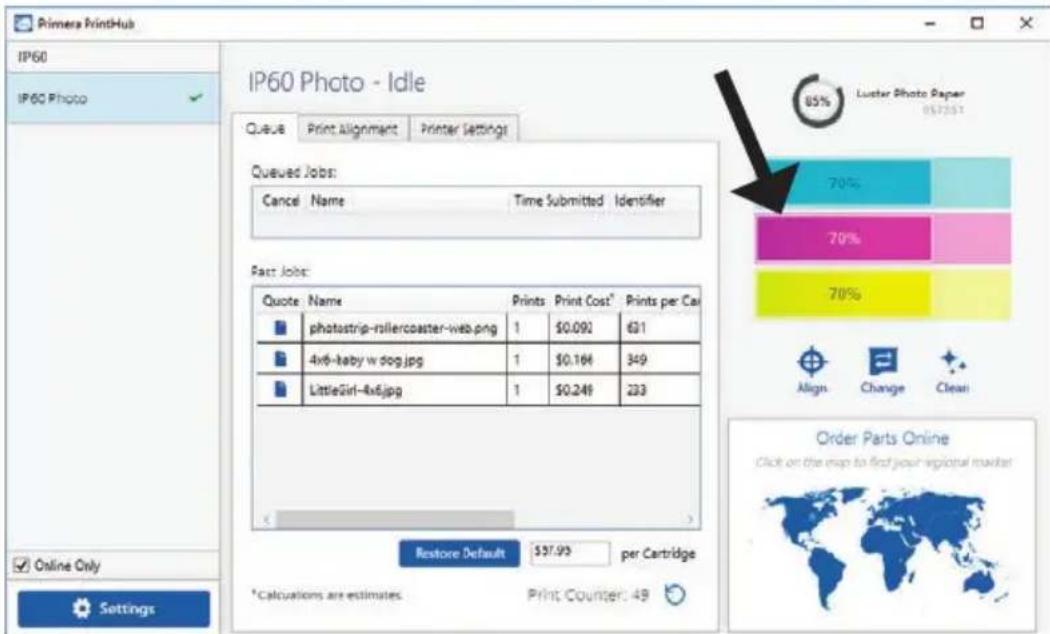
B. USING THE COST ESTIMATOR
The cost estimator is found under the queue section on the first tab of PrintHub. The last five job costs are stored in the list. Each job will show the cost per photo based on the cost per cartridge entered below the list. Enter the actual amount you paid for the cartridge. Prints remaining on the currently-installed cartridge and total prints on new cartridge are both displayed automatically on the Past Jobs list after printing.
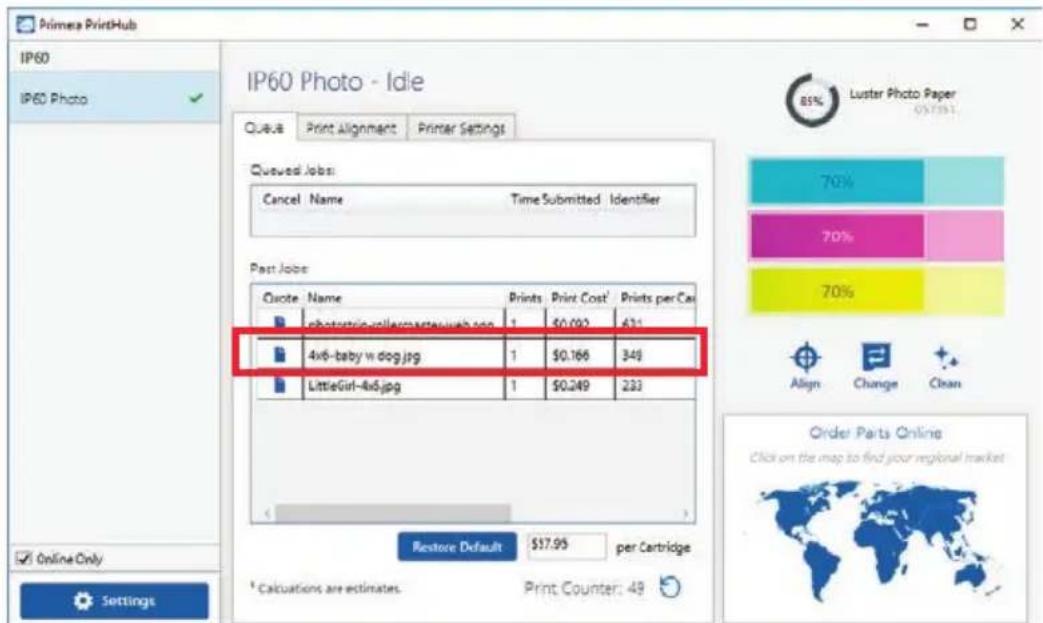
To see a printable/saveable report click on the document icon next to the job you want to see. A report will display the information. You can print or save the report from this screen. You can also change the currency, change the job name, or adjust the cost from this screen.
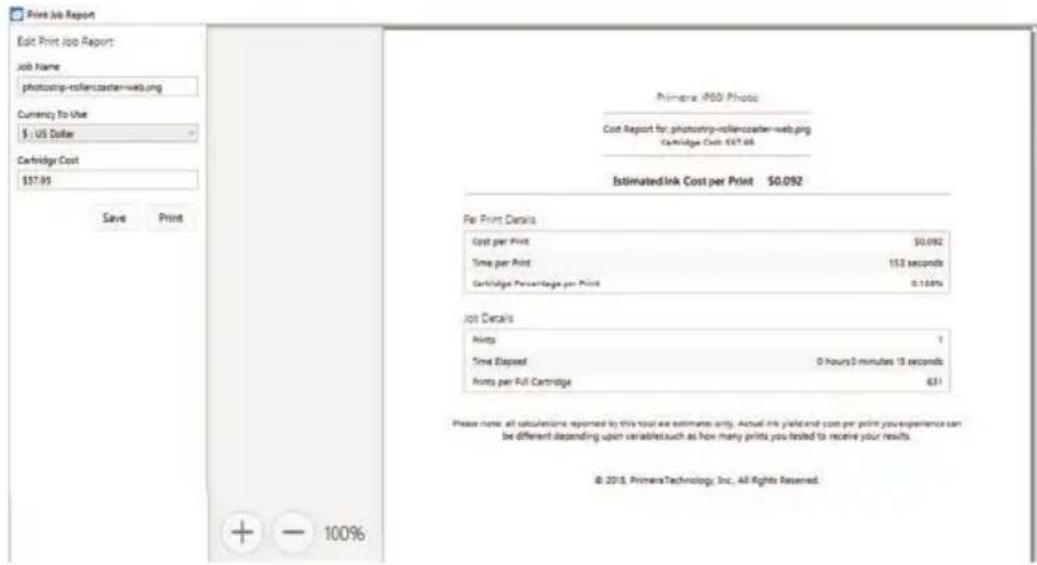
Important Note: The cost per photo represents the average cost per photo over an entire run of photos. This means that the per-photo cost will decrease and become more accurate as the number of photos printed increases. This is because the ink that is used for periodic cartridge maintenance is divided into a larger number of photos.
C. REPLACING INK CARTRIDGES / INK LOW WARNING
You can replace ink cartridges at any time or wait for the Ink Low Warning to prompt you to replace cartridges. The first and only ink low warning will occur at 0% ink remaining. You can continue printing at this point, but the ink may run out at any moment which will result in poor print quality. If you dismiss the ink low warning, you will not be warned again.
To change an ink cartridge, follow this procedure:
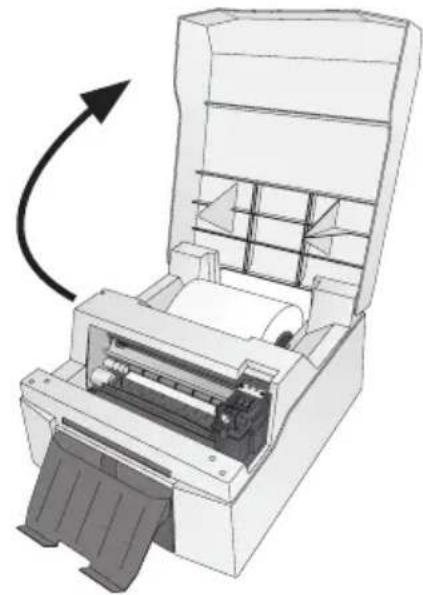
- Open the Top Cover.
natural_image
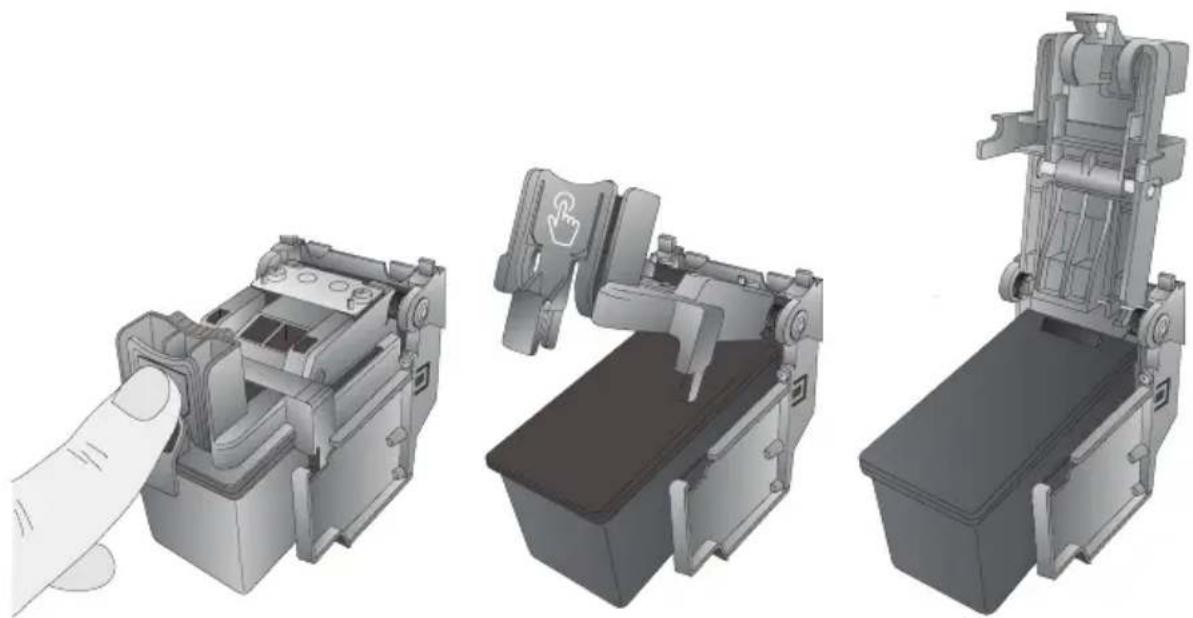
Diagram of a printer with an open lid and internal compartments, showing a curved arrow indicating rotation (no text or symbols present)- Press or pinch the tab on the front of the cartridge carrier to open the carrier lid.
natural_image
Three technical illustrations of a mechanical device assembly, showing hand tool interacting with internal components (no text or symbols present)- Remove the ink cartridge.
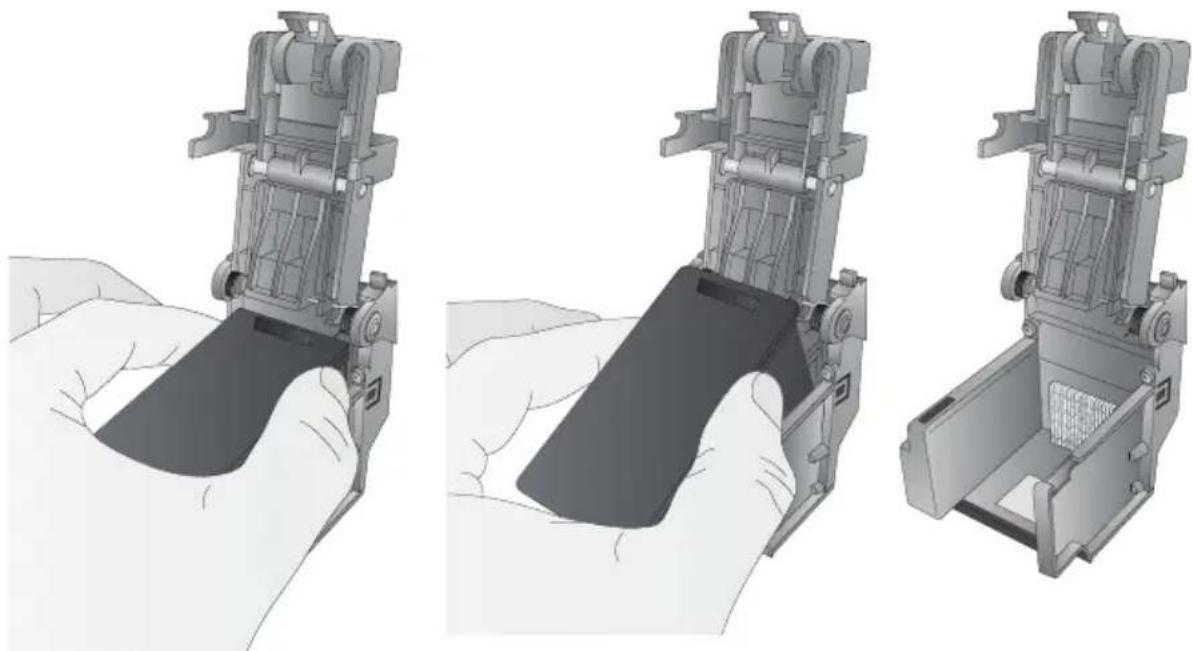
natural_image
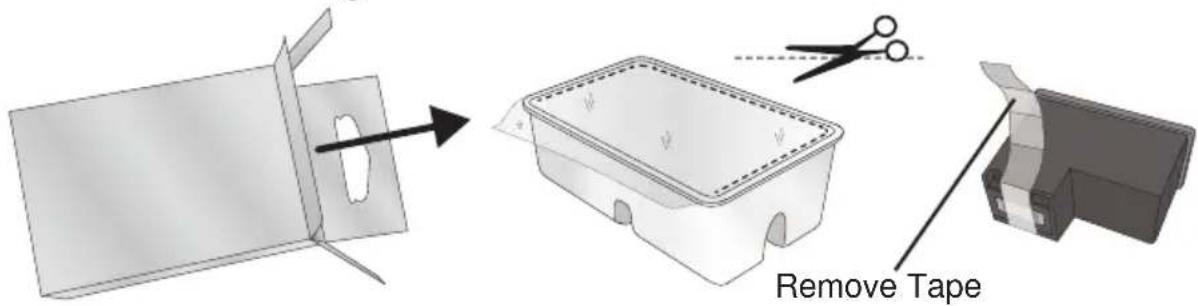
Three-step illustration of a hand holding a mechanical device, showing internal components and assembly (no text or symbols)- Locate a new ink cartridge and remove it from its packaging. Remove the foil outer packaging and the tape covering the nozzles.
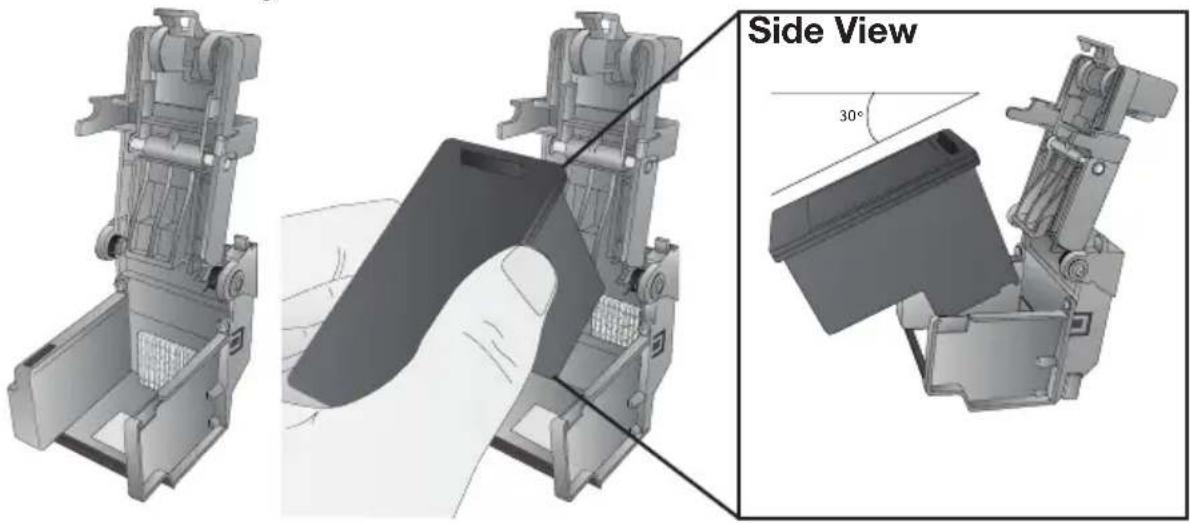
- Place the new ink cartridge into the empty cartridge carrier. Note: When installing the cartridge, tilt the cartridge at a slight backward angle of approximately 30 degrees.
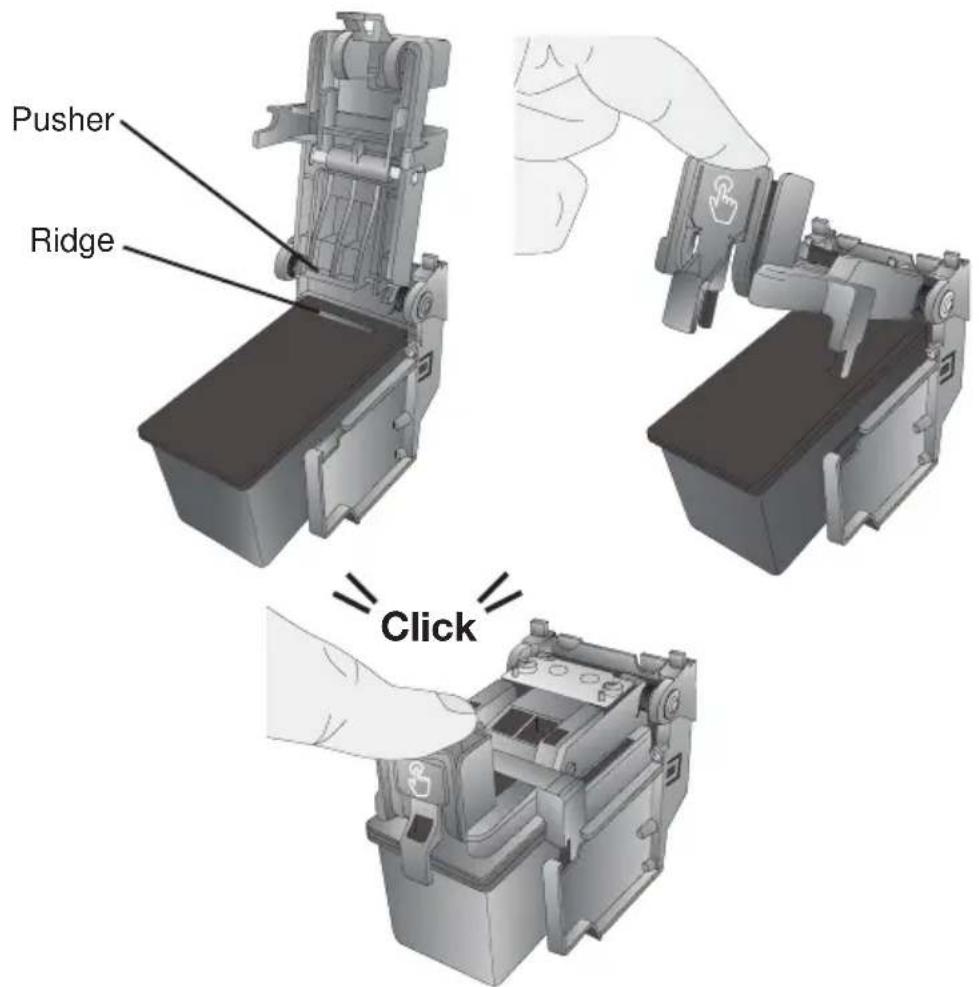
- Make sure the ink cartridge is pushed back far enough so the ridge on the cartridge is behind the spring-loaded pusher on the lid. Close the lid of the cartridge carrier by lightly pressing down from the top until you hear a click.
Section 4: Printing from a PC
You may print to the IP60 from any printing program! However, Primera provides a simple printing program, Primera Snap, which allows you to crop, change orientation, and select various standard photo sizes.
A. PRINTING FROM PRIMERA SNAP
Primera Snap installs automatically with the IP60 software installer. To open the software search for "Snap" or click on the Windows Icon in the lower left. You will find Primera Snap under "P".
Overview
Portrait Mode (click to change)
Click up/down arrows to adjust size
Click and drag to crop Click to print
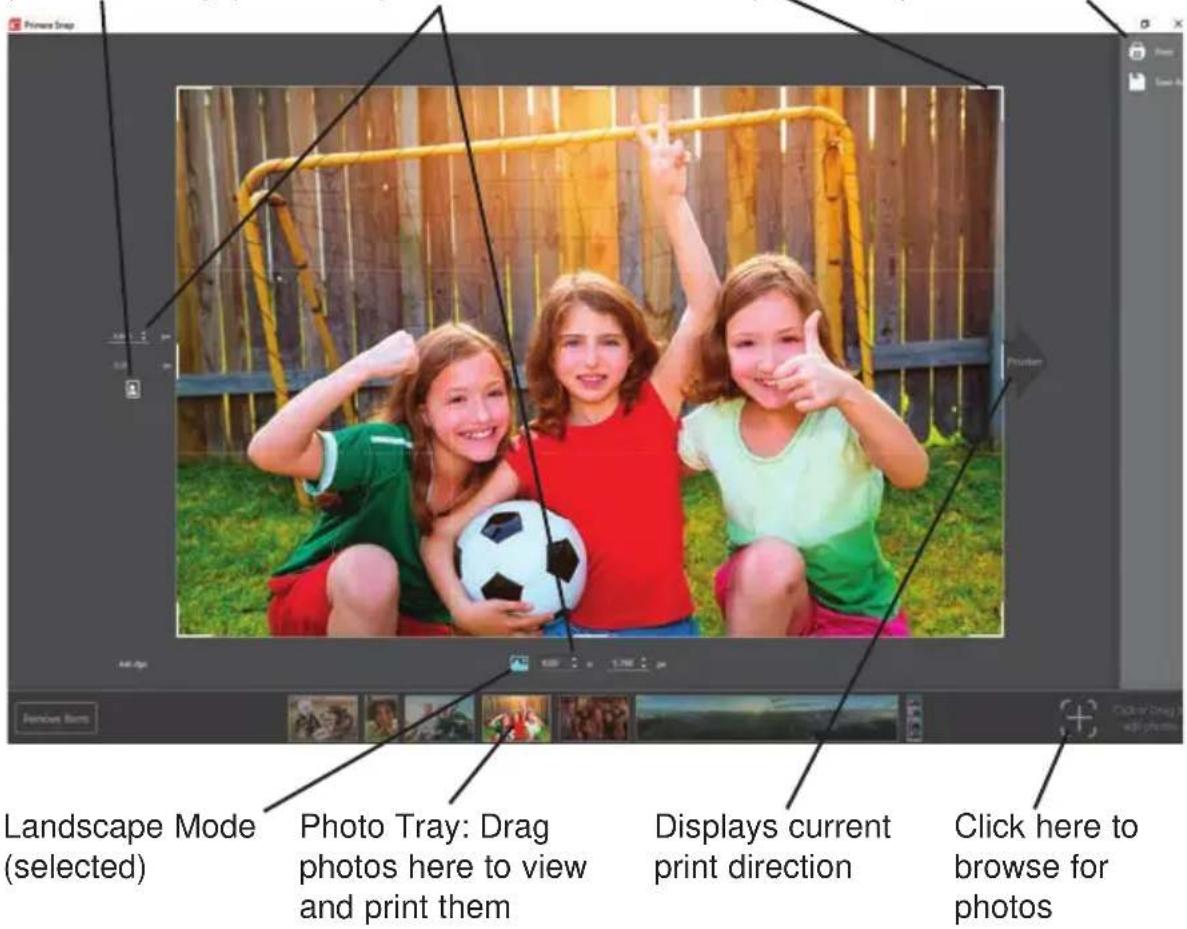
Orientation/Print Direction
When you drag in or browse to a file, Primera Snap will choose the orientation that best fits the current aspect ratio. For example, if your image is a 300 dpi JPG at 1800 x 1200 pixels the software will choose a 6 inch wide x 4 inch high portrait image. When Portrait Mode is selected, the portrait icon will turn blue and the print direction arrow will point up.

natural_image
Three girls sitting on grass, one holding a soccer ball and making a peace sign, with wooden fence and camera lens in the corner (no text or symbols on main subjects)Portrait mode (selected) Print direction
If you change the orientation to landscape, the print direction arrow will switch to the right side and the landscape icon will change to blue. The size will also change to 6 x 8 inches. However, since in this example the image aspect ratio does NOT match the 6x8 size, the image will automatically be cropped. You will typically need to adjust the crop to fit the particular photo selected.
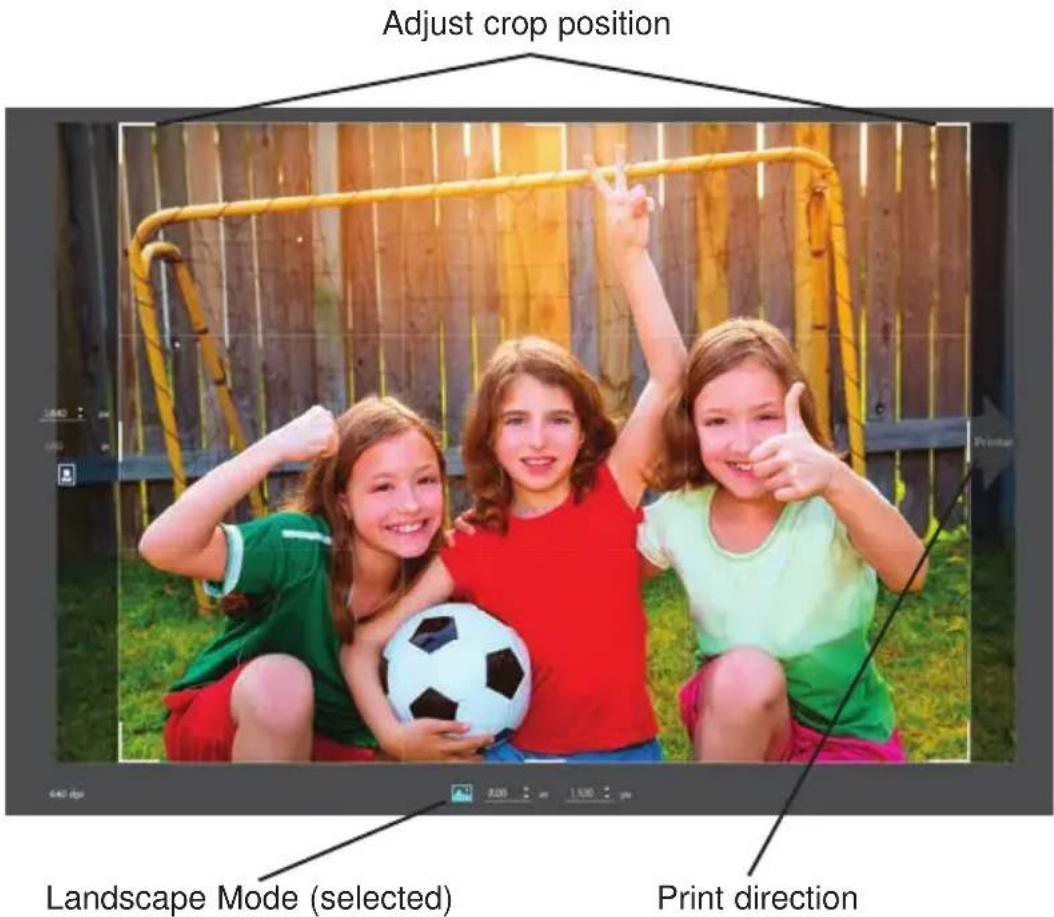
Note: You may also print the original aspect ratio of 6x9. Using the up/down arrows simply toggle the size to 9 inches.
Cropping Images
Any image may be cropped by hovering over the corners of the image until a double arrow appears. Once the arrows appear, click and drag to move the crop lines. Primera Snap will automatically maintain the photo size that is currently set.

Current size and orientation are maintained when cropping
Note: At least one height/width measurement must be set to 6 inches.
Printing other sizes
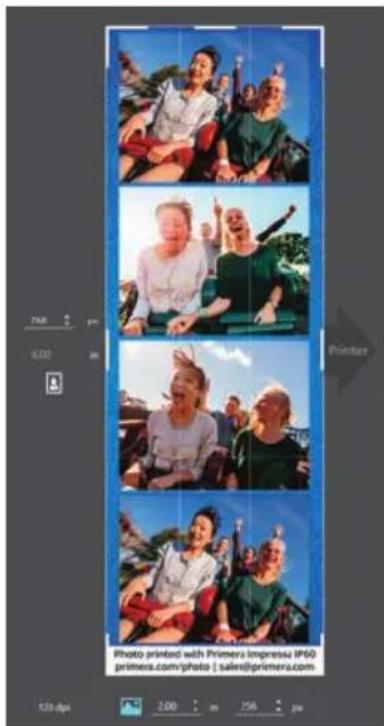
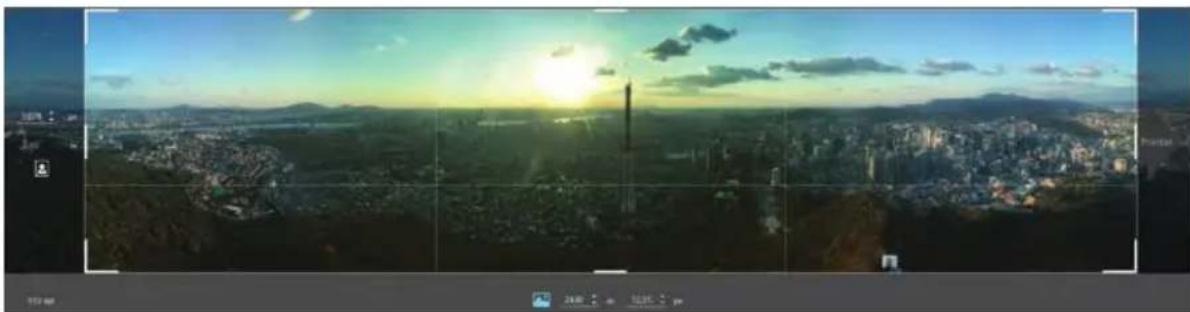
If the size does not match 4x6 or 6x8, the software can also print any other custom or standard sizes including 6x12, 2x6 (photo strips) or Panoramic sizes from 6x18 to 6x24. Primera Snap will always set one of the measurements to 6 inches and then choose the closest size to match the aspect ratio.
Note: The maximum print size is 6x24.
natural_image
Panoramic aerial view of a cityscape at sunset with green hills and distant mountains (no visible text or symbols)Printing from Primera Snap
To print, click on the Print icon in the upper right corner of the software. All available Primera printers will appear here. For example, if you have two IP60 printers each loaded with a different type of photo paper, both will appear on this list.
Click "Use This Printer" to select the printer.
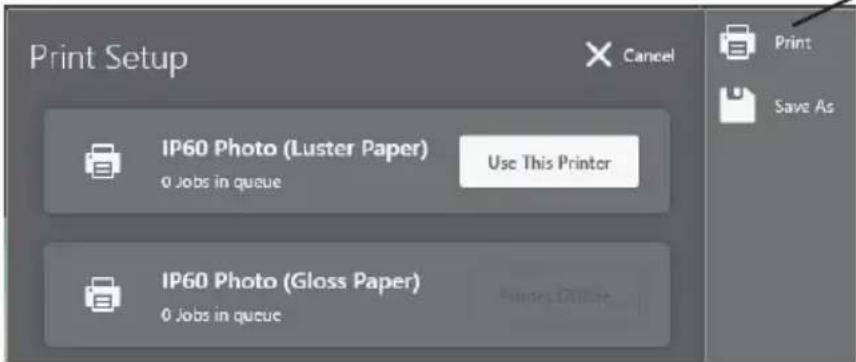
All of the printer settings will be displayed in the Print Setup window.
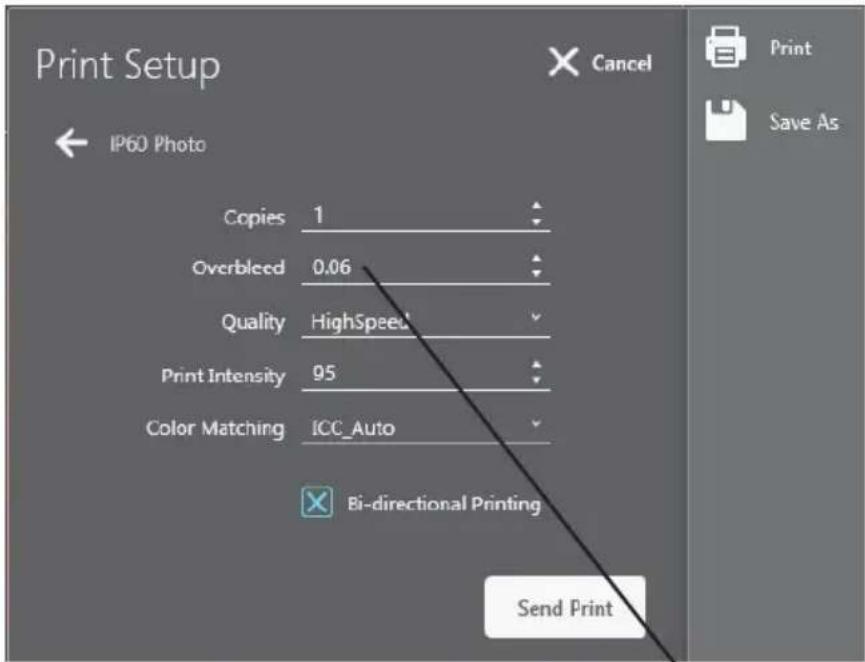
If you see white space around your print, increase the overbleed.
You may change the number of copies, adjust overbleed, quality, print intensity, color matching, and bi-directional print. For more information on print settings, see the next section in this manual.
Click "Send Print" to print.
B. PRINTER SETTINGS
If you are printing from Primera Snap, the print settings can be found right before printing after clicking the Print Icon and selecting the printer.
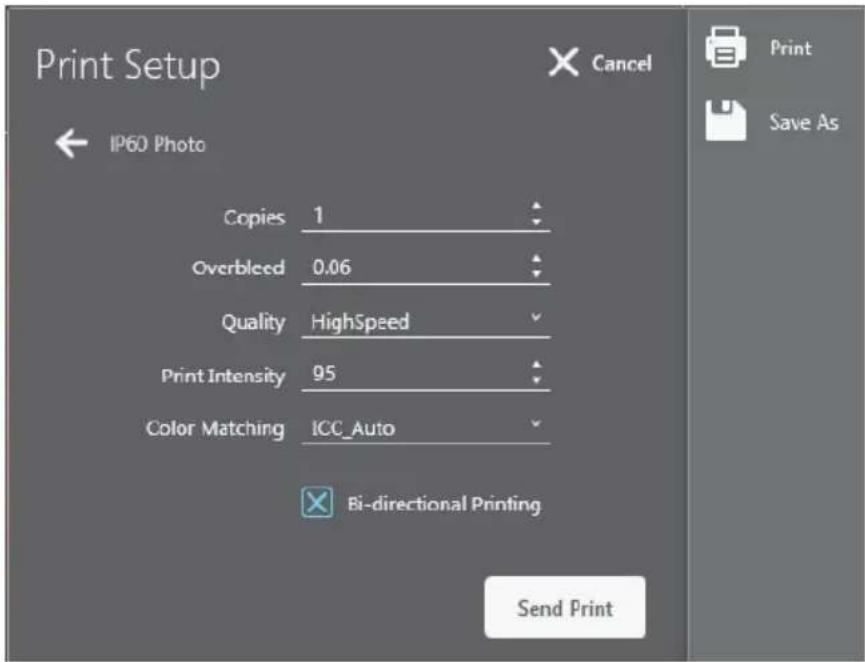
When printing from other programs, you will have slightly different options and may be presented with the following screen. You can adjust the default print settings by going to: Control Panel – Devices and Printers. Then right click on "IP60 Photo" and choose printing preferences.
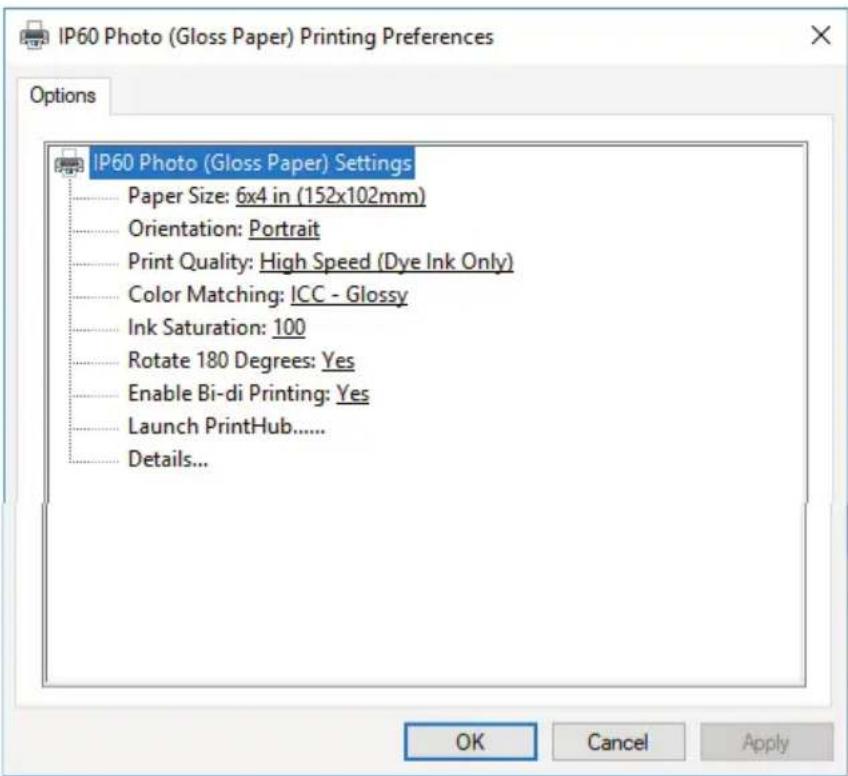
Below is a description of each of the print settings.
- Paper Size. Select from one of the various preset standard sizes or choose "Custom" to manually enter the size. The sizes that indicate + "Overbleed" have a .06" overbleed added to the displayed size. In Primera Snap, the size setting is chosen during the image setup, so it is not available on the settings screen when printing. The following sizes are available: 6x2, 6x4, 6x4.5, 6x6, 6x8, 6x8.5, 6x10, 6x12, 6x18 and 6x24.
- Orientation. The orientation can be set to landscape or portrait. In Primera Snap, the orientation setting is chosen during the image setup, so it is not available on the settings screen when printing.
- Print Quality. There are three quality modes available:
High Speed (Dye Ink Only) - Default Setting All samples printed, quoted print times, and costs-per-print are based upon this settings. This is generally the ONLY print mode that most people will ever use. It's fast, produces excellent print quality, and uses less ink than Better and Best modes. (2 passes per 3/4" of printing)*
Better (Dye or Pigment) - This setting is intended for use with pigment ink. It's slower and uses more ink than High Speed mode. Since pigment ink does not spread out as much as dye when it contacts the paper, pigment ink needs more passes which results in slower printing. Pigment ink has archival performance, so these prints are intended for sale at higher prices. Although dye ink can be used with this setting, not much of an improvement in quality can be seen. (4 passes per 3/4" of printing)*
Best (Dye or Pigment) - This setting is intended for use with pigment ink. It's slower and uses more ink than High Speed and Better modes. Since pigment ink does not spread out as much as dye when it contacts the paper, pigment ink needs more passes which results in slower printing. Pigment ink has archival performance, so these prints are intended for sale at higher prices. Although dye ink can be used with this setting, not much of an improvement in quality can be seen. (8 passes per 3/4" of printing)*
*A pass is one movement of the print cartridge from the left-to-right or right-to-left. In bidirectional mode the cartridge prints from both the right side and the left side.
• Color Matching. The color matching options should generally be set to match the currently-installed photo paper. The default option is ICC (International Color Consortium) Auto Select which will automatically read the currently- installed paper and set the color matching to that setting. If you do not like the look of the photo being printed, you may change to any of the listed options. There are six options:
o None – No color matching is used
o Vivid Photos - Non-ICC color matching option which uses more ink but may provide a more vibrant print than ICC modes.
o ICC Auto Select - Auto selects based on currently-installed paper
o ICC - Glossy – Profile matched to Primera Glossy paper
o ICC - Luster – Profile matched to Primera Luster paper
o ICC Repositionable Luster - Profile matched to Primera Repositionable Luster paper
- Ink Saturation. The ink saturation can be adjusted to lighten or darken a photo without changing the quality/speed of the print. The default is 85%.
- Rotate 180 Degrees. Set to "Yes" to print portrait photos right-side-up when viewing the printer from the front.
- Enable Bi-di Printing. Set to "Yes" to print during both right and left movements of the print cartridge. "Yes" will print fastest. Set to "No" to possibly increase quality. "No" will print slower.
- Launch PrintHub. Click this setting to open PrintHub.
- Details. Click this setting to view the driver version, firmware version, total printed photos on the printer, view various printer calibration settings, and view or reset the print counter.
C. ADJUSTING PRINT ALIGNMENT AND CUT STRIP SIZE
You may need to adjust print alignment if you see white space on any side of the printed photo. Adjust print alignment using PrintHub. Go to the Print Alignment tab (second tab).
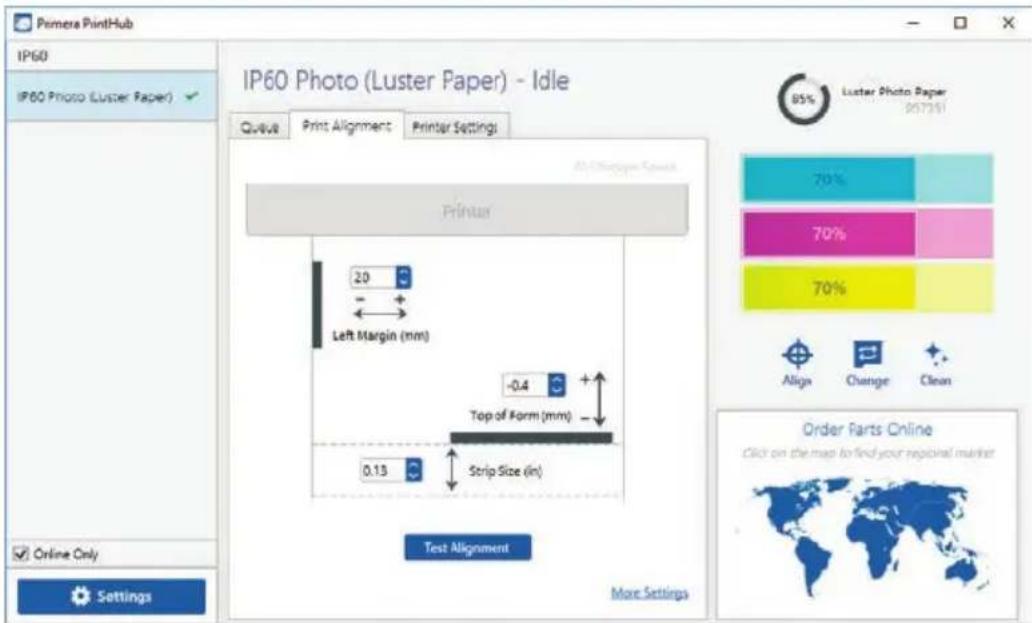
Important Note! Before adjusting any values, print the test print to see how close you are to alignment. The on-screen graphic matches the print, which makes it easier to adjust these values.
Three items can be adjusted here:
- Left Margin Offset. This value moves the printed photo left or right. Add to the current value to move the printed photo to the right. Subtract from the current value to move the printed photo to the left.
Note: Before adjusting this value, make sure the label stock is properly loaded. It is important that the paper is aligned with the pinch rollers. See Section 2B.
- Top of Form (TOF). This value moves the print start position up or down on the paper. Add to the current value to move the printed photo up, or toward the printer. Subtract from the current value to move the printed photo down, or away from the printer. The value is automatically saved as soon as you set it.
- Strip Size. This value adjusts the size of the strip cut from between photos. Increase the size to reduce curling of the strips, if necessary, to allow them to stack neatly and pack tightly in the cut waste bin. Reduce the size to reduce the amount of photo paper wasted per print. The default size is .12".
You may have to make several adjustments to one or more of these values. After each adjustment you can click the Test Alignment button to print a small test pattern on the photo. This will help you enter the correct alignment value.
Finally, it is also possible to remove white space around the photo by increasing the overbleed in Print Setup right before printing when printing from Primera Snap. However, it is best to overbleed as little as possible to avoid ink waste and to minimize the rate at which ink is collected by the air filtration system.
Section 5: Printing from a Mac
(Coming Soon)
Section 6: Troubleshooting and Maintenance
A. SOLVING PRINT QUALITY PROBLEMS
Many factors can affect the quality of a print. The following are listed in order from most likely to least likely:
- Quality Setting. There are three printer settings which can affect quality. (Section 4B)
- Print Quality - Increase to Better or Best.
- Color Matching - Set to Vivid for Best Quality
- Enable Bi-di Printing - Set to "No" for Best Quality
-
Clean the Ink Cartridge. Run an automatic cleaning print from PrintHub, or manually clean the ink cartridge as described in Section 6B.
-
Change the Ink Cartridge. Try a new ink cartridge. Make sure that the cartridge has ink remaining. Check the ink levels via the PrintHub or Printer Utility (Mac).
-
Align Print Head. Normally, print head alignment is only necessary after changing an ink cartridge. However, in certain cases, running the alignment again can improve print quality. Align the print head by opening PrintHub or Printer Utility (Mac). Click on the Align Print Head icon below the ink levels. Follow the onscreen prompts to load your paper for alignment.
-
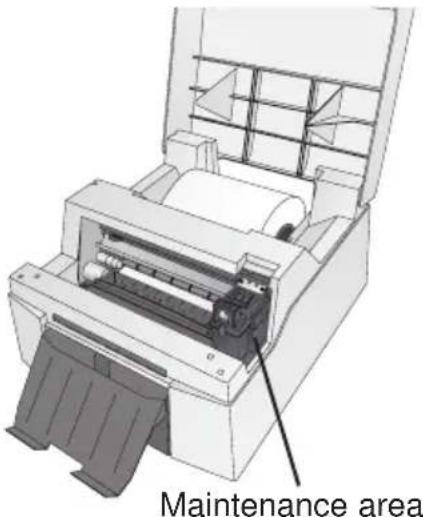
Clean the Maintenance Area. Power off the printer! Gently move the cartridge to the left to access the maintenance area. This includes the rubber cartridge nozzle cap and the plastic roller. Under normal use this can become dirty with ink. Clean with a paper towel dampened with rubbing alcohol.
-
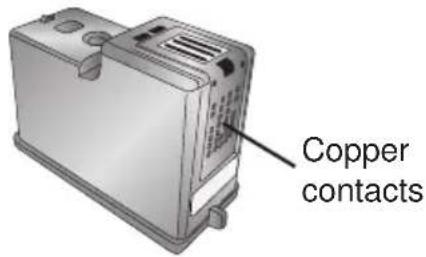
Copper Contacts. Clean the copper contacts on the back of the cartridge carrier and the corresponding contacts on the ink cartridge with a paper towel dampened with rubbing alcohol.
-
Image Resolution (DPI). Try another image. Perhaps the resolution of the current image is not sufficient for a quality print. We recommend a 300 DPI image. Images less than 150 DPI may print pixelated.
-
Cable. Try another USB cable. Make sure that it is less than 6 feet (2 meters) long. Faulty cables or cables that are too long interrupt communications which can result in print quality issues.
B. POOR PRINT QUALITY - CLEANING THE INK CARTRIDGE
It may be necessary to clean the ink cartridge nozzles if you notice poor print quality, or if you suspect a cartridge nozzle has become slightly dried out or clogged. If the cartridge has been left out of the printer for more than 30 minutes, the ink in the print head nozzles may have dried. If you are having print quality problems, follow the steps below to clean the cartridge.
-
Before moving on to the next step, ensure that the ink level of the cartridge is more than 10%. If the ink level is lower than 10%, replace the cartridge.
-
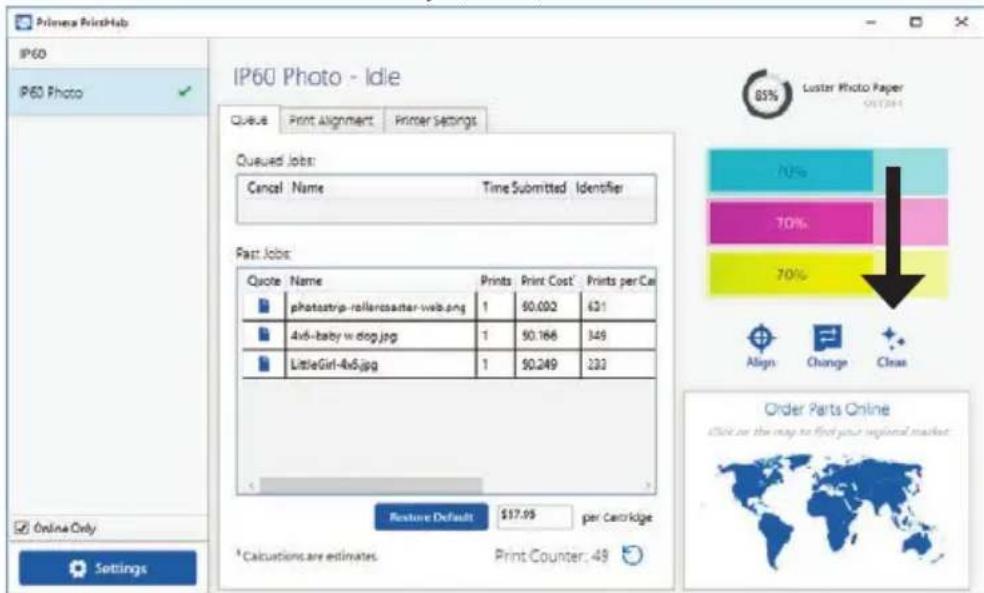
Try cleaning the ink cartridge using the clean function in PrintHub or Printer Utility (Mac).
- Determine if printing is now acceptable by printing your image.
If the print has missing colors or voids, remove the ink cartridge from the printer and proceed to step 4.
- Prepare items needed for procedure.
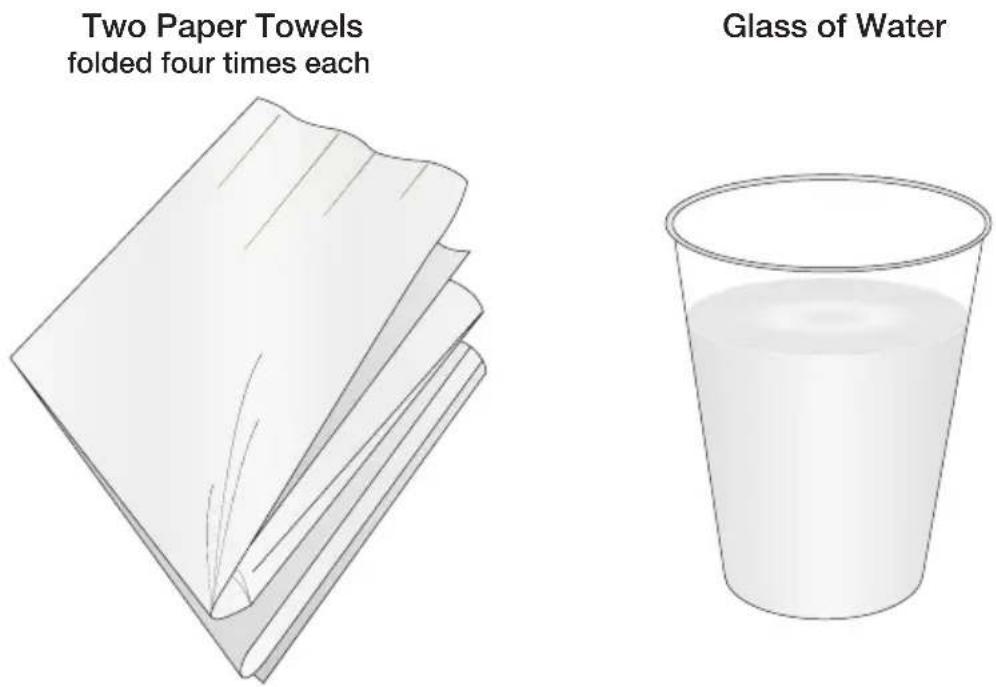
- Soak the paper towels in water for 5 seconds.
Note: Do not squeeze water from paper towels after removing from water.
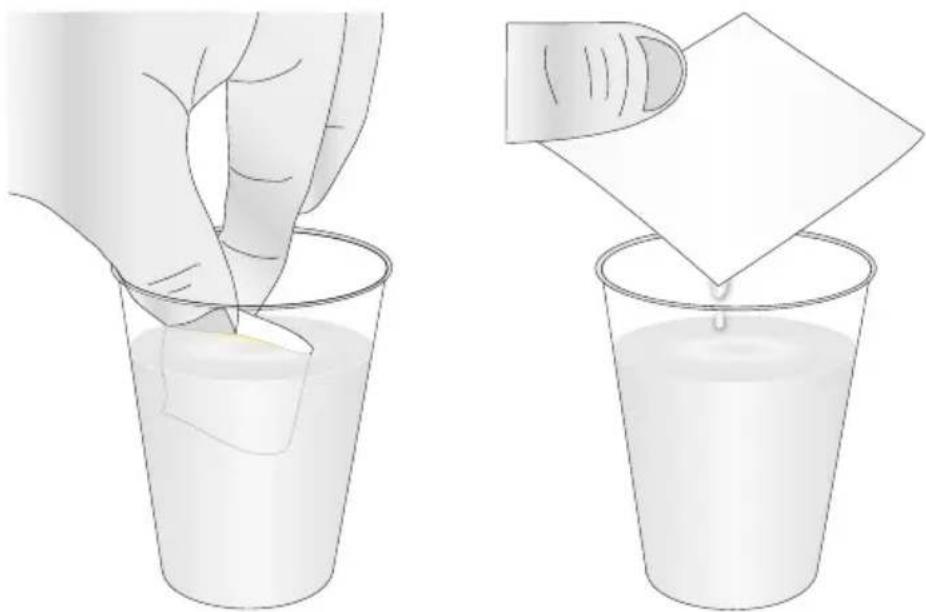
natural_image
Illustration of two steps in a glass beaker: adding liquid into a container and pouring liquid from a paper (no text or symbols)- Place one paper towel on ink cartridge nozzles. Gently press the paper towel with your finger. Leave the paper towel on the nozzles for 30-40 seconds.
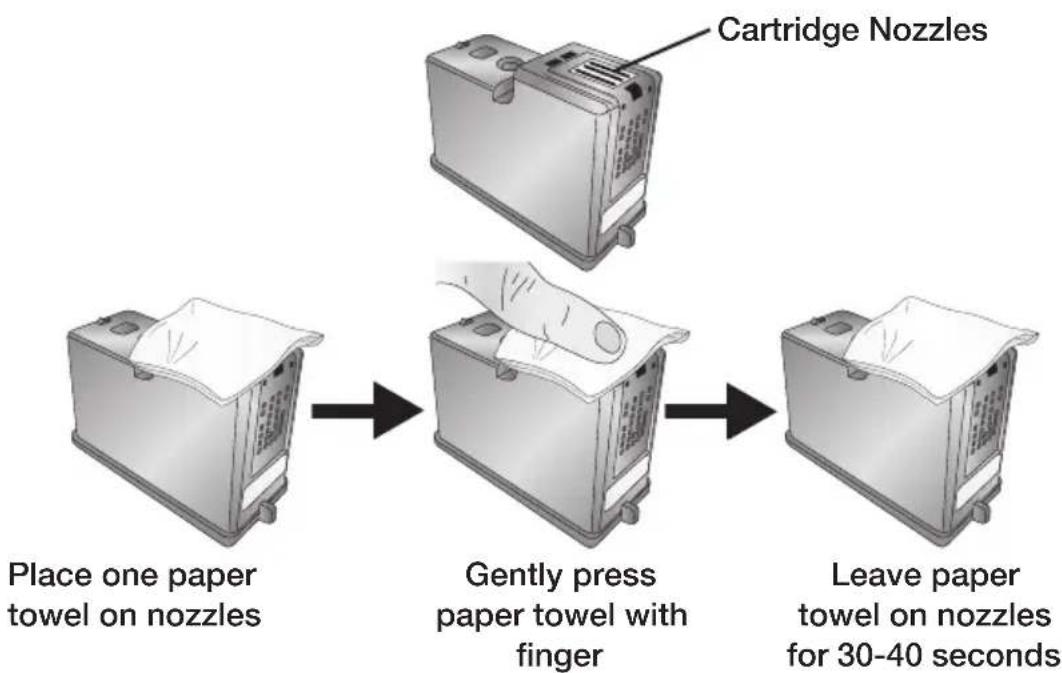
flowchart
graph LR
    A["Place one paper towel on nozzles"] --> B["Gently press paper towel with finger"]
    B --> C["Leave paper towel on nozzles for 30-40 seconds"]
    D["Cartridge Nozzles"] --> A
- Wipe nozzles.
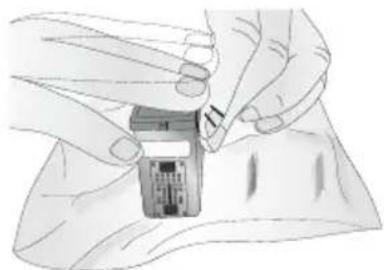
natural_image
Illustration of hands installing or adjusting a small electronic component (no text or symbols visible)A. Place a second damp paper towel on flat/hard surface.
B. Press the nozzles into the paper towel.
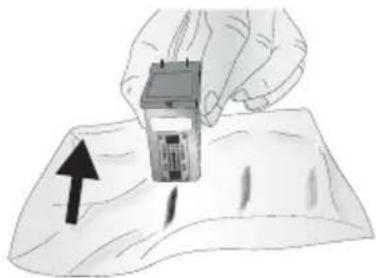
C. Firmly tap the top of the cartridge three times to force the ink out.
natural_image
Illustration of a hand holding a small electronic device over a printed surface with an upward arrow (no text or symbols)D. Wipe/Drag the cartridge in the direction indicated.
E. Repeat until all colors are seen on the paper towel.
natural_image
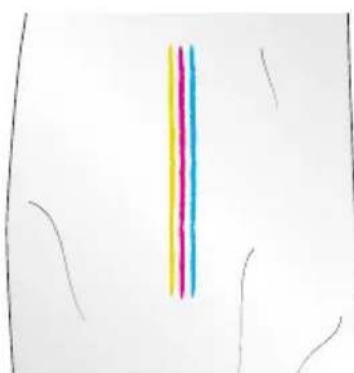
Simple line drawing of a vertical strip with two parallel lines, no text or symbols presentAfter wiping the nozzles, the paper towel should show all three colors.
If all three colors are present, proceed to step 8.
If the paper towel doesn't show all three colors, then repeat step 7.
If paper towel still doesn't show all three colors repeating step 7, then replace the cartridge.
- Dry the ink cartridge.
natural_image
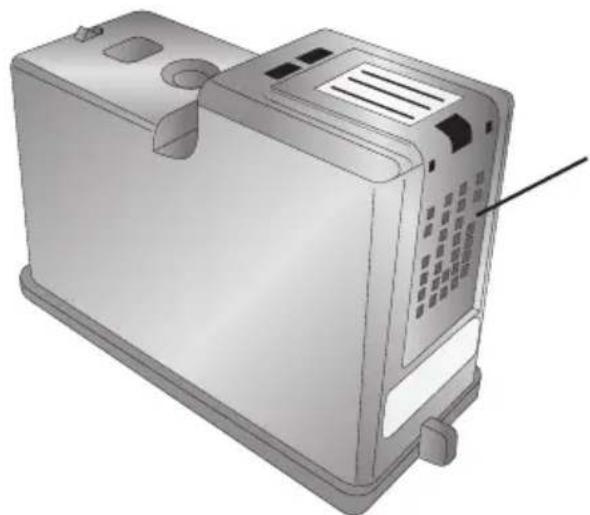
3D rendering of a rectangular electronic device with a control panel and ventilation slots (no visible text or symbols)Dry excess water from cartridge. Ensure cartridge contacts are completely dry. Printer damage may result if cartridge contacts are not completely dry.
- Verify the ink cartridge is now functioning properly by printing your image.
C. INTERPRETING THE PRINTER'S INDICATOR LIGHTS
Most error messages will appear on your computer screen via the PrintHub application or the Printer Utility (Mac). However, if the error prevents communication with the computer, the LED lights may be used to help diagnose the problem.
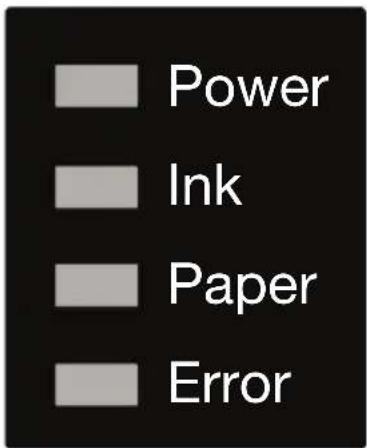
- Power. The Power LED will illuminate when the printer is plugged in and power is switched on. It will flicker when it is processing or printing a job. - Ink. The Ink LED will illuminate when the ink is low. The LED will flash when no ink cartridge is detected.
• Paper. The Paper LED will illuminate when there is no paper loaded into the feed area. The Paper LED will flash when no roll of paper is detected.
- Error. The Error LED will flash in any error condition.
D. SOLVING PAPER FEED ALIGNMENT PROBLEMS
If the paper is not feeding straight through the printer, please check the following items:
- Be sure to load the paper according to Section 2B.
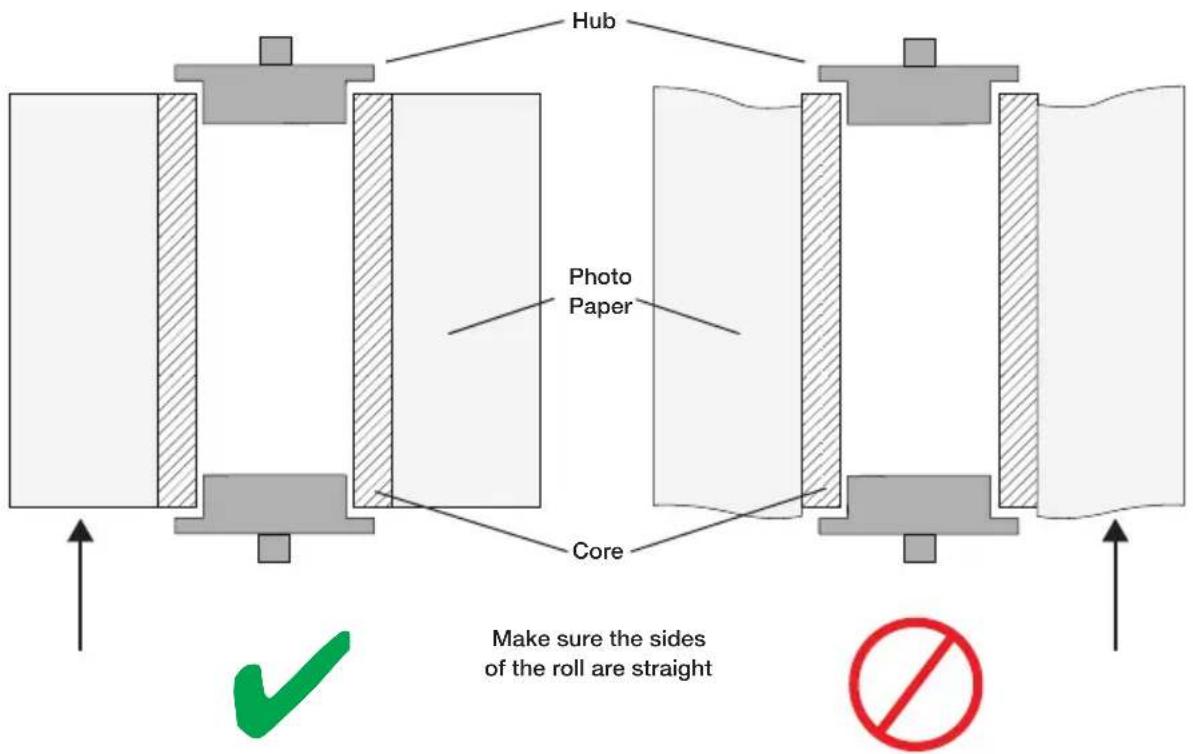
- Make sure that the side of the paper roll is straight before you load the paper. See the diagram below. Sometimes the paper will move during shipping or handling and create a "cone" which must be straightened by hand before loading the paper.
Side Cut Away of Photo Paper Roll
E. PRINTER MAINTENANCE
Every 25 ink cartridges it is necessary to replace the internal ink filters. To replace the ink filters follow these instructions:
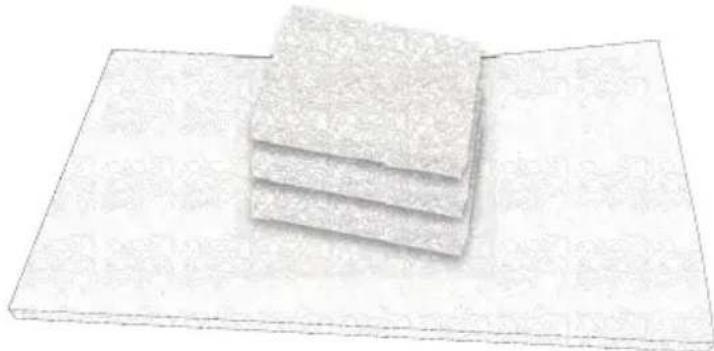
- Purchase the IP60 Ink Filter Replacement Kit. SKU 57342 The kit contains 3 small filters and 1 large pad.
natural_image
Stacked rectangular sheets on a flat surface, no text or symbols visible- Remove the photo paper from the IP60. Remove the photo tray and the cut waste bin.
- Switch off the printer and remove the power cable.
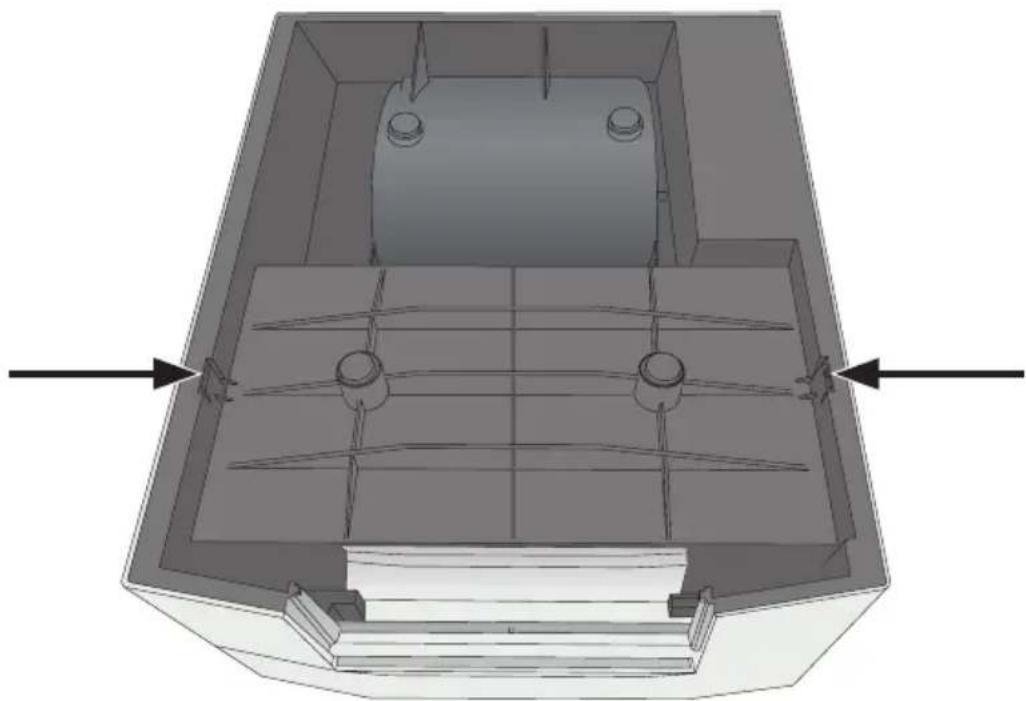
- Turn the printer over so the bottom is facing up. While you turn the printer over, hold the cover closed so that it does not fall open.
natural_image
3D technical diagram of a mechanical housing or enclosure with internal components and mounting holes (no text or symbols)-
Press the locking tabs inward on both the left and right side inward slightly, one at a time, while lifting upward on the tray. Remove tray.
-
Turn the ink filter tray over and set it on a table.

natural_image
Simple 3D rectangular block with a black border, no text or symbols present-
Remove the large ink pad. Replace it with the new pad. Press the pad around the edges to completely seat the pad in the tray. You may wish to use rubber gloves to handle the used ink pads and filters.
-
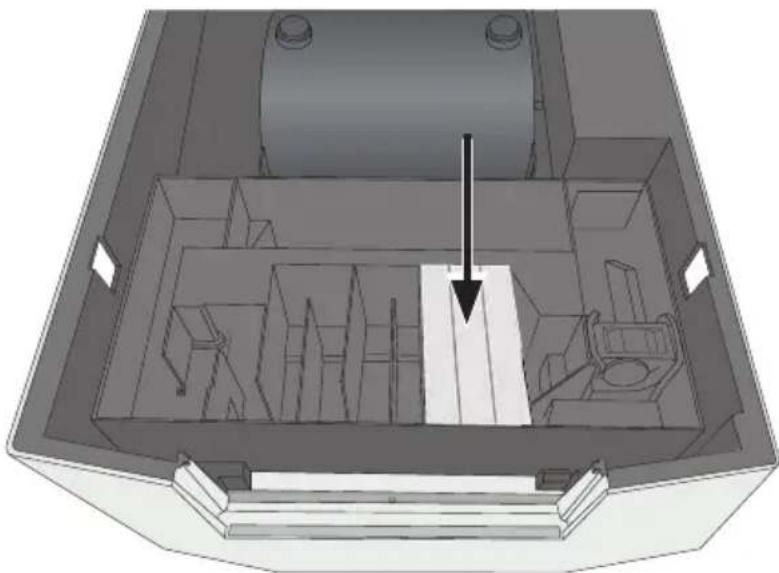
Now remove the used filters from the printer. On the bottom of the printer you will see three ink filters stacked next to each other. Remove these and discard them.
natural_image
3D technical diagram of a mechanical assembly with internal compartments and a central component (no text or symbols)-
Insert the new filters. All three should be installed together. The longer edge should be facing down and toward the front of the printer.
-
Replace the ink pad tray. Push down near each tab until you hear a click. The orientation of the tray is not important.
-
Turn the printer right side up.
F. TECHNICAL SUPPORT
If you have difficulties in operating your printer, the procedures in this manual and the software User's Guide should, in most cases, solve the problem. If you still have difficulty, contact Technical Support using one of the methods listed below.
| Source | Location |
| Primera Knowledge Base www.primera.com/kb | |
| Email Support www.primera.com/customer-support | |
| Phone Support 763-475-6669 (Mon - Fri 8 a.m. - 6 p.m CST) | |
| Chat Support www.primera.com - look for the chat prompt on lower right |
Section 7: Technical Specifications
Print Method: Thermal inkjet
Print Resolutions: Up to 4800 DPI
Print Speeds: 2x6: 3.5 seconds
4x6: 7 seconds
6x8: 14 seconds
6x12: 21 seconds
6x24: 42 seconds
Print Head: New print head with every ink cartridge change
Ink Tanks: Single high-capacity Cyan, Magenta, Yellow ink cartridge; process black (Part Number 53494)
Colors: 16.7 million
Color Matching: ICC color profiles for all Primera-supplied media. Ability to add custom ICC color profiles for other media types.
Max. Print Width: 6" (152.4 mm)
Media Types: Roll-fed pressure-sensitive paper and adhesive-backed paper
Media Sensing: Fixed see-through sensor for detecting media presence.
Supply Roll: 3" (76mm) core with Smart Chip.
Ink Level Warning: Calculates actual number of prints remaining based upon ink usage of graphics being printed (patent pending)
Indicator Lights: Power, Ink, Paper, Error
Operating Systems: Window 7, 8, 10, Mac OS X 10.9+ (coming soon)
Data Interface: USB 2.0
Printing Software: Primera Snap (included); Can also be used with most other popular label design and graphics programs
Electrical Rating: 12VDC, 5.0A
Power Requirements: 100-240VAC, 50/60 Hz, 60 watts
Certifications: UL, UL-C, CE, FCC Class A
Weight: 8 lbs. (3.6 kg)
Dimensions: 12.7"W x 8.31"H x 15.07"D
(323mmW × 211mmH × 383mmD)
Index
Align Print Head....33
Alignment Tab....30
Color Matching....26, 29, 43
Cost....15, 16
Cost Estimator....16
Crop 21, 24
DPI 34
Error LED....3, 38
Ink LED 3,38
Ink Low Warning....18
Ink Saturation....29
Installing Photo Paper......10
Left Margin Offset 30
Orientation....22, 28
Overbleed....26
Panoramic 8,25
Paper LED....3, 38
Paper Size....28
Print Alignment 30
Print Quality....18, 28, 33, 34
Printing....21
Resolution....34

- Impressa® IP60
- Digital Photo Printer
- Printing History
- Product Disposal
- Battery Notice
- WARNING
- CAUTION!
- Interactive Feature in this PDF Document
- Table of Contents
- Section 1: Getting Started....1
- Section 2: Photo Paper......8
- Section 3: Primera PrintHub (PC)....15
- Section 4: Printing from a PC ....21
- Section 5: Printing from a Mac ....32
- Section 6: Troubleshooting and Maintenance....33
- Section 7: Technical Specifications....43
- Index 44
- Section 1: Getting Started
- THANK YOU...
- CHOOSING A GOOD LOCATION
- TRANSPORTING THE PRINTER
- UNPACKING AND INSPECTION
- IDENTIFYING THE PARTS
- INSTALLING/REMOVING THE PHOTO TRAY
- INSTALLING/REMOVING THE CUT WASTE BIN
- Section 2: Photo Paper
- PAPER AND ROLL SPECIFICATIONS
- INSTALLING PHOTO PAPER
- REMOVING A ROLL OF PAPER
- Section 3: Primera PrintHub (PC)
- MONITORING INK LEVELS
- USING THE COST ESTIMATOR
- REPLACING INK CARTRIDGES / INK LOW WARNING
- Section 4: Printing from a PC
- PRINTING FROM PRIMERA SNAP
- Overview
- Orientation/Print Direction
- Cropping Images
- Printing other sizes
- Printing from Primera Snap
- PRINTER SETTINGS
- ADJUSTING PRINT ALIGNMENT AND CUT STRIP SIZE
- Section 5: Printing from a Mac
- Section 6: Troubleshooting and Maintenance
- SOLVING PRINT QUALITY PROBLEMS
- POOR PRINT QUALITY - CLEANING THE INK CARTRIDGE
- INTERPRETING THE PRINTER'S INDICATOR LIGHTS
- SOLVING PAPER FEED ALIGNMENT PROBLEMS
- PRINTER MAINTENANCE
- TECHNICAL SUPPORT
- Section 7: Technical Specifications
- Index
Brand : PRIMERA
Model : Impressa IP60
Category : Printer