
WMicS1 - Microphone GODOX - Free user manual and instructions
Find the device manual for free WMicS1 GODOX in PDF.


| Product Type | Wireless Microphone System |
| Brand | Godox |
| Model | WMicS1 |
| Frequency Range | 2.4 GHz |
| Transmission Range | Up to 100 m (line of sight) |
| Audio Output Connector | 3.5 mm TRS |
| Power Supply | Built-in lithium-ion battery |
| Battery Life | Approximately 4-6 hours |
| Charging Port | USB-C |
| Charging Time | Approximately 2 hours |
| Dimensions (Transmitter) | 60 x 40 x 16 mm |
| Weight (Transmitter) | 30 g |
| Dimensions (Receiver) | 60 x 40 x 16 mm |
| Weight (Receiver) | 30 g |
| Operating Temperature | 0°C to 40°C |
| Included Accessories | Lavalier microphone, USB charging cable, windscreen, belt clip, carrying case |
| Maintenance | Clean with a soft, dry cloth. Avoid exposure to moisture and extreme temperatures. |
| Safety | Do not disassemble. Keep away from water and heat sources. Use only specified charger. |
| Spare Parts and Repairability | Battery is non-removable. Internal components are not user-serviceable. Contact Godox service center for repairs. |
| Intended Use | Wireless audio recording for cameras, smartphones, and audio recorders |
Frequently Asked Questions - WMicS1 GODOX
User questions about WMicS1 GODOX
0 question about this device. Answer the ones you know or ask your own.
Ask a new question about this device
Download the instructions for your Microphone in PDF format for free! Find your manual WMicS1 - GODOX and take your electronic device back in hand. On this page are published all the documents necessary for the use of your device. WMicS1 by GODOX.
USER MANUAL WMicS1 GODOX
UHF Wireless Microphone System
深圳市神牛摄影器材有限公司
GODOX Photo Equipment Co., Ltd.
Add: Building 2, Yaochuan Industrial Zone, Tangwei Community, Fuhai Street, Bao'an District, Shenzhen 518103, China
Tel: +86-755-29609320(8062) Fax: +86-755-25723423 E-mail: godox@godox.com
Made In China
CE CE RoHS ☐
godox.com
natural_image
Line drawing of a Kodax radio station with two antennas and control buttons (no text or symbols on device body)Instruction Manual | 说明手册
Chinese English Bilingual | 中英文双语
前言
- 天线
2.3.5mm 音频线输入接口
- Power 指示灯
绿灯:电量充足
- 红灯:电量低,需更换电池
-
电源 / 静音键
-
菜单键
-
麦克风输入接口
-
Audio 指示灯
-绿灯:拾音模式
- 红灯:静音模式
-
OLED 显示屏
-
菜单 +
-
菜单 -
- 天线
2.3.5mm音频线输出接口
- Power 指示灯
-绿灯:电量充足
- 红灯:电量低,需换电池
-
电源 / 返回键
-
菜单链
-
3.5mm 耳机监听接口
-
RF 指示灯
- 绿灯:RF 信号强
- 红灯:RF 信号弱或已断开
Thank you for purchasing UHF Wireless Microphone System — WMicS1. These products are suitable for video recording, journalistic shooting, audio recording, etc. Please read this manual carefully before using to make sure the correct operation and exert the optimum function.
Features:
- UHF Frequency Range: 514MHz-596MHz. There are 96 wireless channels which can be freely switched without interference
• High and stable sound quality like broadcast
• The maximum wireless distance up to 100m - With OLED display to show the parameters setting
- Achieve real-time monitoring with 3.5mm earphone
- With output volume control and silence function
• The power of transmitter is adjustable - Support two transmitters and one receiver to work simultaneously
- Two power supply mode
Warning
Do not disassemble. Should repairs become necessary, this product must be sent to an authorized maintenance center.
△ Always keep this product dry. Do not use in rain or in damp conditions.
⚠️ Keep out of reach of children.
Do not use the flash unit in the presence of flammable gas. In certain circumstance, please pay attention to the relevant warnings.
Do not leave or store the product if the ambient temperature reads over 40^ C.
△ Turn off the flash trigger immediately in the event of malfunction.
△ Observe precautions when handling batteries.
- Use only batteries listed in this manual. Do not use old and new batteries or batteries of different types at the same time.
- Read and follow all warnings and instructions provided by the manufacturer.
- Batteries cannot be short-circuited or disassembled.
- Do not put batteries into a fire or apply direct heat to them.
- Do not attempt to insert batteries upside down or backwards.
- Batteries are prone to leakage when fully discharged. To avoid damage to the product, be sure to remove batteries when the product is not used for a long time or when batteries run out of charge.
- Should liquid from the batteries come into contact with skin or clothing, rinse immediately with fresh water.
Content
Forward 10
Warning 11
Content 12
Names of Parts 13
Included Item 15
Recommended Combination 16
Power Supply 16
Operation Instruction 16
Technical Data 19
Troubleshooting 20
Maintenance 20
Names of Parts
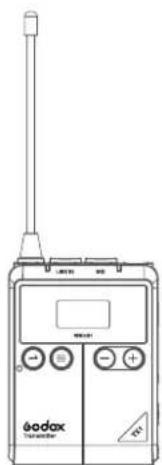
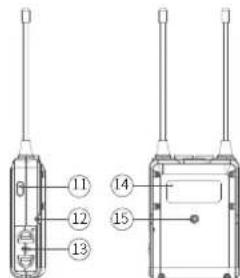
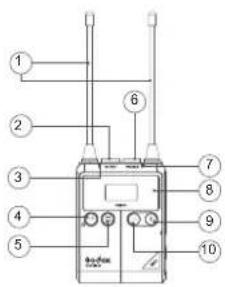
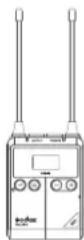
Body-pack Transmitter (TX1)
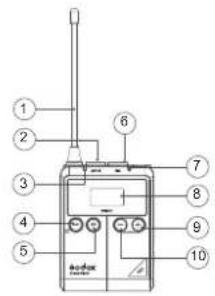
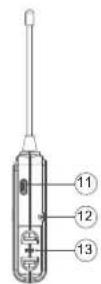
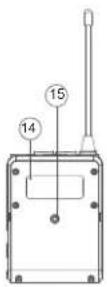
- Antenna
- 3.5mm Audio Line In Port
- Power Indicator -Green light: full battery level -Red light: Low battery level, replace the batteries
- Power Source/Mute Button
-
Menu Button
-
MicrophoneInput Port
- Audio Indicator
-Green light: Sound
directivity mode
-Red light: Silent mode - OLED Display
- Menu +
-
Menu -
-
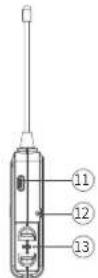
Type-C USB Port
- Metal Clip Port
- Battery Holder (-2x AA Battery)
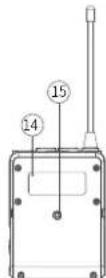
- Product Label
- 1/8"Shoe Mount Port
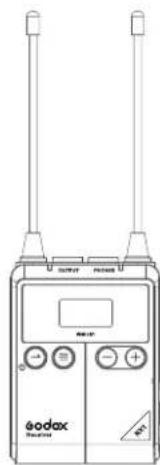
Portable Receiver (RX1)
- Antenna
- 3.5mm Audio Output Port
- Power Indicator -Green light: full battery level -Red light: Low battery level, replace the batteries
- Power Source/Mute Button
- Menu Button
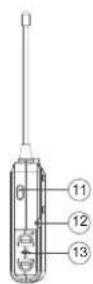
- 3.5mm Earphone Monitoring Port
- RF Indicator -Green light: Strong RF signal -Red light: Week or disconnected RF signal
- OLED Display
- Volume +/Menu +
-
Volume -/Menu -
-
Type-C USB Port
- Metal Clip Port
- Battery Holder (-2x AA Battery)
- Product Label
- 1/8"Shoe Mount Port
OLED Display: OLED Display:
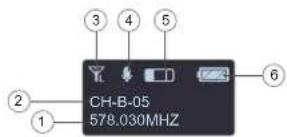
- Communication Frequency
- Wireless Group and Channel
- Transmitting Power Icon
- Silence Icon
- Input Volume Indicator
- Battery Level Indicator
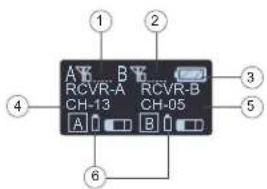
- A Group Frequency Signal
- B Group Frequency Signal
- Battery Level Indicator
- A Group Receive Channel
- B Group Receive Channel
- Transmitter's Battery Level and Volume
Included Item
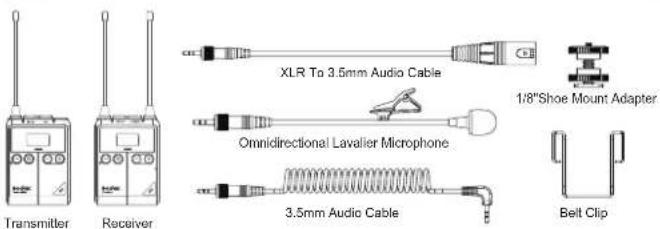
| Name Model Included Items | ||
| Body-pack Transmitter TX1 | Transmitter x1 Belt Clip x1Omnidirectional LavalierMicrophone×1 | |
| Portable Receiver RX1 | Receiver x1 Belt Clip x13.5mm Audio Cable×1XLR To 3.5mm Audio Cable×11/8"Shoe Mount Adapter x1 | |
| UHF Wireless MicrophoneSystem Kit 1 | WMlcS1Kit 1 | Transmitter x1Receiver x1 Belt Clip x2Omnidirectional LavalierMicrophone×13.5mm Audio Cable×1XLR To 3.5mm Audio Cable×11/8"Shoe Mount Adapter x1 |
| UHF Wireless MicrophoneSystem Kit 2 | WMicS1Kit 2 | Transmitter x2Receiver x1 Belt Clip x3Omnidirectional LavalierMicrophone×23.5mm Audio Cable×1XLR To 3.5mm Audio Cable×11/8"Shoe Mount Adapter×1 |
Recommended Combination
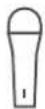
Wireless Handheld Microphone
Transmitter WH-M1
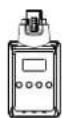
Plug-On XLR Transmitter TX3-XLR
Power Supply
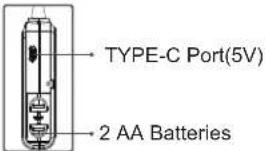
There are two modes of power supply
Operation Instruction
Transmitter Setting
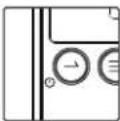
- Power on/off: Long press the power switch for 2 seconds to power it on or off. Short press the power switch to make it silent.
- GRP/CH/RF Setting: Long press the menu button to enter the setting interface. Then, short press the menu button to switch the next setting.
- GRP Group setting: Choose GRP and press +/- to choose A or B group.
- CH Channel setting: Choose CH and press +/- to set channel from 01 to 48.
- RF Power setting: Choose RF power to switch H/L power.
- Display brightness setting: short press +/- button until OLED light is displayed on the panel. Then, long press the menu button to choose the corresponding brightness level of OLED light. Short press +/- button to choose brightness from 1 to 8 levels.
- Software version: short press +/- button until Version is displayed, which means the version of software.
- Backlighting time: Short press +/- until Back Light is displayed on the LCD panel. Then, long press the menu button and the backlighting time will be blinking. Short press the +/- button to choose backlighting time: ON means lighting and OFF means off. Delay10S/30S/60S.
- Restore factory settings: short press the +/- button until Restore Default is displayed. Then, long press the menu button to restore factory settings.
Receiver Setting
- The setting methods of power on&off/GRP/CH is the same as transmitter. Set the receiver's group and channel to the same as the transmitter's to record sound.
- Display brightness setting: short press +/- button until OLED light is displayed on the panel. Then, long press the menu button and the corresponding brightness value of OLED light will be blinking. Short press +/- button to choose brightness from 1 to 8 levels.
• Output mode: there are Stereo mode and Mono mode.
Short press +/- button to enteroutput mode. Then, long pressthe menubutton to switch the two channels. When in Monochannel output, the sound of left channel and right channel will be output simultaneously. When in Stereo channel output, the sound of left channel(A group) and right channel(B group) will be output independently. The default channel of this system is Mono channel.
- Software version: short press +/- button until Version is displayed, which means the version of software.
- Backlighting time: Short press +/- until Back Light is displayed on the LCD panel. Then, long press the menu button and the backlighting time will be blinking. Short press the +/- button to choose backlighting time: ON means lighting and OFF means off. Delay10S/30S/60S.
- Restore factory settings: short press the +/- button until Restore Default is displayed. Then, long press the menu button to restore factory settings.
Transmitter Port
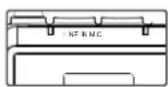
LINE IN: To connect with external audio signal input.
MIC: To connect with lavalier microphone.
Receiver Port
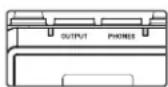
OUTPUT: To connect with external audio signal output.
PHONES: To connect with earphone cable.
Technical Data
| Name Body-pack | Transmitter TX1 | PortableReceiver RX1 | ||
| Channel Group | A/B | |||
| Selectable Channel | 96(Group A: 48; Group B: 48) | |||
| RF Frequency Range | 514MHz - 596MHz | |||
| Oscillator Type | Crystal Controlled Phase-Locked Loop Synthesizer | |||
| Audio Frequency Range | 40Hz-18KHz | |||
| Sound Delay | 12ms | |||
| Antenna | 1/4λ | |||
| Audio Input Port 3.5mm Port | ||||
| Power Supply | USB Port Type-C USB | |||
| Battery Two AA batteries | ||||
| Working Temperature Range | 0°C-40°C | |||
| Storage Temperature | -10°C-40°C | |||
| Signal Noise Ratio | ≈70dB | |||
| Receive Sensitivity \ -95dBm | ||||
| Distortion \ Below 0.5% | ||||
| Size 63*190*22mm 63*190*25mm | ||||
| Net Weight 70g 80g | ||||
-19--20-
Troubleshooting
- Unable to receive audio signal. Make sure batteries are installed correctly and Power Switch is turned on. Check if the transmitter and the receiver are set to the same channel, if the microphone or earphone is well connected, or if the devices are set to the correct mode.
- Check if the transmitter is set to silent mode or not.
- Signal disturbance or shooting interference. Change a different channel of the transmitter and receiver.
- Operating audio distance limited or signal missing. Check if batteries are exhausted. If so, replace them.
Maintenance
Avoid sudden drops. The device may fail to work after strong shocks, impacts, or excess stress.
Keep dry. The product isn't water-proof. Malfunction, rust, and corrosion may occur and go beyond repair if soaked in water or exposed to high humidity.
Avoid sudden temperature changes. Condensation happens if sudden temperature changes such as the circumstance when taking the transmitter and receiver out of a building with higher temperature to outside in winter. Please put the transmitter and receiver in a handbag or plastic bag beforehand.
Keep away from strong magnetic field. The strong static or magnetic field produced by devices such as radio transmitters leads to malfunction.
This product, except consumables e.g. lapel microphone, is supported with a one-year warranty.
Unauthorized service will void the warranty.
If the product had failures or was wetted, do not use it until it is repaired by professionals.
Changes made to the specifications or designs may not be reflected in this manual.
Brand : GODOX
Model : WMicS1
Category : Microphone