
SmartClean 2274N - Vacuum Cleaner BISSELL - Free user manual and instructions
Find the device manual for free SmartClean 2274N BISSELL in PDF.


User questions about SmartClean 2274N BISSELL
0 question about this device. Answer the ones you know or ask your own.
Ask a new question about this device
Download the instructions for your Vacuum Cleaner in PDF format for free! Find your manual SmartClean 2274N - BISSELL and take your electronic device back in hand. On this page are published all the documents necessary for the use of your device. SmartClean 2274N by BISSELL.
USER MANUAL SmartClean 2274N BISSELL
natural_image
Line drawing of a robotic vacuum cleaner with control knob and base mount (no text or symbols)IMPORTANT SAFETY INSTRUCTIONS
READ ALL INSTRUCTIONS BEFORE USING YOUR ROBOT VACUUM.
When using an electrical appliance, basic precautions should always be followed, including the following:

WARNING
TO REDUCE THE RISK OF FIRE, ELECTRIC SHOCK, OR INJURY:
» Do not use outdoors or on wet surfaces.
» Do not allow to be used as a toy. Close attention is necessary when used by or near children.
» Do not use for any purpose other than described in this User's Guide. Use only manufacturer's recommended attachments.
» Do not charge with damaged cord or plug. If appliance is not working as it should, has been dropped, damaged, left outdoors, or dropped into water, have it repaired at a qualified technician.
» Do not pull or carry by cord, use cord as a handle, close a door on cord, or pull cord around sharp edges or corners. Do not run appliance over cord. Keep cord away from heated surfaces.
» Do not unplug by pulling on cord. To unplug, grasp the charger, not the cord.
» Do not handle charger, docking station or robot vacuum cleaner with wet hands.
» Do not put any object into openings. Do not use with any opening blocked; keep openings free of dust, lint, hair, and anything that may reduce air flow.
» Keep hair, loose clothing, fingers, and all parts of body away from openings and moving parts.
» Do not use to pick up flammable or combustible materials (lighter fluid, gasoline, kerosene, etc.) or use in areas where they may be present.
» Do not use in an enclosed space filled with vapors given off by oil base paint, paint thinner, some moth proofing substances, flammable dust, or other explosive or toxic vapors.
» Do not use to pick up toxic material (chlorine bleach, ammonia, drain cleaner, etc.).
» Do not pick up anything that is burning or smoking, such as cigarettes, matches, or hot ashes.
» Do not use without filter in place.
» Use only on dry, indoor surfaces.
» Keep appliance on a level surface.
» Do not carry the robot vacuum cleaner while it is running.
» Place the cords from other appliance out of the area to be cleaned.
» Do not operate the vacuum in a room where an infant or child is sleeping.
» Do not operate the vacuum in an area where there are lit candles or fragile objects on the floor to be cleaned.
» Do not operate the vacuum in a room that has lit candles on furniture that the vacuum may accidentally hit or bump into.
» Do not allow children to sit on the vacuum.
» Prevent unintentional starting. Ensure the switch is in the off-position before connecting to battery pack, picking up or carrying the appliance. Do not carry the appliance with your finger on the switch.
» Disconnect the battery pack from the appliance before making any adjustments, changing accessories, or storing appliance. Such preventive safety measures reduce the risk of starting the appliance accidentally.
» Recharge only with the charger specified by the manufacturer. A charger that is suitable for one type of battery pack may create a risk of fire when used with another battery pack.
» Use appliances only with specifically designated battery packs. Use of any other battery packs may create a risk of injury and fire.
» When battery pack is not in use, keep it away from other metal objects, like paper clips, coins, keys, nails, screws or other small metal objects, that can make a connection from one terminal to another. Shorting the battery terminals together may cause burns or a fire.
» Under abusive conditions, liquid may be ejected from the battery; avoid contact. If contact accidentally occurs, flush with water. If liquid contacts eyes, additionally seek medical help. Liquid ejected from the battery may cause irritation or burns.
» Do not use a battery pack or appliance that is damaged or modified. Damaged or modified batteries may exhibit unpredictable behavior resulting in fire, explosion or risk of injury.
» Do not expose a battery pack or appliance to fire or excessive temperature. Exposure to fire or temperature above 130 degrees C may cause explosion.
» Having servicing performed by a qualified repair person using only identical replacement parts. This will ensure that the safety of the product is maintained.
» For use only with battery pack.
» For use only with charger.
» Do not modify or attempt to repair the appliance or the battery pack.

WARNING
This product contains a Lithium Ion rechargeable battery. According to Federal and State regulations, removal and proper
disposal of Lithium Ion batteries is required. For disposal instructions see the instructions on page 6.

SAVE THESE INSTRUCTIONS
This model is for household use only.
WARNING
» Plastic film can be dangerous. To avoid danger of suffocation, keep away from children.
» Do not plug in your vacuum cleaner UNTIL you are familiar with all instructions and operating procedures.
» To reduce the risk of electrical shock, turn power switch off and disconnect polarized plug from electrical outlet BEFORE performing maintenance or troubleshooting checks.
Thanks for buying a BISSELL vacuum!
We love to clean and we're excited to share one of our innovative products with you. We want to make sure your vacuum works as well in one year as it does today, so this guide has tips on using (page 7-9), maintaining (pages 10-12), and if there is a problem, troubleshooting (page 13-14).
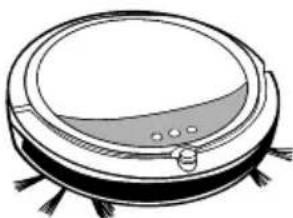
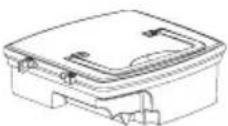
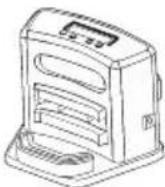
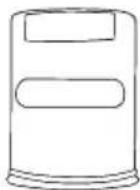
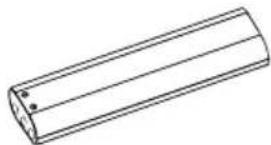
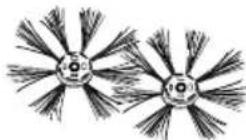
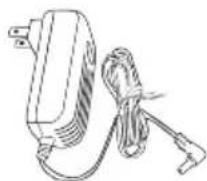
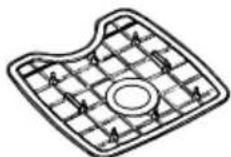
Package Contents
natural_image
Line drawing of a vacuum cleaner with control knob and mounting feet (no text or symbols)3.
5.
natural_image
Simple line drawing of a cylindrical object with two small holes, no text or symbols present.-
-
-
(Located inside Dust Bin) -
BISSELL SmartClean® Robotic Vacuum
-
Rechargeable Li-Ion Battery
-
Dust Bin
-
Edge Cleaning Brushes
-
Programmable Docking Station
6.PowerAdapter
-
Invisible Wall (4 AA batteries not included)
-
Filter
NOTE: Not all accessories come with every model. Be sure to check the carton for additional tools.
Safety Instructions.....2
Product View.....4
Assembly 5-6
Operations 7-9
Maintenance & Care ..... 10-12
Troubleshooting ..... 13-14
Warranty 15
Service 15
Product Registration ..... 16
Parts & Supplies ..... 16
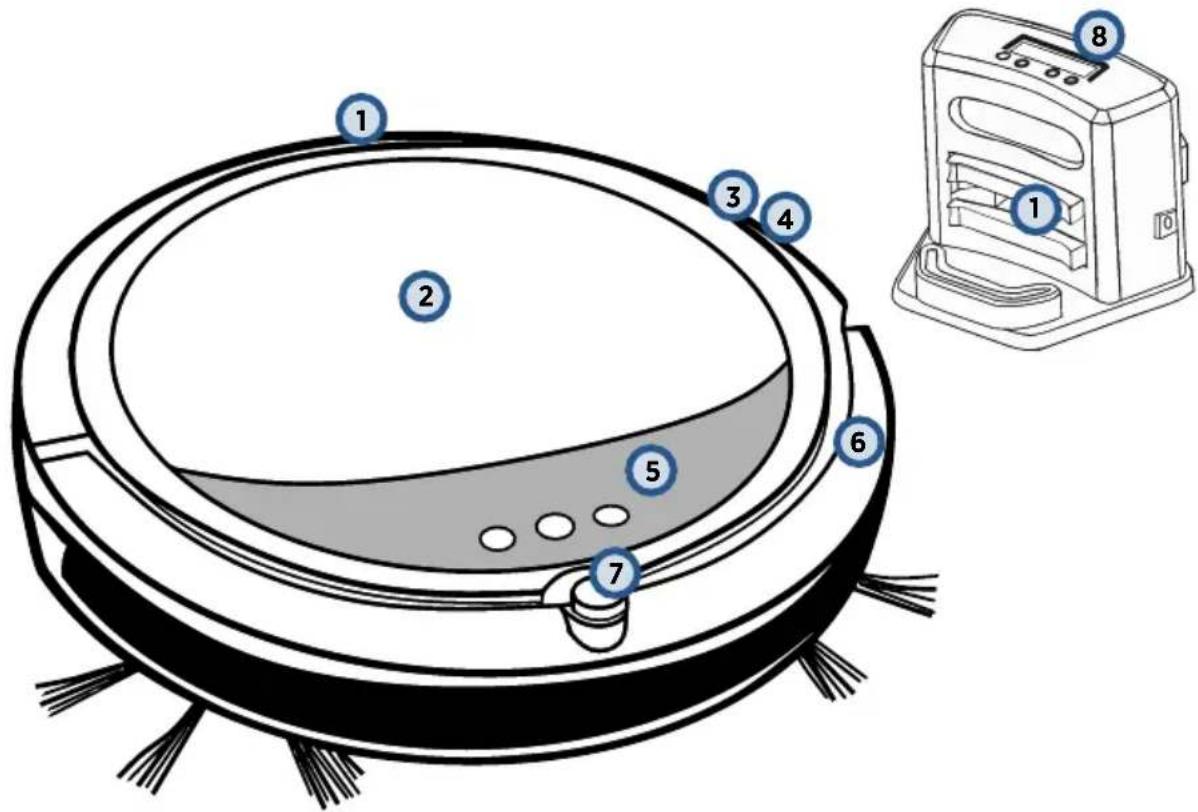
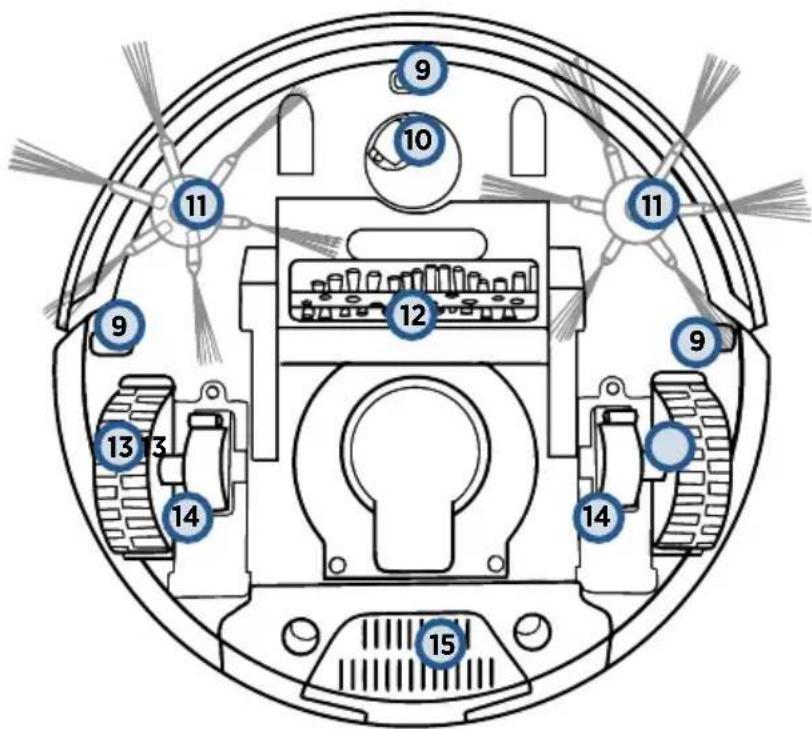
Getting to Know Your Vacuum
text_image
Diagram of a robotic vacuum cleaner with numbered parts and an inset image of the device labeled 1 through 8.1ContactPoints for automatic charging
2TopCover (Dust Bin inside)
3 DC Jack
4 Power Switch
5 Control Panel and LED Display
6 Bumper
7IRReceiver
(for remote & docking station)
8 Docking Station with LED Control Panel
9 Cliff Sensors
10 Front Wheel
11 Edge-Cleaning Brushes
12 Brush Roll
13 Rear Wheels
14 Wheel Cover Plates
15 Battery Cover Plate
text_image
Diagram of a circular electronic device with numbered components, likely an electrical or mechanical assembly.Assembly ▶
WARNING
Do not plug in your vacuum until you are familiar with all instructions and operating procedures.
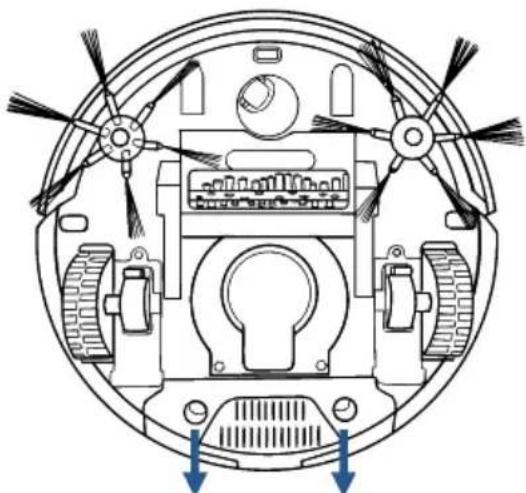
Battery Installation & Removal
** DO NOT REMOVE THE PLASTIC SHRINK SLEEVE FROM THE BATTERY PACK.
natural_image
Technical diagram of a circular mechanical device with labeled components and directional arrows (no text or symbols)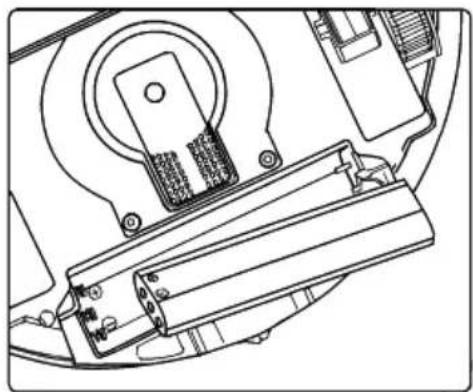
natural_image
Technical line drawing of a mechanical assembly with no visible text or symbolsTo Install the Battery:
First, turn the power switch to the off position. Press on the two circles of the battery cover and slide the cover towards you and insert the battery.
Install the battery in the compartment, ensuring the +/- terminals of the battery match the +/- indicators in the battery compartment
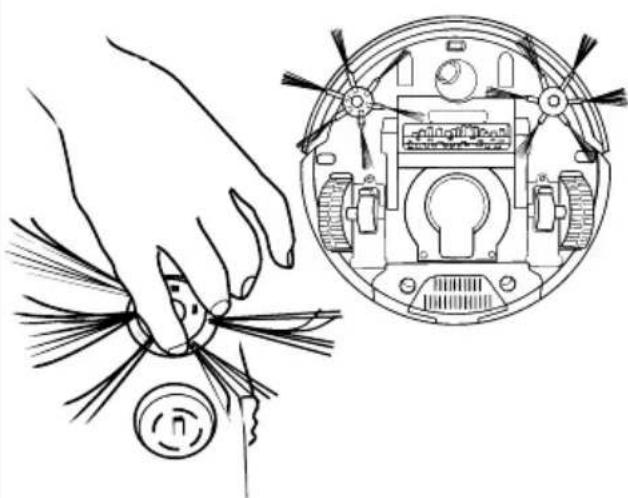
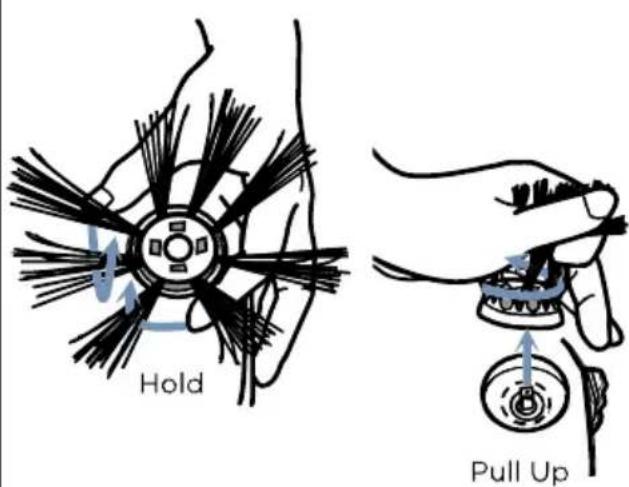
Installing & Removing the Side Brush ▶
natural_image
Illustration of a hand using a power tool to clean or adjust a circular device with visible components (no text or symbols)To Install: Push the brush directly onto the holder.
text_image
Hold Pull UpTo Remove: Hold the brush bristle and pull upward to remove the brush.
Getting Ready to Clean

natural_image
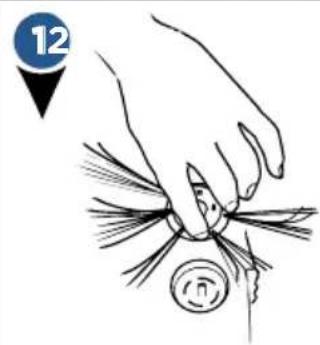
Illustration of a hand holding a circular object with a pointer, no text or symbols presentInstall the edge cleaning brushes and the battery according to the assembly instructions.
text_image
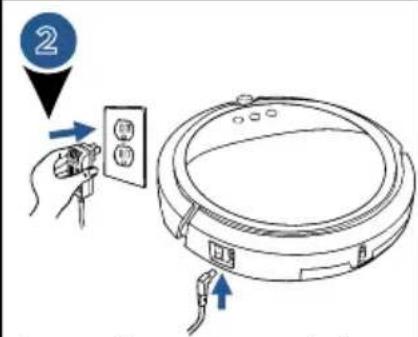
Diagram showing a hand inserting a device into a circular device with labeled buttons and arrows indicating action.Leave the power switch on and charge the battery directly from power cord for 4-5 hours prior to the first operation.

text_image
3Use the invisible wall to keep the robot from cleaning in areas where obstructions have not been removed.
Initial Charging of the Battery: AC/DC Adaptor

natural_image
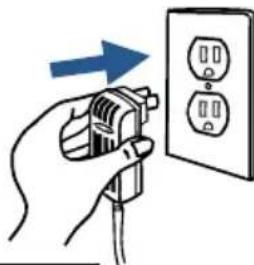
Illustration of a hand using a power plug to switch an electrical outlet (no text or symbols present)NOTE: The unit will not charge if the power switch is OFF.
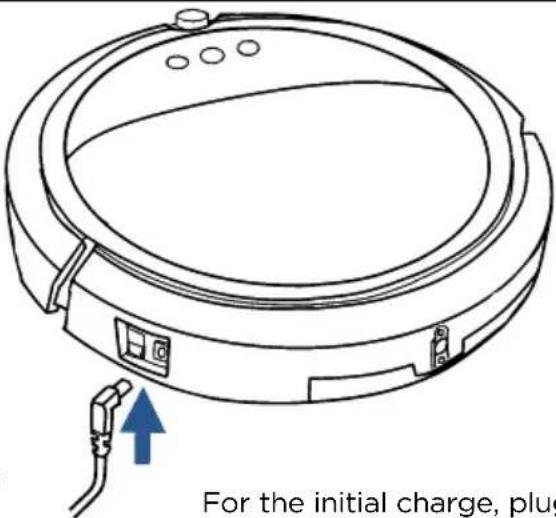
Plug the adaptor plug into the port directly next to the power switch first, and then plug the other end in to the wall outlet. Turn on the power switch of the unit on. The initial charge will take 4-5 hours.
text_image
For the initial charge, plugFor the initial charge, plug the wall adaptor directly into the charging port on the robot vacuum and turn the power on.
WARNING - DISPOSAL OF BATTERY
If your SmartClean robotic vacuum is to be disposed of, the battery should be removed and disposed of properly. For specific disposal instructions of the battery, please contact RBRC (Rechargeable Battery Recycling Corporation) 1-800-822-8837 or visit www.rbrc.com
Recharging the Battery: Docking Station

NOTE: The unit will not charge if the power switch is OFF.
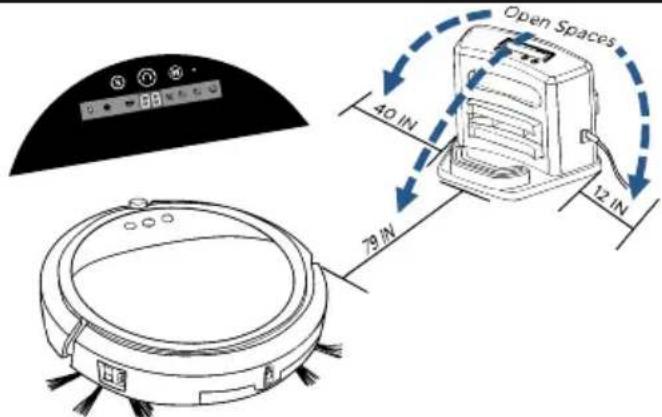
Make sure the docking station is installed correctly with at least 40 inches to one side, 12 inches to the opposing side and no obstructions in front of the docking station. After the initial charge is complete, plug the wall adaptor directly into the docking station.
text_image
Open Spaces 40 IN 79 IN 12 INTo test the auto-charge feature of the dock, turn the power switch ON and select "00" with the center button (see page 9 for control panel details). The vacuum should back into the dock for recharging if the appropriate spacing was provided for the docking station.
The Invisible Wall\*: Assembly & Use
*Requires 4AA batteries. Batteries sold separately
natural_image
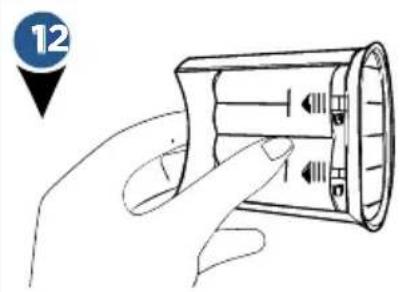
Hand inserting a cylindrical device into a battery (no text or symbols visible)To remove the battery cover, hold the invisible wall and press firmly while sliding downward to remove the battery cover.
natural_image
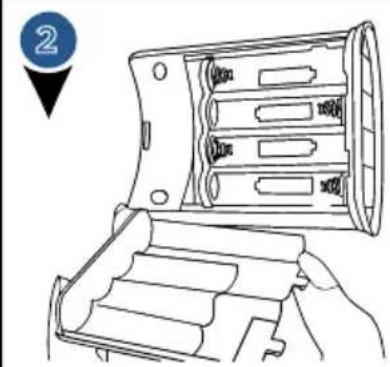
Line drawing of a hand holding a device with internal compartments (no text or symbols)Insert batteries with the +/- terminals facing the directions indicated and replace the battery cover. (AA batteries not included)
text_image
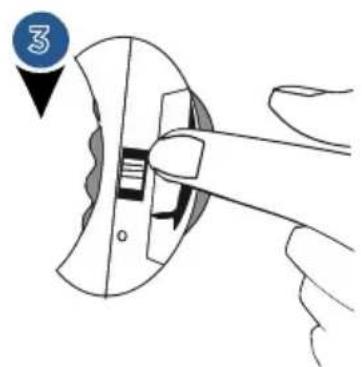
3To turn on the invisible wall slide the switch away from the light towards the (I) symbol. Wait 10 seconds between turning it on or off.
TIP: If the robot strays too far away from the docking station, it may not return automatically. Use the invisible wall to keep the robot within range of the docking station.
text_image
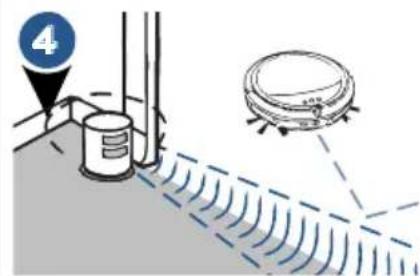
Diagram illustrating a sensor or measurement setup with labeled components and signal pathsPlace the invisible wall in the threshold of a room or in front of an area of the room you do not want the robot to clean. Indicator light is only ON when robot approaches sensor path.
TIP: Run time and performance may vary based on the amount of debris present. Use the invisible wall to limit the allowed range in messier rooms.
GETTING READY TO CLEAN
There are 2 options for cleaning:
Option 1: Scheduled cleanings using the Docking Station
Option 2: Manual cleaning using the robot's control panel
Schedule Cleanings Using Docking Station
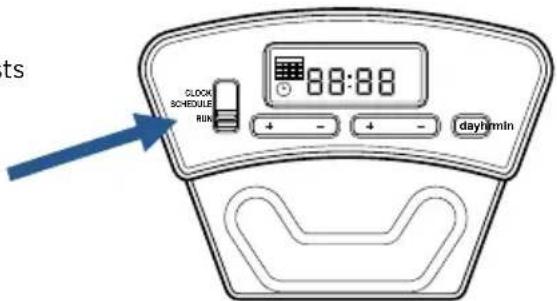
Toggle Switch adjusts between 3 settings:
-Set CLOCK
-Set SCHEDULE (auto cleaning)
-Set RUN (once clock and schedule are set)
text_image
ts CLOCK SCHEDULE RUN 8:00:00 + - + - daytime minSelection buttons for Hour (hr), Minute (min) and Day (day).
ICONS
SCHEDULE mode (will flash when selected)
CLOCK mode (will flash when selected)

Program CLOCK Program

Cleaning SCHEDULE
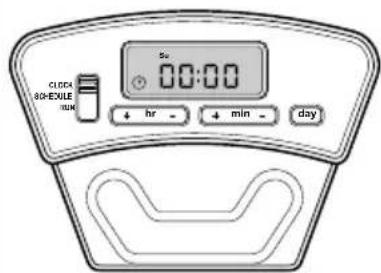
text_image
CLOCK 80HESULE RUN 00:00 hr - + min - day- Slide the switch to the CLOCK setting (the CLOCK icon will be flashing).
- Use the "+" or "-" buttons to set the hour.
NOTE: The time is set using military time.
- Use the "+" or "-" buttons to set the minute.
- Use the "day" button to set the day.
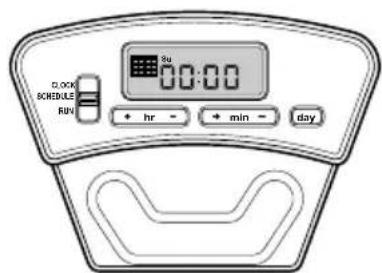
text_image
5.00 SCHEDULE RUN 00:00 + hr - + min - day- Slide the switch to the SCHEDULE setting (the SCHEDULE icon will be flashing).
- Use the "+" or "-" buttons to set the hour.
NOTE: The schedule is set using military time.
- Use the "+" or "-" buttons to set the minute.
- Use the "day" button to set the correct day. There are five format schedules available for the day setting (see below).

Run the CLOCK and SCHEDULE
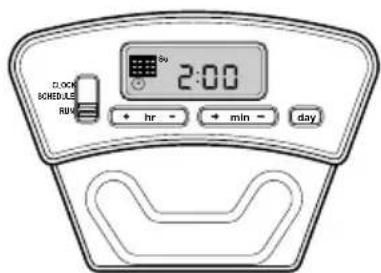
text_image
D. 00 SCHEDULE RUN 2:00 hr - + min - day- Slide the switch to the RUN setting.
- If the clock and schedule have been programmed, the CLOCK and SCHEDULE icon will both display lit when the switch is on RUN mode.
Format of schedules:
a. One day a week (one day of week will be lit)
b. Everyday of week (Sun - Sat will be lit)
c. Five days a week (Mon - Fri will be lit)
d. Six days a week (Mon - Sat will be lit)
e. Two days a week (Sat and Sun will be lit)
Manual Cleanings Using Control Panel
| Selecting a Cleaning Time Control Panel Display What It Does | ||
| 1st Press | 99 | Maximum run time - will return to the docking station to recharge |
| 2nd Press | 30 | 30 minute run time - will return to the docking station to charge |
| 3rd Press | 45 | 45 minute run time - will return to the docking station to charge |
| 4th Press | 60 | 60 minute run time - will return to the docking station to charge |
| 5th Press | 00 | Sends robot back to the docking station without cleaning |
| 6th Press | 30 | 30 minute run time - will not return to the docking station |
| 7th Press | 45 | 45 minute run time - will not return to the docking station |
| 8th Press | 60 | 60 minute run time - will not return to the docking station |
| MODE Selecting the Navigation Control | Panel Display What It | Does |
| 1st Press | Spiral - Robot will work in circles until it encounters an obstacle (once it encounters an obstacle it will switch to AUTO mode) | |
| 2nd Press | Along the Wall - Robot will clean along walls and edges | |
| 3rd Press | “Z” Formation - Robot will move up and down the room following a zig-zag path | |
| 4th Press | Diagonal Path - Robot will move in diagonal paths around the room, adjusting its direction as obstacles are encountered | |
| 5th Press | Auto - Robot will cycle through all modes (Spiral, Along the Wall, “Z” Formation, and Diagonal Path) |
| + - Selecting the Cleaning Power Control Panel Display What It Does | ||
| 1st Press Cleaning power is set to normal | ||
| 2nd Press Cleaning power is set to Turbo | ||
| Display on screen What It Does | |
| Battery Low: Battery needs to be charged(Power LED turns Red) | |
| The trash can indicator shows the dust bin is full and needs to be emptied | |
Cleaning the Dust Bin

WARNING
To reduce the risk of electric shock, turn power switch off and disconnect plug from electrical outlet before performing maintenance or troubleshooting checks.
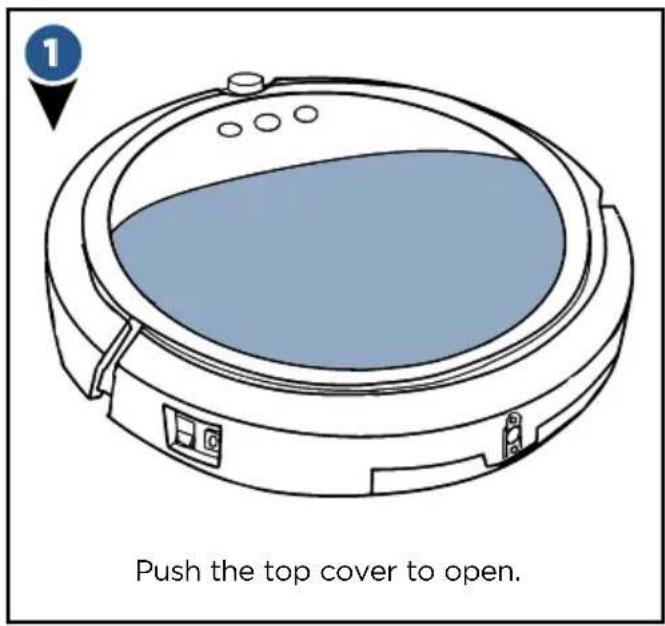
text_image
Push the top cover to open.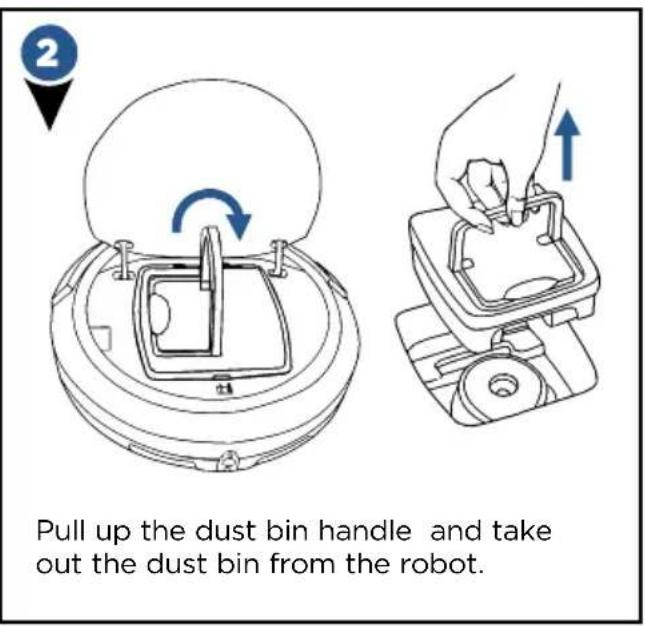
text_image
2 Pull up the dust bin handle and take out the dust bin from the robot.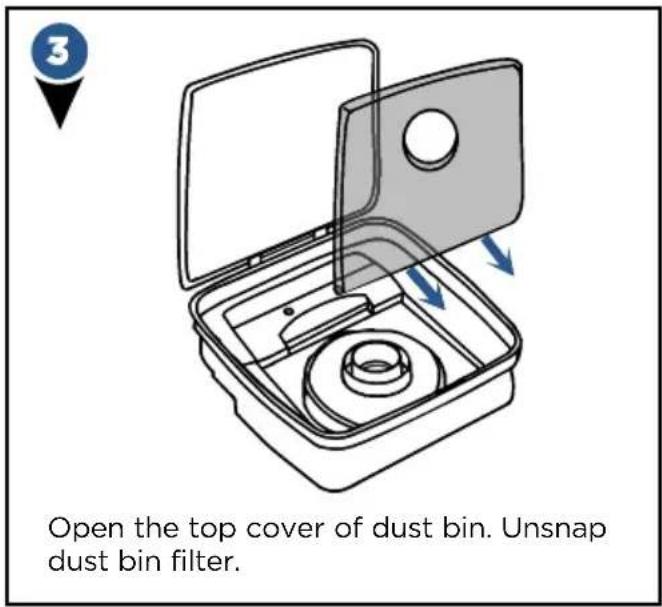
text_image
Open the top cover of dust bin. Unsnap dust bin filter.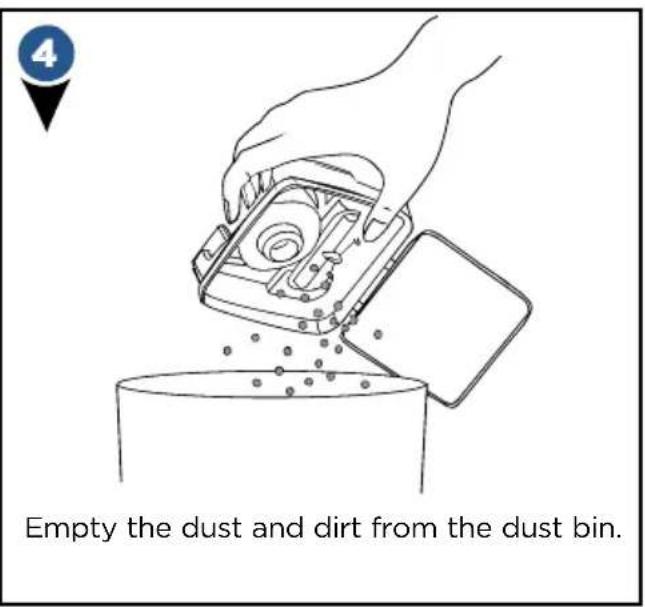
text_image
Empty the dust and dirt from the dust bin.Cleaning the Dust Bin cont.

natural_image
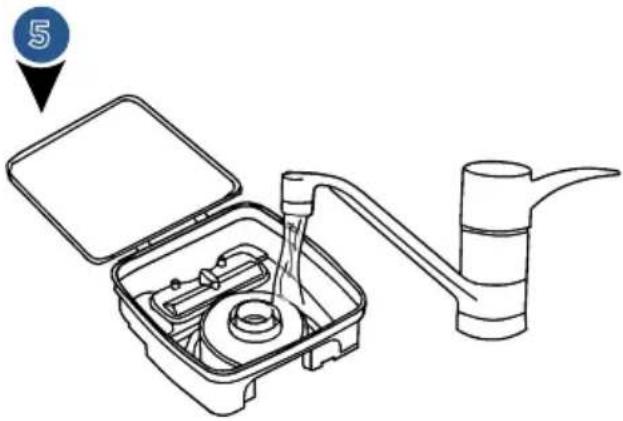
Line drawing of a water pump tool with open lid and internal components, no text or symbols presentRinse the dust bin with tap water. It is not necessary to wash every time.
Do not machine wash the dust bin.
natural_image
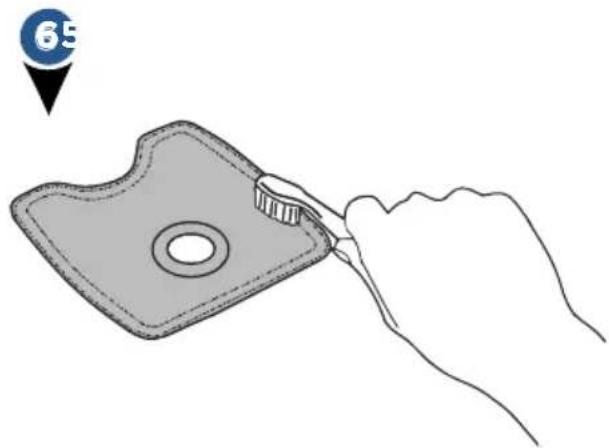
Line drawing of a hand holding a small tool interacting with a square mechanical part, with a numbered marker '65' in the corner (no text or symbols on the diagram itself)Periodically clean the filter with a soft bristle brush. Do not wash the filter.
natural_image
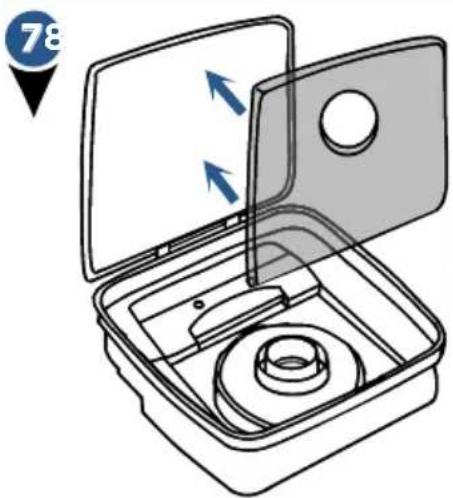
Diagram of a device with open lid and internal compartments, showing directional arrows indicating movement (no text or symbols)Once clean, reinstall the filter and close the dust bin lid.
text_image
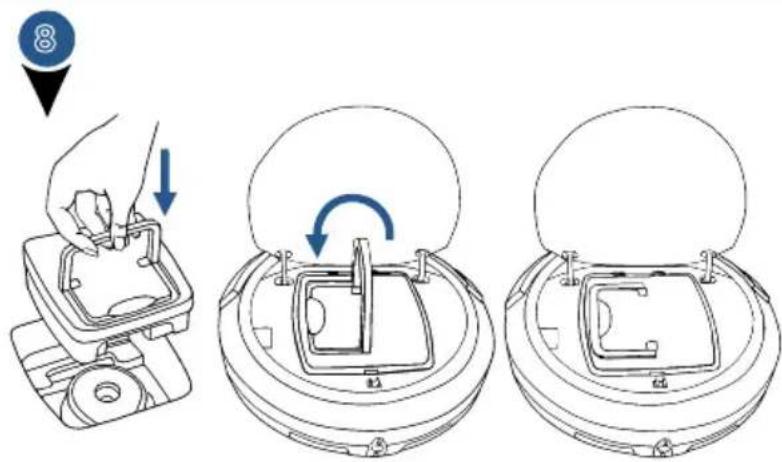
Diagram illustrating a mechanical assembly process with labeled parts and directional arrows indicating motion or assembly steps.Place dust bin back in robot and close top cover.
WARNING
Do not operate vacuum with damp or wet filters, or without filters or the Dust Bin in place. Allow components to dry before reassembling the Dust Bin.
Cleaning the Intake ▶
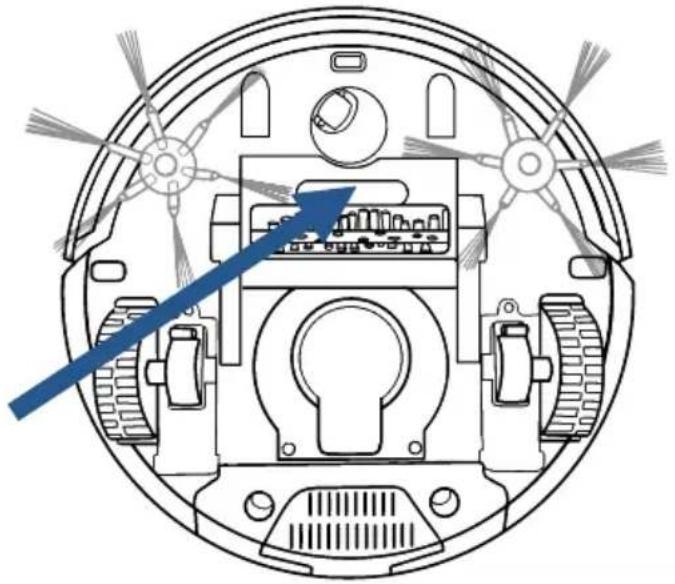
After repeated use, dirt and dust can accumulate around the intake of the vacuum and the working efficiency can be reduced.
To ensure the best efficiency and constant airflow, the intake should be cleaned periodically by removing any debris from the intake or brushroll.
Before cleaning the intake ensure the robot is not attached to the charging cable or dock, and the power switch is in the OFF position.
natural_image
Technical diagram of a mechanical device with internal components and a blue arrow indicating direction (no text or symbols)Cleaning the Sensors ▶
After repeated use, dirt and dust can accumulate on the sensors of the vacuum and the working efficiency can be reduced.
To ensure the best efficiency, the sensors should be cleaned off periodically by brushing any dirt or debris from them.
Before cleaning the sensors, ensure the robot is not attached to the charging cable or dock and the power switch is in the OFF position.
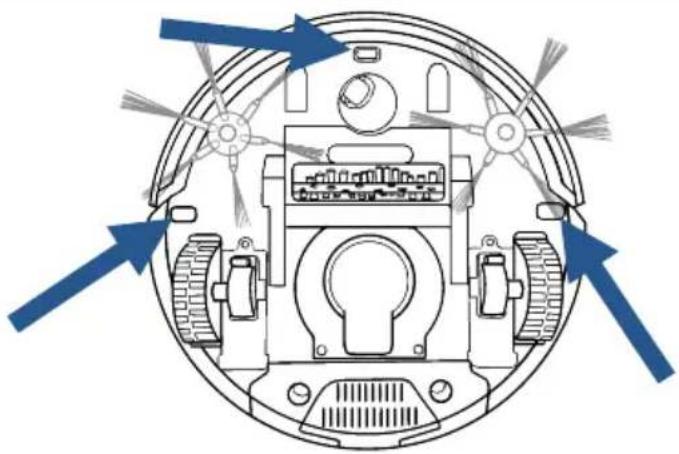
natural_image
Technical diagram of a circular mechanical or electronic device with internal components and directional arrows indicating flow or movement (no text or symbols present)Cleaning the Side Brushes ▶
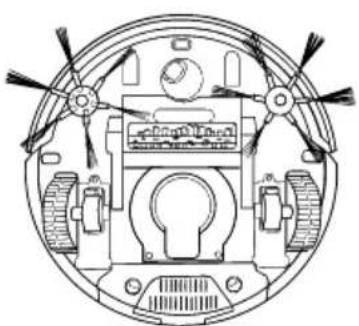
natural_image
Technical line drawing of a circular mechanical or electronic component with gears and a central hub (no text or symbols)After being used for a period of time, the brushes need to be cleaned to work more effectively.
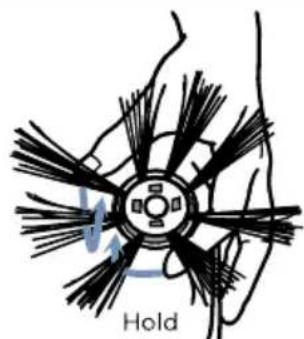
natural_image
Diagram of a mechanical component with multiple blades and a central hub, labeled 'Hold' (no other text or symbols)Turn power OFF. Place bottom of cleaner upward on a flat surface. Hold the brush bristles and pull upward to remove brush.
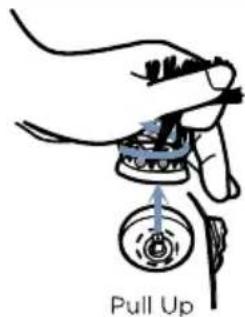
text_image
Pull UpThe side brushes can be rinsed and if they become crooked, you can soak them in hot water to make them return to the original shape. Return brushes after completely dried.
Troubleshooting
WARNING
To reduce the risk of electric shock, turn power switch off and disconnect plug from electrical outlet before performing maintenance or troubleshooting checks.
| Problem Possible causes Remedies | ||
| LED display doesn't light up | Battery is not installed correctly. Install the battery according to the instructions on page 5. | |
| Very low battery. Charge the battery according to the instructions on page 6. | ||
| Power switch on the vacuum is turned off. | Turn the power switch located by the unit's charging port to ON. | |
| Low or no suction | The dust bin is full. Empty the dust bin. | |
| Filter is missing. Check to see if the filter is in place. | ||
| Side brushes do not operate properly | Cleaning is required. If side brushes become crooked or dirty, soak them in hot water to return to its original shape. Let them dry completely. | |
| Vacuum will not start | The battery is not installed properly. | To install the battery properly, please refer to page 5 for battery installation. |
| Battery power is low. Charge the battery. | ||
| The top cover is not installed properly. | Close the top cover and turn vacuum ON again. | |
| Battery is not charging | Power switch is not in the ON position. | Flip the switch to the ON position and place the robot on the charging base or plug in the power cord directly. |
| LED display says ERROR | E1, E2, E3, E4, E5, E6 and Beep 2 times or 3 times. | Please refer to the table on page 14 for solving the problems. If the problem is not fixed, turn OFF the power switch and then turn the switch back ON. |
| Doesn't return to base after cleaning | Mode not set with Docking LED Icon. | Change mode (refer to page 9). |
| Cleaning interrupted by error code or full dust bin. | Refer to Error code table (page 14) and fix. | |
| Robot is too far away from the docking station. | Use the invisible wall to limit range of the robot. | |
LED Error Code (power LED flashes red)
| Display on screen Possible cause Solution | ||
| E1 | The wheel is stuck. Remove vacuum from obstacles, and restart the power switch. | |
| E2 | The top cover or dust bin is not installed properly. | Install the top cover and dust bin properly. The unit will detect the error and fix automatically. If the unit does not fix automatically, turn the unit off and back on. |
| E3 | The bumper is stuck. Remove vacuum from obstacles. The unit will detect the error and fix automatically. | |
| E4 | The unit was lifted up from the floor. | Put vacuum back on the floor. |
| E5 | The color of the floor is too dark | Remove robot from the flooring. Use invisible wall to keep the robot off of the flooring. |
| E6 | The battery is not installed properly. Charging error. (Power switch is off) | To install the battery properly, please refer to page 5 for battery installation, and turn on the power switch after installation is complete |
LED Display
| Display on screen Indication | |
| Lo | Battery Low: Battery needs to be charged.(Power LED turns Red) |
Warranty
This warranty gives you specific legal rights, and you may also have other rights which may vary from state to state. If you need additional instruction regarding this warranty or have questions regarding what it may cover, please contact BISSELL Consumer Care by E-mail, or telephone as described below.
Limited One-Year Warranty
Subject to the *EXCEPTIONS AND EXCLUSIONS identified below, upon receipt of the product BISSELL will repair or replace (with new or remanufactured components or products), at BISSELL's option, free of charge from the date of purchase by the original purchaser, for one year any defective or malfunctioning part.
See information below on "If your BISSELL product should require service".
This warranty applies to product used for personal, and not commercial or rental service. This warranty does not apply to fans or routine maintenance components such as filters, belts, or brushes. Damage or malfunction caused by negligence, abuse, neglect, unauthorized repair, or any other use not in accordance with the User's Guide is not covered.
BISSELL IS NOT LIABLE FOR INCIDENTAL OR CONSEQUENTIAL DAMAGES OF ANY NATURE ASSOCIATED WITH THE USE OF THIS PRODUCT. BISSELL'S LIABILITY WILL NOT EXCEED THE PURCHASE PRICE OF THE PRODUCT.
Some states do not allow the exclusion or limitation of incidental or consequential damages, so the above limitation or exclusion may not apply to you.
\*EXCEPTIONS AND EXCLUSIONS FROM THE TERMS OF THE LIMITED WARRANTY
THIS WARRANTY IS EXCLUSIVE AND IN LIEU OF ANY OTHER WARRANTIES EITHER ORAL OR WRITTEN. ANY IMPLIED WARRANTIES WHICH MAY ARISE BY OPERATION OF LAW, INCLUDING THE IMPLIED WARRANTIES OF MERCHANTABILITY AND FITNESS FOR A PARTICULAR PURPOSE, ARE LIMITED TO THE ONE YEAR DURATION FROM THE DATE OF PURCHASE AS DESCRIBED ABOVE.
Some states do not allow limitations on how long an implied warranty lasts so the above limitation may not apply to you.
NOTE: Please keep your original sales receipt. It provides proof of date of purchase in the event of a warranty claim.
Service
If your BISSELL product should require service:
Contact BISSELL Consumer Care for information about repairs or replacement parts or if you have questions about your warranty.
Website:
www.BISSELL.com
E-mail:
www.BISSELL.com/email-us
Call:
BISSELL Consumer Care 1-800-237-7691
Monday - Friday 8am - 10pm ET Saturday 9am - 8pm ET
Sunday 10am - 7pm ET
Please do not return this product to the store.
Other maintenance or service not included in the manual should be performed by an authorized service representative.
For any questions or concerns, BISSELL is happy to be of service. Contact us directly at 1-800-237-7691.
Register your product today!
Registering is quick, easy and offers you benefits over the lifetime of your product.
You'll receive:
BISSELL Rewards Points
Automatically earn points for discounts and free shipping on future purchases.
Faster Service
Supplying your information now saves you time should you need to contact us with questions regarding your product.
Product Support Reminders and Alerts
We'll contact you with any important product maintenance reminders and alerts.
Special Promotions
Optional: Register your email to receive notice of offers, contests, cleaning tips and more!
Visit www.BISSELL.com/registration!
Visit us online at: BISSELL.com
When contacting BISSELL, have model number of cleaner available.
Please record your
Model Number: ____
Please record your
Purchase Date: ____
NOTE: Please keep your original sales receipt. It provides proof of purchase date in the event of a warranty claim. See Warranty on page 15 for details.
Parts & Supplies
For Parts and Supplies, go to BISSELL.com and enter your model number in the search field.
We can't wait to hear from you!
We really do read your comments, tweets, and posts.
Rate this product on BISSELL.com
or any of our retailer sites and let us (and millions of your closest friends) know what you think!
For cleaning tips and more visit www.BISSELL.com or find us at:




YouTube
BISSELL BISSELLClean BISSELL BISSELLBISSELLClean

©2017 BISSELL Homecare, Inc
Grand Rapids, Michigan
All rights reserved. Printed in China
Part Number 161-3987 10/17 RevB
Visit our website at: www.BISSELL.com