HD-100 - Camera Aida - Free user manual and instructions
Find the device manual for free HD-100 Aida in PDF.


User questions about HD-100 Aida
0 question about this device. Answer the ones you know or ask your own.
Ask a new question about this device
Download the instructions for your Camera in PDF format for free! Find your manual HD-100 - Aida and take your electronic device back in hand. On this page are published all the documents necessary for the use of your device. HD-100 by Aida.
USER MANUAL HD-100 Aida
natural_image
Close-up of a black AIDA camera module with visible lens and control knob (no text or symbols on body)HD-100
HD HDMI POV Camera
Operation Guide
Ver. 1.0 / JUNE 2019

natural_image
A pattern of parallel purple diagonal stripes on white background (no text or symbols)
CAUTION
RISK OF ELECTRIC SHOCK. DO NOT OPEN.

CAUTION:
TO REDUCE THE RISK OF ELECTRIC SHOCK, DO NOT REMOVE COVER (OR BACK) NO USER SERVICEABLE PARTS INSIDE. REFER SERVICING TO QUALIFIED SERVICE PERSONNEL.

Warning
This symbol indicates that dangerous voltage consisting a risk of electricshock is present within this unit.

Precaution
This exclamation point symbol is intended to alert the user to the presence of important operating and maintenance (servicing) instructions in the literature accompanying the appliance.
Warning
To prevent damage which may result in fire or electric shock hazard, do not expose this appliance to rain or moisture.
- Be sure to use only the standard adapter that is specified in the specification sheet. Using any other adapter could cause fire, electrical shock, or damage to the product.
- Incorrectly connecting the power supply or replacing battery may cause explosion, fire, electric shock, or damage to the product.
- Do not connect multiple cameras to a single adapter. Exceeding the capacity may cause excessive heat or fire.
- Securely plug the power cord into the power receptacle. Insecure connection may cause fire.

natural_image
A decorative pattern of parallel purple diagonal stripes on white background (no text or symbols)-
Do not place conductive objects (e.g. screw drivers, coins, metal items, etc.) or containers filled with water on top of the camera. Doing so may cause personal injury due to fire, electric shock, or falling objects.
-
Do not install the unit in humid, dusty, or sooty locations. Doing so may cause fire or electric shock.
-
If any unusual smells or smoke come from the unit, stop using the product. Immediately disconnect the power source and contact the service center. Continued use in such a condition may cause fire or electric shock.
-
If this product fails to operate normally, contact the nearest service center. Never disassemble or modify this product in any way.
-
When cleaning, do not spray water directly onto parts of the product. Doing so may cause fire or electric shock.
Precaution
Please read this Operation Guide before installing and using the camera & retain this copy for your reference.
-
Always follow the instructions in the operations guide when applying power. Fire and equipment damage can occur if power is applied incorrectly. For the correct power supply, refer to the specifications page.
-
Do not use camera if fumes, smoke or a strange odor is emitted from the camera, or if it seems not functional correctly. Disconnect the power source immediately and consult with your supplier.
-
Do not use the camera in extreme environments where high temperatures or high humidity exists. Use the camera under conditions where temperatures are between 32^ F \~ 104^ F, and humidity is below 90%.
-
If installed close to a TV, radio transmitter, magnet, electric motor transformer or audio speakers the magnetic field generated may interfere with or distort the image.
-
Try to avoid fluorescent light reflections, unstable light conditions, direct pointing toward the sun. Use caution when operating the camera in the vicinity of spotlights or other bright lights and light reflecting objects.
-
To prevent damage, do not drop the camera or subject it to strong shock or vibration.
HD-100
text_image
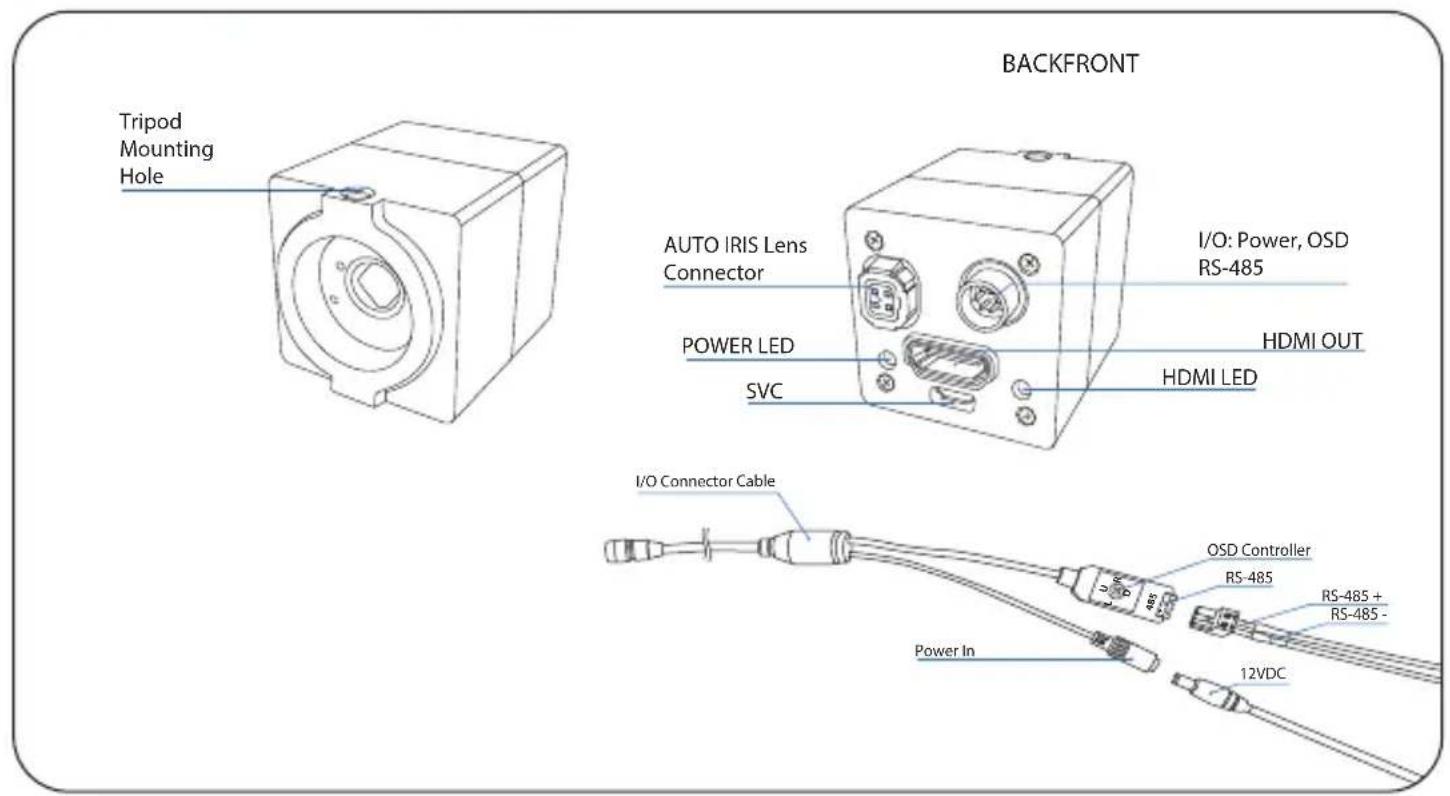
BackFRONT Tripod Mounting Hole AUTO IRIS Lens Connector I/O: Power, OSD RS-485 POWER LED HDMI OUT SVC HDMI LED I/O Connector Cable OSD Controller RS-485 RS-485 + RS-485 - Power In 12VDCFEATURES
- Full HD Progressive Scan sensor captures sharp and vivid color under different light conditions.
- Advanced digital image processor provides vivid and detailed imaged by utilizing WDR, White Balance, and Noise Reduction.
- Motion-compensated temporal noise reduction filter leads to effective noise reduction for motion video without blur.
• HDMI seamless video performance. - Black Level Set-up provides the better color transition from digital to analog.
- Auto White Balance and shutter speed provides the optimized performance in a variety of situations.
• Built-in OSD controls for customizable image settings. - Versatile, compact, and rugged design.
OSD MENU
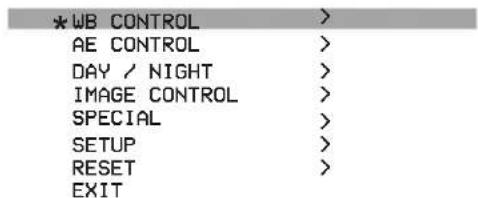
MAIN MENU
text_image
*WB CONTROL > AE CONTROL > DAY / NIGHT > IMAGE CONTROL > SPECIAL > SETUP > RESET > EXIT >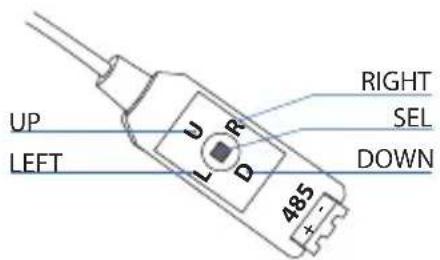
text_image
UP LEFT RIGHT SEL DOWN 4851 Move the Cursor Up/Down to Choose Menu
To move from item to item in the menu, move the joystick to the Up/Down.
② Change the Value
To change the value of the selected item, move the joystick to the Left/Right.
③ Shift to the Sub Menu of the Chosen Menu
To go into sub menu, press SEL key.
The menu items with > always have its sub menu.
WB CONTROL
WB CONTROL
| *MODE | ATW |
| PUSH | |
| BLUE | |
| RED | |
| RETURN |
AWB
Auto white balance mode will adjust white balance within 3,000^ 8,000^ temperature.
ATW
Auto trace white mode will adjust white balance within 1,900^ 11,000^ temperature.
ONE PUSH
One push mode is used if AWB or ATW cannot produce the proper white balance. Place a white paper in front of the camera when using the one push mode to self adapt.
INDOOR
Indoor mode will adjust white balance to indoor lighting conditions.
OUTDOOR
Outdoor mode will adjust white balance to outdoor lighting conditions.
MANUAL
Manual mode will adjust white balance manually.
BLUE : 0 \~ 100
Select blue gain within the range of 0 to 100
RED : 0 \~ 100
Select red gain within the range of 0 to 100
AE CONTROL
text_image
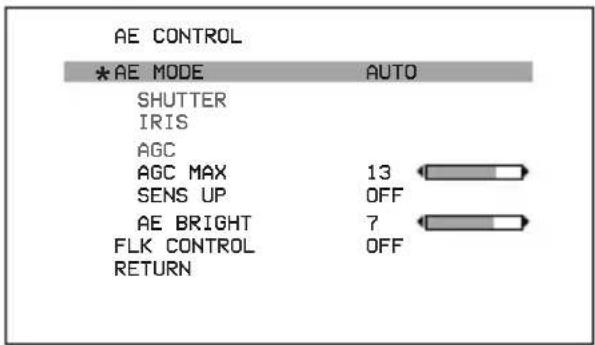
AE CONTROL *AE MODE AUTO SHUTTER IRIS AGC AGC MAX 13 SENS UP OFF AE BRIGHT 7 FLK CONTROL OFF RETURNAUTO
Auto mode will adjust the exposure level automatically.
Detailed fine tuning options are available under this menu.
AGC MAX : OFF, LOW, MIDDLE, HIGH, DMIN, DMID, DMAX "AGC MAX" sets the maximum gain value to control the video noise caused by Auto Gain Control.
SENS UP : OFF, x2 \~ x10 "SENS UP" mode controls the digital slow shutter to allow extra light into the camera and adjust the picture quality.
AE BRIGHT : 0\~20 Auto Exposure brightness level can be adjusted.
AE CONTROL
AE CONTROL
text_image
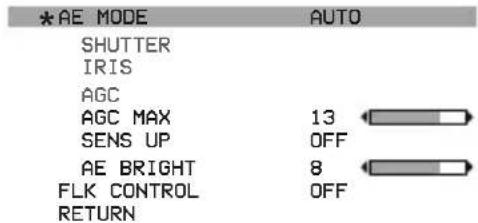
*AE MODE AUTO SHUTTER IRIS AGC AGC MAX 13 SENS UP OFF AE BRIGHT 8 FLK CONTROL OFF RETURNSHUT FIX
SHUT FIX mode provides more detailed shutter speed option.
All other controls are tuned for the selected shutter speed.
SHUTTER : AUTO, 1/30 \~ 1/10,000
Shutter speed can be set.
AGC MAX : OFF, LOW, MIDDLE, HIGH, DMIN, DMID, DMAX
"AGC MAX" sets the maximum gain value to control the video noise caused by Auto Gain Control.
▶SENS UP : OFF, x2 \~ x10
"SENS UP" mode controls the digital slow shutter to allow extra light into the camera and adjust the picture quality.
▶AE BRIGHT : 0\~10
Auto Exposure brightness level can be adjusted.
AE CONTROL
AE CONTROL
text_image
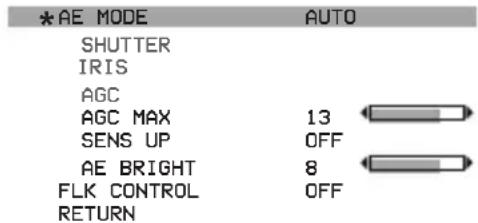
*AE MODE AUTO SHUTTER IRIS AGC AGC MAX 13 SENS UP OFF AE BRIGHT 8 FLK CONTROL OFF RETURNAGC FIX
AGC FIX mode provides more detailed gain option.
All other controls are tuned for the selected gain value.
▶AGC : AUTO, 0dB \~ 27dB, d2X \~ d9X
Gain level can be set.
AGC MAX : OFF, LOW, MIDDLE, HIGH, DMIN, DMID, DMAX
"AGC MAX" sets the maximum gain value to control the video noise caused by Auto Gain Control.
▶AE BRIGHT : 0\~10
Auto Exposure brightness level can be adjusted.
AE CONTROL
AE CONTROL
text_image
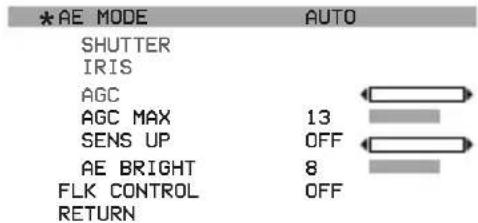
*AE MODE AUTO SHUTTER IRIS AGC AGC MAX 13 SENS UP OFF AE BRIGHT 8 FLK CONTROL OFF RETURN▶ IRIS SPEED : 0 \~ 5
Electronic Iris speed can be controlled. (DC Iris lens only)
➢LENS MODE : INDOOR, OUTDOOR, MANUAL
Lens setting will be optimized for the selected environment. (DC Iris lens only)
▶FLK CONTROL : AUTO, ON, OFF
"FLK CONTROL" mode provides a proper image sensor frequency to match the power frequency in order to minimize video flicker.
DAY & NIGHT
DAY & NIGHT
* MODE DAY (COLOR)
NIGHT COLOR
COLOR BURST
RETURN
Adjust color or B&W setting from this menu.
▶MODE : DAY(COLOR), NIGHT(B&W)
Set camera to either color mode or B&W mode.
▶NIGHT COLOR : ON, OFF
When "NIGHT COLOR" is turned ON, camera stays on color mode
even "NIGHT(B&W)" is selected from the MODE.
COLOR BURST : ON, OFF
Color burst signal ON or OFF can be set for CVBS signal.
(Not applicable)
IMAGE CONTROL
text_image
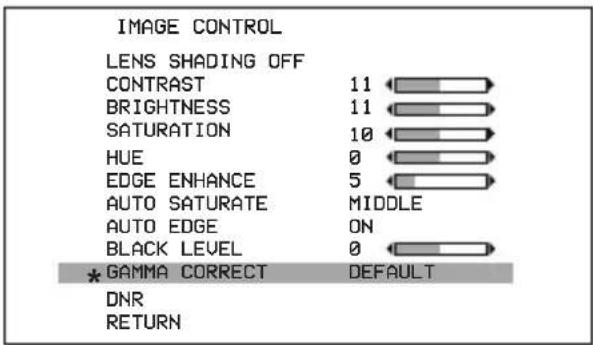
IMAGE CONTROL LENS SHADING OFF CONTRAST 11 BRIGHTNESS 11 SATURATION 10 HUE 0 EDGE ENHANCE 5 AUTO SATURATE MIDDLE AUTO EDGE ON BLACK LEVEL 0 * GAMMA CORRECT DEFAULT DNR RETURNCamera image control can be adjusted from EFFECT menu.
LENS SHADING : ON, OFF
Optical vignetting issue can be corrected from this menu.
Gamma level can be adjusted.
GAMMA CORRECT: DEFAULT, 0.4 \~ 1.0
Gamma level can be adjusted.
DNR
Camera noise level can be adjusted from this menu
▶DNR MODE : OFF, 2D, 3D, 2D+3D
Digital noise reduction can be applied from this menu.
▶DNR LEVEL : AUTO, LOW, MIDDLE, HIGH
Noise reduction level can be adjusted from this menu.
DNR APERTURE : 0 \~ 4
Motion artifacts tightness can be adjusted.
0=Most ghost artifact 4=Least ghost artifact.
IMAGE CONTROL
text_image
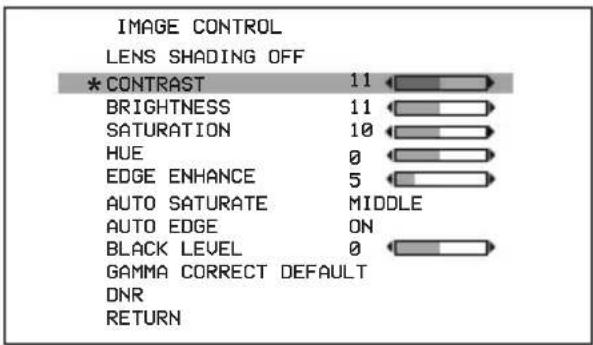
IMAGE CONTROL LENS SHADING OFF * CONTRAST 11 BRIGHTNESS 11 SATURATION 10 HUE 0 EDGE ENHANCE 5 AUTO SATURATE MIDDLE AUTO EDGE ON BLACK LEVEL 0 GAMMA CORRECT DEFAULT DNR RETURNCONTRAST : 0 \~ 20
Contrast level can be adjusted.
▶BRIGHTNESS: 0 \~ 20
Brightness level can be adjusted.
SATURATION : 0 \~ 20
Saturation level can be adjusted.
HUE: 0 \~ 20
Hue level can be adjusted.
Image sharpness level can be adjusted.
AUTO SATURATE: OFF, LOW, MIDDLE, HIGH
Decrease saturation automatically when noisy scene is detected.
▶AUTO EDGE : ON, OFF
Decrease edge enhancement (sharpness) automatically when noisy scene is detected.
DEFAULT
Set EFFECT menu to default value.
SPECIAL
SPECIAL
| * DZOOM | ON | > |
| DEFOG | OFF | |
| DWDR | OFF | |
| MOTION DETECT | OFF | |
| BACKLIGHT | OFF | |
| BINNING | OFF | |
| DEFECT PIXEL | ON | > |
| DISP. FUNCTION | > | |
| FLICKER DETECT | ON | |
| PRIVACY | > | |
| RETURN |
D-ZOOM
| *ZOOM CONTROL | |
| PIP | OFF |
| PIP SIZE | 1/16 |
| PIP POSITION | |
| DZOOM SAVE | |
| DEFAULT | |
| RETURN | |
Camera special functions can be adjusted from SPECIAL menu.
DZOOM : ON, OFF
Digital Zoom and PIP function can be enabled from this menu.
ZOOM CONTROL: RATIO, POSITION, RETURN
Adjust the digital zoom ratio and position.
Use LEFT / RIGHT button to adjust the ratio, then press select.
USE LEFT / RIGHT/ UP / DOWN button to adjust the image position, then press select.
Press select to exit.
PIP : ON, OFF
Turn ON or OFF the PIP window.
▶PIP SIZE: : 1/16, 1/25
Change the size of PIP window.
▶PIP POSITION : POSITION, RETURN
Adjust the PIP window location.
USE LEFT / RIGHT/ UP / DOWN button to adjust the image position, then press select.
Press select to exit.
DEFAULT
Set privacy zone to default value.
SPECIAL
DEFOG SETUP
STRENGTH
*THRESHOLD
AUTO LEVEL
RETURN
DEFOG : ON, OFF, AUTO
"DEFOG" menu improves foggy image.
STRENGTH : 0 \~ 16
Change defog strength.
THRESHOLD : 0 \~ 3
Threshold value sets minimum sensitivity value for automatic defog control. Higher value makes defog-on control reluctant.
▶AUTO LEVEL : LOW, MID, HIGH
Auto level value sets maximum strength value for automatic defog control. Higher value makes defog effect to be stronger.
DWDR
Wide Dynamic range can be adjusted from the sub menu.
MOTION DETECT
Camera can detect a motion within the selected areas.
SPECIAL
BACKLIGHT - BLC
text_image
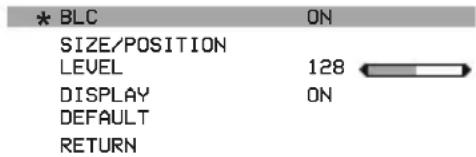
* BLC ON SIZE/POSITION LEVEL 128 DISPLAY ON DEFAULT RETURNBACKLIGHT - HLM
AREA
text_image
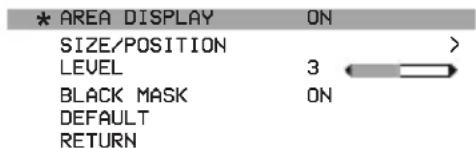
* AREA DISPLAY ON SIZE/POSITION > LEVEL 3 BLACK MASK ON DEFAULT RETURNCamera backlight compensation can be adjusted.
BLC : OFF, ON
BLC enables back light compensation.
SIZE/POSITION : SIZE, POSITION, RETURN Adjust BLC area window size.
LEVEL
Backlight level compensation level can be adjusted from this menu. Higher level will compensate more from the selected area.
▶DISPLAY : OFF, ON
BLC area display can be turned ON or OFF.
DEFAULT
Set BLC menu to default value.
HLM : OFF, ON
HLM can be adjusted.
▶ AREA DISPLAY : ON, OFF
HLM AREA DISPLAY can be turned ON or OFF.
SIZE/POSITION : SIZE, POSITION, RETURN
Adjust BLC area window size.
LEVEL : 0 \~ 20
Amount of masking area can be adjusted.
BLACK MASK : OFF, ON
Masking area highlight can be turned ON or OFF.
DEFAULT
Set HLM menu to default value.
SPECIAL
DEFECT PIXEL
| *STATIC PROGRESS | PRESS OK |
| SDPC UPDATE | PRESS OK |
| SDPC CLEAR | PRESS OK |
| RETURN |
BINNING : OFF, ON
Binning can be turned ON of OFF.
DEFECT PIXEL : OFF, ON, ON(FIXED), STATIC
Defective Pixel Correction feature can be operated.
It is turned ON by default and will run both dynamic and static DPC function.
SPECIAL
DISPLAY FUNCTION
| *FREEZE | OFF |
| MIRROR | OFF |
| IMAGE EFFECT | OFF |
| ROTATION | OFF |
| PICTURE STYLE | OFF |
| PIC CONTRAST | |
| PIC SATURATION | |
| PIC EDGE | |
| RETURN |
DISPLAY FUNCTION
Adjust image display features from this menu.
FREEZE : OFF, ON
Image freeze can be turned ON or OFF.
MIRROR : OFF, MIRROR, V-FLIP, BOTH(H/V)
Image mirror or flip can be operated.
IMAGE EFFECT : OFF, NEGATIVE, GREY MODE,
Several color effects can be applied.
▶ROTATION : OFF, ROT_L FULL, ROT_L 1:1,
ROT R Full, ROT R 1:1
Image can be rotated either left or right side.
▶PICTURE STYLE : OFF, STANDARD, VIVID,
CLEAR, VIVID CLEAR, NEUTRAL,
Different types of picture style can be applied.
FLICKER DETECT : OFF, ON
"FLICKER DETECT" mode provides a proper image sensor frequency
to match the power frequency in order to minimize video flicker.
PRIVACY

text_image
PRIVACY MASK * MODE ON TYPE SQUARE MASK NO. MASK 1 DISPLAY ON COLOR BLACK POLY SELECT POSITION-X 2 POSITION-Y 5 SIZE-X 20 SIZE-Y 11 DEFAULT RETURN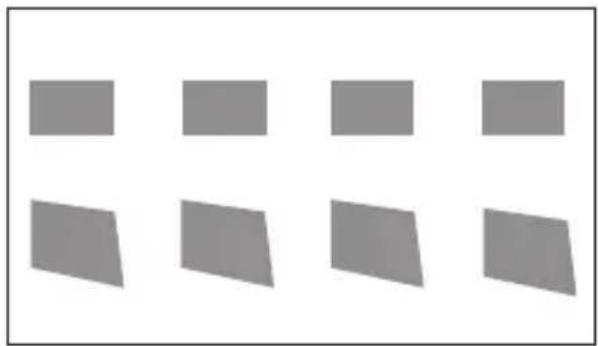
natural_image
Grid of eight gray rectangular shapes arranged in four rows and three columns (no text or symbols)Privacy zone can be setup from this menu.
MODE : ON, OFF
Enable "PRIVACY ZONE" ON or OFF.
▶ TYPE: SQUARE, POLYGON
Select privacy zone shape.
▶MASK NO. : MASK1 \~ MASK8
Select privacy zone mask number.
▶DISPLAY : ON, OFF
Turn ON or OFF the selected privacy mask zone.
COLOR : WHITE, GREEN, BLUE, RED, CYAN, MAGENTA, YELLOW, GRAY-1 \~ 6, MOSAIC, BLACK Select privacy zone mask color.
▶ POLY SELECT : L-TOP, L-BOTTOM, R-TOP, R-BOTTOM
Change the shape of the polygon by selecting the corner of the polygon.
▶ POSITION-X & POSITION-Y
Change the size of the selected corner from "POLY SELECT" menu.
SIZE-X & SIZE-Y
Change the size of the privacy square.
DEFAULT
Set privacy zone to default value.
SETUP
SETUP
| * CAM TITLE | OFF |
| COMMUNICATION | |
| SYSTEM INFO | |
| OUTPUT FORMAT | 1080P30 |
| RETURN |
Camera setup can be adjusted from this menu.
▶CAM TITLE : OFF, ON
Camera title can be turned ON or OFF.
COMMUNICATION
VISCA communication control can be adjusted.
CAM ID: 0 \~ 7 Camera ID can be setup.
ID DISPLAY: OFF, ON Camera ID can be displayed.
BAUDRATE : 2400, 4800, 9600, 19200, 38400 Camera baudrate can be set.
SYSTEM INFO
Camera information can be found under this menu.
OUTPUT FORMAT
Camera resolution and frame rate can be set. 1080p by default.
Supported formats are: 1080P 60 / 59.94 / 50 / 30 / 29.97 / 25 / 24 1080i 60 / 59.94 / 50 720P 60 / 59.94 / 50
SETUP
text_image
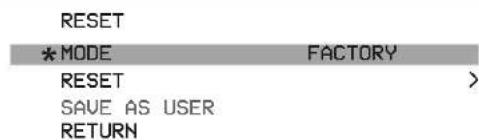
RESET *MODE FACTORY RESET > SAVE AS USER RETURNMODE : FACTORY, USER
Camera will reset to factory default or user saved value.
RESET
Reset the camera to the selected mode.
SAVE AS USER
Save the user desired setting from the menu. Mode must be set to User.
SPECIFICATION: HD-100
| Image Sensor | 1/3 inch Progressive CMOS |
| Sensor Size | Diagonal 7.2mm(17:9) |
| Effective Pixels | Horizontal: 1920, Vertical: 1080 |
| Pixel Size | 2.75 μm (H) x 2.75 μm (V) |
| Resolution | 1080p / 1080i : 1920 x 1080720p : 1280 x 720 |
| Frame Rate | 1080p : 60 / 59.94 / 50 / 30 / 29.97 / 25 / 241080i : 60 / 59.94 / 50720p : 60 / 59.94 / 50 |
| Video Signal Output | HDMI 1.3a |
| White Balance | AWB/AE/AF |
| Lens | C / CS Mount (Default 4mm Lens) |
| Audio Input | 3.5mm Stereo Mic-in & Line in over I/O Cable |
| Audio Sample Rate | 16/24/32 Bits |
| Color Space | 4:2:2(YCbCr) 10bit |
| Camera Control | OSD Control Button / via RS-485 |
| Operation Temperature | 32°F - 104°F |
| Dimension & Weight | 39mm x 39mm x 50.50mm/ 1.53" x 1.53" x 1.99"140 g / 0.3 lbs |
| Power Requirements | 6W at 12VDC (+9 - +15VDC) |
Specifications are subject to change without notice
AIDA IMAGING

Disposal of Old Appliances
- When this crossed-out wheel bin symbol is attached to a product it means the product is covered by the European Directive 2002/96/EC.
- All electrical and electronic products should be disposed of separately form the municipal waste stream stream in accordance to laws designated by the government or the local authorities.
- The correct disposal of your old appliance will help prevent potential negative consequences for the environment and human health.
- For more detailed information about disposal of your old appliance, please contact your city office, waste disposal service or the shop where you purchased the product.
FCC
This equipment has been tested and found to comply with the limits for a Class A digital device, pursuant to part 15 of the FCC Rules.
These limits are designed to provide reasonable protection against harmful interference when the equipment is operated in a commercial environment.
This equipment generates, uses, and can radiate radio frequency energy and, if not installed and used in accordance with the instruction manual, may cause harmful interference to radio communications.
Operation of this equipment in a residential area is likely to cause harmful interference in which case the user will be required to correct the interference at his own expense.