HD-NDI-200 - Camera Aida - Free user manual and instructions
Find the device manual for free HD-NDI-200 Aida in PDF.


| Product Type | Full-HD NDI® | HX2 POV Camera |
| Brand | Aida |
| Model | HD-NDI-200 |
| Dimensions (LWH) | 2.13" x 5" x 2.13" (54mm x 127mm x 54mm) |
| Power Supply | 12VDC, 2A (adapter included); PoE (IEEE802.3af) |
| Sensor | 1/2.8" Sony Progressive CMOS Sensor |
| Resolution | Up to 1920x1080p Full HD |
| Video Interfaces | HDMI (v1.4), RJ-45 (NDI® | HX2, RTSP, RTMP), 3.5mm audio in |
| Lens | 4mm default (80° HFOV), CS mount (C mount adapter included) |
| Control | RS485 (VISCA), RJ-45 (VISCA over IP), NDI®, OSD menu via breakout cable, Web UI |
| Network Speed | 1000M |
| Video Compression | H.264, H.265 |
| Bitrate Range | 1024 kbps – 20480 kbps |
| White Balance | Auto, Indoor, Outdoor, One Push, ATW, Manual |
| Exposure | Auto, Manual |
| Minimum Illumination | 0.01 Lux |
| Operating Temperature | 0°C – 50°C (32°F – 122°F) |
| Maintenance | Clean with dry soft cloth and neutral cleaning agent; do not pour liquids inside |
| Safety | Read manual before use; keep cables safe; do not open housing; avoid direct sunlight |
| Spare Parts & Repairability | Contact support for service; do not disassemble |
| Warranty | 2 years from date of purchase (unless noted) |
Frequently Asked Questions - HD-NDI-200 Aida
User questions about HD-NDI-200 Aida
0 question about this device. Answer the ones you know or ask your own.
Ask a new question about this device
Download the instructions for your Camera in PDF format for free! Find your manual HD-NDI-200 - Aida and take your electronic device back in hand. On this page are published all the documents necessary for the use of your device. HD-NDI-200 by Aida.
USER MANUAL HD-NDI-200 Aida
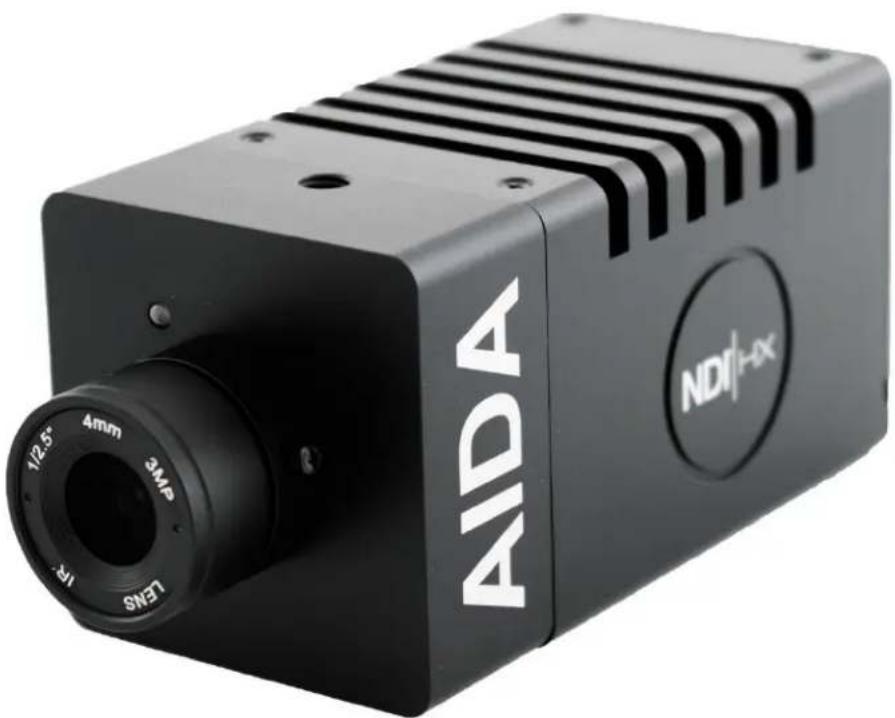
Full-HD NDI® | HX2 POV Camera
natural_image
Black AIDA laser camera module with visible lens, aperture, and control buttons (no text-heavy elements)Version 1.0
AIDA
Table of Contents:
1 Safety Guides
2 Packing List and Quick Start
3 Product Highlights and Camera Specs
6 OSD Menu
9 Web Settings
16 VISCA Control
17 VISCA Commands
18 NDI®|HX2 Protocol*
20 Warranty and Support
Safety Guide:
- Before operation, please read all the instructions in the manual carefully. For your convenience, please keep this manual.
- Ensure the power supply input is within the recommended rate before powering on.
- Camera power voltage = 12VDC, with a rated currency to 2A.
- Please keep the power cable, video cable, and control cable safe and out of obstructions.
- Operational temperature of the camera is between 0-50C / 32F-122F. To avoid damage, do not pour anything inside the camera. Avoid direct sunlight or outdoor environments.
- Do not remove the camera housing or cover. For service, please contact our support line.
- Use a dry, soft cloth to clean the camera housing with a neutral cleaning agent when needed.
Packing List:
Check for the items below when opening the package:
1 EA
-AIDA HD-NDI-200
-Power Adapter
-Power adapter sockets
-Micro USB Cable
-C/CS Mount Adapter
-Thank you card
Quick Start:
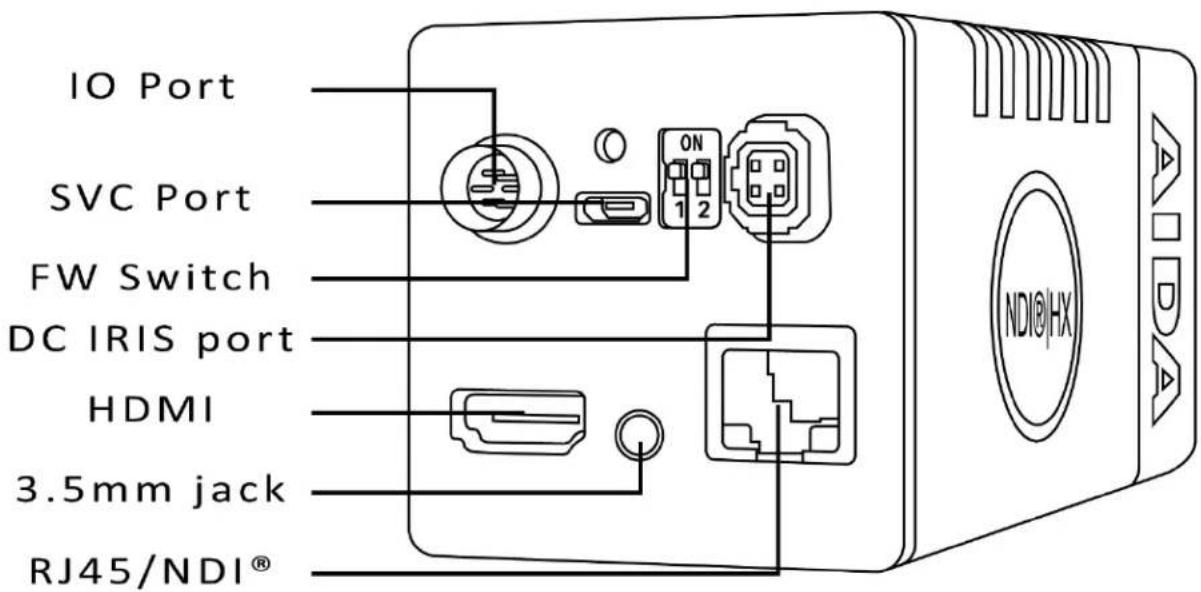
- Ensure that all cable connections are secure before powering on the camera.
text_image
IO Port SVC Port FW Switch DC IRIS port HDMI 3.5mm jack RJ45/NDI® ON 1 2 NDI@HX AIDA- Test the video either through HDMI or NDI. The camera will be default resolution of 1080 30p.
Product Highlights:
- Contains a Sony CMOS ISP (1/2.8" progressive CMOS sensor) providing up to 1920x1080 full HD resolution.
- Utilizes the newest NDI® | HX2 for the lowest latency, quality and compression video over a single network.
- Autodiscover enabled for fast installation over any network.
- Standard 4mm lens for a standard 80 degree HFOV shot.
• Full HD video over HDMI, RTSP, RTMP, and NDI. - Fully adjustable camera settings, from White balance, exposure settings, and image parameters.
- Supports PoE: get power and video over one ethernet cord.
- Controllable over RS485 or online web UI.
- Menu based image parameters controllable over breakout cable or web UI.
- Free firmware updates when needed.
- Mountable tripod holes on the top and bottom.
- Audio input in rear portion of the camera for multi-channel TRS stereo audio via NDI® | HX2 or RJ45 streaming.
- Functional tally light for program, preview, and standby modes. (NDI transmission)
Camera Specs:
| Video Interface | HDMI (V1.4) | RJ-45 | NDI® | HX2 |
| Sensor | 1/2.8" Sony Progressive CMOS Sensor |
| Lens | 4mm Default lens (80 degree HFOV) |
| Lens Mount | CS Mount (C mount adapter included) |
| Control Port | RS485, RJ-45 (VISCA over IP), NDI |
| Network Speed | 1000M |
| Video Encode | H.264/H.265 |
| Bit-Rate Control | Variable Bit Rate, Constant Bit Rate |
| Video Bit Rate | 1024 kbps (min) ~ 20480 kbps (max) |
| IP Protocol | IP, RTSP, RTMP, VISCA over IP, NDI® | HX2 |
| POE | Supported (IEEE802.3af) |
| Minimum Lux | 0.01 Lux |
| White Balance | Auto/Indoor/Outdoor/One Push/ATW/Manual |
| Exposure | Auto/Manual |
| Gamma | Supported |
| WDR | Supported |
| BLC | Supported |
| 2D/3D NDR | Supported |
| Audio | TRS Stereo Line In (3.5mm Jack) |
| Dimensions | LWH 2.13" x 5" x 2.13" (54mm x 127mm x 54mm) |
Camera Specs: (CONTD.)
| Video Format | HDMI | 1920 x 108060p/59.94p/50/30p/29.97p/25p/24p/23.98p1920x108060i/59.94i/50i1280x72060p/59.94p/50p/30p/29.97p/25p |
| IP / NDI|HX (frames) | 1920x10803~601280x7203~601024x5763~60620x3603~60 |
OSD Menu: (CONTD.)
- To access the OSD menu, please use the OSD controller on the breakout cable.
- Enter the menu by pressing the OSD control button once.
- Navigate through the menu by tilting the joystick up, down, left or right to manipulate the menu.
- To exit, go back to the main menu and press the OSD control button once.
| SYSTEM | Language | Select Language (English only) | Default: English |
| Protocol | VISCA: Serial and IP default | Default: VISCA | |
| Address | Select VISCA address ID | Default: 1 | |
| Baudrate | Select the VISCA baudrate | Default: 9600 | |
| Return | Return to previous menu | ||
| EXPOSURE | EXP. Mode | Choose between auto and manual exposure settings | Default: AUTO |
| Shutter | Change shutter speed under manual settings only | Default: AUTO Manual: 1/100 | |
| Gain | Change gain under manual settings only | Default: AUTO Manual: 0 | |
| DC IRIS | Allow for DC IRIS Lens compatibility | Default: On | |
| Flick | Allows for adjustment of flickerless option | Default: 50hz | |
| Backlight | Allows for enabling of backlight to compensate for low light | Default: OFF | |
| Gamma | Allows for changing gamma settings | Default: 0 | |
| Return | Return to the previous menu |
OSD Menu: (CONTD.)
| IMAGE | WB Mode | Auto/Indoor/Outdoor/Onepush/ATW/Manual/Sodium/Flourescent | Default:AUTO |
| R_Gain | Adjust red gain under manual settings | Default:52 | |
| B_Gain | Adjust blue gain under manual settings | Default:58 | |
| Defog | Allows adjustment against hazy objects | Default: OFF | |
| Return | Return to previous menu | ||
| QUALITY | 2D NR | When enabled, image noises and sharpness are reduced | Default: OFF |
| 3D NR | When enabled, less image reduction happens | Default:AUTO | |
| Sharpness | Set the level for sharpness | Default: 3 | |
| Contrast | Set the level for contrast | Default: 8 | |
| Saturation | Set the level for Saturation | Default: 8 | |
| Bright | Set level for brightness | Default: 8 | |
| D_WDR | Enables control of WDR | Default: OFF | |
| Return | Return to previous menu | ||
| CTRL | Mirror | Mirrors the image across the Y plane | Default: OFF |
| Flip | Mirrors the image across the X plane | Default: OFF | |
| D/N Mode | Enables the night shutter mode for low light situations | Default: DAY | |
| Gain Limit | Allows to set limit on amount of light that enters the camera | Default: 128 | |
| FORMAT | Resolutions | Allows for the changing of resolutions. Scroll down for more options. | Default:1080 30p |
| Return | Return to previous menu |
OSD Menu: (CONTD.)
| NETWORK | DHCP | Enable or disable DHCP | Default: OFF |
| Address | Set the IP address of the camera | Default: 192.168.1.188 | |
| Netmask | Set the netmask of the camera | 255.255.255.0 | |
| Gateway | Set the gateway of the camera | 192.168.1.001 | |
| Return | Return to the previous message | ||
| RESET | Cam Reset | Reset all Image parameters | Default: RESET |
| All Reset | Factory reset the camera (please give the camera a moment to reboot) | Default: RESET | |
| Return | Return to the previous menu | ||
| INFO | FW Ver | Use this when referring to support | |
| Info | Use this to quickly glance over the cameras IP settings, as well as resolution and visca settings. | ||
| Return | Return to previous menu |
Web Settings:
The camera web interface supports most major browsers such as Chrome, Firefox, IE, Safari, Opera, etc.
The web interface uses flash to see the camera preview. This will change by the end of the year 2020 onto our alternative player.
1. Login
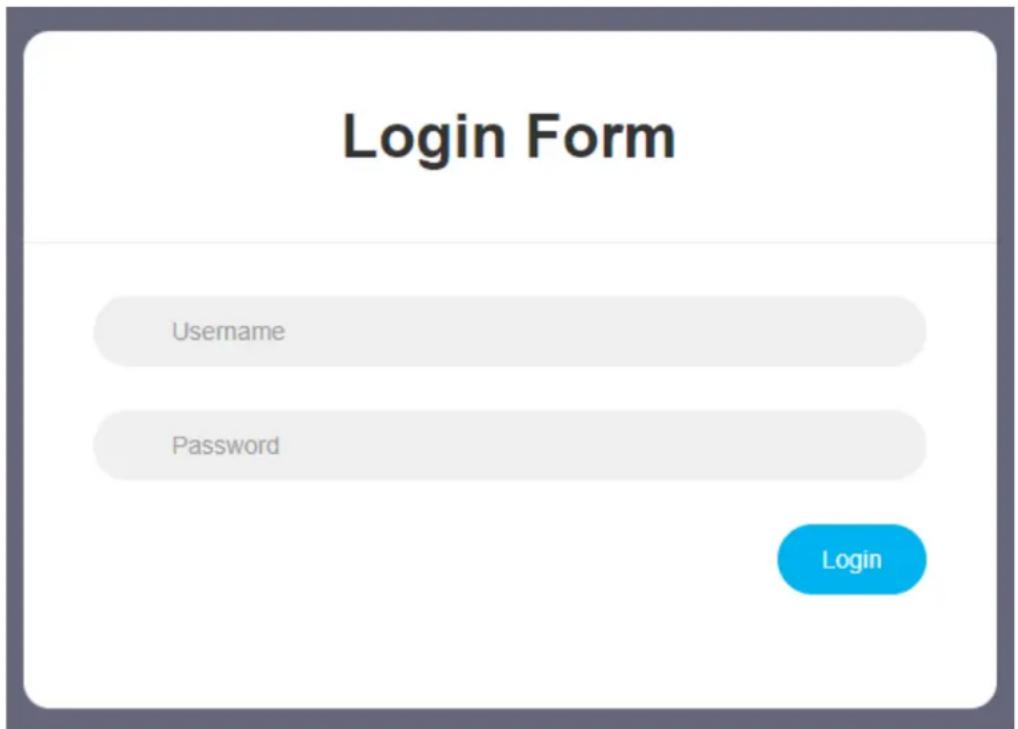
Open your desired browser and in the address bar, please type the camera's default IP address: 192.168.1.188. (If you are unable to connect, please locate the IP address under the INFO menu, and make sure your device is connected to the same network as it)
You will be prompted with the following screen. The default username and password for the camera is both admin.
text_image
Login Form Username Password LoginWeb Settings: (CONTD.)
2. Realtime Preview
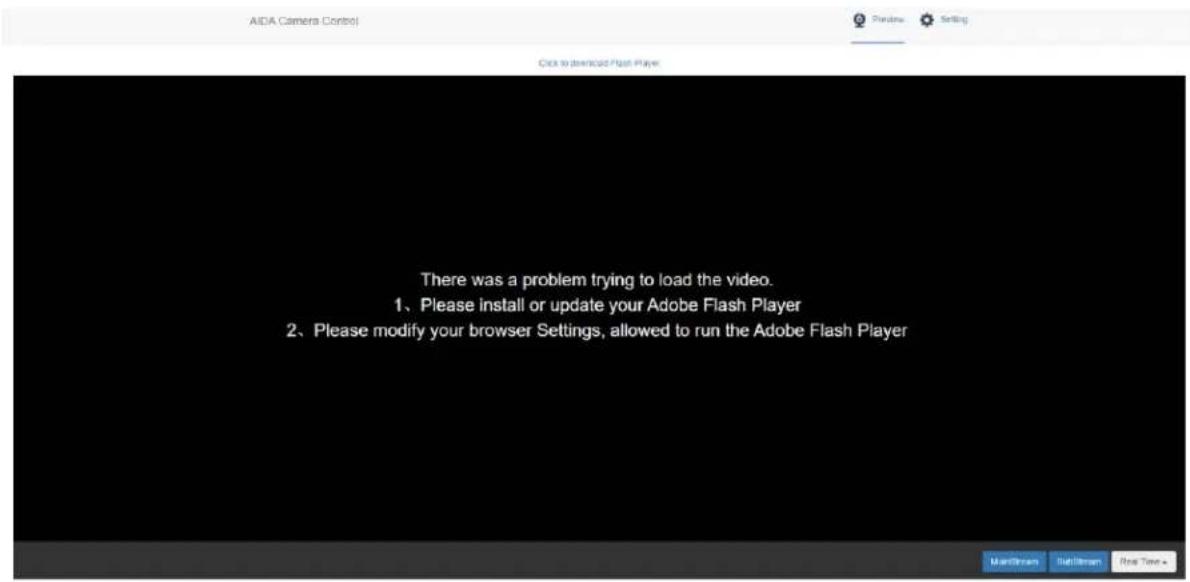
When logging in the first time, you will notice a black screen with the error "problem trying to load the video." In order to live preview, you will need to click the "click to download flash player button" above the black screen.
text_image
AIDA Camera Control Preview Setting Click to download Flash Player There was a problem trying to load the video. 1、Please install or update your Adobe Flash Player 2、Please modify your browser Settings, allowed to run the Adobe Flash Player Mainstream EditFrom Real Time+Once you allow flash to run, you will see the real-time preview like so:
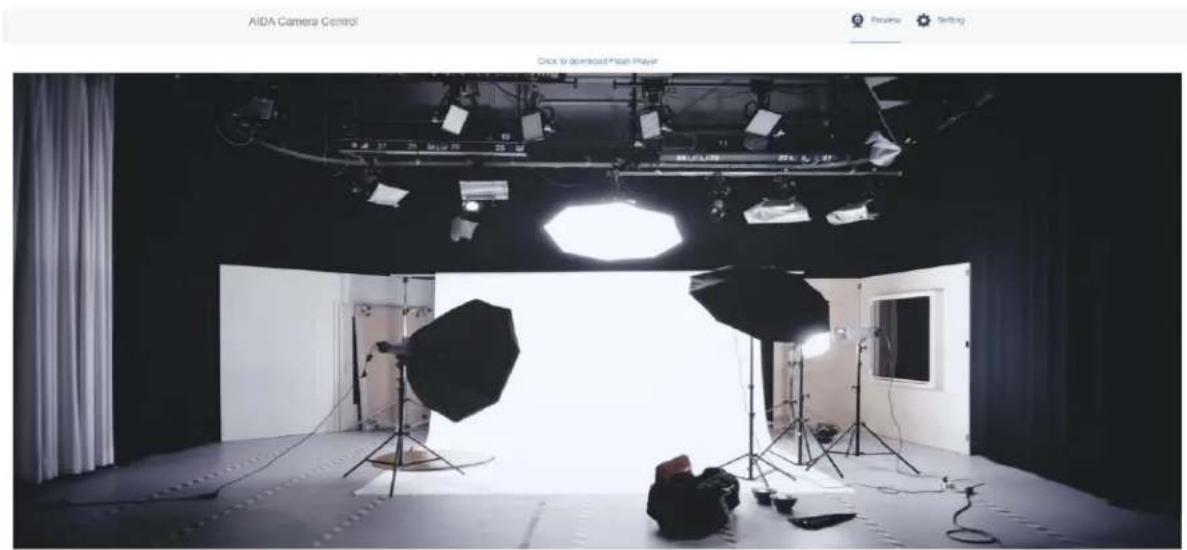
natural_image
Interior of an AIDA Camera Control studio with studio lighting and a person working on the floor (no visible text or symbols)Web Settings: (CONTD.)
3. Camera Parameters
Clicking on the settings tab on the top right allows you to enter the network and image settings of the camera.
The first tab you will encounter is the video encode. Under video encode, you can change the encode mode, resolution, bitrate, framerate, bitrate control, and I-frame interval. You may also enable or disable the streams.
Video Encode
Stream
Main
Sub
Enable


Encode Mode
H.264

H.264

Profile
MP

MP

RTSP Address
rtsp://192.168.1.188:554/stream/main
rtsp://192.168.1.188:554/stre am/sub
Resolution
1920x1080

1280×720

Bitrate(kbps) (1024-16384)
4096
2048
Framerate
30

30

Bitrate Control
CBR

CBR

I Frame Interval (3-120)
30
30

Save
Web Settings: (CONTD.)
The Video Transmission tab is responsible for the direct streaming protocol: RTMP. Under this tab, you can change the RTMP settings for direct streaming to social media platforms, as well as enable or disable NDI®.
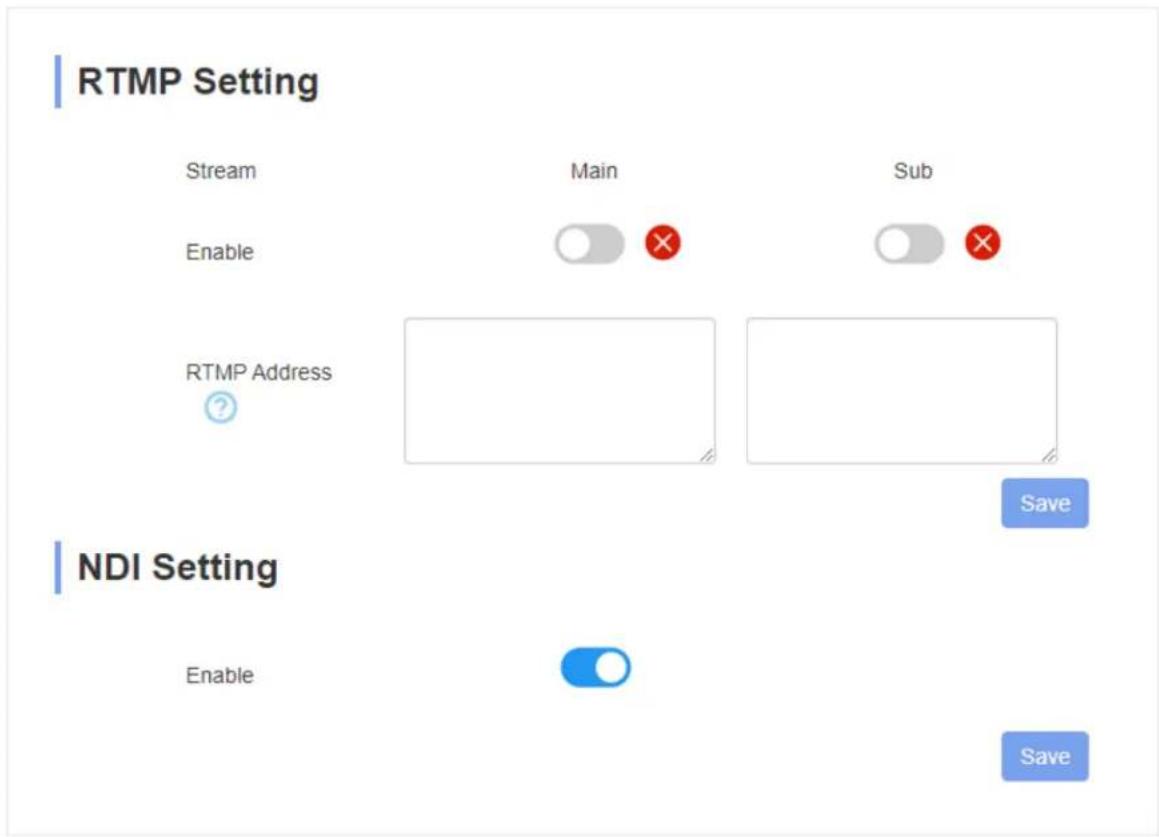
text_image
RTMP Setting Stream Enable RTMP Address Main Sub Save NDI Setting Enable SaveFor more info on how to stream directly to places like youtube or facebook, please visit our YouTube channel for further details!
Web Settings: (CONTD.)
The Audio Settings tab is responsible for the audio embedment settings. Here you can turn on or off the audio. You are also able to change the encode mode, as well as the sample and bitrate.
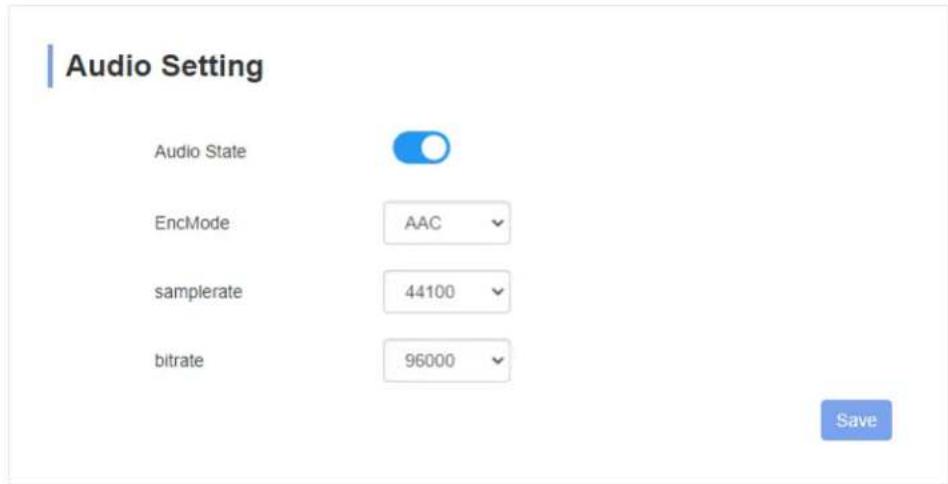
text_image
Audio Setting Audio State EncMode AAC samplerate 44100 bitrate 96000 SaveThe Image Parameter tab allows you to access the camera settings.
Here you are able to change your image settings via the web interface instead of the OSD menu. You have access to all the settings you can normally find on the OSD menu.
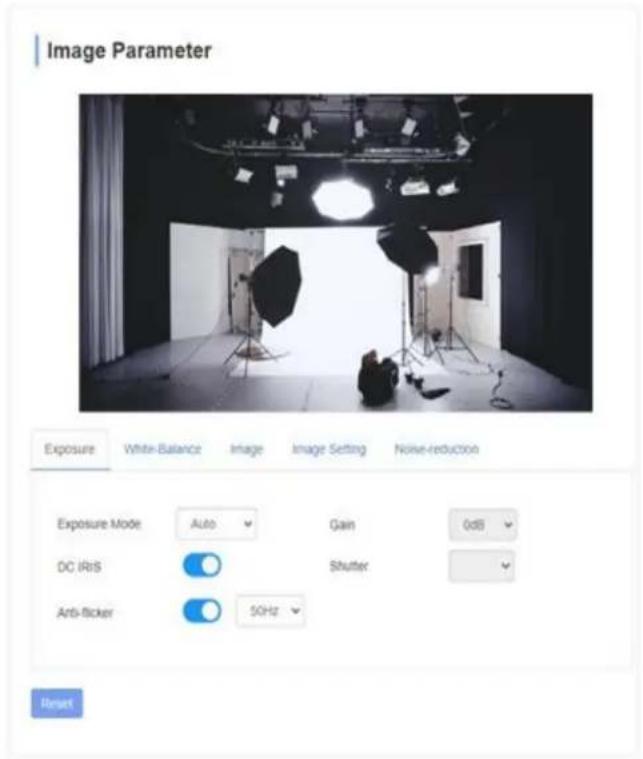
text_image
Image Parameter Exposure White-Balance Xiage Xiage Setting Noise-reduction Exposure Mode Auto Gain 0dB DC IaaS Shutter Anti-sterior 50Hz ResetWeb Settings: (CONTD.)
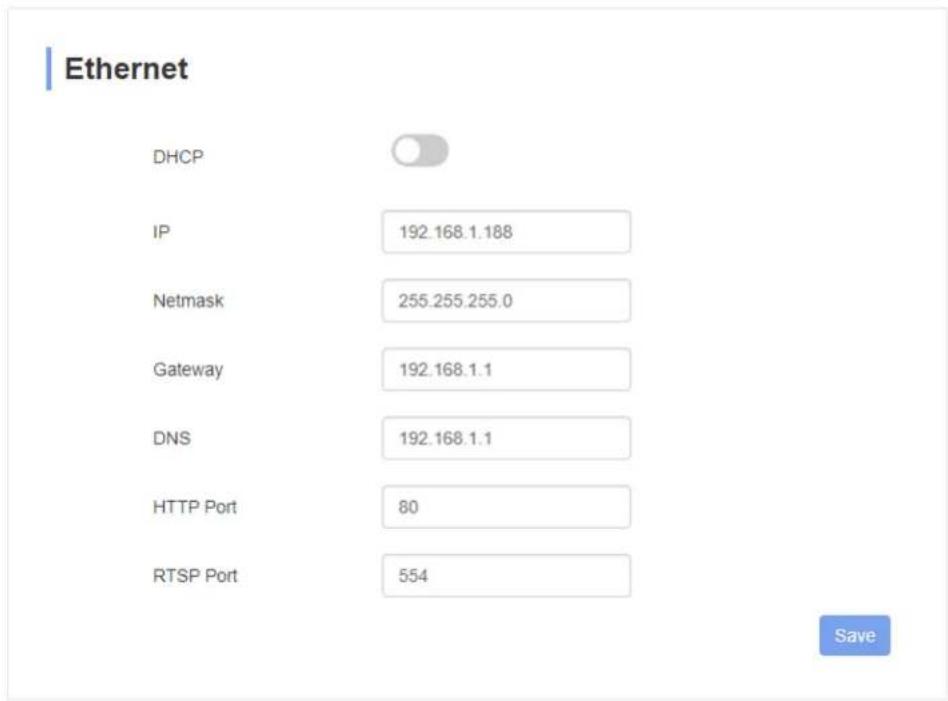
The Ethernet tab allows you to change the IP settings of the camera, as well as other settings. We highly recommend not changing anything you don't know, as it can cause irreversible damage not covered by warranty.
text_image
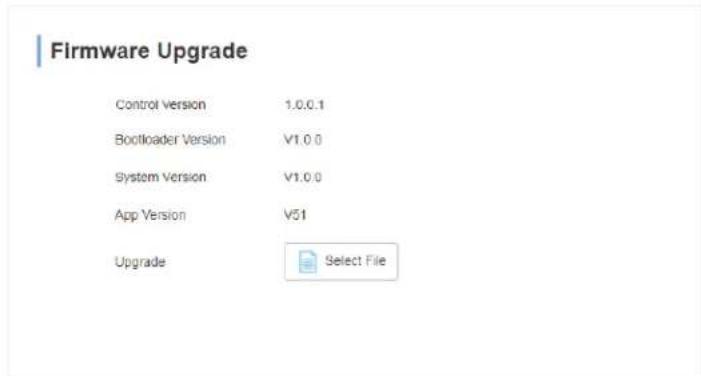
Ethernet DHCP IP 192.168.1.188 Netmask 255.255.255.0 Gateway 192.168.1.1 DNS 192.168.1.1 HTTP Port 80 RTSP Port 554 SaveThe Firmware Upgrade tab allows you to update the firmware of the camera. Stay up to date by signing up for our newsletter, as well as visit our website at aidaimaging.com/download for the latest and greatest firmwares!
text_image
Firmware Upgrade Control Version 1.0.0.1 Bootloader Version V1.0.0 System Version V1.0.0 App Version V51 Upgrade Select FileWeb Settings: (CONTD.)
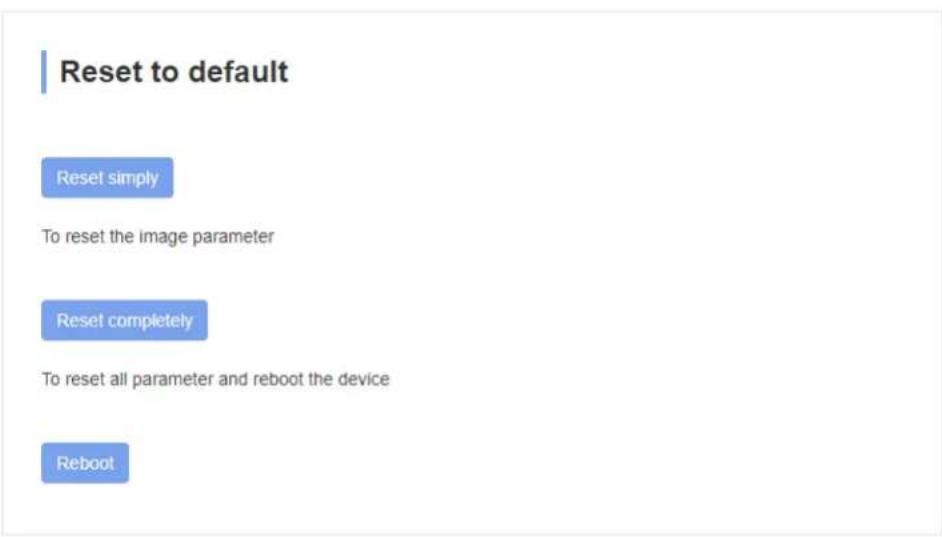
The Reset to Default tab allows you to reset the image parameter, or factory reset the camera. It also allows for you to remotely reboot the camera.
text_image
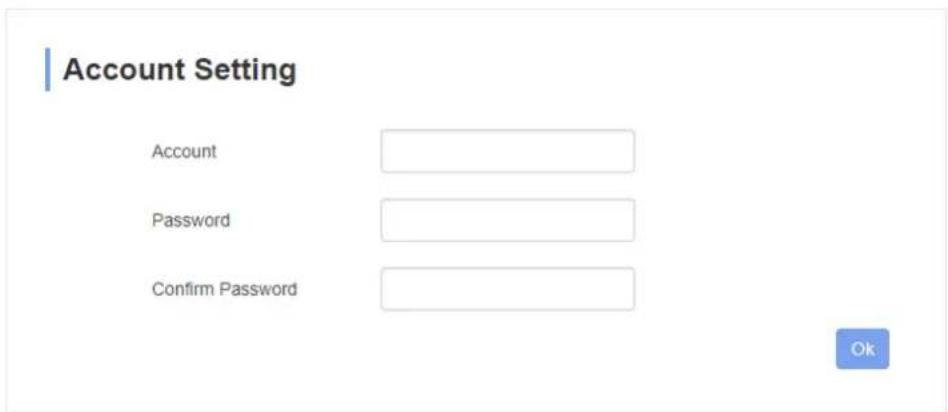
Reset to default Reset simply To reset the image parameter Reset completely To reset all parameter and reboot the device RebootThe Account tab allows you to change the username and password of the camera IP address. If you happen to forget the username or password, please factory reset the camera via the OSD menu to reset the password.
text_image
Account Setting Account Password Confirm Password OkVISCA Control:
The HD-NDI-200 is able to be controlled via RS485 VISCA or VISCA over IP.
To setup RS485, please locate the RS485 terminal block on the breakout cable.
To setup VISCA over IP, please use the RJ45 port and connect it to your software or hardware that helps control camera parameters. Here are some specs on controlling the camera over IP:
Control Port: RJ-45 Gigabit LAN
IP Protocol: IPv4
Transmission Protocol: TCP/UDP
IP Address: Default (192.168.1.188) Check OSD menu for more info
Port Address: 52381
Confirm send/transmission control: Depends on software
What is VISCA over IP?
VISCA commands are the communication between the controller and the camera equipment. These commands are sent via UDP on the network. Since UDP transmission isn't that stable, a couple of steps must happen before a setting is executed. The controller first sends out a VISCA command. The camera equipment then receives the VISCA command and returns that message aback to the controller. Once that command is executed, the action will follow suit and the message will be complete. Each VISCA command controls its own setting, so there are no overlaps in existing commands.
VISCA Protocol:
For our VISCA protocol, please head to our download page at aidaimaging.com/download to find the full command packet.
NDI® | HX2 Protocol:
What is NDI®?
NDI ^ is NewTek's innovative Network Device Interface technology, is a royalty free standard enabling IP video workflows across Ethernet networks. NDI ^ | HX2 is a bi-directional standard that allows video systems to identify and communicate with one another over IP, and to encode, transmit, and receive multiple streams of broadcast-quality, low latency, frame-accurate video and audio in real time. The NDI ^ | HX2 encoding algorithm is resolution and frame rate independent, supporting up to 4K and beyond, as well as multi-channel, floating-point audio up to 16 channels and beyond. NDI ^ | HX2 also includes tools to implement video access and grouping, bi-directional metadata, tally, and more
What about NDI® | HX2?
NDI ^® | HX2 is the next generation for efficient NDI protocol. It uses H.264, but is also capable of using H.265 (HEVC) for even more efficient compression. There are a couple of differences between NDI ^® | HX2 and its predecessor, NDI ^® | HX.
Some differences is that NDI ^® |HX2 is a true native NDI ^® stream from the camera source. It is considered a better implementation than the previous generation, allowing for a more reliable, lower latency video. It shares very similar features to true NDI ^® , such as discovery options, ability to carry metadata, and control of low level network transmission. (TCP)
You will also not need any drivers for NDI®|HX2, as NDI 4 will be used to decode it. This makes it a lot easier on previous versions of equipment. For more info on the differences between the three different types of NDI®, please view the next page.
NDI® | HX2 Protocol: (CONTD.)
| Parameter | NDI® | NDI®|HX | NDI®|HX2 |
| Transport | TCP/UDP/Multi-TCP | UDP (TCP) | TCP/UDP/Multi-TCP |
| Image Format | Size / Aspect Independent | Size / Aspect Independent | Size / Aspect Independent |
| Tally Feedback | Yes | Yes | Yes |
| Bidirectional Device Control | Yes | Yes | Yes |
| Integrated Alpha Channel | Yes | No | No |
| Compression | NDI® Codec | HX (H.264) | H.264/H.265 |
| Connection | Socket, Unicast / Multicast and FEC | Unicast/MultiCast | Socket, Unicast / Multicast and FEC |
| HD (1080i) Data Rate | ~ 100 Mbit/s | 8-20 Mbit/s | 1-50 Mbit/s |
| Essence Packing | Discrete Audio, Metadata and Video Frame packets, single connection | Delivered as Discrete Audio, Metadata and Video Frame packets, single connection | Discrete Audio, Metadata and Video Frame packets, single connection |
| Infrastructure | Gigabit / Load Balanced Multi NIC / 10GBit | Gigabit / Wireless | Gigabit / Wireless |
| Service Discovery | Bonjour (mDNS), NDI® Access (manual), Server (NDI®4) | automatic via HX Driver | Bonjour (mDNS), NDI® Access (manual), Server (NDI®4) |
| API | free license, SDK Libraries for Win(x86), Mac, Linux(x86 & ARM), iOS, FPGA reference | hardware encode, Decode with NDI® Libraries | Send with NDI® Embedded SDK, Receive with Free NDI® Libraries |
So how does the HD-NDI-200 play into all this?
Being one of the first Full-HD POV NDI® on the market, we aim to give everyone a chance at fulfilling their streaming or video capturing needs. Using NDI® to setup studios in seconds is easier to do than setting up old BNC cabling, or running out of HDMI repeaters to finish a job. With more reliability and efficient data transfer, we picture future studios running off NDI®, and moving more towards an IP infrastructure. The HD-NDI-200 is also extremely cost-effective, making it possible for studios to capture multiple angles one camera simply can't.
Warranty and Support:
Warranty:
AIDA Imaging warrants its cameras and items to be free from defects under normal use. With that in mind, we fulfill 2 years of warranty from the date of purchase unless otherwise noted. Please refer to our website for more information at: aidaimaging.com/support
Support:
If you would like additional support or explanation on anything on this manual, please feel free to go to our FAQ page on our website at aidaimaging.com/support. If you are in need of additional help, or have any general questions, please feel free to contact us in these various ways:
Telephone: 909.333.7421
Email: Support@aidaimaging.com
Website: aidaimaging.com/support
We are open yearly, Mon-Fri 8A.M. to 5P.M. PST, excluding major holidays and events.
Also, keep up to date with firmwares and new releases from AIDA Imaging by signing up for our newsletter, found on our website.