
UC3022 - Audio/video converter ATEN - Free user manual and instructions
Find the device manual for free UC3022 ATEN in PDF.


User questions about UC3022 ATEN
0 question about this device. Answer the ones you know or ask your own.
Ask a new question about this device
Download the instructions for your Audio/video converter in PDF format for free! Find your manual UC3022 - ATEN and take your electronic device back in hand. On this page are published all the documents necessary for the use of your device. UC3022 by ATEN.
USER MANUAL UC3022 ATEN
Compliance Statements
FEDERAL COMMUNICATIONS COMMISSION INTERFERENCE STATEMENT
This equipment has been tested and found to comply with the limits for a Class B digital service, pursuant to Part 15 of the FCC rules. These limits are designed to provide reasonable protection against harmful interference in a residential installation. Any changes or modifications made to this equipment may void the user's authority to operate this equipment. This equipment generates, uses, and can radiate radio frequency energy. If not installed and used in accordance with the instructions, may cause harmful interference to radio communications.
However, there is no guarantee that interference will not occur in a particular installation. If this equipment does cause harmful interference to radio or television reception, which can be determined by turning the equipment off and on, the user is encouraged to try to correct the interference by one or more of the following measures:
◆ Reorient or relocate the receiving antenna.
- Increase the separation between the equipment and receiver.
- Connect the equipment into an outlet on a circuit different from that to which the receiver is connected.
- Consult the dealer or an experienced radio/TV technician for help.
The device complies with Part 15 of the FCC Rules. Operation is subject to the following two conditions: (1) this device may not cause harmful interference, and (2) this device must accept any interference received, including interference that may cause undesired operation.
FCC Caution: Any changes or modifications not expressly approved by the party responsible for compliance could void the user's authority to operate this equipment.

text_image
CE FC 20 E3914 UK CAKCC Statement
Industry Canada Statement
This Class B digital apparatus complies with Canadian ICES-003.
CAN ICES-003 (B) / NMB-003 (B)
HDMI Trademark Statement
The terms HDMI, HDMI High-Definition Multimedia Interface, and the HDMI Logo are trademarks or registered trademarks of HDMI Licensing Administrator, Inc.

RoHS
This product is RoHS compliant.
The frequency and maximum EIRP Power in EU are listed as below 2402MHz\~2480MHz:0.32dBm
You are cautioned that changes or modifications not expressly approved by the part responsible for compliance could void the user's authority to operate the equipment.
FCC RF Radiation Exposure Statement:
- This Transmitter must not be co-located or operating in conjunction with any other antenna or transmitter.
- This equipment complies with FCC RF radiation exposure limits set forth for an uncontrolled environment. This equipment should be installed and operated with a minimum distance of 20 centimeters between the radiator and your body.
Radiation Exposure Statement: This equipment complies with IC radiation exposure limits established for an uncontrolled environment. This equipment must be installed and operated with a minimum distance of 20 cm between the radiation source and your body.
This equipment should be installed and operated with a minimum distance of 20 cm between the radiator and your body.
備考1. “超出0.1wt%”及“超出0.01wt%”係指限用物質之百分比含量超出百分比含量基準值。
Note 1: “Exceeding 0.1 wt %” and “exceeding 0.01 wt %” indicate that the percentage content of the restricted substance exceeds the reference percentage value of presence condition.
備考2. “○”係指該項限用物質之百分比含量未超出百分比含量基準值。
Note 2: “○” indicates that the percentage content of the restricted substance does not exceed the percentage of reference value of presence.
備考3. “-”係指該項限用物質為排除項目。
Note 3: “-” indicates that the restricted substance corresponds to the exemption.
製造商:宏正自動科技股份有限公司
This user manual is provided to help you get the most from the CAMLIVE ^™ PRO unit. It covers all aspects of installation, configuration, and operation. An overview of the information found in the manual is provided below.
Chapter 1, Introduction introduces you to the Dual HDMI to USB-C UVC Video Capture. Its purpose, features, installation considerations, and panel components are presented and described.
Chapter 2, Hardware Setup describes the steps that are necessary to quickly and safely set up your installation.
Chapter 3, Livestream / Record Setup explains how to find CAMLIVE on your system and presents how to setup video and audio source using an example live-stream/record software/platform.
Chapter 4, Aten OnAir Lite App explains how to download and configure the CAMLIVE™ PRO's OnAir Lite App.
Chapter 5, The Firmware Upgrade Utility explains how to download the CAMLIVE™ PRO's firmware and upgrade the device using the utility.
An Appendix provides a list of safety instructions and precautions, contact information for ATEN technical support, product specifications, and other technical information.
Note:
- Read this manual thoroughly and follow the installation and operation procedures carefully to prevent any damage to the unit or any connected devices.
- ATEN regularly updates its product documentation for new features and fixes. For an up-to-date CAMLIVE™ PRO documentation, visit http://www.aten.com/global/en/
Conventions
This manual uses the following conventions:
MonospacedIndicates text that you should key in.
[] Indicates keys you should press. For example, [Enter] means to press the Enter key. If keys need to be chorded, they appear together in the same bracket with a plus sign between them: [Ctrl+Alt].
- Numbered lists represent procedures with sequential steps.
◆ Bullet lists provide information, but do not involve sequential steps.
Indicates selecting the option (on a menu or dialog box, for example), that comes next. For example, Start > Run means to open the Start menu, and then select Run.
Indicates critical information.

Package Contents
1 UC3022 CAMLIVE™ PRO Dual HDMI to USB-C UVC Video Capture
1 USB-B to USB-C cable
1 USB-B to USB-A cable
1 power adapter
1 camera mount adapter kit
1 user instructions
*When using the CAMLIVE™ PRO, if you are only detecting MJPG video, please disconnect the USB Type-B to USB-C cable that you connected with the host. Flip the USB-C head around and reconnect it to the host. Please refer to Using the USB Cables on page 22 for more details.
Note: Make sure that all of the components are present and in good order. If anything is missing or was damaged in shipping, contact your dealer.
Product Information
For information about all ATEN products and how they can help you connect without limits, visit ATEN on the Web or contact an ATEN Authorized Reseller. Visit ATEN on the Web for a list of locations and telephone numbers:
| International http://www.aten.com |
| North America http://www.aten-usa.com |
User Information
Online Registration
Be sure to register your product at our online support center:
International http://eservice.aten.com
Telephone Support
For telephone support, call this number:
| International 886-2 | 8692-6959 |
| China 86-400-810-0 | 810 |
| Japan 81-3-5615-5811 | |
| Korea 82-2-467-6789 | |
| North America 1-88 | 8-999-ATEN ext 4988 |
| 1-949-428-1111 | |
User Notice
All information, documentation, and specifications contained in this manual are subject to change without prior notification by the manufacturer. The manufacturer makes no representations or warranties, either expressed or implied, with respect to the contents hereof and specifically disclaims any warranties as to merchantability or fitness for any particular purpose. Any of the manufacturer's software described in this manual is sold or licensed as is. Should the programs prove defective following their purchase, the buyer (and not the manufacturer, its distributor, or its dealer), assumes the entire cost of all necessary servicing, repair and any incidental or consequential damages resulting from any defect in the software.
The manufacturer of this system is not responsible for any radio and/or TV interference caused by unauthorized modifications to this device. It is the responsibility of the user to correct such interference.
The manufacturer is not responsible for any damage incurred in the operation of this system if the correct operational voltage setting was not selected prior to operation. PLEASE VERIFY THAT THE VOLTAGE SETTING IS CORRECT BEFORE USE.
Table of Contents
Compliance Statements ...... ii
About this Manual v
Conventions ......vi
Package Contents ...... vii
Product Information ...... viii
User Information......viii
Online Registration......viii
Telephone Support......viii
User Notice ix
1. Introduction
Overview....1
Features 2
Planning the Installation 2
Requirements 2
Supported Operating System and Requirements 3
Components 4
Front View....4
Rear View 6
2. Hardware Setup
Mounting the Camera Mount Adapter....7
Optional Rack Mounting 7
Connecting the CAMLIVE™ PRO Unit 8
Aten OnAir Lite App Installation 10
Phone Tray 10
Software 11
PC....11
Android Smartphone 11
3. Livestream / Record Setup
Livestream / Record Platform 13
Discovering CAMLIVE on your System 13
Mac Operating System 13
Windows Operating System 16
Video and Audio Setup 18
Using the USB Cables 22
HDCP Switching....23
Resetting the CAMLIVE™ PRO 24
4. Aten OnAir Lite App
ATEN OnAir Lite Application....25
Supported Systems....25
Installing the ATEN OnAir Lite App 25
Connecting the CAMLIVE™ PRO on your Mobile Device ..... 26
Disconnecting the CAMLIVE™ PRO from your Mobile Device ..... 27
Page Components .....28
Project Settings 29
System Information Tab 29
Video Mixer 30
Multi-Crop 32
Resize Crop Scene 33
Renumber Crop Scene ....33
Remove Crop Scene 34
Add Crop Scene 34
Scene Editor 35
Overlay Button....36
Switching Video Source....36
Reset Button 37
Resize/Crop Tool....37
Resize 37
Crop....38
Remote Deck 40
Mapping Hotkey with Corresponding Softwares (OBS).....40
Audio Mixer 43
Settings Panel 46
Chroma Key 46
Auto Switch 48
More Settings 49
Advanced 49
Resetting the CAMLIVE™ PRO 50
ATEN OnAir Lite App Factory Default Settings 51
5. The Firmware Upgrade Utility
Overview 53
Downloading the Firmware Upgrade Package ....53
Preparation....54
Starting the Upgrade ....55
Upgrade Succeeded....57
Upgrade Failed 58
Appendix
Safety Instructions....59
General 59
Technical Support 61
International 61
North America 61
Specifications 62
Limited Warranty 64
This Page Intentionally Left Blank
Overview
The CAMLIVE™ PRO is designed to easily capture and mix the two connected 4K video sources in FHD format for livestream purpose with outstanding video effects and remarkable image quality. This video capture device combines video capture, encoding, and 2-channel video mixing and switching from HDMI source and professional line-level audio device. It helps livestreaming become unique and stand out from thousands of CDN videos. The CAMLIVE™ PRO supports easy switch between multiple connected sources and combine them for a rich information delivery in steaming. In addition, it automatically converts the sources to clean-looking USB video format in 720P or 1080P, which is sent to your laptop/smartphone via USB.
Easy to use – the CAMLIVE™ PRO provides an intuitive ATEN OnAir Lite App. This App places everything you need to customize your video stream right at your fingertips. Combine, crop, and scale video to make outstanding PnP layouts. Preset up to 8 custom scenes and manage audio sources with the intuitive touch panel interface for a superior pro-level finish. Open up a world of possibilities by using the chroma keying. You can make it look like you are anywhere by changing the background for eye-popping effects.
Providing smooth video streaming workflow for dual camera or single operator setups, the CAMLIVE™ PRO allows any streamer to broadcast over internet for higher quality livestream to major streaming services or remote conferencing service such as YouTube Live, Facebook, OBS, Microsoft Teams, Microsoft Mixer, Zoom, CameraFi, and Twitch. It enables eye-popping, high-quality one stop programming streaming broadcasting capability with PC and Mac platform.
Whether you're capturing, editing or streaming, the CAMLIVE™ PRO is flexible enough to fit all independent livestreaming broadcasting environments. This micro device packs several features in one such as and its lightweight design makes it possible to fit in any case and bring it to any live event. With just the CAMLIVE™ PRO, companion app, and your laptop / smartphone, you have all the devices you need to present engaging livestreaming that will rival the most advanced streamers on social media and provides an easy-to-use solution.
Features
- Mix and capture two unencrypted 4K live videos at 1080P UVC format on PC or mobile device via USB 3.x interface with seamless transition
- Intuitive Android / iOS App control – set up your camera gear and direct your show from anywhere
◆ Supports real-time HDMI program video preview - Easily identifiable chroma keys – can make the video look like you are anywhere by changing the background
◆ Provides audio mixer with additional dual analog audio inputs
◆ Supports protected video (encrypted) switching mode for regular event usage
◆ Compatible with USB & Thunderbolt 3 (USB-C)
Planning the Installation
Requirements
Prepare the following before installing the CAMLIVE™ PRO unit:
◆ 2 HDMI source devices
◆ 1 HDMI display
◆ 1 XLR audio source
◆ 1 RCA audio source
◆ 1 mobile device (Android / iOS)
Supported Operating System and Requirements
| Operating System Minimum Hardware | Requirement |
| Windows 7 with Win7_driver installed | CPU: Intel® i3 Dual Core 2.8Ghz or higherRAM: 4GB or moreOne USB-C Interface or USB-A Interface |
| Windows 10 or above | |
| OS X 10.13 or later | |
| Android 5.0.1 or later with UVC support | Android smartphone with UVC and USB-C Interface |
Note: For Windows 7 users, please download and install the Win7_driver from on our website. To download the driver, see Downloading the Firmware Upgrade Package, page 53.
Components
Front View
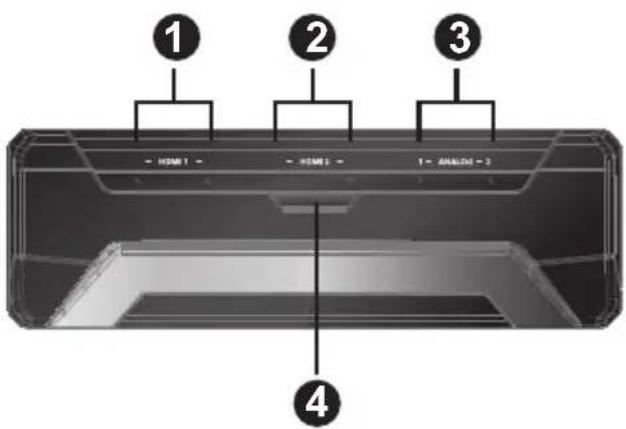
text_image
① HDM1 ② HDM2 ③ 1 - 40000 - 3 ④| No. | Component Description | |
| 1 | HDMI 1 video status LED | The LED lights green to indicate the HDMI 1 video source connection is in effect. |
| HDMI 1 audio status LED | The LED lights green to indicate the HDMI 1 audio source connection is in effect. | |
| The LED lights orange to indicate the HDMI 1 audio source connection is muted. | ||
| 2 | HDMI 2 video status LED | The LED lights green to indicate the HDMI 2 video source connection is in effect. |
| HDMI 2 audio status LED | The LED lights green to indicate the HDMI 2 audio source connection is in effect. | |
| The LED lights orange to indicate the HDMI 2 audio source connection is muted. | ||
| 3 | Analog 1 audio Status LEDs | The LED lights green to indicate the Analog 1 (RCA) audio source connection is in effect. |
| The LED lights orange to indicate the Analog 1 (RCA) audio source connection is muted. | ||
| Analog 2 audio status LEDs | The LED lights green to indicate the Analog 2 (XLR) audio source connection is in effect. | |
| The LED lights orange to indicate the Analog 2 (XLR) audio source connection is muted. | ||
| No. | Component | Description |
| 4 B | leuetooth link pushbutton | Press to quickly switch between scene 1 and scene 2. Press and hold 3 seconds to disconnect the Bluetooth connection between CAMLIVETM PRO and your mobile device. Press and hold the Bluetooth link pushbutton, and power on the CAMLIVETM PRO to perform a firmware upgrade. See Preparation, page 54. Press and hold the Bluetooth link pushbutton, power on the CAMLIVETM PRO, and wait for 10 seconds to reset the unit. See Resetting the CAMLIVETM PRO, page 24. |
Note:
- All the LEDs blink at the same time to indicate that the firmware upgrade is in progress.
- The HDMI 1 video status LED and the HDMI 2 video status LED blink once every 0.5 seconds for 3 seconds when you disconnect the Bluetooth connection.
Rear View
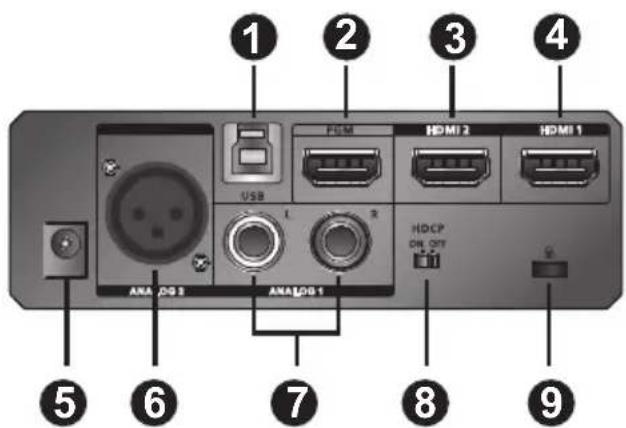
text_image
1 2 3 4 USB L R HDMI 2 HDMI 1 ANA LOG 3 ANA LOG 1 HDCP ON OPT G 5 6 7 8 9| No. | Component Description |
| 1 USB Type-BUVC output port | Connects to a host. |
| 2 HDMI program output port | Connects to an HDMI-enabled display for programmed (PGM) video output. |
| 3 HDMI 2 input port | Connects to an HDMI input.Note: This port supports interlaced HDMI video input. |
| 4 HDMI 1 input port | Connects to an HDMI input. |
| 5 power jack The power adapter plugs here. | |
| 6 Analog 2 input port | Connects XLR audio source here. |
| 7 Analog 1 input port (L/R) | Connects RCA audio source here. |
| 8 HDCP switch Switch to display HDCP protected content. | |
| 9 Kensington Lock Kersington security slot plugs here. | |
Chapter 2
Hardware Setup

Please review the safety information regarding the placement of this device in Safety Instructions, page 59.
Mounting the Camera Mount Adapter
To mount the camera mount adapter, screw the camera mount adapter on the bottom of the CAMLIVE™ PRO with the screws provided in the camera mount adapter kit.
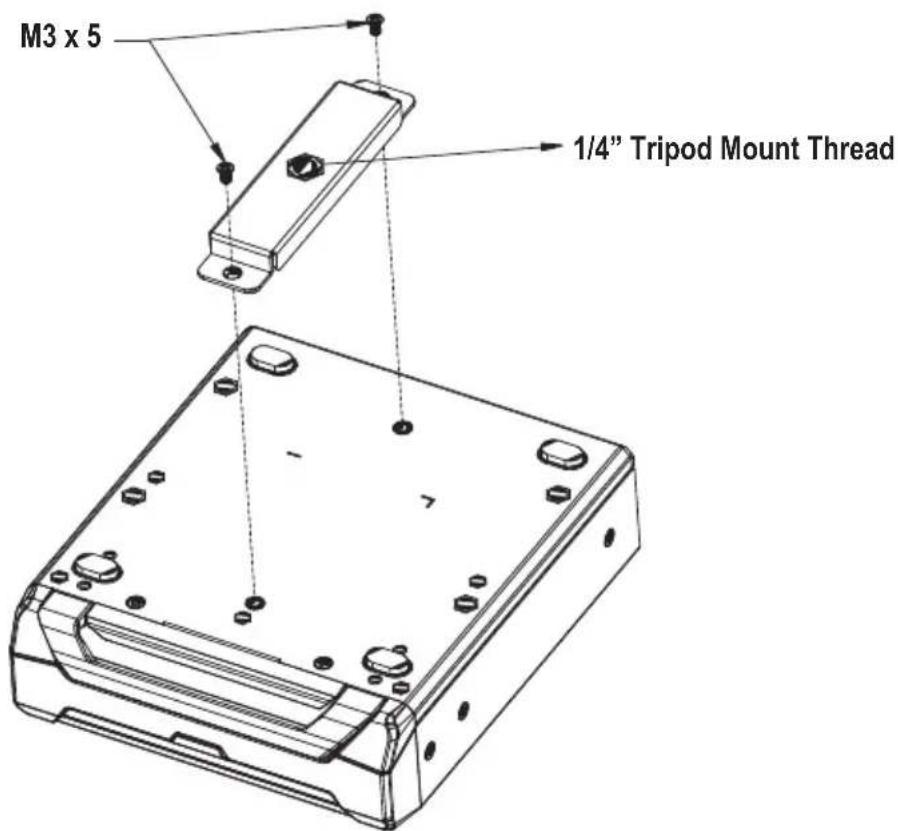
text_image
M3 x 5 1/4" Tripod Mount ThreadOptional Rack Mounting
For convenience and flexibility, the CAMLIVE™ PRO is compatible with the Teranex Mini Rack Shelf.
Connecting the CAMLIVE™ PRO Unit
Follow the steps below to connect the CAMLIVE™ PRO.
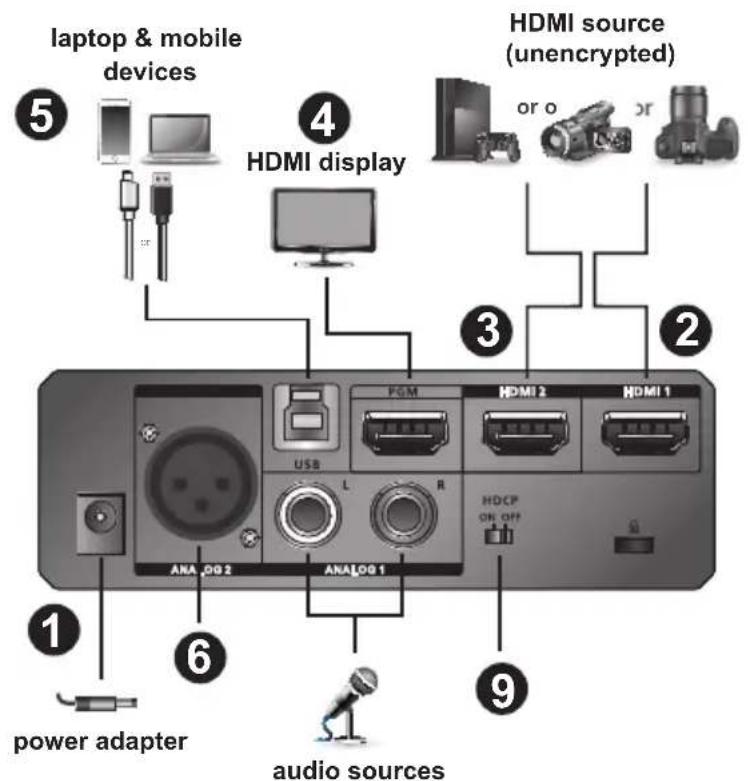
text_image
laptop & mobile devices HDMI display HDMI source (unencrypted) or o or 2 3 4 5 6 1 power adapter audio sources ANA OG 2 ANALOG 1 FDM USB L R HDMI 2 HDMI 1 HDCP OR OFF 97
text_image
· HDMI 1 · · HDMI 2 · 1 - ANALOG 3 app installed mobile device- Plug the power adapter cable into the power jack.
- Connect your first HDMI source device to the HDMI 1 input port.*
- Connect your second HDMI source device to the HDMI 2 input port.*
- Connect the HDMI program output port to an HDMI-enabled display using an HDMI cable (not included) to display your pre-programmed HDMI content.
- If your laptop only has a USB Type-A interface, connect the USB Type-B to USB Type-A cable (included) to your laptop. Or, if your Android mobile
device / laptop only has a USB-C interface, connect the USB Type-B to USB-C cable (included) to your Android mobile device / laptop respectively.
- Connect your XLR audio source to the Analog 2 input port.
- Connect your RCA audio source to the Analog 1 input port.
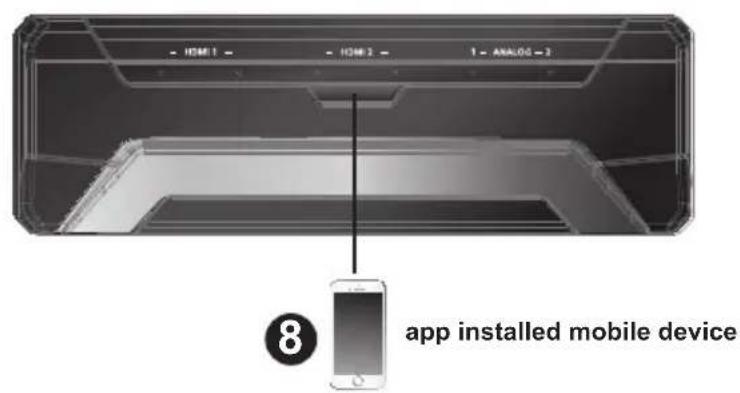
- Open the ATEN OnAir Lite app to pair up the CAMLIVE™ PRO with your app installed mobile device. For more information, see Aten OnAir Lite App, page 25.
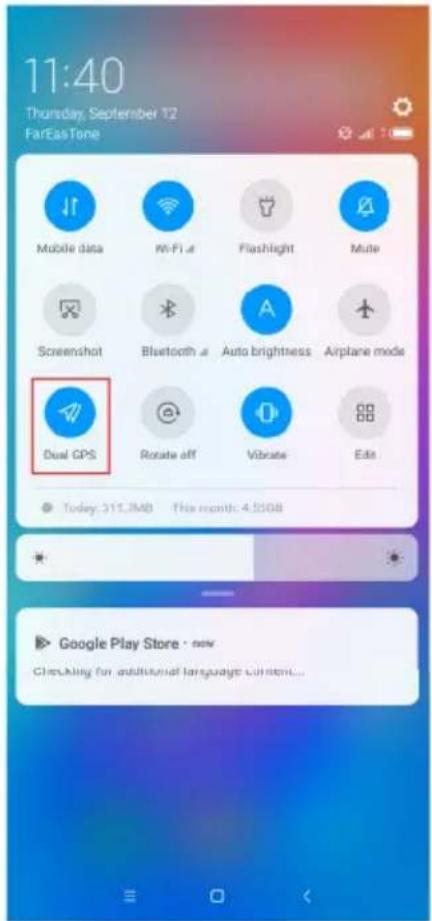
Note: Please make sure to enable the GPS function before you begin to use the ATEN OnAir Lite app.
Android iOS
text_image
11:40 Thursday, September 12 FarEasTone Mobile data WiFi a Flashlight Mute Screenshot Bluetooth a Auto brightness Airplane mode Dual GPS Rotate off Vibrate Edit Today: 311.7MB This month: 4.55GB Google Play Store · now Checking for additional language content...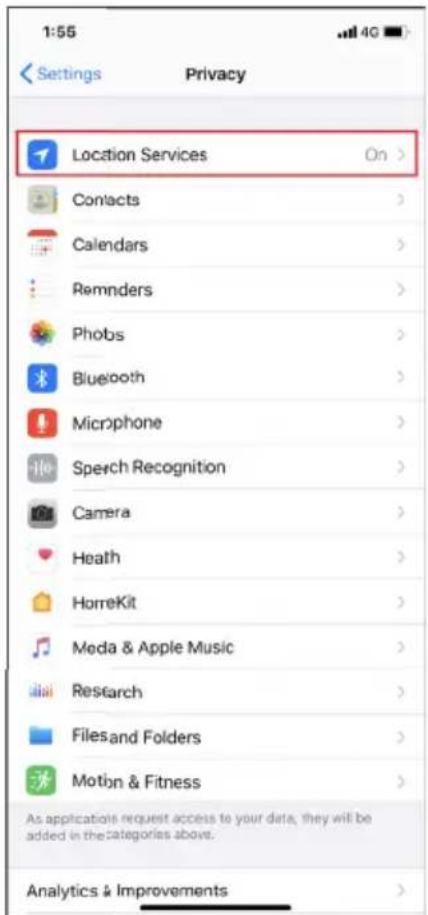
text_image
1:55 Settings Privacy Location Services On > Contacts > Calendars > Reminders > Phobs > Bluetooth > Microphone > Speech Recognition > Camera > Heath > HomeKit > Meda & Apple Music > Research > Filesand Folders > Motion & Fitness > As application request access to your data, they will be added in the categories above. Analytics & Improvements >- (Optional) For video switching, to display the HDCP protected content to the connected HDMI display (without video capture), please put the HDCP switch to ON.
Note: * The CAMLIVE™ PRO cannot capture HDCP protected content.
Aten OnAir Lite App Installation
Download and install the ATEN OnAir Lite app from the Play Store to your Android mobile device. This app is designed for the UC3022 to manage and edit the program results. The ATEN OnAir Lite app includes the following power features.
◆ Storyboard-like management
Scenes editor
◆ Audio sensing switch
♦ Chroma keyin management
◆ Audio mixer management
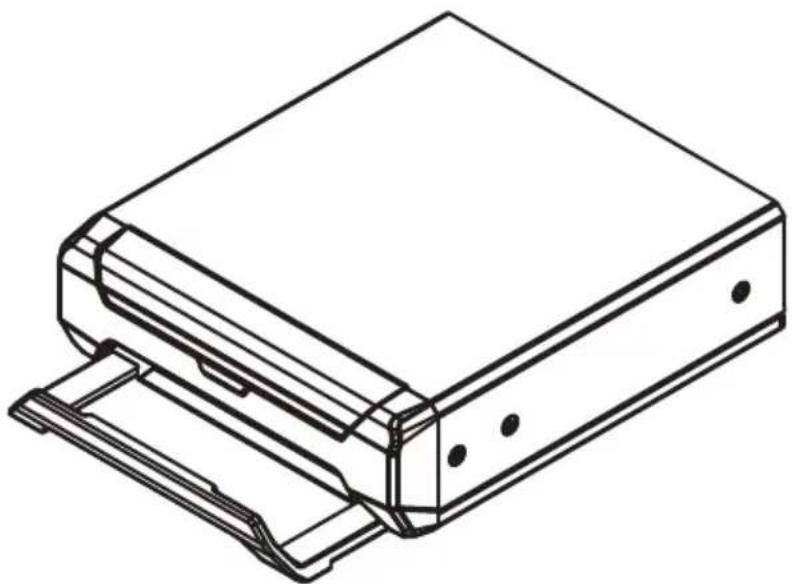
Phone Tray
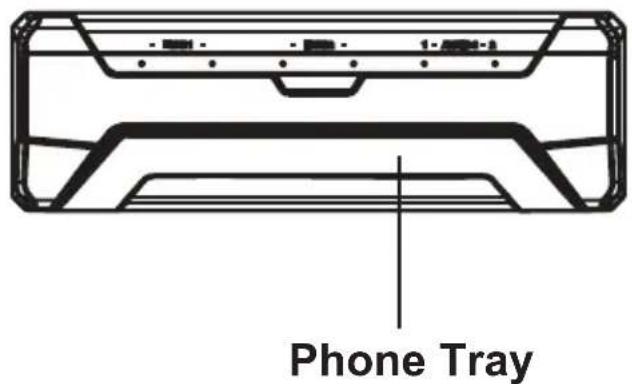
A phone tray is available for the mobile device to sit in. To use the phone tray for your mobile device, follow the steps below.
- Simply slide the phone tray out from the CAMLIVE™ PRO.
text_image
Phone Tray- Place your mobile device on it.
natural_image
Technical line drawing of a rectangular electronic component with mounting bracket (no text or symbols)Software
To enable CAMLIVE™ PRO, please download and install a suitable video recording or live streaming software for your requirement.
PC
Below lists some examples of supported video recording / live streaming software for PC.
All trademarks are property of their respective owners.
OBS: https://obsproject.com
Xsplit: https://www.xsplit.com
https://www.youtube.com
https://www.facebook.com
https://www.zoom.com
https://www.skype.com
https://www.microsoft.com/en-us/microsoft-365
Android Smartphone
Below is an example of supported video recording / live streaming for Android smartphone.
All trademarks are property of their respective owners.
http://www.camerafi.com/supported-devices/
A general reference of how to go about using CAMLIVE ^™ PRO is described in the next chapter.
This Page Intentionally Left Blank
Chapter 3
Livestream / Record Setup
Livestream / Record Platform
Below lists a few of the available live-streaming or recording software/platforms:
OBS: https://obsproject.com
Xsplit: https://www.xsplit.com
https://www.youtube.com
https://www.facebook.com
https://www.zoom.com
https://www.skype.com
https://www.microsoft.com/en-us/microsoft-365
All trademarks are property of their respective owners.
Discovering CAMLIVE on your System
CAMLIVE™ PRO is a plug-and-play device, please make sure your system is able to discover it. After connecting CAMLIVE™ PRO as shown in Connecting the CAMLIVE™ PRO Unit on page 8, refer to the examples below on how your system may discover CAMLIVE™ PRO.
Mac Operating System
- On the desktop, click to select "Go" followed by "Utilities".
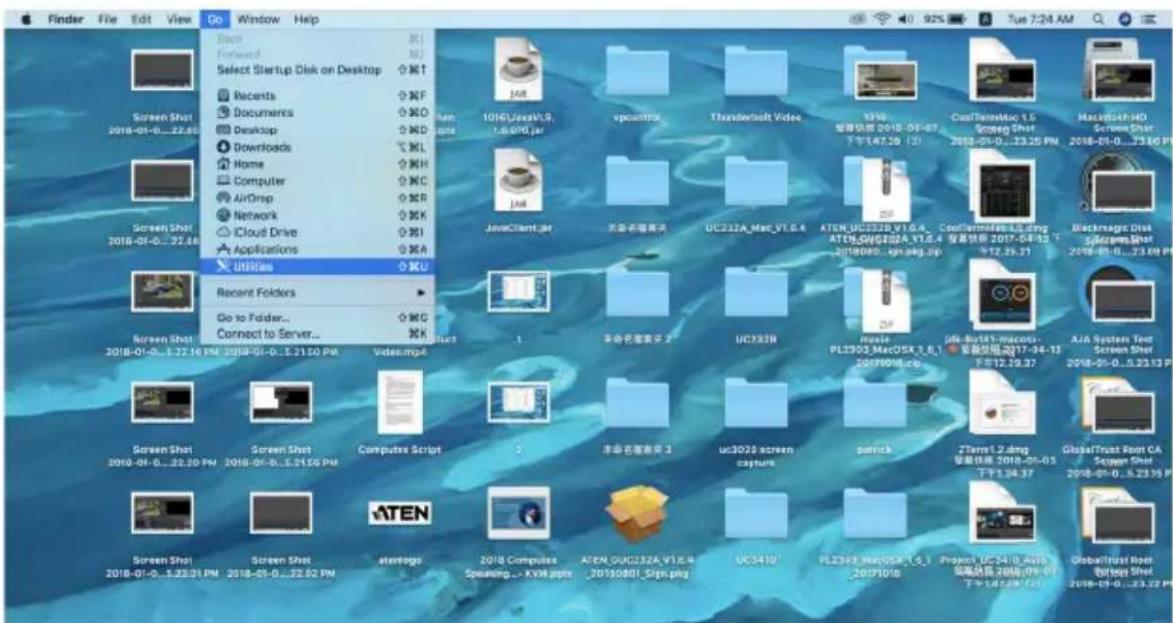
text_image
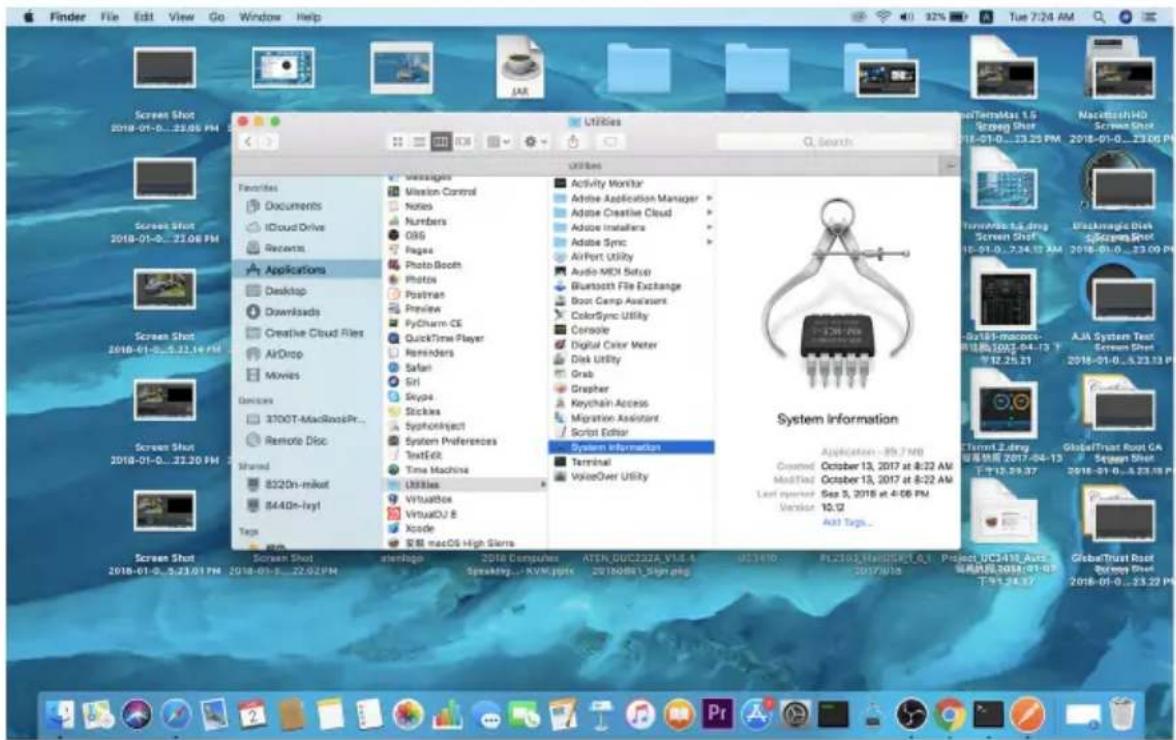
Finder File Edit View Go Window Help Back Forward Select Startup Disk on Desktop Recent Documents Desktop Downloads Home Computer AirOmp Network iCloud Drive Applications Utilities Recent Folders Go to Folder... Connect to Server... Videmcp4 1016/JawV.S. 1.6.9/0.jar vpcastfa Thunderbolt Video VM8 星展视频 2018-01-07 下午147:30 131 CatalTherMoc 1.5 Screen Shot 2018-01-0...23:30 PM BlackRock HD Screen Shot 2018-01-0...23:30 PM 2018-01-0...23:30 PM Computes Script 2018 Computer Speaking... KV8.pptx ATEN.GUC232A.V1.6.4 20180801.Sign.png UC3410 PL2349_MACOSX_1_6_1 2019/10/8 Project UC3410 AUTO 视频动画 2018-01-05 下午147:30 131 GlobalTrust Note CA Screen Shot 2018-01-0...23:30 PM atentago- On the "Utilities" window, double-click "System Information" to bring up the system window.
text_image
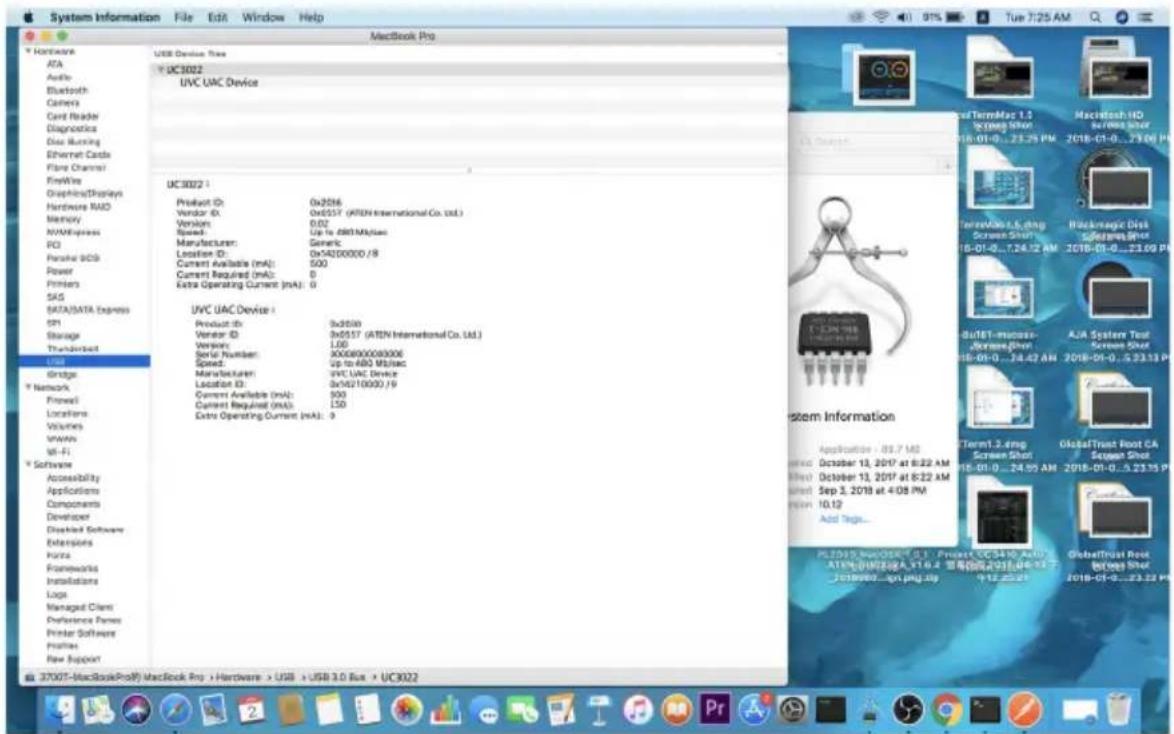
Finder File Edit View Go Window Help Screen Shot 2018-01-0...22.05 PM Screen Shot 2018-01-0...22.06 PM Screen Shot 2018-01-0...22.16 PM Screen Shot 2018-01-0...22.20 PM Screen Shot 2018-01-0...22.31 PM Screen Shot 2018-01-0...22.37 PM Screen Shot 2018-01-0...22.43 PM Screen Shot 2018-01-0...22.50 PM Screen Shot 2018-01-0...22.57 PM Screen Shot 2018-01-0...22.64 PM Screen Shot 2018-01-0...22.71 PM Screen Shot 2018-01-0...22.78 PM Screen Shot 2018-01-0...22.85 PM Screen Shot 2018-01-0...23.00 PM Screen Shot 2018-01-0...23.07 PM Screen Shot 2018-01-0...23.14 PM Screen Shot 2018-01-0...23.21 PM Screen Shot 2018-01-0...23.28 PM Screen Shot 2018-01-0...23.35 PM Screen Shot 2018-01-0...23.42 PM Screen Shot 2018-01-0...23.49 PM Screen Shot 2018-01-0...23.56 PM Screen Shot 2018-01-0...23.63 PM Screen Shot 2018-01-0...23.70 PM Screen Shot 2018-01-0...23.77 PM Screen Shot 2018-01-0...23.84 PM Screen Shot 2018-01-0...23.91 PM Screen Shot 2018-01-0...23.98 PM Screen Shot 2018-01-0...24.05 PM Screen Shot 2018-01-0...24.12 PM Screen Shot 2018-01-0...24.19 PM Screen Shot 2018-01-0...24.26 PM Screen Shot 2018-01-0...24.33 PM Screen Shot 2018-01-0...24.40 PM Screen Shot 2018-01-0...24.47 PM Screen Shot 2018-01-0...24.54 PM Screen Shot 2018-01-0...24.61 PM Screen Shot 2018-01-0...24.68 PM Screen Shot 2018-01-0...24.75 PM Screen Shot 2018-01-0...24.82 PM Screen Shot 2018-01-0...24.89 PM Screen Shot 2018-01-0...25.06 PM Screen Shot 2018-01-0...25.13 PM Screen Shot 2018-01-0...25.20 PM Screen Shot 2018-01-0...25.27 PM Screen Shot 2018-01-0...25.34 PM Screen Shot 2018-01-0...25.41 PM Screen Shot 2018-01-0...25.48 PM Screen Shot 2018-01-0...25.55 PM Screen Shot 2018-01-0...25.62 PM Screen Shot 2018-01-0...25.69 PM Screen Shot 2018-01-0...25.76 PM Screen Shot 2018-01-0...25.83 PM Screen Shot 2018-01-0...25.90 PM Screen Shot 2018-01-0...25.97 PM Screen Shot 2018-01-0...26.04 PM Screen Shot 2018-01-0...26.11 PM Screen Shot 2018-01-0...26.18 PM Screen Shot 2018-01-0...26.25 PM Screen Shot 2018-01-0...26.32 PM Screen Shot 2018-01-0...26.39 PM Screen Shot 2018-01-0...26.46 PM Screen Shot 2018-01-0...26.53 PM Screen Shot 2018-01-0...26.60 PM Screen Shot 2018-01-0...26.67 PM Screen Shot 2018-01-0...26.74 PM Screen Shot 2018-01-0...26.81 PM Screen Shot 2018-01-0...26.88 PM Screen Shot 2018-01-0...26.95 PM Screen Shot 2018-01-0...27.02 PM- Go to the USB page by clicking "USB" under "Hardware".
text_image
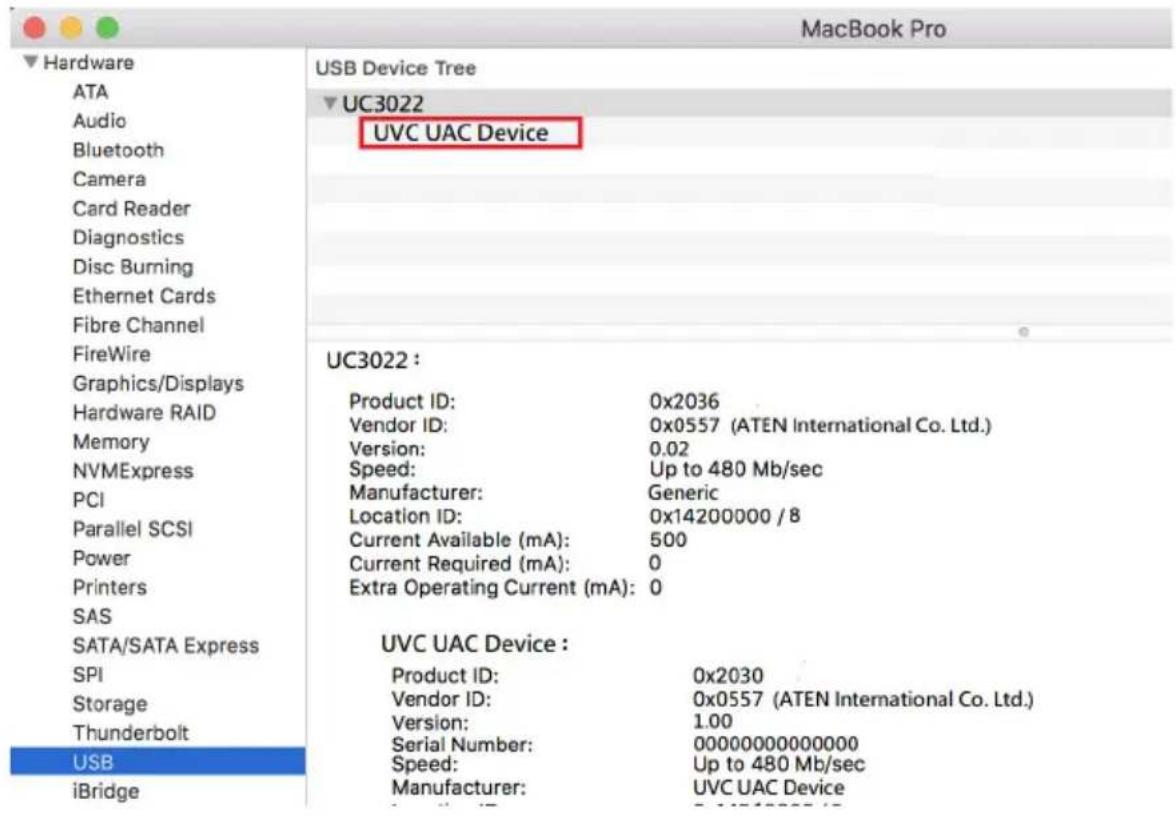
System Information File Edit Window Help MacBook Pro USB Device Tree UC3022 UVC UAC Device UC3022 : Product ID: 0x3556 Vendor ID: 0x5557 (ATEN International Co. Ltd.) Version: 0.02 Speed: Up to 480 MHz/sec Manufacturer: Generic Location ID: 0x14200000 /8 Current Available (mA): 500 Current Required (mA): 0 Extra Operating Current (mA): 0 UVC UAC Device : Product ID: 3x3556 Vendor ID: 3x5557 (ATEN International Co. Ltd.) Version: 1.00 Serial Number: 80089000093006 Speed: Up to 480 MHz/sec Manufacturer: SVC UAC Device Location ID: 3x14210000 /9 Current Available (mA): 500 Current Required (mA): 150 Extra Operating Current (mA): 9 37X07-MacBookPro® MacBook Pro > Hardware > USB > USB 3.0 Bus > UC3022- Under "USB 3.0 Bus", you should see an "UVC UAC Device". This indicates that your system has successfully discovered CAMLIVE™ PRO.
text_image
MacBook Pro Hardware ATA Audio Bluetooth Camera Card Reader Diagnostics Disc Burning Ethernet Cards Fibre Channel FireWire Graphics/Displays Hardware RAID Memory NVMExpress PCI Parallel SCSI Power Printers SAS SATA/SATA Express SPI Storage Thunderbolt USB iBridge USB Device Tree UC3022 UVC UAC Device UC3022 : Product ID: 0x2036 Vendor ID: 0x0557 (ATEN International Co. Ltd.) Version: 0.02 Speed: Up to 480 Mb/sec Manufacturer: Generic Location ID: 0x14200000 / 8 Current Available (mA): 500 Current Required (mA): 0 Extra Operating Current (mA): 0 UVC UAC Device : Product ID: 0x2030 Vendor ID: 0x0557 (ATEN International Co. Ltd.) Version: 1.00 Serial Number: 000000000000000 Speed: Up to 480 Mb/sec Manufacturer: UVC UAC DeviceGo to the next section for an example of how to setup both video and audio for live-streaming and recording using CAMLIVE™ PRO.
Windows Operating System
This is an example used in a Windows 10 Operating System.
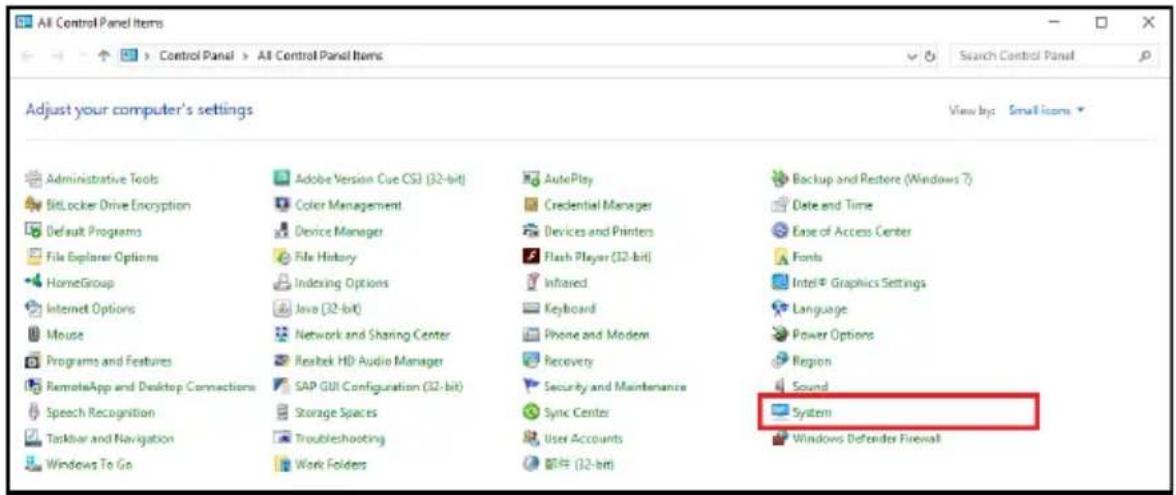
- On a Windows 10 desktop, go to Control Panel and select System.
text_image
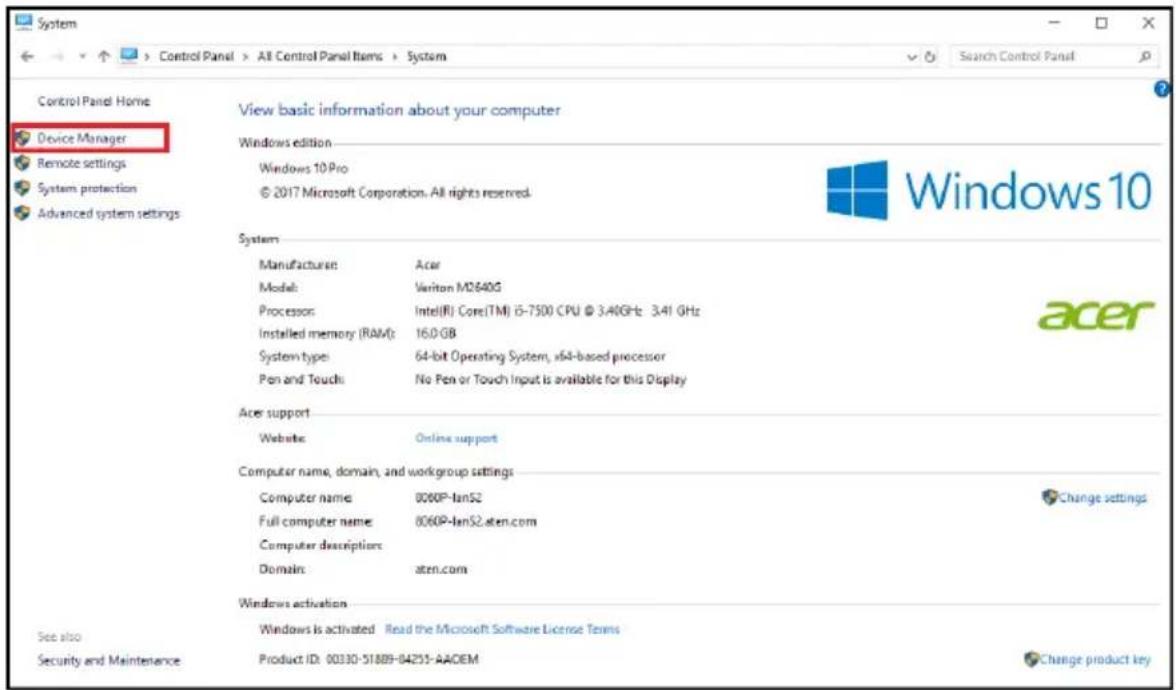
All Control Panel Items Control Panel > All Control Panel Items Search Control Panel Adjust your computer's settings View by: Small items Administrative Tools BitLocker Drive Encryption Default Programs File Explorer Options HomeGroup Internet Options Mouse Programs and Features RemoteApp and Desktop Connections Speech Recognition Taskbar and Navigation Windows To Go Adobe Version Cue CS1 (32-bit) Color Management Device Manager File History Indexing Options Java (32-bit) Network and Sharing Center Resibek HD Audio Manager SAP GUI Configuration (32-bit) Storage Spaces Troubleshooting Work Folders AutoPlay Credential Manager Devices and Printers Flash Player (32-bit) Infrared Keyboard Phone and Modem Recovery Security and Maintenance Sync Center User Accounts 部件 (32-bit) Backup and Restore (Windows 7) Date and Time Ease of Access Center Fonts Intel® Graphics Settings Language Power Options Region Sound System Windows Defender Firewall- The System window appears, select Device Manager.
text_image
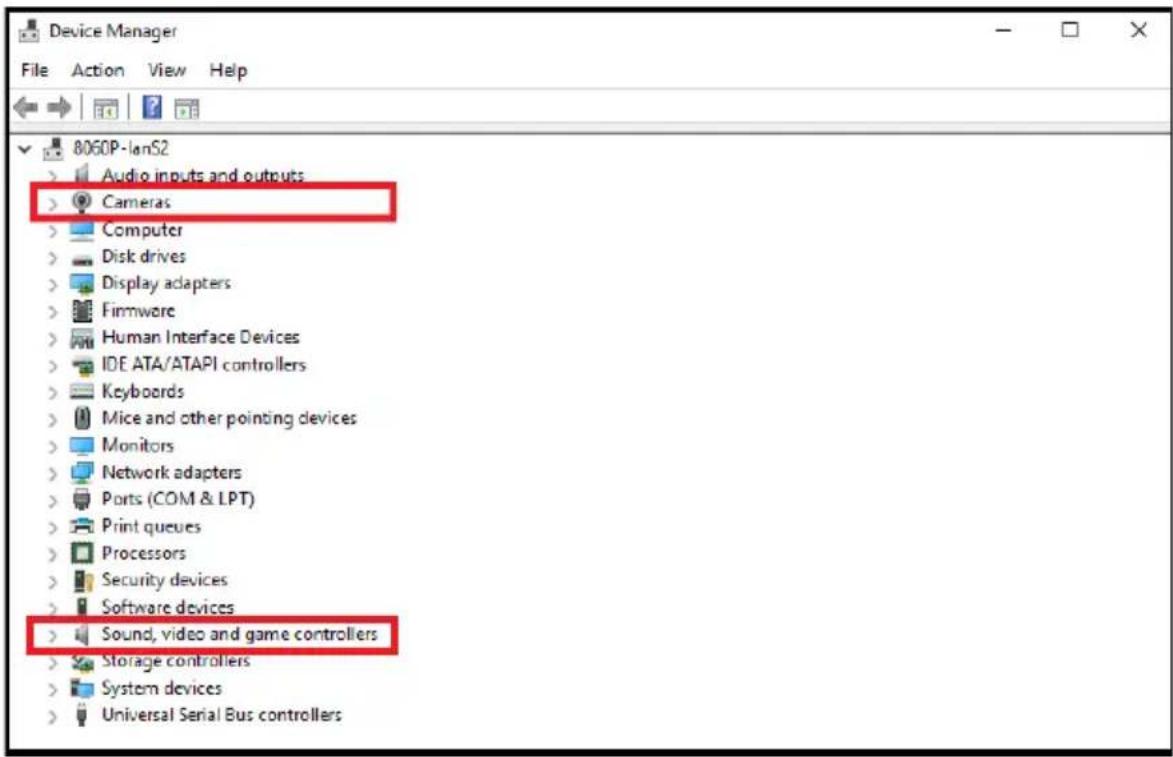
System Control Panel Home Device Manager Remote settings System protection Advanced system settings View basic information about your computer Windows edition Windows 10 Pro © 2017 Microsoft Corporation. All rights reserved. System Manufacturer: Acer Model: Veriton M2640G Processos: Intel(R) Core(TM) i5-7500 CPU @ 3.4GHz 3.41 GHz Installed memory (RAM): 16.0 GB System type: 64-bit Operating System, x64-based processor Pen and Touch: No Pen or Touch Input is available for this Display Acer support Website: Online support Computer name, domain, and workgroup settings Computer name: 8060P-lanS2 Full computer name: 8060P-lanS2.aten.com Computer descriptions: Domain: aten.com Windows activation Windows is activated Read the Microsoft Software License Teams See also Security and Maintenance Product ID: 00330-51889-84255-AAOEM Change product key- The Device Manager window appears. Click on Cameras and Sound, video and game controllers.
text_image
Device Manager File Action View Help 8060P-lanS2 Audio inputs and outputs Cameras Computer Disk drives Display adapters Firmware Human Interface Devices IDE ATA/ATAPI controllers Keyboards Mice and other pointing devices Monitors Network adapters Ports (COM & LPT) Print queues Processors Security devices Software devices Sound, video and game controllers Storage controllers System devices Universal Serial Bus controllers- You should see an "USB Video Device" in the Camera list, and an "USB Audio Device" in the Sound, video and game controllers list. This indicates that your system has successfully discovered CAMLIVE™ PRO.
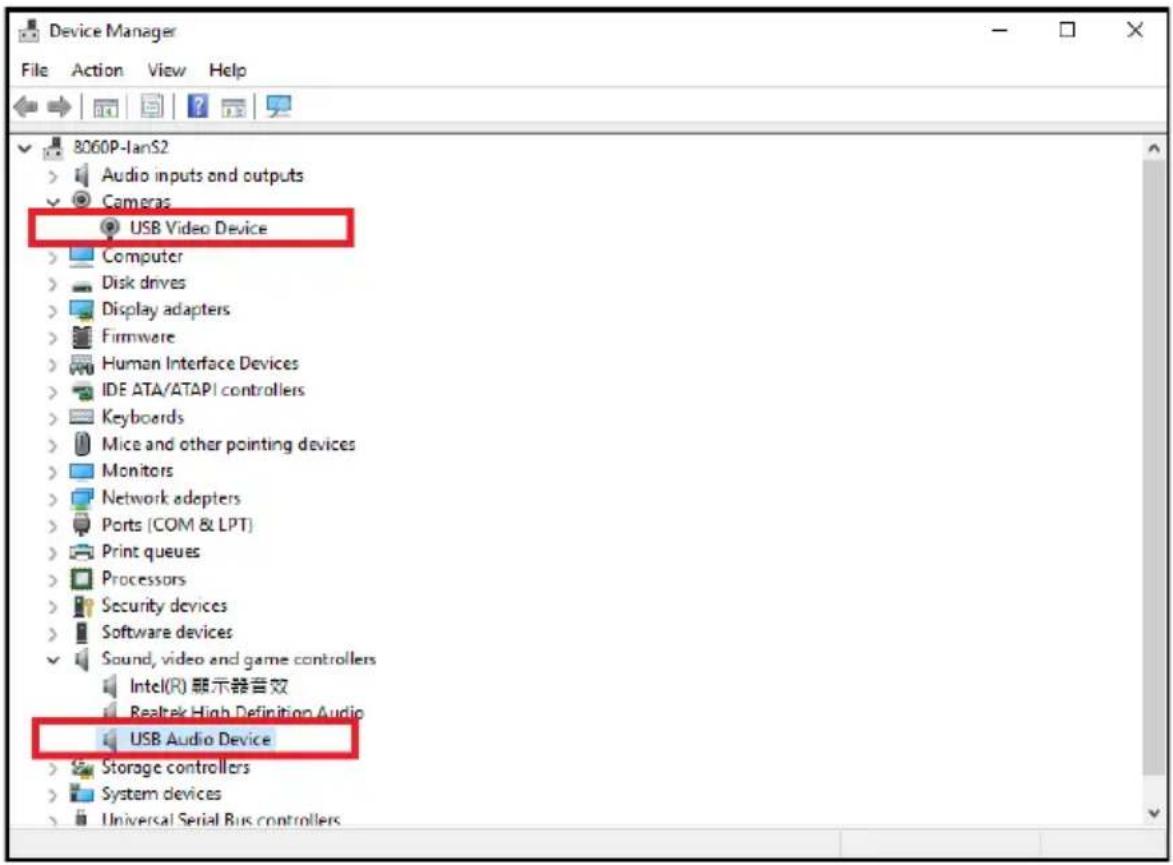
text_image
Device Manager File Action View Help 8060P-lanS2 Audio inputs and outputs Cameras USB Video Device Computer Disk drives Display adapters Firmware Human Interface Devices IDE ATA/ATAPI controllers Keyboards Mice and other pointing devices Monitors Network adopters Ports (COM & LPT) Print queues Processors Security devices Software devices Sound, video and game controllers Intel(R) 顯示器音效 Realtek High Definition Audio USB Audio Device Storage controllers System devices Universal Serial Bus controllersVideo and Audio Setup
After your system discovers CAMLIVE™ PRO, choose your livestream/record platform. You will need to setup the video and audio source coming from CAMLIVE™ PRO.
Follow the steps below to setup your video and audio sources (separately).
Note: OBS software is the example used in the setup steps below.
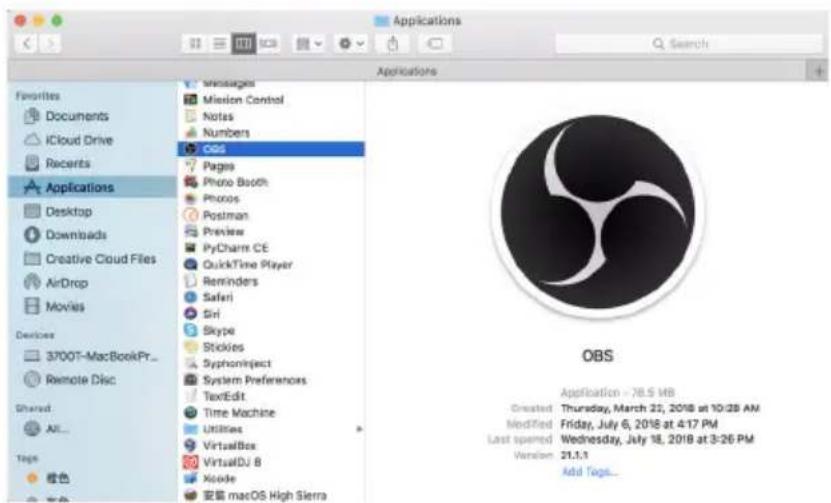
text_image
Applications Favorites Documents iCloud Drive Recents Applications Desktop Downloads Creative Cloud Files AirDrop Movies Devices 3700T-MacBookPr... Remote Disc Shared... All... Tags: 橙色 Messages Mission Control Notes Numbers OBS Pages Photo Booth Phonos Postman Preview PyCharr CE QuickTime Player Reminders Saferi Girl Skype Stickies Syphoninject System Preferences TextEdit Time Machine Utilities VirtualBox VirtualDJ 8 Xcode 安装 macOS High Sierra Applications Search OBS Application - 78.5 MB Created Thursday, March 22, 2018 at 10:28 AM Modified Friday, July 6, 2018 at 4:17 PM Last opened Wednesday, July 18, 2018 at 3:26 PM Version 21.1.1 Add Tags...- On your system, open the OBS software.
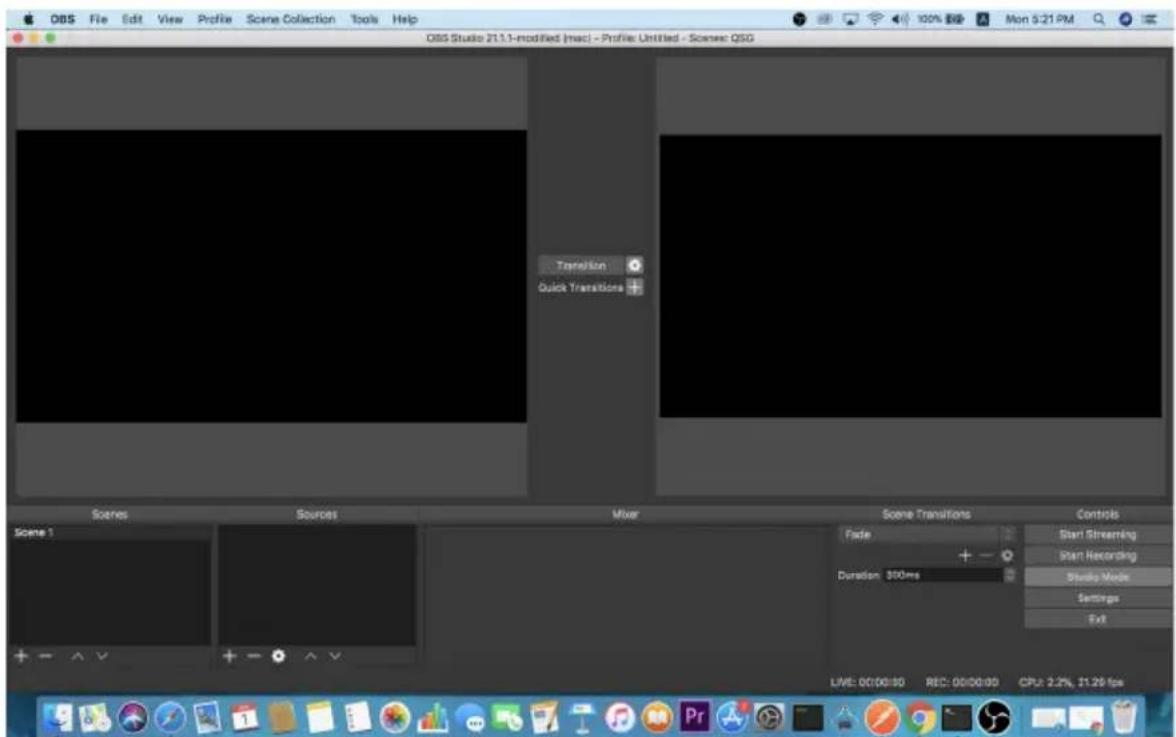
text_image
OBS Studio 21.1.1-modified (mac) - Profile: Untitled - Scenes QSG Transition Quick Transitions Scenes Sources Vias Scene Transitions Fade + - Duration 300ms Controls Start Streaming Start Recording Studio Music Settings Exit LIVE: 00:00:00 REC: 00:00:00 CPU: 2.2%, 21.29 fps- Locate and click the "+" button on the bottom of the "Sources" pane (outlined in red in the picture below) to open the add source menu:
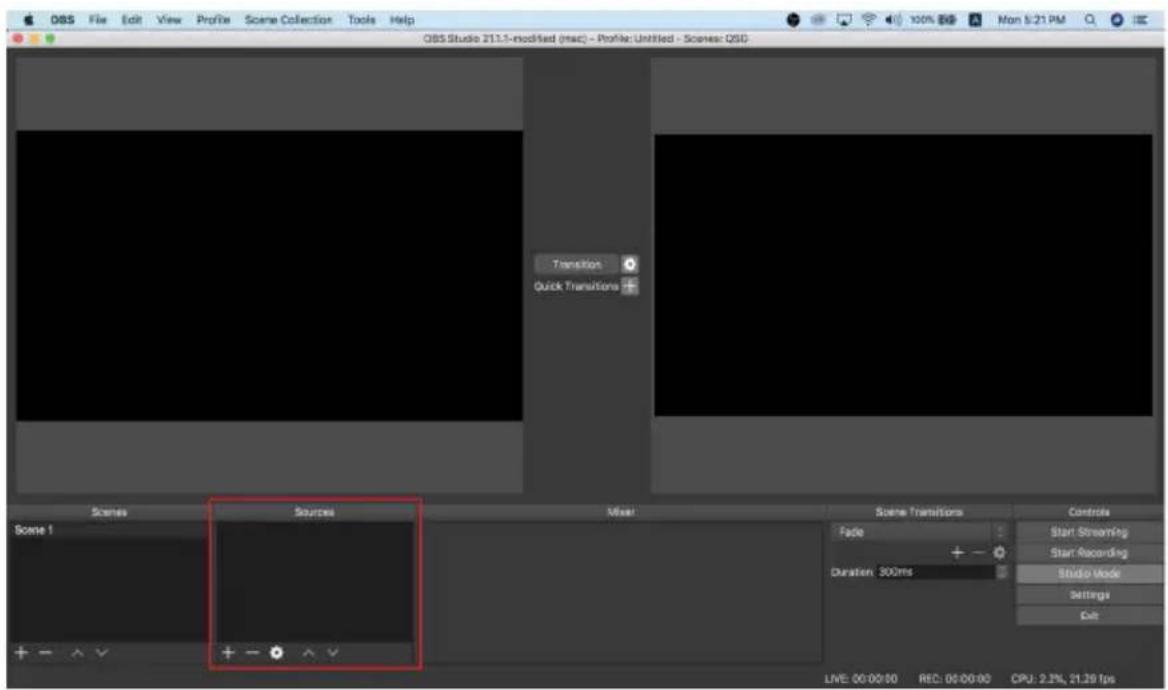
text_image
OBS Studio 21.1.x-modified (mac) - Profile: Untitled - Scenes: QSD Transition Quick Transitions Scene Scene 1 Sources Match Scene Transitions Fade + - Duration 300ms Controls Start Streaming Start Recording Studio Mode Settings Calt LIVE: 00:00:00 RED: 00:00:00 CPU: 2.3%, 21.29 fps- Select "Video Capture Device" or "Audio Capture Device."
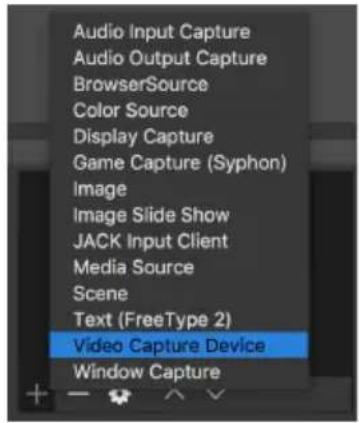
text_image
Audio Input Capture Audio Output Capture BrowserSource Color Source Display Capture Game Capture (Syphon) Image Image Slide Show JACK Input Client Media Source Scene Text (FreeType 2) Video Capture Device Window Capture- A pop-up window will be shown for you to name the video/audio source.
Click the "OK" button to continue.
It is recommended that "Make source visible" is checked.
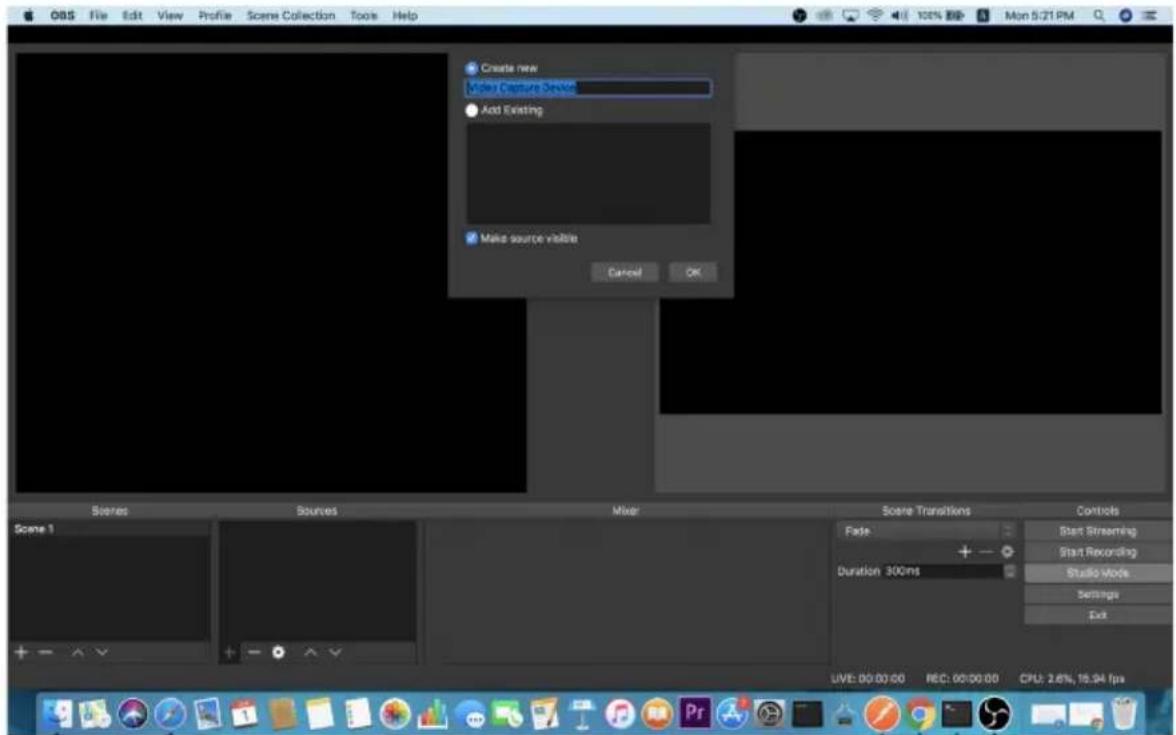
text_image
Create near Video Capture Device Add Existing Make source visible Cancel OK Scene Sources Mixer Scene Transitions Controls Scene 1 Fake + Duration 300ms Start Streaming + - LIVE: 00:00:00 REC: 00:00:00 CPU: 2.6%, 16.94 fps- On the properties page, click the drop-down menu named "Device" to select CAMLIVE™ PRO's video/audio source. Both the video and audio sources of CAMLIVE™ PRO have the name "HDMI to U3 capture".
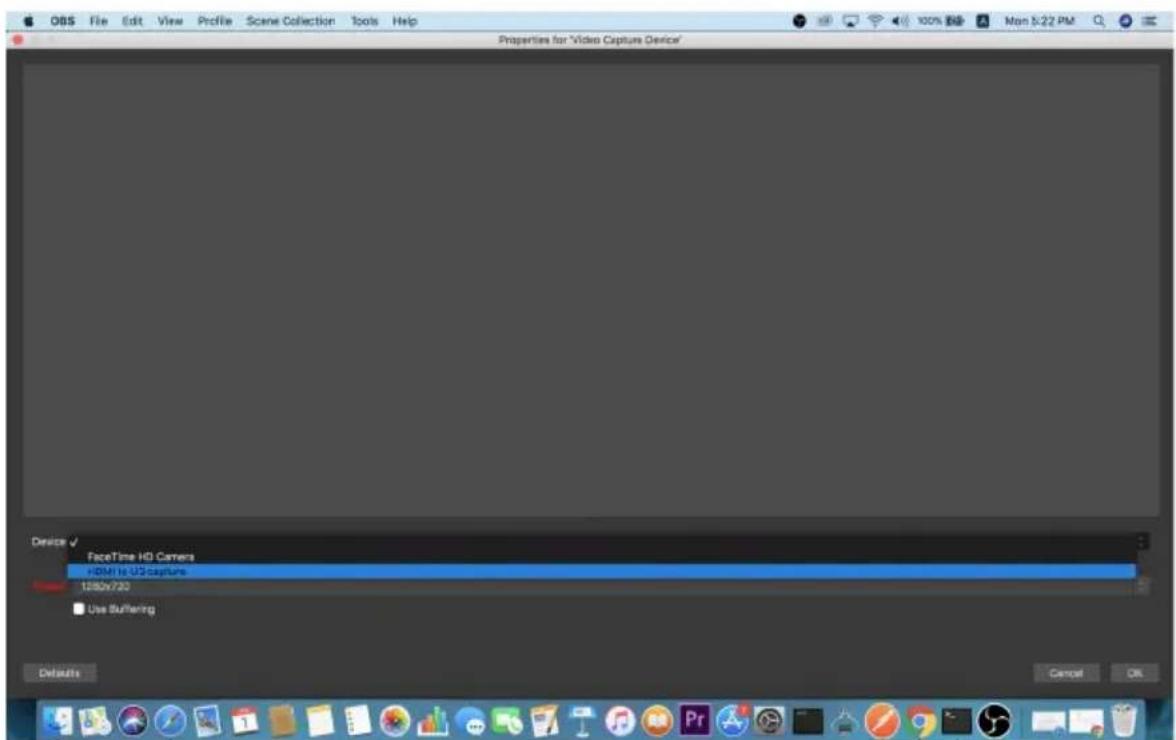
text_image
Properties for "Video Capture Device" Device FaceTime HD Cameras HDMI US Capture 100x720 Use Scrubbing Defaults Cancel OKAfter selecting the video source, the image from CAMLIVE™ PRO should be displayed as shown below.
Click the "OK" button to continue.
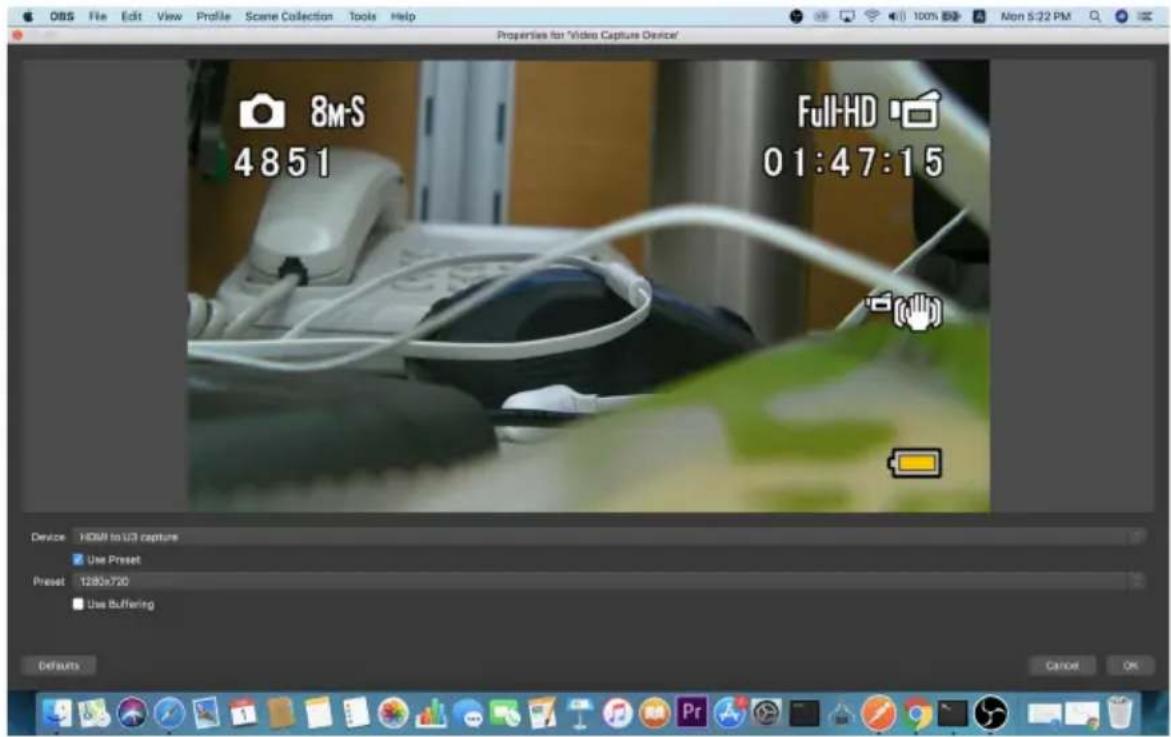
text_image
8m-S 4851 Full-HD 01:47:15 Device HDM to U3 capture Use Preset Preset 1285x730 Use Buffering Defaults Cancel OK- For successful setup, the sources will be shown in the "Source" panel.
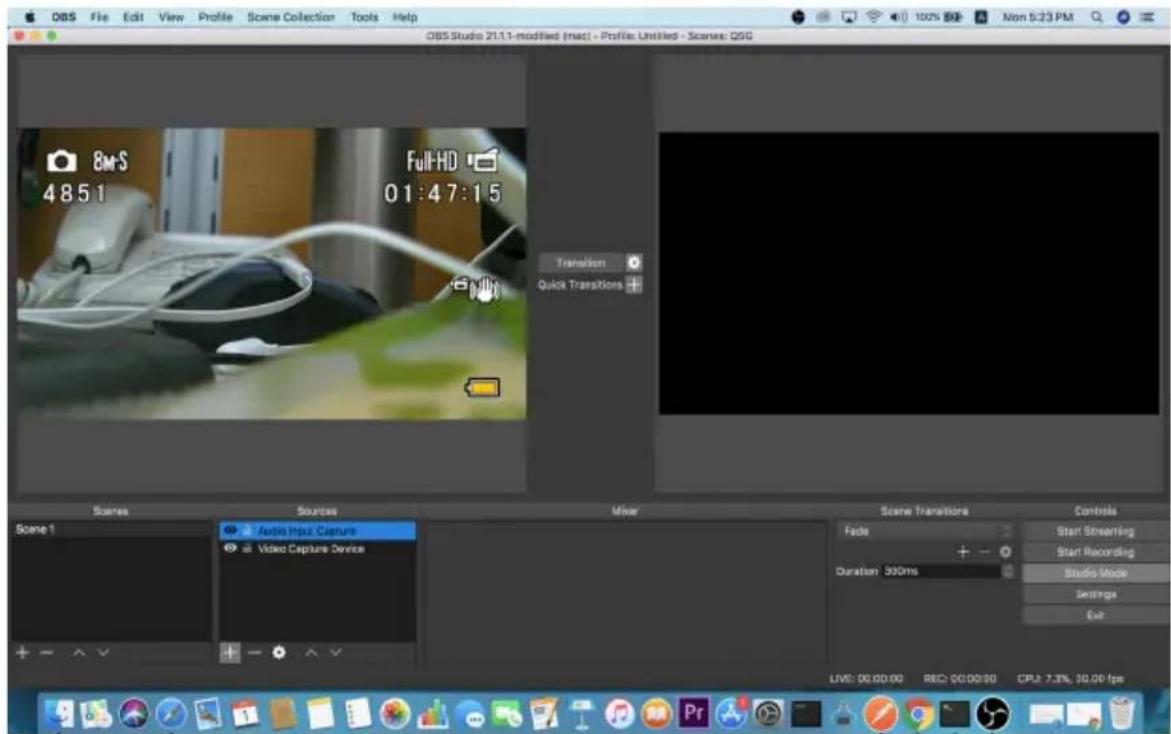
text_image
OBS Studio 21.1.1-modified (mac) - Profile: Untitled - Scenes: QSG 8M-S 4851 Full-HD 01:47:15 Transition Quick Transitions Scenes Sources Audio Input Capture Video Capture Device Scene Transitions Fade + - Duration 300ms Controls Start Streaming Start Recording Studio Mode Settings Exit LIVE: 00:00:00 REC: 00:00:30 CPU: 7.3%, 30.00 fpsSetup of video and audio sources are complete, you can now start live-streaming/video recording.
Detailed configuration of your live-streaming/video recording software/platform is not within the scope of this user manual, please refer to the software/platform's instruction guides/manual.
Using the USB Cables
When connecting CAMLIVE™ PRO on a PC with a USB 2.0 interface, it will automatically set the provided compressed video quality to the MJPEG compression mode to fit the data bandwidth. For better video quality, we strongly recommend to connect CAMLIVE™ PRO to a USB 3.1 Gen1 interface.
To make sure the result match your media output you wish to capture, please check the detected video format from your capture software first.
Capture device custom setting page examples displaying USB 3.1-RAW and USB 2.0-MJPEG on OBS software are shown below:
USB 2.0 mode with MJPEG video format only
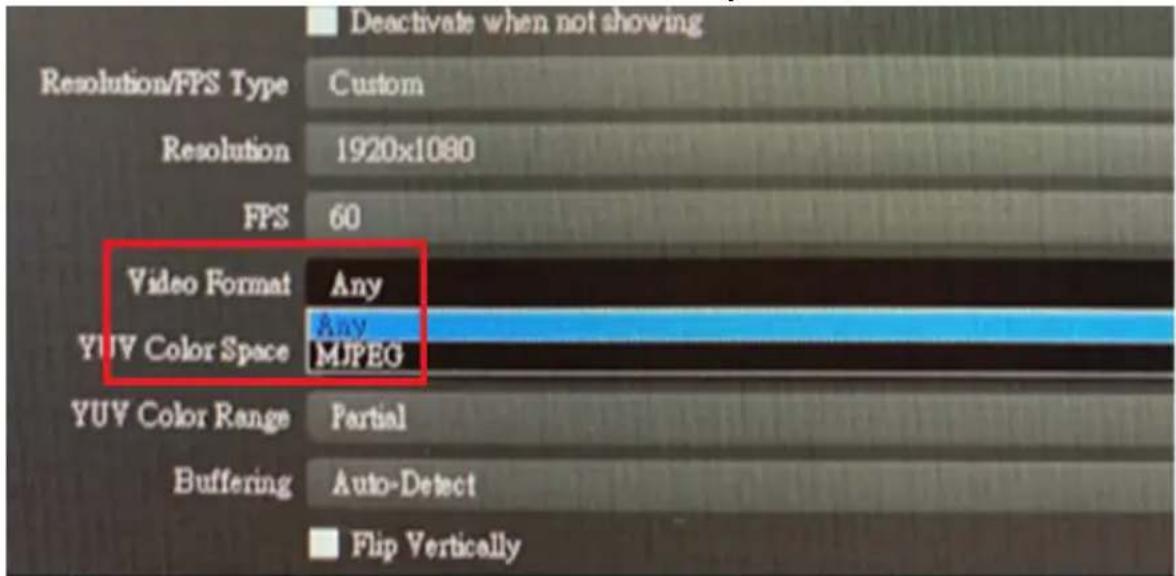
text_image
Deactivate when not showing Resolution/FFS Type Custom Resolution 1920x1080 FPS 60 Video Format Any YUV Color Space Any MJPEG YUV Color Range Partial Buffering Auto-Detect Flip VerticallyUSB 3.1 mode with RAW (YUY2) and MJPEG video formats
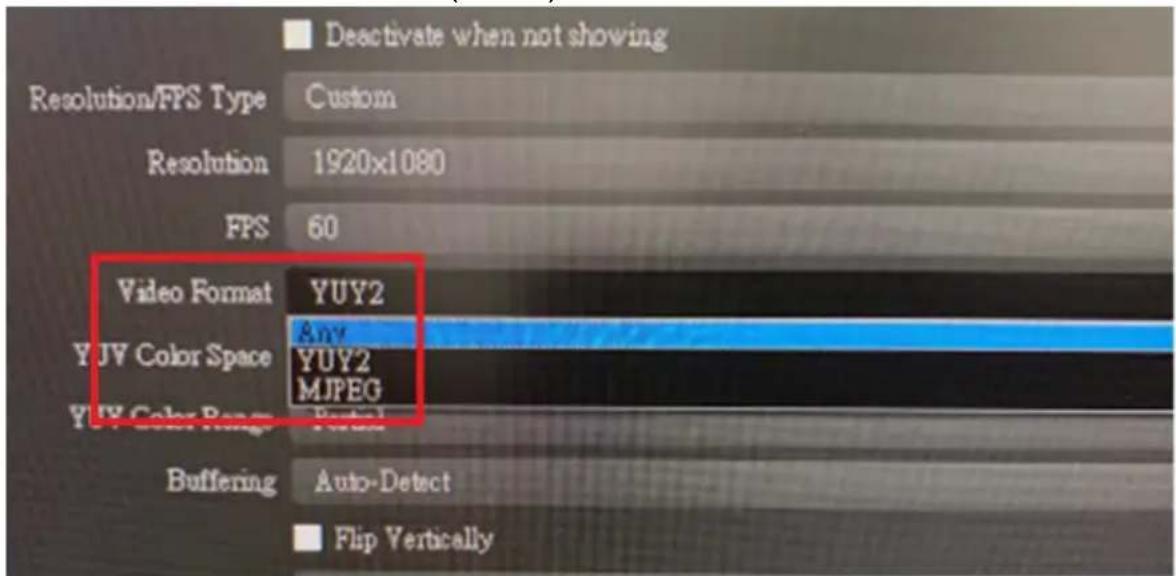
text_image
Deactivate when not showing Resolution/ FPS Type Custom Resolution 1920x1080 FPS 60 Video Format YUY2 Any YJV Color Space YUY2 MJPEG YJV Color Range Portal Buffering Auto-Detect Flip VerticallyIf you find that the captured media only has MJPEG format, simply flip the USB Type-B to USB-C cable connector connected to the CAMLIVE™ PRO as shown in the diagram below:
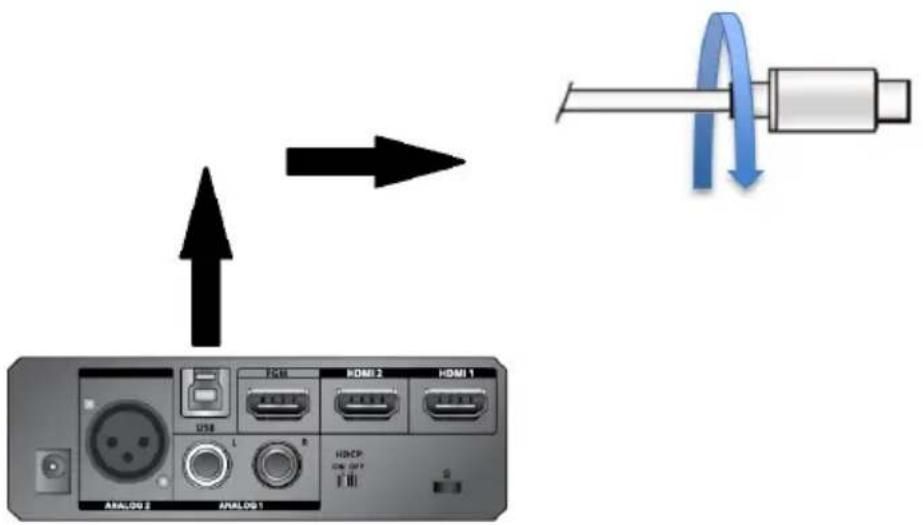
text_image
Diagram showing signal transmission from an analog device to a cylindrical device via HDMI 2 and HDMI 1, with directional arrows indicating signal flow.HDCP Switching
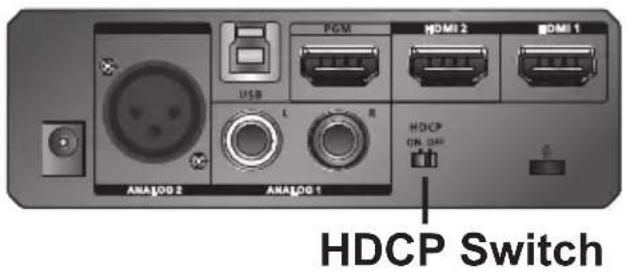
To display HDCP protected content via the HDMI program output port using an HDMI cable, switch the HDCP switch to ON. The default is OFF.
Note: 1. The CAMLIVE™ PRO cannot capture HDCP protected content.
- UVC / UAC become unavailable when the HDCP Switch is switched to ON.
text_image
HDCP Switch ANALOG 2 ANALOG 1 USB L R HDMI 2 HDMI 1 HDCP ON OFF| HDCP | PGM HDMI Output Resolution | USB Video Output Mode | UVC Video Output Format |
| OFF 720p, 1080p | PC 720p, 1080p MJPEG or YUY2 | ||
| phone 720p, 1080p MJPEG | |||
| ON 720p, 1080p, 2160p @ 30Hz | N/A N/A | ||
Resetting the CAMLIVE™ PRO
To reset the CAMLIVE ^TM PRO to its default settings, do the following:
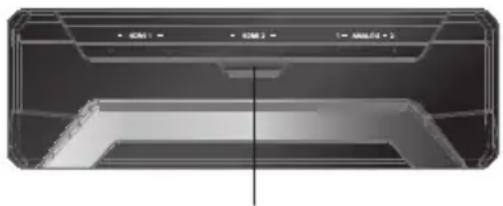
- Press and hold the Bluetooth link pushbutton.
natural_image
Exterior view of a modern office building (no signage)Bluetooth Link Pushbutton
- Plug the power adapter cable into the power jack to power on the CAMLIVE™ PRO. Wait for 10 seconds before you release the Bluetooth link pushbutton.
- The front panel LEDs blink together once every 0.1 seconds and the CAMLIVE ^™ PRO resets itself back to default settings.
Chapter 4
Aten OnAir Lite App
ATEN OnAir Lite Application
ATEN OnAir Lite app acts as the central controller for CAMLIVE™ PRO. The app's design is a control panel where you can monitor program results, edit scenes, setup video and audio settings, etc. Download the ATEN OnAir Lite app from the App Store or Google Play and install it on your mobile device.
Note: 1. The maximum operating hour for the ATEN OnAir Lite app is 4 hours.
2. Please make sure to enable the GPS function before you begin to use the ATEN OnAir Lite app.
Supported Systems
The ATEN OnAir Lite app supports the following mobile operating systems:
| Mobile Operating System Supported Versions | |
| Android version 5 or later | |
| iOS version 10 or later | |
Installing the ATEN OnAir Lite App
- Install the ATEN OnAir Lite app on a mobile device.
a) From the mobile device, tap the App Store icon.
or Google Play
b) In the search box, type "CAMLIVE™ PRO".
c) Tap ATEN OnAir Lite and install the app.


- From the mobile device, tap the ATEN OnAir Lite app icon

- Follow the on-screen instructions.
Connecting the CAMLIVE™ PRO on your Mobile Device
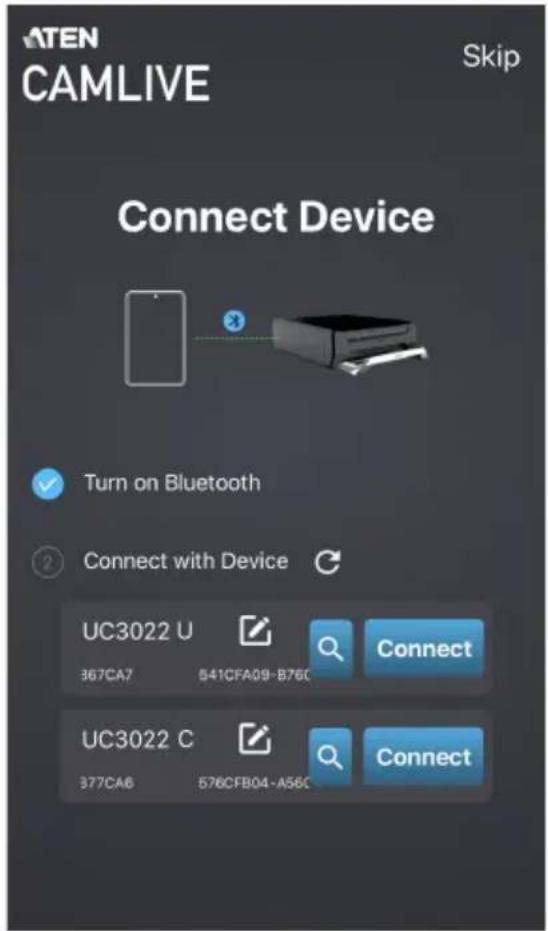
CAMLIVE™ PRO is a plug-and-play device, after connecting CAMLIVE™ PRO as shown in Connecting the CAMLIVE™ PRO Unit on page 8. Open the ATEN OnAir Lite app, it automatically searches for the CAMLIVE™ PRO, and press Connect.
text_image
ATEN CAMLIVE Skip Connect Device Turn on Bluetooth Connect with Device UC3022 U 367CA7 541CFA09-B76C Connect UC3022 C 377CA6 576CFB04-A56C Connect| Component Description | |
 | Tap this button to edit the name of your CAMLIVETM PRO. |
 | Tap this button to search for your CAMLIVETM PRO in the installation site, and the front panel LEDs will blink together for a few seconds, allowing the users to locate the CAMLIVETM PRO. |
 | Tap this button to connect the CAMLIVETM PRO with |
 | Tap this button to skip the connection with your mobile device. You may still make changes on the app, but the configuration will not be applied until the CAMLIVETM PRO is connected. |
When you have connected to the CAMLIVE™ PRO successfully, the screen below appears.
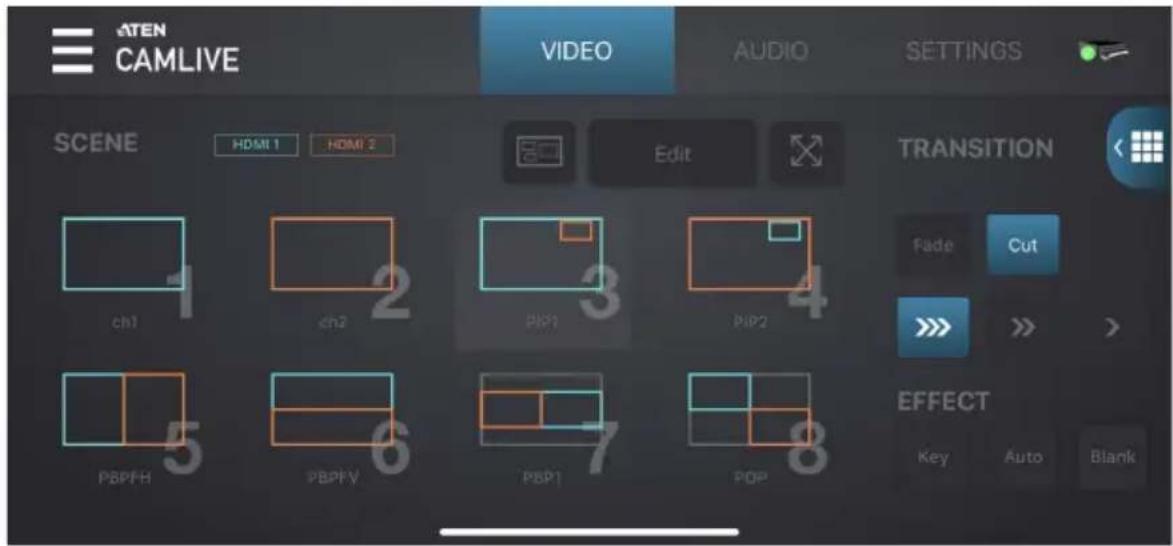
text_image
ATEN CAMLIVE VIDEO AUDIO SETTINGS SCENE HDMI 1 HDMI 2 Edit TRANSITION Fade Cut PBPFH PBPFY PBP1 PBP2 EFFECT Key Auto BlankWhen your mobile device is out of range, a warning message below appears. To connect back to the CAMLIVE™ PRO, press Searching for device and follow the on-screen instructions as explained in page 26.
To enter Offline Mode, press Offline Mode. In Offline Mode, you are able to configure the CAMLIVE™ PRO, but the configuration will not take effect until the device is connected back to the ATEN OnAir Lite app.
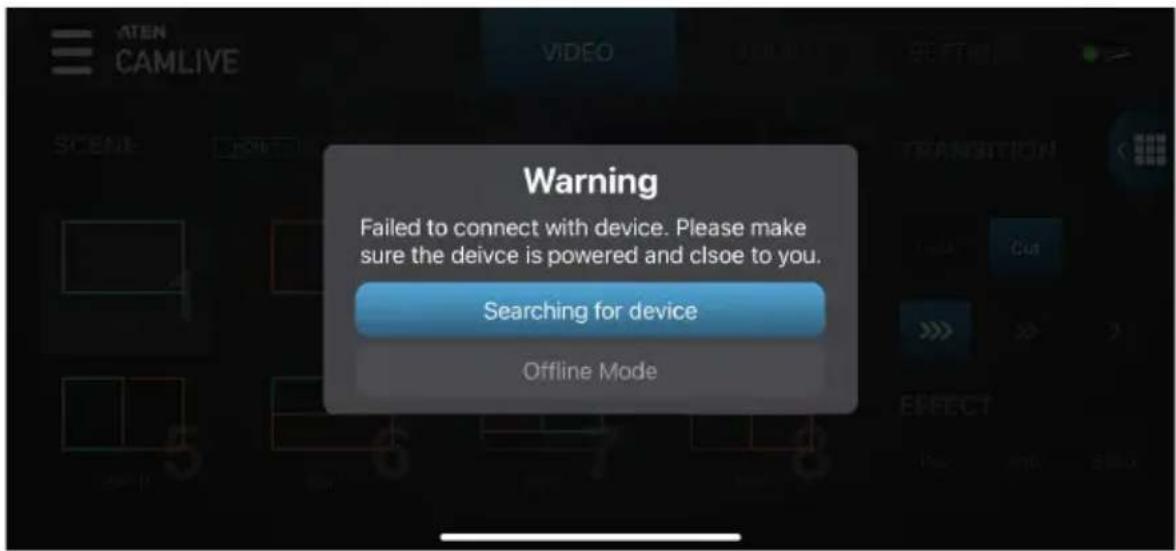
text_image
Warning Failed to connect with device. Please make sure the device is powered and close to you. Searching for device Offline ModeDisconnecting the CAMLIVE™ PRO from your Mobile Device
To disconnect the CAMLIVE™ PRO, press the System Information icon, and select Disconnect. See Project Settings, page 29.
To connect another mobile device to the CAMLIVE™ PRO, press the Bluetooth link pushbutton for 3 seconds. HDMI1 and HDMI 2 LEDs blink together once every 0.5 seconds for 3 seconds.
Page Components
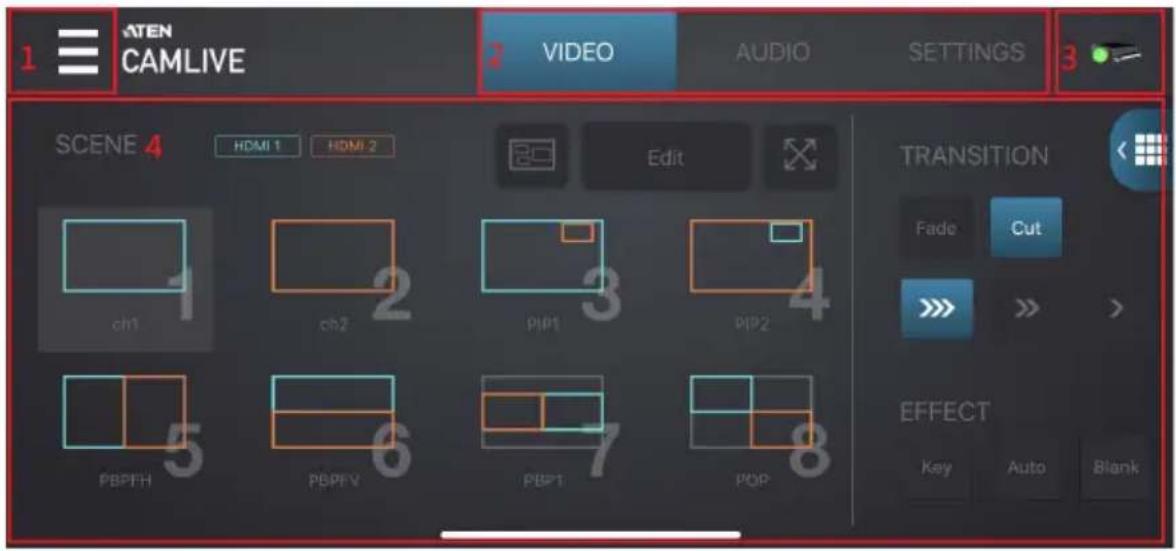
text_image
ATEN CAMLIVE VIDEO AUDIO SETTINGS 3 SCENE 4 HDMI 1 HDMI 2 Edit 1 ch1 ch2 pip1 pip2 5 PBPFH PBPFV PBPT POP TRANSITION Fade Cut EFFECT Key Auto Blank| No. | Component Description | j Tap to change project name, open, import, or export projects, and run the tutorial. |
| 1 | P r o Settings | |
| 2 | Deck Selector Tap to | select the desired configuration deck.Three decks are available: Video Mixer, Audio Mixer, and Settings. |
| 3 | S y s Information | tTap to seem upgrade the current software version, and firmware version information, or disconnect with the device. See Project Settings, page 29. |
| 4 | Deck Content The content depends on the selected deck. | |
Project Settings
To modify your project name, open, import, or export a project, and run the tutorial, tap

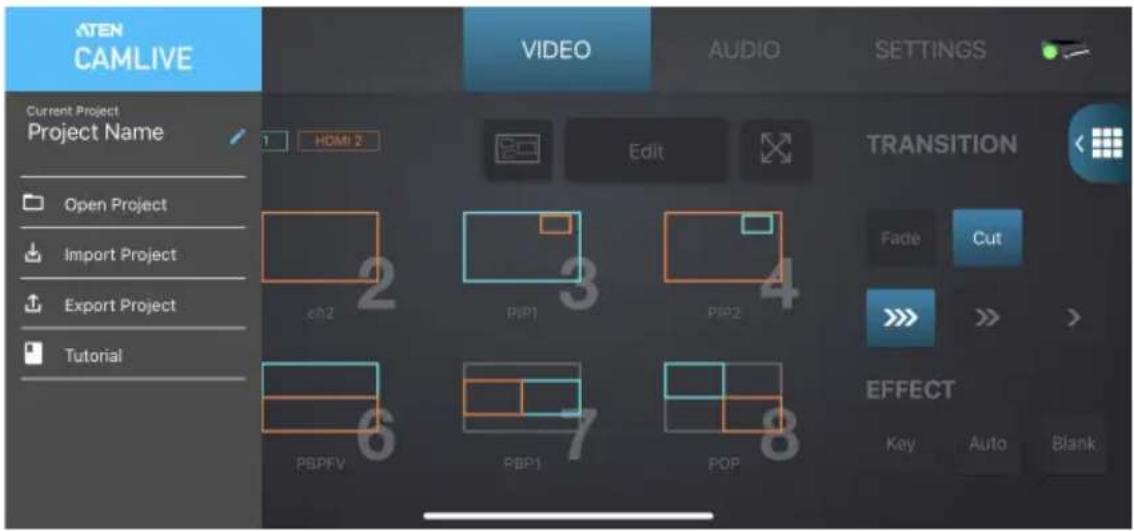
text_image
ATEN CAMLIVE Current Project Project Name Open Project Import Project Export Project Tutorial VIDEO AUDIO SETTINGS 1 HDMI 2 Edit TRANSITION Fade Cut 2 3 4 6 7 8 PBP1 PBP2 PBPFV PBP1 POP EFFECT Key Auto BlankSystem Information Tab
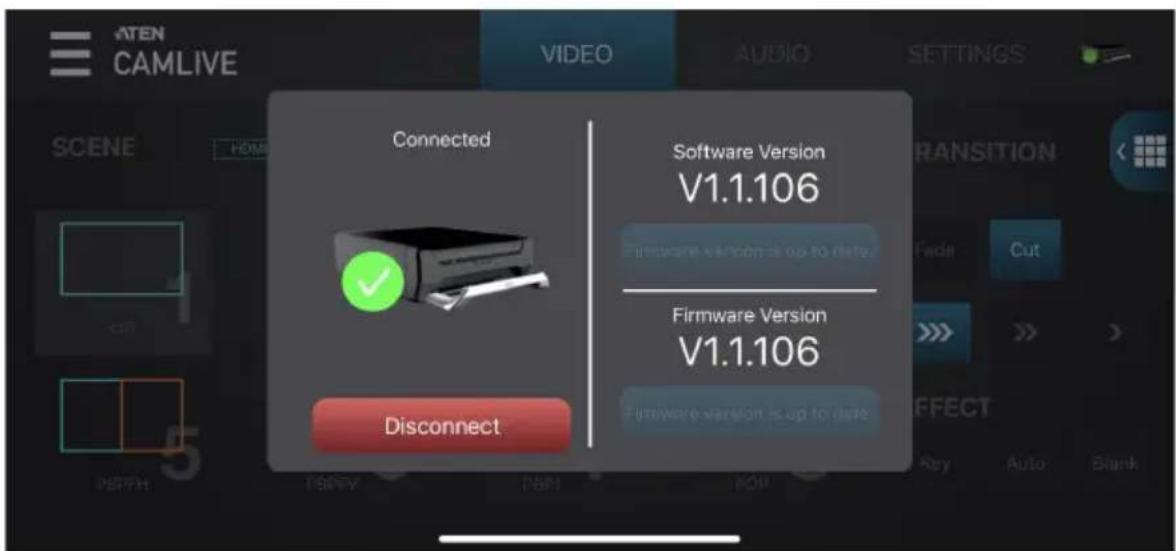
To browse or upgrade the current software and firmware version, or disconnect with the device, tab from the ATEN OnAir Lite app screen.

Note: To automatically upgrade the software and firmware to the latest version, it is required to manually to upgrade the software and firmware version to v1.1.105. See The Firmware Upgrade Utility, page 53.
text_image
ATEN CAMLIVE VIDEO AUDIO SETTINGS SCENE HOME Connected Software Version V1.1.106 Firmware version is up to date. Firmware Version V1.1.106 Disconnect Firmware version is up to date OK Auto BlankVideo Mixer
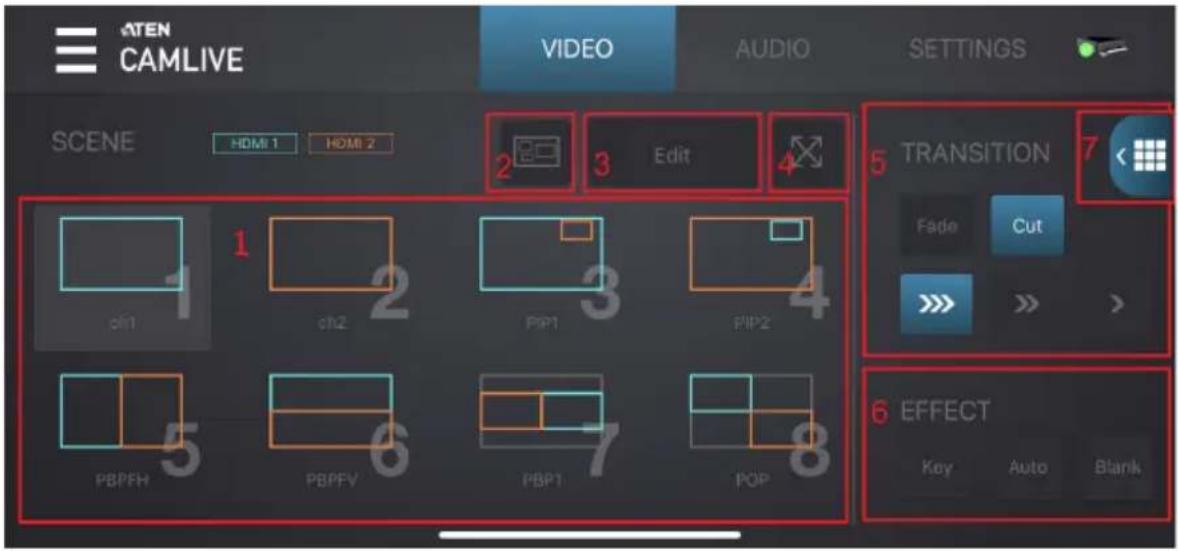
The Video Mixer deck page allows you to adjust effect on your video, scene selection and editing, and transition control.
The components of the page is shown below:
text_image
ATEN CAMLIVE VIDEO AUDIO SETTINGS SCENE HDMI 1 HDMI 2 Edit TRANSITION Fade Cut 6 EFFECT Key Auto Blank| No. | Component Description |
| 1 Scene Selector | 8 scenes are shown here. |
Blue outline scene = HDMI 1. e.g. 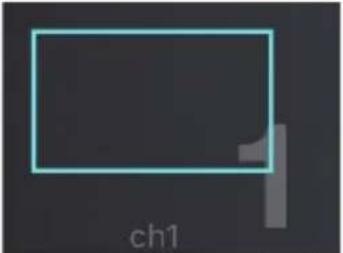 | |
Orange outline scene = HDMI 2. e.g. 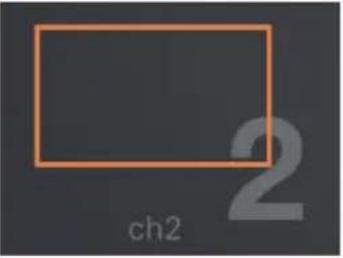 | |
| Tap a scene to put the scene into the PRV Preview section. To put the scene in PRV Preview to PGM Preview, use the Transition Control (explained below). | |
| 2 Multi-Crop You can | crop multiple images from HDMI 1 and HDMI 2 inputs. Refer to page 32 on how to crop multiple images. |
| 3 SceneEditor | You can configure each individual scenes by tapping this icon.Refer to page 35 on how to edit each scene. |
| 4 Enlarge Tap to enlarge the scene selector. | |
| 5 TransitionControl | Controls the switching for the current stream (PGM).To switch,1. Tap the Cut  2. Select a specified time between 1s, 2s, and 3s transition,and tap the 2. Select a specified time between 1s, 2s, and 3s transition,and tap the  on.Using the Cut buttonThe transition happens immediately when you tap the Cutbutton.Using the Fade buttonTapping the Fade button will begin the transition after a specified time (1, 2, and 3 seconds). on.Using the Cut buttonThe transition happens immediately when you tap the Cutbutton.Using the Fade buttonTapping the Fade button will begin the transition after a specified time (1, 2, and 3 seconds). |
| 6 | E f fControleTap  the chroma key effect to the HDMIdisplay connected on the HDMI Program Output Port. SeeChroma Key, page 46 for more details.Tap the chroma key effect to the HDMIdisplay connected on the HDMI Program Output Port. SeeChroma Key, page 46 for more details.Tap  display content for the HDMIdisplay connected on the HDMI Program Output Port to followthe input audio source. See Auto Switch, page 48.Tap display content for the HDMIdisplay connected on the HDMI Program Output Port to followthe input audio source. See Auto Switch, page 48.Tap  link background to the HDMIdisplay connected on the HDMI Program Output Port. link background to the HDMIdisplay connected on the HDMI Program Output Port. |
| 7 RemoteDeck | Tap to create hotkeys for the CAMLIVETM PRO to work withvideo recording and live streaming softwares on your PC. |
Multi-Crop
To crop multiple images from the connected HDMI 1 and HDMI 2 inputs, follow the steps below.
- Select a scene from the scene selector.
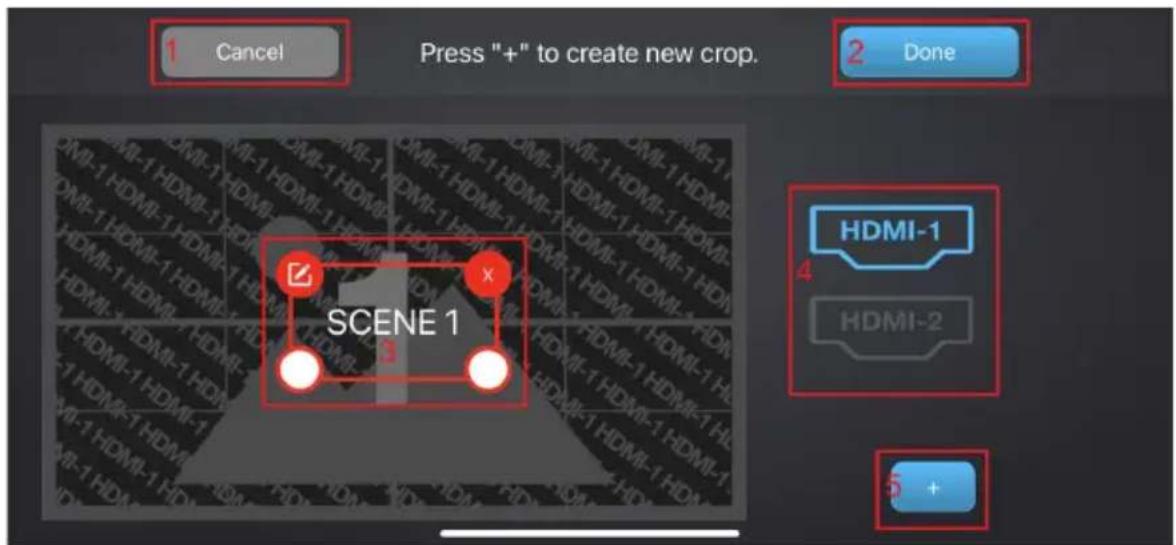
- Tap the button from the Video Mixer page and the screen below appears.
text_image
1 Cancel Press "+" to create new crop. 2 Done SCENE 1 HDMI-1 4 HDMI-2 5 +| No. | Component Description |
| 1 Cancel Tap to cancel | your Multi-Crop configuration. |
| 2 Done Tap to save your Multi-Crop configuration. | |
| 3 Multi-Crop Tool | To resize the crop scene, see Resize Crop Scene, page 33.To re-number your crop scene, see Renumber Crop Scene, page 33.To remove your crop scene, see Remove Crop Scene, page 34. |
| 4 HDMI 1 & HDMI 2 Inputs | Select between HDMI 1 and HDMI 2 inputs to crop your contents. |
| 5 Add Tab to add more | crop scene, see Add Crop Scene, page 34 |
- When you have completed the configuration, tap Done.
Resize Crop Scene
To resize a crop scene, tap and hold to drag the cropping tool point to adjust the cropping area. Tap and hold to relocate the cropping area.
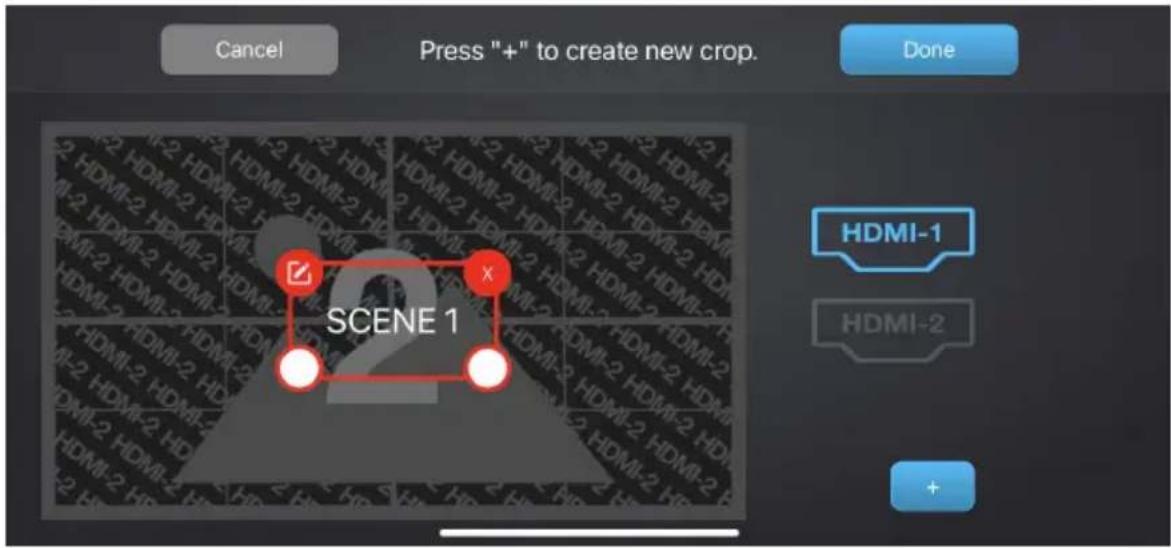
text_image
Cancel Press "+" to create new crop. Done SCENE 1 HDMI-1 HDMI-2 +Renumber Crop Scene
To renumber a crop scene, tap the button, and the screen below appears. Tap on an option to renumber your scene from 1:SCENE to 8:SCENE.
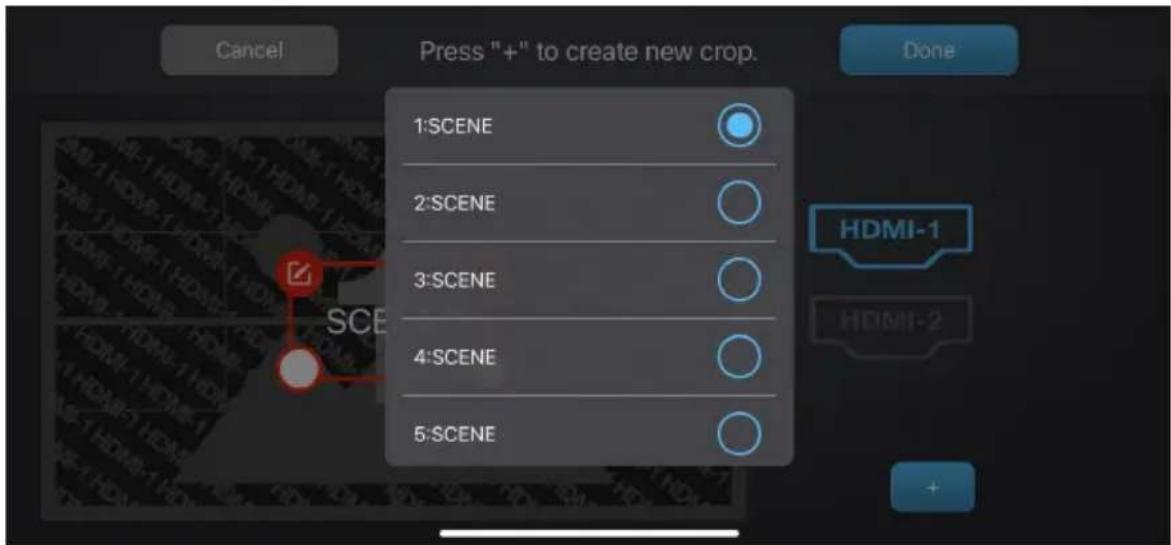
text_image
Cancel Press "+" to create new crop. Done 1:SCENE 2:SCENE 3:SCENE 4:SCENE 5:SCENE HDMI-1 HDMI-2Remove Crop Scene
To remove a crop scene, tap the button.
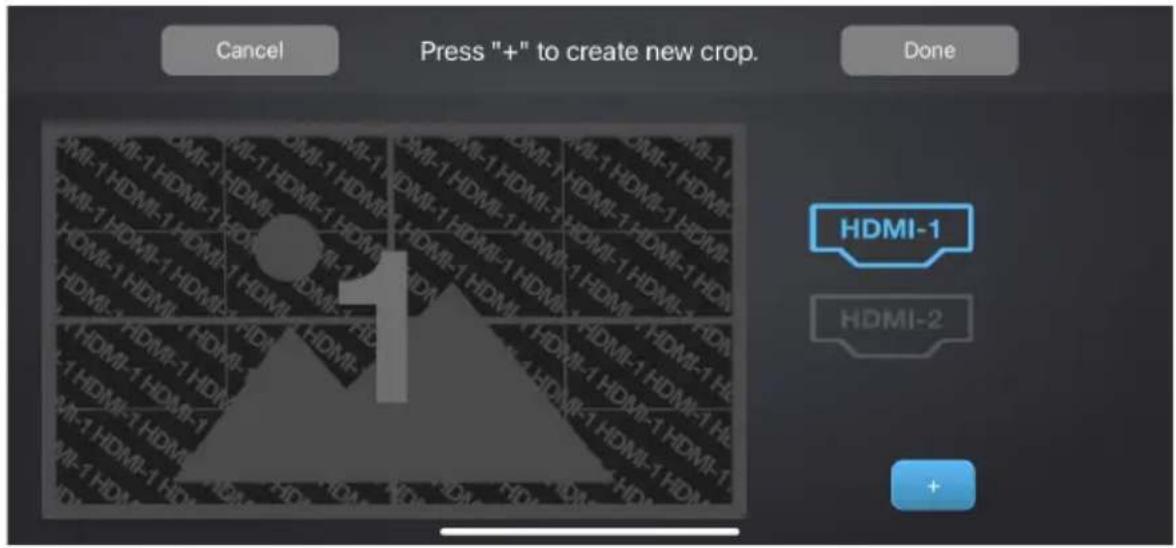
text_image
Cancel Press "+" to create new crop. Done HDMI-1 HDMI-2 +Add Crop Scene
To add more crop scene, tap the button.
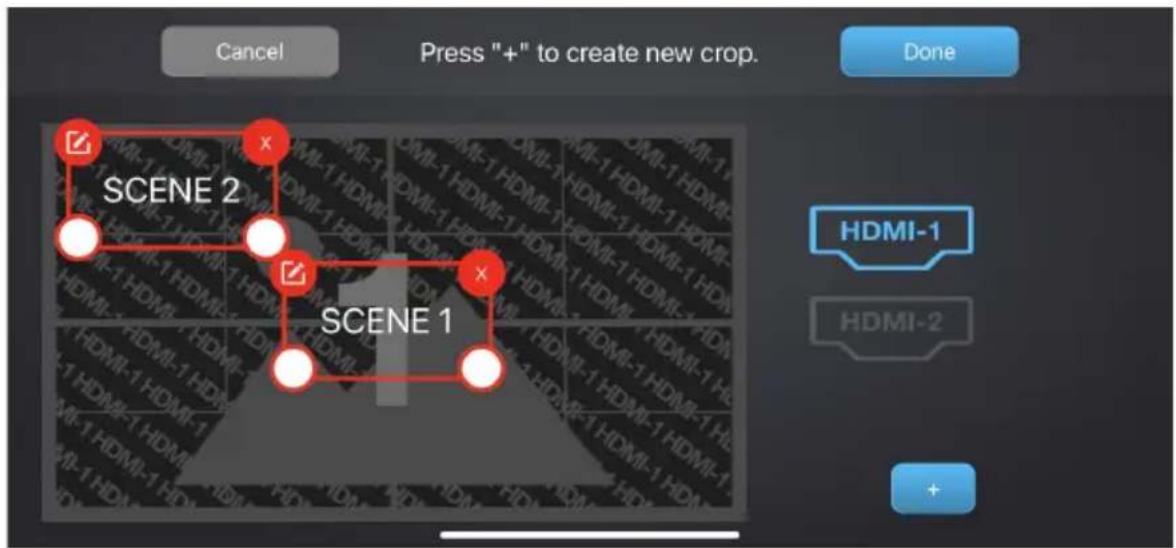
text_image
Cancel Press "+" to create new crop. Done SCENE 2 SCENE 1 HDMI-1 HDMI-2Scene Editor
To edit a scene, follow the steps below.
-
Select a scene from the scene selector.
-
Tap the button from the Video Mixer page.
An example of a PIP2 is used and shown below:
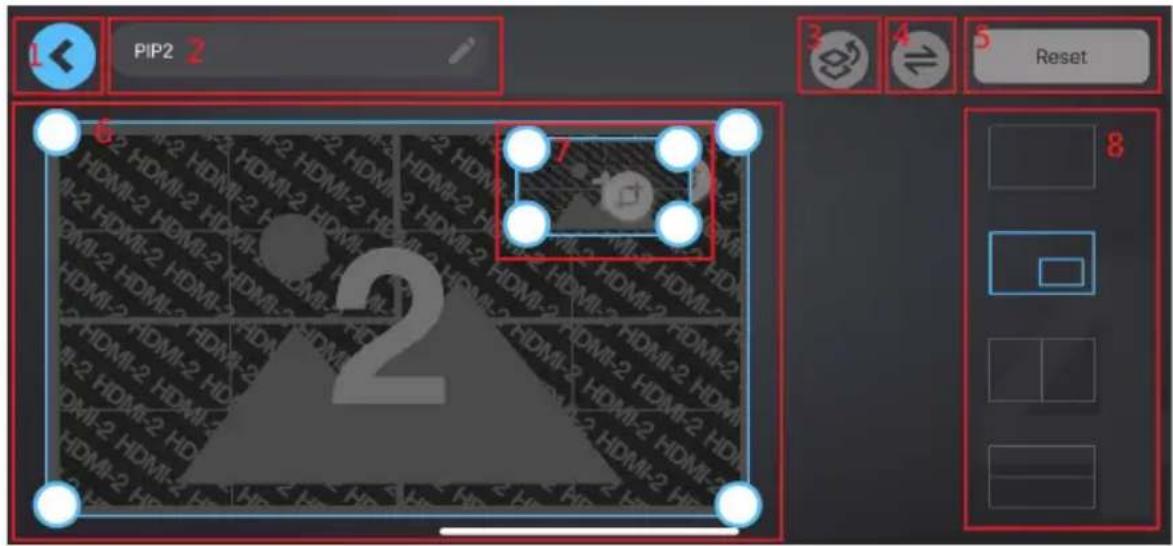
text_image
PIP2 Reset 1 2 3 4 5 6 7 8| No. | Component Description | |
| 1 | Return Button Tap to return to the Video Mixer page | |
| 2 | Scene Name This region displays the scene name. Tap to edit the scene name. | |
| 3 | Overlay Button Tap to switch between main display and overlay display.You can also resize and crop the overlay scene. | |
| 4 | Switch Video Source (Dual-View)Druing dual-view, tap this button to switch video source position between HDMI 1 and HDMI 2. You can also resize and crop the switched source. | |
| 5 | Reset Button Tab to reset the current scene. | |
| 6 | HDMI 2Display and Resize ToolDisplays the HDMI 2 content with resize / crop tool.To resize the HDMI 2 content, see Resize, page 37.To crop the HDMI 2 content, see Crop, page 38. | |
| 7 | HDMI 1Display and Resize ToolDisplays the HDMI 1 content with resize / crop tool.To resize the HDMI 1 content, see Resize, page 37.To crop the HDMI 1 content, see Crop, page 38. | |
| 8 Layout Selection | Tap to select a preferred layout. You can also resize the dual-view. | |
Overlay Button
To view the overly display from a dual-view scene, tap from the Scene Editor page.
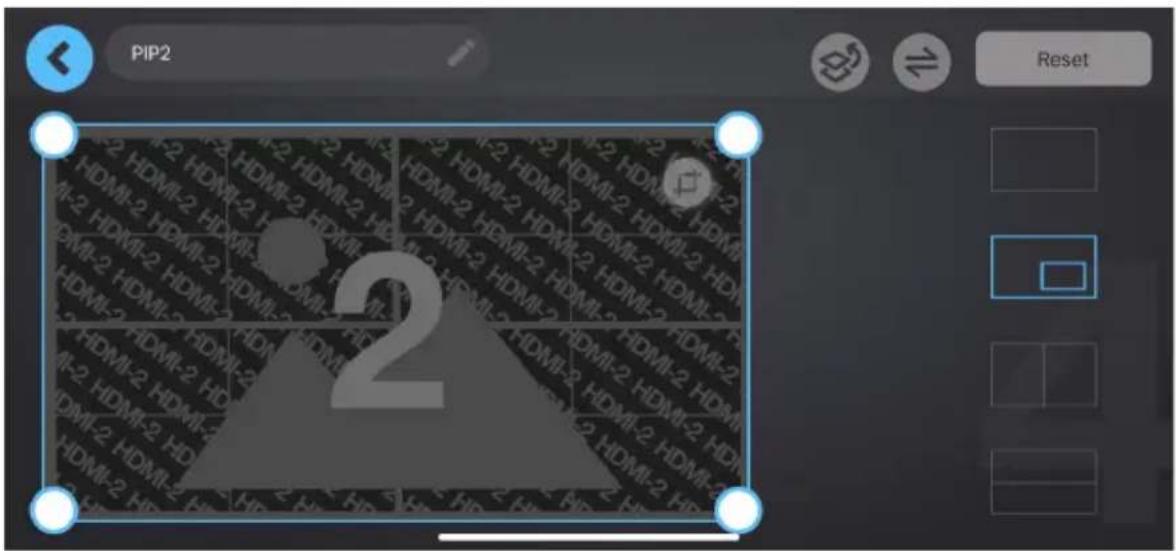
text_image
PIP2 ResetSwitching Video Source
To switch the video source position between HDMI 1 and HDMI 2, tap from the Scene Editor page.
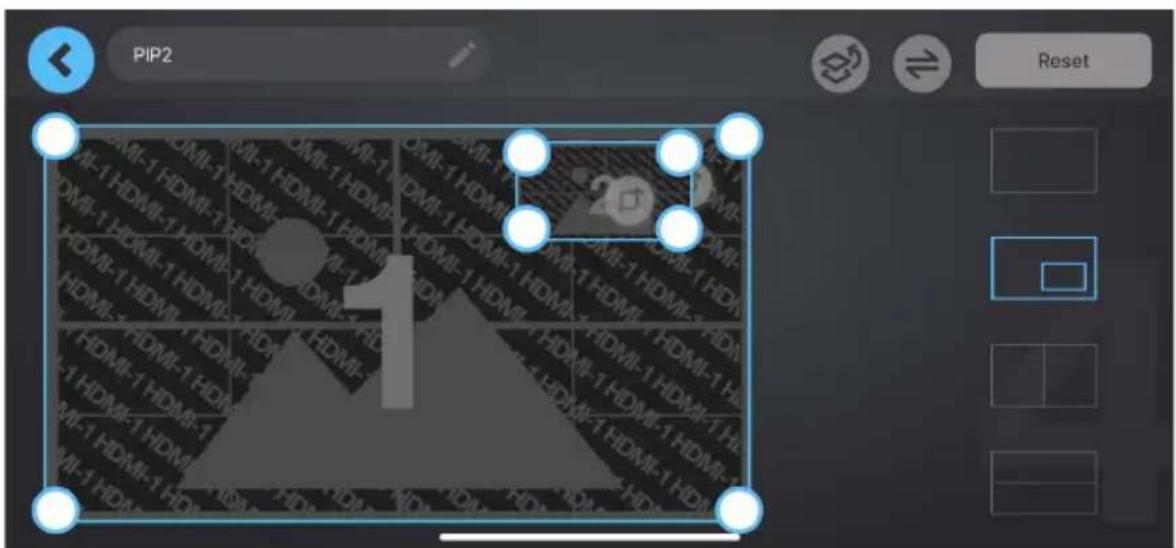
text_image
PIP2 ResetReset Button
To reset or undo any changes made to the selected scene, tap from the Scene Editor page. A warning message appears, click OK.
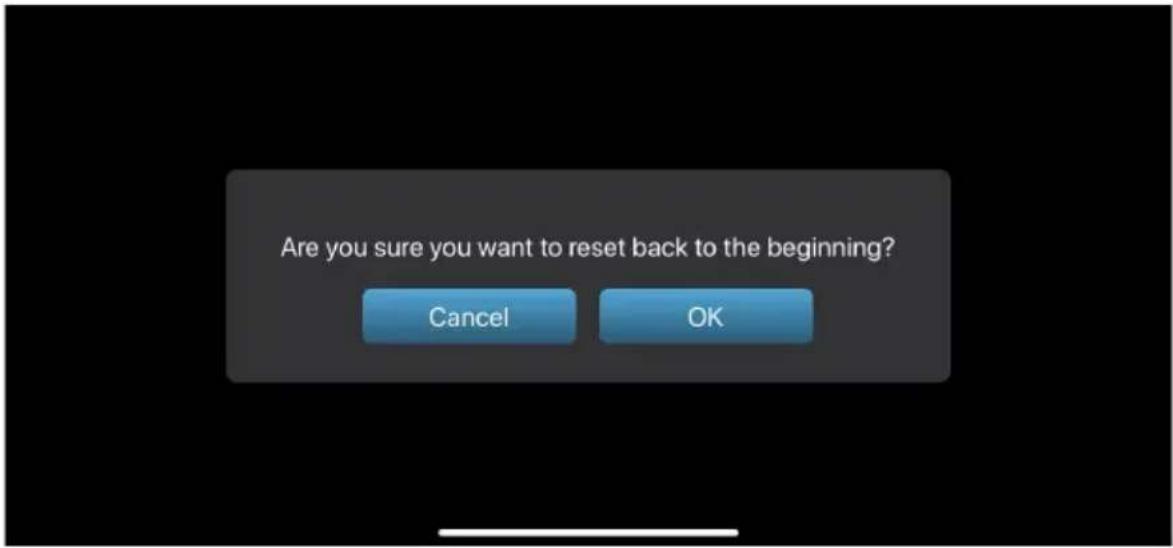
text_image
Are you sure you want to reset back to the beginning? Cancel OKResize/Crop Tool
This section describes how to resize or crop HDMI 1 and HDMI 2 of the scene layout.
Resize
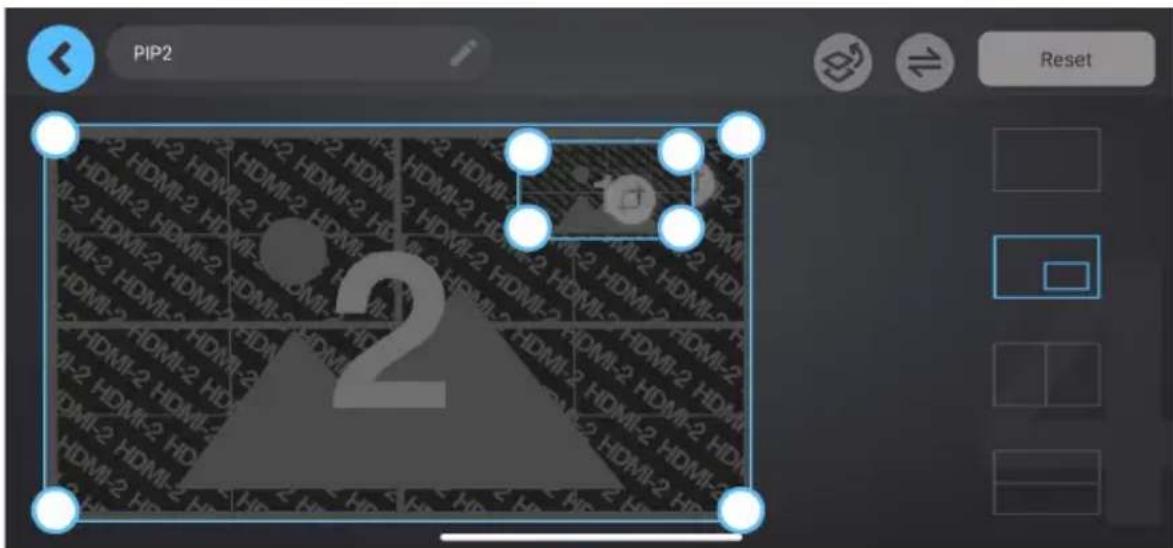
To resize HDMI 1 and HDMI 2 display content, select a scene and tap button from the Video Mixer page. A resize tool will be visible on the HDMI 1 and HDMI 2 displays in the scene editor page. An example of a PIP2 is used and shown below:
text_image
PIP2 ResetTap and hold to drag the resize tool to resize the displays.
Crop
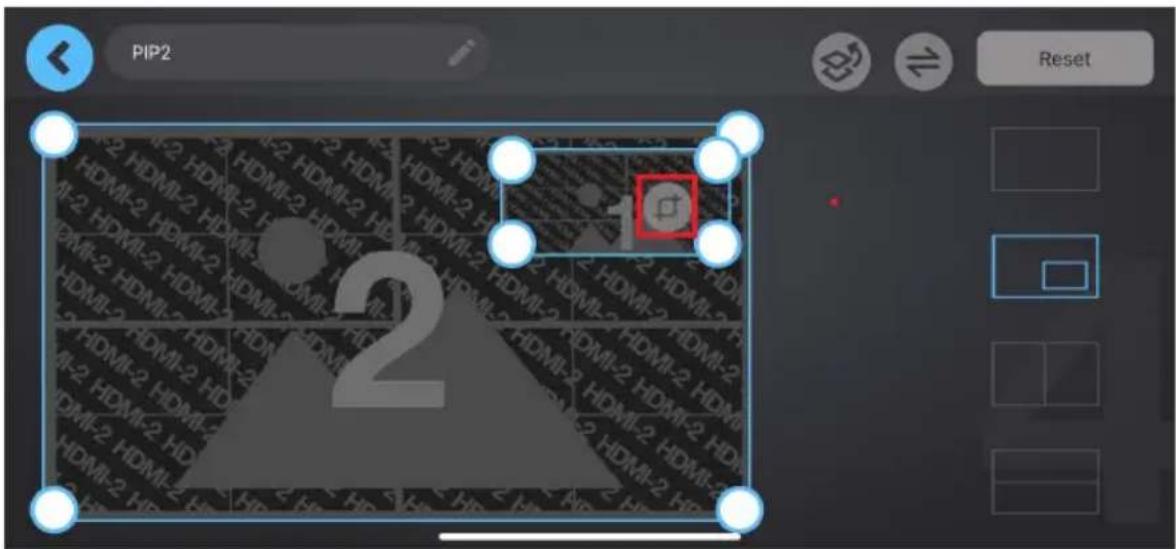
To crop HDMI 1 and HDMI 2 display content, select a scene and tap. Edit button from the Video Mixer page. A crop tool will be visible on the HDMI 1 and HDMI 2 displays in the scene editor page. An example of a PIP2 is used and shown below:
text_image
PIP2 Reset 2To crop the display content, follow the steps below.
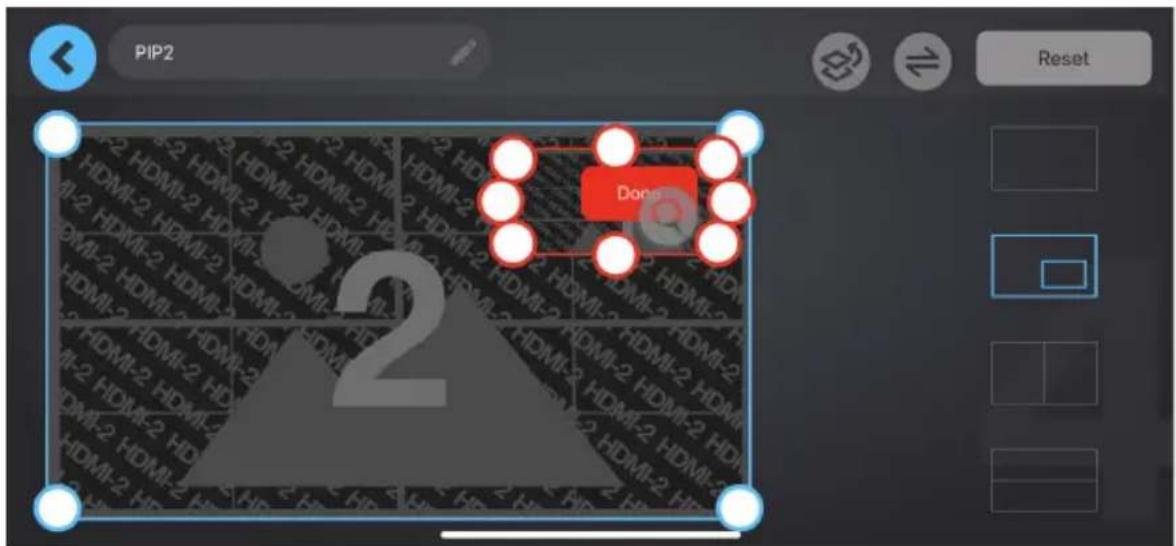
- Tap the crop tool button and the screen below appears.
text_image
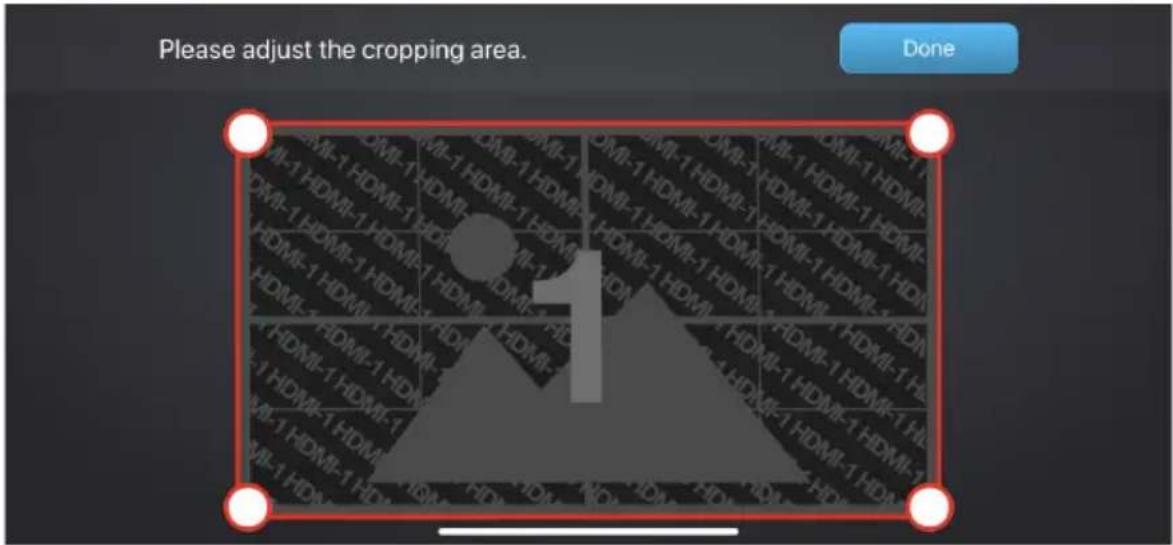
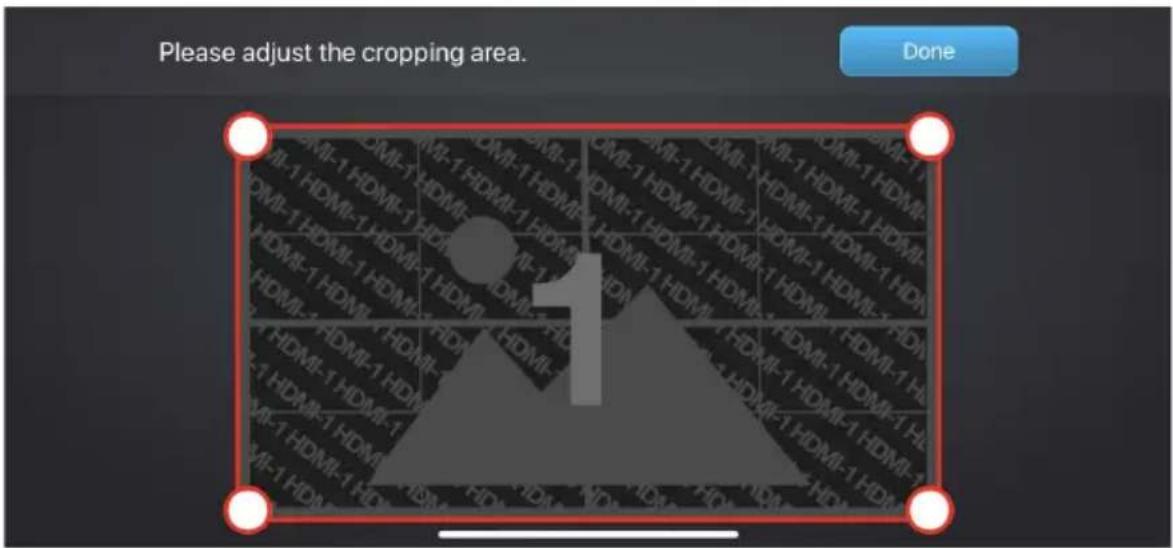
PIP2 Done Reset- Tap the enlarge button to crop the display content. The screen below appears.
text_image
Please adjust the cropping area. Done- Tap and hold to drag the cropping tool point to adjust the cropping area. Tap and hold to relocate the cropping area.
text_image
Please adjust the cropping area. Done- When completed, tap Done.
Remote Deck
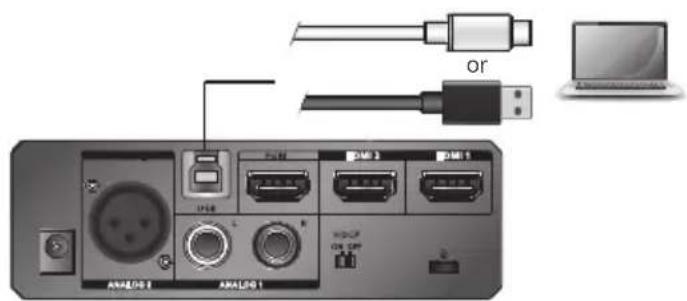
The Remote Deck allows users to set a hotkey combination to work with the softwares installed on your host. Remember to connect the USB cable to the host.
text_image
ANALOG1 ANALOG1 USB USB 1 USB 2 USB 3 USB 4 OR OR L L R WDCF ON CPVNote: 1. For hotkeys to work on the software, make sure the corresponding software is opened and operable, and the software itself must support hotkey features.
- Make sure the hotkeys combination you configured is matched to the corresponding software's hotkey values.
Mapping Hotkey with Corresponding Softwares (OBS)
To create a hotkey for the corresponding software, follow the steps below.
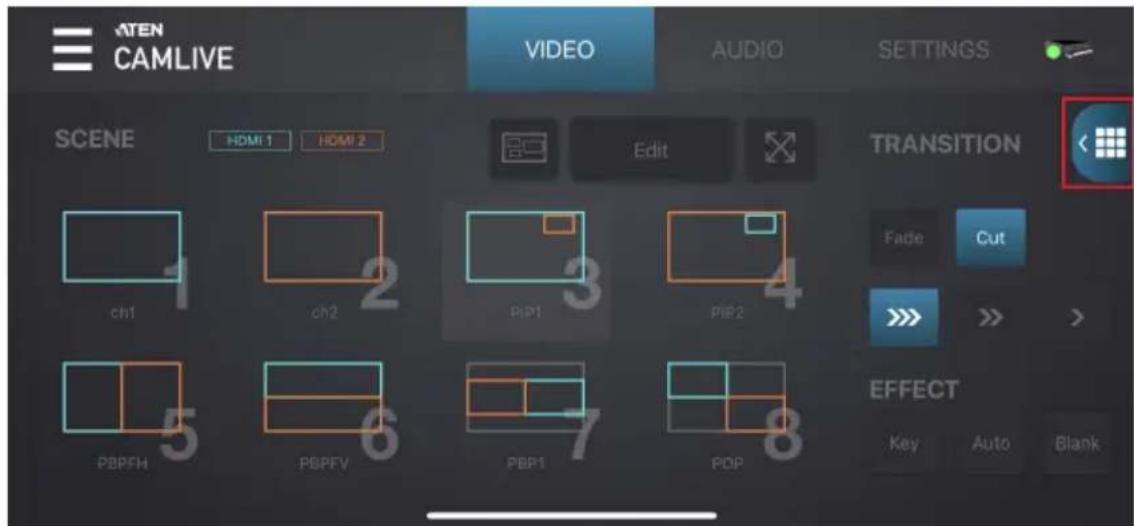
- Tap from the Video Mixer deck page.
text_image
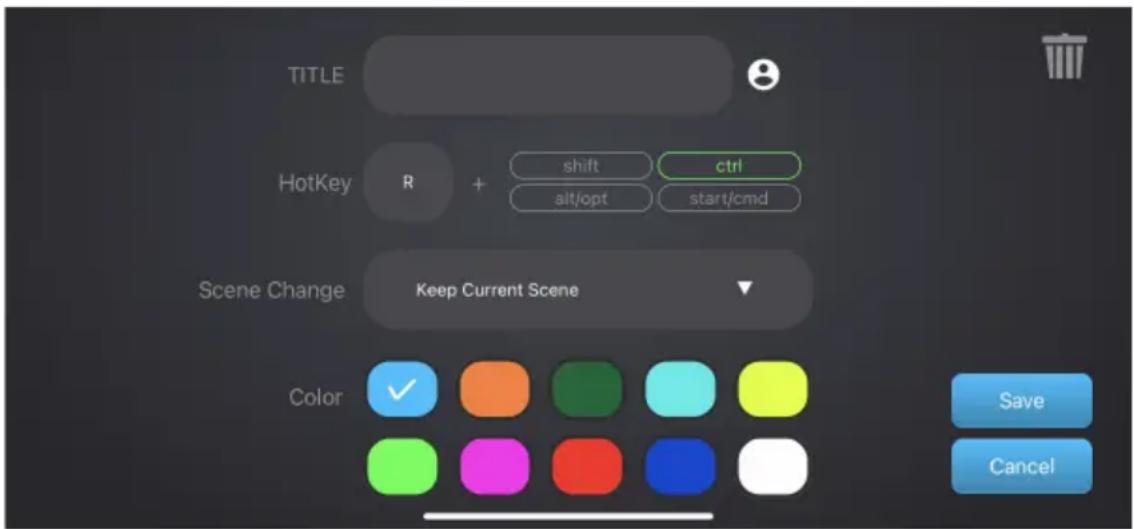
ATEN CAMLIVE VIDEO AUDIO SETTINGS SCENE HDMI 1 HDMI 2 Edit TRANSITION Fade Cut PBPFH PBPFV PBP1 PBP2 EFFECT Key Auto Blank3. From the hotkey settings page, you can name the hotkey mapping, select a hotkey combination, select a scene, and choose a color. After configuration, click Save.
text_image
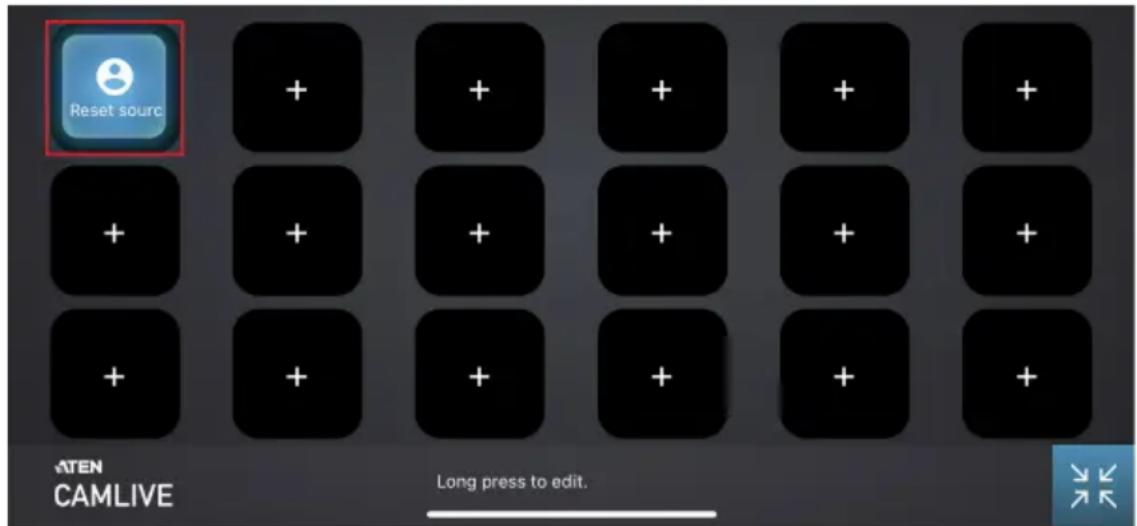
TITLE HotKey R + shift ctrl alt/opt start/cmd Scene Change Keep Current Scene Color ✓ Color Save Cancel- Now the hotkey mapping appears on the Hotkey Mapping page. Tap on it to activate the hotkey on OBS. Make sure the OBS is opened and operable on your host.
text_image
Reset sourc ATEN CAMLIVE Long press to edit.- To edit a hotkey, long press the hotkey to enter hotkey settings page.
- Tap to exit the Hotkey Mapping page.
Audio Mixer
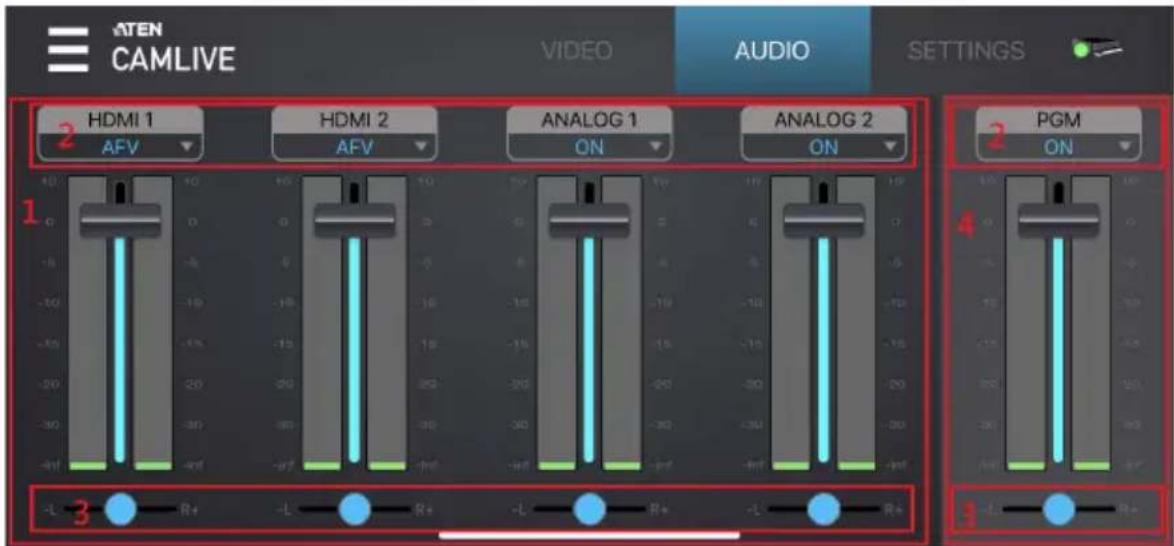
The components of the Audio Mixer deck page is shown below:
text_image
ATEN CAMLIVE VIDEO AUDIO SETTINGS 2 HDMI 1 AFV HDMI 2 AFV ANALOG 1 ON ANALOG 2 ON 3 PGM ON - L - R+ - L - R+ - L - R+ - L - R+| No. | Component Description | |
| 1 | Audio LevelControl | Slide the volume slider to control the volume of each audio source. |
| No. | Component Description |
| 2 | Audio Control Tap to select and adjust audio control. For the LEDs status indication, see Front View, page 4. |
| HDMI1 and HDMI2: Tap to select an audio control for HDMI 1 and HDMI 2 between AFV, ON, and MUTE. | |
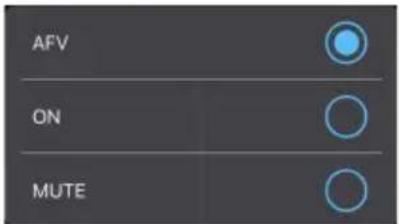 | |
| AFV (Audio-Follow-Video): Broadcasting the source's video and audio at the same time. ON: The audio is turned on (unmuted). MUTE: The audio is turned off (muted). | |
| ANALOG 1: Tap to select an audio control for ANALOG 1 between ON, and MUTE. | |
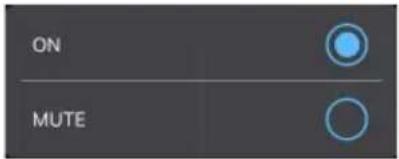 | |
| ON: The audio is turned on (unmuted). MUTE: The audio is turned off (muted). | |
| ANALOG 2: Tap to select an audio control and adjust MIC Gain settings for ANALOG 2 between ON, and MUTE. | |
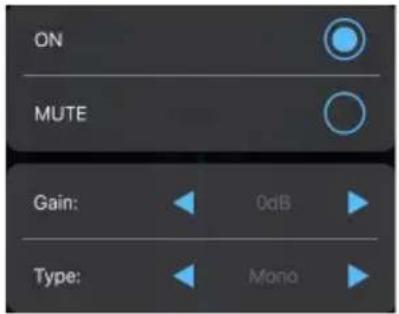 | |
| ON: The audio is turned on (unmuted). MUTE: The audio is turned off (muted). Gain: Select the threshold between 0dB, +6dB, +12dB, +18dB, +24dB, and +30dB. Type: Select between Mono and Stereo. |
| No. | Component | Description |
PGM: Tap to select an audio control and adjust compressor settings for PGM between ON, and MUTE. 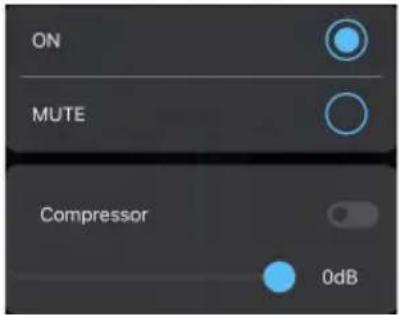 ON: The audio is turned on (unmuted).MUTE: The audio is turned off (muted).Compressor: Tap to enable or disable the compressor function and drag the dial to adjust the threshold. The default setting is disable.The Compressor looks like this Compressorwhen it is disabled.The Compressor looks like this Compressorwhen it is enabled. ON: The audio is turned on (unmuted).MUTE: The audio is turned off (muted).Compressor: Tap to enable or disable the compressor function and drag the dial to adjust the threshold. The default setting is disable.The Compressor looks like this Compressorwhen it is disabled.The Compressor looks like this Compressorwhen it is enabled. | ||
| 3 L/R | Balance Control | Tap and hold to drag and control which side of the sound source is to be more emphasized. |
| 4 | P G M Control | Slide the volume slider to control the volume of PGM. |
Settings Panel
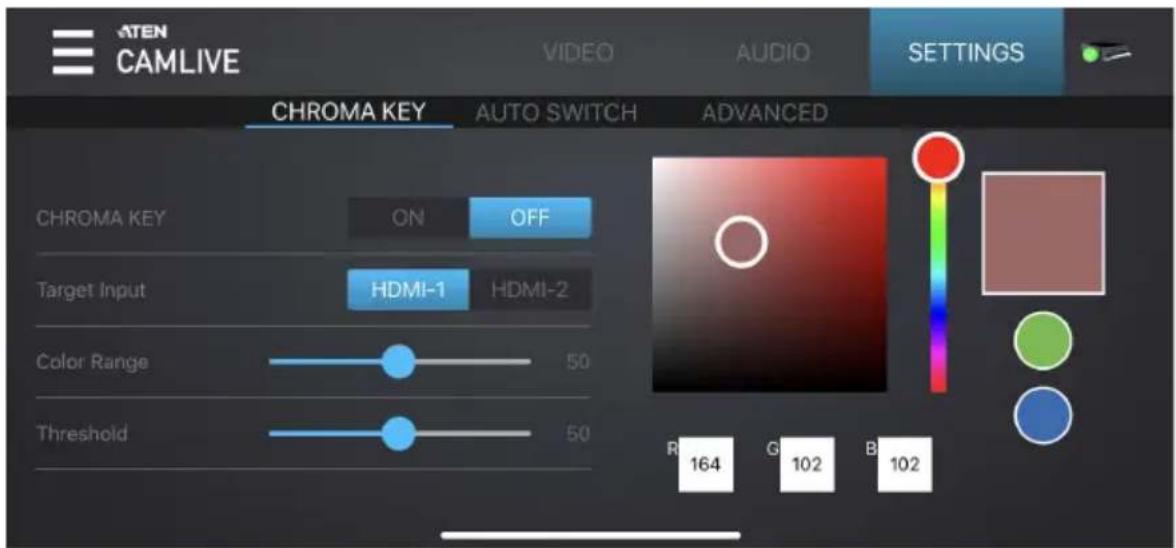
The Settings deck page is shown below:
text_image
ATEN CAMLIVE VIDEO AUDIO SETTINGS CHROMA KEY AUTO SWITCH ADVANCED CHROMA KEY ON OFF Target Input HDMI-1 HDMI-2 Color Range 50 Threshold 50 R 164 G 102 B 102Chroma Key
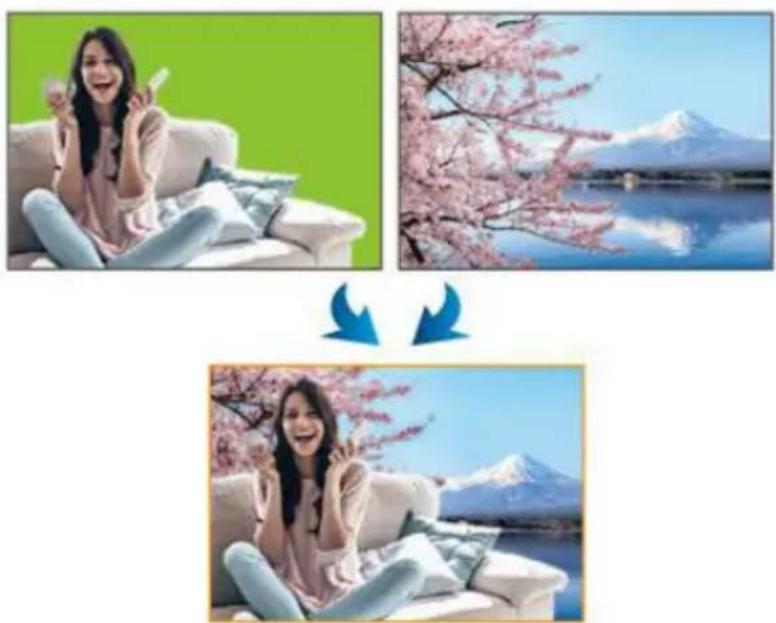
Chroma key allows user to composite two HDMI sources based on a color range, it usually goes hand-in-hand with a green screen. Our ATEN OnAir Lite app removes the color screen background and fill in the area with the HDMI sources.
natural_image
Three-panel image sequence showing a smiling woman in a sofa, cherry blossoms on a lake, and a mountain range with blue arrows indicating transformation (no text or symbols)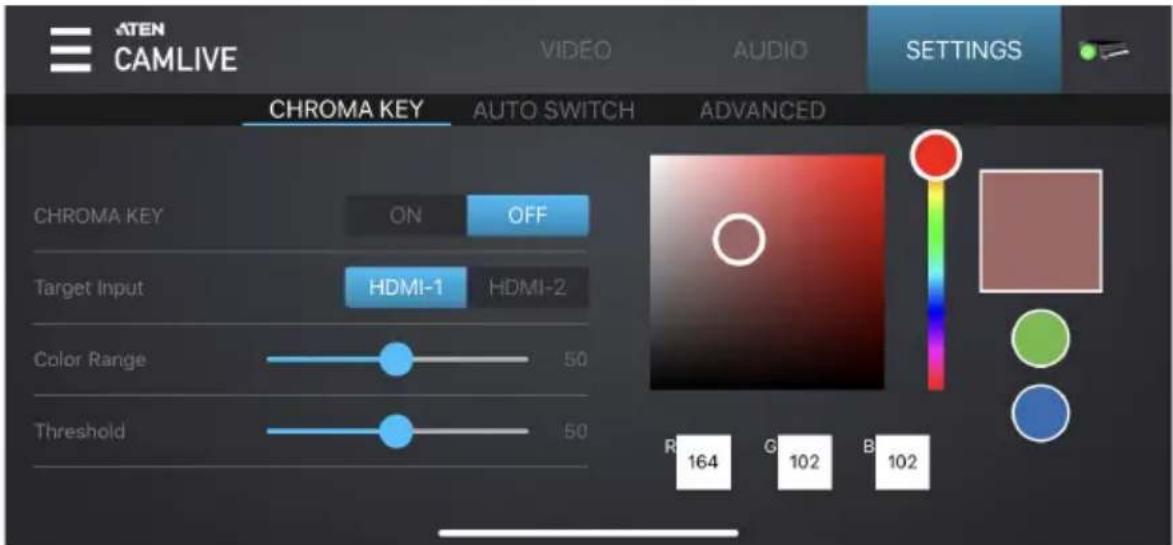
text_image
ATEN CAMLIVE VIDEO AUDIO SETTINGS CHROMA KEY AUTO SWITCH ADVANCED CHROMA KEY ON OFF Target Input HDMI-1 HDMI-2 Color Range 50 Threshold 50 R 164 G 102 B 102| No. | Component Description |
| 1 CHROMA KEY Turns | on or off the Chroma Key effect and selects a color background for the HDMI input source to be fully transparent. |
| 2 Target Input | Selects a target input for the Chroma Key. |
| 3 Color Range Adjust the color range for the colored background. | |
| 4 Threshold Adjust the threshold for the colored background. | |
Auto Switch
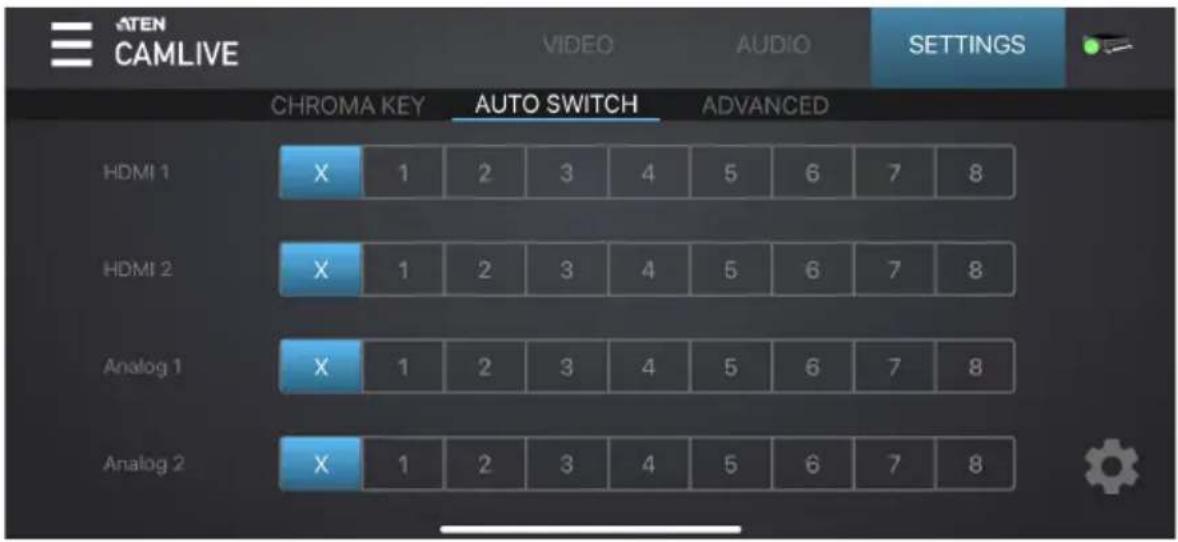
Auto switch allows user to switch the HDMI display content connected on the HDMI Program Output Port to automatically follow with the input audio source. You can select a scene for each audio input source for the auto switch.

natural_image
Illustration of three people sitting on a sofa with floating icons representing communication and user interaction (no text or symbols)
flowchart
graph TD
    A["Audio1"] --> B["Audio2"]
    style A fill:#f9f,stroke:#333
    style B fill:#bbf,stroke:#333
text_image
ATEN CAMLIVE VIDEO AUDIO SETTINGS CHROMA KEY AUTO SWITCH ADVANCED HDMI 1 X 1 2 3 4 5 6 7 8 HDMI 2 X 1 2 3 4 5 6 7 8 Analog 1 X 1 2 3 4 5 6 7 8 Analog 2 X 1 2 3 4 5 6 7 8Note: See Scene Selector, page 30 for more details.
| No. | Component Description |
| 1 | HDMI 1 Selects a scene for the HDMI 1. |
| 2 | HDMI 2 Selects a scene for the HDMI 2. |
| 3 | ANALOG 1 Selects a scene for the ANALOG 1. |
| 4 | ANALOG 2 Selects a scene for the ANALOG 2. |
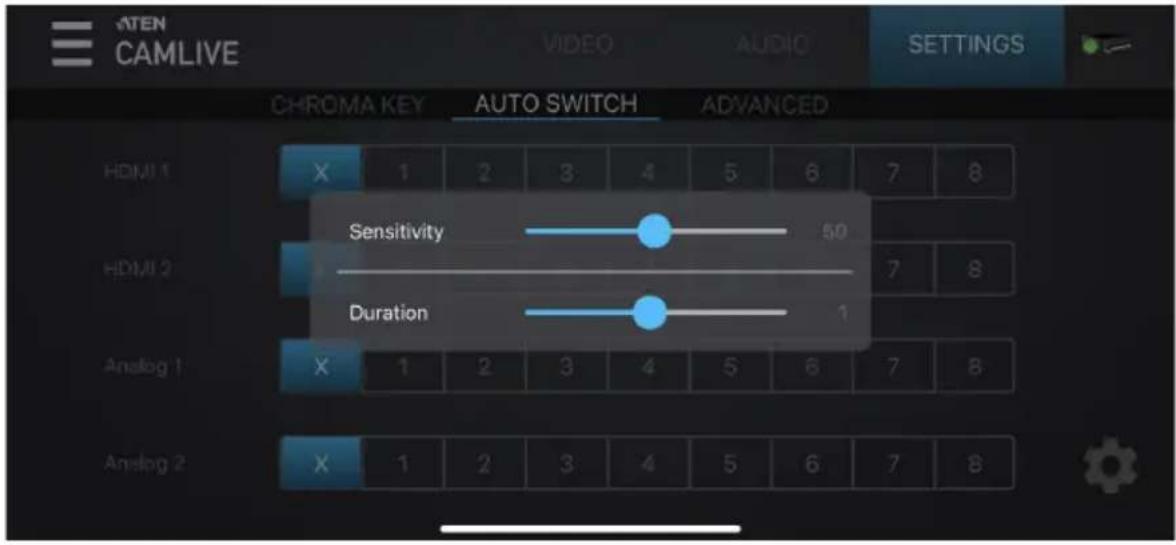
More Settings
Tap on the to adjust the audio sensitivity and duration.
text_image
ATEN CAMLIVE VIDEO AUDIO SETTINGS CHROMA KEY AUTO SWITCH ADVANCED HDMI 1 X 1 2 3 4 5 6 7 8 Sensitivity 50 HDMI 2 Duration 7 8 Analog 1 X 1 2 3 4 5 6 7 8 Analog 2 X 1 2 3 4 5 6 7 8Advanced
text_image
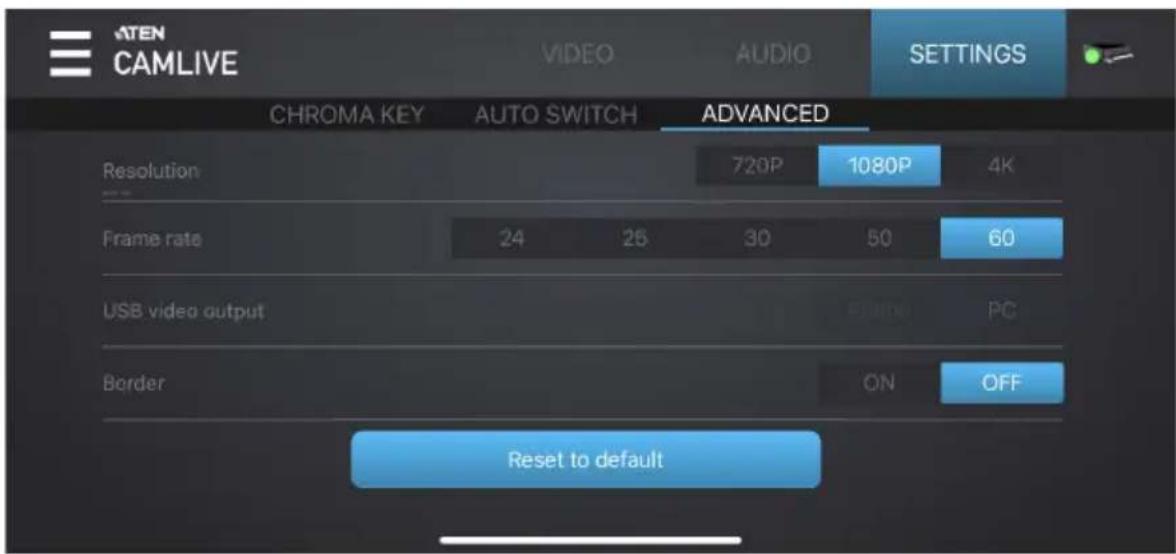
ATEN CAMLIVE VIDEO AUDIO SETTINGS CHROMA KEY AUTO SWITCH ADVANCED Resolution 720P 1080P 4K Frame rate 24 26 30 50 60 USB video output PC Border ON OFF Reset to default| No. | Component Description |
| 1 | Resolution Selects a resolution for the HDMI display content when the HDCP is turned on.Note: 4K resolution is not supported when the HDCP is turned off, see HDCP Switching, page 23 for details. |
| 2 | Frame Rate Selects a frame rate for the HDMI display content when the HDCP is turned on. |
| 3 | USB Video Output Selects a USB video output between Phone and PC. |
| 4 | Border Sets a video border for the HDMI display content. |
Resetting the CAMLIVE™ PRO
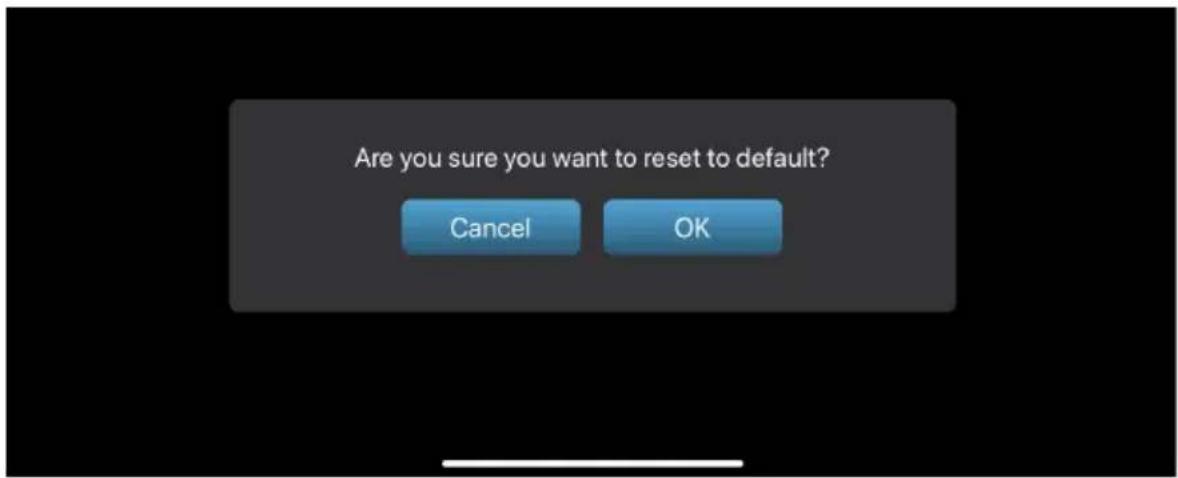
To reset the CAMLIVE™ PRO back to the factory settings, tap. A warning message appears, click OK.
text_image
Are you sure you want to reset to default? Cancel OKATEN OnAir Lite App Factory Default Settings
The OnAir Lite app factory default settings are as follows:
| Deck Component Setting Default | |||
| Video Layout Name 1 ch1 | |||
| 2 | ch2 | ||
| 3 | P | ||
| 4 | P | ||
| 5 | P | ||
| 6 | P | ||
| 7 | P | ||
| 8 | POP | ||
| Transition Effect | Cut | ||
| Duration | 0.3 seconds | ||
| Audio HDMI 1 | Volume | AFV, 0dB | |
| HDMI 2 | Volume | ||
| ANALOG 1 (RCA) | Volume | ||
| ANALOG 2 (XLR) | Volume | ||
| Gain | |||
| Type | |||
| PGM | Volume | ||
| Compressor | |||
| Settings | CHROMA KEY | Target Input HDMI 1 | |
| Select Color 130 / 130 / 130 | |||
| Color Range 50 | |||
| Threshold 50 | |||
| AUTO SWITCH | HDMI 1 X | ||
| HDMI 2 X | |||
| Analog 1 X | |||
| Aanalog 2 X | |||
| Sensitivity 50 | |||
| Duration 1 | |||
| ADVANCED Resolution 1080p (HDCP On) | |||
Chapter 5
The Firmware Upgrade Utility
Overview
The purpose of the Firmware Upgrade Utility is to provide an easy process for users to upgrade the CAMLIVE ^™ PRO unit to either support PC video capture, or Android smartphone video capture capability.
As new firmware versions become available, new firmware upgrade packages are posted on our website. Check the website regularly to find the latest information and packages.
Downloading the Firmware Upgrade Package
To download the firmware upgrade package:
- On our Website, go to Support Center - Download and choose the device model, or from the CAMLIVE™ PRO product page, click on the Support and Downloads tab, and go to Software & Drivers. A list of available firmware upgrade packages appears.
- Choose the firmware upgrade package that you wish to install (usually the most recent) and download it to your computer.
Preparation
To prepare for the firmware upgrade, do the following:
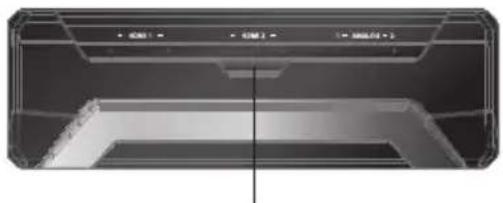
- Press and hold the Bluetooth link pushbutton.
natural_image
Interior view of a transparent rectangular device with internal structure (no visible text or symbols)Bluetooth Link Pushbutton
- Plug the power adapter cable into the power jack to power on the CAMLIVE™ PRO. The front panel LEDs blink together once every 0.5 seconds to indicate Firmware Upgrade Mode is in effect.
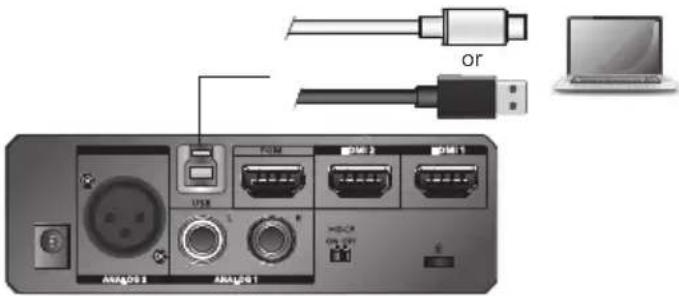
- Connect the USB Type-B UVC output port to the host. If your laptop only has a USB Type-A interface, connect the (included) USB Type-B to USB Type-A adapter between the host and the USB Type-B UVC output port.
text_image
USB USB 1 USB 2 USB 3 USB 4 USB 5 USB 6 USB 7 USB 8 USB 9 USB 10 or L A#A#G#1 A#A#G#1Starting the Upgrade
To upgrade the CAMLIVE ^™ PRO, follow the steps below:
- Run the downloaded Firmware Upgrade Package file – either by double clicking the file icon, or by opening a command line and entering the full path to it.
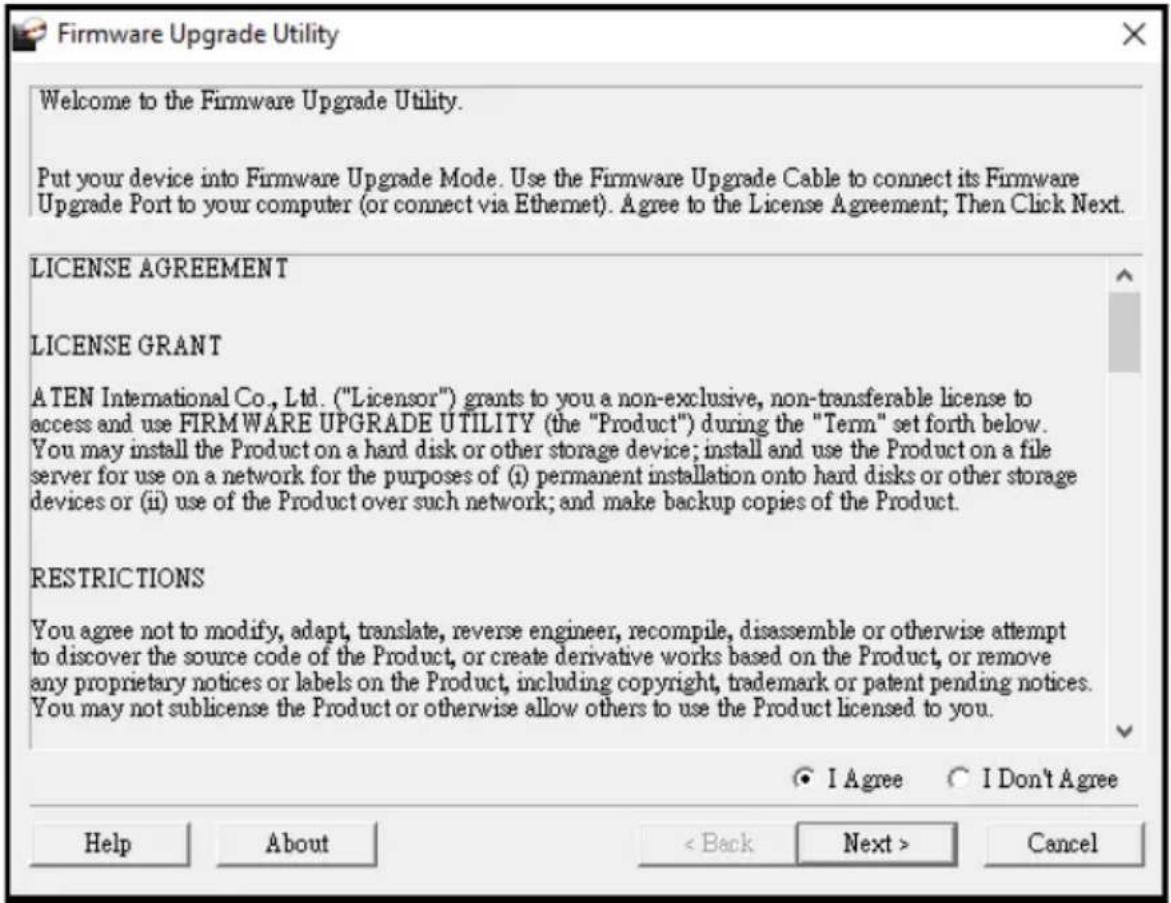
The Firmware Upgrade Utility Welcome screen appears:
text_image
Firmware Upgrade Utility Welcome to the Firmware Upgrade Utility. Put your device into Firmware Upgrade Mode. Use the Firmware Upgrade Cable to connect its Firmware Upgrade Port to your computer (or connect via Ethernet). Agree to the License Agreement; Then Click Next. LICENSE AGREEMENT LICENSE GRANT ATEN International Co., Ltd. ("Licensor") grants to you a non-exclusive, non-transferable license to access and use FIRMWARE UPGRADE UTILITY (the "Product") during the "Term" set forth below. You may install the Product on a hard disk or other storage device; install and use the Product on a file server for use on a network for the purposes of (i) permanent installation onto hard disks or other storage devices or (ii) use of the Product over such network; and make backup copies of the Product. RESTRICTIONS You agree not to modify, adapt, translate, reverse engineer, recompile, disassemble or otherwise attempt to discover the source code of the Product, or create derivative works based on the Product, or remove any proprietary notices or labels on the Product, including copyright, trademark or patent pending notices. You may not sublicense the Product or otherwise allow others to use the Product licensed to you. I Agree I Don't Agree Help About < Back Next > CancelNote: The screens shown in this section are for reference only. The wording and layout of the actual screens put up by the Firmware Upgrade Utility may vary slightly from these examples.
- Read the License Agreement (enable the I Agree radio button).
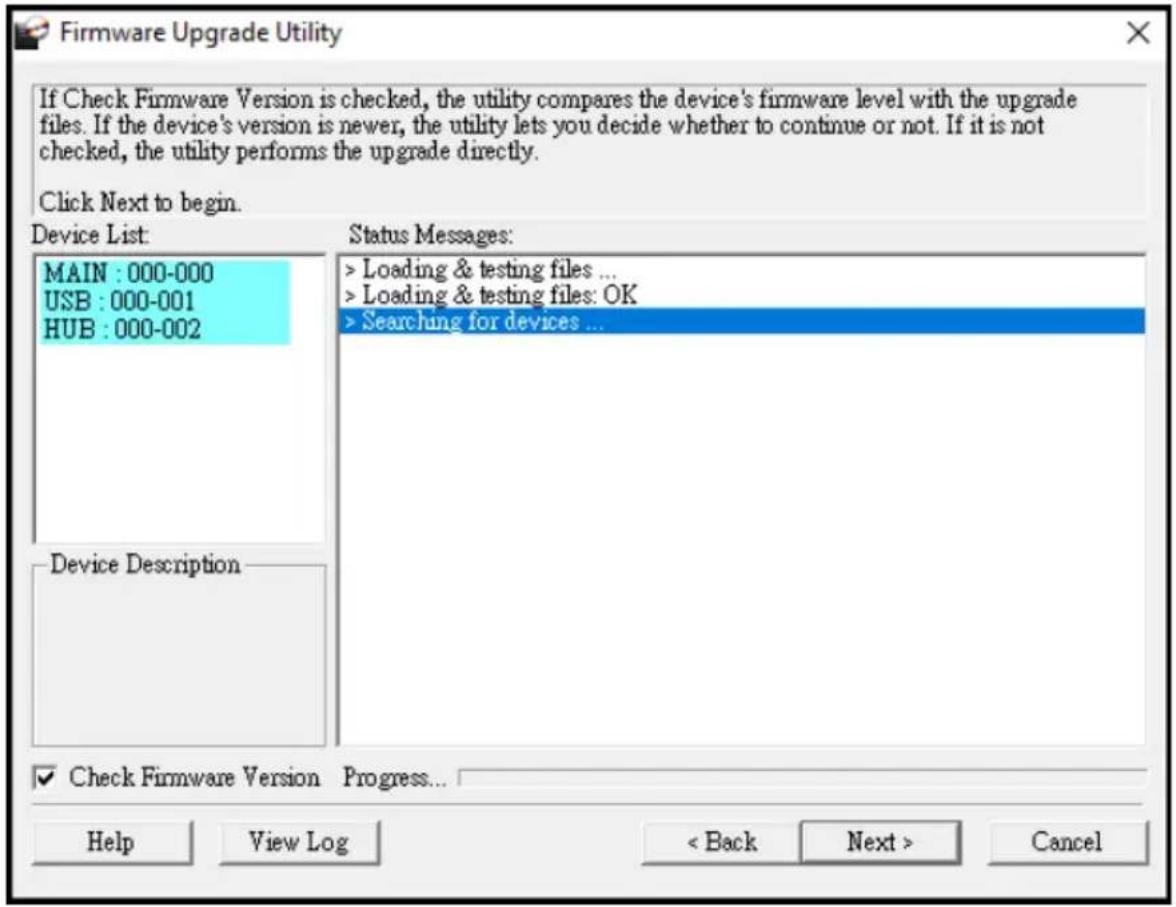
3. Click Next to continue. The Firmware Upgrade Utility main screen appears:
text_image
Firmware Upgrade Utility If Check Firmware Version is checked, the utility compares the device's firmware level with the upgrade files. If the device's version is newer, the utility lets you decide whether to continue or not. If it is not checked, the utility performs the upgrade directly. Click Next to begin. Device List: MAIN : 000-000 USB : 000-001 HUB : 000-002 Status Messages: > Loading & testing files ... > Loading & testing files: OK > Searching for devices ... Device Description ✓ Check Firmware Version Progress... Help View Log < Back Next > CancelThe Utility inspects your installation. All the devices capable of being upgraded by the package are listed in the Device List panel.
4. Click Next to perform the upgrade.
text_image
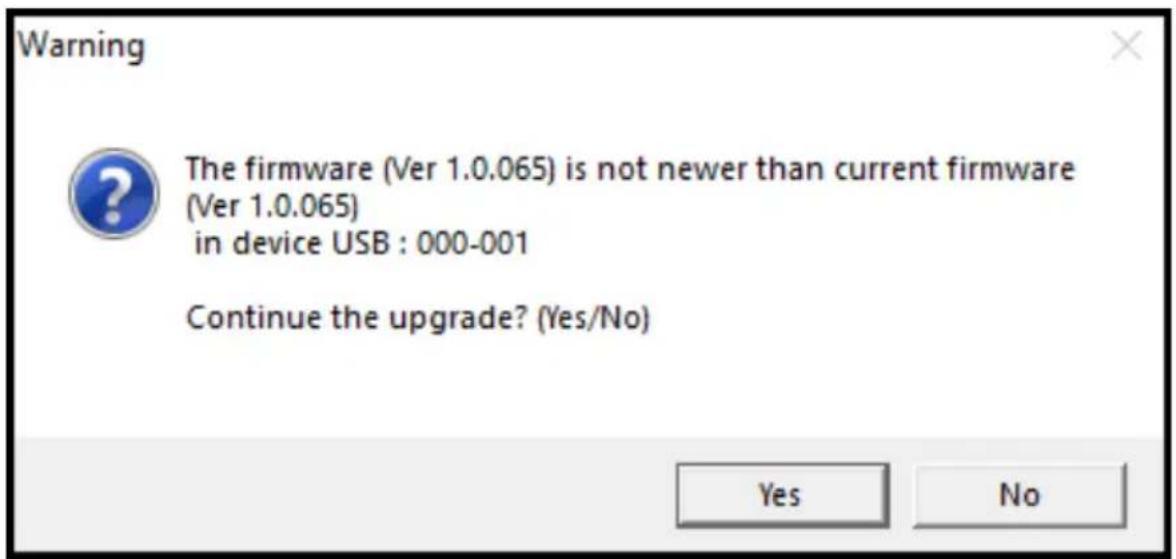
Warning The firmware (Ver 1.0.065) is not newer than current firmware (Ver 1.0.065) in device USB : 000-001 Continue the upgrade? (Yes/No) Yes NoIf you enabled Check Firmware Version, the Utility compares the device's firmware level with that of the upgrade files. If it finds that the device's version is higher than the upgrade version, it brings up a dialog box
informing you of the situation and gives you the option to Continue or Cancel.
If you didn't enable Check Firmware Version, the Utility installs the upgrade files without checking whether they are a higher level, or not.
As the Upgrade proceeds, status messages appear in the Status Messages panel, and the progress toward completion is shown on the Progress bar.
Upgrade Succeeded
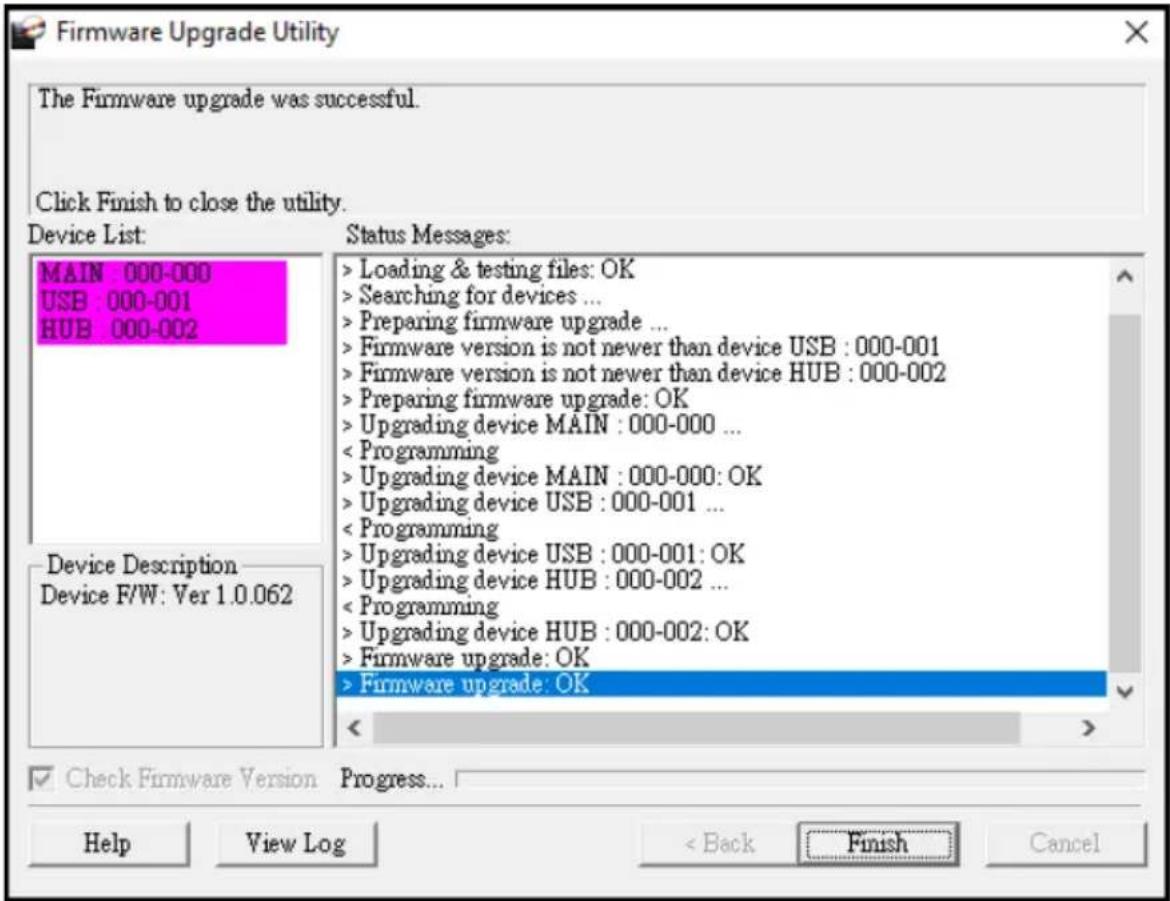
After the upgrade has completed, a screen appears to inform you that the procedure was successful:
text_image
Firmware Upgrade Utility The Firmware upgrade was successful. Click Finish to close the utility. Device List: MAIN 000-000 USB : 000-001 HUB : 000-002 Device Description Device F/W: Ver 1.0.062 Status Messages: > Loading & testing files: OK > Searching for devices ... > Preparing firmware upgrade ... > Firmware version is not newer than device USB : 000-001 > Firmware version is not newer than device HUB : 000-002 > Preparing firmware upgrade: OK > Upgrading device MAIN : 000-000 ... < Programming > Upgrading device MAIN : 000-000: OK > Upgrading device USB : 000-001 ... < Programming > Upgrading device USB : 000-001: OK > Upgrading device HUB : 000-002 ... < Programming > Upgrading device HUB : 000-002: OK > Firmware upgrade: OK > Firmware upgrade: OK < Back Finish Cancel ✓ Check Firmware Version Progress... Help View Log < Back Finish CancelClick Finish to close the Firmware Upgrade Utility.
After a successful completion, the CAMLIVE™ PRO exit Firmware Upgrade Mode, and resets itself.
Note: For Windows 7 users, please download and install the Win7_driver from on our website after the upgrade is successful. To download the driver, see Downloading the Firmware Upgrade Package, page 53.
Upgrade Failed
If the Upgrade Succeeded screen doesn't appear, it means that the upgrade failed to complete successfully, in which case you should do the following:
- Power off the CAMLIVE™ PRO by removing the power jack.
- Invoke Firmware Upgrade Mode by holding down the Bluetooth link pushbutton on the front panel (see HDMI 2 audio status LED, page 4), and power on the CAMLIVE™ PRO. The front LEDs flash together.
- Do the firmware upgrade procedure again.
Safety Instructions
General
- This product is for indoor use only.
- Read all of these instructions. Save them for future reference.
◆ Follow all warnings and instructions marked on the device. - Do not place the device on any unstable surface (cart, stand, table, etc.). If the device falls, serious damage will result.
- Do not use the device near water.
Do not place the device near, or over, radiators or heat registers. - The device cabinet is provided with slots and openings to allow for adequate ventilation. To ensure reliable operation, and to protect against overheating, these openings must never be blocked or covered.
- The device should never be placed on a soft surface (bed, sofa, rug, etc.) as this will block its ventilation openings. Likewise, the device should not be placed in a built-in enclosure unless adequate ventilation has been provided.
- Never spill liquid of any kind on the device.
- Unplug the device from the wall outlet before cleaning. Do not use liquid or aerosol cleaners. Use a damp cloth for cleaning.
- The device should be operated from the type of power source indicated on the marking label. If you are not sure of the type of power available, consult your dealer or local power company.
- To prevent damage to your installation it is important that all devices are properly grounded.
Do not allow anything to rest on the power cord or cables. Route the power cord and cables so that they cannot be stepped on or tripped over. - Position system cables and power cables carefully; Be sure that nothing rests on any cables.
- Never push objects of any kind into or through cabinet slots. They may touch dangerous voltage points or short out parts resulting in a risk of fire or electrical shock.
Do not attempt to service the device yourself. Refer all servicing to qualified service personnel. -
If the following conditions occur, unplug the device from the wall outlet and bring it to qualified service personnel for repair.
-
The power cord or plug has become damaged or frayed.
- Liquid has been spilled into the device.
- The device has been exposed to rain or water.
- The device has been dropped, or the cabinet has been damaged.
- The device exhibits a distinct change in performance, indicating a need for service.
- The device does not operate normally when the operating instructions are followed.
- Only adjust those controls that are covered in the operating instructions. Improper adjustment of other controls may result in damage that will require extensive work by a qualified technician to repair.
Technical Support
International
- For online technical support – including troubleshooting, documentation, and software updates: http://support.aten.com
- For telephone support, see Telephone Support, page viii:
North America
| Email Support support@aten-usa.com | ||
| Online Technical Support | Troubleshooting Documentation Software Updates | http://www.aten-usa.com/support |
| Telephone Support 1-888-999-ATEN ext 4988 | 1-949-428-1111 | |
When you contact us, please have the following information ready beforehand:
◆ Product model number, serial number, and date of purchase
- Your computer configuration, including operating system, revision level, expansion cards, and software
◆ Any error messages displayed at the time the error occurred
◆ The sequence of operations that led up to the error
◆ Any other information you feel may be of help
Specifications
| Function CAMLIVE ^TM | PRO |
| Connectors | |
| Video In 2 x HDMI Type-A Female | (Black) |
| USB Port USB 3.2 Gen1 Type-B Male | Male (Blue)Note: USB Type-B to USB-C and USB Type-B to USB Type-A cables included in the package. |
| Video Output 1 x HDMI Type-A Female | (PGM Video, Black) |
| Audio Inputs 1 x Balanced Analog | Audio via XLR Connectors1 x Unbalanced Audio via RCA Connectors |
| Video Resolution | |
| Video Input (HDMI support) 720p50 | 720p60, 1080p24, 1080p25, 1080p30, 1080p50, 1080p60, 2160p24, 2160p25, 2160p30 |
| PGM Video Output (HDMI support) | UVC Capture Enabled:720p50, 720p60, 1080p24, 1080p25, 1080p30, 1080p50, 1080p60 (HDCP disabled) |
| UVC Capture Disabled:720p50, 720p60, 1080p24, 1080p25, 1080p30, 1080p50, 1080p60, 2160p24, 2160p25, 2160p30 (HDCP enabled) | |
| Audio Sampling 16-bit PCM audio | 44.1KHz and 48KHz |
| UVC Output Uncompressed 720p60 | 60, 1080p60 UVC VideoStream with UAC Audio(Uncompressed video stream is only available on USB3.1 connection) |
Environmental
| Operating Temperature 0 - 40 °C | |
| Storage Temperature -20 – 60 °C |
Humidity 0 - 80% RH, Non-Condensing
| Function CAMLIVE ^TM | PRO |
| Minimum Hardware Requirement | PC/Mac:CPU: Intel® i3 Dual Core 2.8Ghz or aboveRAM: 4GB or aboveOne USB-C Interface or USB Type-A InterfaceSmartphone*:Android smartphone with UVC and USB-C InterfaceNote: For detail UVC compatible device list, please review the following link of third part App.http://www.camerafi.com/supported-devices/ |
| Connection Bluetooth Low Energy (BLE) Technology | |
| OS Support Windows 7 or above | Mac OS X 10.13 or laterAndroid 5.0.1 or later with UVC supportNote: For Windows 7 users, please download and install the Win7_driver from on our website. To download the driver, see Downloading the Firmware Upgrade Package, page 53. |
| Physical Properties | |
| Housing Metal | |
| Weight 0.68 kg (1.50 lb) | |
| Dimensions (L x W x H) 13.00 x 15.18 x 4.25 cm (5.12 x 5.98 x 1.67 in) | |
Limited Warranty
ATEN warrants its hardware in the country of purchase against flaws in materials and workmanship for a Warranty Period of two [2] years (warranty period may vary in certain regions/countries) commencing on the date of original purchase. This warranty period includes the LCD panel of ATEN LCD KVM switches. Select products are warranted for an additional year (see A+ Warranty for further details). Cables and accessories are not covered by the Standard Warranty.
What is covered by the Limited Hardware Warranty
ATEN will provide a repair service, without charge, during the Warranty Period. If a product is detective, ATEN will, at its discretion, have the option to (1) repair said product with new or repaired components, or (2) replace the entire product with an identical product or with a similar product which fulfills the same function as the defective product. Replaced products assume the warranty of the original product for the remaining period or a period of 90 days, whichever is longer. When the products or components are replaced, the replacing articles shall become customer property and the replaced articles shall become the property of ATEN.
To learn more about our warranty policies, please visit our website: http://www.aten.com/global/en/legal/policies/warranty-policy/
© Copyright 2021 ATEN® International Co., Ltd.
Released: 2021-06-18
ATEN and the ATEN logo are registered trademarks of ATEN International Co., Ltd. All rights reserved. All other brand names and trademarks are the registered property of their respective owners.