Pad 10 - Tablet Captiva - Free user manual and instructions
Find the device manual for free Pad 10 Captiva in PDF.


User questions about Pad 10 Captiva
0 question about this device. Answer the ones you know or ask your own.
Ask a new question about this device
Download the instructions for your Tablet in PDF format for free! Find your manual Pad 10 - Captiva and take your electronic device back in hand. On this page are published all the documents necessary for the use of your device. Pad 10 by Captiva.
USER MANUAL Pad 10 Captiva
Introduction, Important Notes, Precautions before Use 2
Cleaning, Disposal, Used Logos, Intended Use ....3
Layout and Definitions 4
Presentation of the QWERTZ keyboard 5
Insert and remove keyboard....6
Power on/off....6
Using touch screen 8
Desktop....8
Settings....100
Wi-Fi settings....13
Bluetooth settings....14
Use of extended storage 14
-
Using USB stick ....144
-
Using SD card ....15
Downloading, installing/uninstalling applications 15
Connecting to PC 16
E-Mail....16
Play music....17
Photo....17
Camera....18
GPS Navigation 19
FM Radio 19
Battery Charging 19
Information for Energy Saving....19
System Update....20
Specifications....20
Package Content......21
RED Directive....21
Manufacturer and Imprint 21
GNU General Public License, Version 2 (GPL)....21
Troubleshouting....22
Introduction
Thank you for purchasing this tablet.
The tablet is equipped with a built-in wireless and Bluetooth module. Running on Android 6.0, Quad-Core processor und highly responsive capacitive multi-touch screen, it brings you a wonderful user experience. The tablet allows you to view photos, watch movies, read e-book* as well as news and communicate with the whole world. This guide serves to enable users to get to know familiar with the product as soon as possible. Here we have made a brief introduction to the key layout and definitions in figures and words.
Before beginning, please read this user manual carefully.
*Software not included
The content of this manual must not be reproduced, also not partial.
Important Notes
- Charge the battery for at least 12 hours before initial start-up.
- The display protective film protect the display during storage and transportation. Please remove this film, when the tablet is used.
Precautions before use
- This product is suitable for use in non-tropic areas below 2,000 meters
- Prevent this product from falling to the ground, it could be strongly damaged.
- Keep the tablet and all accessories out of the reach of small children.
-
Keep the tablet away from rain, moisture, dust, chemical, direct sunlight and heat source and heat, for example longer storage in the car. Some parts and the built in rechargeable battery could be deformed.
-
Avoid using it in the strong magnetic and strong electrostatic environment as well as during thunderstorms as much as possible.
-
Once any water or other liquid splashes on to this product, close it immediately and do not use until it dries out.
-
Do not clean this product with any detergent containing chemical element or other liquid to avoid causing damage due to corrosion and becoming damp. If cleaning is really necessary, clean it with dry soft cloth tissue paper.
-
Handle the screen gently. To clear fingerprints or dust on the screen, use soft cloth dedicated for camera lens instead of gauze. Do not place objects on the tablet, the display could be damaged.
-
Please back up your important files at any time to avoid loss.
-
Please do not disassemble this tablet and power adapter by yourself; otherwise you will lose the right to warranty.
-
Do not use the product if it is mechanically damaged.
-
Do not disconnect the tablet from power suddenly, when formatting or uploading and downloading, which can lead to program errors.
-
Please use the original power adapter for charging. Nonconforming chargers may cause harms.
-
Protect the power cord. When connect the power cord, do not step onto it or place any object on it, which may cause extrusion. Protect the connector of the power cord connected devices specially.
-
Rechargeable battery The battery in this product cannot be easily replaced by users themselves. Replacement with incorrect type batteries may cause explosion or fire.
-
While using the earphone, if the volume is excessively high it may cause hearing damage. So please adjust the volume of the player to a moderate level and balance the time of using.
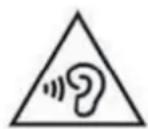
Note:
Pictures in this manual are for demonstration purpose only and may differ from the real product. The manual shows the operation of the tablet and the basic functions of the Android operating system. There are numerous specialist books and information on the internet available for further information and explanations regarding Android operating system.
Cleaning
Handle the screen gently. To clear the fingerprints or dust on the screen, use soft cloth dedicated for camera lens instead of gauze.
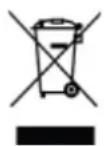
Disposal
This unit contains a battery. If the battery or device is defective, it should not be disposed of with household waste. Batteries can possibly contain harmful substances that can harm the environment and people's health. Please dispose of the battery and device commercially or at municipal recycling plants. Return is free of charge and is prescribed by law. Please only dispose of empty batteries in the containers provided and tape their terminals.
Used Logos
All brandmarks, trademark and products are registered by their respective company.
Intended Use
The tablet offers many opportunities for the use. For example surf internet*, read news and e-books, look movies, play games and communication with the whole world*.
The tablet is intended for home and office use in normal environmental conditions and not for industrial application.
*Internet-connection is needed which could cause cost.
Layout and Definitions
Front View
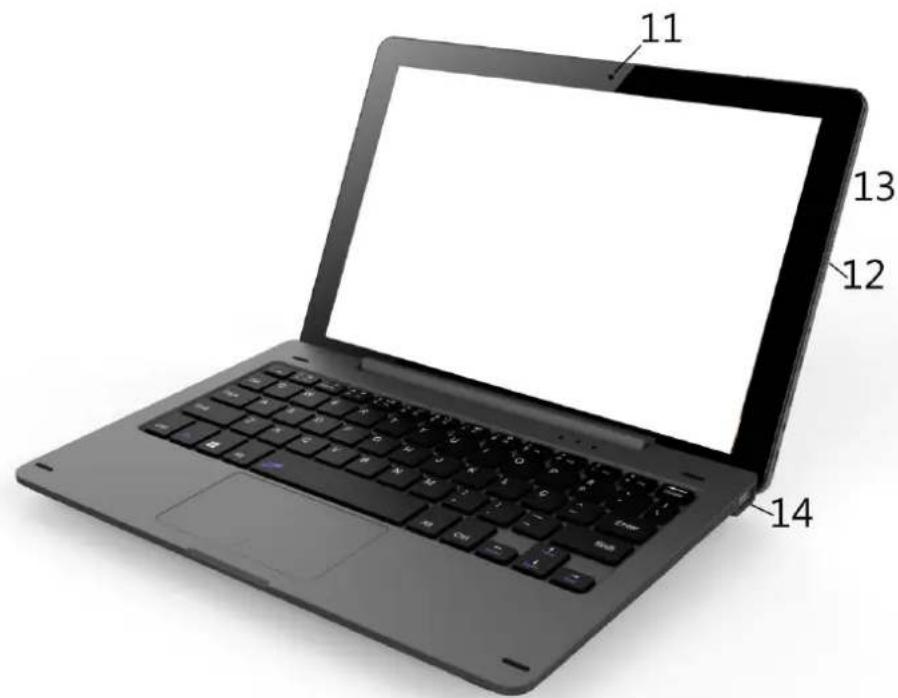
text_image
11 13 12 14Rear View
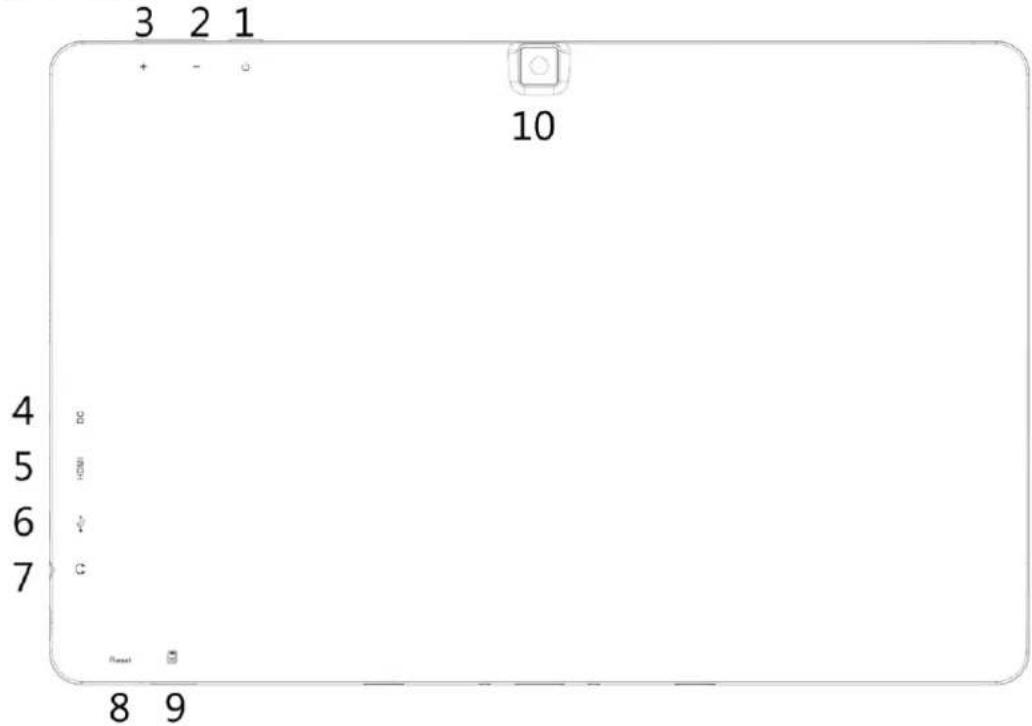
text_image
3 2 1 + - 10 4 5 6 7 8 9- Power Key: see Power on/off
- Sound - : lower the volume
- Sound + : raise the volume
- Power DC-in port: recharge the battery
- Micro HDMI port: connect this output to HDMI input of external TV or TFT
- Micro USB port: for data transfer to PC and external USB devices (OTG function)
- Headphone connector: 3.5mm, connect earphone or active loudspeaker
- Reset pin opening: Reset function
- Micro SD Card slot: supports micro SDHC card, max. 32GB, Class 10 recommended
- Rear camera: 5.0 Megapixel
- Front camera: 2.0 Megapixel
- Speaker outlet
- Microphone outlet
- USB 2.0 port: connect to external USB devices
Presentation of the QWERTZ keyboard
The tablet is equipped with a pluggable German QWERTZ keyboard with additional function keys (blue color). The function key will act as hot key when pressed while the Fn key is held down.
Fn + ESC: back
Fn + key 1: search on home screen
Fn + key 2: switch on/ off the loudspeaker
Fn + key 3: lower the sound volume
Fn + key 4: increase the sound volume
Fn + key 5: select
Fn + key 6: copy
Fn + key 7: paste
Fn + key 8: cut
Fn + key 9: start webbrowser
Fn + key 0: lower brightness of display
Fn + key β: increase brightness of display
Fn + key : switch on standby mode - power LED (17) off
Fn + key Entf : delete previous character
Fn + key : switch off touchpad – touchpad LED (19) is switched on
Fn + key Y: shows <
Fn + key X: shows >
Fn + key C: shows |
key : capital letters activated – LED (18) is switched on
The touchpad (20) with its buttons is a pointing device that functions as an optical mouse, which can perform navigation, scrolling and selection functions. The components of the touchpad are:
Touch area (21): Moves the pointer, selects or activates items on the screen Left touchpad button (22): Equivalent to the left button of a mouse button Right touchpad button (23): Equivalent to the right button of a mouse button
Note: The touchpad is a pressure sensitive device that requires proper handling to avoid damage. Do not place heavy objects on the touchpad or its buttons. Do not scratch your fingernails or sharp objects over the touchpad.
Insert and remove keyboard
For simple and fast inputs, for example editing text documents, the tablet can be operated with the keyboard. Inserting and removing can be performed when the tablet is switched on or off.
Remove the keyboard: Open the tablet and keyboard at about 90^ angle and pull the tablet upwards
Insert the keyboard: Rotate the inserting mechanism so that the guide aids (15) point upwards at a 90^ angle to the keyboard. The carefully insert the tablet into the guide aids (15) of the keyboard until it stops. The electrical connections between tablet and keyboard is established through the connections (16). The angle between the tablet and the keyboard can then be adapted to the needs.
Note: Never remove the tablet from the keyboard when it is closed ( 0^ angle). Mechanical damage could occur;
Power on/off
Power on: Press the power key (1) for about 2 seconds. Startup may take about 1 minute. The locked home screen is displayed.
Power off: Press the power key (1) for about 2 seconds and choose “Power off” in the popup message
Lock/unlock screen/ energy saving mode:
Press the power key (1) shortly to close the screen. The system will enter into standby/ power saving mode. Press the power key (1) again to wake up the tablet, switch on the screen and exit power saving mode.
Note: During standby mode, the basic functions of the tablet will not be turned off, only the screen is turned off.
Forced shutdown: In case of no response of the device, press power key (1) (approx. 30sec.) to switch off the tablet.
Note: Do not use forced shutdown unless necessary. Shut down the device following power of steps.
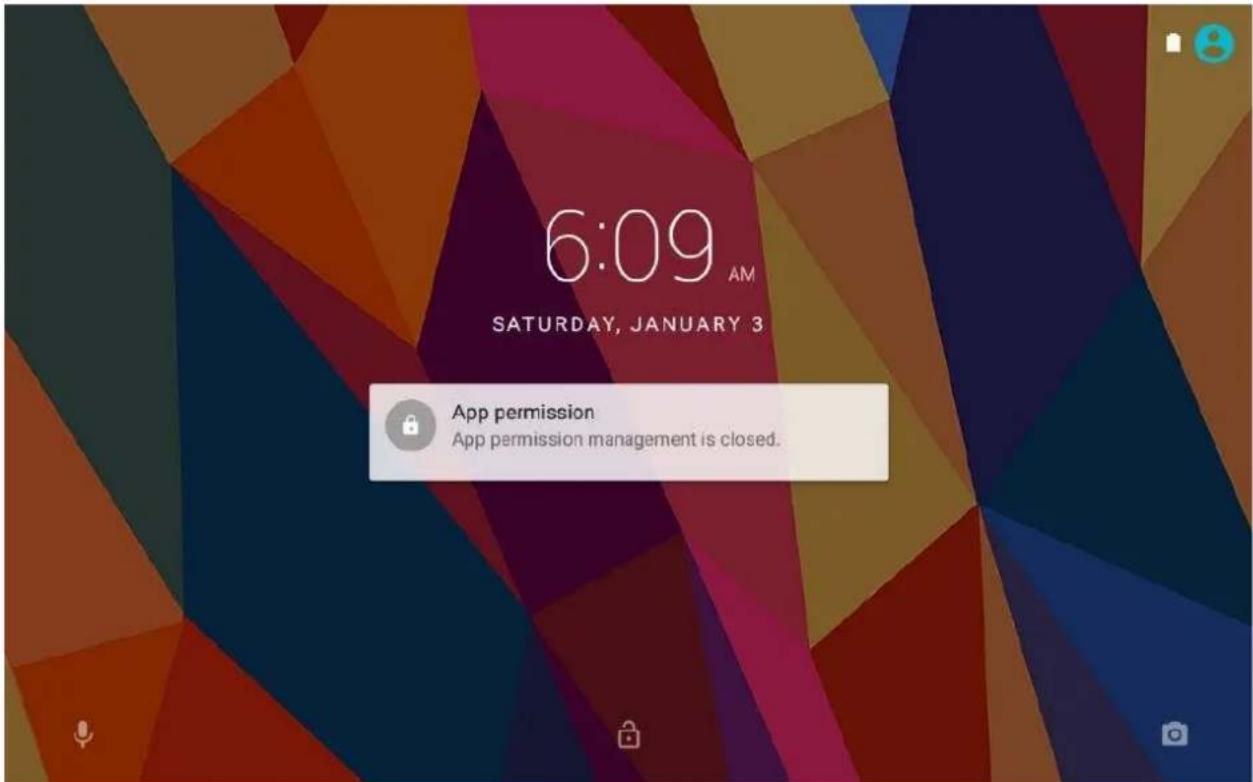
Screen locked
text_image
6:09 AM SATURDAY, JANUARY 3 App permission App permission management is closed.Unlock the screen: Touch and drag up

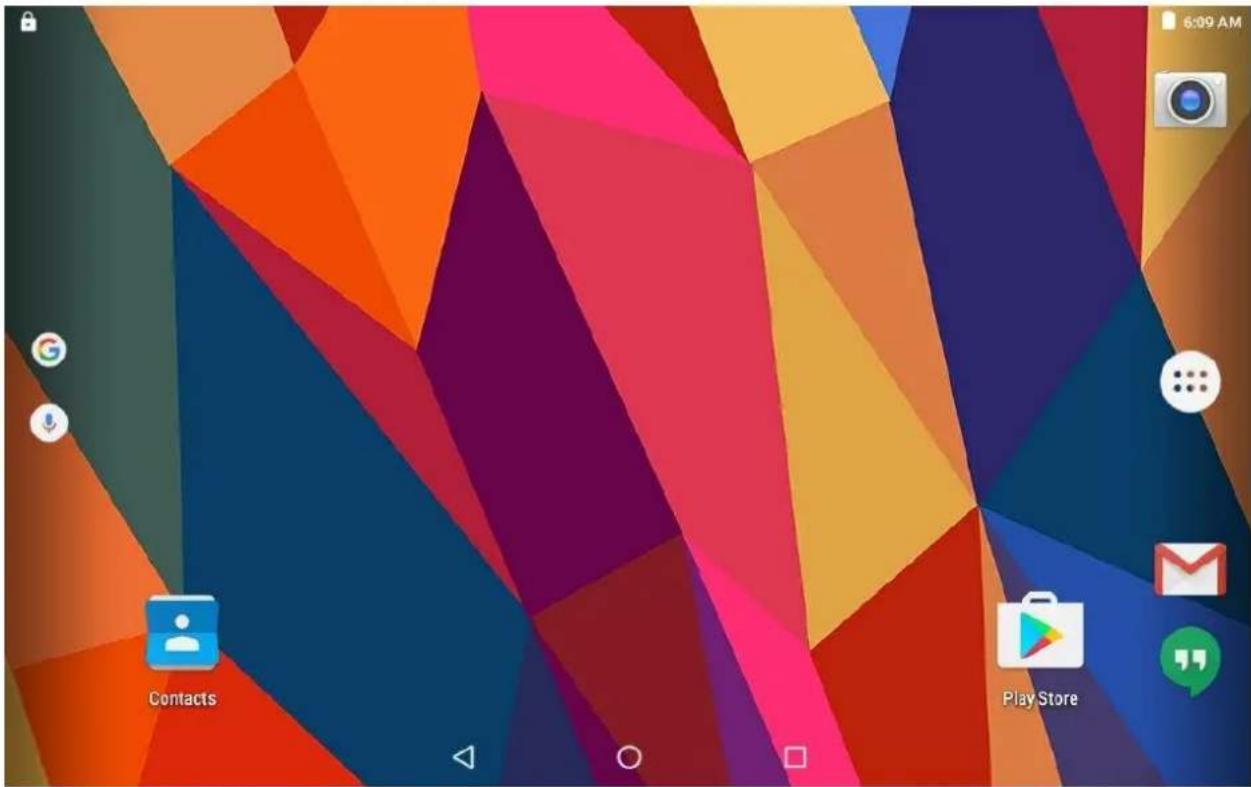
Screen unlocked
text_image
6:09 AM Contacts Play StoreUsing touch screen
Single click: single click an icon to start the application and select the option you require.
Long click: long click an icon to get an information of various options for this icon
Press and hold: select an icon and hold to drag it to the desktop.
Wipe: wipe with your finger to right or left over the display to switch among different interfaces.
Screen scrolling: wipe with your finger up or down over the display to scroll the screen
Note: To avoid scratching or damaging the screen, never put or drop anything on it.
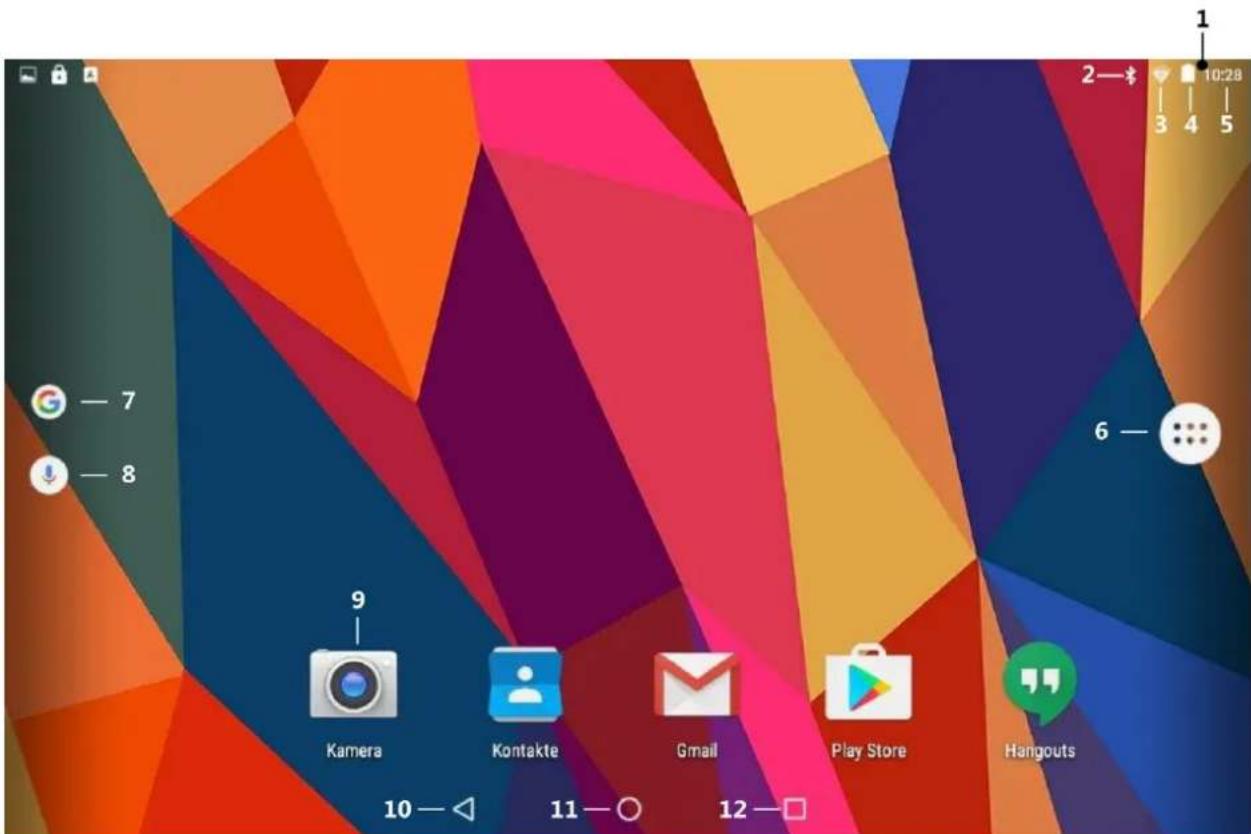
Presentation of the Home screen
text_image
1 2—$ 10:28 3 4 5 — 7 — 8 6 — 9 Kamera Kontakte Gmail Play Store Hangouts 10 — ◀ 11 — ○ 12 — □1: Information board: notification bar, slide downwards
2: Bluetooth: shows the Bluetooth status
3: Wi-Fi: shows the Wi-Fi statur and signal strength
4: Battery: shows battery state of charge
5: Time icon: shows current time
6: App-list: click to see all available applications
7: Search: click to start the search function
8: Speech search: click to start the speech search function
9: App icon: click to start the application
10: Return: return to previous page
11: Home Button: return to Home Screen
12: Current Apps: shows all the Applications which are executed
Note:
On different screens, you can tap to view menu options.
Add apps & widgets to Home Screen
Launch app list, press selected icon and draw them to Home Screen. At Home Screen, press an icon to drag leftward or rightward to move it to other pages, or delete it.
Wallpaper
Long press blank area of Home Screen, choose different ways of setting wallpapers in the popup.
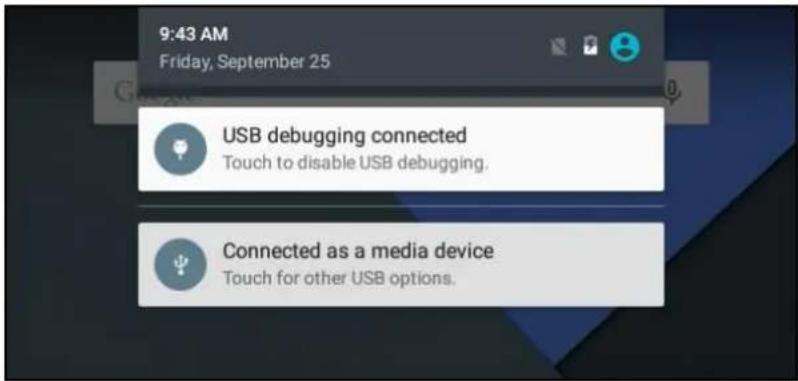
Notification Bar
Slide downwards from top of the screen to view Notification Bar, which can show switches of Wi-Fi, brightness, etc.. Slide upwards to go to Home Screen again.
text_image
9:43 AM Friday, September 25 USB debugging connected Touch to disable USB debugging. Connected as a media device Touch for other USB options.Search function
Tap to search information on the internet. Voice Search is supported by Voice Search
App Tap the search result to access related application.
Note: Internet connection is required to use the search function.
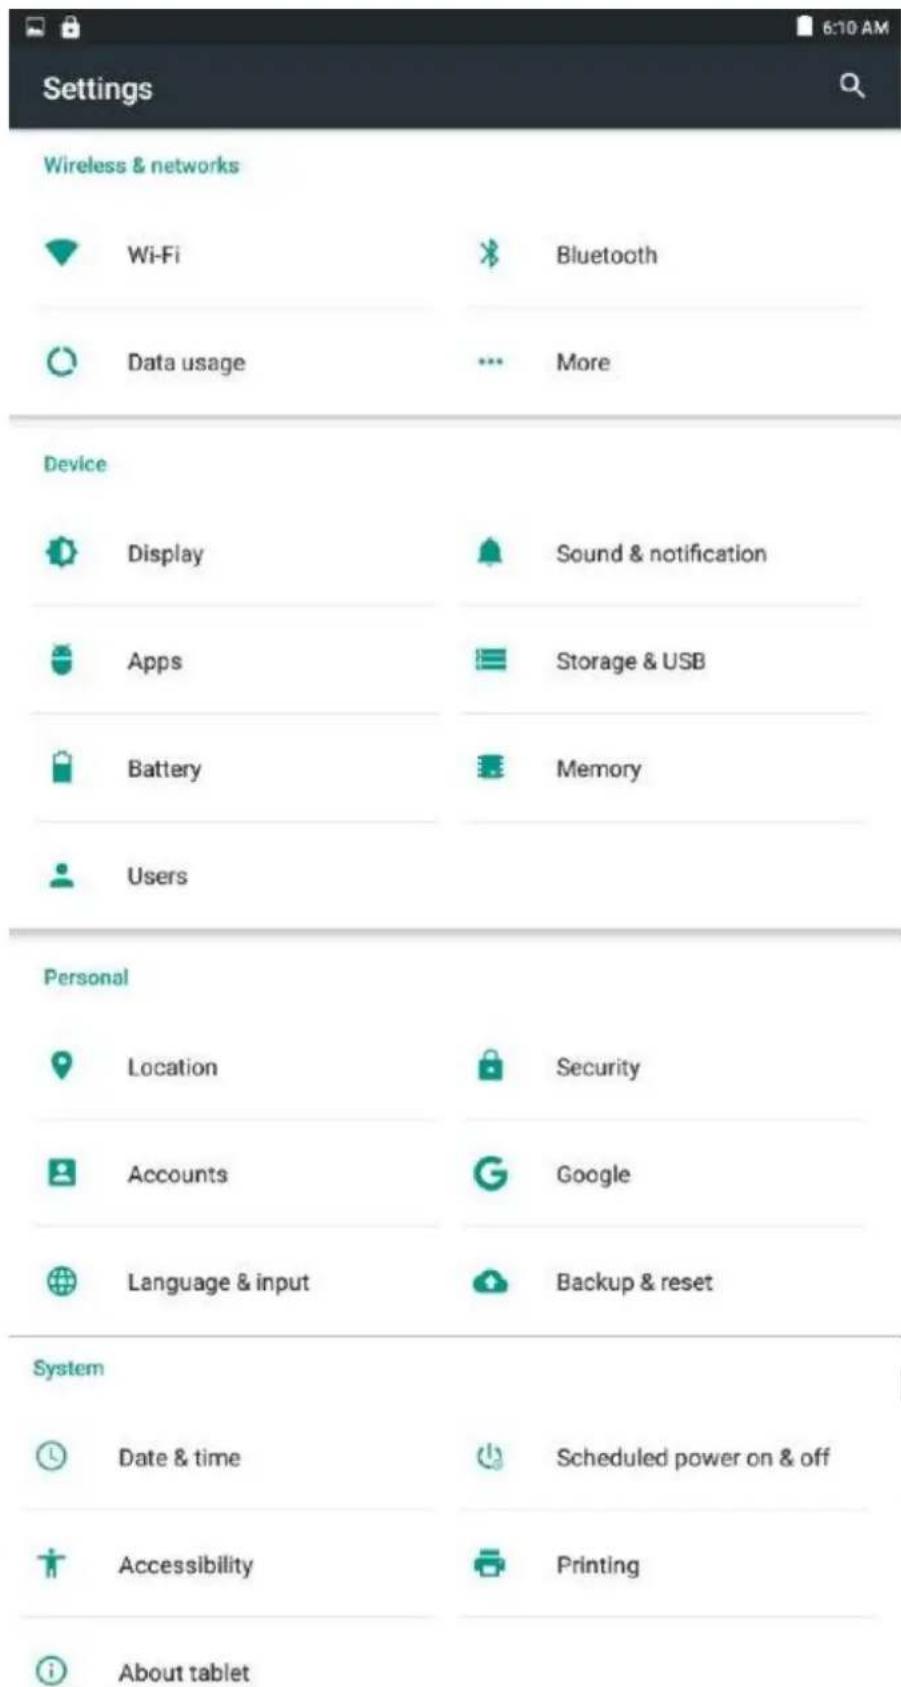
Settings
Open the App-list and tap to open the settings app.
text_image
Settings Wireless & networks Wi-Fi Bluetooth Data usage More Device Display Sound & notification Apps Storage & USB Battery Memory Users Personal Location Security Accounts Google Language & input Backup & reset System Date & time Scheduled power on & off Accessibility Printing About tablet| Wireless & networks | ||
| Wi-Fi | Set and manage wireless access point (refer to WIFI setting for details). | |
| Bluetooth | Set and manage wireless connections (Bluetooth) | |
| Data usage | Set and manage data traffic. | |
| More... | Aeroplane Mode | On-/ off wireless connections |
| Tethering&portable hotspot | Share mobile data connection with other devices | |
| VPN | Configure VPN network | |
| Device | ||
| Sound & notification | Volume | Adjust volume of media, alarm clock and notification.Click and slide to  volume and then click OK. volume and then click OK. |
| Notifying ringtone | Select the notifying ringtone you want. | |
| Screen lock prompt tone | Prompt tone when screen is locked/unlocked | |
| Display | Brightness | Click and slide to  brightness and then click OK. brightness and then click OK. |
| HDMI-settings | Adjust screen size and time out of HDMI output | |
| Wallpaper | Set wallpaper of Home screen | |
| Sleep | Adjust standby/ energy saving mode | |
| Daydream | Screensaver | |
| Font size | Adjust font size in the interface | |
| Cast Screen | Mirror the screen to TV (Miracast, Chromecast) | |
| Rotate Display | Setting if the screen should be rotate if tablet is rotated | |
| Apps | View and manage Apps | |
| Storage&USB | Shows the memory allocation of internal and mobile memory (SD card, USB stick) | |
| Battery | Display battery status | |
| Storage | Shows the information of the RAM | |
| Users | Managing user | |
| Personal | ||
| Location | Display my location and source of location information | |
| Accounts | View, add, synchronize and delete accounts | |
| Settings for accounts and services | ||
| Security | Screen lock | Set screen security protection |
| User's information | Set to display user's information on the screen. | |
| Device management | 1. Add or delete device manager.2. Unknown source APK installation settings. | |
| Credential storage | Manage application access security credentials and other credentials. | |
| Language & input | Language | Set default language |
| Spell checker | Spelling and dictionary | |
| Keyboard and input method | Set default keyboard and input methodSettings for voice control | |
| Speech | ||
| Mouse/Touchpad | Adjust mouse speed. | |
| Backup & reset | 1. Backup/restore device data.2. Restore default settings. | |
| System | ||
| Date & time | Set or adjust time and date in the device. | |
| Scheduled power on&off | Time bases power on & off settings of the tablet | |
| Accessibility | Set different options for inputs of the application software | |
| Printing | Manage printer services (may require additional software) | |
| About tablet | View system status, legal info, model, Android version, core version and version number. | |
Wi-Fi settings
Many functions require Wi-Fi connection, so we suggest you use the preset Wi-Fi network.

- Click → Settings → Wireless & networks
- Enable Wi-Fi.
The device will search and list all available Wi-Fi networks automatically. The icon 📋 beside Wi-Fi means you need to enter a password to connect to it.
- Click the Wi-Fi network you want to connect to → if there is a password, you need to enter
the password → Click Connect. After connecting to WIFI network, you will see an icon on the desktop.
- Click

rn to desktop.

beside

on
Note: If the Wi-Fi is set to be hidden, it will not be searched automatically. You need to click add Wi-Fi network and then enter required information to add the Wi-Fi.
Bluetooth settings
1. Make device discoverable
You must pair your tablet with a device before you can connect to it. Once you pair your tablet with a device, they stay paired unless you unpair them.
Under

“Settings”, “Wireless & networks” choose “Bluetooth”. Tap “Bluetooth” and
then "On" to turn on. The Bluetooth indicator

appears in the status bar.
2. Scan for devices
After scanning, there will be a list of the IDs of all available Bluetooth devices in range. If the device you want to pair with isn't in the list, ensure that the other device is turned on and set to be discoverable.
3. Pair with the Bluetooth device
Tap the name of an available Bluetooth device to pair with. In the popup “Bluetooth pairing request” dialog, type a PIN or accept the suggested PIN.
If the pairing is successful, your tablet connects to the device.
Example: to transmit a photo
Go to “Photo”, choose a photo to share. Tap any spot on the photo to view a submenu. Tap

icon →
and then choose the device name in the Paired devices list. The photo
will then be sent.
You can touch the right icon to unpair the device.
Note: After pairing, it shows under the Bluetooth device “Paired but not connected”, but file transmission is still possible.
You can see the received files by touching the right corner icon. At present, the Bluetooth function only supports files transmission. To extend battery life, turn Bluetooth power off when not in use.
Use of extended storage
1. Using USB stick
Insert the USB stick into micro USB port (6) or into OTG cable (accessory), then insert the OTG connection cable into the micro USB port (6) of the tablet. Follow the instructions on the screen or slide downwards from top of screen to view the notification bar. Select the desired option.
Removing USB Stick
Close all applications or files on the USB Stick. Click → Settings → Storage & USB → USB → eject USB. Remove USB Stick or OTG cable from micro USB port (6).
Note: Do not insert and remove USB stick repeatedly in a short time, otherwise the USB stick may be damaged. Only FAT32 formatted USB sticks are supported.
2. Using SD card
The tablets supports micro SDHC cards up to 32GB, Class 10 recommended.
Insert the storage card into the micro SD card slot (9) and press it down with your finger.
Follow the instructions on the screen or slide downwards from top of screen to view the notification bar. Select the desired option.
Removing SD card
Close all applications or files on the card. Click → Settings → Storage & USB → SD card → eject SD card. Press the card softly and it will be ejected. Then move it out.
Note: Do not insert and remove the card repeatedly in a short time, otherwise it may be damaged. Only FAT32 formatted SD Cards are supported.
Downloading, installing/uninstalling applications
You can find many free interesting Android applications in the internet. Just open the browser and search for “Android applications”.
The Android applications you purchase or download can be installed through File manager in a fast and easy way.
- Copy the .apk file you want to install to SD card or USB stick →Insert the card or connect USB stick to the tablet.
-
Click File manager icon.
-
Click 📄 or 🌐 (USB) and find the folder in which .apk file is saved.
-
Select the apk file → Install. After installing, the icon of the application will display in the interface where all applications are displayed.
- Click to run the application directly, or click Complete to return to File manager interface.
Downloading and installing application from internet
You can download Android applications from internet or other e-market directly and install them into your device quickly and conveniently.

- Click Search
icon to connect to internet.
-
Enter address and click the download link of the application you want to download to the device.
-
After downloading, click and hold the download file (in download record interface), → Click Open → Install.
Note: All downloaded and installed applications are developed by third party. We are not liable for performance issues caused by third-party applications.
Uninstalling applications
You can uninstall any installed Android application conveniently.
-
Click Menu → Settings → Apps → Downloaded.
-
Click the application you want to uninstall, → Uninstall.
-
Click Yes to uninstall.
Connecting to PC
-
Connect the device to a PC, and then this device can be used as a mobile storage device. When using a USB cable to connect to PC, connect one end of the cable to the micro USB port of the tablet (6) and the other end to USB port of PC.
-
The PC with Windows OS recognize the tablet as external drive file explorer. You are able to exchange files between PC and tablet very easily.
-
Slide downwards from top of screen to view the notification bar. Select the desired Option, like file transfer (MTP), photo transfer (PTP).
To receive and send emails, you must have a remote mailbox service. This service may be offered by a service provider. The tablet is compliant with applicable internet standards for POP3 / IMAP/ Exchange. Before you can send or receive emails it is needed to set up an email account and define the email settings correctly. You can define more than one email box.
To set up your email
- Tap Email icon from application list
- You can use mailbox guide to set up your mailbox, tap Next until it's done.
- If you need to add another email account, tap the option button at the upper right – Settings - ADD ACCOUNT, then set up the email account with the mailbox guide.
When you are finished setting up the email account, the email messages will be downloaded to the tablet. You can switch between email accounts, if have created more accounts. Select an account name at the top-left screen.
Play music
Tap Music icon from the application list.
Play music
- Select a music file
- Control playback with the virtual keys
The current list of songs are randomly shuffled for playback
Replays the current list when the list ends
Repeats the current playing song
Note: The tablet support the most popular audio formats MP3, WAV, AAC, AAC+. Some files may not play properly depending on how they are encoded.
Create a playlist
- Tap the Menu icon (next to the music file)
- Select Add to playlist
- Select New
- Enter a name
- Tap Save
To delete a playlist, tap the music button on the upper left, select Playlists, tap Menu icon and select the one which you want to delete.
Photo
Tap Photo icon from the application list to view or organize images and videos, send your files to other devices and set pictures as Wallpapers.
View a picture
- Select a folder.
- Select a picture to view. To view more pictures, scroll left or right.
- To zoom in, place two fingers on the screen and spread them apart. To zoom out, move fingers closer together. You can also double-tap the screen.
- To start a slideshow, tap the option button and then select Slideshow.
-
To view the details of a file, tap the "i" button, to get the information of the image.
-
To share a picture with others via email tap at the title bar.
-
To set a picture as wallpaper, tap the option button at the upper right – select Set picture as Wallpaper, zoom in or out to set wallpaper effect and then tap Set Wallpaper.
-
To set a picture as a caller ID, tap the option button at the upper right – select Set picture as – Contact photo – Contacts, create a new contact or select an existing contact, drag the slides of the crop box to create the crop area.
Note: The tablet support JPEG.
Play a video
- Select a folder.
- Select a video to play.
- Control playback with the virtual keys
Note: The tablet support the most popular video formats MPEG-4, H.263, H.264. Some files may not play properly depending on how they are encoded.
Tip: You can also use the pre-installed Video Player to play videos, or open the video files from File Manager Explorer directly.
Camera
The camera allows you to take photos and record videos.
Take a picture
- Tap Camera icon from the application list
- Before taking a picture, you need to make some adjustments. Place two fingers on the screen and spread them apart or move fingers closer together to zoom in or zoom out.
- Aim the lense at the subject and tap 📄 to take a photo. The photo is saved automatically to the folder DCIM.
- Slide from left edge of the frame to switch photographing and video recording mode. Slide from right edge of the frame to view the pictures.
Record a video
- Tap

nge to video mode from picture mode
- Tap

recording
- During recording a video, tab the frame to take a picture, which does not stop the video recording.

at the title bar.
- Tap

recording. The video is saved automatically to the folder DCIM.
- Slide from right edge of the frame to view the pictures.
GPS Navigation
The tablet has built-in GPS module. Please install third party navigation application to get navigation function.
FM Radio
Tap FM Radio icon to receive radio channels.
Note: An earphone must be connected to the headphone connector to receive radio channels. Earphone cables are used as antenna.
Battery Charging
Connect the DC plug of power adapter to the power DC-in port (4) of the tablet. Plug the power adapter into a power outlet for charging the battery. It takes around 5 hours according to the existing battery capacity to charge to full battery. Please only use a 5V/2.0A power adapter included in the gift box.
During charging, the icon of battery will be , and when charging completes, the icon will be

● You can still use the device while charging, but this will prolong the charging time.
- Use the device at least once every week.
- Fully charge the battery regularly.
- Don't keep the battery empty for a long time.
A charge capacity between 40% and 80% is recommended.
- Avoid higher ambient temperature (see specification
The battery may be damaged or there is a risk of fire or explosion.
Note:
In order the WiFi work fine, the battery should be charged for a minimum of 30%. The battery can also be charged with a USB charger via the micro USB Port (6). In this case the charging time could be extended.
Information for Energy Saving
The power saving/ standby mode is executed after 10 min. of user inactivity. This can be changed by the user at Settings – Device – Display. For more options check at Settings – Device – Battery Saver.
For energy saving
- Switch off at Settings Wi-Fi, Bluetooth, GPS if they are not needed
- Adjust Display brightness at Settings – higher brightness has higher power consumption
- Close all Apps which are not needed
System Update
In the Settings – About tablet – System updates you can check and perform a possible system software update. Do not switch off the tablet till the system update is finished. Please use the power adapter during the system update. An empty battery will switch off the tablet during the update which could cause a fault.
Note: The manufacturer is not liable for errors in the software update, possibly due incorrect data transmission, power interruption or other influences.
Specifications
Display: 25,7 cm (10.1") capacitive multitouch, 5 pt., 800 x 1280 IPS
CPU: ARM Cortex A53 Quad Core 1,3 GHz, MTK MT8163
GPU: Mali-T720
OS : Android 6.0
RAM: 1 GB DDR3L
Internal memory: 16 GB Flash (approx. 10 GB free available) Note: The size of the free available memory can be changed by software update.
Slots: micro USB 2.0, headphone, micro SD cardreader (up to 32GB), micro HDMI, DC in, built-in speaker, built-in microphone, USB 2.0 on keyboard
Camera: Front 2.0MP, Back 5.0MP
Communication: Wi-Fi 802.11 b/g/n 2,4GHz, Bluetooth 4.0
Rechargeable battery: 5.400 mAh, up to 4.5 hours working time Note: The battery in this product cannot be easily replaced by users themselves.
Others: G-Sensor, GPS, FM Radio, Keyboard-Dock, German QWERTZ keyboard
Dimension: Tablet: aprox. 252 x 167 x 10 mm Keyboard: aprox. 252 x 167 x 8 mm
Weight: Tablet: aprox. 530g Keyboard: aprox. 520g
Power: via power adapter 100 – 240 V AC 50/60 Hz max. 0,5A (see rating label power adapter)
Environment Operating: Temperature 5°C to 35°C, relative humidity 20% to 80% non-condensing
Environment Storage: Temperature 0°C to 60°C, relative humidity 20% to 80% non-condensing
Package content:
Tablet, Power Adapter, OTG cable, Keyboard, this manual, Warranty card, Service card
RED Directive:
This product complies with the essential requirements of RED Directive (Radio Equipment Directive) 2014/53/EU.
This product is intended for home and office use in all member states of the EU.
Manufacturer and Imprint:
CAPTIVA® GmbH
Siemensstrasse 9
D-85221 Dachau/ Germany
Tel: ++49 (0) 8131 / 5695-0
Fax: ++49 (0) 8131 / 5695-500
The contents of this manual must not be reproduced in any form without written permission, neither partial. The manufacturer is not liable for technical or editorial errors as completeness.
GNU General Public License, Version 2 (GPL)
-
This tablet contain Software, which may used regarding the license conditions of GNU General Public License, Version 2 (GPL).
-
Disclaimer in relation to the licensors of the software: "This program is distributed in the hope that it will be useful, but WITHOUT ANY WARRANTY; without even the implied warranty of MERCHANTABILITY of FITNESS FOR A PARTICULAR PURPOSE. See the GNU General Public License for more details, http://www.gnu.org/licenses
-
The GPL License is available on the device under legal information. The full license is available at http://www.gnu.org/licenses.
-
We will send you on demand the full corresponding Source Code on a normal disk against reimbursement of our costs. Please send your request to the manufacturer address in the manual, by pointing GPL-Sourcecode for CAPTIVA PAD 10 2-in-1.
Troubleshooting
- Can not turn on the tablet
Check the tablet's power level; please charge it before starting it.
- No sound from earphone
Check if volume is set to '0'. Or earphone may be broken, please change for another one.
- No sound from speaker
Check if volume is set to '0'. Or earphone is connected. The connected earphone switch off the speaker.
- Big noise
Check if there is dust in the earphone or speaker. Check if the file is broken.
- Screen drift or unresponsive screen
Switch off the tablet by a long press (approx. 30 sec.) of the power button (1).
Do not use this way to switch off the tablet unless it is necessary. Please wait about
5 minutes and switch on again.
- The tablet becomes unresponsive
Pin carefully, for example use toothpick, the reset button (8) to reset the tablet and power it on again.
- Application not workable
Possible reasons may be that this app is not compatible with your OS or the downloaded .apk file is broken so you may need to download a full version.
- How to delete a Google account?
The accounts are added, shown or deleted in “Settings” → “Personal” → “Accounts”, or in “Settings” → “Personal” → “Backup&reset” → “Factory setting”. Your tablet’s internal storage, downloaded apps, etc. will also be deleted, except the info in your flash memory. Be careful before you carry out this operation.
- USB unmounted, SD card unmounted
Some times after inserting SD card or USB, it will show on the tablet that “unmounted”. Remove SD-card or USB device and excute factory setting. Then turn off and turn on tablet once again. If fail, you have to upgrade the firmware.
- Multimedia files cannot be played or viewed
The photo-, music- or movie file may be damaged or the file format is not supported.
D-85221 Dachau/ Germany
Tel: ++49 (0) 8131 / 5695-0
Fax: ++49 (0) 8131 / 5695-500
See the GNU General Public License for more details, http://www.gnu.org/licenses.