
Tempo - Microphone MXL - Free user manual and instructions
Find the device manual for free Tempo MXL in PDF.


User questions about Tempo MXL
0 question about this device. Answer the ones you know or ask your own.
Ask a new question about this device
Download the instructions for your Microphone in PDF format for free! Find your manual Tempo - MXL and take your electronic device back in hand. On this page are published all the documents necessary for the use of your device. Tempo by MXL.
USER MANUAL Tempo MXL
natural_image
Studio photo of a Timpo audio recording studio microphone on a tripod stand against a red background (no text or symbols visible on the device itself)Congratulations on your purchase of the MXL Tempo USB microphone. MXL microphones are the result of world-class engineering and manufacturing capabilities. They are designed to provide you with outstanding performance and exceptional value. While we encourage you to review this entire manual, there are a few key points about handling this microphone that we want you to familiarize yourself with right from the start.
MXL USB mics are professional quality, cardioid condenser studio microphones designed specifically for recording, podcasting, and video chats. Unlike microphones designed for live performance or dynamic model microphones, this instrument requires careful handling. Hence, you should observe the following:
ALWAYS: Handle the microphone carefully, avoiding sudden shocks such as dropping or bumping the microphone into other objects.
ALWAYS: Maintain a distance of approximately 4 – 6 inches when speaking or singing into the microphone. You are encouraged to use a pop filter for added protection of the sensitive capsule and to shield the instrument from saliva and sudden bursts of air.
NEVER: Tap the microphone to check if it's working. The RED LED on the back of the microphone located next to the headphone jack will tell you it's on and that the correct side is facing you.
NEVER: Blow into the microphone to check if it's working. The RED LED on the back of the microphone located next to the headphone jack will tell you it's on and that the correct side is facing you.
By following these few basic handling procedures, you can expect a long and trouble-free relationship with your new microphone. Again, thank you for your purchase of this outstanding MXL microphone.
A Little Background Information
MXL condenser microphones use what is known as a cardioid pickup pattern, which is more sensitive to sound waves arriving at the front of the microphone as opposed to those arriving from the sides or rear. This microphone benefits from being a USB (Universal Serial Bus) device—meaning this is a plug and play microphone
that will interface with Windows® operating system and Mac® computers without the need for any special drivers. Because it is a USB device, this microphone does not require an external microphone preamp, as is the case with most condenser microphones.
When recording an outdoor performance, use a windscreen to protect your microphone from recording problems caused by wind and damage from the elements.
Unpack Your Microphone
Begin by examining the contents of your MXL USB kit. You should have the following components:
• One MXL Tempo USB microphone
• USB 2.0 high speed cable
- Tripod stand
- Hard mount mic stand adapter
- Owner's manual
Getting Familiar with Your Microphone
In addition to speaking or singing into the side of the microphone with the cardioid symbol 📞 you should also notice the 1/8" stereo headphone jack on the back. This is a stereo headphone jack for monitoring the microphone's signal as well as hearing the audio played back from your computer. The 1/8" jack accepts most headphones but the maximum headphone volume will vary by manufacturer and model so care should always be exercised when first plugging in.
Using the Supplied Desktop Microphone Stand
- Screw the microphone stand mount to the desktop stand.
- Separate the desktop stand's legs and place it on a flat surface.
- While holding the microphone upright and firmly in one hand, secure the microphone to the desktop stand by screwing the black mounting ring into the microphone's base. The microphone should now sit securely in the desktop stand.
- Adjustments can be made to the angle of the microphone by loosening the thumbscrew on the side of the stand adapter.
- At this point, attach the end of the USB cable that matches the microphone's connector. The other end
of the cable will connect to your computer's USB port.
Connecting the Microphone to Your Computer (Windows)
The MXL Tempo USB microphone will operate with both USB 2.0 (high speed USB) and USB 1.1 data buses. We recommend you connect your microphone directly to the computer's USB port as opposed to using a USB hub. USB hubs have been known to interfere with the performance of various USB devices.
PLEASE NOTE: Audio and video recording can be very taxing to a computer's resources. For this reason, you should close any and all running applications that are not essential.
Please take the following steps to get connected:
- If open, close your audio recording application. You will open it after the microphone is connected and operational.
- Connect the remaining end of the USB cable to the computer's USB port. You will see a red LED illuminate on the back of the microphone located next to the headphone jack, and Windows will display the New Hardware Found dialog message.
- Allow Windows time to identify the device.
- In approximately one minute, Windows should display a dialog message stating that Your New Hardware is Installed and Ready for Use. After this first connection, Windows will require just a few moments to identify the microphone.
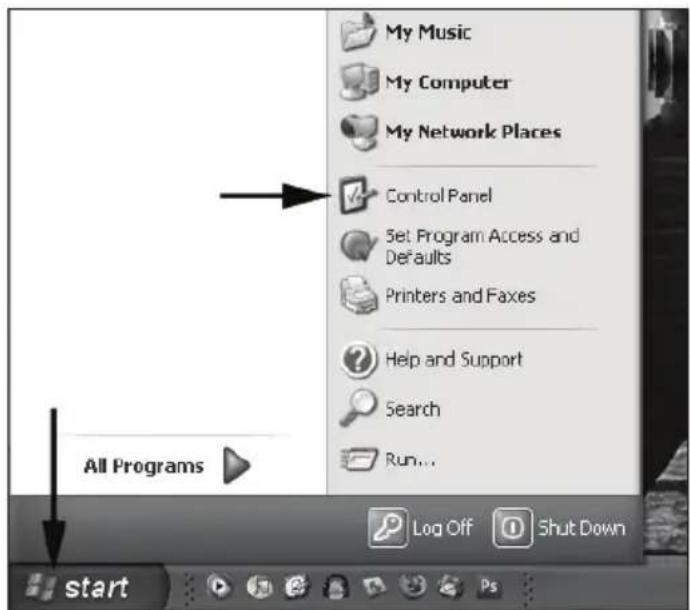
text_image
My Music My Computer My Network Places Control Panel Set Program Access and Defaults Printers and Faxes Help and Support Search Run... All Programs Start Log Off Shut DownInitial Setup with Windows XP Operating System
-
To select the MXL Tempo USB microphone as the default audio device, go to the Start Menu and select Control Panel.
-
Select Sounds and Audio Devices.

text_image
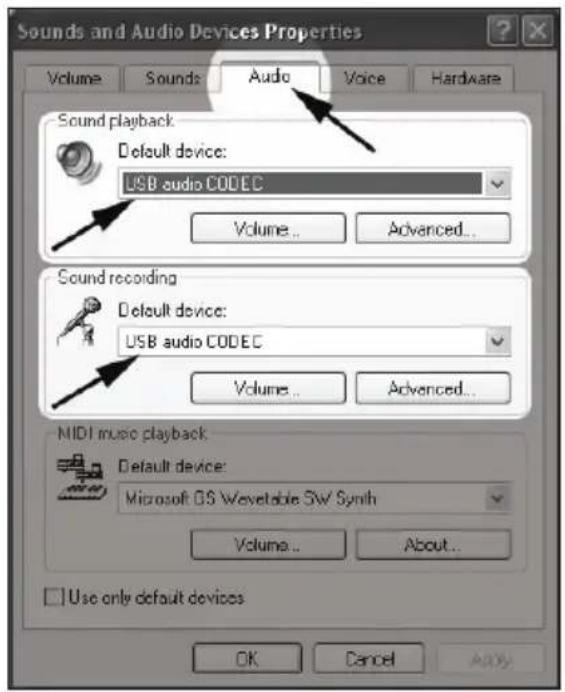
category view Update support Options CMI Audio Config Date and Time Display Folder Options Fonts Java Keyboard Mail Mouse Network Connections Phone and Modem ... Power Options Printers and Faxes QuickTime Regional and Language ... Security Center Sounds and Audio Devices Speech System Taskbar and Start Menu Wireless Network Set...- Click on the Audio tab and select USB audio CODEC as the default device for Sound playback and Sound Recording.
text_image
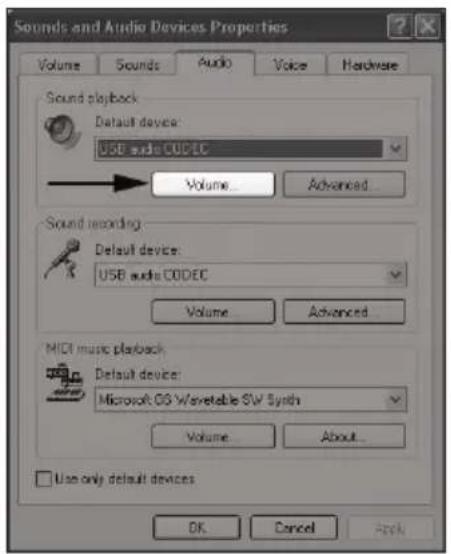
Sounds and Audio Devices Properties Volume Sounds Audio Voice Hardware Sound playback Default device: USB audio CODEC Volume... Advanced... Sound recording Default device: USB audio CODEC Volume... Advanced... MIDI music playback Default device: Microsoft OS Wavetable SW Synth Volume... About... Use only default devices OK Cancel ADDY- To adjust the headphone volume, click on the Volume button under Sound playback.
text_image
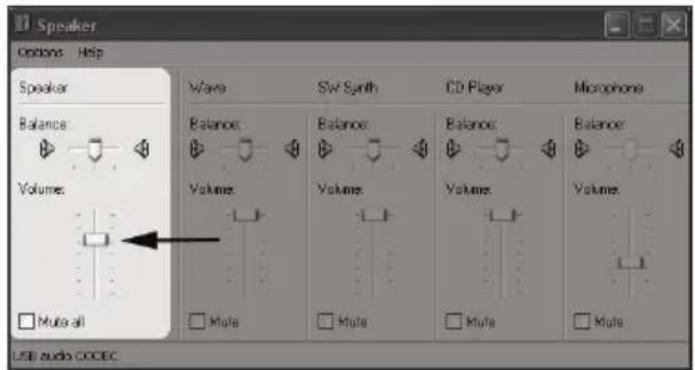
Sounds and Audio Devices Properties Volume Sounds Audio Voice Hardware Sound playback Default device: USB audio CODEC Volume... Advanced... Sound recording Default device: USB audio CODEC Volume Advanced... MIDI music playback Default device: Microsoft GS Wavetable SW Synth Volume About... Use only default devices OK Cancel Apply- The master volume can be changed by moving the Speaker fader up or down.
text_image
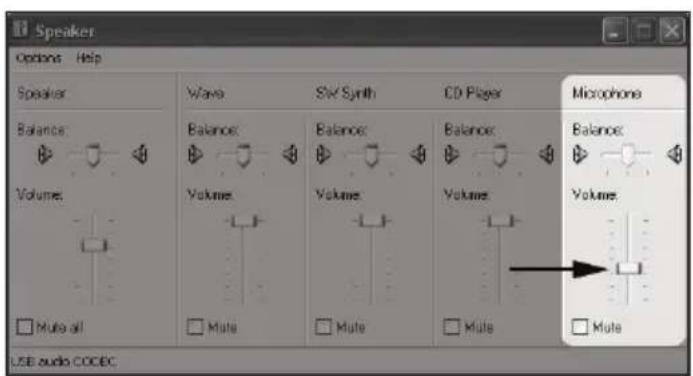
Speaker Options Help Speaker Balance Volumes Wave Sw Synth CD Player Microphone Balance Volumes Volume Volume Volume Volume Volume Mute all USB audio CODEC- To adjust the volume of the microphone signal directly to the headphones, adjust the Microphone fader up or down (this does not affect the volume of the microphone signal being recorded).
text_image
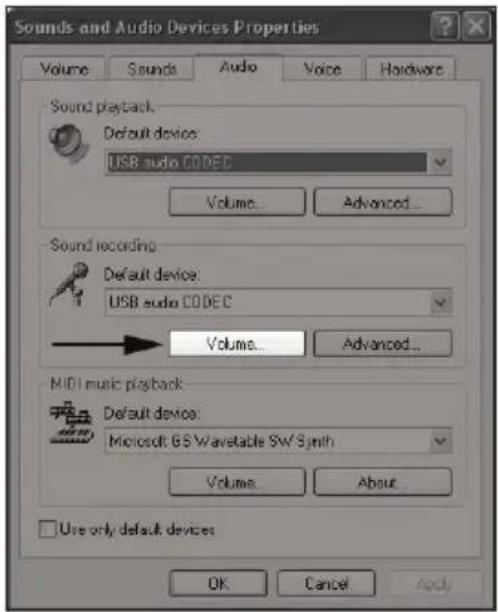
Speaker Options Help Speaker Wave SW Synth CD Player Microphone Balance Balance Balance Balance Balance Volume Volume Volume Volume □ Mute all □ Mute □ Mute □ Mute USB audio CODEC- To adjust the volume of the microphone signal that goes to the computer and is recorded, click on the Volume button under sound recording.
text_image
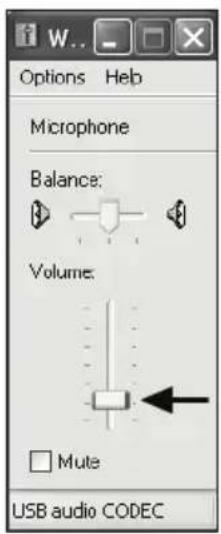
Sounds and Audio Devices Properties Volume Sounds Audio Voice Hardware Sound playback Default device: USB audio CODEC Volume... Advanced... Sound recording Default device: USB audio CODEC Volume... Advanced... MIDI music playback Default device: Microsoft GS Wavable SW Smith Volume... About... Use only default devices OK Cancel Help- Adjust the level by moving the Microphone fader up or down. The gain of the microphone is very sensitive. For most applications, the gain will be set towards the bottom of the fader.
text_image
Options Help Microphone Balance: Volume: Mute USB audio CODECYour computer is now setup to use the MXL Tempo USB microphone with most recording applications. Some applications will require additional settings to be changed within the program. Please see your recording software's manual for proper setup.
Initial Setup with Windows Vista/Windows 7 Operating Systems
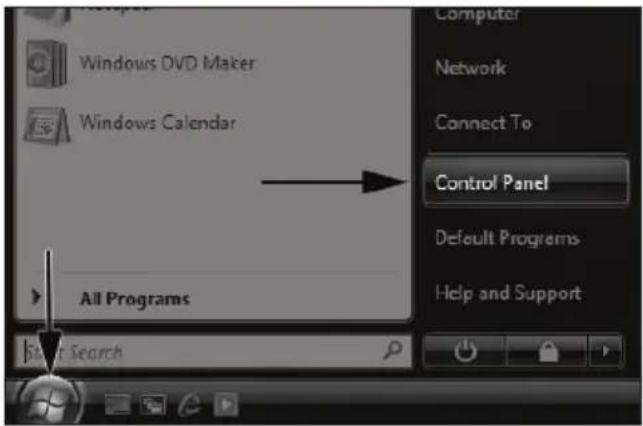
- To select the Tempo USB microphone as the default audio device, go to the Start Menu and select Control Panel.
text_image
Windows DVD Maker Windows Calendar All Programs Start Search Computer Network Connect To Control Panel Default Programs Help and Support- Double click the Sound icon.
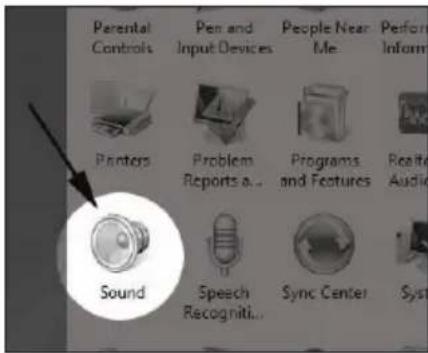
text_image
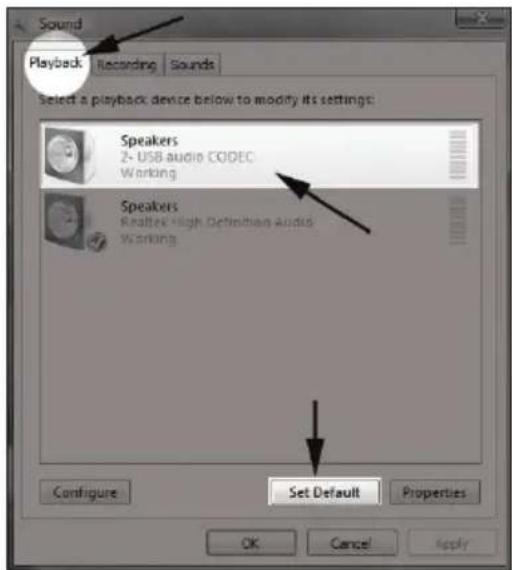
Parental Controls Pen and Input Devices People Near Me Perform Inform Printers Problem Reports a... Programs and Features Realti Audio Sound Speech Recogniti... Sync Center Syst- Select the Playback tab. Highlight the speaker icon labeled as USB AUDIO CODEC and click Set Default. To make further adjustments to the playback volume, double-click on the speaker icon labeled USB AUDIO CODEC.
text_image
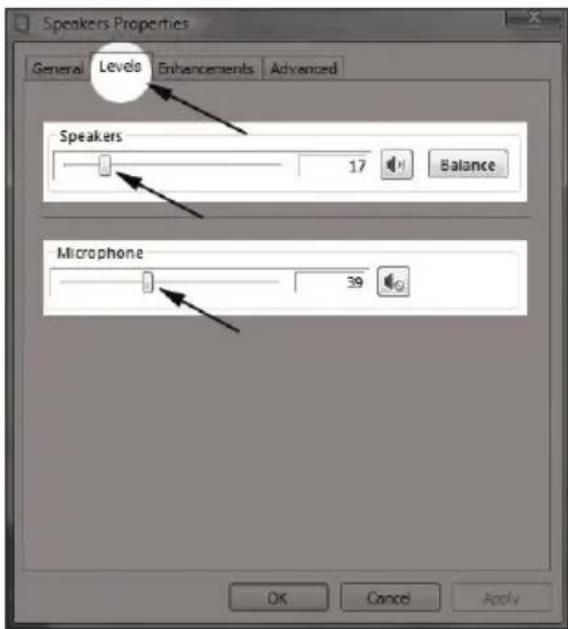
Sound Playback Recording Sounds Select a playback device below to modify its settings: Speakers 2-USB audio CODEC Working Speakers Realtek High Definition Audio Working Configure Set Default Properties OK Cancel Apply- Click on the tab labeled Levels. The volume of the headphones can be adjusted by moving the fader labeled as Speakers.
To adjust the volume of the microphone signal directly to the headphones, adjust the Microphone fader (this does not affect the volume of the microphone signal being recorded). Then click OK.
text_image
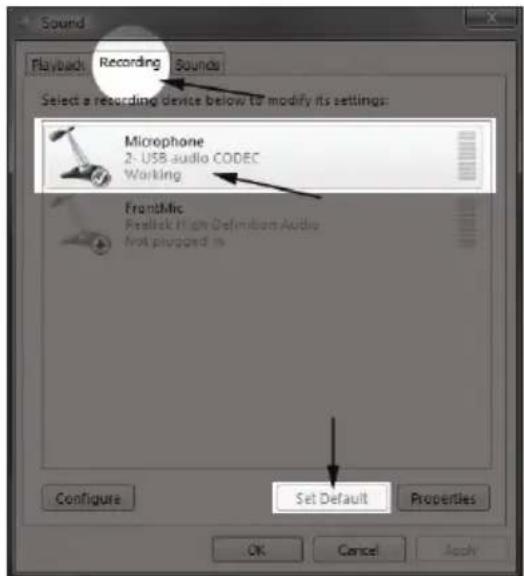
Speakers Properties General Levels Enhancements Advanced Speakers 17 Balance Microphone 39 OK Cancel Apply- To set the MXL Tempo USB microphone as the default input, select the Recording tab in the Sound window. Highlight the microphone icon labeled USB AUDIO CODEC and click Set Default.
To make further adjustments to the microphone volume, double-click on the microphone icon labeled USB AUDIO CODEC.
text_image
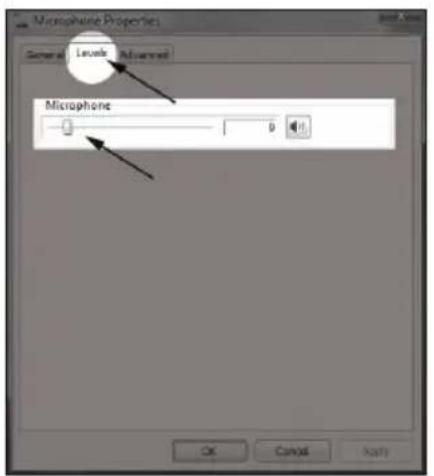
Sound Playback Recording Sounds Select a recording device below to modify its settings: Microphone 2-USB audio CODEC Working Frontomic Realtek High Definition Audio Not plugged in Set Default Properties Configure OK Cancel Apply- Click on the tab labeled Levels and adjust the Microphone fader. The gain of the microphone is very sensitive. For most applications the fader will be set towards the left.
To make adjustments to the sample rate and bit depth, click on the tab labeled Advanced and select the appropriate setting in the drop down menu.
text_image
Microphone Properties General Lancate Advanced Microphone 9 OK Cancel Apply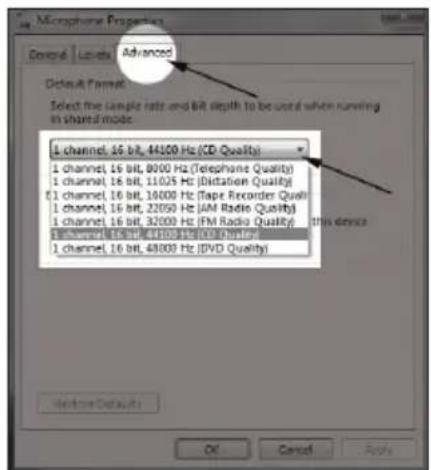
text_image
Microphone Properties General Levels Advanced Default Format Select the sample rate and BR depth to be used when running in shared mode. 1 channel, 16 bit, 44100 Hz (CD Quality) 1 channel, 16 bit, 8000 Hz (Telephone Quality) 1 channel, 16 bit, 11025 Hz (Dstration Quality) 1 channel, 16 bit, 16000 Hz (Tape Recorder Quality) 1 channel, 16 bit, 22050 Hz (AM Radio Quality) 1 channel, 16 bit, 32000 Hz (FM Radio Quality) 1 channel, 16 bit, 44100 Hz (DVD Quality) 1 channel, 16 bit, 48000 Hz (DVD Quality) This device OK Cancel ApplyYour computer is now setup to use the MXL Tempo USB microphone with most recording applications. Some applications will require additional settings to be changed within the program. Please see your recording software's manual for proper setup.
Initial Setup with Mac OS X
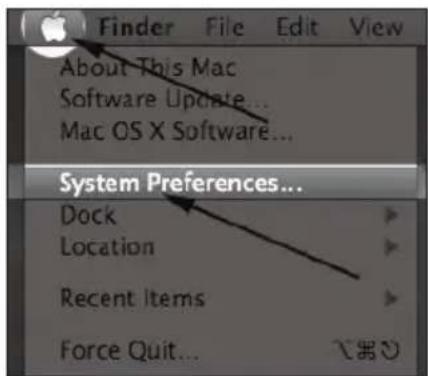
- To select the Tempo USB as the default sound device click on the Apple icon at the top of the screen then select the System Preferences.
text_image
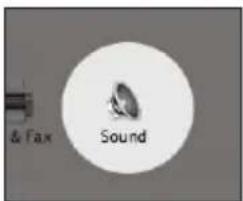
Finder File Edit View About This Mac Software Update... Mac OS X Software... System Preferences... Dock Location Recent Items Force Quit...- Click on the Sound icon.
text_image
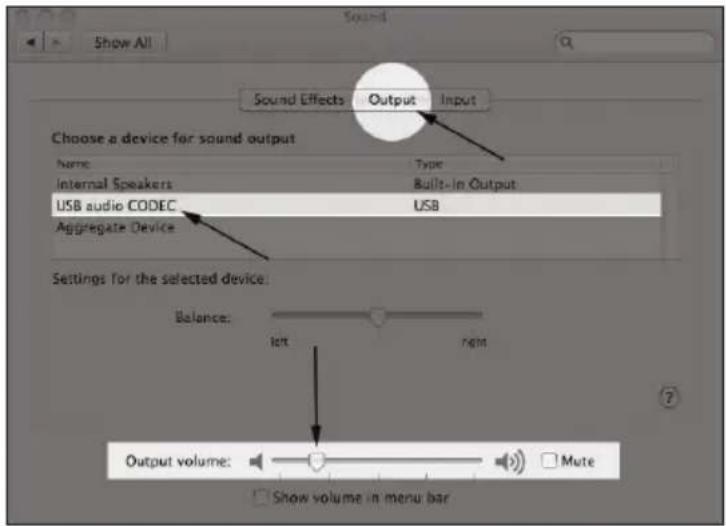
& Fax Sound- Click on the Output tab, then select the device named USB Audio CODEC. You can adjust the headphone volume by moving the fader labeled Output Volume.
text_image
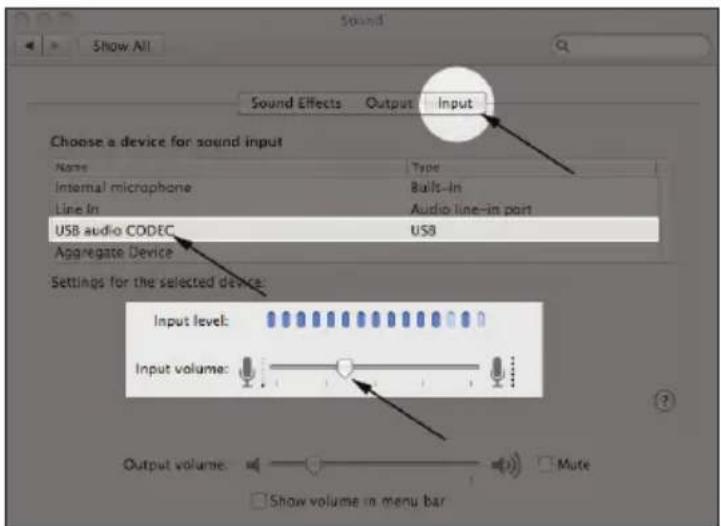
Sound Show All Sound Effects Output Input Choose a device for sound output Name Type Internal Speakers Built-in Output USB audio CODEC USB Aggregate Device Settings for the selected device: Balance: let rem Output volume: Mute Show volume in menu bar- Next click on the Input tab and select the device named USB Audio CODEC. You can adjust the microphone volume by moving the Input Volume fader. The gain of the microphone is very sensitive. For most applications the fader will be set more towards the left.
text_image
Sound Show All Sound Effects Output Input Choose a device for sound input Name Type Internal microphone Built-in Line In Audio line-in part USB audio CODEC USB Aggregate Device Settings for the selected device: Input level: Input volume: Output volume: Mute Show volume in menu barYour computer is now setup to use the MXL Tempo USB microphone with most recording applications. Some applications will require additional settings to be changed within the program. Please see your recording software's manual for proper setup.
For More Information
For additional information about your MXL USB microphone, how to contact technical support, as well as information on other products manufactured by MXL, please visit us online at www.mxlmics.com.

text_image
MXL®www.mxlmics.com
Warranty
Marshall microphones are guaranteed against defects in material and workmanship for one year from date of purchase. Should you encounter any problem with this unit, promptly contact the company you purchased it from for assistance. The original dated sales receipt will be necessary for any warranty claim. Do not send any unit directly to us without prior authorization from our service department! Warranty coverage is limited to repair or replacement (at our option) of the microphone, and does not cover incidental damages due to use of this unit, nor damage caused by accidental misuse of this product.
MXL is a registered trademark of Marshall Electronics Inc. Mac® is a trademark of Apple Inc., registered in the U.S. and other countries. Windows is a registered trademark of Microsoft Corporation in the United States and other countries.