
Pet Hair Eraser 1650 - Vacuum Cleaner BISSELL - Free user manual and instructions
Find the device manual for free Pet Hair Eraser 1650 BISSELL in PDF.


| Brand | Bissell |
| Model | Pet Hair Eraser 1650 |
| Type | Upright Vacuum Cleaner |
| Cyclonic Pet Hair Spooling System | Yes - hands-free empty |
| Tangle Free Brush Roll | Yes - reduces hair wrap |
| Specialized Pet Tools | 2-in-1 Pet Brush, LED Lighted Crevice Tool, Pet TurboEraser Tool |
| Power | 120V, 60Hz (polarized plug) |
| Amperage | 12 A (typical upright vacuum) |
| Brush Roll On/Off Switch | Yes |
| Height Adjustment | Multiple settings with knob |
| Suction Control | Floor suction / Hose-tool suction knob |
| Dirt Container Capacity | Approx. 1.5 liters (estimated) |
| Filters | Pre-motor washable foam and mesh, post-motor pleated (replace every 3-6 months) |
| Optional Febreze Filter | Yes (included separately) |
| Wand and Hose | Detachable wand and hose for above-floor cleaning |
| Cord Length | Approx. 25 ft (estimated) |
| Weight | Approx. 16 lbs (estimated) |
| Dimensions (H x W x D) | Approx. 46 x 12 x 15 in (estimated) |
| Warranty | Limited 5-Year Warranty |
| Motor Protection | Thermal protector auto-reset |
| Included Accessories | Vacuum base, hose/wand, 2-in-1 Pet Brush, LED Crevice Tool, Pet TurboEraser Tool, tool caddies, Febreze filter |
Frequently Asked Questions - Pet Hair Eraser 1650 BISSELL
User questions about Pet Hair Eraser 1650 BISSELL
0 question about this device. Answer the ones you know or ask your own.
Ask a new question about this device
Download the instructions for your Vacuum Cleaner in PDF format for free! Find your manual Pet Hair Eraser 1650 - BISSELL and take your electronic device back in hand. On this page are published all the documents necessary for the use of your device. Pet Hair Eraser 1650 by BISSELL.
USER MANUAL Pet Hair Eraser 1650 BISSELL
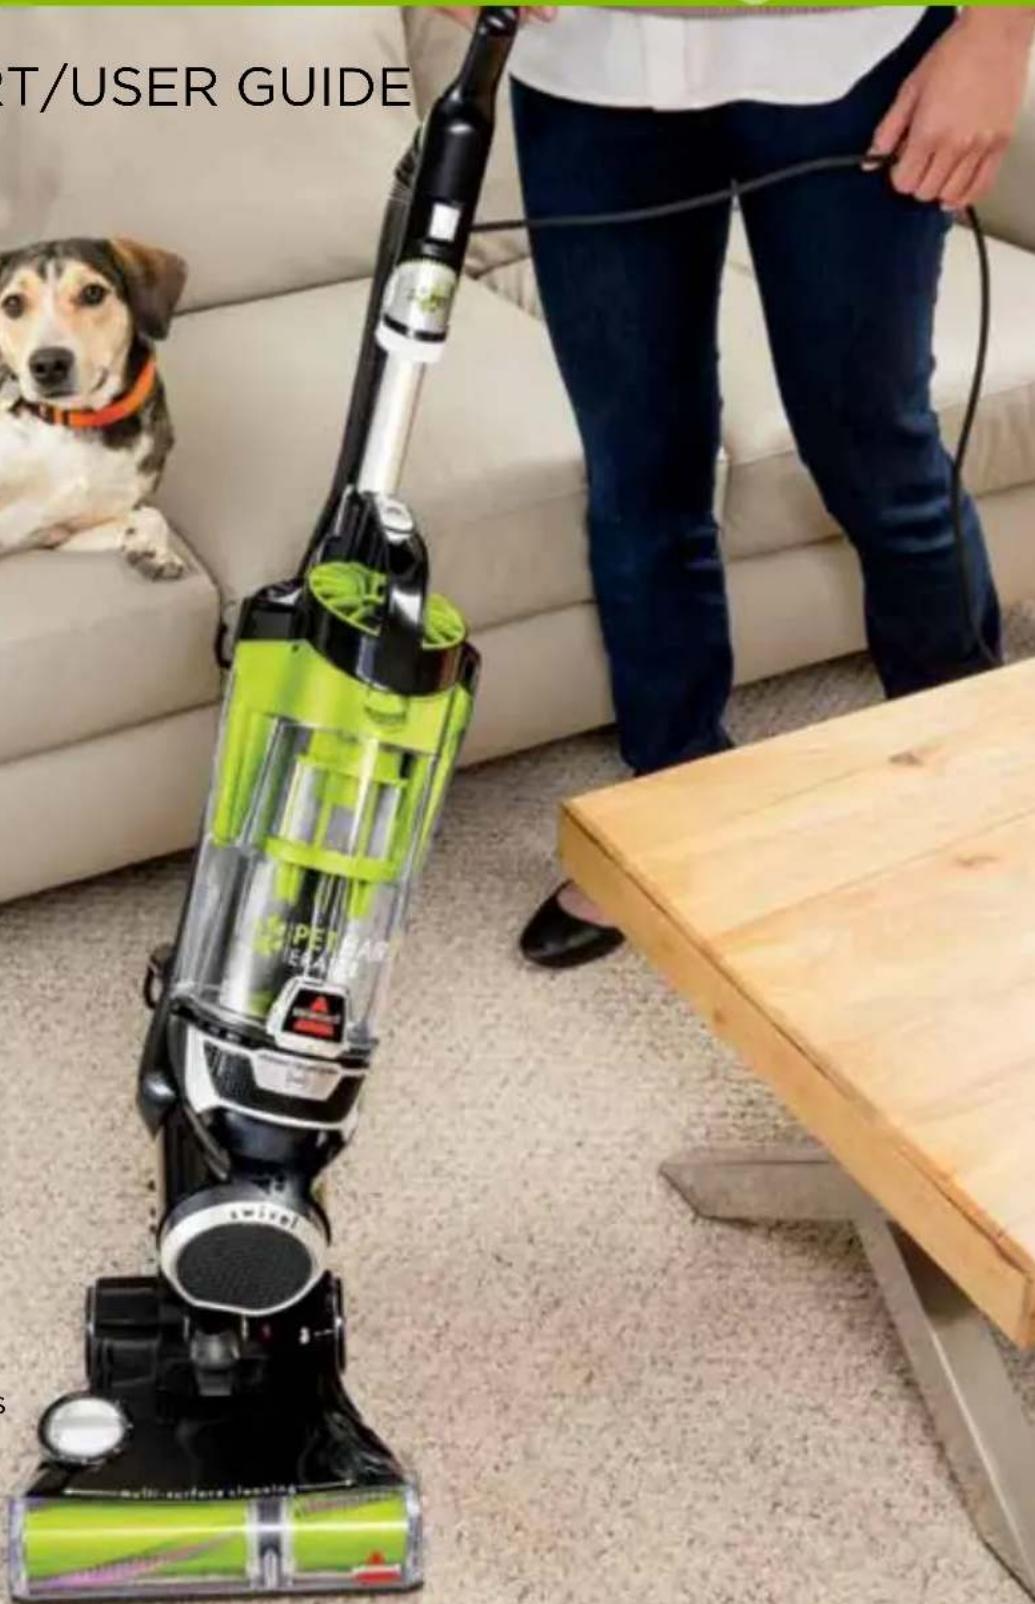
ENGINEERED FOR HOMES WITH PETS
QUICK START/USER GUIDE 1650 Series

More of a video person? Look for this icon and go online for an instructional how-to video at
www.BISSELL.com
text_image
T/USER GUIDEQuick Start Guide
REFER TO PAGE 5 FOR COMPLETE USER GUIDE INSTRUCTIONS, PRODUCT VIEW, AND IMPORTANT SAFETY NOTICES.
Assembly

text_image
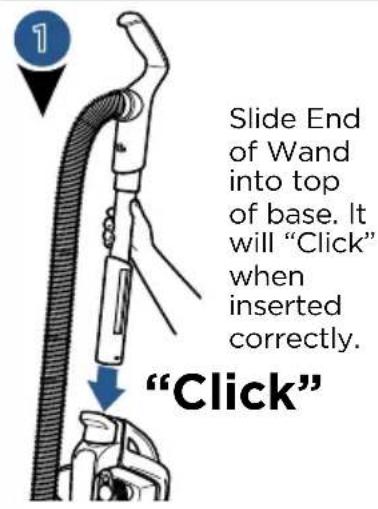
Slide End of Wand into top of base. It will "Click" when inserted correctly. "Click"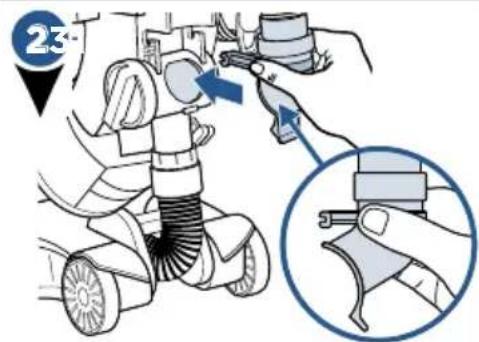
text_image
Diagram illustrating a robotic device with a hand holding a tool, showing a close-up of the component being inserted.Insert end of Hose into vacuum base by sliding the arms in and down first. Press down hard on the bottom tab with both your thumbs to "click" in.
natural_image
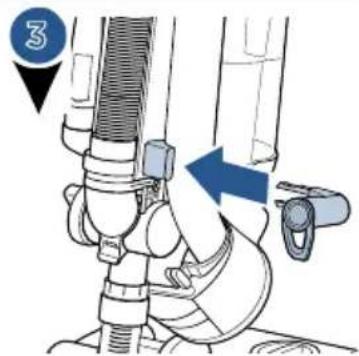
Diagram of a mechanical device with a blue arrow indicating direction, no text or symbols presentPush Cord Wrap in firmly until you hear "Click". Wrap power cord around cord wraps.
text_image
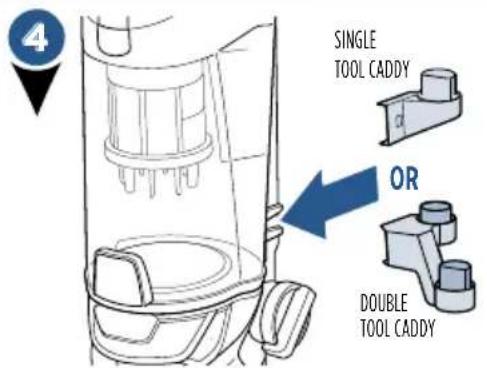
4 SINGLE TOOL CADDY OR DOUBLE TOOL CADDYYou have the option to store just the LED Lighted Crevice Tool or both that and the Pet TurboEraser Tool. Pick the single tool caddy or double tool caddy and push hard to slide it on the base of vacuum.
5 INSTALL OPTIONAL FEBREZE® FILTER
natural_image
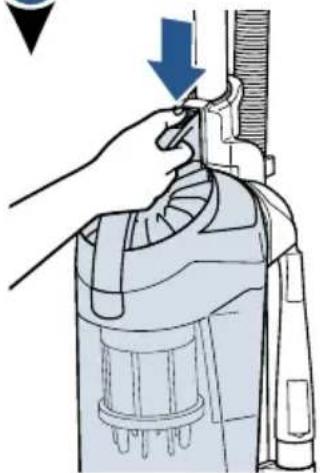
Illustration of a hand using a tool to adjust or install a device, with no visible text or symbols.Press Tank Release Button and pull container away from vacuum.
natural_image
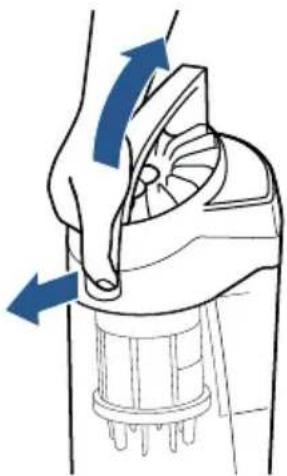
Diagram of a hand pressing down on a mechanical component with blue arrows indicating motion (no text or symbols)Pull tab out on front of dirt container and pull handle up to open.
IMPORTANT REMINDER
natural_image
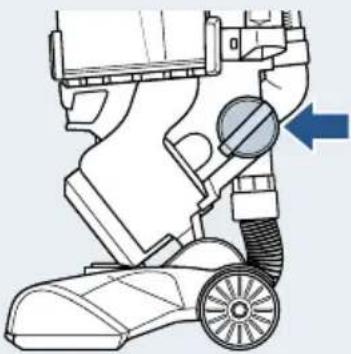
Diagram of a vacuum cleaner with attached hose and wheel, showing mechanical components and a blue arrow indicating motion (no text or symbols)Your vacuum came in floor cleaning mode, to use your tools, be sure to turn the Vacuum Suction Knob to align arrow with "hose/tool suction." See page 9 for further instructions.
Remove the yellow
foam filter (non-Febreze®) and replace with black Febreze® filter (included separately) last. Be sure black filter faces out, covering white mesh filter.
Place dirt container back on vacuum.
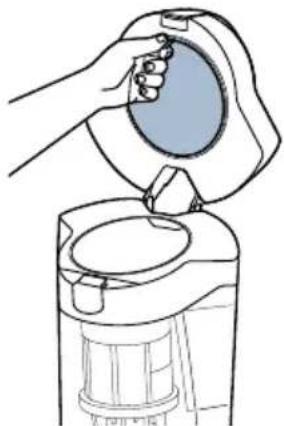
natural_image
Line drawing of a hand pouring liquid into a blender (no text or symbols)Built for Pet Owners
Cyclonic Pet Hair Spooling System™
BISSELL's first vacuum with a Cyclonic Pet Hair Spooling System™ for a Hands Free Empty.
A patented hair management system that spools and traps hair to keep it out of your filters and off your hands.
Just press the release button and watch the ball of pet hair drop right out.
You no longer have to reach up and pull the 'yuck' out.
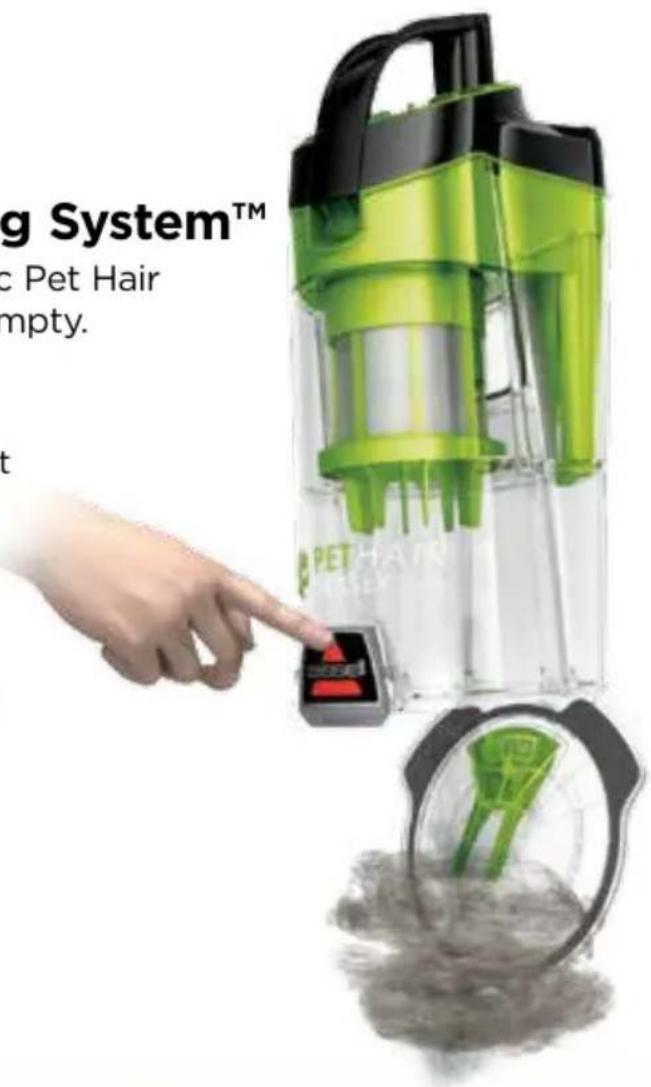
text_image
g System™ c Pet Hair empty. t PET HAIR MILEXTangle Free Brush Roll
Pick up pet hair without having to cut if off your brush roll.
The Tangle Free Brush Roll's unique design helps reduce hair from wrapping and catching on the bristles, and uses the carpet to pull the hair off the brush roll.
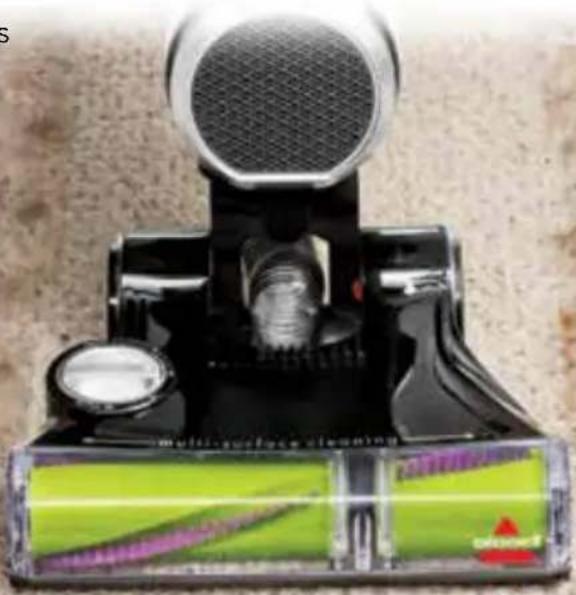
natural_image
Close-up of a black vacuum cleaner with a green cover and a white dial, no visible text or symbols.Cut the hassle NOT the hair!
by Pet Owners
New Specialized Pet Tools
Customize your cleaning with interchangeable tools stored right on board.
Soft dusting side for delicate surfaces and rubber fingers on the other side remove embedded pet hair on stairs and furniture.
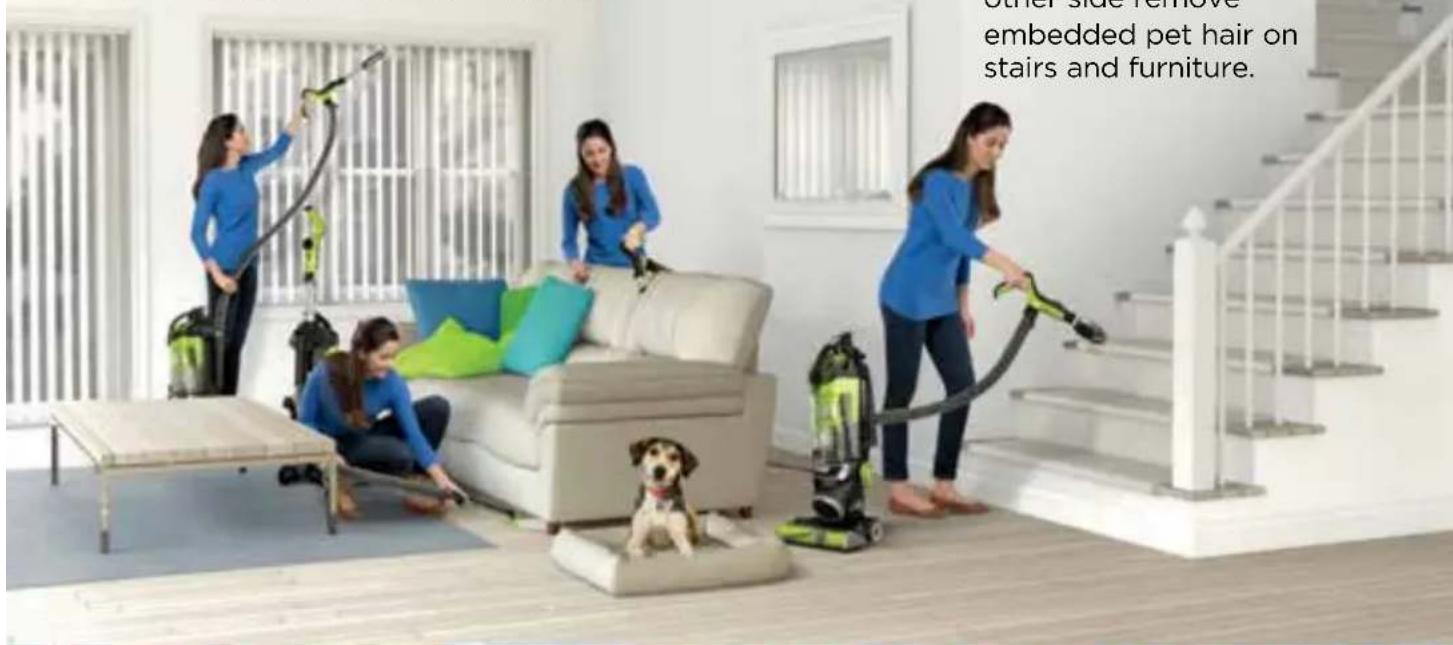
text_image
other side remove embedded pet hair on stairs and furniture.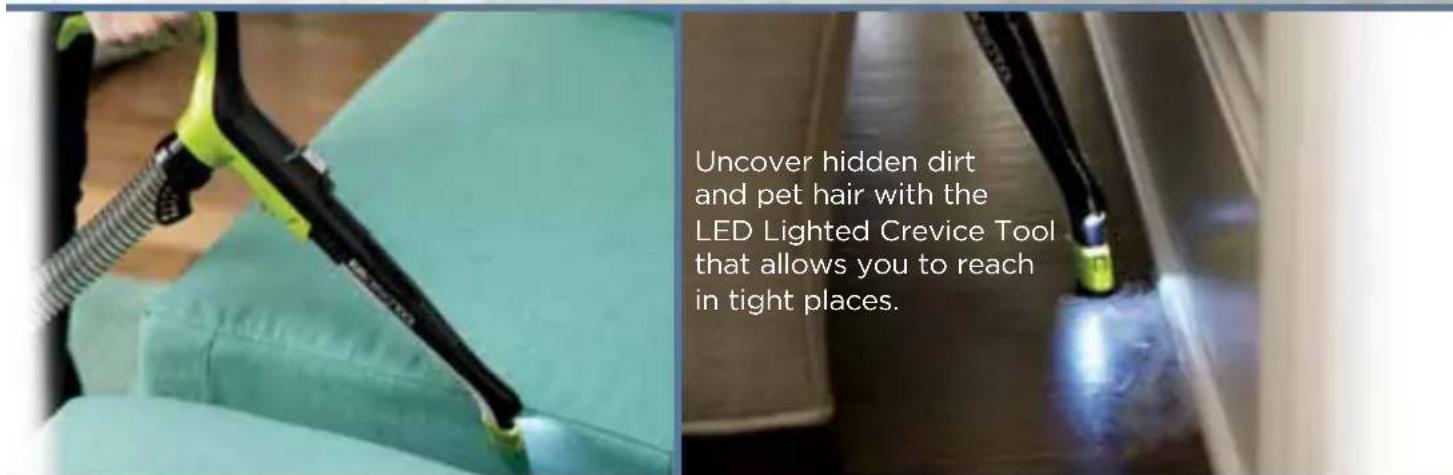
text_image
Uncover hidden dirt and pet hair with the LED Lighted Crevice Tool that allows you to reach in tight places.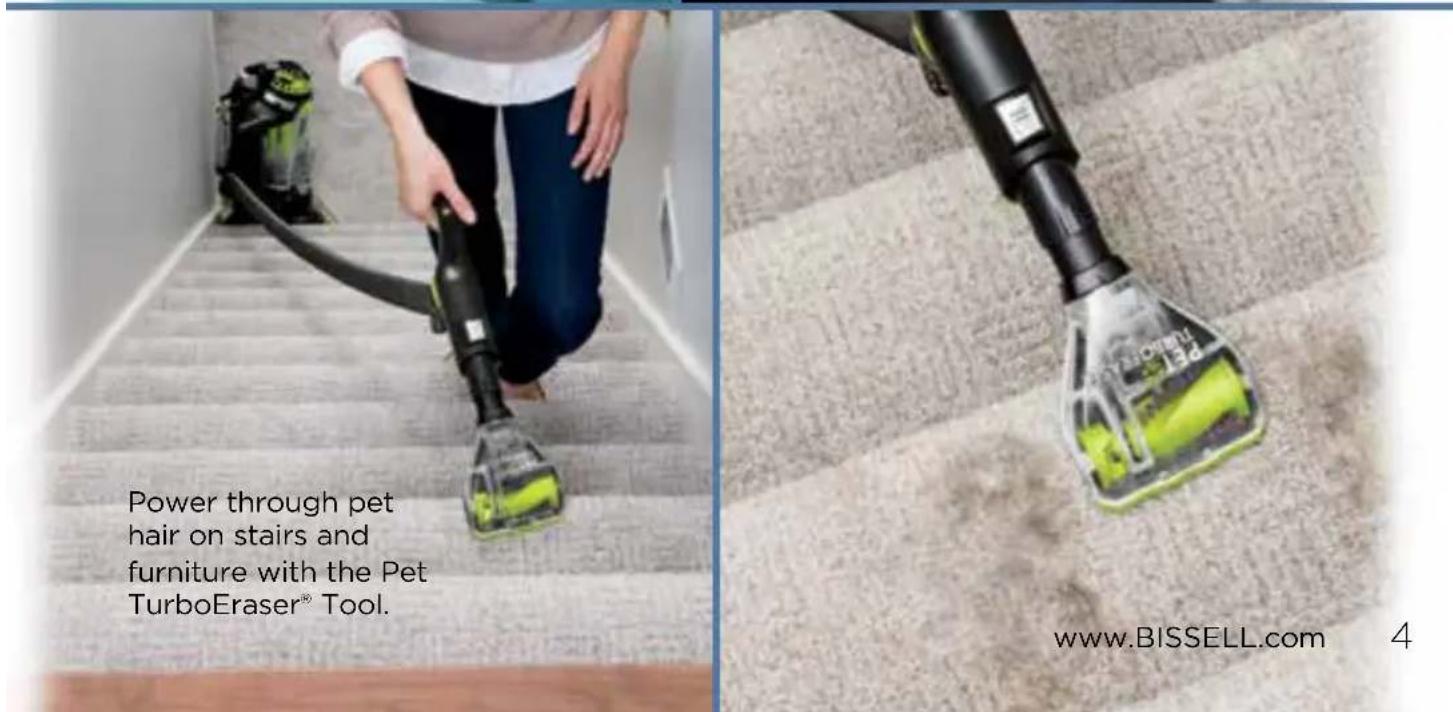
text_image
Power through pet hair on stairs and furniture with the Pet TurboEraser® Tool. www.BISSELL.com 4IMPORTANT SAFETY INSTRUCTIONS
READ ALL INSTRUCTIONS BEFORE USING YOUR UPRIGHT VACUUM.
Always connect to a polarized outlet (one slot is wider than the other). Unplug from outlet when not in use and before conducting maintenance. When using an electrical appliance, basic precautions should be observed, including the following:

WARNING
TO REDUCE THE RISK OF FIRE, ELECTRIC SHOCK, OR INJURY:
» Do not leave vacuum cleaner when it is plugged in. Unplug from outlet when not in use and before servicing.
» Do not use outdoors or on wet surfaces.
» Do not allow to be used as a toy. Close attention is necessary when used by or near children.
» Do not use for any purpose other than described in this User's Guide. Use only manufacturer's recommended attachments.
» Do not use with damaged cord or plug. If appliance is not working as it should, has been dropped, damaged, left outdoors, or dropped into water, have it repaired at an authorized service center.
» Do not pull or carry by cord, use cord as a handle, close a door on cord, or pull cord around sharp edges or corners. Do not run appliance over cord. Keep cord away from heated surfaces.
» Do not unplug by pulling on cord. To unplug, grasp the plug, not the cord.
» Do not handle plug or vacuum cleaner with wet hands.
» Do not put any object into openings. Do not use with any opening blocked; keep openings free of dust, lint, hair, and anything that may reduce air flow.
» Keep hair, loose clothing, fingers, and all parts of body away from openings and moving parts.
» Turn off all controls before plugging or unplugging vacuum cleaner.
» Use extra care when cleaning on stairs.
» Do not use to pick up flammable or combustible materials (lighter fluid, gasoline, kerosene, etc.) or use in areas where they may be present.
» Do not use vacuum cleaner in an enclosed space filled with vapors given off by oil base paint, paint thinner, some moth proofing substances, flammable dust, or other explosive or toxic vapors.
» Do not use to pick up toxic material (chlorine bleach, ammonia, drain cleaner, etc.).
» Do not pick up anything that is burning or smoking, such as cigarettes, matches, or hot ashes.
» Do not use without filters in place.
» Do not pick up hard or sharp objects such as glass, nails, screws, coins, etc.
» Use only on dry, indoor surfaces.
» Keep appliance on a level surface.
» Do not carry the vacuum cleaner while it is running.
» Unplug before connecting or disconnecting the TurboBrush® Tool.
LED LIGHTED CREVICE TOOL WARNING
- Caution: Risk of fire and burns. Do not recharge, disassemble, heat above 60^ (140°F) or incinerate. Keep batteries out of reach of children and in original package until ready to use. Dispose of used batteries promptly.
- Never put batteries in mouth. If swallowed, contact your physician or local poison control.
- Replace Battery With CR1632 Only. USE OF ANOTHER BATTERY MAY PRESENT A RISK OF FIRE OR EXPLOSION. CR1632 cells may be purchased anywhere batteries are sold.
READ OPERATOR'S MANUAL

SAVE THESE INSTRUCTIONS
This model is for household use only.

WARNING
» Plastic film can be dangerous. To avoid danger of suffocation, keep away from children.
» Do not plug in your vacuum cleaner UNTIL you are familiar with all instructions and operating procedures.
» To reduce the risk of electrical shock, turn power switch off and disconnect polarized plug from electrical outlet BEFORE performing maintenance or troubleshooting checks.
Thanks for buying a BISSELL vacuum!
We love to clean and we're excited to share one of our new innovative products with you. We want to make sure your vacuum works as well in five years as it does today, so this guide has tips on using (page 7-11), maintaining (pages 12-15), and if there is a problem, troubleshooting (page 16).
What's in the Box?
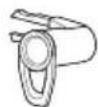
Lower Cord Wrap
User Guide
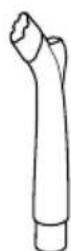
Febreze® Filter (optional use)

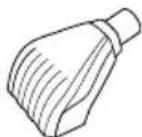

Double Tool Caddy (optional use)

Single Tool Caddy (optional use)
LED Lighted Crevice Tool
Pet TurboEraser® Tool
NOTE: Standard accessories may vary by model. To identify what should be included with your purchase, please refer to the "Carton Contents" list located on the carton top flap.
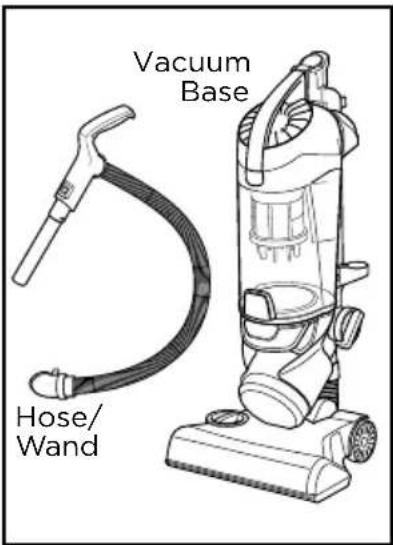
text_image
Vacuum Base Hose/WandQuick Start / Assembly ..... 2
New Pet Innovation ..... 3-4
Safety Instructions. . . . . . . . . 5
Product View....7
Operations 8-11
Maintenance & Care ..... 12-15
Troubleshooting ..... 16
Warranty 17
Service....17
Contact Information ..... 17
Product Registration.....18
Parts & Supplies ..... 18
Product View
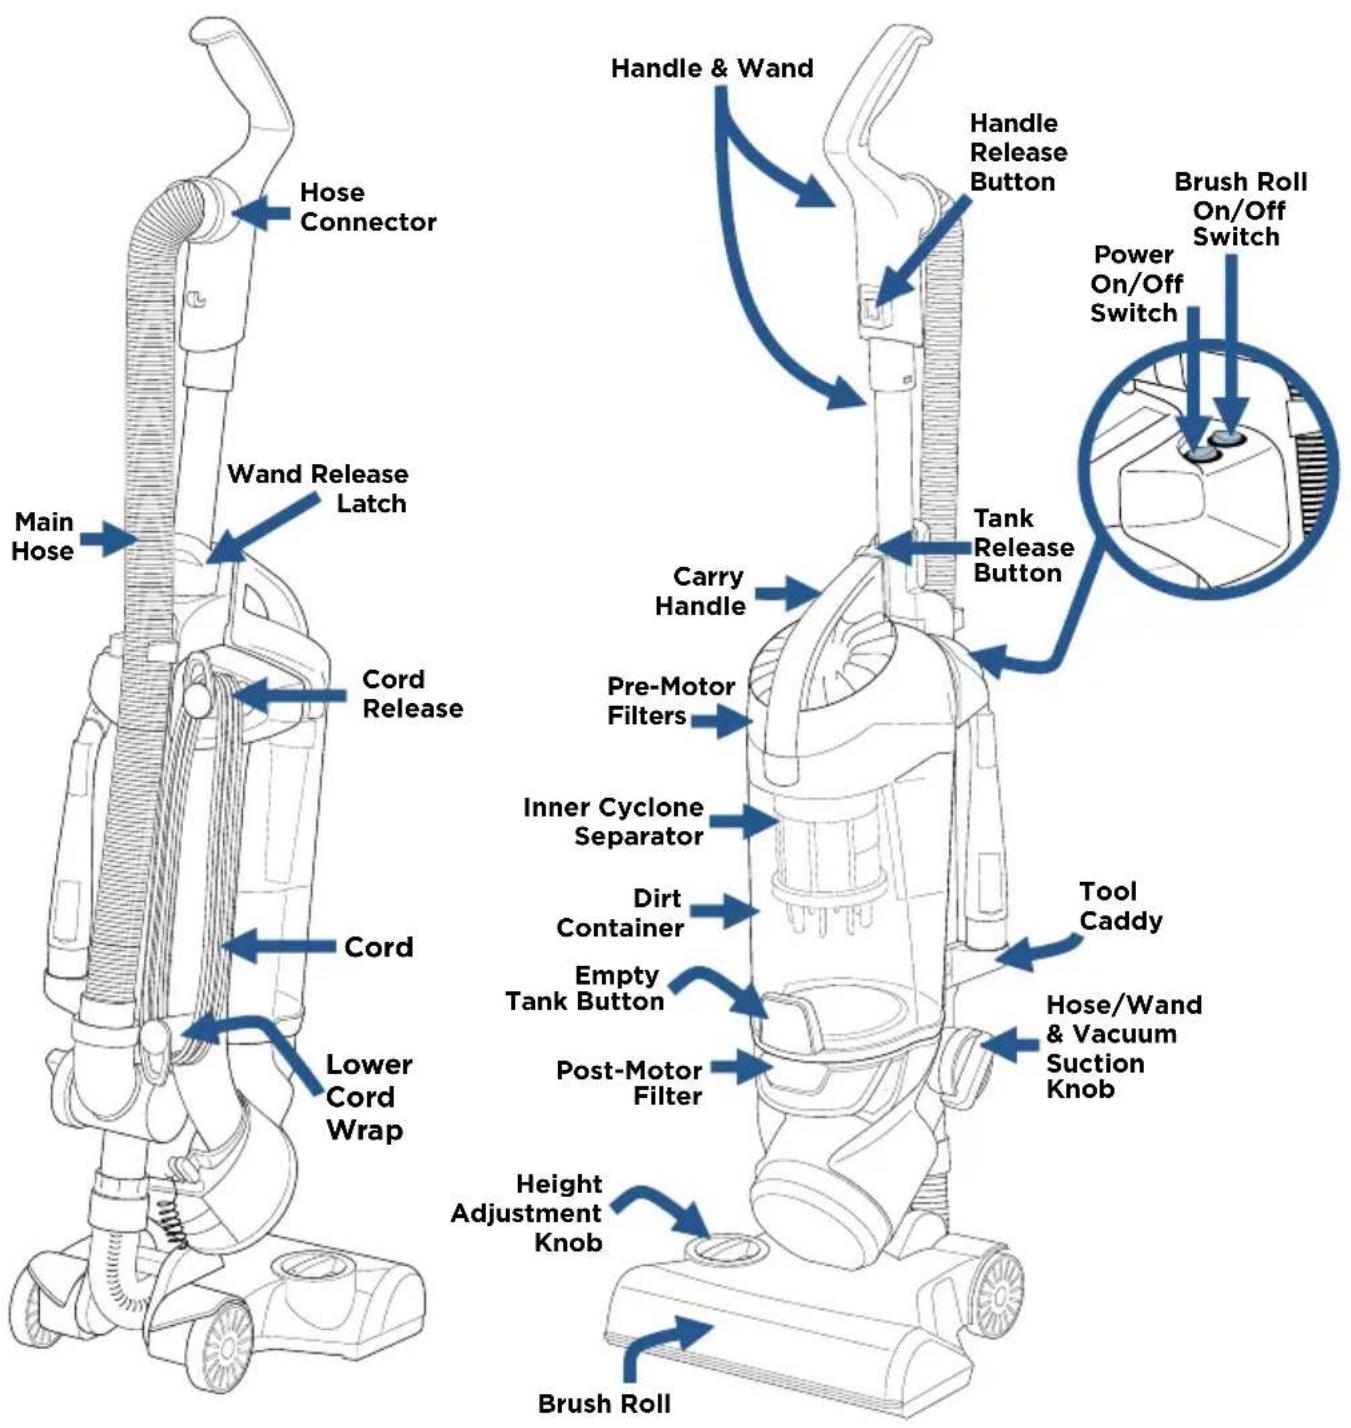
text_image
Hose Connector Main Hose Wand Release Latch Cord Release Cord Lower Cord Wrap Handle & Wand Handle Release Button Brush Roll On/Off Switch Power On/Off Switch Tank Release Button Carry Handle Pre-Motor Filters Inner Cyclone Separator Dirt Container Empty Tank Button Post-Motor Filter Tool Caddy Hose/Wand & Vacuum Suction Knob Height Adjustment Knob Brush RollTHIS APPLIANCE HAS A POLARIZED PLUG
To reduce the risk of electric shock, this appliance has a polarized plug (one blade is wider than the other). This plug will fit in a polarized outlet only one way. If the plug does not fit fully in the outlet, reverse the plug. If it still does not fit, contact a qualified electrician to install a proper outlet. Do not change the plug in any way.
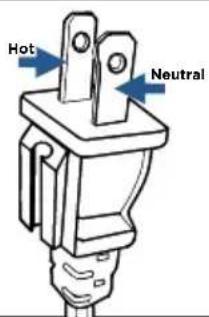
text_image
Hot NeutralOperations
WARNING
Do not plug in your vacuum until you are familiar with all instructions and operating procedures.
NOTE: Be sure the green suction knob on side of vacuum is turned to "Floor Suction" before use.

natural_image
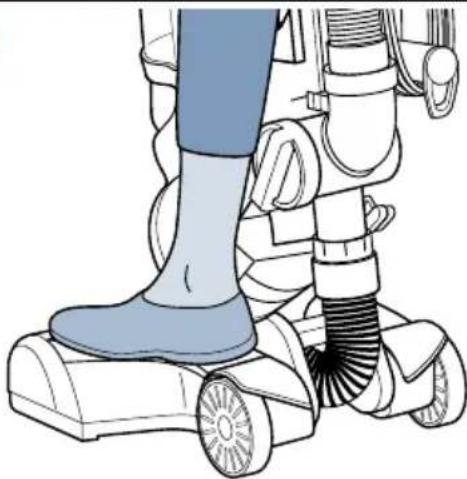
Illustration of a person's lower legs using a vacuum cleaner (no text or symbols visible)Step gently on base and pull back on handle to recline.

text_image
21 Power On/Off Switch Brushroll On/Off SwitchTurn vacuum on by pressing Power Switch on (I - ON and O - OFF). Press Brush roll switch to run the PowerBrush for carpet cleaning (brush roll is on when light on switch is illuminated). See page 15 to maintain the brush roll.
NOTE: The brush roll will automatically shut off when vacuum is locked in upright position, recline to reactivate.

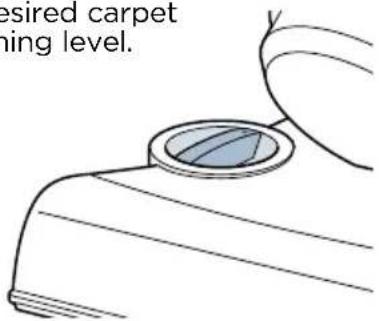
Turn Height Adjustment Knob to desired carpet cleaning level.
text_image
desired carpet wing level.
natural_image
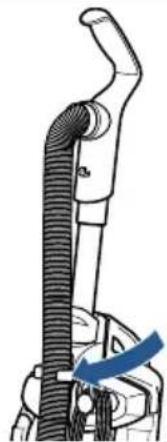
Diagram of a vacuum cleaner with a blue arrow indicating motion direction (no text or symbols)Utilize the clip on the back of your vacuum to hold the hose in place. Pull out when using hose with tool attachments.
NOTE: For optimal carpet cleaning performance, adjust to the lowest practical setting. If your vacuum is difficult to push, adjust to the next higher setting.
NOTE: In the unlikely event that hair wrapped around your brush roll, run vacuum back and forth on clean carpet several times to help release any wrapped hair.
NOTE: Turn off the brush roll when vacuuming hard or delicate surfaces that may be caught by the rotating brush. This could include hard wood, tiled floors, small area rugs or frieze carpets that have long delicate fibers or threads.
Brush roll Safety Feature


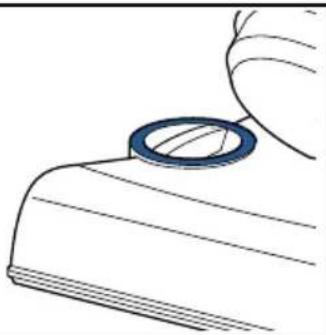
If red light illuminates around height adjustment knob, you have tripped your brush roll motor safety feature.
natural_image
Technical line drawing of a mechanical component with a blue circular feature (no text or symbols)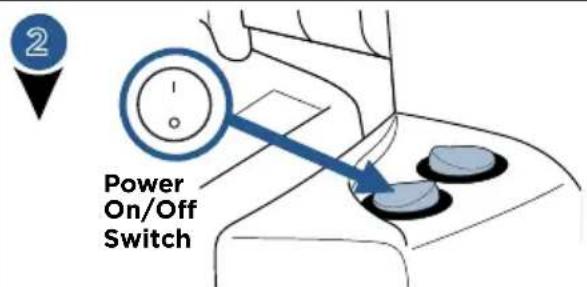
text_image
Power On/Off SwitchPut vacuum in upright position and turn it off.

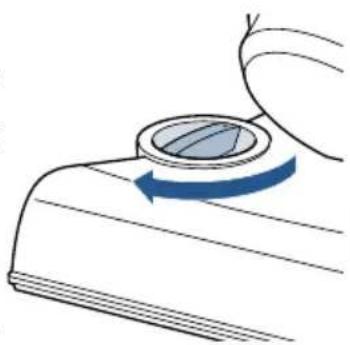
It may have tripped because of use on premium soft carpet. Turn Height Adjustment Knob to the "high carpet" setting. Also check if debris is clogged in brush roll. Clear debris if necessary.
natural_image
Diagram of a device with a circular component and blue arrow indicating rotation (no text or symbols)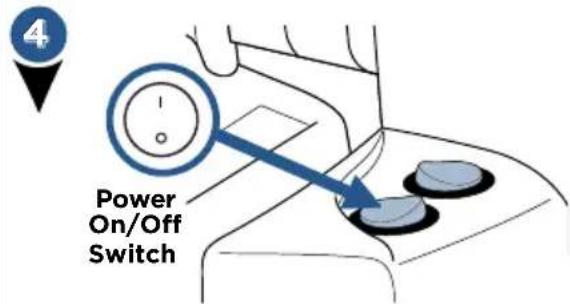
text_image
4 Power On/Off SwitchTurn vacuum back on and try again.
Above Floor Cleaning: Handle


text_image
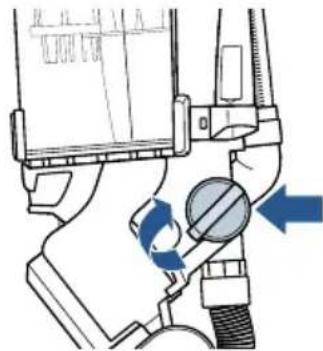
Technical diagram showing mechanical assembly with blue arrows indicating motion or force direction, likely illustrating a valve or actuator mechanism.To use tools and the hose/wand; turn the green knob aligning arrow with "hose/tool suction."

natural_image
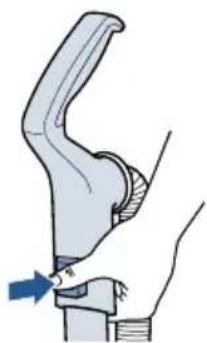
Illustration of a hand holding a curved mechanical component with a blue arrow indicating force direction (no text or symbols)Press Handle Release Button to release handle from wand.
natural_image
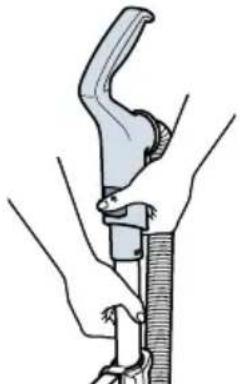
Illustration of hands using a tool to cut or adjust a mechanical part (no text or symbols present)Pull straight up and out.

natural_image
Two identical white and black shoe covers arranged on a diagonal line (no text or symbols)2-in-1 Pet Brush has white soft bristles for those gentle uses and rubber knobs for embedded pet hair.
natural_image
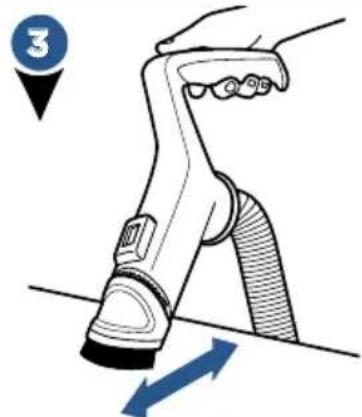
Illustration of a hand using a handheld device to lift a surface, with directional arrows indicating movement (no text or symbols)Use the collar with the white soft bristles side for delicate surfaces.

natural_image
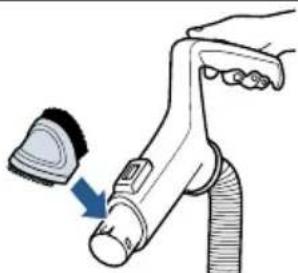
Illustration of a hand holding a handheld device with a blue arrow pointing to the device tip (no text or symbols present)Un-click the collar and flip around to use the rubber fingers for removing pet hair from your furniture. Listen for 2 "clicks" when reattaching.
Once done using Handle, slide back on to Wand until it "clicks."
Be sure to turn the green knob back to "Floor Suction" mode after using tools.
Above Floor Cleaning: Wand

text_image
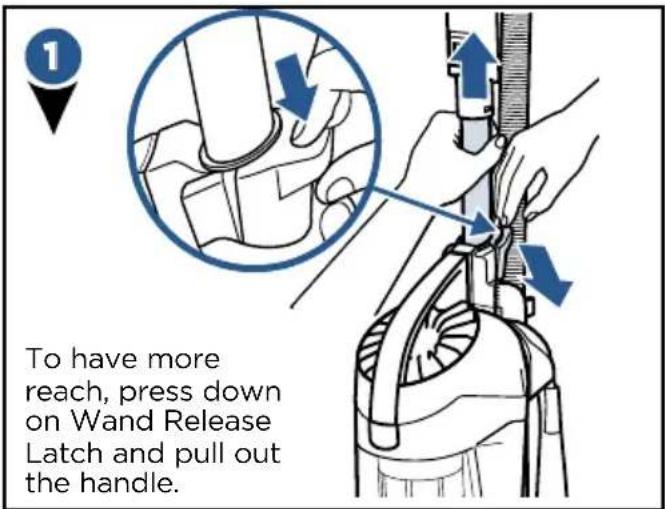
To have more reach, press down on Wand Release Latch and pull out the handle.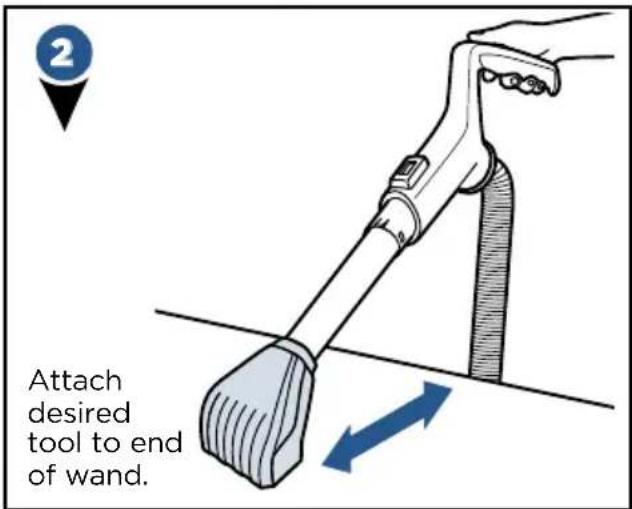
text_image
2 Attach desired tool to end of wand.Above Floor Cleaning: Hose

text_image
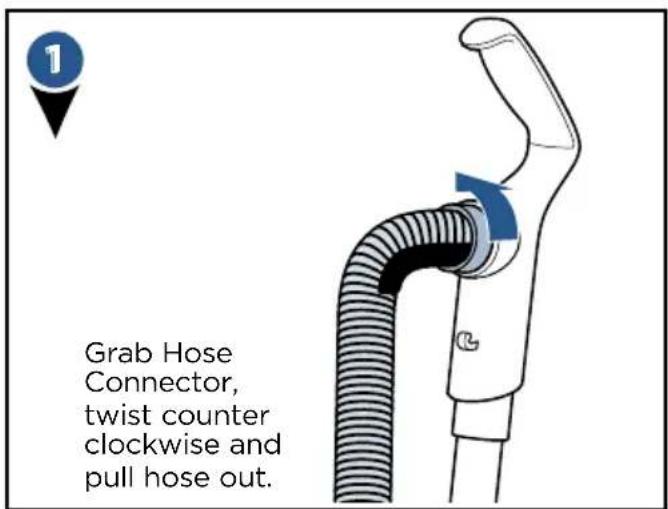
1 Grab Hose Connector, twist counter clockwise and pull hose out.
text_image
Attach desired tool to end of hose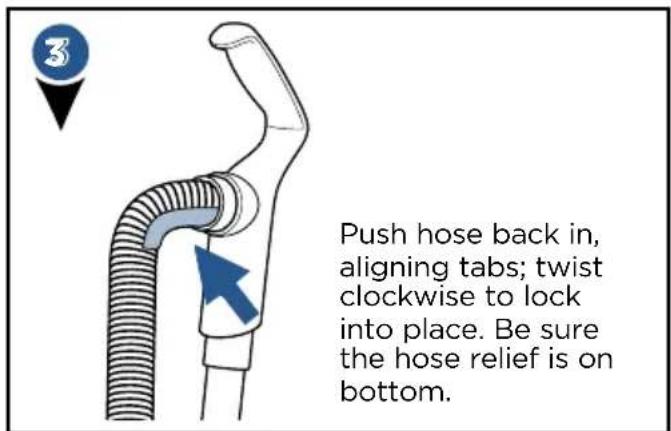
text_image
Push hose back in, aligning tabs; twist clockwise to lock into place. Be sure the hose relief is on bottom.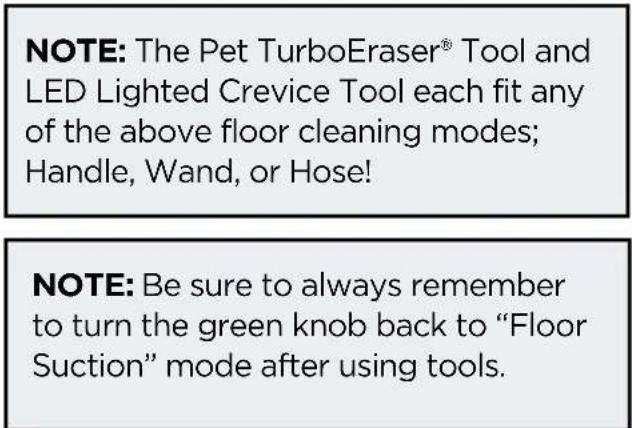
text_image
NOTE: The Pet TurboEraser® Tool and LED Lighted Crevice Tool each fit any of the above floor cleaning modes; Handle, Wand, or Hose! NOTE: Be sure to always remember to turn the green knob back to “Floor Suction” mode after using tools.LED Lighted Crevice Tool

text_image
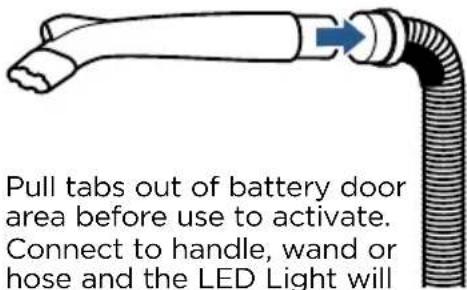
Pull tabs out of battery door area before use to activate. Connect to handle, wand or hose and the LED Light willPull tabs out of battery door area before use to activate. Connect to handle, wand or hose and the LED Light will automatically come on.

natural_image
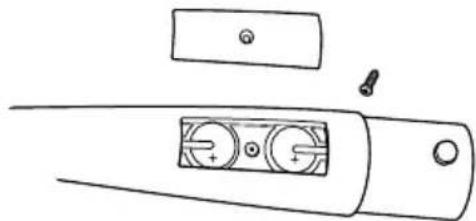
Diagram of a device with internal components and a screw, no text or symbols presentTo replace LED battery, unscrew the small screw with a Phillips head screw driver. Pull cover off to reveal two batteries (CR1632 3V). Slide and pull out each battery and replace with new. Be sure the “+” sign on battery is facing out.
Dispose of used battery promptly. Keep away from children. Do not disassemble and do not dispose of in fire.
NOTE: When the small tab on the connection point of Crevice tool comes into contact with the handle, wand, or hose; that triggers the LED light to come on. When using with the Wand, be sure it does not pop through the opening at the end of the Wand.
Vacuum Motor Protection
An internal thermal protector has been designed into your vacuum to protect it from overheating. When the thermal protector activates, the main vacuum motor will stop operating. If this happens, proceed as follows.

Turn vacuum OFF and unplug from electrical outlet.

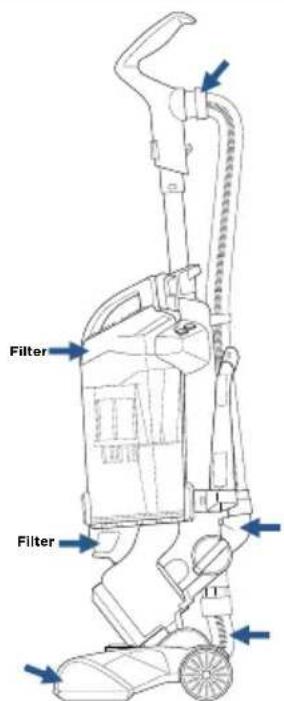
Check for the source of overheating problem (full dirt cup, dirty filters or, a clog) and fix by following the maintenance instructions.

When the motor cools for approximately 30 minutes, the thermal protector automatically resets and cleaning may continue. If the vacuum will not turn on or the thermal protector continues to activate, your vacuum may need servicing. Call BISSELL Consumer Care.
text_image
Filter FilterPossible areas that could clog.
NOTE: The thermal protector controls the main vacuum motor only, not the brush motor. If the thermal protector activates, the brush will continue to operate normally; however, there will be no suction.
Removing/Emptying Dirt Tank
WARNING
To reduce the risk of electrical shock, turn power switch off and disconnect polarized plug from electrical outlet before performing maintenance or troubleshooting checks.

text_image
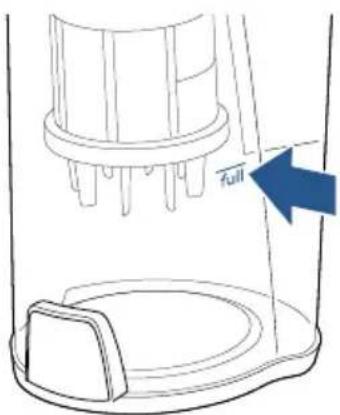
fullVacuum tank is full. Time to empty!

natural_image
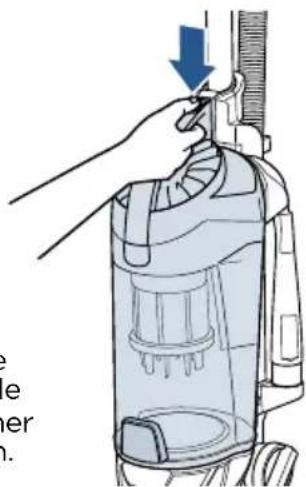
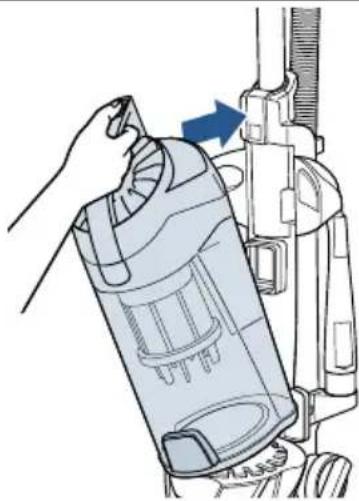
Illustration of a hand using a vacuum cleaner to lift a component, with no visible text or symbols.Press Tank Release Button. Grab handle to pull Dirt Container away from vacuum.

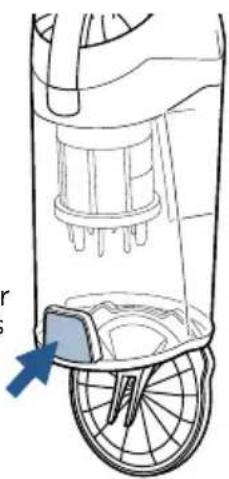
Holding Dirt Container over a trash bin, press Tank Empty Button.
Snap bottom back into place.
natural_image
Diagram of a bicycle wheel assembly with a blue arrow pointing to the wheel rim (no text or symbols present)
Place tank back on the vacuum. Be sure you place the front of the tank first and push back to "click" into place.
natural_image
Illustration of a hand holding a vacuum cleaner's bag with a blue arrow indicating motion (no text or symbols)WARNING
Do not operate vacuum with damp or wet filters. Allow components to dry before reassembling the Dirt Container.
WARNING
Before using your vacuum, make sure that the dirt container is in locked position and that all filters, both pre and post-filters are in place. DO NOT operate your vacuum without these filters.
Parts & Supplies
For Parts and Supplies, go to www.BISSELL.com and enter your model number in the search field.
Cleaning & Replacing Top Pre-Motor Filters


Press Tank Release Button and pull away from vacuum.
natural_image
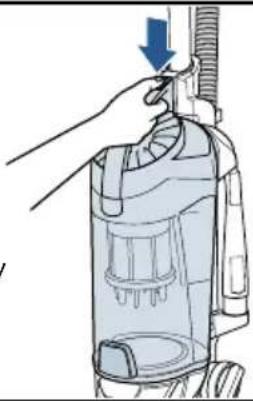
Illustration of a hand using a vacuum cleaner to lift a component, showing internal components and a blue arrow indicating the direction (no text or symbols present)
Pull tab out on front of dirt container and pull handle up to open filter location.
natural_image
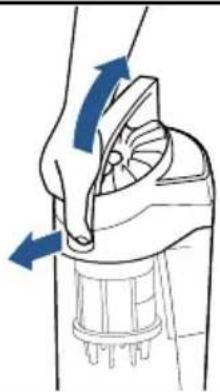
Illustration of a hand using a handheld device to lift a fan (no text or symbols present)
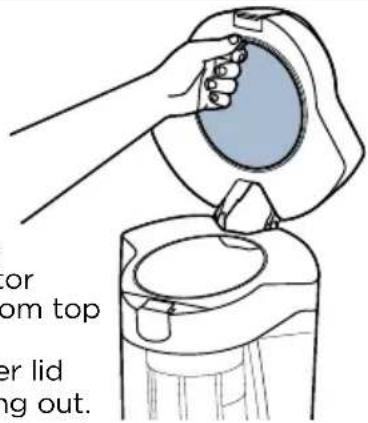
Remove pre-motor filters from top of dirt container lid by pulling out.
text_image
for om top er lid ng out.
natural_image
Illustration of a faucet with blue water droplets falling from a perforated sink (no text or symbols)
Both the Pre-Motor Mesh and Foam filters are washable.
Clean with mild detergent, rinse and squeeze all excess water. Allow filters to dry completely before reinserting.
Place dry pre-motor filters back in the top of dirt container placing the thick foam filter last.
Cleaning & Replacing Bottom Post-Motor Filter


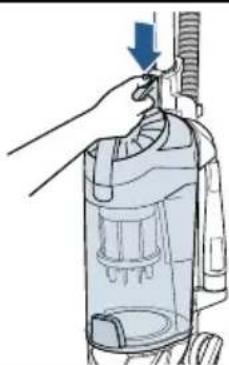
Press Tank Release Button and pull away from vacuum.
natural_image
Illustration of a hand inserting a vacuum cleaner into a device, showing the handle and internal components (no text or symbols)
With dirt container removed, pull tab up to access post-motor filter.
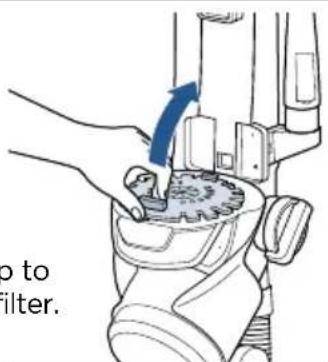
text_image
to filter.
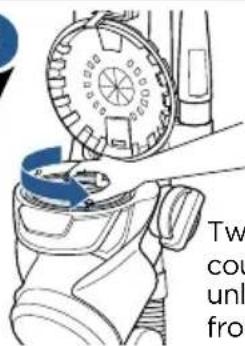
text_image
Tw cou unl fromTwist filter counter-clockwise to unlock and remove from vacuum.

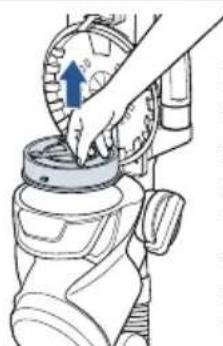
natural_image
Illustration of a hand adjusting a mechanical component with a blue arrow indicating direction (no text or symbols present)Lift to remove filter.
When reassembling, place filter back in unit and twist clockwise to "click" into place.
The pleated filter may NOT be washed. If dust/debris accumulates, gently tap the filter on inside of a trash bin.
NOTE: Replace this filter every 3 to 6 months. Visit BISSELL.com for Model 1650 filter replacements.
Cleaning Inner Cyclone Separator

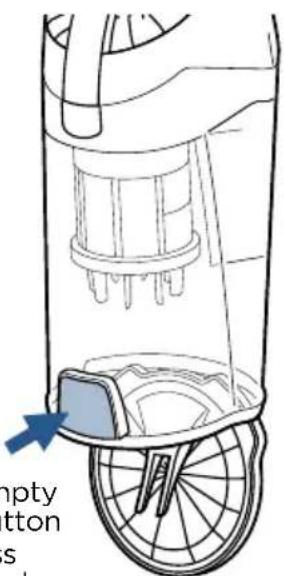
text_image
empty tton sPush Empty Tank Button to access Inner Cyclone Separator.
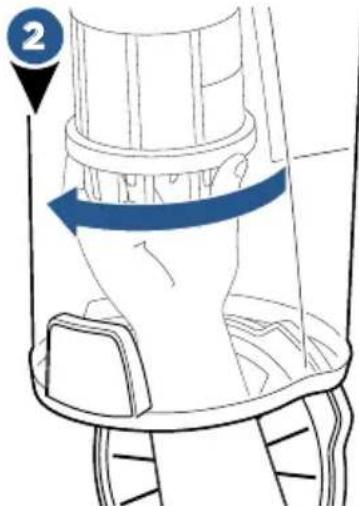
natural_image
Diagram of a mechanical device with a blue arrow indicating rotational motion (no text or symbols)Twist counter-clockwise to remove separator from dirt container and pull down.

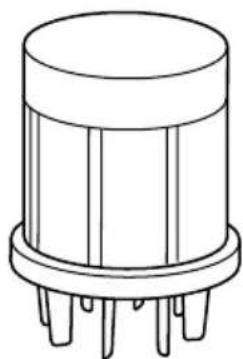
natural_image
Line drawing of a cylindrical electronic component with six pins (no text or symbols)Tap separator against inside of trash bin and rinse under warm water if necessary. Be sure to let it completely dry before placing back in Dirt Container.
Maintain the Pet TurboEraser® Tool

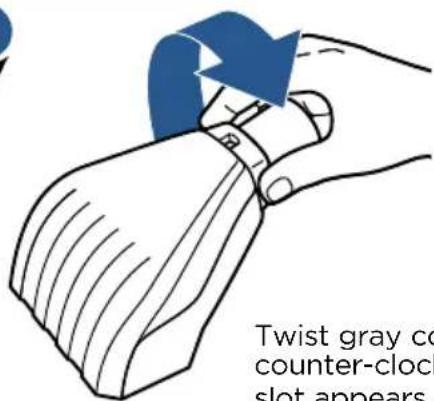
text_image
Twist gray co counter-clock slot appearsTwist gray collar counter-clockwise, until slot appears, and then separate faceplate.

Paddle Wheel

text_image
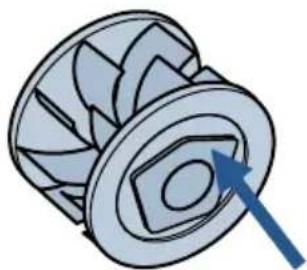
Paddle Wheel Belt RollerRemove brush roll, belt, and paddle wheel. Inspect for damages and replace if necessary.

natural_image
Illustration of a mechanical impeller or turbine component with a blue arrow pointing to the center (no text or symbols present)To reassemble, align two clips on each end of paddle wheel with belt on and pop back into place.
Place brush roll with belt back in.
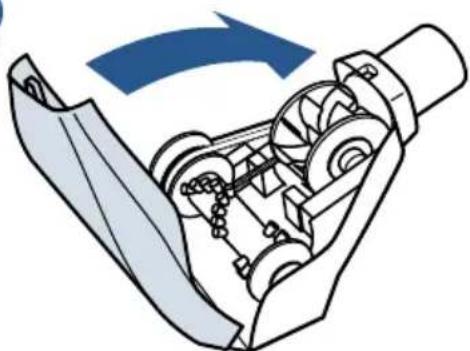
Faceplate will not close properly if all parts are not aligned correctly.

natural_image
Mechanical assembly diagram showing a gear mechanism with a blue arrow indicating rotational motion (no text or symbols)To put faceplate back on, align the tabs in the top of the cover and place it down to "click" into place.
Replace the Brush & Belt

text_image
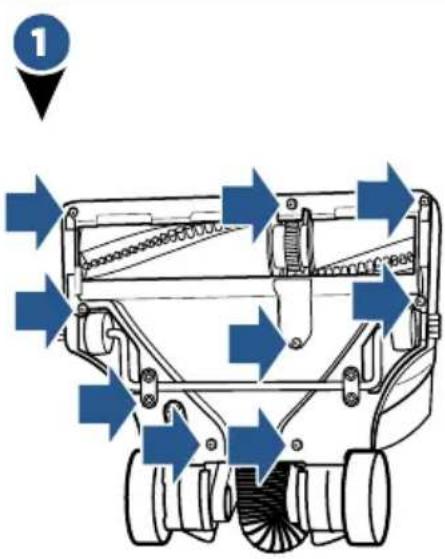
1Unplug vacuum, turn over and unscrew 9 Silver Phillips head screws to remove bottom cover.
natural_image
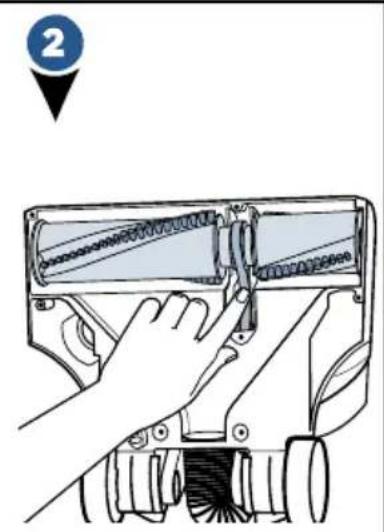
Illustration of a hand using a tool to adjust or install a mechanical component, no text or symbols presentPull roller straight out and slide belt off motor gear. Replace roller and/or belt.
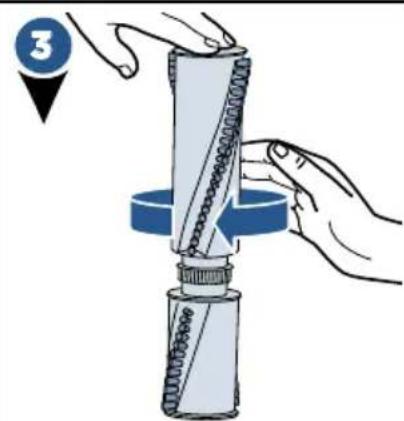
text_image
3- Inspect brush roll by placing it on its end and spin. The brush roll should spin freely, multiple times by one flick. If it doesn't, replace brush roll.
- Inspect belt, replace if it appears damaged.

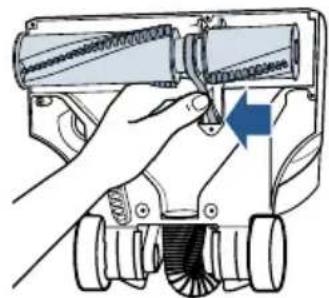
natural_image
Illustration of a hand operating a mechanical device with a blue arrow indicating rotation (no text or symbols present)- Place belt back on brush roll.
- Pinch belt around brush roll & hook back around the silver motor gear.
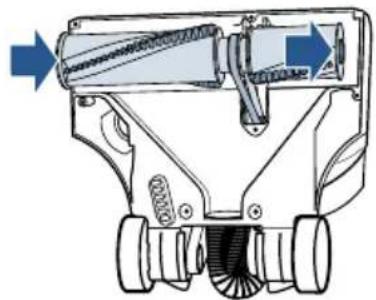
natural_image
Mechanical assembly diagram showing a motor or gear mechanism with no visible text or symbols- Rotate brush roll into place and line up end caps.
- Re-attach bottom cover with 9 screws.
NOTE: If an object becomes lodged in foot and brush shuts off, turn vacuum off and unplug from electrical outlet. Remove obstruction and brush will automatically reset when vacuum is plugged and turned back on.
Parts & Supplies
For Parts and Supplies, go to www.BISSELL.com and enter your model number in the search field.
Troubleshooting

To reduce the risk of electric shock, turn power switch off and disconnect plug from electrical outlet before performing maintenance or troubleshooting checks.
| Problem Possible causes Remedies | ||
| Brush roll doesn't rotate | Brush roll switch is turned off Make sure Brush roll switch is on | |
| Vacuum is locked in upright position | Recline vacuum and switch on the Brush roll | |
| Vacuuming on Premium Soft Carpet | Turn Height Adjustment Knob to the “high carpet” setting. Turn vacuum off and back on | |
| Brush roll safety feature triggered (blue changes to red light illuminating around height adjustment knob) | Unplug, check for debris, and remove the debris | |
| Brush roll has lodged debris or other entanglements, keeping the brush from rotating | Unplug, check for debris, and remove the debris | |
| Vacuum won't pick up dirt | Vacuum Suction Knob is in “hose/ tool suction” mode | Turn knob aligning arrow with “Floor Suction” |
| Filters are dirty Remove and rinse pre-motor filters.Allow enough time for them to dry properly before reinserting. Remove and dust off post-motor filter | ||
| There is a clog in the vacuum Remove debris and any other entanglements that may be restricting the brush rolls rotation | ||
| Dirt Container is not seated correctly | Press the Tank Release to release the Dirt Container and reseat properly | |
| There is a crack or hole in the Main Hose | If there is a crack or hole, order a new Main Hose from the BISSELL website | |
| Main Hose is not connected Locate the Main Hose and reconnect by pushing the hose connection to secure the latch | ||
| There is a clog in the hose or wand | Check inside of hose for clogs by disconnecting from handle.Disassemble wand and check for clogs | |
| Hair wrapped around brush roll | Run vacuum back and forth on clean carpet several times to release wrapped hair | |
| Dirt is escaping from the vacuum | Dirt Container is full Empty the Dirt Container | |
| Filters are missing Check to see if all of the Pre-Motor and Post-Motor filters are in place | ||
| Hose won't pick up dirt | Vacuum Suction Knob is in “Floor Suction” mode | Turn knob aligning arrow with “hose/ tool suction” |
Warranty
This warranty gives you specific legal rights, and you may also have other rights which may vary from state to state. If you need additional instruction regarding this warranty or have questions regarding what it may cover, please contact BISSELL Consumer Care by E-mail, telephone, or regular mail as described below.
Limited Five-Year Warranty
Subject to the *EXCEPTIONS AND EXCLUSIONS identified below, upon receipt of the product BISSELL will repair or replace (with new or remanufactured components or products), at BISSELL's option, free of charge from the date of purchase by the original purchaser, for five years any defective or malfunctioning part.
See information below on "If your BISSELL product should require service".
This warranty applies to product used for personal, and not commercial or rental service. This warranty does not apply to fans or routine maintenance components such as filters, belts, or brushes. Damage or malfunction caused by negligence, abuse, neglect, unauthorized repair, or any other use not in accordance with the User's Guide is not covered.
BISSELL IS NOT LIABLE FOR INCIDENTAL OR CONSEQUENTIAL DAMAGES OF ANY NATURE ASSOCIATED WITH THE USE OF THIS PRODUCT. BISSELL'S LIABILITY WILL NOT EXCEED THE PURCHASE PRICE OF THE PRODUCT.
Some states do not allow the exclusion or limitation of incidental or consequential damages, so the above limitation or exclusion may not apply to you.
\*EXCEPTIONS AND EXCLUSIONS FROM THE TERMS OF THE LIMITED WARRANTY
THIS WARRANTY IS EXCLUSIVE AND IN LIEU OF ANY OTHER WARRANTIES EITHER ORAL OR WRITTEN. ANY IMPLIED WARRANTIES WHICH MAY ARISE BY OPERATION OF LAW, INCLUDING THE IMPLIED WARRANTIES OF MERCHANTABILITY AND FITNESS FOR A PARTICULAR PURPOSE, ARE LIMITED TO THE FIVE YEAR DURATION FROM THE DATE OF PURCHASE AS DESCRIBED ABOVE.
Some states do not allow limitations on how long an implied warranty lasts so the above limitation may not apply to you.
NOTE: Please keep your original sales receipt. It provides proof of date of purchase in the event of a warranty claim.
Service
If your BISSELL product should require service:
Contact BISSELL Consumer Care to locate a BISSELL Authorized Service Center in your area. If you need information about repairs or replacement parts, or if you have questions about your warranty, contact BISSELL Consumer Care.
Website:
www.BISSELL.com
E-mail:
www.BISSELL.com/email-us
Call:
BISSELL Consumer Care 1-800-237-7691
Monday - Friday 8am - 10pm ET
Saturday 9am - 8pm ET
Sunday 10am - 7pm ET
Please do not return this product to the store.
Other maintenance or service not included in the manual should be performed by an authorized service representative.
For any questions or concerns, BISSELL is happy to be of service.
Contact us directly at 1-800-237-7691.
Register your product today!
Registering is quick, easy and offers you benefits over the lifetime of your product.
You'll receive:
BISSELL Rewards Points
Automatically earn points for discounts and free shipping on future purchases.
Faster Service
Supplying your information now saves you time should you need to contact us with questions regarding your product.
Product Support Reminders and Alerts
We'll contact you with any important product maintenance reminders and alerts.
Special Promotions
Optional: Register your email to receive notice of offers, contests, cleaning tips and more!
Visit www.BISSELL.com/registration!
Visit the BISSELL website: www.BISSELL.com
When contacting BISSELL, have model number of cleaner available.
Please record your Model Number: ____
Please record your Purchase Date: ____
NOTE: Please keep your original sales receipt. It provides proof of purchase date in the event of a warranty claim. See Warranty on page 17 for details.
Parts & Supplies
For Parts and Supplies, go to www.BISSELL.com and enter your model number in the search field.
We can't wait to hear from you!
Rate this product and let us (and millions of your closest friends) know what you think!
www.BISSELL.com