
IAN 283331 - Lighting Livarno Lux - Free user manual and instructions
Find the device manual for free IAN 283331 Livarno Lux in PDF.


| Product type | Indoor luminaire |
| Brand | Livarno Lux |
| Model | IAN 283331 |
| Category | Lighting |
| Height | Approx. 50 cm |
| Width | Approx. 30 cm |
| Depth | Approx. 30 cm |
| Weight | 1.5 kg |
| Material | Metal and glass |
| Color | White / Matte nickel |
| Bulb type | Integrated LED |
| Luminous flux | 800 lumens |
| Color temperature | 3000 K (warm white) |
| Power supply | Mains 220-240 V, 50/60 Hz |
| Protection class | Class II |
| Ingress protection | IP20 |
| Functions | On/off via switch |
| Beam angle | 120° |
| LED lifespan | Up to 25,000 hours |
| Maintenance | Clean with a soft, dry cloth |
| Spare parts | Non-replaceable bulb (sealed LED) |
| Repairability | Repairability index not provided |
| Warranty | 2 years |
| Included accessories | User manual, mounting hardware |
Frequently Asked Questions - IAN 283331 Livarno Lux
User questions about IAN 283331 Livarno Lux
0 question about this device. Answer the ones you know or ask your own.
Ask a new question about this device
Download the instructions for your Lighting in PDF format for free! Find your manual IAN 283331 - Livarno Lux and take your electronic device back in hand. On this page are published all the documents necessary for the use of your device. IAN 283331 by Livarno Lux.
USER MANUAL IAN 283331 Livarno Lux
Assembly, operating and safety instructions
NL BE
STAANDELED-LAMP
Before reading, unfold both pages containing illustrations and familiarise yourself with all functions of the device.
FR BE
GB / IE Assembly, operating and safety instructions Page 11
Included items Page 12
Parts Description......Page 12
Technical Data Page 13
Safety Page 13
Safety advice......Page 13
Initial use Page 14
Assembling the light....Page 14
Switching the light on/off......Page 14
Adjusting the lamp Page 14
Changing the bulb....Page 14
Care and cleaning......Page 15
Disposal Page 15
Warranty and Service......Page 15
Warranty Page 15
Service address......Page 15
Declaration of Conformity....Page 15
Manufacturer......Page 16
| List of pictograms used | |||
 | Read the instructions! |  | Observe the warnings and safety notices! |
 | Volt (AC) Warning! Risk of electric shock |  | |
 | Hertz (mains frequency) For your safety |  | |
 | Watt (effective power) |  | This light is not suitable for dimmer or electronic switches. |
 | Safety class II Warning - Hot surfaces! |  | |
 | This light is only suitable for indoor use in dry and enclosed spaces. |   | Dispose of the packaging and device in an environmentally-friendly manner! |
LED Floor lamp
Introduction
We congratulate you on the purchase of your new device. You have chosen a high quality product. Please read carefully and
completely through these operating instructions. Fold out the page with the illustrations. These instructions form part of the product and contain important information about bringing the product into use and its handling. Always observe all the safety advice. Check that the correct mains voltage is available and that all the parts have been properly assembled before bringing into use. Should you have any questions or be uncertain as to how to operate the device, please get in touch with your dealer or service point. Please keep these instructions in a safe place and hand them on to a third party if necessary.
Includeditems
Check that all the items and accessories are present and that the lamp is in perfect condition immediately after unpacking.
Model no.: 14121106L/14121209L
1 LED Floor lamp
3 Tubes (each 3-piece)
1 Lamp shade
1 Bulb
1 Set of assembly instructions and instructions for use
Model no.: 14121305L
1 LED Floor lamp
1 Lamp shade with light bulb holder
1 Tube (4-piece)
1 Base
1 Bulb
1 Set of assembly instructions and instructions for use
Properuse

This light is suitable only for interior use, in dry and enclosed spaces. This lamp is intended for use only in a domestic
environment.
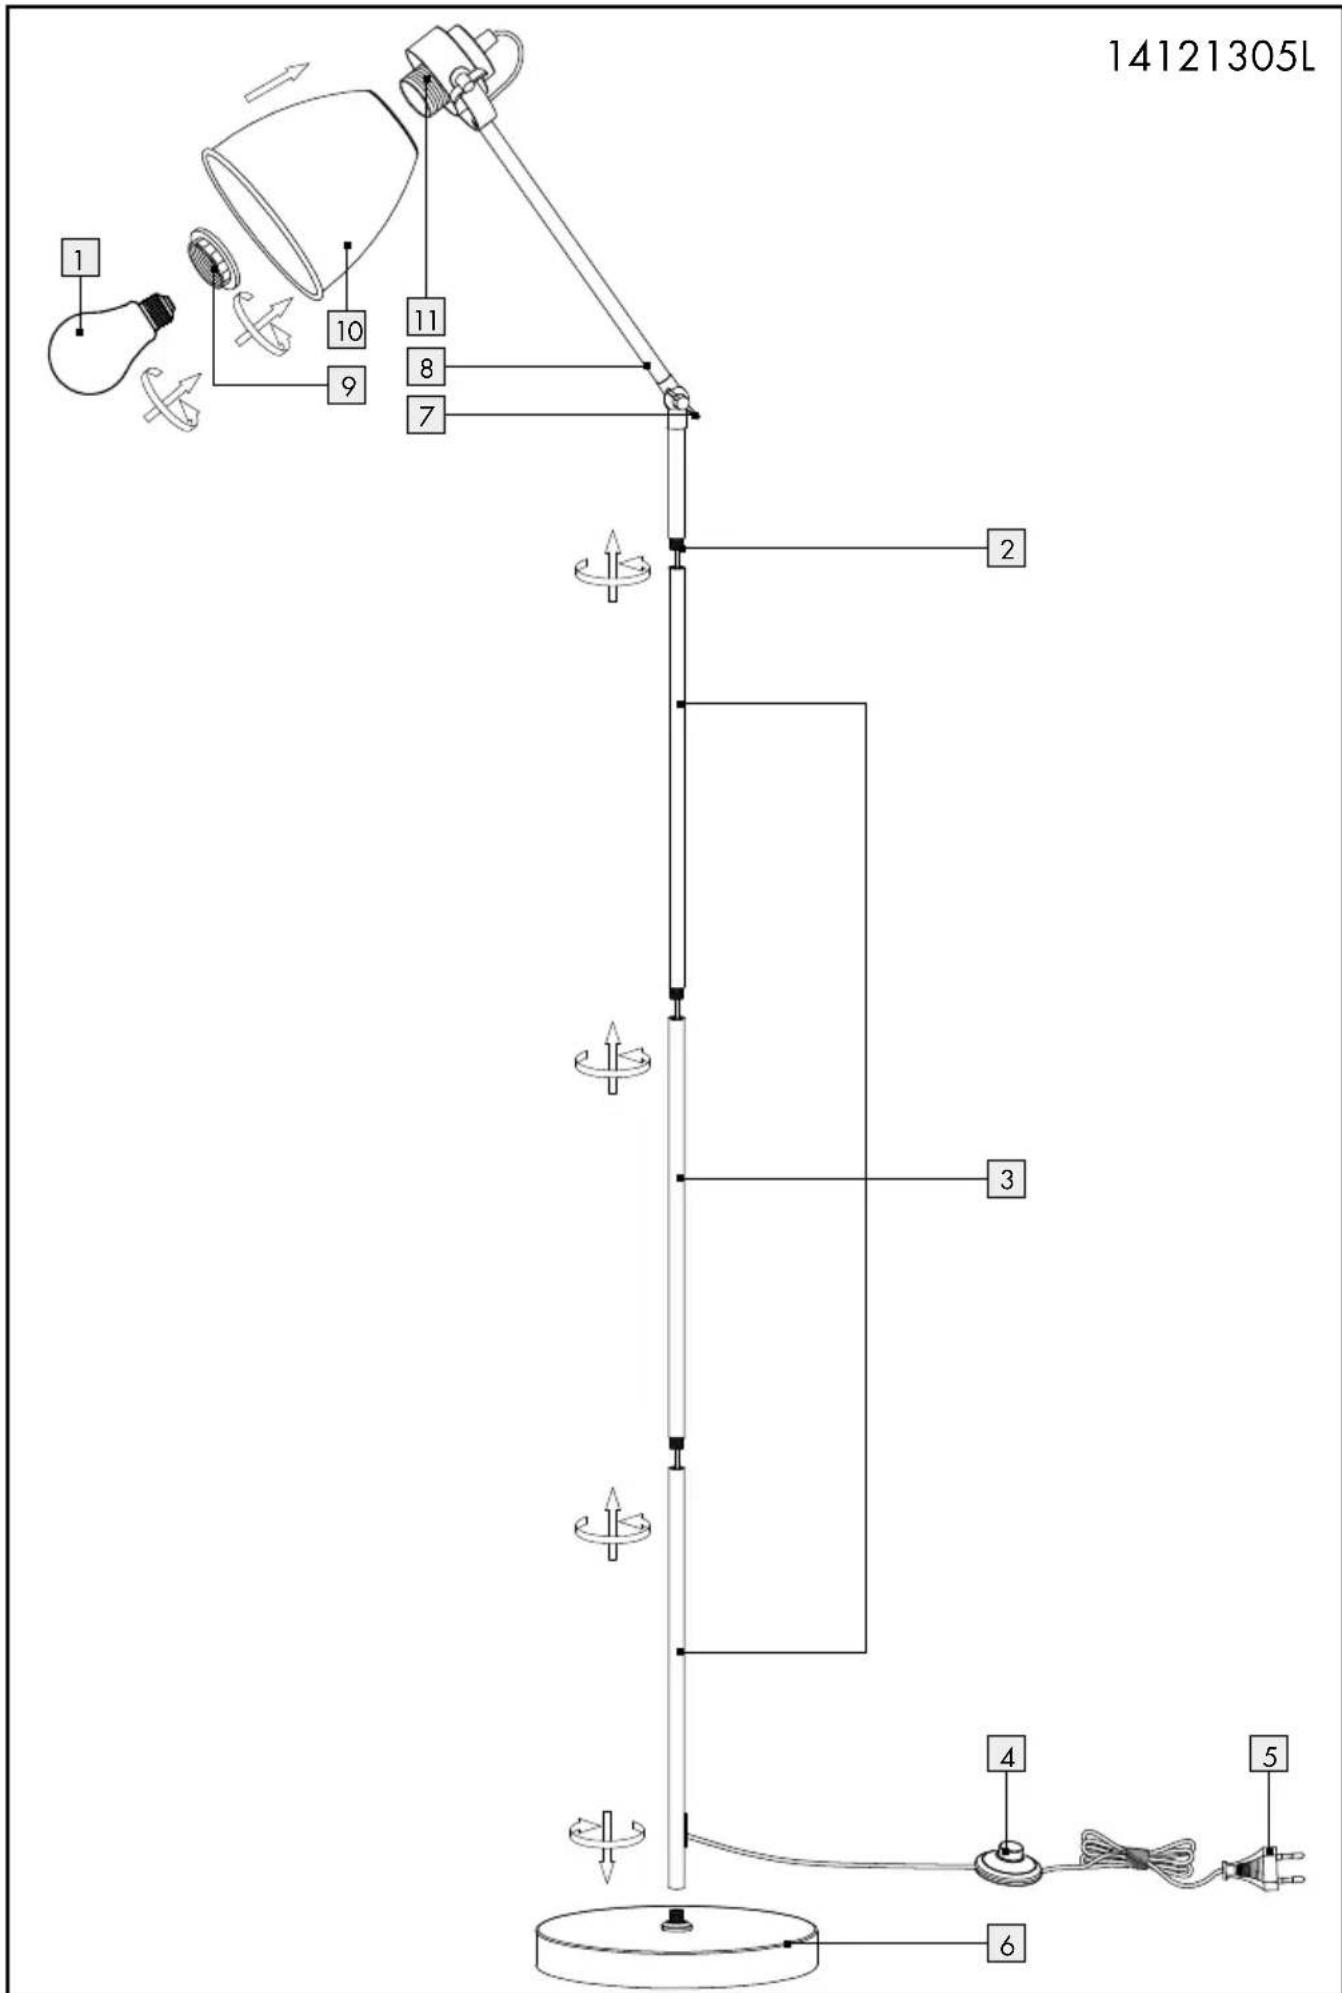
PartsDescription
1 Light bulb
2 Screw thread (14121106L/14121209L)
3 Tube
4 Foot switch
5 Mains plug
6 Base (14121305L)
7 Locating screw (14121305L)
8 Lamp arm (14121305L)
9 Lamp ring (14121305L)
10 Lamp shade (14121305L)
11 Lamp socket (14121305L)
●TechnicalData
Model no.: 14121106L/14121209L/14121305L
Operating voltage: 230-240V\~50Hz
Rated power: 7W
Protection class: II/

●Safety

Safetyadvice
The right to claim under the guarantee shall be rendered invalid in respect of damage caused by the non-observance of these operating instructions! No liability is accepted for consequent damage! No liability is accepted for damage to property or persons caused by improper handling or non-observance of the safety advice!

To avoid danger to life from electric shock
■ Every time before connecting the lamp the mains, check it and the mains lead for damage. Never use your light if you find it is damaged in any way.
WARNING! A damaged light bulb means your life is at risk from electric shock. If there is any damage, repairs to be carried out or other problems related to the light bulb, please contact the service centre or a qualified electrician.
In order to prevent hazards, if the outer flexible cable of this lamp becomes damaged it may only be replaced by the manufacturer, a service representative of the manufacturer or a similar specialist!
Before assembly, ensure that the mains voltage available corresponds to the operating voltage necessary of the light (see "Technical Data").
■ Never let the lamp come into contact with water or other liquids.
■ Always unplug the light from the mains prior to assembly, disassembly, cleaning or if the light will not be used for extended periods.
■ Never open or insert anything into electrical fittings or equipment. Doing this sort of thing can lead to a serious danger to life from electric shock.

To avoid danger of fire and injury
CAUTION! RISK OF INJURY! Check bulbs for damage immediately after unpacking. Do not fit defective bulbs into the light. If they are, contact the service point for a replacement.
CAUTION! RISK OF BURNS DUE TO HOT SURFACES! Ensure the lamp has been switched off and allowed to cool before you touch it. In this way you will avoid the danger of burns. Bulbs give off a lot of heat around the top of the lamp.
- Do not cover the light or the mains plug with objects. Excessive heat can result in a fire.
■ Never leave the lamp operating unattended.
Do not allow the lamp or the packaging materials to lie around unattended. Plastic film or bags, Styrofoam etc. can turn into dangerous toys for children.
ATTENTION!
- Do not look into the LED from a close distance during operation.
Do not look at the LED with an optical instrument (e.g. magnifier).
This light is not suitable for dimmer or electronic switches.


Working safely
- Install the light so that it is protected from moisture and dirt.
Prepare carefully before assembly and allow yourself enough time. Lay out all the individual components and additional tools or materials required so that you can see and reach them.
Safety / Initial use
■ Remain alert at all times and always watch what you are doing. Always proceed with caution and do not assemble the lamp if you cannot concentrate or feel unwell.
In order to disconnect the lamp completely from the power supply, the mains plug 5 must be removed from the socket.
-Initialuse
Assembling the light
Model no.: 14121106L/14121209L
☐ Connect the sections of the tube 3 and screw in place.
Note: Be sure to screw in the tubes as far as possible so that the light is stable.
☐ Repeat this process with all sections of the tube 3.
☐ Assemble the lamp head by screwing the tubes
3 one after the other onto the screw thread 2.
Note: Be sure to screw in the tubes as far as possible so that the light is stable.
☐ Use a clean, lint-free cloth to insert the bulb 1.
□ Screw the bulb 1 clockwise into the lamp socket.
☐ Plug the mains plug 5 into a properly installed socket.
□ Verify it is seated correctly.
Model no.: 14121305L
Note: Remove the transport locks from the tubes 3. Please ensure that you pull the cable during assembly slowly through the tube 3.
- Connect the individual sections of tube 3 to one another and screw into place in an anti-clockwise direction. Be careful not to damage the cable in the inside of the lamp.
☐ Screw the tube 3 clockwise onto the base 6.
☐ Remove the lamp ring 9 from the lamp socket 11.
Place the lamp shade 10 onto the lamp socket 11 and screw it tightly using the lamp ring 9.
☐ Use a clean, lint-free cloth to insert the bulb 1.
☐ Screw the bulb 1 clockwise into the lamp socket 11.
☐ Plug the mains plug 5 into a properly installed socket.
□ Verify it is seated correctly.
Your light is now ready to use.
- Switching the light on / off
☐ Use the foot switch ☐ 4 to turn the LED light on and off.
- Adjusting the lamp
CAUTION! RISK OF BURNS DUE TO HOT SURFACES! Allow the lamp to cool down completely.
Model 14121305L: Bring the lamp arm into the desired position 8. If the lamp arm 8 changes position, retighten the locating screw 7.
All models: The lamp head for all models can be moved up or down.
- Changing the bulb
WARNING! DANGER OF ELECTRIC
SHOCK! First unplug the mains plug 5 from the socket.
CAUTION! RISK OF BURNS DUE TO HOT
SURFACES! Allow the light to cool down completely. Only replace the lamp after it has completely cooled off.
☐ Use a clean, lint-free cloth when replacing the bulb 1.
□ Twist the defective bulb 1 anti-clockwise out of the bulb socket.
☐ Only use LED bulbs with a maximum output of 7 W and E27 base.
☐ Insert the new bulb 1 into the bulb socket and turn it clockwise to tighten it. Ensure that it is positioned correctly.
☐ Plug the mains plug 5 into the socket again.
- Care and cleaning
WARNING! RISK OF ELECTRIC SHOCK!
First pull the mains plug 5 out of the mains socket.
CAUTION! RISK OF BURNS DUE TO HOT
SURFACES! First allow the lamp to cool completely.
WARNING! RISK OF ELECTRIC SHOCK!
For electrical safety reasons, never clean the lamp with water or other fluids nor immerse it in water.
- Do not use any solvents, petrol or similar. This would cause damage to the light.
□ Always use a dry, fluff-free cloth for cleaning.
☐ Plug the mains plug 5 into the socket again.
- Disposal

The packaging is made entirely of recyclable materials, which you may dispose of at local recycling facilities. The Green Dot is not valid for Germany.

Observe the marking of the packaging materials for waste separation, which are marked with abbreviations (a) and numbers (b) with following meaning: 1–7: plastics / 20–22: paper and fibre-board / 80–98: composite materials.

The product and packaging materials are recyclable, dispose of it separately for better waste treatment. The Triman logo is valid in France only.

Contact your local refuse disposal authority for more details of how to dispose of your worn-out product.

To help protect the environment, please dispose of the product properly when it has reached the end of its useful life and not in the household waste. Information on collection points and their opening hours can be obtained from your local authority.
- Warranty and Service
Warranty
You receive a 36 month warranty on this product, valid from the date of purchase. The appliance has been carefully produced under strict quality control. Within the warranty period we shall rectify without charge all material and manufacturing defects. In the event of a defect during the warranty period, please send the appliance to the listed Service Centre address, referencing the following item number: 14121106L/14121209L/14121305L. Wear parts (such as bulbs) and damage caused by improper handling, non-observance of the operating instructions or unauthorised interference are excluded from the warranty. The performance of services under the warranty does not extend or renew the warranty period.
Serviceaddress
Please have your receipt and the product number (e.g. IAN 12345) available for all queries as proof of purchase.
Declaration of Conformity
This product fulfils the requirements of the applicable European and national directives. Conformity has been demonstrated. The relevant declarations and documents are held by the manufacturer.
Manufacturer
Fourniture......Page 18
- STAANDELED-LAMP
- Safety Page 13
- Initial use Page 14
- Care and cleaning......Page 15
- Disposal Page 15
- Warranty and Service......Page 15
- LED Floor lamp
- Introduction
- Includeditems
- Model no.: 14121106L/14121209L
- Model no.: 14121305L
- Properuse
- PartsDescription
- ●TechnicalData
- Model no.: 14121106L/14121209L/14121305L
- ●Safety
- Safetyadvice
- To avoid danger to life from electric shock
- To avoid danger of fire and injury
- ATTENTION!
- Working safely
- Safety / Initial use
- -Initialuse
- Assembling the light
- - Switching the light on / off
- - Adjusting the lamp
- CAUTION! RISK OF BURNS DUE TO HOT SURFACES! Allow the lamp to cool down completely.
- - Changing the bulb
- WARNING! DANGER OF ELECTRIC
- CAUTION! RISK OF BURNS DUE TO HOT
- - Care and cleaning
- WARNING! RISK OF ELECTRIC SHOCK!
- - Disposal
- - Warranty and Service
- Warranty
- Serviceaddress
- Declaration of Conformity
- Manufacturer
Brand : Livarno Lux
Model : IAN 283331
Category : Lighting