
IAN 276249 - Lighting Livarno Lux - Free user manual and instructions
Find the device manual for free IAN 276249 Livarno Lux in PDF.


| Product type | LED strip set |
| Brand | Livarno Lux |
| Model | IAN 276249 |
| Use | Indoor use only |
| Total power consumption | approx. 3 W |
| Primary supply voltage | 100-240 V ~, 50-60 Hz |
| Secondary voltage | 12 V =, 0,25 A |
| Number of LEDs per strip | 9 x 0,1 W |
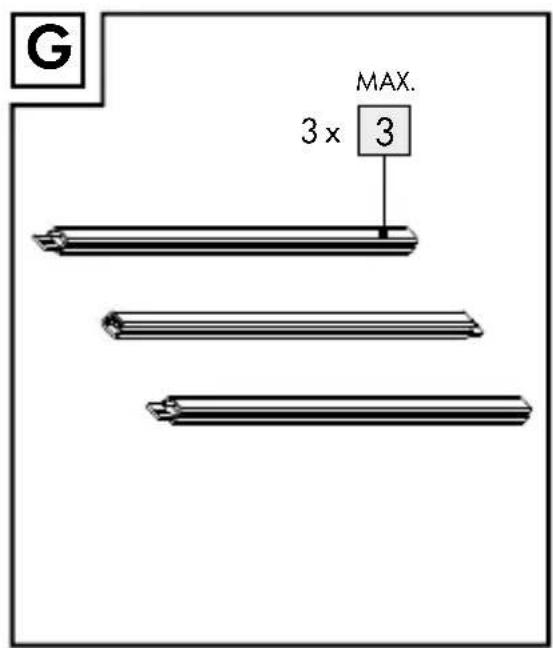
| Number of strips | 3 |
| Package contents | 3 strips, 1 power adapter, 3 connection cables, 6 wall plugs, 6 mounting clips, 6 screws, 6 double-sided adhesive films, 1 end cap, 1 instruction manual |
| Switch type | ON/OFF switch on cord |
| Mounting | Wall or cabinet mounting, with screws or adhesive |
| Maintenance and cleaning | Dry, lint-free cloth, no solvents |
| Bulb replacement | Not possible, the whole unit must be replaced |
| Repairability | No user-serviceable parts |
| Warranty | 3 years |
| Certifications | TÜV/GS (strip and power supply block) |
| Ambient temperature | Not specified, standard indoor use |
Frequently Asked Questions - IAN 276249 Livarno Lux
User questions about IAN 276249 Livarno Lux
0 question about this device. Answer the ones you know or ask your own.
Ask a new question about this device
Download the instructions for your Lighting in PDF format for free! Find your manual IAN 276249 - Livarno Lux and take your electronic device back in hand. On this page are published all the documents necessary for the use of your device. IAN 276249 by Livarno Lux.
USER MANUAL IAN 276249 Livarno Lux
Operation and Safety Notes
FR BE
SET DE RÉGLETTES À LED
GB / IE Operation and Safety Notes Page 18
natural_image
Pure mechanical diagram showing a shaft and two directional arrows, no text or symbols present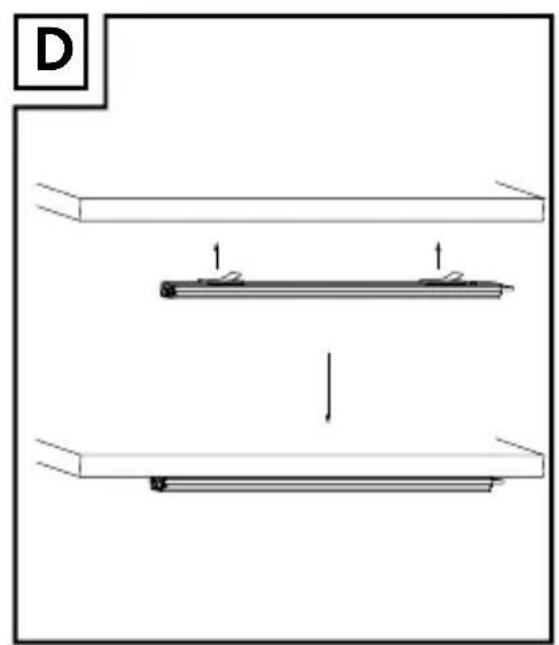
natural_image
Diagram showing two parallel plates with downward arrows indicating a process or movement, no text or symbols present.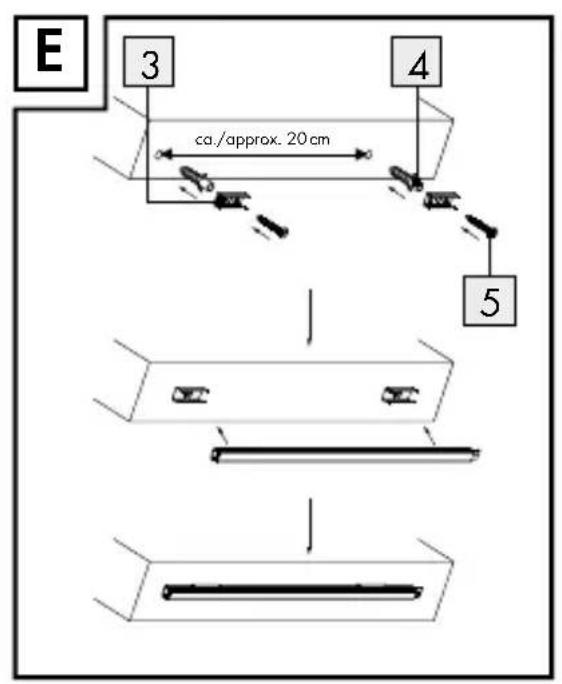
flowchart
graph TD
    A["3"] --> B["car with car inside a box"]
    C["4"] --> D["car moving right"]
    E["5"] --> F["car moving down"]
    B --> G["ca./approx. 20 cm"]
    F --> H["Car on horizontal line"]
Intended use......Page 19
Description of parts......Page 20
Technical details......Page 20
Included items ......Page 21
Safety information......Page 21
Safety advice for installation......Page 25
Installation......Page 25
Mounting the product on a cupboard ......Page 26
Mounting the product on a wall....Page 26
Operation ......Page 27
Cleaning and care ......Page 27
We congratulate you on the purchase of your new product. You have chosen a high quality product. The instructions for use are part of the product. They contain important information concerning safety, use and disposal. Before using the product, please familiarise yourself with all of the safety information and instructions for use. Only use the unit as described and for the specified applications. If you pass the product on to anyone else, please ensure that you also pass on all the documentation with it.
Intendeduse
This product is suitable for use in-doors. This product is intended for use in private, domestic environment only and not for commercial purposes. Other uses or modification of the product shall be considered as improper use and could lead to injury or damage. The manufacturer accepts no liability for loss or damage arising from improper use.
• Description of parts
1 LED light strip
2 Connection lead
3 Fastening clip
4 Dowel
5 Screw
6 Connector
7 In-line switch
8 Mains adapter
- Technical details
LED light strip + Mains adapter:
Total power
consumption: approx. 3 W
LED light strip:
Operating
voltage:12V = 2.3W
Bulbs per strip: 9 x 0.1 W LED
Note: the bulbs
cannot be replaced
LED light strip (Model No.
HG01183A) TÜV/GS tested.
Mains adapter:
Nom. voltage,
primary:100-240V\~,
50-60 Hz
Nom. voltage,
secondary:12V
0.25 A, 3 W
Protection class: □
Mains adapter (Model No. YNQST120025VL) TÜV/GS tested.
Included items
3 LED light strip sets
1 Mains adapter
3 Interconnection cables
6 Dowels
6 Fastening clips
6 Screws
6 Double-sided adhesive tapes
1 End cap
1 Operating instructions
Safety information
WARNING! DANGER OF DEATH AND
ACCIDENTS FOR TODDLERS AND CHILDREN! Never
leave children unsupervised with the packaging material. The packaging material represents a danger of suffocation. Children frequently underestimate the dangers. Please keep children away from the device at all times.
This device is not a toy and should not be played with by children. Children are not able to understand the dangers that can occur when handling this device.
This appliance can be used by children aged from 8 years and above and persons with reduced physical, sensory or mental capabilities or lack of experience and knowledge if they have been given supervision or instruction concerning use of the appliance in a safe way and understand the hazards involved. Children shall not play with the appliance. Cleaning and user maintenance shall not be made by children without supervision.
■ Ensure that the product is installed by suitably experienced or qualified persons only.
Check before installation that the supporting surface is suitable for the fastenings and the weight of the lighting product. If you have any questions about the product or are unsure about any of its aspects, please seek the advice of an electrical equipment specialist.
Do not pull on the product lead. Ensure that it is positioned to avoid creating a trip hazard.
The product can be used on all surfaces officially classified as being of "normal flammability".
- Do not attach any other objects to the product.
■ After use store the light fitting in its original packaging to avoid causing unintentional damage.
■ Ensure that the light fitting does not present a trip hazard.

CAUTION! RISK OF OVER-
HEATING! Do not operate the light fitting while it is still in the packaging or rolled up.

This lamp is only
intended for use indoors.
Avoid the danger of death from electric shock!
Before use, ensure that the mains voltage available is the same as the required operating voltage for the device (100-240V\~).
Before connecting to the mains, always check the product for any damage.
■ Never use the product if you find damage of any kind.
The connecting cable cannot be repaired! If the cable is damaged, the product must be taken out of use and disposed of in the proper way.
This article does not contain any parts which can be serviced by the user. The bulbs cannot be replaced.
■ Never open any of the electrical parts or insert any kind of object into them.
■ Protect the product from sharp edges, mechanical loads and hot surfaces.
Do not install with sharp fasteners or nails.
■ Always remove the mains plug from the socket before installing, dismantling or cleaning.
■ Never touch the mains plug or the product with moist or wet hands.
■ Only connect the light strip to supply adaptor.
■ Use the lighting product with only the components described in these operating instructions.
■ Disconnect the lighting product from the mains if you intend not to use it for an extended period (e.g. holiday).
■ LED light strip should only be replaced with the same type of light strip which is supplied with this product.
The product is only suited for use with the included mains adapter (YNQST120025VL).
■ Please note that the power adapter continues to draw a small amount of power even if the lamp is turned off as long as the power adapter is plugged into a power outlet. To switch the device off completely, unplug the power adapter from the socket.
■ The illuminant is not replaceable.
If the illuminant fails at end of its life, the entire light must be replaced.
●Safety advice for installation
The product can be mounted with the supplied fastenings on to all surfaces officially classified as being of "normal flammability".
CAUTION! RISK OF ELECTRIC SHOCK! Ensure that you do not strike any electrical cables, gas or water pipes in the vicinity of where you are drilling. If necessary, check the area using a suitable detector before you drill.
Before installation, check whether the substrate is suitable for the fastenings and can support the weight of the product. If you are unsure about any aspects of this step, please seek the advice of an electrical equipment specialist.
- Do not use any sharp and / or pointed objects, such as wire, nails or clamps, to fasten the product in place.
- Avoid bending the product. Otherwise the insulation could be damaged.
- Installation
The LED strip light 1 can be connected using a connection cable 2 (Fig. B) or without a connection cable (Fig. C).
- Mounting the product on a cupboard
Note: Thoroughly clean the surface on to which you intend to install the product. The surface must be clean, dry and free of grease. Otherwise the self-adhesive foil may not stick properly.
- Using a pencil, mark the position on the wall on to which you intend to attach the LED light strip 1. If necessary, use a spirit level as a guide.
- Stick the double-sided adhesive tape onto the LED light strip 1. Then pull the paper from the self- adhesive foil on the back of the LED light strip 1.
- Position the self-adhesive foil on the markings and press to fix it firmly into place (Fig. D).
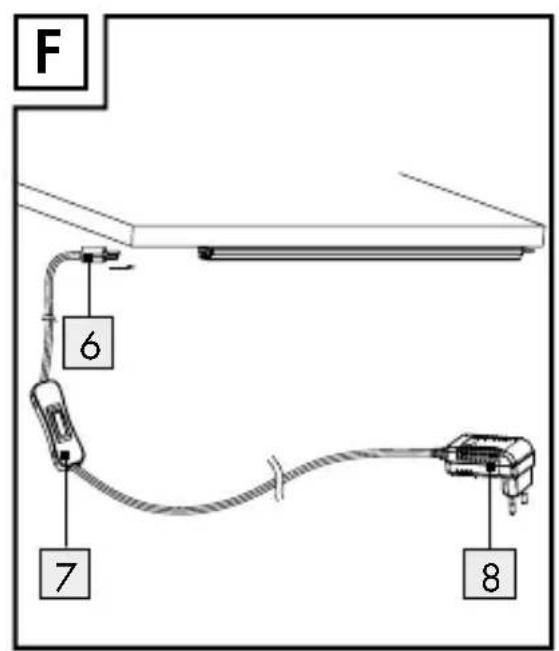
- Connect the LED light strip 1 to the mains adapter 8 (Fig. F) or connect the LED light strip 1 to the connection lead 2 to connect it to an additional light (Fig. B).
- Mounting the product on a wall
- Drill the fastening holes (Fig. E).
CAUTION! Ensure that you do not damage any cables in the wall.
- Insert the dowels 4 into the drilled holes (Fig. E).
- Fix the fastening clips 3 to the wall with the screws 5.
- Connect the LED light strip 1 to the mains adapter 8 (Fig. F) or connect the LED light strip 1 to the connection lead 2 to connect it to an additional light (Fig. B).
Operation
☐ Insert the mains adapter 8 into the mains socket.
☐ Press the ON / OFF switch on the in-line switch 7 to switch on the lights (Fig. F).
☐ Press the ON / OFF switch on the in-line switch 7 to switch off the lights.
- Cleaning and care
CAUTION! RISK OF ELECTRIC SHOCK!
First remove the mains
plug from the socket.
- Do not use any solvents, petrol or similar items. This would damage the device.
☐ Only a dry, lint-free cloth should be used for cleaning.
●Disposal
The packaging is made entirely of recyclable materials, which you may dispose of at local recycling facilities.
Contact your local refuse disposal authority for more details of how to dispose of your worn-out product.
To help protect the environment, please dispose of the product properly when it has reached the end of its useful life and not in the household waste. Information on collection points and their opening hours can be obtained from your local authority.
- Warranty
The device has been manufactured to strict quality guidelines and meticulously examined before delivery. In the event of product defects you have legal rights against the retailer of this product. Your legal rights are not limited in any way by our warranty detailed below.
The warranty for this device is 3 years from the date of purchase. Should this device show any fault in materials or manufacture within
3 years from the date of purchase, we will repair or replace it – at our choice – free of charge to you.
The warranty period begins on the date of purchase. Please keep the original sales receipt in a safe location. This document is required as your proof of purchase. This warranty becomes void if the device has been damaged or improperly used or maintained.
The warranty applies to faults in material or manufacture. This warranty does not cover product parts subject to normal wear, thus possibly considered consumables (e.g. batteries) or for damage to fragile parts, e.g. switches, rechargeable batteries or glass parts.
CE
Introduction......Page 31
Utilisation conforme .....Page 31
Montage mural ......Page 39
Application......Page 39
⚠ WAARSCHU- WING! LEVENS- GEVAAR EN
GEVAAR VOOR ONGE- VALLEN VOOR KLEUTERS
- SET DE RÉGLETTES À LED
- Safety information......Page 21
- Safety advice for installation......Page 25
- Installation......Page 25
- Operation ......Page 27
- Cleaning and care ......Page 27
- Intendeduse
- • Description of parts
- - Technical details
- LED light strip + Mains adapter:
- LED light strip:
- Mains adapter:
- Included items
- Safety information
- WARNING! DANGER OF DEATH AND
- ACCIDENTS FOR TODDLERS AND CHILDREN! Never
- CAUTION! RISK OF OVER-
- Avoid the danger of death from electric shock!
- ●Safety advice for installation
- - Installation
- - Mounting the product on a cupboard
- - Mounting the product on a wall
- Operation
- - Cleaning and care
- CAUTION! RISK OF ELECTRIC SHOCK!
- ●Disposal
- - Warranty
- Introduction......Page 31
- Application......Page 39
- ⚠ WAARSCHU- WING! LEVENS- GEVAAR EN
- GEVAAR VOOR ONGE- VALLEN VOOR KLEUTERS
Brand : Livarno Lux
Model : IAN 276249
Category : Lighting