
10030846 - Fireplace Klarstein - Free user manual and instructions
Find the device manual for free 10030846 Klarstein in PDF.


| Product Type | Electric Fireplace |
| Model | 10030846 |
| Brand | Klarstein |
| Dimensions (W x H x D) | Approx. 70 x 50 x 20 cm |
| Weight | Approx. 12 kg |
| Power Supply | 220-240 V, 50 Hz |
| Heating Power | 1500 W (adjustable) |
| Heating Area | Up to 25 m² |
| Flame Effect | Realistic LED flame, adjustable brightness |
| Thermostat | Adjustable thermostat control |
| Remote Control | Included |
| Timer | 1-9 hours |
| Safety Features | Overheat protection, tip-over switch |
| Installation | Freestanding or wall-mounted |
| Material | Metal body with glass front |
| Heat Settings | Low (750 W) and High (1500 W) |
| Flame Modes | Multiple flame colors and intensity |
| Noise Level | < 40 dB (heater off) |
| Maintenance | Clean with soft dry cloth; no lubrication needed |
| Repairability | Replacement parts available via Klarstein support |
| Certification | CE, RoHS |
Frequently Asked Questions - 10030846 Klarstein
User questions about 10030846 Klarstein
0 question about this device. Answer the ones you know or ask your own.
Ask a new question about this device
Download the instructions for your Fireplace in PDF format for free! Find your manual 10030846 - Klarstein and take your electronic device back in hand. On this page are published all the documents necessary for the use of your device. 10030846 by Klarstein.
USER MANUAL 10030846 Klarstein
natural_image
Row of white icons representing kitchen appliances including blender, kettle, refrigerator, air conditioner, fan, and microwave (no text or symbols)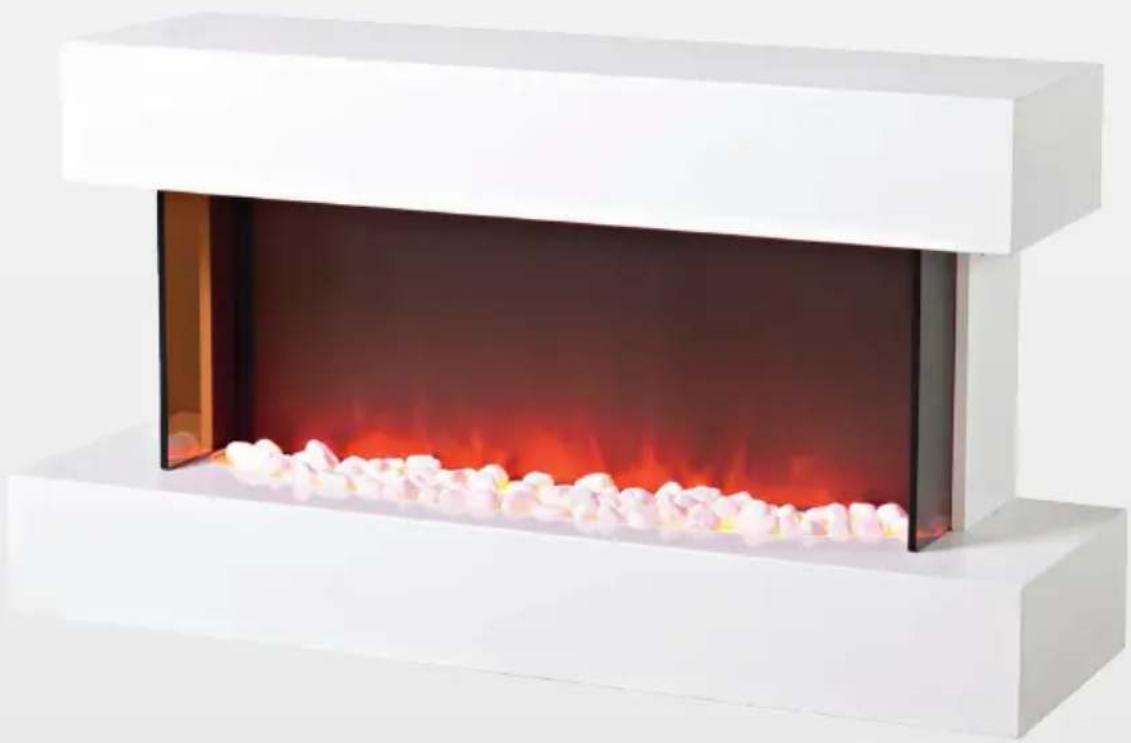
natural_image
Modern white fire extinguisher with red ambient lighting and small white gravel base (no text or symbols visible)Note: The device is not suitable for use as a primary heat source.
natural_image
Symbol of a trash bin crossed with a diagonal line, no text or numbers presentCongratulations on purchasing this equipment. Please read this manual carefully and take care of the following hints to avoid damages. Any failure caused by ignoring the mentioned items and cautions mentioned in the instruction manual are not covered by our warranty and any liability.
TECHNICAL DATA
| Item number 10030846 | |
| Power supply 220-240 V ~ 50 Hz | |
| Power consumption 2000 W |
SAFETY INSTRUCTIONS
General Hints
- Read all instructions before using this appliance.
- This heater is hot when in use. To avoid burns, do not let bare skin touch hot surfaces.
- Pillows, bedding, papers, clothes and curtains at least 3 feet (0.9m) from the front of this heater and keep them away from the sides and rear.
- CAUTION: Extreme caution is necessary when any heater is used by or near children or invalids and whenever the heater is left operating unattended.
• Always unplug this appliance when not in use. - Do not operate any heater with a damaged cord or plug or after the appliance malfunctions, has been dropped or damaged in any manner. Return heater to authorized service facility for examination, electrical or mechanical adjustment, or repair.
- Any repairs to this appliance should be carried out by a qualified service person.
- Under no circumstances should this appliance be modified.
- Do not use outdoors.
- This heater is not intended for use in bathrooms, laundry areas and similar indoor locations. Never locate heater where it may fall into a bathtub or other water container.
- Do not run cord under carpeting. Do not cover cord with throw rugs, runners or similar coverings. Arrange cord away from traffic areas and where it will not be tripped over.
- To disconnect this appliance, turn controls to the off position, then remove plug from outlet.
- Connect to properly grounded outlets only.
- This appliance, when installed must be electrically grounded in accordance with local codes.
- Do not insert or allow foreign objects to enter any ventilation or exhaust opening as this may cause an electric shock, fire or damage the heater.
- To prevent possible fire, do not block air intakes or exhaust in any manner. Do not use on soft surfaces, like a bed, where openings may become blocked.
- This heater has hot and arcing or sparking parts inside. Do not use it in areas where gasoline, paint or flammable liquids are used or stored. This appliance should not be used as a drying rack for clothing, nor should Christmas stockings or decorations be hung on or near it.
- Use this appliance only as described in this manual. Any other use not recommended by the manufacturer may cause fire, electric shock or injury to person. Always plug heaters directly into a wall outlet/receptacle. Never use with an extension cord or relocatable power tap(outlet/power strip).
- Once the inner temperature of this insert reach to 85 ± 2^ C , this insert will off-work automatically. To reset temperaturing limiting control, disconnect power using plug or main switch for 5 minutes.
Hints on Installation
- Always plug heaters directly into a wall outlet/receptacle. Never use with an extension cord or relocatable power tap (outlet/power strip).
- Check your heater cord and plug connections. A loose fitting outlet can cause the plug to overheat and/or cause a fire. Be sure plug fits tight in the outlet. Check frequently during use to make sure plug and outlet are not hot. If so, discontinue using heater and have outlet replaced by a qualified electrician. Note: Heaters draw more current than small appliances, overheating of the outlet may occur even if it has not occurred with the other appliances.
• Always unplug heater when not in use. - Do not operate heater with a damaged cord or plug or after the heater malfunctions, has been dropped or damaged in any manner. Discard heater or return to an authorized service facility for examination and/or repair
- Do not run cord under carpeting. Do not cover cord with throw rugs, runners, or similar coverings. Do not route cord under furniture or appliances. Arrange cord away from traffic area and where it will not be tripped over.
- Do not place any objects such as furniture, papers, clothes, and curtains closer than 3 feet (0.9 m) to the front of the heater and keep them away from the sides and rear when the heater is plugged in.
- Do not place the heater near a bed because objects such as pillows or blankets can fall off the bed and be ignited by the heater.
Hints on Cleaning and Care
- Periodic cleaning/vacuuming of the fan/heater unit is recommended. Make sure the unit is turned OFF and unplugged whenever you are cleaning the heater or fireplace.
- Make sure the power is turned off before proceeding. Any electrical repairs or rewiring of this unit should be carried out by a licensed electrical in accordance with national and local codes.
- If repairing or replacing any electrical component or wiring, the original wire routing, colour coding and securing locations must be followed.
- Electrical outlet wiring must comply with local building codes and other applicable regulations to reduce the risk of fire.electrical shock and injury to persons.
- Do not use this fireplace if any part of it has been under water. Immediately call a qualified service technician to inspect the fireplace and replace any part of the electrical system.
- Disconnect power before attempting any maintenance or cleaning to reduce the risk of fire. electrical shock or personal injury.
Hints on Tempered Glass
- Under no circumstances should this product be operated with broken glass.
- Do not strike or slam the glass.
- Do not use abrasive cleansers to clean the glass.
- This product uses tempered glass. Replacement of the glass supplied by the manufacturer should be done by a qualified service person.
The fireplace must not be used until it is securely fastened to the wall. When choosing a location for your electric fireplace, ensure that the general instructions are followed. For best results, install the electric fireplace away from direct sunlight and dust.
Handling and Unpacking
- The installation should be carried out by two adults to avoid injury or damage. If for any reason it is considered too heavy, please obtain assistance.
- When lifting the fireplace, always keep your back straight. Bend your legs and not your back. Avoid twisting at the waist. It is better to reposition your feet.
- Avoid upper body I top heavy bending. Always bend from the knees rather than the waist. Do not lean forward or sideways while handling the heater.
• Always grip the heater with the palm of the hand. Do not use the tips of fingers for support.
• Always keep the heater as close to the body as possible. This will minimize the cantilever action. - Use gloves to provide additional grip.
- Unpack the package and lift the product gently out of the box, put it on a flat surface with the front panel facing up.
Safety Warnings
- Do not connect this heater to a programmer, timer, separate remote control system or any other device that switches the heater on automatically, since a fire risk exists if the heater is covered or positioned incorrectly
- If the supply cord is damaged, it must be replaced by the manufacturer, its service agent or similarly qualified persons in order to avoid a hazard.
- In order to avoid a hazard due to inadvertent resetting of the thermal cut-out, this appliance must not be supplied through an external switching device, such as a timer, or connected to a circuit that is regularly switched on and off by the utility.
- Do not use this heater in the immediate surroundings of a bath, shower or swimming pool.
• Always make sure the electrical socket is accessible and located adjacent to but not above the heater. - This heater must be located against the walls.
CONTROL PANEL AND REMOTE CONTROL
| 1. 2. 3. 4. | 1. 5. 4. 3. 2. 6. 7. |
| 1 On/Off 5 Child safety lock | |
| 2 Heater 6 Plus | |
| 3 Timer 7 Minus | |
| 4 Brightness |
KEY FUNCTIONS
 | Power ButtonThis button will not only put the fireplace insert in a standby mode, but also you can see the flame effect through the screen. This will turn off all functions at once. |
 | HeaterThe fireplace contains a fan forced heater. The default setting temperature is 72°F (22°C). The thermostat setting range is 50°-86°F or 10°-30°C. The thermostat is adjustable by 2°F or 1°C increments. To change between °F and °C press and hold the Heater button for 5 seconds. |
 | TimerPressing the timer button repeatedly will cycle through the following timer settings: 30 minutes, 1 hour, 2 hr, 3 hr, 4 hr, 5 hr,6 hr, 7 hr, 8 hr and off. The fireplace will automatically turn off when the timer reaches zero minutes. |
 | BrightnessThis button controls the brightness of the flame effect. |
 | Child safety lockThe child safety lock is adjustable from remote control only. Holding the child safety lock button for 5 seconds disables or enables all functions on the control panel and remote control. |
 | PlusFunction increase of any function button. |
 | MinusFunction decrease of any function button. |
DISPLAY SYMBOLS
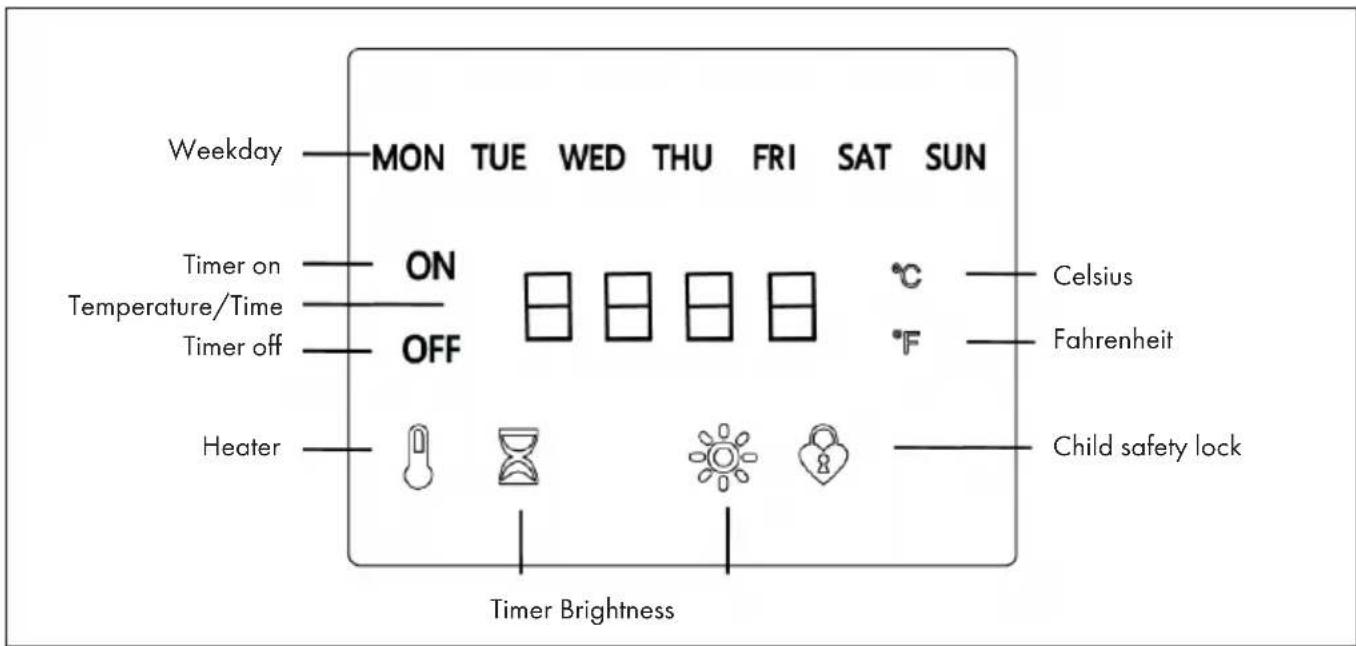
Notes on setting the timer
Use the TIMER button to turn on the daily or weekly timer.
Note: You can not set the weekly timer by the control panel, but you can set the day timer. The day setting time is 30 (min) - 1H - 2H - 3H ... up to 8H. The previous screen display shows the settled number (1/2/3...8) and later shows H (Hour). By remote control you can set both the day and weekly timer, the specifications are as below.
Set present date and time
To set the present time the appliance must be turned off, but the power must be on at the socket.
- Press and hold the TIMER button for 5 seconds until the first two digits start flashing. Use the [+] and [-] buttons to set the current year (e.g. 18 for 2018).
- Press the TIMER button a second time until the back digits start flashing. You can now set the month using the [+] and [-] keys (e.g. 7 for July).
- Press the TIMER button a third time until the first two digits start flashing. Use the [+] and [-] keys to set the date (e.g. 10).
- Press the TIMER button a fourth time until the rear digits start flashing. Use the [+] and [-] keys to set the day of the week:
1 = Monday
2 = Tuesday
3 = Wednesday
4 = Thursday
5 = Friday
6 = Saturday
7 = Sunday
-
Press the TIMER button a fifth time until the first two digits start flashing. Use the [+] and [-] buttons to set the hours (e.g. 10).
-
Press the TIMER button a sixth time until the back digits start flashing. Use the [+] and [-] buttons to set the minutes (e.g. 47).
- Press the TIMER button again to save the time you set and turn the power on. The digital display shows the ambient temperature. You can now set the weekly timer.
Set the day timer
Press TIMER button on remote control, you can set day timer. Press [+] and [-] button to set the day time. Press [+] to set the time to 30 (min) - 1H - 2H - 3H ... up to 8H - 00. Press [-] to set the time to 8H - 7H - 6H ... down to 30 minutes.
Note: While making any settings relevant to timer setting, the screen will also display the timing icon. When the timer setting has only 99 seconds left, the digital tube will show the seconds left.
Set the week timer
Press this TIMER button 3-5 seconds to set the weekly timer. Press the TIMER button for 5 seconds, and the display panel will show [ON] and [MON], while the digital display showing [...].
Weekly timer set, start from Monday, for example setting Monday: Monday [ON] status - Monday [OFF] status - Thursday [ON] status - ... Sunday [OFF] status.
- Press TIMER button the first time, through the , , button to set the start working time on Monday, while the display board [ON] and [MON] will be flashing at the same time. Firstly, set the hour, the first two digital of the tube showing hours, you can press [+] and [-] button to set the hour.
- Press TIMER button the second time to set minutes. Ten minutes is considered to be a unit and you could press [+] and [-] button to adjust minutes (from 10, 20 - 50 - 00 minutes).
- Press TIMER button the for the third time, you can set the power-off working time on Monday. The [ON] icon will be disappear and at the same time the [OFF] icon will flash on. [MON] icon will not disappear. First, you can set hours by pressing plus and minus button. The first two digit will display hours.
- Press TIMER button the fourth time to set the minutes, you can adjust the minutes by pressing plus and minus button. You will finish setting the Monday timer setting after four time setting operation.
5 Press the TIMER button again you can setting the on-off situation on Tuesday. The operation method is same as Monday.
Note: When you finish to set the whole week, the digital tube will show the ambient temperature. This indicate the setting have been finished.
Disabling the timer on a certain day of the week
If you do not want to set the on-off timer on a certain day of the week, you need to press the timer key continuously for four times to skip this day.
Example: you do not need to set on-off status on Tuesday. When the Monday timer setting is finished, press the timer setting key, then you could set Tuesday. [ON] and [MON] will disappear. Instead, [ON] and [TUE] will lit up. At the same time, the first two digits begin to flash on the screen. In this case you should not press [+] or [-] button to set time. Press the TIMER button again. At the same time, the second two digits begin to flash on the screen. In this case you should not press [+] or [-] button to set time. Press the TIMER button again. The [ON] icon on the display board will disappear while [OFF]
icon lit up and the digit tube will transfer to Wednesday set.
Note: The same day timing and weekly timing conflict, according to the principle of first switch to the first set, all settings need memory function
Child lock

The child safety lock is adjustable from remote control only. Holding the child safety lock button for 5 seconds disables or enables all functions on the control panel and remote control.
Temperature control energy-saving features
- When the difference between actual detected temperature and set temperature are within 3^ (for example, set 18^ and detected 16^ - 18^ ), heating power is 1000 W.
- When the difference between actual detected temperature and set temperature exceeds 3^ (for example, set 18^ , detected as 15^ or below), heating power is 2000 W.
- When the actual detected temperature is 1^ C higher than the set temperature, the heating will be off (for example, set to 27^ C, the actual test is 28^ C), the fan will stop working after 10 seconds.
- Press the power off button on the control panel, the temperature control function will record the last setting when power on again.
Open Window function (additional hidden functions)
In the thermostat control heating mode, when the ambient temperature drops over 5^ C within 10 minutes, the buzzer will make a „beep“ sound three times and the digital display will show [E8]. This means there is window open or there may exist some cooling items opened, at the same time the temperature control turns the heating off.
Closing the window or cooling items the ambient temperature will not fall down again and the display [E8] disappear. [E8] characters will not disappear if you turn off the heating by the control panel or remote control, even when window is not closed. You will need to turn the appliance off at the wall and unplug from the power supply.
Changing the batteries of the remote control
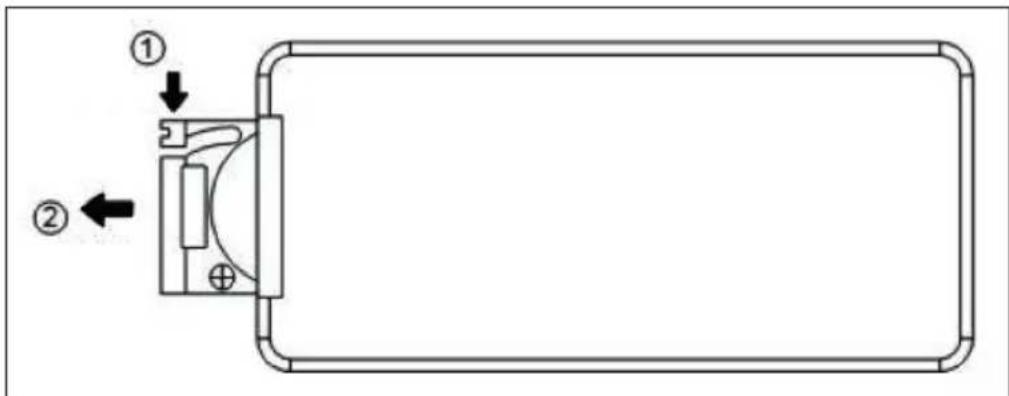
The fire is supplied with an IR multifunction remote. Before the remote will operate the plastic insulating sheet needs to be removed.
-
Locate and remove (2) the battery bracket (1).
-
The battery has two sides, one with a button feature, and the other is flat.
-
Insert the battery with the button side down into the battery bracket, making sure the battery is firmly seated.
Note: the battery should be removed if the product is to be left unused for a long period of time.
Safety Control (Thermal Cut-Out)
The unit has an overheat protection which is activated when the air inlets and outlets of the unit are blocked. Turn off the power and unplug the appliance from the wall outlet. Leave the unit switched off for at least 10 minutes and make sure that all blockages are removed. Now plug the mains plug back into the socket and switch on the appliance.
CLEANING AND MAINTENANCE
Note: always disconnect the appliance at the supply outlet socket before undertaking any cleaning.
- Except for periodic cleaning of dust, there are no specific requirements for care, other than regular cleaning of the general appliance. A wipe with a dry cloth is normally sufficient. DO NOT use abrasive cleaners as they can damage the finish.
- Make sure the heater outlet grille (located next to the switches) are kept clear of dust, pet hair and other airborne household matter. These should be vacuum cleaned periodically using a brush attachment.
• If in doubt consult a qualified electrician. - Excluding fuses, use only genuine manufacturers spare parts available from your supplier.
Important information on maintenance and repairs
- The device has a special fuse. If the fuse has to be replaced, have it replaced by a specialist company with a fuse of the same type.
- This product has no user-serviceable parts. Do not attempt to repair this product yourself. Only qualified service personnel should perform servicing!
TROUBLESHOOTING
| Problem Possible Cause and Suggested Solution | |
| Fire is not switching on. Ensure mains switch is on. | |
| Logs glow but flame effect does not work. | Check to see if the spinning motor is working. |
| Heater doesn’t work, but Power and Heater switches / buttons are in the „ON” position | Turn all switches / buttons to the „OFF” position and unplug the unit from the wall outlet for 10 minutes. After 10 minutes plug the unit back into wall outlet, and operate as normally. |
| Fire seems noisy. There is a level of noise when the flame effect is in use, caused by a motor that helps generate the effect. This noise will be heard when there is no other background noise. | |
| Remote is not operating Check or replace batteries. | |
| Display shows E1. The overheating protection has been triggered. | |
| Display shows E2. The thermostat sensor is defective or disconnected. | |
HINTS ON DISPOSAL
natural_image
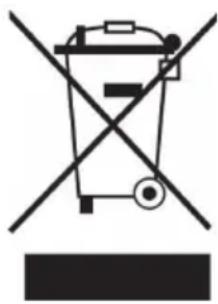
Symbol of a trash bin crossed with a diagonal line, no text or numbers presentAccording to the European waste regulation 2012/19/EU this symbol on the product or on its packaging indicates that this product may not be treated as household waste. Instead it should be taken to the appropriate collection point for the recycling of electrical and electronic equipment. By ensuring this product is disposed of correctly, you will help prevent potential negative consequences for the environment and human health, which could otherwise be caused by inappropriate waste handling of this product. For more detailed information about recycling of this product, please contact your local council or your household waste disposal service.
Your product contains batteries covered by the European Directive. 2006/66/EC, which cannot be disposed of with normal household waste. Please check local rules on separate collection of batteries. The correct disposal of batteries helps prevent potentially negative consequences on the environment and human health.
DECLARATION OF CONFORMITY

Producer:
Chal-Tec GmbH, Wallstraße 16, 10179 Berlin, Germany.
This product is conform to the following European
Directives:
2014/30/EU (EMC)
2014/35/EU (LVD)
2011/65/EU (RoHS)
2009/125/EC (ErP)
PRODUCT DATA SHEET
| Model identifier(s): | 10030846 | |||||
| Item | Symbol | Value | Unit | Item | Unit | |
| Heat output | Type of heat input, for electric storage local space heaters only | |||||
| Nominal heat output | P_nom | 1.9 | kW | manual heat charge control, with integrated thermostat | N/A | |
| Minimum heat output | P_min | 1.0 | kW | manual heat charge control with room and/or outdoor temperature feedback | N/A | |
| Maximum continuous heat output | P_max,c | 1.9 | kW | electronic heat charge control with room and/or outdoor temperature feedback | N/A | |
| Auxiliary electricity consumption | fan assisted heat output | N/A | ||||
| At nominal heat output | el_max | 1.9 | kW | Type of heat output/room temperature control | ||
| At minimum heat output | el_min | 1.0 | kW | single stage heat output and no room temperature control | no | |
| In standby mode | e_lss | 0.40 | W | Two or more manual stages, no room temperature control | no | |
| with mechanic thermostat room temperature control | no | |||||
| with electronic room temperature control | no | |||||
| electronic room temperature control plus day timer | no | |||||
| electronic room temperature control plus week timer | yes | |||||
| Other control options (multiple selections possible) | ||||||
| room temperature control, with presence detection | no | |||||
| room temperature control, with open window detection | yes | |||||
| with distance control option | no | |||||
| with adaptive start control | no | |||||
| with working time limitation | no | |||||
| with black bulb sensor | no | |||||
| Contact details | Chal-Tec GmbH, Wallstraße 16, 10179, Berlin, Germany | |||||

- TECHNICAL DATA
- SAFETY INSTRUCTIONS
- General Hints
- Hints on Installation
- Hints on Cleaning and Care
- Hints on Tempered Glass
- Handling and Unpacking
- Safety Warnings
- CONTROL PANEL AND REMOTE CONTROL
- KEY FUNCTIONS
- DISPLAY SYMBOLS
- Notes on setting the timer
- Set present date and time
- Set the day timer
- Set the week timer
- Disabling the timer on a certain day of the week
- Child lock
- Temperature control energy-saving features
- Open Window function (additional hidden functions)
- Changing the batteries of the remote control
- Safety Control (Thermal Cut-Out)
- CLEANING AND MAINTENANCE
- Important information on maintenance and repairs
- TROUBLESHOOTING
- HINTS ON DISPOSAL
- DECLARATION OF CONFORMITY
- Producer:
- This product is conform to the following European
- Directives:
Brand : Klarstein
Model : 10030846
Category : Fireplace