
Handy Steamer HS1000 - Vapeur / Nettoyeur vapeur BLACK & DECKER - Free user manual and instructions
Find the device manual for free Handy Steamer HS1000 BLACK & DECKER in PDF.


| Brand | Black & Decker |
| Model | Handy Steamer HS1000 |
| Product type | Portable steam cleaner |
| Power supply | Electric, 220-240 V, 50/60 Hz |
| Power | 1000 W |
| Water tank capacity | 300 ml |
| Heat-up time | About 30 seconds |
| Steam runtime | Up to 10 minutes |
| Dimensions (L x W x H) | 30 x 15 x 20 cm |
| Weight | 1.2 kg |
| Housing material | Heat-resistant plastic |
| Power cord length | 3 meters |
| Included accessories | Concentrator nozzle, nylon brush, cleaning cloth |
| Main functions | Descaling, deep cleaning, stain removal |
| Recommended use | Hard surfaces, upholstery, clothing |
| Safety | Child lock, automatic shut-off in case of overheating |
| Maintenance and cleaning | Clean the tank with white vinegar, descale regularly |
| Spare parts and repairability | Available on the manufacturer's website |
| Warranty | 2 years |
| Certifications | CE, RoHS |
Frequently Asked Questions - Handy Steamer HS1000 BLACK & DECKER
User questions about Handy Steamer HS1000 BLACK & DECKER
0 question about this device. Answer the ones you know or ask your own.
Ask a new question about this device
Download the instructions for your Vapeur / Nettoyeur vapeur in PDF format for free! Find your manual Handy Steamer HS1000 - BLACK & DECKER and take your electronic device back in hand. On this page are published all the documents necessary for the use of your device. Handy Steamer HS1000 by BLACK & DECKER.
USER MANUAL Handy Steamer HS1000 BLACK & DECKER
Please Read and Save this Use and Care Book
natural_image
White portable food heater with clear lid and control knob (no visible text or symbols)Register your product online at www.prodprotect.com/applica, for a chance to WIN \$100,000!
Accessories/Parts (USA/Canada)
1-800-738-0245
Model
Modelo
Modèle
HS1000
IMPORTANT SAFEGUARDS
When using electrical appliances, basic safety precautions should always be followed, including the following:
Read all instructions.
☐ Do not touch hot surfaces. Use handles or knobs.
☐ To protect against a risk of electric shock, do not immerse cord, plug, or base unit in water or other liquid.
☐ Close supervision is necessary when any appliance is used by or near children.
☐ Unplug from outlet when not in use and before cleaning. Allow to cool before putting on or taking off parts or cleaning.
☐ Do not operate any appliance with a damaged cord or plug or after the appliance malfunctions or is dropped or damaged in any manner. Return the appliance to the nearest authorized service facility for examination, repair, or electrical or mechanical adjustment. Or, call the appropriate toll-free number listed on the cover of this manual.
☐ The use of accessory attachments not recommended by the appliance manufacturer may cause injuries.
☐ Do not use outdoors.
☐ Do not let cord hang over the edge of table or counter or touch hot surfaces.
☐ Do not place on or near a hot gas or electric burner or in microwave or heated oven.
☐ Extreme caution must be used when moving an appliance containing hot food, water, or other hot liquids.
☐ To disconnect, turn any control to "off", then remove plug from wall outlet.
☐ Do not use appliance for other than intended use.
SAVE THESE INSTRUCTIONS.
POLARIZED PLUG (120V Models Only)
This appliance has a polarized plug (one blade is wider than the other). To reduce the risk of electric shock, this plug is intended to fit into a polarized outlet only one way. If the plug does not fit fully into the outlet, reverse the plug. If it still does not fit, contact a qualified electrician. Do not attempt to modify the plug in any way.
ELECTRICAL CORD
a) A short power-supply cord (or detachable power-supply cord) is to be provided to reduce the risk resulting from becoming entangled in or tripping over a longer cord.
b) Longer detachable power-supply cords or extension cords are available and may be used if care is exercised in their use.
c) If a long detachable power-supply cord or extension cord is used,
1) The marked electrical rating of the detachable power-supply cord or extension cord should be at least as great as the electrical rating of the appliance,
2) If the appliance is of the grounded type, the extension cord should be a grounding-type 3-wire cord, and
3) The longer cord should be arranged so that it will not drape over the countertop or tabletop where it can be pulled on by children or tripped over.
TAMPER-RESISTANT SCREW
Warning: This appliance is equipped with a tamper-resistant screw to prevent removal of the outer cover. To reduce the risk of fire or electric shock, do not attempt to remove the outer cover. There are no user-serviceable parts inside. Repair should be done only by authorized service personnel.
Note: If the power supply cord is damaged, it should be replaced by qualified personnel or in Latin America by an authorized service center.
Product may vary slightly from what is illustrated.
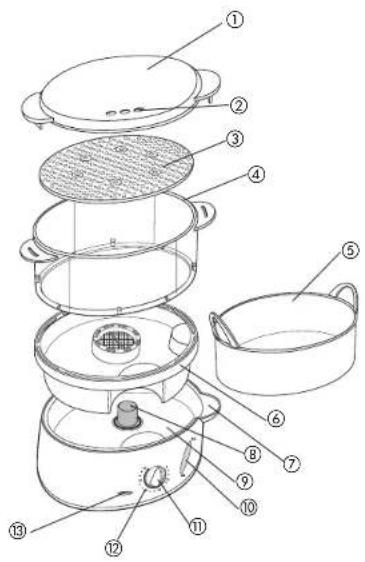
- 1 . Lid with handles (Part # HS1000-01)
- Steam vents
- 3 . Steam basket bottom tray with built-in egg holders (Part # HS1000-05)
- 4 . Steaming basket (Part # HS1000-02)
- 5 . 5-cup rice bowl (Part # HS1000-03)
- 6 . Drip tray with built-in Flavor Scenter screen (Part # HS1000-04)
- External water-fill inlet
- Heating element
- Water reservoir
- Water window with Min/Max water level markings
- 75-minute timer
- Unit base
- Power indicator light
- Consumer replaceable/removable parts
How to Use
This appliance is for household use only.
GETTING STARTED
- Remove packing materials and any stickers from the unit.
- Wash all parts as instructed in Care and Cleaning.
- Select a location for the unit. Do not place unit directly under cabinets or too close to the wall to allow steam to escape without damaging counter space or cabinets.
USING THE STEAMING BASKET
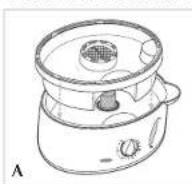
Filling Water Reservoir
- Place the drip tray into the base of the unit (A).
Important: To avoid water overflow, the drip tray must be in place before filling the water reservoir.
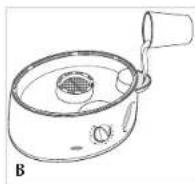
- Pour water into the water-fill inlet (B) up to the MAX marking on the water window. Do not overfill.
Important:
- Water should never go below the MIN level on the water window.
- Do not add any salt, pepper, seasoning, herbs, beer, wine or any other liquid to the water reservoir.
- During the cooking cycle, check the water window. If water level is low, add cold tap water to the water-fill inlet as needed. This will ensure continuous steaming.
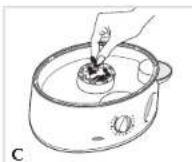
- Place herbs or spices in Flavor Scenter * screen for added flavor (C). (See Flavor Scenter® Tips).
Note: You can also use the drip tray without adding herbs to the Flavor Scenter® if you prefer.
Tips for Using the Flavor Scenter® Screen
• To prevent small herbs or ground spices from falling through the screen, rinse or wet the screen before adding seasonings.
- If using herbs, use whole or coarsely chop the leaves.
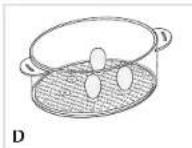
4. Place food in the steaming basket. See Cooking Chart on page 6 and 7 for Helpful Tips. You can also cook up to 6 eggs by inserting each egg into the indentation of the steam basket (D).
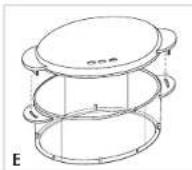
- Cover the steaming basket so that the lid handles line up over the basket handles. Make sure the lid tabs fit properly into the steaming basket openings (E).
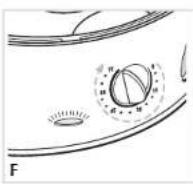
- Place the steaming basket onto the drip tray, plug the power cord into wall outlet and set the Timer for the desired cooking time, up to 75 minutes (F); see Cooking Chart on page 6 and 7 for recommended times. Power indicator light illuminates. When the time is up, a bell rings, the power indicator light goes out and the unit automatically shuts off.
- When cooking is finished, unplug the unit and remove food immediately to avoid over-cooking.
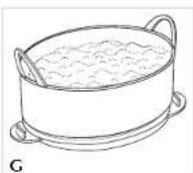
- Use the lid inverted as a tray for the steam basket (G). CAUTION: Use pot holders when removing the lid or lifting the steaming basket, drip tray or rice bowl. Lift the lid away from your face and body to avoid escaping steam.
USING THE RICE BOWL
When cooking in the rice bowl, add rice, herbs, seasonings and water directly into the rice bowl.
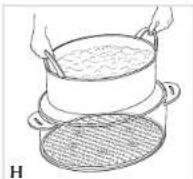
- Place the steaming basket onto the drip tray and place the rice bowl with contents into the steaming basket (H). Cover steaming basket with the lid.
- Plug cord into wall outlet and set the timer to desired cooking time, up to 75 minutes; see Cooking Chart on page 6 for recommended times.
- When cooking is finished, unplug the unit and remove the rice bowl immediately to avoid over-cooking.
- Use the lid inverted as a tray for the steam basket.
CAUTION: Use pot holders when removing the lid or lifting the steaming basket, drip tray or rice bowl. Lift the lid away from your face and body to avoid escaping steam.
COOKING CHART
Helpful Tips:
• Times are based on a cold start and using cold tap water.
- Use foods directly from where they are stored, for example, refrigerator or freezer.
- Use inverted lid to hold hot steaming basket.
• Stir vegetables half way through cooking cycle.
- Times are to be used as a guide; increase or decrease time according to personal preference.
- Solid foods such as chicken, fish steaks and fillets should be placed in a single layer.
| Food | Amount | Suggested Seasoning | Time |
| EGGS | |||
| Soft cooked eggs 6 eggs 12 minutesHard cooked eggs 6 eggs 24 minutes | |||
| RICE | |||
| White 1 cup rice with salt, pepper, 35 minutes1 12 cups water butter, olive oil1 12 cups rice 45 minuteswith 1 12 cups water | |||
| Brown 1 cup rice with salt, pepper 50 minutes1 12 cups water butter, olive oil | |||
| FRESH VEGETABLES | |||
| Asparagus | 8 oz. trimmed fresh | chervil or savory | 15 to 17 minutes |
| Broccoli | 1 bunch (about 1 lb. fresh florets) | basil or dill | 16 to 18 minutes |
| Cabbage | 1 small head, about 1 12 lbs. | oregano and basil | 14 to 16 minutes |
| Carrots | 1 lb. peeled and sliced | tarragon or mint | 23 to 25 minutes |
| Cauliflower 1 head (about coriander or 20 to 22 minutes1 lb. fresh florets)celery seeds | |||
| Corn on the cob | 3 medium sized fresh ears of corn cut into 3-inch pieces | dill or marjoram | 15 to 18 minutes |
| Green beans | 1 lb. trimmed whole beans | thyme and/or savory | 15 to 17 minutes |
| Red or brown skin potatoes medium potatoes, quartered | 1 12 lbs rosemary | 40 to 42 minutes or dill | |
| Snow peas | 1/2 lb. trimmed fresh whole | sliced fresh ginger and garlic | 10 to 12 minutes |
| Spinach | 8 ounces fresh whole spinach | garlic and parsley | 8 to 10 minutes |
| Squash, Zucchini or 1 Yellow squash 1-inch chunks garlic | |||
| Sweet potatoes 1 | 12 lbs., cut into ginger or 112 -inch chunks whole cloves | 28 to 30 minutes | |
| FROZEN VEGETABLES | |||
| Frozen peas 1 lb. thyme and/or 10 to 12 minutes rosemary | |||
| Frozen mixed 1 lb. garlic or vegetables | 14 to 16 minutes oregano | ||
| REHEATING | |||
| Reheat baked dish or frozen entree | Cold baked lasagna 4 x 4-inch piece; cooked frozen entree | 20 to 22 minutes | |
| POULTRY | |||
| Boneless chicken breasts | 1 12 lb. | fresh sage or thyme | 35 minutes |
| MEAT | |||
| Hot dogs | 1 lb. package | 15 to 17 minutes | |
| FISH | |||
| Fish Fillets | Salmon - 3 fillets about 1 lb. | dill and/or garlic | 14 to 16 minutes |
| Tilapia - 3 fillets chervil and about 112 lbs. dill | 12 to 14 minutes | ||
| Salmon steaks | 2 steaks, total weight 114 lbs. garlic | dill and | 22 to 24 minutes |
| Crab | King crab legs, about 1 lb. | lemon slices | 25 minutes |
| Snow crab clusters, about 112 lbs. marjoram | lemon and | 18 to 20 minutes | |
| Clams | 2 dozen little neck clams | lemon and/or garlic | 15 minutes |
| Lobster tails | 3 tails, about 112 lbs. | lemon slices or wedges | 20 to 22 minutes |
| Shrimp | 112 lbs. shelled and deveined, garlic about 112 lbs. | lemon and | 20 to 22 minutes |
Care and Cleaning
This appliance contains no user-serviceable parts. Refer service to qualified service personnel.
IMPORTANT: Unplug the unit and allow to cool completely before cleaning.
CLEANING
Steaming Basket, Rice Bowl, Lid and Drip Tray
Immerse in warm, sudsy water. Rinse and dry thoroughly. These parts can also be washed in the dishwasher, top rack only.
Water Reservoir
Clean with warm, sudsy water. Use a non-abrasive plastic brush or mesh scouring pad to clean the interior. Rinse thoroughly with clean, warm water. Do not immerse base in water.
Unit Base Exterior
Wipe base with a damp cloth then dry thoroughly. Never immerse the base in liquid or place in the dishwasher.
IMPORTANT: Do not use bleach, abrasive pads or cleaners to clean any part of the unit. MAINTAINING YOUR UNIT
Mineral deposits left by hard water can clog your unit and cause steam to stop before food is cooked. Cleaning is recommended every 3 months. The frequency of flushing out deposits is affected by your usage and water hardness.
- Fill water reservoir to the Max level (on the water window) with white vinegar.
IMPORTANT: Do not use any other chemical or commercial descaler.
-
Make sure the drip tray, steaming bowl and lid are in place.
-
Plug unit into wall outlet.
-
Set timer to 25 minutes.
IMPORTANT: If vinegar begins to boil over the edge of the unit base, unplug the unit and turn off the timer. Reduce amount of vinegar.
-
Once you hear the bell ring, unplug the unit and let it cool completely.
-
Pour out vinegar from water reservoir and rinse reservoir several times with warm, sudsy water.
STORING YOUR UNIT
Unplug unit from wall outlet and let it cool completely before removing the drip dray for storage.
+ 1 . Tapa con asas (Pieza No. HS1000-01)
- Escapes de vapor
For service, repair or any questions regarding your appliance, call the appropriate "800" number on the cover of this book. Do not return the product to the place of purchase.
Do not mail the product back to the manufacturer nor bring it to a service center.
You may also want to consult the website listed on the cover of this manual.
One-Year Limited Warranty
(Applies only in the United States and Canada)
What does it cover?
- Any defect in material or workmanship; provided; however, Applica's liability will not exceed the purchase price of the product.
For how long?
• One year after the date of original purchase.
What will we do to help you?
- Provide you with a reasonably similar replacement product that is either new or factory refurbished.
How do you get service?
- Save your receipt as proof of the date of sale.
- Check our on-line service site at www.prodprotect.com/applica, or call our toll-free number, 1-800-231-9786, for general warranty service.
- If you need parts or accessories, please call 1-800-738-0245.
What does your warranty not cover?
• Damage from commercial use
• Damage from misuse, abuse or neglect
- Products that have been modified in any way
- Products used or serviced outside the country of purchase
- Glass parts and other accessory items that are packed with the unit
- Shipping and handling costs associated with the replacement of the unit
- Consequential or incidental damages (Please note, however, that some states do not allow the exclusion or limitation of consequential or incidental damages, so this limitation may not apply to you.)
How does state law relate to this warranty?
- This warranty gives you specific legal rights, and you may also have other rights that vary from state to state or province to province.
¡NECESITA AYUDA?
San Jose, Costa Rica
Tel.: (506) 257-5716
223-0136
Ecuador
Servicio Master Ecuador
3.3 Independence Square,
Port of Spain
Trinidad, W.I.
Tel.: (868) 623-4696
Venezuela
Inversiones BDR CA
Av. Casanova C.C.
City Market
Nivel Plaza Local 153.
Diagonal Hotel Melia.
Caracas
Tel. (582) 324 0969
Col. Centro, Mexico D. F., CP 06050
Copyright © 2007 Applica Consumer Products, Inc.
Made in People's Republic of China
Printed in People's Republic of China
Importado por:
- IMPORTANT SAFEGUARDS
- SAVE THESE INSTRUCTIONS.
- POLARIZED PLUG (120V Models Only)
- ELECTRICAL CORD
- TAMPER-RESISTANT SCREW
- How to Use
- GETTING STARTED
- USING THE STEAMING BASKET
- Filling Water Reservoir
- Important:
- Tips for Using the Flavor Scenter® Screen
- USING THE RICE BOWL
- COOKING CHART
- Helpful Tips:
- Care and Cleaning
- CLEANING
- Steaming Basket, Rice Bowl, Lid and Drip Tray
- Water Reservoir
- Unit Base Exterior
- STORING YOUR UNIT
- One-Year Limited Warranty
- (Applies only in the United States and Canada)
- What does it cover?
- For how long?
- What will we do to help you?
- How do you get service?
- What does your warranty not cover?
- How does state law relate to this warranty?
- ¡NECESITA AYUDA?
- Ecuador
- Venezuela
Brand : BLACK & DECKER
Model : Handy Steamer HS1000
Category : Vapeur / Nettoyeur vapeur