
BHBS 174NHCH - Refrigerator HOOVER - Free user manual and instructions
Find the device manual for free BHBS 174NHCH HOOVER in PDF.


| Brand | Hoover |
| Model | BHBS 174NHCH |
| Product type | Refrigerator with freezer compartment |
| Climate class | SN (10 °C to 32 °C), N (16 °C to 32 °C), ST (16 °C to 38 °C), T (16 °C to 43 °C) |
| Refrigerant | R600a (isobutane) |
| Insulating gas | Cyclopentane |
| Power supply | 220-240 V, 50 Hz (standard estimate) |
| Temperature setting | 4 main levels + 4 sub-levels per level (advanced settings) |
| Refrigerator defrost | Automatic |
| Freezer defrost | Manual (recommended from 3 mm of frost) |
| Interior lighting | LED |
| Door open alarm | Yes, after 90 seconds |
| Fan | Present (can be activated manually, recommended above 28-30 °C) |
| Reversible door opening | Yes, requires a qualified technician |
| Freezing capacity | Indicated on the rating plate |
| Available spare parts (thermostats, sensors, PCB, LED) | 7 years from the last marketed unit |
| Available spare parts (handles, hinges, shelves, bins) | 7 years from the last marketed unit |
| Available spare parts (door gaskets) | 10 years from the last marketed unit |
| Warranty | 2 years (EU), varies by country |
| Recommended cleaning | Warm water + baking soda or neutral soap; avoid solvents and abrasives |
| Safety | Flammable gas (R600a); do not use an extension cord; do not damage the refrigerant circuit |
Frequently Asked Questions - BHBS 174NHCH HOOVER
User questions about BHBS 174NHCH HOOVER
0 question about this device. Answer the ones you know or ask your own.
Ask a new question about this device
Download the instructions for your Refrigerator in PDF format for free! Find your manual BHBS 174NHCH - HOOVER and take your electronic device back in hand. On this page are published all the documents necessary for the use of your device. BHBS 174NHCH by HOOVER.
USER MANUAL BHBS 174NHCH HOOVER
| GUIDA RAPIDA DI MANUTEZIONE E D'USO | IT |
| MAINTENANCE AND USER'S GUIDE | EN |
| MANUEL D'ENTRETIEN ET D'UTILISATION | FR |
| GUÍA RÁPIDA DE USO Y MANTENIMIENTO | ES |
| BEDIENUNGS- UND INSTALLATIONSANLEITUNG | DE |
| GUIA RÁPIDO DE MANUTENÇÃO E DE USO | PT |
| HANDLEIDING VOOR ONDERHOUD EN GEBRUIK | NL |
| ГРНГОРОΣ ОДНГОΣ ΣΥΝΤΗΡΗΣΗΣ ΚΑΙ ΧΡΗΣΗΣ | EL |
| KRÓTKA INSTRUKCJA KONSERWACJI I UŻYTKOWANIA | PL |
| STRUČNÝ NÁVOD PRO POUŽITÍ A ÚDRŽBU | CZ |
| ИНСТРУКЦИЯ ЗА ЕКСПЛОАТАЦИЯ | БГ |
| COMBINE FRIGORIFICE MANUAL DE UTILIZARE | RO |
| NAVODILA ZA UPORABO | SL |
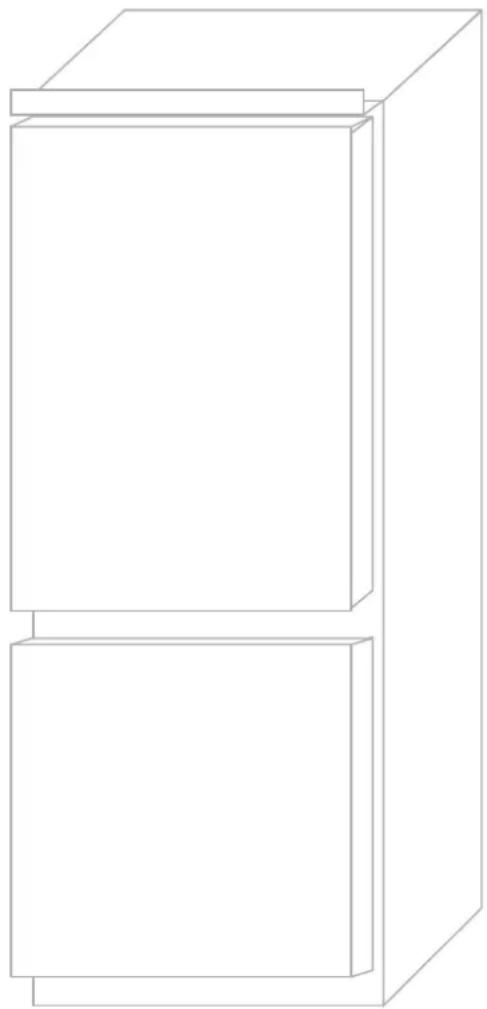
Congratulations on purchasing this fridge, which has been designed using the latest technologies for an easy-to-use, environmentally friendly appliance.
We recommend you read this guide and the technical datasheet carefully to find out everything you need to know about your new fridge.
agricultural businesses, hotels, motels,
Fig. 2
STORAGE
Built-in products
Fig. 4
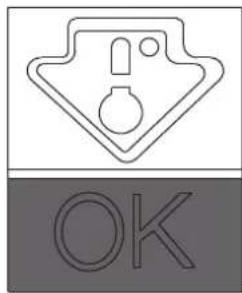
Fig. 5
NOTE:
Practical tips
MATCHING THE PANELS OF THE BUILT-IN COLUMN TO THE APPLIANCE DOORS
PRODUCT DIMENSION AND BUILT-IN COMPARTMENT.. 17--18
INSTALLATION OF THE APPLIANCE IN THE COLUMN.... 18--18
COUPLING OF THE PANELS OF THE BUILT-IN COLUMN
OF THE APPLIANCE DOORS 19--19
PRECAUTIONS FOR THE CORRECT OPERATION ...... 19--19
SUSPENDING USE OF THE APPLIANCE 19--19
TROUBLESHOOTING 20--20
Thank you for purchasing this product.
Before using your refrigerator, please carefully read this instruction manual in order to maximize its performance. Store all documentation for subsequent use or for other owners. This product is intended solely for household use or similar applications such as:
- the kitchen area for personnel in shops, offices and other working environments
- on farms, by clientele of hotels, motels and other environments of a residential type
- at bed and breakfasts (B & B)
- for catering services and similar applications not for retail sale.
This appliance must be used only for purposes of storage of food, any other use is considered dangerous and the manufacturer will not be responsible for any omissions. Also, it is recommended that you take note of the warranty conditions.
SAFETY INFORMATION
The refrigerator contains a refrigerant gas (R600a: isobutane) and insulating gas (cyclopentane), with high compatibility with the environment, that are, however, inflammable.
We recommend that you follow the following regulations so as to avoid situations dangerous to you:
- Before performing any operation, unplug the power cord from the power socket.
- The refrigeration system positioned behind and inside the refrigerator contains refrigerant. Therefore, avoid damaging the tubes.
- If in the refrigeration system a leak is noted, do not touch the wall outlet and do not use open flames. Open the window and let air into the room. Then call a service centre to ask for repair.
- Do not scrape with a knife or sharp object to remove frost or ice that occurs. With these, the refrigerant circuit can be damaged, the spill from which can cause a fire or damage your eyes.
- Do not install the appliance in humid, oily or dusty places, nor expose it to direct sunlight and to water.
- Do not install the appliance near heaters or inflammable materials.
- Do not use extension cords or adapters.
- Do not excessively pull or fold the power cord or touch the plug with wet hands.
- Do not damage the plug and/or the power cord; this could cause electrical shocks or fires.
- It is recommended to keep the plug clean, any excessive dust residues on the plug can be the cause fire.
- Do not use mechanical devices or other equipment to hasten the defrosting process.
- Absolutely avoid the use of open flame or electrical equipment, such as heaters, steam cleaners, candles, oil lamps and the like in order to speed up the defrosting phase.
- Do not use or store inflammable sprays, such as spray paint, near the refrigerator. It could cause an explosion or fire.
- Do not use electrical appliances inside the food storage compartments, unless they are of the type recommended by the manufacturer.
- Do not place or store flammable and highly volatile materials such as ether, petrol, LPG, propane gas, aerosol spray cans, adhesives, pure alcohol, etc. These materials may cause an explosion.
- Do not store medicine or research materials in the refrigerator. When storing materials that require strict temperature control, they may deteriorate or undergo uncontrolled reactions that can cause risks.
- Keep the ventilation openings in the appliance enclosure or in the built-in structure free of obstruction.
- Do not place objects or containers filled with water on top of the appliance.
- Do not perform repairs on this refrigerator. All interventions must be carried out solely by qualified personnel.
- This appliance can be used by children aged 8 years and above and by persons with reduced physical, sensory, or mental capabilities, or with a lack of experience and knowledge, provided they have been given adequate supervision or instruction concerning safe use of the appliance and understand the hazards involved.
Children should not play with the appliance. Cleaning and user maintenance should not be performed by children without supervision.
Turning the knob fully counterclockwise will produce a click, which corresponds to switching off the product.
When the appliance is installed, the electrical cord and the power socket must be easily accessible.
The socket must be compatible with the appliance's plug. If not, request replacement of the plug by an authorized technician; do not use extension cords or multiple connectors.
Do not touch internal parts or frozen food with moist or wet hands, as this can cause burns.
Disposal of old appliances
This appliance is marked according to European Directive 2012/19/EU on Waste Electrical and Electronic Equipment (WEEE). WEEE contains both polluting substances (which can cause negative consequences for the environment) and basic components (which can be reused). It is important to subject WEEE to specific treatments to remove and properly dispose of all pollutants, and to recover and recycle all materials. Individuals can play an important role in ensuring that WEEE does not become an environmental issue; it is essential to follow some basic rules:
- WEEE should not be treated as household waste;
- WEEE should be handed over to the relevant collection points managed by the municipality or by registered companies. In many countries, for large WEEE, home collection may be available.
In many countries, when you buy a new appliance, the old one may be returned to the retailer who has to collect it free of charge on a one-to-one basis, as long as the equipment is of equivalent type and has the same functions as the supplied equipment.
Conformity
By placing the C€ mark on this product, we are confirming compliance to all relevant European safety, health and environmental requirements which are applicable in legislation for this product.
INSTALLATION
WARNINGS:
- Do not install the appliance in a damp or wet location as this could compromise the insulation and result in leakage. Furthermore, on the exterior of the same, condensate could accumulate.
- Do not place the appliance in locations outside or near sources of heat or exposed to direct sunlight.
The appliance operates properly within the range of environmental temperatures indicated:
+10 +32°C for the climatic class SN +16 +32°C for the climatic class N +16 +38°C for the climatic class ST +16 +43'C for the climatic class T (See the nameplate of the product)
- Do not place containers with liquids on top of the appliance.
- Wait at least 3 hours after final placement before placing the appliance in operation.
Electrical connection
After shipping, place the appliance vertically and wait at least 2 - 3 hours before connecting it to the electrical system. Before inserting the plug into the electrical socket, make sure that:
- The socket is earthed and in compliance with the law.
- The socket can withstand the maximum power load of the appliance, as indicated on the nameplate of the refrigerator.
- The power supply voltage is within the amounts indicated on the nameplate of the refrigerator.
- The cord must not be folded or compressed.
- The cord must be checked regularly and replaced solely by authorized technicians.
- The manufacturer declines any liability whenever these safety measures are not respected.
Appliance start-up
Remove all wrapping/packaging present inside the appliance and clean with water and baking soda or neutral soap.
After the installation, wait 2 - 3 hours to allow time for the refrigerator/freezer to stabilize at normal working temperature, before placing fresh or frozen foods inside.
If the power cord becomes disconnected, wait at least five minutes before restarting the refrigerator/freezer. At this point, the appliance is ready for use.
OPERATION
Turning On/Off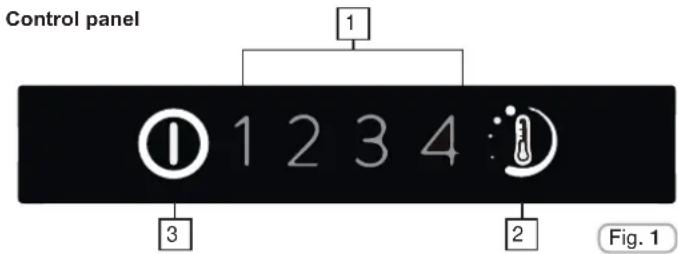
- Temperature indicator LED
- Temperature control
- ON/OFF button
Turning the appliance ON:
Plug the appliance in, if all the temperature indicators LEDs are off, press ON/OFF (3) for 1 second. When you release the ON/OFF button (3) a temperature light will come on and the appliance will beep.
Turning the appliance OFF:
Press the ON/OFF button (3) for 1 second. When you release it, the temperature light will go out and the appliance will beep. In the event of a power failure, when the power comes back on, the appliance will run using the last saved setting.
Setting the temperature
Press the button for setting the temperature until you reach the level you want, where level 1 is the warmest and level 4 is the coldest. Under normal operating conditions, we recommend using an intermediate setting (level 2).
| On/Off | 1 | 2 | 3 | 4 |
| Press button (2) for less than 2 seconds to change the temperature level. | ||||
| On/Off | 1 | 2 | 3 | 4 |
Advanced settings menu:
Use this menu to set an intermediate level.
On/Off 1 2 3 4 Press button (2) for more than 2 seconds. When you release it, LED 2 will flash.
On/Off 1 2 3 4
The next time you press button (2) for less than 2 seconds, the intermediate level will be set. This operation works in cycles every time you press the button.
| On/Off | 1 | 2 | 3 | 4 |
| On/Off | 1 | 2 | 3 | 4 |
If you do not press button (2) for more than 5 seconds, the settings will be saved.
The temperature levels in advanced settings are set from warmest to coldest, e.g., 2/2.1/2.3/2.4, which means there are 4 sub-levels for every main level.
Door open alarm
If the door is left open for longer than 90 seconds, an alarm is sounded. To turn it off, simply close the door or press button 2.
| Position Conditions | |
| 1-2 Summer or ambient temperature between 25-35 °C | |
| 2-3 Spring, autumn or ambient temperature between 15-25 °C | |
| 3-4 Winter, or ambient temperature between 5-15 °C | |
Refrigerator Compartment Fan (if present)
The fan is preset to OFF.
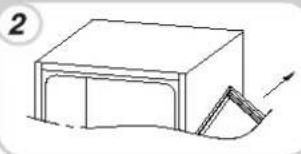
To activate, press the switch (Fig. 2).
To optimize energy consumption, it is recommended that you turn the fan on only when the ambient air temperature exceeds 28 to 30°C.
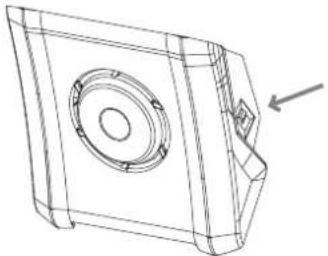
Fig. 2
CONSERVATION
- To maintain the best flavour, nourishment and freshness of foods, it is advisable to store them in the refrigerator compartment as shown in Fig. 5 below, making sure to wrap them in aluminium or plastic sheets or in appropriate covered containers to avoid cross-contamination.
Refrigerator zone
Fruit / Vegetables
- To decrease fruit and vegetable moisture losses they must be wrapped in plastic materials such as, for example, films or bags and then inserted in the fruit/vegetable zone. In this way rapid deterioration is avoided.
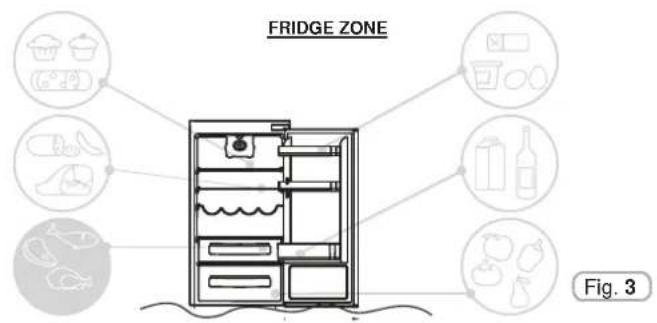
Refrigerated section fresh zone
(not all models)
The zone shown below is recommended for meat, fish, poultry, etc.; do not store fruit and vegetables because they can freeze;
Indicator of the temperature in the coldest zone
(not all models)
Some models are equipped with an indicator of the temperature in the refrigerator compartment in the coldest zone, for you to be able to control the average temperature.
This symbol indicates the coldest zone of the refrigerator (Fig. 4).
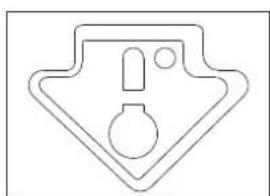
Fig. 4
Check that on the temperature indicator, the word OK is clearly shown (Fig. 5). If the word does not appear, this means that the temperature is too high: adjust the temperature to a cooler setting and wait for about 10 hours.
Recheck the indicator: if necessary, proceed with a new adjustment.
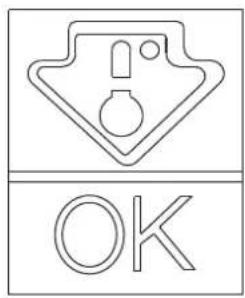
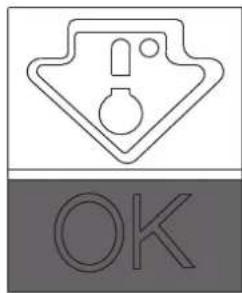
Fig. 5
NOTE:
If large quantities of food are inserted or the refrigerator door is frequently opened, it is normal for the indicator to fail to show OK. Wait for at least 10 hours before setting the temperature at its coldest levels (3,4).
Freezer zone
Use the table below for the compartments

Freezing process can only occur in the compartments

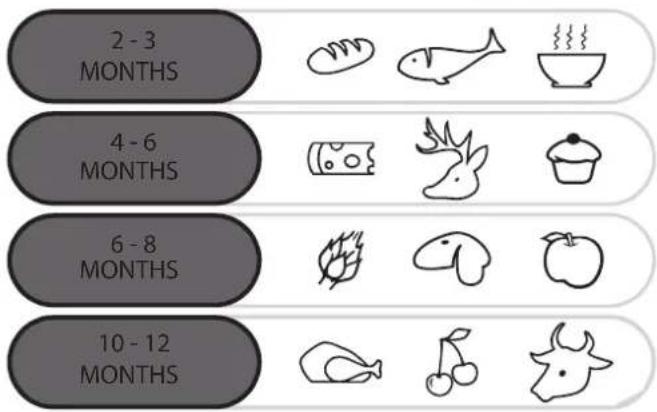
Practical recommendations
Place food on the shelves in a homogeneous manner to allow air to circulate properly and to cool it.
- Avoid contact between the food and the far end walls of the refrigerator compartment.
- Do not introduce hot foods as they can cause deterioration of existing ones and increase energy consumption.
- Remove the wrappings of foods before inserting them.
- Do not put in dishes or other containers unless previously washed.
- Do not obstruct the cold air ventilator openings with food.
- Do not cover the glass shelf of the vegetable bin to allow for proper air circulation.
- Do not store bottles in the freezer compartment as they can burst when frozen.
- In the case of prolonged power outage, keep the doors closed so that foods remain cold as long as possible.
- The installation of the appliance in a hot and humid location, with frequent door openings and storing large amounts of vegetables can cause the formation of condensate and affect the performance of the unit itself. • To prevent excessive energy consumption, the frequent or prolonged opening of the doors is not recommended.
FREEZING
- Foods must be fresh.
- Freeze small amounts of food at a time in order to freeze quickly. Never exceed the maximum amount indicated on the rating label.
- During freezing, do not open the freezer door.
- Food must be sealed, airtight.
- Separate food to be frozen by those already frozen.
- Label bags or containers to keep an inventory of frozen foods.
- Once defrosted, do not ever refreeze foods and consume them promptly.
NOTE:
The temperature doesn't usually need to be adjusted. Only in case you find excessive cooling of the products contained in the refrigerator compartment, gently set the warmest temperature levels (1,2). On completion of freezing, set the warmest temperature levels (1,2).
DEFROSTING
Defrosting the refrigerator compartment
During normal functioning, the refrigerator is automatically defrosted. There is no need to dry the drops of water present on the rear wall or to eliminate the frost (depending on functioning). The water is conveyed to the rear part through the drain hole found there and the heat of the compressor causes it to evaporate. - Keep the drainage pipe (Fig. 6) clean in the refrigerator compartment to keep it free of water.
The rating plate states the maximum quantity of foods that can be frozen (see Figure 6).
(Figure 6)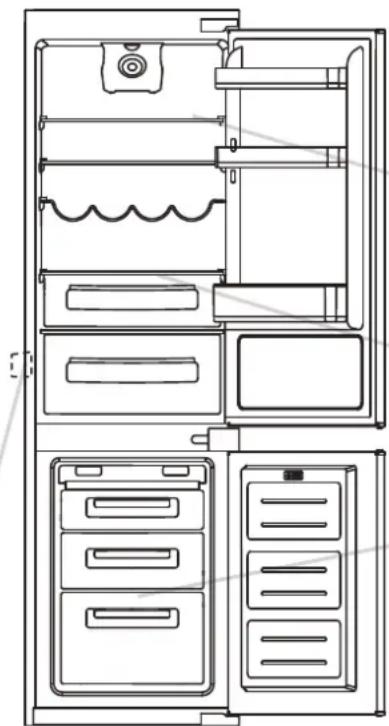
Defrosting of the fridge compartment occurs automatically in this product.
A small amount of frost or drops of water on the back of the fridge compartment when the fridge is working is normal.
Make sure the water outlet is always clean and make sure foods do not touch the back or sides of the freezer compartment.
We recommend you defrost the freezer area when the layer of frost is more than 3 mm thick.
N.B. Here you will find your appliance rating plate: it includes all the data to be transmitted to the Customer Service should a fault arise.
Important: if your ambient temperature is high, the appliance may operate continuously, thus building up excessive frost on the inner wall of the fridge. Set the warmest temperature levels (1,2).
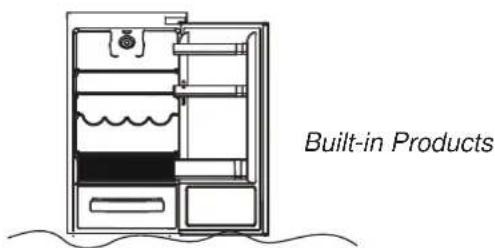
The most energy-saving configuration requires drawers, food box and shelves to be positioned in the product, please refer to the above pictures.
Defrosting the freezer compartment
(static products without NO-FROST technology)
When the layer of frost present in the freezer compartment exceeds 3mm, it is recommended to proceed with the defrosting as it increases energy consumption.
1) Press the ON/OFF button (3) for 1 second. 2) Disconnect the power cord. 3) Remove the frozen food and temporarily place it in a cool place. 4) Leave the freezer door open to speed up defrosting. 5) Collect the water at the bottom of the product. 6) Dry the freezer. 7) Reconnect the power cord and set the desired values. 8) Wait a moment and then put the frozen food back in.
WARNING:
Absolutely avoid using open flames or electrical appliances, such as heaters, steam cleaners, candles, oil lamps, and the like, to accelerate the defrosting phase.
Do not scrape with a knife or sharp object to remove frost or ice. These can damage the refrigerant circuit, and a leak can cause a fire or damage your eyes.
Defrosting the freezer compartment
(NO-FROST products)
Defrosting is automatic.
MAINTENANCE AND CLEANING
Lighting
LED lighting
The product is equipped with LED lights. Please contact the Technical Assistance Service for replacement.
Compared to traditional light bulbs, LEDs last longer and are environmentally friendly.
Cleaning
NOTICE:
- Before each operation, unplug the refrigerator from the power socket to prevent electric shocks.
- Do not pour water directly on the outside or inside of the refrigerator itself. This could lead to oxidation and damaging of the electrical insulation.
IMPORTANT:
To prevent cracking of the inside surfaces and plastic parts, follow these suggestions:
- Wipe away any food oils adhered to plastic components.
- The internal parts, gaskets and external parts can be cleaned with a cloth with warm water and baking soda or a neutral soap. Do not use solvents, ammonia, bleach or abrasives.
- Remove the accessories, for example, the shelves, from the refrigerator and from the door. Wash in hot soapy water. Rinse and thoroughly dry.
- The back of the appliance tends to accumulate dust which can be eliminated with the use of a vacuum cleaner, after having switched off and disconnected the appliance from the electrical outlet. This provides greater energy efficiency.
ENERGY SAVINGS
For better energy savings, we suggest:
- Installing the appliance away from heat sources and not exposed to direct sunlight and in a well ventilated room.
- Avoid putting hot food into the refrigerator to avoid increasing the internal temperature and therefore causing continuous functioning of the compressor.
- Do not excessively stuff foods so as to ensure proper air circulation.
- Defrost the appliance in case there is ice (see DEFROSTING) to facilitate the transfer of cold.
- In case of absence of electrical energy, it is advisable to keep the refrigerator door closed.
- Open or keep the doors of the appliance open as little as possible
- Avoid adjusting the thermostat to temperatures too cold.
- Remove dust present on the rear of the appliance (see CLEANING).
AVOIDING NOISES
During its operation, the refrigerator emits some absolutely normal noises, such as:
• HUMMING, the compressor is running. - RUMBLINGS, RUSTLINGS and HISSING, the refrigerant is flowing through the tubes. - TICKS and CLICKS, the operation shutdown of the compressor. Small measures to reduce the vibration noises: - Containers touch each other: Avoid contact between containers and glass recipients. - Drawers, shelves, bins vibrate: Check the proper installation of internal accessories.
NOTE:
The refrigerant gas produces noise even when the compressor is off; it is not a defect, it is normal. If you hear a clicking sound inside the appliance, it is normal as due to expansion of the various materials.
REVERSIBILITY OF THE DOOR
The doors of the appliance can be reversed so as to allow the opening to the right or left according to exigency.
NOTE:
- Inversion of the doors must be performed by qualified technical personnel.
- Inversion of the doors is not covered by the warranty.
REVERSING THE OPENING OF THE DOORS
Remove the upper plate and hinge by screw driver.
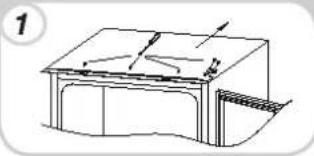
Remove the right bottom hinge and left plastic plugs, and refit them onto the opposite side.
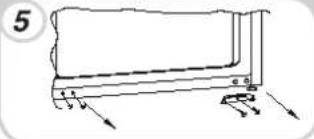
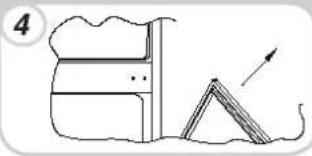
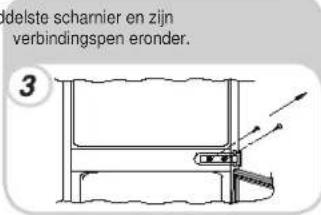
Remove the upper door. Remove
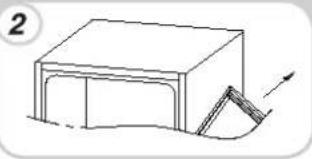
Use the opposite hinge and cover and fit into the left bottom.
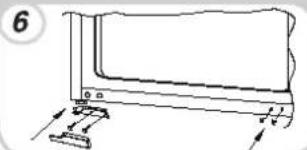
the middle hinge and its connecting pin underneath.
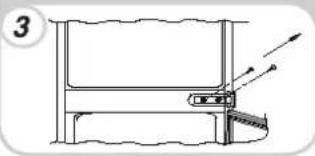
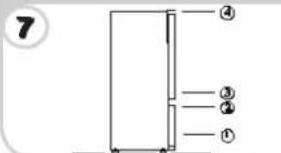
Reassemble the doors and hinges workings from bottom to top, from 1-4.
Remove the bottom door.
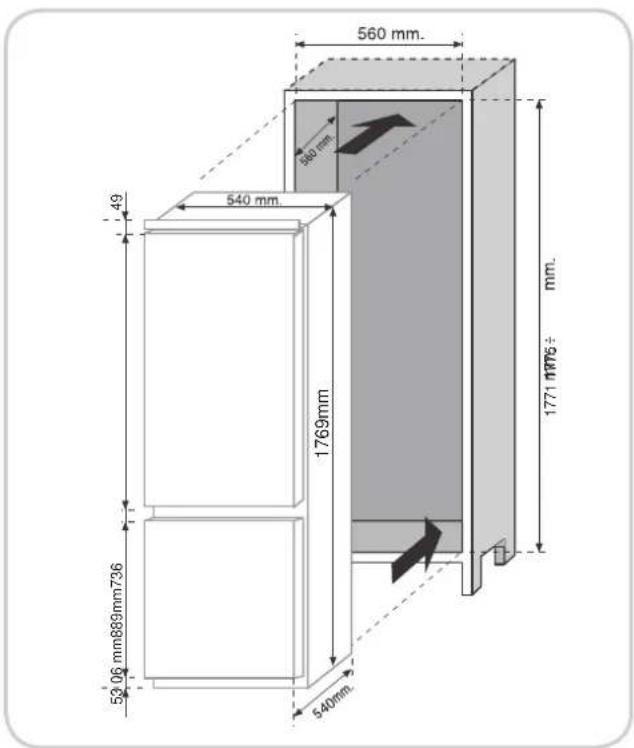
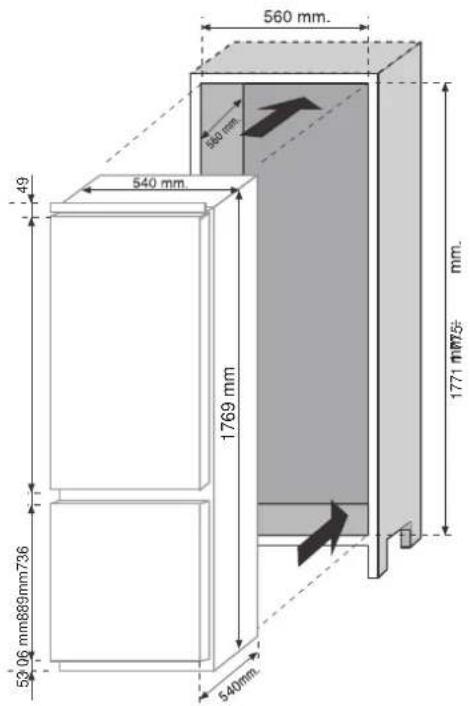
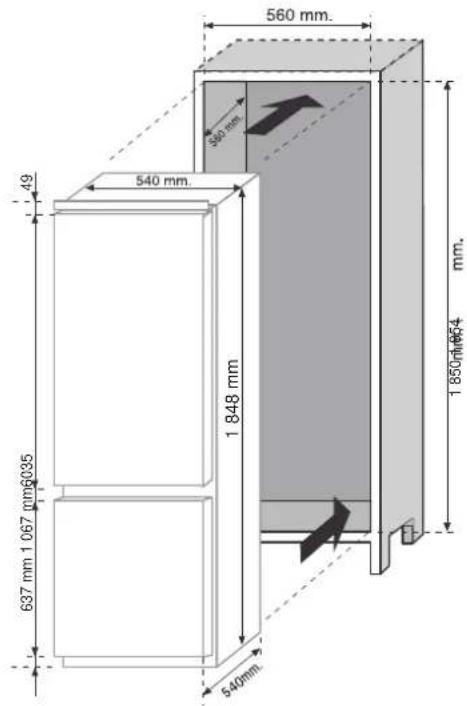
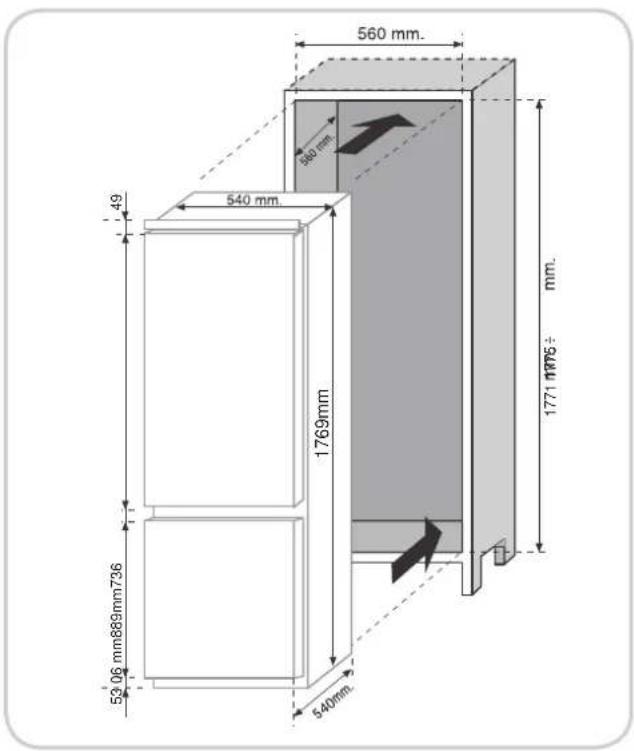
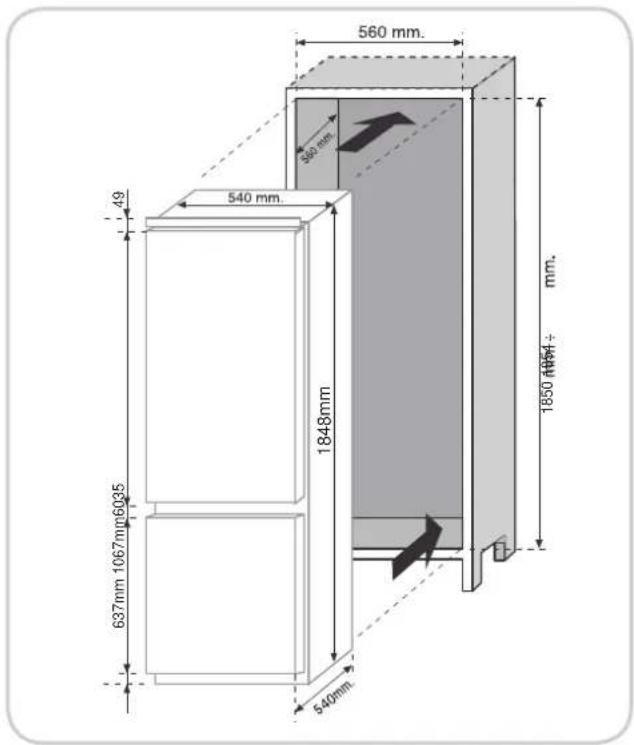
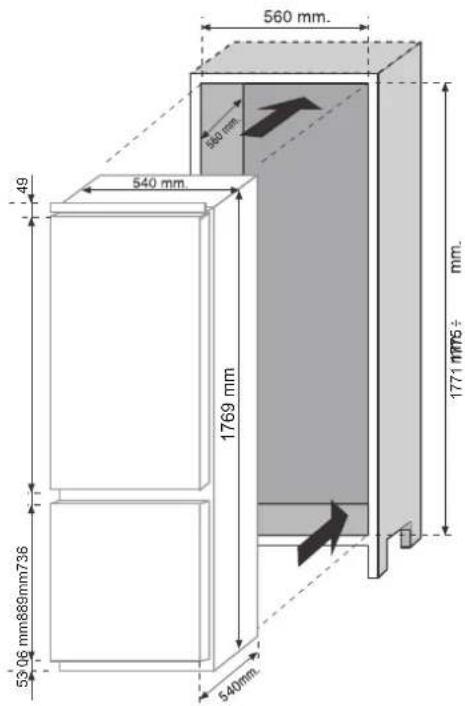
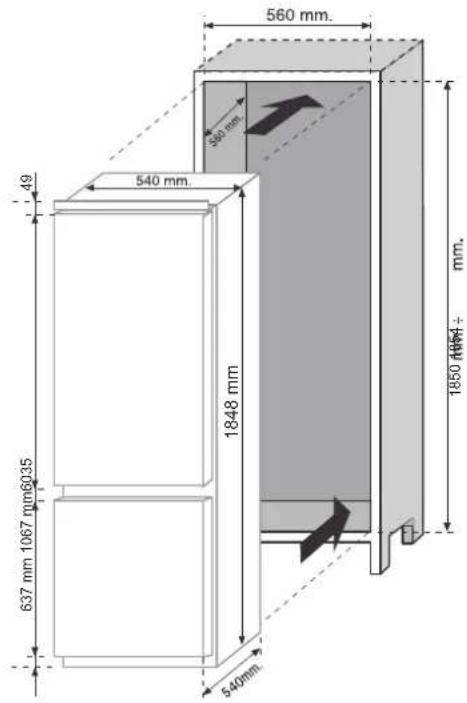
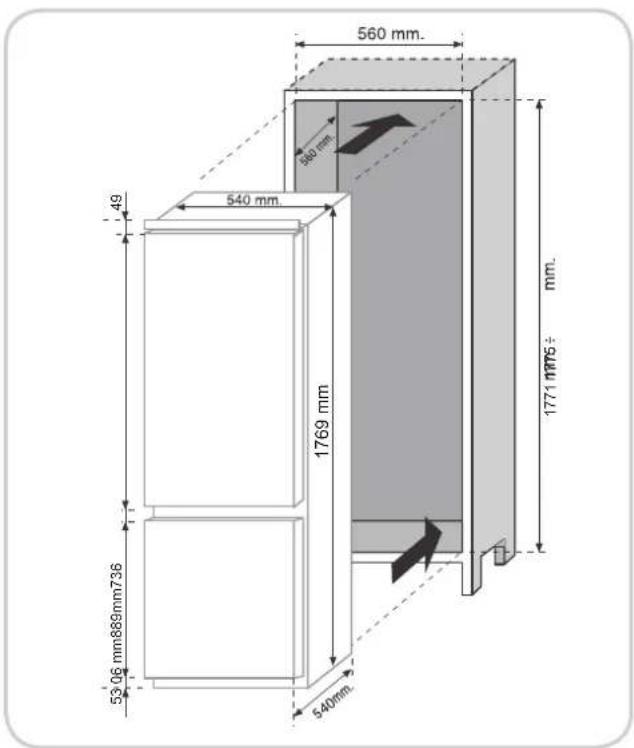
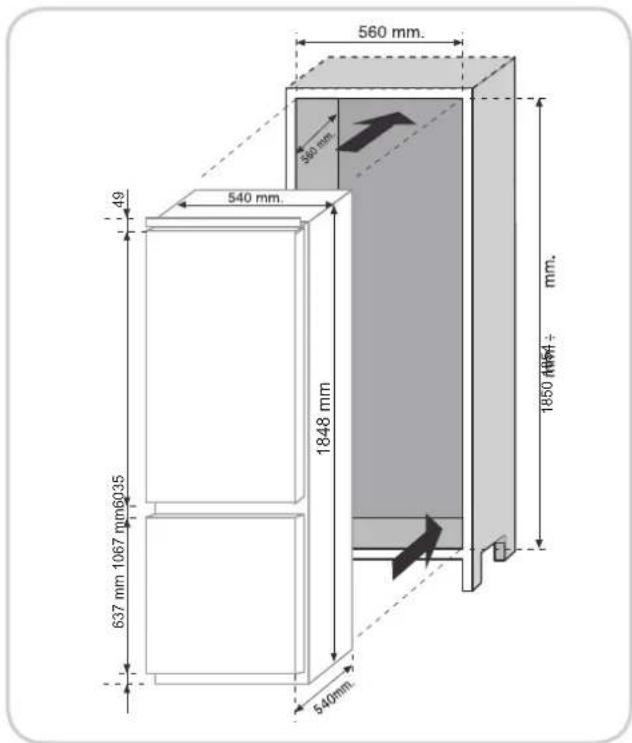
PRODUCT DIMENSIONS AND BUILT-IN COMPARTMENT
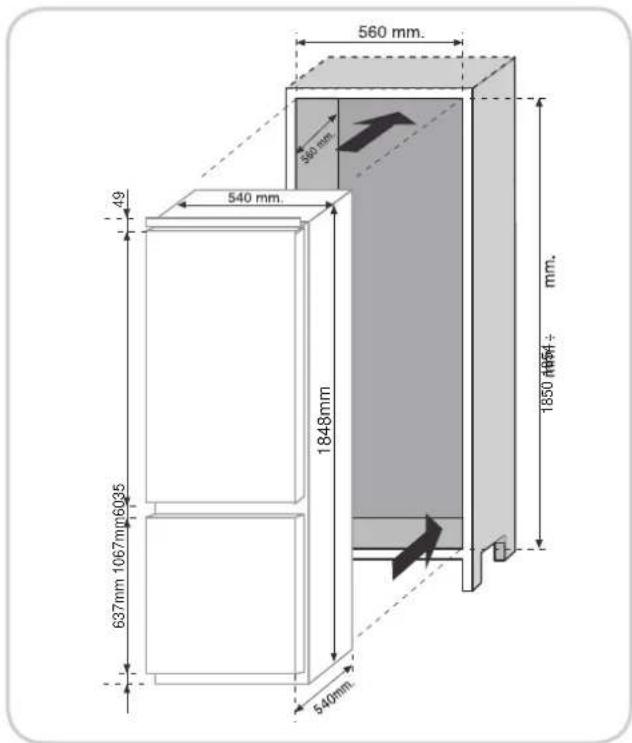
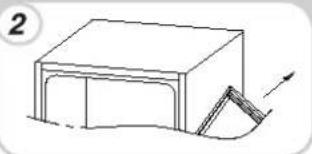
Insert the appliance into the column, placing it on the opposite side of the hinges, and make sure there is a 3-5 mm distance gap.
1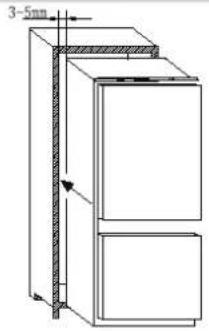
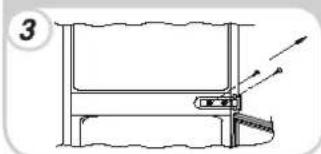
After ensuring the match between appliance door and column door, then screw the appliance upper part to the cabinet
2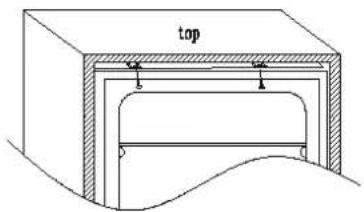
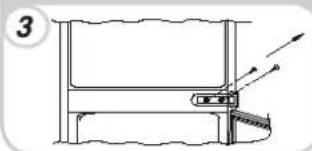
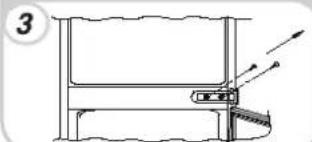
Screw the appliance lower part.
3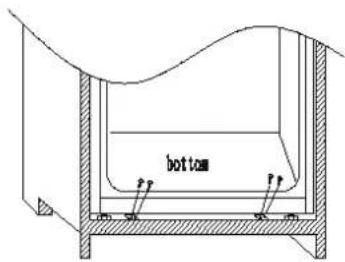
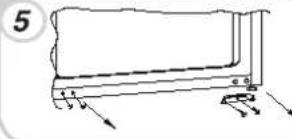
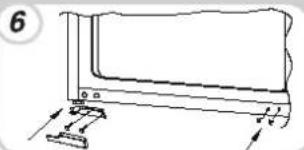
Fit the seal to the appliance, cut off the excessive part if necessary. Fit the bottom parts with plastic covers.
4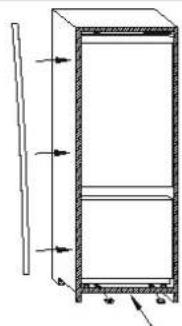
Use a cross-screwdriver to loosen the connecting pin underneath the right middle hinge, and adjust to screw onto the right cabinet wall.
COUPLING OF THE PANELS OF THE BUILT-IN COLUMN OF THE APPLIANCE DOORS
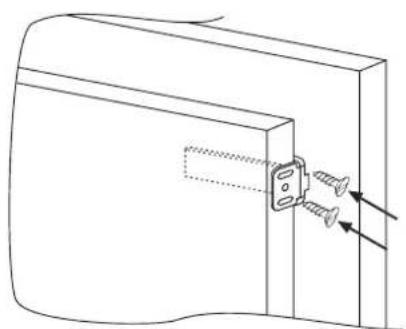
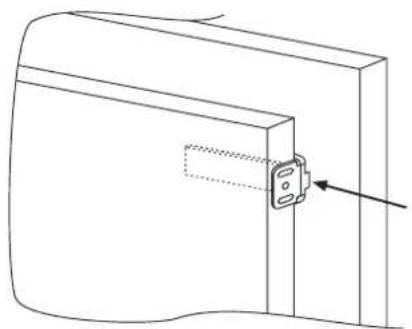
The appliance is equipped with coupling devices for the appliance doors with the column panels (loader slide).
Secure the slide in the inner part of the panel of the built-in column at the desired height and at approx. 20 mm from the outer wire of the door.
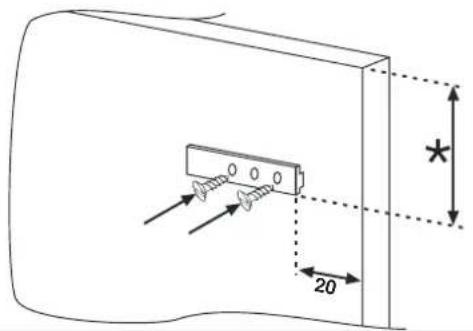
Open the doors of the built-in column and the fridge. Position the built-in loader in the slide, then fit it into the fridge door.
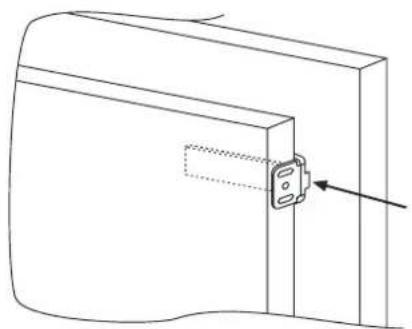
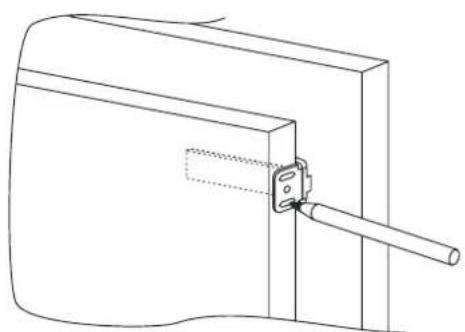
Mark the fixing points for the screws and drill with a bit of a diameter of 2.5 mm.
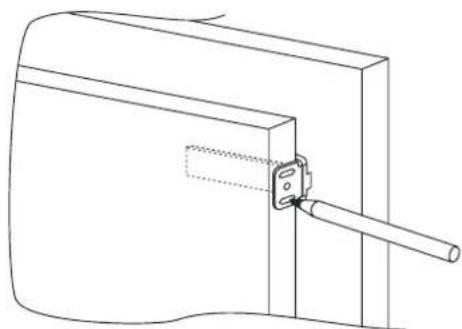
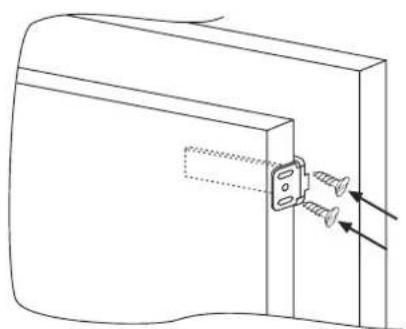
Connect the appliance door to the cabinet panel keeping the loader slots as guidelines.
PRECAUTIONS FOR THE CORRECT OPERATION
Once the product has been embedded, place the rear part of the column in contact with the wall so as to prevent access to the compressor compartment.
For the product to operate correctly it is essential to allow adequate air circulation so as to cool down the condenser located in the rear part of the appliance.
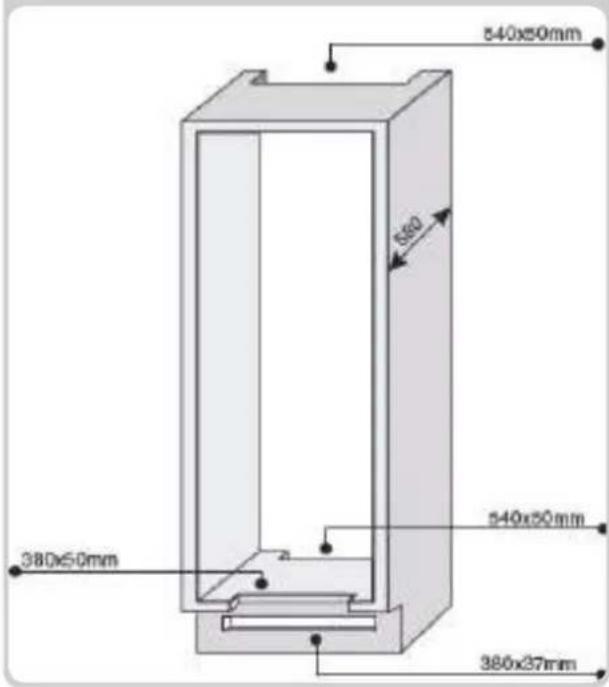
For this reason, the column must be equipped with a rear chimney, whose upper opening must not be blocked, and with a front slot which will be covered with a ventilation grill.
Size of the unit cut outs.
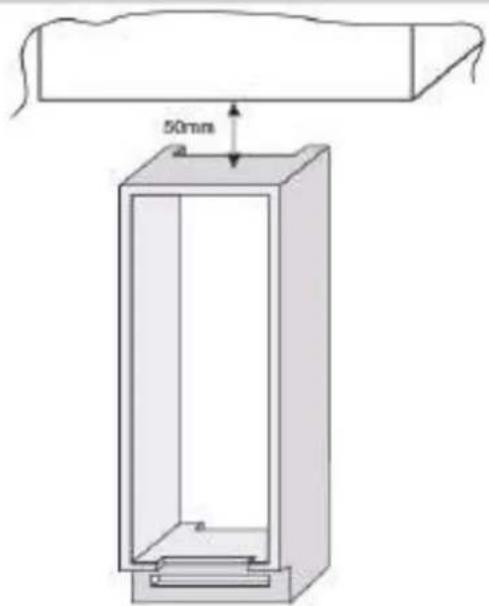
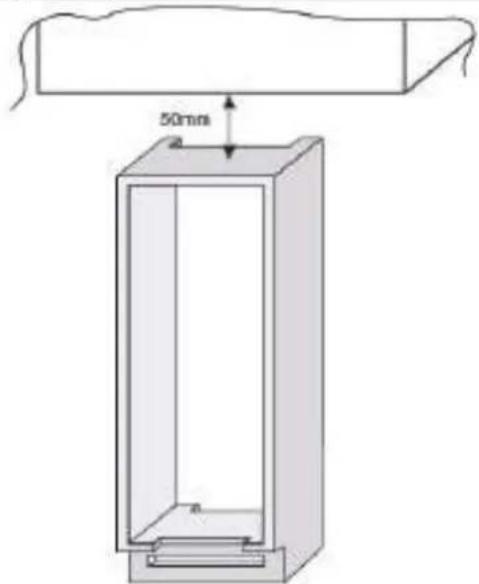
Room to leave between the unit and ceiling.
SUSPENDING USE OF THE APPLIANCE
If the appliance is not to be used for a long time: 1) Turn the appliance OFF (see Operation). 2) Extract the plug or remove the safety device. 3) Clean the appliance. 4) Leave the doors of the appliance open.
CAUSE PROBLEM REMEDY
| The inside illumination light bulb does not turn on. | Electricity absence.Door switch is blocked. | The power cord is not properly plugged in.Check whether the appliance is switched off.(see Temperature Adjustment).Ensure that there is a current in the house.Check that it is active. |
| The refrigerator and freezer do not sufficiently cool. | The doors are not closed.The doors are frequently openedErroneous setting of the temperature.The refrigerator and freezer have been excessively filled.Surrounding temperature is too low.No electrical power. | Check that the door and gaskets close properly.Avoid unnecessary opening of the doors for a period of time.Check the temperature setting and, if it is possible, cool even more (see Temperature adjustment)Wait for the stabilization of the temperature of the refrigerator or freezer.Check that the ambient temperature is in accordance with what is indicated on the nameplate (see Installation).The power cord is not properly plugged in.Check whether the appliance is switched off (see Temperature adjustment)Ensure that in the home there is current. |
| The food in the refrigerator freezes. | Erroneous setting of the temperature.Food in contact with the back wall.The freezing of too much fresh food causes a lowering of the temperature of the refrigerator | Check the temperature setting (see Temperature Adjustment) and, if possible, decrease temperature setting.Separate the food from the back wall of the refrigerator.Do not exceed the maximum amount to be frozen (see Freezing). |
| The bottom of the refrigerator compartment is wet or droplets are present. | The drain tube could be clogged. | Clean the drain tube with a stick or the like to allow the discharge of water. |
| Presence of drops or water on the back wall of the refrigerator. | Normal operation of the refrigerator. | It is not a defect (see Defrosting). |
| Presence of water in the vegetable drawer. | Lack of air circulation.Vegetables and fruits with too much moisture. | Verify that your glass shelf tray vegetables are not put foods that prevent air circulation.Wrap the fruit and vegetable materials plastic such as, for example, films, bags or containers. |
| The motor runs continuously. | The doors are not closed.The doors are opened frequently.Ambient temperature is very high.Thickness of frost than 3mm. | Make sure the doors are closed and if the seals close properly.Avoid unnecessary open ports for a certain period.Verify that the ambient temperature is in accordance with the specifications on the nameplate (see Installation).Set the display/thermostat a warmer temperature.Defrost the unit (see Defrosting). |
| The frozen food is thawing. | The ambient temperature range below climate class of the product.The compressor starts rarelyThe freezer door is not closed. | Move the unit to a warmer or heat the room.Make sure the door is closed and that the gasket is sealing properly. |
| WI-FI light flashes 3 sec on - 1 sec off. | Router off.Lacking connection. | Switch the router on.Reset the product (see WI-FI) |
IF YOU ARE NOT SOLVED THE PROBLEM, CONTACT THE SERVICE CENTER, PLEASE GIVE THE TYPE OF FAULT AND THE INFORMATION ON THE PLATE OF THIS APPARATUS TO INSIDE THE REFRIGERATOR COMPARTMENT:
• The model of equipment. • The number of series.
CONTENTS
EN
SAFETY INFORMATION.... 22--22
INSTALLATION 23--23
OPERATION.... 23--23
STORAGE 24--24
FREEZING 25--25
DEFROSTING.... 25--25
MAINTENANCE AND CLEANING.... 26--26
ENERGY SAVING 26--26
PRODUCT DIMENSIONS AND BUILT-IN COMPARTMENT
.... 27--28
INSTALLATION OF THE APPLIANCE IN THE COLUMN .... 28--28
ASSEMBLY OF THE COLUMN PANELS
BUILDING IN THE APPLIANCE DOORS ..... 29--29
OPERATING PRECAUTIONS
CORRECT 29--29
SUSPEND USE OF THE APPLIANCE 29--29
TROUBLESHOOTING 30--30
Fig. 2
STORAGE
Fig. 4
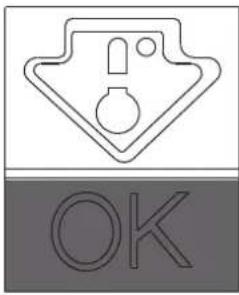
Fig. 5
NOTE:
DEFROSTING
PRODUCT DIMENSIONS AND BUILT-IN COMPARTMENT
ASSEMBLY OF THE COLUMN PANELS BUILT-IN APPLIANCE DOORS
PRECAUTIONS FOR CORRECT OPERATION
Fig. 2
STORAGE
Fig. 4
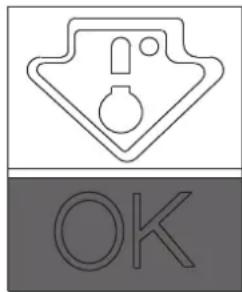
Fig. 5
NOTE:
DEFROSTING
PRODUCT DIMENSIONS AND RECESS DIMENSIONS
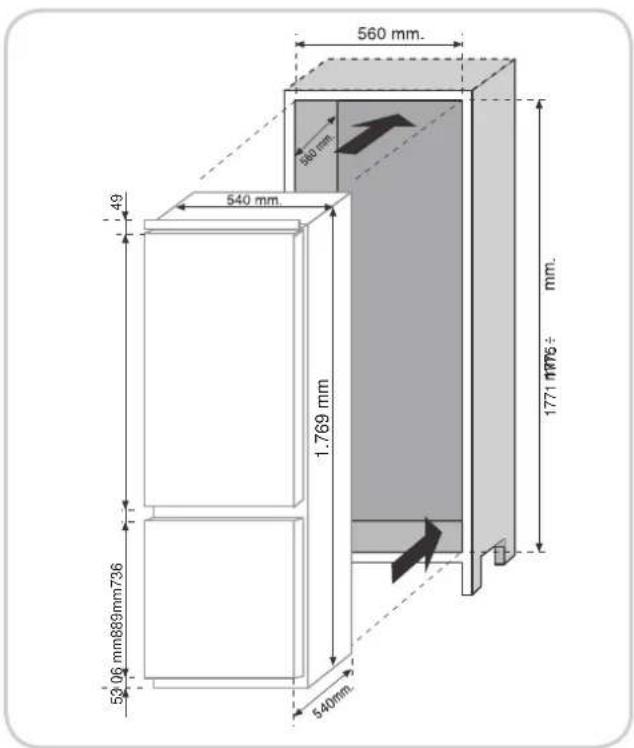
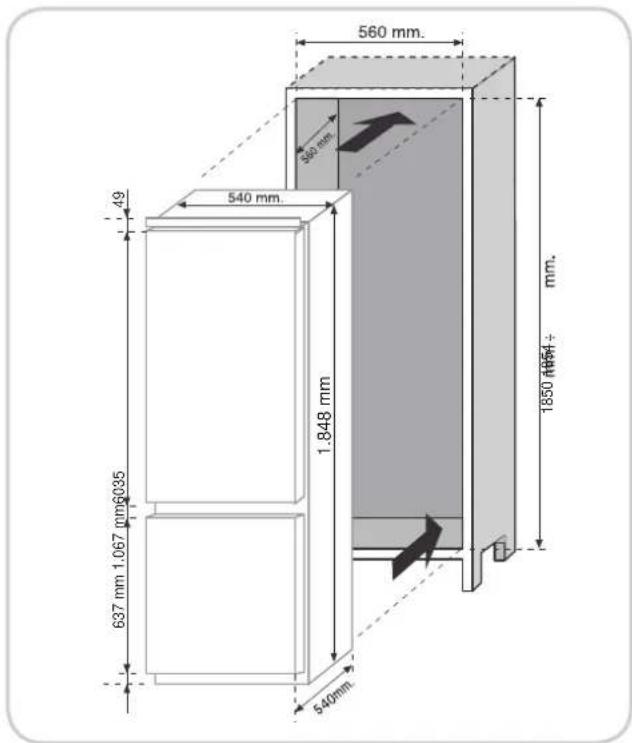
COUPLING OF THE PANELS OF THE BUILT-IN COLUMN OF THE APPLIANCE DOORS
| On/Off | 1 | 2 | 3 | 4 |
| On/Off | 1 | 2 | 3 | 4 |
Fig. 2
STORAGE
Fig. 4
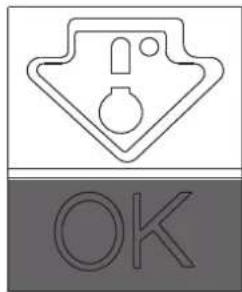
Fig. 5
NOTE:
DIMENSIONS
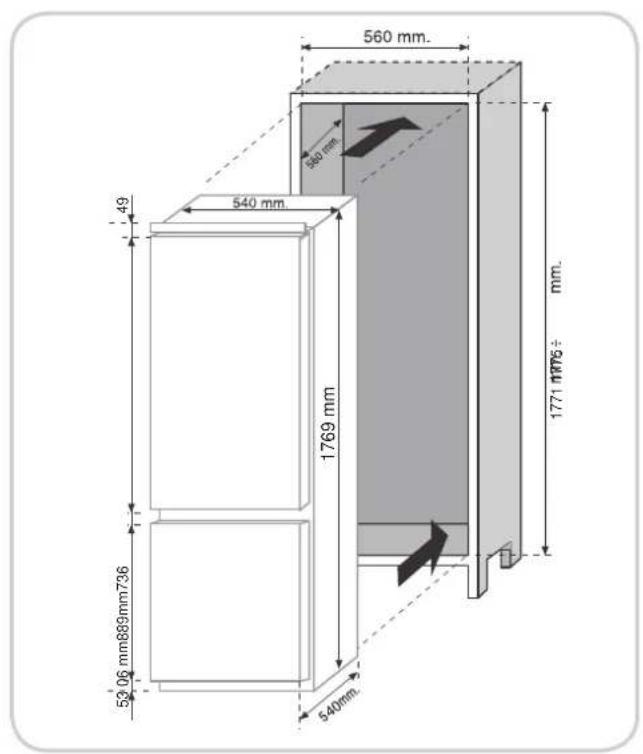
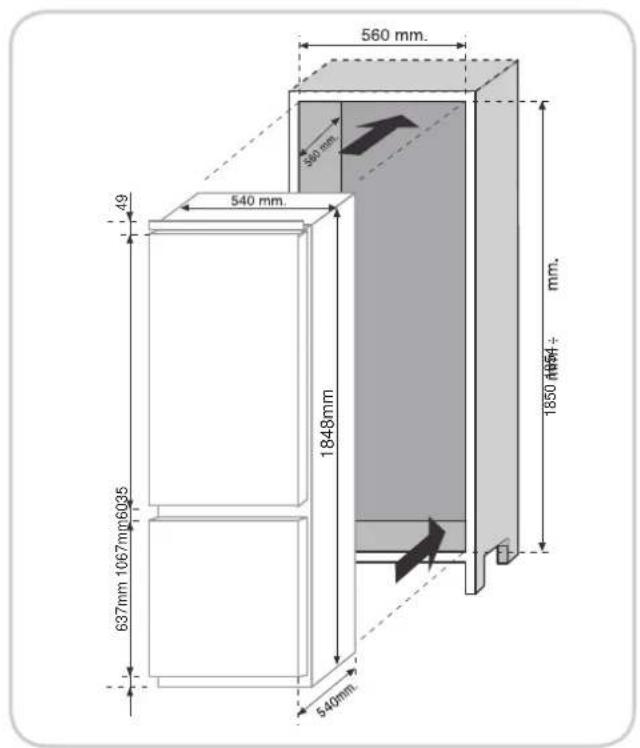
NOTES FOR CORRECT OPERATION
COUPLING THE PANELS TO THE BUILT-IN COLUMN
THE APPLIANCE DOORS 59--59
Fig. 2
MAINTENANCE
Fig. 4
Check that the temperature indicator clearly shows the word OK (Fig. 5).
DEFROSTING
Defrosting the refrigerator compartment
3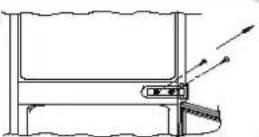
COUPLING PANELS OF THE BUILT-IN COLUMN INCLUDED IN THE APPLIANCE DOORS
Open the doors of the built-in column and the refrigerator. Position the built-in loader on the slide and fit it onto the refrigerator door.
- in bed & breakfasts (B & B)
Fig. 2
STORAGE
Fig. 4
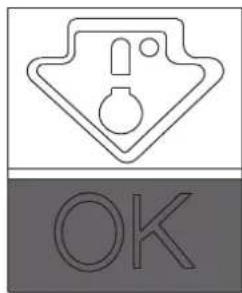
Fig. 5
NOTE:
• GEBROM, the compressor is in operation.
PRODUCT DIMENSIONS AND BUILT-IN CABINET
COUPLING OF THE BUILT-IN CABINET PANELS AND THE APPLIANCE DOORS
PRECAUTIONS FOR CORRECT OPERATION
PROBLEM CAUSE SOLUTION
Fig. 2
MAINTENANCE
Fig. 4
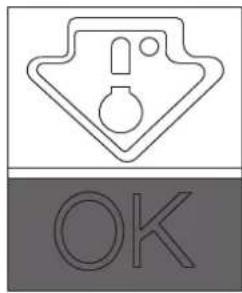
Fig. 5
NOTE:
DEFROSTING
Defrosting of the cooler
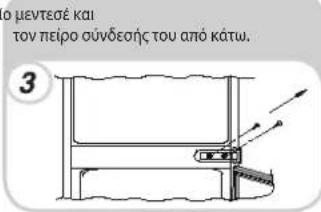
Fig. 2
STORAGE
Fig. 4
Fig. 5
NOTE:
DIMENSIONS OF THE APPLIANCE AND THE BUILT-IN CABINET
CONNECTING THE CABINET DOOR PANELS TO THE APPLIANCE DOORS
PRECAUTIONS FOR CORRECT OPERATION
Fig. 2
MAINTENANCE
Fig. 4
DIMENSIONS OF THE APPLIANCE AND THE CABINET FOR BUILT-IN INSTALLATION
ATTACHING THE CABINET PANELS TO THE APPLIANCE DOORS
MEASURES FOR CORRECT OPERATION
Fig. 2
STORAGE
Fig. 4
Fig. 2
FOOD STORAGE
Built-in products
Fig. 4
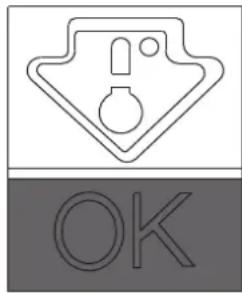
Fig. 5
NOTE:
Remove the top door.
PRODUCT DIMENSIONS AND INSTALLATION SPACE
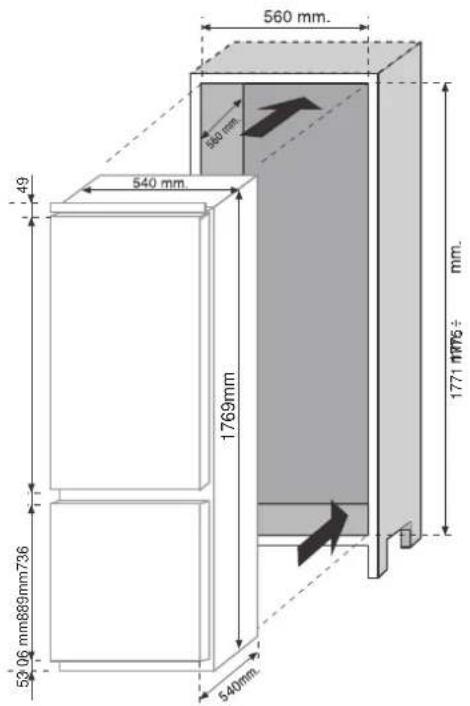
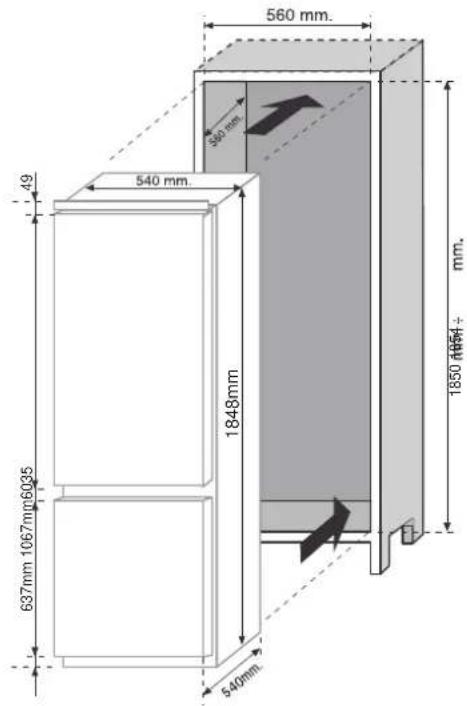
FIXING THE FURNITURE PANELS TO THE APPLIANCE DOORS
SAFETY MEASURES FOR CORRECT OPERATION OF THE APPLIANCE
SAFETY INSTRUCTIONS FOR USE
Fig. 2
FOOD STORAGE
Figure 4
Check that the letters OK are clearly visible on the temperature indicator. (Fig. 5)
If the letters are not visible, the temperature is too high.
Set a lower temperature and wait about 10 hours, then check the indicator again and adjust the temperature again if necessary.
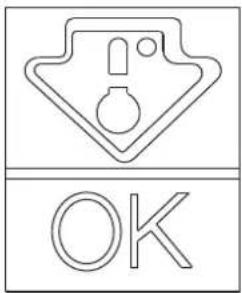
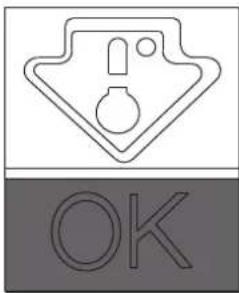
Figure 5
NOTE:
Remove the lower hinge on the right and the plastic plugs on the left, and reinstall them on the opposite side.
Remove the upper door. Remove the middle hinge and the pin below it.
Install the hinge and cover on the left side at the bottom.
APPLIANCE AND NICHE DIMENSIONS
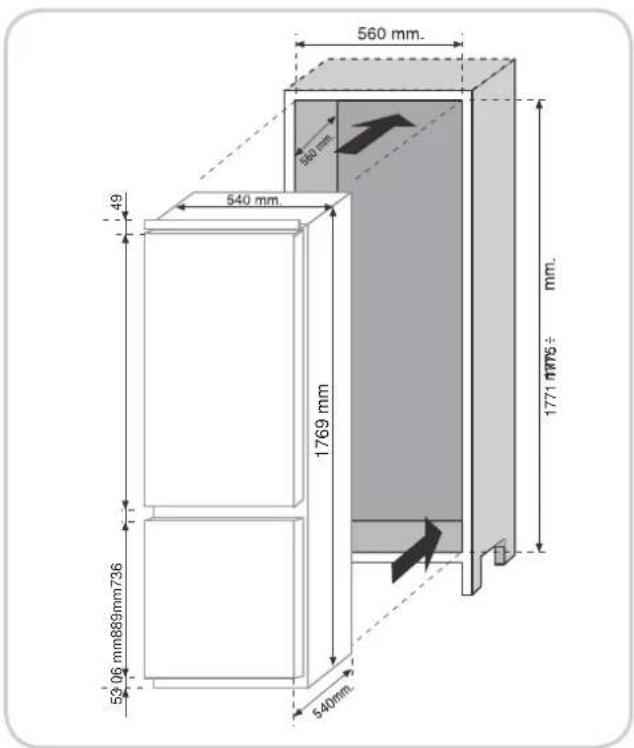
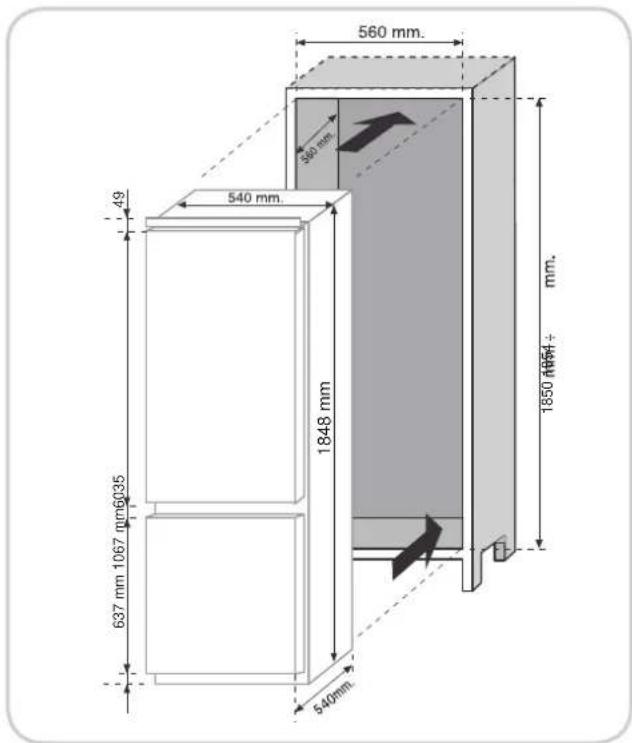
Slide the appliance into the niche and align it with the side of the cabinet on the side without hinges; it should be 3-5 mm away from the cabinet side.
1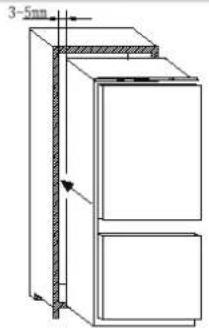
Make sure the appliance and cabinet doors align, and secure the appliance to the cabinet at the top.
2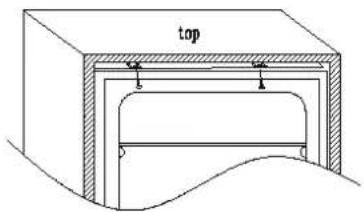
Using a Phillips screwdriver, loosen the pins under the middle hinge on the right, adjust it to the cabinet side, and tighten it.
ASSEMBLING THE CABINET DOORS AND THE REFRIGERATOR DOORS
The appliance is supplied with elements (slides and brackets) that allow the assembly of both doors.
Attach the slide to the inside of the cabinet door at the desired height. Make sure that the bracket is approximately 20 mm from the outer edge of the door!
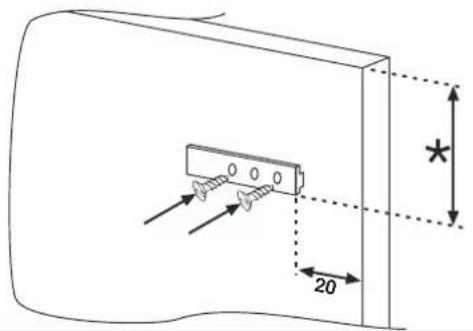
Open the cabinet door and the refrigerator door. Place the slide bracket onto the slide and attach it to the refrigerator door.
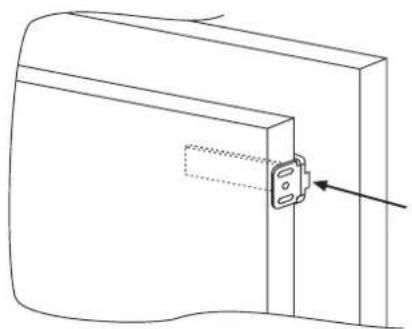
Mark the positions of the holes and drill them with a 2.5 mm diameter drill bit.
Assemble both doors; use the grooves on the slide brackets as a guide.
FOR TROUBLE-FREE OPERATION OF THE REFRIGERATOR
When you place the refrigerator in its proper location, push it against the wall to prevent access to the compressor.
There must be enough space between the cabinet and the ceiling; the cabinet must not reach the ceiling.
IF YOU WILL NOT USE THE APPLIANCE FOR SOME TIME
If you will not need the appliance for an extended period:
FOR appliances without a 4-star compartment: this refrigerating appliance is not suitable for freezing foodstuffs
FOR a free standing appliance: this refrigerating appliance is not intended to be used as a built-in appliance
FOR Wine Coolers: this appliance is intended to be used exclusively for the storage of wine
FOOD STORAGE
Position different food in different compartments according to the table below.
| Refrigerator compartment | Type of food |
| Door or balconies of fridge compartment | ·Foods with natural preservatives, such as jams, juices, drinks, condiments.·Do not store perishable foods |
| Crisper drawers (salad drawer) | ·Fruits, herbs and vegetables should be placed separately in the crisper bin·Do not store bananas, onions, potatoes, garlic in the refrigerator |
| Fridge shelf – middle | ·Dairy products, eggs |
| Fridge shelf – top | ·Foods that do no need coocking, such as ready-to-eat foods, deli meats, leftovers. |
| Freezer drawer(s)/tray | ·Foods for long-term storage·Bottom drawer for raw meet, poultry, fish·Middle drawer for frozen vegetables, chips.·Top tray for ice cream, frozen fruit, frozen baked goods. |
- It's suggested to set the temperature at 4°C in the fridge compartment, and, if possible, at -18°C in the freezer compartment.
- For most food categories, the longest storage time in the fridge compartment is achieved with colder temperatures. Since some particular products (such as fresh fruits and vegetables) may be damaged by colder temperatures, it is suggested to keep them in the crisper drawers, whenever present. If not present, maintain an average setting of the thermostat.
- For frozen food, refer to the storage time written on the food packaging. This storage time is achieved whenever the setting respects the reference temperatures of the compartment (one-star -6°C, two stars -12°C, three stars -18°C).
POSITIONING
Install the appliance at a location where the ambient temperature corresponds to the climate class indicated on the rating plate of the appliance:
- Extended temperate (SN): 'this refrigerating appliance is intended to be used at ambient temperatures ranging from 10 °C to 32 °C'
- Temperate (N): 'this refrigerating appliance is intended to be used at ambient temperatures ranging from 16 °C to 32 °C'
- Subtropical (ST): 'this refrigerating appliance is intended to be used at ambient temperatures ranging from 16 °C to 38 °C'
- Tropical (T): 'this refrigerating appliance is intended to be used at ambient temperatures ranging from 16 °C to 43 °C'
AVAILABILITY OF SPARE PARTS
Thermostats, temperature sensors, printed circuit boards and light sources are available for a minimum period of seven years after placing the last unit of the model on the market. Door handles, door hinges, trays and baskets for a minimum period of seven years and door gaskets for a minimum period of 10 years, after placing the last unit of the model on the market.
GUARANTEE
Minimum guarantee is: 2 years for EU Countries, 3 years for Turkey, 1 year for UK, 1 year for Russia, 3 years for Sweden, 2 years for Serbia, 5 years for Norway, 1 year for Morocco, 6 months for Algeria, Tunisia no legal warranty required.
TECHNICAL ASSISTANCE
To contact technical assistance, visit our website: https://corporate.haier-europe.com/en/ Under the “website” section, choose the brand of your product and your country. You will be redirected to the specific website where you can find the telephone number and form to contact technical assistance.
For further information about the product, please consult https://eprel.ec.europa.eu/ or scan the QR code on the energy label supplied with the appliance.
- STORAGE
- NOTE
- PRACTICAL TIPS
- MATCHING THE PANELS OF THE BUILT-IN COLUMN TO THE APPLIANCE DOORS
- SAFETY INFORMATION
- DISPOSAL OF OLD APPLIANCES
- CONFORMITY
- INSTALLATION
- WARNINGS
- ELECTRICAL CONNECTION
- APPLIANCE START-UP
- OPERATION
- TURNING THE APPLIANCE ON
- TURNING THE APPLIANCE OFF
- SETTING THE TEMPERATURE
- ADVANCED SETTINGS MENU
- DOOR OPEN ALARM
- REFRIGERATOR COMPARTMENT FAN (IF PRESENT)
- CONSERVATION
- REFRIGERATOR ZONE
- FRUIT / VEGETABLES
- REFRIGERATED SECTION FRESH ZONE
- INDICATOR OF THE TEMPERATURE IN THE COLDEST ZONE
- FREEZER ZONE
- PRACTICAL RECOMMENDATIONS
- FREEZING
- DEFROSTING
- DEFROSTING THE REFRIGERATOR COMPARTMENT
- DEFROSTING THE FREEZER COMPARTMENT
- WARNING
- MAINTENANCE AND CLEANING
- LIGHTING
- LED LIGHTING
- CLEANING
- NOTICE
- IMPORTANT
- ENERGY SAVINGS
- FOR BETTER ENERGY SAVINGS, WE SUGGEST
- AVOIDING NOISES
- REVERSIBILITY OF THE DOOR
- REVERSING THE OPENING OF THE DOORS
- PRODUCT DIMENSIONS AND BUILT-IN COMPARTMENT
- COUPLING OF THE PANELS OF THE BUILT-IN COLUMN OF THE APPLIANCE DOORS
- PRECAUTIONS FOR THE CORRECT OPERATION
- SUSPENDING USE OF THE APPLIANCE
- CONTENTS
- EN
- ASSEMBLY OF THE COLUMN PANELS BUILT-IN APPLIANCE DOORS
- PRECAUTIONS FOR CORRECT OPERATION
- PRODUCT DIMENSIONS AND RECESS DIMENSIONS
- DIMENSIONS
- NOTES FOR CORRECT OPERATION
- MAINTENANCE
- COUPLING PANELS OF THE BUILT-IN COLUMN INCLUDED IN THE APPLIANCE DOORS
- PRODUCT DIMENSIONS AND BUILT-IN CABINET
- COUPLING OF THE BUILT-IN CABINET PANELS AND THE APPLIANCE DOORS
- DEFROSTING OF THE COOLER
- DIMENSIONS OF THE APPLIANCE AND THE BUILT-IN CABINET
- CONNECTING THE CABINET DOOR PANELS TO THE APPLIANCE DOORS
- DIMENSIONS OF THE APPLIANCE AND THE CABINET FOR BUILT-IN INSTALLATION
- ATTACHING THE CABINET PANELS TO THE APPLIANCE DOORS
- MEASURES FOR CORRECT OPERATION
- FOOD STORAGE
- PRODUCT DIMENSIONS AND INSTALLATION SPACE
- FIXING THE FURNITURE PANELS TO THE APPLIANCE DOORS
- SAFETY MEASURES FOR CORRECT OPERATION OF THE APPLIANCE
- SAFETY INSTRUCTIONS FOR USE
- APPLIANCE AND NICHE DIMENSIONS
- ASSEMBLING THE CABINET DOORS AND THE REFRIGERATOR DOORS
- FOR TROUBLE-FREE OPERATION OF THE REFRIGERATOR
- IF YOU WILL NOT USE THE APPLIANCE FOR SOME TIME
- POSITIONING
- AVAILABILITY OF SPARE PARTS
- GUARANTEE
- TECHNICAL ASSISTANCE
Brand : HOOVER
Model : BHBS 174NHCH
Category : Refrigerator