P61076 (MD 43061) - Pregnant Lifebeat - Free user manual and instructions
Find the device manual for free P61076 (MD 43061) Lifebeat in PDF.


| Product Type | Portable Bluetooth Speaker |
| Brand | Lifebeat |
| Model | P61076 (MD 43061) |
| Dimensions (W x H x D) | 200 x 100 x 100 mm (approx.) |
| Weight | 0.5 kg (approx.) |
| Power Source | Built-in rechargeable battery, USB-C charging |
| Battery Life | Up to 10 hours |
| Connectivity | Bluetooth 5.0, 3.5 mm AUX input |
| Output Power | 10 W RMS |
| Frequency Response | 80 Hz - 20 kHz |
| Driver Size | 52 mm full-range driver |
| Water Resistance | IPX5 (splash-proof) |
| Controls | Power, volume +/- , play/pause, track skip, Bluetooth pairing |
| Microphone | Built-in for hands-free calls |
| Supported Audio Formats | MP3, WAV, FLAC (via Bluetooth) |
| Cable Included | USB-C charging cable, 3.5 mm AUX cable |
| Cleaning Instructions | Wipe with a soft dry cloth; do not use abrasive cleaners or immerse in water |
| Safety Precautions | Do not expose to extreme temperatures; keep away from children; avoid dropping |
| Spare Parts Availability | Battery and charging port replaceable by authorized service center |
| Repairability | User replaceable battery; other repairs by qualified technician |
| Package Contents | Speaker, USB-C cable, AUX cable, user manual |
| Warranty | 1 year limited warranty |
Frequently Asked Questions - P61076 (MD 43061) Lifebeat
User questions about P61076 (MD 43061) Lifebeat
0 question about this device. Answer the ones you know or ask your own.
Ask a new question about this device
Download the instructions for your Pregnant in PDF format for free! Find your manual P61076 (MD 43061) - Lifebeat and take your electronic device back in hand. On this page are published all the documents necessary for the use of your device. P61076 (MD 43061) by Lifebeat.
USER MANUAL P61076 (MD 43061) Lifebeat
natural_image
Black rectangular electronic device with metallic silver stripe (no visible text or symbols)WLAN-Multiroom-Lautsprecher WLAN multi-room speaker WLAN-Multiroom hoparlör
LIFEBEAT® P61076 (MD 43061)
Inhaltsverzeichnis
DE
natural_image
Pure architectural line drawing of a rectangular structure with no text, numbers, or symbols7) Lautsprecher
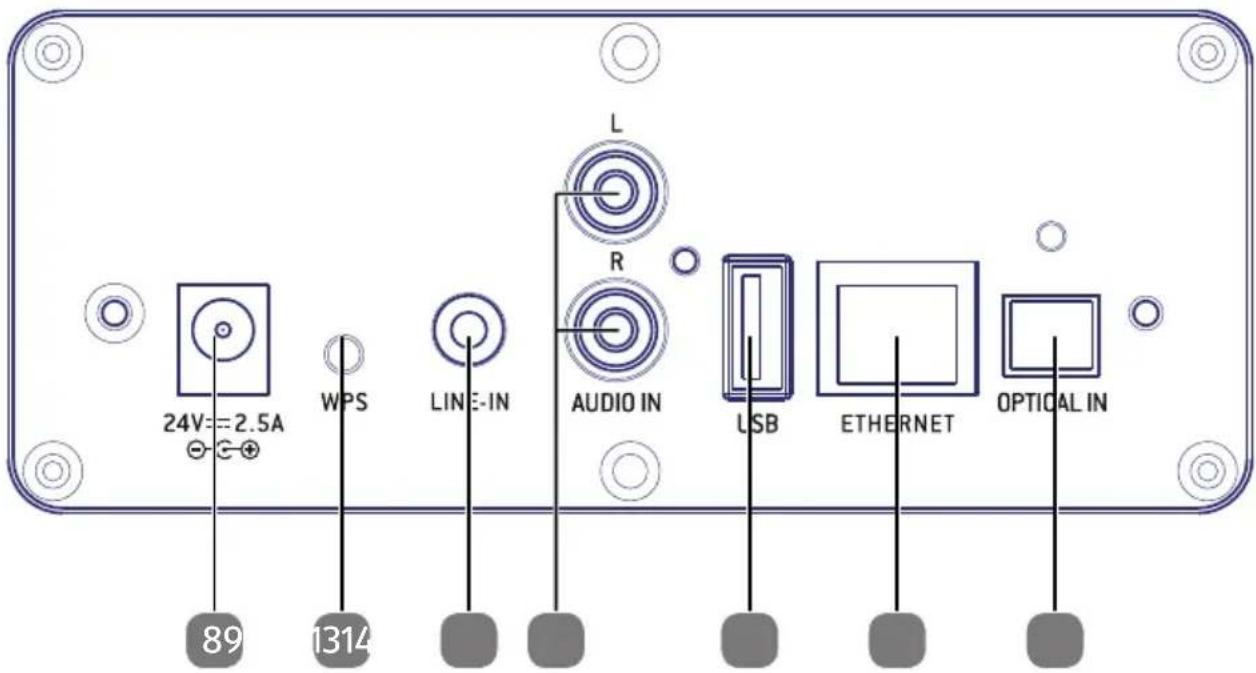
5.3. Rückseite
text_image
24V=2.5A WPS LINE-IN AUDIO IN L R USB ETHERNET OPTICAL IN 89 1314text_image
QR code image containing encoded data, no visible human-readable texttext_image
GERATELSTE Family room 120 Mabaplan 3 120 Mabaplan 4 Balance 120 Mabaplan 5 RETAIN ADD1. Notes on how to use these instructions .... 37
1.1. Symbols and keywords used in these instructions ....37
EN
2. Proper use
3. Safety information
3.1. People not permitted to use this device ....38
3.2. Setting up the device safely 39
3.3. Mains connection....39
3.4. Thunderstorms....40
3.5. Never carry out repairs yourself ....40
4. Getting started
4.1. Check package contents ....41
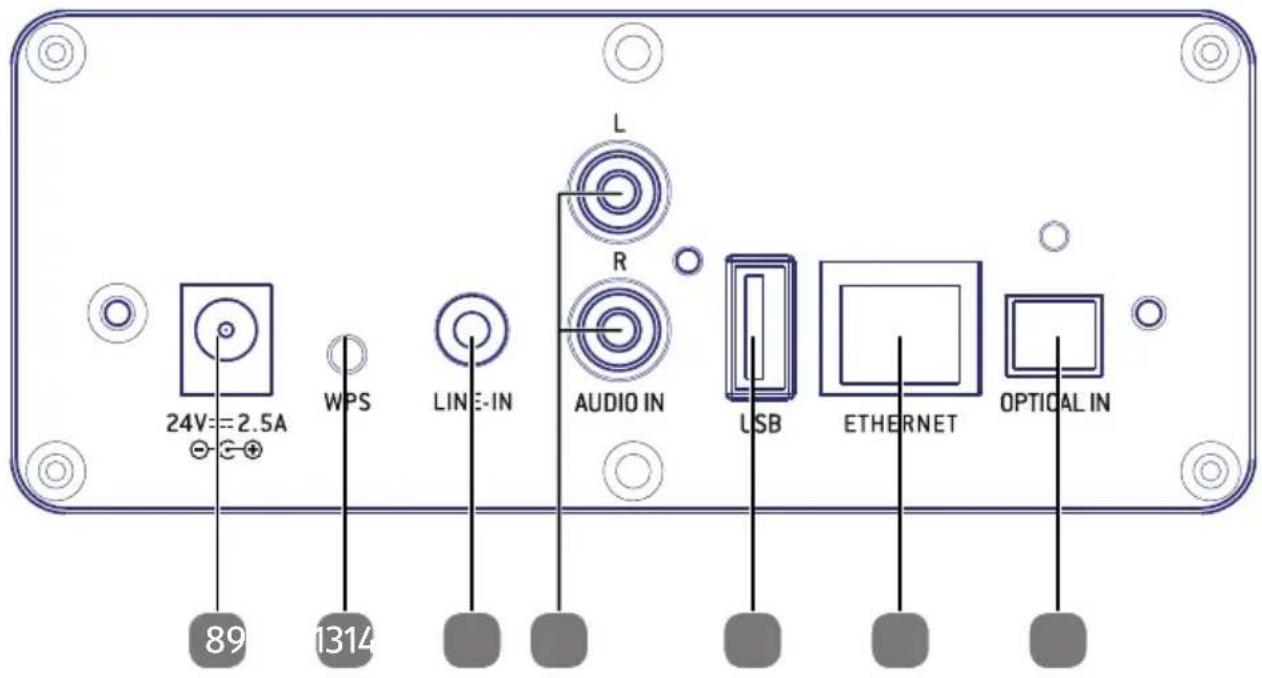
4.3. Connections....42
5. Overview of the WLAN loudspeaker 43
5.1. Top....43
5.2. Front 44
5.3. Rear 45
5.4. Remote control....46
6. LED displays
7. Controlling the volume via remote controls for other devices ...... 47
-
Network configuration....48
8.1. Network requirements 48 -
Connecting to a power supply 48
-
Switching the loudspeaker on and off 48
-
Using the device for the first time....48
11.1. WLAN connection via WPS 49
- Control using the Lifebeat P application 49
12.1. Installation via direct link....49
12.2. Installation via Google Play or the Apple App Store ....49
-
Adding the WLAN loudspeaker to a network.... 50
-
Playing back music 51
14.1. Installing the app on an Android/Apple smartphone/tablet PC......51
14.2. Establishing a direct WLAN connection via LIFEBEAT P....51
14.3. Listening to music via Spotify ^® 52
14.4. Installing Spotify 52
-
Playback via the LIFEBEAT P app 53
-
Playback via Bluetooth 54
-
Playback from an external audio device.... 54
-
Charging a USB device via the USB socket 54
-
Resetting the device in case of malfunction....55
19.1. Resetting the device to factory settings via the app ....55
19.2. Manually resetting the device to factory settings ....56
- Software update 57
- Troubleshooting 58
- Cleaning 59
- Disposal 59
- Technical data 60
- Compliance information 61
- Legal notice 62
1. Notes on how to use these instructions

Before using the device for the first time, read these operating instructions thoroughly and follow the safety advice!
Please keep these instructions in a safe place for future reference. Always include these instructions if you pass the device on to a new owner.
1.1. Symbols and keywords used in these instructions
 | DANGER!Warning of immediate mortal danger!WARNING!Warning of possible mortal danger and/or serious irreversible injuries!CAUTION!Warning of possible minor or moderate injuries! |
 | ATTENTION!Please follow the instructions to avoid property damage! |
 | NOTICE!Additional information on using the device! |
 | NOTICE!Please follow the instructions in the operating instructions! |
 | WARNING!Warning of risk of electric shock! |
 | WARNING!Warning of danger due to loud volume! |
| • Bullet point/information on operating steps and results | |
| ► Tasks to be performed | |
2. Proper use
This device is used for playing audio files streamed over a WLAN network. In addition, you can use the device to play audio signals from external devices, as well as to charge USB devices.
Never use the device for any other purpose. Only use the device indoors.
- The device is intended for private use only and not for industrial/commercial use.
Please note that we shall not be liable in cases of improper use:
- Do not modify the device without our consent and do not use any auxiliary equipment that we have not approved or supplied.
- Use only spare parts and accessories that we have supplied or approved.
- Heed all the information in these operating instructions, especially the safety information. Any other use is deemed improper and can cause personal injury or property damage.
- Do not use the device in extreme environmental conditions.
3. Safety information
3.1. People not permitted to use this device
Keep the device and its accessories out of the reach of children.
- This device may be used by children over the age of 8 and by persons with reduced physical, sensory or mental abilities or by those without experience and/or knowledge, if they are supervised or have been instructed in the safe use of the device and have understood the dangers that result from it. Children must not be allowed to play with the device. Cleaning and user maintenance may not be carried out by children, unless they are aged 8 or over and are supervised.
- Children younger than 8 should be kept away from the device and the mains cable.
- DANGER! Keep plastic packaging out of the reach of children. There is a risk of suffocation!
3.2. Setting up the device safely
- Set up and operate all the components on a stable, level and vibration-free surface to prevent the product from falling.
- Do not subject the product to knocks and vibrations. Knocks and vibrations may damage the sensitive electronics.
- Do not place the product near heat sources (e.g. heaters) that could affect it.
- Do not place naked flames (e.g. lit candles) on or near the product.
- Make sure that the vents are never covered so as to ensure that there is always adequate ventilation.
- Do not place any objects on the cables as they may be damaged.
- Maintain a minimum distance of approx. 10 cm between the product or mains adapter and any walls. Ensure adequate ventilation.
- Do not place liquid-filled containers, such as vases, on or near the device. The container may tip over and the liquid may impair the electrical safety of the product. Keep the device away from moisture and from water in droplet or spray form.
- In order to prevent malfunctions, avoid knocks, dust, heat and direct sunlight. The operating temperature is 5-35°C.
- Do not use the product outdoors as it could be damaged by rain, snow, etc.
- To avoid malfunctions, keep the product at a distance of at least one metre from high-frequency or magnetic interference sources (televisions, loudspeakers, mobile telephones, etc.). If any malfunctions occur, set up the device at a different location.
- Major changes in temperature or fluctuations in humidity can cause moisture to build up within the product due to condensation – this can cause an electrical short circuit.
3.3. Mains connection
- Connect the mains adapter only to a power socket (AC 100–240 V \~ 50/60 Hz) that is easy to reach and close to the place where you have set up the device. The socket outlet must be freely accessible so that you can unplug the device from the mains quickly if necessary.
-
Only use the power cable supplied with the product. Never try to connect the mains adapter to other connectors as this may cause damage.
-
If the product has been moved from a cold room to a warm room, wait before connecting it to the power supply. The resulting condensation may damage the device. The device can be operated safely as soon as it has reached room temperature.
- Make sure that the mains cable does not present a trip hazard. Do not allow the connecting cable to become trapped or squashed.
3.4. Thunderstorms
Pull out the mains plug if you are away for a long period of time or there is a thunderstorm.
3.5. Never carry out repairs yourself
- If the plug, cable or device is damaged, immediately unplug the device from the mains.
- Do not use the device if it or the connecting cables are visibly damaged or if the device itself has been dropped.

WARNING!
Never try to open and/or repair a device component yourself. There is a risk of electric shock!
- In the event of a fault, contact our Service Centre or another suitable professional repair workshop.
3.6. Safe handling of batteries
The remote control of the device requires a button cell battery. Please note the following:
- Keep batteries away from children. They can be fatal if swallowed. If a battery is swallowed, please obtain immediate medical assistance.
- Do not throw batteries into a fire; do not short-circuit them and do not dismantle them.
- If necessary, clean the battery and device contacts before insertion.
- Please pay attention to the polarity (+/−) when inserting the batteries.
-
Remove the batteries if the device is not going be used for long periods.
-
Remove spent batteries immediately from the device! There is an increased risk of leakage!
- Do not expose the batteries to extreme conditions; for example, do not place the device on top of radiators! There is an increased risk of leakage!
- Never try to recharge non-rechargeable batteries! There is a risk of explosion!
- Immediately remove leaking batteries from the remote control. Clean the contacts before inserting a new battery. There is a risk of skin irritations from battery acid!
- If battery acid has leaked out, under no circumstances allow it to come into contact with the skin, eyes and mucous membranes! If the acid does come into contact with skin, immediately rinse the affected areas with plenty of clear water and consult a doctor immediately.
4. Getting started
4.1. Check package contents
Remove all packaging materials including the film on the display.

DANGER!
Do not let children play with the plastic film. There is a risk of suffocation!
Please check your purchase to ensure that all items are included. If anything is missing, please contact us within 14 days of purchase. The following items are supplied with your product:
- WLAN loudspeaker
- Mains adapter (model TP06-240250W)
- Remote control
• These operating instructions - Warranty card
4.2. Inserting the battery in the remote control
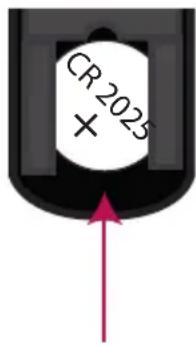
The remote control works with one 3 V button battery, type CR2025.

WARNING!
There is a risk of explosion if batteries are replaced incorrectly. Replace batteries only with the same or equivalent type.
▶ Slide down the battery compartment cover on the back of the remote control. Remove any spent batteries by pushing them down and out of the guide and dispose of them at a collection point for used batteries.
Insert a fresh CR 2025 battery into the battery compartment with the positive pole facing up. Ensure the +/- terminals are correct.
▶ Replace the cover.
text_image
CR2025 ×4.3. Connections
WLAN mode: The device has an integrated WLAN antenna.
▶ Mains adapter: Connect the connector plug on the supplied mains adapter to the DC IN socket and plug the mains plug into an AC 100–240 V \~ 50/60 Hz socket.
LINE IN: Connect a 3.5 mm stereo jack to the LINE IN socket to play back stereo sound output from other audio devices via the WLAN loudspeaker.
▶ AUDIO IN: Connect a stereo cinch cable to the AUDIO IN sockets to play back stereo sound output from other audio devices via the WLAN loudspeaker.
USB: You can connect a smart device here to charge its internal battery via the USB connection.
▶ ETHERNET: Connect a network cable to the ETHERNET socket to connect the WLAN loudspeaker to your home network via LAN.
▶ OPTICAL IN: Connect a Toslink cable to the OPTICAL IN socket to play back digital audio signals from other audio devices via the WLAN loudspeaker.
5. Overview of the WLAN loudspeaker
5.1. Top
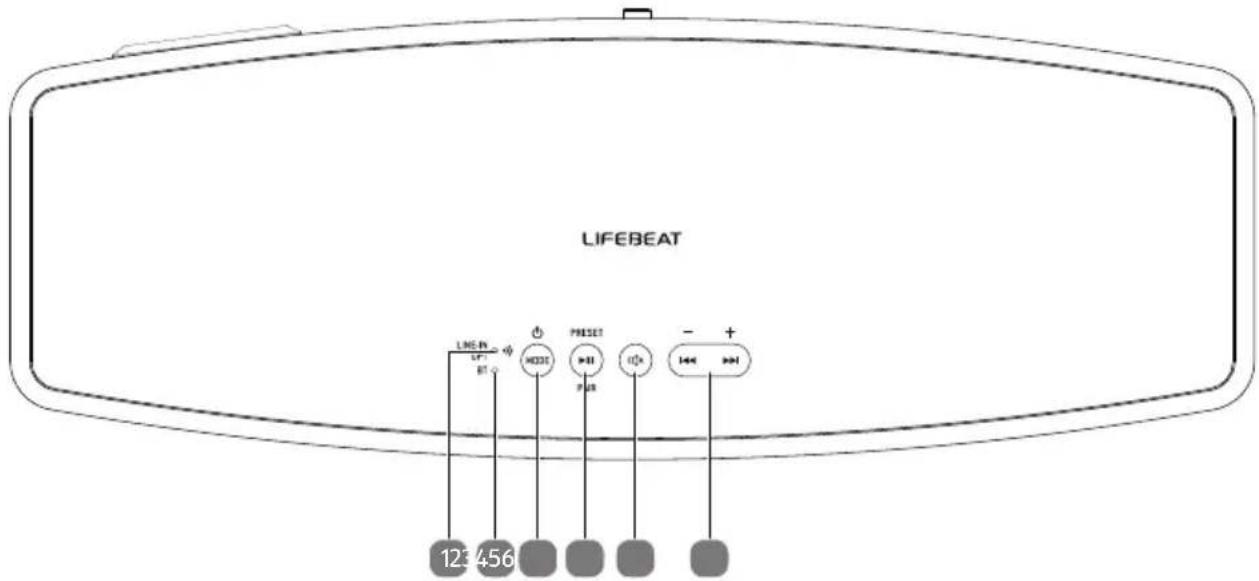
text_image
LIFEBEAT LINE IN + - 123456 RESET + - +1) OPT/ LINE IN/ WIFI LED
Lights up red LINE IN/ AUDIO IN operating mode
Lights up green OPTICAL IN
Flashes yellow Waiting for a WLAN connection
Flashes quickly yellow WLAN operating mode (searching for connection)
Lights up yellow WLAN operating mode (connected)
Off
Standby
mode
2) BLUETOOTH LED
3) MODE/STANDBY: Switch to standby mode/switch on device; select operating mode
4) ▶II; PRESET/PAIR: Play/Pause; BT Pairing
5) MUTE: Switch sound to mute
6) VOL-/VOL+: Press for a long time: reduce/increase sound, press briefly: previous track/next track (not available in Bluetooth mode)
5.2. Front
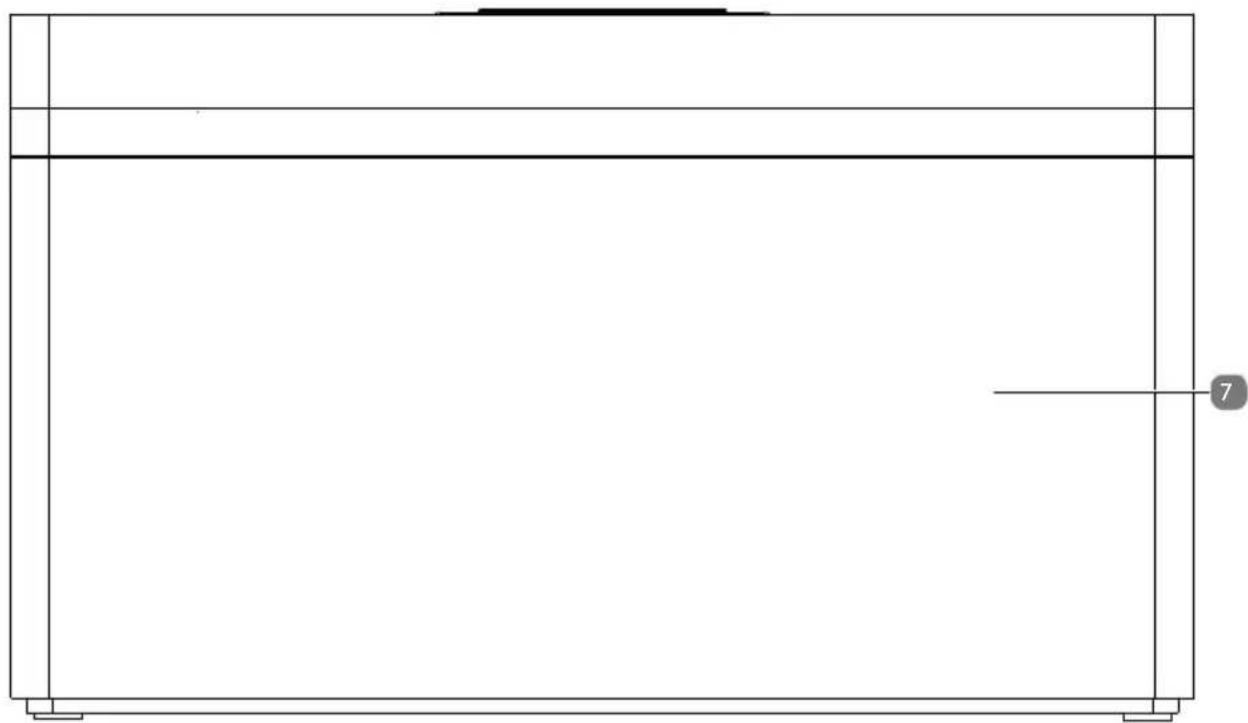
natural_image
Pure architectural or engineering line drawing of a rectangular frame with no text, numbers, or symbols7) Speaker
5.3. Rear
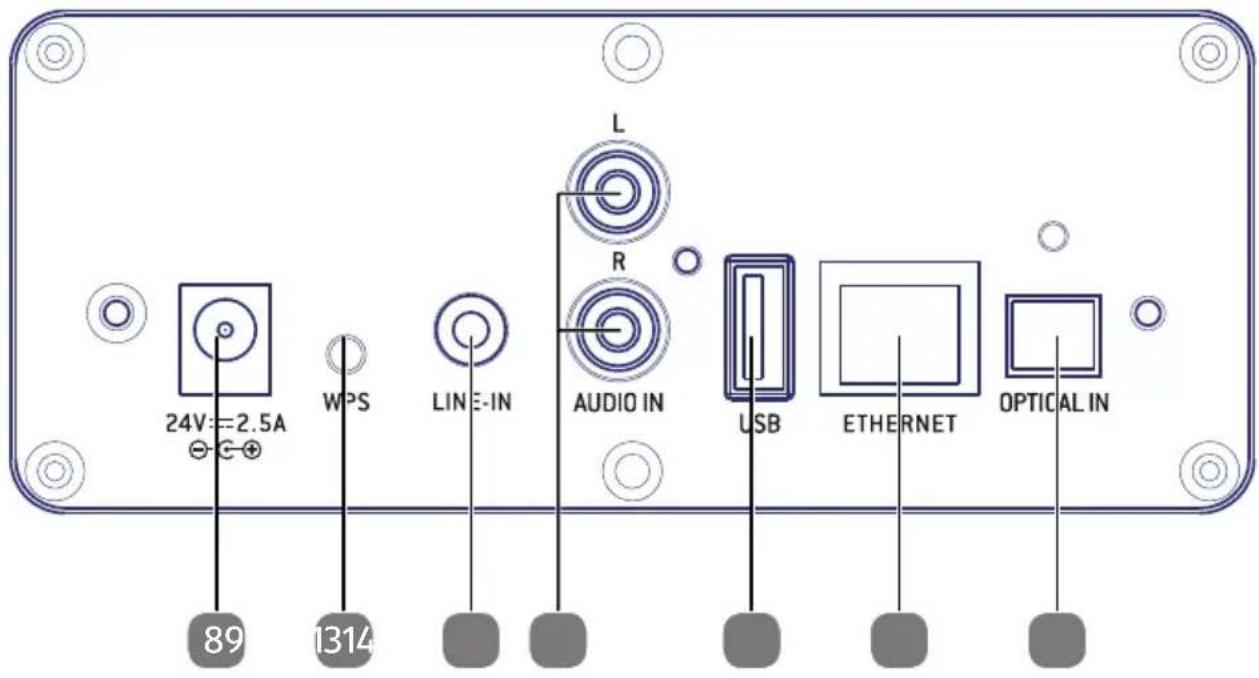
text_image
24V: =2.5A WPS LINE-IN AUDIO IN L R USB ETHERNET OPTICAL IN 89 13148) DC IN: Socket for mains power adapter
9) WPS: Use WPS function
10) LINE IN: Audio input, 3.5 mm stereo socket
11) AUDIO IN L/R: Audio input cinch sockets L/R
12) USB: USB socket for charging external devices
13) Ethernet: LAN socket (RJ45 socket)
14) OPTICAL IN: Optical audio input (Toslink socket)
5.4. Remote control
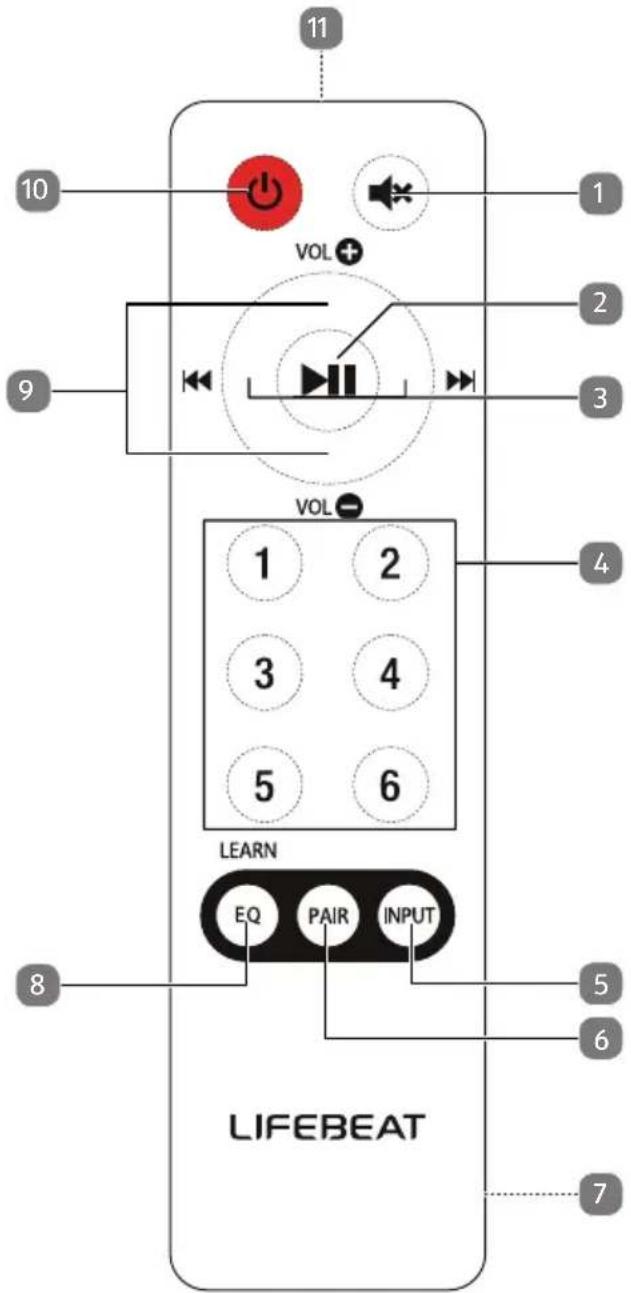
text_image
11 10 VOL + 1 2 3 9 VOL - 4 1 2 3 4 5 6 LEARN EQ PAIR INPUT 8 LIFEBEAT 5 6 71) MUTE: Switch sound to mute
2) ▶ II: Start/pause playback
3) SKIP /: Previous track/next track
4) Number buttons
5) INPUT: Select operating mode
7) Battery compartment (on the rear)
9) VOL -/VOL +: Decrease/increase volume
11) IR sensor
6) PAIR: Activate pairing function in Bluetooth mode
8) EQ/LEARN: Set Equalizer; Long press for learning function
10) STANDBY/ON: Switch to standby mode/switch on device
6. LED displays
| LED Display Status | ||
| BLUETOOTH | Blue light Bluetooth | connection active |
| Flashes blue Searching | for Bluetooth connection | |
| OPT/LINE IN/WIFI | Lights up red Operating modeLINE IN/ AUDIO IN | |
| Green light OPTICAL | IN | |
| Flashes yellow Waiting for WLAN connection | ||
| Flashes quickly yellow | WLAN operating mode (searching for connection) | |
| Lights up yellow WLAN | AN operating mode (connected) | |
| Off Standby mode | ||
7. Controlling the volume via remote controls for other devices
You can control the volume on the WLAN loudspeaker via the remote control for your television set. To do this, the IR receiver on the WLAN loudspeaker must firstly learn to read the signal from the new remote control.
▶ Hold down the EQ/LEARN button on the remote control for the loudspeaker for approx. 2 seconds.
The OPT/LINE IN/WIFI LED flashes red.
Now press VOL + on the remote control for the loudspeaker. The OPT/LINE IN/WIFI LED flashes quickly red.
▶ Point the remote control for the television set at the IR receiver on the WLAN loudspeaker and then press the corresponding button for VOL +.
The OPT/LINE IN/WIFI LED stops flashing red.
▶ Repeat this process for the VOL - function.

NOTICE!
Not every infrared code is compatible with the remote control for the WLAN loudspeaker.
8. Network configuration
The WLAN loudspeaker is connected to the network via WLAN or LAN. The WLAN antenna on the loudspeaker receives the signals from your network router. In order to connect the WLAN loudspeaker to your home network via LAN, connect a network cable to the ETHERNET socket.
8.1. Network requirements
The network must meet the following requirements for the device to be able to access music files on the network:
- The router used for the network must have a DHCP server function so it can automatically assign the device a network IP address.
Otherwise, set the DHCP function in the web interface to manual.
- The media sharing function for UPNP must be set up on the router.
9. Connecting to a power supply
Connect the power supply plug on the supplied mains adapter (model TP06-240250W) to the DC IN socket on the device.
Connect the mains cable with the socket on the mains adapter and then connect it to a 230 V \~ 50/60 Hz mains socket.
10. Switching the loudspeaker on and off
Switching on the loudspeaker
▶ Press the MODE/STANDBY button on the loudspeaker to turn it on.
The loudspeaker switches to the last mode set.
Standby mode
▶ Press and hold down the MODE/STANDBY button until the Bluetooth and OPT/LINE IN/WIFI LEDs go out to switch the loudspeaker to standby mode. In standby mode, the loudspeaker maintains its network connection so that it is immediately available to use when it is switched on again. The loudspeaker consumes more electricity in this operating mode than in standby mode.
11. Using the device for the first time
- You can connect the WLAN loudspeaker to your router's existing network with the WPS button.
- When using the WLAN loudspeaker for the first time, position it as near as possible to the router in order to guarantee a clear WLAN signal during the setup process. Then move the WLAN loudspeaker to the desired position within the range of the WLAN signal.
11.1. WLAN connection via WPS
If your router has a WPS button, you can easily connect the loudspeaker to the network using this button:
▶ Press the WPS button on the WLAN loudspeaker until the OPT/LINE IN/WIFI LED flashes yellow.
Now press the WPS button on the WLAN router.

NOTICE!
Please also refer to the instructions for the router.
The device will now establish a connection with the network. The OPT/LINE IN/WIFI LED flashes quickly while the connection is being established.
- Once a connection has been successfully established, the OPT/LINE IN/WIFI LED will light up permanently yellow.
- The device can now play back audio signals via the network.
- The device saves the connection data so that it does not need to be entered again when the device is switched on again.
12. Control using the Lifebeat P application
You can control your loudspeaker using the Lifebeat P app on your smartphone or tablet PC.
12.1. Installation via direct link
Scan the adjacent QR code to be directed to the download page for the Lifestream IR app on Google Play or the App Store from Apple:

text_image
QR code image containing encoded data, no visible human-readable text12.2. Installation via Google Play or the Apple App Store
▶ Open Google Play or the Apple App Store and search for the term "MEDION Lifebeat P" ^1 .
▶ Install the "Lifebeat P" app from Medion. Follow the installation instructions on the screen.

NOTICE
In order to be able to install the Lifebeat P application, there must be an Internet connection.
13. Adding the WLAN loudspeaker to a network
▶ Switch on the loudspeaker and wait until the system has completely powered up (you will hear a welcome tone).
Switch the loudspeaker to WLAN mode. The OPT/LINE IN/WIFI LED flashes yellow.
Connect your mobile device to your WLAN network.
▶ Start the LIFEBEAT P app and tap on Add Device.
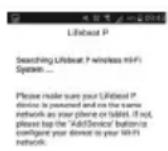
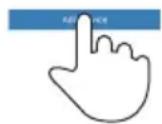
Now press the WPS button on the rear of the loudspeaker. The OPT/LINE IN/WIFI LED flashes quickly yellow.
Tap on Next.
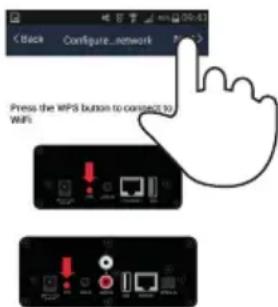
text_image
< Back Configure_network Press the WiFi button to connect to WiFiNow enter the password for your WLAN network and confirm your entry by tapping on Connect.
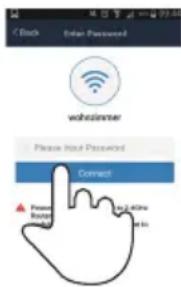
text_image
Back Enter Passworded vohocimmer Please input Password Connect Power Board 10.240ms 10.240ms 10.240ms▶ A signal tone will sound after the connection has been successfully established and the OPT/LINE IN/WIFI LED will light up yellow.
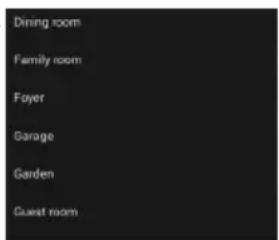
You can now enter a name for your WLAN loudspeaker in the app. This enables you to differentiate between loudspeakers if you are operating multiple loudspeakers.
text_image
Dining room Family room Foyer Garage Garden Guest room
NOTICE
Your mobile device (smartphone or tablet PC) must be registered on your router's WLAN network.
14. Playing back music
You can use your WLAN loudspeaker to play music from the network, play music from a device registered via WLAN (direct mode) or play stereo signals from an externally connected device.
The following section describes the operating modes on the WLAN loudspeaker and the different audio sources.

NOTICE!
A corresponding UPNP-capable app is required to control music play-back via the network with a smartphone or tablet PC.
14.1. Installing the app on an Android/Apple smartphone/tablet PC
In order to be able to control music playback on the WLAN loudspeaker from a tablet PC or smartphone, you first need to install the LIFEBEAT P app for your tablet PC/smartphone that is available via the Playstore (Android) or AppStore (Apple).
14.2. Establishing a direct WLAN connection via LIFEBEAT P
If it is not possible to establish a network connection via WPS, use the LIFEBEAT P app on your smartphone or tablet to establish a connection with the Internet or the WLAN loudspeaker.
▶ Switch on the loudspeaker and wait until the system has completely powered up (welcome tone).
▶ Switch the loudspeaker to WLAN mode. The OPT/LINE IN/WIFI LED flashes yellow.
▶ Open the WLAN settings on your mobile device.
▶ Select the suggested audio system "P61076_XXXX" and tap on connect.
▶ If using for the first time, enter the network key "LIFE-BEAT".

NOTICE!
It is highly recommended that you change the network key for the loudspeaker after using it for the first time.
Now press the "back button" on your smartphone.
▶ Start the LIFEBEAT P app.
The LIFEBEAT P app now connects your mobile device to the WLAN loudspeaker.
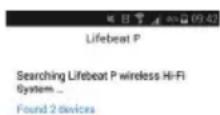
As soon as the connection is operational, the app switches automatically to the source directory.
As soon as the device setup and thus the WLAN loudspeaker's connection to the Internet has been successfully completed, the OPT/LINE IN/WIFI LED lights up permanently yellow.
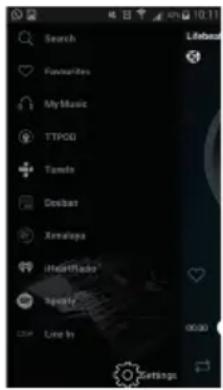
text_image
Search Favorites My Music TTPG Textron Doubet Xenaliapa iHeartRadio Spotify Live In Settings14.3. Listening to music via Spotify®
You can play back audio files from the music streaming service
Spotify® via the WLAN loudspeaker. The prerequisite is that you have the premium version of the Spotify app installed on your smartphone or tablet PC and the WLAN loudspeaker and the device with the Spotify app are registered on the same network.

text_image
Spotify®14.4. Installing Spotify
▶ Open Google Play or the Apple App Store and search for the term Spotify.
▶ Install the Spotify app on your smartphone or tablet PC. Follow the installation instruction on the screen.
▶ Subscribe to a premium account from Spotify®.

NOTICE!
In order to be able to install the Spotify application, there must be an Internet connection.
The premium version of the Spotify app is subject to a fee.
You can find information about Spotify® software licences at www.spotify.com/connect/third-party-licenses.
15. Playback via the LIFEBEAT P app
▶ Switch on the loudspeaker and wait until the system has completely powered up (you will hear a welcome tone).
▶ Switch the loudspeaker to WLAN mode. The OPT/LINE IN/WIFI LED flashes yellow.
▶ Start the LIFEBEAT P app.
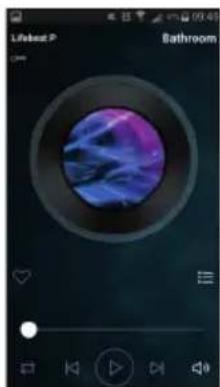
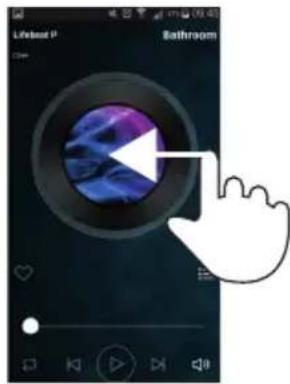
The app starts on the main screen where you can open playlists, skip forwards and backwards through tracks, change the volume or select favourites.
▶ Open the device list by swiping your finger from right to left on the main screen of the app.
All of the registered WLAN loudspeakers will now be displayed here.
In order to add a WLAN loudspeaker to a group, you need to tap on the corresponding WLAN loudspeaker and simply "pull" it onto another desired WLAN loudspeaker.
This enables you to play music from all of the WLAN loudspeakers "allocated" to this group at the same time.
natural_image
Digital music player interface showing a circular blue abstract effect with purple and purple hues, displayed in a media player window (no readable text or symbols)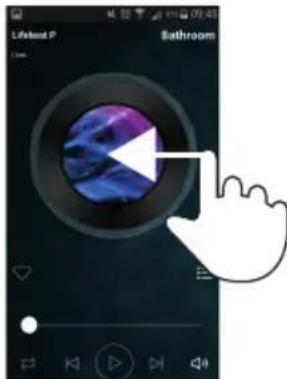
text_image
Lifetime P Bathroom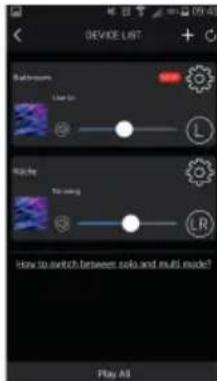
text_image
DEVICE LIST Backends Load-in Radio For use How to switch between rails and multi mode? Play All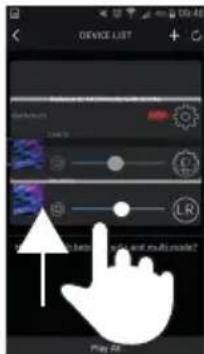
text_image
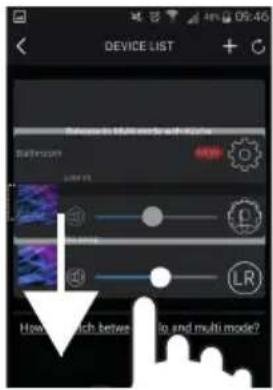
DEVICE LIST LRT LR Play 42In order to delete a WLAN loudspeaker from a group, simply "pull" the desired WLAN loudspeaker out of the group.
You can now play different music via each individual WLAN loudspeaker.
NOTICE
You can also use the playback modes (LINE IN, AUDIO IN, OPTICAL IN or BLUETOOTH) to play music on other loudspeakers!
text_image
DEVICE LIST Refine to multi mode with options Submersion Laser 10 Control LR How much between modes and multi mode?16. Playback via Bluetooth
- Switch the loudspeaker to Bluetooth mode. The Bluetooth LED lights up blue. - Press and hold down the PRESET/PAIR button to switch the WLAN loudspeaker into Bluetooth pairing mode.
The Bluetooth LED will start to flash blue and a signal tone will sound.
Connect the smart device via Bluetooth with the Bluetooth device "P 61076". The Bluetooth LED will light up permanently blue as soon as the WLAN loudspeaker has been connected to the Bluetooth device.
17. Playback from an external audio device
Connect a 3.5 mm stereo jack to the LINE IN socket to play back stereo sound output from other audio devices via the WLAN loudspeaker.
or
Connect a stereo cinch cable to the AUDIO IN socket to play back stereo sound output from other audio devices via the WLAN loudspeaker.
or
Connect a Toslink cable to the OPTICAL IN socket to play back digital audio signals from other audio devices via the WLAN loudspeaker.
- Then use the MODE button on the loudspeaker or the INPUT button on the remote control to select the corresponding operating mode (see "6. LED displays" on page 47).
18. Charging a USB device via the USB socket
You can charge the battery on a device that is capable of being charged via a USB connection using the USB socket on the WLAN loudspeaker.
Connect the device that you want to charge to the USB socket on the rear of the WLAN loudspeaker using a USB cable.

NOTICE
The USB socket on the WLAN loudspeaker delivers a charging current of 1 A at an output voltage of max. 5 V. Any devices that you connect to the WLAN loudspeaker for charging must not consume higher currents. In order to charge other devices, the WLAN loudspeaker must either be switched on and the USB charging function selected or the device should be in standby mode.
19. Resetting the device in case of malfunction
If the device fails to react, disconnect the mains plug from the mains socket and then plug it in again after a few seconds.
19.1. Resetting the device to factory settings via the app
▶ Switch the WLAN loudspeaker on.
▶ Start the LIFEBEAT P app.
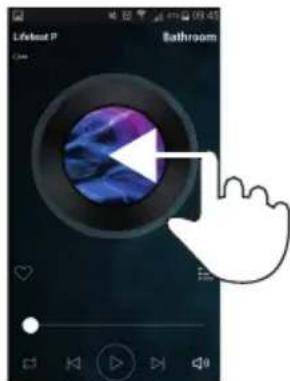
▶ Open the device list by swiping your finger from right to left on the main screen of the app.
text_image
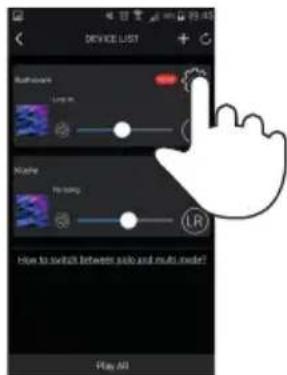
Lifestyle P BathroomNow tap on the setting) for the desired WLAN loudspeaker.
text_image
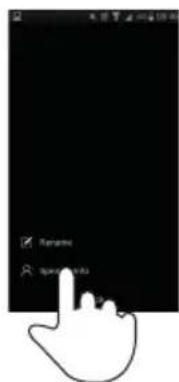
DEVICE LIST Multi-mode Live in Balance No longer How to switch between radio and multi mode! Play AllNow tap on Speaker Info.
text_image
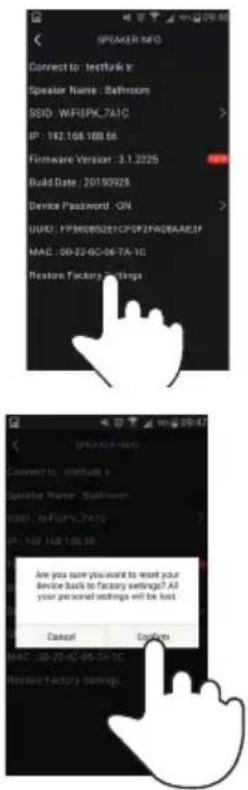
Rename Special InfoNow tap on Restore Factory Settings.
Now tap on Confirm.
text_image
SPRAGER INFO Connect to: teeth#:ir Speaker Name: Bathroom SSID: WIFISPA_7A1C IP: 192.108.108.56 Firmware Version: 3.1.2025 Build Date: 2019/09/25 Device Password: ON UUID: FP360B02E1CPDF2FA0B6AAE1F MAC: 06-22-GC-06-7A-1G Restore Factory Settings An you sure you want to want your device back to factory settings? All your personnel settings will be lost. Cancel Cancel MAC: 00-30-60-95-7A-1C Renderer Factory Settings.19.2. Manually resetting the device to factory settings
If the loudspeaker no longer connects to the WLAN access point or you want to re-establish the WLAN connection, you can manually reset the device to the factory settings.
▶ Press and hold down the WPS button on the rear of the loudspeaker for around 10 seconds.
The loudspeaker will switch off and then back on again.
▶ Wait until the system has completely powered up.
Two signal tones will then sound to confirm that the settings have been reset.
Connect the loudspeaker to a WLAN access point again as described in "8. Network configuration" on page 48.
20. Software update
- You can update the software for the WLAN loudspeaker via the app. The app searches to see if a software update is available and then downloads the update onto the WLAN loudspeaker from the Internet.
▶ Switch the WLAN loudspeaker on.
▶ Start the LIFEBEAT P app.
▶ Open the device list by swiping your finger from right to left on the main screen of the app.
The app automatically checks whether a software update is available for the registered WLAN loudspeaker.
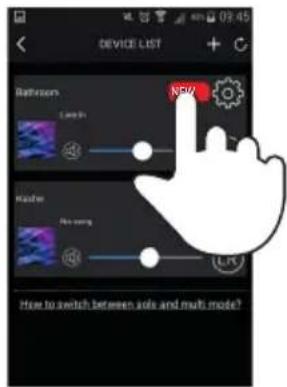
If an update is available, the information field NEW appears next to the setting (for the corresponding WLAN loudspeaker.
Now tap off NEW to start the software update for the desired WLAN loudspeaker.
text_image
Livebeat (P) Bathroom 12:00 12:00 12:00 12:00 12:00 12:00 12:00 12:00 12:00 12:00 12:00 12:00 12:00 12:00 12:00 12:00 12:00 12.00 12.00 12.00 12.00 12.00 12.00 12.00 12.00 12.00 12.00 12.00 12.00 12.00 12.00 12.00 12.00 12.00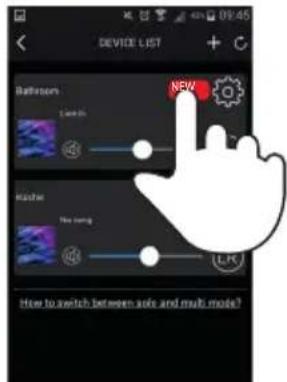
text_image
DEVICE LIST Bathroomers New Master New song LPC How to switch between sofa and multi mode?21. Troubleshooting
If the product malfunctions, please check first if you can remedy the problem yourself with the help of the following hints.
Never try to repair the product yourself. Please contact our Service Centre or another professional repair shop if a repair is necessary.
| Problem Possible cause Solution | ||
| No sound Incorrect playback mode selected | Set the mode to WLAN mode, LINE IN/AUDIO IN mode, OPTICAL mode or Bluetooth mode. | |
| Volume level too low. Check the volume level. | ||
| No reception. Check the network settings. | ||
| Problems with the router connection. | No DHCP server is activated. | Check the router settings. |
| An incorrect network key was entered for the network. | Re-enter the network key for the network. | |
| The IP address that you have manually entered is outside of the address range for the router. | Enter a valid IP address for the WLAN loudspeaker. | |
| The settings for the access point have changed. | Manually reset the device to the factory settings and connect it again to the access point. | |
| The WLAN loudspeaker cannot be controlled by the Lifestream app. | The WLAN loudspeaker and smartphone/tablet PC are not on the same WLAN network. | Check the network status of the WLAN loudspeaker and smartphone/tablet PC. |
22. Cleaning
▶ Switch off the device before cleaning it.
▶ Use a soft, dry cloth to wipe the device. Never use rough cloths, abrasive detergent, thinners or solutions containing alcohol to clean the device. These can damage the device.
23. Disposal

Packaging
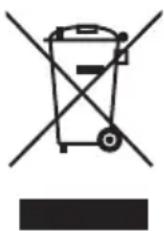
Your device is packaged to protect it from transportation damage. Packaging is raw material and can be reused or added to the recycling system.
Device
Old devices should not be disposed of with the normal household rubbish. In accordance with Directive 2012/19/EU, the device must be properly disposed of at the end of its service life. This involves separating the materials in the device for the purpose of recycling and avoiding any impact on the environment. Take old devices to a collection point for electrical scrap or a recycling centre. Contact your local waste disposal company or your local authority for more information on this subject.
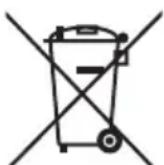
Batteries
Batteries must be properly disposed of. Retailers who stock batteries and local authority collection points have appropriate disposal containers for this purpose. You can contact your local waste disposal company or municipal authorities for further information.
24. Technical data
Mains adapter
Model: TP06-240250W
Manufacturer: FIT-POWER.,
China
Input voltage: AC 100 – 240 V \~ 50/60 Hz, 1.5 A max
Output voltage: 24 V 2.5 A

Speakers: 2 x 18 W RMS
Subwoofer: 36
W
Dimensions: approx. 380 x 228 x 140 mm
Weight: approx. 4.74 kg
WLAN
Frequency range: 2.4 GHz
WLAN standard: 802.11 b/g/n
Encryption: WPA2
possible
Range: inside approx. 35–100 m/
outside approx. 100–300 m
Bluetooth
BT version: 2.4 GHz, 4.0 supports A2DP, AVRCP
Range: up to 10m
Connections
Mains adapter input: DC 24 V, 2,5 A

AUX IN: 3.5 mm stereo jack
AUDIO IN: cinch sockets L/R
USB: USB 2.0 A port
ETHERNET: RJ45 LAN socket
OPTICAL IN: Toslink port
USB service and charging connection
USB output: DC 5 V -- max. 1 A
Subject to technical and optical changes as well as printing errors.
25. Compliance information
This device is supplied with the following wireless features:
- Wireless LAN
Medion AG hereby declares that the product conforms to the following European requirements:
• R&TTE Directive 1999/5/EC
• EMC Directive 2014/30/EU
• Low Voltage Directive 2014/35/EU
• Ecodesign Directive 2009/125/EC
• RoHS Directive 2011/65/EU
This product satisfies the basic requirements and relevant regulations of the Ecodesign Directive 2009/125/EC (Commission Regulation 1275/2008). However, due to its mode of operation (continuous permanent provision of a WLAN signal), no provision is made in respect of this product to minimise power consumption in accordance with the Ecodesign Directive.
To minimise power consumption, disconnect the device from the power outlet when not required.
Full declarations of conformity are available at www.medion.com/conformity.
CE
26. Legal notice
Copyright © 2016
Status: 2016-02-18
All rights reserved.
This operating manual is protected by copyright.
Mechanical, electronic and any other form of reproduction is prohibited without the written permission of the manufacturer
Copyright is owned by the company:
Medion AG
Am Zehnthof 77
45307 Essen
Germany
The operating manual can be reordered via the service hotline and is available for download via the service portal at www.medion.com/gb/service/start/.
You can also scan the QR code above and download the operating manual onto your mobile device via the service portal.
İçindekiler
DE
natural_image
Pure architectural line drawing of a rectangular structure with no text, numbers, or symbols7) Hoparlör
5.3. Arka taraf
text_image
24V=2.5A WPS LINE-IN AUDIO IN L R USB ETHERNET OPTICAL IN 89 1314text_image
QR code image containing encoded data, no visible human-readable texttext_image
Libcast P Searching Libcast P wireless Wi-Fi System... Please make sure your Libcast P device is powered and on the same network as your iPhone or Inbit, if not, please press up the 'Add Device' button to configure post device to your Wi-Fi network. Click User < Rock Configure...network Press the WPS button to connect by Wi-Fi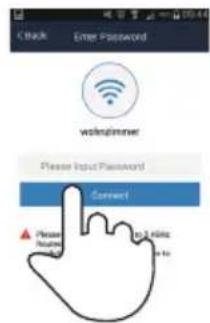
text_image
check Enter Password welcome Please Input Password Current Please Name to 2 MHz to 10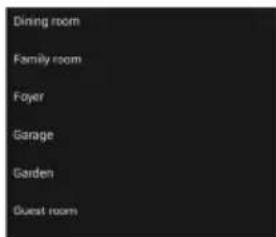
text_image
Dining room Family room Foyer Garage Garden Guest room
BİLGİ
text_image
Search Favorites My Music TTPD Tsubin Doublet Xenaiapa HeartRadio Spotify Line In Settingstext_image
Livebox P Bathroom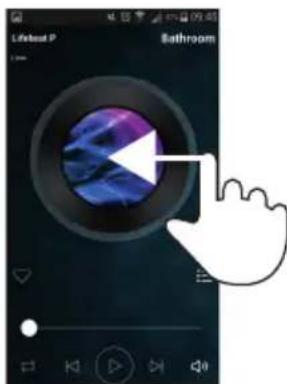
text_image
Lifebat P Bathroom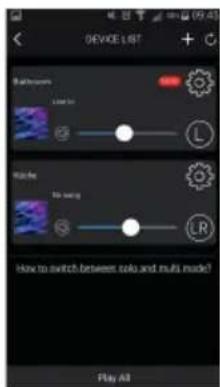
text_image
DEVICE LIST Background Local to Mode To bring How to switch between radio and multi mode! Play All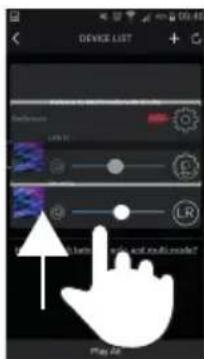
text_image
DEVICE LIST Device List Play 48text_image
DEVICE LIST Bathroomers Draw it How much between to and multi mode? Playtext_image
Lifebeat P Bathroomtext_image
DEVICE LIST Multi-mode Live on Multi-mode Hi ramp How to switch between solo and multi model? Play Alltext_image
Remove R Open Info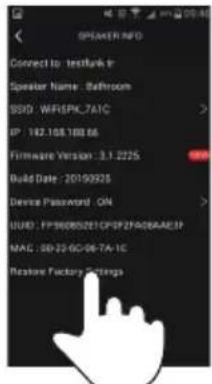
text_image
SPAKER INFO Connect to: textlink in Speaker Name: Bathroom SSID: WFRSPK7A1C IP: 142.108.108.66 Firmware Version: 3.1.2225 Build Date: 2019/09/25 Device Password: ON GUID: FP360852E1CFI2F408AAE3F MAC: BD-25-GC-06-7A-1C Features Factory Settings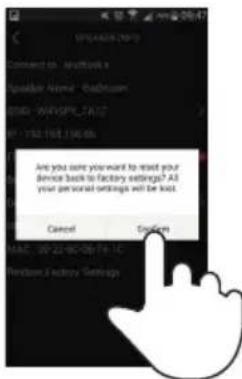
text_image
Are you sure you want to read your device back to factory settings? All your personal orders will be lost. Cancel Installtext_image
Livebest Bathroom