
A910 - Smartphone ZTE - Free user manual and instructions
Find the device manual for free A910 ZTE in PDF.


| Product Type | Smartphone |
| Brand | ZTE |
| Model | BLADE A910 |
| Operating System | Android |
| Processor | Not specified |
| Display | Not specified |
| Rear Camera | Yes, with flash |
| Front Camera | Yes |
| Fingerprint Sensor | Yes |
| SIM Type | Nano-SIM (dual SIM) |
| Memory Card Support | microSDHC (shared SIM slot) |
| Battery | Built-in rechargeable, not removable |
| Charging | Via micro-USB |
| Headphone Jack | Yes (3.5mm) |
| Connectivity | Wi-Fi, Bluetooth, GPS, FM Radio |
| SAR (Head) | 0.274 W/kg |
| SAR (Body) | 0.983 W/kg |
| Special Features | Gesture input, Smart power, HDR mode, Face beauty |
| Safety | Keep 15 mm from body; avoid liquids; use approved accessories |
| Maintenance | Clean with soft cloth; avoid alcohol |
| Warranty | See manufacturer |
Frequently Asked Questions - A910 ZTE
User questions about A910 ZTE
0 question about this device. Answer the ones you know or ask your own.
Ask a new question about this device
Download the instructions for your Smartphone in PDF format for free! Find your manual A910 - ZTE and take your electronic device back in hand. On this page are published all the documents necessary for the use of your device. A910 by ZTE.
USER MANUAL A910 ZTE
ZTE BLADE A910 User Manual....2
Thank you for choosing this ZTE cellular device. In order to keep your device in its best condition, please read this manual and keep it for future reference.
Copyright
Copyright © 2016 ZTE CORPORATION
All rights reserved.
No part of this publication may be quoted, reproduced, translated or used in any form or by any means, electronic or mechanical, including photocopying and microfilm, without the prior written permission of ZTE Corporation.
Notice
ZTE Corporation reserves the right to make modifications on print errors or update specifications in this guide without prior notice. This manual has been designed with the utmost care to ensure the accuracy of its content. However, all statements, information and recommendations contained therein do not constitute a warranty of any kind, either expressed or implied. Please refer to For Your Safety to be sure to use your phone properly and safely. We offer self-service for our smart terminal device users. Please visit the ZTE official website (at www.ztedevice.com) for more information on self-service and supported product models. Information on the website takes precedence.
Disclaimer
ZTE Corporation expressly disclaims any liability for faults and damages caused by unauthorized modifications of the software.
Images and screenshots used in this manual may differ from the actual product. Content in this manual may differ from the actual product or software.
Trademarks
ZTE and the ZTE logos are trademarks of ZTE Corporation.
Google and Android are trademarks of Google, Inc.
The Bluetooth ^® trademark and logos are owned by the Bluetooth SIG, Inc. and any use of such trademarks by ZTE Corporation is under license.

microSDHC Logo is a trademark of SD-3C, LLC.
Other trademarks and trade names are the property of their respective owners.
Version No.: R1.0
Edition Time: October 10, 2016
Contents
Getting Started....11
Getting to Know Your Phone 11
Knowing the Keys 13
Installing the nano-SIM Card(s)/ microSDHC Card .....14
Charging the Battery 15
Extending the Battery Life 17
Powering On/Off 18
Setting Up for the First Time....18
Locking/Unlocking the Screen and Keys....18
Using the Touch Screen 19
Getting to Know the Home Screen 23
Personalizing 25
Changing the System Language 25
Setting the Date and Time....25
Changing Ringtone and Notification Sound ......26
Turning On/Off System Sounds 26
Adjusting Volume 26
Switching to Silent or Vibration Mode ....27
Applying New Wallpapers....27
Changing Screen Brightness....29
Setting the Icon Style ....29
Setting the Home Screen Transition Effect 29
Protecting Your Phone With Screen Locks....30
Knowing the Basics....31
Monitoring the Phone Status 31
Managing Notifications....32
Managing Icons and Widgets 35
Organizing With Folders 36
Rearranging the Primary App Icons....37
Entering Text 38
Editing Text.... 45
Opening and Switching Apps 45
Connecting to Networks and Devices......46
Connecting to Cellular Networks 46
Connecting to Wi-Fi 48
Connecting to Bluetooth Devices 52
Connecting to Your Computer via USB....54
Sharing Your Cellular Data Connection 57
Connecting to Virtual Private Networks 60
Phone Calls 62
Placing and Ending Calls 62
Answering or Rejecting Calls 63
Working With the Call History......64
Calling Your Contacts....65
Checking Voicemail 65
Using Options During a Call....66
Managing Multi-party Calls....66
Adjusting Your Call Settings 68
Contacts 73
Checking Contact Details 73
Adding a New Contact....73
Setting Up Your Own Profile....74
Importing, Exporting, and Sharing Contacts....74
Working With Favourite Contacts 75
Working With Groups 76
Searching for a Contact....78
Editing Contacts....79
Web Accounts......80
Adding or Removing Accounts....80
Configuring Account Sync 81
Email....83
Setting Up the First Email Account ....83
Checking Your Emails 83
Responding to an Email 84
Writing and Sending an Email 85
Adding and Editing Email Accounts 86
Changing General Email Settings....87
Messaging 88
Opening the Messaging Screen 88
Sending a Message 88
Replying to a Message....89
Forwarding a Message....90
Copying a Message....90
Changing Message Settings 91
Calendar 92
Viewing Your Calendars and Events....92
Creating an Event....93
Editing, Deleting or Sharing an Event....93
Changing Calendar Settings 94
Browser 95
Opening the Browser 95
Downloading Files 96
Changing Browser Settings....96
Camera....97
Capturing a Photo....97
Recording a Video 99
Customizing Camera/Camcorder Settings....99
Gallery....102
Opening Gallery....102
Working With Albums.... 102
Working With Pictures.... 103
Retouching Your Pictures....104
Playing Videos....105
Play Music 106
Playing your music....106
Managing playlists....109
Video Player 110
Opening the Video Library....110
Playing and Controlling Videos....110
Managing Video Files.... 111
FM Radio 112
Scanning and Saving Channels....112
Listening to FM Radio 112
Recording Radio Programs 113
Playing a saved recording radio program.... 113
Sound Recorder....114
Recording a Voice Memo 114
Playing a Voice Memo....114
More Apps 115
FingerPrint Box....115
Wireless and Networks....123
Device 125
Personal 129
System 135
Troubleshooting....137
For Your Safety ....142
General Safety....142
Radio Frequency (RF) Exposure.... 143
Distraction 146
Product Handling 146
Electrical Safety.... 150
Radio Frequency Interference.... 151
Explosive Environments.... 153
Declaration of RoHS Compliance 154
Disposal of Your Old Appliance....155
EC DECLARATION OF CONFORMITY ....156
Getting Started
Getting to Know Your Phone
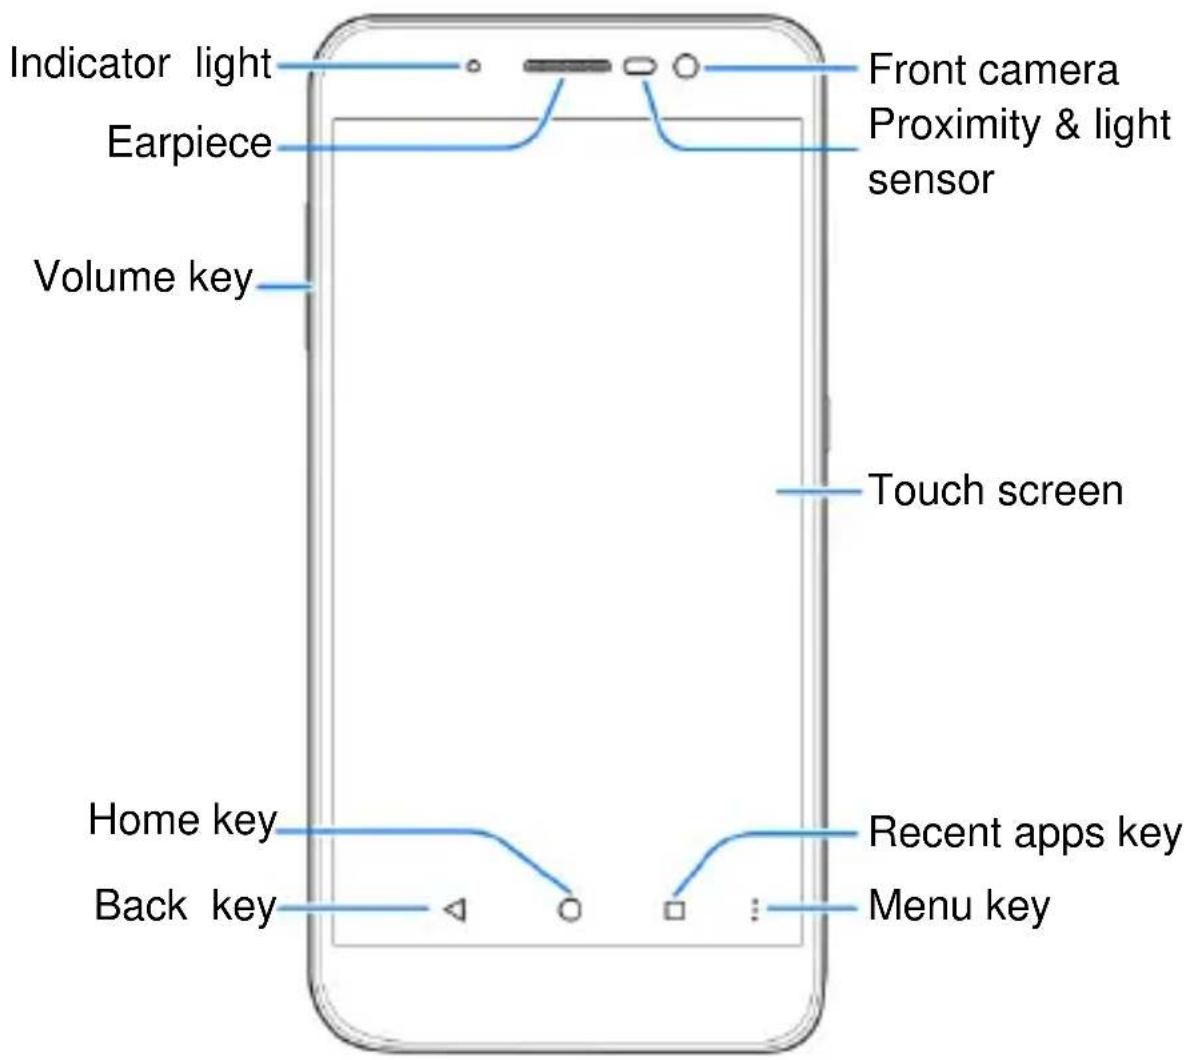
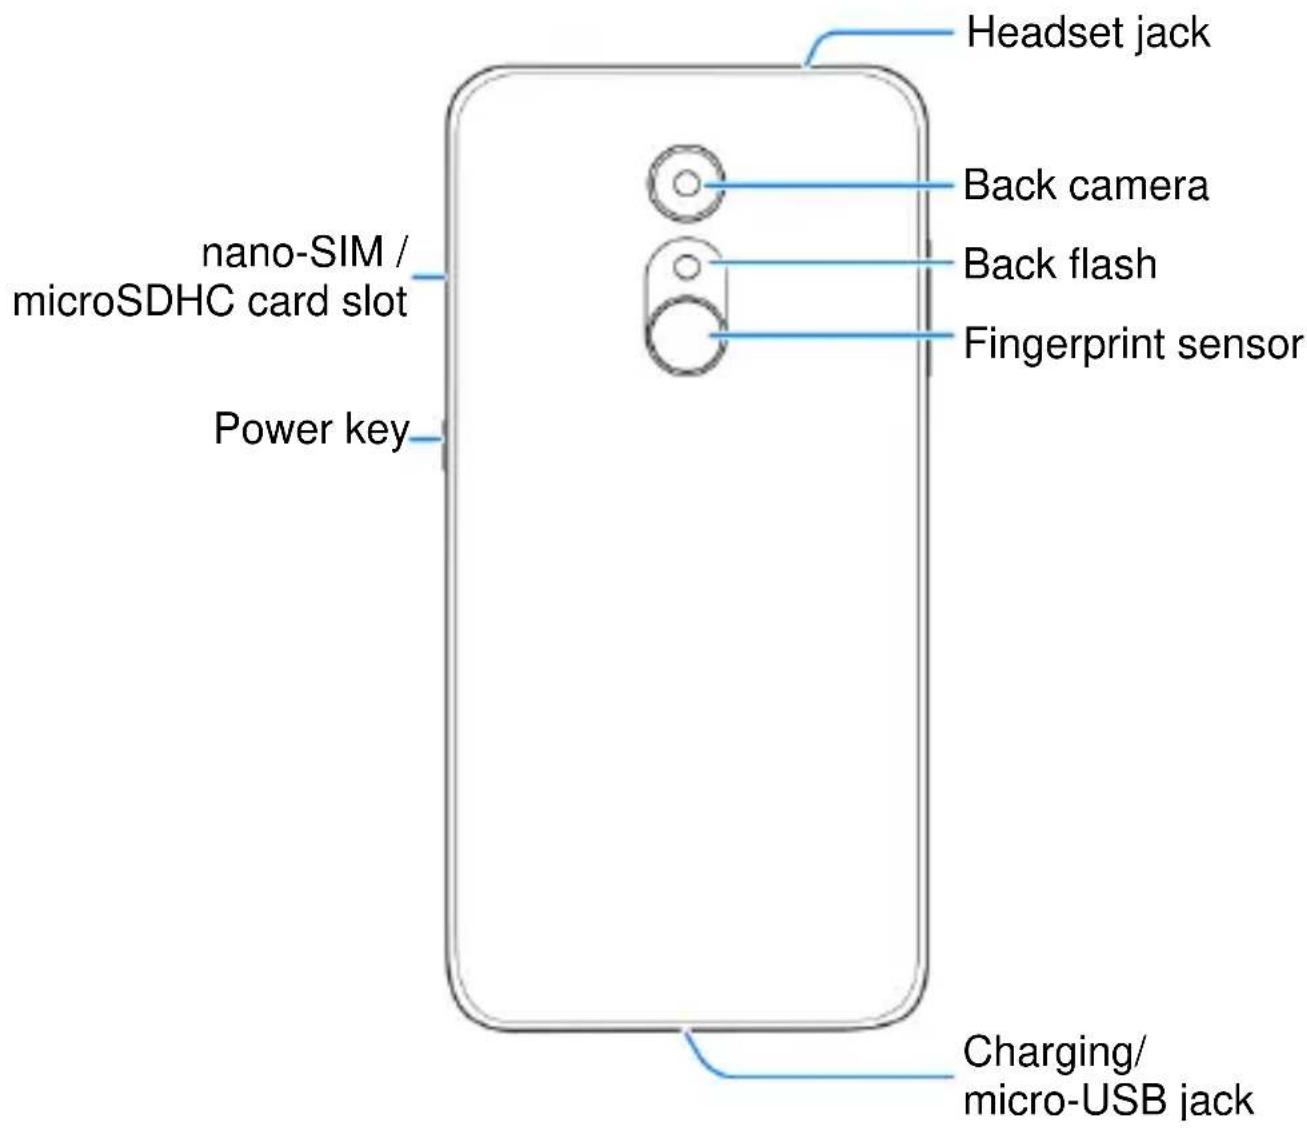
Knowing the Keys
| Key | Function |
| Power key | Press and hold to turn on or off airplane mode, reboot, power off, or switch sound mode.Press to turn off or on the screen display. |
| Home key | Touch to return to the home screen from any application or screen.Touch and hold to use Google Search. |
| Back key | Touch to go to the previous screen. |
| Menu key | Touch to view the options for the current screen.Touch and hold to see recently used applications. |
| Recent apps key | Touch to see recently used applications. |
| Volume key | Press or hold either end of the key to turn the volume up or down. |
Installing the nano-SIM Card(s)/microSDHC Card
Power off your phone before installing or removing the nano-SIM or microSDHC card.

WARNING!
To avoid damage to the phone, do not use any other kind of SIM cards, or any non-standard nano-SIM card cut from a SIM card. You can get a standard nano-SIM card from your service provider.
- Insert the tip of the tray eject tool into the hole on the nano-SIM / microSDHC card tray.
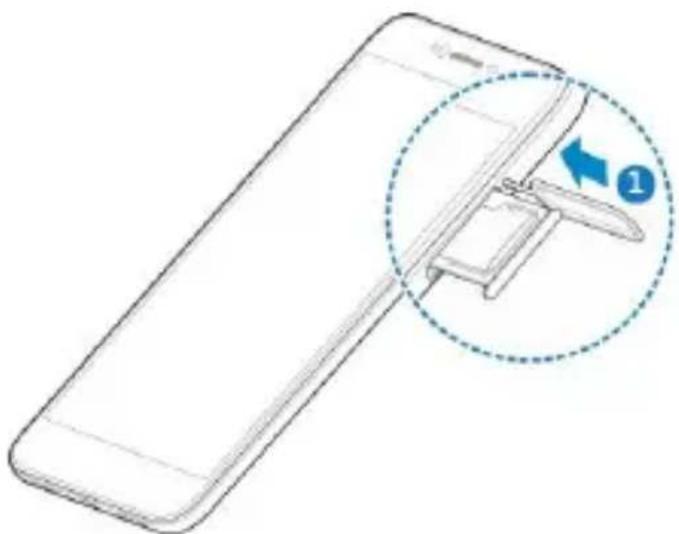
natural_image
Line drawing of a smartphone showing the cable being inserted into a clip, with a magnified inset highlighting the cable attachment (no text or symbols present)- Pull out the nano-SIM card tray or microSDHC card tray and place the nano-SIM card or microSDHC card on the tray, as shown. Then carefully install the tray back.
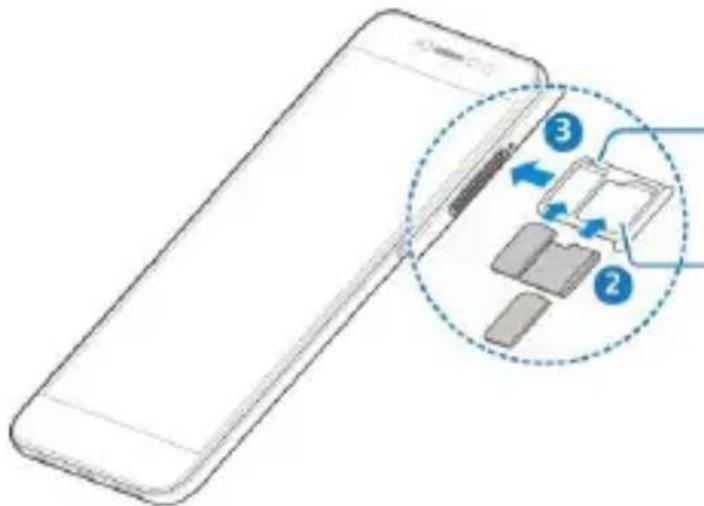
nano-SIM
card slot 1
nano-SIM card
slot 2/microSDHC
card slot

NOTE:
- Slot 1 only supports nano-SIM card. Slot 2 supports nano-SIM card or microSDHC card.
- The two nano-SIM slots support 4G/3G/2G networks. When one nano-SIM card is set to connect with 4G/3G networks, the other installed nano-SIM card can only connect with 2G networks.
Charging the Battery
Your phone's battery should have enough power for the phone to turn on, find a signal, and make a few calls. You should fully charge the battery as soon as possible.
If the battery is low, there will be a pop-up message on the screen. As you charge your phone, the screen will show you the exact battery level on the status bar.

WARNING!
Use only ZTE-approved chargers and cables. The use of unapproved accessories could damage your phone or cause the battery to explode.

CAUTION:
Do not change the built-in rechargeable battery in your phone by yourself. The battery can only be changed by ZTE or ZTE authorized service provider.
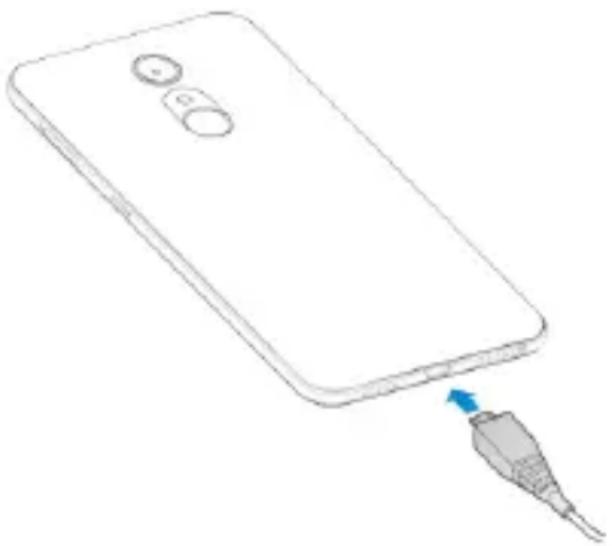
- Connect the adapter to the charging jack. Ensure that the adapter is inserted with the correct orientation. Do not force the connector into the charging jack.
natural_image
Line drawing of a smartphone with a cable inserted into its body (no text or symbols)- Connect the charger to a standard AC power outlet. If the
phone is on, you'll see a charging icon, such as 🎨 or 🎩, appear on the status bar. - Disconnect the charger when the battery is fully charged.

NOTE:
- If the battery is extremely low, you may be unable to power on the phone even when it is being charged. In this case, try again after charging the phone for at least 30 minutes. Contact the customer service if you still cannot power on the phone after prolonged charging.
- The battery is not removable, do not remove the rear cover please.
- If the screen freezes or takes too long to respond, try pressing and holding the Power key for about 10 seconds to power off the phone, then press the Power key to start.
Extending the Battery Life
Active applications, screen brightness levels, Bluetooth and Wi-Fi usage and GPS functionality can drain your battery. You can follow the helpful tips below to conserve your battery power:
- Reduce the screen backlight time.
- Lower the screen brightness.
- Turn Wi-Fi, Bluetooth and auto-sync off when not in use.
- Disable the GPS function when not in use. Most applications using this function will periodically query the GPS satellites for your current location, and each query drains your battery.
Powering On/Off
- Press and hold the Power key to turn on your phone.
- To power off, press and hold the Power key to open the options menu and touch Power off > OK.

NOTE:
If the phone freezes or takes too long to respond, you can press and hold the Power key for about 10 seconds to power off the phone.
Setting Up for the First Time
When you first power on your phone after you purchase it or reset it to factory settings (see Backup & Reset), you need to do some settings before using it.
Flick the language field to select the language. Then follow the prompts to set up Wi-Fi, Google account, Google location and other options.
Locking/Unlocking the Screen and Keys
Your phone allows you to quickly lock the screen and keys (put the phone to sleep mode) when not in use and to turn the screen back on and unlock it when you need it.
To lock the screen and keys:
To quickly turn the screen off and lock the keys, press the Power key.

NOTE:
To save battery power, the phone automatically turns off the screen after some time of inactivity. You will still be able to receive messages and calls while the phone screen is off.
To unlock the screen and keys:
- Press the Power key to turn the screen on.
- Swipe up on the screen.

NOTE:
If you have set an unlock pattern, PIN or a password for your phone (see Protecting Your Phone With Screen Locks), you'll need to draw the pattern or enter the PIN/password to unlock your screen.
Using the Touch Screen
Your phone's touch screen enables you to control actions through a variety of touch gestures.
- Touch
When you want to type using the onscreen keyboard, select items on the screen such as the application and settings icons, or press the onscreen buttons, simply touch them with your finger.

natural_image
Illustration of a hand with a finger pointing upward (no text or symbols)- Touch and Hold
To open the available options for an item (for example, a message or link in a web page), touch and hold the item.

natural_image
Illustration of a hand with a blue circular highlight on the index finger (no text or symbols)- Swipe or Slide
To swipe or slide means to quickly drag your finger vertically or horizontally across the screen.

natural_image
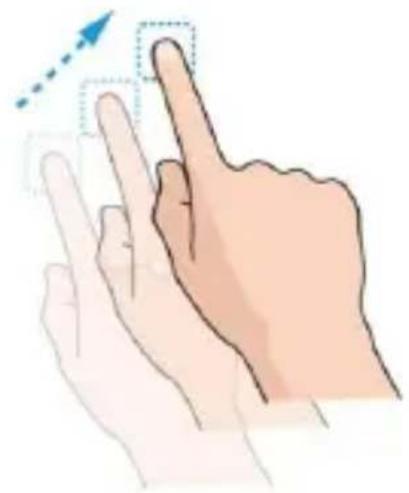
Illustration of a hand with fingers and fingers raised, showing motion direction (no text or symbols)- Drag
To drag, press and hold your finger with some pressure before you start to move your finger. While dragging, do not release your finger until you have reached the target position.
natural_image
Illustration of a hand pointing at a finger with a dotted arrow indicating motion (no text or symbols)- Pinch
In some apps (such as Maps, Chrome, and Gallery), you can zoom in and out by placing two fingers on the screen at once and pinching them together (to zoom out) or spreading them apart (to zoom in).

natural_image
Illustration of two hand gestures with blue arrows indicating movement (no text or symbols)- Rotate the screen
For most screens, you can automatically change the screen orientation from portrait to landscape by turning the phone sideways.

NOTE:
The auto-rotate feature needs to be enabled for the screen orientation to automatically change. Touch the Home key > Settings > Display > When device is rotated and select Rotate the contents of the screen.
You can also access the screen rotation control by sliding down the status bar twice and touch Auto_rotate.
Getting to Know the Home Screen
The home screen is the starting point for your phone's applications, functions, and menus. You can customize your home screen by adding shortcuts, folders, widgets, and more.
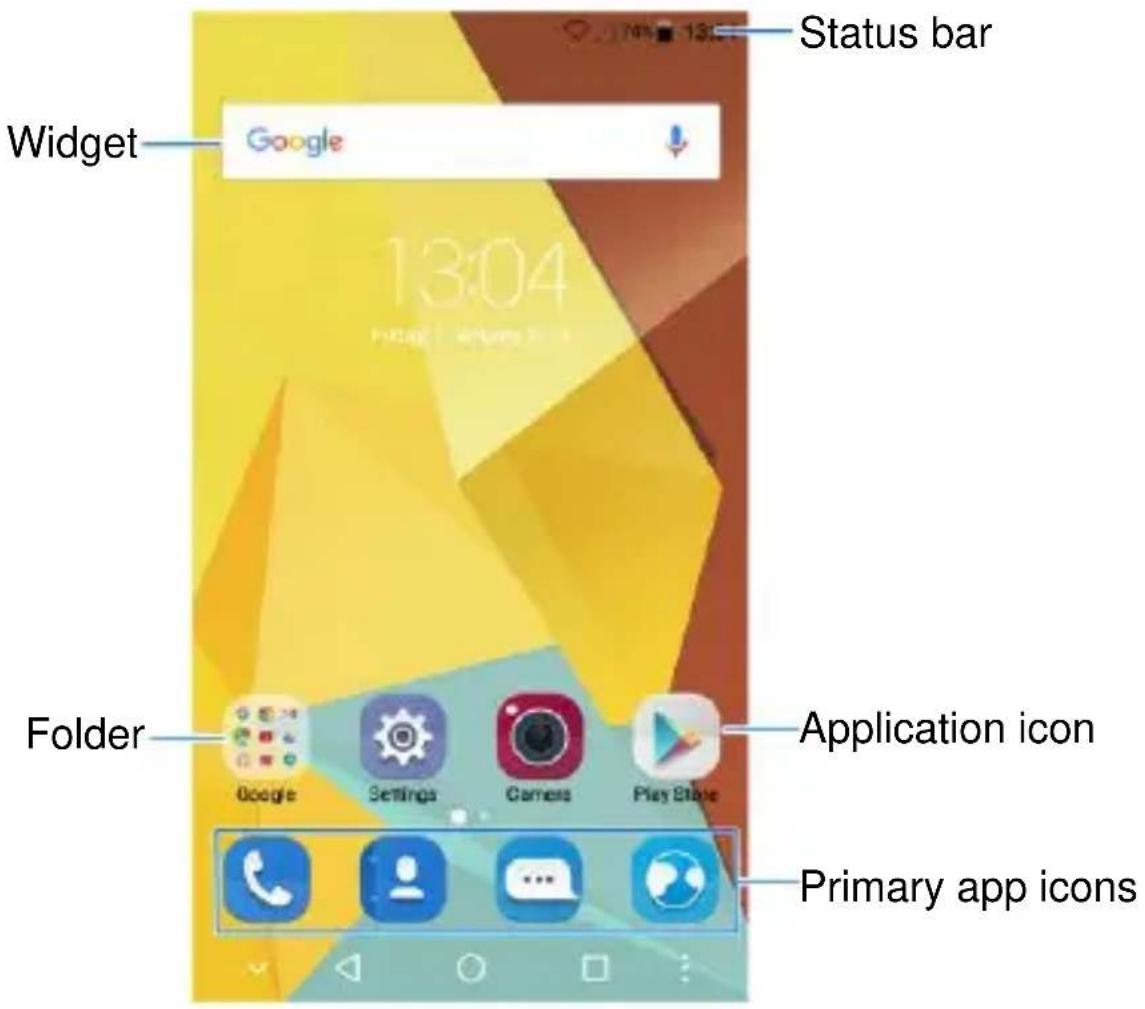
Extended Home Screen Panels
Your home screen is extendable, providing more space for shortcuts, widgets, and more. Simply swipe left or right on the
home screen to see the extended panels. You can add or remove home screen panels, or adjust their order.
To add a new home screen panel:
- Touch the Home key to return to the home screen, or touch and hold an empty area of the home screen to open the Widget panel.
- Touch and hold an application icon on the home screen or a widget on the Widget panel and drag it to the right edge of the screen to create a new home screen panel and put the icon or widget on it.

NOTE:
No empty home screen panel is allowed to exist. If the icon, widget or folder is the only item on the current home screen panel, the panel will be deleted as you remove the item.
To adjust the order of a home screen panel:
- Touch and hold an empty area of the home screen and slide left or right to view the home screen thumbnails.
- Touch and hold a thumbnail and drag it left or right to the place you need.

NOTE:
Touch at the top of a home screen thumbnail to set it as the main home screen.
Personalizing
Changing the System Language
- Touch the Home key > Settings > Language & input > Language.
- Select the language you need.
Setting the Date and Time
- Touch the Home key > Settings > Date & time.
- Set the date, time, time zone, and time format.
▶ To adjust the date and time automatically, touch
Automatic date & time and choose Use network-provided time or Use GPS-provided time.
▶ To adjust the date and time manually, touch Automatic date & time > Off and touch Set date / Set time to change the date and time.
▶ To adjust the time zone automatically, touch Automatic time zone.
- To adjust the time zone manually, touch Automatic time zone and touch Select time zone to set the correct time zone.
▶ To adjust the format of time, touch Use 24-hour format.
Changing Ringtone and Notification Sound
You can customize the default incoming call ringtone and the default notification sound.
- Touch the Home key > Settings > Sound & notification.
- Touch Phone ringtone or touch Default notification ringtone.
- Select the ringtone you want to use and touch OK.
Turning On/Off System Sounds
- Touch the Home key > Settings > Sound & notification > Other sounds.
- Touch Dial pad tones, Screen locking sounds, Touch sounds, or Vibrate on touch.
Adjusting Volume
- Touch the Home key > Settings > Sound & notification.
- Drag the sliders below Media volume, Alarm volume, and Ring volume to adjust the volume for each type of audio.

NOTE:
You can adjust the media volume when a media application is in use by pressing the Volume key. If no media application is active, press the Volume key to adjust ringtone volume (or the earpiece volume during a call).
Switching to Silent or Vibration Mode
You can set the phone to silent or vibration mode by using one of the following methods.
- Press the Volume key when no media application is active to show the volume management window. Drag the slider to the left or keep pressing the lower end of the Volume key to switch the phone to vibration mode.
- Swipe down from the top of the screen to open the notification panel and drag the panel downwards. Touch Ring or Vibrate to switch the phone to vibration or silent mode.
- Press and hold the Power key and touch or to switch to silent or vibration mode.

NOTE:
Silent and vibration modes will not silence your alarm sound.
Applying New Wallpapers
You can set the wallpaper for the home screen and lock screen.
To set the home screen wallpaper:
- Touch the Menu key from the home screen.
- Touch MiColor and select the color you like for the wallpaper. You can also touch Pick color to open the camera and drag the white round button on the viewfinder screen to pick the color for the wallpaper.
- or -
Touch Wallpaper and slide left or right to select an image as the wallpaper. You can also touch GALLERY or CAMERA to choose or capture a picture. Some cropping may be needed for Gallery images.

NOTE:
In addition, you can touch the Home key > Settings > Display > Wallpaper to pick an image from Gallery or Photos, or an animation from Live Wallpapers.

NOTE:
To change the home screen wallpaper blur effect, touch the Menu key from the home screen, touch Wallpaper and drag the Blur bar to adjust it. This feature is not available for live wallpapers.
To set the lock screen wallpaper:
- Drag up from the bottom of the lock screen.
- Touch MiColor and select the color you like for the wallpaper.
- or -
Touch Wallpaper and slide left or right to select an image as the wallpaper. You can also touch GALLERY to choose a picture.
Changing Screen Brightness
- Touch the Home key > Settings > Display > Brightness level.
- Drag the slider to manually adjust the screen brightness.

NOTE:
Your phone can automatically adjust the screen brightness for available light. Touch Adaptive brightness in the Display settings screen to turn the feature on or off.
Setting the Icon Style
You can change the icon style of some pre-installed apps.
- Touch the Menu key from the home screen.
- In the window that appears at the bottom, touch Icon.
- Select the icon style you like.
Setting the Home Screen Transition Effect
- Touch the Menu key from the home screen.
- In the window that appears at the bottom, touch Effect.
- Pick an effect and the phone will demonstrate how it works. Touch other effects until you find the favourite one.
Protecting Your Phone With Screen Locks
You can protect your phone by creating a screen lock. When it is enabled, you need to swipe up on the screen, draw a pattern, record a voice, enter a numeric PIN or password to unlock the phone's screen and keys.
- Touch the Home key > Settings > Security > Screen lock.
- Touch None, Swipe, Pattern, PIN or Password.
▶ Touch None to disable the screen lock.
- Touch Swipe to enable screen lock and allow unlocking with a ‘swipe’ gesture. You can unlock the screen by swiping up on the screen.
▶ Touch Pattern to draw and redraw a pattern that you must draw to unlock the screen.
▶ Touch PIN or Password to set a numeric PIN or a password that you must enter to unlock the screen.
- For Pattern, PIN, or Password lock, select how you want notifications and their contents to show when the phone is locked. Then touch DONE.
Knowing the Basics
Monitoring the Phone Status
The status bar at the top of the home screen provides phone and service status icons on the right side. Below are some of the icons you may see.
 | GPRS connected |  | No signal |
 | EDGE connected |  | Signal strength |
 | HSPA connected |  | Cellular data in use |
 | 4G connected |  | No nano-SIM card installed |
 | Vibration mode |  | Airplane mode |
| [D3S8] | Do not disturb mode on(Alarms only or Priority only) |  | Bluetooth®on |
 | Do not disturb mode on(Total silence) | [04HG] | Connected to a Wi-Fi®network |
 | Battery low | [AO6Z] | Wi-Fi in use |
 | Battery partially drained | [KSH5] | Speaker on |
 | Battery full |  | Phone microphone off |
 | Battery charging | Alarm set | |
 | Wired headset connected |
Managing Notifications
Notification Icons
The status bar at the top of the home screen provides notification icons on the left. Below are some of the icons you may see.
 | New SMS |  | Upcoming event |
 | New message(s) from the Email app |  | New Wi-Fi network detected |
| New message(s) from the GmailTM app |  | Downloading data | |
| Portable Wi-Fi hotspot on |  | Sending data | |
| Missed call |  | USB connected | |
| Call in progress |  | USB tethering on | |
| Call on hold |  | Song playing |
Open/Close the Notification Panel
Notifications report the arrival of new messages, calendar events, and alarms, as well as ongoing events, such as when you are playing music. You can open the notification panel to view the details of notifications.
- To open the notification panel, swipe your finger down on the home screen or from the top of the screen.
- To close the notification panel, swipe your finger up on the screen or touch the Back key.
Respond to or Remove a Notification
In the notification panel, you can respond to a notification or remove the notifications. The notification panel also supports expandable notifications that let you perform additional actions right from the notification itself.
- To respond to a notification, just touch it.
- Slide down with one finger to expand certain notifications. You can also swipe two fingers vertically or pinch-zoom to expand or collapse certain notifications.
- To remove all notifications, touch = below all the notifications.
- To manage notifications you have received, touch and hold a notification to identify the application that created it. You can then touch and enable Block to hide future notifications from this app, or enable Priority to show them in priority mode.

NOTE:
If you block notifications for an app, you may miss its important alerts and updates. The notifications of some apps cannot be blocked.
Use Quick Settings
The Quick Settings make it convenient to view or change the most common settings for your phone.
Open the notification panel and drag the panel downwards to find the following Quick Settings on the screen.
- Wi-Fi: Touch to turn on or off Wi-Fi. Touch and hold to open the Wi-Fi menu in Settings.
- Data: Touch to enable or disable data access over the cellular network. Touch and hold to open the Data usage menu in Settings.
- Ring / Vibrate / Silent: Touch to switch among silent mode, vibrate mode, and sound mode.
- Location: Touch to turn on or off location services. Touch and hold to open the Location menu in Settings.
- Bluetooth: Touch to turn on or off Bluetooth. Touch and hold to open the Bluetooth menu in Settings.
- Sync: Touch to turn on or off auto-sync of accounts data.
- Hotspot: Touch to turn on or off the Wi-Fi hotspot feature. Touch and hold to open the Tethering & portable hotspot menu in Settings.
- Auto-rotate: Touch to turn on or off the auto-rotate screen feature.
• Airplane mode: Touch to turn on or off airplane mode.
- Smart power: Touch to turn on or off smart power.
- Flashlight: Touch to turn on or off the flash.
- Dual-SIM settings: Touch to get to the SIM cards settings menu.
- Brightness: Uncheck AUTO and drag the brightness slider to adjust the screen brightness.

NOTE:
In the Quick Settings screen, touch 📄 at the top to get to the Settings menu; touch the battery icon to open the battery settings screen; touch 📋 to edit the quick settings panel.
Managing Icons and Widgets
Add Widgets
- Touch the Home key.
- Touch and hold an empty area of the home screen to open the Widget panel.
- Slide left or right to browse all available widgets. Touch and hold a widget and drag it to a home screen panel.

NOTE:
While holding the item, you can drag it to the right edge of the screen to create a new home screen panel and put the item on it.
Move Icons or Widgets
- Touch and hold an icon or a widget on the home screen.
- Drag it to the place you need.
Remove Icons or Widgets
- Touch and hold an icon or a widget on the home screen.
- Drag it to to remove it.
- If the icon is an application, touch OK to uninstall it.

NOTE:
Some preinstalled apps cannot be uninstalled.
Adjust Widget Size
- Touch and hold a widget on the home screen and then release it.
- An outline appears around the widget. Drag the outline to resize the widget.

NOTE:
Not all widgets can be resized.
Organizing With Folders
You can create folders on the home screen and add several application icons to a folder.
You can move folders the same way as moving icons.
- Touch and hold an icon on the home screen and drag it quickly over another icon.
- Release the icon. A new folder will be created and both icons are added into the folder.

NOTE:
Some recommended app icons may appear when you create a folder. You can check the icons you need to add them in the folder.
- To add more icons into the folder, touch and hold each icon and drag it over the folder before releasing it.

NOTE:
Touch the folder and then touch the name field to rename the folder.
Rearranging the Primary App Icons
The home screen includes a customizable primary icons area at the bottom visible from all home screen panels. You can keep at most five items in the area. Drag icons or folders in or out of the area to rearrange it.

natural_image
Four app icons on a blue background: telephone, user profile, chat bubble, and chat icon (no text or symbols)Entering Text
You can enter text using the onscreen keyboard. Some apps open it automatically. In others, you open it by touching where you want to type. Touch the Back key to hide the onscreen keyboard. You can also enter text by speaking with the Google voice typing feature.
Enable or Disable Input Methods
- Touch the Home key > Settings > Language & input > Current Keyboard.
- Touch CHOOSE KEYBOARDS at the bottom.
- Slide the switches beside the input methods to enable or disable them.

NOTE:
Some default input methods may not be disabled.
Change Input Methods
- When you use the onscreen keyboard to enter text, the icon appears at the bottom.
- Touch
- Select the input method you need.
Android Keyboard
The Android Keyboard provides a layout similar to a desktop computer keyboard. When screen auto-rotation is enabled, turn the phone sideways and the keyboard will change from portrait to landscape. The landscape keyboard is not supported in all applications.
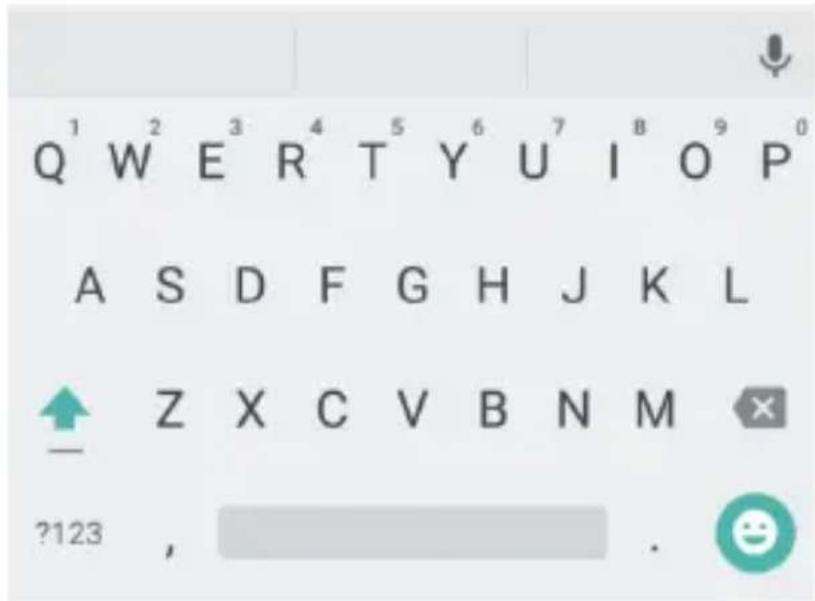
- Touch the alphabetic keys to enter letters. Touch and hold some specific keys to enter associated accented letters or numbers. For example, to enter È, touch and hold E ^3 and the available accented letters and number 3 appear. Then slide to choose È.
- As you enter a word, candidates appear above the keyboard. Touch to select the correct one; touch and hold to see more possible options.
- Touch to use uppercase. Double-tap to lock uppercase. This key also changes to indicate the current
case you are using: for lowercase, for uppercase, and when locked in uppercase.
- Touch to delete the text before the cursor.
- Touch to select numbers and symbols. You can then touch to find more.
- Touch to enter miniature icons, such as expressions, horoscopes, and animals.
- Touch to use Google voice typing.
- Touch and hold to change the input languages or set up the Android Keyboard.
Google Voice Typing
Google Voice typing uses the Google voice recognition service to convert speech to text.
- Touch /, to access the voice typing feature when you are using the SwiftKey Keyboard or Android Keyboard.
Or touch when entering text, and then select Google voice typing.
- When you see the microphone image, speak what you want to type.
- You can continue entering text to keep it or to delete it.
NOTE:
Say "comma," "period," "question mark," "exclamation mark," or "exclamation point" to enter punctuation.
SwiftKey Keyboard
SwiftKey Keyboard offers three layouts: FULL, THUMB and COMPACT. You can touch ≡ > ⚙ > LAYOUT to select a layout.
You can also speed up text input by moving your finger from letter to letter or word from word without lifting the finger.
The FULL Layout
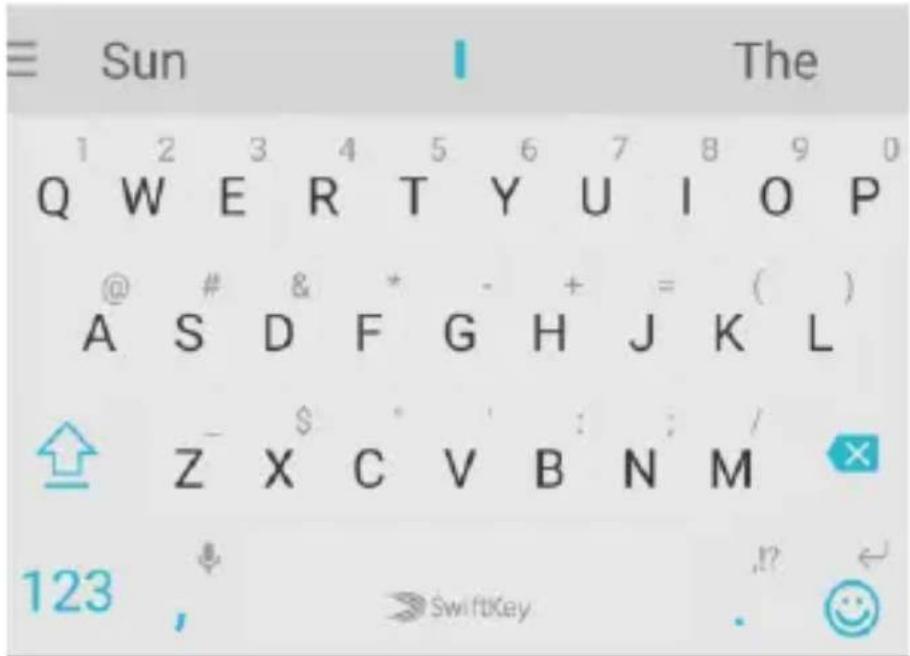
The FULL layout offers an input experience similar to a computer keyboard.
- The alphabetic keys: Touch the keys to enter letters. Touch a key and hold if necessary to choose more characters.
- The shift key: Touch to use uppercase. Double-tap to lock uppercase. This key also changes to indicate the
current case you are using: for lowercase, for uppercase, and when locked in uppercase.
- Pre-defined texts: Touch to enter digits, symbols, and other pre-defined texts. You can touch to find more, or touch to go back to the alphabetic keys. Touch to enter Emoji and emoticons.
- The delete key: Touch to delete text before the cursor.
- More options: Touch ≡ > / to access additional functions of SwiftKey, resize the keyboard, undock the keyboard, change keyboard themes, and more.
The THUMB Layout
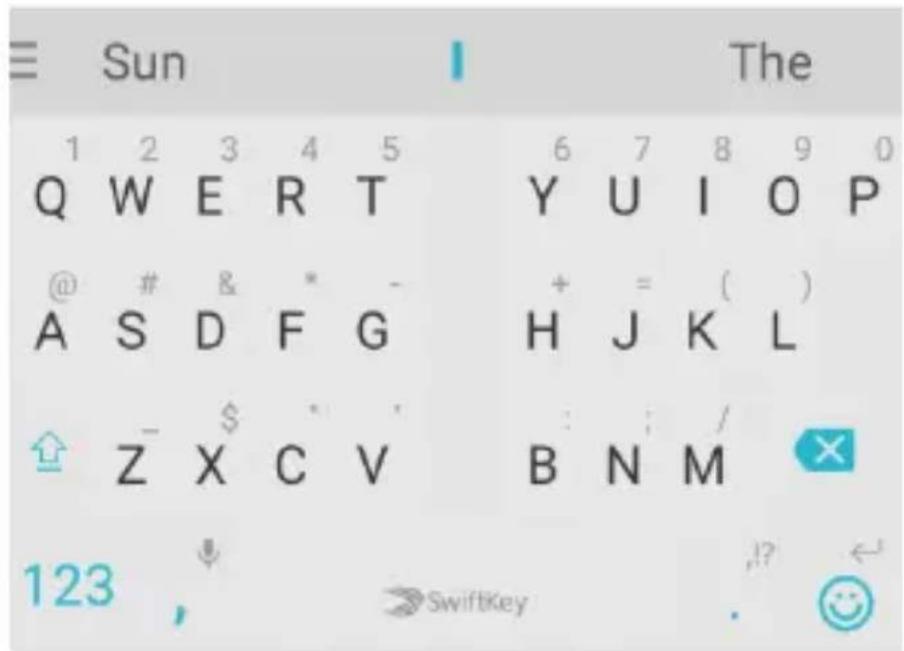
Touch the keys to enter letters. You can also touch and hold the key to choose the number or symbol you need.
The COMPACT Layout
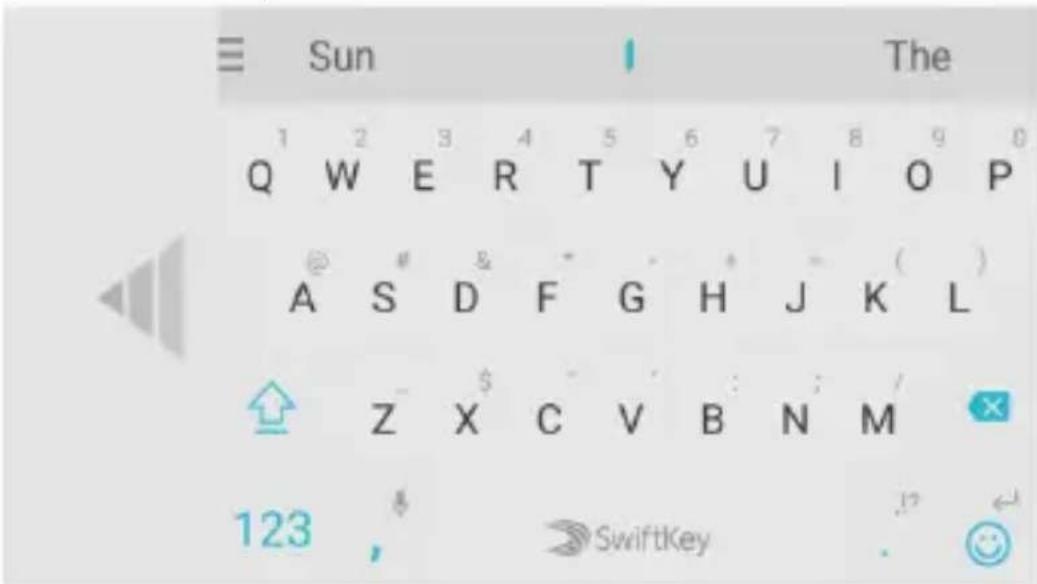
- Touch to enter the letter on the key. You can also touch and hold a key to choose more numbers and symbols.
- Touch and hold / to change the keyboard to align left or right.
Gesture input
Gesture input allows you to enter text by moving your finger on the screen from letter to letter to enter each word.
To enable gesture input:
- On the SwiftKey keyboard, touch > > TYPING.
- Touch Gesture input > Flow.
- Touch the Back key to return to the text field. Open the SwiftKey keyboard.
- Move your finger from letter to letter on the keyboard to trace a word without lifting the finger, until you reach the end of the word.
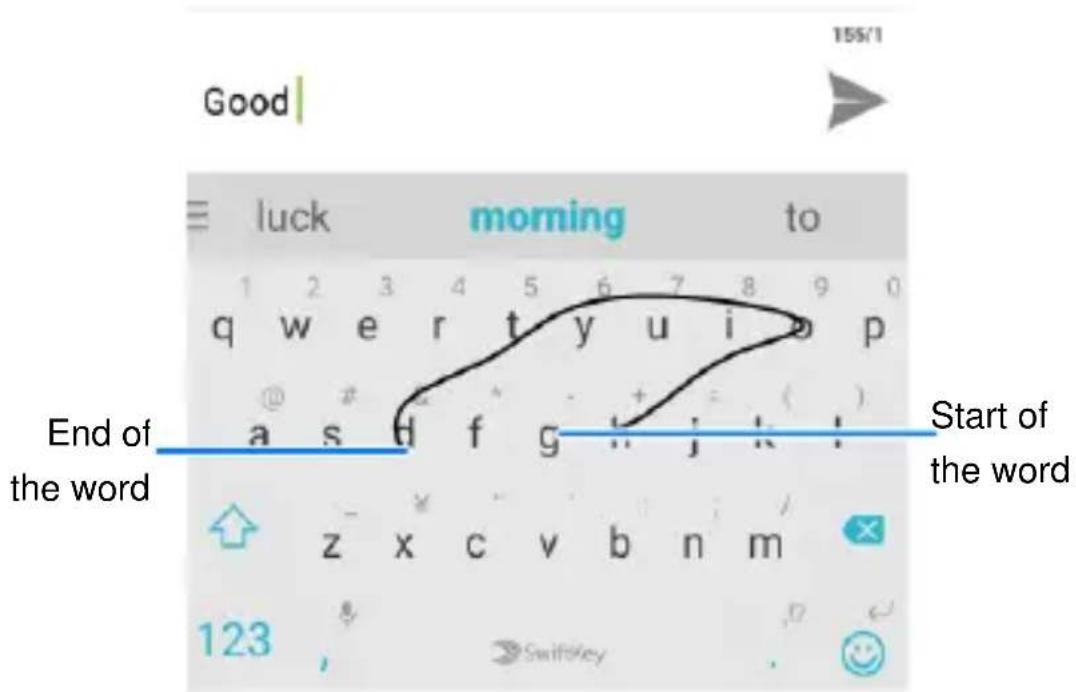

NOTES:
- Touch when you want to. If you want to enter a single letter, go ahead and touch.
- Lift your finger at the end of the word. A space is added automatically when you begin to trace the next word.
Input Method Settings
Choose the input method settings by touching Settings > Language & input from the home screen.
In the Keyboard & input methods section, you can set the current input method and choose the settings for input methods.
Editing Text
- Move the insertion point: Touch where you want to type. The cursor blinks in the new position, and a tab appears below it. Drag the tab to move the cursor.
- Select text: Touch and hold or double-tap within the text. The nearest word highlights, with a tab at each end of the selection. Drag the tabs to change the selection.
- Cut or copy: Select the text you want to manipulate. Then touch CUT or COPY to cut or copy the text to the clipboard.
- Replace text with the clipboard text: Select the text you want to replace. Then touch PASTE.
Opening and Switching Apps
Open an App
- Touch the Home key.
- Slide left or right on the screen and touch an app to open it.
Switch Between Recently Opened Apps
-
Touch and hold the Menu key or touch the Recent apps key. The apps you've used recently are displayed in a series of tabs. Slide up and down to see all the tabs.
-
Touch a tab to open that app.

NOTE:
You can swipe a tab sideways or touch X on the tab to remove it from the screen. Touch CLEAR ALL to remove all tabs.
Connecting to Networks and Devices
Connecting to Cellular Networks
Manage the nano-SIM Cards
You can turn on or off the nano-SIM cards and choose the default card for voice calls, messaging, and data.
To turn on or off a card:
-
Touch the Home key > Settings > SIM cards.
-
Touch the on/off switch next a card displayed.
To set the default card:
-
Touch the Home key > Settings > SIM cards.
-
Touch Calls or SMS Messages and select a card as the default.
To manage card name and display number:
-
Touch the Home Key > Settings > SIM cards.
-
Touch SIM slot 1 or SIM slot 2.
-
In the window that opens, edit the card name or select the display numbers.
Control Mobile Data Use
You can use or disable the mobile data service of the micro-SIM card in slot 1.
To enable or disable data access:
- Touch the Home key > Settings > SIM cards.
- Touch the Cellular Data to select a SIM for data.
To get data services when roaming:
- Touch the Home key > Settings > More > Cellular networks.
- Touch the Data roaming switch.

NOTE:
Data roaming may incur significant roaming charges.
Select Preferred Network Type
- Touch the Home key > Settings > More > Cellular networks.
- Touch Preferred network type and touch the type of network you prefer the phone to connect to.
Set Access Point Names
To connect to the Internet you can use the default Access Point Names (APN). And if you want to add a new APN, please contact the service provider to get the necessary information.
- Touch the Home key > Settings > More > Cellular networks.
- Touch Access Point Names and then touch
- Touch each item to enter the information you get from your service provider.
- Touch ▶ Save to complete.

NOTE:
To set the APN to default settings, touch > Reset to default.
Select Network Operator
- Touch the Home key > Settings > More > Cellular networks.
- Touch Network operators.
- Touch Search networks to search for all available networks.
- Touch a network in the network list to register manually.
You can also touch Choose automatically to select preferred network automatically.
Connecting to Wi-Fi
Wi-Fi is a wireless networking technology that can provide Internet access at distances of up to 100 meters, depending on the Wi-Fi router and your surroundings.
Turn Wi-Fi On and Connect to a Wi-Fi Network
- Touch the Home key > Settings > Wi-Fi.
- Slide the Wi-Fi switch to the On position to turn on Wi-Fi.
- Touch a network name to connect to it.
- If the network is secured, enter the password and touch CONNECT.

NOTE:
Your phone automatically connects to previously used Wi-Fi networks when they are in range.
Get Notified of Open Networks
- Touch the Home key > Settings > Wi-Fi.
- Slide the Wi-Fi switch to the On position.
- Touch ▶ Advanced.
- Slide the Network notification switch.
When Wi-Fi is on, you receive notifications in the status bar when your phone detects an open Wi-Fi network. Switch off this option to turn off notifications.
Add a Wi-Fi Network
You can add a Wi-Fi network if the network does not broadcast its name (SSID), or to add a Wi-Fi network when you are out of range.
To connect to a secured network, you first need to get the security details from the network's administrator.
-
Touch the Home key > Settings > Wi-Fi.
-
Slide the Wi-Fi switch to the On position.
-
Touch > Add network.
-
Enter the network SSID (name). If necessary, enter security or other network configuration details.
-
Touch SAVE.
Connect to a WPS Network
Wi-Fi Protected Setup (WPS) is a feature that makes it easy to add your phone to the access points which support WPS.
You can use one of the following methods to connect your phone to a wireless network using WPS.
Method one: WPS button (Recommended)
- Touch the Home key > Settings > Wi-Fi.
- Slide the Wi-Fi switch to the On position.
- Touch > Advanced > WPS Push Button.
- Press the WPS button on the access point and the access point will recognize your phone and add it to the network.
Method two: PIN number
- Touch the Home key > Settings > Wi-Fi.
- Slide the Wi-Fi switch to the On position.
- Touch □ > Advanced > WPS Pin Entry.
- The WPS PIN number displays on the screen. Enter the PIN number into the access point's setup page.
After entering the PIN number, your phone automatically finds the access point and configures the connection.
NOTE:
For detailed information about the WPS feature of the access point, please refer to its user documents.
Forget a Wi-Fi Network
You can make your phone forget about the details of a Wi-Fi network that you added - for example, if you don't want the phone to connect to it automatically or if it is a network that you no longer use.
- Touch the Home key > Settings > Wi-Fi.
- Slide the Wi-Fi switch to the On position.
- Touch the Wi-Fi network name and then touch FORGET.
Adjust Advanced Wi-Fi Settings
- Touch the Home key > Settings > Wi-Fi.
- Touch □ > Advanced to adjust the following settings.
▶ Network notification: Get notifications in the status bar when Wi-Fi is on and an open network is available.
- Keep Wi-Fi on during sleep: Set whether to keep Wi-Fi on in sleep mode.
▶ Install certificates: Install certificates needed for connecting to certain Wi-Fi networks.
▶ Wi-Fi Direct: Use the Wi-Fi Direct feature.
▶ WPS Push Button: Connect to a WPS network via the push button method.
▶ WPS Pin Entry: Connect to a WPS network via the phone PIN method.
▶ MAC address: Check the MAC address.
IPv4 address: Check the phone's IPv4 address.
Connecting to Bluetooth Devices
Bluetooth is a short-range wireless communication technology. Phones or other devices with Bluetooth capabilities can exchange information wirelessly within a distance of about 10 meters (32.8 feet). The Bluetooth devices must be paired before the communication is performed.
Turn Bluetooth On/Off
- Touch the Home key > Settings > Bluetooth.
- Slide the Bluetooth switch to the On or Off position.
When Bluetooth is on, the ✕icon appears in the status bar.
Change the Device Name
- Touch the Home key > Settings > Bluetooth.
- Slide the Bluetooth switch to the On position if Bluetooth is off.
- Touch □ > Rename this device.
- Edit the name and touch RENAME.
Pair With Another Bluetooth Device
- Touch the Home key > Settings > Bluetooth.
- Slide the Bluetooth switch to the On position if Bluetooth is off.
Your phone automatically scans for and displays the IDs of all available Bluetooth devices in range. You could touch
Refresh if you want to scan again.
-
Touch the device you want to pair with.
-
Confirm that the Bluetooth passkeys are the same between the two devices and touch PAIR. Alternately, enter a Bluetooth passkey and touch PAIR.
Pairing is successfully completed when the other device accepts the connection or the same passkey is entered.

NOTE:
The Bluetooth passkey may be fixed for certain devices, such as headsets and hands-free car kits. You can try entering 0000 or 1234 (the most common passkeys), or refer to the documents for that device.
Forget (Unpair With) a Bluetooth Device
You can make your phone forget its pairing connection with another Bluetooth device. To connect to the device again, you need to search it and enter or confirm a passkey again.
- Touch the Home key > Settings > Bluetooth and ensure that Bluetooth is turned on.
- In the list of paired devices, touch the icon beside the Bluetooth device you want to forget.
- Touch FORGET.
Send Data via Bluetooth
- Open the appropriate application and select the file or item you want to share.
-
Select the option for sharing via Bluetooth. The method may vary by application and data type.
-
Touch a Bluetooth device the phone has paired with or wait for it to search for new devices and touch one of them.
Receive Data via Bluetooth
- Turn Bluetooth on before trying to receive data via Bluetooth.
- Flick down the status bar and touch .
- Touch ACCEPT to start receiving the data.
Received files are stored automatically in a dedicated folder (Bluetooth, for instance) in the phone. You can access them with the File Manager app.
Connecting to Your Computer via USB
You can connect your phone to a computer with a USB cable and transfer music, pictures, and other files in both directions. Your phone stores these files in its internal storage or on an external microSDHC card.
If you are using USB tethering, you must turn that off before you can use USB to transfer files between your phone and computer.
Connect Your Phone to a Computer via USB
- Connect your phone to the PC with a USB cable.
- Open the notification panel and touch (USB for file transfer).
- Choose one of the following options:
▶ Charge only: Charge your phone via USB.
▶ Install driver: Install the driver needed for some USB
connection modes (such as MTP). You only need to install the driver on the same PC once.

NOTE:
You can also install the driver on PC by running the executable file in the new CD-ROM drive.
- Connect to PC software: Install apps or manage data on the phone via PC software.
▶ Media device (MTP): Transfer files on Windows ^® or Mac ^® .

NOTE:
For Windows XP, please install the drivers and Media Player 11 (or later version) when you use Media device (MTP) for the first time.
▶ Camera (PTP): Transfer photos using camera software.

NOTE:
To make your phone connect to the computer automatically using the selected connection type, check Don't ask me again.
Connect With Windows Media ^® Player
You can sync music, picture, and video files on your phone and the computer installed with Windows Media Player.
- Connect the phone with your computer via USB and choose Media device (MTP).
- Open Windows Media Player and synchronize music, picture, and video files.
Disconnect Your Phone From the Computer
To disconnect the phone from the computer, simply unplug the USB cable when you're finished.
Remove the microSDHC Card From Your Phone
If you need to remove the microSDHC card while the phone is on, you must unmount it first.
- Touch the Home key > Settings > Storage & USB.
- Scroll down and touch the right of the microSDHC card. you can now safely remove the microSDHC card from the phone.

NOTE:
If you unmount the microSDHC card, some apps that you are using will stop and may be unavailable until you remount the microSDHC card.
Erase the microSDHC Card
- Touch the Home key > Settings > Storage & USB.
- Scroll down and touch SD card > Settings > Format > ERASE & FORMAT.
CAUTION:
The formatting procedure erases all the data on the microSDHC card, after which the files CANNOT be retrieved.
Sharing Your Cellular Data Connection
You can share your phone's data capabilities through tethering or by activating the Wi-Fi hotspot feature to create a cellular hotspot.
Share Your Cellular Data Connection via USB
You can access the Internet on your computer via the USB tethering feature of your phone. The feature needs data connection on a cellular network and may result in data charges.

NOTE:
You cannot transfer files between your phone and your computer when the phone is USB tethered.
- Connect your phone to your computer with a USB cable.
- Touch the Home key > Settings > More > Tethering & portable hotspot.
- Switch on USB tethering. A new network connection will be created on your computer.

NOTE:
To stop sharing your data connection, switch off USB tethering or disconnect the USB cable.
Share Your Cellular Data Connection via Bluetooth
If your computer can obtain an Internet connection via Bluetooth, you can configure your phone to share its cellular data connection with your computer.
- Pair your phone with your computer via Bluetooth.
- Configure your computer to obtain its network connection via Bluetooth. For more information, please see your computer's documentation.
- Touch the Home key > Settings > More > Tethering & portable hotspot.
- Switch on Bluetooth tethering. Your computer is now sharing your phone's data connection.

NOTE:
To stop sharing your data connection, switch off Bluetooth tethering.
Share Your Cellular Data Connection as a Wi-Fi Hotspot
You can share your phone's data connection with other devices by turning your phone into a portable Wi-Fi hotspot. The feature needs data connection on a cellular network and may result in data charges.

NOTE:
When the portable Wi-Fi hotspot feature is enabled, you cannot use your phone's Wi-Fi capability to access the Internet. You still remain connected to the Internet via your cellular data network.
- Touch the Home key > Settings > More > Tethering & portable hotspot > Wi-Fi hotspot.
- Slide the Wi-Fi hotspot switch to the On or Off position. After a moment, the phone starts broadcasting its Wi-Fi network name (SSID).
- On another device, locate your phone via Wi-Fi and connect with it to start using the phone's cellular data.

NOTE:
To stop sharing your data connection, switch off Wi-Fi hotspot.

NOTE:
To get notified when your Wi-Fi hotspot is off which is due to hotspot sleep policy, touch Keep Wi-Fi Hotspot on to set the time for sleep policy.
Set Your Wi-Fi Hotspot
You can change the name of your phone's Wi-Fi network (SSID) and secure your portable Wi-Fi hotspot.
-
Touch the Home key > Settings > More > Tethering & portable hotspot > Wi-Fi hotspot > Set up Wi-Fi hotspot.
-
Set your name and security options as follows:
▶ Network name: Enter or edit a network SSID (name) that other devices see when scanning for Wi-Fi networks.
- Security: Choose a security option, None (not recommended) or WPA2 PSK (other users can access your Wi-Fi hotspot only if they enter the correct password). When you select WPA2 PSK, touch the Password field to edit the security password.
- Touch SAVE to save your settings.
Connecting to Virtual Private Networks
Virtual private networks (VPNs) allow you to connect to the resources inside a secured local network. VPNs are commonly deployed by corporations, schools, and other institutions to let people access local network resources when not on campus, or when connected to a wireless network.
Depending on the type of VPN you are using, you may be required to enter your login credentials or install security certificates before you can connect to your VPN. You can get this information from your network administrator.
Add a VPN
- Touch the Home key > Settings > More > VPN.
- Touch at the top right corner and fill in the information provided by your network administrator.
- Touch SAVE.
The VPN is added to the list on the VPN screen.

NOTE:
You must set a lock screen pattern, PIN or password before using VPN.
Connect to a VPN
- Touch the Home key > Settings > More > VPN.
- Touch the VPN that you want to connect to.
- When prompted, enter any requested credentials, and then touch CONNECT.
Modify a VPN
- Touch the Home key > Settings > More > VPN.
- Touch behind the VPN name to modify.
- Touch SAVE.
Phone Calls
You can place calls from the Phone app, the Contacts app, or other apps or widgets that display contact information. Wherever you see a phone number, you can usually touch it to dial.
Placing and Ending Calls
Place a Call by Dialing
- Touch the Home key >
- Touch and enter the phone number with the dialpad. Touch to delete incorrect digits.


NOTE:
As you enter the phone number, your phone searches for matching information in your contacts. If you see the number and contact you want to call, touch it to place the call immediately.
- Touch below the keypad to dial.
You can also touch the search box at the top of the Phone app screen and enter the phone number or contact name you want to call. Touch the matching contact or Call [number] to place the call.

NOTE:
To make an international call, touch and hold the 0 key to enter the plus (+) symbol. Next, enter the country code, followed by the city/area code and then the phone number.
End a Call
During a call, touch 📋 on the screen.
Answering or Rejecting Calls
When you receive a phone call, the incoming call screen opens, displaying the caller ID or the information about the caller that you've entered in the Contacts app. You can answer or reject the call, or reject it with a text message.
Answer a Call
When you receive a phone call, drag Ⓤ over to answer the call.
- or -
If the screen is unlocked, touch ANSWER to answer the call.

NOTE:
To silence the ringer before answering the call, press either end of the Volume key.
Reject a Call
When you receive a phone call, drag Ⓤ over to reject the call.
- or -
If the screen is unlocked, touch DISMISS to reject the call.

NOTE:
To edit the preset text response from within the Phone app, touch in the top search field and select Settings > Quick responses.
Working With the Call History
The call history is a list of all the calls you've placed, received, or missed. It provides a convenient way to redial a number, return a call, or add a number to your contacts.
To open the call history, you can touch the Home key > (in the top search field) > Call History.
Place a Call From the Call History
- Open the call history.
- Touch beside a listing to call back.

NOTE:
You can touch View full call history > AI, (incoming), (outgoing), or (missed) to filter the records by call type.
Take other actions on a call history entry
Open the call history, touch a listing number.
- Touch to Create new contact.
- Touch to Add to a contact.
- Touch to Send Message to this number.
- Touch Ⓤ Call details to view more call information.

NOTE:
In the call history screen, touch : > Delete to delete the call history record.
Touch : > Clear call history to delete all history records.
Calling Your Contacts
-
Touch the Home key > 📞. Your favourite contacts and frequently called contacts are displayed in the tab.
-
Touch a contact to place the call, or touch or swipe to the tab to view all your contacts and touch beside a contact to make a call.
Checking Voicemail
If you have set the phone to divert calls to voicemail, callers can leave voicemail messages when they cannot reach you. Here's how to check the messages they left.
- Touch the Home key > > .
- Touch and hold the 1 key in the dialer. If prompted, enter your voicemail password.
- Follow the voice prompts to listen to and manage your voicemail messages.

NOTE:
See Set Voicemail for how to set your voicemail service. For detailed information, please contact the service provider.
Using Options During a Call
During a call, you will see a number of onscreen options. Touch an option to select it.
- Touch to switch to the keypad when you need to enter a code (for example, the PIN for your voicemail or bank account) during the call.
- Touch to mute or unmute your microphone.
- Touch to turn on or off the speaker.
- Touch 📁 to put the call on hold. Then touch 📋 > Add call to make another call separately from the first call, which is put on hold.
- Touch > Start recording to record phone conversation.
- Touch to end the current call.

WARNING!
Because of higher volume levels, do not place the phone near your ear during speakerphone use.
Managing Multi-party Calls
When the call waiting and three-way call features are available, you can switch between two calls or set up a conference call.

NOTE:
The call waiting and three-way call features need network support and may result in additional charges. Please contact your service provider for more information.
Switch between Current Calls
When you're on a call and another call comes in, your phone screen informs you and displays the caller ID.
To respond to an incoming call while you're on a call:
- Drag 📞 over to answer the call. (This puts the first caller on hold and answers the second call.)
- Drag over to reject the call.
To switch between two calls:
Touch the tab at the bottom (displayed as "On hold") to switch back to the other call.
Set Up a Conference Call
With this feature, you can talk to two people at the same time.
- Place the first call.
- Once you have established the connection, touch □ > Add call and dial the second number. (This puts the first caller on hold.)
- Touch to call the second number, then touch > Merage calls to set up a conference call.
If one of the people you called hangs up during your call, you and the remaining caller stay connected. If you initiated the call and are the first to hang up, all callers are disconnected.
To end the conference call, touch
Adjusting Your Call Settings
Set Contact Display Options
You can set the order of the contacts displayed in the CONTACTS tab of the Phone app.
- Touch the Home key > 📞 > : (in the top search field) > Settings > Display options.
- Touch Sort by or Name format to set the order of the contacts and the format of the contact names.
Set Vibration and Dialpad Tones
Turn on or off vibration for incoming calls as well as dialpad sounds.
- Touch the Home key > 📞 > : (in the top search field) > Settings.
-
In the Sounds and vibration section, touch the option you want to configure.
-
Touch Phone ringtone to select the ringtone for incoming call notification.
▶ Check Also vibrate for calls to enable vibration for incoming call notification.
▶ Check Dialpad tones to play sounds when you touch the dialpad keys.
Edit Quick Response to Rejected Callers
- Touch the Home key > 📞 > ⋮ (in the top search field) > Settings > Quick responses.
- Touch a text message to edit it.
Set Speed Dials
You can touch and hold the 1 \~ 9 keys from the dialer to call the corresponding speed dial number.
The number key 1 is reserved to speed dial your voicemail.
To assign a speed dial key:
- Touch the Home key > 📞 > ⋮ (in the top search field) > Settings > Speed dial.
- Touch a speed dial key.
- Enter a phone number or select one from the contact list.
- Touch TURN ON.
Set hearing aids
- Touch the Home key > 📞 > ⋮ (in the top search field) > Settings > Calling accounts.
- Check hearing aids to turn on hearing aid compatibility.
Set Voicemail
-
Touch the Home key > 📞 > : (in the top search field) > Settings > Calling accounts.
-
Select a nano-SIM card.
-
Touch Voicemail to configure voicemail settings.
-
Touch Service to select the voicemail service provider. Your carrier is the default.
- Touch Setup > Voicemail number to edit the voicemail number.
- Touch Sound to select the notification sound for new voicemails.
▶ Check Vibrate to enable vibration for notification.
Use Fixed Dialling Numbers
Fixed Dialling Numbers (FDN) allows you to restrict outgoing calls to a limited set of phone numbers.
- Touch the Home key > 📞 > ⋮ (in the top search field) > Settings > Calling accounts.
- Select a nano-SIM card.
- Touch Fixed Dialling Numbers and the following options are available.
▶ Enable FDN: Input the PIN2 code to enable the FDN feature.
▶ Change PIN2: Change the PIN2 code for FDN access.
▶ FDN list: Manage the FDN list.
NOTE:
The PIN2 code is provided by your carrier. Entering an incorrect PIN2 code more times than allowed can get your nano-SIM card locked. Contact the service provider for assistance.
Forward Incoming Calls
Call forwarding feature allows you to forward your incoming calls to another phone number.
- Touch the Home key > 📞 > ⋮ (in the top search field) > Settings > Calling accounts.
- Select a nano-SIM card.
- Touch Call forwarding.
- Touch an available option to enable it.
Bar Certain Calls
Call barring feature allows you to forbid certain types of calls from your phone.
- Touch the Home key > 📞 > ⋮ (in the top search field) > Settings > Calling accounts.
- Select a nano-SIM card.
- Touch Call barring.
- Set the restriction of specific types of calls from your phone.
Other Options
- Touch the Home key > 📞 > ⋮ (in the top search field) > Settings > Calling accounts.
- Select a nano-SIM card.
- Touch Additional settings.
- Touch Caller ID to choose whether your number is displayed when someone receives your outgoing call. Or check Call waiting to get notified of incoming calls during a call.

NOTE:
Please contact the service provider to check whether the caller ID and call waiting features are available.
Set TTY mode
Your phone is a TTY compatible device. A TTY device can allow people who have hearing or speech disabilities to communicate by telephone. Simply connect the TTY device to the phone's headset jack.
Select a TTY mode for your phone to work with a TTY device, or turn TTY off.
- Touch the Home key > 📞 > : (in the top search field) > Settings >Accessibility.
- Select one of the following options. Consult your teletypewriter manufacturer's manual if necessary.
▶ TTY Off: Users who can hear and talk can disable TTY support.
▶ TTY Full: Users who cannot talk or hear may use this mode to send and receive text messages through TTY device.
▶ TTY HCO: Users who can hear, but cannot talk, may use this mode to listen to conversation of the other party, and respond via text messages.
▶ TTY VCO: Users who can talk, but cannot hear, may use this mode to talk through the phone and receive responses via text messages.
Contacts
You can add contacts on your phone and synchronize them with the contacts in your Google account or other accounts that support contact syncing.
To see your contacts, touch the Home key > 📷. From there, you can touch the tabs on the top of the screen to quickly switch to contact groups or favourite contacts.
Checking Contact Details
- Touch the Home key > 📷 and then touch the ALL CONTACTS tab to access your contact list.
- Scroll through the list to view all your contacts.
- Touch a contact to view its details.

NOTE:
If you have a lot of contacts stored, you'll see a slider on the right side of the screen. Drag the slider to the initial letter you need.
Adding a New Contact

- Touch the Home key > .
- Touch to add a new contact.
-
Touch the account field near the top of the screen to choose where to save the contact. If a sync account is selected, the contacts will be synced automatically with your account online.
-
Enter the contact name, phone numbers, email addresses, and other information.
- Touch to save the contact.
Setting Up Your Own Profile
You can create your own name card in your phone.
- Touch the Home key > 📷 and then touch the ALL CONTACTS tab.
- Touch Set up my profile.
If a profile has already been set up, touch the listing beside ME and touch - Edit your profile information. Touch More Fields to add more information if you want.
- Touch .
Importing, Exporting, and Sharing Contacts
You can import/export contacts from/to your nano-SIM card, the phone storage or the microSDHC card. This is especially useful when you need to transfer contacts between different devices. You can also quickly share contacts using Bluetooth, Google Drive, Email, Gmail or Messaging.
Import or Export Contacts
- Touch the Home key > .
- Touch : > Import/Export.
- Select the source of the contact data and touch NEXT.
- Select the destination of the imported/exported contacts and touch NEXT.
- If necessary, select the contacts you want to import or export and touch OK.
Share Contacts
- Touch the Home key > 📷 and then touch the ALL CONTACTS tab.
- Touch and hold one contact you want to share until the check box appears.
- Check the contacts you want to share and then touch : > Share.
- Choose how to share the contacts. Options depend on the applications and services installed.
Working With Favourite Contacts
In the favourite contacts tab, you can find your favourite contacts and frequently contacted contacts.
Add a Contact to Favourites
You can add the contacts you use frequently to FAVOURITES so that you can find them quickly.
- Touch the Home key > 📷 and then touch the ALL CONTACTS tab.
- Touch a contact and then touch at the top.
Remove a Contact From Favourites
- Touch the Home key > and then touch the FAVOURITES tab.
- Touch a favourite contact and then touch at the top.
Working With Groups
View Your Contact Groups
- Touch the Home key > and then touch the GROUPS tab.
- Scroll through the list to view the preset groups and any groups you have created.
- Touch a group to view its members.

NOTE:
To send a message or an email to all or some of the group members, you can touch the Home key > and then touch the
GROUPS tab, touch a group to open and then touch : > Send group message / Send group E-mail.
Set Up a New Group
- Touch the Home key > and then touch the GROUPS tab.
- Touch to create a new group.
- If you have added contact accounts other than the phone, select an account for the new group.
- Touch the Group's name field and enter the group name.
- Touch and select the contacts you wish to be the group members.
- Touch OK.
- Touch to save the group.
Delete a Group
- Touch the Home key > and then touch the GROUPS tab.
- Touch a group and then touch : > Delete.
- Touch OK to disband the group. The contacts in the group will not be deleted.
Edit a Group
- Touch the Home key > and then touch the GROUPS tab.
- Touch a group and then touch > Edit.
- Touch the group name to edit it, or touch the field below to add more members.
- Touch .

NOTE:
To remove group members, touch a group in the GROUPS tab and touch : > Edit to touch the behind the group member you want to remove.
Searching for a Contact
- Touch the Home key >
- Touch at the top of the screen.
- Input the contact name or any information the contact has to search for it. The contacts matched will be listed.
Editing Contacts
Edit Contact Details
- Touch the Home key > .
- Touch a contact you need to edit and then touch .
- Edit the contact and touch .

Delete Contacts
- Touch the Home key >
- Touch and hold one contact you want to remove until the check box appear.
- Check the contacts you want to remove and then touch :> Delete.
- Touch OK to confirm.

Web Accounts
Adding or Removing Accounts
You can add multiple Google accounts and Microsoft Exchange ActiveSync ^® accounts. You may also add other kinds of accounts depending on the apps installed on your phone.
Add an Account
- Touch the Home key > Settings > Accounts > Add account.
- Touch the type of account you want to add.
- Follow the onscreen steps to enter the information about the account. Most accounts require a username and password, but the details may vary. You may also need to obtain some information from IT support or your system administrator.
When the account is successfully added, it is displayed in the Accounts menu.
Remove an Account
Removing an account will delete it and all information associated with it from your phone, such as emails and contacts.
- Touch the Home key > Settings > Accounts.
-
Touch the account category and then touch the account.
-
Touch : > Remove account > REMOVE ACCOUNT.
Configuring Account Sync
Configure Auto Sync Setting
- Touch the Home key > Settings > Accounts.
- Touch : and check or uncheck Auto-sync data.
▶ When automatic sync is turned on, changes you make to information on your phone or on the web are automatically synced with each other.
- When automatic sync is turned off, you need to sync manually to collect emails, updates, or other recent information.
NOTE:
You can also turn on or off auto sync in the Quick Settings screen. See Use Quick Settings.
Sync Manually
- Touch the Home key > Settings > Accounts.
- Touch the account category and then the account you want to sync.
- Touch : > Sync now. Or touch the types of information you want to sync.
Change an Account's Sync Settings
- Touch the Home key > Settings > Accounts.
- Touch the account category and then the account. The Sync screen appears, showing a list of information the account can sync.
- When auto-sync is enabled, switch on or off items as you need. The types of information switched on on the phone and the web will be kept in auto-sync. When auto-sync is disabled, touch a listing to sync that type of information between the phone and the web.
Touch Email to receive and send emails from your webmail or other accounts, using POP3 or IMAP, or access your Exchange ActiveSync account for your corporate email needs.
Setting Up the First Email Account
- Touch the Home key, slide screen to touch Email.
- Enter the email address and password.
- Touch NEXT to let the phone retrieve the network parameters automatically.

NOTE:
You can also enter these details manually by touching MANUAL SETUP or when automatic setup fails.
- Follow the on-screen instructions to finish the setup.
Your phone will show the inbox of the email account and start to download email messages.
Checking Your Emails
Your phone can automatically check for new emails at the interval you set when setting up the account.
You can also check new emails manually by dragging down on the message list.
Responding to an Email
You can reply to or forward a message that you receive. You can also delete messages and manage them in other ways.
Reply to or Forward an Email
- Open the email you want to reply to or forward from the Inbox.
- Do the following as you need:

▶ To reply to the sender, touch .
▶ To reply to the sender and all recipients of the original email, touch
▶ To forward the email to someone else, touch → or : > Forward.
- Edit your message and touch

Mark an Email as Unread
You can return a read email to the unread state - for example, to remind yourself to read it again later. You can also mark a batch of emails as unread.
- While reading a message, touch

- While in a message list (for instance, the Inbox), touch the sender images at the left side of the messages and then touch
Delete an Email
You can delete an email from its folder. You can also delete a batch of emails.
- While reading a message, touch
- While in a message list (for instance, the Inbox), touch the sender images at the left side of the messages and then touch 📄


NOTE:
If you accidentally delete one, touch UNDO to retrieve it.
Writing and Sending an Email
- Open your email Inbox and touch


NOTE:
If you have more than one email account added on the phone, touch the sender line to select the account you want to use for sending the message.
- Enter a contact name or email address in the To field. Separate each recipient with a comma.

NOTE:
To send a carbon copy or blind carbon copy to other recipients, touch to open the Cc/Bcc field and enter the contact names or email addresses.
-
Enter the email subject and compose the email text.
-
Touch > Attach file to add audio files, images, videos and other types of files as attachments.
- Touch at the top right of the screen to send the message.
Adding and Editing Email Accounts
Add an Email Account
After setting up your first email account (see Setting Up the First Email Account), you can add more email accounts and manage them separately.
- Open Email to get the Inbox screen.
- Touch ≡ > Settings > Add account.
- Follow the prompts to set up the account as you did with the first one.
Edit an Email Account
You can change a number of settings for an account, including how often you check for email, how you're notified of new mails, your email signature, and details about the servers the account uses to send and receive mails.
- Open Email to get the Inbox screen.
- Touch > Settings and touch the account whose settings you want to change.
- Make the changes and touch when you finish.
Changing General Email Settings
General settings apply to all email accounts you add.
- Open Email to get the Inbox screen.
- Touch ≡ > Settings > General settings.
- Make the changes and touch when you finish.
Messaging
You can use Messaging to exchange text messages (SMS) and multimedia messages (MMS).
Opening the Messaging Screen
Touch the Home key >

The Messages screen opens, where you can create a new message, search for messages, or open an ongoing message thread.
- Touch to write a new text or multimedia message.
- Touch to search for a message using keywords.
- Touch an existing message thread to open the conversation you’ve had with a certain number.
Sending a Message
- On the Messages screen, touch 📋 at the top right.
- Add recipients by one of the following ways.
- Touch the Type name or number field and manually enter the recipient’s number or the contact name. If the phone presents a few suggestions, touch the one you want to add.
▶ Select recipients from your contacts or call log by touching +
- Touch the Type text message field and enter the message text.
- If you want to send a multimedia message, touch : > Add subject to add a message subject or touch □ to attach a file to the message.
- Touch
NOTE:
You can also include email addresses as recipients for a multimedia message.
NOTE:
Do not add a message subject or any attachment if you want to send a text message. Otherwise you may be charged for a multimedia message.
Replying to a Message
Messages you receive are appended to existing threads of the same number. If the new message comes from a new number, a new thread is created.
-
On the Messages screen, touch the thread that has the message you want to reply to.
-
Type your reply in the text box at the bottom. You can touch if you want to reply with an MMS.
- Touch .
Forwarding a Message
- On the Messages screen, touch the thread that has the message you want to forward.
- Touch and hold the message and then touch Forward in the menu that opens.
- Enter a recipient for the message and edit the content if you want.
- Touch .
Copying a Message
You can copy text messages in the phone storage to the nano-SIM cards, or vice versa.
- To copy a text message from the phone to the nano-SIM card, touch and hold the message and select Save message to SIM card.
- To copy a text message from the nano-SIM card to the phone, touch : > Settings > Text Message(SMS) > Manage SIM card messages. Touch and hold a message and then touch Copy to phone memory.
Changing Message Settings
Touch : > Settings in the Messages screen to change messaging settings.
Calendar
Calendar on the phone works with the web-based Google Calendar™ service for creating and managing events, meetings and appointments. It also works with the Microsoft Exchange ActiveSync calendar once you sign into your Exchange account on the phone.
To open Calendar, touch the Home key > Calendar.
Viewing Your Calendars and Events
Select Visible Calendars
- Open the Calendar app.
- Touch > Calendars to display.
- Touch the calendars to check the ones you want to see or uncheck the ones you'd like to hide.
Events from hidden calendars are not shown in the Calendar app.
Change Calendar Views
You can view your calendars in different forms. The app offers four view types: Month, Week, Day, and Agenda.
To change calendar views, touch Month, Week, Day, or Agenda at the bottom of the screen. You can also touch a day block in Month view to switch to Day view or Agenda view.
- In Month view, swipe vertically to see previous and future months.
- In Week or Day view, swipe horizontally to see previous and future weeks/days.
- When you are viewing past or future days, weeks, or months, touch at the top to quickly switch to today.
View Event Details
In Agenda, Day, or Week view, touch an event to view its details.
In Month view, touch a day to switch to Day view or Agenda view. Then touch an event to view its details.
Creating an Event
- In any Calendar view, touch at the top.
You can also touch a spot in Day or Week view twice to add an event to that time spot.
-
If you have more than one calendar account, touch the current account above the Event name line to choose one.
-
Enter the event details and touch DONE.
Editing, Deleting or Sharing an Event
-
Find the event you want to edit, delete, or share.
-
Open its details screen (see View Event Details in this chapter).
-
Do one of the following as you need.
▶ To edit the event, touch changes.
Touch DONE to save your
▶ To delete the event, touch
OK.
▶ To share the event, touch
nd choose how to share.


Changing Calendar Settings
To change Calendar settings, open a calendar view (Day, Week, Month, or Agenda), and touch > Settings.
You can change General settings, which apply to all accounts, or other settings that only apply to specific accounts.
Browser
Use Browser to view web pages and search for information.
Opening the Browser
Touch Broswer in the home screen. The last web page you were viewing is displayed. If you have not used Browser recently, your home page opens.
Browser also opens when you touch a web link - for example, in an email or a text message.
- Open the Browser app.
- Touch the address box at the top of the web page.
- Enter the address (URL) of a web page or enter terms you want to search for and touch

NOTE:
Touch behind the address box if you want to stop opening the page.

NOTE:
Touch the tabs icon and touch New window to open a new web page in a new tab.
Downloading Files
Touch and hold an image or a link to a file or to another web page. In the menu that opens, touch Save image or Save link.
The downloaded files are saved to your phone or the memory card. You can view or open them in the Downloads app.
Changing Browser Settings
You can configure a number of Browser settings to customize the way you browse the web, including several that you can use to control your privacy.
To open the Browser settings screen, touch □□> Settings.
Camera
You can use your phone to take photos and record videos. Photos and videos are stored on the microSDHC card you have installed or in the phone storage. You can copy them to your computer or access them in the Gallery app.
Capturing a Photo
- Touch the Home key >

- Aim the camera at the subject and make any necessary adjustment. Auto camera mode is used by default.
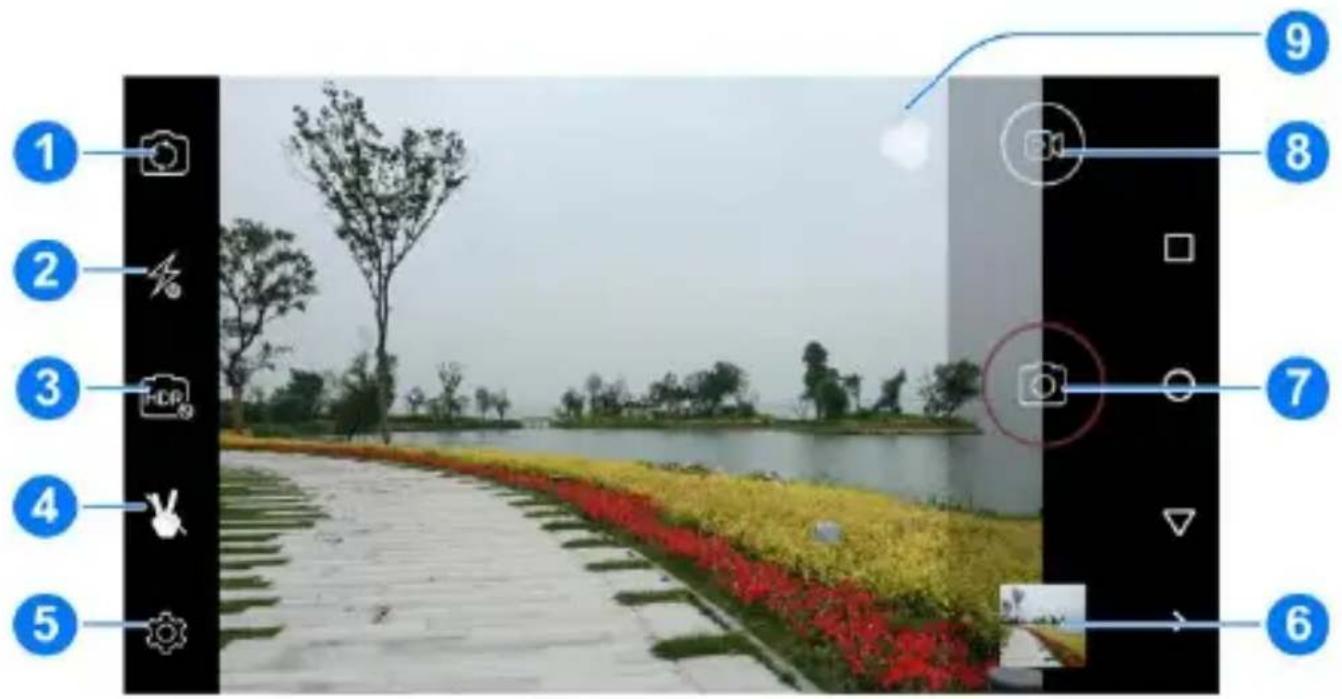
| Number | Function |
| 1 | Switch between the front and back cameras. |
| 2 | Change the flash setting. |
| 3 | Switch to turn on or off HDR mode. |
| 4 | Auto capture when this gesture is detected. |
| 5 | Change the camera settings. |
| 6 | View pictures and videos you have taken. |
| 7 | Capture a picture. |
| 8 | Touch to start recording a video. |
| 9 | Select colour effect (only available for the back camera). |

WARNING!
Keep a safe distance when using the flash. Do not point the flash towards the eyes of people or animals.

NOTE:
You can spread or pinch on the screen to zoom in or out before taking pictures.
-
Touch the area where you want the camera to focus, or leave the camera to autofocus on the center of the image.
-
Lightly touch


NOTE:
You can touch and hold take burst shots.
Recording a Video
You can record a normal-speed or slow motion video clip.
- Touch the Home key > recording.
and touch
to start - Touch any area on the screen that you want the camcorder to focus on before and during recording.


NOTE:
While the recording is in progress, touch / to pause or continue the recording. Touch to save the frame as a separate photo.
- Touch to stop recording.
Customizing Camera/Camcorder Settings
Before capturing a photo or a video, you can touch 📄 to open the following camera and camcorder setting options.

NOTE:
Not all options are available for the front camera or the back camera.
- Camera options

▶ Volume key control: Set the Volume key for shutter, volume or zoom.
▶ Zero shutter delay: Slide the switch to turn on or off this feature.
▶ Voice capture: You can say “Capture” or “Cheese” to capture a photo. You can turn off this feature.
Face detection: Set the camera to automatically find and focus on people's faces in the viewfinder screen.
▶ Smile shot: Auto capture when smile is detected. You can turn on or off this feature.
▶ Auto scene detection: Set the camera to automatically detect the scene.
▶ Self-timer: Set a time delay before the camera takes a picture automatically after you touch the shutter icon, or turn off this feature.
▶ Capture number: Set the capture number.
▶ Picture size: Set the image size for your photo.
▶ Preview size: Set the image size for preview photo.
▶ ISO: Touch to set the ISO parameter.
- Camcorder options

▶ Noise reduction: Reduce the noise when taking a video.
▶ Microphone: Turn on this feature to record a video with voice or turn off to set to silence when taking a video.
▶ Audio mode: Touch to select audio mode.
▶ Time lapse interval: Set the time interval between each frame when you shot time lapse videos with the back camera.
▶ Video quality: Set the quality for your video.
- Other options

▶ Shutter sound: Turn on or off the shutter sound for photo taking and video recording.
▶ GPS location info: Select whether to store the GPS location in your captured photos and videos.
▶ Face beauty: Touch to choose face beauty mode or turn off this feature.
▶ Exposure: Touch to set exposure.
▶ Scene mode: Touch to choose scene mode.
▶ White balance: Touch to choose white balance mode.
▶ Image properties: Touch to set the properties of the image.
Anti-flicker: Touch to set anti-flicker or turn off this feature.
- Restore defaults: Restore default camera and camcorder settings.
Gallery
Opening Gallery
Touch the Home key, slide screen to touch 📋 to view albums of your pictures and videos.
Working With Albums
When you open Gallery, all pictures and videos on your phone are displayed in a number of albums. Swipe up and down to see them all.
To view album contents:
Touch an album to view the pictures and videos it contains.
To share albums, pictures, or videos:
- Touch and hold an album to select it or touch and hold an item after you open an album to select a picture or a video.
- Touch more items that you want to share.
- Touch and select how you want to share the items.
To delete albums, pictures, or videos:
- Touch and hold an album to select it or touch and hold an item after you open an album to select a picture or a video.
- Touch more items that you want to delete.
3. Touch > OK.
Working With Pictures
Touch a picture in an album to view the picture in full screen.
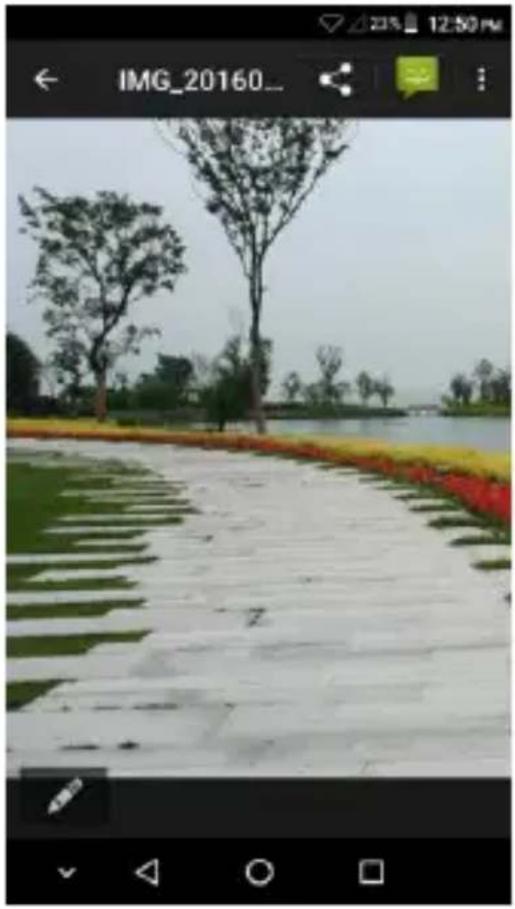
natural_image
Landscape photo showing a paved path beside a lake with trees and flowerbeds, no visible text or symbols.When viewing a picture in full screen, the following features are available.
- Swipe horizontally to see more pictures or videos.
- Pinch a picture to make it smaller. You'll then see a filmstrip-style view of all your pictures in a row. Swipe left or right to scan through them all.

NOTE:
You can delete a picture or video by swiping it up in the filmstrip view. If you accidentally delete one, touch UNDO to retrieve it.
- Double-tap the picture, or pinch two fingers together or spread them apart to zoom out or in.
- Touch to edit, print the picture, set it as wallpaper or contact photo, beautify people's faces in the picture, check file details, or browse the album contents in a slideshow.
- Touch to edit the picture.
- Touch > Delete > OK to delete the picture.

NOTE:
Some options may not be available for certain albums or pictures.
Retouching Your Pictures
You can edit any photos you took and some other pictures in Gallery. The changed picture is saved in the same album as the original image, which is not affected.
- Touch while viewing a picture in full screen to open the editor interface.
- Touch an edit option along the bottom of the screen and edit the picture.

NOTE:
Slide left or right at the bottom of the screen to find all options.
 | Apply filters and old photo effects. |
 | Add a frame to the picture. |
 | Crop, straighten, rotate, draw or flip (mirror) the picture. |
 | Adjust exposure, saturation, hue, sharpness, and other colour options. |
- Touch SAVE to save the new picture.
Playing Videos
- Touch an album in the gallery and then touch the thumbnail of a video.
- Touch it and select a player to start playing. Touch the video to view the playback controls.
Play Music
Music supports a wide variety of audio formats, so it can play music you purchase from online stores, music you copy from your CD collection, and so on.
Playing your music
Touch the Home key > Google > Play Music. If you are prompted, select an account to access its online music library. The app searches your online library and your phone for music and playlists before displaying your combined music library, organised by PLAYLISTS, GENRES, ARTISTS, ALBUMS and SONGS. You can touch 📄 > My Library to view all the music and playlists. To change views of your library, swipe left or right.
Touch a song to play it. When the song is playing, touch the summary information at the bottom to display the playback screen.
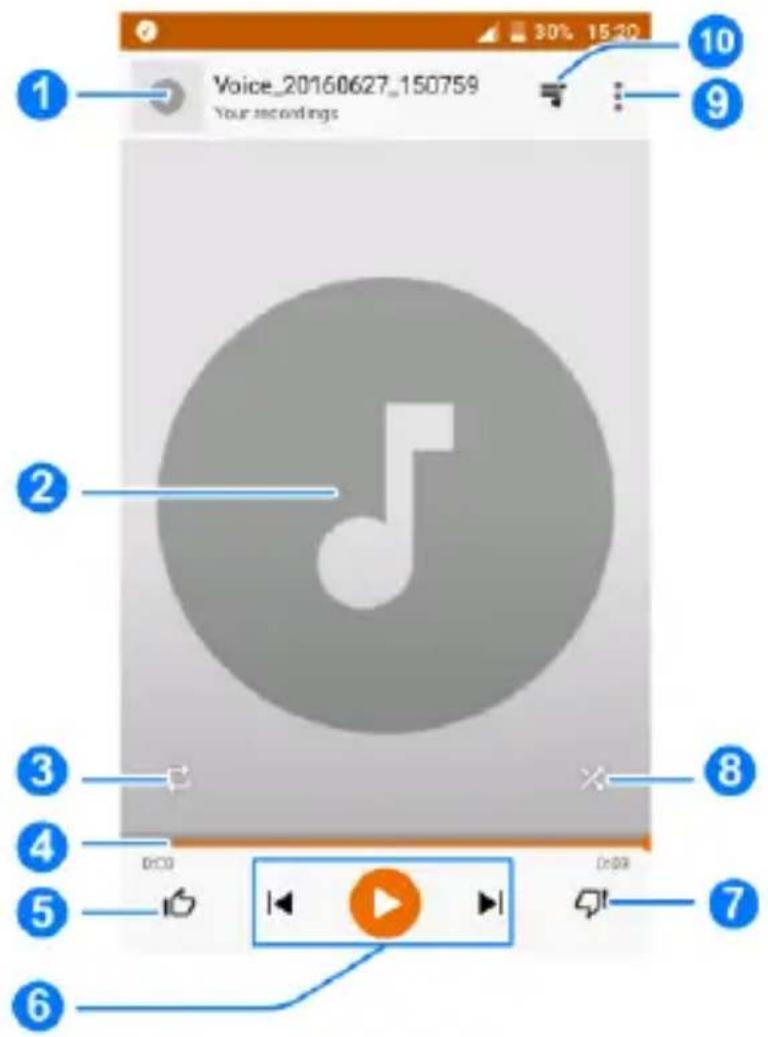
| Number | Function |
| 1 | Song and artist information. Touch or drag down to return to the music library. |
| 2 | Album artwork (if available). Slide left/right to switch to the next/previous song in the playlist. |
| 3 | Toggle repeat mode. You can repeat the current track, repeat the current playlist, or turn off repeat. |
| 4 | Drag the progress bar to jump to any part of the song. |
| 5 | Give the song a thumbs-up. |
| 6 | Playback control. Skip songs, or pause and resume playback. |
| 7 | Give the song a thumbs-down. |
| 8 | Turn on or off shuffle. |
| 9 | Get more options. |
| 10 | Touch to see the current playlist (queue). |
You can still control the music when you are not in the playback screen.
- In the music library of the Play Music app, touch the summary information at the bottom of the screen to restore the playback screen.
- In other apps, flick down the notification panel. Touch the song title to restore the playback screen, or just touch or play the previous or the next song. Touch to play the current song, and touch to pause.
- When the screen is locked, the song information, album cover as well as playback control is displayed on the screen. You can pause/resume playback or skip songs.
Managing playlists
Create playlists to organise your music files into sets of songs, so that you can play the songs you like in the order you prefer.
To create a playlist or add a song to a playlist:
- Touch : next to a song and select Add to playlist. Touch the playlist to add the song.
- Touch : next to a song and select Add to playlist. Touch NEW PLAYLIST to create a new playlist. Type name and description to edit the playlist, and touch CREATE PLAYLIST.
To delete a playlist:
- Touch > My Library in the Play Music app.
- Touch PLAYLISTS tab.
- Touch : next to the playlist you want to delete.
- Touch Delete > OK.

NOTE:
Certain automatically created playlists such as Last added cannot be deleted.
Video Player
Use the Video app to manage your video library and watch videos.
Opening the Video Library
Touch the Home key, slide screen to touch Video to view your video library, where your video files are displayed in a list.
Swipe up or down to find the video you want. You can also
touch > View or Sort to change the display mode or sort the list.
Playing and Controlling Videos
Touch a video in the video library to play it. Touch the screen to show the playback controls. You can control the video and audio or carry out other operations.
- Touch the play/pause button at the bottom to pause or resume the playback.
- Slide horizontally on the screen to rewind or fast forward.
- Slide vertically on the right or left part of the screen to adjust volume or brightness.
- Touch or to skip to the previous or the next video.
- Touch to change the video ratio.
- Touch to rotate the video.
- Touch to capture a screenshot.
- Touch to hide the control panel for lock the screen.
- Touch to play the video in a small window and continue with other tasks on the phone.
- Touch to play the video in silence.
- Touch to share or delete the video, or configure player settings.
Managing Video Files
Delete Video Clips
- Touch > Delete in the video library.
- Check the videos you want to delete.
- Touch DELETE > OK.
Share Video Clips
- Touch > Share in the video library.
- Check the videos you want to share.
- Touch SHARE and select how you want to share them.
FM Radio
With the FM radio, you can search for radio channels, listen to them, and save them on your phone. Note that the quality of the radio broadcast depends on the coverage of the radio station in your area. The wired headset works as an antenna, so always connect the headset when using the radio. When you receive an incoming call while listening to the radio, the radio will be turned off.
Scanning and Saving Channels
- Plug in a wired headset and touch the Home key, slide the screen to touch FM Radio.
- Touch . Your phone scans for all available channels and touch behind the channel to join the favorites list.
Listening to FM Radio
- Touch the Home key, slide screen to touch FM Radio while the headset is connected.
- Touch or to switch to other channels, or touch or to adjust the channel frequency.


NOTES:
- Favourite channels are put on the FM Radio main screen. Slide up or down to view all favourite channels.
- Touch > Earphone to listen to the radio programs through the phone speaker.
- Touch 📤 > Speaker to listen to the radio programs through the phone speaker.
Recording Radio Programs
When you listen to the radio, you can record your favourite programs and save the audio on the phone.
- Touch : > Start recording to start recording.
- When the program ends, touch the STOP RECORDING.
- Recorded files are stored automatically in a folder (Records, for instance) in the phone storage or the microSDHC card. You can access them with the File Manager app, or play them with the Music app.
Playing a saved recording radio program
- Open the FM Radio app and touch : > Saved recordings on the top right to display.
- Touch the saved recording radio program to play.
Sound Recorder
Sound Recorder enables you to record voice memos and listen to them whenever you like.
Recording a Voice Memo
- Touch the Home key, slide screen to touch Tools > Sound Recorder.
- Touch to start recording. During recording, you can do the following:
▶ Touch / to pause or continue the recording.
▶ Touch to cancel the recording.
- Touch to stop recording. The memo is automatically saved.
If you don't want to save the memo after recording it, touch and hold the memo and then touch Delete > OK to delete it.
Playing a Voice Memo
All the records are put on the main screen. To play a voice memo, just touch it.

NOTE:
Touch and hold a memo to delete, rename, share, check its file information, add a tag, or set it as your phone ringtone.
More Apps
FingerPrint Box
You can use your fingerprint to unlock your phone or encrypt the important data and private information in your phone.
Registering your fingerprints
To protect your privacy, it is recommended to set a digital password before you use a fingerprint.
- Touch the Home key, slide screen to touch
- Touch Set security password, and set a digital unlocking password.
- Touch Tap to record fingerprint and place your finger on fingerprint sensor to register your fingerprint.


NOTE:
You can touch 📄 to change security password, security questions and security level.
Unlocking the screen with fingerprints
When you register your fingerprint, the phone automatically applies the fingerprint to Unlock screen. If screen unlocking is not selected, you can perform the following actions to enable this function:
- Touch the Home key, slide screen to touch
- Verify your fingerprint.
- Slide to turn on Unlock screen. The screen unlocking (through fingerprints) function is enabled.

When the screen is in off or locked state, you can unlock the screen by inputting the registered fingerprint through fingerprint sensor. If fingerprint input fails or it is inconvenient to input fingerprints, the digital password can be used as an alternative to unlock the screen.
Encrypting apps with fingerprints
- Touch the Home key, slide screen to touch
- Verify your fingerprint.
- Touch Launch encrypted apps.
- Touch next to the app(s) you want to bound to fingerprints.

When you enter the bound apps you need to verify your fingerprint.
Accessing apps directly with fingerprints
If this function is enabled, you can directly access apps with the registered fingerprint when the phone stays in black or unlocking screen.

NOTE:
To use simple touch, you need to turn on the function of fingerprint Unlock screen.
- Touch the Home key, slide screen to touch
- Verify your fingerprint.
- Touch Simple touch.
- Touch Add, and then verify a finger that you want to perform simple touch fingerprint sensor to record fingerprint.
- Select an app, click Done.

Using finger-touch with fingerprints
You can touch fingerprint sensor to do more operations.
Such as: touch fingerprint sensor to return to previous screen; When launching camera, touch fingerprint sensor to capture photo or when screen is turned off or locked, touch fingerprint sensor to open or close flashlight and etc.
- Touch the Home key, slide screen to touch
- Verify your fingerprint.
- Touch Finger-touch according to your needs.

Encrypting pictures with fingerprints
- Touch the Home key, slide screen to touch
- Verify your fingerprint.
- Touch Privacy to select the files to be encrypted.

Backup & Restore
Touch the Home key, slide screen to touch Tools > Backup & Restore. You can back up your user data, such as contacts, messages, and installed applications to the microSDHC card regularly. If the data get lost, restore it from the microSDHC card.
Touch > Help to view detailed guide.

NOTE:
You can back up your user data to the phone storage when the microSDHC card is not inserted. Please keep these data in your PC or other devices to avoid data loss.
Calculator
Touch the Home key, slide screen to touch Tools > Calculator to use the phone's convenient built-in calculator for some basic as well as advanced mathematical equations. Touch to calculate tips.

NOTE:
Slide from right to left to access advanced function buttons.
Clock
Touch the Home key, slide screen to touch Clock. The Clock app allows you to check local time in places around the world, set alarms, and use timers.
Set a New Alarm
- Touch the ☐ tab in the Clock app.
- Touch an existing alarm to configure it, or touch at the bottom of the screen to create a new alarm.
- Set up the alarm options, such as time, alarm days, snooze, and alarm ringtone.
- Touch SAVE to save and exit.
NOTES:
- To enable or disable existing alarms directly, just touch the switches on the right side.
- Touch ⏻ in the ⏻ tab to configure alarm settings.
Check World Time
Touch the 📄 tab in the Clock app to check local time around the world.
Touch at the bottom to add a new city or country.
Use the Stopwatch and Countdown
Touch the 📄 or 🖱 tab in the Clock app to use the stopwatch or the countdown timer.
Stopwatch allows you to record lap times, while countdown allows you to set a time and count down to zero.
Downloads
The Downloads app keeps a record of the files you have downloaded using apps such as Chrome or Email.
Touch the Home key, slide screen to touch Downloads to check the record.
- Touch a file to open it with the appropriate applications.
- Touch and hold a file to delete or share it.
File Manager
Quickly access all of your images, videos, audio clips, and other types of files on your phone storage.
Touch the Home key, slide screen to touch File Manager.
- Touch 📋 at the top right to find the file you need by category.
- Touch at the top right to browse folders and files.
- Touch at the top left and select your phone storage, the microSDHC card or the connected USB device.
- Touch and hold an item to access option icons such as Copy, Move, Share, or Delete.
- To copy or move an item, navigate to a new location and touch Paste.
Google Apps
Open the Google apps to use Google services. Some apps are put in the Google folder on the home screen.

NOTE:
Some contents or Google services may not be available in your region.
- Google: Use Google search or get information when you need it with Google Now.
- Chrome: Use the Chrome app to browse the Internet and get your bookmarks, browsing history, and more synced with your Google account.
- Gmail: Send and receive emails via your Gmail account or other personal email accounts.
- Maps: Find your place and find your way in the world.
- YouTube: Watch video clips from YouTube.com, or upload your own and share with the world.
- Drive: Store files on Google servers for free after you sign in to your Google account. You can access them on your computers, your phones and other devices, share them, or collaborate with others.
- Play Music: Play music on the phone and on your Google account.
-
Play Movies & TV: Purchase, download and watch the latest and your favorite movies and TV shows.
-
Hangouts: Chat with Google+ friends or send text or multimedia messages.
- Photos: Manage photos on the phone and your Google account.
- Play Store: Buy and download apps, games, and other content from the Google Play Store.
Settings
Touch the Home key > Settings. The Settings app contains most of the tools for customizing and configuring your phone.
Wireless and Networks
Wi-Fi
Touch the Home key > Settings > Wi-Fi. You can turn Wi-Fi on or off and configure your Wi-Fi connections. See Connecting to Wi-Fi.
Bluetooth
Touch the Home key > Settings > Bluetooth. You can turn Bluetooth on or off and configure your Bluetooth connections. See Connecting to Bluetooth Devices.
SIM cards
Touch the Home key > Settings > SIM cards. You can manage the data, call, and networks for installed nano-SIM cards. See Connecting to Mobile Networks.
Data Usage
Touch the Home key > Settings > Data usage to manage cellular data use of each nano-SIM card installed.
Touch the Cellular data or Set cellular data limit switches to turn on or off cellular data or cellular data limit.
You can check how much data has been used during the time cycle you set, set cellular data limit and warning, see what apps have been using cellular data, or restrict background data for individual apps.

NOTE:
The data usage is measured by your phone, and your carrier's data usage accounting may differ.
Airplane Mode
Touch the Home key > Settings > More and slide the switch beside Airplane mode to turn airplane mode on or off. All the phone's radios that transmit voice or data are turned off when airplane mode is on.
Tethering & Portable Hotspot
Touch the Home key > Settings > More > Tethering & portable hotspot to share your phone's cellular data connection with PCs or other devices via USB, Bluetooth or Wi-Fi. See Sharing Your Cellular Data Connection.
VPN
Touch the Home key > Settings > More > VPN to set up and connect to virtual private networks. See Connecting to Virtual Private Networks.
Cellular Networks
Touch the Home key > Settings > More > Cellular networks to control cellular data use, set access point names, or select cellular network or network types. See Connecting to Cellular Networks.
Device
Display
Touch the Home key, slide screen to touch Settings > Display to configure the following options.
- MiraVision™: MiraVision™ is a set of engines to enhance display picture quality.
- Brightness level: Set the brightness of the display.
- Adaptive brightness: Automatically adjust screen brightness.
- Wallpaper: Select a background image or animation as the wallpaper for the home screen.
- Sleep: Set the length of time of inactivity before the screen turns off automatically.
- Daydream: Manage the Daydream function. When Daydream is enabled, photos or animations will be displayed as a screensaver.
-
Font size: Set the font size of the text on the screen.
-
When device is rotated: Select whether the screen contents should rotate when the phone is rotated.
- Cast: Connect with TVs that support wireless display and project your phone's content on the TV screen. You need to turn on Wi-Fi first. For detailed introduction, please refer to the TV manual.
Sound & Notification
Touch the Home key > Settings > Sound & notification. You can adjust different types of volume (see Adjusting Volume), toggle sound and mute (see Switching to Silent or Vibration Mode), set up ringtone and notification sound (see Changing Ringtone and Notification Sound), select system sounds (see Turning On/Off System Sounds), turn on or off the power-on/off sound, or control notification display.
Gesture & motion
Touch the Home key > Settings > Gesture & motion to enable those features to consume more power. Some functions may be unavailable if leather case is used.
Apps
Touch the Home key > Settings > Apps to see apps installed on your phone and manage them.
Touch an app in the list to see its information. You can stop the app, disable or enable it, uninstall it, clear its data, cache or defaults, or move it between the user ROM and the microSDHC card.

NOTE:
Not all applications can be moved, disabled or uninstalled.
Storage & USB
Touch the Home key > Settings > Storage & USB to manage the phone storage and provides options for your microSDHC card.
Default write disk
This menu allows you to choose the default location for new data, such as files downloaded, photos captured, and voice recorded.
-
Touch the Home key > Settings > Storage & USB > Default write disk.
-
Touch Phone Storage to store items in the phone's memory.
- or -
If a microSDHC card is present, touch SD card to store data on the card.
Device storage
You can install apps into the phone storage. When you connect your phone to your computer, only User ROM is accessible from your computer.
To view the phone storage space:
Touch the Home key > Settings > Storage & USB and scroll to the Device storage section.
User ROM
The user ROM is part of the phone storage where you can store your files. When you connect your phone to your computer, this storage is accessible and you can copy files between them.
To view the user ROM space:
Touch the Home key > Settings > Storage & USB and scroll to the User ROM section.
SD card
The external SD card storage options let you view the microSDHC card's total and available space, unmount the card for safe removal from the phone, and format (erase) the card. For details, see Remove the microSDHC Card From Your Phone and Erase microSDHC Card.
Battery
Touch the Home key > Settings > Battery to view the battery level, check what has been using the battery, and enable battery saving mode.

NOTE:
You can touch an app or service to adjust its settings in order to save battery life. For example, touch Screen to change screen brightness and sleep.
Touch > Battery saver to manage battery saving mode, which reduces your phone's performance and limits vibration, location services and most background data to improve battery life. You can turn on or off Battery saver, or set a battery level at which Battery saver can turn on automatically.
Touch > Battery optimization. Battery optimization helps prolong battery standby time when you're not using the phone. If there are apps that you don't want battery optimization enabled, you can turn the feature off in those apps. Just touch Not optimized/All apps, touch the app name and then touch Don't optimize > DONE.
Memory
Touch the Home key > Settings > Memory to see the memory using situation. Including the average memory use and the apps of used memory in that time.
Connect to PC
Touch the Home key > Settings > Connect to PC to select your USB connection type between your phone and PC. See Connecting to Your Computer via USB.
Personal
Leather case Mode
Touch the Home key > Settings > Leather case Mode. When the phone is put into a special flip case which is sold separately, you can open the flip case to wake up the phone without by pressing the Power key, or close the case to activate a mini-screen.
To turn on this feature, slide the switch to the On position and check Screen wake-up.
Location
Touch the Home key > Settings > Location to manage location services, which help your phone and apps determine your location. To use location-related applications, such as finding your location on Google Maps, you must have location services turned on on your phone.
- Slide the switch at the top to turn location services on or off.
- When location is enabled, touch Mode to select location sources you want to use.
▶ High accuracy: Get accurate location using both GPS and Wi-Fi as well as cellular networks.
▶ Battery saving: Use only Wi-Fi and cellular networks to get your approximate location. This will drain less power from your battery than using GPS.
▶ Device only: Use GPS to pinpoint your location.
In the Location menu, touch Google Location History to configure Google location options.
Security
Touch the Home key > Settings > Security to configure options that help keep your phone and data safe.
- Screen lock: Disable the screen lock or enable it with swipe, pattern, PIN, or password. See Protecting Your Phone With Screen Locks.
- Smart Lock: Keep the phone unlocked when connected to trusted devices, in trusted places, or unlocked by trusted
voice, or unlocked when your phone is being carried on the body.

NOTE:
You need to sign in to your Google account on the phone to use the Smart Lock feature.
- Encrypt phone: Encrypt your data on the phone to protect your privacy.
- Set up SIM card lock: Touch a nano-SIM card tab and you can manage the following settings.
- Lock SIM card: Activate or deactivate the PIN lock to require PIN before accessing the nano-SIM card.
▶ Change SIM PIN: Change the PIN used to access the nano-SIM card.

NOTE:
Put all your confidential passwords in a safe place for future use. If you enter the wrong SIM PIN more times than allowed, your nano-SIM card will be locked and you cannot access the cellular phone network. Contact your operator for a PIN Unlock Key (PUK) to restore the nano-SIM card.
- Make passwords visible: Display passwords as you enter them.
- Device administrators: View or deactivate apps you have authorized to be device administrators.
- Unknown sources: Check this option to permit installation of apps from sources other than the Play Store.
-
Storage type: Check the credential storage type.
-
Trusted credentials: Display trusted CA certificates.
• Install from SD card: Install certificates from the phone storage or the microSDHC card.
• Clear credentials: Delete all certificates. - Trust agents: View or deactivate trust agents.
- Screen pinning: Keep a screen of your choice in view, so that others cannot switch to other apps and access your personal information.
- Apps with usage access: Turn on or off some apps' access to your phone usage information.
Fingerprint
Touch the Home key > Settings > Fingerprint. You can set up to 5 fingerprints and use them to unlock the phone. You can also press the fingerprint sensor to take a photo or answer incoming call. See FingerPrint Box.
Accounts
Touch the Home key > Settings > Accounts to manage your web accounts and synchronization. Touch Add account to sign in to or create accounts on your phone.
Touch an account type to see that type of accounts you have added and adjust the accounts settings.
Touch the Home key > Google to easily manage settings for Google apps and features. You can set the options for Google account and services.
Language & Input
Touch the Home key > Settings > Language & input to configure options related to system language, input methods, speech input and output as well as mouse/trackpad input.
• Language: Select a language for your system.
- Spell checker: Use Google Spell Checker to check for spelling errors when entering text.
- Personal dictionary: Add new words to the phone's dictionary or remove words from the dictionary. The words you add are used for spelling check and word suggestion.
- Keyboard & input methods: Configure text input settings. See Input Method Settings.
• Text-to-speech output:
▶ Preferred engine: Select the speech synthesis engine you want to use or change its settings.
▶ Speech rate: Select how quickly you want the synthesizer to speak.
Listen to an example: Play a brief sample of the speech synthesizer, using your current settings.
▶ Default language status: Check whether the text-to-speech output feature supports the current
system language.
• Voice Control: Select and configure voice input services.
- Pointer speed: Select how fast the pointer/mouse should scroll when you connect the phone to a trackpad or mouse accessory.
Backup & Reset
Touch the Home key > Settings > Backup & reset to manage data backup and restoration options and to reset the phone to factory status.
- Back up my data: Back up app data, Wi-Fi passwords, and other settings to Google servers after you sign in to your Google account.
- Backup account: Set the Google account that the data is backed up to.
- Automatic restore: Restore previously backed up settings and data when you reinstall an app.
- Network settings reset: Reset all network settings, including Wi-Fi, Cellular data, Bluetooth. Choose the nano-SIM card you want to reset and touch RESET SETTINGS to begin.
- DRM reset: Deletes all DRM licenses.
- Factory data reset: Reset your phone to factory default settings. All your data will be erased during the process.
System
Date & Time
Touch the Home key > Settings > Date & time to set date, time, time zone, and the time format. You can also use network-provided data.
Scheduled Power On/Off
Touch the Home key > Settings > Scheduled power on/off. Slide the switches to turn on or off automatic power on and power off. Then set the power on/off time and repeat.
Accessibility
Touch the Home key > Settings > Accessibility to configure accessibility plug-ins and services on your phone, such as using Color inversion, Color correction or Large text for users with sight problems.
Printing
Touch the Home key > Settings > Printing to manage Google Cloud Print service or other printer plug-ins installed from the Google Play Store or your printer manufacturer.
About Phone
Touch the Home key > Settings > About phone to view phone status, legal information and other information. You can also upgrade your phone system from update packages copied to the storage card.
Troubleshooting
If you encounter problems while using the phone, or if it performs abnormally, you can refer to the chart below. If your particular problem cannot be resolved using the information in the chart, contact the dealer where you purchased the phone.
| Problem | Possible causes | Possible solution |
| Poor reception | The network signal is too weak at your current location, for example, in a basement or near a tall building, because wireless transmissions cannot effectively reach it. | Move to a location where the network signal can be properly received. |
| The network is busy at the current time (for example, during peak times, there may be too much network traffic to handle additional calls). | Avoid using the phone at such times, or try again after waiting a short time. | |
| You are too far away from a base station for your service provider. | You can request a service area map from your service provider. | |
| Echo or noise | The network link quality is poor on the part of your service provider. | End the call and dial again. You may be switched to a better-quality network link or phone line. |
| The local telephone line quality is poor. | End the call and dial again. You may be switched to a better-quality network link or phone line. | |
| Unable to select certain features | Your service provider does not support these features, or you have not applied for services that provide these features. | Contact your service provider. |
| Cannot charge the battery | The battery or battery charger is damaged. | Contact the dealer. |
| The phone's temperature is below 0 °C or higher than 45 °C. | Adjust the battery charging environment to avoid extremes of temperature. | |
| The contact between the battery and charger is poor. | Check all connectors to ensure that all connections have been properly made. | |
| Shortened standby time | The standby time is related to your service provider system configuration. The same phone used with different service providers' systems will not provide exactly the same length of standby time. | If you are located in an area where signaling is weak, temporarily power off the phone. |
| The battery is depleted. high temperature environments, battery life will be shortened. | Contact the dealer to change a new battery. | |
| If you are not able to connect to the network, the phone will continue to send out signals as it attempts to locate a base station. Doing so consumes battery power and will consequently shorten standby time.Battery power has been depleted. | Change your location to one where the network is accessible, or temporarily turn off your phone.Recharge the phone's battery. | |
| Cannot turn your phone on | ||
| nano-SIM card error | The nano-SIM card malfunctions or is damaged. | Take the nano-SIM card to your service provider for testing. |
| The nano-SIM card is inserted improperly. | Insert the nano-SIM card properly. | |
| There is debris on the nano-SIM card contacts. | Use a soft, dry cloth to clean the nano-SIM card contacts. | |
| Unable to connect to the network | The nano-SIM card is invalid. | Contact your service provider. |
| You are not within the network's service area. | Check the service area with your service provider. | |
| The signal is poor. | Move to an open space, or if you are inside a building, move closer to a window. | |
| Cannot answer incoming calls | You have activated the Call barring feature. | Disable this feature. See Bar Certain Calls. |
| Cannot make outgoing calls. | You have activated the Call barring feature. | Disable this feature. See Bar Certain Calls. |
| You have activated the Fixed dialling numbers feature. | Disable this feature. See Use Fixed Dialling Numbers. | |
| PIN Code blocked | You have entered an incorrect PIN code three consecutive times. | Contact your service provider. If the service provider provides the nano-SIM card's PUK code, use the PUK code to unlock the nano-SIM card. |
| Phone crashes, reboots, freeze, or cannot be powered on | Some third-party software is not compatible with your phone. | Uninstall the software that may cause the problem. |
| Upgrade the phone software. | ||
| Reset the phone to factory status. |
For Your Safety
General Safety
 | Don’t make or receive handheld calls while driving. Never text while driving. |  | Don’t use at gas stations. |
 | Keep your phone at least 15 mm away from your ear or body while making calls. |  | Your phone may produce a bright or flashing light. |
 | Small parts may cause choking. |  | Don’t dispose of your phone in fire. |
 | Your phone can produce a loud sound. |  | To prevent possible hearing damage, do not listen at high volume levels for long periods. |
 | Avoid contact with anything magnetic. |  | Avoid extreme temperatures. |
 | Keep away from pacemakers and other electronic medical devices. |  | Avoid contact with liquids. Keep your phone dry. |
 | Turn off when asked to in hospitals and medical facilities. |  | Do not attempt to disassemble your phone. |
 | Turn off when told to in aircrafts and airports. |  | Only use approved accessories. |
 | Turn off when near explosive materials or liquids. |  | Don’t rely on your phone as a primary device for emergency communications. |
Radio Frequency (RF) Exposure
General Statement on RF Energy
Your phone contains a transmitter and a receiver. When it is ON, it receives and transmits RF energy. When you communicate with your phone, the system handling your call controls the power level at which your phone transmits.
Specific Absorption Rate (SAR)
Your mobile device is a radio transmitter and receiver. It is designed not to exceed the limits for exposure to radio waves
recommended by international guidelines. These guidelines were developed by the independent scientific organization ICNIRP and include safety margins designed to assure the protection of all persons, regardless of age and health.
The guidelines use a unit of measurement known as Specific Absorption Rate, or SAR. The SAR limit for mobile devices is 2 W/kg and the highest SAR value for this device when tested at the ear was head was 0.274 W/kg*, and when tested at the body was 0.983 W/kg*. As mobile devices offer a range of functions, they can be used in other positions, such as on the body as described in this user guide**.
As SAR is measured utilizing the device's highest transmitting power, the actual SAR of this device while operating is typically below that indicated above. This is due to automatic changes to the power level of the device to ensure it only uses the minimum power required to communicate with the network.
* The tests are carried out in accordance with EN 50332-1, EN 50332-2, EN 50566, EN 62209-1, EN 62209-2, EN 50360, EN 62479.
** Please see body worn operation.
Body Worn Operation
Important safety information regarding radio frequency radiation (RF) exposure:
To ensure compliance with RF exposure guidelines the phone must be used with a minimum of 15 mm separation from the body.
Failure to observe these instructions could result in your RF exposure exceeding the relevant guideline limits.
Limiting Exposure to Radio Frequency (RF) Fields
For individuals concerned about limiting their exposure to RF fields, the World Health Organization (WHO) provides the following advice:
Precautionary measures: Present scientific information does not indicate the need for any special precautions for the use of mobile phones. If individuals are concerned, they might choose to limit their own or their children's RF exposure by limiting the length of calls, or using ‘hands-free’ devices to keep mobile phones away from the head and body.
Further information on this subject can be obtained from the WHO home page http://www.who.int/peh-emf (WHO Fact sheet 193: June 2000).
Regulatory Information
The following approvals and notices apply in specific regions as noted.
Please find the section Declaration of RoHS Compliance and CE DOC in the end of this manual.
Distraction
Driving
Full attention must be given to driving at all times in order to reduce the risk of an accident. Using a phone while driving (even with a hands-free kit) can cause distraction and lead to an accident. You must comply with local laws and regulations restricting the use of wireless devices while driving.
Operating Machinery
Full attention must be given to operating the machinery in order to reduce the risk of an accident.
Product Handling
General Statement on Handling and Use
You alone are responsible for how you use your phone and any consequences of the use.
You must always switch off your phone wherever the use of a phone is prohibited. Use of your phone is subject to safety measures designed to protect users and their environment.
- Always treat your phone and its accessories with care and keep them in a clean place.
-
Keep the screen and camera lens clean. Unclean screen or camera lens may slow down the phone's reaction to your operations or lower image quality.
-
Clean your phone and its accessories with a soft material such as cleaning cloth for eyeglass lenses. Do not use alcohol or other corrosive substances for cleaning or allow them to get inside.
- Do not expose your phone or its accessories to open flames or lit tobacco products.
- Do not expose your phone accessories to liquid, moisture or high humidity.
- Do not drop, throw or try to bend your phone or its accessories.
- Do not paint your phone or its accessories.
- Do not attempt to disassemble your phone or its accessories, only authorized personnel can do so.
- Do not expose or use your phone or its accessories in an environment with or that can reach extreme temperatures, minimum - [5] and maximum + [50] degrees Celsius.
- Do not place your phone inside or near heating equipments or high pressure containers, such as water heaters, microwave ovens, or hot cooking utensils. Otherwise, your phone may be damaged.
- Please check local regulations for disposal of electronic products.
- Do not carry your phone in your back pocket as it could break when you sit down.
Small Children
Do not leave your phone and its accessories within the reach of small children or allow them to play with it.
They could hurt themselves or others, or could accidentally damage the phone.
Your phone contains small parts with sharp edges that may cause an injury or may become detached and create a choking hazard.
Demagnetization
To avoid the risk of demagnetization, do not allow electronic devices or magnetic media close to your phone for a long time.
Electrostatic Discharge (ESD)
Do not touch the metallic connectors of the nano-SIM card.
Antenna
Do not touch the antenna unnecessarily.
Normal Use Position
When placing or receiving a phone call, hold your phone to your ear, with the bottom toward your mouth.
Air Bags
Do not place your phone in the area over an air bag or in the air bag deployment area as an airbag inflates with great force and serious injury could occur.
Place your phone safely before driving your vehicle.
Seizures/Blackouts
Your phone can produce a bright or flashing light. A small percentage of people may be susceptible to blackouts or seizures (even if they have never had one before) when exposed to flashing lights or light patterns such as when playing games or watching videos. If you have experienced seizures or blackouts or have a family history of such occurrences, please consult a physician. To reduce the risk of blackouts or seizures, you can use your phone in a well-lit room and take frequent breaks.
Repetitive Strain Injuries
To minimize the risk of Repetitive Strain Injury (RSI) when texting or playing games with your phone:
- Do not grip the phone too tightly.
- Press the buttons lightly.
- Use the special features which are designed to minimize the times of pressing buttons, such as Message Templates and Predictive Text.
• Take frequent breaks to stretch and relax.
Emergency Calls
This phone, like any other wireless phone, operates using radio signals, which cannot guarantee connection in all conditions. Therefore, you should not rely solely on any wireless phone for emergency communications.
Loud Noise
This phone is capable of producing loud noises, which may damage your hearing. Turn down the volume before using headphones, Bluetooth headsets or other audio devices.
Phone Heat
Your phone may become warm during charging and during normal use.
Electrical Safety
Accessories
Use only approved accessories.
Do not connect with incompatible products or accessories.
Take care not to touch metallic objects, such as coins or key rings, or allow them to contact or short-circuit the battery terminals.
Never puncture the surface of the battery with sharp objects.
Connection to a Car
Seek professional advice when connecting a phone interface to the vehicle electrical system.
Faulty and Damaged Products
Do not attempt to disassemble the phone or its accessories.
Only qualified personnel can service or repair the phone or its
accessories.
If your phone (or its accessories) has been submerged in water, punctured, or subjected to a severe fall, do not use it until you have taken it to be checked at an authorized service center.
Radio Frequency Interference
General Statement on Interference
Care must be taken when using your phone in close proximity to personal medical devices, such as pacemakers and hearing aids.
Please consult your doctor and the device manufacturers to determine if the operation of your phone may interfere with the operation of your medical devices.
Pacemakers
Pacemaker manufacturers recommend that a minimum separation of 15 cm be maintained between a mobile phone and a pacemaker to avoid potential interference with the pacemaker. To achieve this, use the phone on the opposite ear to your pacemaker and do not carry it in a breast pocket.
Hearing Aids
People with hearing aids or other cochlear implants may experience interfering noises when using wireless devices or when one is nearby.
The level of interference depends on the type of the hearing device and the distance from the interference source. Increasing
the separation between them may reduce the interference. You may also consult your hearing aid manufacturer to discuss alternatives.
Medical Equipment
Switch off your wireless device when you are requested to do so in hospitals, clinics or health care facilities. These requests are designed to prevent possible interference with sensitive medical equipment.
Aircraft
Switch off your wireless device whenever you are instructed to do so by airport or airline staff.
Consult the airline staff about the use of wireless devices on board the aircraft and enable airplane mode of your phone when boarding an aircraft.
Interference in Vehicles
Please note that because of possible interference to electronic equipment, some vehicle manufacturers forbid the use of mobile phones in their vehicles unless a hands-free kit with an external antenna is included in the installation.
Explosive Environments
Gas Stations and Explosive Atmosphere
In locations with potentially explosive atmosphere, obey all posted signs to turn off wireless devices such as your phone or other radio equipment.
Areas with potentially explosive atmosphere include fueling areas, below decks on boats, fuel or chemical transfer or storage facilities, and areas where the air contains chemicals or particles, such as grain, dust, or metal powders.
Blasting Caps and Areas
Power off your mobile phone or wireless device when in a blasting area or in areas where signs are posted to power off “two-way radios” or “electronic devices” to avoid interfering with blasting operations.
Declaration of RoHS Compliance
To minimize the environmental impacts and take more responsibilities to the earth we live on, this document shall serve as a formal declaration that the ZTE BLADE A910 manufactured by ZTE CORPORATION is in compliance with the Directive 2011/65/EU of the European Parliament - RoHS (Restriction of Hazardous Substances) with respect to the following substances:
- Lead (Pb)
- Mercury (Hg)
- Cadmium (Cd)
- Hexavalent Chromium (Cr (VI))
- Polybrominated biphenyls (PBBs)
- Polybrominated diphenyl ethers (PBDEs)
The ZTE BLADE A910 manufactured by ZTE CORPORATION, meets the requirements of Directive 2011/65/EU.
Disposal of Your Old Appliance
natural_image
Symbol of a trash bin crossed with no text or numbers, representing waste sorting or disposal (no text present)- When this crossed-out wheeled bin symbol is attached to a product, it means the product is covered by the European Directive 2012/19/EU.
- All electrical and electronic products should be disposed of separately from the municipal waste stream via designated collection facilities appointed by the government or the local authorities.
- The correct disposal of your old appliance will help prevent potential negative consequences for the environment and human health.
For this product's recycling information based on WEEE directive, please send an e-mail to weee@zte.com.cn
EC DECLARATION OF CONFORMITY
C € 0700
It is hereby declared that following designated product:
Product Type: LTE/WCDMA/GSM(GPRS) Mutil-Mode Digital Mobile Phone
Model No: ZTE BLADE A910
Complies with the essential protection requirements of Directives on Radio and Telecommunication Terminal Equipment (Directive 1999/5/EC), Restriction of the Certain Hazardous Substances in electrical and electronic equipment (Directive 2011/65/EU), Eco-design Requirements for Energy-Related Products (Directive 2009/125/EC) and their amendments.
This declaration applies to all specimens manufactured identical to the samples submitted for testing/evaluation.
Assessment of compliance of the product with the requirements relating to Directive 1999/5/EC was performed by PHOENIX TESTLAB GmbH (Notified Body No.0700) and assessment of compliance of the product with the requirements relating to Directive 2011/65/EU was performed by Intertek Testing Services Ltd., Shanghai and Directive 2009/125/EC was performed by TÜV Rheinland (Shenzhen)Co., Ltd and SGS-CSTC Standards Technical Service Co.,Ltd.. The assessments were based on the
following regulations and standards:
| Requirement | Standard |
| Health and safety | EN 50332-2:2003; EN 50332-1:2000EN 62209-1:2006; EN 62209-2:2010;EN 50566:2013/AC:2014;EN 50360:2001+A1:2012EN 62479:2010 |
| EN609501:2006+A11:2009+A1:2010+A12:2011+A2:2013 | |
| EMC | EN 301 489-1 V1.9.2;EN 301 489-3 V1.6.1;EN 301 489-17 V2.2.1;EN 301 489-7 V1.3.1EN 301 489-24 V1.5.1 |
| Radio Spectrum | EN 301 908-1 V7.1.1;EN 301 908-2 V6.2.1;EN 301 908-13 V6.2.1;EN 301 511 V9.0.2;EN 300 328 V1.9.1;EN 300 440-1 V1.6.1;EN 300 440-2 V1.4.1 |
| RoHS | IEC 62321:2008+ 2013+2015 |
| ErP | (EC) No 278/2009 |
This declaration is the responsibility of the manufacturer:
ZTE Corporation
ZTE Plaza, Keji Road South, Hi-Tech, Industrial Park, Nanshan District, Shenzhen, Guangdong, 518057, P.R.China
Authorised person signing for the company:
Yao Cuifeng Quality Director Of ZTE Corporation
Name in block letters & position in the company
Shenzhen, 31 ^th MAY 2016
王鹏峰
Place & date
Legally valid signature
ZTE BLADE A910
Benutzerhandbuch
Copyright © 2016 ZTE CORPORATION
natural_image
Line drawing of a smartphone showing the internal component being inserted, with a magnified inset highlighting the device's internal structure (no text or symbols present)natural_image
Line drawing of a smartphone with a cable inserted into its body (no text or symbols)natural_image
Illustration of a hand with a finger pointing upward (no text or symbols)natural_image
Illustration of a hand pointing upward with a blue highlight (no text or symbols)natural_image
Illustration of a hand with fingers and fingers raised, showing motion direction (no text or symbols)- Ziehen
natural_image
Illustration of a hand pointing at a dotted square with an arrow, no text or symbols presentnatural_image
Illustration of two hands demonstrating finger movement with blue arrows indicating direction (no text or symbols)natural_image
Four blue app icons: a telephone handset, a user profile icon, a speech bubble with ellipsis, and a chat bubble icon (no text or symbols)Texteingabe
natural_image
Landscape photo showing a paved path beside a lake with trees and greenery, no visible text or symbolsZTE Plaza, Keji Road South, Hi-Tech, Industrial Park, Nanshan District, Shenzhen, Guangdong, 518057, P.R.China
Copyright © 2016 ZTE CORPORATION
Vse pravice pridržane.
natural_image
Line drawing of a smartphone showing the internal component being inserted, with a magnified inset highlighting the device (no text or symbols present)natural_image
Line drawing of a smartphone with a cable inserted, showing the cable being inserted (no text or symbols present)natural_image
Illustration of a hand with a finger pointing upward, no text or symbols present- Dotaknite se in zadržite
natural_image
Illustration of a hand with a blue circular highlight on the index finger (no text or symbols)- Oplazite ali podrsajte
natural_image
Illustration of a human hand with index finger extended, showing motion direction (no text or symbols)- Povlecite
Da povlečete s prstom, pritisnite in zadržite prst preden začnete prst premikati. Med vlečenjem prsta ne spustite, dokler ne dosežete ciljnega položaja.
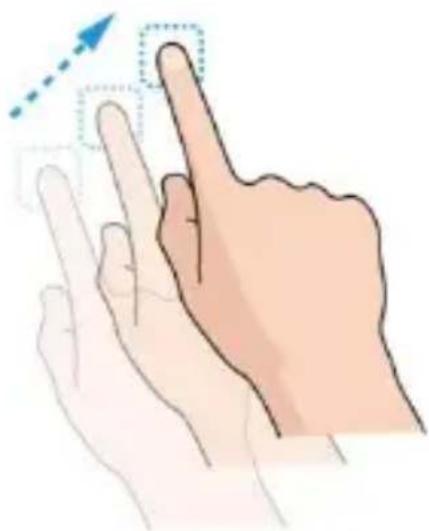
natural_image
Illustration of a hand pointing at a square with a blue arrow and dotted rectangle, no text or symbols present• Uščipnite
natural_image
Illustration of two hands demonstrating finger movement with blue arrows indicating direction (no text or symbols)- Vrtenje zaslona
natural_image
Four app icons: a telephone handset, a person silhouette, a speech bubble with ellipsis, and a chat bubble icon (no text or symbols)Vnašanje besedila
natural_image
Landscape photo showing a paved path beside a lake with trees and flowerbeds, no visible text or symbols.natural_image
Symbol of a trash bin crossed with no text or numbers, representing waste sorting or disposal (no text present)ZTE Plaza, Keji Road South, Hi-Tech, Industrial Park, Nanshan District, Shenzhen, Guangdong, 518057, P.R.China
- Copyright
- Copyright © 2016 ZTE CORPORATION
- All rights reserved.
- Notice
- Disclaimer
- Trademarks
- Contents
- Getting Started....11
- Personalizing 25
- Knowing the Basics....31
- Connecting to Networks and Devices......46
- Phone Calls 62
- Contacts 73
- Web Accounts......80
- Email....83
- Messaging 88
- Calendar 92
- Browser 95
- Camera....97
- Gallery....102
- Play Music 106
- Video Player 110
- FM Radio 112
- Sound Recorder....114
- More Apps 115
- Troubleshooting....137
- For Your Safety ....142
- Declaration of RoHS Compliance 154
- Disposal of Your Old Appliance....155
- EC DECLARATION OF CONFORMITY ....156
- Getting Started
- Getting to Know Your Phone
- Installing the nano-SIM Card(s)/microSDHC Card
- WARNING!
- NOTE:
- Charging the Battery
- CAUTION:
- Extending the Battery Life
- Powering On/Off
- Setting Up for the First Time
- Locking/Unlocking the Screen and Keys
- To lock the screen and keys:
- To unlock the screen and keys:
- Using the Touch Screen
- Getting to Know the Home Screen
- Extended Home Screen Panels
- To add a new home screen panel:
- To adjust the order of a home screen panel:
- Personalizing
- Changing the System Language
- Setting the Date and Time
- Changing Ringtone and Notification Sound
- Turning On/Off System Sounds
- Adjusting Volume
- Switching to Silent or Vibration Mode
- Applying New Wallpapers
- To set the home screen wallpaper:
- To set the lock screen wallpaper:
- Changing Screen Brightness
- Setting the Icon Style
- Setting the Home Screen Transition Effect
- Protecting Your Phone With Screen Locks
- Knowing the Basics
- Monitoring the Phone Status
- Managing Notifications
- Notification Icons
- Open/Close the Notification Panel
- Respond to or Remove a Notification
- Use Quick Settings
- Managing Icons and Widgets
- Add Widgets
- Move Icons or Widgets
- Remove Icons or Widgets
- Adjust Widget Size
- Organizing With Folders
- Rearranging the Primary App Icons
- Entering Text
- Enable or Disable Input Methods
- Change Input Methods
- Android Keyboard
- Google Voice Typing
- SwiftKey Keyboard
- The FULL Layout
- The THUMB Layout
- The COMPACT Layout
- Gesture input
- NOTES:
- Input Method Settings
- Editing Text
- Opening and Switching Apps
- Open an App
- Switch Between Recently Opened Apps
- Connecting to Networks and Devices
- Connecting to Cellular Networks
- Manage the nano-SIM Cards
- To turn on or off a card:
- To set the default card:
- To manage card name and display number:
- Control Mobile Data Use
- To enable or disable data access:
- To get data services when roaming:
- Select Preferred Network Type
- Set Access Point Names
- Select Network Operator
- Connecting to Wi-Fi
- Turn Wi-Fi On and Connect to a Wi-Fi Network
- Get Notified of Open Networks
- Add a Wi-Fi Network
- Connect to a WPS Network
- Method one: WPS button (Recommended)
- Method two: PIN number
- Forget a Wi-Fi Network
- Adjust Advanced Wi-Fi Settings
- Connecting to Bluetooth Devices
- Turn Bluetooth On/Off
- Change the Device Name
- Pair With Another Bluetooth Device
- Forget (Unpair With) a Bluetooth Device
- Send Data via Bluetooth
- Receive Data via Bluetooth
- Connecting to Your Computer via USB
- Connect Your Phone to a Computer via USB
- Connect With Windows Media ® Player
- Disconnect Your Phone From the Computer
- Remove the microSDHC Card From Your Phone
- Erase the microSDHC Card
- Sharing Your Cellular Data Connection
- Share Your Cellular Data Connection via USB
- Share Your Cellular Data Connection via Bluetooth
- Share Your Cellular Data Connection as a Wi-Fi Hotspot
- Set Your Wi-Fi Hotspot
- Connecting to Virtual Private Networks
- Add a VPN
- Connect to a VPN
- Modify a VPN
- Phone Calls
- Placing and Ending Calls
- Place a Call by Dialing
- End a Call
- Answering or Rejecting Calls
- Answer a Call
- Reject a Call
- Working With the Call History
- Place a Call From the Call History
- Take other actions on a call history entry
- Calling Your Contacts
- Checking Voicemail
- Using Options During a Call
- Managing Multi-party Calls
- Switch between Current Calls
- To respond to an incoming call while you're on a call:
- To switch between two calls:
- Set Up a Conference Call
- Adjusting Your Call Settings
- Set Contact Display Options
- Set Vibration and Dialpad Tones
- Edit Quick Response to Rejected Callers
- Set Speed Dials
- To assign a speed dial key:
- Set hearing aids
- Set Voicemail
- Use Fixed Dialling Numbers
- Forward Incoming Calls
- Bar Certain Calls
- Other Options
- Set TTY mode
- Contacts
- Checking Contact Details
- Adding a New Contact
- Setting Up Your Own Profile
- Importing, Exporting, and Sharing Contacts
- Import or Export Contacts
- Share Contacts
- Working With Favourite Contacts
- Add a Contact to Favourites
- Remove a Contact From Favourites
- Working With Groups
- View Your Contact Groups
- Set Up a New Group
- Delete a Group
- Edit a Group
- Searching for a Contact
- Editing Contacts
- Edit Contact Details
- Delete Contacts
- Web Accounts
- Adding or Removing Accounts
- Add an Account
- Remove an Account
- Configuring Account Sync
- Configure Auto Sync Setting
- Sync Manually
- Change an Account's Sync Settings
- Setting Up the First Email Account
- Checking Your Emails
- Responding to an Email
- Reply to or Forward an Email
- Mark an Email as Unread
- Delete an Email
- Writing and Sending an Email
- Adding and Editing Email Accounts
- Add an Email Account
- Edit an Email Account
- Changing General Email Settings
- Messaging
- Opening the Messaging Screen
- Sending a Message
- Replying to a Message
- Forwarding a Message
- Copying a Message
- Changing Message Settings
- Calendar
- Viewing Your Calendars and Events
- Select Visible Calendars
- Change Calendar Views
- View Event Details
- Creating an Event
- Editing, Deleting or Sharing an Event
- Changing Calendar Settings
- Browser
- Opening the Browser
- Downloading Files
- Changing Browser Settings
- Camera
- Capturing a Photo
- Recording a Video
- Customizing Camera/Camcorder Settings
- - Camera options
- - Camcorder options
- - Other options
- Gallery
- Opening Gallery
- Working With Albums
- To view album contents:
- To share albums, pictures, or videos:
- To delete albums, pictures, or videos:
- Touch > OK.
- Working With Pictures
- Retouching Your Pictures
- Playing Videos
- Play Music
- Playing your music
- Managing playlists
- To create a playlist or add a song to a playlist:
- To delete a playlist:
- Video Player
- Opening the Video Library
- Playing and Controlling Videos
- Managing Video Files
- Delete Video Clips
- Share Video Clips
- FM Radio
- Scanning and Saving Channels
- Listening to FM Radio
- Recording Radio Programs
- Playing a saved recording radio program
- Sound Recorder
- Recording a Voice Memo
- Playing a Voice Memo
- More Apps
- FingerPrint Box
- Registering your fingerprints
- Unlocking the screen with fingerprints
- Encrypting apps with fingerprints
- Accessing apps directly with fingerprints
- Using finger-touch with fingerprints
- Encrypting pictures with fingerprints
- Backup & Restore
- Calculator
- Clock
- Set a New Alarm
- Check World Time
- Use the Stopwatch and Countdown
- Downloads
- File Manager
- Google Apps
- Settings
- Wireless and Networks
- Wi-Fi
- Bluetooth
- SIM cards
- Data Usage
- Airplane Mode
- Tethering & Portable Hotspot
- VPN
- Cellular Networks
- Device
- Display
- Sound & Notification
- Gesture & motion
- Apps
- Storage & USB
- Default write disk
- Device storage
- User ROM
- SD card
- Battery
- Memory
- Connect to PC
- Personal
- Leather case Mode
- Location
- Security
- Fingerprint
- Accounts
- Language & Input
- Backup & Reset
- System
- Date & Time
- Scheduled Power On/Off
- Accessibility
- Printing
- About Phone
- Troubleshooting
- For Your Safety
- Radio Frequency (RF) Exposure
- General Statement on RF Energy
- Specific Absorption Rate (SAR)
- Body Worn Operation
- Limiting Exposure to Radio Frequency (RF) Fields
- Regulatory Information
- Distraction
- Driving
- Operating Machinery
- Product Handling
- General Statement on Handling and Use
- Small Children
- Demagnetization
- Electrostatic Discharge (ESD)
- Antenna
- Normal Use Position
- Air Bags
- Seizures/Blackouts
- Repetitive Strain Injuries
- Emergency Calls
- Loud Noise
- Phone Heat
- Electrical Safety
- Accessories
- Connection to a Car
- Faulty and Damaged Products
- Radio Frequency Interference
- General Statement on Interference
- Pacemakers
- Hearing Aids
- Medical Equipment
- Aircraft
- Interference in Vehicles
- Explosive Environments
- Gas Stations and Explosive Atmosphere
- Blasting Caps and Areas
- Declaration of RoHS Compliance
- Disposal of Your Old Appliance
- EC DECLARATION OF CONFORMITY
- ZTE BLADE A910
- Benutzerhandbuch
- Texteingabe
- Vse pravice pridržane.
- Vnašanje besedila
Brand : ZTE
Model : A910
Category : Smartphone