
CDI 6015WIFI - Dishwasher CANDY - Free user manual and instructions
Find the device manual for free CDI 6015WIFI CANDY in PDF.


| Product Type | Built-in Dishwasher |
| Brand | Candy |
| Model | CDI 6015WIFI |
| Capacity | 15 place settings |
| Dimensions (H x W x D) | 85 x 60 x 60 cm |
| Net Weight | 45 kg |
| Electrical Supply | 220-240 V, 50 Hz, 10 A |
| Energy Class | D |
| Water Consumption per Cycle | 9.5 L |
| Energy Consumption per Cycle | 0.95 kWh |
| Noise Level | 44 dB(A) |
| Connectivity | Built-in Wi-Fi (Candy Simply-Fi app) |
| Wash Programs | Eco, Intensive, Rapid 30 min, Glasses, Delicate, Pre-wash |
| Special Function | Half load, Delay start (1-24 h), Child lock |
| Drying Type | Condensation with heat exchanger |
| Number of Baskets | 3 (adjustable upper basket, lower basket, cutlery) |
| Tub Material | Stainless steel |
| Filter | Self-cleaning, easy to disassemble |
| Maintenance | Regular cleaning of filter and spray arms, periodic descaling |
| Repairability Index | 8.5/10 |
| Spare Parts Available | Filters, spray arms, baskets, seals, heating element, pump |
Frequently Asked Questions - CDI 6015WIFI CANDY
User questions about CDI 6015WIFI CANDY
0 question about this device. Answer the ones you know or ask your own.
Ask a new question about this device
Download the instructions for your Dishwasher in PDF format for free! Find your manual CDI 6015WIFI - CANDY and take your electronic device back in hand. On this page are published all the documents necessary for the use of your device. CDI 6015WIFI by CANDY.
USER MANUAL CDI 6015WIFI CANDY
EN User instructions
text_image
Technical diagram of a mechanical device with labeled parts A and B, showing connections between a housing, tubing, and a valve.Thank you for choosing a Candy appliance; quality dishwashers which guarantee high performance and reliability.
Candy manufacture a vast range of domestic appliances: washing machines, washer/dryers, cookers, microwave ovens, ovens and hobs, refrigerators and freezers.
Ask your dealer for the catalogue with the complete range of Candy products. Please read this booklet carefully as it provides important information regarding the safe installation, use, and maintenance of the machine, together with some useful advice on how to achieve the best results from your dishwasher.
For future reference please keep this instruction booklet in a safe place.
CUSTOMER SERVICE AND GUARANTEE
Your new appliance is fully guaranteed by the manufacturer for 12 months against electrical/mechanical breakdown excluding:
A. Any faults which occur due to bad installation or misuse of the machine.
B. Any faults which occur due to repair of, or interference with, the machine by any person not authorised by the manufacturer to carry out service.
C. Any faults which occur due to any parts which are fitted to the machine which are not the original manufacturers parts.
D. Any faults arising from non-domestic use or unusual or abnormal use of the machine.
E. Any faults arising from operation at incorrect voltage.
F.Any faults arising from incorrect operation of the machine.
The guarantee applies to Gt Britain and Northern Ireland only, and is an addition to your statutory rights.
AFTER SALES SERVICE
For service and repairs call your local engineer on our national telephone number:
| GIAS Service | Tel: 08444 995599 |
| Support Service | (Eire 0818 200021) |
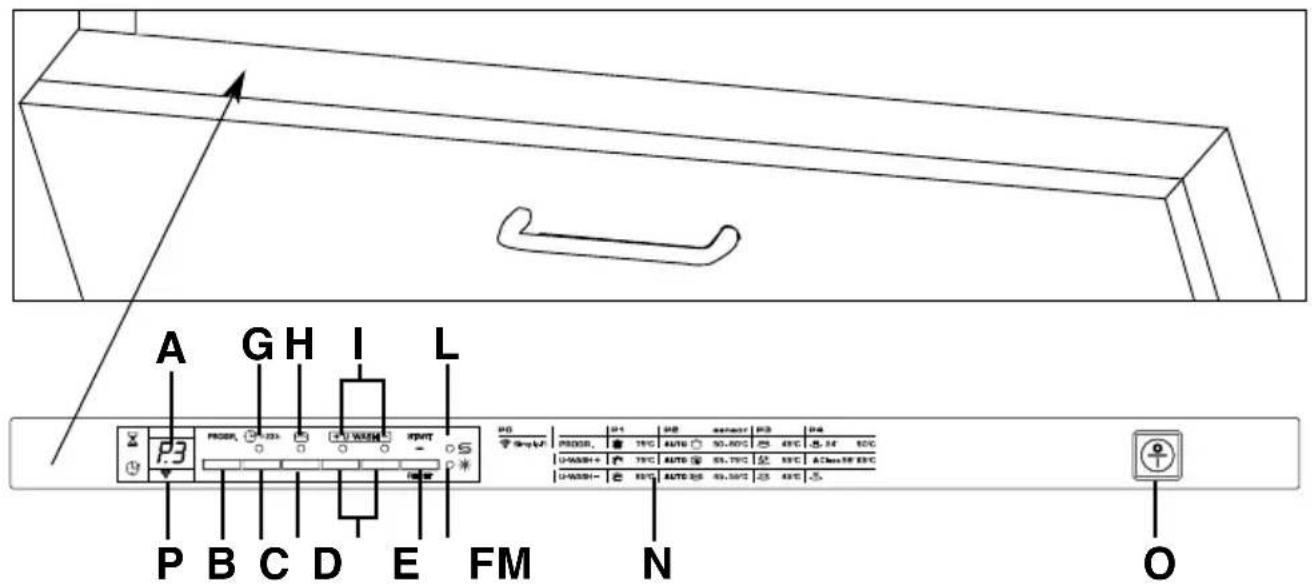
DESCRIPTION OF THE CONTROL PANEL
text_image
A G H I L P3 P000, 200 1.5V 4V P3 2000 200 1.5V 4V P3 2000 200 1.5V 4V P3 2000 200 1.5V 4V P3 2000 200 1.5V 4V P3 2000 200 1.5V 4V P3 2001 200 1.5V 4V P3 2001 200 1.5V 4V P3 2001 200 1.5V 4V P3 2001 200 1.5V 4V P3 2001 200 1.5V 4V P3 2002 200 1.5V 4V P3 2002 200 1.5V 4V P3 2002 200 1.5V 4V P3 2002 200 1.5V 4V P3 2003 200 1.5V 4V P3 2003 200 1.5V 4V P3 2003 200 1.5V 4V P3 2003 200 1.5V 4V P3 2004 200 1.5V 4V P3 2004 200 1.5V 4V P3 2004 200 1.5V 4V P3 2005 200 1.5V 4V P3 2005 200 1.5V 4V P3 2005 200 1.5V 4V P3 2006 200 1.5V 4V P3 2006 200 1.5V 4V P3 2006 200 1.5V 4V P3 2007 200 1.5V 4V P3 2007 200 1.5V 4V P3 2007 200 1.5V 4V P3 2008 200 1.5V 4V P3 2008 200 1.5V 4V P3 2008 200 1.5V 4V P3 2009 200 1.5V 4V P3 2009 200 1.5V 4V P3 2010 201E P3 2011 P3 2012 P3 2013 P3 2014 P3 2015 P3 2016 P3 2017 P3 2018 P3 2019 P3 OA DIGITAL DISPLAY
B "PROGRAMME SELECTION" button
C "DELAY START" button
D "ALL in 1" option button
E "DEGREE OF SOILING" buttons
F "START"/"RESET" button (start/cancelling programme)
G "DELAY START" indicator light
H "OPTION SELECTION" light
I "DEGREE OF SOILING" lights
L "SALT EMPTY" light
M "RINSE AID EMPTY" light
N Programme guide
O "ON/OFF" button
P Wi-Fi light ( 📤 Simply-Fi)
| DIMENSIONS | ||
| Width x Height x Depth (cm) | 59,8 x 82 ÷ 90 x 55 | |
| Depth with door open (cm) | 117 | |
| TECHNICAL DATA | ||
| EN 50242 place load | 16 | |
| Capacity with pans and dishes | 9 persons | |
| Water supply pressure (MPa) | Min. 0,08 - Max. 0,8 | |
| Fuse / Power input / Supply voltage | See rating plate | |
| CONSUMPTION (main programmes)* | ||
| Programme Energy (kWh) Water (L) | ||
| INTENSIVE | 2,07 | 21 |
| UNIVERSAL | 1,46 | 15 |
| ECO | 0,95 | 10 |
| RAPID 24' | 0,59 | 9 |
| Power consumption of the off-mode and of the left-on mode: 0,30 W / 0,45 W | ||
| *Values are measured in a laboratory according to European Standard EN 50242 (consumption may vary according to conditions of usage). | ||
PROGRAMME SELECTION AND SPECIAL FUNCTIONS
(Use in conjunction with programme guide)
"DEGREE OF SOILING" buttons
+ U·WASH -
These buttons allow to modify the wash intensity, according to how dirty the dishes are. The wash time and temperature will be modified.
Pressing the button + the intensity of wash will be increased, pressing the button - the intensity of wash will be reduced and the wash time will be remarkably shorter.
The combination of the buttons with the 4 main wash programmes enable to have 8 additional wash cycles.
IMPORTANT
When the dishwasher is switched on, the "DEGREE OF SOILING" last used will be indicated.
Programme settings
■ Open the door and place the dirty dishes inside the appliance.
■ Press the "ON/OFF" button ⏻ . The display will show two lines.
■ Choose a programme by pressing the "PROGRAMME SELECTION" button ("PROGR.").
■ If you wish to choose the "DEGREE OF SOILING", press the corresponding button.
■ If you wish to select an option, press the option button (the corresponding indicator light will light up).
The option button can be selected or deselected WITHIN one minute of the programme commencing.
■ Press the "START" button.
The length of the program will be shown on the display alternating hours with minutes [l.e.: 1 h (1 hour) / 25 (25 minutes)].
■ Close the door (after an audible signal has sounded, the programme will start automatically).
WHITIN one minute of the programme commencing, another programme can be selected, by pressing the "PROGRAMME SELECTION" button (it is also possible to change the "DEGREE OF SOILING" setting).
"AUTOMATIC" programmes
The dishwasher is equipped with a dirt sensor, able to analyse water murkiness during all "AUTOMATIC" programme phases (see programme list); thanks to this sensor the washing cycle parameters are automatically adapted to the real quantity of dirt on dishes. Thus excellent washing results are guaranteed while optimising water and energy consumption.
"IMPULSE" programmes
The “IMPULSE” programmes use an impulse washing technology, which reduces consumption, noise and increases performances.
IMPORTANT
The “intermittent” working of the washing pump MUST NOT BE considered a malfunction, it is a characteristic of the impulse washing so must be considered a normal function of the programme.
Programme interruption
Opening the door when a programme is running is not recommended especially during the main wash and final hot rinse phases. However, if the door is opened while a programme is running (for example, to add dishes) the machine stops automatically and the display will flash the remaining time before the end of the cycle. Close the door, without pressing any buttons. The cycle will start from where it left off.

WARNING!
If you open the door during the drying cycle, an audible audio signal advises you that the drying cycle has not yet finished.
Changing a running programme
Proceed as follows to change or cancel a running programme:
■ Open the door.
■ Hold the "RESET" button down for at least 5 seconds. "00" will appear on the display and some audible signals will sound.
■ The running programme will be cancelled. The display will show two lines.
■ At this point a new programme can be set.

WARNING!
Before starting a new programme, you should check that there is still detergent in the dispenser. If necessary, top up the dispenser.
If there is any break in the power supply while the dishwasher is operating, a special memory stores the selected programme and, when the power is restored, it continues where it left off.
Programme end
A 5 second alarm will sound (if not muted) 3 times at 30 second intervals to signal that the programme has ended.
Dishes can now be removed and the dishwasher turned off by pressing the "ON/OFF" button or dishes can be loaded for a new cycle.
Option buttons
"ALL in 1" button

This option optimises the use of "ALL in 1" ("3 in 1"/ "4 in 1"/"5 in 1", etc...) combined detergents. By pressing this button, the selected washing programme is modified to get the best performance from combined detergents; furthermore, the salt and rinse aid shortage lights are de-activated.

WARNING!
Once selected, this option keeps being on (light on) also for next washing cycles and it can be de-activate (light off) only by pressing the button once again.
IMPORTANT
This option is recommended when using the RAPID 24' program, the duration of which will be extended for about 15 minutes, allowing the detergent tablets to achieve a better performance.
"DELAY START" button

1-23h
Dishwasher start time can be set with this button, delaying start from 1 to 23 hours.
Proceed as follows to set a delayed start:
■ Press the "DELAY START" button ("00" will appear on the display).
■ Press the button again to increase the delay in hours (each time the button is pressed the delay is increased by 1 hour to a maximum of 23). The “DELAY START” indicator light will turn on.
■ To start the countdown press the "START" button (the "DELAY START" indicator light will start to flash). At the end of the countdown, the programme will automatically start (the "DELAY START" indicator light will turn off).
If you wish to see which programme has been selected, press the "PROGRAMME SELECTION" button.
Proceed as follows to cancel a delayed start:
■ Hold the "RESET" button down for at least 5 seconds. "00" will appear on the display and some audible signals will sound.
■ The delayed start and the selected programme will be cancelled.
The display will show two lines.
■ At this point, a new programme and option buttons must be set to start a new programme as indicated in the "PROGRAMME SETTINGS" section.
Alarm mute for the PROGRAMME END
The alarm for the programme end may be muted as follows:
IMPORTANT
The dishwasher must ALWAYS be off before start of this procedure.
- Hold down the "PROGRAMME SELECTION" button and at the same time switch on the dishwasher by pressing the "ON/OFF" button (a brief audible signal will sound).
- Keep the "PROGRAMME SELECTION" button pressed for at least 15 seconds (during this time, 2 audible signals will sound).
- Release the button when the second audible signal sounds ("b1" will appear on the display to indicate that the alarm is on).
- Press the same button again ("b0" will appear on the display to indicate that the alarm is off).
- Turn off the dishwasher by pressing the "ON/OFF" button to confirm the new setting.
To turn the alarm on again, follow the same procedure.
Simply-Fi

Simply-Fi
For details on Wi-Fi settings, please refer to the appropriate section of this user manual.
Memorization of the last programme used
The last programme used can be memorized by following the below:
IMPORTANT
The dishwasher must ALWAYS be off before start of this procedure.
- Hold down the "PROGRAMME SELECTION" button and at the same time switch on the dishwasher by pressing the "ON/OFF" button (a brief audible signal will sound).
- Keep the "PROGRAMME SELECTION" button pressed for at least 30 seconds (during this time, 3 audible signals will sound).
-
Release the button when the THIRD audible signal sounds ("A0" will appear on the display to indicate that the memorization is off).
-
Press the same button again ("A1" will appear on the display to indicate that the memorization is on).
-
Turn off the dishwasher by pressing the "ON/OFF" button to confirm the new setting.
To disable the memorization, follow the same procedure.
IMPORTANT
This dishwasher is equipped with an anti-overflow safety device which will automatically discharge any excess water should a problem occur.

WARNING!
To ensure the correct operation of the anti-overflow safety device, we recommend that the dishwasher is not moved or tilted during operation. If however it is necessary to tilt or move the dishwasher, please ensure that the washing cycle is complete and that there is no remaining water inside the dishwasher.
The dishwasher is able to signal a series of faults in the display.
AUTOMATIC FAULT SIGNALS
| FAULTS CAUSE SOLUTION | ||
| E2 appears on the display and the alarm sounds. | No water (inlet hose closed). | Turn off the dishwasher, open the inlet hose and reset the cycle. |
| E3 appears on the display and the alarm sounds. | The machine cannot drain water. | Check if the drain tube is bent or if the siphon or filters are clogged.If the problem persists, contact Customer Service. |
| E4 appears on the display and the alarm sounds. | Water leak | Check if the drain tube is bent or if the siphon or filters are clogged.If the problem persists, contact Customer Service. |
| E5,E6,E7,Ef or EL appears on the display and the alarm sounds. | Electronic control fault. | Contact Customer Service. |
| E8 or Ei appear on the display and the alarm sounds. | The water heating element is not working correctly or the filter plate is clogged. | Clean the filter plate.If the problem persists, contact Customer Service. |
PROGRAMME GUIDE
Wash with prewash
For wash programmes with prewash, it is advisable to add a second dose of detergent (max. 10 g) directly in the machine.
◆/() = "AUTOMATIC" PROGRAMMES ARE OPTIMISED THANKS TO THE DIRT SENSOR THAT ADAPTS WASHING PARAMETERS TO DISH DIRT LEVELS.
PO = is the program which allows you to access the Simply-Fi functions
| U·WASH + |  | Hygienic 75°C | An antibacterial cycle, intended for washing and sterilising dishes (even heavily stained ones) babies' bottles etc. |
| PROGR.P1 |  | INTENSIVE 75°C | Once a day - for heavily soiled pans and any other items that have been left all day for washing. |
| U·WASH- |  | Strong & Fast 65°C | Intended for rapid washing of very dirty dishes. |
| U·WASH + | Universal plus 65 - 75°C | Intended for everyday dishwashing. Two final rinses ensure a high level of hygiene and cleanliness. | |
| PROGR.P2 | UNIVERSAL 50 - 60°C | Once a day - for normal soiled pans and any other items that have been left all day for washing. | |
| U·WASH- | Daily 45 - 55°C | Fast cycle, for "normally" dirty dishes - intended for frequent washes and normal loads. | |
| U·WASH + | Night 55°C | Quietest washing cycle. Ideal for functioning by night and for taking advantage of reduced energy fares. | |
| PROGR.P3 | ECO | ECO 45°C | Programme for normally soiled tableware (the most efficient in terms of its combined energy and water consumption for that type of tableware).Programme standardised to EN 50242. |
| U·WASH- | Delicate 45°C | Suitable for delicate crockery and glassware. Also for less soiled items excluding pans. | |
| U·WASH + | A Class | A Class 59' 65°C | Suitable for heavily soiled items that are to be washed straight after a meal (Max 8 place load). |
| PROGR.P4 | RAPID 24' 50°C | Quick wash for dishes which are to be washed immediately after the meal. Wash load of 4/6 persons. | |
| U·WASH- | Pre-wash | Short cold pre-wash for items that are stored in the dishwasher until you are ready to wash a full load. | |
| Check list | Programme contents | Avarage duration in minutes | Special function buttons available | ||||||||||
| Detergent for soaking (Prewash) | Detergent for washing | Clean filter | Check rinse aid dispenser | Check salt container | Hot pre-wash | Cold pre-wash | Main wash | First cold rinse | Second cold rinse | Hot rinse with rinse aid | With cold water (15°C)*-Tolerance ± 10%- | "DELAY START" button | "ALL in 1" button |
| ● | ● | ●● | ○ | ● | 75°C | ○ | ○ | ○ | 140 | YES | YES | ||
| ● | ● | ●● | ○ | ● | 75°C | ○ | ○ | ○ | 130 | YES | YES | ||
| ● | ● | ●● | ○ | ● | 65°C | ○ | ○ | 85 | YES | YES |
| ● | ● | ●● | ○ | ● | 65°C/75°C | ○ | (○) | ○ | 115/125 | YES | YES | ||
| ● | ●● | (○) | (50°C/60°C | ○ | ○ | 100/120 | YES | YES | |||||
| ● | ●● | (○) | 45°C/55°C | ○ | ○ | 70/80 | YES | YES |
| ● | ●● | ●○ | 55°C | ○ | ○ | 240 | YES | YES | |||||
| ● | ● | ●● | ●○ | 45°C | ○ | 190 | YES | YES | |||||
| ● | ●● | ●○ | 45°C | ○ | ○ | 85 | YES | YES |
| ● | ● | ●● | ○ | ● | 65°C | ○ | 59 | YES | YES | ||||
| ● | ●● | ● | 50°C | ○ | 24 | YES | YES | ||||||
| ● | ○ | 5 | YES |
* WITH HOT WATER THE TIME REMAINING UNTIL THE END OF THE PROGRAMME IS AUTOMATICALLY DISPLAYED WHILE THE PROGRAMME IS RUNNING.
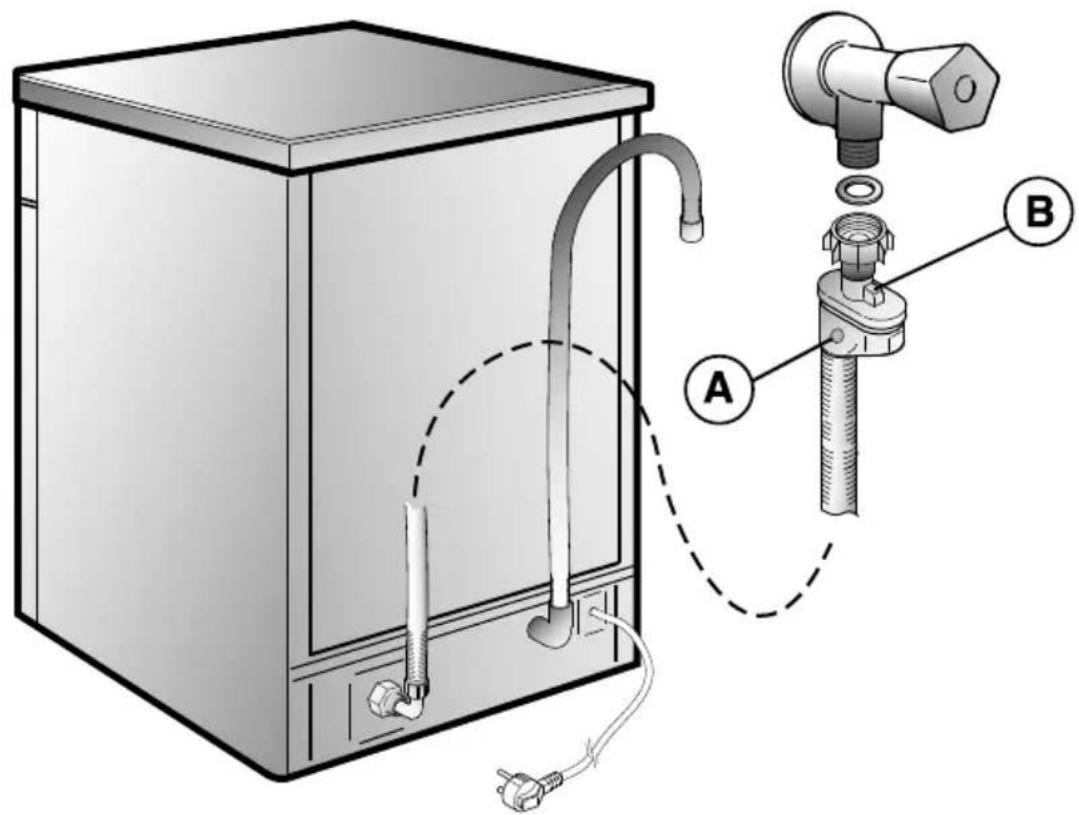
AQUASTOP-SYSTEM
The water-stop device protects against water damages caused by leaks on the fill hose which could develop due to natural ageing of the hose.
In the water-stop system the leaking water fills the corrugated hose and activates a stop valve which cuts off the water supply to the machine.
This fault is shown by a red sector on the window Ⓐ.
Would this occur, please refer to your Service Agent.
If the hose is not long enough for correct connection, it must be replaced with a longer one. The hose can be obtained from your Service Agent.
B Safety antitwist device (press and twist to remove the washer).
text_image
Technical diagram of a water heater system with labeled components A and B, showing pipe connection and wiring connections.WATER SOFTENER UNIT
Depending on the source of the supply, water contains varying amounts of limestone and minerals which are deposited on the dishes leaving whitish stains and marks. The higher the level of these minerals present in the water, the harder the water is. The dishwasher is fitted with a water softener unit which, through the use of special regenerating salt, supplies softened water for washing the dishes. The degree of hardness of your water can be obtained from your water supply company.
Regulating the water softener
The water softener can treat water with a hardness level of up to 90^ fH (French grading) or 50^ dH (German grading) through 8 settings.
The settings are listed in the table below:
| Level | Water hardness | Use of regenerating salt | Water softener setting | |
| °FH (French) | °dH (German) | |||
| 0 | 0-5 | 0-3 | NO | d0 |
| 1 | 6-10 | 4-6 | YES | d1 |
| 2 | 11-20 | 7-11 | YES | d2 |
| 3 | 21-30 | 12-16 | YES | d3 |
| *4 | 31-40 | 17-22 | YES | d4 |
| 5 | 41-50 | 23-27 | YES | d5 |
| 6 | 51-60 | 28-33 | YES | d6 |
| 7 | 61-90 | 34-50 | YES | d7 |
* The softener unit is set in the factory at level 4 (d4) as this satisfies the requirements of the majority of users.
Regulate the setting of your water softener unit according to the degree of hardness of your water as follows:
IMPORTANT
The dishwasher must ALWAYS be off before start of this procedure.
- Hold down the "PROGRAMME SELECTION" button and at the same time switch on the dishwasher by pressing the "ON/OFF" button (a brief audible signal will sound).
- Keep the "PROGRAMME SELECTION" button pressed for at least 5 seconds, UNTIL a brief audible signal sounds. The current water softener setting level will be shown on the display.
- Press the same button again to select the required water softener level: each time the button is pressed, the setting will increase by one level. When you have reached "d7", the display will go back to "d0".
- Turn off the dishwasher by pressing the "ON/OFF" button to confirm the new setting.

WARNING!
If any problem occurs, turn the dishwasher off by pressing the "ON/OFF" button and start the procedure again from the beginning (STEP 1).
Salt loading indicator
This model is provided with an indicator light on the control panel which will light up when it is necessary to reload the salt container.
IMPORTANT
The appearance of white stains on dishes is generally an important sign that the salt container needs filling.

Simply-Fi
DISHWASHER ENROLMENT
Terminology and tools
- Wi-Fi SYSTEM:
You can activate the remote control system of the dishwasher via Wi-Fi, this will allow you to control various aspects of the dishwasher's operation. For example, selecting and starting a wash cycle or pausing a wash cycle that's in progress. If the remote control system is disabled, then the Simply-Fi app will still allow you to track the progress of a wash cycle and see how much time is left until it completes. However you cannot control any of the dishwasher functions through Simply-Fi.
- REGISTRATION PROCEDURE:
This is the process by which the dishwasher is connected to a wireless router and enables communication with the Simply-Fi app.
- ON/OFF BUTTON:
If the dishwasher is switched off (via the "ON/OFF" button or disconnected from the mains supply, then functionality through the remote control system will not be available. To reactivate the Wi-Fi system, restore power to the dishwasher, select the P0 program and then press the "START/RESET" button.
- RESET:
To restore the Wi-Fi system to factory settings, you need to press two buttons simultaneously until display the message AP. On freestanding models, you should press the "SUPER ECO" and "ALL IN 1" buttons.
On built-in models, you should press the "U•WASH" "+ " and "-" buttons.
- MODEM SETTING:
To activate the Wi-Fi capabilities of your dishwasher, you will need to link it to your internet router or hub. To establish a wireless connection, you will need to input the router/hub ID and password. The dishwasher will only be compatible with a modem that has the specifications shown in the table below. If it doesn't, then you may not get a Wi-Fi signal.
Wi-Fi uncertified routers may fail to establish the connection.
| Parameter | Specifications |
| Frequency | 2,402 ~ 2,480 MHz |
| Modulation | 802.11b compatibility: DSSS (CCK-11, CCK-5.5, DQPSK-2 and DBPSK-1)802.11g: OFDM (default) |
| Channel intervals | 5 MHz |
| Channels | 1-14 |
| Transmission rate (over the air) | 1-11 Mbps for 802.11b6-54 Mbps for 802.11g |
| Receive sensitivity | -83 dBm typical |
| Output level (Class1) | 0 to +12 dBm (software configurable) |
FUNCTIONS
The Simply-Fi app allows you to manage the dishwasher from either indoors or outdoors.
To comply with relevant standards, the door of the dishwasher needs to be closed to control the appliance remotely. If the door is not closed, then it will not be possible to start a wash cycle, but it is possible to use the Simply-Fi app.
Within the Simply-Fi app there are several different functions:
- PROGRAMS/OPTIONS:
Through the Menu you can select up to 12 programs and up to 4 options (depending on the wash cycle that is selected) and save them under "Favourites". The "Quick Start" function allows you to quickly access a list of previously selected wash cycles and quickly set the same one again.
- DELAY START:
This allows you to modify the start time of the wash cycle (by up to 23 hours). The Simply-Fi app also allows you to track the progress of a wash cycle and see how much time is left until it completes.
- NOTIFICATION:
The app will inform you about the progress of a wash cycle (i.e. washing, rinse, drying phase) and communicate any problems that arise during the course of a cycle (e.g. problems with water supply). At the end of the wash cycle, the dishwasher will go into stand-by and the app will return to its home screen.
- POWER CONTROL:
The app is able to show the levels of energy consumption at various stages of the wash cycle, as well as providing daily and weekly energy reports.
Furthermore, once the cost of the household electricity supply is determined, the app will suggest the best time to use the dishwasher.
- DIAGNOSTICS:
The app informs the user about any errors or problems that may occur during the wash cycle (e.g. failure to load / unload). The user will be provided with practical advice on how to solve the problem (e.g. make sure the filter is clean, add salt or rinse aid) before calling the Customer Care Department.
With this the Candy Hoover Group, declares that this appliance marked with CE 0051 complies with the essential requirements of the R&TTE Directive 1999/5/EC. To receive a copy of the declaration of conformity, please contact the manufacturer at: www.candy-group.com
For detailed information about HOW TO CONNECT your Simply-Fi appliance and HOW TO USE it at its best, go to www.candysimplyfi.com or visit the dedicated Simply-Fi Customer Service website:
www.simplyfiservice.candy-group.com
Enhorabuena,
text_image
Technical diagram of a mechanical device with labeled parts A and B, showing connections between a housing, tubing, and a valve.Programmes "IMPULSE"
Touche "DEPART DIFFERE"

1-23h
text_image
Technical diagram of a mechanical device with labeled parts A and B, showing pipe connections and internal components.ADOUCISSEUR D'EAU
- PROGRAMMES/OPTIONS:
text_image
Technical diagram of a mechanical device with labeled parts A and B, showing connections between a housing, tubing, and a valve.WASSERENTHÄRTER
| ● | ● | ●● | ○ | ● | 65°C/75°C | ○ | (○) | ○ | 115/125 | SIM | SIM | ||
| ● | ●● | (○) | 50°C/60°C | (○) | ○ | 100/120 | SIM | SIM | |||||
| ● | ●● | (○) | 45°C/55°C | (○) | ○ | 70/80 | SIM | SIM |
| ● | ●● | ●○ | 55°C | ○ | ○ | 240 | SIM | SIM | |||||
| ● | ● | ●● | ●○ | 45°C | ○ | 190 | SIM | SIM | |||||
| ● | ●● | ●○ | 45°C | ○ | ○ | 85 | SIM | SIM |
| ● | ● | ●● | ○ | ● | 65°C | ○ | 59 | SIM | SIM | ||||
| ● | ●● | ● | 50°C | ○ | 24 | SIM | SIM | ||||||
| ● | ○ | 5 | SIM |
text_image
Technical diagram of a mechanical assembly with labeled parts A and B, showing connections between a housing, tubing, and a valve.| ● | ● | ●● | ○ | ● | 75°C | ○ | ○ | ○ | 140 | JA JA | ||
| ● | ● | ●● | ○ | ● | 75°C | ○ | ○ | ○ | 130 | JA JA | ||
| ● | ● | ●● | ○ | ● | 65°C | ○ | ○ | 85 | JA JA |
| ● | ● | ●● | ○ | ● | 65°C/75°C | ○ | (○) | ○ | 115/125 | JA JA | ||
| ● | ●● | (○) | 50°C/60°C | (○) | ○ | 100/120 | JA JA | |||||
| ● | ●● | (○) | 45°C/55°C | (○) | ○ | 70/80 | JA JA |
| ● | ●● | ●○ | 55°C | ○ | ○ | 240 | JA JA | |||||
| ● | ● | ●● | ●○ | 45°C | ○ | 190 | JA JA | |||||
| ● | ●● | ●○ | 45°C | ○ | ○ | 85 | JA JA |
| ● | ● | ●● | ○ | ● | 65°C | ○ | 59 | JA JA | ||||
| ● | ●● | ● | 50°C | ○ | 24 | JA JA | ||||||
| ● | ○ | 5 | JA |
* WANNEER DE MACHINE WARM WATER GEBRUIKT TIJDENS EEN PROGRAMMA, KOMT AUTOMATISCH OP DE DISPLAY TE STAAN HOEVEEL MINUTEN HET NOG DUURT TOT HET EINDE VAN HET PROGRAMMA.
AQUASTOP-SYSTEEM
text_image
Technical diagram of a mechanical assembly with labeled parts A and B, showing pipe connections and components.WATERONTHARDINGSSYSTEEM
- PROGRAMMA'S/OPTIES:
The manufacturer declines all responsibility in the event of any printing mistakes in this booklet. The manufacturer also reserves the right to make appropriate modifications to its products without changing the essential characteristics.
To consult the product fiche, please refer to the manufacturer website.