FM33 - Lawn mower VARI - Free user manual and instructions
Find the device manual for free FM33 VARI in PDF.


User questions about FM33 VARI
0 question about this device. Answer the ones you know or ask your own.
Ask a new question about this device
Download the instructions for your Lawn mower in PDF format for free! Find your manual FM33 - VARI and take your electronic device back in hand. On this page are published all the documents necessary for the use of your device. FM33 by VARI.
USER MANUAL FM33 VARI
natural_image
Illustration of three lawn mower machines in grayscale, no text or symbols present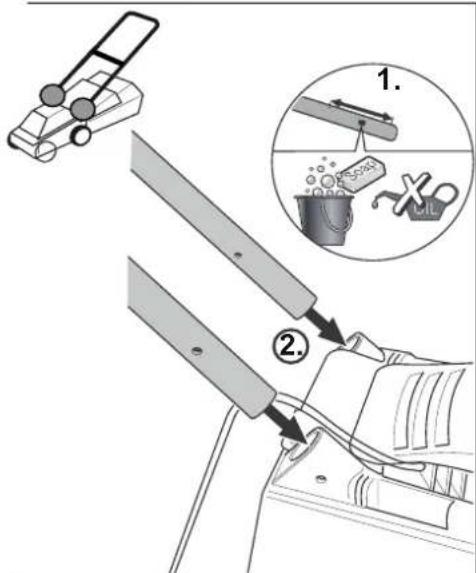
text_image
Diagram illustrating a mechanical assembly with labeled parts and an inset showing a tool interacting with a bucket.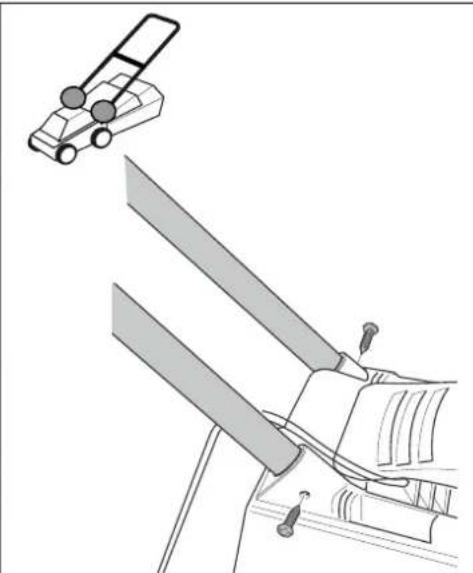
natural_image
Diagram of a vehicle's suspension system with a car and two directional sensors (no text or labels)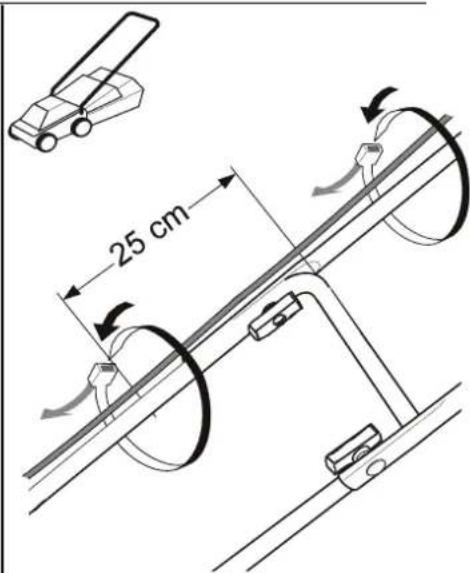
text_image
25 cm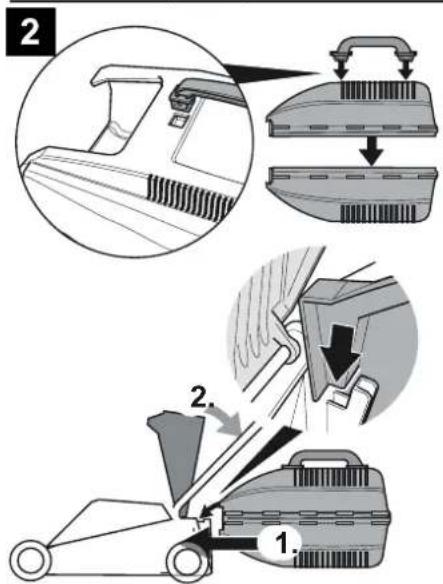
text_image
Technical diagram illustrating a mechanical assembly process with labeled steps 1 and 2, showing components like a bracket, gear, and belt.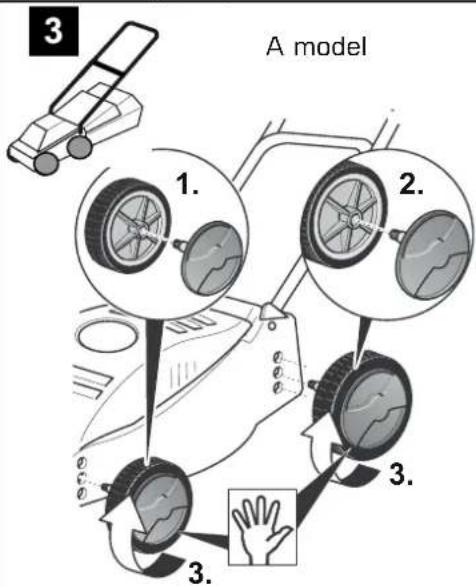
text_image
3 A model 1. 2. 3. 3. 3.B model
text_image
"Click"3
C model
text_image
1 Click 23
natural_image
Mechanical diagram of a wheel with a rotating shaft and arrow indicating rotation (no text or symbols)6
text_image
Diagram of a lawn mower with labeled parts and directional arrows indicating motion or movement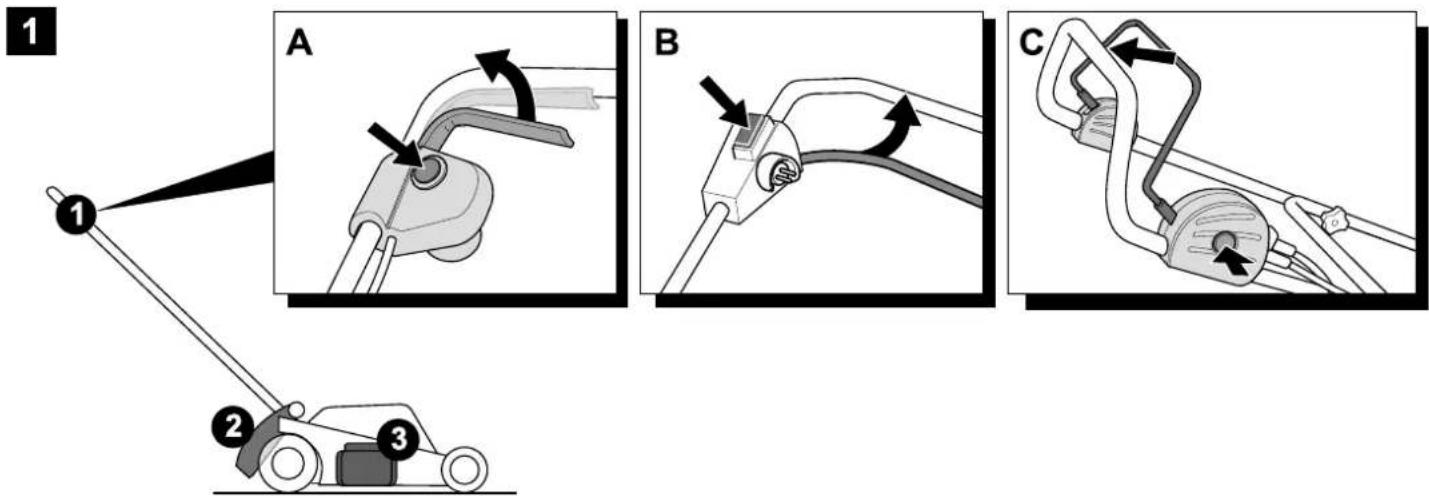
text_image
1 A B C 2 3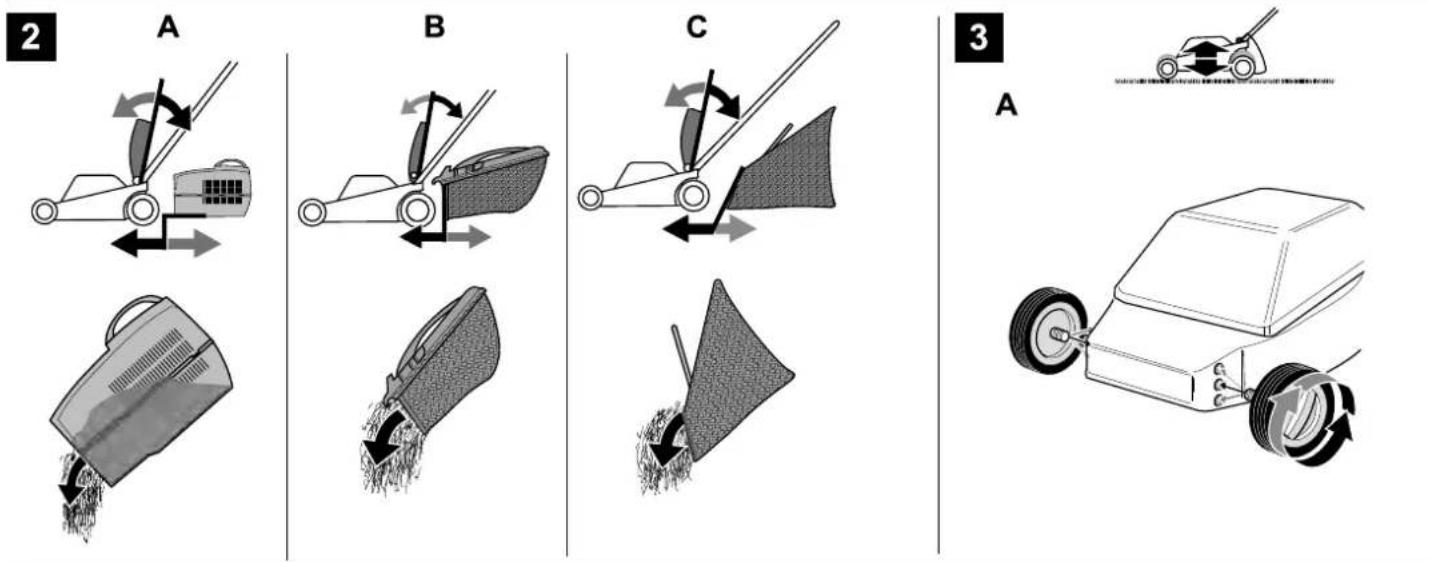
text_image
2 A B C 3 A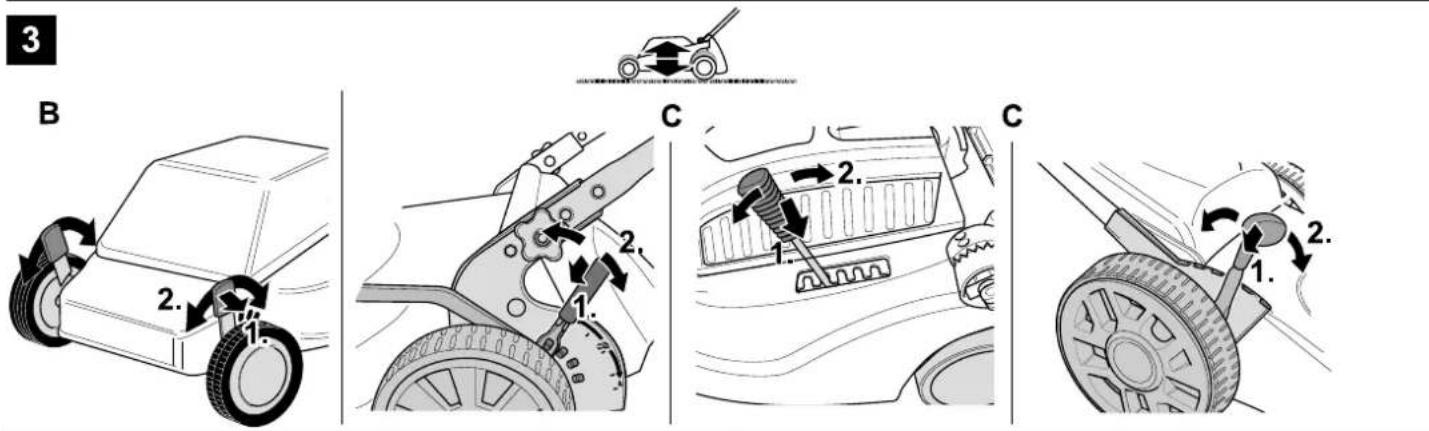
text_image
3 B 2. 1. 2. C 1. 2. C 1. 2.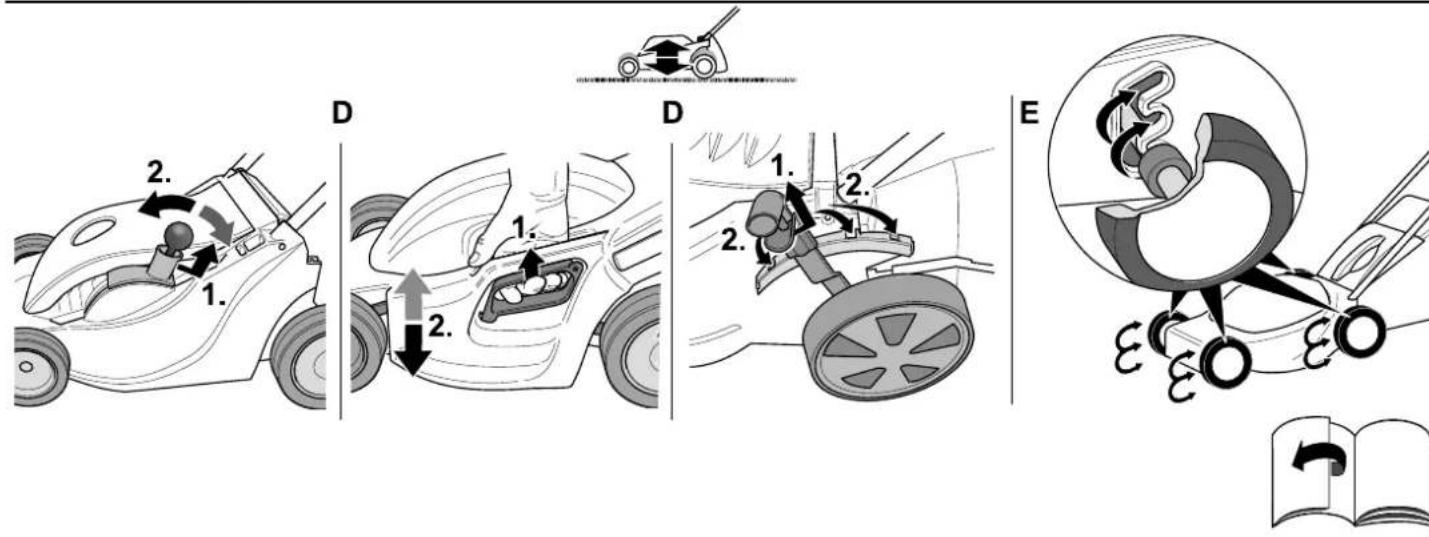
text_image
1. 2. D 1. 2. D 1. 2. E 3 34
text_image
A 2. 1.B
text_image
1. 2.C
text_image
Diagram showing cable installation steps with labeled components and connection pointsD
text_image
D 1. 2.E
text_image
E 1. 2. 1.F
natural_image
Diagram of a cable clamp or connector being inserted into a cable, showing internal components and wiring (no text or labels)G
text_image
G 1. 2.H
text_image
1. 2.|
text_image
Diagram showing cable installation with labeled components and a magnified inset highlighting a connector detail.J
text_image
Diagram showing a car safety harness with labeled parts and a magnified inset highlighting the component '1'.K
text_image
1. 2.5
text_image
A 1. 2.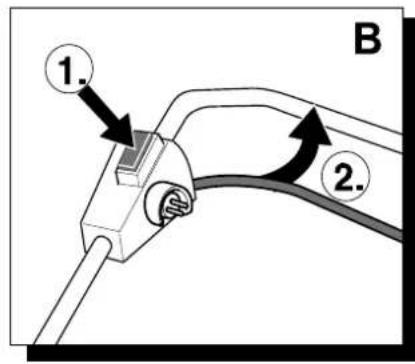
text_image
1. 2. B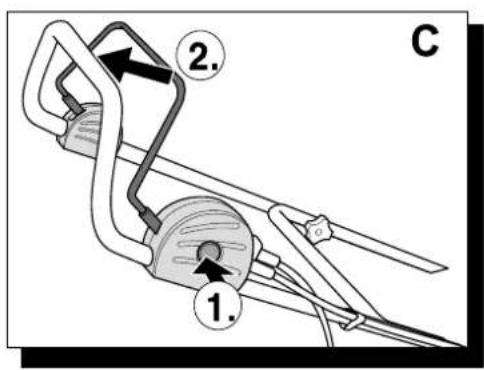
text_image
C 1. 2.6
A
text_image
Diagram of a lawn mower with labeled parts and directional arrows indicating motion or movement.B
text_image
Diagram of a lawn mower with labeled parts and directional arrows indicating motion or movement7
text_image
Technical diagram illustrating car door seat assembly steps with labeled components A and B8
A
text_image
1. 2.9
natural_image
Diagram of a mechanical clamp or bracket with a gear and rotation arrow, no text or symbols present10
text_image
GOA
text_image
A STOPB
text_image
Diagram showing a mechanical assembly with labeled parts and directional arrows indicating movement or assembly.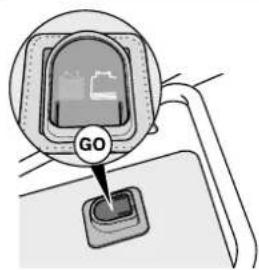
text_image
GOB
text_image
STOP
English
(Original operating instructions)
Deutsch
Assembling the unit 2
Operating safety 3
Tips on lawn care 4
Transporting the appliance 5
Servicing/cleaning 5
Laying up the vehicle 5
Warranty 5
Identifying and eliminating malfunctions 6
Information on rating plate
These details are very important for identifying your appliance when you order spare parts or contact our aftersales service. The rating plate is found near the engine. Enter all the details on rating plate in the following fields.
natural_image
Simple diagram with three horizontal lines inside a rectangle (no text or symbols)This and other appliance information can be found on the separate CE declaration of conformity which is a component of these operating instruction.
Illustrations
Fold out the illustrated pages at the start of the operating instructions. Various models are described in these operating instructions. Graphical representations may deviate in detail from the purchased unit.
For your safety
Use the appliance properly
This appliance is approved solely for use
in accordance with the descriptions and safety instructions specified in this user's guide,
to mow the lawns of domestic and leisure gardens.
Any other use is not as intended. Improper use is not covered by the warranty and the
manufacturer will reject any liability. The user is liable for all damage caused to third parties and their property. Unauthorized modifications made to the mower rule out any liability on the part of the manufacturer for damage resulting therefrom.
Observe the safety and operating information
Before using the appliance for the first time, read and follow these operating instructions carefully. Keep these instructions in a safe place for future reference. Never allow children or other persons to use the lawnmower who do not know the operating instructions.
It the appliance changes ownership, hand over the operating instructions.
General safety information
In this section you will find general information about safety. Warnings that apply specifically to individual parts of the appliance, functions or activities are shown at the corresponding point in this users guide.
Before working with the appliance
Persons using the appliance must not be under the influence of intoxicants, e.g. alcohol, narcotics, medication, etc.
Persons younger than .16 years of age must not use this lawnmower – local regulations can determine the minimum age of the users.
This appliance is not intended for use by persons (including children) with reduced physical, sensory or mental capabilities, or lack of experience and knowledge, unless they have been given supervision or instruction concerning use of the appliance by a person responsible for their safety.
Children should be supervised to ensure that they do not play with the appliance.
For children, cleaning and maintenance of the machine is permitted only under adult supervision.
Before you begin work, make that you are familiar with all attachments and operating controls as well as their functions. Use outdoors with the permitted and appropriately identified connection cable only, e. g. B. H07RN – F 3 x 1.5 mm ^2 (max. 50 m). Connecting parts of connection-cables must be splash-proof and made of rubber or covered with rubber.
Before using the unit, always check whether the connection cable is damaged, brittle or tangled. To do this, switch off the unit and pull out the mains plug. Use only a connection cable which is in perfect condition.
Before using the appliance,
- check whether the grass catcher works and the deflector closes correctly. Replace damaged, worn out or missing parts immediately.
- check for any wearing or damage to the cutters, fastening pins, and the whole cutter unit. All worn or damaged parts must be replaced in sets at a specialist workshop in order to rule out imbalances.
- check whether the cable between the motor and switch/plug combination is damaged. Immediately have a damaged cable replaced by a specialist company.
Spare parts and accessories must satisfy the requirements specified by the manufacturer.
Therefore use original spare parts and original accessories only or spare parts and accessories authorised by the manufacturer.
All repair work must be conducted exclusively at a specialised garage.
When working with the appliance
When working with or on the appliance you must wear protective clothing. This includes: safety shoes, trousers,
tightly fitting clothing, protective goggles, etc.
Operate the vehicle only when it is in good technical condition as stipulated and delivered by the manufacturer.
Before all work on this appliance
To prevent injury, before performing any work (e.g. maintenance and adjustments) on this unit
- switch OFF the engine,
- wait until all rotating parts have come to a standstill,
- pull out the mains plug,
- leave motor to cool down (approx. 30 minutes)
After working with the appliance
Before leaving the unit, always pull out the mains plug.
Safety devices
Figure 1

Danger
Never use a lawnmower if it has damaged safety devices or if there are no safety devices fitted.
Safety lever (1)
The safety lever stops the motor and cutting blades in an emergency. There must be no attempt to circumvent this function, which is crucial for your personal safety.
Ejection flap (2) or impact protection (3)
The ejection flap/impact protection protects you from being injured by the blade or by ejected solid objects. The lawnmower must always be operated with the ejection flap or impact protection.
Symbols on the appliance
On the appliance you will find various symbols on adhesive labels. They have the following specific meanings:
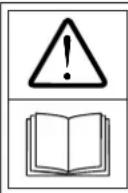
Attention! Please read the operating instructions before putting lawnmower into operation!
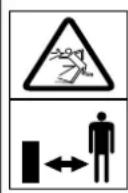
Keep third parties away from the danger area!
| Before working on the cutters, pull out the mains plug! Keep fingers and feet away from the cutting tools! Before adjusting or cleaning the unit or before checking whether the connection cable is entangled or damaged, switch off the unit and pull out the mains plug. Keep the connection cable away from the tools. |
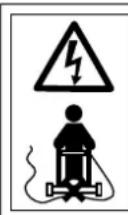
Keep connection cable away from the cutters!
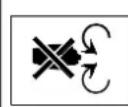
Never put your hands and/or feet in the vicinity of rotating parts.
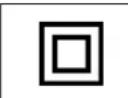
Appliance classes Class II double insulated
Always keep these symbols on the appliance in a legible state.
Symbols in the user's guide
Symbols are employed in the user's guide to indicate hazards or draw attention to important information. They have the following specific meanings:
! Danger
Draws your attention to sources of potential danger associated with the task you are undertaking at the time which constitute a danger to persons.
Caution
Used to highlight hazards which are associated with the activity that is being described, whereby damage could occur to the appliance.
i Note
This indicates important information and application tips.
Disposal instructions
Dispose of packaging remnants, old units, etc., in accordance with local regulations.

Old electrical equipment is recyclable and should thereforere not be thrown in the dustbin!
We request that you support us with your active contribution in the conservation of resources and protection of the environment and to dispose of this unit at collection points, if available.
Assembling the unit
Illustration on the enclosed sheet show you how to assemble your unit in a few steps and make it ready for use.

VARI
Operating safety

Risk
of electric shock
- Use a safety switch on your mains socket (= residual current operated device with a release current not exceeding 30 mA).
- If you sever the power cord while mowing, you are at risk of being killed or injured. Slowly move away in short steps from the un/t. Pull the plug out of the socket. When mowing, ensure that the connection cable never gets into the cutting area.
Accident
- No person, especially children, and/or animals should be allowed to stand close to the mower while it is in use.
Risk of injury due to ejected stones or other objects.
Falling over
- Operate the vehicle at walking speed only.
- Be particularly careful when mowing in reverse and pulling the appliance towards you.
- When mowing on steep slopes, there is a risk of the mower tipping over and you could be injured as a result. Mow crossways to the slope, never upwards and down wards. Do not mow on inclines greater than 20% .
- Be particularly careful when changing direction of travel and ensure that you always have a firm footing, especially on slopes.
- Mowing along perimeters involves a risk of injury. Mowing near edges, hedges, or steep inclines is dangerous. Keep a safe distance from perimeters when mowing.
- If the ground is wet the mower could slip due to reduced traction and overturn. Mow only when the grass is dry.
- Work only by daylight or in good artificial lighting.
Injury
- Always maintain a safe distance from the rotating tool by means of the steering handle.
- The working area of the operator is behind the steering handle during operation.
- Never place your hands, feet, or other parts of the body near rotating parts.
- Stop the motor if you have to tilt the unit or transport it over surfaces other than grass.
- Never lift or carry the appliance when the engine is running. First, pull the mains plug out of the socket.
- Switch the motor off and pull out the mains plug before loosening blockages or removing obstructions from the discharge channel or before checking, cleaning, transporting or adjusting the lawn mower or before working on the unit.
- If you remove the grass catcher, you or other persons might get injured due to ejected, mowed materials or foreign bodies. Never empty the grass sack while the engine is running. To do this, switch off the unit.
- Check the surface on which the appliance is to be used and remove all objects that the appliance can take up and fling out.
- Do not use the unit in adverse weather conditions, e.g. if there is a probability of rain or a storm.
- If the cutter strikes a foreign object (e.g. stone) or if the unit starts vibrating unusually: Switch off the motor immediately and pull out the mains plug.
Before continuing to use the unit, have it checked for damage by a service centre.
- In the case of mowers with rotary blades, never stand in front of grass ejection holes.
Stumbling
- When turning the unit, you may trip over the connection cable and injure yourself. Always guide the cable in such a way that it is always kept out of the walking and working area.
- Operate the vehicle at walking speed only.

Caution
Damage to the lawn mower.
- Stones, scattered branches, and similar objects can damage the machine and impair its correct operation. Remove all
objects from the appliance's path before every use.
- Operate the appliance only when it is in good technical condition Subject the appliance to a thorough visual check before using it. Check in particular the safety devices, electric controls, power cables and threaded connections for damage and secure attachment. Replace damaged parts before operating the unit.

Operating times
Comply with the national/municipal regulations concerning the times when the mower may be used (if required, contact your local authority).

Directions
Details of specific locations on the appliance (e.g. left, right) are always quoted as seen from the steering handle and while facing forward.
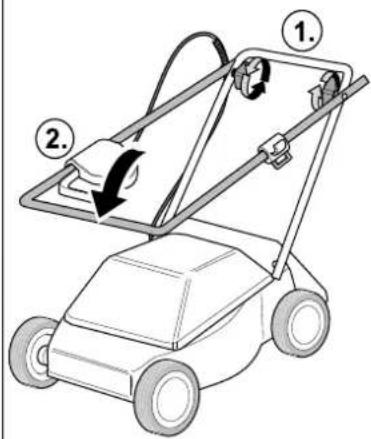
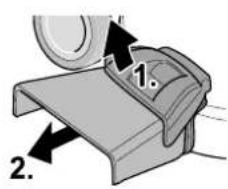
1. Hang the grass catcher
Figure 2
- Lift up the deflector flap and hook the grass sack onto the appliance.
2. Set the cutting height

Caution
Select cutting height for uneven terrain to prevent the cutter from ever coming into contact with the ground.
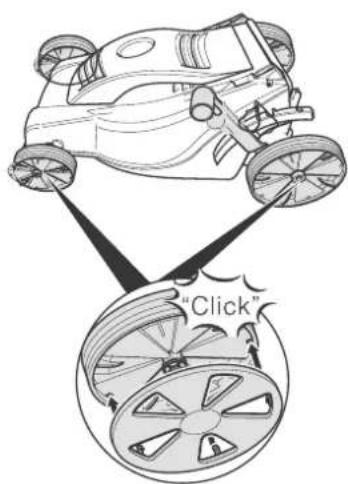
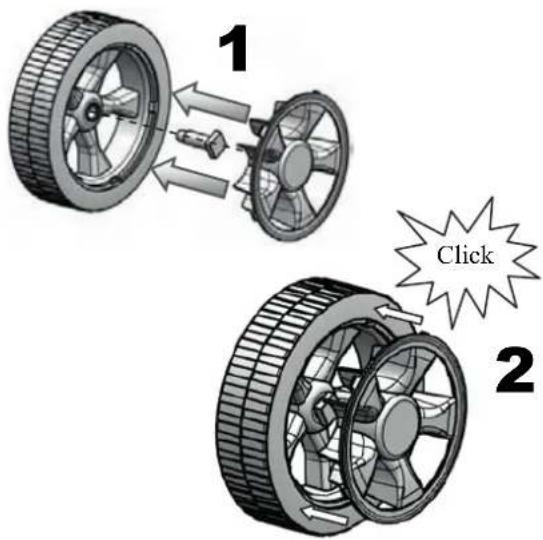
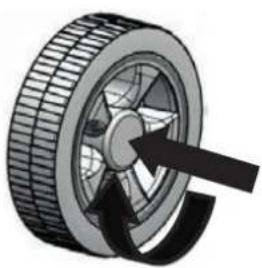
Figure 3
Set the cutting height of the grass as required.
Setting option (depending on model) from approx. 3 cm to maximum 9 cm.

Note
If units have individual wheel adjustment, set all wheels to the same height.
Model A:
- Unscrew wheels and move to the appropriate height setting.
Model B:
- Pull the lap and snap into place in the position required.
Model C:
- Advance or push back the lever of the central vertical adjustment

and snap into place in the position required.
Model D:
- Actuate lock and simultaneously set the required height by pulling or pressing on the handle/lever. When the lock is released, the selected setting engages.
Model E:
- Pull the wheel forwards and lock in the required position.
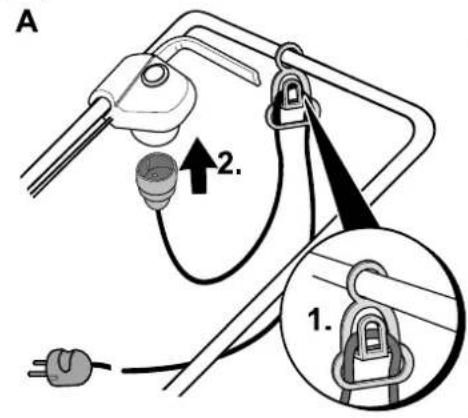
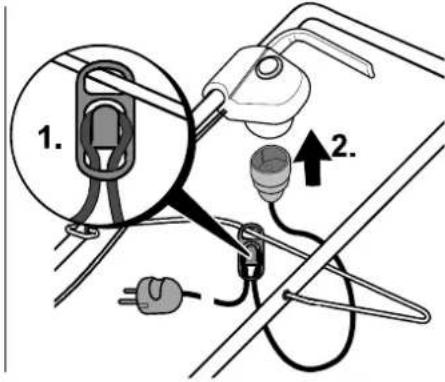
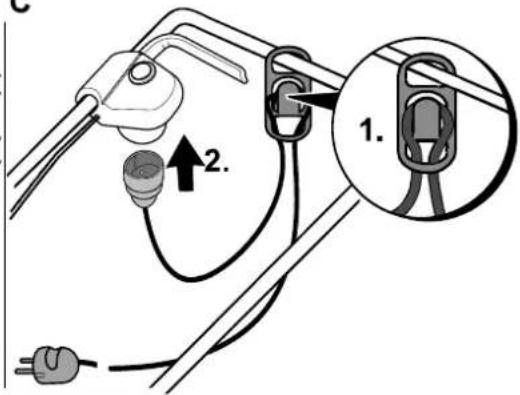
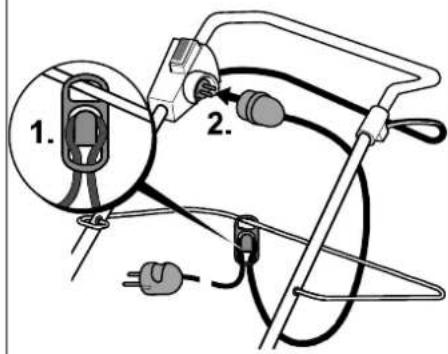
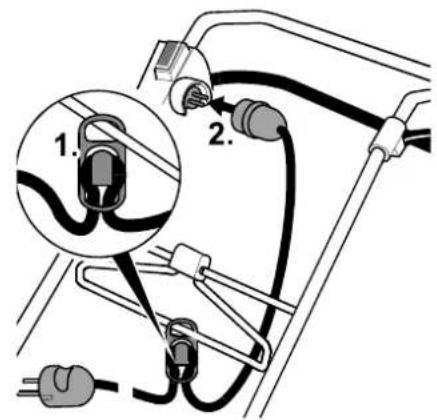
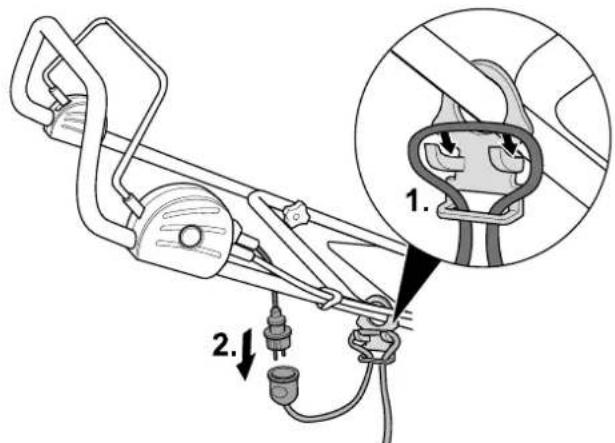
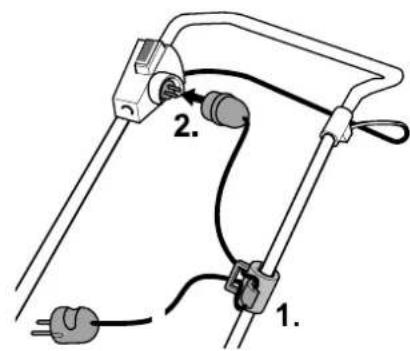
3. Power cord
Figure 4
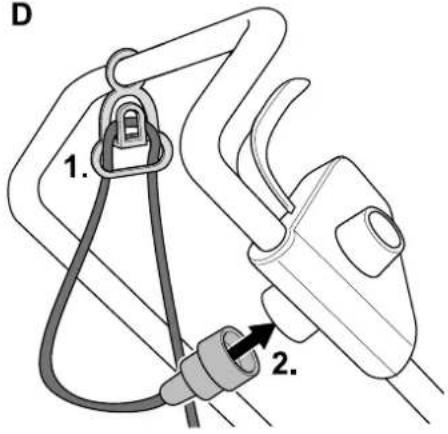
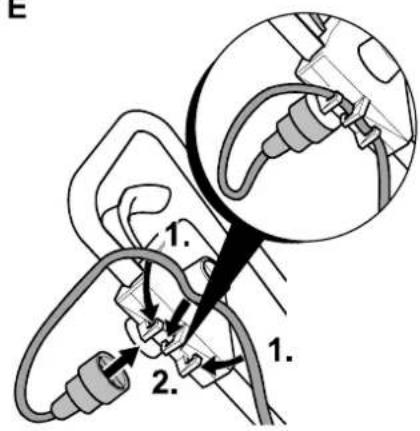
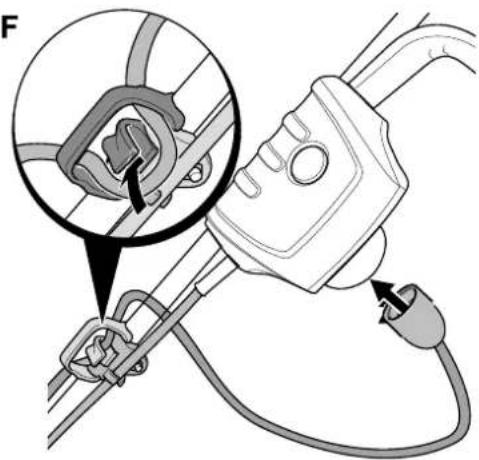
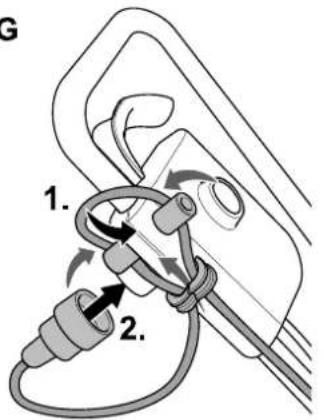
- Attach connection cable to the cable grip.
- Insert the connection cable first into the switch/plug combination on the unit and then into a 230 V-socket.
4. Starting the engine

Danger
Keep hands and feet well away from the cutting blade.

Caution
- Do not tip the appliance when starting.
- If an attempt is made to start the unit in tall grass, the motor may overheat and be damaged. Figure 5
- Keep the appliance on an even surface with little or the shortest possible grass.
- Standing behind the unit – press and hold down the locking button.
- Pull and hold the safety lever, release locking button.
The motor and the cutter run.
You can now start work.
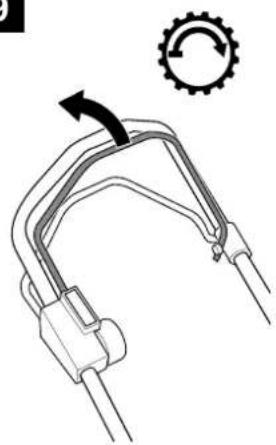
5. Engaging/disengaging gear drive
(only in the case of lawn mowers with gear drives)
Figure 9
Putting gear drive into gear
- Pull lever and hold.
Throwing gear drive out of gear
- Release lever.
6. Stopping the engine
- Release the safety hoop.
The engine and the cutting tool stop after a short time.
7. Detaching and emptying the grass sack
Figure 2
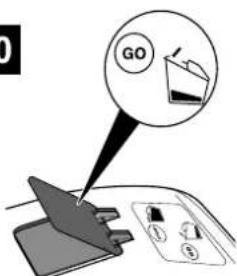
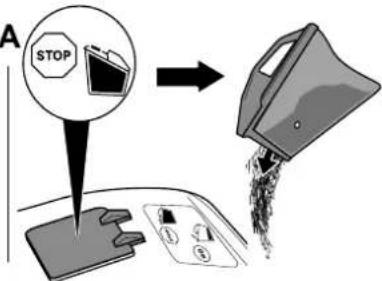
It cut grass is left lying on the ground or it the level indicator (optional, Fig. 10) indicates that the basket is full:
- Release safety hoop and wait until the engine stops.
- Lift the deflector flap and unhook the grass sack.
• Empty out the contents.
8. Working without the grass sack Whenever you detach the grass sack, the deflector lap drops down. When working without a grass catcher, the mowed grass is ejected directly downwards.
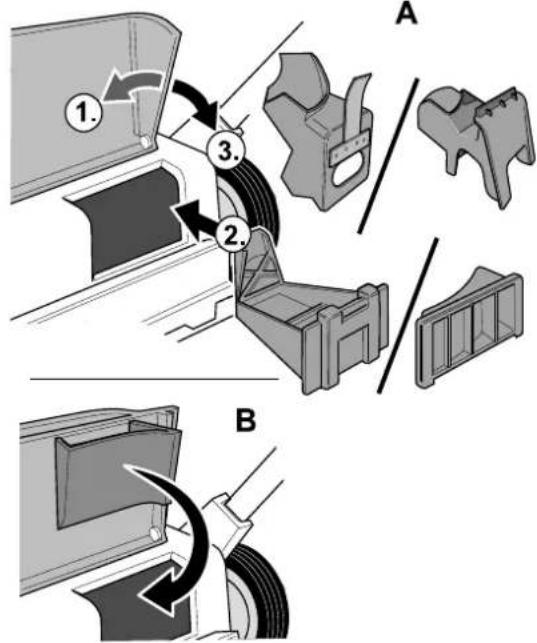
9. Retrofitting for mulching
(only for units with mulching accessory/ optional).
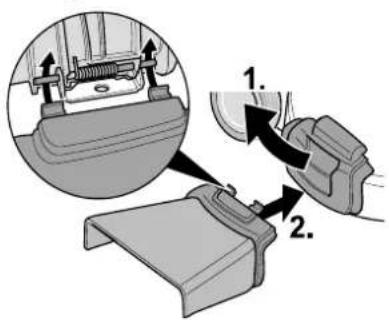
Units with rear discharge: Figure 7A
- Lift the ejection flap.
- Remove the grass catcher.
- Insert mulch key (depending on model).
- Lower the ejection flap.
i Note
Models with integrated mulching function do not require a separate mulch key - a specially shaped rear lap assumes this function (Fig. 7B).
Units with side discharge:
- Remove side discharge – impact protection/mulch lock closes automatically (Fig. 8A).
10. Changing units over to side discharge
(depending on model)
- If fitted:
Remove grass catcher and lower the rear discharge flap.
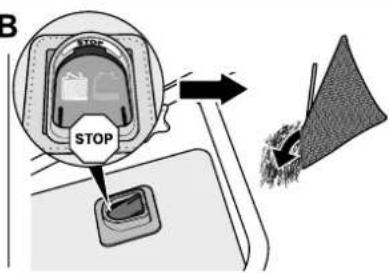
- Lift impact protection/mulch lock and attach side discharge (Fig. 8B).
11. After finishing work
• Empty the grass sack.
- Pull the mains plug out of the socket and the unit.
- Leave the motor to cool down (approx. 30 minutes) before cleaning, servicing, storing or shutting down the unit.
Tips on lawn care
Mowing
Lawns consist of various grass types. Frequent mowing promotes the growth of grass, resulting in strong roots and a firm sward. If you seldom cut the grass, you will enhance the development of high growing types of grass and other weeds, (such as clover, daisies). The normal height of a lawn is approx. 4–5 cm. Only ^1/_3 of the total height should be mown; therefore cut 7–8 cm long grass to normal height. Try not to cut the grass shorter than 4 cm, otherwise the lawn will suffer during dry periods. If the grass has grown particularly high (for example, during a holiday period), cut it back to its normal height in several stages. When mowing, always overlap the mown swaths slightly.
Mulching (using the accessories)
The grass is cut into small pieces (approx. 1 cm) and left to lie on the lawn. The lawn therefore retains a lot of nutrients. For an optimum result always keep the lawn short, see also the section entitled “Mowing”. Observe the following when mulching:
- Do not mow wet grass.
– Never mow more than 2 cm. - Mow slowly.
– Clean the cutters regularly.

Transporting the appliance
the

Danger
Before transporting the unit on or in a vehicle: Switch off motor and remove connection cable.
Leave motor to cool down (approx. 30 minutes). For transport on or in a vehicle, secure the appliance adequately against slipping.
Before lifting or carrying the unit, pull out the mains plug. Before moving the unit over surfaces, such as footpaths or driveways, stop the motor.

Caution
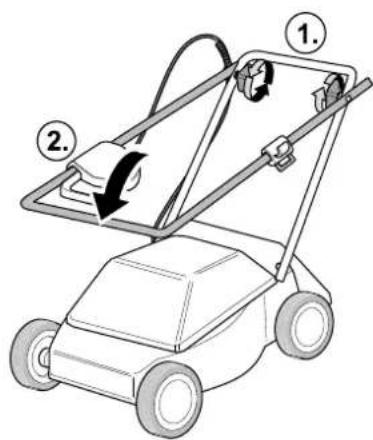
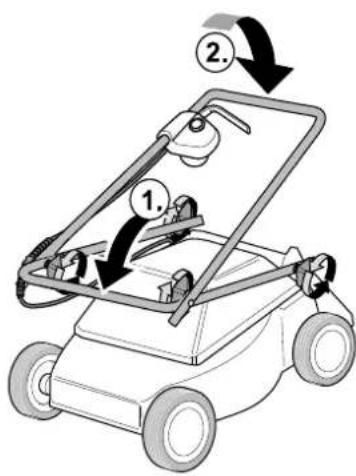
Do not wedge or kink the cable which runs between the motor and switch/plug combination. Figure 6
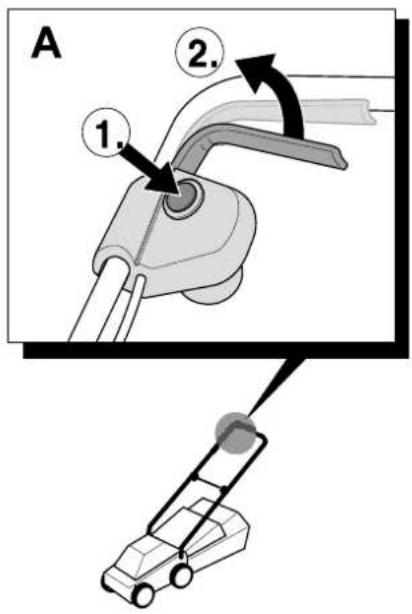
- The steering handle can be folded down to facilitate storage.
Servicing/cleaning

Danger
To protect against injury before all
work on the appliance
- switch OFF the engine,
- wait until all rotating parts have come to a standstill,
– pull out the mains plug,
- leave motor to cool down (approx. 30 minutes).
Servicing

Danger
To protect against injury from (the cutters, have a specialist garage perform all work such as replacing or regrinding the cutters (special tools required).
Before each operation
- Check connection cable.
- Check that threaded connections are tight.
- Check safety devices.
- Check unit - see section "Before working with the appliance".
Check the point of contact of the clutch:
(only in the case of awn mowers with gear drives)
- The lawn mower should not drive forwards when the engine is running and when the gear drive is not engaged.
- The awn mower should drive forwards when the engine is running and the gear drive is engaged.
- If necessary, adjust the point of connection using the knurling tool/adjusting nut on the gear drive lever or Bowden cable.
Once a season
- Lubricate the joints and torsion spring on the discharge flap.
- AI the end of the season the appliance must be checked and serviced at a specialist garage.
Cleaning

Caution
- Do not splash the unit with water, otherwise electric components may be damaged.
– Clean the appliance after every use. Failure to clean the appliance can damage the materials and cause malfunctions.
Cleaning the grass sack
The easiest time to dean the grass
catcher is immediately after mowing.
- Detach and empty the grass sack.
– The grass sack can be cleaned by means of a powerful jet of water from a garden hose.
- Allow the grass sack to dry out thoroughly before using it again.
Cleaning lawnmower

Danger
Work on the cutters can cause injury. Wear safety gloves for your protection. Whenever possible, always clean the appliance directly after mowing.
- Tilt the unit 10 the side,
- clean the cutter chamber and the ejector cover with brush, hand broom, or cloth,
- set the appliance down on its wheels and remove all visible grass residue and other soiling.
Laying up the vehicle

Caution
Damage to mower materials
Keep the vehicle only in clean and dry rooms when the engine is cold. During prolonged storage, e.g. in winter, ensure that the unit is protected against rust.
At the end of the season or when the vehicle will not be used for longer than a month,
- Clean the appliance and the grass sack.
- To protect metal parts from rust, wipe them all down with an oiled cloth (resin-free oil) or apply an oil spray.
Warranty
The warranty rules issued by our company or the importer apply to every country. As part of the warranty, we remedy malfunctions on your appliance free of charge provided that this malfunction is caused by a material or manufacturing defect. In the event of a warranty claim, please turn to your dealer or the nearest branch office.
Identifying and eliminating malfunctions
Malfunctions that occur during the operation of your lawnmower often have simple causes that you should know and be able to repair on your own. In cases of doubt your specialised garage will be please assist you further.
| Problem Possible cause(s) | Remedy Possible cause(s) | Remedy |
| Engine does not start. | Connection cable not connected or defective. | Check and plug in cable; if required replace or have it repaired by a specialist. |
| Household fuse overloaded. | Switch on fuse; if required increase the fused house connection or have one installed by a specialist. | |
| Switch/plug combination defective. | Have it repaired by a specialist company. | |
| Motor is humming, but not running. | Lawnmower Is standing in long grass. | Place the lawnmower onto a surface with shorter grass. |
| Blade is blocked. | Pull out mains plug, remove blockage. | |
| Motor suddenly stops. | Plug has become loose. | Check cable, ensure that it is attached to the cord grip, insert plug again. |
| Overload protection has switched off (depending on model). | Pull out mains plug, remove blockage in the discharge, wait approx. 30 min., switch on again. | |
| Unusual noises (rattling, clanging, knocking). | Screws, nuts, or other fasteners loose. | Tighten parts; if the noises persist: Contact a specialist workshop. |
| Strong vibrations. | Damaged blade shaft or defective cutter. | Switch off the unit immediately. Have defective parts replaced by a specialist workshop. |
| Wheel drive does not work. | V-belt or gears defective. | Damaged parts must be replaced at a specialist garage. |
| Unclean cut or speed Is decreasing. | Grass too high. | Set larger cutting height, if necessary mow twice. |
| Grass Is not being picked up or grass catcher is not filling | Grass too damp. | Let the lawn dry. |
| Ejector clogged. | Pull out mains plug, remove blockage. | |
| Cutters bunt. | Cutters must be replaced or reground at a specialist garage. | |
| Grass sack full. | Switch off mower, empty grass catcher. | |
| Dirty grass sack. | Switch off mower, clean air slots in the grass catcher. |