
TX432 - Network card / adapter TP-LINK - Free user manual and instructions
Find the device manual for free TX432 TP-LINK in PDF.

| Product Type | Network Card / Adapter |
| Brand | TP-Link |
| Model | TX432 |
| Interface | USB 3.0 |
| Wireless Standards | IEEE 802.11a/b/g/n/ac |
| Frequency Bands | 2.4 GHz and 5 GHz |
| Maximum Data Rate | Up to 600 Mbps (2.4 GHz: 300 Mbps, 5 GHz: 300 Mbps) |
| Security | WPA, WPA2, WPA3 |
| Antenna | External omni-directional |
| Dimensions | 90 x 30 x 15 mm |
| Weight | 30 g |
| Power Supply | USB bus-powered |
| Operating Temperature | 0°C to 40°C |
| Storage Temperature | -40°C to 70°C |
| Operating Humidity | 10% to 90% non-condensing |
| Compatible Operating Systems | Windows, macOS, Linux |
| Maintenance | Clean with a dry, soft cloth. Do not use liquid cleaners. |
| Safety Precautions | Avoid water, extreme temperatures, and physical damage. Do not disassemble. |
| Spare Parts & Repairability | No user-serviceable parts. Contact TP-Link support for repairs. |
| Package Contents | Adapter, Quick Installation Guide, Resource CD |
Frequently Asked Questions - TX432 TP-LINK
User questions about TX432 TP-LINK
0 question about this device. Answer the ones you know or ask your own.
Ask a new question about this device
Download the instructions for your Network card / adapter in PDF format for free! Find your manual TX432 - TP-LINK and take your electronic device back in hand. On this page are published all the documents necessary for the use of your device. TX432 by TP-LINK.
USER MANUAL TX432 TP-LINK
JetStream 10-Gigabit 2-Port SFP+ Module
COPYRIGHT & TRADEMARKS
Specifications are subject to change without notice. TP-LINK® is a registered trademark of TP-LINK TECHNOLOGIES CO., LTD. Other brands and product names are trademarks or registered trademarks of their respective holders.
No part of the specifications may be reproduced in any form or by any means or used to make any derivative such as translation, transformation, or adaptation without permission from TP-LINK TECHNOLOGIES CO., LTD. Copyright © 2013 TP-LINK TECHNOLOGIES CO., LTD. All rights reserved.
http://www.tp-link.com
FCC STATEMENT

This equipment has been tested and found to comply with the limits for a Class A digital device, pursuant to part 15 of the FCC Rules. These limits are designed to provide reasonable protection against harmful interference when the equipment is operated in a commercial environment. This equipment generates, uses, and can radiate radio frequency energy and, if not installed and used in accordance with the instruction manual, may cause harmful interference to radio communications. Operation of this equipment in a residential area is likely to cause harmful interference in which case the user will be required to correct the interference at his own expense.
This device complies with part 15 of the FCC Rules. Operation is subject to the following two conditions:
1) This device may not cause harmful interference.
2) This device must accept any interference received, including interference that may cause undesired operation.
Any changes or modifications not expressly approved by the party responsible for compliance could void the user's authority to operate the equipment.
CE Mark Warning
CE
This is a class A product. In a domestic environment, this product may cause radio interference, in which case the user may be required to take adequate measures.

- When product has power button, the power button is one of the way to shut off the product; When there is no power button, the only way to completely shut off power is to disconnect the product or the power adapter from the power source.
- Don’t disassemble the product, or make repairs yourself. You run the risk of electric shock and voiding the limited warranty. If you need service, please contact us.
- Avoid water and wet locations.
Chapter 1 Introduction
1.1 Overview of the Product
JetStream 10-Gigabit 2-Port SFP+ Module TX432 is an interface card providing two 10G SFP+ ports. It is applicable to multiple TP-LINK switch models.
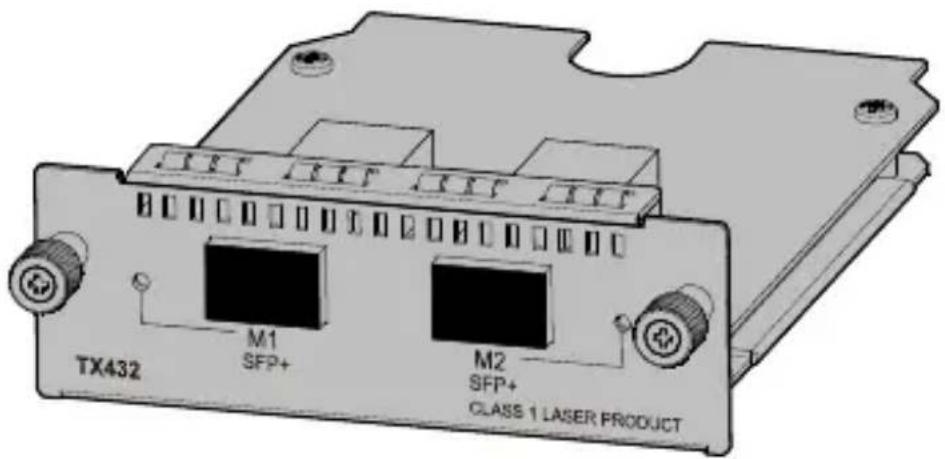
Figure 1-1 Appearance of TX432
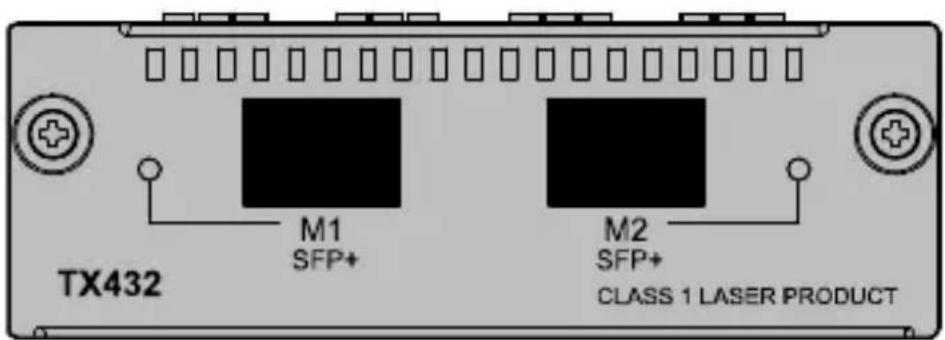
Figure 1-2 Front panel of TX432
1.2 Description of Ports
Ports of TX432 are both 10G SFP+ ports. You can insert an SFP+ transceiver into the port (on TX432) to connect it to the SFP+ port (on another device) through an optical fiber, or an SFP+ cable provided by TP-LINK. For details about the supported SFP+ transceivers and SFP+ cables, please refer to the table below.
| Transceiver /Cable | Central wavelength | Connector | Interface cable | Max transmission distance |
| TXM431-SR | 850nm | LC | 50/125μm multimode optical fiber | 300m |
| 62.5/125um multimode optical fiber | 33m | |||
| TXM431-LR | 1310nm | 9/125μm single-mode optical fiber | 10km | |
| TXC432-CU1M | - | - | SFP+ cable | 1m |
| TXC432-CU3M | 3m |
1.3 Description of LEDs
There is an LED for each port, labeled as M1 and M2, on the panel of TX432. Described below:
| LED Status Description | ||
| M1,M2 | Off The port isn’t connected to any devices. | |
| On SPF+ port is connected to a device. | ||
| Blinking | SPF+ port is connected to a device and transferring data. | |
Note:
The switch applicable to TX432 will display corresponding LEDs on its front panel to indicate the port status of the interface card. For details about the LEDs, please refer to the switch user guide.
Chapter 2 Installation
2.1 Tools for installation
- Philips screwdriver
- ESD-preventive wrist strap
2.2 Installing & Removing the Interface Card
- Installing the Interface Card to the switch
- Wear an ESD-preventive wrist strap, and make sure that it has good skin contact and is well grounded.
- Use a Phillips screwdriver to loosen the mounting screws of the filler panel on the interface card slot of the switch (T3700G-28TQ for example) and remove the filler panel, as shown in Figure 2-1.
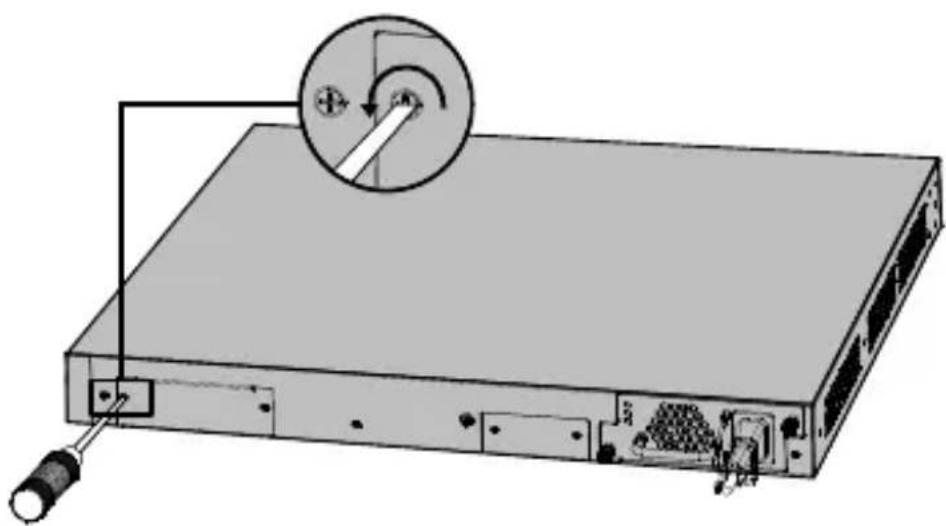
natural_image
Diagram of a server rack with an attached cable and a magnified inset showing a cable pin (no text or symbols present)Figure 2-1 Install an interface card (1)
- Hold the fastening screws on the front panel of the interface card, and gently push the interface card in along the slot guide rail until the interface card is flush with the switch, as shown in Figure 2-2.
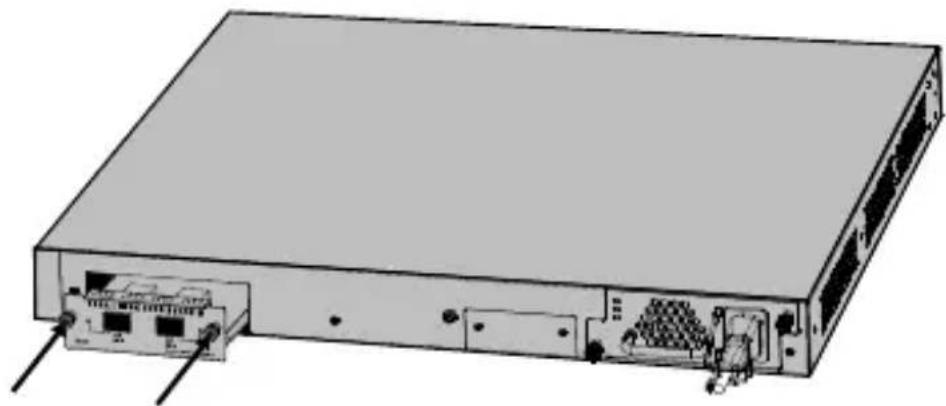
natural_image
Illustration of a network switch device showing internal ports and connectors (no text or labels)Figure 2-2 Install an interface card (2)
- Tighten the captive screws with a Phillips screwdriver to fix the interface card in place.
- Removing the Interface Card
-
Wear an ESD-preventive wrist strap, and make sure that it has good skin contact and is well grounded.
-
Use a Phillips screwdriver to loosen the captive screws at both sides of the interface card until all spring pressure is released.
- Pull the interface card towards you along the guide rails, until it completely comes out of the switch chassis.
Note:
- TX432 supports hot plug, so if necessary you can install or remove the interface card when the switch is operating. However, it is recommended that the power be turned off during installation.
- Do not touch the surface-mounted components directly with your hand while the switch is in operation.
- After removing an interface card, if no new interface card is to be installed, please install the filler panel as soon as possible to prevent dust from entering and ensure the normal ventilation in the switch.
2.3 Verifying the Installation
The switch applicable to TX432 will display corresponding LEDs on its front panel to indicate the port status of the interface card. When the switch runs properly, check whether the interface card is operating properly according to the status of its Port LED. If the interface card isn't operating properly, check whether it is installed correctly.
2.4 Safety of Laser Use
TX432 is a Class-1 laser device.
Do not look straight at the optical port of TX432 when it is operating, because the optical fiber beam is of high energy and thus will do great harm to the retina.

Looking straight at the optical fiber beam could do great harm to your eyes.
Appendix: Specifications
| Normal | |
| Standards | IEEE 802.3ae, IEEE 802.3aq, SFF-8431 |
| Safety & Emissions FCC, CE | |
| Max Power Consumption | 6.57w with Fiber |
| LED | M1,M2 |
| Operating Temp | 0°C~50°C (32°F~122°F) |
| Storage Temp | -40°C~70°C (-40°F~158°F) |
| Operating Humidity 10%~90% RH, Non-condensing | |
| Storage Humidity 5%~90% RH, Non-condensing | |
| Dimension | 131*92*31mm |
Technical Support
■ For more troubleshooting help, go to:
http://www.tp-link.com/en/support/faq
■ To download the latest Firmware, Driver, Utility and User Guide, go to:
http://www.tp-link.com/en/support/download
■ For all other technical support, please contact us by using the following details:
Global
Tel: +86 755 2650 4400
Fee: Depending on rate of different carriers, IDD.
E-mail: support@tp-link.com
Service time: 24hrs, 7 days a week
USA/Canada
Toll Free: +1 866 225 8139
E-mail: support.usa@tp-link.com(USA) support.ca@tp-link.com(Canada)
Service time: 24hrs, 7 days a week
Turkey
Tel: 0850 7244 488 (Turkish Service)
Fee: Depending on rate of different carriers.
E-mail: support.tr@tp-link.com
Service time: 09:00 to 21:00, 7 days a week
Ukraine
Tel: 0800 505 508
Fee: Free for Landline; Mobile: Depending on rate of different carriers
E-mail: support.ua@tp-link.com
Service time: Monday to Friday, 10:00 to 22:00
Brazil
Toll Free: 0800 608 9799 (Portuguese
Service)
E-mail: suporte.br@tp-link.com
Service time: Monday to Friday, 09:00 to
20:00; Saturday, 09:00 to 15:00
Indonesia
Tel: (+62) 021 6386 1936
Fee: Depending on rate of different carriers.
E-mail: support.id@tp-link.com
Service time: Sunday to Friday, 09:00 to
12:00, 13:00 to 18:00 *Except public holidays
Australia/New Zealand
Tel: NZ 0800 87 5465 (Toll Free)
AU 1300 87 5465 (Depending on 1300 policy.)
E-mail: support.au@tp-link.com (Australia) support.nz@tp-link.com (New Zealand)
Service time: 24hrs, 7 days a week
Germany/Austria
Tel: +49 1805 875 465 (German Service)
+49 1805 TPLINK
+43 820 820 360
Fee: Landline from Germany: 0.14EUR/min.
Landline from Austria: 0.20EUR/min.
E-mail: support.de@tp-link.com
Service time: Monday to Friday, 09:00 to
12:30 and 13:30 to 18:00. GMT+1 or GMT+2
(DST in Germany) *Except bank holidays in
Hesse
Singapore
Tel: +65 6284 0493
Fee: Depending on rate of different carriers.
E-mail: support.sg@tp-link.com
Service time: 24hrs, 7 days a week
UK
Tel: +44 (0) 845 147 0017
Fee: Landline: 1p-10.5p/min, depending on
the time of day. Mobile: 15p-40p/min,
depending on your mobile network.
E-mail: support.uk@tp-link.com
Service time: 24hrs, 7 days a week
Italy
Tel: +39 023 051 9020
Fee: Depending on rate of different carriers.
E-mail: support.it@tp-link.com
Service time: Monday to Friday, 09:00 to 13:00; 14:00 to 18:00
Malaysia
Toll Free: 1300 88 875 465
Email: support.my@tp-link.com
Service time: 24hrs, 7 days a week
Poland
Tel: +48 (0) 801 080 618
+48 223 606 363 (if calls from mobile phone)
Fee: Depending on rate of different carriers.
E-mail: support.pl@tp-link.com
Service time: Monday to Friday, 09:00 to
17:00. GMT+1 or GMT+2 (DST)
France
Tel: 0820 800 860 (French service)
Fee: 0.118 EUR/min from France
Email: support.fr@tp-link.com
Service time: Monday to Friday, 09:00 to
18:00 *Except French Bank holidays
Switzerland
Tel: +41 (0) 848 800 998 (German Service)
Fee: 4-8 Rp/min, depending on rate of different time.
E-mail: support.ch@tp-link.com
Service time: Monday to Friday, 09:00 to
12:30 and 13:30 to 18:00. GMT+1 or GMT+2 (DST)
Russian Federation
Tel: 8 (499) 754 5560 (Moscow NO.)
8 (800) 250 5560 (Toll-free within RF)
E-mail: support.ru@tp-link.com
Service time: From 09:00 to 21:00
(Moscow time) *Except weekends and holidays in RF