
ZRA1523 - Heating Zephir - Free user manual and instructions
Find the device manual for free ZRA1523 Zephir in PDF.


| Type de produit | Fan Heater |
| Modèle | ZRA1523 |
| Marque | Zephir |
| Catégorie | Chauffage |
| Dimensions (H x L x P) | 25 cm x 18 cm x 12 cm |
| Poids | 1.5 kg |
| Alimentation | 220-240 V, 50 Hz |
| Puissance maximale | 2000 W |
| Niveaux de puissance | 2 (1000 W / 2000 W) |
| Thermostat réglable | Oui |
| Ventilation seule (sans chauffe) | Oui |
| Protection contre la surchauffe | Oui |
| Arrêt automatique en cas de basculement | Oui |
| Type de commande | Boutons mécaniques |
| Indicateur lumineux de fonctionnement | Oui |
| Matériau du boîtier | Plastique résistant à la chaleur |
| Entretien | Nettoyer la grille d'entrée d'air avec un aspirateur ; essuyer l'extérieur avec un chiffon humide |
| Niveau sonore | Environ 45 dB |
| Longueur du câble | 1,5 m |
| Pages du manuel | 15 |
| Garantie | 2 ans |
Frequently Asked Questions - ZRA1523 Zephir
User questions about ZRA1523 Zephir
0 question about this device. Answer the ones you know or ask your own.
Ask a new question about this device
Download the instructions for your Heating in PDF format for free! Find your manual ZRA1523 - Zephir and take your electronic device back in hand. On this page are published all the documents necessary for the use of your device. ZRA1523 by Zephir.
USER MANUAL ZRA1523 Zephir
MANUALE D'ISTRUZIONI
GUIDA ALL'USO
- This product is not suitable for well insulated for well insulated spaces or occasional use.
- When using an electrical appliance, basic safety precautions should always be observed, including the following:
- This appliance is not intended for use by persons (including children) with reduced physical, sensory or mental capabilities, or lack of experience and knowledge, unless they have been given supervision or instruction concerning use of the appliance by a person responsible for their safety.
- Children should be supervised to ensure that they do not play with the appliance.
- The product is for household use only.
- Connect the appliance to single phase AC supply of the voltage specified on the rating plate.
- In order to avoid overheating, do not cover the heater.
- Never leave the heater unattended while it is in use. Always turn the product to the OFF position and unplug it from the electrical outlet when not in use.
- Extreme caution is necessary when any heater is used by or near children, invalids or elderly person and whenever the heater is left operating and unattended.
- The heater must not be located immediately below an electrical socket-outlet.
- Do not run cord under carpeting and do not cover cord with throw rugs, runners or the like. Arrange cord away from traffic area and where it will not be tripped over.
- Do not operate the heater with a damaged cord or plug, or after the heater malfunctions, has been dropped, or damaged in any manner.
- If the supply cord is damaged, it must be replaced by the manufacturer or its service agent or a similarly qualified person to avoid a hazard.
- Avoid the use of an extension cord as this may overheat and cause a risk of fire.
- Use the heater in a well-ventilated area. Do not insert or allow objects to enter any ventilation or exhaust opening. To prevent a possible fire, do not block air intakes or exhaust openings in any manner. Do not use on soft surfaces, like a bed, where openings may become blocked. Use the heater on flat, dry surfaces only.
- Do not place this heater near flammable materials, surfaces or substances, as there may be a risk of fire. Keep the above flammable materials, surfaces or substances at least 1m from the front of the product and keep them away from the sides and rear.
- Do not use the heater in any areas where petrol, paint or other flammable liquids are stored e.g. Garages or workshops as a hot, arcing or sparking parts inside the heater.
- Don't use this heater in the immediate surroundings of a bath, a shower or a swimming pool. Never locate the heater where it may fall into bathtub or other water container.
- This heater is hot when in use. To avoid burns and personal injury, do not let bare skin touch hot surfaces. If provided, use handles when moving the product.
- Be sure that no other appliances are in use on the same electrical circuit as your product as an overload can occur.
- This heater is filled with a precise quantity of special oil.
- Repair requiring opening of the oil container are only to be made by the manufacturer or his service agent who should be contacted if there is an oil leakage.
- Regulations concerning the disposal of oil when scrapping the appliance have to be followed.
- The heater should not be used in a room, of which the floor area is less than 5M2 .
- The cord shouldn't be placed nearby the hot surface of the appliance.
NOTE: It is normal when the heaters are turned on for the first time or when they are turned on after having not been used for a long period of time the heaters may have noise inside, This will disappear when the heater has been on a short while.
DESCRIPTION
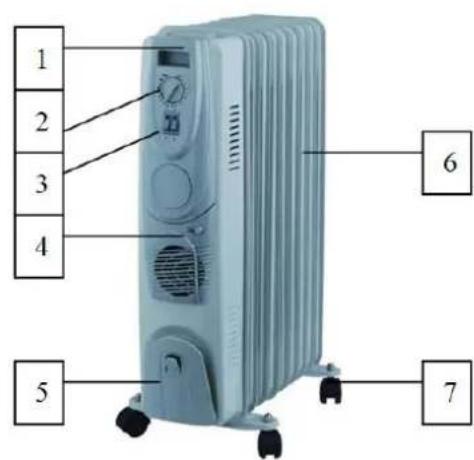
- Carry handle
- Thermostat knob
- Power switch
- Fan switch
- Cord storage
- Radiant fins
- Castor
ASSEMBLY INSTRUCTIONS
The heater is packaged with the feet unattached. You must attach them before operating the heater.
WARNING: Do not operate without feet attached. Do operate the heater only in upright position (feet on the bottom, controls on the top), any other position could create a hazardous situation.
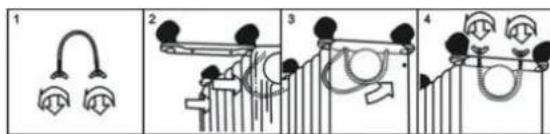
- Place the radiator body upside-down on a scratch-free location, make sure it is stable and will not fall.
- Screw off the wing nuts from the U-shaped bolt provided, attach the U-shaped bolt to the U-facing flange between first and second fins (near the front cover).
- To attach the castor mounting plate to the radiator body, you should insert the threaded ends of the U bolt in the holes on the castor mounting plate.
- Screw the wing nuts back to the U bolt and fasten the wing nut properly.
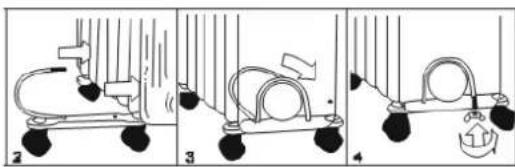
Note: do not over tighten, which may cause the damage of radiator flange. - Screw off spherical nut from the castor, align the shaft to the hole of the castor mounting plate, insert in, and screw on the spherical nut.
- Repeat 2, 3, 4 and 5 on the rear of radiator for mounting of the rear castors.
Note: the rear castors must be mounted between the end two fins.
HOW TO USE
- Before using the heater, make sure that it is on a flat and stable surface. Damage may occur if it is placed on an incline or decline.
- Set all the controls to OFF position and insert the plug into a socket-outlet with well grounded. Be sure that plug fits firmly.
- Rotate the thermostat knob clockwise to MAX position and switch the heater on as follow:
a. the switch I for low heat;
b. the switch II for medium heat;
c. both switches on for high heat.
- When your room reaches the desired temperature, now slowly rotate the thermostat knob counter clockwise until the pilot light goes out. The thermostat can now be left at this setting. As soon as the room temperature has dropped below the set temperature, the unit will switch itself on automatically until the set temperature has been reached again. In this way the room temperature remains constant with the most economical use of electricity.
- If you want to change the room temperature setting, rotate the thermostat knob clockwise to raise the temperature, or counter clockwise to lower it.
- This heater includes an overheat protection system that shuts off the heater when parts of the heater are getting excessively hot.
- To completely shut the heater off, turn all the controls to OFF, and remove plug from the socket-outlet.
FAN HEATER
If you want to fasten the speed of heating efficiency when you turn on the unit power, you can just push the fan heater switch "ON", the room temperature will be raised in high speed. Push the fan heater switch "OFF", the fan heater power will be off immediately.
TIMER
- Setting unit timer according to the clock by turn it clockwise (don't turn it counter clockwise).
- The timer has a small switch, the function is as follow:
a. I=Unit is always On;
b. =Timer function is ON
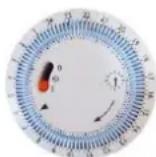
- Set the timer to position. There are 96 small plastic pins on the timer, each correspond to 15 minutes interval. Push outward the pins corresponding to the time you want the heater to turn ON and push inward the pins corresponding to the time you want the heater to turn OFF.
CAUTION:
A. Do not use the timer function unattended.
B. The heater will not operate if timer is set to the ⏻ position and the pins are not activated according to the times required.
C. If the heater looses its electricity supply, e.g. Switched off at the mains socket or in the even of a power failure, the time should be reset after the power on again.
D. L'unità non funziona se il timer è impostato in posizione ed i perni non sono sollevati secondo la fascia oraria desiderata.
- The pilot light will be on when the timer is set to ON position or the timing function is activated.
CLEANING AND MANTEINANCE
- Always remove the plug from the socket-outlet and allow the radiator to cool down before clean the heater.
- Wipe radiator with a soft damp (not wet) cloth.
Warning:
- Do not immerse the heater in water.
- Do not use any cleaning chemicals such as detergents and abrasives.
- Do not allow the interior to get wet as this could create a hazard.
- To store away the heater, wind the cable round bobbin and store the heater in a clean dry place.
- In case of malfunction or doubt, do not try to repair the radiator yourself, it may result in a fire hazard or electric shock.
INFORMATION REQUIREMENTS FOR LOCAL SPACE HEATERS
| Item | Symbol | Value | Unit | Item | Unit | ||
| Heat output | Type of heat input, for electric storage local space heaters only (select one) | ||||||
| Nominal heat output | Pnom | 1,0961 | KW | manual heat charge control, with integrated thermostat | no | ||
| Minimum heat output (indicative) | Pmin | 0 | KW | manual heat charge control with room and/or outdoor temperature feedback | no | ||
| Maximum continuous heat output | Pmax,c | 1,0961 | KW | electronic heat charge control with room and/or outdoor temperature feedback | no | ||
| Auxiliary electricity consumption | fan assisted heat output | no | |||||
| At nominal heat output | elmax | N/A | KW | Type of heat output/room temperature control (select one) | |||
| At minimum heat output | elmin | N/A | KW | single stage heat output and no room temperature control | no | ||
| In standby mode | elSB | N/A | W | Two or more manual stages, no room temperature control | Yes | ||
| with mechanic thermostat room temperature control | no | ||||||
| with electronic room temperature control | no | ||||||
| electronic room temperature control plus day timer | no | ||||||
| electronic room temperature control plus week timer | no | ||||||
| Other control options (multiple selections possible) | |||||||
| room temperature control, with presence detection | no | ||||||
| room temperature control, with open window detection | no | ||||||
| with distance control option | no | ||||||
| with adaptive start control | no | ||||||
| with working time limitation | no | ||||||
| with black bulb sensor | no | ||||||
| Contact details info | Westim S.p.A Via Roberto Bracco 42/E, Rome-Italy | ||||||
www.uniorservice.com
WESTIM S.p.A.
Via Roberto Bracco 42/E
00137, Roma
Tel. 06 8720311
Italiano
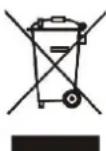
Disposal of old electrical & electronic equipment (Applicable in the European Union and other European countries with separate collection systems)
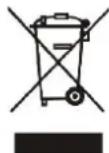
This symbol on the product or in its packaging indicates that this product shall not be treated as household waste. Instead it shall be handed over to the applicable collection point for the recycling of electrical and electronic equipment. By ensuring this product is disposed of correctly, you will help prevent potential negative consequences for the environment and human health, which could otherwise be caused by inappropriate waste handling of this product. The recycling of materials will help to conserve natural resources. For more detailed information about recycling of this product, please contact your local city office, your household waste disposal service or the shop where you purchased the product.
Français


Brand : Zephir
Model : ZRA1523
Category : Heating