XTL-W70 - Car stereo SONY - Free user manual and instructions
Find the device manual for free XTL-W70 SONY in PDF.

User questions about XTL-W70 SONY
0 question about this device. Answer the ones you know or ask your own.
Ask a new question about this device
Download the instructions for your Car stereo in PDF format for free! Find your manual XTL-W70 - SONY and take your electronic device back in hand. On this page are published all the documents necessary for the use of your device. XTL-W70 by SONY.
USER MANUAL XTL-W70 SONY
Operating Instructions ____ GB
The model and serial numbers are located on the bottom of the unit. Record the serial number in the space provided below. Refer to these numbers whenever you call upon your Sony dealer regarding this product.
Model No. XTL-W70 Serial No.
For installation and connections, see the supplied installation/connections manual.
This symbol is intended to alert the user to the presence of uninsulated "dangerous voltage" within the product's enclosure that may be of sufficient magnitude to constitute a risk of electric shock to persons.

This symbol is intended to alert the user to the presence of important operating and maintenance (servicing) instructions in the literature accompanying the appliance.
WARNING
This equipment has been tested and found to comply with the limits for a Class B digital device, pursuant to Part 15 of the FCC Rules. These limits are designed to provide reasonable protection against harmful interference in a residential installation. This equipment generates, uses, and can radiate radio frequency energy and, if not installed and used in accordance with the instructions, may cause harmful interference to radio communications. However, there is no guarantee that interference will not occur in a particular installation. If this equipment does cause harmful interference to radio or television reception, which can be determined by turning the equipment off and on, the user is encouraged to try to correct the interference by one or more of the following measures:
— Reorient or relocate the receiving antenna.
— Increase the separation between the equipment and receiver.
— Connect the equipment into an outlet on a circuit different from that to which the receiver is connected.
— Consult the dealer or an experienced radio/TV technician for help.
You are cautioned that any changes or modifications not expressly approved in this manual could void your authority to operate this equipment.
Welcome!
Thank you for purchasing the Sony Mobile Colour TV.
- This unit can receive the TV broadcasts in the United Kingdom and other CCIR B/G system areas, such as Germany and the USA, as well as other countries, depending on the model.
- You can connect both PAL and NTSC video playback units (European model only).
- The low reflection liquid crystal panel reduces the glare from outside lighting sources.
- You can manually adjust the brightness of the display according to the prevailing light conditions of the surrounding environs.
- The visual off function turns the picture off so that you can listen to the TV or video sound only.
- The automatic memory function can store up to 12 stations.
- This unit has several input/output terminals for connecting a video player, navigation system, and rear monitor.
- In addition to normal screen mode, full screen, zoom screen, and wide-zoom screen modes are also available.
- The backlighting control (DIMMER) produces sharp contrast images free from reversed or blurred colors. Furthermore, the Auto bright control feature continuously makes automatic adjustments to screen brightness in response to the surrounding light conditions.
Table of Contents
Warning and Precautions 5
Location of Controls 6
Getting Started
Selecting a TV system (European model only)....8
Storing TV stations automatically (Automatic memory function) ...... 9
Watching a TV Programme 10
Viewing the Wide Screen 11
Watching a Video 13
Listening to the TV/video Sound with the Picture Off (Visual off function).... 14
Adjusting the Picture 15
Adjusting the Screen Brightness (Auto bright control) 17
Using the Navigation System 18
Listening to the TV/video Sound while Using the Navigation System (Simultaneous play function) 19
Additional Information 20
Specifications 22
Troubleshooting Guide....23
Warning and Precautions
Warning
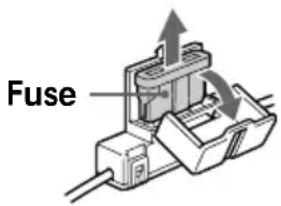
Never use a fuse with an amperage rating exceeding the one supplied with the unit as this could damage the unit.
Fuse replacement
When replacing the fuse, be sure to use one that matches the amperage described on the original fuse. If the fuse blows, check the power connection and replace the fuse. If the fuse blows again after replacement, there may be an internal malfunction. In such a case, consult your nearest Sony dealer.
Precautions
- Do not mount the monitor where it will obstruct the driver's view.
- Do not touch the TV aerial and monitor at the same time during storms. You may get an electric shock.
- If your car was parked in direct sunlight resulting in a considerable rise in temperature inside the car, allow the unit to cool off before operating it.
If you have any questions or problems concerning your unit that are not covered in this manual, please consult your nearest Sony dealer.
Preventing accidents
The TV/video pictures appear only after you park the car and set the parking brake. When the car starts moving, the TV/video pictures automatically disappear for safety reasons, after displaying the following caution for 5 seconds.
PICTURE OFF FOR YOUR SAFETY
Do not operate equipment connected to the TV tuner unit or watch the monitor while driving. You may cause a traffic accident if your attention is distracted by the monitor.
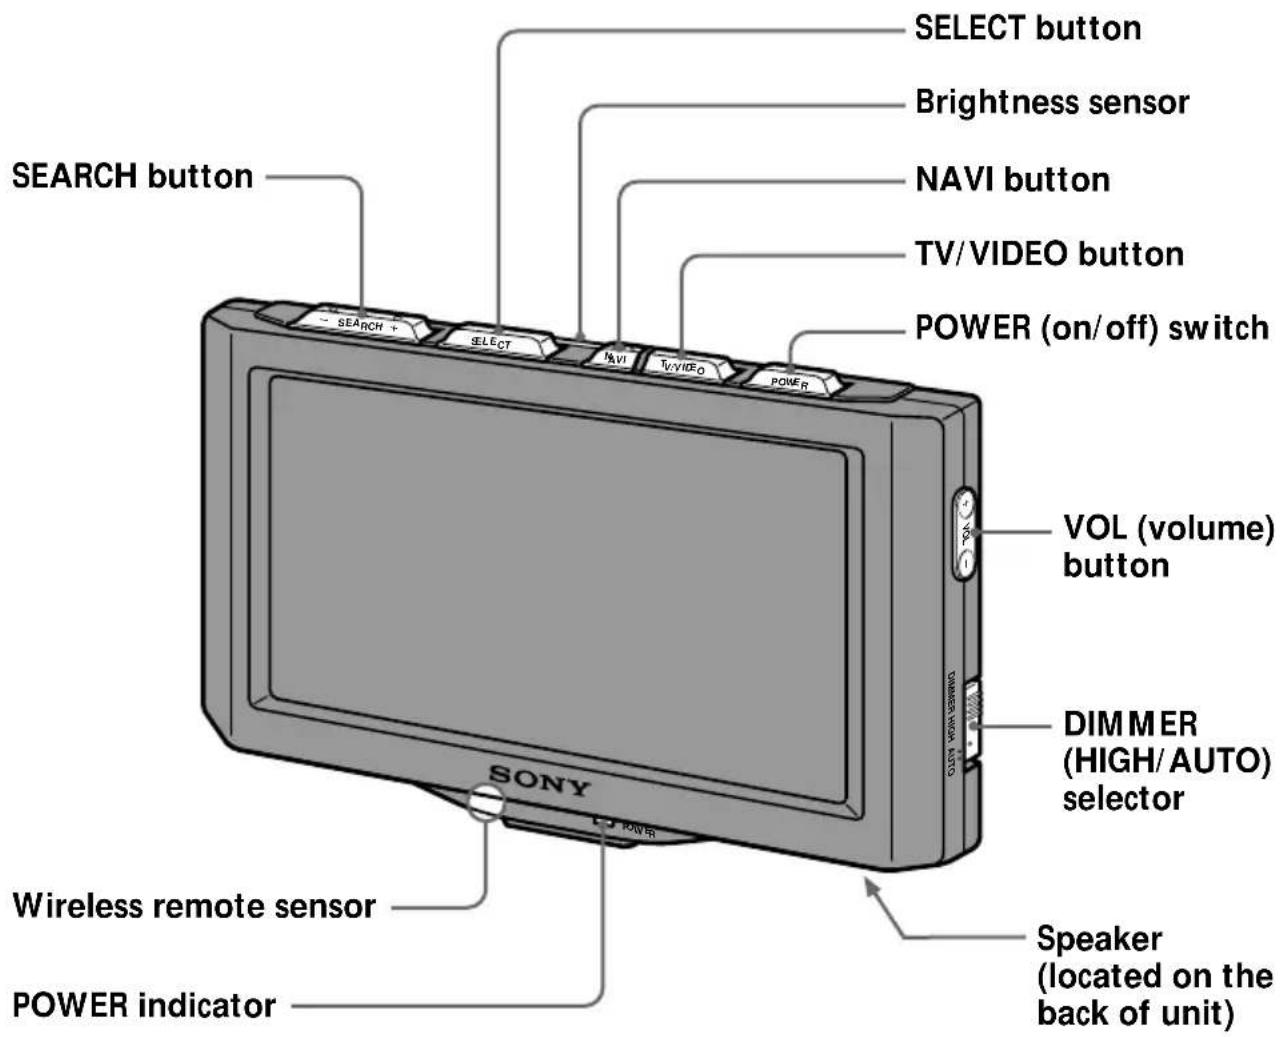
Location of Controls
Monitor
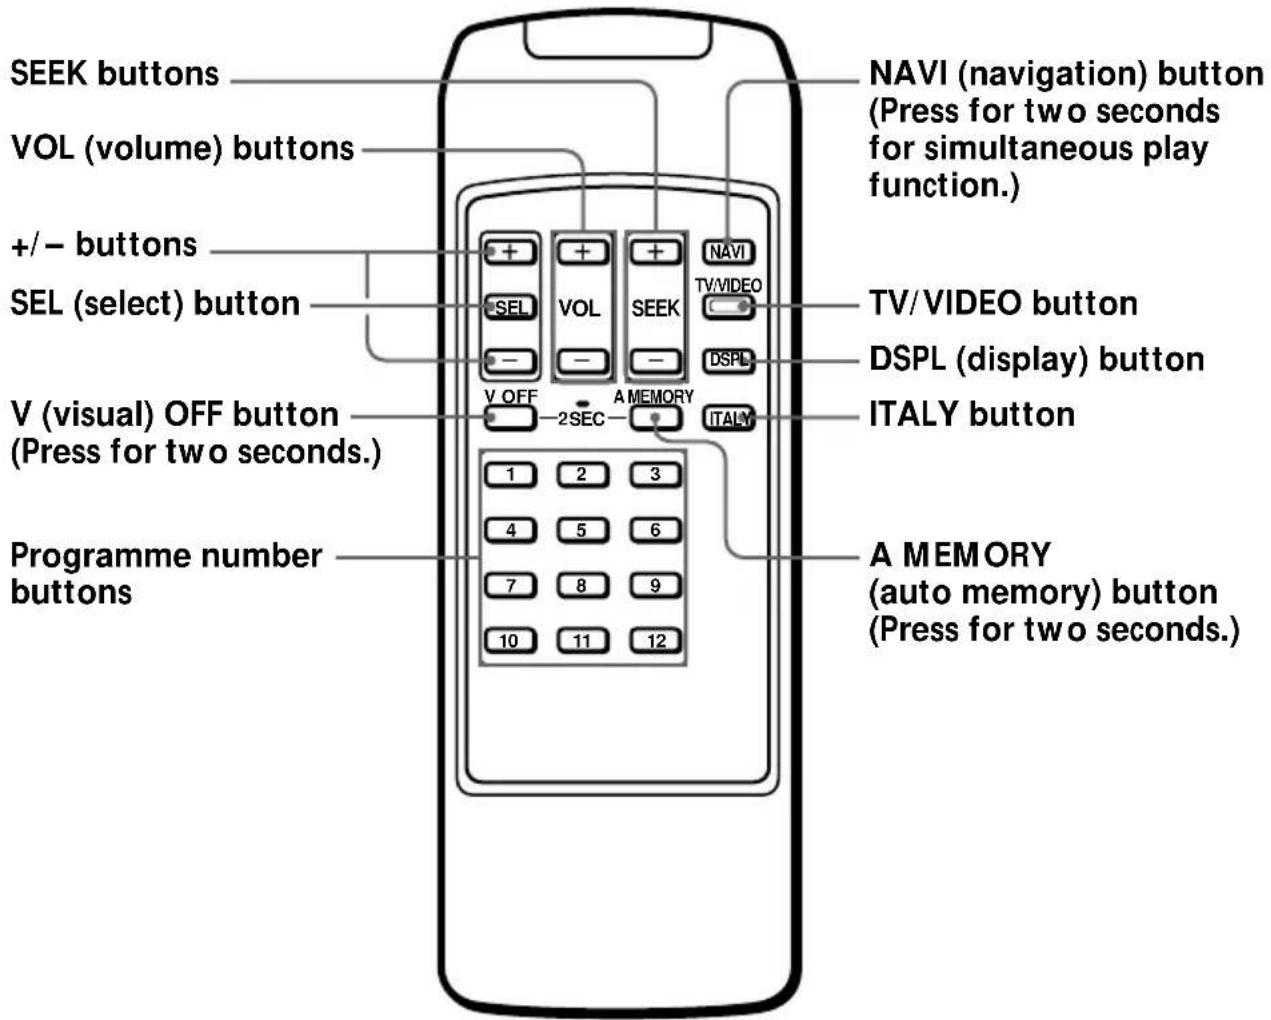
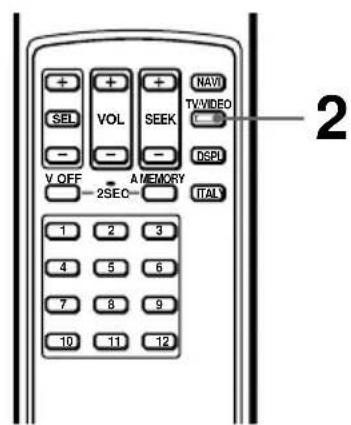
Wireless remote
Getting Started
Selecting a TV system (European model only)
Set the TV system selector on the side of the TV tuner unit, to the correct position for your area.
Areas except United Kingdom: set to 1 United Kingdom: set to 2
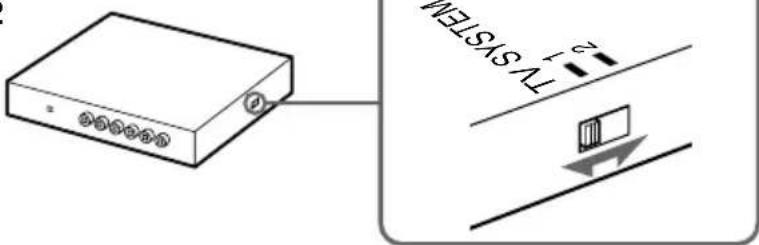
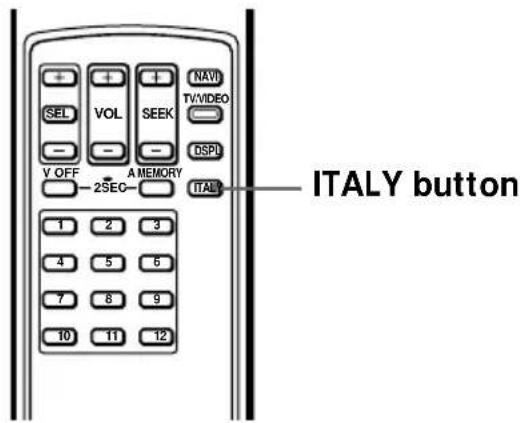
If you select TV system 1 on the TV tuner unit, press ITALY on the wireless remote. If the picture does not appear, press ITALY again.
When you select TV system 1, the TV programme numbers appear as follows:
VHF (Areas except Italy) VHF (Italy) UHF (Both areas)

When you select TV system 2, the TV programme numbers appear as follows:
UHF (United Kingdom)
Storing TV stations automatically
(Automatic memory function)
You can store up to 12 VHF/UHF stations.
VHF stations on programme numbers 2 through 12 are stored on the programme number buttons. UHF stations on programme numbers 21 through 69 (14 through 69 for USA) are stored in order after the stored VHF stations.
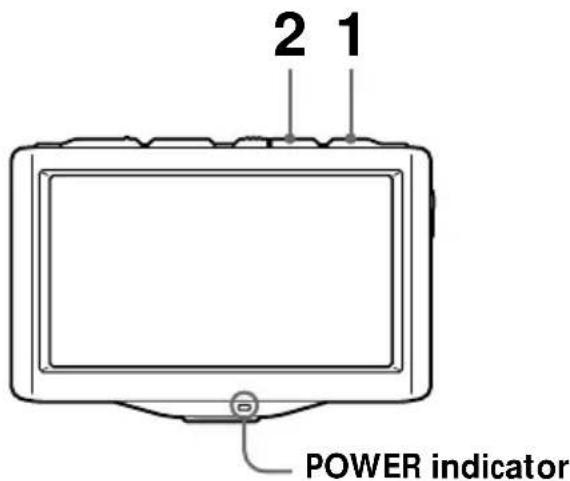
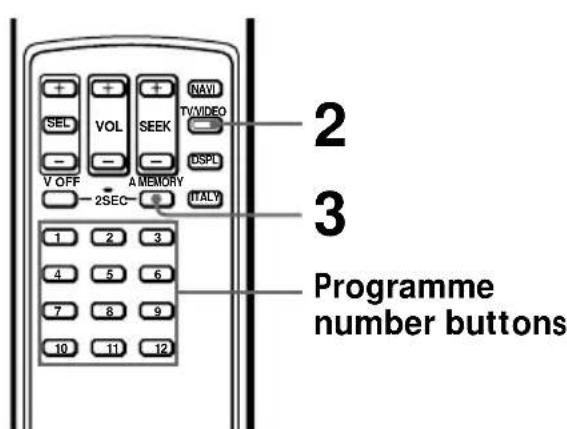
1 Press POWER on the TV.
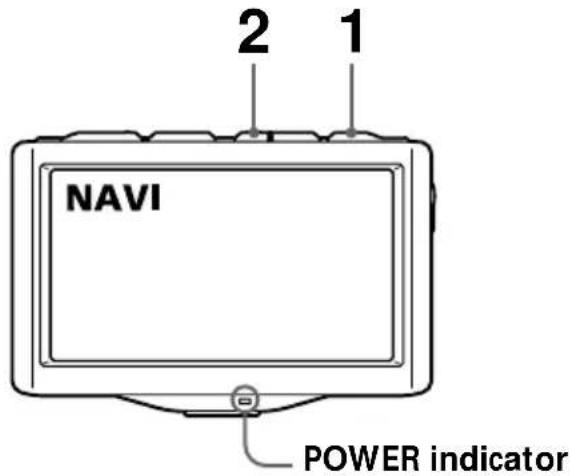
The POWER indicator lights up.
2 Press TV/VIDEO repeatedly until a TV programme appears on the display.
3 Press A MEMORY on the wireless remote for two seconds.
The wireless remote stores VHF stations on the programme number buttons corresponding to the VHF station numbers.
UHF stations are stored on the remaining programme number buttons in order.
Example
| Programme number button | 1 | 2 | 3 | 4 | 5 | 6 | 7 | 8 | 9 | 10 | 11 | 12 |
| VHF station | 13* | 2 | - | 4 | - | 6 | - | 8 | - | 10 | - | 12 |
| UHF station | 21 | - | 24 | - | 27 | - | 32 | - | 34 | - | 48 | - |
| For Italy | - | A | B | C | D | E | F | G | H | H1 | H2 | - |
* USA only
Watching a TV Programme
Note
The TV picture does not appear while the car is moving for safety reasons.
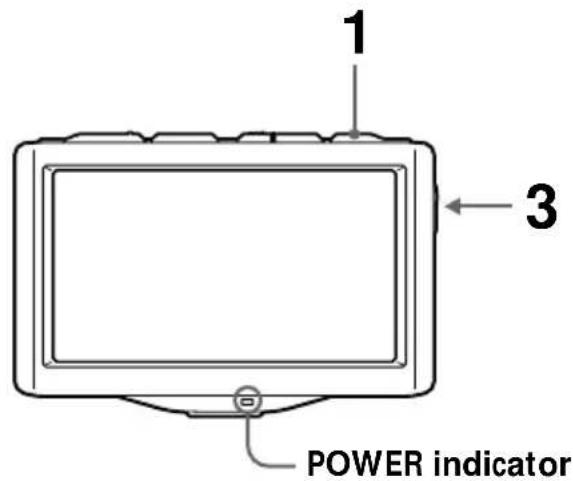
1 Press POWER.
The POWER indicator lights up.
2 Press the programme number buttons (1 through 12) to select the desired TV station.
The TV programme number appears for five seconds in the upper right corner of the display each time you select a station.
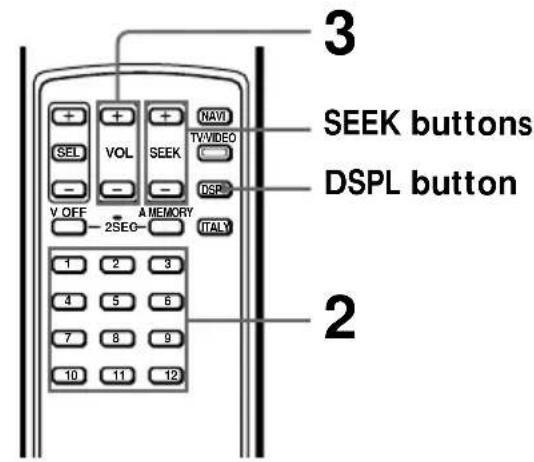
3 Adjust the volume.
Press VOL on the monitor, or on the wireless remote.
Turning on the on-screen display
Press DSPL.
To turn off the display, press it again.
Turning off the TV
Press POWER.
If you cannot receive the stored stations while traveling
Press SEEK momentarily to search for the station automatically. When the unit receives a station, it stops scanning. Press the button repeatedly until the desired station is received.
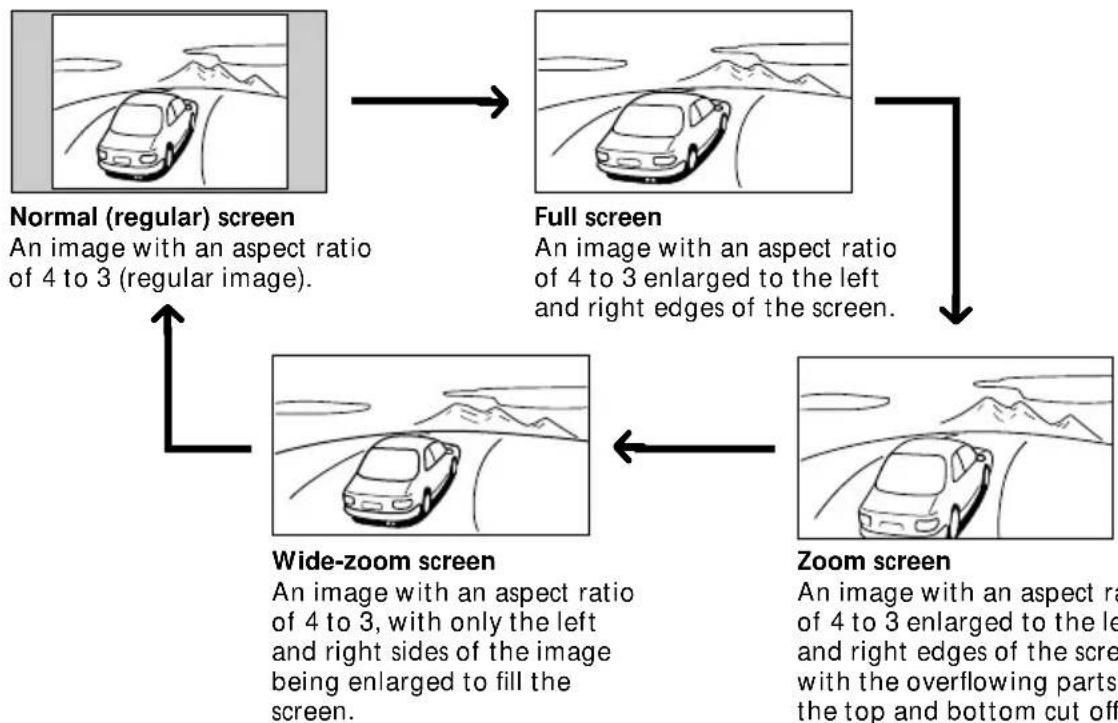
Viewing the Wide Screen
In addition to normal screen mode, full screen, zoom screen, and wide-zoom screen modes are also available.
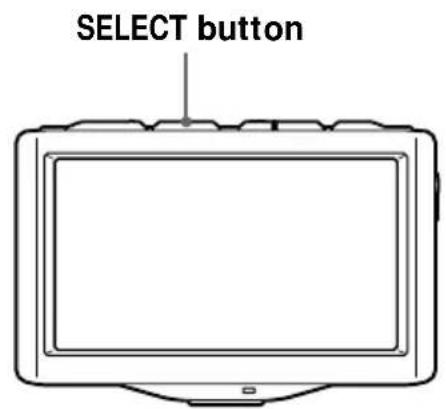
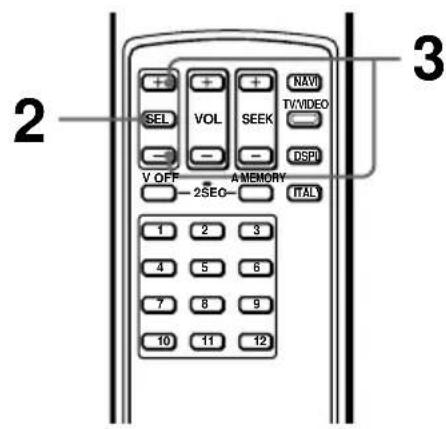
Press SELECT.
Pressing SELECT switches the screen mode in the following sequence:
flowchart
graph TD
    A["Normal (regular) screen\nAn image with an aspect ratio of 4 to 3 (regular image)."] --> B["Full screen\nAn image with an aspect ratio of 4 to 3 enlarged to the left and right edges of the screen."]
    B --> C["Zoom screen\nAn image with an aspect ratio of 4 to 3 enlarged to the left and right edges of the screen with the overflowing parts of the top and bottom cut off."]
    C --> D["Wide-zoom screen\nAn image with an aspect ratio of 4 to 3, with only the left and right sides of the image being enlarged to fill the screen."]
continued →
(Continued)
Tips
- With this operation:
— The wireless remote does not work.
— Beeps are deactivated.
— The screen size type is not displayed. - When you turn on the unit again, the screen mode is reset to full screen.
- Images may appear coarse-grained when viewed in the zoom screen mode.
- This unit is manufactured according to wide-zoom specifications for typical home-use wide TV sets.
- Changing the screen mode will also change the scale of the map screen on your navigation system.
Watching a Video
Note
The video picture does not appear while the car is moving for safety reasons.
You can watch video CDs and cassettes recorded in either the PAL or NTSC colour system (European model only). Make sure you have connected a video player to the TV tuner unit correctly. For details, see the Installation/Connections manual.
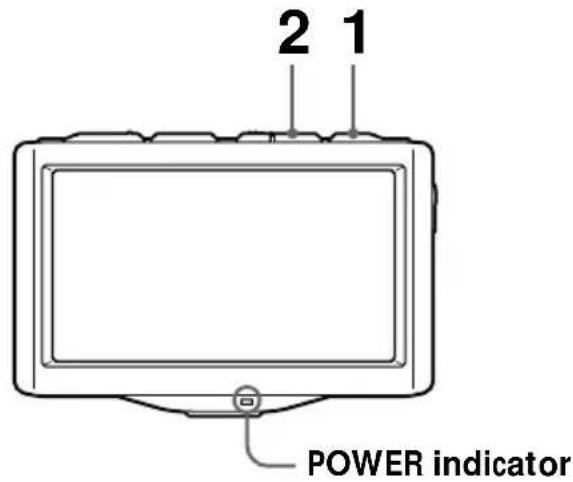
1 Press POWER.
The POWER indicator lights up.
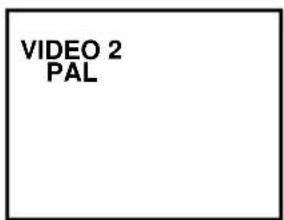
2 Press TV/VIDEO to select the input you connected the video player to, VIDEO 1 or VIDEO 2.
Each time you press TV/VIDEO, the indication changes as follows:
TV programme number → VIDEO 1 → VIDEO 2
3 Turn the video player on and begin playback.
The unit displays PAL or NTSC colour system video pictures and the following display appears for five seconds (European model only).
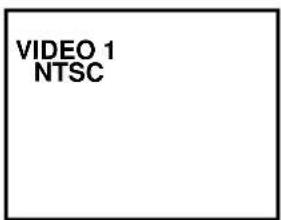
PAL VideoNTSC Video
Listening to the TV/video Sound with the Picture Off (Visual off function)
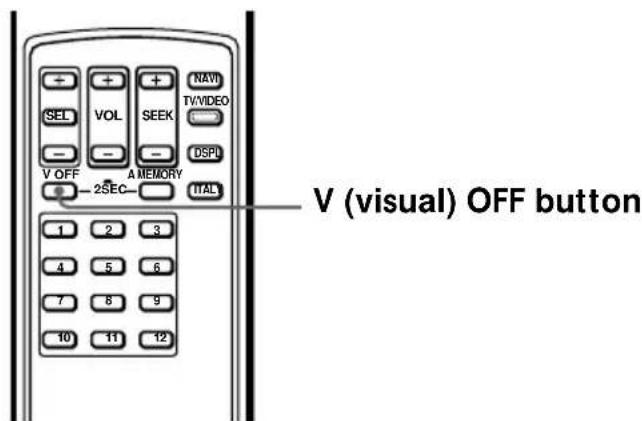
Press V OFF for two seconds.
You only hear the sound of the selected programme.
To cancel the visual off function, press V OFF again. If you turn the unit off or turn the ignition switch to the OFF position, the visual off function will be cancelled.
The visual off function is also canceled when you select another TV programme with the programme number buttons (TV only).
When the visual off function is canceled, the screen mode returns to "Full screen."
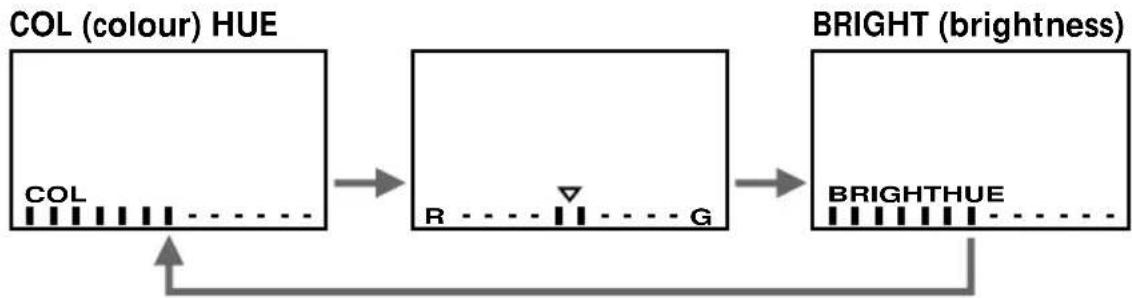
Adjusting the Picture
You can adjust the colour, hue and brightness of the picture.
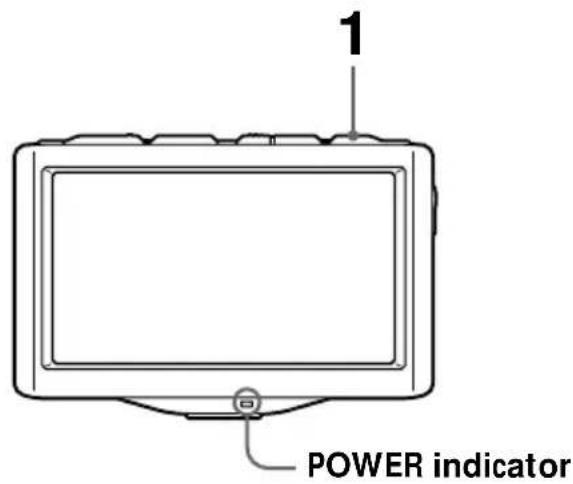
1 Press POWER.
The POWER indicator lights up.
2 Press SEL.
Each time you press SEL, the items change as follows:
flowchart
graph LR
    A["COL (colour) HUE"] --> B["R"]
    B --> C["BRIGHT (brightness)"]
    C --> D["BRIGHTHUE"]
    style A fill:#f9f,stroke:#333
    style B fill:#ccf,stroke:#333
    style C fill:#cfc,stroke:#333
Note
You do not need to adjust HUE when watching a TV programme or playing back PAL video sources. When you press SEL, only COL and BRIGHT appear (European model only).
3 Press either SEL + or - to adjust.
Press one of these buttons within five seconds. The item will be cancelled after five seconds if you do not touch the (+) or (-).
| Colour | Hue | Brightness | |
| (+) | For more colour intensity | To make the picture greenish | To brighten the picture |
| For less colour intensity | To make the picture reddish | To darken the picture |
(Continued)
Tips
- To restore the factory settings, press SEL for more than two seconds. VISUAL STD (standard) appears.
- When the picture is too dark or too bright from the viewing position, press SEL to select BRIGHT and press + or -.
Adjusting the Screen Brightness (Auto bright control)
Depending on the surrounding light, you can adjust the screen brightness by controlling the brightness of the fluorescent pipe installed in the liquid crystal panel.
Change the DIMMER selector located on the side of the monitor to HIGH or AUTO.
Side of the monitor
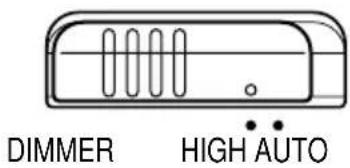
HIGH: Increases the screen brightness.
AUTO: The unit responds to the surrounding light and adjusts the screen brightness automatically (auto bright control).
Notes
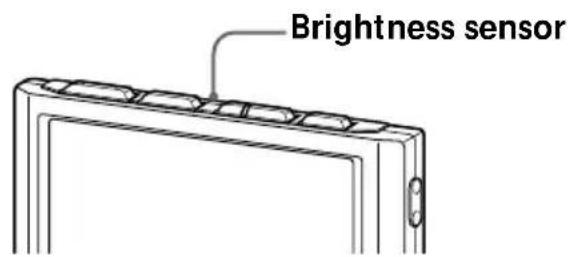
- Do not cover the brightness sensor. If you cover the sensor, the auto bright control will not work.
- The HIGH setting may make the screen look dazzling to your eyes in the nighttime. Driving immediately after viewing the screen could be dangerous; wait for your eyes to get accustomed to the surround light before driving.
Using the Navigation System
You can display navigation information by connecting an optional navigation system.
1 Press POWER.
The POWER indicator lights up.
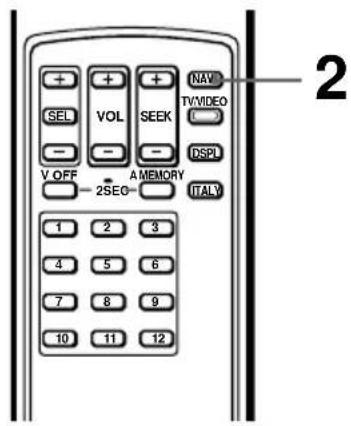
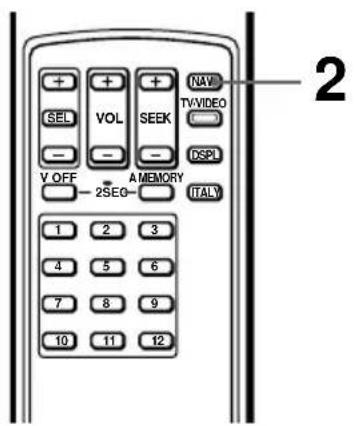
2 Press NAVI momentarily.
NAVI appears for five seconds in the upper left corner of the screen.
Note
As of May 2001, the Sony navigation system will be not available.
Listening to the TV/video Sound while Using the Navigation System (Simultaneous play function)
You can listen to the TV or video sound even while the navigation system is on.
1 Press POWER and select a TV programme, or select VIDEO 1 or VIDEO 2 and begin video playback.
2 Press NAVI for two seconds.
The navigation display appears, and the sound of the selected TV programme or video is heard.
Listening to another TV programme
Press a programme number button or SEEK.
Changing to the TV or video screen
Press TV/VIDEO.
Canceling the simultaneous play function
To turn the TV or video sound off, press NAVI for two seconds.
Additional Information
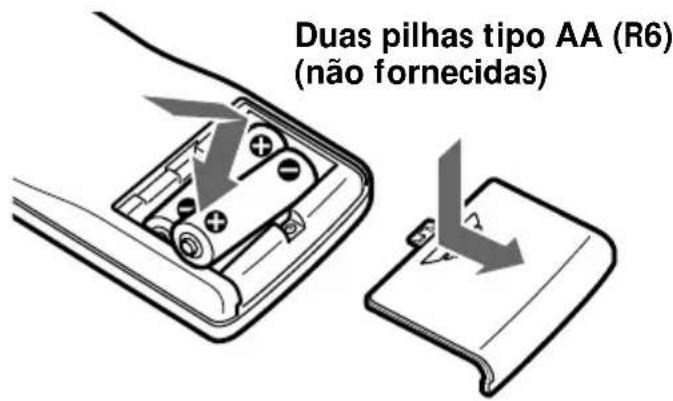
Installing the batteries
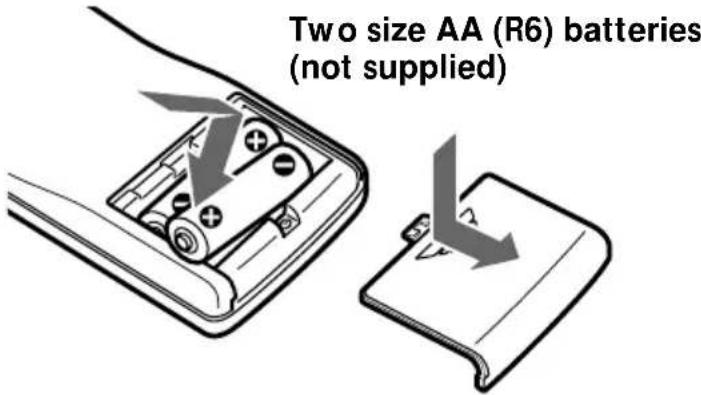
Battery life is about six months depending on the amount you use the wireless remote.
Notes on batteries
To avoid damage from battery leakage and subsequent corrosion:
— insert the batteries matching the “+” and “-” ends on the batteries to the “+” and “-” diagrams inside the battery compartment.
— do not use an old battery with a new one, or different types of batteries together.
— remove the batteries when you do not use the unit for a long period of time.
— do not charge the batteries.
If any battery leakage occurs, replace all the batteries with new ones after cleaning the battery compartment.
Notes on the wireless remote
- Do not leave the wireless remote near any heat sources, or in a place subject to direct sunlight (especially on the dashboard).
- When you park your car in direct sunlight, place the wireless remote in a location such as the glove-box, where it will not be subjected to direct sunlight.
About wireless radios and portable telephones
When you use a wireless radio or portable telephone near this unit, picture or sound interference may occur. Do not use such devices near this unit.
About the liquid crystal display (LCD) panel
- Do not press on the LCD panel on the monitor unit as doing so can distort the picture or cause a malfunction. The picture may become unclear, or the LCD panel may be damaged.
- Notes on cleaning
— Clean the LCD panel with a slightly damp soft cloth.
— Do not use solvents such as benzine, thinner, commercially available cleaners or antistatic spray. - Do not use this unit in temperatures under 5^ (41 °F) or over 45^ (113 °F).
- If your car was parked in a cold or hot place, the picture may not be clear. The monitor is not damaged. The picture will become clear after the temperature in your car becomes normal.
Some stationary blue or red dots may appear on the monitor. These are called bright spots, and can happen with any LCD. The LCD panel is highly sophisticated, and more than 99.99 % of the segments used in the panel are flawless. However, there is a possibility that less than 0.01 % of the segments are defective and may not light up properly. However, these segments will not interfere with your viewing.
Specifications
Monitor
System Liquid crystal colour display
Display Transparent TN LCD panel
Drive system TFT active matrix system
Picture size 154.1 · 87.0 mm, 177 mm
(6^1/8·3^1/2in.,7in.)
(w · h, diagonally)
Picture segment
336,960 (w 1440 · h 234)
Speaker type
36 mm (1^7/_16 in.)
dynamic speaker
Power requirements
12 V DC car battery
(negative earth)
Current drain Approx. 1.0 A
Dimensions
Operating temperature
+5^ +45^
(41^ 113^)
Mass Approx. 450 g (1 lb.)
TV tuner unit
Television system
European model
CCIR B,G,I system
US model NTSC
Colour system
European model
TV: PAL
Video: PAL, NTSC
US model TV: NTSC
Video: NTSC
Channel converge
European model
VHF: CCIR 2 CH \~ 12 CH
ITALY A CH \~ H2 CH
UHF: 21 CH \~ 69 CH
(CCIR/ITALY)
UHF: B21 CH \~ B69 CH (UK)
US model VHF: 2 CH \~ 13 CH
UHF: 14 CH \~ 69 CH
Power requirements
12 V DC car battery
(negative earth)
Current drain Approx. 0.5 A
Output terminals
Video output: RCA pin 1 Vp-p, 75 ohm
Audio output: RCA pin -10 dBs, 10 kohm
Monitor output: Square 16 -pin (exclusive)
Input terminals
Video input (2 system):
RCA pin 1 Vp-p, 75 ohm
Audio input: RCA pin -10 dBs, 10 kohm
Aerial input (4 system):
mini plug
Navigation input:
Square 16-pin
(exclusive)
RCA pin:
Video 1 Vp-p, 75 ohm
Audio (monaural)
-10 dBs, 10 kohm
Approx. 3 m (9.8 ft.)
(including batteries)
TV aerial
Cord 5 m (16.4 ft.), 75 ohm
Supplied accessories
Wireless remote (1)
Power input cord (1)
Monitor cable (1)
TV aerial (1)
Parts for installation and
connections (1 set)
Mounting kit (1 set)
Design and specifications are subject to change without notice.
Troubleshooting Guide
| Problem | Cause/Solution |
| No picture, no sound | The power cord or battery has been disconnected.The fuse has blown.Press TV/VIDEO. |
| Good picture, but no sound | Press the + side of the volume button on the wireless remote, or on the monitor. |
| Dotted lines or stripes | This may be caused by local interference such as a car engine or motorcycle. Adjust the aerials for minimum interference. |
| The picture is blurred, or has double images or ghosts | Connect the aerials securely.This may be caused by reflections from nearby mountains or buildings. |
| No picture, or no sound when you connect the optional equipment | The cord has been disconnected. Connect the cord securely.Press TV/VIDEO. |
| Cannot select a channel or cannot view a TV programme | Select the TV. → Press TV/VIDEO and select the TV mode.The wireless remote batteries may be exhausted.Press A MEMORY button for two seconds. |
| Good sound but no picture | The visual off function is working.→ Press V OFF.Driving while the TV or video player is on. → For safety, the picture will not appear. |
| No response when pressing the buttons on the wireless remote | The wireless remote batteries may be exhausted. |
Willkommen!
natural_image
Mechanical assembly diagram showing a component with arrows indicating motion or force (no text or symbols)natural_image
Line drawing of a rectangular electronic device with ports and a label (no text or symbols on the device itself)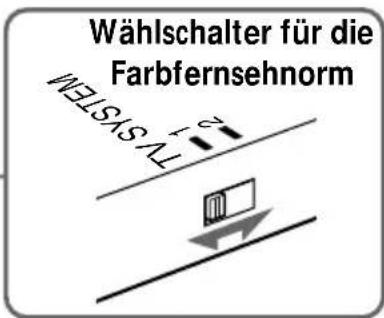
PICTURE OFF FOR YOUR SAFETY
Local dos controles 5
Como iniciar
PICTURE OFF FOR YOUR SAFETY
Instalando as pilhas