
MVC-FDR3 - Camera SONY - Free user manual and instructions
Find the device manual for free MVC-FDR3 SONY in PDF.


| Product Type | Digital Still Image Capture Adaptor |
| Model | MVC-FDR3 (NTSC) / MVC-FDR3E (PAL) |
| Storage Medium | 3.5-inch 2HD floppy disk (MS-DOS format, 1.44 MB) |
| Image Compression | JPEG (also BITMAP optional) |
| Image Size | 640 × 480 pixels (VGA) |
| LCD Screen | 2.5-inch TFT, 84,000 dots |
| Input/Output Connectors | S VIDEO (4-pin mini DIN), VIDEO (phono), CAMERA |
| Power Requirements | 8.4 V DC (AC adaptor) or 7.2 V (battery pack) |
| Power Consumption | 4.9 W (with LCD), 3.4 W (without LCD) |
| Battery Pack | InfoLITHIUM NP-F550, NP-F750, NP-F950 (not supplied) |
| Charging Time (NP-F550) | Normal: 150 min, Full: 210 min |
| Continuous Recording Time (NP-F550) | Approx. 100 min (with LCD) |
| Dimensions (W × H × D) | Approx. 130 × 50 × 165 mm (5 1/8 × 2 × 6 1/2 in) |
| Weight | Approx. 650 g (1 lb 23 oz) excluding floppy disk |
| Operating Temperature | 0 °C to 40 °C (32 °F to 104 °F) |
| Storage Temperature | -20 °C to 60 °C (-4 °F to 140 °F) |
| Supplied Accessories | Remote Commander, AC power adaptor, lithium battery, AC power cord, video cable |
| Main Functions | Record still images from TV/video/game, play back on TV or LCD, slide show, index view, image protection, delete, format disk |
| Recording Modes | STANDARD (approx. 20-30 images), FINE (approx. 10-15 images), BITMAP (1 image) |
| Cleaning | LCD: use LCD cleaning kit; casing: soft cloth with water; avoid solvents |
| Safety | Lithium battery caution; do not expose to rain/moisture; use only specified battery |
Frequently Asked Questions - MVC-FDR3 SONY
User questions about MVC-FDR3 SONY
0 question about this device. Answer the ones you know or ask your own.
Ask a new question about this device
Download the instructions for your Camera in PDF format for free! Find your manual MVC-FDR3 - SONY and take your electronic device back in hand. On this page are published all the documents necessary for the use of your device. MVC-FDR3 by SONY.
USER MANUAL MVC-FDR3 SONY
Digital Still Image Capture Adaptor
Operating Instructions ____ EN
natural_image
Line drawing of a vintage DVD player with open lid and control panel (no text or symbols on device)MVC-FDR1/FDR1E
MVC-FDR3/FDR3E
MaviCap
To prevent fire or shock hazard, do not expose the unit to rain or moisture.
For the Customers in the U.S.A. and CANADA
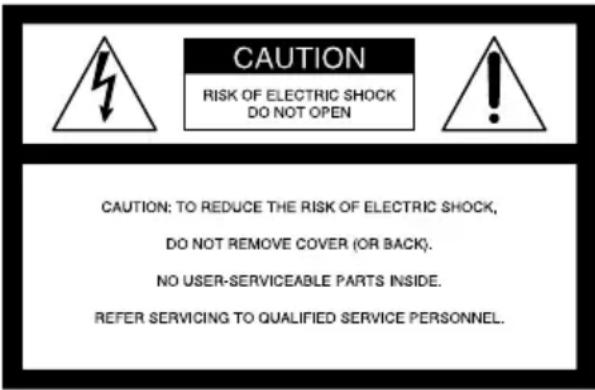
This symbol is intended to alert the user to the presence of uninsulated “dangerous voltage” within the product’s enclosure that may be of sufficient magnitude to constitute a risk of electric shock to persons.

This symbol is intended to alert the user to the presence of important operating and maintenance (servicing) instructions in the literature accompanying the appliance.
DISPOSAL OF LITHIUM ION BATTERY.
LITHIUM ION BATTERY. DISPOSE OF PROPERLY.
You can return your unwanted lithium ion batteries to your nearest Sony Service Center or Factory Service Center.
Note: In some areas the disposal of lithium ion batteries in household or business trash may be prohibited.
For the Sony Service Center nearest you call 1-800-222-SONY (United States only)
For the Sony Factory Service Center nearest you call 416-499-SONY (Canada only)
Caution: Do not handle damaged or leaking lithium ion battery.
CAUTION
TO PREVENT ELECTRIC SHOCK, MATCH WIDE BLADE OF PLUG TO WIDE SLOT. FULLY INSERT.
You are cautioned that any changes or modifications not expressly approved in this manual could void your authority to operate this equipment.
Note:
This equipment has been tested and found to comply with the limits for a Class B digital device, pursuant to Part 15 of the FCC Rules. These limits are designed to provide reasonable protection against harmful interference in a residential installation. This equipment generates, uses, and can radiate radio frequency energy and, if not installed and used in accordance with the instructions, may cause harmful interference to radio communications. However, there is no guarantee that interference will not occur in a particular installation. If this equipment does cause harmful interference to radio or television reception, which can be determined by turning the equipment off and on, the user is encouraged to try to correct the interference by one or more of the following measures:
– Reorient or relocate the receiving antenna.
- Increase the separation between the equipment and receiver.
- Connect the equipment into an outlet on a circuit different from that to which the receiver is connected.
- Consult the dealer or an experienced radio/TV technician for help.
Owner's Record
The model and serial number are located on the inside of the front shell. Record the serial number in the space provided below.
Refer to these numbers whenever you call upon your Sony dealer regarding this product.
Model No. ____ Serial No. ____
NOTICE FOR THE CUSTOMERS IN THE UNITED KINGDOM
A moulded plug complying with BS 1363 is fitted to this equipment for your safety and convenience.
Should the fuse in the plug supplied need to be replaced, a 5 AMP fuse approved by ASTA or BSI to BS 1362, (i.e., marked with Ⓧ or ⬇ mark) must be used.
If the plug supplied with this equipment has a detachable fuse cover, be sure to attach the fuse cover after you change the fuse. Never use the plug without the fuse cover. If you should lose the fuse cover, please contact your nearest Sony service station.
ATTENTION:
The electromagnetic fields at the specific frequencies may influence the picture of this unit.
Table of contents
Before using the image capture adaptor .. 4
Preparation 7
1 Connect to the TV....7
2 Turn on the power 7
3 Insert the floppy disk until it clicks 8
Setting the date and time 9
Recording images 11
Connection 11
Recording 12
Viewing images 16
Playing back six images at a time (INDEX screen) 17
Viewing images using a personal computer 18
Changing the mode settings 20
Using the battery pack 23
Changing the lithium battery 26
Precautions 28
Troubleshooting.... 29
Self-diagnosis display 30
Specifications 31
Parts identifications 32
Index 35
Before using the image capture adaptor
This digital still image capture adaptor uses a floppy disk to store the images.
Use the following floppy disk type.
- Size: 3.5-inch
- Type: 2HD
- Capacity: 1.44 MB
- Format: MS-DOS format (512 bytes · 18 sector)
If you use a 3.5-inch 2HD floppy disk other than described above, format it using this unit or a personal computer.
Be sure to read before using the image capture adaptor
Image recording format on this image capture adaptor
The image data recorded with this image capture adaptor is compressed and recorded in JPEG format. Extension of the file is ".JPG". For details, see page 19.
Precaution on copyright
Television programs, films, video tapes, floppy disk, and other materials may be copyrighted. Unauthorized recording of such materials may be contrary to the provision of the copyright laws.
Notes on the Operating Instructions
- The instructions in this operating instructions are for the four models listed below. Before you start reading this operating instructions and operating the unit, check the model number by looking at the bottom of the image capture adaptor.
- The MVC-FDR3/FDR3E is the model used for illustration purposes. Otherwise, the model name is indicated in the illustrations. Any differences in operation are clearly indicated in the text, for example, “MVC-FDR3/FDR3E only.”
As you read through this manual, buttons and settings on the image capture adaptor are shown in capital letters.
e.g., Press REC.
Types of differences
Model number MVC-FDR1 MVC-FDR1E MVC-FDR3 MVC-FDR3E
LCD screen No No Yes Yes
TV color system NTSC PAL NTSC PAL
Power sources
You can use your digital still image capture adaptor in any country or area with the supplied AC power adaptor within 100 V to 240 V AC, 50/60 Hz.
Use a commercially available AC plug adaptor [a], if necessary, depending on the design of the wall outlet [b].

flowchart
graph LR
    A["AC power adaptor (supplied)"] --> B["Plug"]
    B --> C["Plug (a)"]
    C --> D[" socket (b)"]
Note on TV color systems
TV color systems differ from country to country.
MVC-FDR1/FDR3 is an NTSC system image capture adaptor.
MVC-FDR1E/FDR3E is a PAL system image capture adaptor.
To record TV programs, etc., or to view the image on a TV, use a correct color system TV.
Check the following list.
NTSC system
Bahama Islands, Bolivia, Canada, Central America, Chile, Colombia, Ecuador, Jamaica, Japan, Korea, Mexico, Peru, Surinam, Taiwan, the Philippines, the U.S.A., Venezuela, etc.
PAL system
Australia, Austria, Belgium, China, Czech Republic, Denmark, Finland, Germany, Great Britain, Holland, Hong Kong, Italy, Kuwait, Malaysia, New Zealand, Norway, Portugal, Singapore, Slovak Republic, Spain, Sweden, Switzerland, Thailand, etc.
PAL-M system
Brazil
PAL-N system
Argentina, Paraguay, Uruguay
SECAM system\*
Bulgaria, France, Guiana, Hungary, Iran, Iraq, Monaco, Poland, Russia, Ukraine, etc.
* If your TV color system is SECAM, set the monitor image select switch to the SOURCE position as described on page 15.
Precautions
Do not shake or strike the image capture adaptor
Malfunctions, inability to record images or to use floppy disks, image and memory data breakdown, damage or loss may occur.
Do not get the image capture adaptor wet
If moisture condensation occurs, refer to "Precautions" on page 28 and follow instructions on how to remove the condensation before using.
Back up recommendations
To avoid the potential risk of data loss always copy (back up) data to a disk.
Preparation
1 Connect to the TV.
To view the image recorded on a floppy disk and/or the on-screen display, connect the TV as shown below. You can view higher quality images with S video cable connection.
For MVC-FDR3/FDR3E only
You can view the image on the LCD screen instead of connecting the unit to the TV.

flowchart
graph LR
    A["LCD lock release button"] --> B["S VIDEO OUT"]
    B --> C["S VIDEO cable (not supplied)"]
    C --> D["VIDEO IN"]
    D --> E["INPUT: S VIDEO"]
    D --> F["VIDEO IN"]
    G["VIDEO OUT"] --> B
    H["VIDEO cable (supplied)"] --> C
    I["Signal flow"] --> J["Computer"]
EN
2 Turn on the power.
In advance:
For MVC-FDR1/FDR1E Turn on the TV and set the TV/VCR selector on the TV to VCR.
For MVC-FDR3/FDR3E Press the LCD lock release button and open the LCD panel.
(1) Connect the AC power adaptor to the power cord and to the image capture adaptor.


(2) Connect the power cord to the wall outlet.
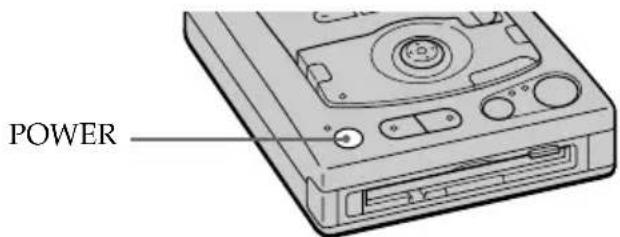
(3) Press POWER.
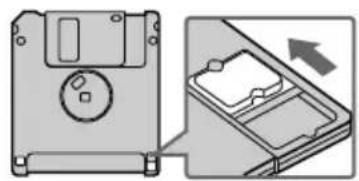
3 Insert the floppy disk until it clicks.
Before inserting, check that the write protect tab is set to the recordable position.
To view the image, see page 16.
Slide the tab to shut the opening.
natural_image
Diagram showing a floppy disk with a circular slot and an open lid, alongside a magnified view of the internal portion (no text or symbols)
To eject the floppy disk
Press the floppy disk eject button.
Using the control button
You can select an item in the menu which appears on the LCD screen by pressing the upper, lower, left or right side of the control button. When an item is selected, the color of the item changes from blue to yellow. To enter your selection, press the center of the control button.

Setting the date and time
To store the file in the MS-DOS system, you need to set the date and time. Otherwise, the file will be stored with wrong date and time, and the CLOCK SET menu will appear each time you turn on the power.
When you use the image capture adaptor for the first time
Since the CLOCK SET menu appears when you turn on the power, skip steps (2) and (3) below.
(1) Press POWER to turn on the power.
If the “ ☆ ” indicator appears on the LCD screen, replace the lithium battery according to the procedures on page 26.
(2) Select "MENU" with the control button, then press it.
The menu appears on the LCD screen.
To cancel menu screen, select "→RETURN" with the control button, then press it.

(3) Select "CLOCK SET" with the control button, then press it.

(4) Select the desired display of the date with the control button, then press it.
Y/M/D (year/month/day)
M/D/Y (month/day/year)
D/M/Y (day/month/year)
Continued to the next page
(5) Select the date and time with the control button, then press it.
The item to be changed is indicated with ▲/▼.
Select number by pressing the upper side or lower side of the control button, then press it to enter the number.
After entering the number, ▲/▼ moves to the next item.
When you selected "D/M/Y," set the time on a 12-hour cycle.
12:00 AM stands for midnight.
12:00 PM stands for noon.

(6) Select "ENTER" with the control button, then press it to start the clock.
To cancel setting the date and time
Select "CANCEL" with the control button, then press it.
Recording images
You can record images from TV, video equipment, video game, etc., on a floppy disk in the form of a still image.
Connection
Connect the source to be recorded as shown below. Then, turn on the power and insert the floppy disk (p. 7 - 8).
You can record higher quality images with S video cable connection.
For MVC-FDR1/FDR1E:
If you want to check the image during recording, connect the TV as shown on page 7 in addition to the below connection.

Recording
(1) Press STANDBY. The STANDBY lamp lights up.

(2) Start playing back the source to be recorded. The image from the TV or video equipment appears on the LCD screen.
(3) Press MEMORY when you want to record. The captured image becomes still. [MEMORY] appears on the LCD screen and the MEMORY lamp lights up.

(4) Press REC. The captured image is recorded on the floppy disk. During recording, the REC lamp flashes, "RECORDING" appears and the remaining disk capacity indicator appears on the LCD screen.

Note When the REC lamp is flashing, be sure not to shake or strike the unit. Do not press the floppy disk eject button, turn off the power or disconnect the power source.
If you don't want to record the captured image in step 3
Press MEMORY again. [MEMORY] disappears and the image being played back appears on the LCD screen.
If the captured image is blurred in step 3
Press FIELD/FRAME repeatedly until FIELD appears. Then press REC (step 4). Normally record in the FRAME mode so that you can record fine images. To select the FRAME mode, press FIELD/FRAME repeatedly until FRAME appears.
The number of images you can record on a floppy disk
The number of images you can record is different depending on image quality and subject complexity.
Image quality MVC-FDR1/FDR1E MVC-FDR3/FDR3E
STANDARD: about 30 - 40 images about 20 - 30 images
FINE: about 15 – 20 images about 10 – 15 images
BITMAP: 1 image 1 image
Change the disk when the remaining disk capacity indicator is empty and flashes. The image quality is set to FINE and BITMAP is set to OFF at the factory. You can change the image quality and BITMAP in the menu (page 20).
Note
If you attempt to record more than 55 images, “DISC FULL” appears on the LCD screen and you cannot record the image even when the remaining disc capacity indicator is not empty.
By connecting the Sony Color Video Camera CCD-Z7/Z7E
The specially designed Sony Color Video Camera CCD-Z7/Z7E is available to use with the unit.
You can take a picture using the camera and record it on the floppy disk in the unit. Refer to the operating instructions of the camera for further information.

natural_image
Illustration of a camera and its optical device (no text or symbols on the devices themselves)If two or three source units are connected
The signal input to the CAMERA jack has priority, followed by the S VIDEO jack, and then the VIDEO jack.
If a camera is connected, only the image from the camera appears.
If both the S VIDEO and VIDEO jacks are connected to video equipment, only the image from the S VIDEO jack appears.
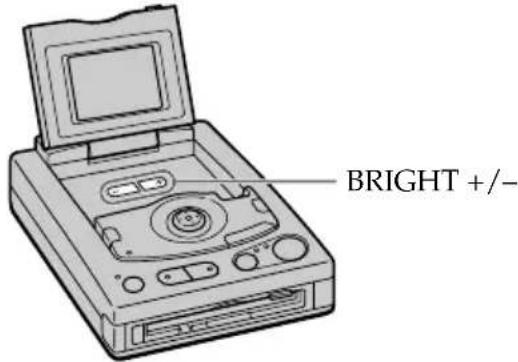
Adjusting the brightness of the LCD screen (MVC-FDR3/FDR3E only)
Press the BRIGHT +/- buttons.
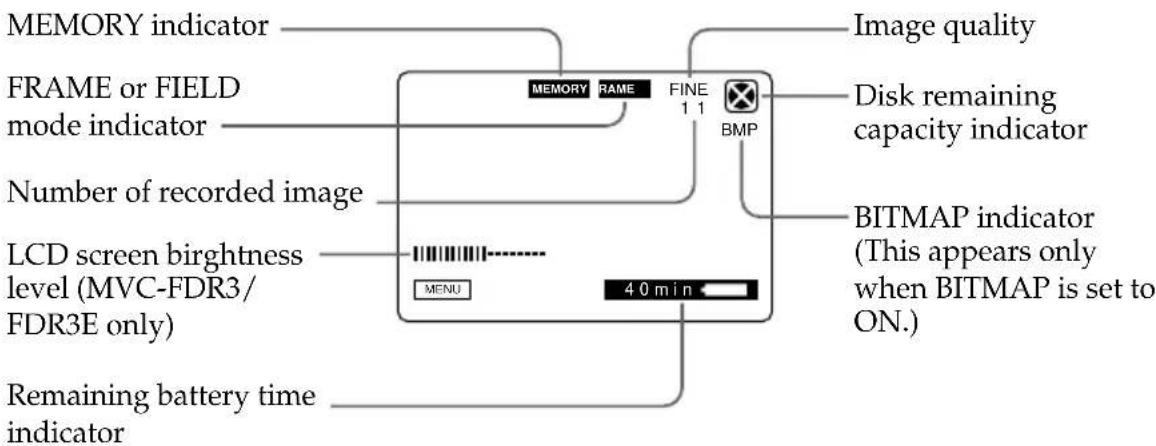
The indicators during recording
The indicators are not recorded.
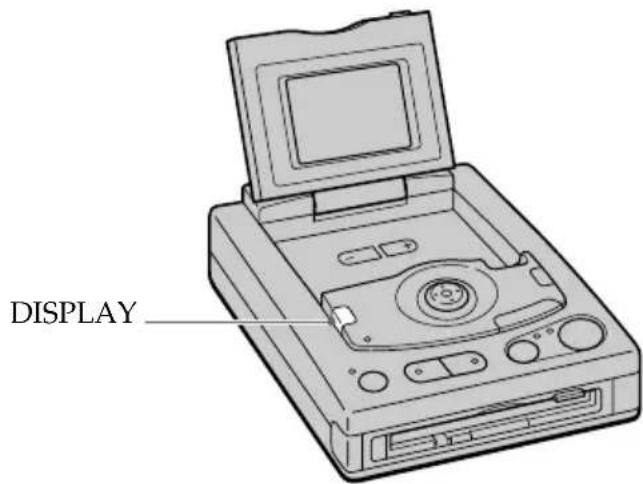
To turn off the indicators
Press DISPLAY.
If noise or black stripes appear on the image
(1) Set the monitor image select switch to the SOURCE position.

(2) Check the connection:
- If you connect the source to be recorded to the CAMERA or VIDEO IN jack, connect the TV to the VIDEO OUT jack. You cannot view the image if the TV is connected to the S VIDEO OUT jack.
- If you connect the source to be recorded to the S VIDEO IN jack, connect the TV to the S VIDEO OUT jack. You cannot view the image if the TV is connected to the VIDEO OUT jack.
Note
No on-screen display appears even if you press the DISPLAY button. However, you can display the menu by pressing the control button instead of by selecting MENU on the screen. The menu appears with a blue background.
Viewing images
You can view the still images recorded using this unit or a digital still camera on the LCD screen (MVC-FDR3/FDR3E only) or the TV. You can also play back six images at a time from the floppy disk (INDEX screen).
To view on the TV, connect the TV as shown on page 7.
Turn on the power and insert the floppy disk.

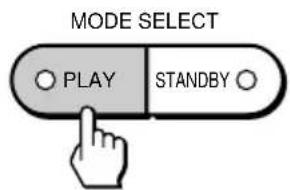
(1) Press PLAY.
The PLAY lamp lights up.
(2) To display the preceding image, select “◀” with the control button, then press it.
To display the next image, select “▶” with the control button, then press it. When the indicators on the LCD screen are not displayed, press the left or right side of the control button, or press ◀ or ▶ of the Remote Commander, to display the preceding or next image.
Note
When the ACCESS lamp is flashing, be sure not to shake or strike the unit. Do not turn the power off or disconnect the power source.
The indicators during playback
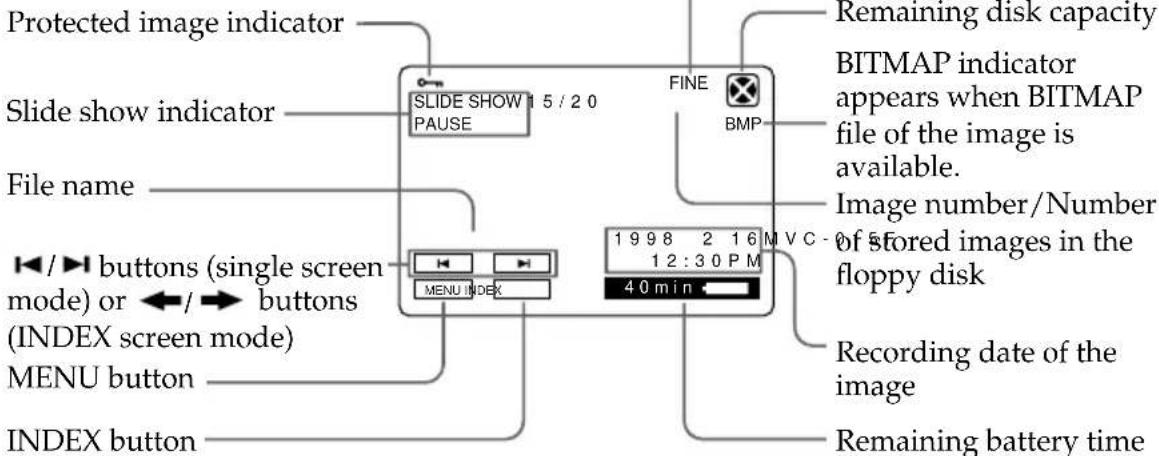
To turn off the indicators
Press DISPLAY.
Playing back six images at a time (INDEX screen)
Select "INDEX" with the control button, then press it.
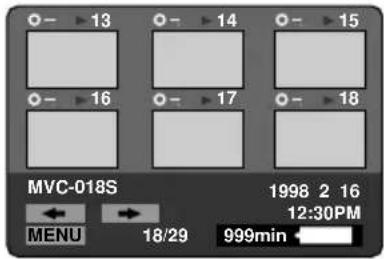
The ▶ mark appears on the image that is displayed before changing to INDEX screen mode.
- To display the following 6 images, select “→” with the control button, then press it.
- To display the preceding 6 images, select “◀” with the control button, then press it.
- To return to the normal playback screen (SINGLE screen), select an image with the control button, then press it.
- The number displayed at the upper right side of the image shows the recording order on the disk. It is different from the file number (p. 19).
Adjusting the brightness of the LCD screen (MVC-FDR3/FDR3E only)
Press the BRIGHT +/- buttons.

Viewing images using a personal computer
The image data recorded with this unit is compressed and stored in JPEG format. If BITMAT is set to ON in the menu when you record the image, the data is stored also in BITMAP format.
This data can be viewed using a personal computer which has the JPEG or BITMAP view ability application installed. For detailed procedures using image data with an application, refer to the application instruction manual.

Example: personal computer with Windows 95 installed
(1) Start up Windows 95 and insert the floppy disk into the disk drive of the personal computer.
(2) Open "My computer" and double-click "3.5 inch FD".
(3) Double-click the desired data file.
Image file
File name and extension
The images recorded on this unit are given the file names "MVC-xxxF" or "MVC-xxxS." "xxx" stands for a number between 001 to 999.
“F” stands for FINE and is given when the picture quality is set to FINE in the menu.
"S" stands for STANDARD and is given when the picture quality is set to STANDARD in the menu.
The extension is "BMP" or "JPG."
"BMP" is given to the BITMAP file* recorded when the BITMAP is set to "ON" in the menu.
"JPG" is given to the image data compressed in JPEG format.
When the unit records the images with either of the above extensions, the extension "411" for index screen is recorded automatically at the same time. You can display this index screen data only on this unit.
Example
MVC-001S.BMP Image file (recorded as BITMAP file)
MVC-001S.JPG Image file (compressed and recorded in JPEG format)
MVC-001S.411 Index screen data of MVC-001S
* When the image recorded as a BITMAP file, it is recorded also in JPEG format.
Number of the file name
The number of the file name is reset to "001" each time you change the floppy disk. If the floppy disk already has image files recorded, the file number starts from the number following the last file number.
If you want to continue to number the files sequentially in a new floppy disk, set FILE NUMBER to SERIES in the menu.
Recommended OS/applications example
OS
- Windows 3.1
- Windows 95 or later
Applications
- Microsoft Internet Explorer etc.
Note
For Macintosh, you can use the floppy disk recorded with this unit using the PC Exchange with Mac OS system 7.5 or higher. A viewing application for Macintosh is also necessary to view images.
Changing the mode settings
(1) Select MENU with the control button, then press it.
The menu appears.
STANDBY mode PLAY mode
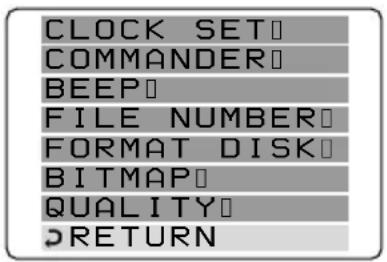

(2) Select the desired item with the control button, then press it.
The selected item changes from blue to yellow. When the control button is pressed, only the item is left on the screen.
(3) Change the setting with the control button, then press it.
When the setting is finished, the menu screen disappears.
To cancel changing the mode settings
Select "RETURN" or "CANCEL" with the control button, then press it. The screen returns to the menu screen. To turn off the menu screen, select "RETURN" with the control button, then press it.
Setting the mode of each item
The unit is set to the settings marked with * (asterisk) at the factory.
Items for both STANDBY and PLAY modes
CLOCK SET
Select this item to set the date and time. See page 9.
COMMANDER
- Select ON when using the supplied Remote Commander.
- Select OFF if the unit operates incorrectly when using a Remote Commander of other equipment. You cannot use the supplied Remote Commander when OFF is selected.
BEEP
- Select ON so that beeps sound when you press the buttons.
- Select OFF to turn the beep sound off.
Items in STANDBY mode only
FILE NUMBER
- Select SERIES to continue to number the image files sequentially from one floppy disks to another.
- Select NORMAL to number the image files from 001 in each floppy disk.
Notes on the SERIES setting
- The image files are numbered up to 999 irrespective of turning the power on/off.
- If you record the files with file numbers exceeding 900 and eject the floppy disk, the file number is reset to 001. The file number starts from 001 in the new floppy disk. If the floppy disk already has image files recorded, the file number starts from the number following the last file number.
BITMAP
- Select ON to record the image as a BITMAP file. The image is not compressed and therefore the data is large. The file extension is "BMP."
- Select OFF not to record the image as a BITMAP file.
If you set BITMAP to ON
- When the image recorded as a BITMAP file, it is recorded also in JPEG format with the extension "JPG."
- You cannot play back the BITMAP file with this unit. The unit displays the image recorded in JPEG format instead of the BITMAP file.
- You can record only one image as a BITMAP file with this unit.
QUALITY
- Select STANDARD to record an image in standard quality.
- Select FINE to record a image in high quality.
See page 13 for the number of recordable images in each mode.
Items in PLAY mode only
SLIDE SHOW <20 S/10 S/5 S/NORMAL PLAY\*>
You can play back all images in the floppy disk in a continuous loop.
- Select 20 S to play back images with 20-second intervals.
- Select 10 S to play back images with 10-second intervals.
- Select 5 S to play back images with 5-second intervals.
- Select NORMAL PLAY to cancel SLIDE SHOW playback.
To start SLIDE SHOW playback, select ▶ on the screen with the control button and press it. To pause the playback, select ■ with the control button and press it.
On the Remote Commander, press ▶/■ to start SLIDE SHOW and press ▶/■ again to pause the playback. You can start and pause the playback by pressing ▶/■ repeatedly.
To return to normal playback, select NORMAL PLAY.
Continued to the next page
FORMAT DISK
- Select OK to format floppy disks.
- Select CANCEL to cancel formatting.
Formatting erases all information on the floppy disk, including the protected image data. Check the contents of the disk before formatting.
Be sure that the battery is fully charged when formatting a floppy disk. Formatting takes about 2 minutes maximum.
PROTECT
To prevent accidental erasure, you can protect the image.
In SINGLE screen mode:
- Select ON to protect the image on the screen.
- Select OFF* to cancel protecting the image.
In INDEX screen mode:
- Select ALL to protect all images.
- Select SELECT to protect or cancel protecting the selected image.
To do this,
① Select the image by moving ▶ with the control button, and press it.
o— appears on the upper left side of the image.
② Select "ENTER" at the lower left of the screen with the control button, then press it.
Note
You cannot delete a protected image. To delete a protected image, cancel the protection first.
DELETE
You can delete images you do not want to keep any longer. Once you delete an image, you cannot restore it. Check the images carefully before deleting them.
In SINGLE screen mode:
- Select OK to delete the image on the screen.
- Select CANCEL* to cancel deleting the image.
In INDEX screen mode:
- Select ALL to delete all images.
- Select SELECT to delete the selected image.
To do this,
① Select the image by moving ▶ with the control button, and press it. The number of selected image changes color.
Press again to cancel deleting. The number returns to normal display.
② Select "ENTER" at the lower left of the screen with the control button, then press it.
Note
You cannot delete a protected image. To delete a protected image, cancel the protection first.
Using the battery pack
This unit operates only with the "InfoLITHIUM" battery pack.
"InfoLITHIUM" is a trademark of Sony Corporation.
Sony "InfoLITHIUM" battery packs NP-F550, NP-F750, NP-F950, etc. are commercially available.
1 Attach the battery pack to the unit.
While pressing the battery pack against the unit, slide it to the left.

natural_image
Diagram of an open CD or DVD drive showing internal components and a separate battery casing (no text or symbols present)EN
To remove the battery pack, while pressing the battery eject switch, slide the battery pack to the right.
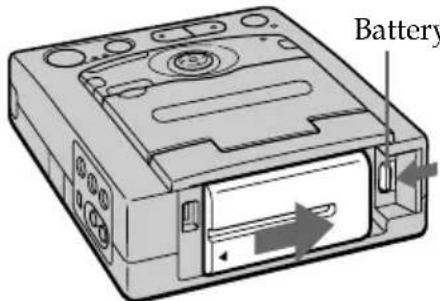
2 Charge the battery pack.
You can charge the battery pack while you are not using the unit. If you turn on the power, charging stops.
(1) Attach the battery pack.
(2) Connect the AC power adaptor to the power cord and to the image capture adaptor.

(3) Connect the power cord to the wall outlet.
The CHARGE lamp lights up and charging begins. When the battery is charged, the CHARGE lamp turns off (normal charge). If you keep charging for another one hour (full charge), you can use the battery pack slightly longer.

CHARGE lamp
Notes
- If you turn on the unit, charging stops. Do not turn on the unit while charging the battery pack.
- Do not connect or disconnect the AC power adaptor while using the unit on the battery pack. Doing so will interrupt the power supply to the unit and may damage the floppy disk.
Charging time
Battery pack NP-F550 NP-F750 NP-F950
| Full charge* 210 300 390 |
| Normal charge** 150 240 330 |
Approximate minutes to charge an empty battery pack.
* To keep charging for another one hour after the CHARGE lamp turns off.
** To charge until the CHARGE lamp turns off.
Note on remaining battery time indication
Remaining battery time* is displayed on the LCD screen or the TV. However, the indication may not be displayed properly depending on conditions of use and circumstances.
* During recording, remaining battery time indicates how long the power can be used for recording.
During playback, it indicates how long the image can be displayed on the LCD screen or the TV.
"InfoLITHIUM" battery pack
The "InfoLITHIUM" is a lithium ion battery pack which can exchange data with compatible equipment about its battery consumption.
Battery life/Number of images that can be recorded
MVC-FDR1/FDR1E
Continuous recording
Battery pack Battery life Number of images
NP-F550 135 (125) 750 (690)
NP-F750 240 (225) 1330 (1250)
NP-F950 360 (335) 2000 (1860)
Continuous playing\*
Battery pack Battery life Number of images
NP-F550 150 (140) 900 (840)
NP-F750 280 (255) 1680 (1530)
NP-F950 410 (380) 2460 (2280)
MVC-FDR3/FDR3E
Battery life and number of images when using the LCD screen.
If you are not using the LCD screen, the figures are same as for MVC-FDR1/FDR1E.
Continuous recording
Battery pack Battery life Number of images
NP-F550 100 (95) 560 (530)
NP-F750 180 (165) 1000 (920)
NP-F950 275 (250) 1530 (1390)
Continuous playing\*
Battery pack Battery life Number of images
NP-F550 110 (105) 660 (630)
NP-F750 200 (185) 1200 (1110)
NP-F950 310 (280) 1860 (1680)
Approximate battery life in minutes and the number of images that can be recorded and played back under the temperature of 77^ F ( 25^ C). Numbers in parentheses indicate the time when you use a normally charged battery.
* Playing at about 10-second intervals
- Battery life and the number of images will be decreased if you use the unit in a cold environment or if you repeat turning the power on/off.
- Battery life and the number of images above are a guide to record or play back images in some floppy disks.
Changing the lithium battery
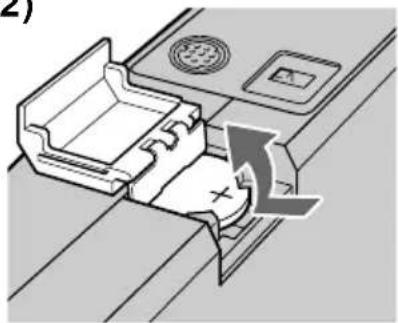
When the lithium battery becomes weak or dead, the “‡” indicator flashes on the screen. In this case, replace the battery with a Sony CR2025 or Duracell DL-2025 lithium battery. Use of any other battery may present a risk of fire or explosion.
When installing the lithium battery, keep the power source connected. Otherwise, you will need to reset the date and time retained by the lithium battery.
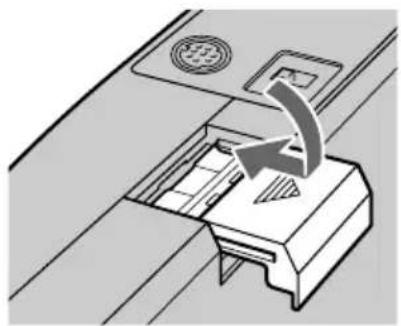
(1) Slide the lid of the lithium battery compartment and open it.
(2) While pushing the lithium battery up, and pull it out from the holder.
(3) Install the lithium battery with the positive (+) side facing out.
(4) Close the lid.
(1)

natural_image
Diagram showing a mechanical or electrical component with an arrow indicating rotation or movement, no text or symbols present.(2)

natural_image
Diagram of a mechanical component with a directional arrow indicating motion or force (no text or symbols present)

natural_image
Diagram of a device with a scroll wheel and directional arrow indicating rotation or movement (no text or symbols)Notes
- Keep the lithium battery out of the reach of children. Should the battery be swallowed, immediately consult a doctor.
- Wipe the battery with a dry cloth to assure a good contact.
- Do not hold the battery with metallic tweezers, otherwise a short-circuit may occur.
- Note that the lithium battery has a positive (+) and a negative (−) terminals. Be sure to install the lithium battery so that terminals on the battery match the terminals on the unit.
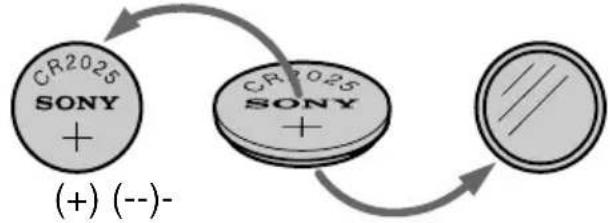
flowchart
graph TD
    A["CR2025 SONY +"] --> B["CR2025 SONY +"]
    B --> C["---/---"]
    style A fill:#f9f,stroke:#333
    style B fill:#f9f,stroke:#333
    style C fill:#ccf,stroke:#333
WARNING
The battery may explode if mistreated. Do not recharge, disassemble, or dispose of in fire.
CAUTION
Danger of explosion if battery is incorrectly replaced. Replace only with the same type recommended by the manufacturer. Discard used batteries according to the manufacturer's instructions.
On cleaning
Cleaning the LCD screen
Wipe the screen surface with a LCD cleaning kit (not supplied) to remove fingerprints, dust, etc.
Cleaning the surface
Clean the surface with a soft cloth slightly moistened with water. Do not use any type of solvent such as alcohol or benzene as it may mar the finish of the casing.
Concerning floppy disks
To protect data recorded on floppy disk, note the following:
- Avoid storing floppy disks near magnets or magnetic fields such as those of speakers and televisions, permanent erasure of disk data may result.
- Avoid storing floppy disks in areas subject to direct sunlight or sources of high temperature, such a heating device. Floppy disk warping or damage may result, rendering the disk useless.
- Avoid contact with the disk's surface by opening the disk shutter plate. If the disk's surface becomes blemished, data may be rendered unreadable.
- Avoid dropping liquids on the floppy disk.
- Be sure to use a floppy disk case to ensure protection of important data.
- Use only a 2HD type disk head cleaner when cleaning the disk drive.
- Even when you use a 3.5-inch 2HD floppy disk, image data may not be recorded and/or displayed depending on the using environment. In this case, use other brand disks.
Operational temperature recommendations
This unit's operational temperature is between 32^ to 104^ (0°C to 40°C). Do not use this unit in extreme climates such as that of a hot beach or a skiing resort.
Moisture condensation
If the unit is brought directly from a cold to a warm location, or is placed in a very damp room, moisture may condense inside or outside the unit. Should this occur, the unit will not operate properly. In this case, remove the floppy disk, turn off the unit, and wait about an hour for the moisture to evaporate.
Troubleshooting
Should any problem persist after you have made those checks, consult your nearest Sony dealer. If “C:□□:□□” appears on the LCD screen or on the TV, the self-diagnosis function has worked. See page 30.
| Symptom | Cause and/or Solution |
| The unit does not work. | The power is not turned on.Turn on the power. (p. 7)The floppy disk is not installed properly.Remove the disk and reinstall it. (p. 8) |
| You cannot record images. | You did not press the STANDBY button.Press the STANDBY button to turn on the STANDBY lamp. (p. 12)Floppy disk is full.Delete the images you don't want to keep, and then start recording. (p. 22)Change the floppy disk.No disk has been inserted.Insert a disk.The disk which cannot be used with the unit is installed.Use 2HD, 1.44MB, MS-DOS formatted disk. (p. 4)The tab on the disk is set to the write protect position.Slide the tab to shut the opening. (p. 8)The battery is dead.Use a charged battery pack. (p. 23) |
| The picture is noisy. | The unit is placed near a TV or other equipment that generates strong magnets.Place the unit away from the TV, etc. |
| The picture on the LCD screen is too dark. (MVC-FDR3/ FDR3E only) | The LCD screen is adjusted too dark.Adjust brightness of the LCD screen. (p. 14, 17) |
| Incorrect date and time are recorded. | The date and time are not set.Set the date and time. (p. 9) |
| The battery life deteriorates too fast. | The ambient temperature is too low.Charging of the battery pack is not enough.Charge the battery pack fully. (p. 24)The battery pack has served its time.Replace the battery pack with a new one. (p. 23) |
| You cannot play back the images. | You did not press the PLAY button.Press the PLAY button to turn on the PLAY lamp. (p. 16)The battery is discharged.Use a charged battery pack. (p. 23) |
| You cannot delete an image. | The image is protected.Cancel the protection of the image. (p. 22) |
| The power turns off automatically. | The battery is discharged.Use a charged battery pack. (p. 23) |
Self-diagnosis display
The unit has a self-diagnosis display. This function displays the unit condition with five-digits (a combination of a letter and figures) on the LCD screen or on the TV. If this occurs check the following code chart. The five-digit display informs you of the unit current condition. The last two digits (indicated by □□) will differ depending on the state of the unit.

Self-diagnosis display
• C : □□:□□
You can restore the unit malfunction yourself.
• E : □□:□□
Contact your Sony dealer or local authorized Sony service facility.
| First three digits | Cause and/or Corrective Action |
| C:32:□□ | Trouble is with the disk drive.Turn the power off and on again. |
| C:13:□□ | The unformatted disk is installed.Format the disk. (p. 22)The unusable disk with the unit is installed.Change the disk. (p. 4) |
| E:61:□□E:91:□□ | A unit malfunction which you can not restore has occurred.Contact your Sony dealer or local authorized Sony service facility and inform them of the five digits. (example: E:61:10) |
Specifications
System
Data compression
Standard JPEG
Number of the pictures stored on 1 floppy disk
MVC-FDR1/FDR3:
STANDARD about 30 - 40 pictures
FINE about 15 - 20 pictures
BITMAP 1 picture
MVC-FDR1E/FDR3E:
STANDARD about 20 - 30 pictures
FINE about 10 - 15 pictures
BITMAP 1 picture
Image size
MVC-FDR1/FDR3:
640 x 480 (VGA)
MVC-FDR1E/FDR3E:
752 x 568 (VGA)
Memory Floppy disk:
3.5-inch 2HD MS-DOS format
(1.44 MB)
Input and output connectors
S VIDEO input/output
4-pin mini DIN
Luminance signal: 1 Vp-p, 75 ohms,
unbalanced, sync negative
Chrominance signal: 0.286 Vp-p
(MVC-FDR1/FDR3),
0.3 Vp-p (MVC-FDR1E/FDR3E),
75 ohms, unbalanced
VIDEO input/output
Phono jack, 1 Vp-p, 75 ohms,
unbalanced, sync negative
CAMERA input
LCD screen (MVC-FDR3/FDR3E only)
Screen size
2.5-inch
LCD panel
TFT
Total dot number
84000 dots
General
Power requirements
8.4 V (AC power adaptor)
7.2 V (battery pack)
Power consumption
MVC-FDR1/FDR1E: 3.4 W
MVC-FDR3/FDR3E:
When using the LCD screen
4.9 W
When not using the LCD screen, the
power consumption is same as for
MVC-FDR1/FDR1E.
Operation temperature
0^ to 40^ (32°F to 104°F)
Storage temperature
-20^ to +60^ (-4^ to +140^)
Dimensions
Approx. 130 x 50 x 165 mm
(5^1/8×2×6^1/2in.)(w/h/d)
Mass MVC-FDR1/FDR1E:
Approx. 540 g (11 lb. 19 oz.)
(excluding floppy disk)
MVC-FDR3/FDR3E:
Approx. 650 g (11 lb. 23 oz.)
(excluding floppy disk)
Supplied accessories
Remote Commander (1)
AC power adaptor (1)
Lithium battery (1, installed in the unit)
AC power cord (1)
Video cable (1)
AC power adaptor (supplied)
Power requirements
100 - 240 V AC, 50/60 Hz
Output voltage
DC OUT: 8.4 V, 1.5 A
Operation temperature
0^ to 40^ (32°F to 104°F)
Storage temperature
-20^ to +60^ (-4^ to +140^)
Dimensions
Approx. 125 x 39 x 62 mm
(5 × 1^9/16 × 2^1/2 in.) (w/h/d)
Mass Approx. 280 g (10 oz.)
Cord length
Approx. 2 m (6 feet)
Design and specifications are subject to change without notice.
Parts identifications
See pages in parenthesis for more details.
Digital still image capture adaptor
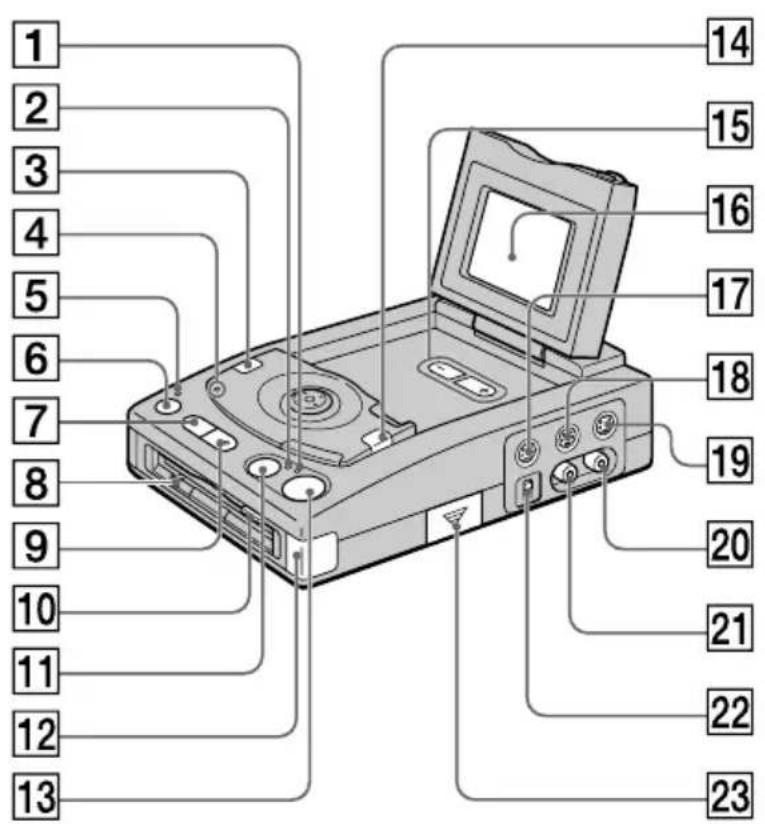
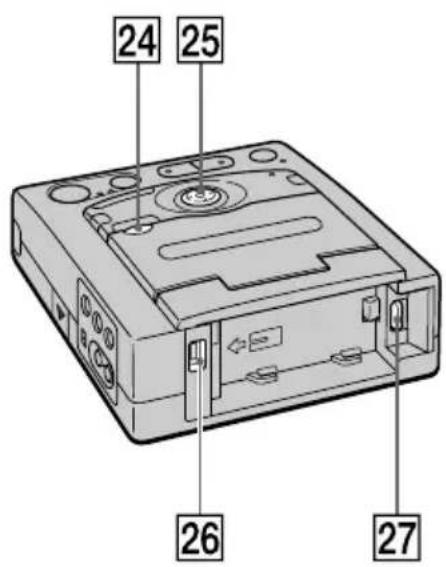
1 REC lamp (p. 12)
2 MEMORY lamp (p. 12)
3 DISPLAY button (p. 14, 16)
4 CHARGE lamp (p. 24)
5 POWER lamp
6 POWER switch (p. 7)
7 PLAY button and lamp (p. 16)
8 ACCESS lamp (p. 16)
9 STANDBY button and lamp (p. 12)
10 Floppy disk eject button (p. 8)
11 MEMORY button (p. 12)
12 Remote sensor
13 REC button (p. 12)
14 FIELD/FRAME button (p. 12)
15 BRIGHT +/- buttons (p. 14, 17, MVC-FDR3/FDR3E only)
16 LCD screen (MVC-FDR3/FDR3E only)
17 CAMERA jack (p. 13)
18 S VIDEO input jack (p. 7)
19 S VIDEO output jack (p. 11)
20 VIDEO output jack (p. 7)
21 VIDEO input jack (p. 11)
22 Monitor image select switch (p. 15)
23 Lithium battery compartment (p. 26)
24 LCD lock release button (p. 7, MVC-FDR3/FDR3E only)
25 Control button (p. 8)
26 DC input jack
27 Battery eject switch (p. 23)
Remote Commander

1 STANDBY button (p. 12)
② FIELD/FRAME button (p. 12)
3 (reverse) button (p. 16)
4 DISPLAY button (p. 14, 16)
5 ▶ (forward) button (p. 16)
6 Transmitter
Point toward the remote sensor to control the image capture adaptor after turning on the image capture adaptor.
7 REC button (p. 12)
8 MEMORY button (p. 12)
9 PLAY/PAUSE button (p. 16)
EN
To prepare the Remote Commander
Insert two R6 (size AA) batteries (not supplied) by matching the + and - on the batteries to the diagram inside the battery compartment.

natural_image
Diagram of a device's internal component with an arrow indicating direction (no text or symbols)
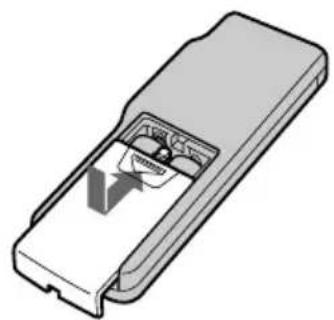
natural_image
3D diagram of a mechanical component with internal cavity and mounting bracket (no text or symbols)Note on battery life
The batteries for the Remote Commander last about six months under normal operation. When the batteries become weak or dead, the Remote Commander does not work.
To avoid damage from possible battery leakage
Remove the batteries when you will not use the Remote Commander for a long time.
Warning messages
Various messages appear on the LCD screen or on the TV. Check them with the following list.
| Message | Meaning |
| DRIVE ERROR | Trouble is with the disk drive. |
| NO DISK | No disk has been inserted. |
| DISK ERROR | Trouble is with the disk.Unusable disk with the image capture adaptor is installed. |
| DISK PROTECT | The tab on the disk is set to the write protect position. |
| DISK FULL | The disk is full. |
| NO FILE | No image has been recorded on the disk. |
| FILE ERROR | Trouble has occurred during playback. |
| FILE PROTECT | The picture is protected. |
| NO SIGNAL | No video signal is input. |
| The battery is weak. | |
| The lithium battery is weak. |
Index
A
AC power adaptor 7,23
Adjusting brightness LCD screen .... 14, 17
B
Battery pack 23
Beep 20
BITMAP 13, 19, 21
C, D
Charging 23
Cleaning 28
Connection Playback .... 7
Recording.... 11
Control button....8
D
Delete....22
F
Floppy disk 8
Format Disk 22
Full charge 24
|
Image quality 13,21
INDEX screen 17
Indicators Playback .... 16
Recording.... 14
InfoLITHIUM battery pack 23
J
JPEG 4,19
L
Lithium battery 26
M
Menu....20
Moisture condensation 28
N
Normal charge 24
P
Playing back 16
Protect.... 22
R
Recording 11
Remaining battery time indicator ..... 14, 16
Remote Commander 33
S, T
Self-diagnosis display 30
Setting the date and time 9
Slide show.... 21
V
Viewing images on the LCD screen or the TV 16
Viewing images using a personal computer 18
W
Warning messages 34
natural_image
Diagram showing a floppy disk with a circular slot and an open lid, alongside a magnified view of its internal structure (no text or symbols)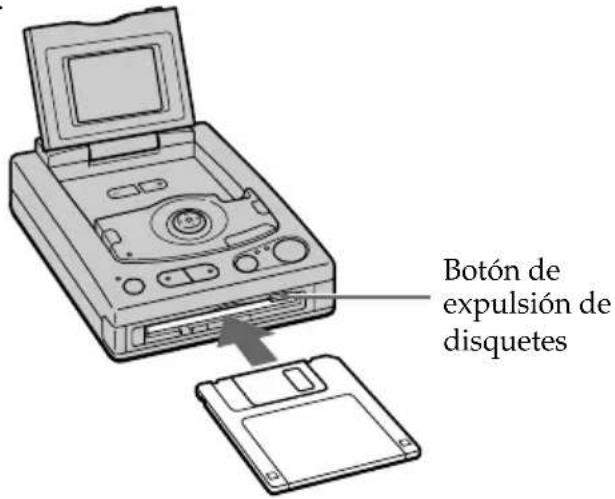
natural_image
Diagram showing a camera connected to a mounted device with a cable (no text or symbols present)natural_image
Diagram of an open CD drive showing internal components and battery casing (no text or symbols)natural_image
Diagram showing a mechanical or electrical component with an arrow indicating rotational motion (no text or symbols present)(2)
natural_image
Diagram of a mechanical assembly with a component and directional arrow (no text or symbols)
natural_image
Diagram of a door handle assembly with a curved arrow indicating rotation or movement (no text or symbols present)Notas
natural_image
Diagram of a remote control panel with an arrow indicating left-side motion (no text or symbols)

natural_image
3D diagram of a remote control box with internal components (no text or symbols)- Digital Still Image Capture Adaptor
- DISPOSAL OF LITHIUM ION BATTERY.
- LITHIUM ION BATTERY. DISPOSE OF PROPERLY.
- CAUTION
- Owner's Record
- NOTICE FOR THE CUSTOMERS IN THE UNITED KINGDOM
- ATTENTION:
- Table of contents
- Before using the image capture adaptor
- Be sure to read before using the image capture adaptor
- Image recording format on this image capture adaptor
- Precaution on copyright
- Notes on the Operating Instructions
- Types of differences
- Model number MVC-FDR1 MVC-FDR1E MVC-FDR3 MVC-FDR3E
- Power sources
- Note on TV color systems
- NTSC system
- PAL system
- PAL-M system
- PAL-N system
- SECAM system\*
- Precautions
- Do not shake or strike the image capture adaptor
- Do not get the image capture adaptor wet
- Back up recommendations
- Preparation
- Connect to the TV.
- For MVC-FDR3/FDR3E only
- Turn on the power.
- In advance:
- Insert the floppy disk until it clicks.
- To eject the floppy disk
- Using the control button
- Setting the date and time
- When you use the image capture adaptor for the first time
- To cancel setting the date and time
- Recording images
- Connection
- For MVC-FDR1/FDR1E:
- Recording
- If you don't want to record the captured image in step 3
- If the captured image is blurred in step 3
- The number of images you can record on a floppy disk
- Image quality MVC-FDR1/FDR1E MVC-FDR3/FDR3E
- Note
- By connecting the Sony Color Video Camera CCD-Z7/Z7E
- If two or three source units are connected
- Adjusting the brightness of the LCD screen (MVC-FDR3/FDR3E only)
- The indicators during recording
- To turn off the indicators
- If noise or black stripes appear on the image
- Viewing images
- Playing back six images at a time (INDEX screen)
- Viewing images using a personal computer
- Example: personal computer with Windows 95 installed
- Image file
- File name and extension
- Number of the file name
- Recommended OS/applications example
- OS
- Applications
- Changing the mode settings
- To cancel changing the mode settings
- Setting the mode of each item
- Items for both STANDBY and PLAY modes
- CLOCK SET
- COMMANDER
- BEEP
- Items in STANDBY mode only
- FILE NUMBER
- Notes on the SERIES setting
- BITMAP
- If you set BITMAP to ON
- QUALITY
- Items in PLAY mode only
- SLIDE SHOW <20 S/10 S/5 S/NORMAL PLAY\*>
- FORMAT DISK
- PROTECT
- DELETE
- Using the battery pack
- Attach the battery pack to the unit.
- Charge the battery pack.
- Notes
- Charging time
- Note on remaining battery time indication
- "InfoLITHIUM" battery pack
- Battery life/Number of images that can be recorded
- MVC-FDR1/FDR1E
- Continuous recording
- Continuous playing\*
- MVC-FDR3/FDR3E
- Changing the lithium battery
- WARNING
- On cleaning
- Cleaning the LCD screen
- Cleaning the surface
- Concerning floppy disks
- Operational temperature recommendations
- Moisture condensation
- Troubleshooting
- Self-diagnosis display
- Specifications
- System
- Input and output connectors
- LCD screen (MVC-FDR3/FDR3E only)
- General
- AC power adaptor (supplied)
- Parts identifications
- Remote Commander
- To prepare the Remote Commander
- Note on battery life
- To avoid damage from possible battery leakage
- Warning messages
- Index
- A
- B
- C, D
- D
- F
- |
- J
- L
- M
- N
- P
- R
- S, T
- V
- W
- Notas
Brand : SONY
Model : MVC-FDR3
Category : Camera