HKGK16155A3I - Fridge Hanseatic - Free user manual and instructions
Find the device manual for free HKGK16155A3I Hanseatic in PDF.


User questions about HKGK16155A3I Hanseatic
0 question about this device. Answer the ones you know or ask your own.
Ask a new question about this device
Download the instructions for your Fridge in PDF format for free! Find your manual HKGK16155A3I - Hanseatic and take your electronic device back in hand. On this page are published all the documents necessary for the use of your device. HKGK16155A3I by Hanseatic.
USER MANUAL HKGK16155A3I Hanseatic
natural_image
Line drawing of an open refrigerator with multiple doors and shelves (no text or symbols)Gebrauchsanleitung
natural_image
Line drawing of an open refrigerator with shelves and doors open (no text or symbols)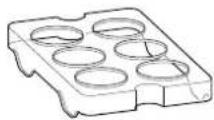
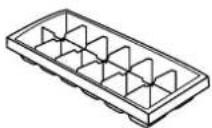
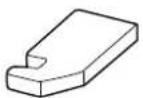
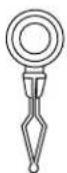
Lieferumfang
natural_image
Simple line drawing of a rectangular frame with a central square and side protrusions, labeled 'D' at the bottom (no text or symbols within the diagram itself)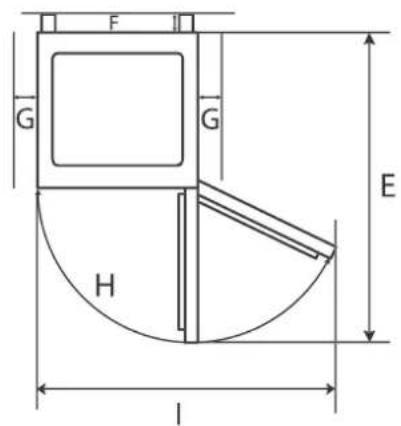
text_image
F G G H E lnatural_image
Technical line drawing of a mechanical assembly with labeled component (11), no readable text or symbols presenttext_image
(13) (14)flowchart
graph TD
    A["Step 1: Initial state"] --> B["Step 2: Internal part"]
    B --> C["Step 3: Internal part with end"]
    C --> D["Step 4: Internal part with end"]
    D --> E["Step 5: Internal part with end"]
text_image
(28) (27)text_image
(13) (14)text_image
(30) (12)natural_image
Line drawing of an open refrigerator with multiple doors and shelves (no text or symbols)User manual
Fridge-freezer
Table of contents
Delivery GB-3
Package contents . . . . . . . . . . . . . GB-3
Check the delivery . . . . . . . . . . . . GB-3
Appliance parts / control elements .... GB-4
Safety GB-5
Intended use. GB-5
Explanation of terms GB-5
Explanation of symbols . . . . . . . . GB-5
Safety notices GB-6
Operation GB-11
Before getting started . . . . . . . . . GB-11
Switching the appliance on and off GB-11
Setting the temperature . . . . . . . GB-11
Glass and door shelves . . . . . . . GB-12
Refrigerating food . . . . . . . . . . . . . GB-13
Filling the fridge compartment .... GB-13
Maintaining quality . . . . . . . . . . . GB-14
Freezing foods / storing frozen foods GB-15
Freezing food . . . . . . . . . . . . . . . . . GB-15
Storing frozen food . . . . . . . . . . . . GB-16
Defrosting food GB-17
Making ice cubes . . . . . . . . . . . . GB-17
Care and maintenance . . . . . . . . GB-18
Checking and cleaning the door seals .... GB-18
Clean exterior GB-18
Cleaning the reverse side . . . . . . GB-18
Defrosting and cleaning the inner compartment . . . . . . . . . . . . . . . . GB-18
Interior light GB-20
Start-up GB-21
Before starting to use the appliance .GB-21
Unpacking and setup . . . . . . . . . GB-21
Setting up and aligning the appliance . . . . . . . . . . . . . . . . . . GB-22
Cleaning before use . . . . . . . . . . GB-23
Commissioning the appliance . . . . GB-23
Changing the door hinges . . . . . . . . GB-24
Troubleshooting table . . . . . . . . . . GB-27
Environmental protection . . . . . . . GB-29
Disposing of old electrical devices in an environmentally-friendly manner . . . . . . . . . . . . . . . . . . . . . . . . . GB-29
Our contribution to the protection of the ozone layer . . . . . . . . . . . GB-29
Service GB-30
Advice, order and complaint ..... GB-30
Repairs and spare parts . . . . . . . GB-30
Product fiche concerning
Regulation (EU) No 1060/2010.....GB-31
Technical specifications . . . . . . . . GB-33

You can find more information on setting up the appliance and starting it up for the first time on page GB-21.

Please read through the safety instructions and user manual carefully before using the appliance. This is the only way you
can use all the functions reliably and reliably.
Be absolutely sure to also observe the national regulations in your country, which are also valid in addition to the regulations specified in this user manual.
Keep all safety notices and instructions for future reference. Pass all safety notices and instructions on to the subsequent user of the product.
Delivery
natural_image
Line drawing of an open refrigerator with multiple doors and shelves (no text or symbols)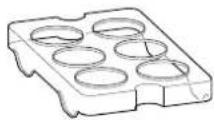
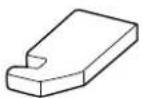
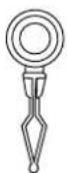
Package contents
1× Fridge-freezer
Fridge compartment
2× Glass shelf
1× Glass shelf as a cover for the fruit/ vegetable drawer
1× Fruit/vegetable drawer
3× Door shelf
Freezer compartment
3× Freezer drawer
2× Egg tray
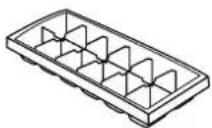
1× Ice cube container
1× Hinge faceplate
1× Cleaning tool (in the thaw water drain on the rear wall above the vegetable drawer)
Check the delivery
-
Move the appliance to a suitable place and unpack it see „Start-up“ on page GB-21).
-
Remove all parts of the packaging, plastic profiles, tape and foam padding.
-
Check that the delivery is complete.
-
Check whether the appliance was damaged during transit.
-
If the delivery is incomplete or the appliance has been damaged during transport, please contact our Service Centre (see page GB-30).
WARNING!
Risk of electric shock!
Never use a damaged appliance.
Appliance parts / control elements
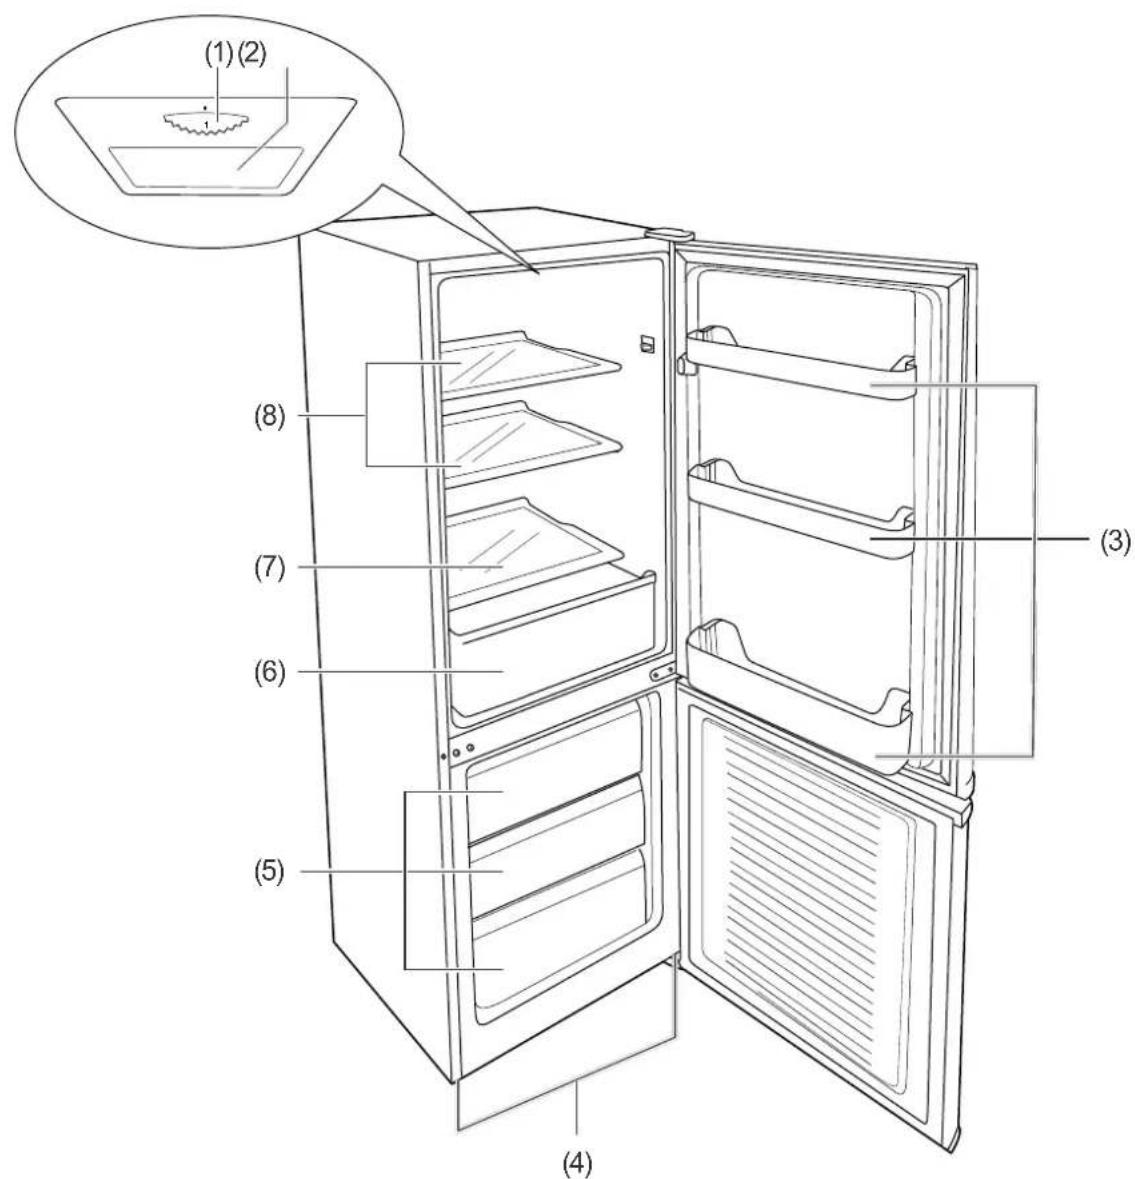
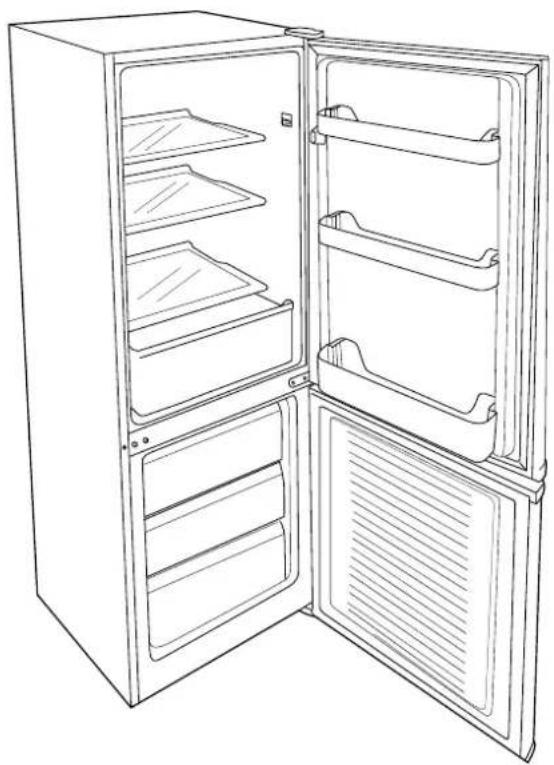
(1) Temperature controller
(2) Refrigerator light
(3) Door shelves
(4) Screw feet (not visible in picture)
(5) Freezer drawers
(6) Vegetable drawers
(7) Glass cover for vegetable drawer
(8) Glass shelves
Safety
Intended use
The purpose of this appliance is to
- chill fresh food,
– to store ordinary commercially available deep-frozen food,
– to deep freeze fresh, room-temperature foods and - to prepare ice cubes.
This appliance is designed for household use and in similar environments such as
– private kitchens in shops, offices and other work areas;
– in agricultural operation and for use by guests in hotels, motels and other accommodation types;
- in bed and breakfasts;
– in the catering business and similar wholesaling operations.
Use the appliance exclusively as described in this user manual. Any other use is deemed improper and may result in damage to property or even personal injury. The manufacturer accepts no liability for damage caused by improper use.
Explanation of terms
The following symbols can be found in this user manual.

WARNING
This symbol indicates a hazard with a medium level of risk which, if not avoided, could result in death or serious injury.

CAUTION
This symbol indicates a hazard with a low level of risk which, if not avoided, could result in minor or moderate injury.

NOTICE
This symbol warns against possible damage to property.

This symbol refers to useful additional information.
Explanation of symbols

Warning: Risk of fire! / flammable materials

4-star logo: Freezer compartment at -18 °C or colder

This appliance complies with the relevant European and national guidelines. This is confirmed with the CE label (corresponding explanations are available from the manufacturer).
Safety notices
In this chapter you will find general safety notices which you must always observe for your own protection and that of third parties. Please also observe the warning notices in the individual chapters.

WARNING
Risks in handling household electrical appliances
Risk of electric shock!
Touching live parts may result in severe injury or death.
■ Only use the appliance indoors. Do not use in wet rooms or in the rain.
■ Do not operate or continue to operate the appliance, if
- it shows visible signs of damage, for example, the connection cable is defective,
– it starts smoking or there is a smell of burning, - it makes unfamiliar noises.
In such cases, pull out the mains plug or unscrew/isolate the fuse and contact our service department (see page GB-30).
■ The appliance corresponds to protection class I and may only be connected to a plug with a protective conductor that has been properly installed. When connecting, make sure that it has the right voltage. You can find more detailed information about this on the nameplate.
■ Do not connect to a timer or a separate remote-controlled system for distance monitoring and control.
■ The appliance must only be completely disconnected from the power supply by pulling out the mains plug. The appliance must therefore be connected to an easily accessible socket so that it can be quickly disconnected from the power supply in the event of breakdown.
■ If the mains plug is no longer accessible after installation, an all-pole disconnecting device complying with overvoltage category III must be connected to the house wiring with a contact gap of at least 3 mm; this includes fuses, circuit breakers and contactors.
■ When positioning the appliance, ensure the supply cord is not trapped or damaged.
■ Do not kink or pinch the mains cable or lay it over sharp edges. This may cause the cable to break and/or cause damage to the insulation.
- Keep the appliance, mains plug and mains cable away from naked flames and hot surfaces.
■ Do not locate multiple portable socket- outlets or portable power supplies at the rear of the appliance.
■ Always hold the mains plug itself, not the mains cable.
■ Never touch the mains plug with wet hands.
■ Never immerse the mains cable or plug in water or any other liquids.
■ If the mains cable of the appliance is damaged, it must be replaced by the manufacturer, through the customer service department or by a qualified specialist.
■ Inspections and repairs to the appliance may only be carried out by au-
thorised specialists see „Service“ on page GB-30).
■ Independent or improper repairs made to the appliance may cause damage to property and personal injury; any liability and warranty claims will be forfeited. Never try to repair a defective or suspected defective appliance yourself.
■ Only parts corresponding to the original appliance specifications may be used for repairs. This appliance contains electrical and mechanical parts which are essential for protection against potential sources of danger.
■ In the event of a fault, as well as before extensive cleaning, pull out the mains plug or isolate/unscrew the fuse.
■ Do not put any objects in or through the housing openings, and also make sure that children cannot insert any objects in them.
■ Check the appliance regularly for damage.
Risks to children
Risk of suffocation!
Children can become entangled in the packaging fi lm or swallow small parts and suffocate.
■ Do not allow children to play with the packaging fi lm.
Risks when dealing with chemical substances
Danger of explosion!
Improper handling of chemical substances can lead to explosions.
■ Do not store explosive substances or spray cans with flammable propel-
lants inside the appliance, as they may cause ignitable gas-air mixtures to explode.
■ Never use defrosting sprays to defrost. They can generate explosive gases.

CAUTION
Risks for certain groups of people
Dangers for children and people with limited physical, sensory or mental capacity!
■ This appliance can be used by children aged from 8 years and above and persons with reduced physical, sensory or mental capabilities or lack of experience and knowledge if they have been given supervision or instruction concerning use of the appliance in a safe way and understand the hazards involved. Children aged from 3 to 8 years are allowed to load and unload refrigerating appliances. Children shall not play with the appliance. Cleaning and user maintenance shall not be made by children without supervision.
■ Make sure children do not have unsupervised access to the appliance.
Risks when dealing with fridge and freezer appliances
Fire hazard!
Improper handling of the appliance can lead to fire and property damage.
■ Only connect the appliance to a properly installed and earthed electric socket.
■ Do not connect to a multi-socket extension cable or a multi-socket plug.
■ In order to guarantee sufficient air circulation, do not close the ventilation openings in the appliance housing.
- Do not position the appliance directly against the wall and adhere to all minimum distances see „Unpacking and setup“ on page GB-21).
Dangers from the refrigerant!
Your appliance's refrigeration circuit contains the environmentally friendly, but fl ammable refrigerant R600a (isobutane).
■ Mechanical intervention in the refrigeration system must only be carried out by authorised specialists.
- Do not damage the refrigeration circuit, for example, by piercing the refrigerant channels of the condensate evaporator with sharp objects, bending the piping, cutting open the insulation, etc.
■ Refrigerant is flammable when spurting out and can damage the eyes. In this case, rinse your eyes in clean water and seek medical assistance immediately.
- To prevent the formation of a flammable gas-air mixture in the event of a leakage in the refrigeration circuit, the installation space must have a minimum size of 1 m ^3 per 8 g of refrigerant in compliance with the EN 378 standard. The amount of refrigerant contained in your appliance can be found on the data sheet page GB-31.
Risk of injury!
Improper handling of the appliance may result in injury.
■ The appliance is heavy and bulky. Ask another person to help with moving and installation.
- Check that entry route and installation location are free of obstacles (e.g. closed doors or objects lying on the floor).
■ Bases, drawers, doors, etc. must not be used as steps or for support purposes.
■ Do not place any heavy objects on the appliance. They may fall down and cause injuries.
■ Lay out the mains cable in such a way that it does not become a trip hazard.
Health hazard!
Contaminated foods can cause health problems.
■ Opening the door for long periods can cause a significant increase of the temperature in the compartments of the appliance.
■ Clean regularly surfaces that can come in contact with food and accessible drainage systems.
■ Store raw meat and fi sh in suitable containers in the refrigerator, so that it is not in contact with or drip onto other food.
■ Two-star frozen-food compartments are suitable for storing pre-frozen food, storing or making ice-cream and making ice cubes.
■ One-, two- and three-star compartments are not suitable for the freezing of fresh food.
■ If the refrigerating appliance is left empty for long periods, switch off, defrost, clean, dry, and leave the door
open to prevent mould developing within the appliance.
Health hazard!
Incorrect handling, insufficient cooling or overlapping items can spoil the stored food. This could lead to a risk of food poisoning when consumed!
■ In particular, pack raw meat and fish carefully to ensure that adjacent food cannot be contaminated by salmonella or similar bacteria.
■ Abide by the storage times recommended by food manufacturers.
■ Note that the shelf life of the frozen food may be shortened due to a rise in the temperature inside the appliance (from defrosting, cleaning or power failure).
If there is a power failure, the frozen food may remain sufficiently cold for some time (see “power cut safe” starting on page GB-31). In case of prolonged power failure or malfunction of the appliance, remove the stored frozen food from the appliance and store it in a sufficiently cool place or in another refrigerating appliance.
■ After a malfunction, check whether the stored food is still edible. Consume thawed and defrosted foods immediately, do not refreeze.
■ Use only drinking water to make ice cubes.
The appliance may not operate properly if exposed to low ambient temperatures for extended periods of time. This can then lead to an increase in temperature inside the appliance.
■ Always abide by the prescribed ambient temperature (see the ‘Climate categories’ starting on page GB-31).
Risk of injury from frozen goods!
Improper handling of the appliance may result in injury. There is a risk of burns caused by low temperatures.
■ The food and the inside walls of the freezer compartment have a very low temperature. Never touch them with wet hands. This can cause injury to the skin. Skin damage can occur even with dry skin.
■ Let ice cubes or ice lollies thaw a little before eating, do not put into your mouth straight from the freezer area.
NOTICE
Risk of damage
If the cooling unit has been transported horizontally, lubricant from the compressor may get into the cooling circuit.
■ Only transport the appliance in a vertical position.
- Allow the cooling unit to stand upright for 2 hours before start-up. The lubricant will flow back into the compressor during this time.
Improper handling of the appliance can lead to property damage.
■ Do not pull or lift the device by the doors or door handles.
- The appliance must only be placed on a level and firm surface. The surface must be strong enough to support the appliance's weight when fully laden.
■ Do not use sharp or pointed objects to unpack it.
■ When unpacking the appliance, never damage the insulation material on the back of the appliance.
- Do not use any electrical parts inside the appliance’s cooling chamber that do not conform to the manufacturer’s recommended design.
■ The interior light must only be used to illuminate the interior of the appliance. It is not suitable for lighting a room.
■ Do not store glass or metal containers containing water, lemonade, beer etc. Water expands when frozen and can burst the container.
■ Defrost the appliance in a timely manner, before it forms a layer of ice and frost of more than 5 mm. Excessive ice formation increases power consumption, the drawers become difficult to open and the door may not close completely.
- Do not use any means other than those recommended by the manufacturer to speed up defrosting. For example, do not use any electric heating equipment, knives or devices with an open flame such as a candle. The thermal insulation and the interior are scratch and heat-sensitive and can melt.
■ When cleaning, please note:
- Never use harsh, granular, soda, acid, solvent-based or abrasive cleaners. These attack the plastic surfaces. All-purpose cleaners with a neutral pH are recommended.
- Door seals and plastic parts are sensitive to oil and grease. Remove contaminants as quickly as possible.
- Use only soft cloths for cleaning.
■ Wait 5 minutes after switching off. Only then switch the appliance on again.
■ Only use original accessories.
Operation
Before getting started
- Read chapter „Safety“ starting on page GB-5 and all the safety notices.
- Set up and connect the appliance as described in chapter „Start-up“ starting on page GB-21.
Switching the appliance on and off
text_image
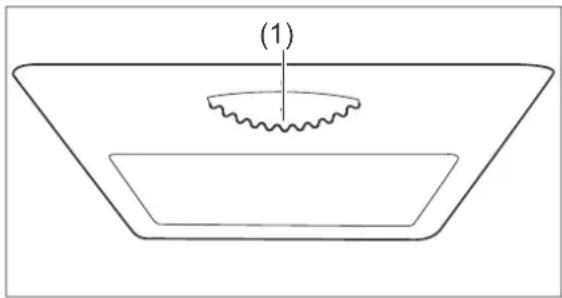
(1)The temperature controller (1) can be used to switch the appliance on and off. It can be found at the top of the fridge compartment.
Switching on
- Set the temperature controller (1) to a setting of between "1" and "7".
The appliance is then switched on. The compressor starts to work, the refrigerant flows through the pipes and a quiet humming sound can be heard. The interior light will switch on as soon as the door is opened and will switch off if the door is closed. - If the appliance makes unusual noises, check that it is on a solid base and remove any objects that are on top of the appliance.
Switching off
- Set the temperature controller (1) to "0". The compressor is switched off. The appliance doesn't refrigerate. The interior light continues to function.
-
To switch the appliance off completely, pull out the mains plug.
-
If the appliance is switched off, leave the door open slightly to avoid mould formation.
Setting the temperature

CAUTION
Health hazard!
The appliance may not operate properly if exposed to low ambient temperatures for extended periods of time. The temperature may increase in the fridge and freezer compartments which may cause the foods stored within to spoil more quickly.
■ Always abide by the prescribed ambient temperature (see “Climate categories” starting on page GB-31).
Using the temperature controller (1), you can set the temperature in the fridge and freezer compartments.
- First select a medium setting.
- If, for example in summer, the ambient temperature increases, so select a lower setting accordingly.
In order to
– increase the refrigeration output in the fridge and freezer compartments, turn the temperature controller towards "7".
– decrease the refrigeration output in the fridge and freezer compartments, turn the temperature controller towards “1”.
You ideally need two refrigerator/freezer thermometers to be able to control the refrigeration output.
Place one in the fridge compartment above the vegetable drawer (6) and one in the freezer compartment. The correct temperature in the fridge compartment is +6 °C. The ideal storage temperature in the freezer compartment is -18 °C.
Glass and door shelves
The glass cover (7) for the vegetable drawer (6), the glass shelves (8) and the door shelves (3) can be removed. The glass shelves (8) can be arranged differently if required.
- Simply pull out the glass shelves (8) and push them back into the holders in the desired position.
- Push the door shelves (3) together slightly sideways and simultaneously pull them upwards out of the holders.
Refrigerating food

WARNING
Danger of explosion!
Improper handling of the appliance can lead to explosions.
■ Do not store explosive substances or spray cans with flammable propellants inside the appliance, as they may cause ignitable gas-air mixtures to explode.

CAUTION
Health hazard!
Contaminated foods can cause health problems.
■ Opening the door for long periods can cause a significant increase of the temperature in the compartments of the appliance.
■ Clean regularly surfaces that can come in contact with food and accessible drainage systems.
■ Store raw meat and fish in suitable containers in the refrigerator, so that it is not in contact with or drip onto other food.
■ Two-star frozen-food compartments are suitable for storing pre-frozen food, storing or making ice-cream and making ice cubes.
■ One-, two- and three-star compartments are not suitable for the freezing of fresh food.
■ If the refrigerating appliance is left empty for long periods, switch off, defrost, clean, dry, and leave the door open to prevent mould developing within the appliance.
Filling the fridge compartment
Fill the fridge compartment in such a way that the temperature conditions inside are used to their full potential.
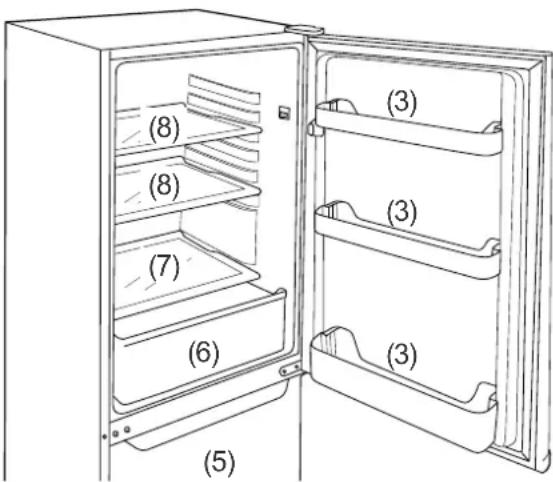
- Place spreadable butter and cheese on the upper door shelf (3) in the fridge compartment. This is where the temperature is warmest.
- Store preserves, jars and eggs on the middle door shelf. Eggs are best stored on the supplied egg rack.
- Place drinks cartons and bottles in the large lower door shelves. Position full containers closer to the hinge in order to reduce the strain on the door.
- Place cooked and baked foods on the glass shelves (8).
– Place fresh meat, game, poultry, bacon, sausage and raw fish on the glass shelf (7) above the vegetable drawer (6). This is where the temperature is lowest. - Place fresh fruit and vegetables in the vegetable drawer (6).
– Only store strong alcohol standing upright and closed tightly. - Allow hot food to cool before placing it in the fridge compartment.
- If you want to freeze and store food for a longer period of time, place raw meat, frozen food, ice-cream, pizza, dried fruit etc. in the freezer drawers (5).
The temperatures within the appliance and therefore also the energy consumption may increase if the doors are frequently opened or opened for long periods, or if the prescribed ambient temperatures are exceeded or are too low (see “temperature categories” starting on page GB-31).
Maintaining quality
- To maintain the flavour and freshness of food in the fridge compartment, only place packaged food in the fridge compartment. Use special plastic containers for food or customary films.
- Place the food
– in the fridge in a way that allows the air to circulate freely. Do not cover the shelves with paper or anything similar.
– somewhere that is not directly against the rear wall. Otherwise it may freeze onto the rear wall.
Freezing foods / storing frozen foods

WARNING
Danger of explosion!
Improper handling of the appliance may lead to an explosion.
■ Do not store explosive substances or spray cans with flammable propellants inside the appliance, as they may cause ignitable gas-air mixtures to explode.

CAUTION
Health hazard!
Incorrect handling, insufficient cooling or overlapping items can spoil the stored food. This could lead to a risk of food poisoning when consumed!
- In particular, pack raw meat and fish carefully to ensure that adjacent food cannot be contaminated by salmonella or similar bacteria.
■ Abide by the storage times recommended by food manufacturers.
■ Note that the shelf life of the frozen food may be shortened due to a rise in the temperature inside the appliance (from defrosting, cleaning or power failure).
If there is a power failure, the frozen food may remain sufficiently cold for some time (see “power cut safe” starting on page GB-31). In case of prolonged power failure or malfunction of the appliance, remove the stored frozen food from the appliance and store it in a sufficiently cool place or in another refrigerating appliance.
■ After a malfunction, check whether the stored food is still edible. Consume thawed and defrosted foods immediately, do not refreeze.
Risk of injury!
Improper handling of the appliance may result in injury. Risk of burns caused by low temperatures.
■ The food and the inside walls of the freezer compartment have a very low temperature. Never touch them with wet hands. This can cause injury to the skin. Skin damage can occur even with dry skin.
■ Let ice cubes or ice lollies thaw a little before eating, do not put into your mouth straight from the freezer area.

If there is not enough space within the drawers of the fridge compartment, can remove the drawers.
Freezing food
Freezing means reducing the core temperature of fresh, room-temperature food to frozen as quickly as possible – for best results “flash-frozen”. If not cooled quickly enough, the food will be “killed by frost”, i.e. the structure will be destroyed. A constant storage temperature of -18^ C is needed to maintain the food’s consistency, taste and nutritional value.
Preparing the food
- Only freeze high quality food.
- Freeze fresh and prepared food dry and unseasoned. Unsalted foods are more durable.
- Allow prepared food to cool before freezing. This not only saves power, but also prevents excessive frost formation in the freezer area.
- Carbonated drinks are not suitable for freezing because the carbon dioxide escapes during freezing.
Suitable packaging
Packaging is important when freezing. This will protect against oxidation, penetration by microbes, transfer of odours and flavourings and drying out (freezer burn).
- Only use packaging material that is strong, impermeable to air and liquid, not too stiff and which can be labelled. It should be designated as suitable for freezer use.
- Use plastic clips, rubber bands or adhesive tapes to seal.
Portions
- Use flat portions as much as possible; these freeze through to the core faster.
- Expel the air from the freezer bag as this causes the contents to dry out and takes up space.
- Fill liquid containers no more 3/4 full, because liquids expand when frozen.
- Do not store glass or metal containers containing liquids such as water, lemonade, beer, etc. Water expands when frozen and may burst the container.
Only high percentage alcohol (from 40% volume) should be frozen, make sure that it is tightly sealed.
- Label the frozen food by type, quantity, amount and expiry date. Use waterproof marker pens or adhesive labels wherever possible.
How to pack the freezer properly
Freezing smaller quantities
Once the freezer temperature is -18^ C, you can freeze fresh, room-temperature foods.
Maximum freezing capacity
Adhere to the maximum freezing capacity. You will find the details on the freezing capacity starting on page GB-31.
Keep fresh goods out of contact with existing frozen foods as they could start to thaw. If contact with stored food can not be avoided, we recommend that you create a cold reserve in the freezer before freezing the fresh goods.
The temperature in the freezer briefly rises after placing fresh goods inside. After 24 hours, the goods are frozen to the core.
Storing frozen food
The deep-freeze chain must not be broken between the manufacturer and your freezer. The temperature of the frozen food must always be at least -18^ C.
Therefore, do not buy any goods that
– are in frosty, over-icy chests.
– are stacked above the stipulated high-load marker.
– partially clumped (particularly easy to identify with berries and vegetables).
– have snow and juice traces.
Transport frozen foods in special styrofoam boxes or insulated bags.
Observe the storage conditions and times on the packaging.
Defrosting food
Observe the following basic rules when defrosting food:
- To defrost food, remove it from the freezer and let it defrost at room temperature or in the refrigerator.
– Always defrost meat, poultry and fish in the refrigerator. Make sure that the frozen food is not immersed in its own thawing liquid. - To defrost food quickly, use the defrost function on your microwave, for example. Observe the manufacturer's instructions and note that bacteria and germs can form in this way.
- If you only want to defrost part of a pack, remove the portion you need and immediately close the rest of the pack. In this way, you will avoid “freezer burn” and will reduce ice formation on the remaining foods.

Cook or use thawed foods as soon as possible. Dispose of the defrosting liquid.
Making ice cubes

CAUTION
Health hazard!
Eating ice cubes which have been prepared using impure or standing water can damage health. Incorrect handling can lead to risks of causing food poisoning.
■ Use only fresh drinking water to make ice cubes.
- Fill the supplied ice cube container to the 3/4 level with fresh drinking water and place it horizontally in the freezer compartment.

The ice cubes are best removed by bending the ice cube container slightly holding it under running water for a short
Care and maintenance

WARNING
Risk of electric shock!
Touching live parts may result in severe injury or death.
■ Before cleaning, unplug the mains plug from the socket or isolate/un-screw the fuse.
■ When pulling out the mains plug, always take hold of the mains plug itself and never the mains cord.

CAUTION
Dangers for children and people with limited physical, sensory or mental capacity!
■ Cleaning and user maintenance must not be carried out by children unless they are supervised.

NOTICE
The surfaces and appliance parts can be damaged through improper handling.
■ Never use harsh, granular, soda, acid, solvent-based or abrasive cleaners. These attack the plastic surfaces. All-purpose cleaners with a neutral pH are recommended.
■ Door seals and plastic parts are sensitive to oil and grease. Remove contaminants as quickly as possible.
■ Only use soft cloths.
Checking and cleaning the door seals
The door seals must be checked regularly so that no air can enter the appliance.
- To test them, clamp a thin piece of paper in various places. The paper should be difficult to pull through at all points.
- If the seal is not uniform everywhere: Warm the seal in the appropriate places in front of you with a hair dryer and pull it out with your fingers.
- Only clean dirty seals with clean water.
Clean exterior
- Painted surfaces
Use only light pH-neutral soapy water.
– Stainless steel surfaces
Use special stainless steel cleaner from a specialist shop. Never use polish.
Cleaning the reverse side
Remove dust and clean the back of the appliance and the compressor once or twice a year.
- Carefully brush the reverse side of the appliance and the compressor with a soft brush.
Defrosting and cleaning the inner compartment
The fridge compartment does not need to be defrosted as it is equipped with an automated thawing function. Frost and ice are automatically defrosted and the thaw water is collected in a thaw water container on the reverse side of the appliance. The thaw water evaporates as a result of the heat generated by the motor.
To defrost the freezer compartment, first create accumulated refrigeration. To do this, set the temperature controller (1) to "7" for at least 3 hours prior to defrosting.
The deep frozen food will now not defrost as quickly.

CAUTION
Danger of explosion!
Improper handling of the appliance can lead to defl agration or explosion!
■ Never use defrosting sprays. They can generate explosive gases.
- Do not use any means other than those recommended by the manufacturer to speed up defrosting. For example, do not use any electric heating equipment, knives or devices with an open flame such as a candle. The thermal insulation and the interior walls are scratch- and heat-sensitive and can melt.
- Set the temperature controller (1) to "0".
- Pull the mains plug out of the socket.
- Remove the frozen food from the freezer.
- Ensure that your food is kept cool enough. If you haven't got the opportunity to store the frozen food in another freezer in the meantime, wrap it up in a thick layer of newspaper and store it in a cool room or in an insulated bag while it is defrosting.
- Remove the drawers from the freezer compartment. Wash them in warm water with washing up liquid and dry thoroughly.
- To accelerate defrosting, place a bowl of hot, but not boiling, water in the freezer compartment. This will accelerate the defrosting process.
- Leave the door open while defrosting and place a cloth in front of the appliance to catch thaw water which may come out.
The defrosting time depends on the thickness of the ice layer. Experience dictates
that it is possible to start cleaning after approx. 1 hour.
-
Take the vegetable drawer, (7) the glass cover (6) and the glass shelves (8) out of the fridge compartment.
In order to remove the door shelves (3), push them together slightly sideways and simultaneously pull them upwards out of the holders. -
Clean all of the parts in lukewarm soapy water. Then dry everything thoroughly.
-
Wash the interior with warm water and washing up liquid.
When wiping clean, add a few drops of vinegar to the water to prevent mould from forming.
Wipe the interior dry and leave the door open a while to air.
text_image
(9) (10)-
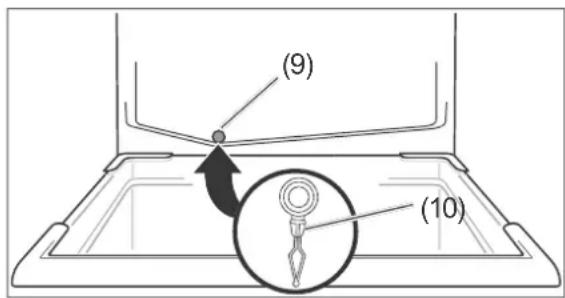
The defrost water drain (6) can be found on the reverse side of the refrigerator area above the vegetable drawer (9).
The cleaning tool can be found in the opening to the thaw water drain (10). Use it to clean the thaw water drain. -
Only clean the door seals with clean water; they are sensitive to oil and fat.
-
Replace the glass shelves (8), the vegetable drawer (6), the glass cover (7) and the door shelves (3).
-
Return the food to the fridge or freezer compartment.
-
Plug the mains plug back into the socket and turn the temperature controller (1) to level "7".
-
As soon as a temperature of -18 ^ has been reached, turn the temperature controller back to the usual position.
Interior light

WARNING
Risk of electric shock!
Touching live parts may result in severe injury or death.
■ Do not remove the cover from the interior lighting.
■ Do not attempt to replace the interior lighting.
Maintenance-free LEDs are used to light the appliance. If the interior light does not work, contact our customer service department (see page GB-30).
Start-up
Before starting to use the appliance
- Read chapter „Safety“ starting on page GB-5 and all the safety notices.
Unpacking and setup
WARNING
Risk of suffocation!
Children can become entangled in the packaging fi lm or swallow small parts and suffocate.
■ Do not allow children to play with the packaging fi lm.
CAUTION
Risk of injury!
Improper handling of the appliance may result in injury.
■ The appliance is heavy and bulky. Seek the help of another person when moving the appliance.
■ Drawers, doors etc. must not be used as steps or for support purposes.
Dangers from the refrigerant!
- Do not damage the refrigeration circuit, for example by piercing the refrigerant channels of the condensate vaporiser with sharp objects, cutting off the tubing, etc.
■ Refrigerant is flammable when spurting out and can damage the eyes. In this case, rinse your eyes in clean water and seek medical assistance immediately.
! NOTICE
Risk of damage!
Improper handling of the appliance may result in damage.
■ If possible, do not tilt the cooling appliance horizontally.
■ Do not use sharp or pointed objects to unpack it.
■ When unpacking the appliance, never damage the insulation material on the back of the appliance.
The appliance may not operate properly if exposed to low ambient temperatures for extended periods of time. This can then lead to an increase in temperature inside the appliance.
■ Always abide by the prescribed ambient temperature (see the ‘Climate categories’ line starting on page GB-31.
- Unpack the appliance and carefully remove all packaging, plastic moulding, adhesive strips, protective film and foam padding from the inside, outside and back of the appliance.
- Select a suitable location and adhere to the stipulated minimum distances and ambient temperatures (see the next page).
- To prevent the formation of a flammable gas-air mixture in the event of a leakage in the refrigeration circuit, the installation space must have a minimum size of 1m^3 per 8g of refrigerant in compliance with the EN 378 standard. The amount of refrigerant contained in your appliance can be found on page GB-33.
text_image
C A B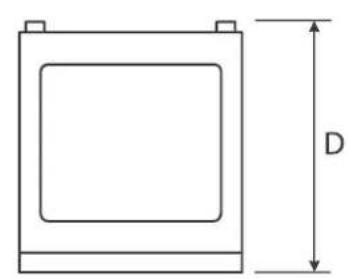
natural_image
Simple line drawing of a rectangular frame with a square cutout and labeled dimension D (no text or symbols beyond the label)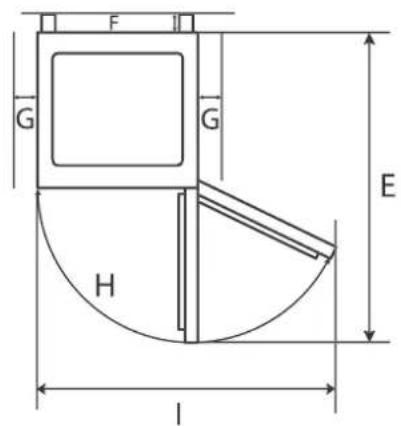
text_image
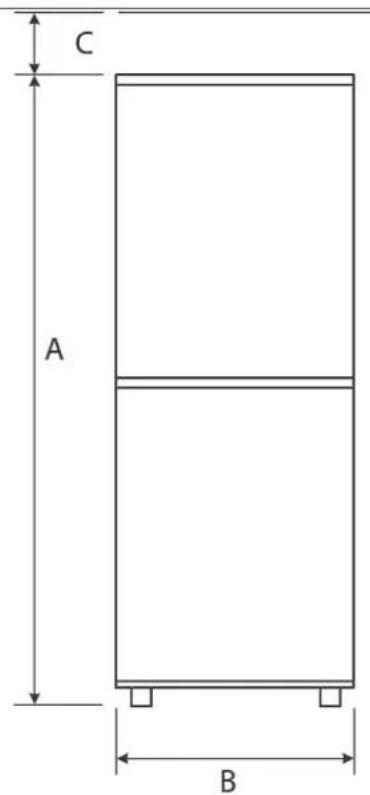
F G G H E lSpace requirement (when the door is open and when the door is closed)
Space required according to the appliance dimensions
A: 1613 ~mm B: 554 ~mm
C: 100 mm D: 558 mm
E: 1062 mm F: 70 mm
G: 100 mm H: 135°
l: 915 mm
- Suitable locations are dry, well-ventilated areas that are cool if possible.
- Unsuitable locations are ones with direct sunlight or which are directly next to an oven, hob or radiator.
- If underfloor heating is installed at the setup location, place the cooling appliance on an insulation plate made from solid material.
Setting up and aligning the appliance
- Place the appliance on as flat and as firm a base as possible.
- Check the position with a spirit level.
flowchart
graph TD
    A["Top Loop"] --> B["Bottom Loop"]
    B --> C["Top Loop"]
    style A fill:#f9f,stroke:#333
    style B fill:#bbf,stroke:#333
    style C fill:#dfd,stroke:#333
    subgraph Top
        D["↓"] --> E["←"]
        F["←"] --> G["←"]
        H["←"] --> I["←"]
        J["←"] --> K["←"]
    end
    subgraph Bottom
        L["↑"] --> M["←"]
        N["←"] --> O["←"]
        P["←"] --> Q["←"]
    end
    style D fill:#fff,stroke:#000
    style F fill:#fff,stroke:#000
    style H fill:#fff,stroke:#000
    style J fill:#fff,stroke:#000
    style L fill:#fff,stroke:#000
    style N fill:#fff,stroke:#000
    style P fill:#fff,stroke:#000
    style Q fill:#fff,stroke:#000
    subgraph Bottom
        R["↓"] --> S["←"]
        T["←"] --> U["←"]
        V["←"] --> W["←"]
        X["←"] --> Y["←"]
        Z["←"] --> AA["←"]
    end
    subgraph Top
        AB["↓"] --> AC["←"]
        AD["←"] --> AE["←"]
        AF["←"] --> AG["←"]
        AH["←"] --> AI["←"]
        AJ["←"] --> AK["←"]
        AL["←"] --> AM["←"]
    end
    subgraph Bottom
        AN["↓"] --> AO["←"]
        AP["←"] --> AQ["←"]
        AR["←"] --> AS["←"]
        AT["←"] --> AU["←"]
        AV["←"] --> AW["←"]
        AX["←"] --> AY["←"]
    end
-
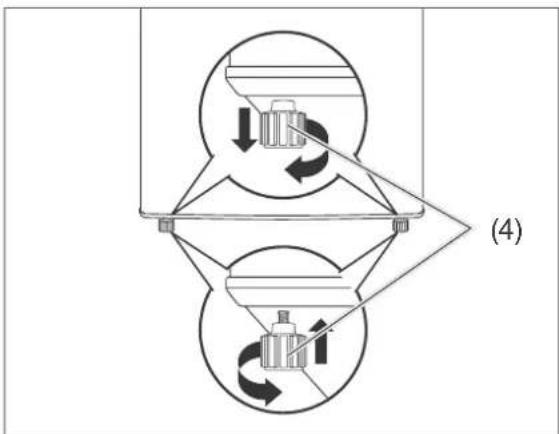
Level out any unevenness on the ground using the two front screw feet (4).
-
Close the doors.
- Tilt the appliance backwards slightly and screw/unscrew the screw feet.
- Stand the appliance back up again and check the alignment with a spirit level. Repeat the process until the appliance is standing up vertically. The appliance should not move when opening the doors.
Cleaning before use
In order to remove the odour which is present in all new appliances, wipe the fridge and freezer compartment out prior to first use with a solution made from 100 ml vinegar and 200 ml water. Then wipe it out with clean water and dry all of the parts off afterwards.
Commissioning the appliance

CAUTION
Fire hazard!
Improper handling of the appliance can lead to fire and property damage.
■ Only connect the appliance to a properly installed and earthed electric socket. Do not connect to a multi-socket extension cable or a multi-socket plug.

NOTICE
Risk of damage!
If the cooling unit has been transported horizontally, lubricant from the compressor may get into the cooling circuit.
- Allow the appliance to stand upright for approx. 2 hours after transport and before connecting. This allows the lubricant enough time to flow back into the compressor.
- Insert the mains plug into an easily accessible and properly installed socket (220-240 V\~ / 50 Hz).
When opening and closing the fridge compartment door, the fridge compartment light is (2) automatically switched on and off.

You will find all important information about operation starting on page GB-11.
Changing the door hinges
Depending on the space conditions, you can change the direction of the door hinges on your appliance. This work, however, requires you to have a certain degree of craftsmanship skills. Please read the following steps completely before changing the hinges.
In addition to the package contents, you will require:
- Star-headed screwdriver (PH2)
– Medium size flat-headed screwdriver - 8 and 10-sized spanner
Removing the doors
- Pull the mains plug out of the socket.
natural_image
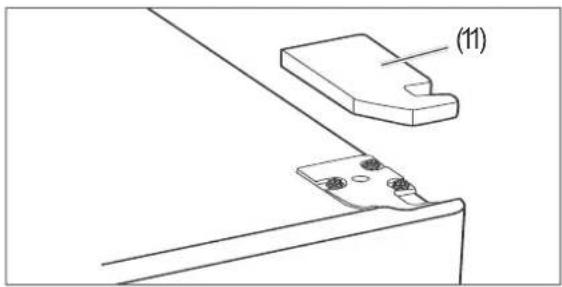
Technical line drawing of a mechanical assembly with two components and a labeled part (11), no readable text or symbols present.- Carefully lift the hinge faceplate up (11) with the help of a flat-headed screwdriver.
text_image
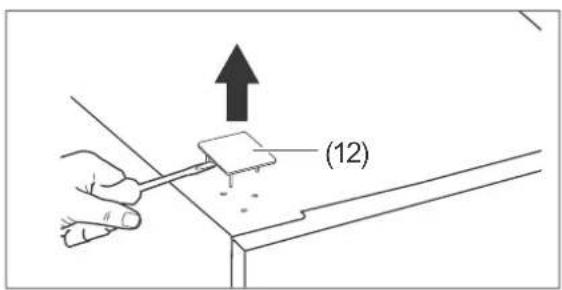
(12)- Also remove the covering plate (12) on the opposite side.
text_image
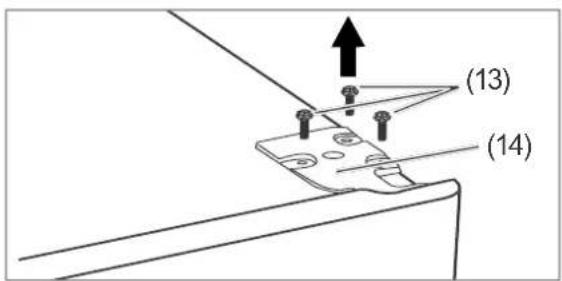
(13) (14)- Loosen and remove the screws (13) and remove the upper hinge (14).
text_image
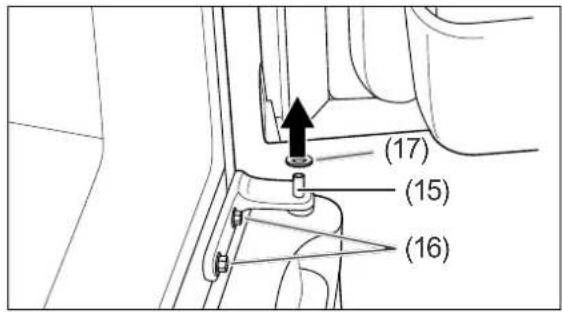
(17) (15) (16)- Open the fridge compartment door and lift it vertically upwards from the bolt on the middle hinge (15). Set the door aside.
- Unscrew both screws on the (16) middle hinge (15) and pull the hinge (15) out of the lower door.
- Remove the washer (17) from the middle hinge (15).
- Lift the freezer compartment door up and off and set it aside.
Preparing the hinges
text_image
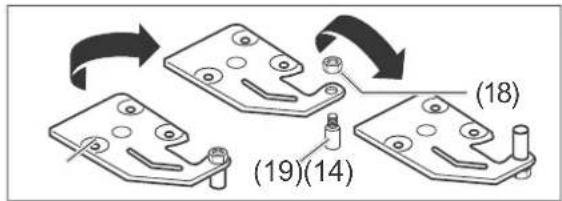
(18) (19)(14)- Unscrew the nuts (18) from the hinge bolts using a size 10 spanner (19). Unscrew the hinge bolts (19) from the upper side of the hinge faceplate (14) and re-screw them back onto the bottom. Rescrew the nuts tightly on to the hinge bolts.
text_image
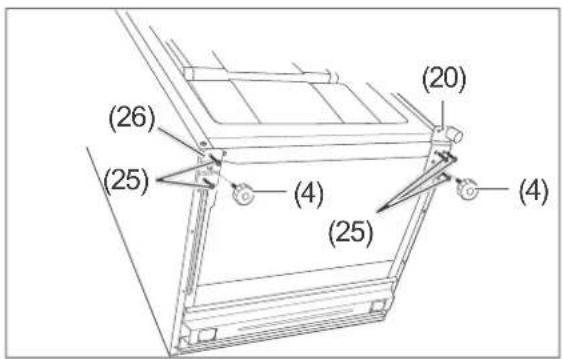
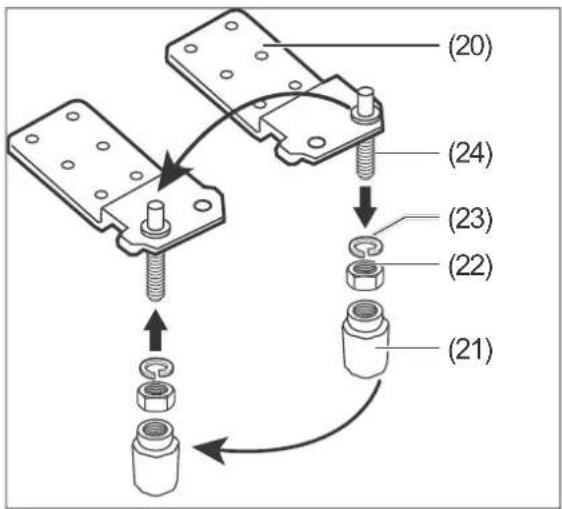
(26) (25) (4) (25) (20) (4)- Tip the appliance back as far as possible (45° max.) in such a way that the front feet of the appliance (4) and the lower hinge plate (20) are easy to reach.
- Unscrew both of the feet of the appliance (4) (anti-clockwise).
- Use a size 8 spanner to unscrew the three screws (25) on the hinge plate (20) and the two screws on the (25) supporting plate (26).
- Remove the hinge plate (20) and the supporting plate (26).
text_image
(20) (24) (23) (22) (21)- Unscrew the decorative cap (21) from the hinge bolt (24).
- Loosen the nut (22) and remove it and the snap ring (23).
- Move the hinge bolt (24) as shown above and reinsert or rescrew the snap ring (23) and the decorative cap (21) respectively.

text_image
(20) (4)- Screw the hinge plate (20) and the support plate back onto (26) the opposite side.
- Screw both appliance feet (4) back on.
- Reposition the appliance upright.
Preparing the doors
text_image
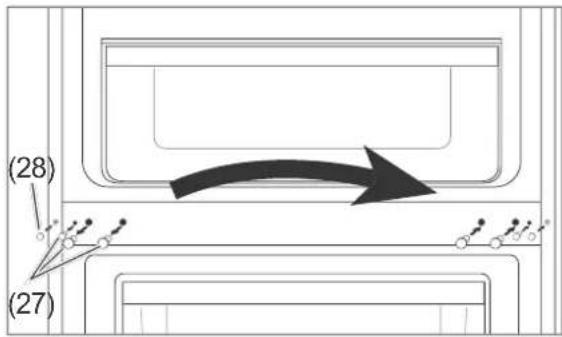
(28) (27)- Remove the 3 blind plugs (27) and the decorative cap (28) on the left side in the area of the middle hinge and affix them in the corresponding positions on the opposite side.
text_image
(29)-
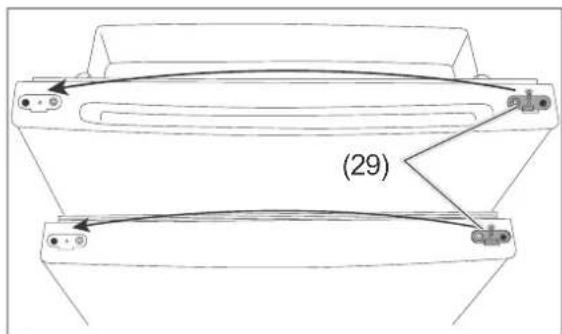
Unscrew the hinge bushings (29) from the top of the fridge compartment door and on the bottom of the freezer compartment door and screw them back on tightly on the opposite side.
-
Place the freezer compartment door on the lower hinge bolts (24) and close the door.
- Position the middle hinge (15) onto the freezer compartment door and screw it on tightly.
- Position the fridge compartment door on the bolts (19) on the middle hinge (15), and close the door.
text_image
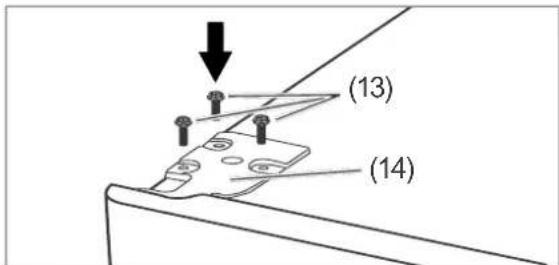
(13) (14)- Place the upper hinge plate (14) on the fridge compartment door and then screw it tight using the three cross-headed screws (13).
- Check whether the fridge compartment door is positioned accurately. If necessary, adjust it using the washer (17).
text_image
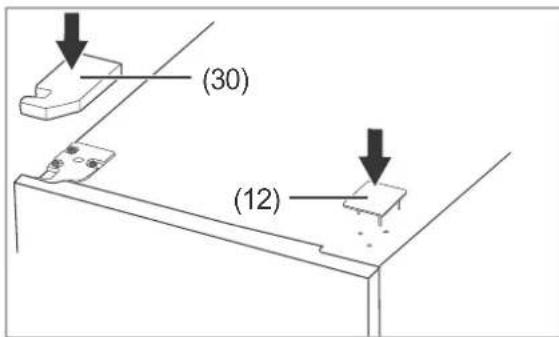
(30) (12)- Press the hinge faceplate (30) onto the hinge plate and the covering plate (12) into the holes on the opposite side.
This is the final step in changing the direction in which the door closes.
Troubleshooting table
Malfunctions can occur in all electrical appliances. This does not necessarily mean there is a defect in the appliance. For this reason, please check the tables to see if you can correct the malfunction.

WARNING
Risk of electric shock in case of improper repair!
Never try to repair a defective or suspected defective appliance yourself. You can put your own and future users' lives in danger. Only authorised specialists are allowed to carry out this repair work.
| Problem Possible cause Solutions, tips, explanations | ||
| Compressor off, interior light off. | No electricity to socket. Check the socket with another appliance. Check the fuse. | |
| Mains plug is loose. Check the tightness of the mains plug. | ||
| Compressor off, interior light on. | Temperature controller (1) is set to “0”. | Turn the temperature controller to a higher position see „Setting the temperature“ on page GB-11). |
| Desired temperature has been reached. | If the refrigerating temperature increases, the compressor will once again switch on independently. | |
| Appliance cools too quickly. | The temperature con-troller is set at too high a level. | Select a lower setting see „Setting the tempera-ture“ on page GB-11). |
| The appliance doesn’t cool suffi-ciently. | The temperature setting is set too low. | Select a higher setting see „Setting the temper-ature“ on page GB-11). |
| Door not tightly closed or door seal is not com-pletely tight. | See “Checking and cleaning the door seals” on page GB-18. | |
| The appliance is near a heat source. | Place insulation plate between the appliances or change location. | |
| Food has been stored warm. | Only store cooled foods. | |
| Too many goods frozen. | Do not exceed the maximum freezing capacity (see page GB-33). | |
| Thick ice layer in the freezer area. | Defrost the freezer compartment see „Defrosting and cleaning the inner compartment“ on page GB-18). | |
| Ambient temperature too low or too high. | Adjust the ambient temperature to the climate category starting on page GB-31. | |
| Compressor seems de-fective. | Set the temperature controller to “7”. If the com-pressor does not switch on within an hour, please contact our service centre (see page GB-30). | |
| Water has accumulated in the fridge compartment at the bot-tom. | The thaw water drain (9) is blocked. | Unblock the thaw water drain with the help of the supplied cleaning tool see „Defrosting and cleaning the inner compartment“ on page GB-18) |
| Appliance is making a noise. | Operating noises are functional and are not a sign of malfunction. | Quiet humming: Refrigeration unit is running. |
| Humming: Refrigerant is flowing through the pipes. | ||
| Clicking: Compressor is switching on or off. | ||
| Noises caused by vibra-tion. | Check that it is stable. | |
| Remove any objects from the appliance. | ||
| Remove any foreign matter from the back of the appliance. | ||
Environmental protection
Disposing of old electrical devices in an environmentally-friendly manner
Electrical appliances contain harmful substances as well as valuable resources.
Every consumer is therefore required by law to dispose of old elec-
trical appliances at an authorised collection or return point. They will thus be made available for environmentally-sound, resource-saving recycling.
You can dispose of old electrical appliances free of charge at your local recycling centre.
Please contact your dealer directly for more information about this topic.

CAUTION
Fire hazard!
Cooling appliances, which contain refrigerants and gases in the cooling systems and insulation, have to be properly disposed of. Refrigerant leakage may cause a fire hazard.
■ Until the point of proper disposal, ensure that none of the cooling fins or tubes on a cooling appliance are damaged.
Our contribution to the protection of the ozone layer

100% CFC and HFC-free refrigerants and foaming agents were used in this appliance. This protects the ozone layer and reduces the green-
house effect.
Our packaging is made of environmentally-friendly, recyclable materials:
– Outer packaging made of cardboard
– Moulded parts made of foamed, CFC-free polystyrene (PS)
– Films and bags made of polyethylene (PE)
– Tension bands made of polypropylene (PP)
- Saving energy also protects against excessive global warming. Your new appliance uses little energy due to its environmentally friendly insulation and technology.
If you would like to dispose of the packaging, please dispose of it in an environmentally friendly way.
Service
In order for us to help you quickly, please tell us:
| Name of appliance Colour Model Order number | |||
| hanseatic Fridge-freezer HKGK 16155A2W | White HKGK 16155A2W 6852 0636 | ||
| hanseatic Fridge-freezer HKGK 16155A3W/I | White HKGK 16155A3W 3764 7804 | ||
| Stainless steel | HKGK 16155A3I 5055 1012 | ||
Advice, order and complaint
Please contact your mail order company's customer service centre if
– the delivery is incomplete,
– the appliance is damaged during transport,
– you have questions about your appliance,
- a malfunction cannot be rectified using the troubleshooting table,
– you would like to order further accessories.
Repairs and spare parts
Customers in Germany
– Please contact our technical service:
Telephone: +49 (0)18 06 18 05 00 (landlines 20 cents/call, mobile networks max. 60 cents/call)
Customers in Austria
- Please contact your mail order company's customer service centre or product advice centre.

Please note: You are responsible for the condition of the appliance and its proper use in the household. If you call out for customer service due to an operating error, you will incur charges, even during the guarantee/warranty period. Damage resulting from non-compliance with this manual unfortunately cannot be recognised.
Product fiche concerning Regulation (EU) No 1060/2010
| Trade mark | hanseatic |
| Model identifier | 6852 0636 / HKG K16155A2W |
| Category of the household refrigerating appliance model | 7, Refrigerator-freezer |
| Energy efficiency class on a scale from A+++ (most efficient) to D (least efficient) | A++ |
| Energy consumption 192 kWh peryear, based on standard test results for 24 hours. Actual energy consumption will depend on how the appliance is used and where it is located | |
| Storage volumeRefrigerator 1 | 59 L |
| Storage volumeFreezer / Star rating | 66 L / 4 star |
| Power cut safe | 15 h |
| Freezing capacity | 3kg / 24h |
| Climate class: N,ST,T . This appliance is intended to be used at an ambient temperature between +16 °C and +43 °C. | |
| Airborne acoustical noise emissions | 39 dB(A) re 1 pW |
| Built-in appliance | no |
The values indicated above have been measured under standardised laboratory conditions pursuant to EN 62552.
| Trade mark | hanseatic |
| Model identifier | 3764 7804 / HKGK16155A3W5055 1012 / HKGK16155A3I |
| Category of the household refrigerating appliance model | 7, Refrigerator-freezer |
| Energy efficiency class on a scale from A+++ (most efficient) to D (least efficient) | A+++ |
| Energy consumption 128 kWh per year, based on standard test results for 24 hours. Actual energy consumption will depend on how the appliance is used and where it is located | |
| Storage volumeRefrigerator 1 | 59 L |
| Storage volumeFreezer / Star rating | 66 L / 4 star |
| Power cut safe | 18 h |
| Freezing capacity | 3 kg/ 24h |
| Climate class: N,ST,T . This appliance is intended to be used at an ambient temperature between +16 °C and +43 °C. | |
| Airborne acoustical noise emissions | 39 dB(A) re 1 pW |
| Built-in appliance | nc |
The values indicated above have been measured under standardised laboratory conditions pursuant to EN 62552.
Technical specifications
| Item number | 6852 0636 |
| Name of appliance | Refrigerator-freezer |
| Model identifier | HKGK16155A2W |
| Device measurements (Height × Width × Depth with connections) | 161,3 cm × 55,4 cm × 55,8 cm |
| Unloaded weight | 50 kg |
| Refrigerant | R600a |
| Filling capacity refrigerant | 68 g |
| Foaming agent | Cyclopentane |
| Rated power 1 | 04 W |
| Supply voltage / frequency / rated current | 220 - 240 V / 50 Hz / 0,6 A |
| Protection class | I |
| Item number | 3764 78045055 1012 |
| Name of appliance | Refrigerator-freezer |
| Model identifier | HKGK16155A3WHKGK16155A3I |
| Device measurements (Height × Width × Depth with connections) | 161,3 cm × 55,4 cm × 55,8 cm |
| Unloaded weight | 58 kg |
| Refrigerant | R600a |
| Filling capacity refrigerant | 67 g |
| Foaming agent | Cyclopentane |
| Rated power | 80 W |
| Supply voltage / frequency / rated current | 220 - 240 V / 50 Hz / 0,6 A |
| Protection class | I |