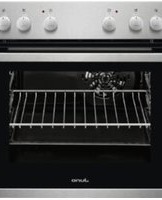
JB097C9 - Oven JUNO - Free user manual and instructions
Find the device manual for free JB097C9 JUNO in PDF.


| Product Type | Built-in Electric Oven |
| Brand | Juno |
| Model | JB097C9 |
| Energy Efficiency Class | A |
| Energy Consumption (Conventional) | 0.93 kWh/cycle |
| Energy Consumption (Fan-forced) | 0.81 kWh/cycle |
| Number of Cavities | 1 |
| Heat Source | Electricity |
| Oven Volume | 72 L |
| Weight | 28.8 kg |
| Dimensions (W x H x D) | 594 x 595 x 550 mm |
| Heating Functions | True Fan + Steam, Moist Fan Baking, Bottom Heat, True Fan Cooking, Turbo Grilling, Fast Grilling, Pizza Setting, Conventional Cooking |
| Steam Cooking | Yes, with water tank (900 ml capacity) |
| Display Type | Digital with clock functions |
| Control Type | Retractable knobs and electronic buttons |
| Safety Features | Child lock (activated manually), safety thermostat, cooling fan |
| Cleaning | Manual cleaning, water tank descaling with citric acid |
| Accessories Included | Wire shelf, combi pan |
| Interior Light | Yes, replaceable halogen lamp (300°C resistant) |
| Installation Type | Built-in |
Frequently Asked Questions - JB097C9 JUNO
User questions about JB097C9 JUNO
0 question about this device. Answer the ones you know or ask your own.
Ask a new question about this device
Download the instructions for your Oven in PDF format for free! Find your manual JB097C9 - JUNO and take your electronic device back in hand. On this page are published all the documents necessary for the use of your device. JB097C9 by JUNO.
USER MANUAL JB097C9 JUNO
Safety instructions 3
Product description 6
Before first use 6
Daily use 7
Clock functions 9
Using the accessories 11
Additional functions 14
Hints and tips 14
Care and cleaning 28
Troubleshooting 31
Installation 33
Energy efficiency 34
Subject to change without notice.
⚠ SAFETY INFORMATION
Before the installation and use of the appliance, carefully read the supplied instructions. The manufacturer is not responsible for any injuries or damages that are the result of incorrect installation or usage. Always keep the instructions in a safe and accessible location for future reference.
Children and vulnerable people safety
- This appliance can be used by children aged from 8 years and above and persons with reduced physical, sensory or mental capabilities or lack of experience and knowledge if they have been given supervision or instruction concerning the use of the appliance in a safe way and understand the hazards involved.
- Children between 3 and 8 years of age and persons with very extensive and complex disabilities shall be kept away unless continuously supervised.
- Children of less than 3 years of age should be kept away unless continuously supervised.
- Do not let children play with the appliance.
- Keep all packaging away from children and dispose of it appropriately.
- Keep children and pets away from the appliance when it operates or when it cools down. Accessible parts are hot.
- If the appliance has a child safety device, it should be activated.
- Children shall not carry out cleaning and user maintenance of the appliance without supervision.
General Safety
- Only a qualified person must install this appliance and replace the cable.
- WARNING: The appliance and its accessible parts become hot during use. Care should be taken to avoid touching heating elements.
- Always use oven gloves to remove or put in accessories or ovenware.
- Before carrying out any maintenance, disconnect the appliance from the power supply.
- Ensure that the appliance is switched off before replacing the lamp to avoid the possibility of electric shock.
- Do not use a steam cleaner to clean the appliance.
- Do not use harsh abrasive cleaners or sharp metal scrapers to clean the glass door since they can scratch the surface, which may result in shattering of the glass.
- If the mains power supply cable is damaged, it must be replaced by the manufacturer, its Authorised Service Centre or similarly qualified persons to avoid an electrical hazard.
- To remove the shelf supports first pull the front of the shelf support and then the rear end away from the side walls. Install the shelf supports in the opposite sequence.
SAFETY INSTRUCTIONS
Installation

WARNING! Only a qualified person must install this appliance.
- Remove all the packaging.
- Do not install or use a damaged appliance.
- Follow the installation instructions supplied with the appliance.
• Always take care when moving the appliance as it is heavy. Always use safety gloves and enclosed footwear. -
Do not pull the appliance by the handle.
-
Keep the minimum distance from other appliances and units.
• Install the appliance in a safe and suitable place that meets installation requirements. - The appliance is equipped with an electric cooling system. It must be operated with the electric power supply.
Electrical connection

WARNING! Risk of fire and electric shock.
- All electrical connections should be made by a qualified electrician.
• The appliance must be earthed.
- Make sure that the parameters on the rating plate are compatible with the electrical ratings of the mains power supply.
• Always use a correctly installed shockproof socket.
- Do not use multi-plug adapters and extension cables.
- Make sure not to cause damage to the mains plug and to the mains cable. Should the mains cable need to be replaced, this must be carried out by our Authorised Service Centre.
- Do not let mains cables touch or come near the appliance door, especially when the door is hot.
- The shock protection of live and insulated parts must be fastened in such a way that it cannot be removed without tools.
- Connect the mains plug to the mains socket only at the end of the installation. Make sure that there is access to the mains plug after the installation.
- If the mains socket is loose, do not connect the mains plug.
- Do not pull the mains cable to disconnect the appliance. Always pull the mains plug.
- Use only correct isolation devices: line protecting cut-outs, fuses (screw type fuses removed from the holder), earth leakage trips and contactors.
- The electrical installation must have an isolation device which lets you disconnect the appliance from the mains at all poles. The isolation device must have a contact opening width of minimum 3 mm.
- This appliance complies with the E.E.C. Directives.
Use

WARNING! Risk of injury, burns and electric shock or explosion.
- This appliance is for household use only.
- Do not change the specification of this appliance.
- Make sure that the ventilation openings are not blocked.
- Do not let the appliance stay unattended during operation.
- Deactivate the appliance after each use.
- Be careful when you open the appliance door while the appliance is in operation. Hot air can release.
- Do not operate the appliance with wet hands or when it has contact with water.
- Do not apply pressure on the open door.
- Do not use the appliance as a work surface or as a storage surface.
- Open the appliance door carefully. The use of ingredients with alcohol can cause a mixture of alcohol and air.
- Do not let sparks or open flames to come in contact with the appliance when you open the door.
- Do not put flammable products or items that are wet with flammable products in, near or on the appliance.

WARNING! Risk of damage to the appliance.
- To prevent damage or discoloration to the enamel:
– do not put ovenware or other objects in the appliance directly on the bottom.
– do not put aluminium foil directly on the bottom of cavity of the appliance.
– do not put water directly into the hot appliance.
– do not keep moist dishes and food in the appliance after you finish the cooking.
– be careful when you remove or install the accessories.
- Discoloration of the enamel or stainless steel has no effect on the performance of the appliance.
- Use a deep pan for moist cakes. Fruit juices cause stains that can be permanent.
- This appliance is for cooking purposes only. It must not be used for other purposes, for example room heating.
• Always cook with the oven door closed. - If the appliance is installed behind a furniture panel (e.g. a door) make sure the door is never closed when the appliance is in operation. Heat and moisture can build up behind a closed furniture panel and cause subsequent damage to the appliance, the housing unit or the floor. Do not close the furniture panel until the appliance has cooled down completely after use.
Steam Cooking

WARNING! Risk of burns and damage to the appliance.
- Released Steam can cause burns:
- Do not open the appliance door during the steam cooking operation.
- Open the appliance door with care after the steam cooking operation.
Care and cleaning

WARNING! Risk of injury, fire, or damage to the appliance.
- Before maintenance, deactivate the appliance and disconnect the mains plug from the mains socket.
- Make sure the appliance is cold. There is the risk that the glass panels can break.
- Replace immediately the door glass panels when they are damaged. Contact the Authorised Service Centre.
- Be careful when you remove the door from the appliance. The door is heavy!
-
Clean regularly the appliance to prevent the deterioration of the surface material.
-
Clean the appliance with a moist soft cloth. Only use neutral detergents. Do not use any abrasive products, abrasive cleaning pads, solvents or metal objects.
- If you use an oven spray, follow the safety instruction on it's packaging.
- Do not clean the catalytic enamel (if applicable) with any kind of detergent.
Internal lighting

WARNING! Risk of electric shock.
- The type of light bulb or halogen lamp used for this appliance is for household appliances only. Do not use it for house lighting.
- Before replacing the lamp, disconnect the appliance from the power supply.
- Only use lamps with the same specifications.
Service
• To repair the appliance contact an Authorised Service Centre.
- Use original spare parts only.
Disposal

WARNING! Risk of injury or suffocation.
- Disconnect the appliance from the mains supply.
- Cut off the mains electrical cable close to the appliance and dispose of it.
- Remove the door catch to prevent children or pets from becoming trapped in the appliance.
PRODUCT DESCRIPTION
General overview
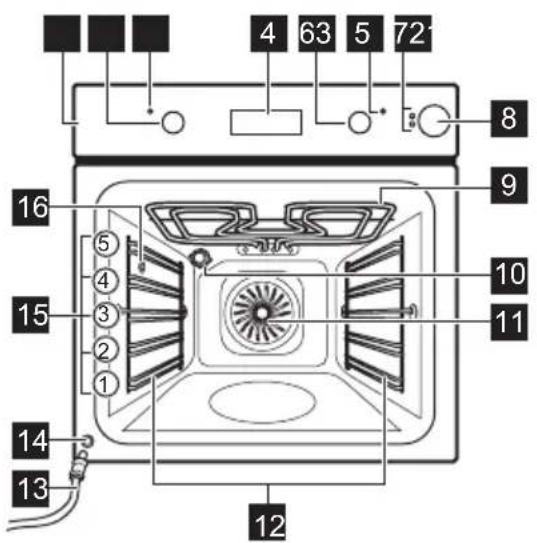
1 Control panel
2 Knob for the heating functions
3 Power lamp / symbol
4 Display
5 Control knob (for the temperature)
6 Temperature indicator / symbol
7 Water tank indicator
8 Water drawer
9 Heating element
10 Lamp
11 Fan
12 Shelf support, removable
13 Draining pipe
14 Water outlet valve
15 Shelf positions
16 Steam inlet
Accessories
- Wire shelf
For cookware, cake tins, roasts. - Combi pan
BEFORE FIRST USE

WARNING! Refer to Safety chapters.

To set the Time of day refer to "Clock functions" chapter.
Initial Cleaning
Remove all accessories and removable shelf supports from the oven.

Refer to "Care and cleaning" chapter.
Clean the oven and the accessories before first use.
Put the accessories and the removable shelf supports back to their initial position.
For cakes and biscuits. To bake and roast or as a pan to collect fat.
Preheating
Preheat the empty oven before first use.
- Set the function .Set the maximum temperature.
- Let the oven operate for 1 hour.
- Set the function . Set the maximum temperature.
- Let the oven operate for 15 minutes.
- Set the function 📄. Set the maximum temperature.
- Let the oven operate for 15 minutes.
- Turn off the oven and let it cool down. Accessories can become hotter than usual. The oven can emit an odour and smoke. Make sure that the airflow in the room is sufficient.

WARNING! Refer to Safety chapters.
Retractable knobs
To use the appliance press the knob. The knob comes out.
Setting a heating function
- Turn the knob for the heating functions to select a heating function.
- Turn the control knob to select the temperature.
The lamp turns on when the oven operates.
- To turn off the oven, turn the knob for the heating functions to the off position.
Heating functions
| Oven function | Application |
| Off position | The oven is off. |
| Light | To turn on the lamp without a cooking function. |
| True Fan + Steam | To steam dishes. Use this function to decrease the length of the cooking time and to preserve the vitamins and nutrients in the food. Select the function and set the temperature between 130 °C to 230 °C. |
| Oven func-tion | Application |
 Moist FanBaking Moist FanBaking | This function is designed to save energy during cooking. For the cooking instructions refer to "Hints and tips" chapter, Moist Fan Baking. The oven door should be closed during cooking so that the function is not interrupted and to ensure that the oven operates with the highest energy efficiency possible. When you use this function, the temperature in the cavity may differ from the set temperature. The heating power may be reduced. For general energy saving recommendations refer to "Energy Efficiency" chapter, Energy Saving. This function was used to comply with the energy efficiency class according to EN 60350-1. |
 Bottom Heat Bottom Heat | To bake cakes with crispy bottom and to preserve food. |
 True FanCooking True FanCooking | To bake on up to three shelf positions at the same time and to dry food.Set the temperature 20 - 40 °C lower than for Conventional Cooking. |
 Turbo Grilling Turbo Grilling | To roast larger meat joints or poultry with bones on one shelf position. To make gratins and to brown. |
 Fast Grilling Fast Grilling | To grill flat food in large quantities and to toast bread. |
 Pizza Setting Pizza Setting | To bake pizza. To make intensive browning and a crispy bottom. |
Display
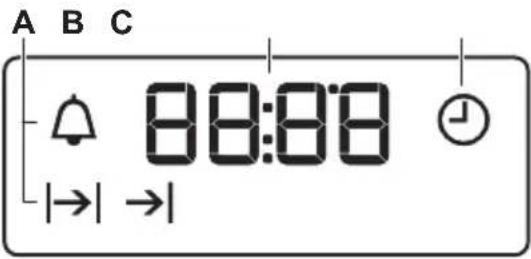
| Oven func-tion | Application |
 Conventional Cooking (Top / Bottom Heat) Conventional Cooking (Top / Bottom Heat) | To bake and roast food on one shelf position. |
A. Clock functions
B. Timer
C. Clock function
Buttons
| Button Function Description | ||
 | MINUS To set the time. | |
 | CLOCK To set a clock function. | |
 | PLUS To set the time. | |
Steam Cooking

Use only water. Do not use filtered (demineralised) or distilled water. Do not use other liquids. Do not put flammable or alcoholic liquids into the water drawer.
- Set the function
- Press the cover of the water drawer to open it.
-
Fill the water drawer with water until the Tank Full indicator is on. The maximum capacity of the tank is 900 ml. It is sufficient for approximately 55 - 60 minutes of cooking.
-
Push the water drawer to its initial position.
- Set the temperature between 130^ C and 230^ C.
Steam cooking gives good results with this temperature range. - Empty the water tank after the steam cooking is completed.
Wait for at least 60 minutes after each use of the steam function to prevent hot water from exiting the water outlet valve.

CAUTION! The appliance is hot. There is a risk of burns. Be careful when you empty the water drawer.
Tank empty indicator
The indicator shows that the tank is empty and must be refilled.
For more information refer to "Steam Cooking".
Tank Full indicator
The indicator shows that the oven is prepared for steam cooking.

If you put too much water into the tank, the safety outlet moves the excess water to the bottom of the oven. Remove the water with a sponge or cloth.
Emptying the water tank

CAUTION! Make sure that the oven is cold before you start to empty the water tank.
- Prepare the draining pipe (C), included in the package with the user manual. Put the connector (B) onto one of the ends of the draining pipe.
- Put the second end of the draining pipe (C) into a container. Put it at a lower position than the outlet valve (A).
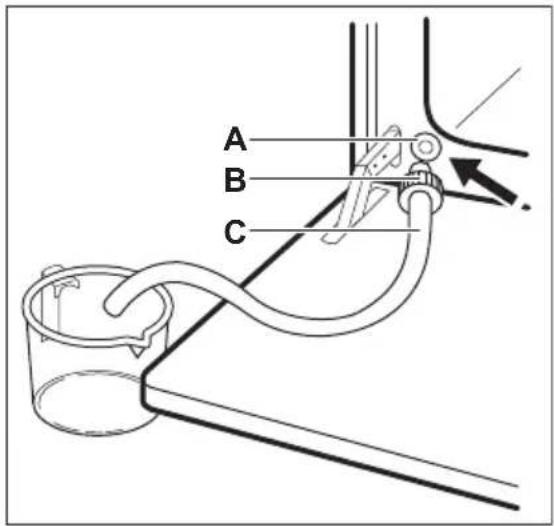
- Open the oven door and put the connector (B) into the outlet valve (A).
- Push the connector again and again to empty the water tank. The water may remain inside after the Tank Empty indicator ☐ on. Wait until the water flow from the water outlet valve stops.
- Remove the connector from the valve when the water stops flowing.

Do not use the drained water to fill the water tank again.
CLOCK FUNCTIONS
Clock functions table
| Clock function Application | ||
| ➊ | TIME OF DAY To set, change or check the time of day. | |
| |→| | DURATION To set how long the appliance operates. | |
| →| | END To set when the appliance deactivates. | |
| |→|→| | TIME DELAY To combine DURATION and END function. | |
| ➁ | MINUTE MINDER | To set countdown time. This function has no effect on the operation of the appliance. You can set the MINUTE MINDER at any time, also when the appliance is off. |
Setting the time. Changing the time
You must set the time before you operate the oven.
The + flashes when you connect the appliance to the electrical supply, when there was a power cut or when the timer is not set.
Press the + or to set the correct time. After approximately five seconds, the flashing stops and the display shows the time of day you set.
To change the time of day press again and again until starts to flash.
Setting the DURATION
- Set an oven function and temperature.
- Press ⏻ again and again until |→| starts to flash.
- Press or to set the DURATION time.
The display shows |→|
- When the time ends, || flashes and an acoustic signal sounds. The appliance deactivates automatically.
- Press any button to stop the acoustic signal.
- Turn the knob for the oven functions and the knob for the temperature to the off position.
Setting the END
- Set an oven function and temperature.
- Press again and again until →| starts to flash.
- Press or to set the time.
The display shows →|
- When the time ends, flashes and an acoustic signal sounds. The appliance deactivates automatically.
- Press any button to stop the signal.
- Turn the knob for the oven functions and the knob for the temperature to the off position.
Setting the TIME DELAY
- Set an oven function and temperature.
- Press again and again until starts to flash.
- Press or to set the time for DURATION.
- Press ⏻.
- Press or to set the time for END.
- Press to confirm.
Appliance turns on automatically later on, works for the set DURATION time and stops at the set END time. At the set time an acoustic signal sounds.
- The appliance deactivates automatically. Press any button to stop the signal.
- Turn the knob for the oven functions and the knob for the temperature to the off position.
Setting the MINUTE MINDER
- Press again and again until starts to flash.

- Press or to set the necessary time.
The Minute Minder starts automatically after 5 seconds.
- When the set time ends, an acoustic signal sounds. Press any button to stop the acoustic signal.
- Turn the knob for the oven functions and the knob for the temperature to the off position.
Cancelling the clock functions
- Press the again and again until the necessary function indicator starts to flash.
- Press and hold .
The clock function goes out after some seconds.
USING THE ACCESSORIES

WARNING! Refer to Safety chapters.
Inserting the accessories
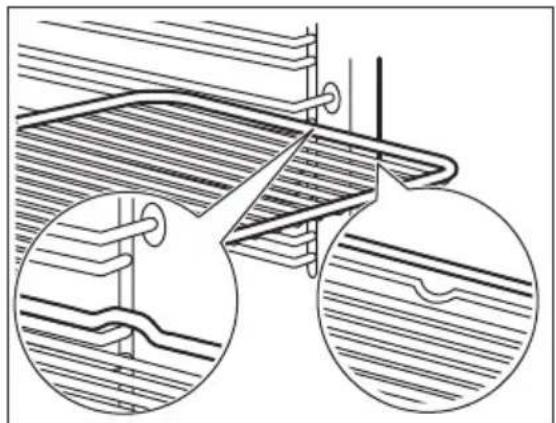
Wire shelf:
Push the shelf between the guide bars of the shelf support and make sure that the feet point down.
natural_image
Technical line drawing of a mechanical assembly with two circular insets showing internal components (no text or symbols)Deep pan:
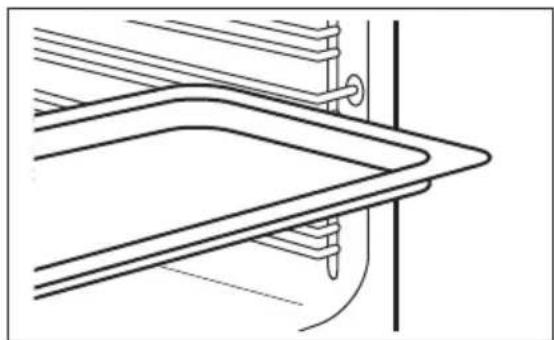
Push the deep pan between the guide bars of the shelf support.
natural_image
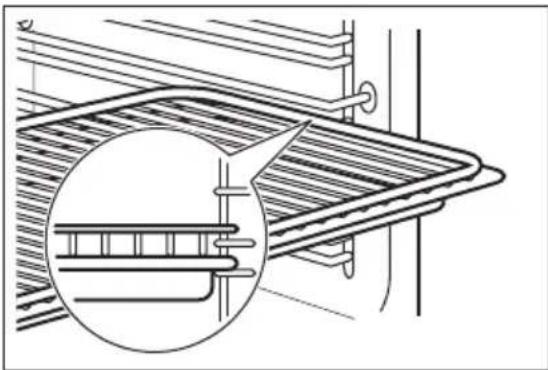
Pure technical line drawing of a mechanical component or bracket assembly without any text, numbers, or symbolsWire shelf and deep pan together:
Push the deep pan between the guide bars of the shelf support and the wire shelf on the guide bars above.
natural_image
Technical line drawing of a structural component with an inset magnified detail (no text or symbols)
Small indentation at the top increase safety. The indentations are also anti-tip devices. The high rim around the shelf prevents cookware from slipping of the shelf.
Accessories for steam cooking

The steam kit accessories are not supplied with the oven. For more information, please contact your local supplier.
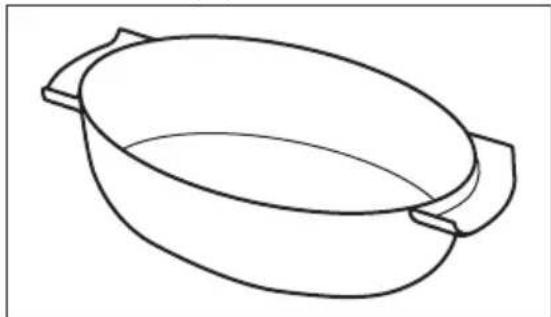
The dietary baking dish for steam cooking functions
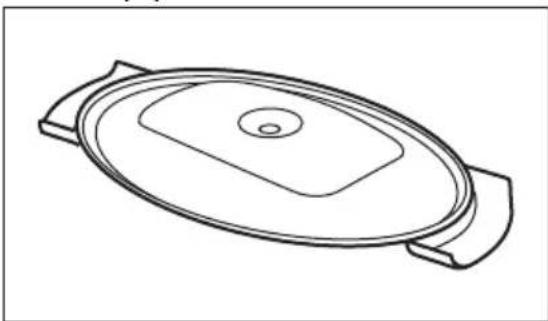
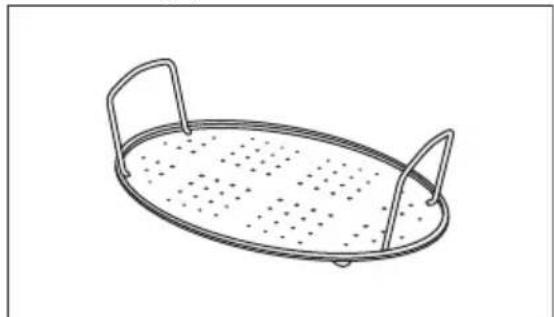
The dish consists of a glass bowl, a lid with a hole for the injector tube (C) and a steel grill to put at the bottom of the baking dish.
Glass bowl (A)
natural_image
Line drawing of a cooking pot with two handles (no text or symbols)Lid (B)
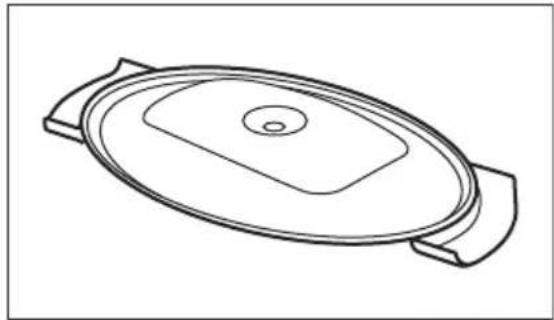
natural_image
Line drawing of a cooking pan with lid and side handles (no text or symbols)The injector and the injector tube
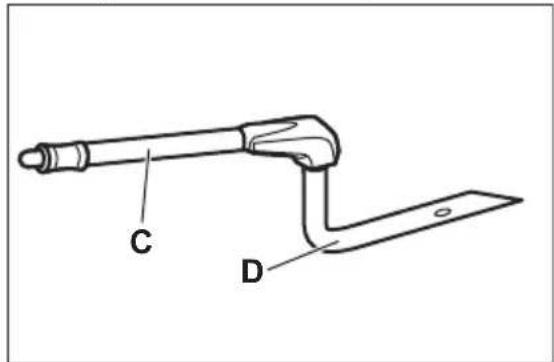
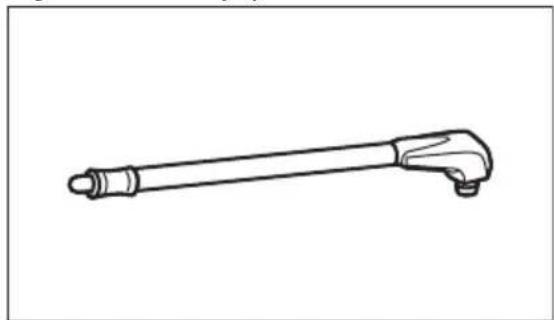
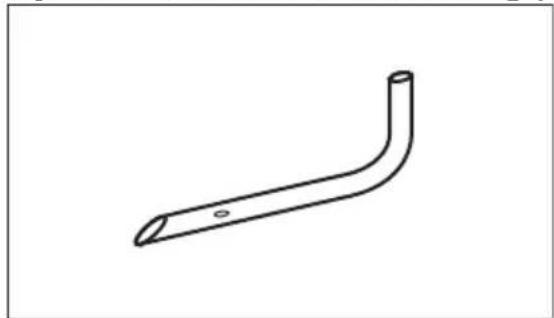
"C" is the injector tube for steam cooking, "D" is the injector for direct steam cooking.
Injector tube (C)
natural_image
Line drawing of a mechanical tool or probe (no text or symbols present)Injector for direct steam cooking (D)
natural_image
Simple line drawing of a bent pipe or support structure (no text or symbols)Steel grill (E)
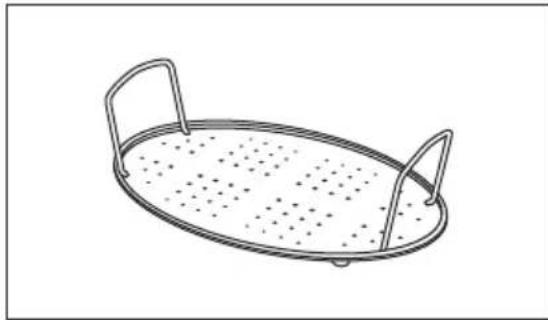
natural_image
Line drawing of an oval-shaped metal grater with two handles and perforated interior (no text or symbols)- Do not put the hot baking dish on cold / wet surfaces.
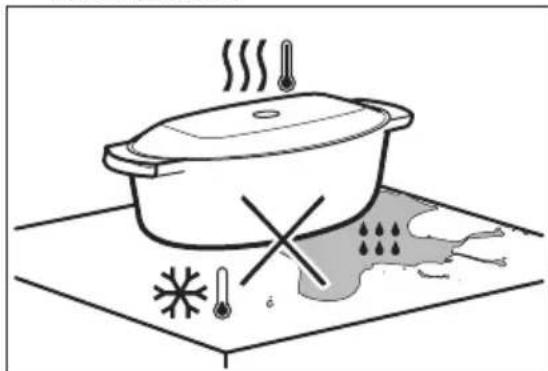
natural_image
Illustration of a cooking pot with steam rising, marked with a cross and thermometer symbols (no text or labels)- Do not put cold liquids in the baking dish when it is hot.
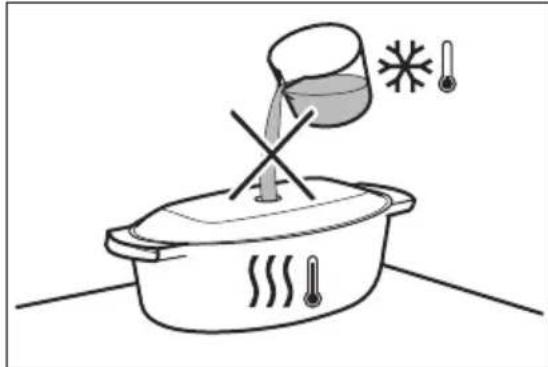
natural_image
Simple line drawing of a cooking pot with a lid and steam rising, no text or symbols present- Do not use the baking dish on a hot cooking surface.
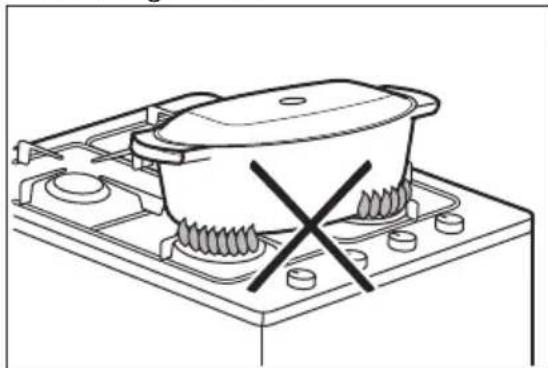
natural_image
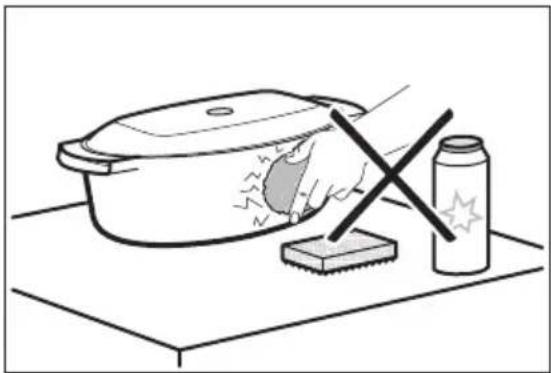
Line drawing of a cooking pot on a stove with a crossed X mark indicating resistance (no text or symbols)- Do not clean the baking dish with abrasives, scourers and powders.
natural_image
Illustration of a cooking pot with a hand using a tool to clean food, next to a spray bottle and a square base (no text or symbols)Steam cooking in a dietary baking dish
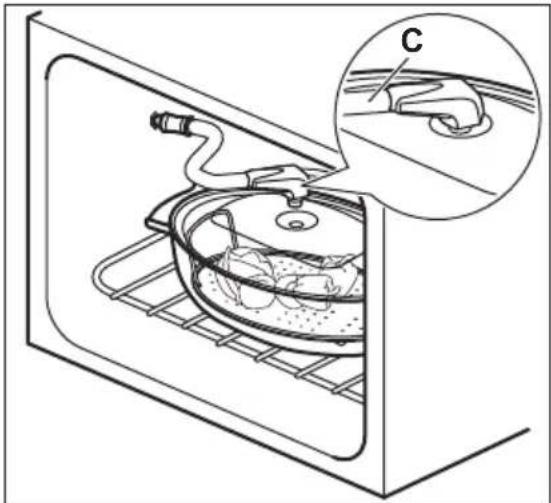
Put the food onto the steel grill in the baking dish and put the lid on it.
- Put the injector tube into the special hole in the lid of the dietary baking dish.
natural_image
Line drawing of a kitchen appliance with a lid and base, showing internal components and a magnified inset labeled 'C' (no text or symbols present)- Put the baking dish onto the second shelf position from the bottom.
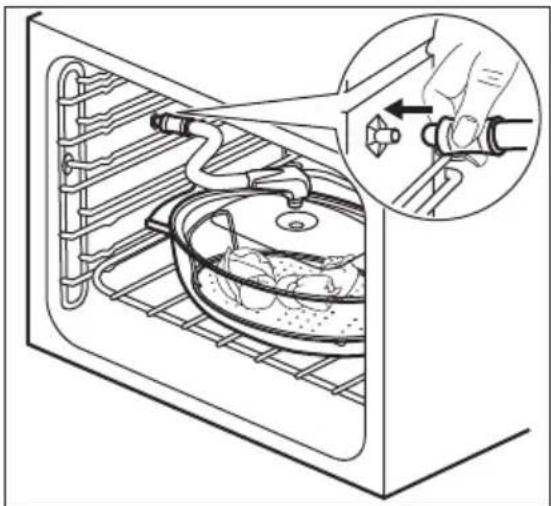
- Put the other end of the injector tube into the steam inlet.
natural_image
Diagram of a kitchen appliance with a hand operating a valve, showing internal components and a magnified view of the handle (no text or symbols present)Make sure that you do not crush the injector tube or let it touch a heating element on the top of the oven.
- Set the oven for the steam cooking function.
Direct steam cooking
Put the food onto the steel grill in the baking dish. Add some water.

CAUTION! Do not use the lid of the dish.

WARNING! Be careful when you use the injector when the oven operates. Always use oven gloves to touch the injector when the oven is hot. Always remove the injector from the oven when you do not use a steam function.

The injector tube is specially made for cooking and does not contain dangerous materials.
- Put the injector (D) into the injector tube (C). Connect the other end into the steam inlet.

natural_image
Diagram of a kitchen appliance showing internal components and a close-up of a hand holding a tool (no text or symbols present)- Put the baking dish onto the first or second shelf position from the bottom. Make sure that you do not crush the injector tube or let it touch a heating element on the top of the oven.
- Set the oven for the steam cooking function.
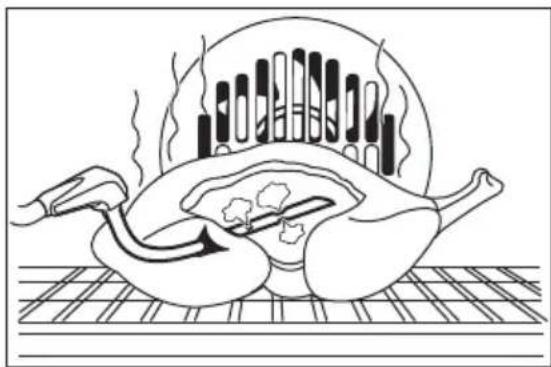
When you cook food such as chicken, duck, turkey, kid or large fish, put the injector (D) directly into the empty part of the meat. Make sure that you do not cause a blockage of the holes.
natural_image
Line drawing of a cooked chicken with steam rising, surrounded by food items (no text or symbols)For more information about steam cooking, refer to the cooking tables for steam cooking in the chapter "Hints and Tips".
ADDITIONAL FUNCTIONS
Cooling fan
When the oven operates, the cooling fan turns on automatically to keep the surfaces of the oven cool. If you turn off the oven, the cooling fan can continue to operate until the oven cools down.
Safety thermostat
Incorrect operation of the oven or defective components can cause
HINTS AND TIPS

WARNING! Refer to Safety chapters.

The temperature and baking times in the tables are guidelines only. They depend on the recipes and the quality and quantity of the ingredients used.
Cooking recommendations
The oven has five shelf positions.
Count the shelf positions from the bottom of the oven floor.
Your oven may bake or roast differently to the oven you had before. The below
dangerous overheating. To prevent this, the oven has a safety thermostat which interrupts the power supply. The oven turns on again automatically when the temperature drops.
tables provide you with the standard settings for temperature, cooking time and shelf position.
If you cannot find the settings for a special recipe, look for the similar one.
The oven has a special system which circulates the air and constantly recycles the steam. With this system you can cook in a steamy environment and keep the food soft inside and crusty outside. It decreases the cooking time and energy consumption.
Baking cakes
Do not open the oven door before 3/4 of the set cooking time is up.
If you use two baking trays at the same time, keep one empty level between them.
Cooking meat and fish
Use a deep pan for very fatty food to prevent the oven from stains that can be permanent.
Leave the meat for approximately 15 minutes before carving so that the juice does not seep out.
To prevent too much smoke in the oven during roasting, add some water into the deep pan. To prevent the smoke condensation, add water each time after it dries up.
Cooking times
Cooking times depend on the type of food, its consistency, and volume.
Initially, monitor the performance when you cook. Find the best settings (heat setting, cooking time, etc.) for your cookware, recipes and quantities when you use this appliance.
Baking and roasting
Cakes
| Food Top / Bottom Heat True Fan Cooking Time | (min) | Comments | ||||
| Tempera-ture (°C) | Shelf position | Temper-ature (°C) | Shelf position | |||
| Whisked recipes | 170 2 160 3 (2 and | 4) | 45 - 60 In a cake mould | |||
| Short-bread dough | 170 2 160 3 (2 and | 4) | 20 - 30 In a cake mould | |||
| Buttermilk cheese-cake | 170 1 165 2 60 - 80 In a 26 | cm cake mould | ||||
| Apple cake (Ap-ple pie) 1) | 170 2 160 2 (left | and right) | 80 - 100 In two 20 cm cake moulds on a wire shelf | |||
| Strudel 175 3 150 2 60 - 80 In a bak- | ing tray | |||||
| Jam-tart 170 2 165 2 (left | and right) | 30 - 40 In a 26 cm cake mould | ||||
| Sponge cake | 170 2 160 2 50 - 60 In a 26 | cm cake mould | ||||
| Christ-mas cake / Rich fruit cake^1) | 160 2 150 2 | 90 - 120 In a | 20 | cm cake mould | ||
| Plum cake^1) | 175 1 160 2 | 50 - 60 In a | bread | tin | ||
| Small cakes - one level | 170 3 140 - | 150 3 20 - 30 | In a bak- | ing tray | ||
| Small cakes - two lev-els | -- 140 - 150 2 and 4 25 - 35 In a bak- | ing tray | ||||
| Small cakes - three lev-els | -- 140 - 150 1, 3 and | 5 | 30 - 45 In a bak-ing tray | |||
| Biscuits / pastry stripes - one level | 140 3 140 - | 150 3 30 - 35 | In a bak- | ing tray | ||
| Biscuits / pastry stripes - two lev-els | -- 140 - 150 2 and 4 35 - 40 In a bak- | ing tray | ||||
| Biscuits / pastry stripes - three lev-els | -- 140 - 150 1, 3 and | 5 | 35 - 45 In a bak-ing tray | |||
| Merin-gues - one level | 120 3 120 3 | 80 - 100 In a | bak- | ing tray | ||
| Merin-gues-two lev-els 1) | -- 120 2 and 4 80 - 100 In a bak- | ing tray | ||||
| Buns 1) | 190 3 190 3 12 - 20 In a bak- | ing tray | ||||
| Eclairs - one level | 190 3 170 3 25 - 35 In a bak- | ing tray | ||||
| Eclairs - two lev-els | -- 170 2 and 4 35 - 45 In a bak- | ing tray | ||||
| Plate tarts | 180 2 170 2 45 - 70 In a 20 | cm cake mould | ||||
| Rich fruit cake | 160 1 150 2 110 - 120 In a 24 | cm cake mould | ||||
| Victoria sandwich | 170 1 160 2 (left | and right) | 50 - 60 In a 20 | cm cake mould | ||
1) Preheat the oven for 10 minutes.
Bread and pizza
| Food Top / Bottom Heat True Fan Cooking Time | (min) | Comments | ||||
| Temper- ature (°C) | Shelf po- sition | Temper- ature (°C) | Shelf po- sition | |||
| White bread 1) | 190 1 190 | 1 60 - 70 1 - 2 | pieces, 500 gr per piece | |||
| Rye bread | 190 1 180 | 1 30 - 45 In a | bread tin | |||
| Bread rolls 1) | 190 2 180 | 2 (2 and | 4) | 25 - 40 6 - 8 rolls in a bak- ing tray | ||
| Pizza 1) | 230 - 250 | 1 230 - 250 | 1 10 - 20 In a bak- | ing tray or a deep pan | ||
| Scones 1) | 200 3 190 | 3 10 - 20 In a bak- | ing tray | |||
1) Preheat the oven for 10 minutes.
Flans
| Food Top / Bottom Heat True Fan Cooking Time | (min) | Comments | ||||
| Temper- ature (°C) | Shelf po- sition | Temper- ature (°C) | Shelf po- sition | |||
| Pasta flan | 200 2 180 | 2 40 - 50 In a | mould | |||
| Vegeta- ble flan | 200 2 175 | 2 45 - 60 In a | mould | |||
| Quich- es 1) | 180 1 180 | 1 50 - 60 In a | mould | |||
| La- sagne 1) | 180 - 190 | 2 180 - 190 2 | 25 - 40 In a | mould | ||
| Cannello- ni 1) | 180 - 190 | 2 180 - 190 2 | 25 - 40 In a | mould | ||
1) Preheat the oven for 10 minutes.
Meat
| Food Top / Bottom Heat True Fan Cooking Time | (min) | Comments | ||||
| Temper- ature (°C) | Shelf po- sition | Temper- ature (°C) | Shelf po- sition | |||
| Beef 200 2 | 190 2 50 - 70 | On a wire | shelf | |||
| Pork 180 2 | 180 2 90 - 120 | On a wire | shelf | |||
| Veal 190 2 | 175 2 90 - 120 | On a wire | shelf | |||
| English roast beef, rare | 210 2 200 | 2 50 - 60 On a wire | shelf | |||
| English roast beef, me- dium | 210 2 200 | 2 60 - 70 On a wire | shelf | |||
| English roast beef, well done | 210 2 200 | 2 70 - 75 On a wire | shelf | |||
| Shoulder of pork | 180 2 170 | 2 120 - 150 With rind | ||||
| Shin of pork | 180 2 160 | 2 100 - 120 2 pieces | ||||
| Lamb 190 2 | 175 2 110 - 130 Leg | |||||
| Chicken 220 | 2 200 2 70 - 85 Whole | |||||
| Turkey 180 | 2 160 2 210 - 240 Whole | |||||
| Duck 175 2 | 220 2 120 - 150 Whole | |||||
| Goose 175 | 2 160 1 150 - 200 Whole | |||||
| Rabbit 190 | 2 175 2 60 - 80 Cut in | pieces | ||||
| Hare 190 2 | 175 2 150 - 200 Cut in | pieces | ||||
| Pheasant | 190 2 175 2 90 - 120 Whole | |||||
Fish
| Food Top / Bottom Heat True Fan Cooking Time | (min) | Comments | ||||
| Temper- ature (°C) | Shelf po- sition | Temper- ature (°C) | Shelf po- sition | |||
| Trout / Sea bream | 190 2 175 | 2 40 - 55 3 - 4 fish | ||||
| Tuna fish / Sal- mon | 190 2 175 | 2 35 - 60 4 - 6 fil- | lets | |||
Grilling
Set the maximum temperature.
Preheat the oven for 3 minutes.
Use the fourth shelf position.
| Food Quantity Time (min) | Pieces Quantity(kg) | 1st side 2nd side | ||
| Fillet steaks 4 0.8 12 - 15 12 - 14 | ||||
| Beef steaks 4 0.6 10 - 12 6 - 8 | ||||
| Sausages 8 - | 12 - 15 10 - 12 | |||
| Pork chops | 4 0.6 12 - 16 12 - 14 | |||
| Chicken (cut in 2) | 2 1 | 30 - 35 25 - 30 | ||
| Kebabs | 4 - | 10 - 15 10 - 12 | ||
| Breast of chicken | 4 0.4 12 - 15 12 - 14 | |||
| Hamburger | 6 0.6 20 - 30 - | |||
| Fish fillet | 4 0.4 12 - 14 10 - 12 | |||
| Toasted sandwiches 4 - 6 | - | 5 - 7 | - | |
| Toast | 4 - 6 | - | 2 - 4 | 2 - 3 |
Turbo Grilling
Use the first or the second shelf position.
Beef
Preheat the oven.
To calculate the roasting time multiple the time given in the table below by the centimetres of thickness of the fillet.
| Food | Temperature (°C) | Time (min) |
| Roast beef or fillet, rare | 190 - 200 | 5 - 6 |
| Food Temperature (°C) | Time (min) |
| Roast beef or fillet, medium | 180 - 190 6 - 8 |
| Roast beef or fillet, well done | 170 - 180 8 - 10 |
Pork
| Food Temperature (°C) | Time (min) |
| Shoulder, neck, ham joint, 1 - 1.5 kg | 160 - 180 90 - 120 |
| Chop, spare rib, 1 - 1.5 kg | 170 - 180 60 - 90 |
| Meat loaf, 0.75 - 1 kg | 160 - 170 50 - 60 |
| Pork knuckle (pre-cooked), 0.75 - 1 kg | 150 - 170 90 - 120 |
Veal
| Food Temperature (°C) | Time (min) |
| Roast veal, 1 kg | 160 - 180 90 - 120 |
| Knuckle of veal, 1.5 - 2 kg | 160 - 180 120 - 150 |
Lamb
| Food Temperature (°C) | Time (min) |
| Leg of lamb, roast lamb, 1 - 1.5 kg | 150 - 170 100 - 120 |
| Food Temperature (°C) | Time (min) |
| Saddle of lamb, 1 - 1.5 kg | 160 - 180 40 - 60 |
Poultry
| Food Temperature (°C) | Time (min) |
| Poultry portions, 0.2 - 0.25 kg each | 200 - 220 30 - 50 |
| Chicken, half, 0.4 - 0.5 kg each | 190 - 210 35 - 50 |
| Chicken, poulard, 1 - 1.5 kg | 190 - 210 50 - 70 |
| Duck, 1.5 - 2 kg | 180 - 200 80 - 100 |
| Goose, 3.5 - 5 kg | 160 - 180 120 - 180 |
| Turkey, 2.5 - 3.5 kg | 160 - 180 120 - 150 |
| Turkey, 4 - 6 kg | 140 - 160 150 - 240 |
Fish (steamed)
| Food Temperature (°C) | Time (min) |
| Whole fish, 1 - 1.5 kg | 210 - 220 40 - 60 |
Moist Fan Baking

For best results follow suggestions listed in the table below.
| Food Accessories | Tempera- | ture (°C) | Shelf position | Time (min) |
| Sweet rolls, 12 pieces | baking tray or dripping pan | 175 3 40 - 50 | ||
| Rolls, 9 pieces | baking tray or dripping pan | 180 2 35 - 45 | ||
| Pizza, frozen, 0.35 kg | wire shelf 180 2 45 - 55 | |||
| Swiss roll baking pan | tray or dripping pan | 170 2 30 - 40 | ||
| Brownie baking pan | tray or dripping pan | 170 2 45 - 50 | ||
| Soufflè, 6 pieces | ceramic ramekins on wire shelf | 190 3 45 - 55 | ||
| Sponge flan base | flan base tin on wire shelf | 180 2 35 - 45 | ||
| Victoria Sandwich | baking dish on wire shelf | 170 2 35 - 50 | ||
| Poached fish, 0.3 kg | baking tray or dripping pan | 180 2 35 - 45 | ||
| Whole fish, 0.2 kg | baking tray or dripping pan | 180 3 25 - 35 | ||
| Fish fillet, 0.3 kg | pizza pan on wire shelf | 170 3 30 - 40 | ||
| Pouched meat, 0.25 kg | baking tray or dripping pan | 180 3 35 - 45 | ||
| Shashlik, 0.5 kg | baking tray or dripping pan | 180 3 40 - 50 | ||
| Cookies, 16 pieces | baking tray or dripping pan | 150 2 30 - 45 | ||
| Macaroons, 20 pieces | baking tray or dripping pan | 180 2 45 - 55 | ||
| Muffins, 12 pieces | baking tray or dripping pan | 170 2 30 - 40 | ||
| Savory pastry, 16 pieces | baking tray or dripping pan | 170 2 35 - 45 | ||
| Short crust biscuits, 20 pieces | baking tray or dripping pan | 150 2 40 - 50 | ||
| Tartlets, 8 pieces | baking tray or dripping pan | 170 2 30 - 40 | ||
| Poached vegetables, 0.4 kg | baking tray or dripping pan | 180 2 35 - 45 | ||
| Vegetarian omelette | pizza pan on wire shelf 180 3 35 - 45 | |||
| Vegetables, mediterran 0.7 kg | baking tray or dripping pan | 180 4 35 - 45 |
Drying - True Fan Cooking
Cover trays with grease proof paper or baking parchment.
For a better result, stop the oven halfway through the drying time, open the door
and let it cool down for one night to complete the drying.
Vegetables
For one tray use the third shelf position.
For 2 trays use the first and fourth shelf position.
| Food Temperature (°C) Time (h) | ||
| Beans 60 - 70 6 - 8 | ||
| Peppers 60 - 70 5 - 6 | ||
| Vegetables for sour 60 - 70 5 - 6 | ||
| Mushrooms 50 - 60 6 - 8 | ||
| Herbs 40 - 50 2 - 3 |
Fruit
| Food Temperature (°C) | Time (h) Shelf position | |||
| 1 position 2 positions | ||||
| Plums 60 - 70 | 8 - 10 | 3 | 1 / 4 | |
| Apricots | 60 - 70 | 8 - 10 | 3 | 1 / 4 |
| Apple slices | 60 - 70 | 6 - 8 | 3 | 1 / 4 |
| Pears | 60 - 70 | 6 - 9 | 3 | 1 / 4 |
True Fan + Steam
Cakes and pastries
| Food Temperature (°C) | Time (min) Shelf position | Comments |
| Apple cake1) | 160 60 - 80 2 In a 20 cm cake mould | |
| Tarts 175 30 - 40 2 | In a 26 cm cake mould | |
| Fruit cake 160 80 - 90 2 | In a 26 cm cake mould | |
| Sponge cake 160 35 - 45 2 | In a 26 cm cake mould | |
| Panettone1) | 150 - 160 70 - 100 2 | In a 20 cm cake mould |
| Plum cake1) | 160 40 - 50 2 | In a bread tin |
| Small cakes 150 - 160 25 - 30 3 (2 and Biscuits 150 20 - 35 3 (2 and Sweet buns1) | 4) | In a baking tray |
| 4) | In a baking tray | |
| 4) | In a baking tray | |
| 4) | In a baking tray | |
| Brioches1) | 180 - 200 12 - 20 2 | In a baking tray |
| 4) | In a baking tray |
1) Preheat the oven for 10 minutes.
Bread and pizza
Preheat the oven for 10 minutes.
Use the baking tray.
| Food Temperature (°C) | Time (min) | Shelf position |
| White bread, 2x 0.5 kg each | 180 - 190 | 45 - 60 2 |
| Food Temperature (°C) | Time (min) | Shelf position | |
| Rolls, 6 - 8, 0.5 kg | 190 - 210 | 20 - 30 2 | (2 and 4) |
| Pizza 200 - 220 | 20 - 30 2 | ||
Flans
Prepare in the cake mould.
| Food Temperature (°C) Time (min) Shelf position | |||
| Vegetables filled 170 - 180 | 30 - 40 | 1 | |
| Lasagne | 170 - 180 | 40 - 50 | 2 |
| Potato gratin | 160 - 170 | 50 - 60 | 1 (2 and 4) |
Meat
Use the second shelf position.
Use the wire shelf.
| Food Temperature (°C) | Time (min) |
| Roast pork, 1 kg | 180 90 - 110 |
| Veal, 1 kg | 180 90 - 110 |
| Roast beef - rare, 1 kg | 210 45 - 50 |
| Roast beef - medium, 1 kg | 200 55 - 65 |
| Roast beef - well done, 1 kg | 190 65 - 75 |
Use the second shelf position.
| Food Temperature (°C) | Time (min) |
| Lamb, leg, 1 kg | 175 110 - 130 |
| Chicken, whole, 1 kg | 200 55 - 65 |
| Turkey, whole, 4 kg | 170 180 - 240 |
| Duck, whole, 2 - 2.5 kg | 170 - 180 120 - 150 |
| Rabbit, cut in pieces | 170 - 180 60 - 90 |
Use the first shelf position.
| Food Temperature (°C) | Time (min) |
| Goose, whole, 3 kg | 160 - 170 150 - 200 |
Fish
Use the second shelf position.
| Food Temperature (°C) | Time (min) |
| Trout, 3 - 4 fish, 1.5 kg | 180 25 - 35 |
| Tuna, 4 - 6 fillets, 1.2 kg | 175 35 - 50 |
| Hake 200 20 - 30 |
Steam reheating
Reheat your dish on the plate.
Preheat the oven for 10 minutes.
Use the second shelf position.
| Food Temperature (°C) | Time (min) |
| Casser-ole / Gratin | 130 15 - 25 |
| Pasta and sauce | 130 10 - 15 |
| Side dishes (e.g. rice, potatoes, pasta) | 130 10 - 15 |
| One-plate dishes | 130 10 - 15 |
| Meat 130 10 - 15 | |
| Vegetables 130 10 - 15 |
Cooking in the dietary baking dish
Use the function: True Fan + Steam.
Vegetables
Use the second shelf position.
Set the temperature to 150^ .
| Food Time (min) | |
| Broccoli florets 20 - 25 | |
| Aubergine 15 - 20 | |
| Cauliflower florets 25 - 30 | |
| Tomatoes 15 | |
| White asparagus 35 - 45 | |
| Green asparagus 25 - 35 | |
| Courgette slices 20 - 25 | |
| Carrots 35 - 40 | |
| Fennel 30 - 35 | |
| Kohlrabi 25 - 30 | |
| Pepper strips 20 - 25 | |
| Celery slices 30 - 35 | |
Meat
Use the second shelf position.
Set the temperature to 150^ .
| Food Time (min) | |
| Cooked ham 55 - 65 | |
| Poached chicken breast | 25 - 35 |
| Kasseler (smoked loin of pork) | 80 - 100 |
Fish
Use the second shelf position.
Set the temperature to 150^ .
| Food Time (min) | |
| Trout 25 - 30 | |
| Salmon filet 25 - 30 |
Side dishes
Use the second shelf position.
Set the temperature to 150^ .
| Food Time (min) | |
| Rice 35 - 40 | |
| Unpeeled potatoes, medium | 50 - 60 |
| Boiled potatoes, quartered | 35 - 45 |
| Polenta 40 - 45 |
Information for test institutes
Tests according to IEC 60350-1.
| Food Function Acces- | sories | Shelf position | Temperature (°C) | Time (min) | Comments |
| Small cake | Conventional Cooking | Baking tray | 3 | 170 20 - 30 | Put 20 small cakes per one baking tray. |
| Small cake | True Fan Cooking / Fan Cooking | Baking tray | 3 | 150 - 160 | 20 - 35 |
| Small cake | True Fan Cooking / Fan Cook-ing | Baking tray | 2 and 4 | 150 - 160 | 20 - 35 Put 20 small cakes per one baking tray. |
| Apple pie | Conven-tional Cooking | Wire shelf | 2 180 | 70 - 90 Use 2 tins (20 | cm diameter), di-agonally shifted. |
| Apple pie | True Fan Cooking / Fan Cook-ing | Wire shelf | 2 160 | 70 - 90 Use 2 tins (20 | cm diameter), di-agonally shifted. |
| Fatless-ponge cake | Conven-tional Cooking | Wire shelf | 2 170 | 40 - 50 Use a cake | mould (26 cm di-ameter).Preheat the oven for 10 minutes. |
| Fatless-ponge cake | True Fan Cooking / Fan Cook-ing | Wire shelf | 2 160 | 40 - 50 Use a cake | mould (26 cm di-ameter).Preheat the oven for 10 minutes. |
| Fatless-ponge cake | True Fan Cooking / Fan Cook-ing | Wire shelf | 2 and 4 | 160 40 - 60 Use a cake | mould (26 cm di-ameter). Diago-nally shifted.Preheat the oven for 10 minutes. |
| Short bread | True Fan Cooking / Fan Cook-ing | Baking tray | 3 140 - 150 | 20 - 40 - | |
| Short bread | True Fan Cooking / Fan Cook-ing | Baking tray | 2 and 4 | 140 - 150 | 25 - 45 - |
| Short bread | Conven-tional Cooking | Baking tray | 3 140 - 150 | 25 - 45 - | |
| Food Function Acces- | sories | Shelf position | Tempera-ture (°C) | Time (min) Comments | |
| Toast 4 - 6 pieces | Grilling Wire | shelf | 4 max. 2 - 3 minutesfirst side; 2 - 3 minutessecond side | Preheat the oven for 3 minutes. | |
| Beef burger 6 pieces, 0.6 kg | Grilling Wire | shelf and dripping pan | 4 max. 20 - 30 Put the wire shelf | on the fourth level and the dripping pan on the third level of the oven. Turn the food halfway through the cooking time.Preheat the oven for 3 minutes. |
CARE AND CLEANING

WARNING! Refer to Safety chapters.
Notes on cleaning
Clean the front of the oven with a soft cloth with warm water and a mild cleaning agent.
To clean metal surfaces, use a dedicated cleaning agent.
Clean the oven interior after each use. Fat accumulation or other food remains may result in a fire. The risk is higher for the grill pan.
Clean all accessories after each use and let them dry. Use a soft cloth with warm water and a cleaning agent. Do not clean the accessories in the dishwasher.
Clean stubborn dirt with a special oven cleaner.
If you have nonstick accessories, do not clean them using aggressive agents, sharp-edged objects or a dishwasher. It
can cause damage to the nonstick coating.
Moisture can condense in the oven or on the door glass panels. To decrease the condensation, operate the oven for 10 minutes before cooking. Clean the moisture from the cavity after each use.
Stainless steel or aluminium ovens
Clean the oven door with a damp cloth or sponge only. Dry it with a soft cloth.
Do not use steel wool, acids or abrasive materials as they can damage the oven surface. Clean the oven control panel with the same precautions.
Cleaning the door gasket
Regularly do a check of the door gasket. The door gasket is around the frame of the oven cavity. Do not use the oven if the door gasket is damaged. Contact an Authorised Service Centre.
To clean the door gasket, refer to the general information about cleaning.
Removing the shelf supports
To clean the oven, remove the shelf supports.

CAUTION! Be careful when you remove the shelf supports.
- Pull the front of the shelf support away from the side wall.
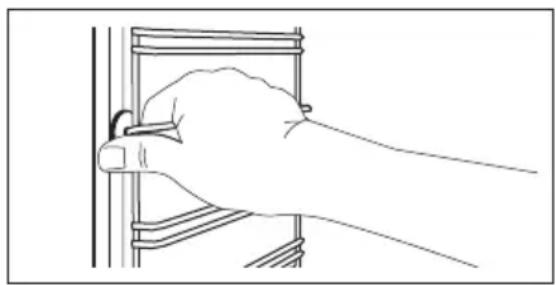
natural_image
Line drawing of a hand holding a tool near a vertical panel (no text or symbols)- Pull the rear end of the shelf support away from the side wall and remove it.
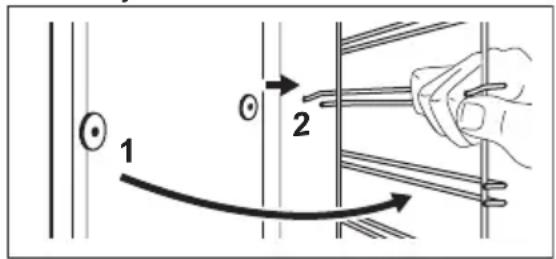
Install the removed accessories in the opposite sequence.
Cleaning the water tank

WARNING! Do not put water into the water tank during the cleaning procedure.

During the cleaning procedure, some water can drip from the steam inlet onto the cavity of the oven. Put a dripping pan on the shelf level directly below the steam inlet to prevent water from falling onto the bottom of the oven cavity.
After some time, you can have lime deposits in your oven. To prevent this, clean the parts of the oven that generate the steam. Empty the tank after each steam cooking.
Types of water
- Soft water with low lime content - recommended type. It decreases the quantity of cleaning procedures.
- Tap water - you can use it if your domestic water supply has purifier or water sweetener.
- Hard water with high lime content - it does not have an effect on the performance of the oven but it increases the quantity of cleaning procedures.
CALCIUM QUANTITY TABLE INDICATED FROM W.H.O. (World Health Organization)
| Calcium de-posit | Water hardness (French de-grees) | Water classifi-(German de-grees) | cation | Run decalcifi-cation every |
| 0 - 60 mg/l 0 - 6 | 0 - 3 Sweet of soft | 75 cycles - 2.5 | months | |
| 60 - 120 mg/l 6 - | 12 3 - 7 Medium hard- | ness | 50 cycles - 2 months | |
| 120 - 180 mg/l | 12 - 18 8 - 10 Hard or | calca- | reous | 40 cycles - 1.5 months |
| over 180 mg/l over | 18 over 10 Very hard | 30 cycles - 1 | month |
- Fill in the water tank with 850 ml of water and 50 ml of citric acid (five teaspoons). Turn off the oven and wait for approximately 60 minutes.
- Turn on the oven and set the function: True Fan + Steam. Set the temperature 230 °C. Turn off the oven after 25 minutes and let it cool down for 15 minutes.
- Turn on the oven and set the function: True Fan + Steam. Set the temperature between 130 and 230^ . Turn off the oven after 10 minutes.
Let it cool down and continue with the removal of the tank contents. Refer to "Daily Use" chapter, Emptying the water tank.
- Rinse the water tank and clean the remaining lime residue in the oven with a cloth.
- Clean the drain pipe by hand in warm water with soap. To prevent damage, do not use acids, sprays or similar cleaning agents.
Removing and installing door
The oven door has two glass panels. You can remove the oven door and the internal glass panel to clean it. Read the whole "Removing and installing door" instruction before you remove the glass panels.

The oven door may close if you try to remove the internal glass panel before you remove the oven door.

CAUTION! Do not use the oven without the internal glass panel.
- Open the door fully and hold both hinges.

natural_image
Technical diagram of a mechanical assembly with an inset showing a close-up of a component (no text or symbols present)- Lift and turn the levers fully on both hinges.
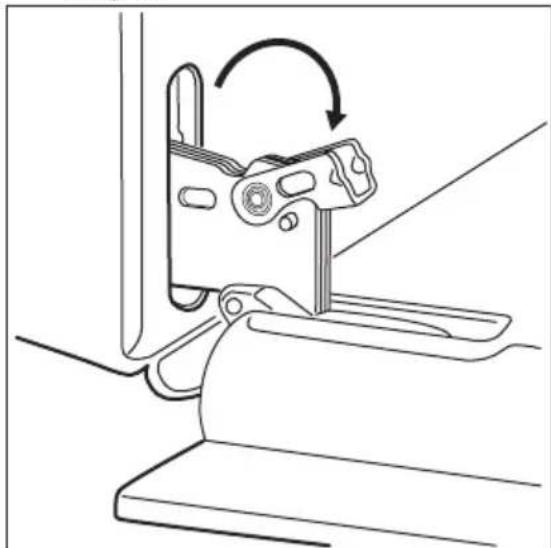
natural_image
Technical line drawing of a mechanical clamp or bracket assembly (no text or symbols)- Close the oven door halfway to the first opening position. Then lift and pull
forward and remove the door from its seat.
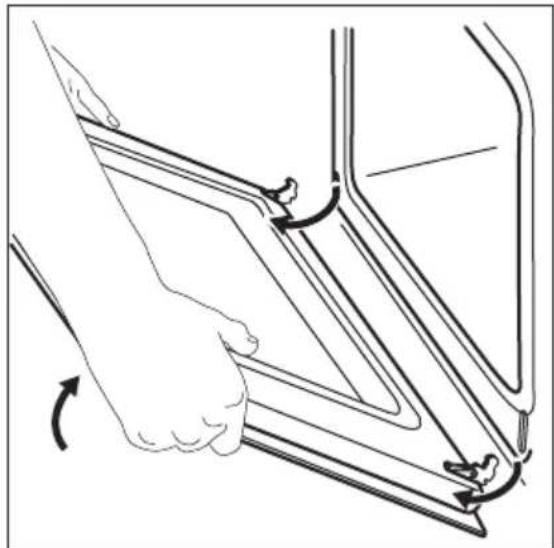
natural_image
Line drawing of a hand holding a door buckle, showing a curved arrow indicating rotation (no text or symbols)- Put the door on a soft cloth on a stable surface.
- Hold the door trim (B) on the top edge of the door at the two sides and push inwards to release the clip seal.
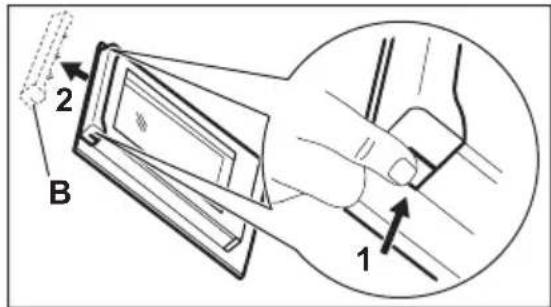
- Pull the door trim to the front to remove it.
- Hold the door glass panel by its top edge and carefully pull it out. Make sure the glass slides out of the supports completely.
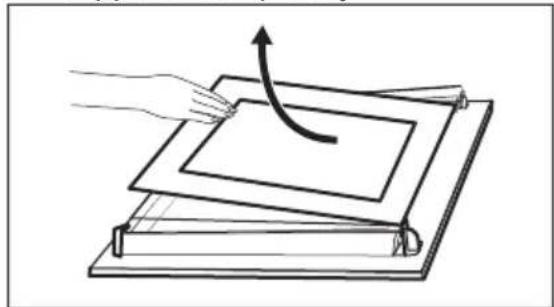
natural_image
Diagram of a hand pressing a curved arrow on a layered rectangular object (no text or symbols)TROUBLESHOOTING
- Clean the glass panels with water and soap. Dry the glass panels carefully. Do not clean the glass panels in the dishwasher.
When the cleaning is completed, install the glass panel and the oven door.
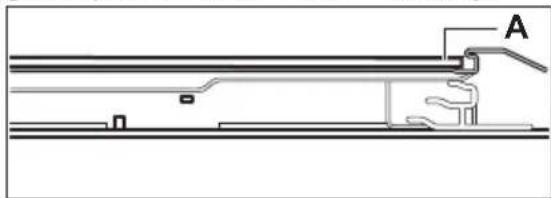
The screen-printing zone must face the inner side of the door. Make sure that after the installation the surface of the glass panel frame on the screen-printing zones is not rough when you touch it.
When installed correctly the door trim clicks.
Make sure that you install the internal glass panel in the seats correctly.
natural_image
Technical line drawing of a mechanical assembly with labeled component A (no text or symbols beyond label)Replacing the lamp

WARNING! Risk of electric shock.
The lamp can be hot.
- Turn off the oven.
Wait until the oven is cooled down. - Disconnect the oven from the mains.
- Put a cloth on the bottom of the cavity.

CAUTION! Always hold the halogen lamp with a cloth to prevent grease residue from burning on the lamp.
The back lamp
- Turn the lamp glass cover to remove it.
- Clean the glass cover.
- Replace the lamp with a suitable 300 °C heat-resistant lamp.
- Install the glass cover.

WARNING! Refer to Safety chapters.
What to do if...
| Problem Possible cause Remedy | ||
| The oven does not heat up. The oven is deactivated. Activate the oven. | ||
| The oven does not heat up. The clock is not set. Set the clock. | ||
| The oven does not heat up. The necessary settings are not set. | Make sure that the settings are correct. | |
| The oven does not heat up. The fuse is blown. Make sure that the fuse is the cause of the malfunction. If the fuse is blown again and again, contact a qualified electrician. | ||
| The display shows "12.00". There was a power cut. Reset the clock. | ||
| The lamp does not operate. The lamp is defective. Replace the lamp. | ||
| Steam and condensation settle on the food and in the cavity of the oven. | You left the dish in the oven for too long. | Do not leave the dishes in the oven for longer than 15 - 20 minutes after the cooking process ends. |
| There is water inside the oven. | There is too much water in the tank. | Deactivate the oven and wipe the water with a cloth or sponge. |
| The indicator "Tank Full" is off. | There is not enough water in the tank. | Fill the tank with water until the indicator comes on. If water starts to come out inside the oven, and the indicator is still off, contact a qualified service engineer. |
| The indicator "Tank Empty" is on. | There is no water in the tank. | Fill the tank. If the indicator is still on, contact a qualified service engineer. |
| The steam cooking does not work. | There is no water in the tank. | Fill the water tank. |
| The steam cooking does not work. | Lime obstructs the hole. Check the steam inlet opening. Remove the lime. | |
| It takes more than three minutes to empty the water tank or the water leaks from the steam inlet opening. | There are lime deposits in the oven. | Clean the water tank. Refer to "Cleaning the water tank". |
Service data
If you cannot find a solution to the problem yourself, contact your dealer or an Authorised Service Centre.
The necessary data for the service centre is on the rating plate. The rating plate is on the front frame of the oven cavity. Do not remove the rating plate from the oven cavity.
We recommend that you write the data here:
Model (MOD.) ......
Product number (PNC) ....
Serial number (S.N.) ....
INSTALLATION

WARNING! Refer to Safety
chapters.
Building In
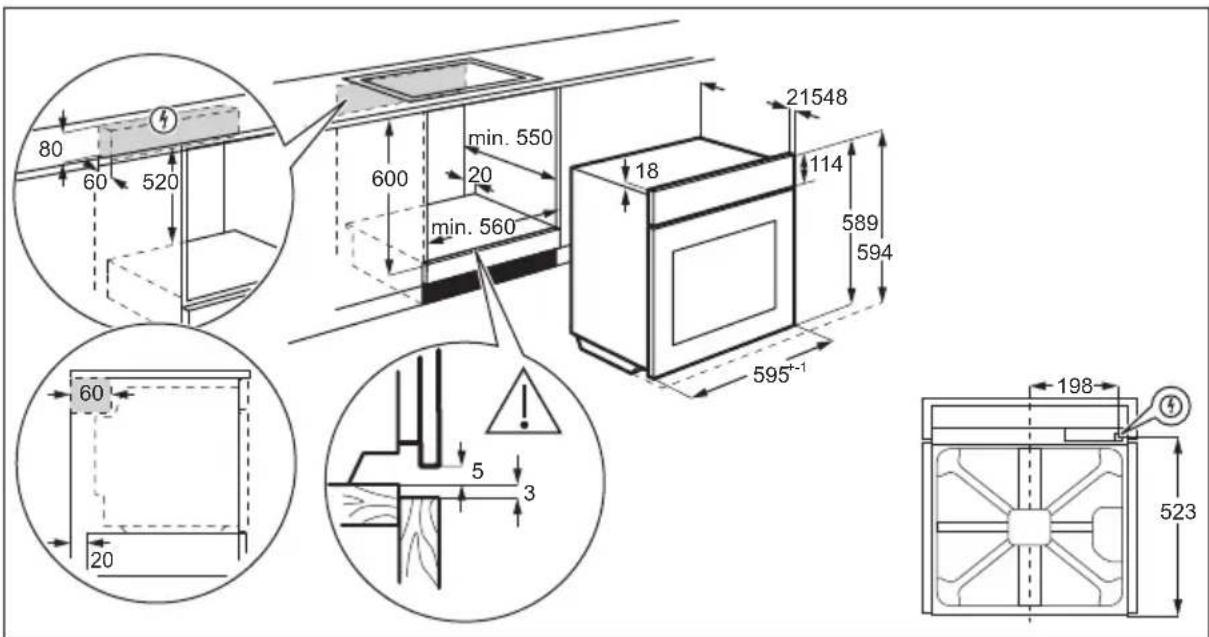
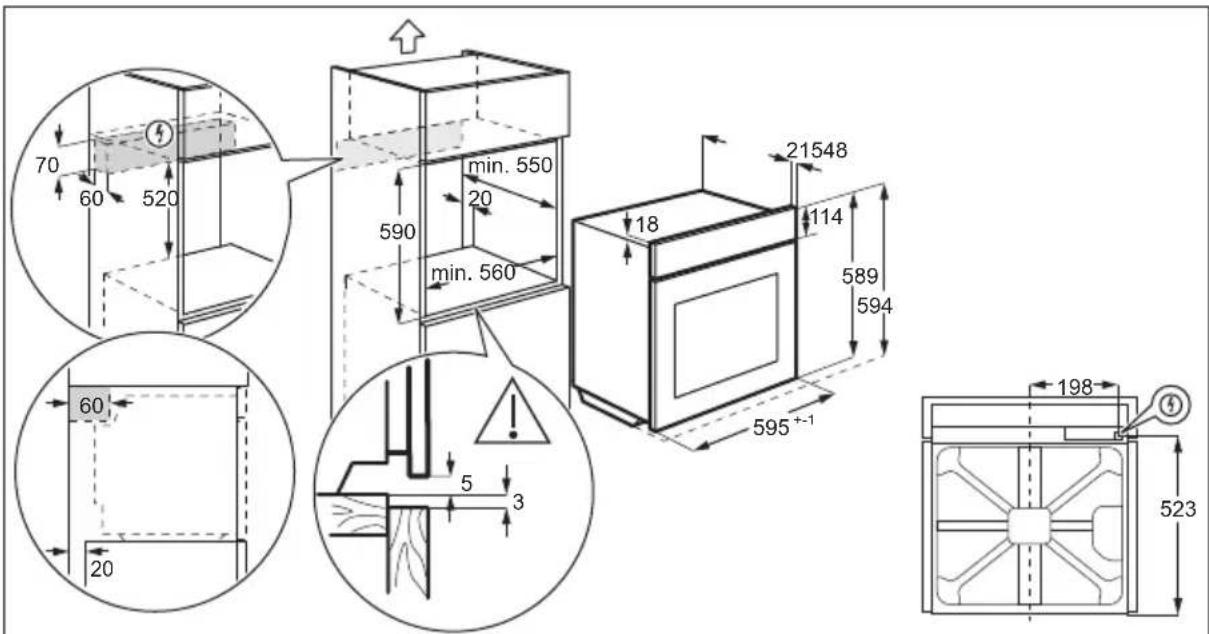
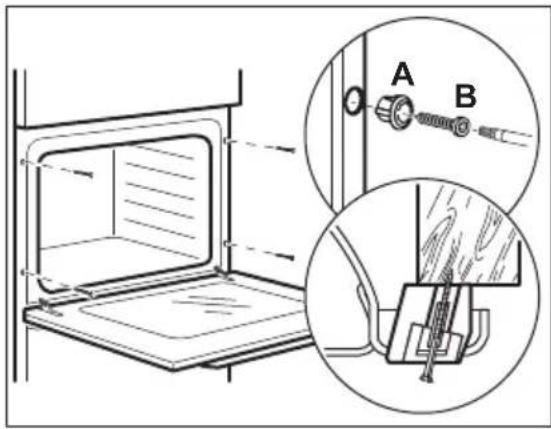
Securing the appliance to the cabinet
Electrical installation

The manufacturer is not responsible if you do not follow the safety precautions from the Safety chapters.
This appliance is supplied with a main plug and a main cable.
ENERGY EFFICIENCY
Cable
Cable types applicable for installation or replacement:
H07 RN-F, H05 RN-F, H05 RRF, H05 VV-F, H05 V2V2-F (T90), H05 BB-F
For the section of the cable refer to the total power on the rating plate. You can also refer to the table:
| Total power (W) Section of the cable (mm2) |
| maximum 1380 3 x 0.75 |
| maximum 2300 3 x 1 |
| maximum 3680 3 x 1.5 |
The earth cord (green / yellow cable) must be 2 cm longer than phase and neutral cables (blue and brown cables).
Product Fiche and information according to EU 65-66/2014
| Supplier's name Juno | |
| Model identification JB097C9 | |
| Energy Efficiency Index 95.3 | |
| Energy efficiency class A | |
| Energy consumption with a standard load, conventional mode | 0.93 kWh/cycle |
| Energy consumption with a standard load, fan-forced mode | 0.81 kWh/cycle |
| Number of cavities 1 | |
| Heat source Electricity | |
| Volume 72 l | |
| Type of oven Built-In Oven | |
| Mass 28.8 kg |
EN 60350-1 - Household electric cooking appliances - Part 1: Ranges, ovens, steam
ovens and grills - Methods for measuring performance.
Energy saving

The oven contains features which help you save energy during everyday cooking.
General hints
Make sure that the oven door is closed properly when the oven operates. Do not open the door too often during cooking. Keep the door gasket clean and make sure it is well fixed in its position.
Use metal dishes to improve energy saving.
When possible, do not preheat the oven before you put the food inside.
When the cooking duration is longer than 30 minutes, reduce the oven temperature to minimum 3 - 10 minutes before the end of the cooking time, depending on the duration of the cooking. The residual heat inside the oven will continue to cook.
Use the residual heat to warm up other dishes.
Keep breaks between baking as short as possible when you prepare few dishes at one time.
Cooking with fan
When possible, use the cooking functions with fan to save energy.
Keep food warm
Choose the lowest possible temperature setting to use residual heat and keep a meal warm.
Moist Fan Baking
Function designed to save energy during cooking.
ENVIRONMENTAL CONCERNS
Recycle materials with the symbol ♣ Put the packaging in relevant containers to recycle it. Help protect the environment and human health by recycling waste of electrical and electronic appliances. Do
not dispose of appliances marked with the symbol with the household waste.
Return the product to your local recycling facility or contact your municipal office.
INHALTSVERZEICHNIS
natural_image
Technical line drawing of a mechanical component with two circular inset views showing internal structure (no text or symbols)natural_image
Pure technical line drawing of a mechanical component or bracket (no text or symbols)natural_image
Technical line drawing of a mechanical assembly with a magnified inset showing internal components (no text or symbols)
natural_image
Line drawing of a cooking pot with two handles (no text or symbols)Deckel (B)
natural_image
Line drawing of a lid with a circular top and flange (no text or symbols)natural_image
Line drawing of a mechanical lever or tool (no text or symbols)natural_image
Simple line drawing of a bent metal rod or bracket (no text or symbols)Stahlrost (E)
natural_image
Line drawing of an oval-shaped metal grater with two handles and perforated interior (no text or symbols)natural_image
Illustration of a cooking pot with steam rising, showing a cross mark and water droplets on a surface (no text or symbols)natural_image
Simple line drawing of a pot with a lid pouring liquid into a pot, accompanied by thermometer symbols (no text or labels)natural_image
Line drawing of a cooking pot on a stove with a crossed X mark indicating a resistance or crossed-out section (no text or symbols present)natural_image
Illustration of a cooking pot with a hand using a tool to clean or remove a surface, next to a spray can and a paint can (no text or symbols)natural_image
Diagram of a kitchen appliance with a side view showing a component labeled 'C' (no text or symbols present)natural_image
Diagram of a kitchen appliance showing internal components and a hand holding a tool, with no visible text or symbols.natural_image
Diagram of a kitchen appliance showing internal components and a magnified view of the handle (no text or labels)natural_image
Line drawing of a cooked dish with steaming meat and a circular arrangement of food items (no text or symbols)natural_image
Line drawing of a hand holding a tool near a vertical panel (no text or symbols)natural_image
Technical diagram of a mechanical assembly with an inset showing a close-up of a bracket and lock mechanism (no text or symbols)natural_image
Technical line drawing of a mechanical clamp or bracket assembly with rotation arrow (no text or symbols)natural_image
Line drawing of a hand holding a door handle, with arrows indicating rotation or movement (no text or symbols)natural_image
Diagram of a hand pressing a curved arrow on a layered platform (no text or symbols)natural_image
Technical line drawing of a mechanical assembly with labeled component A (no text or symbols present)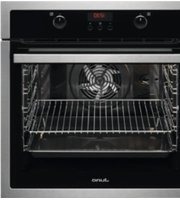
- ⚠ SAFETY INFORMATION
- Children and vulnerable people safety
- General Safety
- SAFETY INSTRUCTIONS
- Installation
- Electrical connection
- Use
- Steam Cooking
- Care and cleaning
- Internal lighting
- Service
- Disposal
- PRODUCT DESCRIPTION
- General overview
- Accessories
- BEFORE FIRST USE
- Initial Cleaning
- Preheating
- Retractable knobs
- Setting a heating function
- Display
- Buttons
- Tank empty indicator
- Tank Full indicator
- Emptying the water tank
- CLOCK FUNCTIONS
- Clock functions table
- Setting the time. Changing the time
- Setting the DURATION
- Setting the END
- Setting the TIME DELAY
- Setting the MINUTE MINDER
- Cancelling the clock functions
- USING THE ACCESSORIES
- Inserting the accessories
- Accessories for steam cooking
- The dietary baking dish for steam cooking functions
- Steam cooking in a dietary baking dish
- Direct steam cooking
- ADDITIONAL FUNCTIONS
- Cooling fan
- Safety thermostat
- HINTS AND TIPS
- Cooking recommendations
- Baking cakes
- Cooking meat and fish
- Cooking times
- Baking and roasting
- Grilling
- Turbo Grilling
- Moist Fan Baking
- Drying - True Fan Cooking
- Vegetables
- True Fan + Steam
- Meat
- Fish
- Steam reheating
- Cooking in the dietary baking dish
- Side dishes
- Information for test institutes
- Notes on cleaning
- Stainless steel or aluminium ovens
- Cleaning the door gasket
- Removing the shelf supports
- Cleaning the water tank
- Types of water
- Removing and installing door
- TROUBLESHOOTING
- Replacing the lamp
- The back lamp
- What to do if...
- Service data
- We recommend that you write the data here:
- Building In
- Securing the appliance to the cabinet
- Electrical installation
- ENERGY EFFICIENCY
- Cable
- Product Fiche and information according to EU 65-66/2014
- Energy saving
- General hints
- Cooking with fan
- Keep food warm
- ENVIRONMENTAL CONCERNS
- INHALTSVERZEICHNIS
Brand : JUNO
Model : JB097C9
Category : Oven