Indigo IS-550 - Kitchen appliance Scarlett - Free user manual and instructions
Find the device manual for free Indigo IS-550 Scarlett in PDF.


| Product Type | Food Steamer |
| Brand | Scarlett |
| Model | Indigo IS-550 |
| Color | Indigo (blue-toned) |
| Power Supply | 220-240 V ~ 50/60 Hz |
| Power Consumption | Approx. 800-1000 W (typical for steamer) |
| Water Reservoir Capacity | 1.2 L (estimated based on manual) |
| Number of Trays | 3 stacking trays + drip tray |
| Rice Bowl | Included |
| Steam Pipe | Included for even cooking |
| Display | Digital LCD with control panel |
| Cooking Programs | Shrimp (10 min), Eggs (12 min), Fish (15 min), Vegetables (20 min), Chicken (30 min), Rice (40 min), Keep Warm (20 min) |
| Manual Timer | Adjustable up to 99 min (default 45 min) |
| Instant Steam | Steam in 35 seconds |
| Auto Shut-off | Yes, after cooking cycle |
| Keep Warm Mode | Automatic for 10 min after cooking |
| Water Level Indicator | External gauge with min/max marks |
| Safety Features | Overheat protection, boil-dry protection |
| Cleaning | Dishwasher-safe trays (top rack); hand wash lid and base |
| Descaling | Recommended every 7-10 uses |
| Materials | Plastic housing, stainless steel heating element |
| Dimensions (WxDxH) | 30 x 30 x 35 cm (estimated) |
| Weight | 2.5 kg (estimated) |
| Cord Length | 0.8 m (typical) |
| Country of Origin | China (typical for Scarlett) |
Frequently Asked Questions - Indigo IS-550 Scarlett
User questions about Indigo IS-550 Scarlett
0 question about this device. Answer the ones you know or ask your own.
Ask a new question about this device
Download the instructions for your Kitchen appliance in PDF format for free! Find your manual Indigo IS-550 - Scarlett and take your electronic device back in hand. On this page are published all the documents necessary for the use of your device. Indigo IS-550 by Scarlett.
USER MANUAL Indigo IS-550 Scarlett
natural_image
Modern Indigo steamer with digital display and control panel (no visible text or symbols)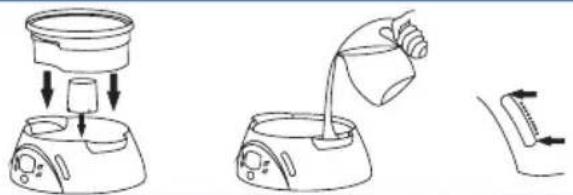
natural_image
Line drawings of a coffee maker with a stand and a hand pouring liquid from a cup (no text or symbols)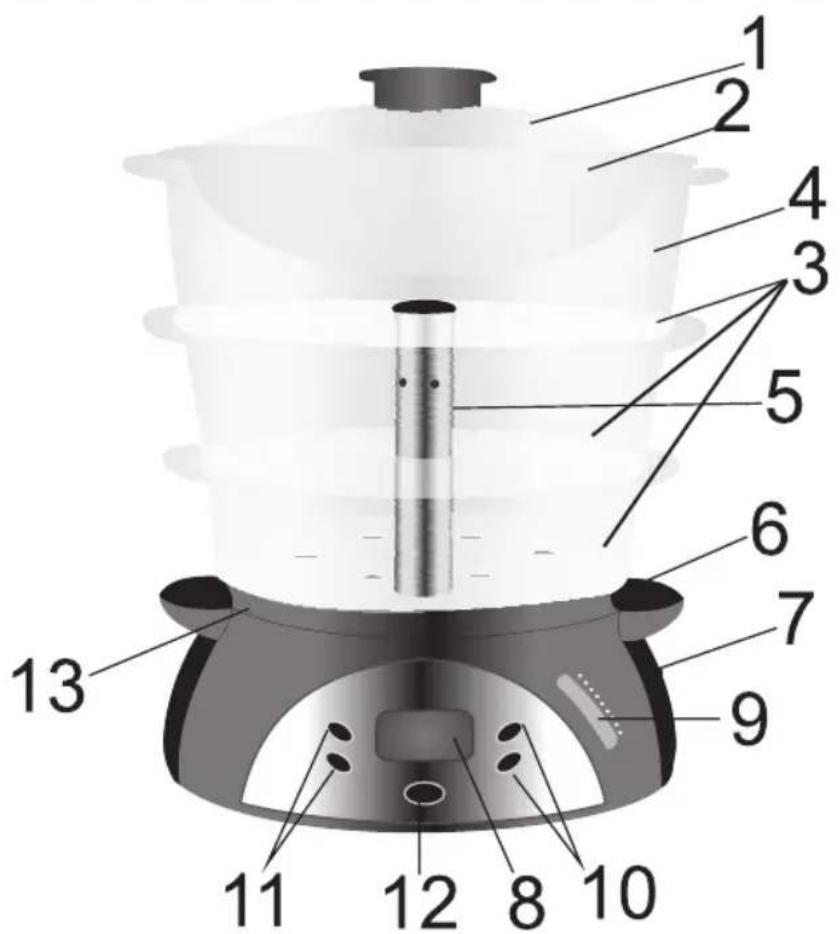
Pls add month and year of production e.g. 08.2010 at this place
- Please read these operating instructions carefully in order to avoid damage due to incorrect use and keep it for future reference.
- Before the first switching on check that the voltage indicated on the rating label corresponds to the mains voltage in your home.
- Incorrect operation and improper handling can lead to malfunction of the appliance and injuries to the user.
- For home use only. Do not use for industrial purposes.
- Always unplug the appliance from the power supply when not in use.
- Do not immerse the unit, cord or plug in water or other liquids. If it has happened, remove the plug from the wall socket immediately, an expert should check the unit before using it again.
- Do not operate the appliance if the cord or the plug is damaged or if the appliance has been otherwise damaged. In such cases take the appliance to a qualified specialist for check and repair if necessary.
- Ensure that the cord does not hang over sharp edges and keep it away from hot surfaces.
- To disconnect the appliance from the power supply pull it by the plug only, not by the cord.
- Place the appliance on a dry stable non-hot surface, away from hot objects (e.g. hotplates); do not place under curtains and shelves.
- Never leave the appliance not supervised during use.
- This appliance is not intended for use by persons (including children) with reduced physical, sensory or mental capabilities, or lack of experience and knowledge, unless they have been given supervision or instruction concerning use of the appliances by a person responsible for their safety.
-
Children should be supervised to ensure that they do not play with the appliance.
-
Do not touch hot surface.
- The use of accessory attachments not recommended by the appliance manufacturer may result in fire, electric shock or injury to users.
- Do not operate the appliance while it is empty or without water in the reservoir.
- The food steamer and components are not for use in ovens (microwave, convection or conventional) or on stove-top.
- Be very careful when moving an appliance containing hot food or water or other hot liquids.
- Lift and open cover carefully to avoid scalding and allow water to drip into bowl.
- If the product has been exposed to temperatures below 0^ C for some time it should be kept at room temperature for at least 2 hours before turning it on.
- The manufacturer reserves the right to introduce minor changes into the product design without prior notice, unless such changes influence significantly the product safety, performance, and functions.
BEFORE THE FIRST USE
- Wash thoroughly all bowls and detachable parts in warm, soapy water before the first use; then rinse and dry carefully.
- Wipe inside the water basin with a damp cloth.
INSTANT STEAM FUNCTION
- Before cooking, when the sleeve is placed on top of the heating element, the instant steam function will automatically produce steam in 35 seconds. Please note: On the heating element sleeve there is a small indentation (cut), which should be faced downward when placed on the heating element.
HOW TO USE FOOD STEAMER
- Place the appliance on a flat, steady surface.
- Pour the water through the special holes, use the external water level gauge for guidance.
- Use only clean water for filling the reservoir; do not use other liquids or food supplements. The reservoir contains the maximum and the minimum filling marks: the water level should be between these marks.
- Place the tray for collecting the condensate on the base.
- Align removable trays with steaming containers.
- Set the steaming containers on the base according to the numbers indicated on them.
- Place the disc in the middle of Tray No. 2.
- Put the food items and place the steaming container on the base starting with number one at the bottom and going in sequence.
- ATTENTION: Do not let water in the reservoir go beyond the minimum level.
- Always put those food items which require more time to cook (for instance, larger food items, etc.) in the bottom container.
- If during cooking you discover that the water went below the required level, then you can add the water through water filling holes without taking off the steaming containers.
- Select the program or set the temperature manually (see the instructions below).
- After you set the time press START button. The cooking indicator will start blinking on the screen.
- Press STOP button to stop the cooking process.
- If you do not press START button within one minute after you set the time, then the screen will turn off.
- Once the cooking cycle is over, you will hear an audio signal.
- Press START button for selecting a new program.
RICE BOWL
- Put rice or other products in the rice bowl; add water, sauce, etc. Close the lid. Plug the steamer in the socket.
- After you hear an audio signal and the screen turns on, press MENU button.
SELECTING THE COOKING PROGRAM
- Press MENU button, select one of the cooking programs:
- Shrimp: 10 min
- Eggs: 12 min
- Fish: 15 min
• Vegetables: 20 min - Chicken: 30 min
- Rice: 40 min
• Temperature maintenance: 20 min. - You may change the cooking time for any of these programs by using +/- buttons.
SETTING THE COOKING TIME MANUALLY
- The default cooking time is 45 minutes. Press + and - buttons to change the time or to set the time you want.
- After the cooking cycle is finished, the steamer will switch to temperature maintenance mode which lasts 10 minutes.
- Press STOP button to turn off the steamer and cancel temperature maintenance mode.
COOKING GUIDELINES
- The condensate from the upper containers gets to the lower containers. Make sure that the food items you put in different containers match well.
-
The rice bowl may be used for cooking liquid dishes: sauces, clear soups, gravy, etc.
-
Leave spaces between the food items. Put those items which require less time for cooking closer to the sides of the containers.
- You may add products during cooking. Add those products which require less time for cooking later.
- When you open the lid, the steam gets out and the required cooking time increases.
- The products in the upper container cook slower than in the bottom container.
USING STEAM PIPE
- Use the steam pipe for cooking a large number of the same or similar products.
- When you use the steam pipe the cooking time in all three levels is the same.
- Place Tray No. 1 on the base.
- Place the steam pipe in the middle of the bottom tray, and then slip the second and the third tray on the pipe.
- ATTENTION: you may use the steam pipe only when you use all three containers simultaneously.
- Distribute the products evenly among the containers.
REHEATING BREAD AND HALF-PREPAREAD FOOD
- Do not wrap or cover bread when reheating.
- For half-prepared food, reheating time depends on the foods' freezing temperature.
- When reheating half-prepared food in the rice bowl, put half-prepared food accurately in the rice bowl and use an aluminum foil to cover.
RICE & GRAINS
- There are many types of rice. Follow specific instructions for each type.
-
Accurately measure rice and water, then combine it in the rice bowl. Pour specified amount of water in water reservoir. Cover and start operating.
-
For For softer rice, increase the specified amount water by 1-2 tablespoons. For firmer rice decrease the water amount by 1-2 tablespoons
- Check consistency of rice at minimum time specified for each type, stirring rice at the same time.
- Rice may be seasoned with salt, pepper or butter after steaming.
| Type of Rice Amount A | Approx. Time | (Minutes) | |
| Rice Wa | er | ||
| Brown-Regular-Parboiled | |||
| 12 cup1 cup | 1cup 112 cups | 42-4545-50 | |
| Long Grain and Wild Rice Mix | |||
| -Regular (6 oz. Pkg.)-Quick cooking (1-2 oz. Pkg.) | MixMix | 112 cups 134 cups | 56-5818-20 |
| Instant 1 cup 112 cups | 12-15 | ||
| White | |||
| -Regular-Long Grain | 1 cup1 cup | 112 cups 134 cups | 45-5050-55 |
VEGETABLES
- Thoroughly wash the vegetables. Remove the roots and the skin if needed.
- The amount of the vegetables, the freshness and preliminary processing affect the duration of cooking. The cooking time may be changed if needed.
- It is better not to thaw frozen vegetables before cooking.
- When cooking the vegetables in the rice bowl cover them with foil to avoid excessive moisture getting on the vegetables.
- Stir frozen vegetables10-12 minutes after the cooking process started.
| Variety Weight / Number of Pieces | Approx Time (Min) | |
| Artichokes, Whole 4 whole tops trimmed 30-32 | ||
| Asparagus, Spears, Beans | 1 pound 12-14 | |
| Beets 1 pound cut 25-28 | ||
| Broccoli, spears 1 pound | 20-22 | |
| Brussels 1 pound 24-26 | ||
| Cabbage 1 pound sliced | 6-18 | |
| Celery 12 pound thinly sliced | 14-16 | |
| Carrots 1 pound thinly sliced | 18-20 | |
| Cauliflower, whole 1 pound | 20-22 | |
| Corn or Cob | 3-5 ears | 14-16 |
| Eggplant | 1 pound 16-18 | |
| Mushrooms, whole | 1 pound 10-12 | |
| Onions | 12 pound thinly sliced | 12-14 |
| Parsnips | 12 pound 8-10 | |
| Peas 1 pound shelled | 12-13 | |
| Peppers, whole | Up to 4 medium (not stuffed) | 12-13 |
| Potatoes (whole, red) | 1 pound (6 small potatoes) | 30-32 |
| Rutabaga | 1 medium diced | 28-30 |
| Spinach | 12 pound 14-16 | |
| Squash | 1 pound 12-14 | |
| Turnips | 1 pound sliced 20-22 | |
| All Frozen Vegetables | 10 oz. | 28-50 |
FISH AND SEAFOOD
- Steaming times listed in the chart are for fresh, or frozen and fully thawed seafood and fish. Clean and prepare fresh seafood and fish before steaming.
- Most fish and seafood cook very quickly. Steam in small portions or in amounts as specified.
- Clams, oysters and mussels may open at different times. Check the shells to avoid overcooking.
- You may steam fish fillets in the rice bowl; serve steamed seafood and fish plain or use seasoned butter or margarine, lemon or favorite sauces.
- Adjust steaming times accordingly.
| Variety | Weight / Number of Pieces | Approx. Time (Minute) |
| Clams in shell | ||
| -Littlenecks/Cherrystones | 1 pound | 10-12 |
| Crab | ||
| -King Crab, legs/claws-Soft Shell | 12 pound8-12 pcs. | 20-228-10 |
| Lobster | ||
| -Tails-Split-Whole, Live | 2-41-11-1 14 pounds | 16-1818-2018-20 |
| Mussels (fresh in shell) | 1 pound | 14-16 |
| Oysters (fresh in shell) | 3 pound | 18-20 |
| Scallops (fresh) | ||
| Variety Weight / Number of Pieces | Approx. Time (Minute) | |
| -Bay (shucked)-Sea (shucked) | 1 pound1 pound | 14-1618-20 |
| Shrimps | ||
| -Medium in shell-Large/Jumbo in shell | 1 pound1 pound | 10-1216-18 |
| Fish | ||
| -Whole-Dressed-Fillets-Steaks | 12 to 34 pound 12 to 34 pound1 pound1 pound, 1" thick | 10-1210-1210-1216-18 |
CLEAN AND CARE
- Unplug the appliance from the power supply. Before cleaning allow the food steamer to cool.
• Empty the drip tray and the water basin. - If there is small amount of water remaining inside the water tank, you can turn the unit upside down and water will come out.
- Wash the lid, drip tray, bowls in warm, soapy water (or on top rack of dishwasher), rinse and dry all parts.
- Clean the water basin carefully with soapy water, do not immerse the unit in water, then wipe with a damp cloth.
- Do not use any abrasive cleaners, organic solvents and aggressive liquids.
- The scum may appear on the heating element. If it grows, the steamer could turn off before the food is cooked.
• After 7-10 uses (depending on water hardness) add some recommended descaling agent into the water basin - Unplug the appliance from the power supply. Before cleaning allow the food steamer to cool.
• Empty the drip tray and the water basin. - If there is small amount of water remaining inside the water tank, you can turn the unit upside down and water will come out.
- Wash the lid, drip tray, bowls in warm, soapy water (or on top rack of dishwasher), rinse and dry all parts.
- Do not use any abrasive cleaners, organic solvents and aggressive liquids.
- The scum may appear on the heating element. If it grows, the steamer could turn off before the food is cooked.
• After 7-10 uses (depending on water hardness) add some recommended descaling agent into the water basin
(exactly follow instructions given), then fill water up to maximum level.
- Do not place the lid, bowls, rice bowl and drip tray during this procedure.
- Plug in and set the timer to 20 minutes. When the timer will ring, unplug the unit from the mains outlet. Allow the unit to cool completely before emptying the water reservoir. Use the cold water to rinse the water reservoir several times.
STORAGE
- Switch off and unplug the appliance.
- Complete all requirements of chapter CLEANING AND MAINTENANCE.
- Keep the appliance in a dry cool place.
МЕРЫ БЕЗОПАСНОСТИ
ŽUVIS IR JŪROS PRODUKTAI
- BEFORE THE FIRST USE
- INSTANT STEAM FUNCTION
- HOW TO USE FOOD STEAMER
- RICE BOWL
- SELECTING THE COOKING PROGRAM
- SETTING THE COOKING TIME MANUALLY
- COOKING GUIDELINES
- USING STEAM PIPE
- REHEATING BREAD AND HALF-PREPAREAD FOOD
- RICE & GRAINS
- VEGETABLES
- FISH AND SEAFOOD
- CLEAN AND CARE
- STORAGE
- МЕРЫ БЕЗОПАСНОСТИ
- ŽUVIS IR JŪROS PRODUKTAI
Brand : Scarlett
Model : Indigo IS-550
Category : Kitchen appliance