
CDX-R3300S - Car stereo SONY - Free user manual and instructions
Find the device manual for free CDX-R3300S SONY in PDF.

| Type | FM/AM Compact Disc Player, Car Stereo |
| Brand | Sony |
| Model | CDX-R3300S |
| Dimensions (Main Unit) | Approx. 178 × 50 × 179 mm (w/h/d) |
| Mounting Dimensions | Approx. 182 × 53 × 161 mm (w/h/d) |
| Weight | Approx. 1.2 kg |
| Power Requirements | 12 V DC car battery (negative earth) |
| Maximum Power Output | 52 W × 4 (at 4 ohms) |
| Speaker Impedance | 4 - 8 ohms |
| CD Player Signal-to-Noise Ratio | 120 dB |
| CD Player Frequency Response | 10 - 20,000 Hz |
| FM Tuning Range | 87.5 - 108 MHz (at 50 kHz step) / 87.5 - 107.9 MHz (at 200 kHz step) |
| AM Tuning Range | 531 - 1,602 kHz (at 9 kHz step) / 530 - 1,710 kHz (at 10 kHz step) |
| Playable Media | Audio CD, CD-R, CD-RW, MP3 files (ISO 9660 level 1/2, Joliet, Romeo) |
| Equalizer | EQ3 with 7 preset curves (XPLOD, VOCAL, CLUB, JAZZ, NEW AGE, ROCK, CUSTOM) plus OFF |
| Detachable Front Panel | Yes, with caution alarm |
| Display | CD TEXT and ID3 tag support (version 1.0 to 2.4) |
| Repeat/Shuffle Modes | Track repeat, album repeat, shuffle album, shuffle disc |
| Radio Station Memory | Up to 6 stations per band (FM1, FM2, FM3, AM1, AM2) via BTM or manual preset |
| Fuse Rating | 10 A |
| Optional Accessories | Card remote commander RM-X114, Rotary commander RM-X4S |
| Maintenance | Clean connectors with alcohol, replace lithium battery (CR2025) yearly |
| Safety | Class 1 laser product; do not use non-standard or damaged discs |
Frequently Asked Questions - CDX-R3300S SONY
User questions about CDX-R3300S SONY
0 question about this device. Answer the ones you know or ask your own.
Ask a new question about this device
Download the instructions for your Car stereo in PDF format for free! Find your manual CDX-R3300S - SONY and take your electronic device back in hand. On this page are published all the documents necessary for the use of your device. CDX-R3300S by SONY.
USER MANUAL CDX-R3300S SONY
FM/AM Compact Disc Player AUTOESTEREO PARA DISCO COMPACTO
Operating Instructions GB
Thank you for purchasing this Sony Compact Disc Player. You can enjoy its various features even more with:
- MP3 file playback.
- CD-R/CD-RW which can have a session added can be played (page 7).
- Discs recorded in Multi Session can be played, depending on the recording method (page 7).
- CD TEXT information (displayed when a CD TEXT disc* is played).
- I D 3 t a gersion 1.0, 1.1, 2.2, 2.3 or 2.4 information (displayed when an MP3 file is played).
- Optional controller accessories
Card remote commander RM-X114 Rotary commander RM-X4S
*1 A CD TEXT disc is an audio CD that includes information such as the disc name, artist name, and track names. This information is recorded on the disc.
*2 ID3 tag is an MP3 file that contains information about album name, artist name, track name, etc.
CLASS 1 LASER PRODUCT
This label is located on the bottom of the chassis.
Table of Contents
Location of controls 4
Precautions 6
Notes on discs 6
About MP3 files ..... 7
Getting Started
Resetting the unit. 9
Detaching the front panel 9
Setting the clock 10
CD Player
Playing a disc....11
Display items 12
Playing tracks repeatedly — Repeat Play .... 12
Playing tracks in random order — Shuffle Play .... 12
Radio
Storing stations automatically — Best Tuning Memory (BTM).....13
Receiving the stored stations ..... 13
Storing only the desired stations ..... 14
Other Functions
Using the rotary commander.... 14
Adjusting the sound characteristics ..... 16
Quickly attenuating the sound ..... 16
Changing the sound and display settings — Menu .... 16
Setting the equalizer (EQ3). 17
Additional Information
Maintenance 18
Removing the unit. 19
Specifications 21
Troubleshooting 22
Error displays/Messages 23
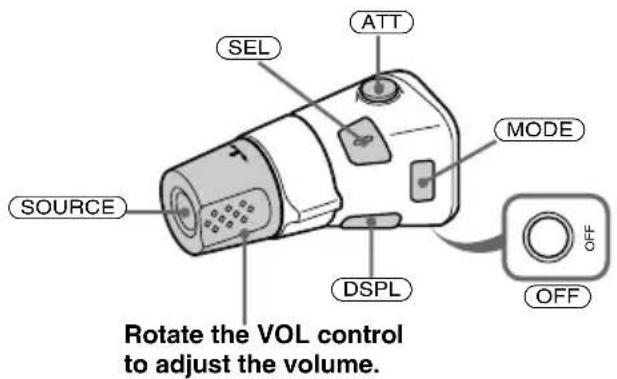
Location of controls
Refer to the pages listed for details.
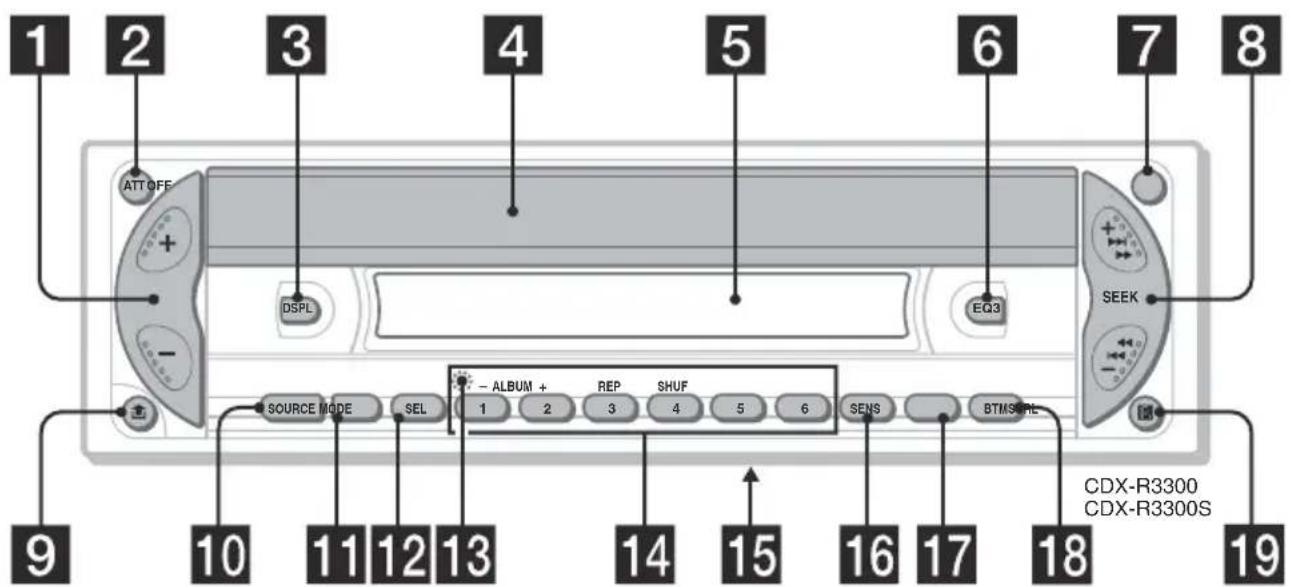
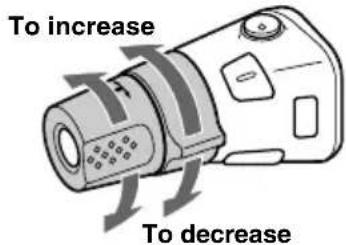
1 Volume +/- button
2 ATT (attenuate) button 16
3 DSPL (display mode change) button
10, 12
4 OPEN/EJECT shutter 11
5 Display window
6 EQ3 button 17, 18
7 OFF (Stop/Power off) button* 9, 11
8 SEEK +/- button
Radio:
To tune in stations automatically/find a station manually.
CD (MP3 files):
To skip tracks/fast-forward, reverse a track.
9 (front panel release) button 9
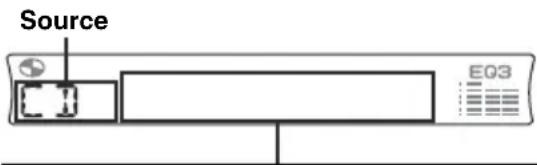
10 SOURCE (Power on/Radio/CD) button
To select the source.
11 MODE button
To change the operation.
12SEL (select) button
To select items.
13 RESET button (located on the front side of the unit, behind the front panel) 9
14 Number buttons 17
Radio:
To store the desired station on each number button.
MP3 files:
①: ALBUM - 11
②: ALBUM + 11
CD:
③: REP 12
④: SHUF 12
15 Frequency select switch (located on the bottom of the unit)
See “Frequency select switch” in the Installation/Connections manual.
16SENS button 13
17 SCRL (scroll) button 12
18 BTM button 13
19 Receptor for the card remote commander
* Warning when installing in a car without an ACC (accessory) position on the ignition switch
After turning off the ignition, be sure to press and hold OFF on the unit until the display disappears.
Otherwise, the display does not turn off and this causes battery drain.
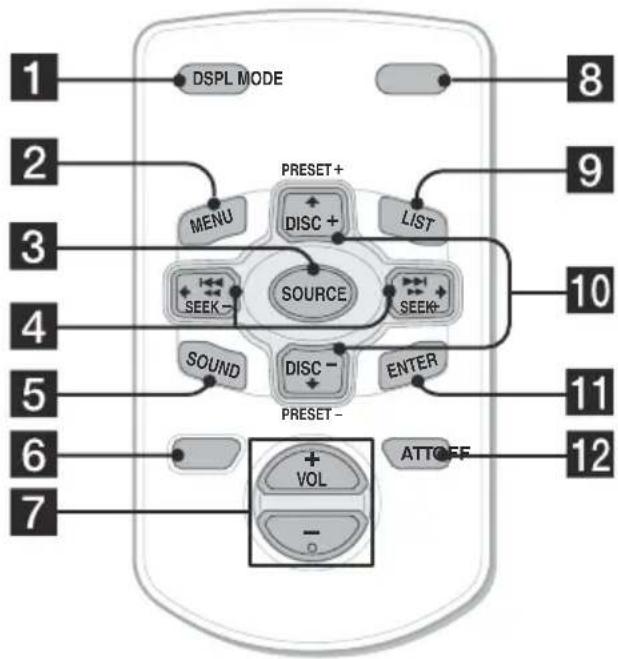
Card remote commander RM-X114 (optional)
flowchart
graph TD
    A["1 DSPL MODE"] --> B["2 MENU"]
    B --> C["3 SOURCE"]
    C --> D["4 SEEK"]
    D --> E["5 SOUND"]
    E --> F["6 VOL"]
    F --> G["7 -"]
    H["8"] --> I["9 LIST"]
    I --> J["10 SEEK-"]
    J --> K["11 ENTER"]
    K --> L["12 ATTOFF"]
    style A fill:#f9f,stroke:#333
    style B fill:#ccf,stroke:#333
    style C fill:#cfc,stroke:#333
    style D fill:#fcc,stroke:#333
    style E fill:#cff,stroke:#333
    style F fill:#ffc,stroke:#333
    style G fill:#cfc,stroke:#333
    style H fill:#fcc,stroke:#333
    style I fill:#ffc,stroke:#333
    style J fill:#cfc,stroke:#333
    style K fill:#fcc,stroke:#333
    style L fill:#ffc,stroke:#333
    style_M["DSPL MODE"] --> N["PRESET+"]
    O["SOURCE"] --> P["DISC +"]
    Q["SOUND"] --> R["DISC -"]
    S["ATTOFF"] --> T["PRESET-"]
The corresponding buttons of the card remote commander control the same functions as those on this unit.
1 DSPL button
2 MENU button* 1
3 SOURCE button
4 SEEK (-/+) buttons
5 SOUND button
6 OFF button
7 VOL (+/-) buttons
8 MODE button
9 LIST button* 1
10DISC* 1(ALBUM)/PRESET (+/-) buttons
11 ENTER button* 1
12 ATT button
*1 Not available for this unit
Note
If the display disappears by pressing OFF, it cannot be operated with the card remote commander unless SOURCE on the unit is pressed, or a disc is inserted to activate the unit first.
Tip
For details on how to replace the battery, see "Replacing the lithium battery" on page 19.
Selecting an album with the card remote commander
Album can be skipped using the DISC (ALBUM) (+/-) buttons on the card remote commander.
| To | Press |
| Skip albums*2– Album selection | + or – [once for each album]To continuously skipalbums, press and holdeither button. |
*2 Available only when an MP3 file is played.
Skipping tracks continuously
Press once SEEK (+) or SEEK (-) on the card remote commander, then press again within 2 seconds and hold.
Precautions
- If your car has been parked in direct sunlight, allow the unit to cool off before operating it.
- Power aerial will extend automatically while the unit is operating.
If you have any questions or problems concerning your unit that are not covered in this manual, please consult your nearest Sony dealer.
Moisture condensation
On a rainy day or in a very damp area, moisture condensation may occur inside the lenses and display of the unit. Should this occur, the unit will not operate properly. In such a case, remove the disc and wait for about an hour until the moisture has evaporated.
To maintain high sound quality
Be careful not to splash juice or other soft drinks onto the unit or discs.
Notes on discs
• To keep a disc clean, do not touch its surface. Handle the disc by its edge.
- Keep your discs in their cases or disc magazines when not in use.
- Do not subject discs to heat/high temperature. Avoid leaving them in a parked car or on a dashboard/rear tray.
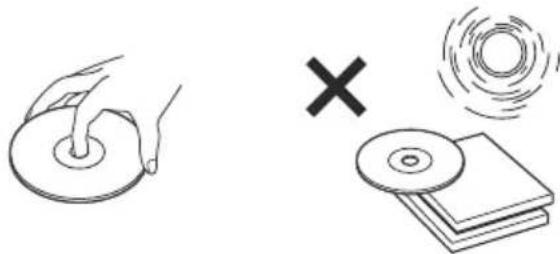
natural_image
Illustration showing a hand holding a circular object and a CD with a cross symbol (no text or labels)- Do not attach labels, or use discs with sticky ink/residue. Such discs may stop spinning when used, causing a malfunction, or may ruin the disc.
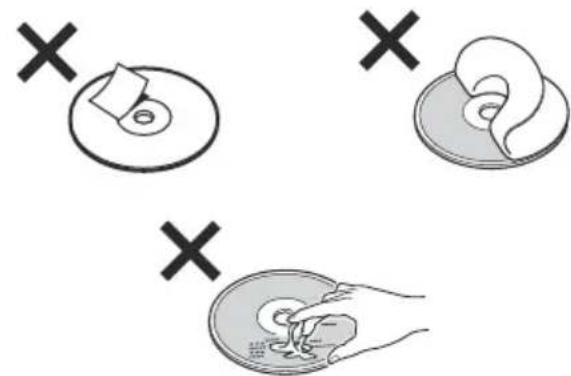
- Do not use any discs with labels or stickers attached. The following malfunctions may result from using such discs:
- Inability to eject a disc (due to a label or sticker peeling off and jamming the eject mechanism).
- Inability to read audio data correctly (e.g., playback skipping, or no playback) due to heat shrinking of a sticker or label causing a disc to warp.
• Discs with non-standard shapes (e.g., heart, square, star) cannot be played on this unit. Attempting to do so may damage the unit. Do not use such discs.
- You cannot play 8 cm CDs.
- Before playing, clean the discs with a commercially available cleaning cloth. Wipe each disc from the centre out. Do not use solvents such as benzine, thinner, commercially available cleaners, or antistatic spray intended for analogue discs.

natural_image
Illustration of a hand holding a CD or DVD disc with a tool, showing a circular object and directional arrows (no text or symbols)Music discs encoded with copyright protection
This product is designed to play back discs that conform to the Compact Disc (CD) standard. Recently, various music discs encoded with copyright protection are marketed by some record companies. Please be aware that among those discs, there are some that do not conform to the CD standard and may not be playable by this product.
Notes on CD-Rs (recordable CDs)/CD-RWs (rewritable CDs)
This unit can play the following discs:
| Type of discs Label on the disc | ||
| Audio CD |  |  |
| MP3 files |  |  |
 |  | |
- Some CD-Rs/CD-RWs (depending on the equipment used for its recording or the condition of the disc) may not play on this unit.
- You cannot play a CD-R/CD-RW that is not finalized*.
- You can play MP3 files recorded on CD-ROMs, CD-Rs, and CD-RWs.
- A CD-R/CD-RW to which a session can be added can be played.
* A process necessary for a recorded CD-R/CD-RW disc to be played on the audio CD player.
About MP3 files
MP3 (MPEG 1 Audio Layer-3) is a standard technology and format for compressing a sound sequence. The file is compressed to about 1/10 of its original size. Sounds outside the range of human hearing are compressed while the sounds we can hear are not compressed.
Notes on discs
You can play MP3 files recorded on CD-ROMs, CD-Rs, and CD-RWs.
The disc must be in the ISO 9660*1 level 1 or level 2 format, or Joliet or Romeo in the expansion format.
You can use a disc recorded in Multi Session*.
\*1 ISO 9660 Format
The most common international standard for the logical format of files and folders on a CD-ROM.
There are several specification levels. In Level 1, file names must be in the 8.3 format (no more than 8 characters in the name, no more than 3 characters in the extension “.MP3”) and in capital letters. Folder names can be no longer than 8 characters. There can be no more than 8 nested folder levels. Level 2 specifications allow file names up to 31 characters long.
Each folder can have up to 8 trees.
For Joliet or Romeo in the expansion format, make sure of the contents of the writing software, etc.
\*2 Multi Session
This is a recording method that enables adding of data using the Track-At-Once method. Conventional CDs begin at a CD control area called the Lead-in and end at an area called Lead-out. A Multi Session CD is a CD having multiple sessions, with each segment from Lead-in to Lead-out regarded as a single session.
CD-Extra: The format which records audio (audio CD data) as tracks on session 1, and records data as tracks on session 2.
Mixed CD: In this format, data is recorded as track 1, and audio (audio CD data) is recorded as track 2.
continue to next page →
Notes
- With formats other than ISO 9660 level 1 and level 2, folder names or file names may not be displayed correctly.
- When naming, be sure to add the file extension ".MP3" to the file name.
- If you put the extension “.MP3” to a file other than MP3, the unit cannot recognize the file properly and will generate random noise that could damage your speakers.
- The following discs take a longer time to start playback.
- a disc recorded with complicated tree structure.
- a disc recorded in Multi Session.
- a disc to which data can be added.
Cautions when playing a disc that is recorded in Multi Session
- When the first track of the first session is audio CD data:
Only audio CD data of the first session is played back.
Any data in subsequent sessions is skipped. - When the first track of the first session is not audio CD data:
- If an MP3 file is in the disc, only MP3 file(s) is played back and other data is skipped. (Audio CD data is not recognized.)
- If no MP3 file is in the disc, "NO MUSIC" is displayed and nothing is played back. (Audio CD data is not recognized.)
The playback order of the MP3 files
The playback order of the folders and files is as follows:
flowchart
graph TD
    1["1"] --> 2["2"]
    1 --> 6["6"]
    2 --> 3["3"]
    2 --> 5["5"]
    3 --> 4["4"]
    3 --> 5["5"]
    4 --> 4a["④"]
    5 --> 6a["⑥"]
    5 --> 7["⑦"]
    6a --> 7a["⑦"]
    7a --> 8["⑧"]
    7a --> 8b["⑧"]
    8b --> 9["⑨"]
    1 --> 1a["Folder (album)"]
    2 --> 2a["MP3 file (track)"]
    3 --> 3a["MP3 file (track)"]
    4 --> 4a["MP3 file (track)"]
    5 --> 5a["MP3 file (track)"]
    6a --> 6a1["MP3 file (track)"]
    7a --> 7a1["MP3 file (track)"]
Tree 1 Tree 2 Tree 3 Tree 4 Tree 5 (root)
Notes
- A folder that does not include an MP3 file is skipped.
- When you insert a disc with many trees, it takes a longer time to start playback. We recommend that you make only one or two trees for each disc.
• Maximum folder number: 150 (including root folder and empty folders) - The maximum number of MP3 files and folders that can be contained in a disc: 300 When a file/folder name contains many characters, this number may become less than 300.
Tip
To specify a desired playback order, before the folder or file name, input the order by number (e.g., "01," "02"), then record contents onto a disc. (The order differs depending on the writing software.)
Getting Started
Resetting the unit
Before operating the unit for the first time, or after replacing the car battery or changing the connections, you must reset the unit.
Remove the front panel and press the RESET button with a pointed object, such as a ballpoint pen.
Note
Pressing the RESET button will erase the clock setting and some stored contents.
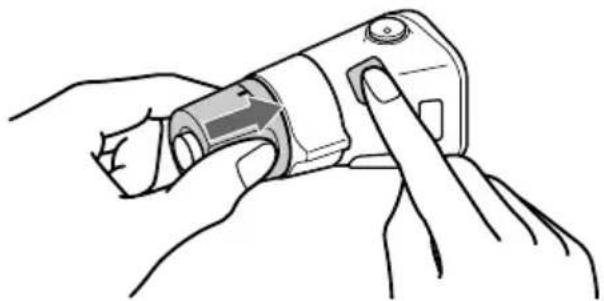
Detaching the front panel
You can detach the front panel of this unit to protect the unit from being stolen.
Caution alarm
If you turn the ignition switch to the OFF position without removing the front panel, the caution alarm will beep for a few seconds.
If you connect an optional amplifier and do not use the built-in amplifier, the beep sound will be deactivated.
1 Press OFF\*.
CD playback or radio reception stops (the key illumination and display remain on).
* If your car has no ACC (accessory) position on the ignition switch, be sure to turn the unit off by pressing OFF until the display disappears to avoid car battery drain.
2 Press then pull it off towards you.

Notes
- If you detach the panel while the unit is still turned on, the power will turn off automatically to prevent the speakers from being damaged.
- Do not drop or put excessive pressure on the front panel and its display window.
- Do not subject the front panel to heat/high temperature or moisture. Avoid leaving it in a parked car or on a dashboard/rear tray.
Tip
When carrying the front panel with you, use the supplied front panel case.
continue to next page →
Attaching the front panel
Attach part Ⓐ of the front panel to part Ⓑ of the unit as illustrated and push the left side into position until it clicks.
Note
Do not put anything on the inner surface of the front panel.
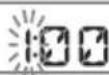
Setting the clock
The clock uses a 12-hour digital indication.
Example: To set the clock to 10:08
1 Press DSPL for 2 seconds.
The hour indication flashes.

①Press the volume +/- button to set the hour.
②Press SEL. The minute indication flashes.
③Press the volume +/- button to set the minute.
2 Press DSPL.

The clock starts. After the clock setting is completed, the display returns to normal play mode.
CD Player
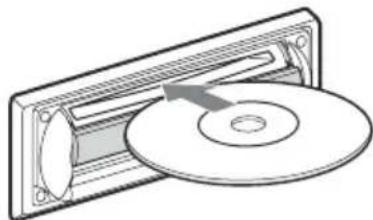
Playing a disc
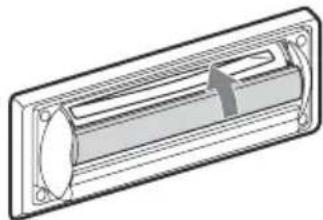
1 Open the shutter.
natural_image
Diagram of a cylindrical device with a downward arrow indicating rotation or movement (no text or symbols)2 Insert the disc labelled side up.

natural_image
Diagram of a CD/DVD drive with an arrow indicating the disk (no text or symbols present)Playback starts automatically.
3 Close the shutter.
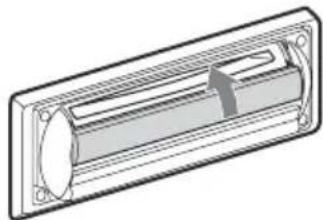
natural_image
Technical line drawing of a rectangular device with internal components and mounting holes (no text or symbols)If a disc is already inserted, press SOURCE repeatedly until "CD" appears to start playback.
To Press
| Stop playback OFF | |
| Skip tracks |  |
| - Automatic |  |
| Music Sensor | [once for each track] |
| Fast-forward/ |  |
| reverse |  |
| - Manual Search |  |
| Skip albums* | 1(ALBUM-) or 2(ALBUM+) |
| - Albums selection | |
* Available only when an MP3 file is played.
To skip tracks continuously, press SEEK (+) or SEEK (-), then press again within 2 seconds and hold.
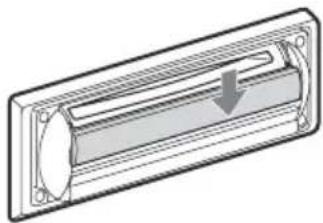
To eject the disc
1 Open the shutter.
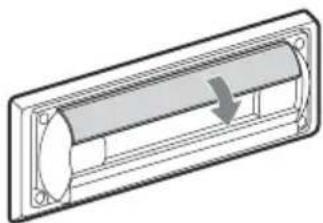
natural_image
Diagram of a cylindrical device with an arrow indicating direction, no text or symbols present2 Push down the shutter.

natural_image
Diagram of a rectangular device with internal components and a downward arrow indicating flow or movement (no text or symbols)The disc is ejected.
Notes
- While ejecting or inserting a disc, do not close the shutter. The disc may be caught and damaged.
- A disc may be ejected if you open the shutter forcefully.
- Before playing a track, this unit reads all track and album information on the disc. Depending on the track structure, it may take more than a minute before playback begins. During this time, "READ" is displayed. Please wait for play to start automatically when the reading is complete.
- Depending on the condition of the disc, it may not play back (page 6, 7).
- While the first/last track on the disc is playing, if (SEEK) (-) or (SEEK) (+) is pressed, playback skips to the last/first track of the disc.
- When the last track on the disc is over, playback restarts from the first track of the disc.
- If you play a high-bit rate MP3 file such as 320 kbps, sound may be intermittent.
Tip
A disc can be played with the shutter opened or closed.
Display items
When the disc/album/track changes, any prerecorded title*1 of the new disc/album/track is automatically displayed (if A.SCRL (Auto Scroll) is set to “ON,” names exceeding 8 characters will be scrolled (page 16)).
Displayable items
- Track number/Elapsed playing time
• Disc name* ^1 /Artist name* ^2 - Album (folder) name* 3
- Track (file) name ^13
• ID 3 ta ^3 g * - Clock
To Press
Switch display item DSPL
Scroll display item SCRL
*1 When pressing DSPL, "NO NAME" indicates that there is no prerecorded name to display.
*2 Only for CD TEXT discs with the artist name.
*3 Only for MP3 files.
Only track name/artist name/album name in ID3 tag is displayed.
When pressing DSPL, "NO ID3" indicates that there is no ID3 tag to display.
Notes
- Some characters cannot be displayed.
- For some CD TEXT discs with very many characters, information may not scroll.
- This unit cannot display the artist name for each track of a CD TEXT disc.
Notes on MP3
- ID3 tag applies to version 1.0, 1.1, 2.2, 2.3 and 2.4.
-
Some characters and signs cannot be displayed (appear as “*”). The maximum number of displayable characters for an album (folder) name/track (file) is 64 (Romeo) or 32 (Joliet); ID3 tag 30 characters (1.0, 1.1, 2.2 and 2.3) or 126 characters (2.4).
-
In the following cases, elapsed playing time may not be displayed accurately.
- when an MP3 file of VBR (variable bit rate) is played.
– during fast-forward/reverse.
Tips
- When A.SCRL (Auto Scroll) is set to "OFF" and the disc/album/track is changed, the disc/album/track name does not scroll.
- When an MP3 file is played and the album is changed, the new album number is displayed.
Playing tracks repeatedly
— Repeat Play
You can select:
- REP-TRACK — to repeat the current track.
- REP-ALBM* — to repeat the tracks in the current album.
* Available only when an MP3 file is played.
During playback, press ③ (REP) repeatedly until the desired setting appears in the display.
Repeat Play starts.
To return to normal play mode, select "REP-OFF."
Playing tracks in random order
— Shuffle Play
You can select:
- SHUF-ALBM* — to play the tracks in the current album in random order.
- SHUF-DISC — to play the tracks in the disc in random order.
* Available only when an MP3 file is played.
During playback, press ④ (SHUF) repeatedly until the desired setting appears in the display. Shuffle Play starts.
To return to normal play mode, select "SHUF-OFF."
Radio
The unit can store up to 6 stations per band (FM1, FM2, FM3, AM1 and AM2).
Caution
When tuning in stations while driving, use Best Tuning Memory to prevent accidents.
Storing stations automatically
— Best Tuning Memory (BTM)
The unit selects the stations with the strongest signals within the selected band, and stores them in the order of their frequency.
1 Press SOURCE repeatedly to select the radio.
2 Press MODE repeatedly to select the band.
3 Press BTM for 2 seconds.
The unit stores stations in the order of their frequencies on the number buttons.
A beep sounds when the setting is stored.
Notes
- If only a few stations can be received due to weak signals, some number buttons will retain their former settings.
- When a number is indicated in the display, the unit starts storing stations from the one currently displayed.
Receiving the stored stations
1 Press SOURCE repeatedly to select the radio.
2 Press MODE repeatedly to select the band.
3 Press the number button (① to ⑥) on which the desired station is stored.
If preset tuning does not work — Automatic tuning/Local Seek Mode
Automatic tuning:
Press SEEK (+) or SEEK (-) to search for the station.
Scanning stops when the unit receives a station. Repeat the operation until the desired station is received.
Local Seek Mode:
If the automatic tuning stops too frequently, press SENS repeatedly until "LOCAL-ON" appears in the display.

Only the stations with relatively strong signals will be tuned in.
To cancel the local seek mode, press SENS twice when receiving FM.
Note
When receiving AM, to cancel the local seek mode, press SENS ("LOCAL-OFF" appears).
Tip
If you know the frequency of the station you want to listen to, press and hold SEEK (+) or SEEK (-) to locate the approximate frequency, then press SEEK (+) or SEEK (-) repeatedly to fine adjust to the desired frequency (manual tuning).
If FM stereo reception is poor
— Monaural Mode
During radio reception, press SENS repeatedly until "MONO-ON" appears in the display.

The sound improves, but becomes monaural (“ST” disappears).
To return to normal radio reception mode, press SENS (“MONO-OFF” appears).
Storing only the desired stations
You can manually preset the desired stations on any chosen number button.
1 Press SOURCE repeatedly to select the radio.
2 Press MODE repeatedly to select the band.
3 Press SEEK (+) or SEEK (-) to tune in the station that you want to store.
4 Press the desired number button (① to ⑥) for 2 seconds until "MEM" appears.
The number button indication appears in the display.
Note
If you try to store another station on the same number button, the previously stored station will be erased.
Other Functions
You can also control the unit with a rotary commander (optional).
Using the rotary commander
First, attach the appropriate label depending on how you want to mount the rotary commander. The rotary commander works by pressing buttons and/or rotating controls.
By pressing buttons
Press To
| SOURCE Change the source(Radio/CD)/Power on | |
| MODE Change radio band | |
| ATT Attenuate the sound | |
| OFF *1 Stop playback or radio reception/Power off | |
| SEL Adjust and select | |
| DSPL Change the display item |
By rotating the control
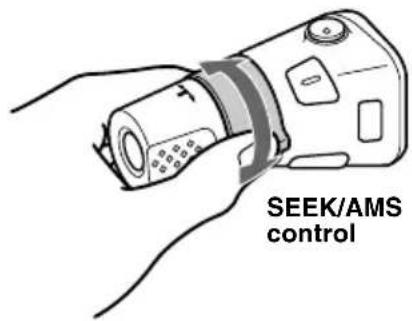
Rotate and release to:
- Skip tracks.
To continuously skip tracks, rotate once and rotate again within 2 seconds and hold the control.
– Tune in stations automatically.
Rotate, hold, and release to:
- Fast-forward/reverse a track.
- Find a station manually.
By pushing in and rotating the control
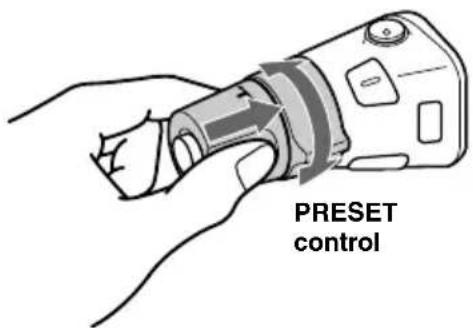
Push in and rotate the control to:
- Receive preset stations.
- Change albums ^*2 .
*1 If your car has no ACC (accessory) position on the ignition key switch, after turning off the ignition, be sure to press and hold OFF until the display disappears.
*2 Available only when an MP3 file is played.
When an MP3 file is played, you can select an album using the rotary commander.
To Do this
| Skip albums – Album selection | Push in and rotate [once for each album] the control. To continuously skip albums, push in and rotate (and hold) the control. |
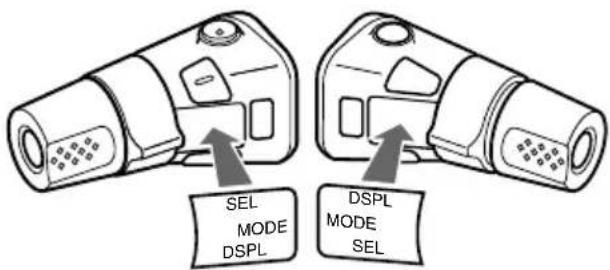
Changing the operative direction
The operative direction of controls is factory-set as shown below.
If you need to mount the rotary commander on the right hand side of the steering column, you can reverse the operative direction.
natural_image
Line drawing of hands using a handheld device to interact with a finger (no text or symbols present)Press SEL for 2 seconds while pushing the VOL control.
Adjusting the sound characteristics
You can adjust the balance, fader, low pass filter and subwoofer volume.
1 Press SEL repeatedly until "BAL," "FAD," "LPF" or "SUB" appears.
Each time you press SEL, the item changes as follows:
LOW*1 → MID*1 → HI*1 →
BAL (left-right) → FAD (front-rear) →
LPF (low pass filter)*2*3 →
SUB (subwoofer volume)*2*4
*1 When EQ3 is activated (page 17).
*2 When "SUB" is selected (page 16).
*3 The cut off frequency is adjustable to 78 Hz, 125 Hz or OFF.
*4 The volume level is adjustable between -10 and +10 steps. (Below -10, "ATT" is displayed.)
2 Press the volume +/- button to adjust the selected item.
Note
Adjust within 3 seconds after selecting the item.
Quickly attenuating the sound
Press ATT.
After “ATT-ON” momentarily appears, “ATT” appears in the display.
To restore the previous volume level, press ATT again.
Changing the sound and display settings
— Menu
The following items can be set:
Set up
- R E A R / S U-B to switch the audio output REAR or SUB.
- Select "REAR" to output to a power amplifier.
- Select "SUB" to output to a subwoofer.
• A.SCRL (Auto Scroll) ^*2 (page 12)
- D E M O ^* to turn the demonstration display on or off.
- Select "ON" to activate the demonstration display (The demonstration starts about 10 seconds after the unit is turned off).
- Select "OFF" to deactivate the demonstration display.
- BEEP — to turn the beeps on or off.
- DIM — to change the brightness of the display.
- Select "ON" to dim the display.
- Select "OFF" to deactivate the Dimmer.
Switching the REAR/SUB ^*1
Press SEL and then press the volume + (REAR) or - (SUB) button.
After 3 seconds, the display returns to normal play mode.
Selecting the desired item
Press SEL and the desired button simultaneously.
SEL + 3: A.SCRL*2
SEL + 4: DEMO*1
SEL + 6 : BEEP
SEL + DSPL : DIM
After the mode setting is completed, the display returns to normal play mode.
To cancel the item, press SEL and the desired button simultaneously again.
*1 When the unit is turned off.
*2 When no CD is playing, this item will not appear.
Setting the equalizer (EQ3)
You can select an equalizer curve for 7 music types (XPLOD, VOCAL, CLUB, JAZZ, NEW AGE, ROCK, CUSTOM and OFF (equalizer OFF)).
You can store a different equalizer setting for each source.
Selecting the equalizer curve
1 Press SOURCE to select a source (Radio or CD).
2 Press EQ3 repeatedly until the desired equalizer curve.
Each time you press EQ3, the item changes.

To cancel the equalizing effect, select "OFF."
continue to next page →
Adjusting the equalizer curve
You can store and adjust the equalizer settings for different tone ranges.
1 Press SOURCE to select a source (Radio or CD).
2 Press EQ3 repeatedly to select the desired equalizer curve.
3 Adjusting the equalizer curve.
① Press SEL repeatedly to select the desired tone range.
Each time you press SEL, the tone range changes.
$$ \begin{array}{l}\text { LOW } \rightarrow \text { MID } \rightarrow \text { HI } (\rightarrow \text { BAL } \rightarrow \text { FAD } \rightarrow\\text { LPF } \rightarrow \text { SUB) }\end{array} $$
②Press the volume +/- button repeatedly to adjust to the desired volume level.
The volume level is adjustable by 1 dB steps from -10 dB to +10 dB.

③ Repeat step ① and ② to adjust the equalizer curve.
To restore the factory-set equalizer curve, press SEL for 2 seconds.
Note
When EQ3 is set to "OFF," you cannot adjust the equalizer curve settings.
Additional Information
Maintenance
Fuse replacement
When replacing the fuse, be sure to use one matching the amperage rating stated on the original fuse. If the fuse blows, check the power connection and replace the fuse. If the fuse blows again after replacement, there may be an internal malfunction. In such a case, consult your nearest Sony dealer.
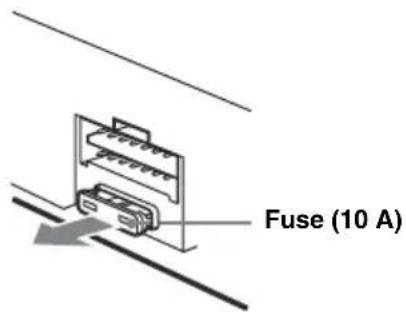
Warning
Never use a fuse with an amperage rating exceeding the one supplied with the unit as this could damage the unit.
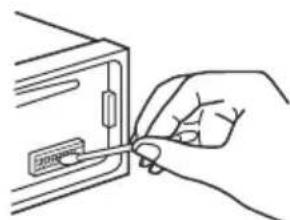
Cleaning the connectors
The unit may not function properly if the connectors between the unit and the front panel are not clean. In order to prevent this, detach the front panel (page 9) and clean the connectors with a cotton swab dipped in alcohol. Do not apply too much force. Otherwise, the connectors may be damaged.
natural_image
Line drawing of a hand inserting a small component into a device (no text or symbols visible)Main unit
natural_image
Line drawing of a hand holding a pen or ruler over a rectangular object (no text or symbols)Back of the front panel
Notes
- For safety, turn off the ignition before cleaning the connectors, and remove the key from the ignition switch.
- Never touch the connectors directly with your fingers or with any metal device.
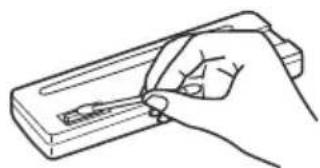
Replacing the lithium battery
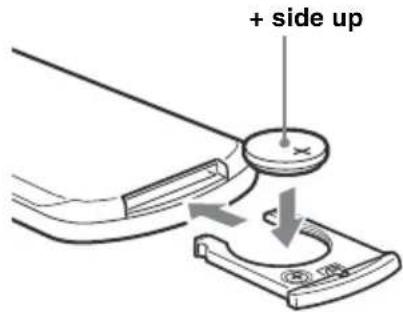
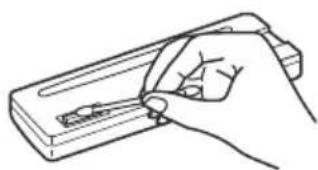
Under normal conditions, battery will last approximately 1 year. (The service life may be shorter, depending on the conditions of use.) When the battery becomes weak, the range of the card remote commander becomes shorter. Replace the battery with a new CR2025 lithium battery. Use of any other battery may present a risk of fire or explosion.

natural_image
Illustration of a hand using a pen to apply a small component to a surface, with no visible text or symbols.↓
Notes on lithium battery
- Keep the lithium battery out of the reach of children. Should the battery be swallowed, immediately consult a doctor.
- Wipe the battery with a dry cloth to assure a good contact.
- Be sure to observe the correct polarity when installing the battery.
- Do not hold the battery with metallic tweezers, otherwise a short-circuit may occur.
WARNING
Battery may explode if mistreated. Do not recharge, disassemble, or dispose of in fire.
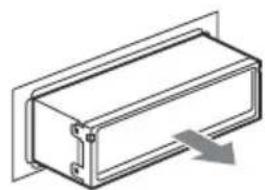
Removing the unit
1 Remove the protection collar.
① Detach the front panel (page 9).
②Engage the release keys together with the protection collar.
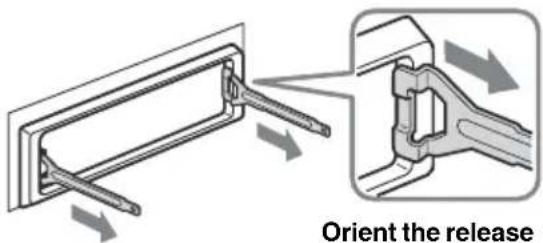
Orient the release key correctly.
③ Pull out the release keys to remove the protection collar.
natural_image
Diagram showing two rectangular metal components with a directional arrow indicating transformation or assembly (no text or symbols present)continue to next page →
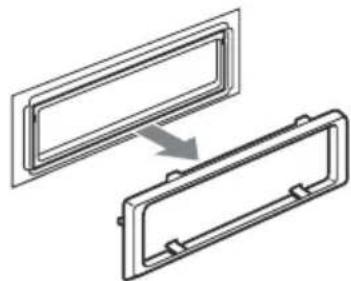
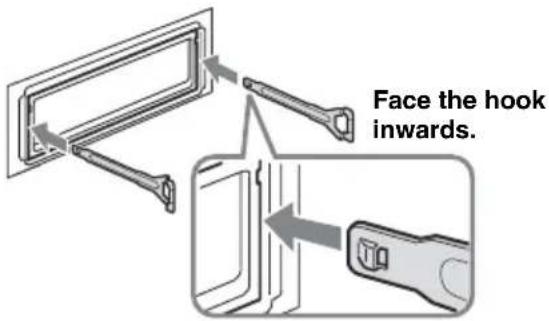
2 Remove the unit.
①Insert both release keys together until they click.
② Pull the release keys to unseat the unit.
natural_image
Technical line drawing of a mechanical component with directional arrows indicating movement (no text or symbols)③Slide the unit out of the mounting.
natural_image
Technical line drawing of a rectangular mechanical component with a downward arrow indicating force or motion (no text or symbols)Specifications
CD Player section
Signal-to-noise ratio 120 dB
Frequency response 10 - 20,000 Hz
Wow and flutter Below measurable limit
Tuner section
FM
Tuning range FM tuning interval:
50 kHz/200 kHz
switchable
87.5 - 108 MHz
(at 50 kHz step)
87.5 - 107.9 MHz
(at 200 kHz step)
Aerial terminal External aerial connector
Intermediate frequency 10.7 MHz/450 kHz
Usable sensitivity 9 dBf
Selectivity 75 dB at 400 kHz
Signal-to-noise ratio 67 dB (stereo),
69 dB (mono)
Harmonic distortion at 1 kHz
0.5 % (stereo),
0.3 % (mono)
Separation 35 dB at 1 kHz
Frequency response 30 - 15,000 Hz
AM
Tuning range AM tuning interval:
9 kHz /10 kHz switchable
531 - 1,602 kHz
(at 9 kHz step)
530 - 1,710 kHz
(at 10 kHz step)
Aerial terminal External aerial connector
Intermediate frequency 10.7 MHz/450 kHz
Sensitivity 30 μV
Power amplifier section
Outputs Speaker outputs
(sure seal connectors)
Speaker impedance 4 - 8 ohms
Maximum power output 52 W × 4 (at 4 ohms)
General
Outputs Audio outputs terminal
(rear/sub switchable)
Power aerial relay control
terminal
Power amplifier control
terminal
Inputs Remote controller input
terminal
Aerial input terminal
Tone controls
Low:
±10 dB at 60 Hz (XPLOD)
Mid:
±10 dB at 1 kHz (XPLOD)
High:
±10 dB at 10 kHz (XPLOD)
Power requirements
12 V DC car battery
(negative earth)
Dimensions
Approx. 178 × 50 × 179 ~mm
(w/h/d)
Mounting dimensions
Approx. 182 × 53 × 161 mm
(w/h/d)
Mass
Approx. 1.2 kg
Supplied accessories
Parts for installation and
connections (1 set)
Front panel case (1)
Optional accessories
Card remote commander
RM-X114
Rotary commander
RM-X4S
Design and specifications are subject to change without notice.
Troubleshooting
The following checklist will help you remedy problems you may encounter with your unit. Before going through the checklist below, check the connection and operating procedures.
General
No sound.
- Press the volume + button to adjust the volume.
- Cancel the ATT function.
- Set the fader control to the centre position for a 2-speaker system.
The contents of the memory have been erased.
- The RESET button has been pressed. → Store again into the memory.
- The power lead or battery has been disconnected.
- The power connecting lead is not connected properly.
No beep sound.
- The beep sound is cancelled (page 16).
- An optional power amplifier is connected and you are not using the built-in amplifier.
The display disappears from/does not appear in the display window.
- The display disappears if you press and hold OFF.
→Press and hold OFF again until the display appears. - Remove the front panel and clean the connectors. For details, see “Cleaning the connectors” on page 18.
Stored stations and correct time are erased. The fuse has blown.
Makes noise when the ignition key is in the ON, ACC, or OFF position.
The leads are not matched correctly with the car's accessory power connector.
No power is being supplied to the unit.
- Check the connection. If everything is in order, check the fuse.
- The car does not have an ACC position. →Press SOURCE (or insert a disc) to turn on the unit.
The power is continuously supplied to the unit.
The car does not have an ACC position.
The power aerial does not extend.
The power aerial does not have a relay box.
CD playback
A disc cannot be loaded.
- Another CD is already loaded.
- The CD has been forcibly inserted upside down or in the wrong way.
Playback does not begin.
- Defective or dirty CD.
- CD-R/CD-RW that is not finalized.
- You tried to play back a CD-R/CD-RW not designed for audio use.
- Some CD-Rs/CD-RWs may not play due to its recording equipment or the disc condition.
MP3 files cannot be played back.
- Recording was not performed according to the ISO 9660 level 1 or level 2 format, or the Joliet or Romeo in the expansion format.
- The file extension “.MP3” is not added to the file name.
- Files are not stored in MP3 format.
MP3 files take longer to play back than others.
The following discs take a longer time to start playback.
- a disc recorded with complicated tree structure.
- a disc recorded in Multi Session.
- a disc to which data can be added.
A disc is automatically ejected.
The ambient temperature exceeds 50^ C.
The operation buttons do not function. CD will not be ejected.
Press the RESET button.
The sound skips from vibration.
- The unit is installed at an angle of more than 45^ .
- The unit is not installed in a sturdy part of the car.
The sound skips.
Dirty or defective disc.
Radio reception
Preset tuning is not possible.
- Store the correct frequency in the memory.
• The broadcast signal is too weak.
The stations cannot be received. The sound is hampered by noises.
- Connect a power aerial control lead (blue) or accessory power supply lead (red) to the power supply lead of a car's aerial booster (only when your car has built-in FM/AM aerial in the rear/side glass).
- Check the connection of the car aerial.
• The auto aerial will not go up.
→ Check the connection of the power aerial control lead.
- Check the frequency.
Automatic tuning is not possible.
- The local seek mode is set to “ON.” → Set the local seek mode to “OFF” (page 13).
- The broadcast signal is too weak.
→ Perform manual tuning.
The "ST" indication flashes.
- Tune in the frequency accurately.
• The broadcast signal is too weak.
→ Set the monaural reception mode to “ON” (page 13).
A programme broadcast in stereo is heard in monaural.
The unit is in monaural reception mode.
→ Cancel monaural reception mode (page 13).
Error displays/Messages
Error displays
The following indications will flash for about 5 seconds, and an alarm sound will be heard.
ERROR
- A CD is dirty or inserted upside down.
→ Clean or insert the CD correctly. - A CD cannot play because of some problem.
→ Insert another CD.
FAILURE
The connection of speakers/amplifiers is incorrect.
→ See the installation guide manual of this model to check the connection.
NO MUSIC
A CD which is not a music file is inserted in this unit.
→ Insert a music CD in this unit.
OFFSET
There may be an internal malfunction.
→ Check the connection. If the error indication remains on in the display, consult your nearest Sony dealer.
RESET
The CD unit cannot be operated because of some problem.
→ Press the RESET button on the unit.
Messages
L.SEEK +/-
The local seek mode is on during automatic tuning (page 13).
“LLLL” 707 r “ ”
You have reached the beginning or the end of the disc and you cannot go any further.
If these solutions do not help improve the situation, consult your nearest Sony dealer.
Bienvenido
CLASS 1 LASER PRODUCT
natural_image
Simple line drawing showing a hand holding a disc and a CD with a cross symbol (no text or labels)natural_image
Hand holding a CD or DVD disc with a tool, showing a circular object and directional arrows (no text or symbols)Nota
natural_image
Diagram of a cylindrical device with a downward arrow indicating rotation or movement (no text or symbols present)natural_image
Diagram of a CD/DVD drive showing disc and DVD components (no text or labels)natural_image
Diagram of a rectangular device with internal components and a curved arrow indicating direction (no text or symbols)natural_image
Diagram of a cylindrical device with a downward arrow indicating direction (no text or symbols)2 Presiónelo.
natural_image
Diagram of a rectangular device with a central shaded area and an arrow indicating direction (no text or symbols)natural_image
Line drawing of hands using a handheld tool to interact with a mechanical component (no text or symbols)natural_image
Pure electrical circuit lines without any symbolsFusible (10 A)
Advertencia
natural_image
Line drawing of a hand inserting a card into a folder (no text or symbols)Unidad principal

natural_image
Line drawing of a hand holding a pen or stylus over a rectangular object (no text or symbols)natural_image
Illustration of a hand using a pen to apply a small component to a surface, with no visible text or symbols.↓
Lado + hacia arriba
natural_image
Diagram of a mechanical device with a central knob and directional arrows indicating motion (no text or symbols)natural_image
Diagram showing two rectangular metal components with a directional arrow indicating movement or transformation (no text or symbols present)natural_image
Technical line drawing of a mechanical bracket with directional arrows indicating motion (no text or symbols)natural_image
Isometric line drawing of a rectangular electronic component with a gray arrow indicating direction (no text or symbols)Especificaciones
±10 dB a 1 kHz (XPLOD)
Altos:
±10 dB a 10 kHz (XPLOD)
CLASS 1 LASER PRODUCT
此標籤位於機殼的底部。
目錄
控制器位置 4
使用前注意事項 6
光碟注意事項 6
關於 MP3 檔案 .....7
開始使用之前
復原本機 9
拆卸前面板 9
設定時鐘 10
CD 播放機
播放光碟 11
顯示項目 12
反覆播放樂曲
一 重複播放 ……12
以隨機順序播放樂曲
一 任選播放 ……12
收音機
自動存儲電台
natural_image
Simple line drawing showing a hand holding a disc and a CD with a cross symbol (no text or labels)natural_image
Hand holding a CD or DVD disc with arrows indicating direction (no text or symbols)具有版權保護編碼的音樂光碟
natural_image
Simple line drawing of a rectangular device with internal components and a small dot at the bottom (no text or symbols)RESET 按鈕
註
註
不要在前面板内表面放任何東西。
設定時鐘
時鐘採用 12 小時制數字顯示。
例如:將時鐘設定為 10:08
1 按住 DSPL 2 秒鐘。
小時指示閃爍。
SET
natural_image
Diagram of a cylindrical device with a downward arrow indicating rotation or movement (no text or symbols)2 装入光碟(標籤面向上)。
natural_image
Diagram of a CD/DVD drive with an arrow indicating the disc (no text or symbols present)播放自動開始。
3 關閉活門。
natural_image
Technical line drawing of a rectangular device with internal components and mounting holes (no text or symbols)natural_image
Diagram of a cylindrical device with a downward arrow indicating rotation or movement (no text or symbols)2 向下按活門。
natural_image
Diagram of a rectangular device with internal components and a downward arrow indicating rotation (no text or symbols)光碟被退出。
註
轉動 VOL 控制器調節音量。
natural_image
Illustration of hands using a handheld tool to interact with a mechanical component (no text or symbols visible)③重複步驟 ①和 ②,調整均衡曲線。
natural_image
Pure electrical circuit lines without any symbols保險絲 (10 A)
警告
natural_image
Line drawing of a hand inserting a card into a folder (no text or symbols)主機
natural_image
Line drawing of a hand holding a tool over a rectangular object (no text or symbols)前面板的背部
註
natural_image
Diagram showing two rectangular metal brackets with a directional arrow indicating transformation or assembly (no text or symbols present)2 取出装置。
natural_image
Technical line drawing of a mechanical component with directional arrows indicating motion (no text or symbols)③將本機從安裝位置滑出。
natural_image
Simple line drawing of a rectangular electronic component with a downward arrow indicating compression or dislocation (no text or symbols)規格
CD 播放機部分
訊噪比 120 dB
頻率響應 10 - 20,000 Hz
抖晃率 低於可測限制
調諧器部分
FM
調諧範圍 FM 調諧間隔:
50 kHz/200 kHz
可轉換
87.5 - 108 MHz
(以 50 kHz 爲一級)
87.5 - 107.9 MHz
(以 200 kHz 爲一級)
天線端子 外接天線連接器
中頻 10.7 MHz/450 kHz
可用靈敏度 9 dBf
- Lead-free solder is used for soldering certain parts.
- Halogenated flame retardants are not used in the certain printed wiring boards.
- Halogenated flame retardants are not used in cabinets.
• Paper is used for the packaging cushions.
http://www.sony.net/
Sony Corporation Printed in Korea