SVTV132SM - Television SVAN - Free user manual and instructions
Find the device manual for free SVTV132SM SVAN in PDF.


| Product Type | LED Television |
| Screen Size | 32 inches (82 cm) |
| Display Resolution | 1366 x 768 (HD) / 1920 x 1080 (FHD) |
| Processor | Quad Core ARM Cortex A53 (1.1 GHz) |
| GPU | Mali470MP x 2 (600 MHz) |
| RAM | 1 GB |
| Internal Storage | 8 GB |
| Operating System | Android 7.1.1 |
| Smart TV | Yes (App Store, YouTube, Netflix, Facebook, etc.) |
| Wi-Fi | Yes (IEEE 802.11b/g/n) |
| Ethernet | Yes (10/100 Mbps) |
| HDMI Inputs | 3 |
| USB Ports | 2 |
| Component Video Input | 1 (via mini RCA) |
| AV Input | 1 (mini RCA) |
| CI Slot | 1 |
| Audio Output | SPDIF Coaxial, Headphone |
| Power Supply | 180-240 V AC, 50/60 Hz |
| Power Consumption (On) | 62 W |
| Standby Power | 0.45 W |
| Dimensions (with stand) | 732 x 237 x 462 mm |
| TV Tuner | DVB-T2/C/S2 (optional) |
| Energy Class | A+ |
| Accessories Included | Remote control, AAA batteries, user manual |
Frequently Asked Questions - SVTV132SM SVAN
User questions about SVTV132SM SVAN
0 question about this device. Answer the ones you know or ask your own.
Ask a new question about this device
Download the instructions for your Television in PDF format for free! Find your manual SVTV132SM - SVAN and take your electronic device back in hand. On this page are published all the documents necessary for the use of your device. SVTV132SM by SVAN.
USER MANUAL SVTV132SM SVAN
ARM Cortex A53(Quad Co...

GPU
Dual-Core

Memoria
1.0GB

Almacenamiento
8GB
natural_image
Technical line drawing of two views of a flat-screen computer chassis with connectors and internal components (no text or symbols)natural_image
Technical line drawing of a computer monitor rear panel with connectors and ventilation slots (no text or symbols)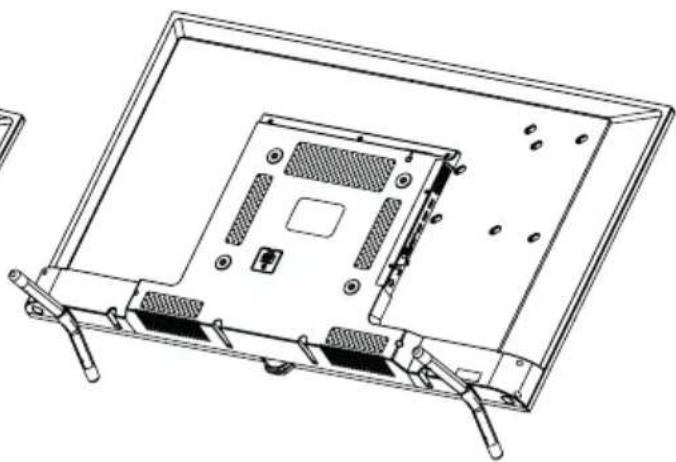
natural_image
Technical line drawing of an open computer chassis showing internal components and mounting brackets (no text or symbols)natural_image
Technical line drawing of two views of a computer chassis showing internal components and cable attachment (no text or symbols)natural_image
Technical line drawing of a computer chassis showing internal components and mounting points (no text or symbols)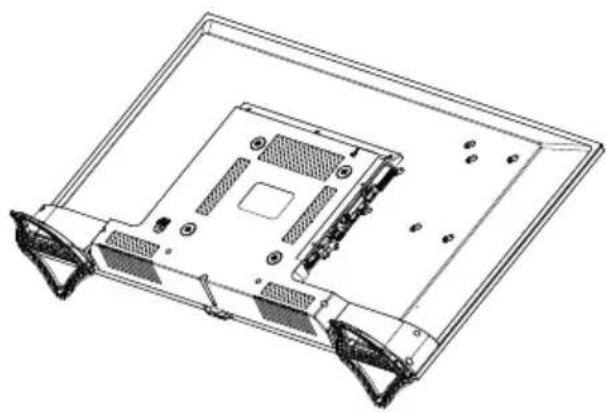
natural_image
Technical line drawing of a computer motherboard showing CPU socket, drive bays, and mounting bracket (no text or labels)User Manual
svan
TU ALTERNATIVA EN ELECTRODOMÉSTICOS
EN
□ SVTV132SM
□ SVTV1400SM
□ SVTV1430SM
• Appliance Features 3
• Safety Warnings 4
• Keypad And Rear Connections 7
- Operating Appliance 8
- Remote Control Key Functions 9
- First Installation Menu 10
• Home Page 12
• Network Settings 15
• Time Settings 15
- Common 15
- About TV 17
• Media 18
Photo 18
Music 19
Video 20
Applications 21
• Live-TV App 21
• Picture Setup 22
- Sound Setup 23
- Channel Setup 23
- Function 27
- Setup 28
- Troubleshooting 29
• Technical Specifications 30
- Product Features 31
- Stand Installation Diagram 32
DEAR COSTUMER
Please read the user manual carefully before you continue.
The appliance has the following features:
• Full function remote control
- Displaying all menus and commands for the operations performed on the screen (On Screen Display)
• Multilanguage OSD menu support
• 100 analog channel memory (Optional)
• Auto search option
• Programmable Switch ON/OFF times
• Auto stand-by after the end of broadcast
• Auto display format (4:3 or 16:9) definition
- Fast teletext with 1000 pages of memory
• Digital Connection with HDMI Input
- Playing audio, picture and film files from USB input
• 4000 digital channel memory (Optional)
- CI Module
• AV Input
- YPbPr Input
• DVB T2/C (Optional)
• DVB T2/C/S2 (Optional)
• DVB S2 (Optional)
- Android™
• Wi-Fi and Ethernet(LAN) Support
- Bluetooth (Optional)

CAUTION
RISK OF ELECTRICAL SHOCK DO NOT OPEN

WARNING: PLEASE DO NOT OPEN COVER (OR BACKPANEL) TO AVOIDELECTRICAL SHOCK DANGER.
THE DEVICE DOES NOT INCLUDE PARTS WHICH CAN BE REPAIRED BY USER. REFER TO AUTHORIZED PERSONEL FOR SERVICE OPERATIONS.

This sign is used for the purpose of warning against risk of electrical shock, because of non-insulated parts that the device includes.

This sign is used for the purpose of warning user that the appliance manual includes important operating and maintenance (service) instructions.
• Make sure that voltage on the identification plate meets the local electric network voltage.
- Parts of the device set are heat sensitive. Maximum ambient temperature must not exceed 40°C.
• To ensure adequate ventilation, at least 10 cm clearance around the product to remain in place.
- The unit set back or cover the ventilation holes on the sides. Ventilation holes in the newspaper, tablecloth, cover with objects such as curtains.
• Install the device far enough from the heat sources (fireplace etc.) and devices that creates strong magnetic and electrical field.
- Relative humidity at the installation room must not exceed 85%.
- Do not expose your appliance to direct sunlight when placing.
- Do not expose your appliance to mechanical vibration or bump.
- Do not place your appliance on dusty environments.
• Water splashes or drops must be avoided upon the devices.
- Substances filled with water (vase, etc.) must not be placed upon the device.
- Condensation can be seen on screen (and on some parts inside the Device set) when moving the set from a colder ambient to a warmer one. Before switching on the appliance set again wait for the evaporation.
- The appliance set can be operated or switched to standby status using the buttons on the set.
- If you are not planning to use the appliance for a long time, unplug the power cable from the main plug.
- It is recommended to unplug the Device set from mains switch and antenna cable during thunderstorms to avoid hazardous electrical or electromagnetic fluctuations. Therefore, arrange the mains and antenna plugs to be unplugged easily when needed.
- Do not place inflammable objects such as lighting candle on the appliance.
Installation
• Install the appliance near a plug that can be accessed easily.
- Place the appliance set on fixed and flat ground.
Wall mount
Remark: Two persons needed for this operation.
To ensure a secure installation consider the following security notes:
- Check the carrying capacity of the wall for the total weight of appliance set and wall mounting mechanism.
- Follow the instructions coming with the wall mount piece.
• The appliance set must be installed on a plain wall. - Make sure to use seals adequate with the wall material.
- Make sure that the appliance set cables won't hang up on the device.
All other security instructions concerning our appliance sets are also valid in here.
Caution:
Make sure that the surface you are planning to place the appliance set on is strong enough to carry the weight. Do not place the set on an unstable surface (a mobile rack, utmost point of a section, etc) and make sure that the front side of the TV set does not hang down over the surface it is placed on.
Transporting the Appliance
- Remove all cables before moving the appliance set.
- When lifting or relocating the appliance set, hold its bottom firmly. Do not stress on LED panel.
- When moving the appliance set, do not expose it to shock or over-vibration.
- When relocating the appliance set or moving it for any reason, package it using original cardboard and packaging materials.
LED panel
Materials used when generating this product are made up of fragile elements. Therefore, product can be broken when in cases of falling over or bumps. LED panel is a high tech product and offers you high detailed images. From time to time, a few inactive pixels on screen can appear in blue, green or red steadily. This has no effect over the product performance.
Maintenance
Before cleaning, always unplug the TV set from the wall outlet. Use a glass cleaner or a smooth cloth without pressing on LED panel to clean the screen and a soft cleanser for the rest of the set. Acetone, toluene or alcohol containing cleaning materials can harm LED panel of your appliance. Do not use cleaners containing this kind of substance.
Important: Aggressive cleansers, alcohol based and abrasive products can damage screen. Frequently dust out the ventilation pores. Using solvents, abrasive or alcohol based products can damage the appliance set. In case of any object or liquid leakage inside the device, immediately pull out the plug and have the device checked by an authorized service. Neither unseal the device by yourself nor have it opened by unauthorised people, otherwise you will risk both yourself and the device.
Keep the packing box and original packing materials to repack your appliance when needed.
Conditions Regarding Environment and Human Health
Complies with the WEEE Directive.
WEEE
This device is made of up of parts which can be recycled in accordance with the WEEE Directive must not be disposed.
- This symbol on product or its package indicates that this product should not be treated as a domestic waste. Instead, it should be delivered to appropriate collection points for recycling electrical and electronic appliances. You will help potential negative results that may arise in respect of environment and human health be prevented by ensuring that this product is disposed accordingly.
Recycling the materials will help natural resources be protected.
For more detailed information regarding recycling of this product, please contact local civil offices, domestic wastes disposal services or the dealer you have purchased the product.
- Do not touch the outlet and wall adapter with wet hands.
- Whenever you recognize a burning smell or smoke immediately unplug the mains switch of appliance set.
- Do not open the back cover of the appliance set on your own. Otherwise you may be exposed to electric shock.
- The appliance set has adequate protection to avoid giving away X-ray radiation. Workouts carried by unqualified persons, changes in the high voltage section or changing the LED panel with an inadequate model can cause a major increase in the X-ray radiation. A set modified this way has no initial specifications and must not be operated.
- Excessive sound pressure from earphones and headphones can cause hearing loss.
- Throw used batteries into appropriate bins considering the damages it can give to the environment.
Information Regarding Usage Faults
- Any liquid contact to product in case of rainwater reaches to the product through antenna cable,
- Incorrect voltage application, high voltage reception,
- Interventions performed by unauthorised individuals,
- Faults due to dropping and crashing after the product is delivered to the consumer, the breakages and scratches on outer surface are all user faults.
Information Regarding Efficient Use in Respect of Energy Consumption
- When the appliance set does not work, it should be unplugged rather than being turned off using the remote controller. In case it is turned off by the remote controller, it will continue to consume energy on Stand-By position.
- Low sound level will reduce energy consumption.
10 years of life
EU declaration of conformity
CE
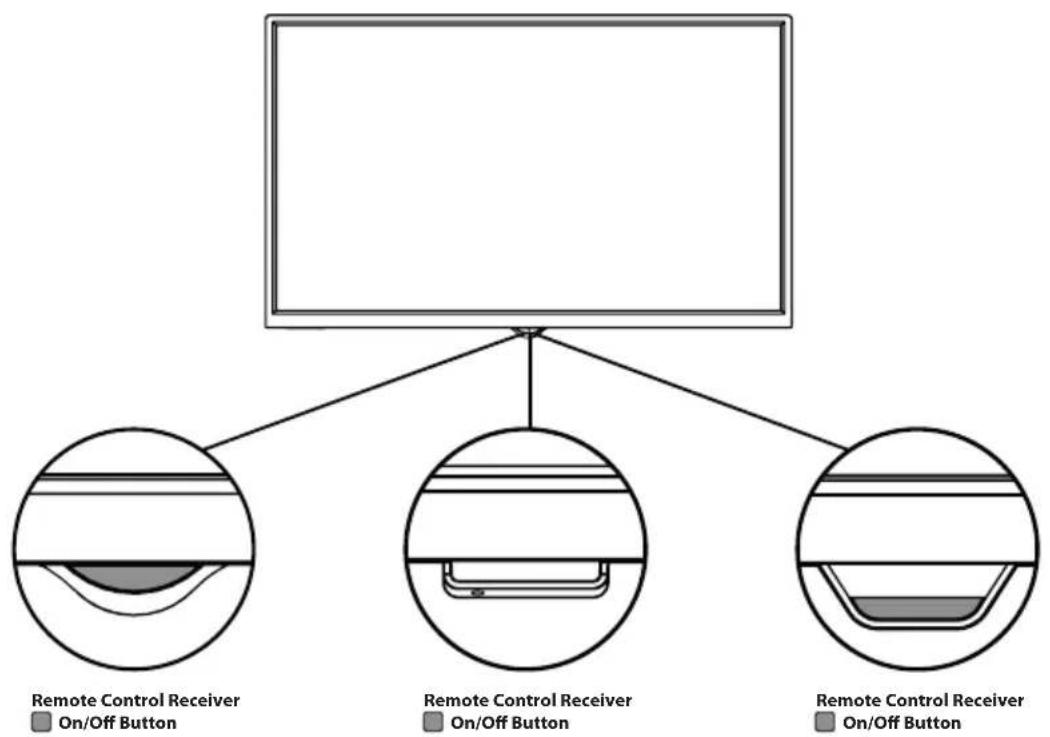
flowchart
graph TD
    A[" "] --> B["Remote Control Receiver"]
    A --> C["Remote Control Receiver"]
    A --> D["Remote Control Receiver"]
    style A fill:#f9f,stroke:#333
    style B fill:#ccf,stroke:#333
    style C fill:#ccf,stroke:#333
    style D fill:#ccf,stroke:#333

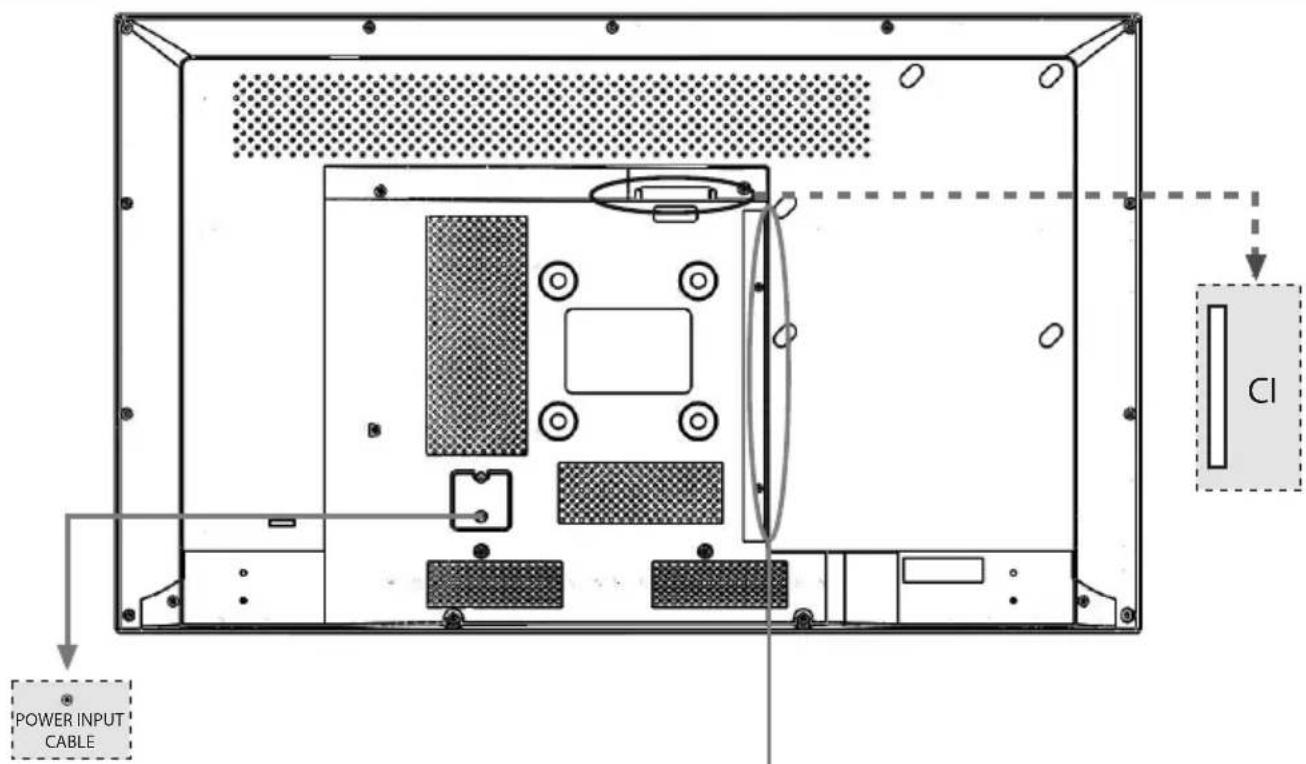
REAR CONNECTIONS

flowchart
graph TD
    A["Device with arrow icon"] --> B["Device with internal components"]
    B --> C["Device with internal components and directional arrows"]
After reading the instructions on this page regarding the operation of your appliance set and remote control, you may continue with the pages about controlling the remote control and channel adjustment procedure.
-
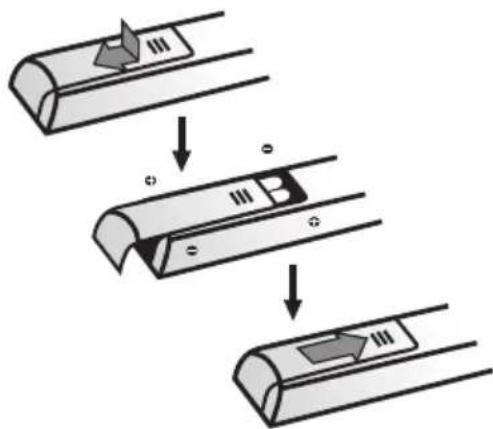
Place two AAA batteries inside the remote control. Matters to be taken into account while using the batteries. Only use the specified type of batteries. Make sure to make the polarization properly. Do not use old and new batteries together. Do not use rechargeable batteries. Do not expose the batteries to high temperatures; do not throw in the fire, charge or lay open. Otherwise this may cause effluence or explosion. Remove the remote control batteries if you will not use it for a long time.
-
Plug the electric cable FIRST to the appliance, and THEN to the wall plug.
CAUTION: The battery, there is danger of explosion is replaced by an incorrect battery type. Replace only with the same or equivalent type battery.
Your appliance set can only be connected to an AC power supply. It must not be connected to a DC supply. If the plug is departed from the electric cable, never plug it into wall plug.
Note: Pictures are figurative. Location of the electric socket at the back side of the appliance can vary upon the model.
- Switch on your Appliance by pressing the POWER button at the rear. You may enter the MENU with MENU button, decrease the volume with VOL- button, increase the volume with VOL+ button and switch between the CH-/+ buttons.
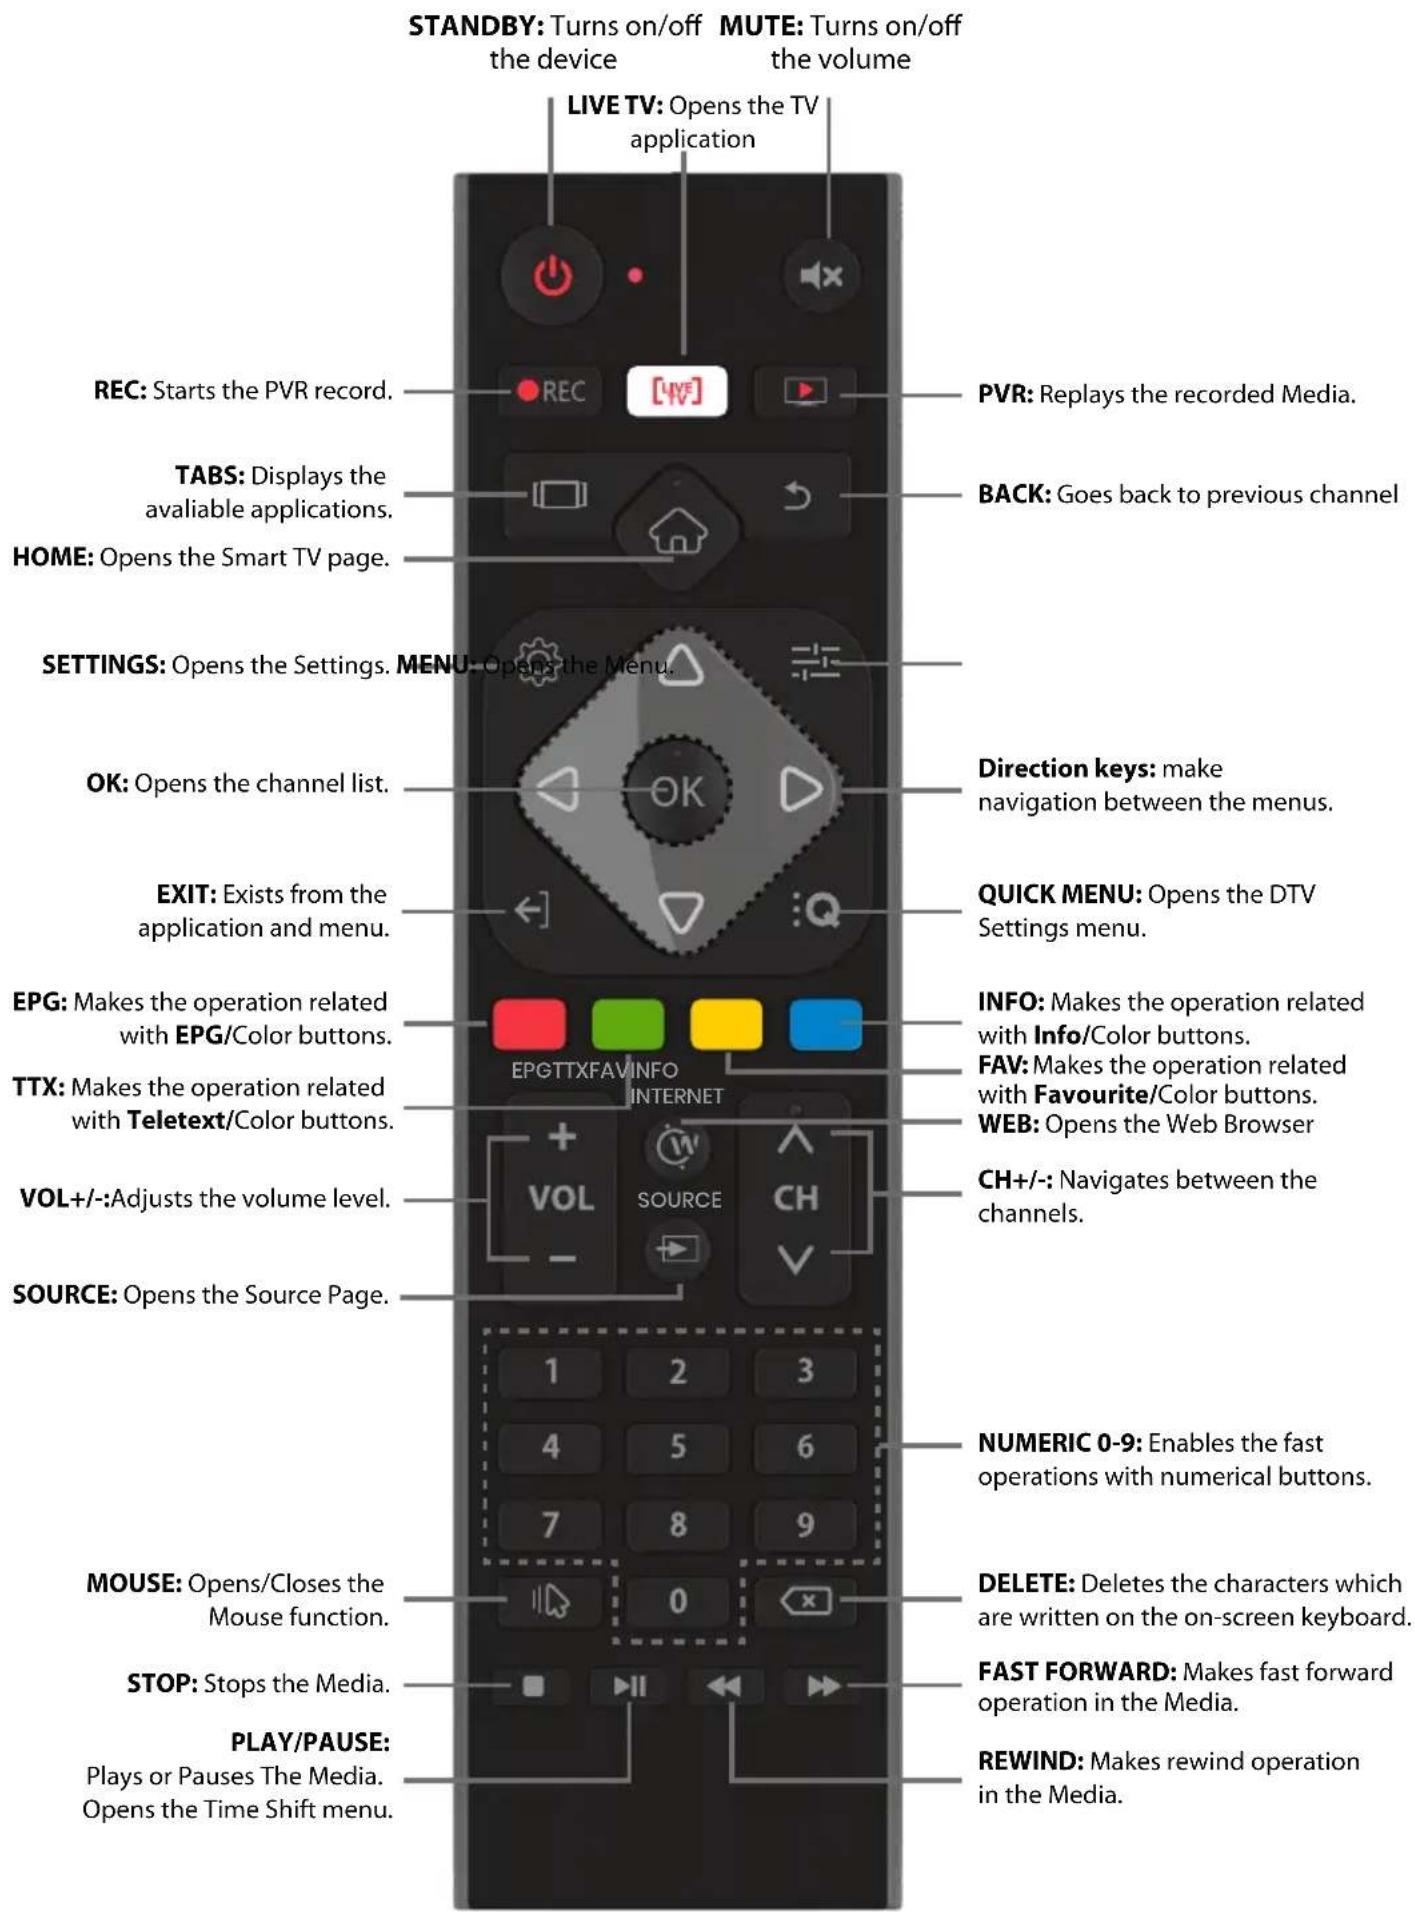
As soon as you power your TV on, TV will start to boot, please wait. After booting is completed, First Installation menu will come to screen.
Language: Press ▲/▼ button to select the language you want, then press OK button to confirm. Press ▶ button to go to the next step.
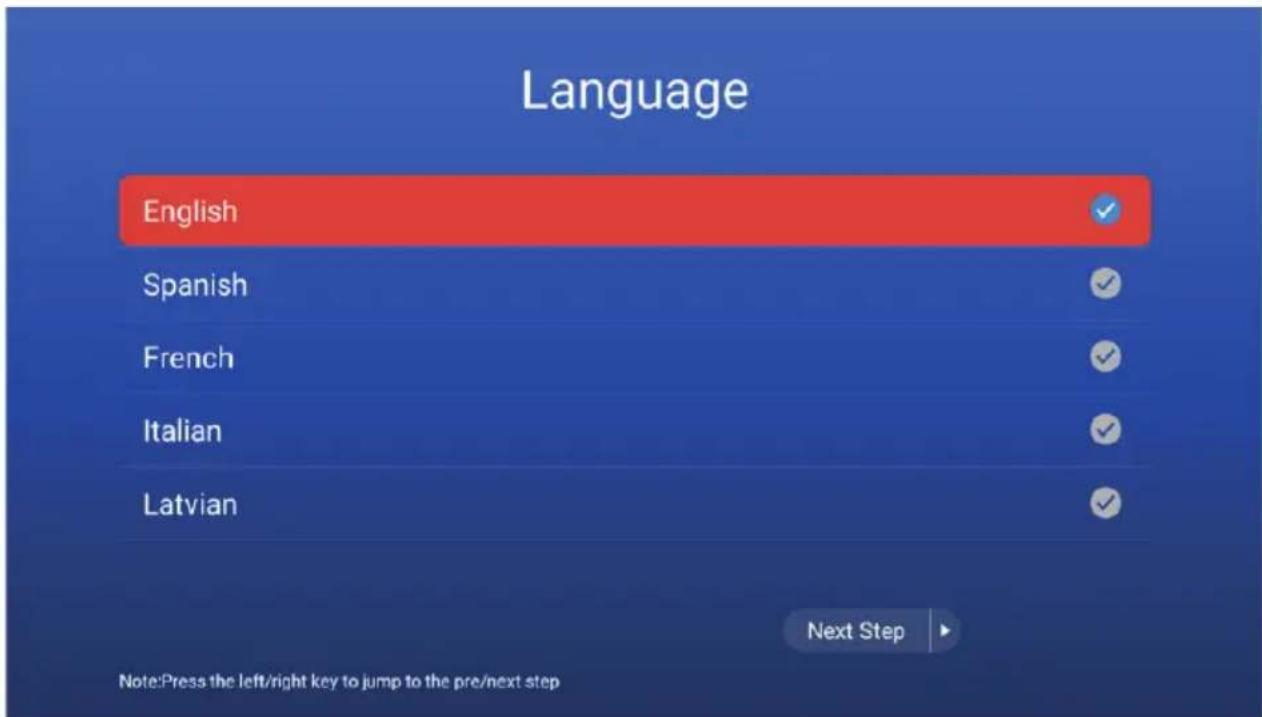
Time Zone: Press ▲/▼ button to select your city, or a city that has the same time zone of your city, then press OK button to confirm. Press ▶ button to go to the next step. You can go back to the previous step by pressing ◀ button.
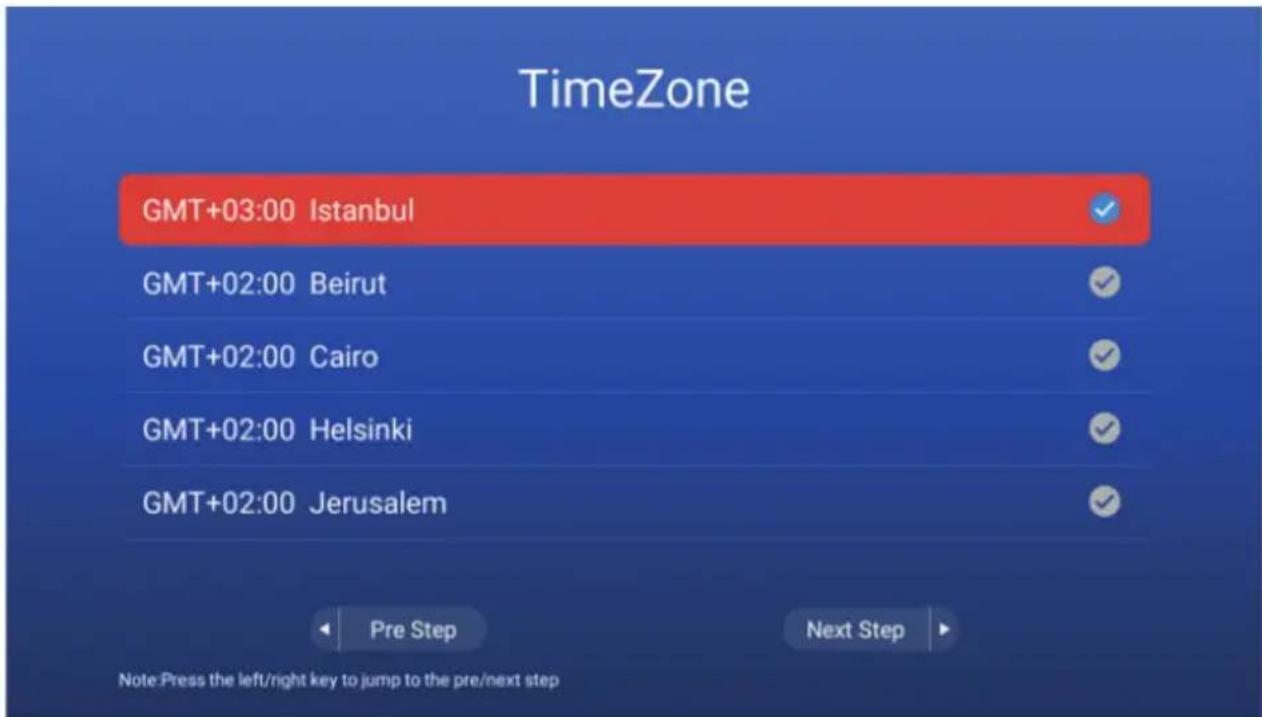
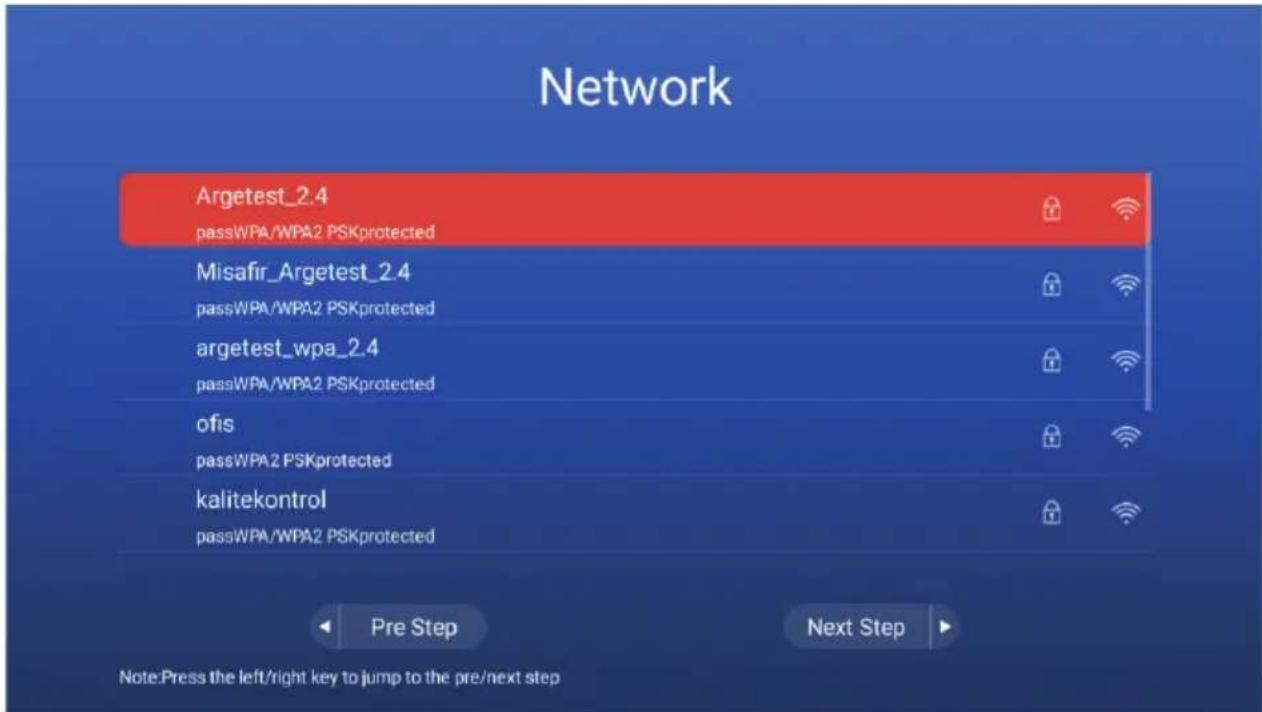
Network: Press ▲/▼ button to select your WiFi network SSID, then press OK button to set. Enter the network password and connect to the internet. Press ▶ button to go to the next step. You can go back to the previous step by pressing ◀ button.
You are ready to start using your Smart TV, you can Press ▲/▼ button to select: Start TV (to open Live-TV app) or Start Launcher (to open the Smart TV Home Page), then press OK button to confirm. Press ▶ button to go to your selection.
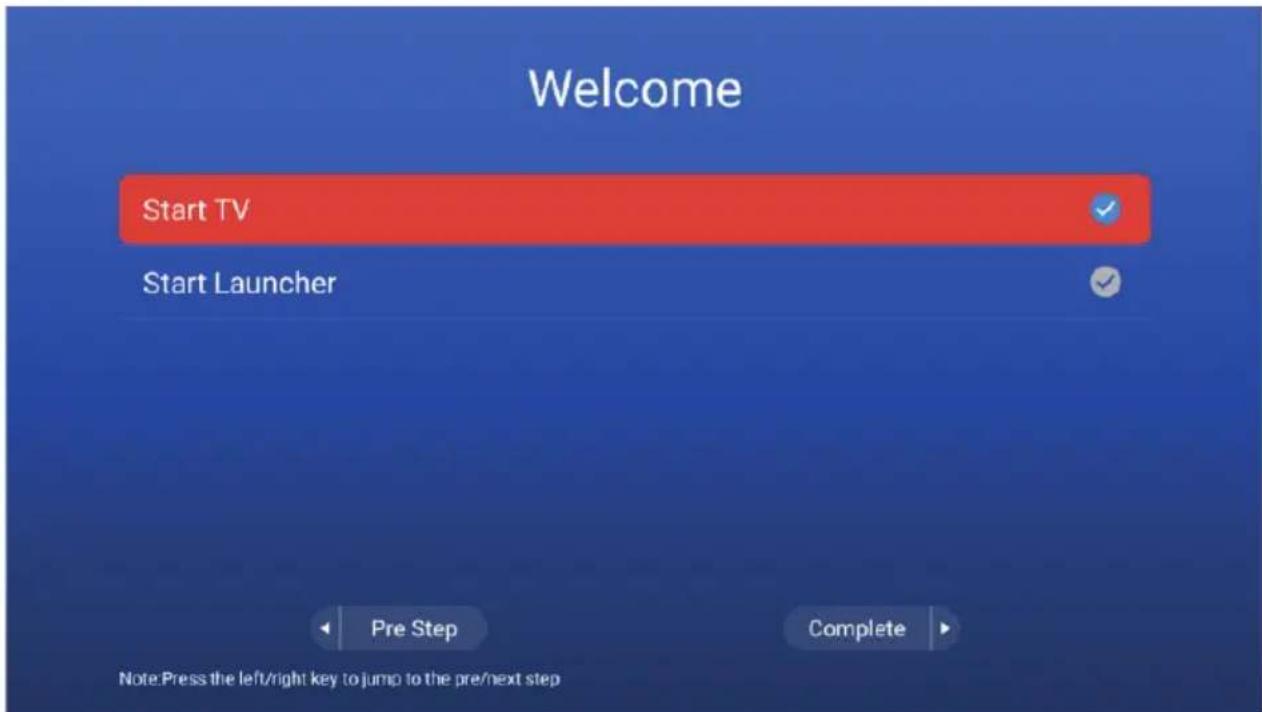
If you choose Start TV, a Quick Setup OSD will come, in which, you can choose your country, the DVB system in your country, ATV/DTV preference and DTV subtitle and audio preferences.

Before starting to use the TV, be sure that time and date are correct.
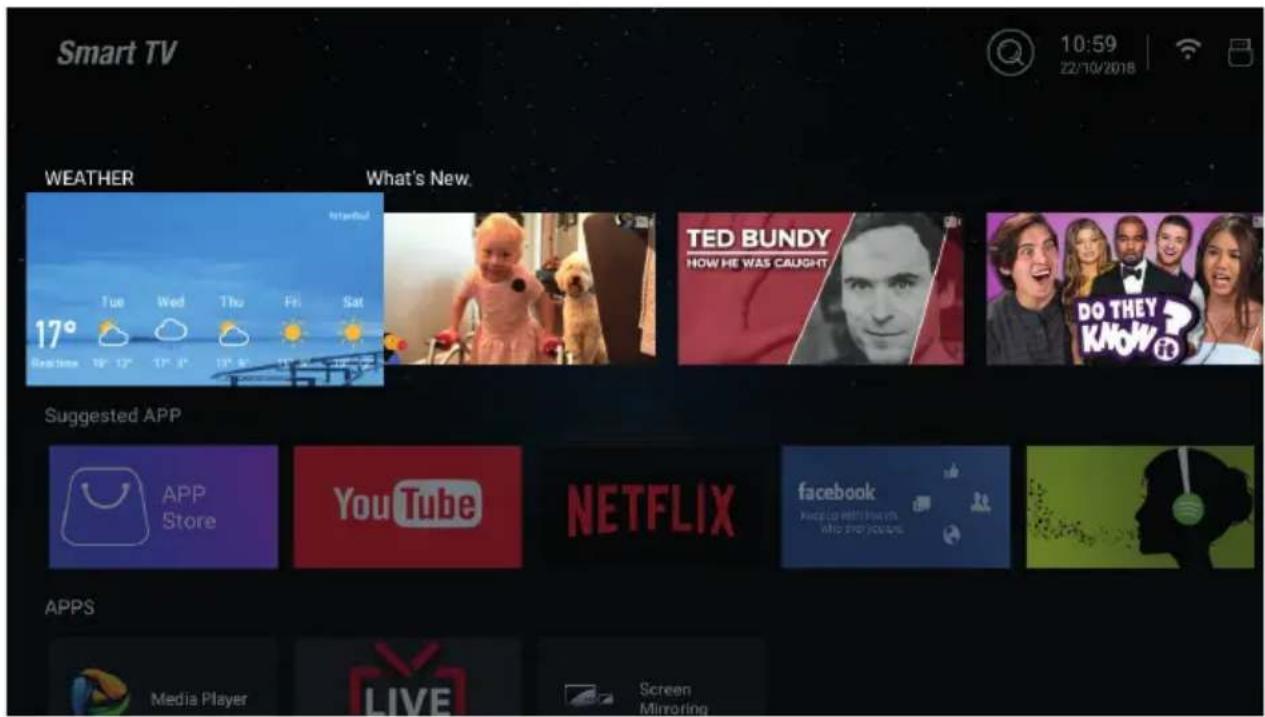
You can enter the home page by pressing "HOME" key in the remote control.
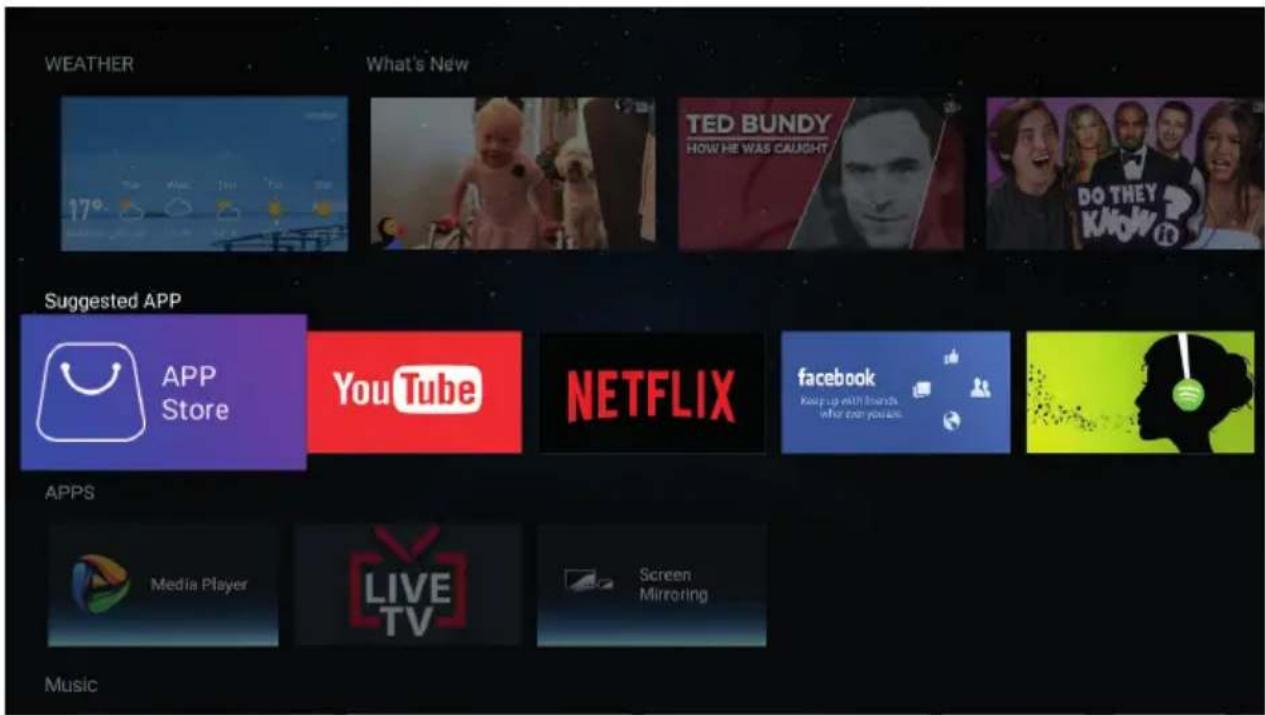
The first row of Home Page includes Weather and new trending videos. Videos will be updated every few days.
Press ◀/▶ button to select the video, and then press OK key to play video you want (Note: YouTube app should be installed to play these videos).
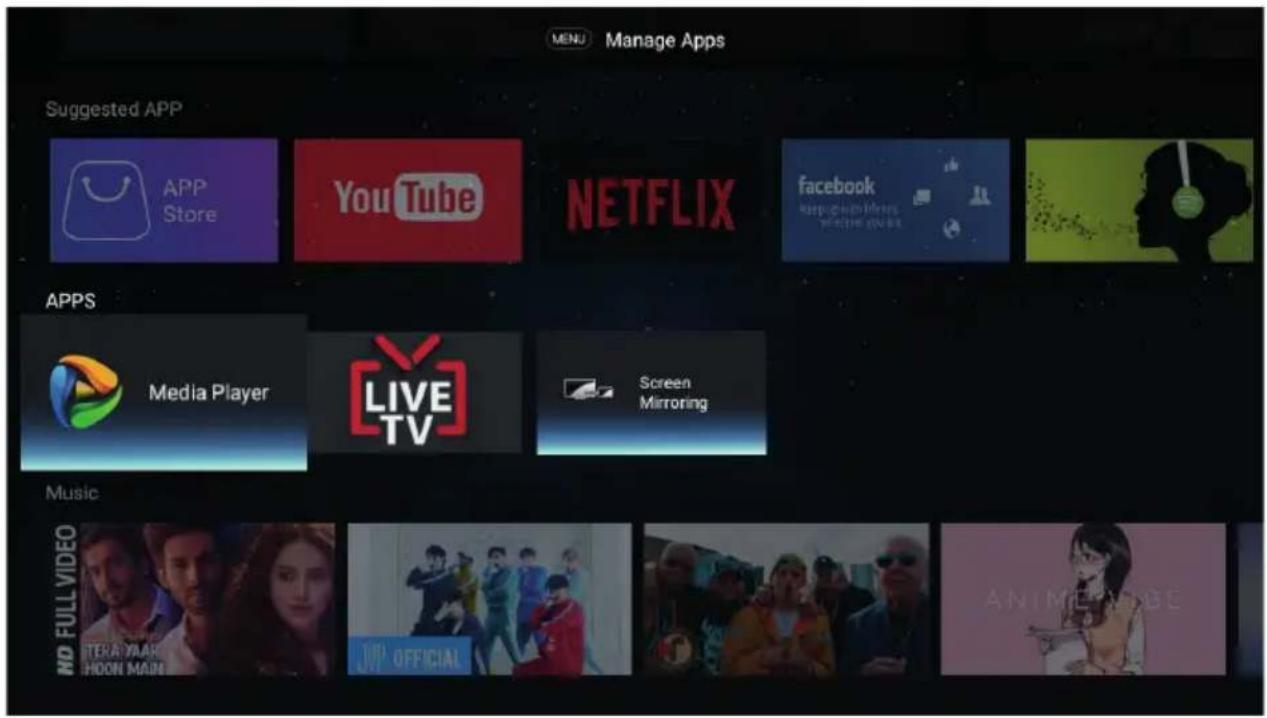
Suggested APP
It is the recommended APPs in the APP Store, press OK key to download these APPs from the Store, you can also enter the APP Store to download other APPs.
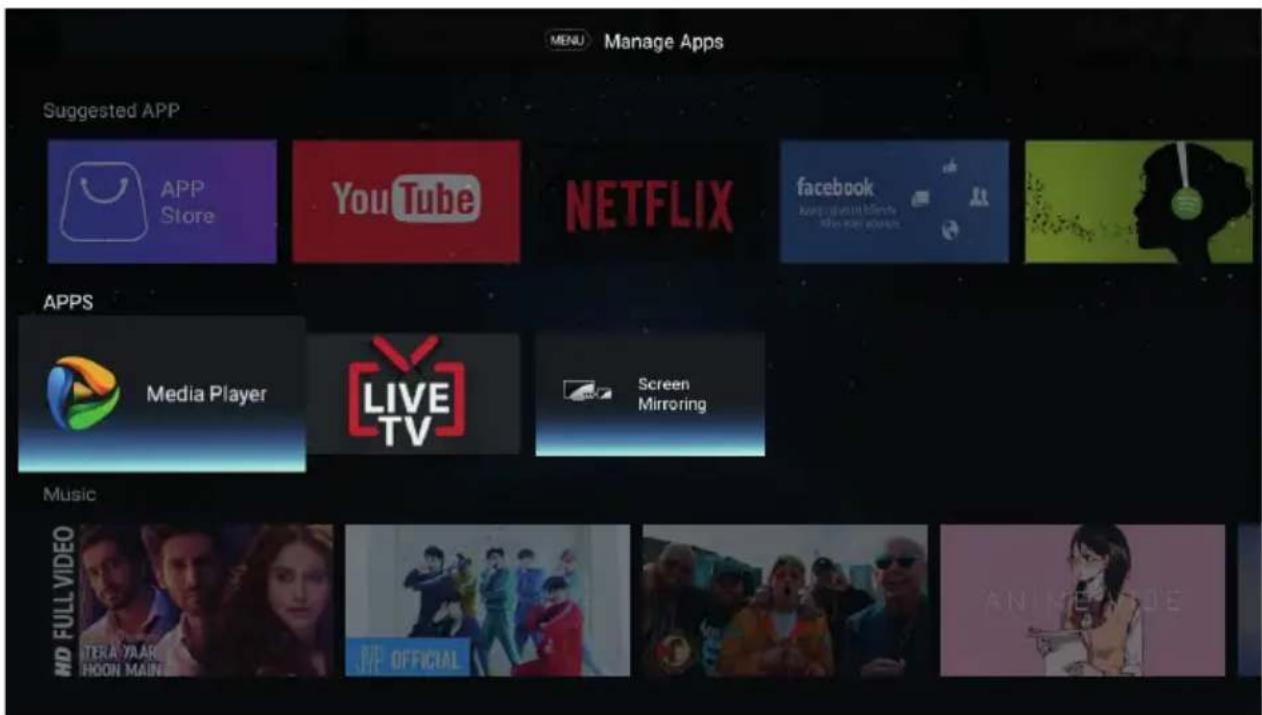
APPS.
This part includes preset apps as well as the apps installed by user.
Press ◀/▶ button to select APP, and then press OK key to run it.
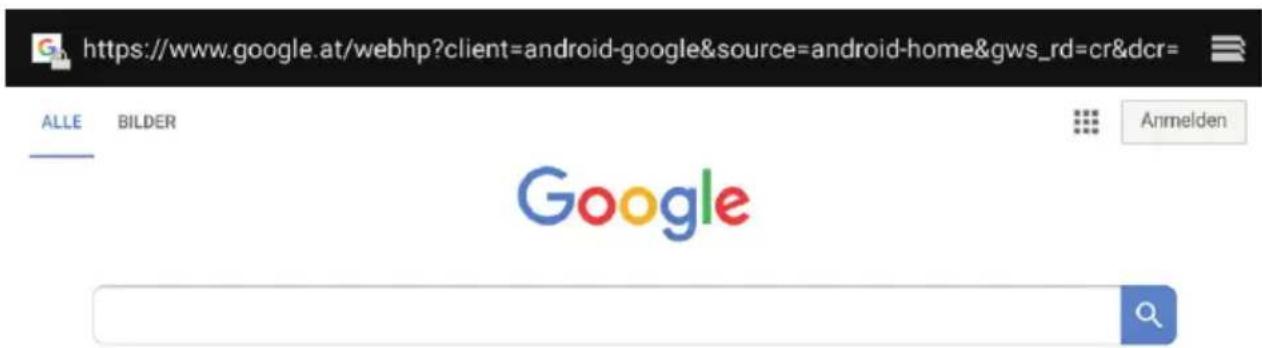
Browser
User can access to the internet by Browser app (Browser needs to be downloaded and installed). After installing Browser, it can be accessed by pressing "WEB" key in the remote control.
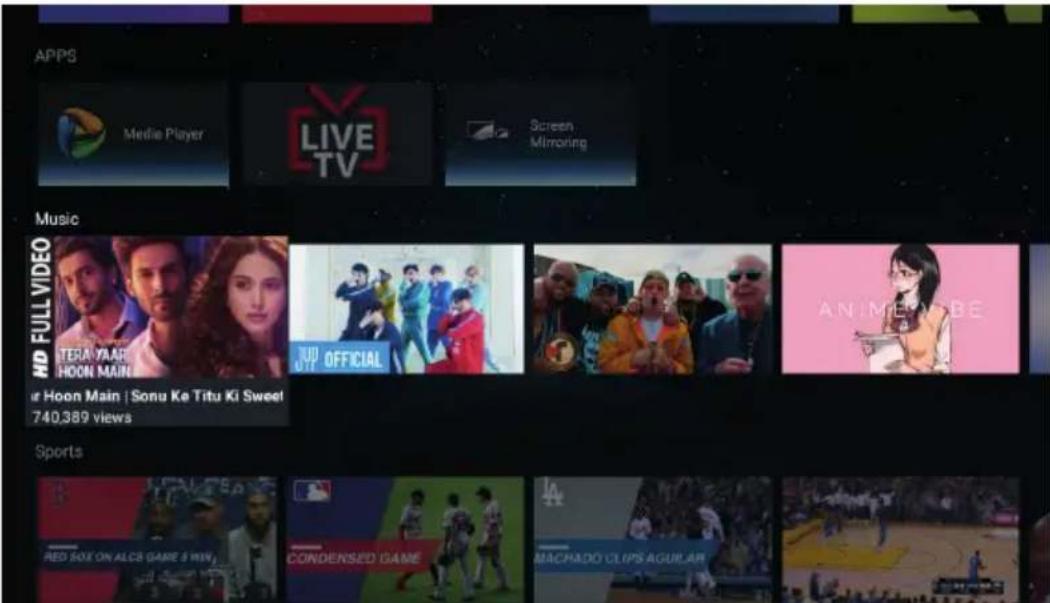
Sports & Music
This row includes the trending music and sport videos.
Press ◀/▶ button to select the video, and then press OK key to play it (Note: YouTube app should be installed to play these videos).
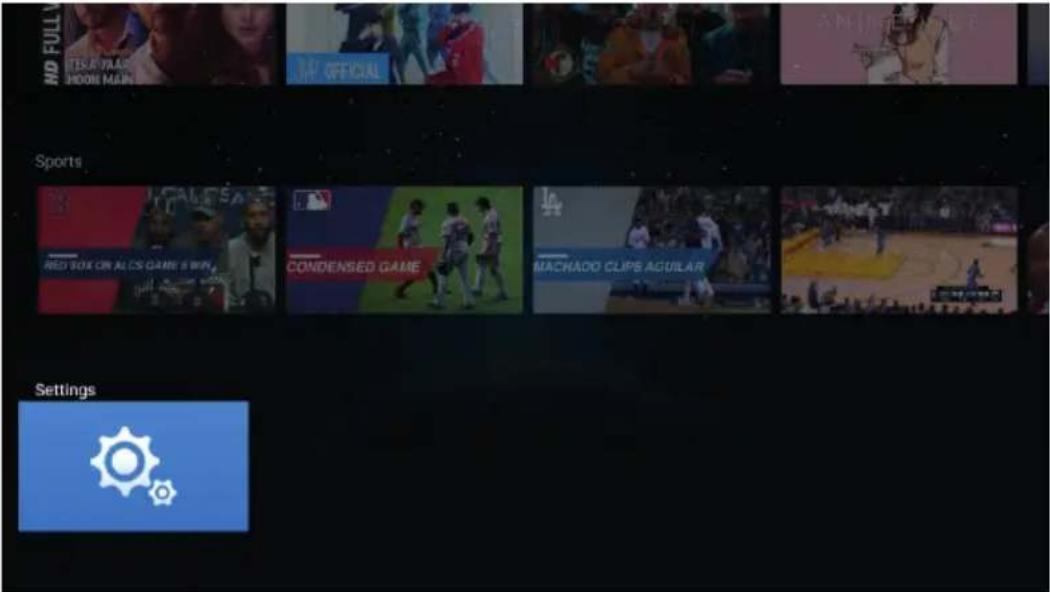
Settings
Press OK key to open system setting.
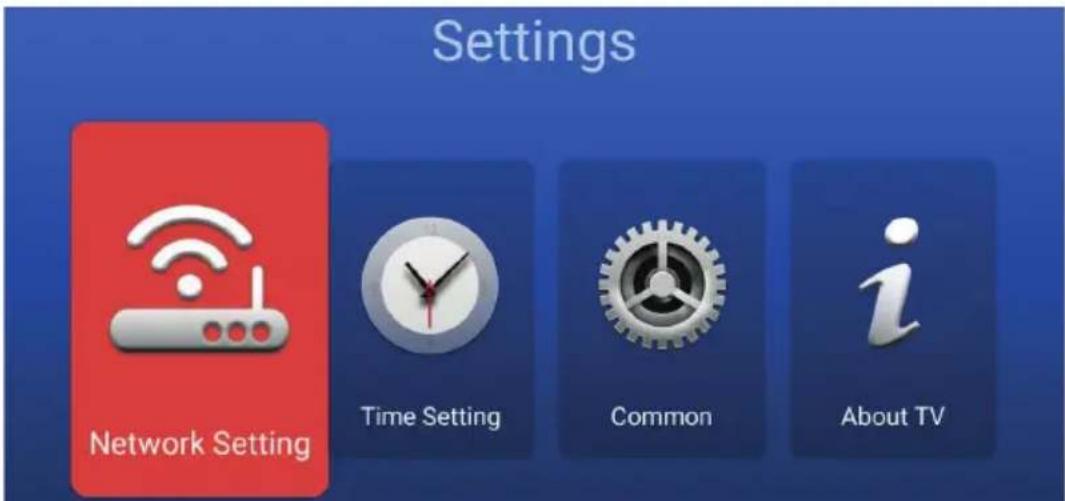
Press ▲/▼ button to select the Network that you want to use. (Bluetooth is Optional)
Network Setting

Wired Network
Disconnected

Wireless Network
HikeenQA_2.4G

Bluetooth


TIME SETTING
Press ▲/▼ key to select the items, and then press OK key to modify it.
Time Setting

Automatic Date&Time
eam-provided time


Time Zone
GMT+01:00 Western Eur...


Set Time


Set Date
22/06/2018


Daylight Saving


24 Hours


COMMON
Press ▲/▼ key to select the items, and then press OK key to modify it.
Common

Language Setting
English


Application Manage


OTA Update


System Recovery

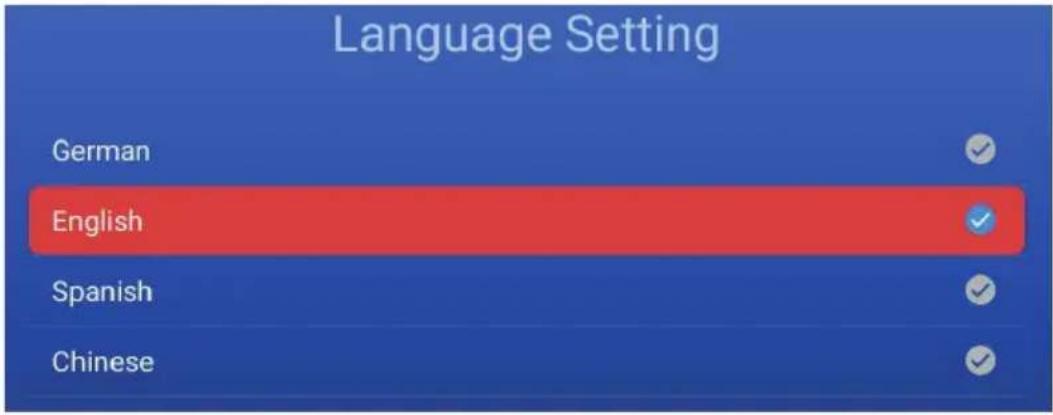
Language Setting
Press ▲/▼key to select the system Language that you want, and press OK key to confirm.
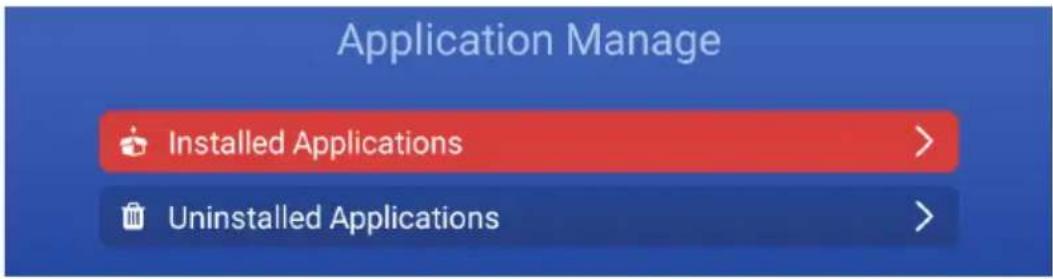
Application Manager
You can check the apps you installed by pressing OK key to Installed Applications item. You can also Uninstall the apps you have downloaded with Uninstalled Applications item.
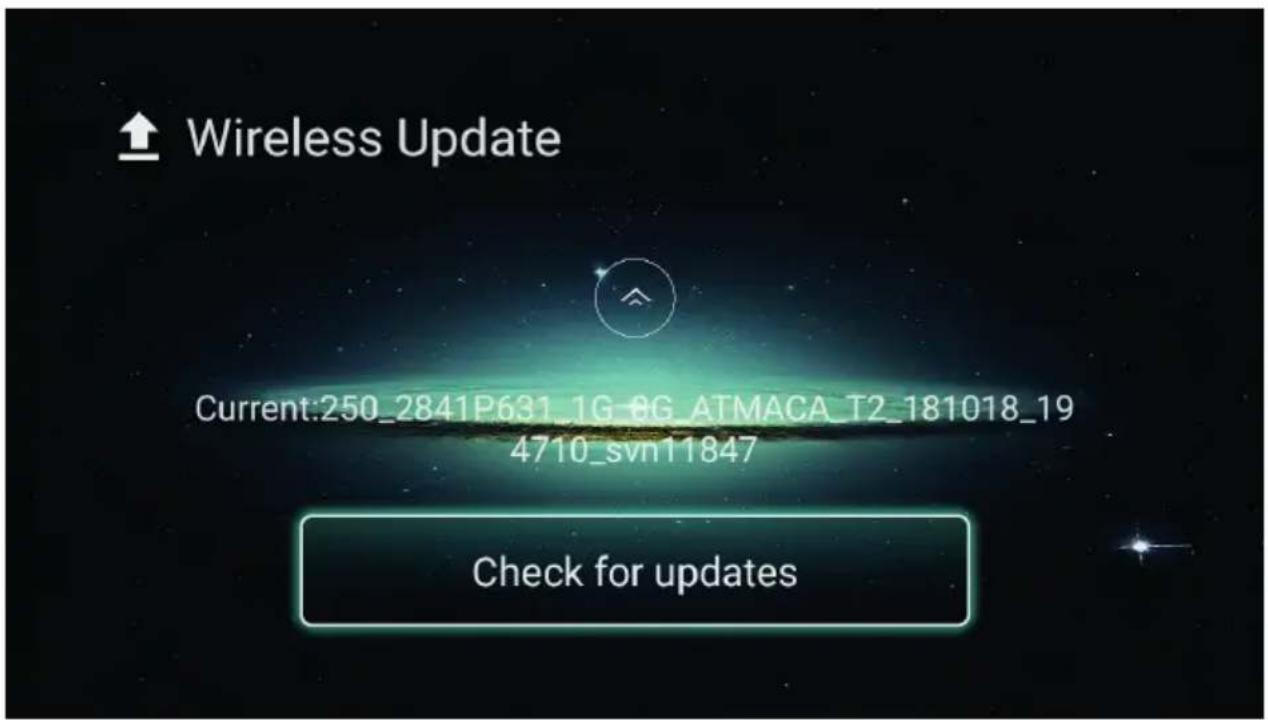
OTA Update
Click the "CHECK FOR UPGRADE" button to check the software update.
System Recovery
Click the "FACTORY DATA RESET" button to do system Recovery, all apps you have downloaded, media files you have stored to the internal memory, and the channels you have installed in ATV/DTV will be deleted. All settings will be also restored to the default factory settings.
System Recovery
This operation will clear all of the data in your device's memory device, including:
• Music, Photos and other user da
• The application data and setting
- Downloaded App
System Recovery
This operation will clear all of the data in your device's memory device.
Confirm
Cancel
FACTORY DATA RESET
□ ABOUT TV
This part shows the system information.
About TV

System Info
Android 7.1.1

CPU
ARM Cortex A53(Quad Co...

GPU
Dual-Core

RAM
1.0GB

ROM
8GB
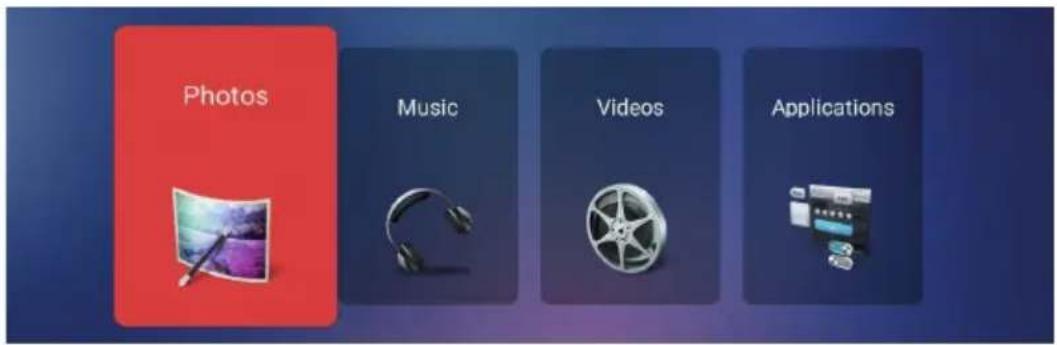
Press ▲/▼/◄/► button to select Media Player in the Home Page, and then press OK to enter.
Photos
Press ◀/▶ button to select Photo in the media menu, and then press OK button to enter.
Press EXIT button to return back to the previous menu.
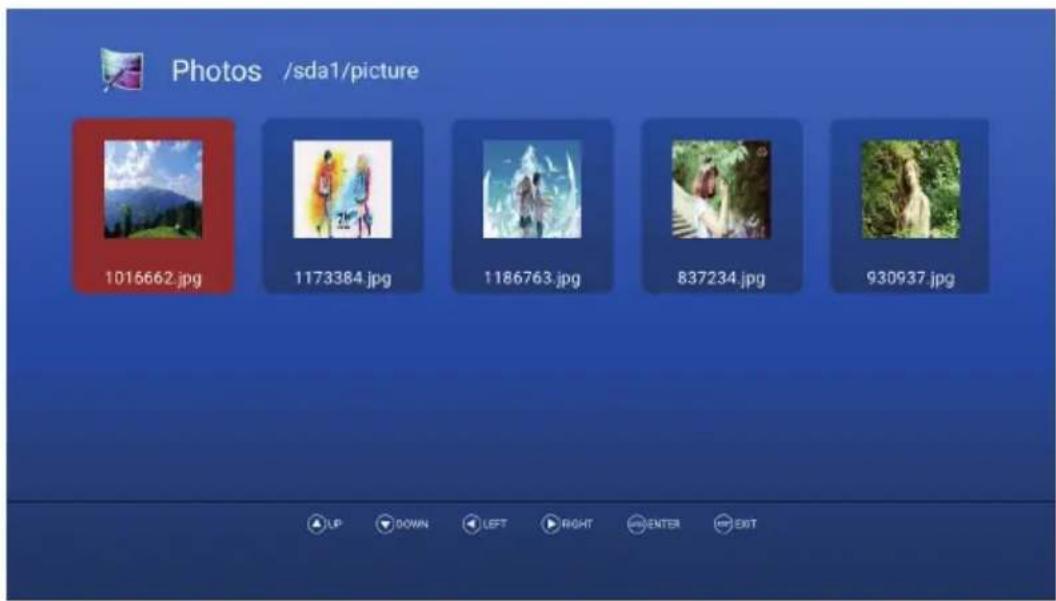
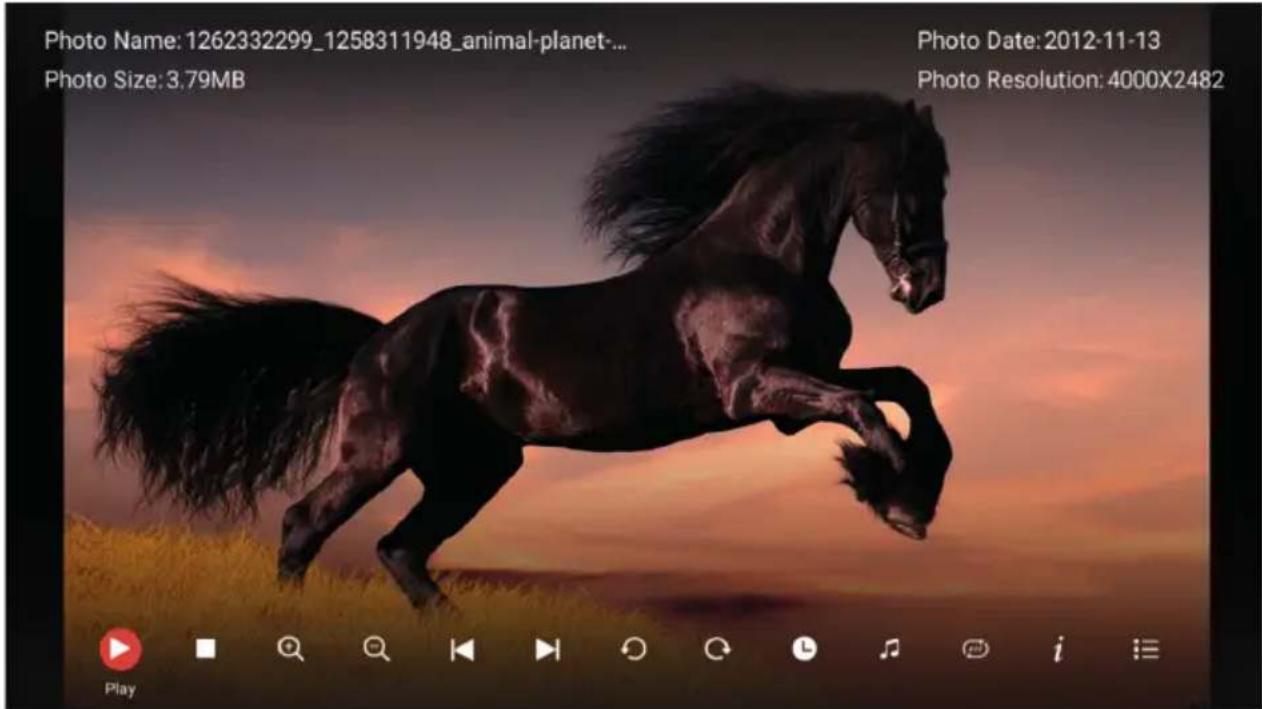
You can see the information of the current playing photo by pressing l icon in the on-screen play bar. Press ▶ || button to play or pause the slide show. Press ▲/▼ button to rotate the picture. Press ◀/▶ to show the next/previous photo.
Music
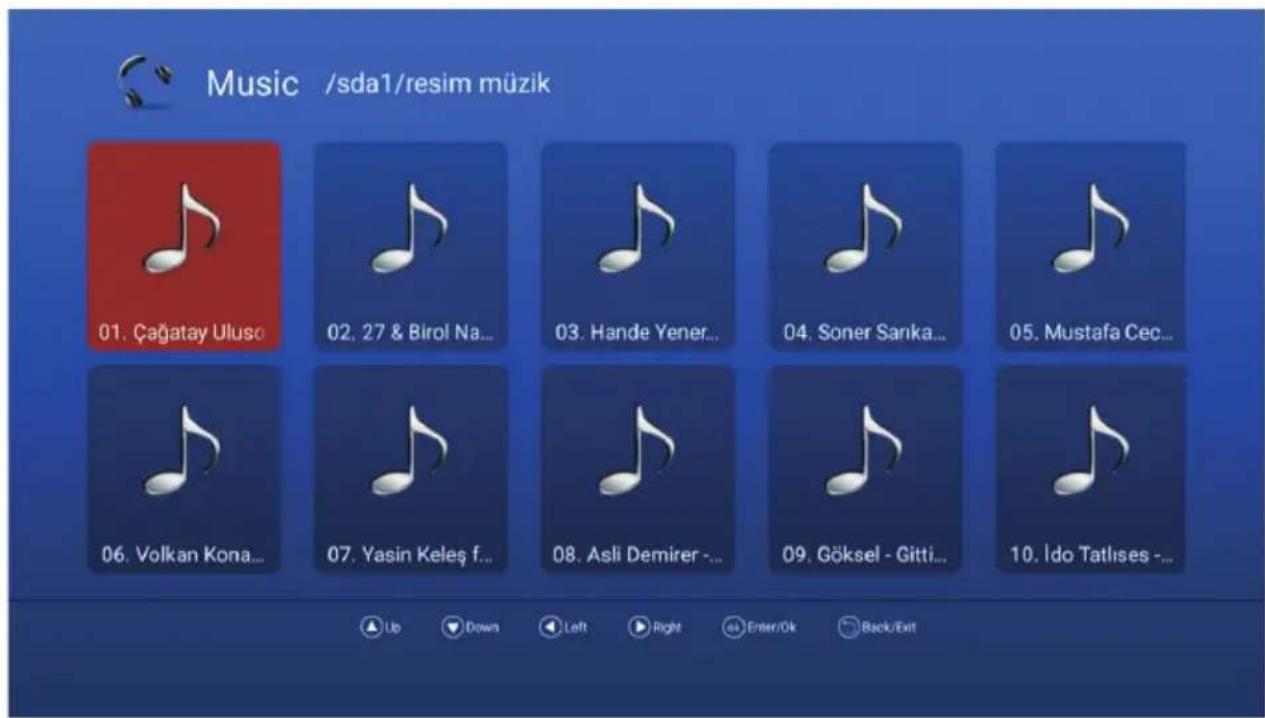
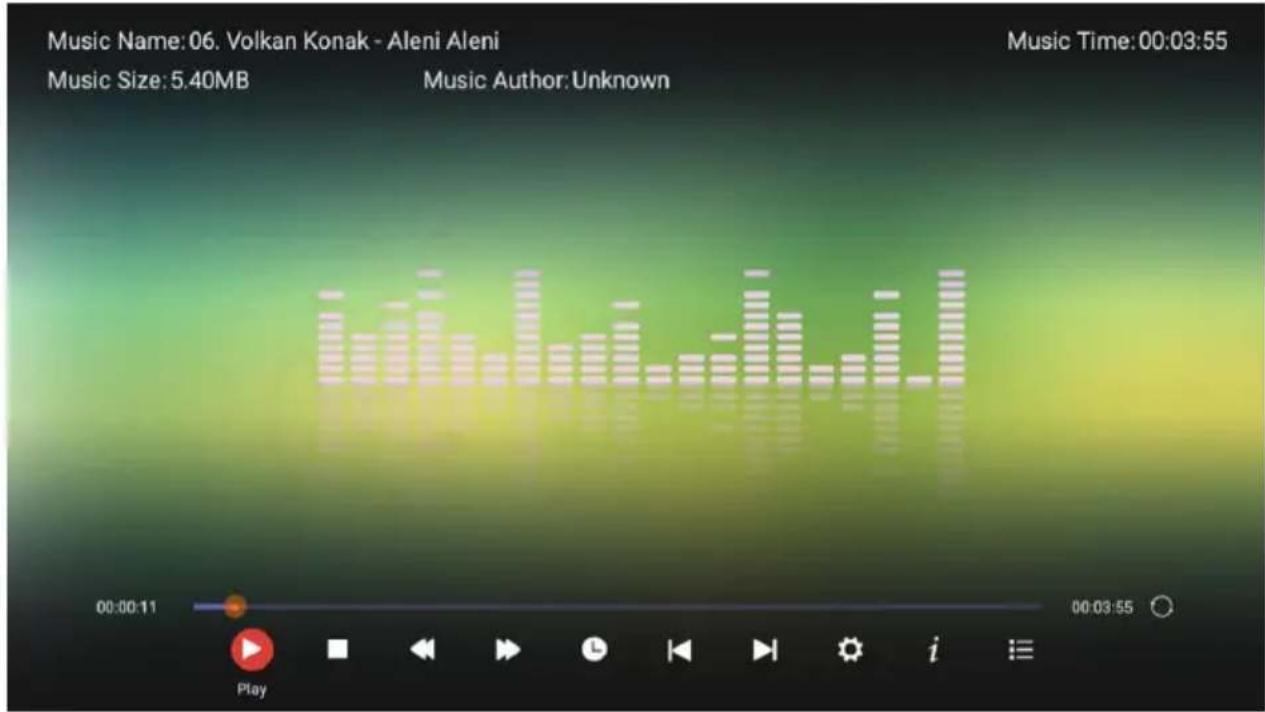
Press ◀/▶ button to select Music in the media menu, and then press OK button to enter. Press EXIT button to return back to the previous menu.
Press ▲/▼/◄/► button to select the song you want to listen, and then press OK button to play. Press EXIT button to return back to the previous menu.
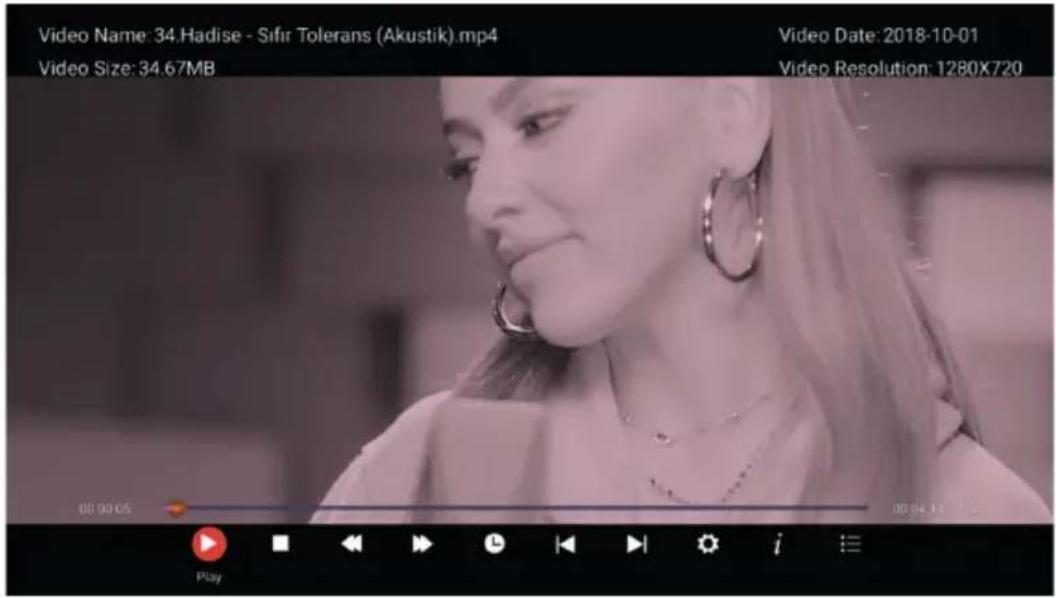
Videos
Press ◀/▶ button to select Video in the media menu, then press OK button to enter.
Press EXIT button to return back to the previous menu.
Press ◀/▶/▲/▼ and OK buttons to select and enter the folder you want.
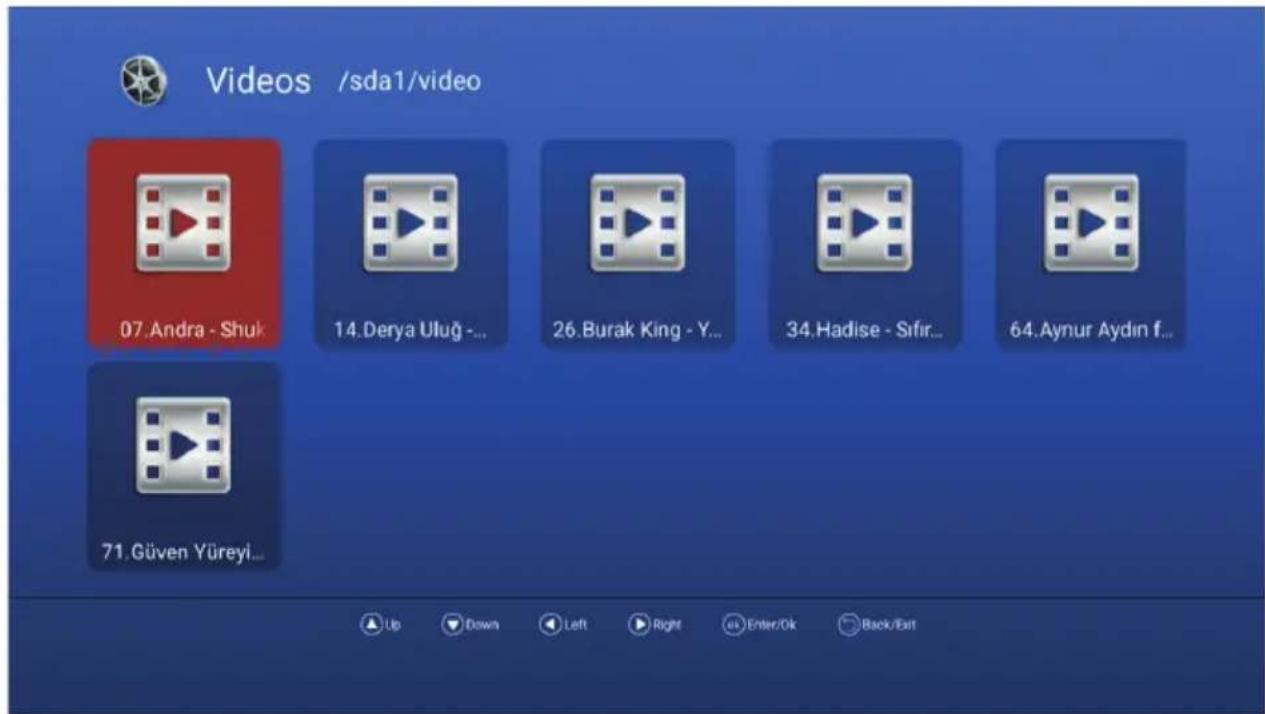
Press ▶ || button to play/pause the video, press ■ button or EXIT button to stop playing.
Applications
Press ◀/▶ button to select Application in the media menu, then press OK button to enter. You can install applications by this selection.
Press EXIT button to return back to the previous menu.
□ Live-TV App
You can open Live-TV App by either pressing "LIVE TV" in the remote control or by opening the app from the Home Page.
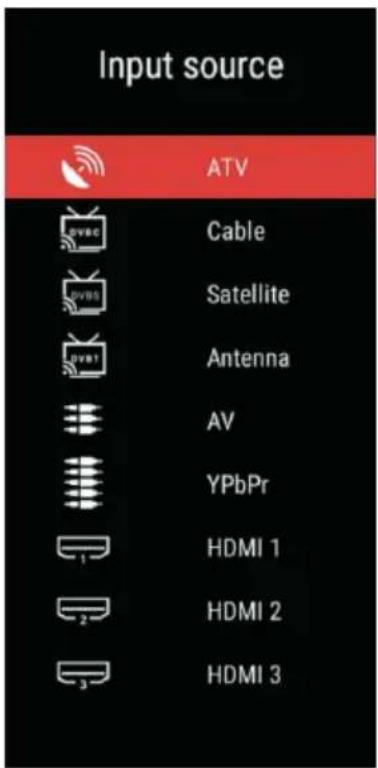
INPUT SOURCE
- Press the source button "SOURCE" to display the input source list;
- Press ▲/▼ button to select the input source you want to watch;
- Press OK button to enter the input source;
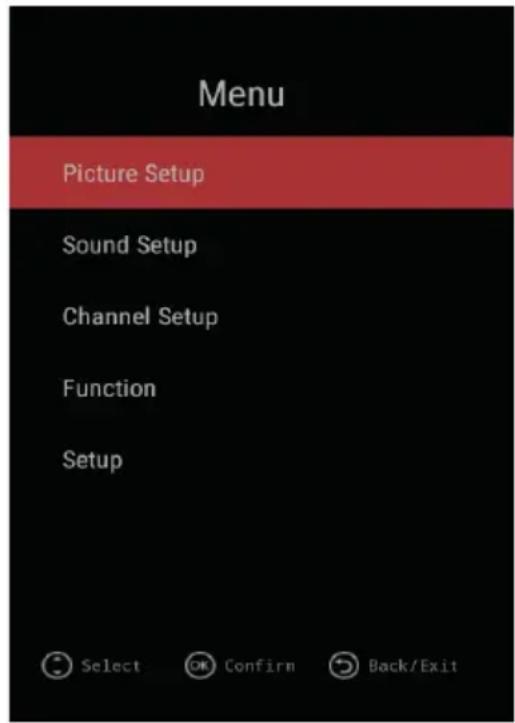
- Press menu button "MENU" to display the main OSD menu;
- Press ▲/▼ button to select the sub-menu you want;
- You can adjust the settings you want, by pressing ▲/▼ to select, OK to enter, and EXIT to save and return back to the previous menu. You can exit the entire menu by pressing EXIT.
□PICTURE SETUP
Picture Mode
Press ▲/▼ button to select Picture Mode, then press OK button to enter. (Available Picture Modes: Standard, Dynamic, Mild, User) You only can adjust the value of Brightness, Contrast, Color, Sharpness, when the picture is in User mode.
Colour Temperature
Press ▲/▼ button to select Colour Temperature, then press OK button to enter. Press ▲/▼ button to select: Normal, Cool, Warm. Press OK to set your selection.
DNR
Press ▲/▼ button to select DNR, then press OK button to enter. Press ▲/▼ button to select: Off, Low, Middle, High, Auto. Press OK to set your selection.
Aspect Ratio
Press ▲/▼ button to select Aspect Ratio, then press OK button to enter. Press ▲/▼ button to select: Auto, 16:9, 4:3, Zoom 1, Zoom 2. Press OK to set your selection.
Backlight Adjust
Press ▲/▼ button to select Backlight Adjust, then press OK button to enter. Press ▲/▼ button to select: Max, High, Mid, Low. Press OK to set your selection.

Press ▲/▼ button to select the option that you want to adjust in the Sound menu, then press OK button to enter.
Sound mode
Press ▲/▼ button to select Sound mode, and then press OK button to confirm. (Available Sound mode: Standard, Movie, Music, User). You can adjust the value of bass and treble, when the sound is in User mode.
Balance
Press ◀/▶ button to adjust. Then press EXIT button to return back the previous menu directly.
AVL
Press OK button to adjust. Then press EXIT button to return back the previous menu directly.
Digital Audio output
Press ▲/▼ button to select SPDIF Output, then press OK button to confirm (Available SPDIF modes: AUTO, PCM, OFF).
Press EXIT button to return back the previous menu directly.
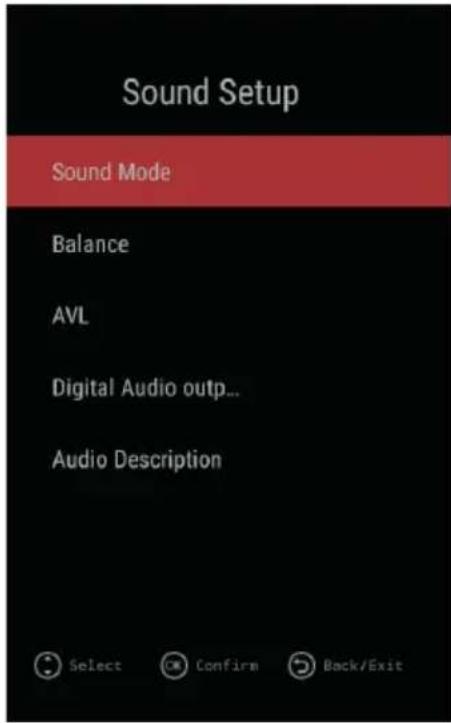
Audio Description
Press OK button to adjust (Available AD ON/OFF).
When you select AD ON, you can press ◀/▶ button to adjust Mixing Level.
□ CHANNEL SETUP
Press MENU button to display the main menu. Press ▲/▼ button to select Channel Setup in the main menu, then press OK to enter.
The Channel Setup settings are different based on ATV/DTV type, as illustrated below:
For ATV
For DVB-S
For DVB-T and DVB-C
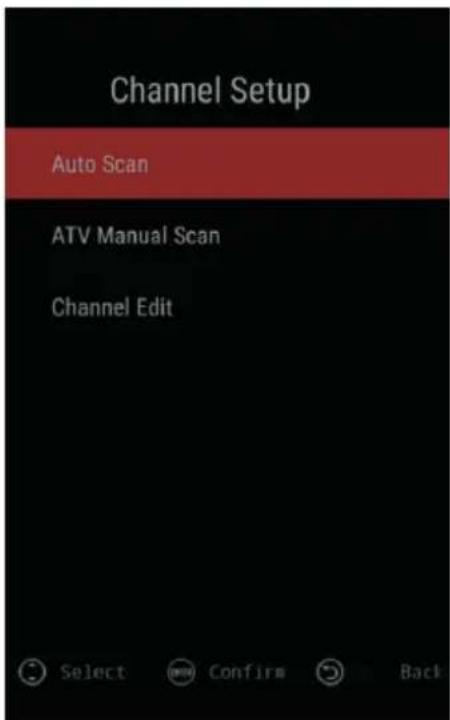
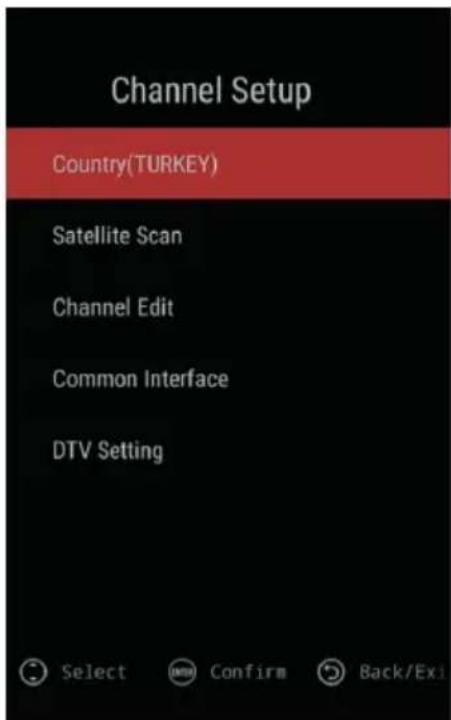
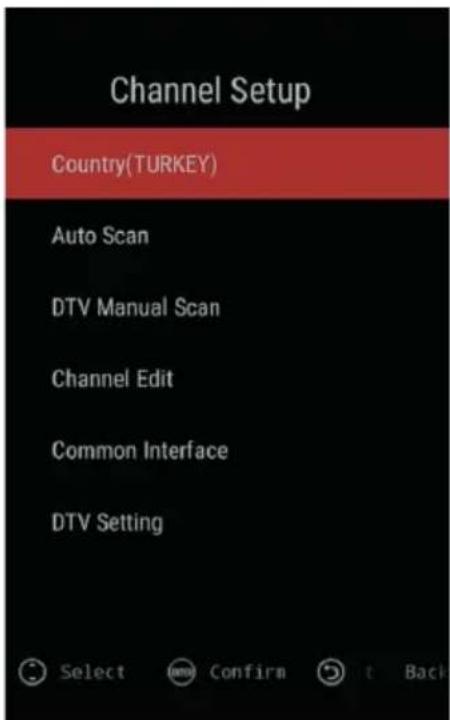
Press ▲/▼ button to select the option that you want to adjust in the Channel Setup menu, then press OK to enter.
After finishing your adjustment, press EXIT button to save and return back to the previous menu and press EXIT button to exit the entire menu.
Country
Press ▲/▼ button to select Country, and then press OK button to confirm.
Auto Scan
Press ▲/▼ button to select Auto Search, and then press OK button to do auto search.
ATV Manual Scan (For ATV Source)
Press ▲/▼ button to select, press ◀/▶ button to adjust, press Start Scan to start. Press EXIT button to return.

DTV Manual Scan (For DVB-C and DVB-T)
Press ▲/▼ button to select, press ◀/▶ button to adjust, press Start Scan to start. Press EXIT button to return.
For DVB-C For DVB-T
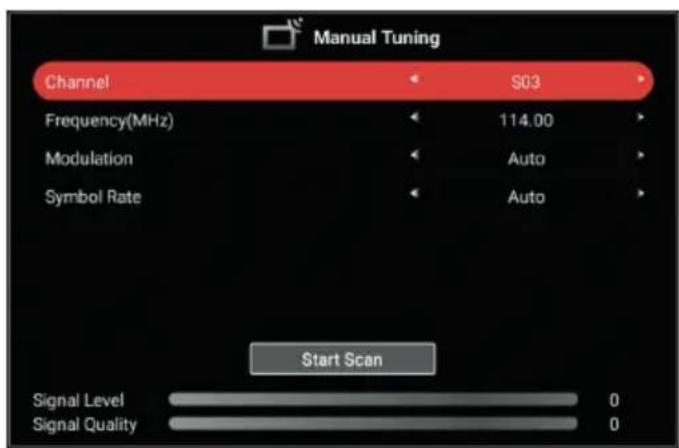
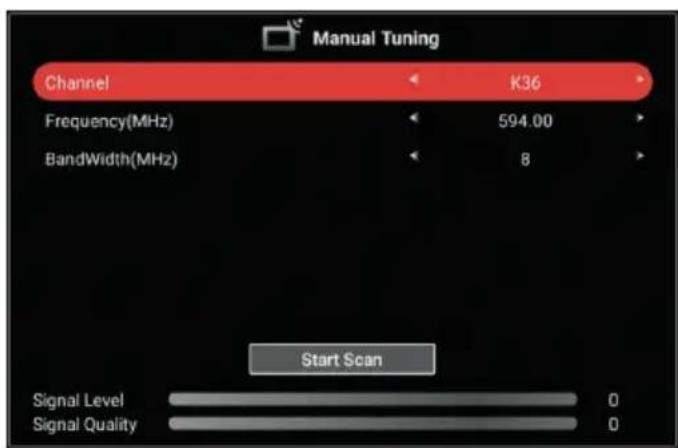
Channel Edit
Press ▲/▼ button to select channel Edit, and then press OK button to enter, you can use the Four Color keys to do Delete/Skip/Swap/Lock function, and press "MOUSE" Key to set Fav. channel.
| Channel Edit | ||||
| Number | Name | Type | Frequency | Function |
| 102 | YLE24 | DTV | 177.50MHz | |
| 102 | YLE TV2 | DTV | 177.50MHz | |
| 122 | YLE Teema | DTV | 177.50MHz | |
| 122 | YLE FST | DTV | 177.50MHz | |
| 122 | YLE TV1 | DTV | 177.50MHz | |
| 2902 | Dolby Labs Test Stream | DTV | 634.00MHz | |
| 2902 | CBARS MPEG | DTV | 634.00MHz | |
| Delete Skip Swap lock | ||||
Common Interface (For DTV)
Press ▲/▼ button to select Common Interface, and then press OK button to enter. You can check the CAM/CI card information by this menu.
DTV Setting
Press ▲/▼ button to select DTV Setting, and then press OK button to enter.
- Subtitle Language
Press OK key to enter the sub-menu, you can Press OK Key to select Subtitle ON/OFF, when the subtitle set to ON, you can select the subtitle language. Press EXIT button to return.
- Subtitle Type
Press OK key to enter the sub-menu, you can Press OK Key to select Normal subtitle or the subtitle for Hard of Hearing.
Press OK key to select Prefer Subtitles 1/Prefer Subtitles 2.
Press EXIT button to return.
- Multi-Audio
Press OK key to enter the sub-menu, you can Press ▲/▼ and OK button to select the audio language (if available). Press EXIT button to return.
- Audio Type
Press OK key to enter the sub-menu, you can Press OK Key to select Normal Audio or the Audio for Hard of Hearing.
Press OK key to select Prefer Audio 1/Prefer Audio 2.
Press EXIT button to return pre.menu.
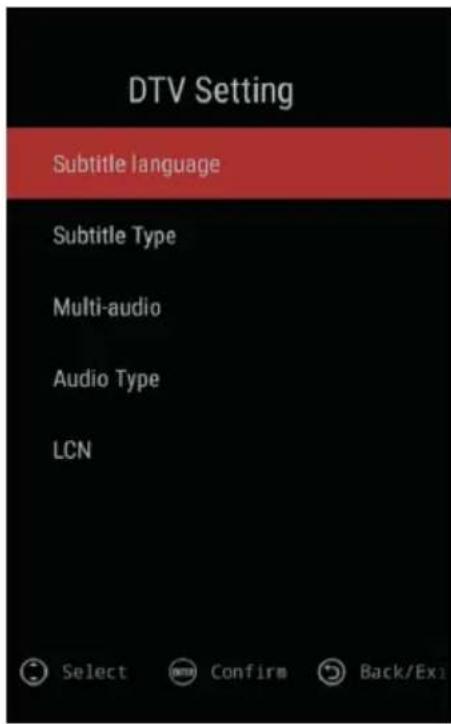
• LCN
Press OK key to enter the sub-menu, you can Press OK Key to select LCN ON/OFF. Press EXIT button to return pre.menu.
Satellite Scan (For DVB-S)
Press ▲/▼ button to choose the Satellite you want, then press OK button to select. Press ◀/▶ button to select the setup parameters.
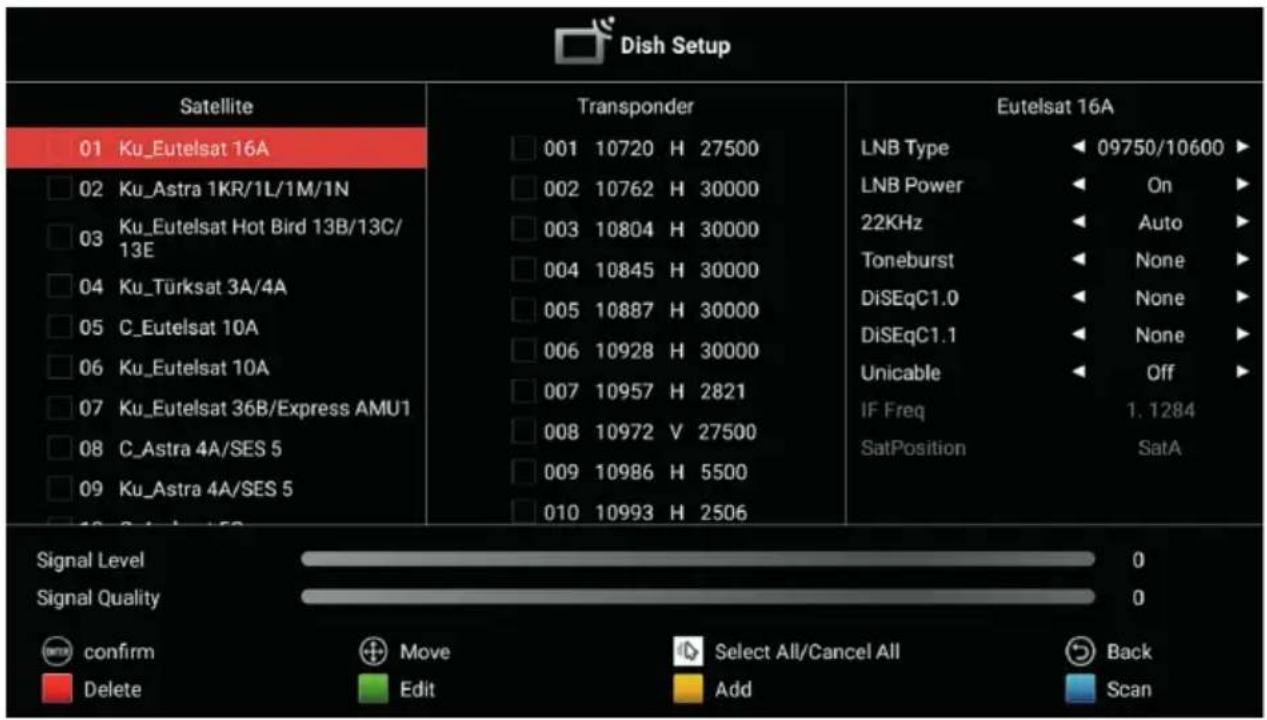
After selecting a satellite and setting all scan parameters, press the blue button to enter Channel Search OSD. Supported Scan Modes: Default Scan / Blind Scan / Network. Press OK Button start scan.
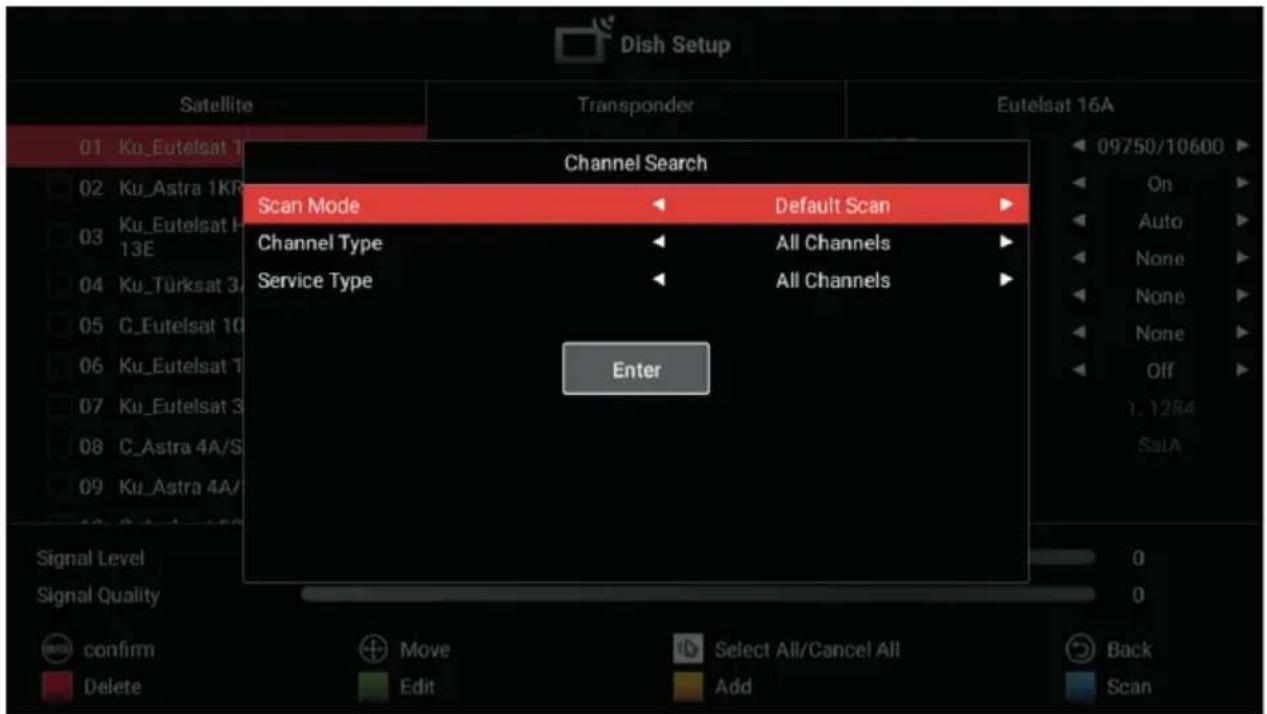
Press ▲/▼ button to select Function, and then press OK button to enter.
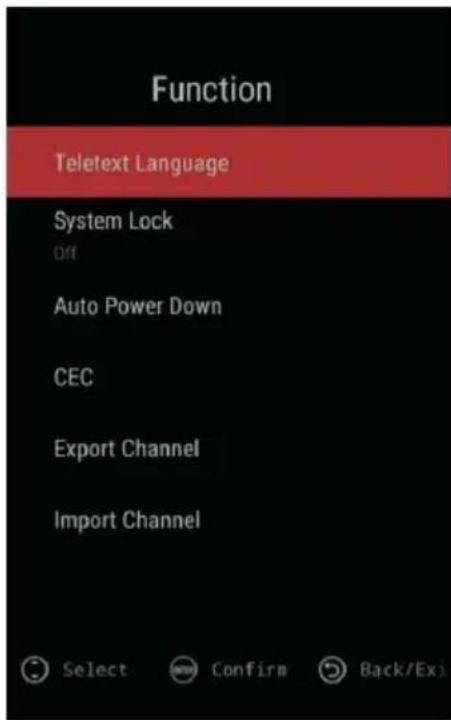
Teletext Language
Press OK key to enter the sub-menu, you can Press OK Key to select the Teletext Language(West Europe/East Europe/Russian/Arabic).
Press EXIT button to return.
System Lock
Press OK key to enter the sub-menu, enter the default PIN "0000". TV will enter to the Parental controls menu.
Press EXIT button to return.
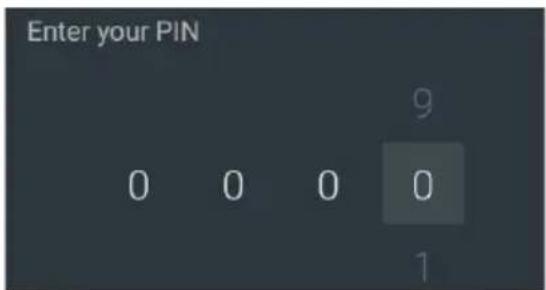
Parental Controls (For DTV)
Press ▲/▼ button to select: ON-OFF / Program Restriction / Change PIN items and Press OK button to confirm.
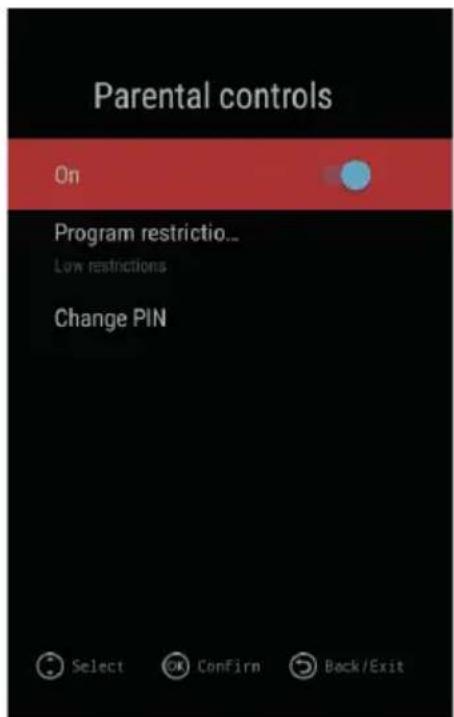
Auto Power Down
Press OK key to enter the sub-menu, press ▲/▼ button to select Off/ 1 hour/ 2 hour/ 3 hour/4 hour item and then press OK button to confirm. Press EXIT button to return pre.menu.
Record Menu (For DTV)
Press OK key to enter the sub-menu, press ▲/▼ button to select the items and then press OK button to set.
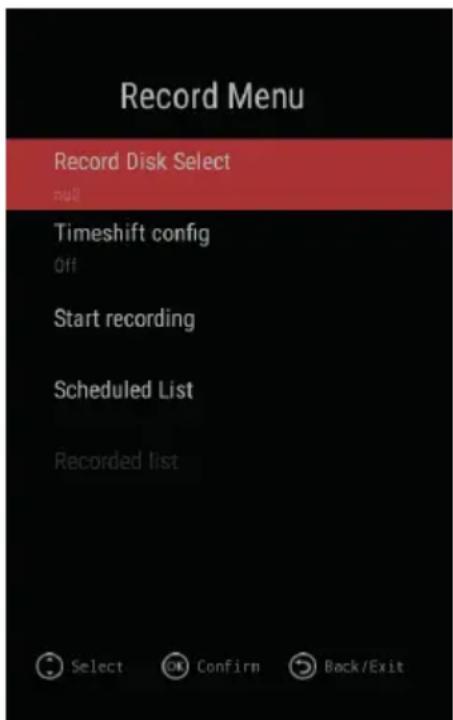
CEC
Press OK key to enter the sub-menu, press ▲/▼ button to select HDMI Control / Device auto power off / TV auto power on / CEC Device List / ARC enable items, then press OK button to change. Press EXIT button to return.
Export Channels
Use this item to export your channel list to an external USB device.
Import Channels
Use this item to import your channel list from an external USB device.
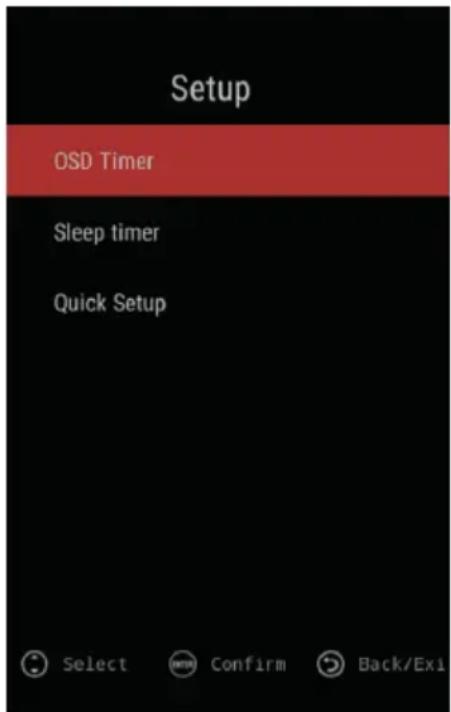
□SETUP
OSD Timer (OSD display time)
Press ▲/▼ button to select OSD Timer. Press OK button to enter. Press ▲/▼ to select Off/10s/20s/30s/40s/50s/60s items and then press OK button to confirm. Press EXIT button to return.
Sleep Timer(power off time)
Press ▲/▼ button to select Sleep Timer. Press OK button to enter. Press ▲/▼ to select Off /15Min/ 30Min / 60Min / 90Min / 120Min / 180Min. items and then press OK button to confirm. Press EXIT button to return.
Quick Setup
Press ◀/▶ button to select. Press OK button to go to the next step. Press EXIT button to return.
You may solve most of the problems you may face with your TV by referring to the following troubleshooting list.
No picture, no sound
- Check whether the fuse or breaker works properly.
- Check the wall plug by plugging another device whether it is working or not.
- There may be a loose contact between the power cord and the wall plug.
- Check the signal source.
No colour
- Change the colour system.
- Adjust saturation.
- Try another channel. The program received can be in black and white.
Remote control not working
- Change the batteries.
- The batteries may be inserted improperly.
- The plug of your device may be pulled out.
No picture, normal sound
- Adjust brightness and contrast.
- There may be a broadcast problem.
Normal picture, no sound
- Increase the volume by pressing VOL+
- Sound setting was muted, press MUTE button to change.
- Change the sound system.
- There may be a broadcast problem.
There are irregular waves
This problem generally occurs due to signal interference arising from some devices around such as a car, a fluorescent lamp or a hair dryer, etc. Adjust the antenna in a way that will minimise the signal interference.
Picture noise and Signal interference
If the antenna has been placed at a frontier zone, there may be picture loss as noisy pixels. If the signal is too weak, a special antenna should be needed to install to increase the signal reception power.
- Adjust the location and direction of your portable or fixed antenna.
- Check antenna connections.
- Adjust fine tuning.
- Try another channel. There may be a broadcast problem.
Shaded picture
Shaded picture arises from the reception of two reflection of TV signal. One of them is the directly receiving signal and the other is the one reflected from high buildings, hills or other objects. To change the location and direction of the antenna may improve signal reception.
Radio frequency interference
In this type of signal interference generally running waves or vertical lines occur, and in some cases picture contrast decreases. Find the radio frequency causing signal interference and remove it.
| OSD LANGUAGE | 22 OSD LANGUAGE | ||
| English, Turkish, German, French, Bulgarian, Polish, Russian, Czech, Croatian, Hungarian, Romanian, Slovak, Greek, Serbian, Arabic, Persian, Macedonian, Albanian, Italian, Portuguese, Spanish, Kurdish | |||
| PANEL | Panel Type | LED (Compatible with 32" ~ 43") | |
| Luminance | 300 cd/m2 (Max) | ||
| Max Resolution | HD: 1366 x 768 FHD: 1920 x 1080 | ||
| Viewing Angle | 178° | ||
| PROCESSOR | CPU | Quad Core (ARM Cortex A53 x 4, 1.1 GHz) | |
| GPU | Mall470MP x 2,600 Mhz | ||
| MEMORY | RAM | 1GB Internal | |
| ROM | 8GB | ||
| OPERATING SYSTEM | ANDROID™ 7.1.1 | ||
| SMART APPLICATIONS | Pre-Installed | App Store, Weather, Miracast | |
| Launcher Highlighted | YouTube, Chrome, NetFlix, Facebook, Spotify | ||
| Web Browser | Chrome | ||
| NOTE: Google Play Store is not supported | |||
| TV | ATV(Optional) | Receiving Range | 48.25MHz ~ 863.25MHz |
| Input Impedance | 75Ω | ||
| Video System | PAL, SECAM, NTSC | ||
| Sound System | M, BG, DK, I, L, NICAM | ||
| Max Storage Channels | 100 | ||
| DVB-S/S2(Optional) | Modulation | COFDM 2K/8K, QPSK,8PSK | |
| LNB Power | Auto/13V/18V/OFF Out put 350mA@Max | ||
| LNB Switch Control | 22KHz | ||
| DiSEqC Version | 1.0 / 1.1/1.2/1.3 compatible | ||
| Receive Channel | 5000 | ||
| DVB-T(Optional) | Modulation | COFDM 2K/8K, QPSK,16QAM, 64QAM | |
| Receive Channel | 1000 | ||
| DVB-T2(Optional) | Modulation | Compliant with EN302755V1.3.1 COFDM: 1K to 32k; code rate:1/3,2/5; Q PSK:16QAM, 64QAM,256QAM Bandwidth:6,7,8Mhz; Guard Interval:1/128--1/4; Code rate:1/2,3/5,2/ 3,3/4,4/5,5/6 SPP: PP1 to PP8 | |
| Receive Channel | 1000 | ||
| DVB-C(Optional) | Modulation | 16QAM,32QAM,64QA M,128QAM, 256QAM | |
| Receive Channel | 1000 | ||
| VIDEO SYSTEM | MPEG1, MPEG-2 MP@ML, MPEG-4 SP@HL3.0, MPEG-4 ASP@HL4.0, H.264, H.265 | ||
| AUDIO SYSTEM | MPEG1 Layer 1, 2, 3 / MPEG2 Layer 2 / AAC | ||
| WMA, AC3, E-AC3, DD/DD+ (Option & need license) | |||
| VIDEO INPUT | HDMI | 480i, 480p, 576i, 576p, 720p, 1080i, 1080p | |
| Component | 480i, 480p, 576i, 576p, 720p, 1080i, 1080p | ||
| AV | Video System | PAL/NTSC/SECAM | |
| Video Level | 1.0 VP-P±5% | ||
| AUDIO INPUT | AV/Component Audio | Mini RCA Input | 0.2 ~ 2.0 VRMS |
| AUDIO OUTPUT | Frequency Response | 100Hz~15KHz @±3dB (1KHz, 0dB reference signal) | |
| Max Output Power | 2×8W (8Ω) THD+N<10%@1KHz for Loudspeaker | 2×8mW (32Ω) THD+N<10%@1KHz for Headphone | |
| WEAK SIGNAL ENHACEMENT | YES | ||
| NOISE REDUCTION | YES | ||
| KEY FUNCTION | STANDBY | ||
| ENERGY SAVING | YES | ||
| STANDBY POWER CONSUMPTION | 0.45W | ||
| HOTEL MODE | YES (Optional) | ||
| INTERNET CONNECTIVITY | ETHERNET (10/100 Mbps) | ||
| Internal WI-FI (IEEE 802.11b/g/n) | |||
| TERMINALS | INPUT | HDMI | 3 × HDMI Connector |
| USB 2 USB Slot | x | ||
| Component Video | 1 x Mini RCA Connector (Black) | ||
| AV | 1 x Mini RCA Connector (Black) | ||
| CI Slot 1 x CI Slot (Black) | |||
| ETHERNET | 1 x RJ45 | ||
| DTV & ATV (Optional) | 1 ×IEC-Connector | ||
| Satellite TV (Optional) | 1 ×F-Connector | ||
| OUTPUT | Headphone (Earphone) | 1 x Mini RCA Connector (Black) | |
| SPDIF Coaxial | 1 x RCA Connector (Orange) | ||
*Android is a trandmark of Google LLC.
18AT013
| Model Name | 32” S2 | 32” T2C 32” T2CS2 | |
| Display screen | 82 cm | 82 cm | 82 cm |
| Voltage | 180-240 V AC | 180-240 V AC | 180-240 V AC |
| Frequency | 50/60 Hz | 50/60 Hz | 50/60 Hz |
| Power consumption | 62W | 62W | 62W |
| Model Name | 40” S2F | 40” T2CF | 40” T2CS2F |
| Display screen | 102 cm | 102 cm | 102 cm |
| Voltage | 180-240 V AC | 180-240 V AC | 180-240 V AC |
| Frequency | 50/60 Hz | 50/60 Hz | 50/60 Hz |
| Power consumption | 82W | 82W | 82W |
| Model Name | 43” S2F | 43” T2CF | 43” T2CS2F |
| Display screen | 109 cm | 109 cm | 109 cm |
| Voltage | 180-240 V AC | 180-240 V AC | 180-240 V AC |
| Frequency | 50/60 Hz | 50/60 Hz | 50/60 Hz |
| Power consumption | 85W | 85W | 85W |
| Inch | Version With Stand Without Stand | ||
| 32" | MODEL 1 (cm) (L x W x H) | 73,2 x 23,7 x 46,2 | 73,2 x 8,72 x 43,5 |
| 32" | MODEL 2 (cm) (L x W x H) | 73,2 x 21,1 x 47,2 | 73,2 x 8,72 x 43,5 |
| 32" | MODEL 3 (cm) (L x W x H) | 73,2 x 21,48 x 45,9 | 73,2 x 8,72 x 43,5 |
| 32" | 73,2 x 20,16 x 47,9M | MODEL 4 (cm) (L x W x H) 73,2 x 8,72 x 43,5 | |
| 40" | MODEL 1 (cm) (L x W x H) | 91,79 x 20,16 x 58,41 | 91,79 x 8,62 x 53,77 |
| 91,79 x 20,24 x 56,58 | MODEL 2 (cm) (L x W x H) 91,79 x 8,62 x 53,7740" | ||
| 91,79 x 21,1 x 57,1M | MODEL 3 (cm) (L x W x H) 91,79 x 8,62 x 53,7740" | ||
| 97,13 x 31,45 x 61,2M | MODEL 1 (cm) (L x W x H) 97,13 x 8,62 x 56,6743" | ||
| 97,13 x 21,2 x 59,1M | MODEL 2 (cm) (L x W x H) 97,13 x 8,62 x 56,6743" | ||
| 97,13 x 21,1 x 60,38M | MODEL 3 (cm) (L x W x H) 97,13 x 8,62 x 56,6743" | ||
Accessories
1 Piece Remote Control
1 Piece User Manual
2 Pieces Battery
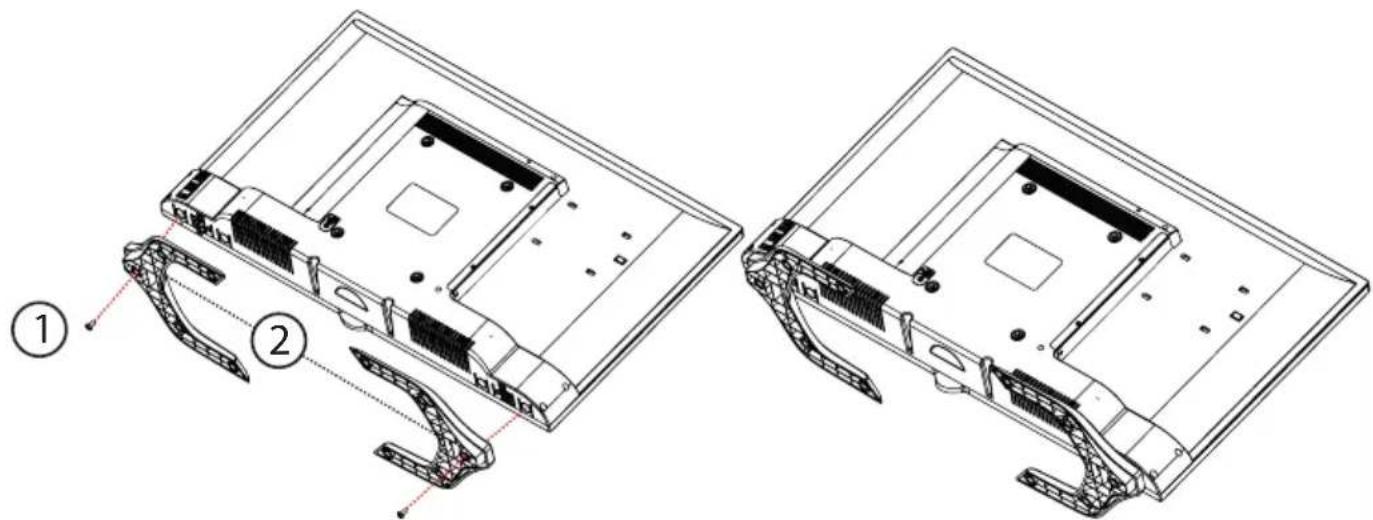
32" STAND INSTALLATION DIAGRAM "MODEL 1"
1- M4X12 SCREWS (2 PCS)
3- Please locate stand as picture shown and screw with M4X12.
2- Left/Right Stand
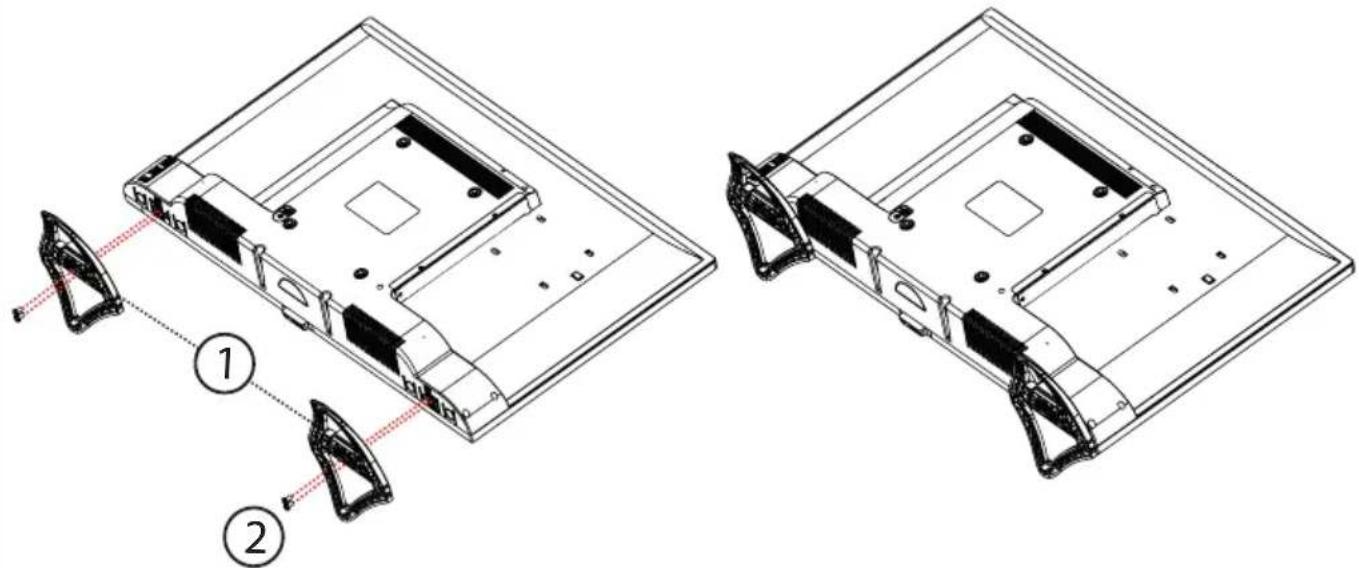
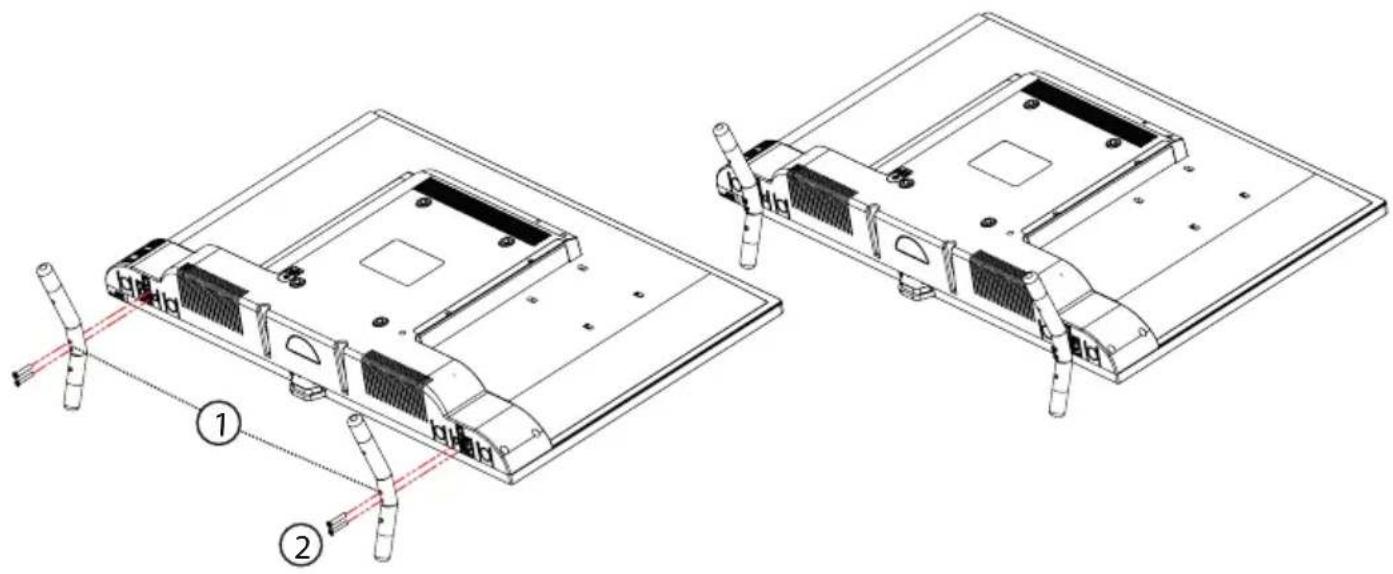
32" STAND INSTALLATION DIAGRAM "MODEL 2"
1- Place the stands into their own slots under the device.
2- Fasten the stand to the device with 2 pieces M4X15 YHB and 2 pieces M5X16 YHB screw.
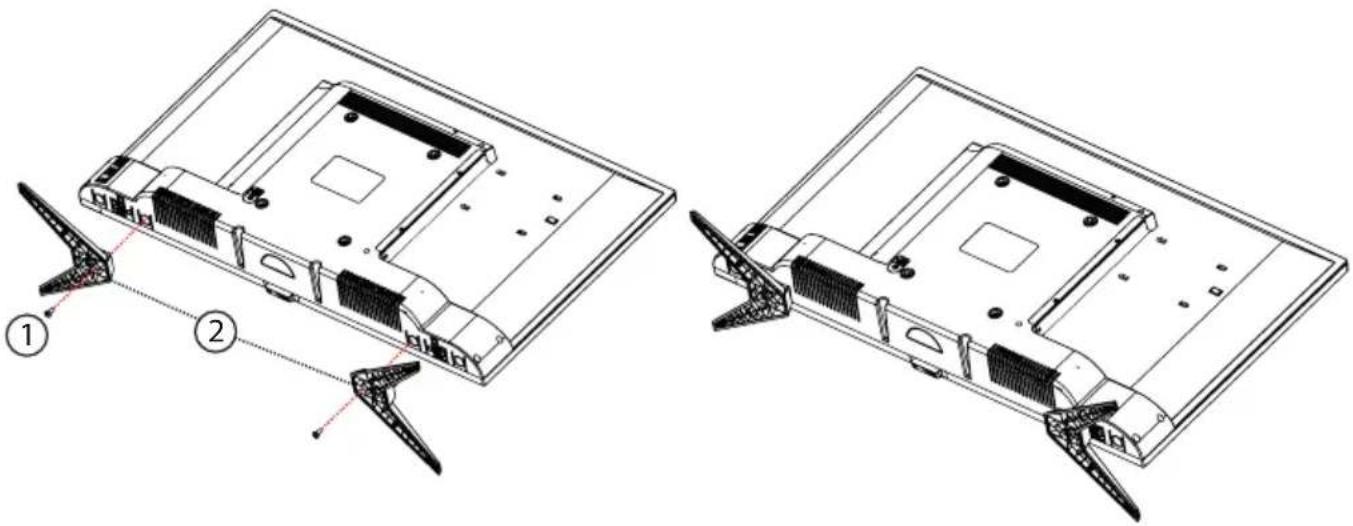
32" STAND INSTALLATION DIAGRAM "MODEL 3"
1- M4X12 SCREWS (2 PCS)
3- Please locate stand as picture shown and screw with M4X12.
2- Left/Right Stand
natural_image
Technical line drawing of two views of a flat-screen computer case with connectors and ventilation slots (no text or symbols)32" STAND INSTALLATION DIAGRAM "MODEL 4"
1- Place the stands into their own slots under the device.
2- Fasten the stand to the device with 2 pieces M4X25 YHB and 2 pieces M5X25 YHB screw.
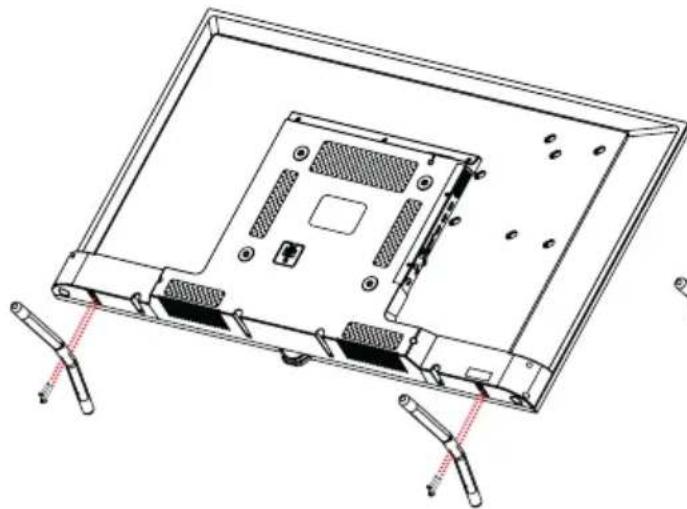
40" - 43" STAND INSTALLATION DIAGRAM "MODEL 1"
1- Place the stands into their own slots under the device.
2- Fasten the stand to the device with 2 pieces M4X25 YSB and 2 pieces M5X25 screw.
natural_image
Technical line drawing of a computer monitor rear panel with connectors and mounting holes (no text or symbols)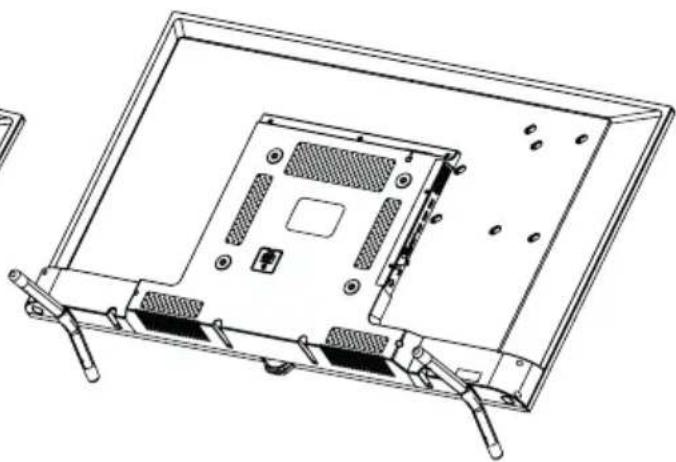
natural_image
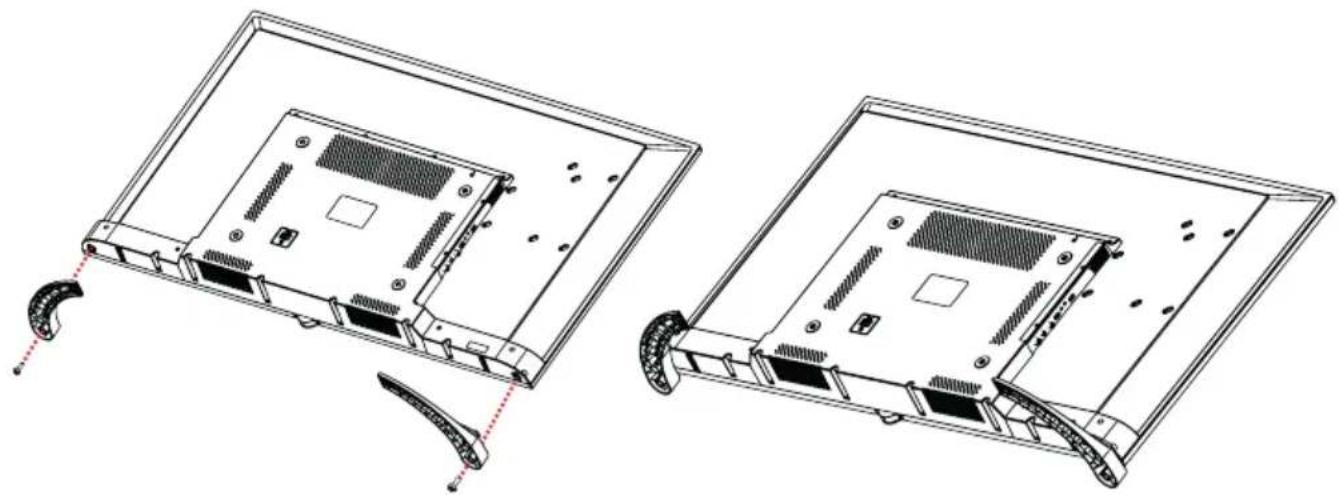
Technical line drawing of an open computer chassis showing internal components and mounting brackets (no text or symbols)40" - 43" STAND INSTALLATION DIAGRAM "MODEL 2"
1- Place the stands into their own slots under the device.
2- Fasten the stand to the device with 2 pieces M4X12 YSB screw.
natural_image
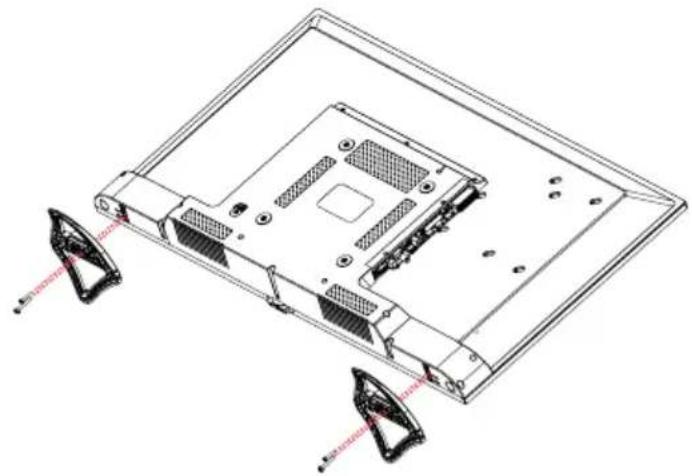
Technical line drawing of two views of a computer chassis showing internal components and cable attachment (no text or symbols)40" - 43" STAND INSTALLATION DIAGRAM "MODEL 3"
- Place the stands into the slots under the TV. 2. Fasten the stands to the TV with
2 pieces of M4x15 YSB and 2 pieces of M5x15 YSB screw.
natural_image
Technical line drawing of a computer chassis showing internal components and mounting points (no text or symbols)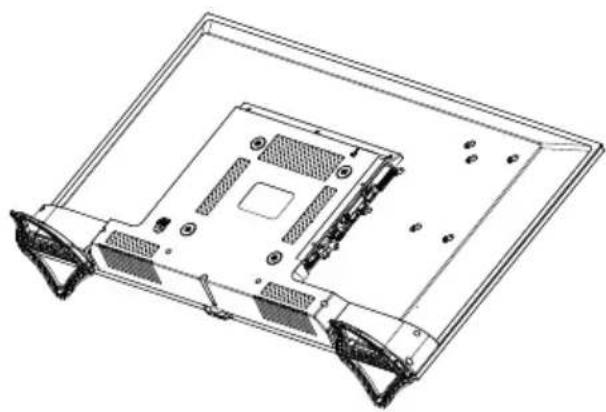
natural_image
Technical line drawing of a computer motherboard showing CPU socket, drive bays, and mounting bracket (no text or labels)A Product fiche
| B Manufacturer | SVAN TRADING S.L. | |||||||||
| C Model No. | SVTV132SM SVTV14306TW1400SM | |||||||||
| D Energy efficiency class | A+ | A+ | A+ | |||||||
| E Visible screen size (diagonal) | 82 cm / 32 " | 102 cm / 40 " | 109 cm / 43 " | |||||||
| F On mode average power consumption | 31 W | 48 W | 53 W | |||||||
| G Annual energy consumption | 45 kWh | 70 kWh | 77 kWh | |||||||
| H Standby power consumption | 0,4 W | 0,4 W | 0,4 W | |||||||
| I Off mode power consumption | - | - | - | |||||||
| J Display resolution | 1,366 x 768 HD1,920 x 1,080 FHD | 1,366 x 768 HD1,920 x 1,080 FHD | 1,366 x 768 HD1,920 x 1,080 FHD | |||||||
K* Energy consumption XYZ kWh per year, based on the power consumption of the television operating 4 hours per day for 365 days. The actual energy consumption will depend on how the television is used.
- User Manual
- svan
- TU ALTERNATIVA EN ELECTRODOMÉSTICOS
- DEAR COSTUMER
- CAUTION
- RISK OF ELECTRICAL SHOCK DO NOT OPEN
- Installation
- Wall mount
- Caution:
- Transporting the Appliance
- LED panel
- Maintenance
- Conditions Regarding Environment and Human Health
- Information Regarding Usage Faults
- Information Regarding Efficient Use in Respect of Energy Consumption
- EU declaration of conformity
- CAUTION: The battery, there is danger of explosion is replaced by an incorrect battery type. Replace only with the same or equivalent type battery.
- Suggested APP
- APPS.
- Browser
- Sports & Music
- Settings
- Network Setting
- TIME SETTING
- COMMON
- Language Setting
- Application Manager
- OTA Update
- System Recovery
- □ ABOUT TV
- About TV
- Photos
- Music
- Videos
- Applications
- □ Live-TV App
- INPUT SOURCE
- □PICTURE SETUP
- Picture Mode
- Colour Temperature
- DNR
- Aspect Ratio
- Backlight Adjust
- Sound mode
- Balance
- AVL
- Digital Audio output
- Audio Description
- □ CHANNEL SETUP
- Country
- Auto Scan
- ATV Manual Scan (For ATV Source)
- DTV Manual Scan (For DVB-C and DVB-T)
- Channel Edit
- Common Interface (For DTV)
- DTV Setting
- - Subtitle Language
- - Subtitle Type
- - Multi-Audio
- - Audio Type
- • LCN
- Satellite Scan (For DVB-S)
- Teletext Language
- System Lock
- Parental Controls (For DTV)
- Auto Power Down
- Record Menu (For DTV)
- CEC
- Export Channels
- Import Channels
- □SETUP
- OSD Timer (OSD display time)
- Sleep Timer(power off time)
- Quick Setup
- No picture, no sound
- No colour
- Remote control not working
- No picture, normal sound
- Normal picture, no sound
- There are irregular waves
- Picture noise and Signal interference
- Shaded picture
- Radio frequency interference
- Accessories
- 32" STAND INSTALLATION DIAGRAM "MODEL 1"
- 32" STAND INSTALLATION DIAGRAM "MODEL 2"
- 32" STAND INSTALLATION DIAGRAM "MODEL 3"
- 32" STAND INSTALLATION DIAGRAM "MODEL 4"
- 40" - 43" STAND INSTALLATION DIAGRAM "MODEL 1"
- 40" - 43" STAND INSTALLATION DIAGRAM "MODEL 2"
- 40" - 43" STAND INSTALLATION DIAGRAM "MODEL 3"
Brand : SVAN
Model : SVTV132SM
Category : Television