
CS-YE9MKX - Air conditioner PANASONIC - Free user manual and instructions
Find the device manual for free CS-YE9MKX PANASONIC in PDF.


| Product Type | Split System Air Conditioner (Inverter) |
| Model | Indoor: CS-YE9MKX, Outdoor: CU-YE9MKX |
| Cooling Capacity | Not specified in manual (estimated 2.6 kW) |
| Heating Capacity | Not specified in manual (estimated 2.9 kW) |
| Power Supply | 220-240 V, 50 Hz, 1 Phase |
| Indoor Unit Dimensions (WxHxD) | 799 x 290 x 232 mm (estimated) |
| Outdoor Unit Dimensions (WxHxD) | 780 x 540 x 290 mm (estimated) |
| Indoor Unit Weight | 9.5 kg (estimated) |
| Outdoor Unit Weight | 31 kg (estimated) |
| Operating Modes | Auto, Cool, Heat, Dry, Fan |
| Temperature Range (Cooling) | Indoor: 16°C - 32°C, Outdoor: 16°C - 43°C |
| Temperature Range (Heating) | Indoor: 16°C - 30°C, Outdoor: -5°C - 24°C |
| Air Direction Control | Horizontal louver (manual) and vertical louver (auto swing) |
| Fan Speeds | Auto, Low, Medium, High, Quiet |
| Special Functions | Powerful Mode, Quiet Mode, Auto Restart, Timer (12-hour) |
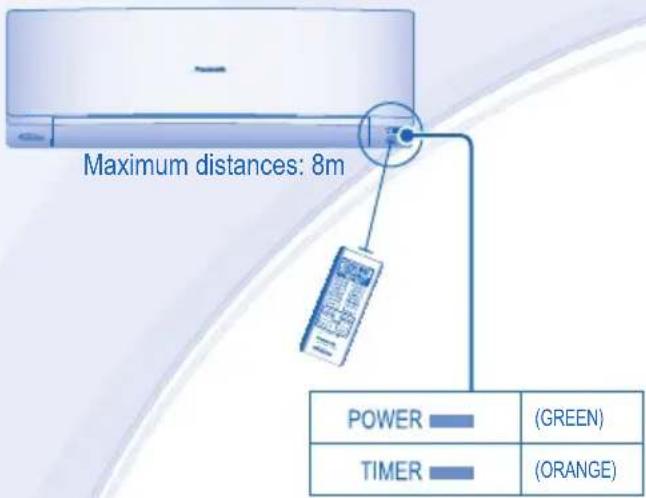
| Remote Control | LCD display, up to 8m range, AAA/R03 batteries |
| Filter Type | Washable air filters |
| Maintenance | Clean filters regularly, wipe unit with soft dry cloth, avoid water/chemicals |
| Safety Features | Earth Leakage Circuit Breaker recommended, auto shut-off on error, child safety (remote) |
| Standard Piping Length | 7.5 m (including indoor unit piping) |
Frequently Asked Questions - CS-YE9MKX PANASONIC
User questions about CS-YE9MKX PANASONIC
0 question about this device. Answer the ones you know or ask your own.
Ask a new question about this device
Download the instructions for your Air conditioner in PDF format for free! Find your manual CS-YE9MKX - PANASONIC and take your electronic device back in hand. On this page are published all the documents necessary for the use of your device. CS-YE9MKX by PANASONIC.
USER MANUAL CS-YE9MKX PANASONIC
natural_image
Illustration of a blue water drop with leaves in a snowy landscape, featuring a white air conditioner unit above (no text or symbols)Panasonic®
Operating Instructions Air Conditioner
Indoor Unit Outdoor Unit
CS-YE9MKX CU-YE9MKX
CS-YE12MKX CU-YE12MKX
CS-YE18MKX CU-YE18MKX


ENGLISH
Before operating the unit, read these operating instructions thoroughly and keep them for future reference.
ESPAÑOL
© Panasonic Home Appliances Air-Conditioning (Guangzhou) Co., Ltd. 2010. Unauthorized copying and distribution is a violation of law.
TABLE OF CONTENTS
SAFETY PRECAUTIONS 8\~9
REMOTE CONTROL 10\~11
INDOOR UNIT 12
TROUBLESHOOTING....13
INFORMATION 50\~55
PRODUCT SPECIFICATION 56
QUICK GUIDE....BACK COVER
NOTE: The illustrations in this manual are for explanation purposes only and may differ from the actual unit. It is subjected to change without notice for future improvement.
Use this air conditioner under the following temperature range
| Temperature (°C) | Indoor Outdoor | ||||
| *DBT *WBT *DBT *WBT | |||||
| COOLING | Maximum 32 23 43 26 | ||||
| Minimum 16 11 16 11 | |||||
| HEATING | Maximum 30 - 24 18 | ||||
| Minimum 16 - -5 -6 | |||||
* DBT: Dry bulb temperature
* WBT: Wet bulb temperature
NOTICE: • This model is not suitable for 24 hours non-stopping operation in heating mode below -5°C.
When the outdoor temperature is below -5^ and you use this model out of above conditions, the outdoor unit might be frozen up and stop operation for protection control.
To prevent personal injury, injury to others, or property damage, please comply the following. Incorrect operation due to failure to follow instructions may cause harm or damage, the seriousness of which is classified as below:

WARNING
This sign warns of death or serious injury.

CAUTION
This sign warns of injury or damage to property.
The instructions to be followed are classified by the following symbols:

This symbol denotes an action that is PROHIBITED


These symbols denote an action that is COMPULSORY.
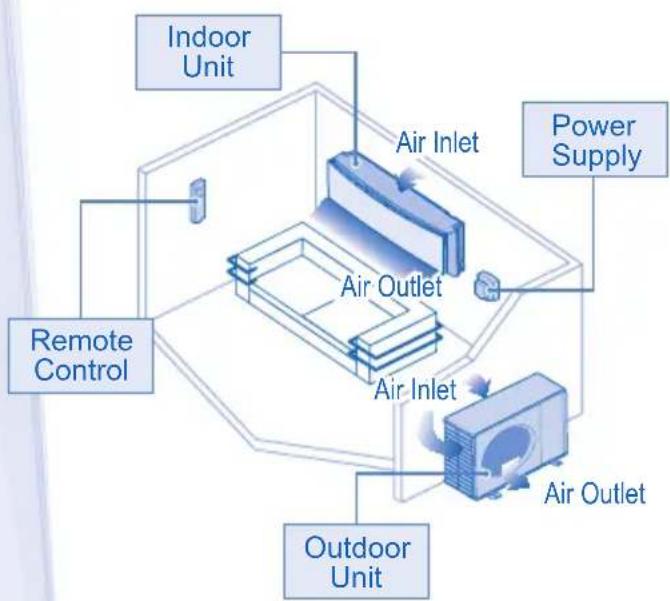
flowchart
graph TD
    A["Indoor Unit"] --> B["Air Outlet"]
    C["Power Supply"] --> D["Air Outlet"]
    E["Outdoor Unit"] --> F["Air Outlet"]
    G["Remote Control"] --> H["Air Outlet"]
    I["Air Inlet"] --> J["Air Outlet"]
    style A fill:#cce5ff,stroke:#333
    style C fill:#cce5ff,stroke:#333
    style E fill:#cce5ff,stroke:#333
    style G fill:#cce5ff,stroke:#333
    style I fill:#cce5ff,stroke:#333
    style J fill:#cce5ff,stroke:#333

WARNING
INDOOR UNIT AND OUTDOOR UNIT

This appliance is not intended for use by persons (including children) with reduced physical, sensory or mental capabilities, or lack of experience and knowledge, unless they have been given supervision or instruction concerning use of the appliance by a person responsible for their safety. Children should be supervised to ensure that they do not play with the appliance.
Please consult authorized dealer or specialist to clean the internal parts, repair, install, remove and reinstall the unit. Improper installation and handling will cause leakage, electric shock or fire.

Do not install the unit in a potentially explosive or flammable atmosphere. Failure to do so could result in fire.
Do not insert your fingers or other objects into the air conditioner indoor or outdoor unit, rotating parts may cause injury.

Do not touch the outdoor unit during lightning, it may cause electric shock.
Do not expose yourself directly to cold air for a long period to avoid excess cooling.
Do not sit or step on the unit, you may fall down accidentally.

REMOTE CONTROL

Do not allow infants and small children to play with the remote control to prevent them from accidentally swallowing the batteries.
POWER SUPPLY

Do not use modified cord, joint cord, extension cord or unspecified cord to prevent overheat and fire.


To prevent overheating, fire or electric shock:
- Do not share the same power outlet with other equipment.
- Do not operate with wet hands.
- Do not over bend the power supply cord.
- Do not operate or stop the unit by inserting or pulling out the power plug.
 WARNING WARNING | |
| POWER SUPPLY | |
| If the supply cord is damage, it must be replaced by the manufacturer, its service agent or similarly qualified persons in order to avoid a hazard. | |
| It is strongly recommended to be installed with Earth Leakage Circuit Breaker (ELCB) or Residual Current Device (RCD) to prevent electric shock or fire. | |
| To prevent overheating, fire or electric shock:Insert the power plug properly.Dust on the power plug should be periodically wiped with a dry cloth. | |
| Stop using the product when any abnormality/failure occurs and disconnect the power plug or turn off the power switch and breaker.(Risk of smoke/fire/electric shock)Examples of abnormality/failureThe ELCB trips frequently.Burning smell is observed.Abnormal noise or vibration of the unit is observed.Water leaks from the indoor unit.Power cord or plug becomes abnormally hot.Fan speed cannot be controlled.The unit stops running immediately even if it is switched on for operation.The fan does not stop even if the operation is stopped.Contact immediately your local dealer for maintenance/repair. | |
| Replacement or installation of power plugs shall be performed by authorized/qualified personnel only. The wires in this mains lead are coloured in accordance with the following code:Terminals wires colours (IEC Standard)Red livebrownBlack neutral blueGreen/Yellow earth green-yellowWiring colour may vary depending on a country wiring code's standard. | |
| This equipment must be earthed to prevent electric shock or fire. | |
| Prevent electric shock by switching off the power supply and unplug when:- Before cleaning or servicing.- Extended non-use.- Abnormally strong lightning activity. | |
CAUTION
 CAUTION CAUTION | |
| INDOOR UNIT AND OUTDOOR UNIT | |
| Do not wash the indoor unit with water, benzene, thinner or scouring powder to avoid damage or corrosion at the unit. | |
| Do not use for preservation of precise equipment, food, animals, plants, artwork or other objects. This may cause quality deterioration, etc. | |
| Do not use any combustible equipment in front of the airflow outlet to avoid fire propagate. | |
| Do not expose plants or pet directly to airflow to avoid injury, etc. | |
| Do not touch the sharp aluminium fin, sharp parts may cause injury. | |
| Do not switch ON the indoor unit when waxing the floor. After waxing, aerate the room properly before operating the unit. | |
| Do not install the unit in oily and smoky areas to prevent damage to the unit. | |
| Do not dismantle the unit for cleaning purpose to avoid injury. | |
| Do not step onto unstable bench when cleaning the unit to avoid injury. | |
| Do not place vase or water container on the unit. Water may enter the unit and degrade the insulation. This may cause an electric shock. | |
| Do not left the window open during Cool/Dry mode operation to prevent water leakage. | |
| Ensure drainage pipe is connected properly and keep drainage outlet clear of gutters, containers or does not immersed in water to prevent water leakage. | |
| After long period of use or use with any combustible equipment, aerate the room regularly. | |
| After long period of use, make sure the installation rack is not deteriorate to prevent the unit from falling down. | |
| REMOTE CONTROL | |
| Do not use rechargeable (Ni-Cd) batteries. It may damage the remote control. | |
| To prevent malfunction or damage of the remote control:Remove the batteries if the unit is not going to be used for a long period of time.New batteries of the same type must be inserted following the polarity stated. | |
| POWER SUPPLY | |
| Do not pull the cord to disconnect the plug to prevent electric shock. | |
REMOTE CONTROL
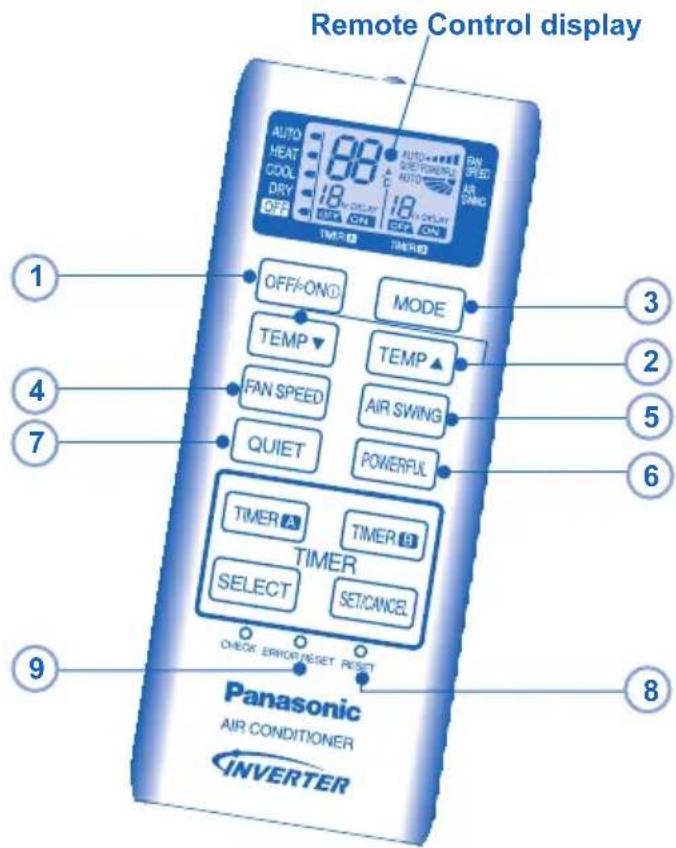
Press the remote control's button
1 TO TURN ON OR OFF THE UNIT

- Please be aware of the OFF indication on the remote control display to prevent the unit from starting/stopping improperly.
2 TO SET TEMPERATURE
- Selection range: 16^ C 30^ C .
- Operating the unit within the recommended temperature could induce energy saving.
HEAT mode: 20^ C \~ 24^ C.
COOL mode: 26°C \~ 28°C.
DRY mode: 1°C \~ 2°C lower than room temperature.
- During operation mode selection the power indicator blinks.
- Unit selects the operation mode according to the indoor intake temperature and remote control temperature.
HEAT mode - To enjoy warm air
- In heat mode, it may take a while for the unit to warm up. The POWER indicator blinks during preheating.
COOL mode - To enjoy cool air
- Use curtains to screen off sunlight and outdoor heat to reduce power consumption during cool mode.
DRY mode - To dehumidify the environment
- Unit operates at low fan speed to give a gentle cooling operation.
- For AUTO, the indoor fan speed is automatically adjusted according to the operation mode.
5 TO ADJUST AIRFLOW DIRECTION (5 OPTIONS)
AIR SWING

- Keeps the room ventilated.
- In COOL mode, if AUTO is set, the louver swing up/down automatically.
- In HEAT mode, if AUTO is set, the horizontal louver fix at predetermined position.
6 TO ACHIEVE TEMPERATURE QUICKLY
- This setting enables the desired set temperature to be reached quickly.
7 TO ENJOY QUIET ENVIRONMENT
- This setting provides a quiet environment by reducing the airflow noise.
- POWERFUL AND QUIET operations can not be activated at the same time.
8 PRESS TO RESTORE THE REMOTE CONTROL'S DEFAULT SETTING
9 NOT USED IN NORMAL OPERATIONS
TO SET THE TIMER (12-HOUR TIMER SETTING)
- When you want the air conditioner to turn ON or OFF automatically.
DELAY OFF-TIMER
For example, to stop the air conditioner 5 hours later.
1 To select the Delay OFF-TIMER, press the SELECT button once.
2 Press the TIMER button to select the delay hour.
- The OFF-TIMER can only be set while the air-conditioner is in operation.
DELAY ON-TIMER
For example, to start the air conditioner 2 hours later.
1 To select the Delay ON-TIMER, press the button once.
2 Press the TIMER button to select the delay hour.
- The ON-TIMER can only be set while the air-conditioner is not in operation.
DELAY OFF AND ON TIMER
For example, to stop the air conditioner 3 hours later and start 4 hours later.
1 To select the Delay OFF and ON Timer, press the SELECT button twice repeatedly.
2 Press the TIMER button to select the delay hour for OFF Timer.
3 Press the TIMER button to select the delay hour for ON Timer.
- This mode of timer can only be set while the air-conditioner is in operation.
DELAY ON AND OFF TIMER
For example, to start the air conditioner 7 hours later and stop 10 hours later.
1 To select the Delay ON and OFF Timer, press the SELECT button twice repeatedly.
2 Press the TIMER button to select the delay hour for ON Timer.
3 Press the TIMER button to select delay hour for OFF Timer.
- This mode of timer can only be set while the air-conditioner is not in operation.
TO CONFIRM THE TIMER SETTING
Press the SETCANCEL button once to activate the timer operation which will start when the set time is reached.
TO CANCEL THE TIMER SETTING
Press the SETCANCEL button again to cancel the timer operation.
- The timer indicator of the indoor unit will light up during the timer operation.
- When ON Timer is set, the unit may start earlier before the actual set time in order to achieve the desired temperature on time.
- If you press operation OFF/ON/O button during the timer setting operation, timer setting will be cancelled.
- If timer is cancelled manually or due to power failure, you can restore the timer again by repeating steps above (once power is resumed).

CAUTION
- Switch off the power supply before cleaning.
- Do not touch the aluminium fin, sharp parts may cause injury.
WASHING INSTRUCTIONS HINT
- Do not use benzene, thinner or scouring powder.
- Use only soap (pH7) or neutral household detergent.
- Do not use water hotter than 40^ C .
- To ensure optimal performance of the unit, cleaning maintenance have to be carried out at regular intervals.
NOTE
- If chemical cloth is used to wipe the unit, instruction for the cloth should be followed.
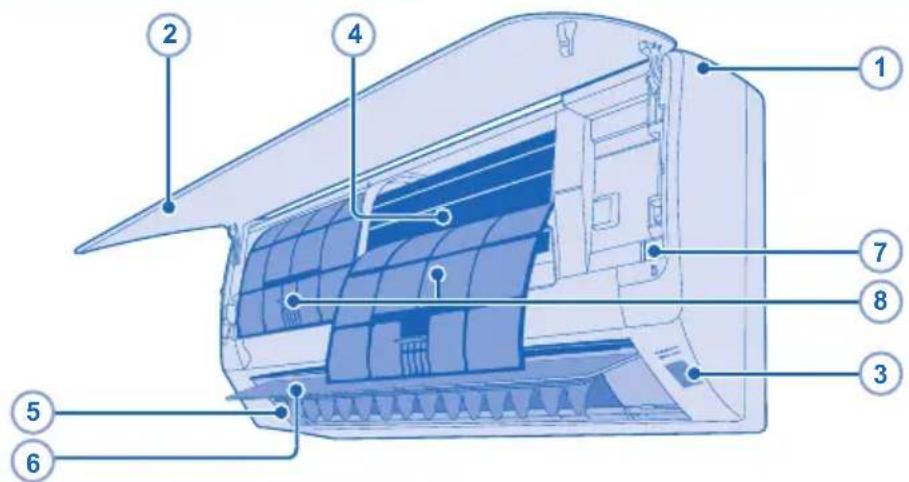
1 INDOOR UNIT
- Wipe the unit gently with a soft, dry cloth.
2 FRONT PANEL
Remove Front Panel
- Raise and pull to remove the front panel.
- Wash gently and dry.
Close Front Panel
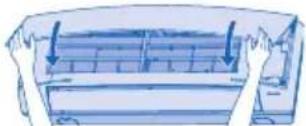
- Press down both ends of the front panel to close it securely.
3 RECEIVER
4 ALUMINIUM FIN
5 HORIZONTAL AIRFLOW DIRECTION LOUVER
- Manually adjustable.

WARNING
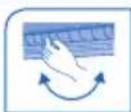
Be careful not to insert your fingers into the unit to avoid injuring by cross-flow fan.
6 VERTICAL AIRFLOW DIRECTION LOUVER
- Do not adjust by hand.
7 AUTO OFF/ON BUTTON
- Use when remote control is misplaced or malfunction.
| Action Mode | |
| Press once. Auto | |
| Press and hold until 1 beep is heard, then release. | Cooling |
| Press and hold until you hear double beep sound, then release. | Heating |
| Press the button to turn off. | |
8 AIR FILTERS
- Clean the filters regularly.
- Wash/rinse the filters gently with water to avoid damage to the filter surface.
- Dry the filters thoroughly under the shade, away from fire or direct sunlight.
- Replace any damage filter.
TROUBLESHOOTING
The following symptoms do not indicate malfunction.
SYMPTOM CAUSE
Mist emerges from indoor unit. ▶ • Condensation effect due to cooling process.
Water flowing sound during operation. ▶ • Refrigerant flow inside the unit.
The room has a peculiar odour. ▶ • This may due to damp smell emitted by the wall, carpet, furniture or clothing.
Indoor fan stops occasionally during automatic fan speed setting. ▶ This helps to remove the surrounding odours.
Operation is delayed a few minutes after restart. ▶ • The delay is a protection to the unit's compressor.
Outdoor unit emits water/steam. ▶ • Condensation or evaporation occurs on pipes.
The unit operates automatically when power is resumed after a power failure. It is the Auto Restart function of the unit. Operation will be restarted automatically under the previous operation mode and air flow direction when power is resumed as the operation is not stopped by remote control.
Indoor fan stops occasionally during heating operation. ▶ To avoid unintended cooling effect.
Power indicator blinks before the unit is switched on. ▶ • This is a preliminary step in preparation for the operation when the ON timer has been set.
Cracking sound during operation. ▶ Changes of temperature cause the expansion/contraction of the unit.
Check the following before calling for servicing.
SYMPTOM CHECK
Heating/Cooling operation is not working efficiently. ▶ Set the temperature correctly.
Noisy during operation.
Remote control does not work. (Display is dim or transmission signal is weak.)
The unit does not work.
The unit does not receive the signal from the remote control.
- Check if the unit has been installed at an incline.
- Close the front panel properly.
- Insert the batteries correctly.
- Replace weak batteries.
- Check if the circuit breaker is tripped.
- Check if timers have been set.
• Make sure the receiver not obstructed. - Certain fluorescent lights may interfere with signal transmitter. Please consult authorized dealer.
The unit stops and the timer indicator blinks.
Use remote control to retrieve error code.
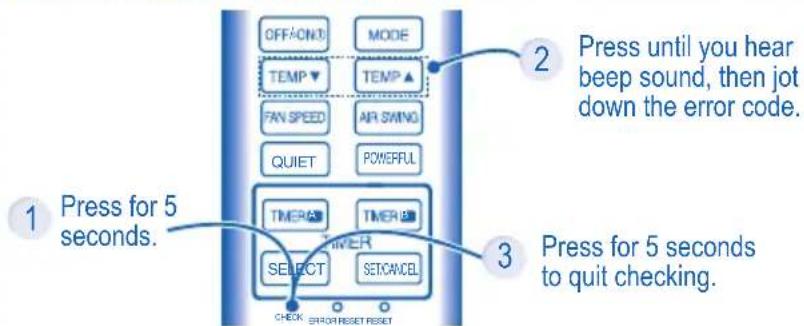
Note:
- For certain error, you may restart the unit with limited operation with 4 beeps during operation starts.
4 Turn the unit off and reveal the error code to authorized dealer.
1 UNIDAD INTERIOR
UNITÀ INTERNA E UNITÀ ESTERNA

1 UNITÀ INTERNA
1 UNIDADE INTERIOR
Retire o painel frontal
1 ВЪТРЕШНА ЧАСТ
natural_image
Illustration of a hand pressing down on a partially assembled air conditioner panel (no text or symbols visible)1 UNUTARNJA JEDINICA
- Jedinicu pažljivo obrišite mekom, suhom krpom.
2 PREDNJA PLOČA
Uklonite prednju ploču
1 iç ÜNİTE
natural_image
Illustration of a car interior with arrows indicating movement or force (no text or symbols)Information for Users on Collection and Disposal of Old Equipment and Used Batteries
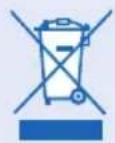
These symbols on the products, packaging, and/or accompanying documents mean that used electrical and electronic products and batteries should not be mixed with general household waste.
For proper treatment, recovery and recycling of old products and used batteries, please take them to applicable collection points, in accordance with your national legislation and the Directives 2002/96/EC and 2006/66/EC.
By disposing of these products and batteries correctly, you will help to save valuable resources and prevent any potential negative effects on human health and the environment which could otherwise arise from inappropriate waste handling.
For more information about collection and recycling of old products and batteries, please contact your local municipality, your waste disposal service or the point of sale where you purchased the items.
Penalties may be applicable for incorrect disposal of this waste, in accordance with national legislation.
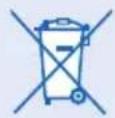
For business users in the European Union
If you wish to discard electrical and electronic equipment, please contact your dealer or supplier for further information.
[Information on Disposal in other Countries outside the European Union]
These symbols are only valid in the European Union. If you wish to discard these items, please contact your local authorities or dealer and ask for the correct method of disposal.
Note for the battery symbol (bottom two symbol examples):
This symbol might be used in combination with a chemical symbol. In this case it complies with the requirement set by the Directive for the chemical involved.
- Checking of remote control batteries.
- No obstruction at air inlet and air outlet vents.
- Use Auto OFF/ON button to select Cooling/Heating operation, after 15 minutes of operation, it is normal to have the following temperature difference between air inlet and air outlet vents: Cooling: ≥ 8°C Heating: ≥ 14°C
FOR EXTENDED NON-USE
- Activate Heat mode for 2\~3 hours to remove moisture left in the internal parts thoroughly to prevent mould growth.
• Turn off the power supply. - Remove the remote control batteries.
NON SERVICEABLE CRITERIAS
TURN OFF POWER SUPPLY then please consult authorized dealer under the following conditions:
• Abnormal noise during operation.
• Water/foreign particles have entered the remote control.
• Water leaks from Indoor unit.
• Circuit breaker switches off frequently.
• Power cord becomes unnaturally warm.
- Switches or buttons are not functioning properly.
- The timer indicator blinks and the unit can not be operated.
- Standard piping length: 7.5 m (Includes Indoor Unit piping length).
| Translations | Deutsch | Français | Greek | Italian | Nederland | Portuguese | Spanish | Bulgarian | Turkish | Arabic | HR | Norwegian |
| Product Specification | ProduktSpezifikation | Caractéristiques du produit | Παλειαργακείς προλίντος | presorcione del producto | productikenmarkon | Especialifications de produits | Especializzazione de produits | Среднебных на продукта | Crissofrika und derivate | Среднебных | Specifikacija proizvoda | Produktete spezifikatzer |
| Model Indoor UnitOutdoor Unit | ModellInngertetAussergerlit | ModèleUnité métenureUnité extéréture | ΜοντέλοΕιουτραης ευσκυή Εξυτικρεις ευσκυή | ModelloImplante interneImplante esterne | ModelBitterinnrichtingButterinnrichting | ModeloElemente interiorElemente exterior | ModeloEquipo interiorEquipo exterior | ModelenΒγρειπεια устройствоΒγισιμα устройство | Modeliç UniteDy Unite | طرازالعربية المئيقيمة | ModelUnutamja jedinicaVanjska jedinica | ModellInnandørsanhetUtendørsenhet |
| Power / Current | Stromversorgung | Alimentation | Παροχήρευματος | Corrente | Stroom | Potência | Corriente | Електрическо захранване | Güç / Akim | /الفreyه/النبار الكهرباني | Napajanje / struja | Effekl/strem |
| Refrigerant | KZHmittel | Réfrigérant | ψυκτικό μεοο | Refrigerante | Koelmiddel | Refrigerante | Refrigerante | Охлаждане | Sogutucu | اللادة المبردة | Rashladno sredsvo | Kjalemiddel |
| Cooling Capacity | Kühlleistung | Capacité réfrigérante | Ικανότηταψυξης | Refrigerazione | Cooling Capacity | Capacidade do refrescamiento | Potencia trigorífica | Охлаждаци кападитет | Sogutma Kapasitesi | سعة التبريد | Kapacilet hadenja | Kjalekapasitet |
| Heating Capacity | Heizleistung | Capacité chauffage | Ικανότηταθέρμανοης | Riscaldamento | Verwarming Capacity | Capacidade do aquecimento | Potencia caltacción | Загриващ кападитет | Isilma Kapasitesi | سعة التدفئة | Kapacitet grijanja | Varmekapasitet |
| Noise LevelConditions1m DistanceMax.codingSound power level | LärmpegelBednungen1m AbstandMax. KürtingSchalfeistungspegel | Niveau de bruitCondensDistance 1 mRetroidissement max.Niveau de puissancesorats | Επιεδο δορυβουΣυνθίκεςΑνστοση 1 μετρουΜεχ. θυήηΣτοδην υχυοςδορυβου | Livello di rumoraCondizioniDistanza di 1 mRetreddamento max.Livello rumore | LawaaipellerVoorwaarden1m afstandMax. KoelingGaludsniveau | Nivel do barulho ConditionsDistância de 1mArrefecimento máx.Nivel de alimentação senere | Nivel sonoroCondicionas1 m de distanciaRefrigeración máx.Nivel de potencia de sonido | Ниво на шумаУсловия1m разстояниеМажинville оп CambridgeНиво на звука | Ses seviyesiKeyufar1m UzaklikMaks. sogutmaSes seviyesi | مستو الحضUAعلاويدالشستفة ام.ألف الأصني التب partiesمستوى phrasesة الحسين | Razina bukeUyjeiUdaljenost od 1 mStandardro grijanjeRazina zvučne snage | StaryniváVilkár1 m avstandMaks. kjellingLydolfoktnivá |
| Air Circulation | Luftzirkulation | Ventilation | Κυκλοφορία ασρα | Circolazione aria | Luchtorculate | Circulação do ar | Circultacion de aire | Βъздушна цуркулация | Hava Devri | دوران الهواء | Cirkulacija zraka | Luftstremning |
| Product weight | Produktgewicht | Poids du produit | Βαρος τουプロιουτος | Peso prodotto | Produktgewicht | Peso do producto | Peso del producto | Тето на продукта | Ürün agidigi | وزن النتح | Masa proizvoda | Produktets vekt |
| Dimensions | Armessungen | Dimensions | Διάσταση | Misure | Afmetingen | Dimensões | Medidas | Размери | Eballar | الأبعاد | Dimenzije | Mál |
MEMO
QUICK GUIDE/GUÍA RÁPIDA/GUIDA RAPIDA/GUIA RÁPIDO/ БЪРЗ СПРАВОЧНИК/BRZE UPUTE/HIZLI REHBER
Remote Control Preparation • Preparación Del Mando A Distancia • Telecomando: Operazioni Preliminari • Preparação Do Controlo Remoto • Подготвяне На Дистанционното Управление • Priprema daljinskog upravljača • Uzaktan Kumanda Hazirlanmasi
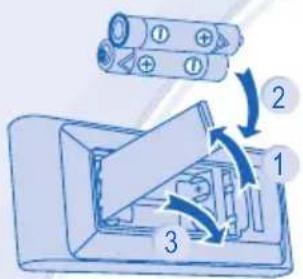
1 Remove the battery cover • Retire la tapa de las pilas • Rimuovere il coperchio batteria • Remova a tampa da bateria • Свалете капака за батериите • Uklonite pokrov baterija • Pil kapağını çıkartın.
2 Insert AAA or R03 batteries (can be used \~ 1 year) •
Inserte pilas AAA o R03 (puede ser usado \~ 1 año) •
Inserire batterie AAA o R03 (può essere utilizzato per circa 1 anno) •
Introduza pilhas AAA ou R03 (pode ser utilizado \~ 1 ano) •
Поставете AAA или R03 батерии (могат да се използват приблизително една година) •
Umetnite AAA ili R03 baterije (mogu se koristiti \~ 1 godinu) •
AAA veya R03 pil kullanın (\~ 1 yıl kullanılabilir)
3 Close the cover • Cierre la tapa • Chiudere il coperchio • Feche a tampa • Затворете капака • Zatvorite pokrov • Kapağı kapatın.
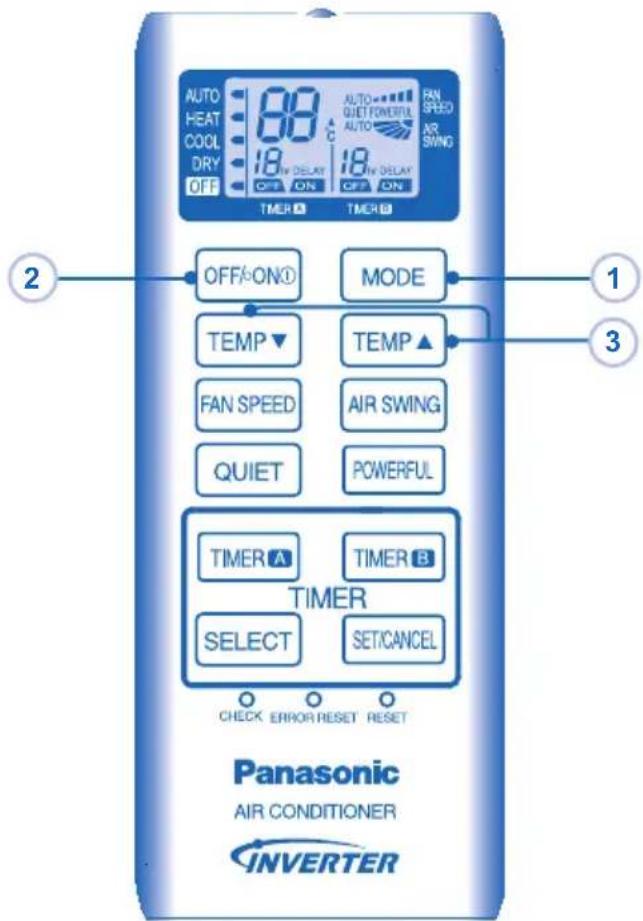
1
MODE

AUTOHEAT DRYCOOL

Select the desired mode.
Seleccione el modo deseado.
Selezionare la modalità desiderata.
Seleccione o modo de funcionamento pretendido.
Избор на желания режим на работа.
Odaberite željeni način.
Istenilen modu seçin.
2
OFF/ON
Start/stop the operation.
Inicio/detenga el funcionamiento.
Avviare/arrestare l'apparecchio.
Ligue/Desligue a unidade.
Включване/спиране.
Pokrenite/zaustavite rad
Çalışmayı başlatın/durdurun.
3
TEMP
Select the desired temperature.
Seleccione la temperature deseada.
Selezionare la temperatura desiderata.
Programe a temperatura desejada.
Настройка на желаната температура.
Odaberite željenu temperaturu.
Istenilen sıcaklığı seçin.
Pursuant to at the directive 2004/108/EC, article 9(2)
Panasonic Testing Centre
Panasonic Service Europe, a division of
Panasonic Marketing Europe GmbH
Winsbergring 15, 22525 Hamburg, F.R. Germany
EEE COMPLIES WITH DIRECTIVE OF TURKEY
EEE YÖNETMELİĞİNE UYGUNDUR
BU ÜRÜNÜN KULLANIM ÖMRÜ 10 YILDIR

- Panasonic®
- Operating Instructions Air Conditioner
- ENGLISH
- ESPAÑOL
- TABLE OF CONTENTS
- WARNING
- CAUTION
- INDOOR UNIT AND OUTDOOR UNIT
- REMOTE CONTROL
- POWER SUPPLY
- Press the remote control's button
- TO TURN ON OR OFF THE UNIT
- TO SET TEMPERATURE
- HEAT mode - To enjoy warm air
- COOL mode - To enjoy cool air
- DRY mode - To dehumidify the environment
- TO ADJUST AIRFLOW DIRECTION (5 OPTIONS)
- TO ACHIEVE TEMPERATURE QUICKLY
- TO ENJOY QUIET ENVIRONMENT
- PRESS TO RESTORE THE REMOTE CONTROL'S DEFAULT SETTING
- NOT USED IN NORMAL OPERATIONS
- TO SET THE TIMER (12-HOUR TIMER SETTING)
- DELAY OFF-TIMER
- DELAY ON-TIMER
- DELAY OFF AND ON TIMER
- DELAY ON AND OFF TIMER
- TO CONFIRM THE TIMER SETTING
- TO CANCEL THE TIMER SETTING
- WASHING INSTRUCTIONS HINT
- NOTE
- INDOOR UNIT
- FRONT PANEL
- Remove Front Panel
- RECEIVER
- ALUMINIUM FIN
- HORIZONTAL AIRFLOW DIRECTION LOUVER
- VERTICAL AIRFLOW DIRECTION LOUVER
- AUTO OFF/ON BUTTON
- AIR FILTERS
- TROUBLESHOOTING
- The following symptoms do not indicate malfunction.
- SYMPTOM CAUSE
- Check the following before calling for servicing.
- SYMPTOM CHECK
- The unit stops and the timer indicator blinks.
- Note:
- UNIDAD INTERIOR
- UNITÀ INTERNA E UNITÀ ESTERNA
- UNITÀ INTERNA
- UNIDADE INTERIOR
- Retire o painel frontal
- ВЪТРЕШНА ЧАСТ
- UNUTARNJA JEDINICA
- PREDNJA PLOČA
- Uklonite prednju ploču
- iç ÜNİTE
- Information for Users on Collection and Disposal of Old Equipment and Used Batteries
- For business users in the European Union
- [Information on Disposal in other Countries outside the European Union]
- Note for the battery symbol (bottom two symbol examples):
- FOR EXTENDED NON-USE
- NON SERVICEABLE CRITERIAS
- QUICK GUIDE/GUÍA RÁPIDA/GUIDA RAPIDA/GUIA RÁPIDO/ БЪРЗ СПРАВОЧНИК/BRZE UPUTE/HIZLI REHBER
- 1
- MODE
- AUTOHEAT DRYCOOL
- 2
- OFF/ON
- 3
- TEMP
Brand : PANASONIC
Model : CS-YE9MKX
Category : Air conditioner