
GM310 - Smartphone LG - Free user manual and instructions
Find the device manual for free GM310 LG in PDF.


User questions about GM310 LG
0 question about this device. Answer the ones you know or ask your own.
Ask a new question about this device
Download the instructions for your Smartphone in PDF format for free! Find your manual GM310 - LG and take your electronic device back in hand. On this page are published all the documents necessary for the use of your device. GM310 by LG.
USER MANUAL GM310 LG
* Make sure the number is correct before making a call.

LG
Life's Good
CE 0168
www.lgmobile.com
MMBB0337304 (1.0)
natural_image
Front view of a black LG mobile phone with playback controls and control buttons (no visible text or symbols on screen)
natural_image
Black cylindrical device with attached buttons and ports, no visible text or symbolsHeadset-Anschluss
Lautstärke
text_image
Diagram showing two hands holding a smartphone with labeled parts ① and ②, indicating a step in the action.2 Akku entnehmen
natural_image
Illustration of two hands holding a black object, no text or symbols presentnatural_image
Close-up of a smartphone's rear panel showing internal components and a magnified inset of a floppy disk (no text or symbols visible)4 Akku einsetzen
natural_image
Black smartphone showing internal components with numbered arrows indicating movement or flow (no text or symbols present)natural_image
Close-up of a black handheld device with a cable inserted, showing a magnified view of its internal component (no text or symbols visible)Speicherkarte
natural_image
Front view of a black LG mobile phone with control buttons and playback controls (no visible text or symbols on screen)Touchpad
Standby-Bildschirm
Statusleiste
TIPP! You can edit an existing memo. Select the one you want to edit, press Options and select Edit.
Geheimnotizen
Declaration of Conformity

LG Electronics
Suppliers Details
Name
LG Electronics Inc
Address
LG Electronics Inc. LG Twin Towers 20
Yeouido-dong Yeongdeungpo-gu, Seoul, Korea 150-721
Product Details
Product Name
GSM 850 / E-GSM 900 / DCS 1800 / PCS 1900 / W-CDMA Terminal Equipment
Model Name
GM310
Trade Name
LG
CE 0168
Applicable Standards Details
RATTE Directive 1999/5/EC
EN 301 489-01 V1.6.1, EN 301 489-07 v1.3.1, EN 301 489-17 v1.2.1, EN 301 489-24 V1.3.1
EN 301 511 V9.0.2
EN 301 908-1 V3.2.1 EN 301 908-2 V3.2.1
EN 50360:2001, EN62209-1:2006
EN 60950-1:2001
EN 300 328 V1.7.1
Supplementary Information
The conformity to above standards is verified by the following Notified Body(BABT)
BABT, Balfour House, Churchfield Road, Watton-on-Thames, Surrey, KT12 2TD, United Kingdom Notified Body Identification Number : 0168
Declaration
I hereby declare under our sole responsibility that the product mentioned above to which this declaration relates complies with the above mentioned standards and Directives
European Standard Center
LG Electronics Logistics and Services B.V.
Veluwezoom 15, 1327 AE Almere, The Netherlands
Tel: +31-36-547-8940, Fax: +31-36-547-8794 e-mail: jacob@lge.com
Name
Seung Hyoun, Ji / Director
Issued Date
- March, 2009

Signature of representative
Fehlerbehebung
Congratulations on your purchase of the advanced and compact GM310 phone by LG, designed to operate with the latest digital mobile communication technology.
Some of contents in this manual may differ from your phone depending on the software of the phone or your service provider.
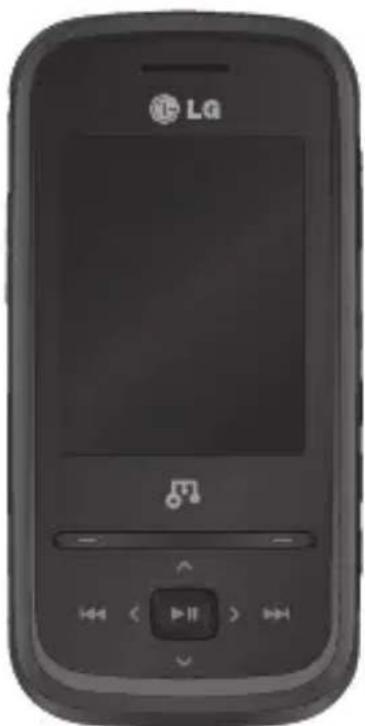
natural_image
Front view of a black LG mobile phone with control buttons and playback controls (no visible text or symbols on screen)
Disposal of your old appliance
1 When this crossed-out wheeled bin symbol is attached to a product it means the product is covered by the European Directive 2002/96/EC.
2 All electrical and electronic products should be disposed of separately from the municipal waste stream via designated collection facilities appointed by the government or the local authorities.
3 The correct disposal of your old appliance will help prevent potential negative consequences for the environment and human health.
4 For more detailed information about disposal of your old appliance, please contact your city office, waste disposal service or the shop where you purchased the product.
Contents
Guidelines for safe and efficient use ..6
Getting to know your phone .....11
Installing the USIM and battery .....13
Memory card ....15
Menu map ......16
Your home screen ......17
Touchpad tips 17
The status bar ......18
Using the Multitasking function .....18
Calls 19
Making a call 19
Making a call from your contacts .....19
Answering and rejecting a call ......19
Speed dialling 19
Viewing your call logs......20
Using call barring 21
Changing the call settings .....21
Common settings 22
Contact 23
Searching for a contact 23
Adding a new contact ......23
Contact options ......23
Creating a group 24
Using service dial numbers .....24
Viewing your own number .....25
Creating a business card .....25
Changing your contact settings .....25
Messaging 26
Messaging 26
Sending a message ......26
Entering text 26
Text input mode using the keypad ...27
Setting up your email 27
Sending an email using your new account ....27
Retrieving your email 27
Message folders ......28
Managing your messages .....28
Changing your text message settings .. 29
Changing your multimedia message settings ....30
Changing your email settings .....30
Changing your other settings .....31
Camera 32
Taking a quick photo 32
After you've taken your photo .....32
Using the quick settings ......32
Using the advanced settings .....33
Adjusting the brightness 34
Changing the image size .....34
Viewing your saved photos .....34
Video camera ....35
Shooting a quick video 35
After you've shot your video .....35
Using the quick settings .....35
Using the advanced settings .....35
Watching your saved videos .....36
MP3 Player ....37
MP3 Player....37
Transferring music onto your phone 39
Playing a song 39
Using options while playing music ...40
Viewing your playlist ....40
Creating a playlist 41
Search for song information with Music
ID ^TM 41
Multimedia ....43
Using the FM radio....43
Searching for stations 43
Reset all channels 44
Listening to the radio 44
Recording your radio 44
Using the Voice recorder 45
Recording your voice memo ......45
Sending a voice recording .....45
My stuff 46
Images 46
Sending a photo 46
Using an image 46
Organising your images 47
Deleting an image 47
Moving or copying an image .....47
Marking and unmarking images .....47
Checking your memory status .....48
Sounds......48
Using a sound 48
Videos 48
Watching a video 48
Contents
Sending a video clip ....49
Games and Applications ....49
Playing a game 49
Using the games options menu .....49
Flash contents ....50
Others 50
My memory card 50
Installing a Java game & application...50
Games & Apps ....51
Games & Apps....51
Playing a game ....51
Viewing applications ....51
Changing the network profile .....51
Organiser & Tools ....52
Adding an event to your calendar ....52
Adding an item to your to do list .....52
Adding a memo 53
Secret memo 53
Date finder 53
Settings 53
Quick menu 53
Setting your alarm ....54
Using your calculator ....54
Using the stopwatch ....54
Converting a unit ....55
Adding a city to your World time .....55
Browser 56
Accessing the web....56
Yahoo 56
Adding and accessing your bookmarks 56
Saving a page....57
Accessing a saved page....57
Viewing your browser history .....57
Using RSS reader....57
Changing the web browser settings .57
Connectivity ....58
Changing your connectivity settings .58
Changing your Bluetooth settings ....58
Pairing with another Bluetooth device .. 59
Using a Bluetooth headset .....59
Sending and receiving your files using Bluetooth ....59
Use your phone as a modem ......60
Use your phone as a mass storage device ....61
Synchronise your phone with your PC .. 61
Installing LG PC Suite on your computer ....61
Connecting your phone and PC .....62
Backing up and restoring your phone's information 62
Viewing your phone files on your PC...62
Synchronising your contacts ......63
Synchronising your messages ......63
Adding music to your handset before you get started 64
Transferring music using Windows Media Player 64
Settings 65
Changing your profiles 65
Using flight mode 65
Changing your phone settings .....65
Changing your display settings .....65
Changing your date & time ......66
Changing your security settings .....66
Viewing memory status ......67
Change your other settings ......67
Streaming settings 68
Resetting your phone 68
Software Upgrade 68
Accessories 70
Network service ....71
Technical data 71
Trouble Shooting 73
Glossary 75
Gracenote® End User License Agreement ....78
Guidelines for safe and efficient use
Please read these simple guidelines. Not following these guidelines may be dangerous or illegal.
Exposure to radio frequency energy
Radio wave exposure and Specific Absorption Rate (SAR) information This mobile phone model GM310 has been designed to comply with applicable safety requirements for exposure to radio waves. These requirements are based on scientific guidelines that include safety margins designed to assure the safety of all persons, regardless of age and health.
- The radio wave exposure guidelines employ a unit of measurement known as the Specific Absorption Rate, or SAR. Tests for SAR are conducted using standardised methods with the phone transmitting at its highest certified power level in all used frequency bands.
- While there may be differences between the SAR levels of various LG phone models, they are all designed to meet the relevant guidelines for exposure to radio waves.
- The SAR limit recommended by the International Commission on Non-Ionizing Radiation Protection (ICNIRP) is 2 W/kg averaged over 10g of tissue.
- The highest SAR value for this model phone tested by DASY4 for use at the ear is 0.479 W/kg (10g) and when worn on the body is 1.52 W/kg (10g).
- SAR data information for residents in countries/regions that have adopted the SAR limit recommended by the Institute of Electrical and Electronics Engineers (IEEE), which is 1.6 W/kg averaged over 1g of tissue.
Product care and maintenance

WARNING
Only use batteries, chargers and accessories approved for use with this particular phone model. The use of any other types may invalidate any approval or warranty applying to the phone, and may be dangerous
- Do not disassemble this unit. Take it to a qualified service technician when repair work is required.
- Keep away from electrical appliances such as TVs, radios, and personal computers.
- The unit should be kept away from heat sources such as radiators or cookers.
- Do not drop.
- Do not subject this unit to mechanical vibration or shock.
-
Switch off the phone in any area where you are required by special regulations. For example, do not use your phone in hospitals as it may affect sensitive medical equipment.
-
Do not handle the phone with wet hands while it is being charged. It may cause an electric shock and can seriously damage your phone.
- Do not to charge a handset near flammable material as the handset can become hot and create a fire hazard.
- Use a dry cloth to clean the exterior of the unit (do not use solvents such as benzene, thinner or alcohol).
- Do not charge the phone when it is on soft furnishings.
- The phone should be charged in a well ventilated area.
- Do not subject this unit to excessive smoke or dust.
- Do not keep the phone next to credit cards or transport tickets; it can affect the information on the magnetic strips.
- Do not tap the screen with a sharp object as it may damage the phone.
Guidelines for safe and efficient use
- Do not expose the phone to liquid or moisture.
- Use the accessories like earphones cautiously. Do not touch the antenna unnecessarily.
Efficient phone operation
Electronics devices
All mobile phones may get interference, which could affect performance.
- Do not use your mobile phone near medical equipment without requesting permission. Avoid placing the phone over pacemakers, for example, in your breast pocket.
- Some hearing aids might be disturbed by mobile phones.
- Minor interference may affect TVs, radios, PCs, etc.
Road safety
Check the laws and regulations on the use of mobile phones in the area when you drive.
- Do not use a hand-held phone while driving.
- Give full attention to driving.
- Use a hands-free kit, if available.
- Pull off the road and park before making or answering a call if driving conditions so require.
- RF energy may affect some electronic systems in your vehicle such as car stereos and safety equipment.
- When your vehicle is equipped with an air bag, do not obstruct with installed or portable wireless equipment. It can cause the air bag to fail or cause serious injury due to improper performance.
- If you are listening to music whilst out and about, please ensure that the volume is at a reasonable level so that you are aware of your surroundings. This is particularly imperative when near roads.
Avoid damage to your hearing
Damage to your hearing can occur if you are exposed to loud sound for long periods of time. We therefore recommend that you do not turn on or off the handset close to your ear. We also recommend that music and call volumes are set to a reasonable level.
Blasting area
Do not use the phone where blasting is in progress. Observe restrictions, and follow any regulations or rules.
Potentially explosive atmospheres
- Do not use the phone at a refueling point.
- Do not use near fuel or chemicals.
- Do not transport or store flammable gas, liquid, or explosives in the same compartment of your vehicle as your mobile phone and accessories.
In aircraft
Wireless devices can cause interference in aircraft.
- Turn your mobile phone off before boarding any aircraft.
- Do not use it on the ground without permission from the crew.
Children
Keep the phone in a safe place out of the reach of small children. It includes small parts which may cause a choking hazard if detached.
Emergency calls
Emergency calls may not be available under all mobile networks. Therefore, you should never depend solely on the phone for emergency calls. Check with your local service provider.
Guidelines for safe and efficient use
Battery information and care
- You do not need to completely discharge the battery before recharging. Unlike other battery systems, there is no memory effect that could compromise the battery's performance.
- Use only LG batteries and chargers. LG chargers are designed to maximize the battery life.
- Do not disassemble or short-circuit the battery pack.
- Keep the metal contacts of the battery pack clean.
- Replace the battery when it no longer provides acceptable performance. The battery pack maybe recharged hundreds of times until it needs replacing.
-
Recharge the battery if it has not been used for a long time to maximize usability.
-
Do not expose the battery charger to direct sunlight or use it in high humidity, such as in the bathroom.
- Do not leave the battery in hot or cold places, this may deteriorate the battery performance.
- There is risk of explosion if the battery is replaced by an incorrect type.
- Dispose of used batteries according to the manufacturer's instructions. Please recycle when possible. Do not dispose as household waste.
- If you need to replace the battery, take it to the nearest authorized LG Electronics service point or dealer for assistance.
- Always unplug the charger from the wall socket after the phone is fully charged to save unnecessary power consumption of the charger.
Getting to know your phone
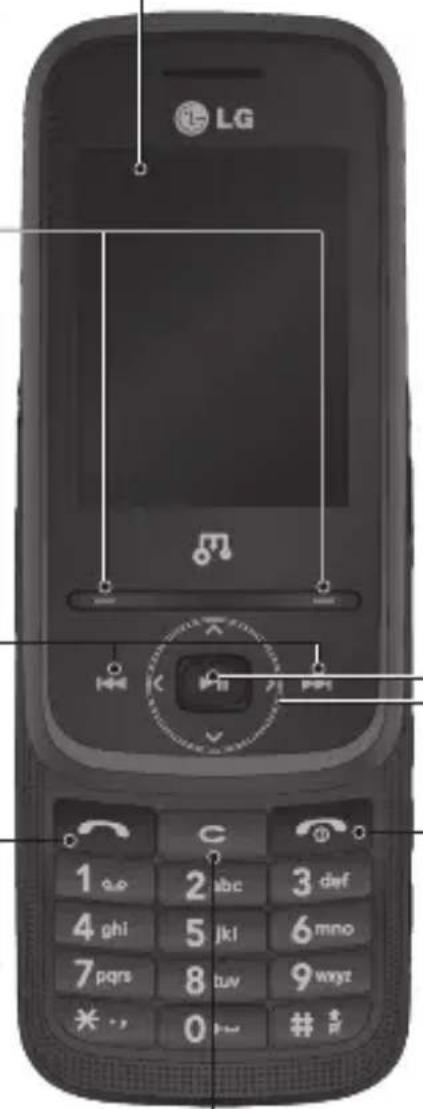
Main screen
Left soft key/Right soft key
Performs the function indicated at the bottom of the display.
Music Control key
- While playing music:
Skip to the previous song.
Skip to the next song.
Note: Music control keys only light in music player menu in stead of left and right key in navigation keys.
Call key
Dials a phone number and answers incoming calls.
Clear key
Deletes a character with each press.
text_image
LG 1 abc 2 abc 3 def 4 ghi 5 jkl 6 mno 7 pqrs 8 tuv 9 wyyt * , 0 # #Confirm key
- When the screen is idle: Go to the main menu directly. (icon)
- In menu: Selects menu options and confirms actions.
- While playing music: Play and pause the song.
Navigation keys
- In standby mode:
Quick menu
Contacts list
Messaging
< Profiles
• In menu: Navigates between menus.
End/Power key
Ends or rejects a call. Turns the phone on/off. Returns to the home screen when you use the menu.
Getting to know your phone
text_image
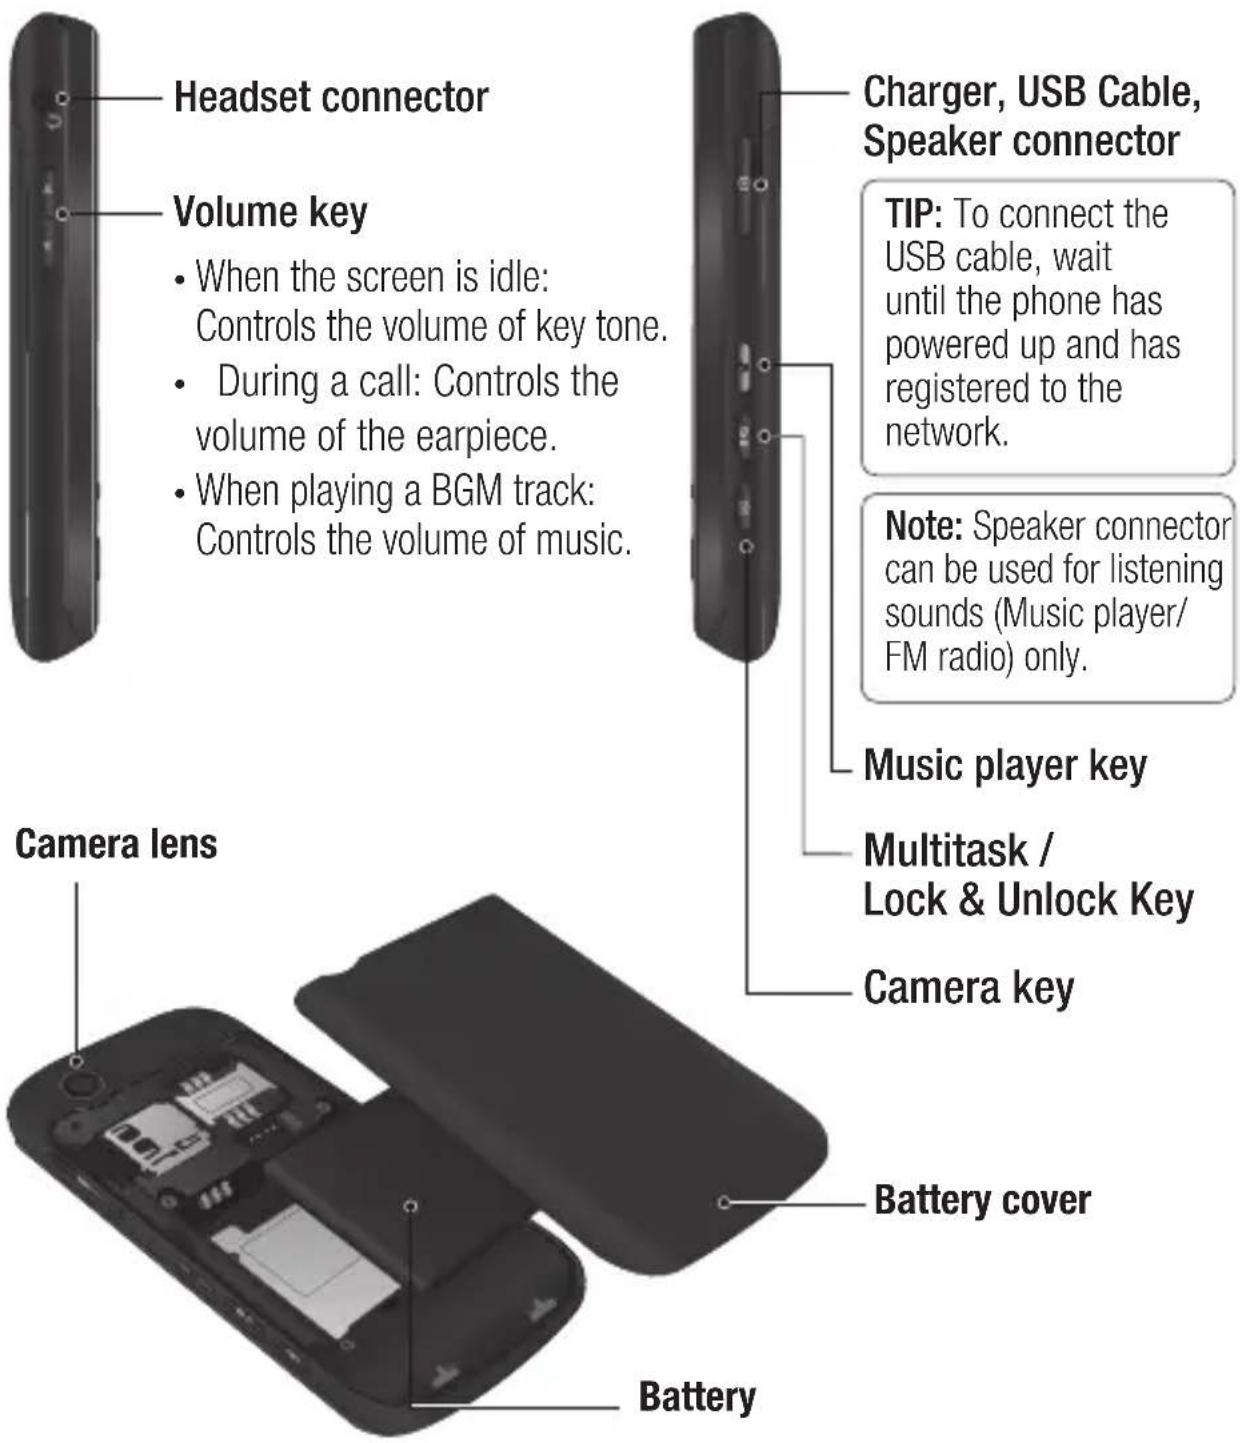
Headset connector Volume key • When the screen is idle: Controls the volume of key tone. • During a call: Controls the volume of the earpiece. • When playing a BGM track: Controls the volume of music. Camera lens Battery Charger, USB Cable, Speaker connector TIP: To connect the USB cable, wait until the phone has powered up and has registered to the network. Note: Speaker connector can be used for listening sounds (Music player/ FM radio) only. Music player key Multitask / Lock & Unlock Key Camera key Battery coverLG GM310 | User Guide12
Installing the USIM and battery
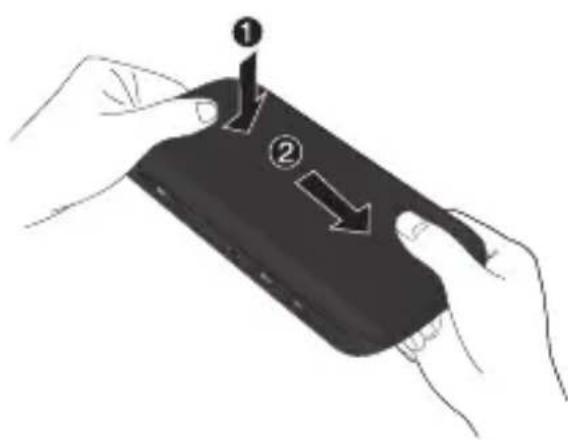
1 Remove the battery cover
Press the battery cover release latch. Slide the battery cover towards the bottom of the phone and away from it.
text_image
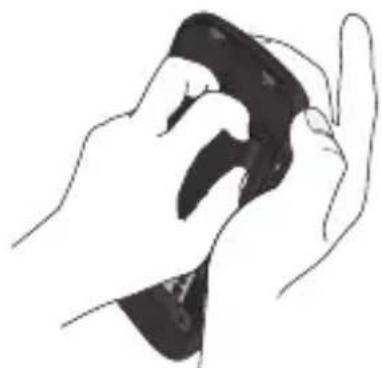
Diagram showing two hands holding a smartphone with labeled parts, including numbered arrows and numbered callouts.2 Remove the battery
Lever the bottom edge of the battery and remove it carefully from the battery compartment.
natural_image
Illustration of two hands holding a black object, possibly a game controller or device (no text or symbols visible)WARNING: Do not remove the battery when the phone is switched on, as this may damage the phone.
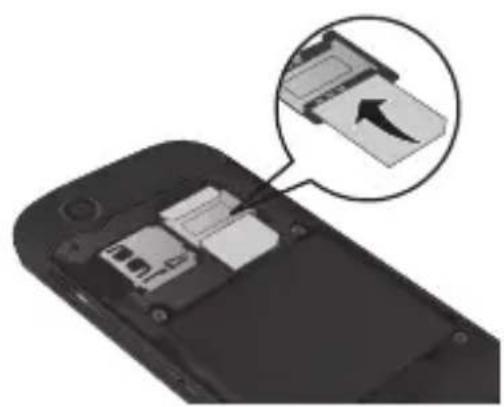
3 Install the USIM card
Slide the USIM card into the USIM card holder. Make sure that the gold contact area on the card is facing downwards. To remove the USIM card, pull it gently in the reverse direction.
WARNING: Do not replace or remove the USIM card while your phone is being used or turned on, or data may be lost or the USIM card might be damaged.
natural_image
Close-up of a black flip phone showing internal components and a magnified inset of the next fold (no text or symbols visible)Installing the USIM and battery
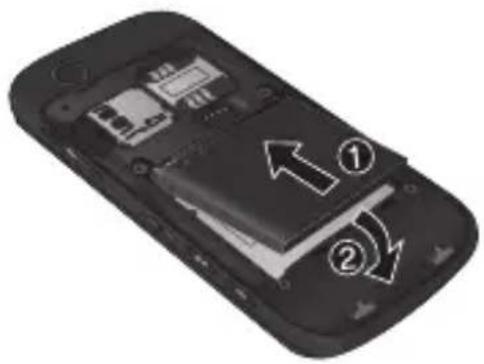
4 Install the battery
Insert the top of the battery first into the top edge of the battery compartment. Ensure that the battery contacts align with the terminals on the phone. Press down the bottom of the battery until it clips into place.
6 Charging your phone
Pull open the cover of the charger socket on the side of your GM310. Insert the charger and plug into a mains electricity socket. Your GM310 will need to be charged until a message reading "Battery full" appears on screen.
natural_image
Interior view of a smartphone showing internal components and arrows indicating movement or flow (no text or symbols present)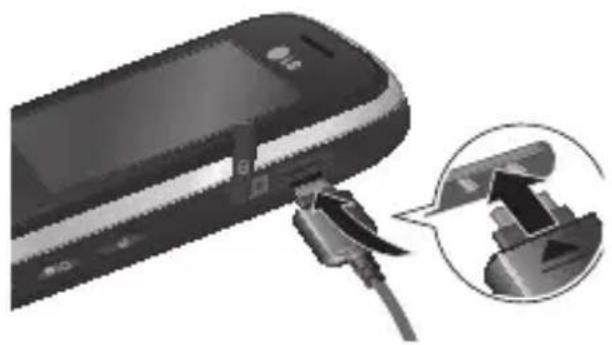
natural_image
Close-up of a handheld electronic device with a cable inserted, showing a close-up of its internal component (no text or symbols visible)5 Replace the battery cover
Slide the battery cover towards the top of the phone until it clicks into place.
Memory card
Installing a memory card
You can expand the memory available on your phone using a memory card.
TIP: A memory card is an optional accessory.
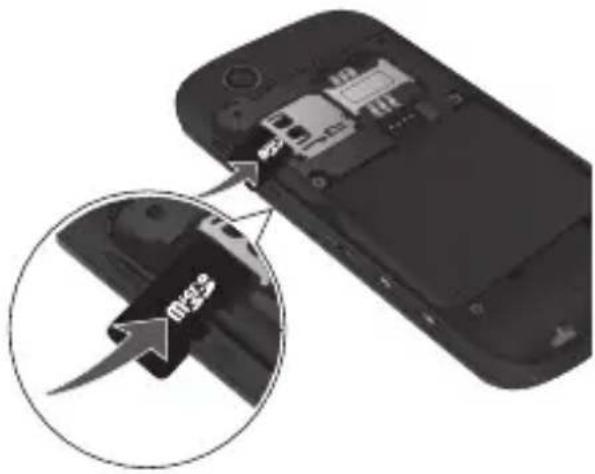
Remove the battery cover. Slide the memory card into the slot until it clicks into place. Make sure that the gold contact area is facing downwards.
natural_image
Close-up of a smartphone showing internal components and a close-up of the main body (no text or symbols visible)Removing a memory card
Remove the battery cover and carefully remove the memory card by gently pushing it in to the phone and quickly releasing it.
Formatting the memory card
Your memory card may already be formatted. If your memory card isn't formatted, you will need to format it before you can begin using it.
1 From the home screen press Menu then select Settings.
2 Choose Memory manager and select External memory.
3 Press Format and enter the password, which is set to 0000 as default. Your memory card will be formatted and ready to use.
4 To view the new formatted folders on your GM310 press Menu and select My stuff. Choose My memory card.
WARNING! When you format your memory card, all the content will be wiped. If you do not want to lose the data on your memory card, back it up first.
Menu map

Games & Apps
- My games & apps
- Settings

Calling
- Call logs
- Call durations
- Data volume
- Call costs
- Call divert
- Call barring
- Fixed dial numbers
- Call waiting
- Common settings

Organiser
- Calendar
- To do
- Memo
- Secret memo
- Date finder
- Settings

Contacts
- Add new
- Search
- Speed dials
- Groups
- Service dial numbers
- Own number
- My business card
- Settings

Messaging
- Create new message
- Inbox
- Mailbox
- Drafts
- Outbox
- Sent items
- My folders
- Templates
- Emoticons
- Settings

Multimedia
- Camera
- Video camera
- FM radio
- Voice recorder

Yahoo
- Yahoo! Go

MP3 Player
- All tracks
- Music Tea™
- Mix&Match™
- My playlists
- Artists
- Albums
- Genres
8.Shuffle tracks - Music ID
0.Easy file sorting

Tools
- Quick menu
- Alarms
- Calculator
- Stopwatch
- Converter
- World time

Browser
- Home
- Enter address
- Bookmarks
- RSS reader
- Saved pages
- History
- Settings

My stuff
- My images
- My sounds
- My videos
- Games & apps
- Flash contents
- Others
- My memory card

Settings
- Profiles
- Phone
- Screen
- Connectivity
- Date & Time
- Network
- Internet profiles
- Access points
9.Packet data conn.
0._Security
*.Memory manager
.Streaming settings
- Reset settings
Your home screen
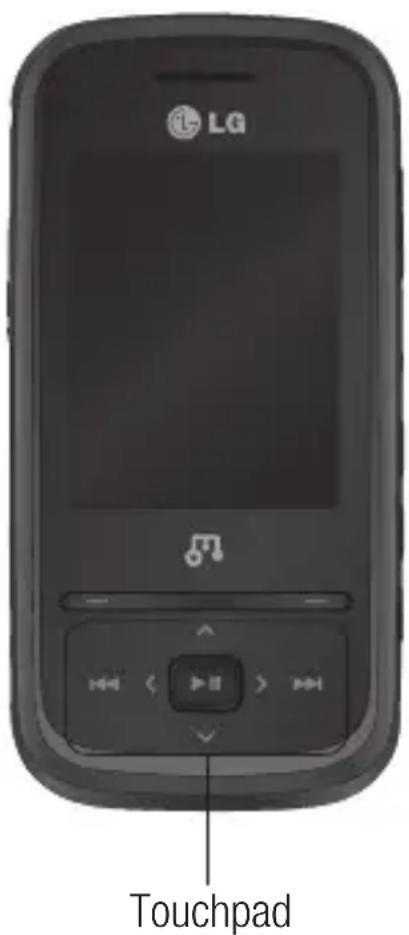
Your GM310 has a touchpad on the slide. You can determine what you see on the main screen using the touch keys.
Touchpad tips
- There's no need to press too hard, the touchpad is sensitive enough to pick up on a light touch.
- Use the tip of your finger to touch the option you require. Be careful not to touch any other keys around it.
- Don't cover the phone with a case or cover as the touchpad will not work with any material covering it.
- When the slide is closed or the screen light is off, to prevent indiscreet action of the touch keys, the touch protection function is automatically enabled. (In this case, the touch keys will not work even if they are pressed.) To disable touch protection, press and hold the lock key on the right hand side of the phone.
- When you enter an options menu, the touchpad will provide a four way arrow pad. Either touch the arrows to move through a menu one item at a time, or slide your finger across the touchpad in the direction you want to move.
text_image
LG TouchpadYour home screen
The status bar
The status bar uses various icons to indicate things like signal strength, new messages and battery life, as well as telling you whether your Bluetooth connection is active.
The table below explains the meaning of icons you're likely to see in the status bar.
| Icon Description | |
| Network signal strength(number of bars will vary) | |
| No network signal | |
| GPRS available | |
| EDGE available | |
| 3G available | |
| Flight mode is activated | |
| Calls are diverted | |
| Roaming service | |
| Bluetooth®is activated | |
| WAP service is connected | |
| Multitasking available | |
| An alarm is set | |
| Schedule | |
| New message | |
LG GM310 | User Guide18
| Icon Description | |
| New voice message | |
| New Email | |
| Normal profile in use | |
| Silent profile in use | |
| Outdoor profile in use | |
| Headset profile in use | |
| Remaining battery life | |
| Battery empty | |
| External memory | |
| FM radio | |
| MP3 music playing | |
Using the Multitasking function
Press the multitasking key to open the multitasking menu.
From here you can view all the applications you have running. You can also access them by using left/right key and selecting the center key without exiting or closing the application. (Some applications such as camera and video camera can not use the multitasking function.)
When you have an application running in the background, ✗ will appear in the status bar.
Calls
Making a call
1 Make sure your phone is on.
2 You can use the keypad after opening the slide. To delete a digit press 📄 or the back arrow.
3 Press 📞 to begin the call.
4 To end the call, press 📞 or slide the cover closed.
TIP! To enter + when making an international call, press and hold 0.
Making a call from your contacts
It's easy to call anyone whose number you have stored in your contacts.
1 Press Menu to open the main menu. Select Contacts, then select Search.
2 Using the keypad, enter the first letter of the contact you want to call and scroll to the contact.
3 Press 📞 to begin the call.
Answering and rejecting a call
When your phone rings, press Accept or press 📞 to answer the call.
While your phone is ringing you can press Silent to mute the ringing. This is useful if you have forgotten to change your profile to silent for a meeting.
Press 📞 or select Reject in order to reject an incoming call.
Speed dialling
You can assign a speed dial number to a contact you call frequently.
1 Press Menu to open the main menu. Select Contacts, then select Speed dials.
2 Your voicemail is preset to speed dial 1 and you cannot change this. Select any other number either by using the navigation keys and selecting Add or by pressing the hard key number.
Calls
3 Your contacts will open. Select the contact you'd like to assign to that number using the navigation keys then select OK.
To call a speed dial number, press and hold the assigned number until the contact appears on screen. The call will begin automatically and there is no need to press 📞.
Viewing your call logs
Press Menu and select Calling. Choose Call logs.
All calls - View a complete list of all your dialled, received and missed calls.
Missed calls - View a list of any calls you have missed.
Dialled calls - View a list of all the numbers you have called.
Received calls - View a list of all the numbers that have called you.
TIP! From any call log select Options and then Delete to delete selected items.
Using call divert
1 Press Menu and select Calling.
2 Select Call divert.
3 Choose whether to divert all calls, when the line is busy, when there is no answer, when you are out of reach.
4 Choose Activate and select whether to divert to voice mail, or to other number.
5 Enter your divert number or select Search to browse Contacts for your divert number.
Note: Charges are incurred for diverting calls. Please contact your network provider for details.
TIP! To turn off all call diverts, choose Deactivate all from the Call divert menu.
Using call barring
1 Press Menu and select Calling.
2 Select Call barring.
3 Choose any or all of the options:
All outgoing
Outgoing international
Outgoing international calls
except home country
All incoming
Incoming when abroad
Deactivate all
4 Enter the call barring password. Please check with your network operator for this service.
TIP! Select Fixed dial numbers from the Calling menu to turn on and compile a list of numbers which can be called from your phone. You'll need your PIN2 code from your operator. When activated, only numbers included in the fixed dial list can be called from your phone.
Changing the call settings
1 Press Menu and select Calling.
2 From here you can amend the settings for:
Call durations - View details of how long you have spent on your calls both received and dialled.
Data volume - View the amount in kilobytes of all your received and sent data.
Call costs - View the charges applied to your last call or all calls. This service is network dependent, some operators are unable to support this.
Call divert - Choose whether to divert your calls.
Call barring - Select which calls you would like to be barred.
Fixed dial numbers - Choose a list of numbers that can be called from your phone.
Call waiting - Be alerted when you have a call waiting.
Calls
Common settings
Call reject - Select Off or On and choose to reject all calls, those from specific groups, contacts, unregistered numbers (those not in your list of contacts) or those with no caller ID.
Send my number - Choose whether your number will be displayed when you call someone.
Auto redial - Allows you to set the auto redial function when a call attempt has failed.
Answer mode - Allows you to set the answering method. You can choose from Press send key, Slide up or Press any key.
Minute minder - Determines whether to sound a tone every 1 minute when you are on the phone.
BT answer mode - Choose how to answer a call when using a Bluetooth headset. Select Hands-free or Handset.
Save new number - Selecting this option will save numbers that are not already in your contacts upon ending the call.
Slide close setting - Set whether or not a call is ended upon closing the slide.
Contact
Searching for a contact
1 Press Menu and select Contacts then choose Search.
2 Using the keypad enter the first letter of the name of the contact you want to call.
3 To scroll through the contacts and their different numbers use the navigation keys.
Or, using the slightly quicker method...
1 Enter the number you wish to search on the home screen and select Options.
2 Choose Search contacts in option menu.
Adding a new contact
1 Press Menu and select Contacts then choose Add new.
2 Choose whether to store your new contact on your Handset or USIM card.
3 Enter the information you want in the fields provided and select Done.
Or to use a slightly quicker method...
1 Enter the number you wish to store and press Options.
2 Choose Save number, and choose either New contact or Update contact.
3 Enter the relevant information and select Done.
Contact options
There are many things you can do when viewing a contact. Here's how to access and use the options menu.
1 Press Menu and select Contacts then choose Search.
2 Select Options to open the list of options. From here you can:
Send message - Send a message to the contact. If the contact has an email address, select whether you'd like to send a Message or Email.
Send business card - Send the contact's details to another person as a business card. Choose to send as a Text message, Multimedia message, Email or via Bluetooth.
Contact
Make call - Directly make voice call to a contact you choose.
Add new contact - Add a new contact.
Edit - Change any of the contact's details.
Add to group - Add a contact to a group.
Mark/Unmark - Choose whether to mark a contact or unmark.
Search by - Search a contact by Number or Group.
Save to USIM - Choose to move or copy to the USIM card or phone (depending on where you originally saved the contact).
Delete - Delete the contact. Select Yes only if you are sure.
Text input -You can insert symbol a contact, change writing method or language and add a word to dictionary.
Speed dials - You can assign a frequently-called contact to a speed dial number.
Creating a group
1 Press Menu and select Contacts.
2 Select Groups and choose Options.
3 Select Add new group.
4 Enter a name for your new group.
5 Press Done.
Note: If you delete a group, the contacts which were assigned to that group will not be lost. They will remain in your contacts.
TIP! You can edit an existing group by highlighting it and selecting Options. Choose to Add member to the group from your contacts, select Edit group and assign a Group ringtone, Rename the group or Delete the group.
Using service dial numbers
You can view the list of Service Dial Numbers (SDN) assigned by your service provider (if supported by the USIM card). Such numbers include emergency, directory enquiries and voicemail numbers. After selecting a service number, press 🔔 to dial that service.
Viewing your own number
Select Own number in the Contacts menu to view your number.
Creating a business card
You can create your own business card by selecting My business card, then Add. Enter your name, number, email address, image and etc.
Changing your contact settings
1 Press Menu and select Contacts.
2 Select Settings. From here you can adjust the following settings:
Contact list settings - Choose whether to view contacts saved to both your Handset & USIM, Handset only or USIM only. You can also select to show the first name or last name of a contact first, and to show a contact picture.
Copy - Copy your contacts from your USIM card to your handset or from your handset to your USIM card. Choose to do this one by one, or all together.
Move - This works in the same way as Copy, but the contact will only be saved to the location you've moved it to. If you move a contact from the USIM card to the handset it will be deleted from the USIM card memory.
Send all contacts via Bluetooth
- Send all contacts information to another handset by Bluetooth.
Backup contacts - You can save all the phonebook data in the handset to an external memory card by the form of vcard.
Restore contacts - You can restore all the phonebook data in an external memory card to the phone memory by the form of vcard.
Clear contacts - Delete all your contacts.
Memory info. - You can check how much memory you've got left on your handset or your USIM card.
Messaging
Messaging
Your GM310 includes functions related to SMS (Short Message Service), MMS (Multimedia Message Service) as well as the network's service messages. To use these functions, press Menu and select Messaging.
Sending a message
1 Press Menu, select Messaging and choose Create new message.
2 Choose Message to send an SMS or MMS.
3 A new message editor will open. Message editor combines SMS and MMS in one intuitive mode that is easy to switch between. The default setting of the message editor is SMS mode.
4 Enter your message using the keypad. See Entering text on the right for more information on how to enter text.
5 Select Options and choose Insert to add an Image, Video, Sound, Symbols, Template, Emoticon, Name & Number, New slide, Subject or More (Business card/Schedule/Memo/To do/My business card).
6 Choose Send.
7 Choose a contact from the list of contacts or enter the phone number.
8 Select Send.
WARNING: Image, Sound, Video, New slide, Subject, Business card, Schedule or My business card is added to the message editor, it will be automatically converted to MMS mode and you will be charged accordingly.
Entering text
You can enter alphanumeric characters using the phone's keypad. For example, storing names in contacts, writing a message and creating scheduling events in the
calendar all require entering text. The following text input methods are available in the phone: T9 mode, Abc mode, and 123 mode.
Note: Some fields may allow only one text input mode (e.g. telephone number in contact fields).
Text input mode using the keypad
When you want to enter text, for example when writing a message, the keypad will default to T9 mode. If you are entering a number, for example when making a call, the keypad number keys will default to numbers.
Setting up your email
You can stay in touch on the move using email on your GM310. It's quick and simple to set up a POP3 or IMAP4 email account.
1 Press Menu, select Messaging and choose Settings.
2 Select Email and choose Email accounts.
3 Select Add and follow the pop up instruction and enter the information required.
Sending an email using your new account
To send/receive an email, you should set up an email account (see above).
1 Press Menu, select Messaging and choose Create new message.
2 Choose Email and a new email window will open.
3 Write a subject line then press OK.
4 Enter your message using the keypad.
Retrieving your email
1 Press Menu and select Messaging then choose Mailbox.
2 Select the account you want to use.
3 Choose Retrieve and the phone will connect to your email account and retrieve your new messages.
Messaging
Message folders
Press Menu and select Messaging. The folder structure used on your GM310 should be self-explanatory.
Create new message - Create your new message.
Inbox - All the messages you receive are placed into your Inbox. From here you can reply, forward and more.
Mailbox - All the mails you receive are placed into your Mailbox.
Drafts - If you don't have time to finish writing a message, you can save what you have written so far in here.
Outbox - This is a temporary storage folder used while messages are being sent.
Sent items - Copies of all the messages you send are kept into your Sent folder.
My folders - You can move messages of Inbox or Sent items into My folders. Also you can move those messages of My folders into the original message box. LG GM310 | User Guide28
Templates - A list of pre written useful messages, useful for a quick reply.
Emoticons - You can add, edit and delete emoticons. You can insert the emoticon which you preferred on writing a message.
Managing your messages
1 Press Menu, select Messaging and choose Inbox.
2 Select Options and then choose to:
Reply - Send a reply to the selected message.
Forward - Send the selected message on to another person.
Make call - Call the person who sent you the message.
Save number - Save the number of the message.
Delete - Delete the selected message.
Create new message - Write a new message or email regardless who sent you message.
Mark/Unmark - Mark a message or all.
Copy&Move - Choose to copy or move the selected message to the USIM card or phone.
Filter - Displays messages by desired message types.
Message info - You can check the of its type, subject, where it is from, and its date.
If you see the message No space for USIM message, you should delete some messages from your inbox to create space.
If you see the message No space for messages, you can delete either messages or saved files to create more space.
TIP! When you receive the message, you can reply quickly by using Quick reply function. While you see the message, press Options and select Quick reply. This is useful if you need to reply the message during a meeting.
TIP! While you see the message, press Options and select Extract. You can extract the information such as a number, email address or web address from the selected message.
Changing your text message settings
Press Menu, select Messaging, then choose Settings and Text message. You can make changes to:
Text message centre - Enter the details for your message centre.
Delivery report - Choose to receive confirmation that your message have been delivered.
Validity period - Choose how long your messages are stored at the message centre.
Messaging
Message types - Convert your text into Voice, Fax, X.400 or Email.
Character encoding - Choose how your characters are encoded. This affects the size of your message and therefore data costs.
Send long text as - Choose whether to send your message as SMS or MMS when you enter a text longer than 2 pages in the message field.
Changing your multimedia message settings
Press Menu, select Messaging, then choose Settings and Multimedia message. You can make changes to:
Retrieval mode - Choose to automatically or manually download multimedia messages depending on whether you are at home or roaming.
Delivery report - Choose to request or allow a delivery report.
Read reply - Choose to request or allow a read reply.
Priority - Choose the priority level of your multimedia message.
Validity period - Choose how long your message is stored at the message centre.
Slide duration - Choose how long your slides appear on screen.
Creation mode - Allows you to select the contents type supported by MMS.
Delivery time - Configures the delivery time of message to the recipient. The multimedia message centre will deliver the message after the delivery time.
Multi msg centre - Allows you to configure network information such as the multimedia service center and the Internet profile, to send a multimedia message.
Changing your email settings
1 Press Menu, select Messaging and choose Settings.
2 Select Email then you can adapt the following settings:
Email accounts - You can set up an email account.
Allow reply email - Choose to allow the sending of ‘read confirmation’ messages.
Request reply email - Choose whether to request read confirmation messages.
Retrieve interval - Choose how often your GM310 checks for new email messages.
Retrieve amount - Choose the number of emails to be retrieved at any one time.
Include message in fwd & reply - Choose whether or not to include the original message.
Include attachment - Choose whether or not to include the original attachment.
Auto retrieval in roaming - Choose whether or not to automatically retrieve your messages when abroad.
New email notification - Choose whether or not to be alerted to new emails.
Signature - Create an email signature and switch this feature on.
Priority - Choose the priority level of your email messages.
Changing your other settings
Press Menu, select Messaging, and choose Settings then:
Voicemail - Add a new voicemail service. Contact your network operator for more information on the service they provide.
Service message - Choose to receive or block service messages. You can also set your message security by creating trusted and untrusted lists of senders.
Info. service - Choose the reception status, channels and language of your info messages.
Camera
Taking a quick photo
1 Press 🔑 to open the viewfinder.
2 Holding the phone horizontally, point the lens towards the subject of the photo.
3 Press 📷 to take a photo.
After you've taken your photo
Your captured photo will appear on the screen. The following options are available:
Back - Go back to previous menu.

Album - View the pictures you have taken in your album.

Send - Send the photo as MMS, email or via Bluetooth.

New image - Take another photo straight away. Your current photo will be saved.

Use as - Set the image you have just taken as wallpaper, a contact image or in your start-up/shut down screen. (Contact image can only be added to contacts saved to your phone, not your USIM card.)
LG GM310 | User Guide32

Delete - Delete the photo you have just taken. The viewfinder will reappear.
Options - You can change the name of the image or edit the image file.
Using the quick settings
From the viewfinder use navigation keys and select the options you would like to use.
Album - Choose to look at the other images in your album.
Video - Choose to switch from camera to video camera mode.
Capture - Allows you to take a picture.
Brightness - Set the brightness of the image in the viewfinder of the camera.
Zoom - Adjust the zoom using the volume key on the left side of your phone. The zoom function is only available when the image size is set to 640x480 or below.
Using the advanced settings
From the viewfinder select Settings to open all the advanced settings options. Use the navigation key to navigate through the options.
Image size - Change the size of the photo.
Colour effect - Choose a colour tone to apply to the photo you're taking.
White balance - The white balance ensures that any white in your photo is realistic. In order for your camera to correctly adjust the white balance you may need to determine the light conditions. Choose from Auto, Incandescent, Sunny, Fluorescent or Cloudy.
Night mode - You can take better pictures at night by selecting On.
Timer - The self-timer allows you to set a delay after the capture button is pressed. Choose from 3 seconds, 5 seconds or 10 seconds. Great for a group photo that you want to be part of.
Shot mode - Choose from Normal or Burst shot. Burst shot lets you to take up to 3, 6, 9 shots automatically in very quick succession, great for taking photos of moving objects or at sporting events.
Image quality - Controls the quality of image. The finer the quality the sharper a photo will be, but the file size will increase. This means you'll be able to store fewer photos in your memory.
< Others >
Memory in use - Choose whether to save your photos to the handset memory or to the external memory.
Hide icons - Hide the icons to the side of the viewfinder.
Shutter sound - Select one of three different shutter sounds.
Note: Always press Select after selecting a new setting to implement the changes you've made. The settings menu will automatically close, ready for you to take your picture.
Camera
Adjusting the brightness
Contrast defines the difference between light and dark in an image. A low contrast image will appear foggy, whereas a high contrast image will appear much sharper.
1 Select Brightness in the quick settings.
2 Slide the contrast indicator along the bar, towards “−” for a lower contrast, hazier image or towards “+” for a higher contrast, sharper image.
Changing the image size
The more pixels, the larger the file size, which in turn means they will take up more of your memory. If you want to fit more pictures on your phone or memory card you can alter the number of pixels to make the file size smaller.
1 Select Image size in Settings.
2 Select a pixel value from the numerical options: 2048x1536, 1600x1200, 1280x960, 640x480, 320x240.
Viewing your saved photos
1 You can access your saved photos from within the camera mode by selecting Album. Your album will appear on the screen.
2 Highlight the photo you want to view to bring it to the front of the album.
3 Select the photo to open it fully.
Video camera
Shooting a quick video
1 Press and hold 📄 to open the viewfinder.
2 Focus the camera on what to record.
3 Press once to start recording.
4 Rec will appear at the bottom of the viewfinder. Press 📄 again to stop recording.
After you've shot your video
A still image representing your captured video will appear on screen. The following options are available:
Back - Go back to previous menu.

Album - Press to look at the other video clips in your album. Your current video clip will be saved.

Play - Press to play the video you have just recorded.

New video - Press to shoot another video straight away. Your current video will be saved.
Send - Send the video as MMS, as an email or via Bluetooth.
Delete - Delete the video you have just recorded. The viewfinder will reappear.
Options - You can change the name of the video clip.
Using the quick settings
From the viewfinder use navigation keys and select the options you would like to use.
Album - Choose to look at the other videos in your album.
Camera - Choose to switch from video camera to camera mode.
Rec - Allows you to record a video.
Brightness - Set the brightness in the viewfinder of the video camera.
Using the advanced settings
From the viewfinder select Settings to open all the advanced settings options. Use the navigation key to navigate through the options.
Video camera
Size - Change the size of the video.
Color effect - Choose an effect tone to apply to the video you're recording.
White balance - The white balance ensures that any white in your photos is realistic. In order for your camera to correctly adjust the white balance you may need to determine the light conditions. Choose from Auto, Incandescent, Sunny, Fluorescent or Cloudy.
Quality - Controls the quality of video.
Duration - Select the maximum length of the recording.
< Others >
Memory in use - Choose whether to save your videos to the handset memory or to the external memory.
Hide icons - Hide the icons to the side of the viewfinder.
Voice - Choose Mute to record a video without sound.
Note: Always press Select after selecting a new setting to implement the changes you've made.
Watching your saved videos
1 You can access your saved videos from within the video camera mode by selecting Album. Your album will appear on screen.
2 Highlight the video you want to view to bring it to the front of the album.
3 Select the video to open it fully.
MP3 Player
MP3 Player
Your GM310 has a built-in music player so you can play all your favourite music.
Note:
- Before using music player, you will need to transfer music file onto your phone.
- If you transfer playlists (songs you’ve organized into lists) to your phone by using the Music Sync application, you can also browse for songs in playlists of Music Tea, Mix & Match and More like this.
- Music player supports codec types as follows: MP3, WMA, AAC, M4A, and RA. Music player does not necessarily support all features and variations of file formats.

gracenote.
Music recognition technology and related data are provided by Gracenote®. Gracenote is the industry standard in music recognition technology and related content delivery. For more information, visit www.gracenote.com.
CD and music-related data from Gracenote, Inc., copyright © 2000-2007 Gracenote. Gracenote Software, copyright © 2000-2007 Gracenote. This product and service may practice one or more of the following U.S. Patents: #5,987,525; #6,061,680; #6,154,773, #6,161,132, #6,230,192, #6,230,207, #6,240,459, #6,304,523, #6,330,593, #7,167,857 and other patents issued or pending.
Gracenote and CDDB are registered trademarks of Gracenote. The Gracenote logo and logotype, and the “Powered by Gracenote” logo are trademarks of Gracenote.
MP3 Player
To access the music player, press Menu and select MP3 Player. Or, you can access the music player by lightly pressing the music player key
on the right hand side of the handset. From here you can access to:
Now playing - Only appears when music is playing. When you select this, you can go back to the on-going player.
All tracks - Contains all of the songs you have on your phone.
MusicTea™ - MusicTea contains 9 tea bags which consists of music files with different characteristics. Each tea bag is matched with a music genre.
Mix&Match™ - Mix&Match™ contains 6 categories which let you enjoy the variety of playlists according to the activities and situations. You can make and manage your playlist with songs to listen to while exercising, or playlist with songs for a particular mood such as romantic. By using More Like This ^TM feature of Music Sync, you can organize songs into each category.
My playlists - Contains any playlists you have created as well as Most played, Top rated More like this and On the go
Artists - Allows you to view all tracks sorted by artist.
Albums - Allows you to view all tracks sorted by album.
Genres - Allows you to view all tracks sorted by genre.
Shuffle tracks - Allows you to play all of the songs in random order.
Music ID - Music ID ^™ is an application which uses the onboard microphone to analyze a song sample and then compare it to a remote database of songs. Once the application completes the analysis of the song sample, it provides you with the name of the song, artist and album.
Easy file sorting - Shows all of the music file folders. From here you can see all of the music file available in your phone and compatible memory card (if inserted).
TIP! Before enjoying the playlists such as More Like This/Mix&Match™/MusicTea™, you will need to transfer MP3 files from your PC to your device. You can download new songs to your GM310 using the Music Sync application in the bundled LG PC Suite CD.
Those songs get an additional feature called More Like This™, which allows you to generate one-press automatic playlists composed of similar songs, according to the title of the album or artist, or the mood of the music. These special playlists are saved in Playlist in a folder called More Like This, or saved in Mix&Match™/MusicTea™. You can enjoy these playlists as you like.
Transferring music onto your phone
The easiest way to transfer music onto your phone is via Bluetooth or sync cable.
To transfer music using Bluetooth:
1 Make sure both devices have Bluetooth switched on and are visible to one another.
2 Select the music file on the other device and choose to send it via Bluetooth.
3 When the file is sent you should to accept it on your phone by selecting Yes.
4 The file should appear in All tracks.
Playing a song
1 Press Menu and select MP3 Player.
2 Choose All tracks then select the song you want to play. Select ▶.
3 Select Ⅱ to pause the song.
4 Select ▶ to skip to the next song.
5 Select 🏠 to skip to the previous song.
MP3 Player
6 Select Back to stop the music and return to the All tracks menu.
TIP! To change the volume while listening to music, use the volume keys on the left hand side of your phone.
TIP! If you press the music player short key while playing music, you can use BGM mode. In BGM (Background Music) mode music can be played while other functions are being used. BGM can be stopped on the music player screen.
Using options while playing music
Select Options and choose from:
Minimize - Hide the music player screen so that you can continue using your phone as normal while music is playing.
Add to playlist - Adds the current track to a playlist.
Set as ringtone - Set the current track as your ringtone.
Rating - Select and rate the current track by the number of stars.
LG GM310 | User Guide40
Information - You can view information about the music file you are listening to.
Music timer - You can set your phone to stop playing music after a period of time.
Settings - You can set up various functions such as shuffle, repeat, audio effect, list/full screen player, visualization and album image.
Viewing your playlist
1 Press Menu and select MP3 Player.
2 Select Playlist and choose from:
Most played - The mostly played 20 tracks are shown.
Top rated - The high rated 20 tracks are shown. If there is no rating track, no file is shown.
More like this - The playlist related with More Like This™ feature.
On the go - If you add the track to ‘On the go’ playlist, choose the track in the list of All tracks, press and hold OK key.
TIP! More Like This™ Automatic Playlists
More Like This™ allows you to generate one-press automatic playlists composed of similar songs, according to the title of the album or artist, or the mood of the music. You can enjoy and manage these playlists as you like.
Creating a playlist
1 Press Menu and select MP3 Player.
2 Choose Playlist.
3 Press Options and select Add new playlist, enter the playlist name and press Save.
4 The new playlist folder will show. Select all of the songs that you would like to include in your playlist by scrolling to them and pressing a tick will show next to the track name. If you accidentally add a song you don't want, select it and press again to untick it.
5 Press Done to store the playlist.
Search for song information with Music ID™
With Music ID, you can find out information of song you want to know. Choose the following features of Music ID:
TagMusic™ - When you hear a song you like but you don't know what it's called, select TagMusic™ feature and record a few second of the audio from an external music source. After complete the record, it automatically links to the Music ID recognition server. Once a song has been identified through Music ID recognition service, you will receive the relevant information of the song.
TagRadio - TagRadio is a feature that helps you find information about the unknown song you hear on the built-in FM radio. During listening to the FM radio, you can select 'Record' to record a short music clip and save it. If you have radio recording files, select file and send it to the Music ID recognition server. Once a song has been identified through Music ID recognition service, you will receive the relevant information of the song.
MP3 Player
TagSong - With TagSong feature, you can add the information on ID3 tag of MP3 files you have. If you send the MP3 file to the Music ID recognition server, you will receive the information of MP3 file such as the name of a song, artist, album and genre, etc, if available. It will provide many benefits to you to better manage and enjoy your music collections.
Note:
- For best results, please use Music ID ^TM feature in a quiet environment.
- An additional cost is incurred when connecting to the service and transmitting data. Check your data charges with your service provider.
- The music record as a WAV format and not saved to your phone.
- If music identification is impossible, ask you whether to retry or not.
- The results of TagMusic/TagRadio will be saved on Tag-history if you select 'Save' option after received the result.
Note: As a result of the Digital Rights Management (DRM) system, some of the media items you download from the Internet or receive by MMS may have a “Get License” menu to access them. You can acquire the key to purchase the right from the website which owns the rights to the contents. Music is copyright protected in international treaties and national copyright laws. It may be necessary to obtain permission or a licence to reproduce or copy music. In some countries national law prohibits private copying of copyrighted material. Please check the national legislation of the applicable country concerning the use of such material.
Multimedia
Using the FM radio
Your GM310 has an FM radio feature so you can tune into your favourite stations to listen on the move.
Note: You will need to insert your headset in order to listen to the radio. Insert the plug into the headset connector.
Searching for stations
You can tune radio stations into your phone by searching for them either manually or automatically. They will then be saved to specific channel numbers so you don't have to keep re-tuning.
To auto tune:
1 Press Menu and select Multimedia, then choose FM radio.
2 Select Option and choose Auto scan then select Yes.
3 Available radio stations will be automatically found and allocated to a channel in your phone.
To manually tune:
1 Press Menu and select Multimedia, then choose FM radio.
2 To enter your station, you can use the navigation key to search or you can enter the frequency using the keypad, then select Set.
3 Select a channel number that you want to save a station to and choose Select.
Note: You can also edit the stations you have saved in a channel number.
TIP! To improve the reception extend the headset cord, which functions as the radio antenna.
Multimedia
Reset all channels
1 Press Menu and select Multimedia, then choose FM radio.
2 Select Options and select Reset all channels. Choose Yes to confirm the reset. Each channel will return to the starting 87.5Mhz frequency.
Listening to the radio
1 Press Menu and select Multimedia, then choose FM radio.
2 Select the channel number of the station you would like to listen to.
Note: You can listen to the radio via built-in speaker. Press Options, select Listen via speaker.
Recording your radio
During listening to the FM radio, you can select Record to record a short clip and save it. You can listen to all of the radio recordings you have saved by selecting Options and Go to Radio recordings. You can also view the saved recordings in the My stuff> My memory card > Sounds > Radio recordings folder.
Note:
- If you do not have a memory card inserted, you will not be able to select Record option in FM Radio menu.
- Please note, if you do not have enough space in your internal memory (smaller than 10 MB), you can not record a clip and save file. You can record a radio clip when you have enough spaces in both internal memory and external memory.
TIP! If you have saved radio recordings in your memory card, you can select the clip and set it as a ringtone. You can also select the part of clip you want to use and create a new ringtone. Select a radio recording file and choose Options > File > Edit. Use Cut and save a file to My stuff > My sounds folder.
Using the Voice recorder
Use your Voice recorder to record voice memos or other sounds.
Recording your voice memo
1 Press Menu and select Multimedia, then choose Voice recorder.
2 Press the center soft key to begin recording.
3 Choose Stop to end the recording.
4 Press Options and select Play to listen to the recording.
Note: You can listen to all of the voice recordings you have saved by selecting Options and Go to Voice recordings.
Sending a voice recording
1 Once you have finished recording, select Options.
2 Select Send and choose from Message, Email or Bluetooth. If you choose Message or Email, the recording will be added to the message and you can write and send it as normal. If you choose Bluetooth, you will be prompted to turn Bluetooth on.
My stuff
You can store any multimedia files on your phone's memory in My stuff so that you have easy access to all of your pictures, sounds, videos and games. You can also save your files to a memory card. The advantage of using a memory card is that you can free up space on your phone's memory.
Images
My images contains a list of pictures including default images pre-loaded onto your phone, images downloaded by you and images taken on your phone's camera.
Sending a photo
1 Press Menu and select My stuff then choose My images.
2 Select the photo you want to send and press Options.
3 Select Send and choose from Message, Email or Bluetooth.
4 If you choose Message or Email, your photo will be attached to the message and you can write and send the message as normal. If you choose Bluetooth, you will be prompted to turn Bluetooth on and your phone will search for a device to send the picture to.
Using an image
You can choose images to use as wallpapers, start up/shut down images or even to identify a caller.
1 Press Menu and select My stuff then choose My images.
2 Select the image and choose Options.
3 Select Use as and choose from:
Wallpaper - Set a wallpaper for the home screen.
Contacts image - Allocate an image to a particular person in your contacts list so that the picture shows when they call you.
Start-up - Set an image to appear when you switch the phone on.
Shut down - Set an image to appear when you switch the phone off.
Organising your images
1 Press Menu and select My stuff, then choose My images.
2 Select Options and choose Sort by.
3 Choose from Date, Type or Name.
Deleting an image
1 Press Menu and select My stuff, then My images.
2 Select the image you want to delete and press Options.
3 Select Delete and choose Yes to confirm.
TIP! To quickly delete any file in My files, highlight it with the cursor and press the □ key.
Moving or copying an image
You can move or copy an image between the phone memory and the memory card. You might want to do this to either free up some space in one of the memory banks or to safeguard your images from being lost.
1 Press Menu and select My stuff then choose My images.
2 Select an image and press Options.
3 Select Move or Copy.
Marking and unmarking images
If you want to move, copy, send or delete several images at once, you first need to identify them by marking them with a tick.
1 Press Menu and select My stuff then choose My images.
2 Select Options and choose Mark/Unmark.
3 A box will appear to the left of each image. If you select an image, a tick will appear in the box marking it.
My stuff
4 To unmark an image, select the image again so that the tick disappears from the box.
5 Once you have marked all of the appropriate images, choose one of the options to apply to all of them.
Checking your memory status
You can check to see how much of your memory you have used and how much you have remaining.
1 Press Menu and select My stuff, then choose My images.
2 Select Options and choose Memory info.
3 Choose Handset memory or External memory.
Note: If you do not have a memory card inserted, you will not be able to select External memory.
Sounds
The My sounds folder contains the Default sounds and Voice recordings.
Using a sound
1 Press Menu and select My stuff, then choose My sounds.
2 Select Default sounds or Voice recordings.
3 Select a sound and press Play to listen to it.
4 Select Options and choose Use as.
5 Choose from Voice ringtone, Message tone, Start-up sound or Shut down sound.
Videos
The My videos folder shows the list of downloaded videos and videos you have recorded on your phone.
Watching a video
1 Press Menu and select My stuff then choose My videos.
2 Select a video and press Play.
Sending a video clip
1 Press Menu and select My stuff then choose My videos.
2 Select a video and choose Options.
3 Select Send and choose from Message, Email or Bluetooth.
4 If you choose Message or Email, your video clip will be attached to the message and you can write and send the message as normal. If you choose Bluetooth, you will be prompted to turn Bluetooth on and your phone will search for a device to send the video to.
Note: The video may need to be resized before it can be sent by MMS. Some videos may be too large to send by MMS at all.
Games and Applications
You can download games and applications to your phone to keep you amused when you have time to spare.
If you download a game from the network, you will need to install the downloaded game in your phone before enjoying the game.
Playing a game
1 Press Menu and select My stuff, then choose My games & apps.
2 Select Games menu.
3 Select a game and press Launch.
Using the games options menu
From the Games and Applications folders, the following options are available:
Create new folder - Create a folder within the games and applications menu.
Sort by - Sort the games and applications by Date, Size or Name.
Memory manager - View the memory status.
My stuff
Flash contents
The Flash contents folder contains all of your default and downloaded flash contents.
Others
The Others folder is used to store files which are not pictures, sounds, videos, games or applications.
My memory card
If you purchase an optional external microSD memory card, you can manage more content.
Installing a Java game & application
Depending on the service provider, all Java based programs such as Java games can be downloaded and run on your phone. You can transfer Java program files from a compatible PC to the memory in your phone using the Bluetooth, USB mass storage or external memory. The Java program files are in .jad or .jar format.
If you save the Java program files in your phone, you should install the files before using a Java game or application first.
To install a Java game & application:
1 Press Menu and select My stuff, then choose Others or My memory card (If external memory is inserted).
2 Select the file (*.jad or *.jar) you want to install and press Install.
Note: The .jad file should contain its own .jar file.
3 Once installed, the Java program can be viewed in the Games or Applications menu where you can select, execute, or delete.
TIP! You can also download Java MIDlet in your phone by using the WAP (Wireless Application Protocol) services. Please note that additional costs may be incurred when using online services.
Games & Apps
Games & Apps
Your GM310 comes with preloaded games to keep you amused when you have time to spare. If you choose to download any additional games or applications they will be saved into this folder.
Note: An additional cost is incurred when connecting to this service. Check your data charges with your network provider.
Playing a game
1 Press Menu and select Games & Apps.
2 Select My games & apps and choose Games.
3 Choose the game you want to play and select Launch.
Viewing applications
You can manage the Java applications installed in your phone by using the Applications menu. You can also delete downloaded applications.
1 Press Menu and select Games & Apps.
2 Select My games & apps and choose Applications.
3 View and manage any applications you have.
Changing the network profile
To download a game, you can set the value to connect to the network using Settings.
1 Press Menu and select Games & Apps.
2 Select Settings.
3 From here you can:
Profiles - You can see profile and add new profile.
Certificates list - You can see the certification list for using Java application.
Organiser & Tools
Adding an event to your calendar
1 Press Menu and select Organiser, then choose Calendar.
2 Select the date you would like to add an event to. You can choose a date either by scrolling to it using the navigation keys or by selecting Options and Go to date in order to enter a date.
3 Select Add new and scroll down to enter the time you would like your event to begin. Scroll down and enter the end time of your event.
4 Enter a Subject for the event. Use the keypad to type letters and numbers.
5 Scroll down again and choose whether you would like to set an Alarm for the event. Scroll left or right to see the available options. You can set the alarm to go off at the starting time of the event or at a set period of time before the event starts to remind you the event is coming up.
LG GM310 | User Guide52
6 Scroll down once more to select whether the event is occurring Not repeated or repeated at Daily, Weekly, Monthly or Annually intervals. Also you can choose User setting. If the event is repeated, you can also scroll down to enter an Expiration date for when the events will stop completely.
7 Select Done and your event will be saved in the calendar. A square cursor will mark the days of any saved events.
Adding an item to your to do list
1 Press Menu and choose Organiser.
2 Select To do and select Add.
3 Set the date for the to do item, add notes and select a priority level: High, Medium or Low.
4 Save your to do list item by selecting Done.
TIP! You can edit an item by selecting it, pressing Options and Edit. Confirm your amends by selecting Save.
Adding a memo
1 Press Menu and select Organiser, then Memo.
2 Select Add and type your memo.
3 Select Save.
4 Your memo will appear on screen the next time you open the memo application.
Secret memo
You can write the private memo to protect your privacy. You enter the security code to use this menu.
Date finder
Date finder is a handy tool to help you calculate what the date will be after a certain amount of days has passed.
Settings
Calendar - You can set the configurations to view the calendar.
Send all shedules & to do via
Bluetooth - You can send all the data in your calendar and/or to do list from your phone to other phones by using Bluetooth.
Backup calendar & To do - You can create the backup files of the calendar or to do list saved in the phone when you insert an external memory.
Restore calendar & To do - You can reset the backup files of calendar or tasks when you insert an external memory.
Memory info. - You can view the information of available memory regarding Calendar, Tasks, Memo and Secret memo.
Clear all - You can delete all data regarding Calendar, Tasks, Memo and Secret memo.
Quick menu
You can specify functions to save in the Quick menu. If you save frequently used functions in the Quick menu, you can quickly use them by pressing the corresponding key.
Organiser & Tools
Setting your alarm
1 Press Menu and select Tools, then choose Alarms.
2 Press Options and select Add new.
3 Scroll down and enter the time you would like the alarm to sound at.
4 Choose the repeat type to indicate whether you would like your alarm to sound Not repeated, Daily, Mon - Fri, Mon - Sat, Except holiday, or Choose weekday.
5 Scroll down and choose whether you would like the alarm to Ring, Vibration, Ring&vibration or Follow profile.
6 Scroll down to choose the alarm tone. Press Menu and choose a sound from Voice recordings or Default sounds.
7 Scroll down and enter a name for the alarm or keep the suggested name.
8 Select Done.
LG GM310 | User Guide54
Using your calculator
1 Press Menu and select Tools, then choose Calculator.
2 Press the numeric keys to input numbers.
3 For simple calculations, select the function you require (+, -, ×, ÷) using the navigation keys followed by =.
4 For more complex calculations, select Options to choose a command.
5 Select c to clear the screen and start a new calculation.
Using the stopwatch
1 Press Menu and select Tools, then choose Stopwatch.
2 Select Start to begin the timer.
3 Choose Lap if want to record a lap time. Up to 20 lap times can be saved.
4 Select Stop to end the timer.
5 Choose Resume to restart the stopwatch at the time you stopped it at or select Reset to return to zero.
Converting a unit
1 Press Menu and select Tools, then choose Converter.
2 Choose whether you would like to convert Currency, Surface, Length, Weight, Temperature, Volume or Velocity.
3 Scroll left and right to select a unit, then scroll down and enter the unit quantity.
4 Scroll down to the unit conversion box and choose the unit measurement you want to convert into. The conversion will show automatically in the line below.
Note: For Currency convert, you need to set Rate according to current exchange rate first.
Adding a city to your World time
1 Press Menu and select Tools, then choose World time.
2 To find out the time of specific city, press Options and select Add city.
3 Scroll down the list or enter the first letter of the city. Also you can select Map and choose a city.
4 Press Select.
TIP! If you are abroad, you can change your time zone from World time by selecting Options, followed by Change current city. Choose your required city as above.
Browser
With a browser at the tip of your fingers, you can get up-to-date news and weather forecasts as well as information on sports or traffic whenever you need it. In addition, the browser allows you to download the latest music, ringtones, wallpapers and games.
Accessing the web
1 Press Menu and choose Browser.
2 To access the browser homepage directly, select Home.
Alternatively, select Enter address and type in your desired URL, followed by Open.
Note: An additional cost is incurred when connecting to this service and downloading content. Check your data charges with your network provider.
Yahoo
You can access Yahoo Mobile Internet Service. To access Yahoo services, press Menu and select Yahoo.
LG GM310 | User Guide56
Note: You may be unable to access Yahoo in some countries. This is dependent on network services.
Adding and accessing your bookmarks
For easy and fast access to your favourite websites, you can add bookmarks and save web pages.
1 Press Menu and choose Browser.
2 Select Bookmarks. A list of your bookmarks will appear on the screen.
3 To create a new folder, select Options and choose Create new folder. Enter the name of your bookmark folder.
4 To add a new bookmark, select Options and press Add new. Enter a name for your bookmark followed by the URL.
5 Select Done. Your bookmark will be displayed in the list of bookmarks.
6 To access the bookmark, simply scroll to it and select Open.
Saving a page
1 Access your required webpage as described above.
2 Select Options and Save items, then choose Save this page.
3 Enter a name for the webpage so you can easily recognise it.
4 Select Save.
Accessing a saved page
1 Press Menu and choose Browser.
2 Select Saved pages.
3 Select Open to connect to the saved page.
Viewing your browser history
1 Press Menu and choose Browser, then select History.
2 A list of web page titles you have accessed recently will be displayed.
3 To access one of these pages, simply select the required page and press Open.
Using RSS reader
RSS (Really simply Syndication) is a family of web feed formats used to publish frequently updated content such as blog entries, news headlines or podcasts. An RSS document, which is called a feed, web feed, or channel, contains either a summary of content from an associated web site or the full text.
Changing the web browser settings
1 Press Menu and choose Browser then select Settings.
2 You can choose to edit Profiles, Appearance settings, Cache, Cookies, Security, or Reset Settings.
3 Once you have changed your settings, press Select.
Connectivity
Changing your connectivity settings
Your connectivity settings have already been set up by your network operator, so you can enjoy your new phone straightaway. If you want to change any settings, use this menu.
Press Menu and select Settings then choose Connectivity. Your options are:
Bluetooth - Set up your GM310 for Bluetooth use. You can adapt your visibility to other devices or search through devices your phone is paired with.
USB connection mode - You can select the USB connection mode on your phone for several uses.
Changing your Bluetooth settings
1 Press Menu and select Settings then choose Connectivity.
2 Choose Bluetooth then Settings. Make your changes to:
LG GM310 | User Guide58
My device visibility - Set Visible or Visible for 1 min so that other devices can detect your phone when they are searching for a Bluetooth device. If you select Hidden, other devices will not be able to detect your phone when they are searching for a Bluetooth device.
My device name -You can name or rename your phone as it will appear on other devices. Your phone's name will be shown on other devices only when My device visibility is set to Visible.
Supported services - You can view the list of devices such as headsets and handsfree supported by Bluetooth enabled phone.
My address - Check your Bluetooth address here.
Note: To improve security, we recommend that once you have configured or paired with a device, Visibility be set to Hidden. For incoming connections, regardless of whether or not the other device has been paired with your phone, you can choose to accept or reject the connection.
Pairing with another Bluetooth device
By pairing your GM310 and another device, you can set up a passcode protected connection. This means your pairing is more secure.
1 Check your Bluetooth is Turn on and Visible. You can change your visibility in the Settings menu, by selecting My device visibility, then Visible.
2 From Bluetooth, choose Turn on and select Search new device.
3 Your GM310 will search for devices. When the search is completed Add and Refresh will appear on screen.
4 Choose the device you want to pair with, select Add and enter a passcode then choose OK.
5 Your phone will then connect to the other device, on which you should enter the same passcode.
6 Your passcode protected Bluetooth connection is now ready.
Using a Bluetooth headset
1 Check your Bluetooth is Turn on and Visible.
2 Follow the instructions that came with your headset to place it in pairing mode and pair your devices.
3 Your GM310 will automatically connect to your Bluetooth headset and switch to headset profile.
Sending and receiving your files using Bluetooth
Bluetooth is a great way to send and receive files as no wires are needed and connection is quick and easy. You can also connect to a Bluetooth headset to make and receive calls.
Before you can start sharing files using Bluetooth, you will need to pair your phone with another Bluetooth device. For information on pairing devices, see Pairing with another Bluetooth device.
Connectivity
To switch Bluetooth on:
1 Press Menu and select Settings. Choose Connectivity then select Bluetooth.
2 Select Turn on.
3 Select Turn off to switch Bluetooth off.
To send a file:
1 Open the file you want to send, typically this will be a photo, video or music file.
2 Select Options and choose Send, then Bluetooth.
3 Select Yes to turn Bluetooth on if it is not already activated.
4 Your GM310 will automatically search for other Bluetooth enabled devices within range.
5 Choose the device you want to send the file to and select Send.
To receive a file:
1 To receive files, your Bluetooth must be both Turn on and Visible.
LG GM310 | User Guide60
2 A message will prompt you to accept the file from the sender. Select Yes to receive the file.
TIP! Keep an eye on the progress bar to make sure your file is sent.
Note: The Bluetooth® word mark and logos are owned by the Bluetooth SIG, Inc. and any use of such marks by LG Electronics is under licence. Other trademarks and trade names are those of their respective owners.
Use your phone as a modem
Just plug in the USB cable, then use your phone to make a fast internet connection.
WARNING: First make sure you have a suitable tariff! Otherwise if you download large amounts of data – such as music or video – you may incur high charges.
1 Connect the USB cable to your phone and your PC.
2 Select PC Internet from the popup menu in your phone.
3 Wait until pop up open up on your PC and then select Start to install the Via the phone software, called Via the phone and its drivers on your PC, then follow the screen instructions.
4 You can now use your web browser. When you've finished, click Disconnect.
5 To connect to the internet the next time, just plug in the cable, the software will start automatically, and you'll be ready to go.
Use your phone as a mass storage device
Your phone can only be used as a mass storage device if you have a memory card inserted.
1 Connect the USB cable to your phone and your PC.
2 Select Mass storage from the popup menu in your phone.
3 Connect your phone to your PC. Your phone will read: Connecting as Mass Storage... followed by "Connected as Mass Storage Mode". Do not disconnect during transfer.
4 All of your phone files will automatically be stored onto your a PC hard drive.
Note: Mass storage backs up content saved on your memory card only, not your handset memory. To transfer the contents of your handset memory (e.g. contacts) you'll need to synchronise using PC Sync.
Synchronise your phone with your PC
You can synchronise your phone with your PC to make sure all your important details and dates match, but also to backup your files to put your mind at ease.
Installing LG PC Suite on your computer
1 Go to www.lgmobile.com and choose your region and then your country.
2 Choose Products menu, select Manual & Software and click Go to Manual & S/W download section. Click Yes and LG PC Suite installer will then appear.
Connectivity
3 Select the language you would like the installer to run in and click OK.
4 Follow the instructions on screen to complete the LG PC Suite Installer wizard.
5 Once installation is complete, the LG PC Suite icon will appear on your desktop.
Connecting your phone and PC
1 Connect the USB cable to your phone and your PC.
2 Select PC suite from the popup menu in your phone.
3 Double click on the LG PC Suite icon on your desktop.
4 Click on Connection Wizard, then USB.
5 Click on Next, then Next again, then choose Finish. Your phone and PC are now connected.
Backing up and restoring your phone's information
1 Connect the USB cable to your phone and your PC.
2 Select the PC Suite from the popup menu in your phone.
3 Click on the Backup icon, and select Backup or Restore.
4 Mark the contents you would like to back up or restore. Select the location you would like to backup information to, or restore information from. Click OK.
5 Your information will be backed up.
Viewing your phone files on your PC
1 Connect the USB cable to your phone and your PC.
2 Select the PC Suite from the popup menu in your phone.
3 Click on the Contents icon.
4 All of the documents, flash contents, images, sounds and videos you have saved onto your phone will be displayed on the screen in the LG Phone folder.
TIP! Viewing the contents of your phone on your PC helps you to arrange files, organise documents and remove contents you no longer need.
Synchronising your contacts
1 Connect the USB cable to your phone and your PC.
2 Select the PC Suite from the popup menu in your phone.
3 Click on the Contacts icon. Your PC will now import and display all contacts saved to your USIM card and handset.
4 Select To Phone. Your PC will export your contacts to your handset.
5 Click on File and select Save. You can now select where you would like to save your contacts to.
Note: To backup contacts saved to your USIM card, click on the USIM card folder on the left side of your PC screen. Right-click your contact then Select All. Right-click your contact again and select Copy to Phone Memory. Now click on the Handset folder on the left of your screen and all your numbers will be displayed.
Synchronising your messages
1 Connect the USB cable to your phone and your PC.
2 Select the PC Suite from the popup menu in your phone.
3 Click on the Messages icon.
4 All of your phone messages will be displayed in folders on your screen.
5 Use the tool bar at the top of your screen to edit and rearrange messages.
Connectivity
Adding music to your handset before you get started
To transfer music from your PC to your phone, you will need the following:
- Microsoft Windows XP or Vista.
• Windows Media Player 10 or above - USB cable
- MicroSD card (If you wish to use external memory as the music storage.)
Transferring music using Windows Media Player
1 Connect the USB cable to your phone and your PC.
2 Select Music sync from the popup menu in your phone.
3 When you try to connect handset on your PC, your handset will read: Music Sync... followed by “Disconnect cable to stop Music Sync.”
4 On the PC, you will be prompted to launch your preferred music management software.
5 Select the Window Media Player.
6 Go to the Sync tab, then drag and drop the music you wish to transfer to your handset into the 'Sync List' pane.
7 Click on Start Sync icon. This step begins the transfer process.

WARNING: Do not disconnect me while the transfer is in progress.
Note: Music sync is available for only music contents.
Settings
Changing your profiles
1 Press Menu and select Settings.
2 Select Profiles and then choose the profile you want to edit.
3 Select Options and choose Edit.
4 You can change all of the tones, its volumes and alert options from here.
Using flight mode
To turn on flight mode,, press Menu and then select Settings and Profiles. Select Flight mode to activate. Flight mode will not allow you to make calls, connect to the internet or send message.
Changing your phone settings
1 Press Menu and select Settings.
2 Select Phone and choose from the list below.
Auto key lock - Choose a duration for locking the key automatically.
Touchpad vibration - Change the setting of touchpad to a vibration.
Languages - Change the language of for your GM310's display.
Power save - Choose to switch the factory set power saving settings Off, Night only or Always on.
Information - View the technical information for your GM310.
Changing your display settings
1 Press Menu and select Settings.
2 Select Screen and choose from:
Screen theme - Choose the theme of your home screen or start-up/shut down screen.
Menu style - Change the menu view from List style or Grid style.
Dialling - Adjust the font style and size for when you are dialling a phone number.
Font - Adjust the font size.
Settings
Backlight - Choose how long the backlight remains on. Also, use the navigation keys to adjust the main screen brightness.
TIP! The longer the backlight is on for, the more battery power is used and you may need to charge your phone more often.
Handset theme - Quickly change the whole look of your screen.
Greeting message - After selecting On, you can write a welcome message. The message will appear on screen whenever you start-up the phone.
Changing your date & time
1 Press Menu and select Settings.
2 Select Date & Time and choose from the list below:
Time - You can enter the current time. You can set the time format to either 24 hours or 12 hours. You can select a city as time zone.
Date - You can enter the current date. You can set the date format (YYYY/MM/DD, DD/MM/YYYY, MM/DD/YYYY).
Auto update date/time -
Select On, and the phone will automatically update the date and time.
Daylight saving - Select whether to activate the daylight saving function or not. You can set the summer time difference of selected home city for 1 hour or 2 hours.
Changing your security settings
Change your security settings to keep your GM310 and the important information it holds protected.
1 Press Menu and select Settings.
2 Select Security and choose from the list below:
PIN code request - Choose a PIN code to be requested when you turn your phone on.
Handset lock - Choose a security code to lock your phone When switching on, If USIM changed or Immediate.
Change codes - Change your PIN code, PIN2 code or Security code.
Note: Security code
The security code protects the unauthorized use of your phone. The default security code is set to '0000' and the security code is required to delete all phone entries and to activate the Reset settings menu. Also, the security code is required to enable or disable the phone lock function to prevent unauthorized use of the phone. The security code default setting can be modified from the Security > Change codes.
Viewing memory status
Your GM310 has three memories available: the phone, the USIM card and an external memory card (you may need to purchase the memory card separately).
You can use the memory manager to determine how each memory is used and see how much space is available.
Press Menu and select Settings, choose Memory manager. You will then see the current status of the memories in your GM310.
If you insert an external memory card in your phone, you can also select Primary storage settings then choose the default location you prefer items to be saved to.
Change your other settings
Network - You can set Select network and Network mode
settings using this menu. Also you can add a preferable network to be connected to Preferred lists.
Settings
Internet profiles - This menu shows the Internet profiles. You can create new profiles, delete or edit them using the Options menu. However, you cannot delete or edit default configurations.
Access points - This menu shows the access points list. You can create new profiles, delete or edit them by using the Options menu. However, you cannot delete or edit default configurations.
Packet Data Conn. - If you select the ‘When available’ option, your phone is automatically registered to a GPRS network when you switch the phone on. If you select “When needed”, the GPRS connection is established for the duration of a WAP or application connection.
Streaming settings
If you want to set different network setting to play streaming content, you can set different network settings by using Streaming settings in Settings menu.
Resetting your phone
Use Reset settings in Settings menu to reset all the settings to the factory definitions.
You need the security code to activate this function.
Software Upgrade
LG Mobile Phone Software Upgrade Program
For more information on installing and using this program, please visit http://update.lgmobile.com.
This feature allows you to upgrade your software to the latest version quickly and conveniently on the Internet without needing to visit our service center.
As the mobile phone software upgrade program requires the user's full attention for the duration of the upgrade process, please be sure to check any instructions and notes that appear at each step before proceeding.
Please note that removing the USB data communication cable or batteries during the upgrade may seriously damage your mobile phone.
As the manufacturer takes no responsibility for loss of data during the upgrade process, you are advised to note down any important information in advance for safekeeping.
Accessories
There are a variety of accessories available for your mobile phone, which may be sold separately. You can select these options according to your personal communication requirements. Consult your local dealer for availability. (Items described below may be optional.)
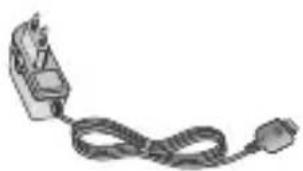
natural_image
Illustration of a handheld device with a coiled cable (no text or symbols visible)Charger
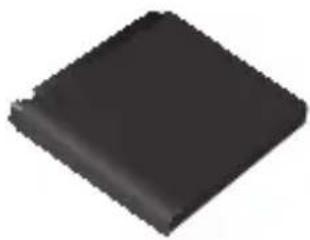
natural_image
Solid black rectangular object with rounded edges, resembling a battery or cover (no text or symbols visible)Battery
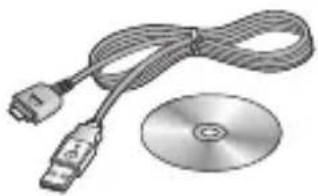
natural_image
Illustration of a USB cable and CD/DVD drive (no text or symbols)USB Data cable and CD
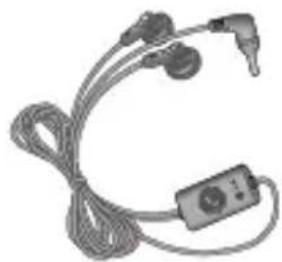
natural_image
Coiled medical or electronic device with earplugs and a control unit (no visible text or symbols)Stereo Headset
Note:
- This list of accessories is not complete. Please consult your local dealer for a list of accessories available in your region.
- Always use genuine LG accessories. Failure to do this may invalidate your warranty.
- Some accessories may be different or may not be available in every market.
Network service Technical data
The wireless phone described in this guide is approved for use on the GSM 850, E-GSM 900, DCS 1800, PCS 1900 and W-CDMA networks.
A number of features included in this guide are called Network Services. These are special services that you arrange through your wireless service provider. Before you can take advantage of any of these Network Services, you must subscribe to them through your service provider and obtain instructions for their use from your service provider.
General
Product name: GM310
System: GSM 850 / E-GSM 900 / DCS 1800 / PCS 1900 / W-CDMA
Ambient Temperatures
Max : +55°C (discharging) +45°C (charging)
Min : -10°C
Declaration of Conformity

LG Electronics
Suppliers Details
Name
LG Electronics Inc
Address
LG Electronics Inc. LG Twin Towers 20, Yeouido-dong, Yeongdeungpo-gu, Seoul, Korea 150-721
Product Details
Product Name
GSM 850 / E-GSM 900 / DCS 1800 / PCS 1900 / W-CDMA Terminal Equipment
Model Name
GM310
Trade Name
LG
CE 0168
Applicable Standards Details
RATTE Directive 1999/S.EG
EN 301 489-01 V1.6.1, EN 301 489-07 v1.3.1, EN 301 489-17 v1.2.1, EN 301 489-24 V1.3.1
EN 301 511 V9.0.2
EN 301 908-1 V3.2.1 EN 301 908-2 V3.2.1
EN 50360:2001, EN62209-1:2006
EN 60950-1:2001
EN 300 328 V1.7.1
Supplementary Information
The conformity to above standards is verified by the following Notified Body(BABT)
BABT, Ballour House, Churchfield Road, Walton-on-Thames, Surrey, KT12 2TD, United Kingdom
Notified Body Identification Number: 0168
Declaration
I hereby declare under our sole responsibility that the product mentioned above to which this declaration relates complies with the above mentioned standards and Directives
European Standard Center
LG Electronics Logistics and Services B.V.
Veluwezoom 15, 1327 AE Almere, The Netherlands
Tel: +31-36-547-8940, Fax: +31-36-547-8794
e-mail: jacob@lge.com
Name
Issued Date
Seung Hyoun, Ji / Director
- March. 2009

Signature of representative
Trouble Shooting
This chapter lists some problems that you might encounter while using your phone. Some problems require that you call your service provider, but most of problems you encounter are easy to correct yourself.
Message Possible causes Possible Corrective measures
| USIM error There is no USIM card in the phone or you may have inserted it incorrectly. | Make sure that the USIM card is correctly inserted. | |
| No connection to the network | Signal weak Outside mobile network | Move higher to a window or open space. Check service provider coverage map. |
| Codes do not match | When you want to change a security code you have to confirm the new code by entering it again. The two codes that you have entered do not match. | Contact your service provider. |
| Function cannot be set | Not supported by service provider or registration required | Contact your service provider. |
| Calls not available | Dialling error New USIM card inserted Charge limit reached | New network not authorised. Check for new restrictions. Contact service provider or reset limit with PIN 2. |
Trouble Shooting
| Message Possible causes Possible Corrective measures | ||
| Phone cannot be switched on | On/Off key pressed too brieflyBattery emptyBattery contacts dirty | Press On/Off key for at least two seconds.Charge battery. Check charging indicator in the display.Clean contacts. |
| Charging error | Battery totally emptyTemperature out of rangeContact problemNo mains voltageCharger defectiveWrong chargerBattery defective | Charge battery.Make sure the ambient temperature is right, wait for a while, and then charge again.Check power supply and connection to the phone. Check the battery contacts, clean them if necessary.Plug in to a different socket or check voltage.If the charger does not warm up, replace it.Only use original LG accessories.Replace battery. |
| Phone loses network | Signal too weak | Reconnection to another service provider is automatic. |
| Number not permitted | The fixed dial number function is on. | Check settings. |
Glossary
To help you understand the main technical terms and abbreviations used in this booklet and take full advantage of the feature on your mobile phone, here are a few definitions.
Call Barring
Ability to restrict outgoing and incoming calls.
Call Divert
Ability to reroute calls to another number.
Call waiting
Ability to inform users that they have an incoming call when engaged on another call.
GPRS (General Packet Radio Service)
GPRS guarantees continuous connection to the Internet for mobile phone and computer users.
It is based on the Global System for Mobile Communication (GSM) circuitswitched cellular phone connections and the Short Message Service (SMS).
GSM (Global System for Mobile Communication)
International standard for cellular communication, guaranteeing compatibility between the various network operators. GSM covers most European countries and many other parts of the world.
JavaTM
Programming language generating applications that can run on all hardware platforms, whether small, medium or large, without modification. It has been promoted for and geared heavily to the Web, both for public Web sites and Intranets. When a Java program runs from a Web page, it is called a Java applet. When it is run on a mobile phone or pager, it is called a MIDlet.
Glossary
Calling Line Identification Services (Caller ID)
Service allowing subscribers to view or block the telephone numbers of callers.
MMS (Multimedia Message Service)
A message service for the handset environment, standardised by the WAP Forum and the 3rd Generation Partnership Program (3GPP). For phone users, MMS is similar to Short Message Service (SMS)-it provides automatic, immediatedelivery of usercreated content from phone to phone numbers, thus the traffic goes from phone to phone. MMS also provides support for e-mail addressing, so that messages can also be sent by email. In addition to the text content of SMS, MMS messages can contain still images, voice or audio clips, and later also video clips and presentation information.
MP3
Moving Picture Experts Group Layer-3 Audio. A file format to provide highquality audio whose quality is equal to that of CD. MP3 is a digital audio standard developed by MPEG, or Moving Picture Experts Group and is widely used for digital audio files.
MPEG4
Motion Picture Experts Group 4. A digital video standard developed by MPEG or Moving Picture Experts Group. MPEG4 compresses video data so that a large video file can be transmitted, and saved more easily. MPEG4 is suitable especially for mobile environment.
Multimedia
Multimedia means media that include various media data such as voice, character string, image, and video data. Currently, the meaning of multimedia includes services provided through multimedia.
Roaming
Use of your phone when you are outside your home area (when traveling for example).
SIM (Subscriber Identification Module)
Card containing a chip with all the information required to operate the phone (network and memory information, as well as the subscriber's personal data). The SIM card fits into a small slot on the back of the phone and is protected by the battery.
SMS (Short Message Service)
Network service sending and receiving messages to and from another subscriber without having to speak to the correspondent. The message created or received (up to 160 characters long) can be displayed, received, edited or sent.
SMTP
Simple Mail Transfer Protocol. A protocol to transfer e-mails between computers over the Internet. SMTP defines the format of control messages between computers, and interaction procedures between them to send e-mails.
Sync
Sync means synchronizing PIM (Personal Information Management) data such as contact information, schedule, to-do, and memo with a PC or an external server.
USB
Universal Serial Bus. A bus type interface that provides fast and flexible connection between devices and computer.
Voice mail
Computerised answering service that automatically answers your calls when you are not available, plays a greeting and records a message.
Gracenote® End User License Agreement
This application or device contains software from Gracenote, Inc. of Emeryville, California (“Gracenote”). The software from Gracenote (the “Gracenote Software”) enables this application to perform disc and/or file identification and obtain music-related information, including name, artist, track, and title information (“Gracenote Data”) from online servers or embedded databases (collectively, “Gracenote Servers”) and to perform other functions. You may use Gracenote Data only by means of the intended End-User functions of this application or device.
You agree that you will use Gracenote Data, the Gracenote Software, and Gracenote Servers for your own personal non-commercial use only. You agree not to assign, copy, transfer or transmit the Gracenote Software or any Gracenote Data to any third party. YOU AGREE NOT TO USE OR EXPLOIT GRACENOTE DATA, THE GRACENOTE SOFTWARE, OR GRACENOTE SERVERS, EXCEPT AS EXPRESSLY PERMITTED HEREIN.
You agree that your non-exclusive license to use the Gracenote Data, the Gracenote Software, and Gracenote Servers will terminate if you violate these restrictions. If your license terminates, you agree to cease any and all use of the Gracenote Data, the Gracenote Software, and Gracenote Servers. Gracenote reserves all rights in Gracenote Data, the Gracenote Software, and the Gracenote Servers, including all ownership rights. Under no circumstances will Gracenote become liable for any payment to you for any information that you provide. You agree that Gracenote, Inc. may enforce its rights under this Agreement against you directly in its own name.
The Gracenote service uses a unique identifier to track queries for statistical purposes. The purpose of a randomly assigned numeric identifier is to allow the Gracenote service to count queries without knowing anything about who you are. For more information, see the web page for the Gracenote Privacy Policy for the Gracenote service.
LG GM310 | User Guide78