
QM-75 - Screen AG Neovo - Free user manual and instructions
Find the device manual for free QM-75 AG Neovo in PDF.


User questions about QM-75 AG Neovo
0 question about this device. Answer the ones you know or ask your own.
Ask a new question about this device
Download the instructions for your Screen in PDF format for free! Find your manual QM-75 - AG Neovo and take your electronic device back in hand. On this page are published all the documents necessary for the use of your device. QM-75 by AG Neovo.
USER MANUAL QM-75 AG Neovo
SAFETY INFORMATION .... 1
Federal Communications Commission (FCC) Notice (U.S. Only)....1
CE 1
Polish Center for Testing and Certification Notice....1
Electric, Magnetic and Electromagnetic Fields ("EMF") 2
Information for U.K. only....3
North Europe (Nordic Countries) Information....4
End-of-Life Disposal 5
Waste Electrical and Electronie Equipment-WEEE 5
Turkey RoHS....6
Ukraine RoHS 6
PRECAUTIONS 7
Cautions When Setting Up....7
Cautions When Using....8
Cleaning and Maintenance....8
Notice for the LCD Display 9
CHAPTER 1: PRODUCT DESCRIPTION ...... 10
1.1 Unpacking 10
1.2 Package Contents....10
1.3 Preparing for the Installation 11
1.4 Wall Mounting Installation.... 11
1.4.1 VESA Grid 12
1.4.2 Ventilation Requirements for Enclosure Locating.... 13
1.5 Using the Remote Sensor and Power Status Indicator 13
1.6 LCD Display Overview 14
1.6.1 Control Panel....14
1.6.2 Input/Output Terminals 16
1.7 Remote Control....18
1.7.1 General Functions.... 18
1.7.2 ID Remote Control....20
1.7.3 Remote Control buttons on USB source 21
1.7.4 Inserting the Batteries in the Remote Control 23
1.7.5 Handling the Remote Control....23
1.7.6 Operating Range of the Remote Control....23
CHAPTER 2: MAKING CONNECTIONS ...... 25
2.1 Connecting the Power 25
2.2 Connecting a Computer 27
2.2.1 Using VGA Input 27
2.2.2 Using DisplayPort Input....28
2.2.3 Using HDMI Input 30
2.3 Connecting External Equipment (Video Player) 31
2.3.1 Using HDMI Video Input.... 31
TABLE OF CONTENTS
2.4 Connecting Audio Equipment 33
2.4.1 Connecting an External Audio Device 33
2.5 Using the Card Reader 34
2.6 Connecting Multiple Displays in a Daisy-chain Configuration 35
2.6.1 Display Control Connection....35
2.7 IR Connection....36
2.8 IR Pass-Through Connection 36
CHAPTER 3: USING THE LCD DISPLAY .... 37
3.1 Turning on the Power 37
3.1.1 Initial Setup....37
3.2 Selecting the Input Source Signal 38
3.3 Adjusting the Volume 38
3.4 Changing the Picture Format 39
CHAPTER 4: USB SOURCE .... 40
4.1 Accessing the USB Menu....40
4.2 Using the USB Menu....41
4.2.1 Creating a Playlist 41
4.2.2 Modifying a Playlist....43
4.2.3 Playing Files in a Playlist....43
4.2.4 USB Menu Settings 43
CHAPTER 5: ON SCREEN DISPLAY MENU .... 45
5.1 Using the OSD Menu 45
5.2 OSD Menu Tree 47
CHAPTER 6: ADJUSTING THE LCD DISPLAY .... 49
6.1 Picture Settings 49
6.2 Screen Settings 53
6.3 Audio Settings 56
6.4 Configuration1 Settings....58
6.5 Configuration2 Settings 62
6.6 Advanced option Settings....64
CHAPTER 7: APPENDIX....75
7.1 Warning Messages....75
7.2 Supported Media Formats....75
7.3 Input Mode 77
7.4 Cleaning 79
7.5 Troubleshooting....80
7.6 Transporting the LCD Display 81
CHAPTER 8: SPECIFICATIONS 84
8.1 Display Specifications 84
8.2 Display Dimensions....85
SAFETY INFORMATION
F
C
C
FCC N
U.S. O

This equipment has been tested and found to comply with the limits for a Class A digital device, pursuant to part 15 of the FCC Rules. These limits are designed to provide reasonable protection against harmful interference when the equipment is operated in a commercial environment. This equipment generates, uses, and can radiate radio frequency energy and, if not installed and used in accordance with the instruction manual, may cause harmful interference to radio communications. Operation of this equipment in a residential area is likely to cause harmful interference in which case the user will be required to correct the interference at his own expense.

Changes or modifications not expressly approved by the party responsible for compliance could void the user's authority to operate the equipment.
Use only an RF shielded cable that was supplied with the display when connecting this display to a computer device.
To prevent damage which may result in fire or shock hazard, do not expose this appliance to rain or excessive moisture.
THIS CLASS A DIGITAL APPARATUS MEETS ALL RE UIREMENTS OF THE CANADIAN INTERFERENCE CAUSING E UIPMENT REGULATIONS.

This device complies with part 15 of the FCC Rules. Operation is subject to the following two conditions (1) This device may not cause harmful interference, and (2) this device must accept any interference received, including interference that may cause undesired operation.
CE

ARNING: This equipment is compliant with Class A of EN55032/CISPR 32. In a residential environment this equipment may cause radio interference.
Polish Center for Testing and Certification Notice
The equipment should draw power from a socket with an attached protection circuit (a three-prong socket). All equipment that works together (computer, display, printer, and so on) should have the same power supply source.
The phasing conductor of the room s electrical installation should have a reserve short-circuit protection device in the form of a fuse with a nominal value no larger than 16 amperes (A).
To completely switch off the equipment, the power supply cable must be removed from the power supply socket, which should be located near the equipment and easily accessible.
A protection mark "B" confirms that the equipment is in compliance with the protection usage requirements of standards PN-93/T-42107 and PN-89/E-06251.
We manufacture and sell many products targeted at consumers, which, like any electronic apparatus, in general have the ability to emit and receive electromagnetic signals.
One of our leading Business Principles is to take all necessary health and safety measures for our products, to comply with all applicable legal requirements and to stay well within the EMF standards applicable at the time of producing the products.
We are committed to develop, produce and market products that cause no adverse health effects.
We confirm that if its products are handled properly for their intended use, they are safe to use according to scientific evidence available today.
We play an active role in the development of international EMF and safety standards, enabling us to anticipate further developments in standardization for early integration in its products.
SAFETY INFORMATION
I U.K.
WARNING - THIS APPLIANCE MUST BE EARTHED.
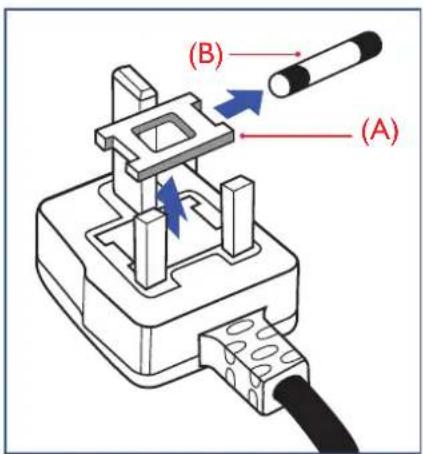
text_image
(A) (B)Important
This apparatus is supplied with an approved moulded 13A plug. To change a fuse in this type of plug proceed as follows
1 Remove fuse cover and fuse.
2 Fit new fuse which should be a BS 1362 5A,A.S.T.A. or BSI approved type.
3 Refit the fuse cover.
If the fitted plug is not suitable for your socket outlets, it should be cut off and an appropriate 3-pin plug fitted in its place.
If the mains plug contains a fuse, this should have a value of 5A. If a plug without a fuse is used, the fuse at the distribution board should not be greater than 5A.

Note
The severed plug must be destroyed to avoid a possible shock hazard should it be inserted into a 13A socket elsewhere.
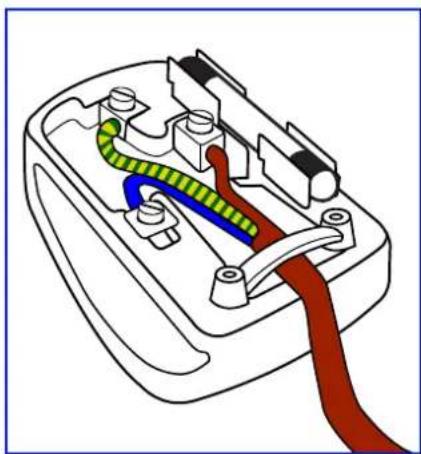
natural_image
Diagram of a plug socket with colored wires (green, blue, red) showing internal components and connections (no text or labels)H
The wires in the mains lead are coloured in accordance with the following code
BLUE - "NEUTRAL" ("N")
BROWN - "LIVE" ("L")
GREEN ELLOW - "EARTH" ("E")
The GREEN ELLOW wire must be connected to the terminal in the plug which is marked with the letter "E" or by the Earth symbol or coloured GREEN or GREEN ELLOW.
The BLUE wire must be connected to the terminal which is marked with the letter "N" or coloured BLACK.
The BROWN wire must be connected to the terminal which marked with the letter "L" or coloured RED. Before replacing the plug cover, make certain that the cord grip is clamped over the sheath of the lead - not simply over the three wires.
N E N C I
Placering/Ventilation
ARNING: F RS KRA DIG OM ATT HUVUDBR TARE OCH UTTAG R L T TKOMLIGA, N R DU ST LLER DIN UTRUSTNING P PLATS.
Placering/Ventilation
AD ARSEL: S RG VED PLACERINGEN FOR, AT NETLEDNINGENS STIK OG STIKKONTAKT ER NEMT TILGN GELIGE.
Paikka/Ilmankierto
AROITUS: SIO ITA LAITE SITEN, ETT VERKKOO HTO VOIDAAAN TARVITTAESSA HELPOSTI IRROTTAA PISTORASIASTA.
Your new Public Information Display contains materials that can be recycled and reused. Specialized companies can recycle your product to increase the amount of reusable materials and to minimize the amount to be disposed of.
Please find out about the local regulations on how to dispose of your old display from your local dealer.
F C U.S.A.
This product may contain lead and/or mercury. Dispose of in accordance to local-state and federal regulations. For additional information on recycling contact www.eia.org (Consumer Education Initiative).
E E E EEE
A E U
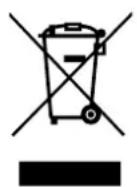
This marking on the product or on its packaging illustrates that, under European Directive 2012/19/EU governing used electrical and electronic appliances, this product may not be disposed of with normal household waste. ou are responsible for disposal of this equipment through a designated waste electrical and electronic equipment collection. To determine the locations for dropping off such waste electrical and electronic, contact your local government office, the waste disposal organization that serves your household or the store at which you purchased the product.
A U S :
Please dispose of according to all Local, State and Federal Laws. For the disposal or recycling information, contact www.mygreenelectronics.com or www.eiae.org.
E L D R

our new Public Information Display contains several materials that can be recycled for new users.
Please dispose of according to all Local, State, and Federal laws.
R H S I
This product complies with the “India E-waste Rule 2011” and prohibits use of lead, mercury, hexavalent chromium, polybrominated biphenyls or polybrominated diphenyl ethers in concentrations exceeding 0.1 weight and 0.01 weight for cadmium, except for the exemptions set in Schedule 2 of the Rule.
E D I
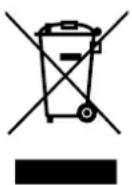
This symbol on the product or on its packaging indicates that this product must not be disposed of with your other household waste. Instead it is your responsibility to dispose of your waste equipment by handing it over to a designated collection point for the recycling of waste electrical and electronic equipment. The separate collection and recycling of your waste equipment at the time of disposal will help to conserve natural resources and ensure that it is recycled in a manner that protects human health and the environment.
B
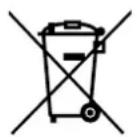
For EU The crossed-out wheeled bin implies that used batteries should not be put to the general household waste There is a separate collection system for used batteries, to allow proper treatment and recycling in accordance with legislation.
Please contact your local authority for details on the collection and recycling schemes.
For Switzerland: The used battery is to be returned to the selling point.
For other non-EU countries Please contact your local authority for correct method of disposal of the used battery.
According to EU directive 2006/66/EC, the battery can t be disposed improperly. The battery shall be separated to collect by local service.
T RHS
 | This icon indicates the existence of a potential haa rd that could result in personal injury or damage to the product. |
 | This icon indicates important operating and servicing information. |
N
Read this User Manual carefully before using the LCD display and keep it for future reference.
The product specifications and other information provided in this User Manual are for reference only. All information is subject to change without notice. Updated content can be downloaded from our web site at
To register online, go to ____.
To protect your rights as a consumer, do not remove any stickers from the LCD display. Doing so may affect the determination of the warranty period.
C S U
Do not place the LCD display near heat sources, such as a heater, exhaust vent, or in direct sunlight.
Do not cover or block the ventilation holes in the housing.
Place the LCD display on a stable area. Do not place the LCD display where it may subject to vibration or shock.
Place the LCD display in a well-ventilated area.
Do not place the LCD display outdoors.
To avoid the risk of shock or permanent damage to the set, do not expose the display to dust, rain, water or an excessively moist environment.
Do not spill liquid or insert sharp objects into the LCD display through the ventilation holes. Doing so may cause accidental fire, electric shock or damage the LCD display.
c u
Use only the power cord supplied with the LCD display.
The power outlet should be installed near the LCD display and be easily accessible.
If an extension cord is used with the LCD display, ensure that the total current consumption plugged into the power outlet does not exceed the ampere rating.
Do not allow anything to rest on the power cord. Do not place the LCD display where the power cord may be stepped on.
If the LCD display will not be used for an indefinite period of time, unplug the power cord from the power outlet.
To disconnect the power cord, grasp and pull by the plug head. Do not tug on the cord; doing so may cause fire or electric shock.
Do not unplug or touch the power cord with wet hands.
When turning off the display by detaching the power cord, wait 6 seconds before re-attaching the power cord for normal operation.
Do not knock or drop the display during operation or transportation.
C M
To protect your display from possible damage, do not put excessive pressure on the LCD panel. When moving your display, grasp the frame to lift do not lift the display by placing your hand or fingers on the LCD panel.
Unplug the display if you need to clean it with a slightly damp cloth. The screen may be wiped with a dry cloth when the power is off. However, never use organic solvent, such as, alcohol, or ammonia-based liquids to clean your display.
If your display becomes wet, wipe it with dry cloth as soon as possible.
If a foreign substance or water gets in your display, turn the power off immediately and disconnect the power cord. Then remove the foreign substance or water, and send the unit to the maintenance center.
In order to maintain the best performance of your display and ensure a longer lifetime, we strongly recommend using the display in a location that falls within the following temperature and humidity ranges.
♦ Temperature 0-40 C (32-104 F)
◆ Humidity 20-80 RH

:

Unplug the power cord from the power outlet and refer to qualified service
personnel under the following conditions
- When the power cord is damaged.
- If the LCD display has been dropped or the housing has been damaged.
◆ If the LCD display emits smoke or a distinct odor.
N LCD D
In order to maintain the stable luminous performance, it is recommended to use low brightness setting.
Due to the lifespan of the lamp, it is normal that the brightness quality of the LCD display may decrease with time.
When static images are displayed for long periods of time, the image may cause an imprint on the LCD display. This is called image retention or burn-in.
◆ To prevent image retention, do any of the following
Set the LCD display to turn off after a few minutes of being idle.
Use a screen saver that has moving graphics or a blank white image.
Execute the ANTI-BURN-IN function of the LCD display. See Configuration 1 P S
ANTI BURN IN section.
Switch desktop backgrounds regularly.
Adjust the LCD display to low brightness settings.
Turn off the LCD display when the system is not in use.
◆ Things to do when the LCD display shows image retention
Turn off the LCD display for extended periods of time. It can be several hours or several days.
Use a screen saver and run it for extended periods of time.
Use a black and white image and run it for extended periods of time.
There are millions of micro transistors inside the LCD display. It is normal for a few transistors to be damaged and to produce spots. This is acceptable and is not considered a failure.
IMPORTANT: Always activate a moving screen saver program when you leave your display unattended.
Always activate a periodic screen refresh application if the unit will display unchanging static content. Uninterrupted display of still or static images over an extended period may cause "burn in", also known as "after-imaging" or "ghost imaging", on your screen. This is a well-known phenomenon in LCD panel technology. In most cases, the "burned in" or "after-imaging" or "ghost imaging" will disappear gradually over a period of time after the power has been switched off.
ARNING Severe "burn-in" or "after-image" or "ghost image" symptoms will not disappear and cannot be repaired. This is also not covered under the terms of your warranty.
CHAPTER 1: PRODUCT DESCRIPTION
1.1 U
This product is packed in a packaging box which contains standard accessories.
Any other optional accessories will be packed separately.
Considering the sie and weight of the display, it is recommended that this product is carried out by two persons.
After opening the packaging box, ensure that the included items are in good condition and complete.
1.2 P C
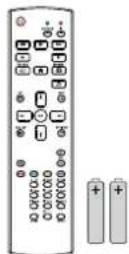
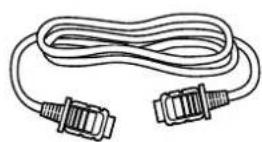
When unpacking, check if the following items are included in the package. If any of them is missing or damaged, contact your dealer.

LCD D
natural_image
Plain light blue background with a thin border (no text or symbols)
R

S G


HDMI

P
natural_image
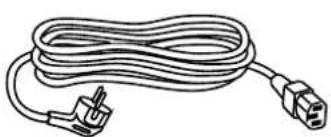
Line drawing of a long, coiled electrical plug with terminal connectors (no text or symbols)
RS232
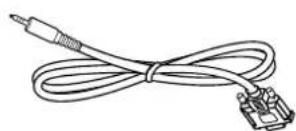
N :
◆ Remote control is shipped with the supplied AAA batteries.
For all other regions, apply a power cord that conforms to the AC voltage of the power socket and has been approved by and complies with the safety regulations of the particular country (Type H05W-F, 2G or 3G, 0.75 or 1mm^2 should be used).
- ou might like to save the package box and packing material for shipping the display.
- The pictures are for reference only. Actual items may vary upon shipment.
PRODUCT DESCRIPTION
1.3 P

Due to the high power consumption, always use the plug exclusively designed for this product. If an extended line is required, please consult your service agent.
The product should be installed on a flat surface to avoid tipping. The distance between the back of the product and the wall should be maintained for proper ventilation. Avoid installing the product in the kitchen, bathroom or any other places with high humidity so as not to shorten the service life of the electronic components.
The product can normally operate only under 3000m in altitude. In installations at altitudes above 3000m, some abnormalities may be experienced.
1.4


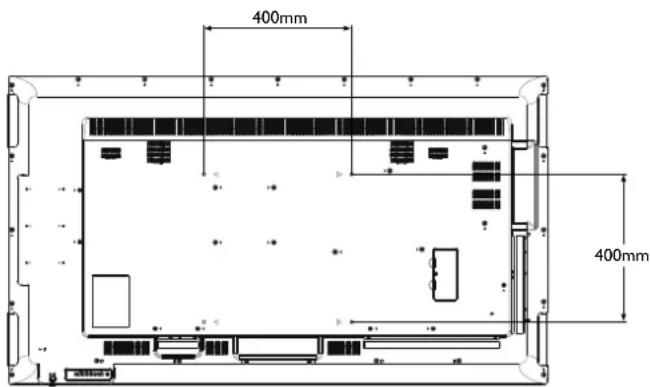
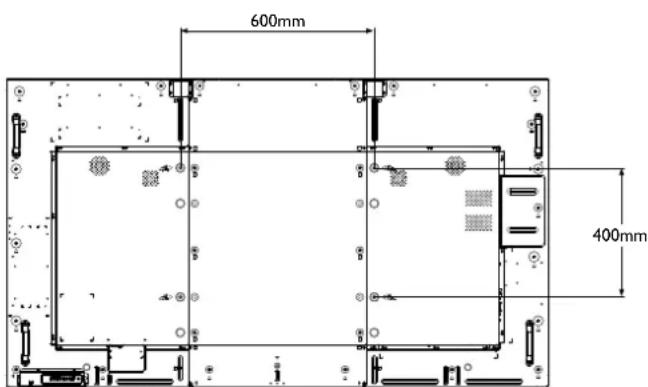
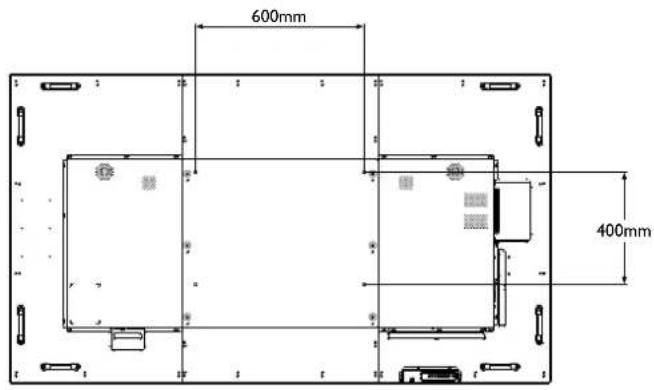
To mount this display to a wall, you will have to obtain a standard wall-mounting kit (commercially available). We recommend using a mounting interface that complies with TUV-GS and/or UL1678 standard in North America.
To wall-mount the LCD display, screw the mounting bracket to the VESA holes at the rear of the LCD display.
M 65
text_image
400mm 400mmM 75
text_image
600mm 400mm
:
Do not press too hard on the LCD panel or edge of the frame, as this may cause the device to malfunction.
N :
- Avoid the wall-mounting kit to block the ventilation holes on the back of the display.
- Secure the LCD display on a solid wall strong enough to bear its weight.
- Lay a protective sheet on a table, which was wrapped around the display when it was packaged, beneath the screen surface so as not to scratch the screen face.
◆ Ensure you have all accessories for mounting this display (wall mount, ceiling mount, etc). - Follow the instructions that come with the base mounting kit. Failure to follow correct mounting procedures could result in damage to the equipment or injury to the user or installer. Product warranty does not cover damage caused by improper installation.
M 86
text_image
600mm 400mm1.4.1 ESA G
| Model Name VESA Grid | |
| M-65 400(W) x 400(H) mm | |
| M-75 600(W) x 400(H) mm | |
| M-86 600(W) x 400(H) mm | |

C :
To prevent the display from falling
For wall or ceiling installation, we recommend installing the display with metal brackets which are commercially available. For detailed installation instructions, see the guide received with the respective bracket.
To lessen the probability of injury and damage resulting from fall of the display in case of earthquake or other natural disaster, be sure to consult the bracket manufacturer for installation location.
N :
For M-65 wall-mounting kits, use M6 mounting screws (having a length 10 mm longer than the thickness of the mounting bracket) and tighten them securely.
For M-75 / M-86 wall-mounting kits, use M8 mounting screws (having a length 15 mm longer than the thickness of the mounting bracket) and tighten them securely.
Unit without base weight is 24.8 kg (M-65), 53.3 kg (M-75), or 63.8 kg (M-86). The equipment and its associated mounting means still remain secure during the test. For use only with UL Listed Wall Mount Bracket with minimum weight/load is 32.8 kg (M-65), 67.0 kg (M-75), or 79.6 kg (M-86).
PRODUCT DESCRIPTION
1.4.2
R
E
L
To allow heat to disperse, leave space between surrounding objects as shown in the diagram below.
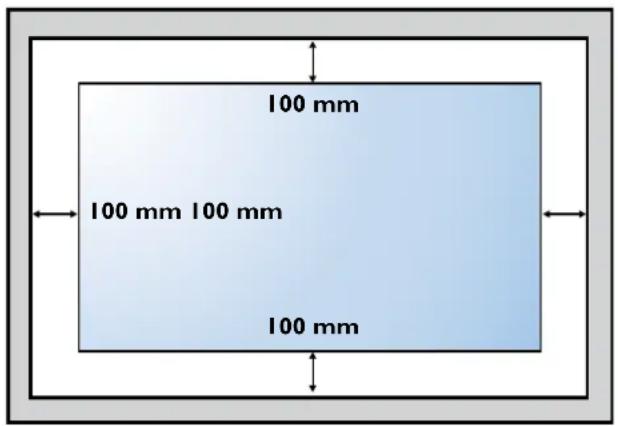
text_image
100 mm 100 mm 100 mm 100 mm1.5 U
R
S
P
s
|
If you want to obtain a better reception of remote control function, please adjust the indicator location to easily check the power status indicator.
If you want to mount the display to the wall, please push the indicator switch upwards before installation.
When adjusting the indicator location, make sure to push/pull the indicator switch firmly until it clicks into place.
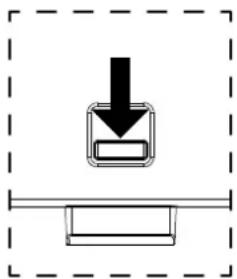
natural_image
Simple line drawing of a download icon above a horizontal bar, enclosed in a dashed border (no text or symbols)Push downward to reveal the indicator
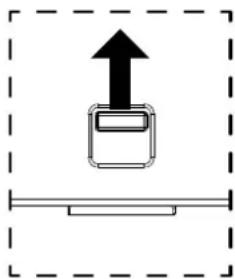
natural_image
Simple line drawing of a mechanical component with an upward arrow and base plate, enclosed in a dashed border (no text or symbols)Pull upward to hide the indicator
PRODUCT DESCRIPTION
1.6 LCD D O
1.6.1 C P
M 65
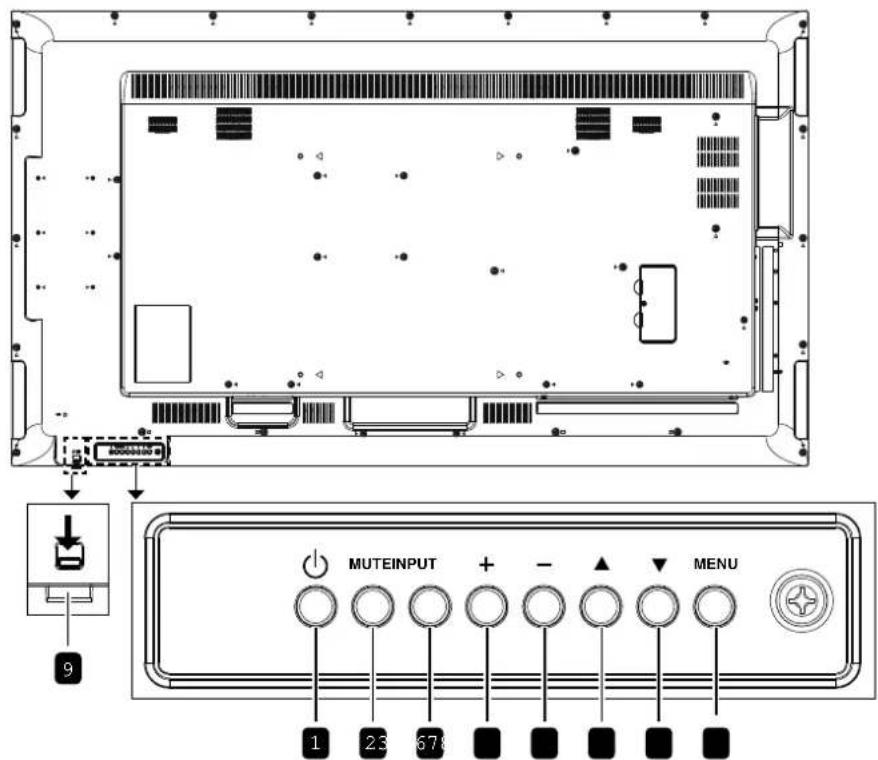
text_image
MUTEINPUT MENU 1 23 678M 75
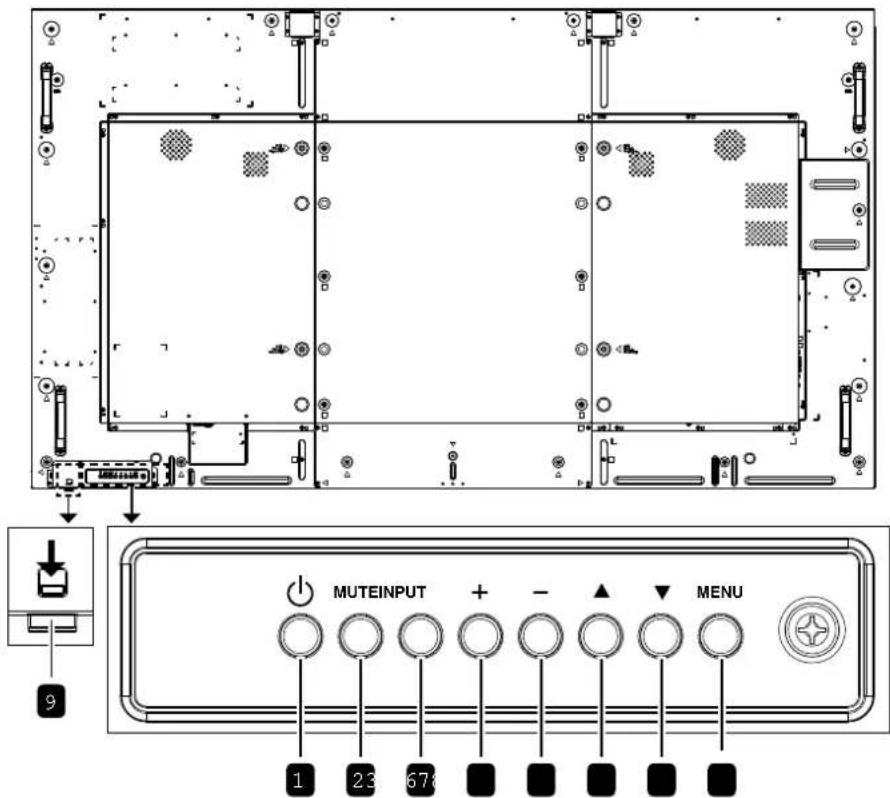
text_image
MUTEINPUT MENU 1 2 3 67M 86
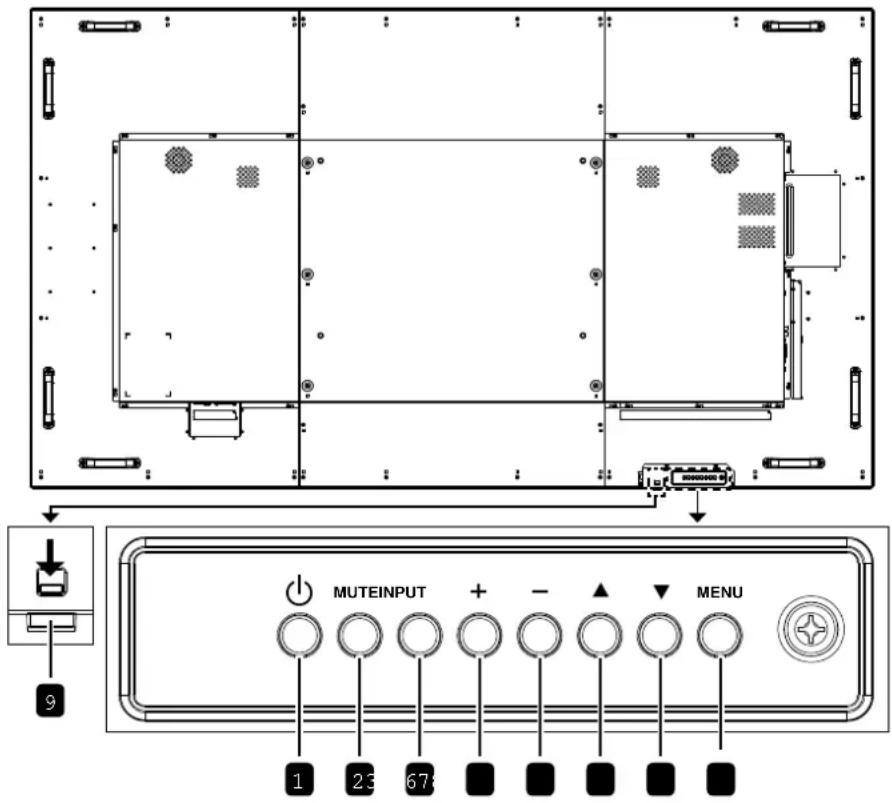
text_image
MUTEINPUT MENU 1 23 671 ⏻ P
Turn the display on or put the display to standby.
2 MUTE
Switch the audio mute ON/OFF.
3 INPUT
Choose the input source.
4 +1
Enter the submenu. Increase the audio output level while OSD menu is off.
5 - D
Return to the previous menu. Decrease the audio output level while OSD menu is off.
6 ▲ U
Move the highlight bar up to select an option or increase the adjustment while OSD menu is on.
7 ▼ D
Move the highlight bar down to select an option or decrease the adjustment while OSD menu is on.
8 MENU
Activate the OSD menu when OSD menu is off. Hide the OSD menu while OSD menu is on.
9 R
Receive command signals from the remote control.
Indicate the operating status of the display
- Lights green when the display is turned on
- Lights red when the display is in standby mode
- Blinks green and red when "Advanced option, Schedule" is enabled
- Blinks red when a failure has been detected
- Lights off when the main power of the display is turned off
PRODUCT DESCRIPTION
1.6.2 I O T
M 65
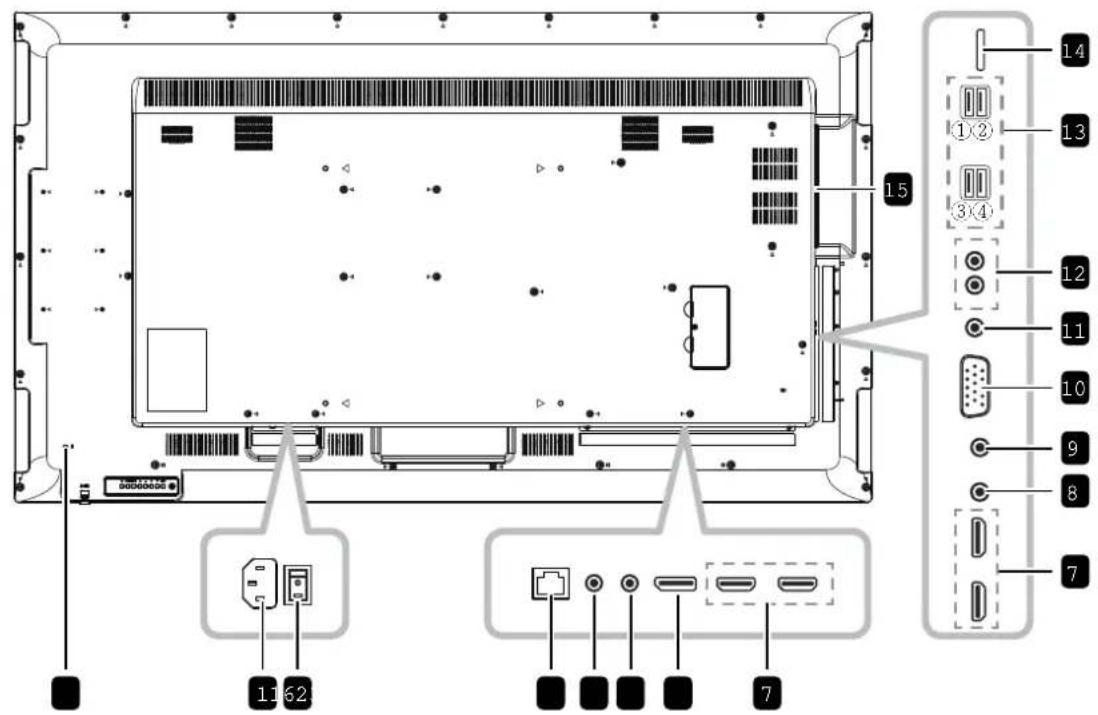
text_image
Technical diagram of a computer monitor rear panel with labeled ports and connectorsM 75
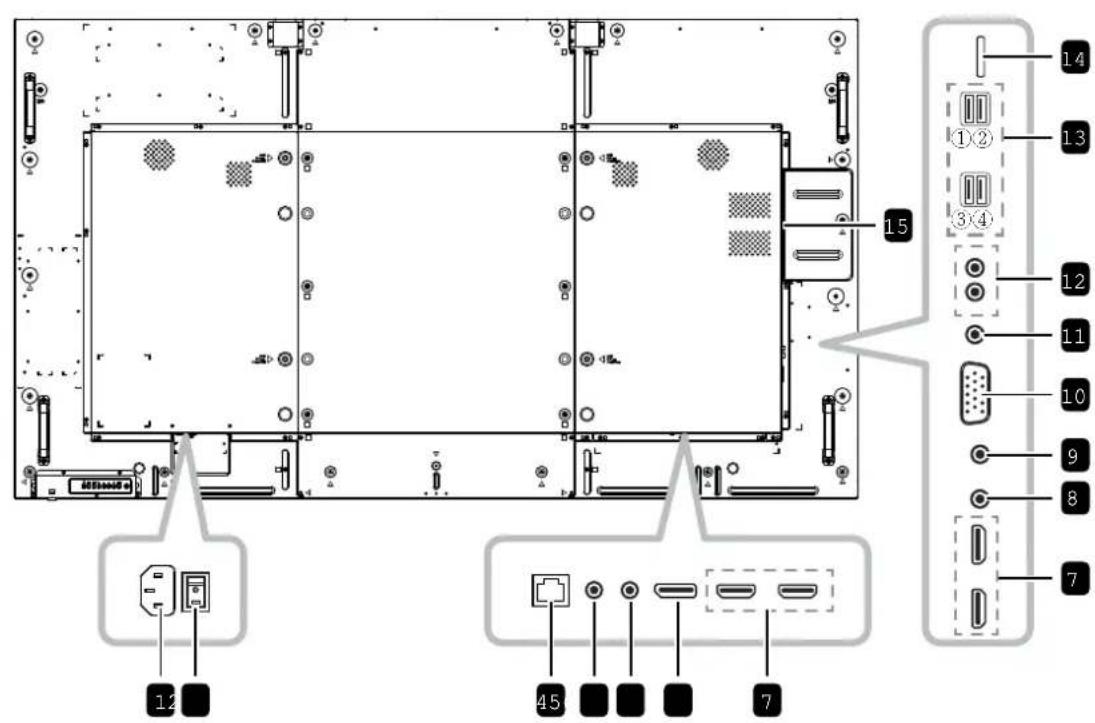
text_image
12 45 7 15 1.4 ①② ③④ 1.3 1.2 1.1 1.0 9 8 7M 86
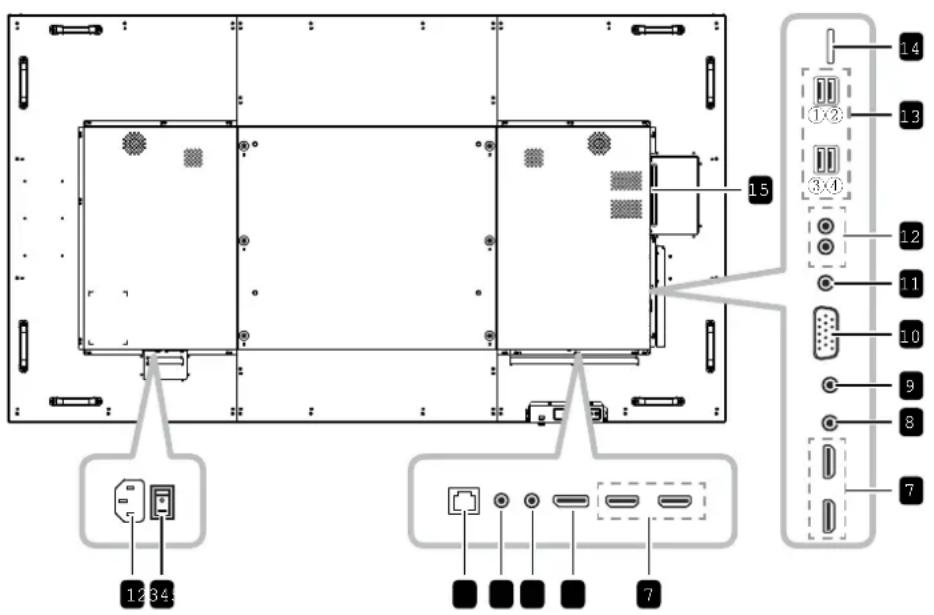
text_image
Technical diagram of an electronic device rear panel with labeled ports and connectors1 AC IN
AC power input from the wall outlet.
2 M
Switch the main power on/off.
3 RJ45
LAN control function for the use of remote control signal from the control center.
4 RS232 IN
RS232 network input for the loop-through function.
5 RS232 OUT
RS232 network output for the loop-through function.
6 D P IN
DisplayPort video input.
7 HDMI1 HDMI2 HDMI3 HDMI4 IN
HDMI video/audio input.
8 IR IN
IR signal input for the loop-through function.
N :
- This display's remote control sensor will stop working if the IR IN jack is connected.
- To remotely control your A/V device via this display, see page 36 for IR Pass-Through connection.
9 IR OUT
IR signal output for the loop-through function.
10 GA IN D S
VGA video input.
11 AUDIO IN
Audio input for VGA source (3.5mm stereo phone).
12 AUDIO OUT
Audio output to external AV device (RCA).
13 USB 2.0 3.0 PORT
Connect your USB storage device.
①USB 2.0 x 1 (Service Port / Media Playback)
② USB 2.0 x 1 (Media Playback)
③ USB 3.0 x 1 (Media Playback)
④ USB power outlet x 1 (5V2A)
14 MICRO SD CARD SLOT
Insert a micro SD card into the slot.
15 OPS SLOT
Slot for installing the optional OPS module..
16 K
s
S
M 65 O
Used for security and theft prevention.
PRODUCT DESCRIPTION
1.7 R C
1.7.1 G F
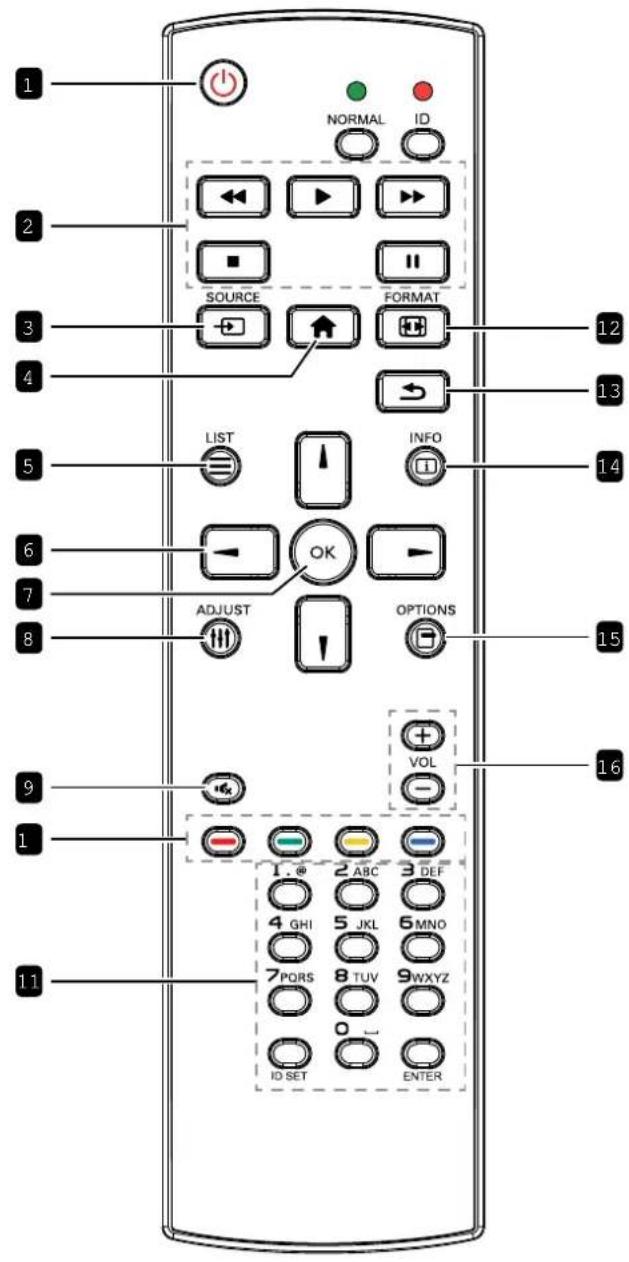
text_image
1 NORMAL ID 2 SOURCE FORMAT 3 LIST INFO 4 OK 5 ADJUST OPTIONS 6 VOL 7 12 13 14 8 15 9 16 1 2 ABC 3 DEF 4 GHI 5 JKL 6 MNO 7 PQRS 8 TUV 9 WXYZ 0 ID SET ENTER 111 PO ER
Turn the display on or to put the display into standby mode.
2 PLAY
Control playback in multimedia mode.
Freee feature
- 11 Freee hot key for all inputs content.
- ▶ Unfreee hot key for all input content.
3 SOURCE
Root Menu Go to Video source OSD.
4 HOME
- Root Menu Access the OSD menu.
- Others Exit the OSD menu.
5 ≡ LIST
No function.
6 NA IGATION

- Root Menu Go to Smart picture OSD.
- Main Menu Move the highlight bar up to adjust the selected item.
- IR Daisy Chain Menu Increase controlled Group ID number.

- Root Menu Go to Audio source OSD.
- Main Menu Move the highlight bar down to adjust the selected item.
- IR Daisy Chain Menu Decrease controlled Group ID number.

- Main Menu Return to the previous menu page.
-
Source Menu Exit the source menu.
• Volume Menu Decrease the volume level. -
Main Menu: Enter the submenu or confirm a selection.
- Source Menu: Confirm the selected source.
• Volume Menu Increase the volume level.
7 OK OK
- Root Menu Go to IR daisy chain OSD in Primary/Secondary mode.
- Main Menu: Confirm an entry or selection.
8 ADJUST
Go to Auto Adjust OSD (for VGA input only).
PRODUCT DESCRIPTION
9 MUTE
Turn the mute function on/off.
10



Choose tasks or options.(not supported).

Hot key for Window selection function.
11

ID SET ENTER
Enter text for network setting.
Set the display ID. See 1.7.2 ID Remote Control for more detail.
12

FORMAT
Change the aspect ratio.
13

BACK
Return to the previous menu or exit from the previous function.
14

INFO
View the information about the display.
15

OPTIONS
No function.
16

+OLUME
Adjust the volume level.
PRODUCT DESCRIPTION
1.7.2 IDR C
ou can set the remote control ID when you want to use this remote control on one of several different displays.
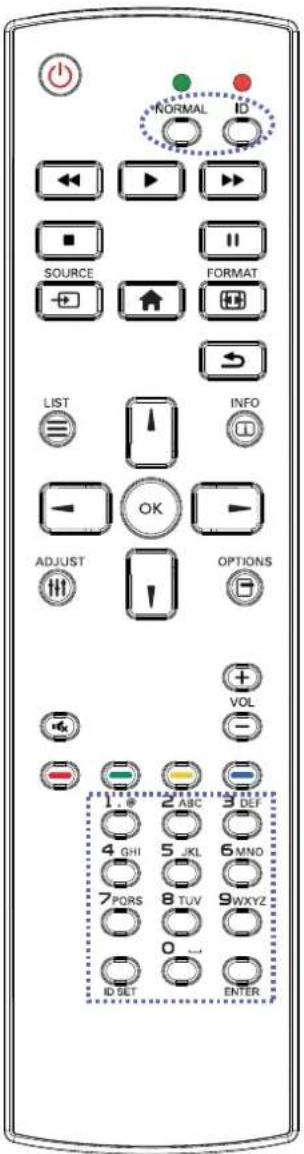
text_image
NORMAL ID SOURCE FORMAT LIST INFO OK ADJUST OPTIONS VOL 1. IF 2 ABC 3 DEF 4 GHI 5 JKL 6 MNO 7 PORS 8 TUV 9 WXYZ 0 ... ID SET ENTERTo set the remote control ID
1 Press the ID button. The red LED blinks twice.
2 Press the ID SET button for more than 1 second to enter the ID mode. The red LED lights up.
Press the ID SET button again will exit the ID mode. The red LED lights off.
3 Press the digit numbers 0 9 to select the display you want to control. For example
Display ID 1 press 0, 1
Display ID 11 press 1, 1
The numbers available are from 01255.
Not pressing any button within 10 seconds will exit the ID mode.
If an error pressing of buttons other than the digits occurred, wait 1 second after the red LED lights off and then lights up again, then press the correct digits again.
4 Press the ENTER button to confirm.
The red LED blinks twice and then lights off.
N :
- Press the NORMAL button. The green LED blinks twice, indicating the remote control returns to normal operation.
It is necessary to set up the ID number for each display before selecting its ID number.
PRODUCT DESCRIPTION
1.7.3 R C USB

text_image
1 NORMAL ID 2 SOURCE FORMAT 3 LIST INFO 4 OK 5 ADJUST OPTIONS 6 VOL 7 12 13 8 15 9 16 1 2 ABC 3 DEF 4 GHI 5 JKL 6 MNO 7 PORS 8 TUV 9WXYZ 0 ... 11 ID SET ENTER1 PO ER
Turn the display on or to put the display into standby mode.
The button is only controlled by Scalar.
2 PLAY
Control playback of media (video/photo/music) files.
To play a media file, select USB
C edit or new add playlist choose media files > press the OK button to play all the media files in the playlist.
When playing a video, press the ■ button to stop playing. Press the ▶ button, to replay the video from the beginning.
When playing a video or displaying a slideshow, press the 11 button to pause playing.
All media files should be put at the folder, which is named "agn" with sub-folder, under the root directory of the specified storage (internal/USB/SD Card). All sub-folders (video/photo/music) are named by media types and shouldn't be changed.
:
:
:
Note that the root directories of three storages are
1 :
USB :
SD :
3 SOURCE
Choose USB as the input source.
The button is only controlled by Scalar.
4 ↑ HOME
Access the OSD menu.
The button is only controlled by Scalar.
5 ≡ LIST
Move the focus up to the next control or widget such as buttons.
6 NA IGATION
Navigate through menus and choose items.
7 OK OK
Confirm an entry or selection.
8 ADJUST
Move the focus down to the next control or widget such as buttons.
PRODUCT DESCRIPTION
9 MUTE
Turn the mute function on/off.
The button is only controlled by Scalar.
10


No function. These two buttons are only controlled by Scalar.
11 N ID SET ENTER
ID SET/ENTER No function. These two buttons are only controlled by Scalar.
12 FORMAT
Change the aspect ratio.
The button is only controlled by Scalar.
13 BACK
Return to the previous menu or exit from the previous function.
14 i INFO
Display information about current input signal. It is shown by Scalar.
USB C edit or new add playlist choose any media files > press the i button to show the information of the chosen media file.
15 OPTIONS
Open toolbar.
USB C edit or new add playlist press the button to open toolbar. Toolbar opens on the left side of the screen.
16 - +OLUME
Adjust the volume level. The buttons are only controlled by Scalar.
PRODUCT DESCRIPTION
1.7.4 I
B
R
C
The remote control is powered by two 1.5V AAA batteries.
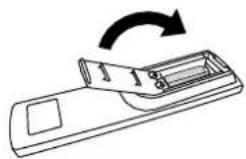
To install or replace batteries
1 Press and then slide the cover to open it.
2 Align the batteries according to the ( ) and (-) indications inside the battery compartment.
3 Replace the cover.
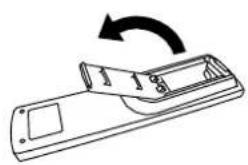
natural_image
Diagram of a device with a rotating arrow indicating rotation (no text or symbols)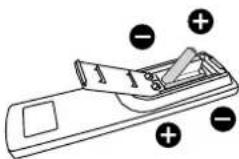
1.7.5 H
R C
Do not subject to strong shock.
Do not allow water or other liquid to splash the remote control. If the remote control gets wet, wipe it dry immediately.
Avoid exposure to heat and steam.
Other than to install the batteries, do not open the remote control.
1.7.6 O
R
R C
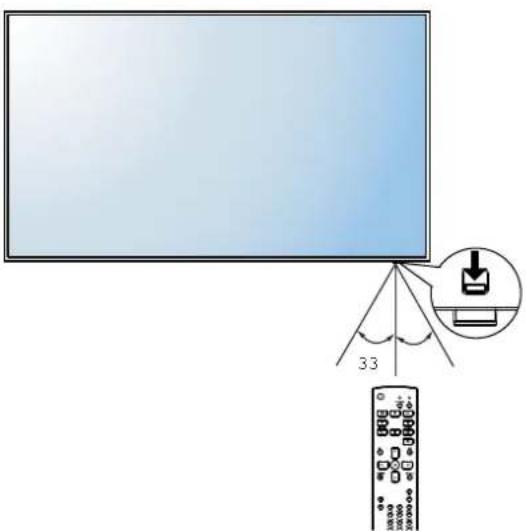
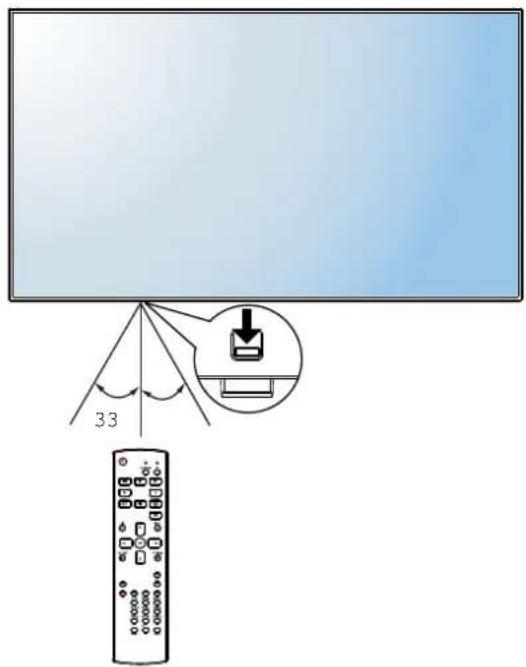
Point the top of the remote control toward the display s remote control sensor (on the left or right side) when pressing a button.
When using the remote control, the distance from the remote control to the sensor on the display should be less than 5m/16ft, and the horizontal and vertical angles should be less than 30°.
M 65 M 75
text_image
33
C
:
The incorrect use of batteries can result in leaks or bursting. Be sure to follow these instructions
Place "AAA" batteries matching the ( ) and ( ) signs on each battery to the ( ) and ( ) signs of the battery compartment.
♦ Do not mix battery types.
Do not combine new batteries with used ones. It causes shorter life or leakage of batteries.
Remove the dead batteries immediately to prevent them from liquid leaking in the battery compartment. Don't touch exposed battery acid, as it can damage your skin.
N :
If you do not intend to use the remote control for a long period, remove the batteries.
The remote control may not function properly when the remote control sensor on this display is under direct sunlight or strong illumination, or when there is an obstacle in the path of signal transmission.
PRODUCT DESCRIPTION
M 86
text_image
33CHAPTER 2: MAKING CONNECTIONS
2.1 C
P
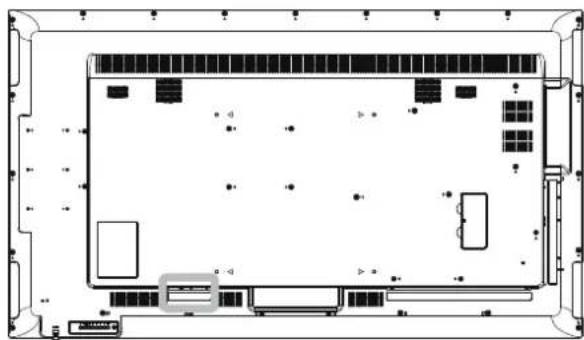
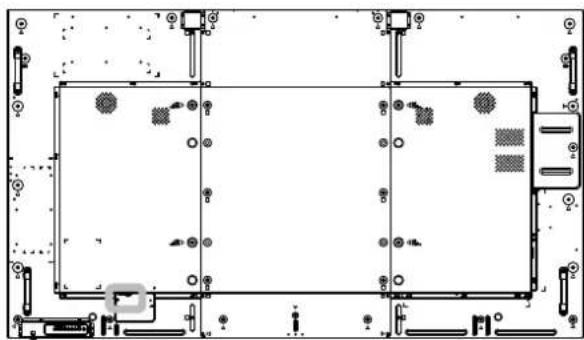
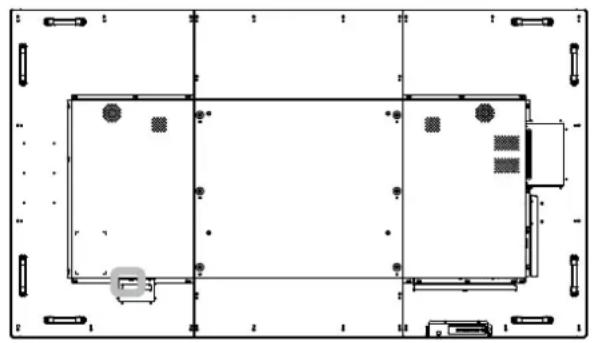
1 Connect one end of the power cord to the AC IN connector at the rear of the LCD display.
2 Connect the other end of the power cord to a power outlet or a power supply.
3 Set the M P switch to ON.
M 65
natural_image
Top-down schematic of a device layout with labeled components (no readable text or symbols)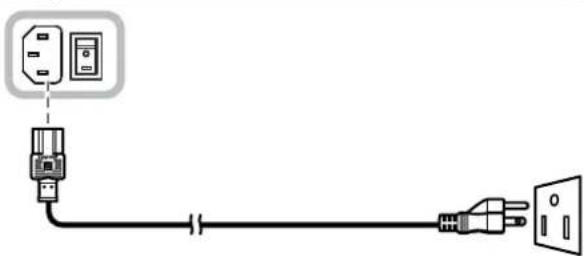
natural_image
Pure electrical circuit lines without any symbolsM 75
natural_image
Pure technical diagram of a rectangular device with mounting brackets and internal components, no text or symbols present.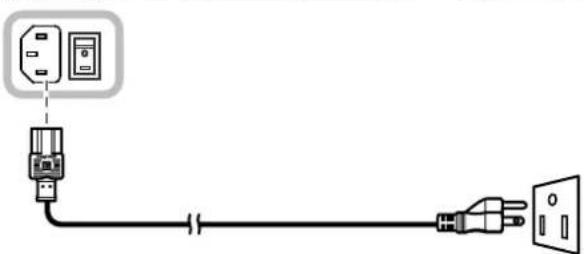
natural_image
Pure electrical circuit lines without any symbolsM 86
natural_image
Top-down schematic of a rectangular room with furniture and fixtures, no text or symbols present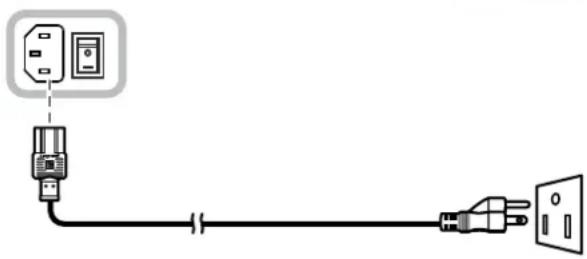
natural_image
Pure electrical circuit lines without any symbols
C :
Make sure that the LCD display is not connected to the power outlet before making any connections. Connecting cables while the power is ON may cause electric shock or personal injury.
When unplugging the power cord, hold the power cord by the plug head. Never pull by the cord.
MAKING CONNECTIONS
2.2 C
C
2.2.1 U GAI
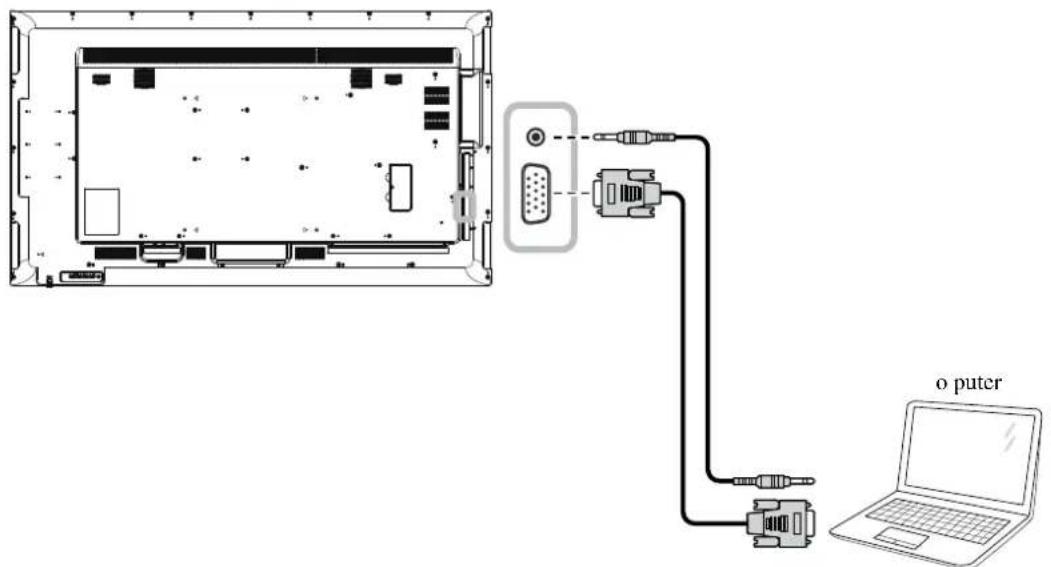
Connect one end of a D-sub cable to the VGA IN connector of the LCD display and the other end of a D-sub cable to the VGA OUT (D-Sub) connector of the computer.
For audio input, connect one end of an audio cable to the AUDIO IN connector of the LCD display and the other end of an audio cable to the AUDIO OUT connector of the computer.
M 65
text_image
Diagram showing a device setup with an open panel, connected to an Oputer via an VGA cable to a laptop.u pin
M 75
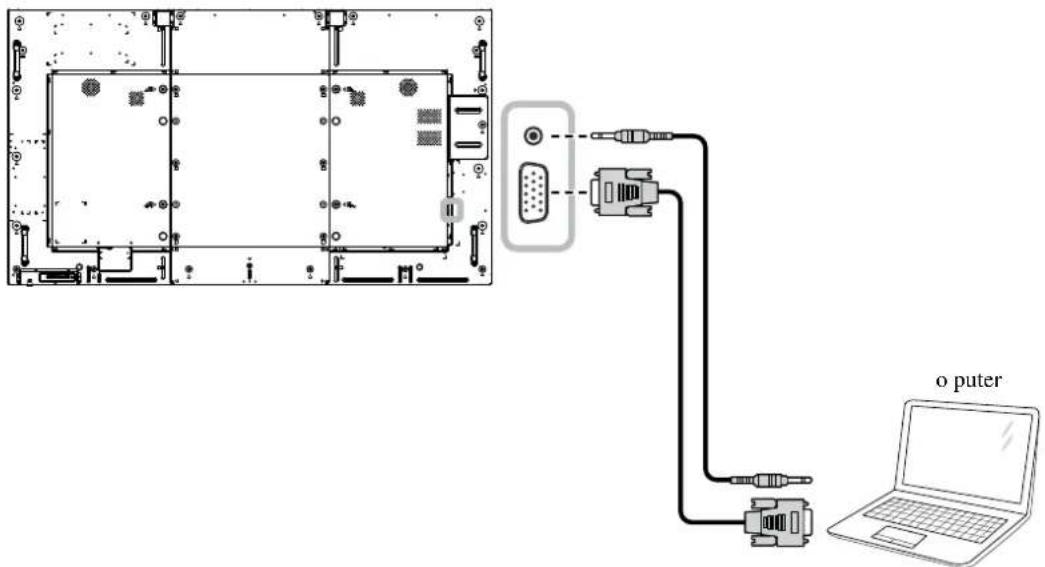
text_image
Diagram showing a device setup with an o puter connected to a laptop via an VGA cable, alongside a schematic view of the internal components.u pin
MAKING CONNECTIONS
M 86
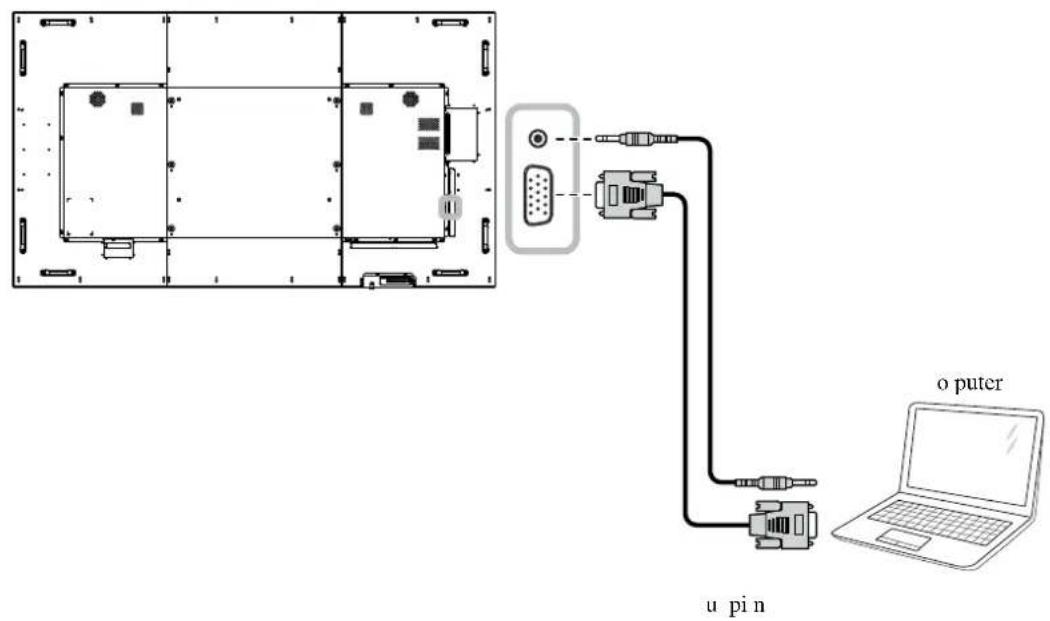
text_image
o puter u pin2.2.2 U D P I
Connect one end of a DisplayPort cable to the DisplayPort IN connector of the LCD display and the other end of a DisplayPort cable to the DisplayPort OUT connector of the computer.
M 65
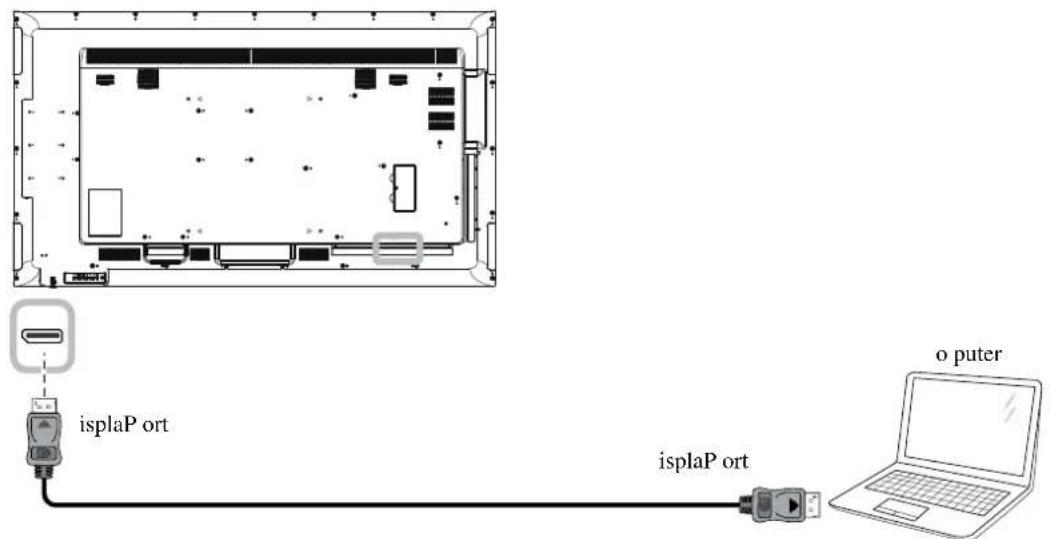
text_image
isplaP ort isplaP ort o puterMAKING CONNECTIONS
M 75
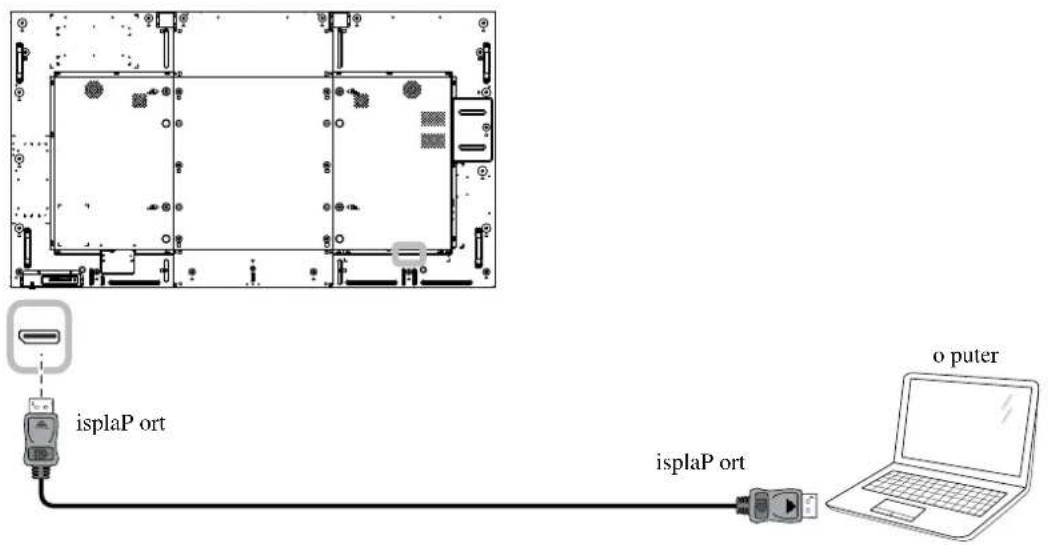
text_image
isplaP ort isplaP ort o puterM 86
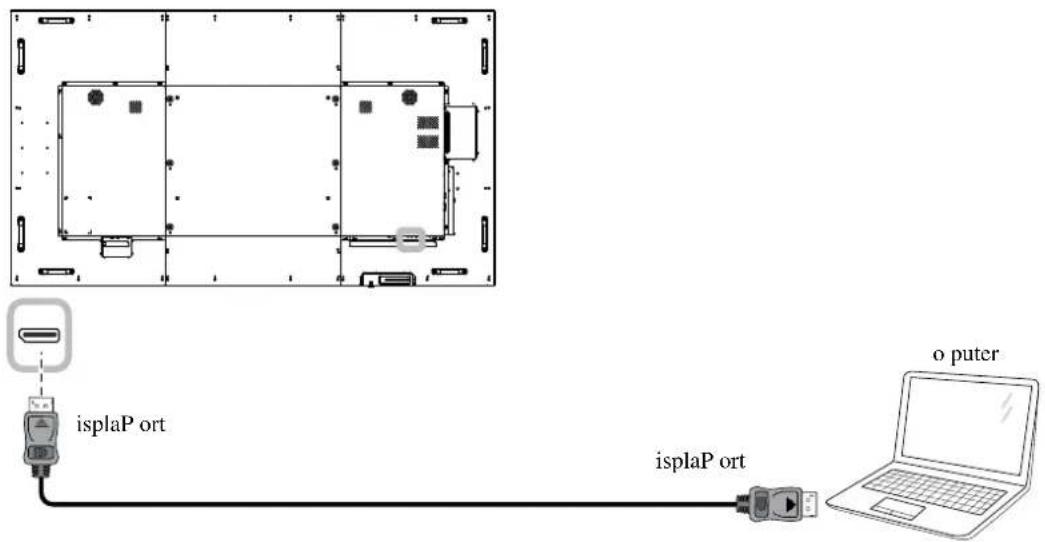
text_image
isplaP ort isplaP ort o puterMAKING CONNECTIONS
2.2.3 U HDMI I
Connect one end of an HDMI cable to the HDMI IN connector of the LCD display and the other end of an HDMI cable to the HDMI OUT connector of the computer.
M 65
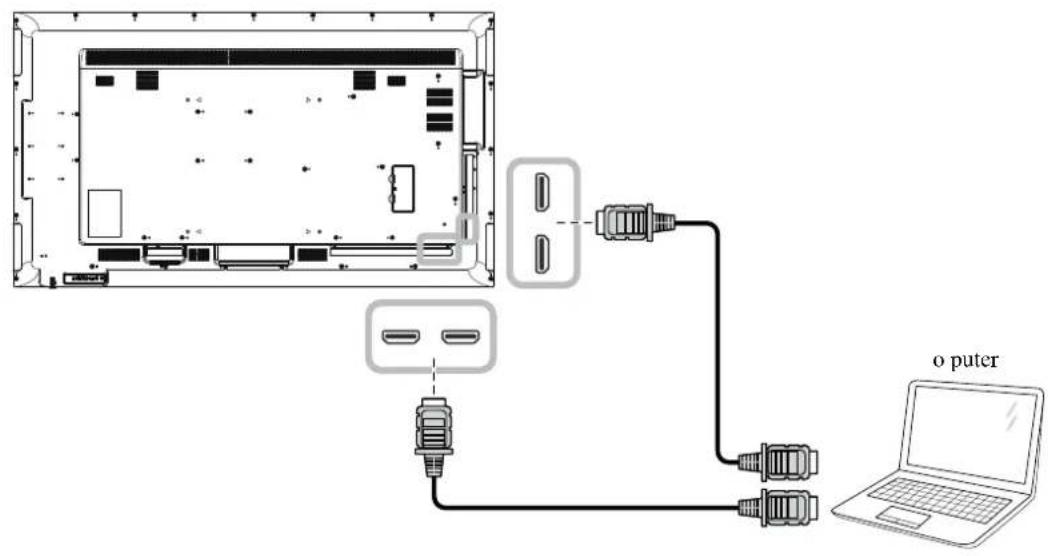
text_image
o puterM 75
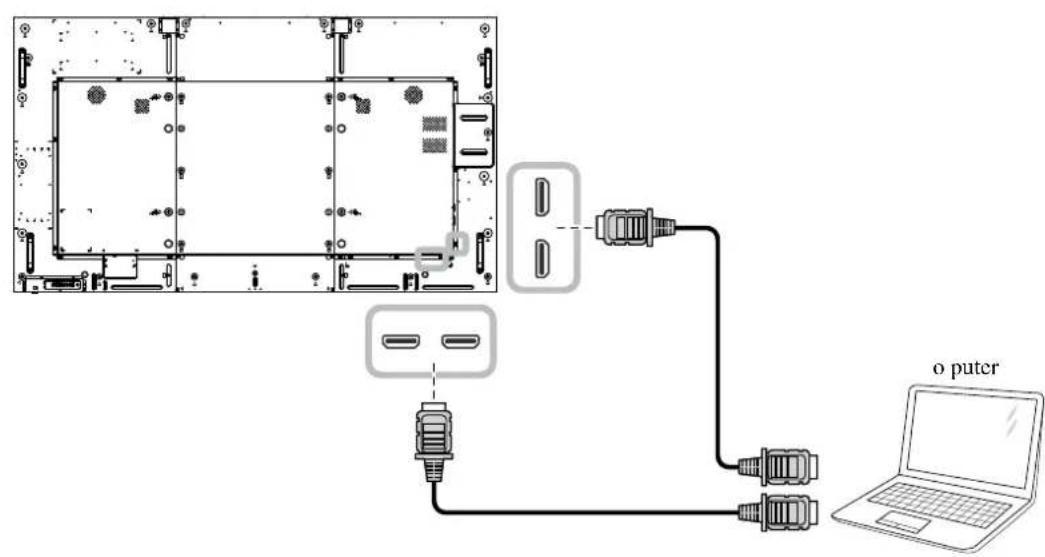
text_image
Diagram showing connections between an electronic device, a laptop, and a power adapter with labeled ports.MAKING CONNECTIONS
M 86
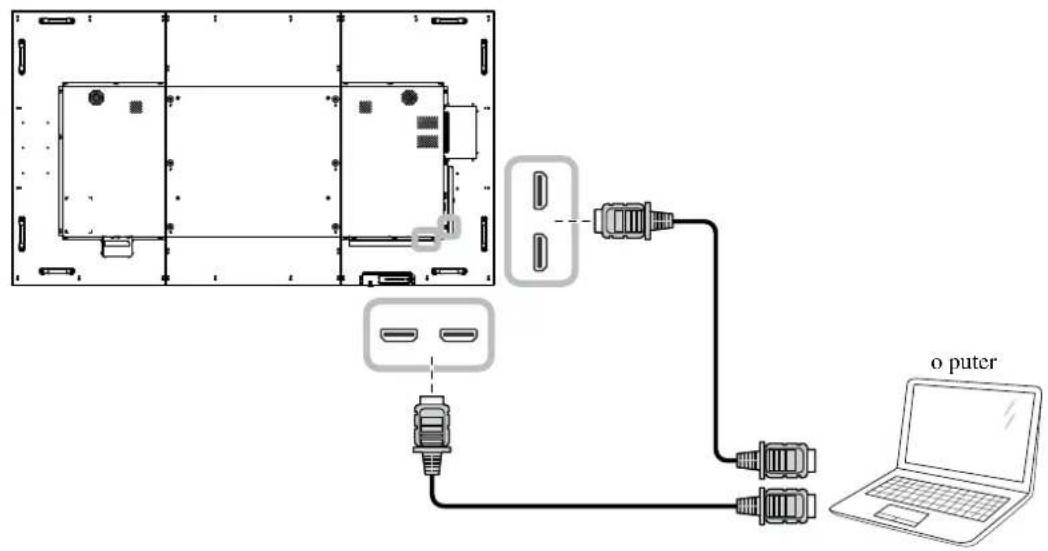
text_image
o putcr2.3 C
E
E
P
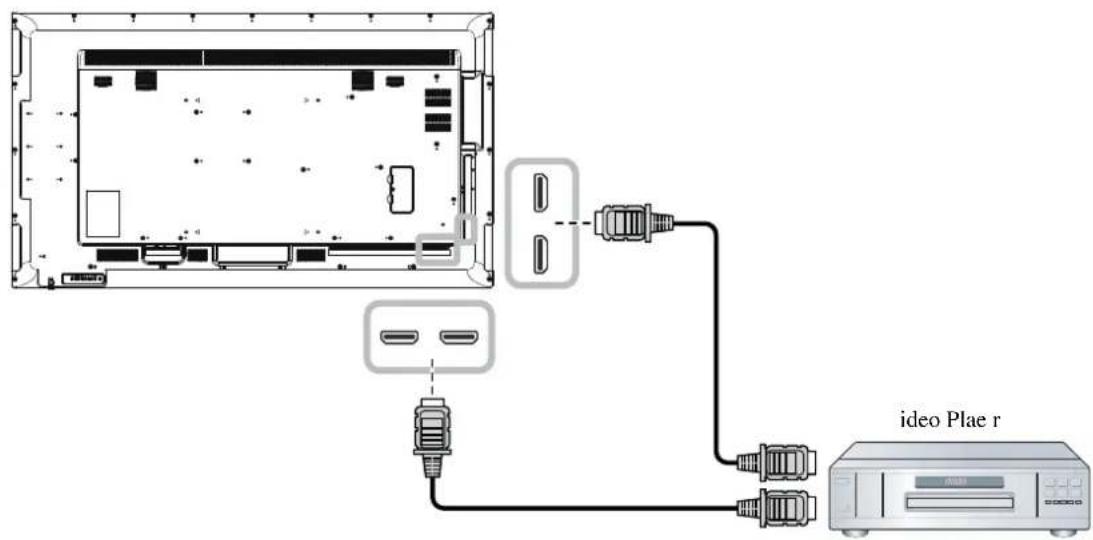
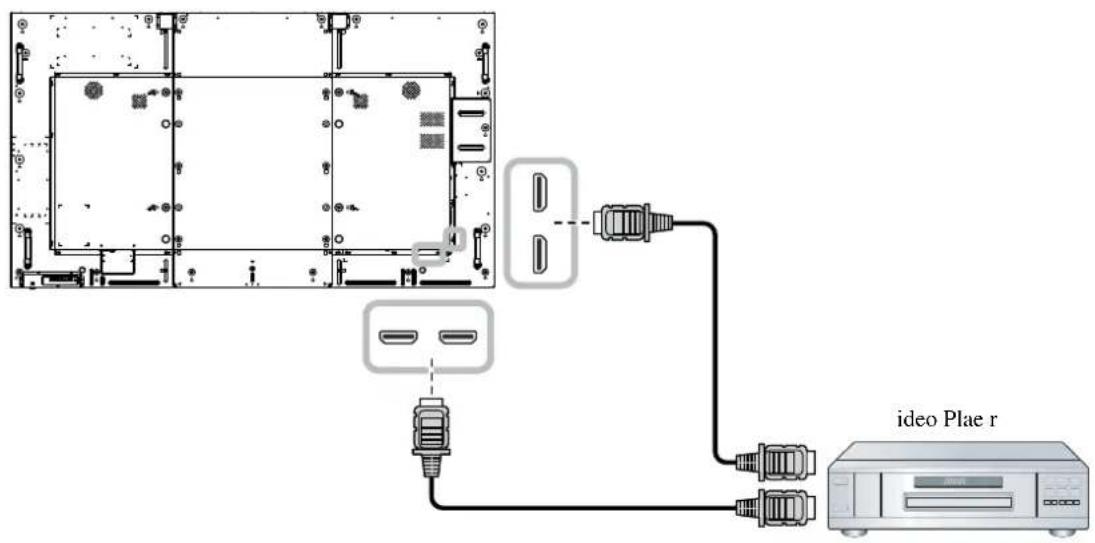
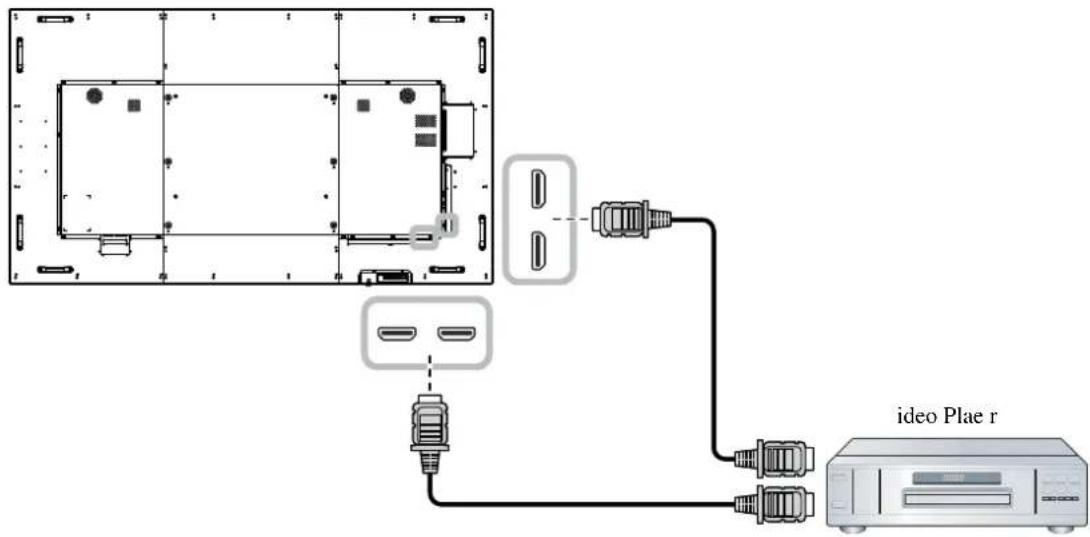
2.3.1 U HDMI I
Connect one end of an HDMI cable to the HDMI IN connector of the LCD display and the other end of an HDMI cable to the HDMI OUT connector of the video player.
M 65
text_image
ideo Plae rMAKING CONNECTIONS
M 75
text_image
ideo Plae rM 86
text_image
ideo Plae rMAKING CONNECTIONS
2.4 C
A E
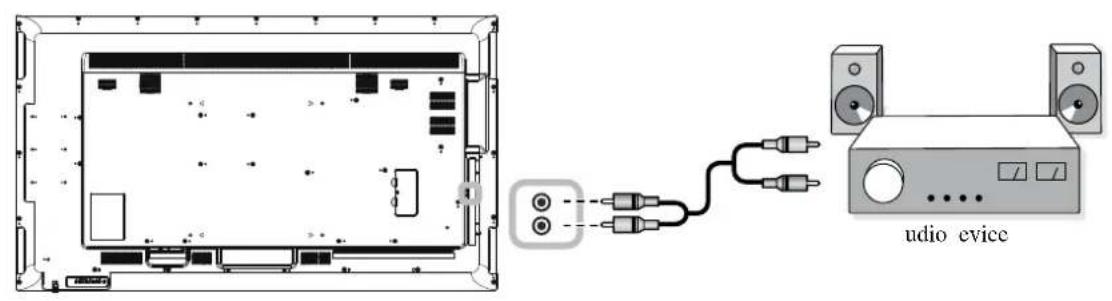
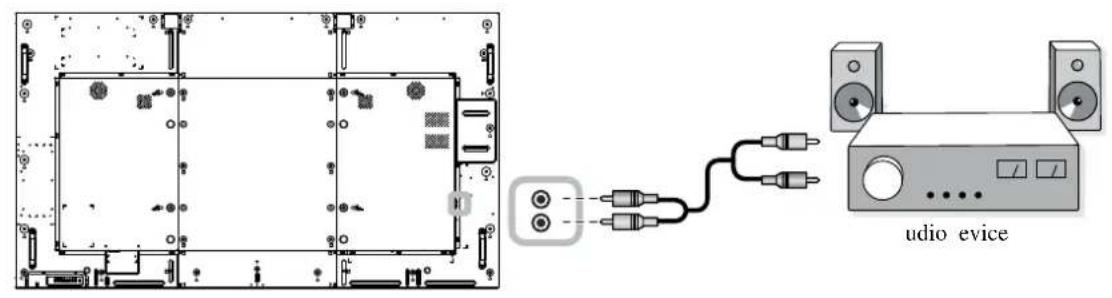
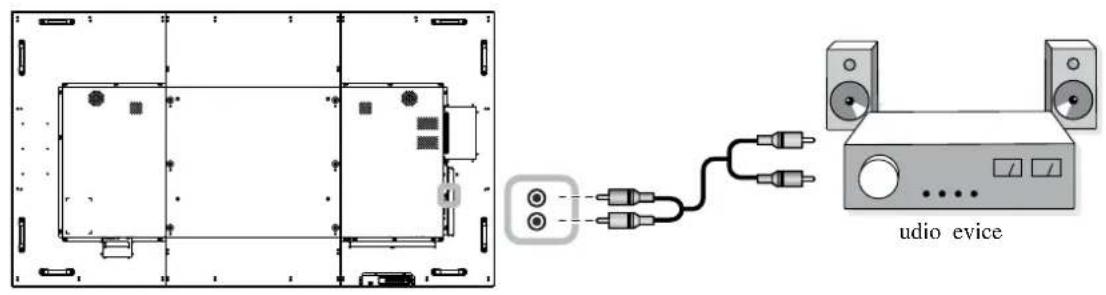
2.4.1 C
E A D
Connect one end of an audio cable to the AUDIO OUT connectors of the LCD display and the other end of an audio cable to the AUDIO IN connectors of the audio device.
M 65
text_image
audio eviceM 75
text_image
audio eviceM 86
text_image
audio eviceMAKING CONNECTIONS
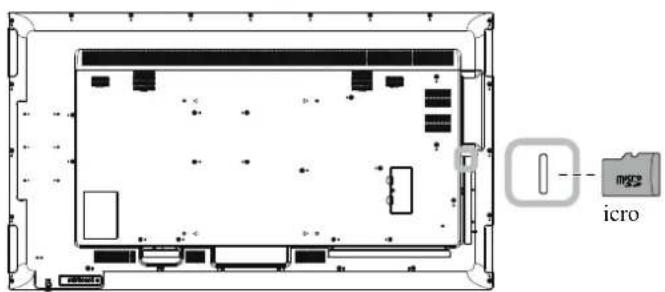
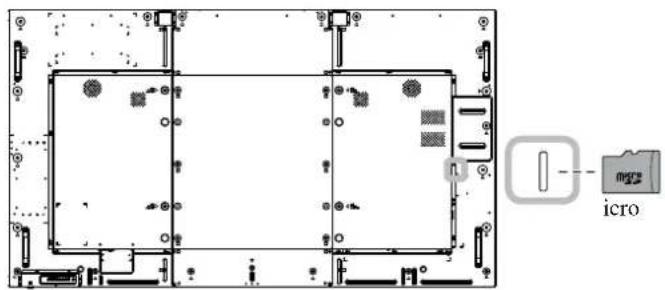
2.5 U
C R
Insert a micro SD card into the slot.
M 65
text_image
micro microM 75
text_image
micro mgsM 86
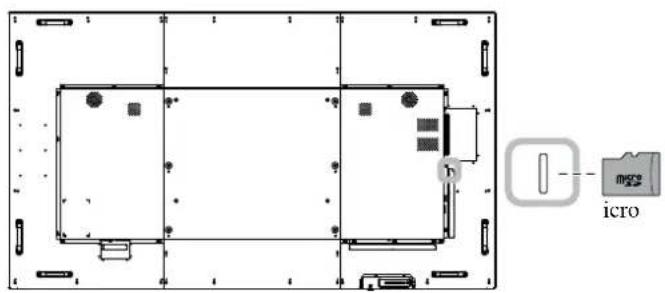
text_image
micro h icroMAKING CONNECTIONS
2.6 Connecting Multiple Displays in a Daisy-chain Configuration
You can interconnect multiple displays to create a daisy-chain configuration for applications such as a video wall.

C :
To avoid unnecessary strain on the bee I, it is highly recommended to keep a minimum space of 0.5mm in which a business card is able to slip between all displays on all sides.
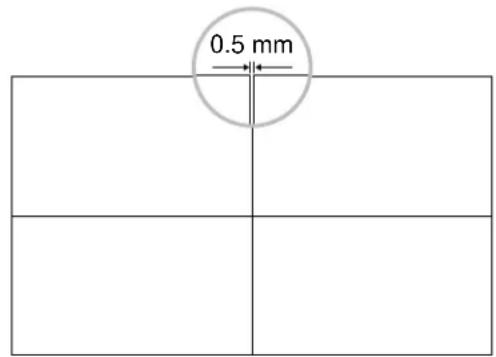
text_image
0.5 mm2.6.1
D
C
C
Connect the RS232 OUT connector of DISPLA 1 to the RS232 IN connector of DISPLA 2.
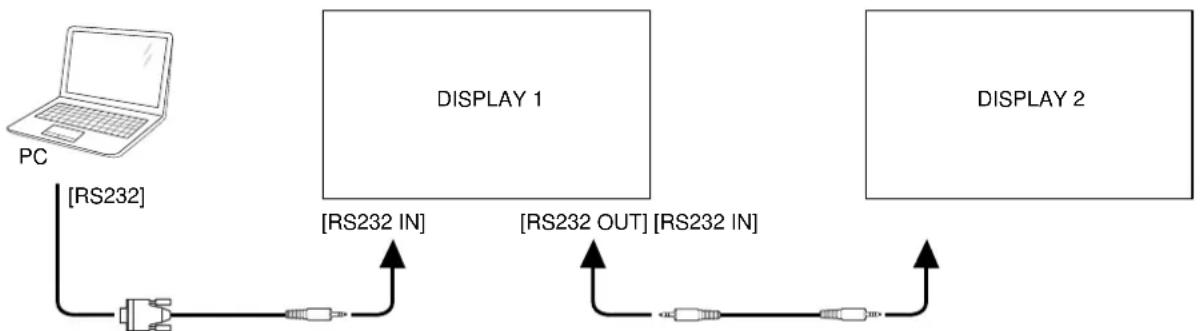
flowchart
graph LR
    PC["PC"] -->|[RS232]| A["Switch"]
    A -->|[RS232 IN]| B["DISPLAY 1"]
    B -->|[RS232 OUT] [RS232 IN]| C["DISPLAY 2"]
    C -->|[RS232 IN]| A
MAKING CONNECTIONS
2.7 IR C
Connect the IR sensor cable to the IR IN connector of the LCD display.
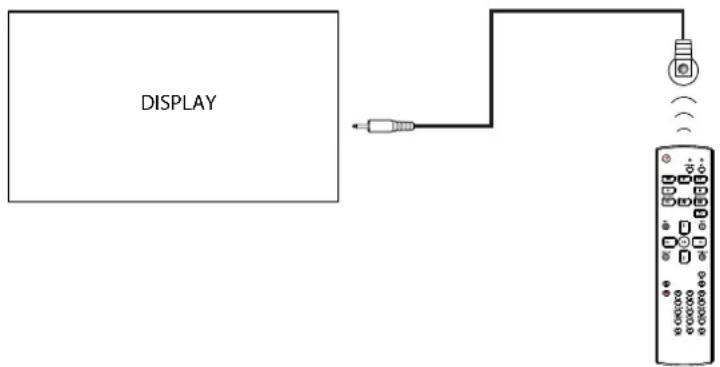
text_image
DISPLAYN :
This display's remote control sensor will stop working if the IR IN is connected.
◆ IR loop through connection can support up to 9 displays.
- IR in daisy chain via RS232 connection can support up to 9 displays.
2.8 IR P T C
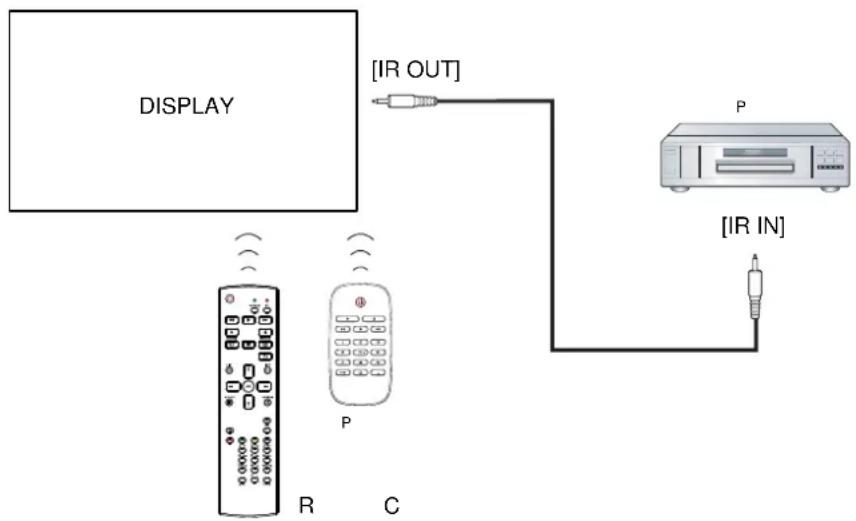
Connect one end of an IR extender cable to the IR OUT connector of the LCD display and the other end of an IR extender cable to the IR IN connector of the video player.
flowchart
graph TD
    A["DISPLAY"] -->|IR OUT| B["P"]
    A -->|IR IN| C["Device"]
    D["R"] --> E["P"]
    F["C"] --> G["P"]
    style A fill:#f9f,stroke:#333
    style B fill:#ccf,stroke:#333
    style C fill:#cfc,stroke:#333
    style D fill:#fcc,stroke:#333
    style E fill:#cff,stroke:#333
    style F fill:#ffc,stroke:#333
    style G fill:#fcc,stroke:#333
CHAPTER 3: USING THE LCD DISPLAY
3.1 T
P
text_image
NORMAL ID SOURCE FORMAT LIST INFOPO ER button
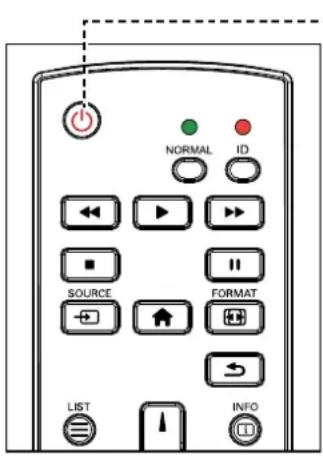
1 Plug the power cord to a power outlet or power supply.
2 Press the ⏻ button to turn the LCD display on.
When the LCD display is turned on, press the ⏻ button to turn off the LCD display.
3.1.1 I S
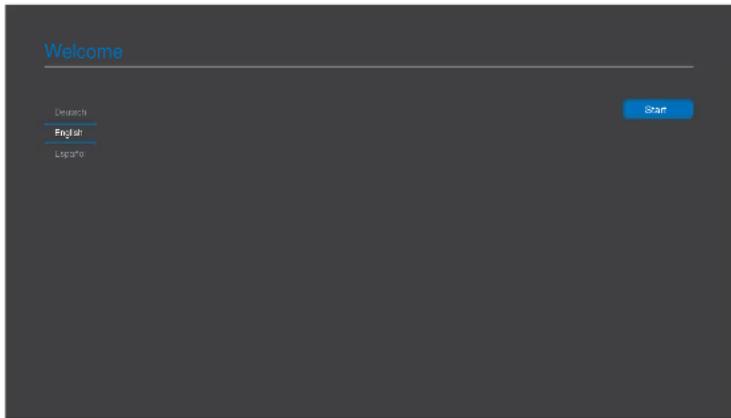
After you turn on the LCD display, a Welcome screen opens. You are prompted to select the default OSD language, configure network settings, and more. Follow the on-screen instructions to complete the initial setup.
text_image
Welcome Deutsche English Lisparle StartN :
- The LCD display still consumes power as long as the power cord is connected to the power outlet. Disconnect the power cord to completely cut off power.
USING THE LCD DISPLAY
3.2 S


text_image
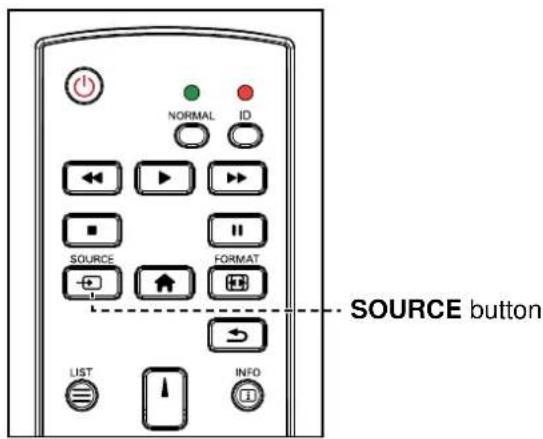
NORMAL ID SOURCE FORMAT SOURCE button LIST INFO1 Press the → button.
2 Press the ↓ or ↑ button to choose a device, then press the OK button.
3.3 A
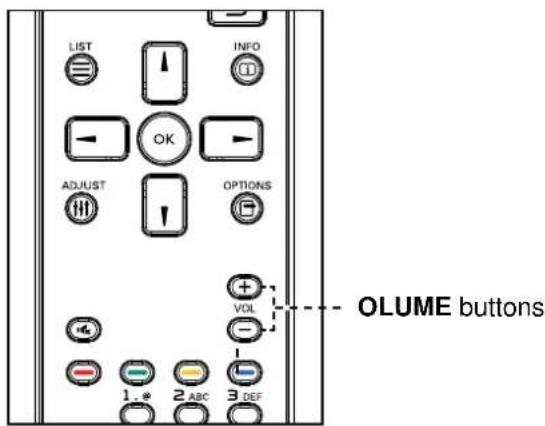
text_image
LIST INFO ADJUST OPTIONS VOL OLUME buttons 1. * 2 ABC 3 DEFPress the -or button to adjust the volume.
N :
- After pressing the button, a menu with available input sources will be displayed on the screen.
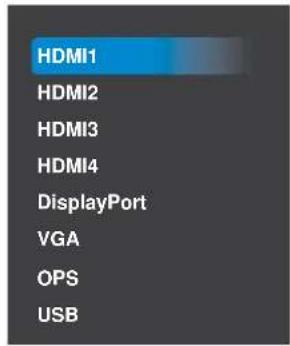
text_image
HDMI1 HDMI2 HDMI3 HDMI4 DisplayPort VGA OPS USBIf the selected input source signal is not connected to the LCD display or is turned off, the screen will display multi-color screen.
N :
- After pressing the—or + button, the volume icon is displayed on the screen automatically.
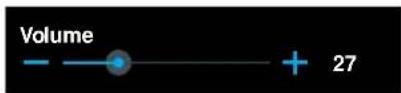
- Press the button to mute the audio.
USING THE LCD DISPLAY
3.4 C


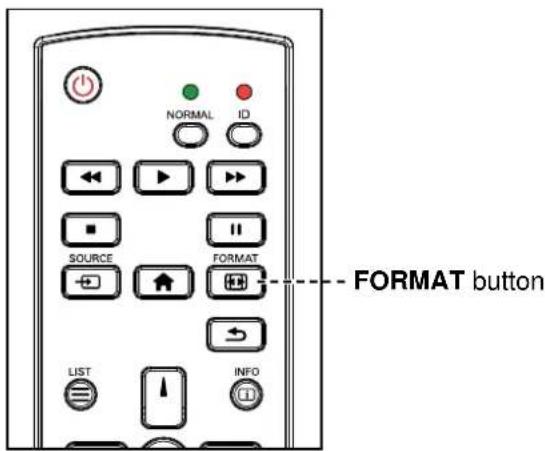
text_image
NORMAL ID SOURCE FORMAT LIST INFO -- FORMAT buttonPress the 📄 button repeatedly to change the picture format.
N :
The available picture formats include
◆ F Restores the correct proportions of pictures transmitted in 16 9 using the full screen display.
4:3 The picture is reproduced in 4:3 format and a black band is displayed on either side of the picture.
R This mode displays the image pixel-by-pixel on screen without scaling the original image sie.
◆ 21:9 The picture is reproduced in 21:9 format and a black band at the top and bottom.
♦ C Choose to apply the custom o om settings set in the S C submenu.
CHAPTER 4: USB SOURCE
4.1 A USB M
N :
◆ The control buttons described in this section are on the remote control.
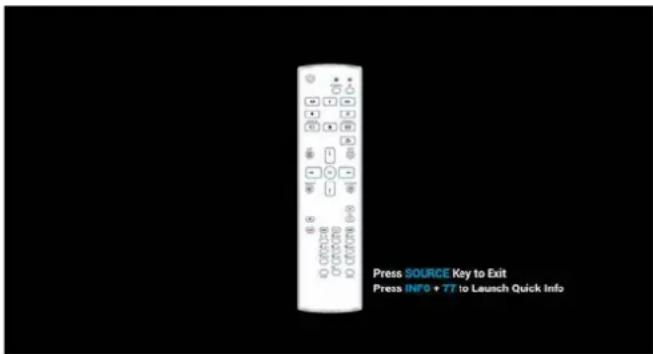
- Press the button once in any menu to return to the previous menu or repeatedly to return to the Hint screen as illustrated below.
text_image
Press SOURCE Key to Exit Press INFO + 77 to Launch Quick InfoTo access the USB source, do the following
text_image
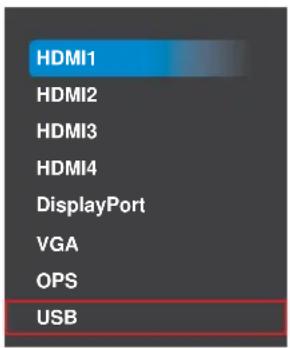
HDMI1 HDMI2 HDMI3 HDMI4 DisplayPort VGA OPS USB1 Press the button to open a list of input sources.
2 Press the ▲ or ▼ button to select USB source from the list.
3 Press the OK button on the remote control to open the item.
4.2 U USB M
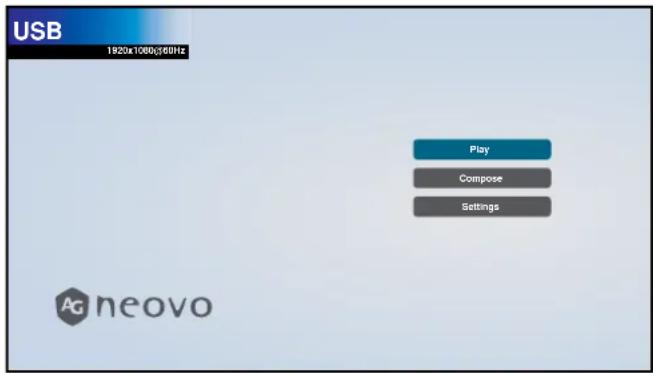
Use the USB source to play your favorite photo, video, and music files. The files can be grouped into playlists from various storage devices, such as internal storage, USB storage, and SD card. The total number of playlists can be up to seven but the media content of a single playlist is not limited.
text_image
USB 1920x1080/66Hz Play Compose Settings Ag neovo4.2.1 C P
To create a playlist, do the following
1 Copy your photo, video, and/or music files on the storage device to the following paths respectfully:
— Photo root dir of storage /agn/photo/
— Video root dir of storage /agn/video/
— Music root dir of storage /agn/music/
N :
◆ Music files can be selected and used as background music for a slideshow.
2 Connect the storage device to the LCD monitor (if necessary).
3 Set the input source to USB. See "4.1 Accessing the USB Menu".
4 Press the ▲ or ▼ button to select the C menu.
tab and then press the OK button to open the PlayList
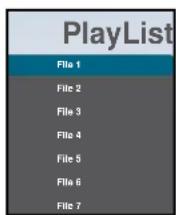
5 Press the ▲ or ▶ button to select a file among F 1 to F 7 where you want to add your media files and then press the OK button.
6 Press the or button to select a storage device where are saved your media files and then press the OK button.
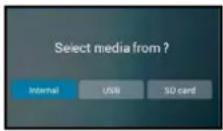
N :
◆ Press the OK button again if prompted to confirm the path.
A file browser opens where your media files on the storage device are displayed in the Source column and the content of the playlist is displayed in the Playlist column.
7 Press the ▲ or ▶ button to select the P or folder and then press the OK button. The folder content is displayed in the Source column.
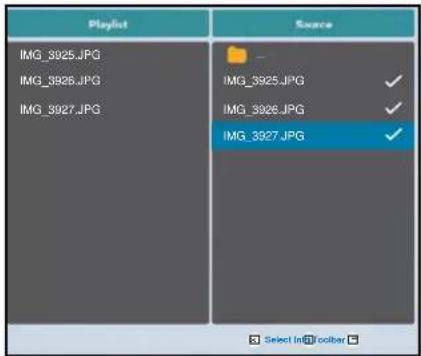
text_image
Playlist IMG_3925.JPG IMG_3926.JPG IMG_3927.JPG Search IMG_3925.JPG IMG_3926.JPG IMG_3927.JPG Select Influcor8 Press the ▲ or ▶ button to select a media file for reviewing (if necessary). Press any of the following buttons
— OK S To select a single file. Press the OK button again to deselect the file.
— i I To preview the media file.
9 Press the O button to start adding or modifying the playlist.
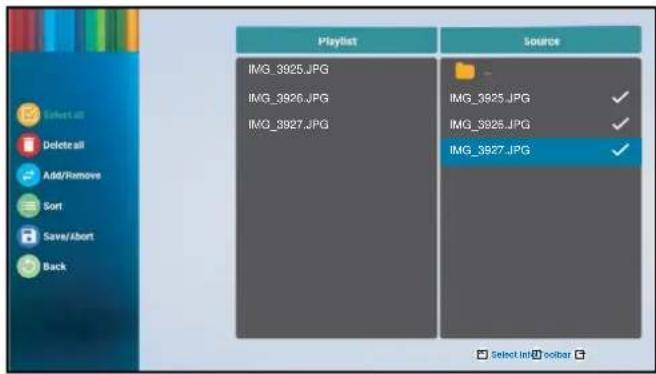
text_image
Playlist IMG_3925.JPG IMG_3926.JPG IMG_3927.JPG Source IMG_3925.JPG IMG_3926.JPG IMG_3927.JPG Select inf @oibarThen press the or button and press the button to select any of the following actions
— S Select all the visible media files on the storage device.
— D Delete all the media files in the playlist.
— A R Add or remove the selected files from the playlist.
— S Sort the media files in the playlist one by one. The Sort menu opens.
a) Press the ▲ or ▼ button and then press the OK button to select the file. Next to the selected file appears 📁 icon.
b) Press the ▲ or ▼ button to adjust the file order in the Slideshow.
—S A Save the playlist or discard the modifications. Press the —or — button to select S or A and then press the OK button to confirm. If you have added only photos to the playlist, you are prompted to add background music to the slideshow. Press the I or I button to select Y or N and press the OK button to confirm. If you decide to add background music to the slideshow, you are prompted to select a music file from the Music folder.
— B Close the toolbar.
10 Repeat steps 1 to 9 for creating more playlists.
4.2.2 M P
To modify a playlist, do the following
1 Set the input source to USB. Refer to "4.1 Accessing the USB Menu".
2 Press the I or I button to select the C tab and then press the OK button to open the PlayList menu.
3 Press the ▲ or ▼ button to select the playlist that you want to modify and then press the OKton.
N :
◆ ou can modify only playlists that have the icon next to the F , where “#” is the file number.
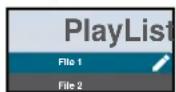
Those playlists that do not have the icon are empty.
4 Press the or button to select E or D the playlist and then press the OK button to confirm.
5 Perform any of the modifications as described in steps 7 to 9 in "4.2.1 Creating a Playlist" section.
4.2.3 P F P
To play files in a playlist, do the following:
1 Set the input source to USB. See "4.1 Accessing the USB Menu".
2 Press the ▲ or ▶ button to select the P tab and then press the OK button to open the PlayList menu.
3 Press the ▲ or ▼ button to select the playlist that you want to play and then press the Ⓤkton.
N :
◆ ou can play only playlists that have the ➕ icon next to the F , where “#” is the file number.
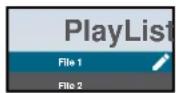
Those playlists that do not have the icon are empty.
4.2.4 USB M S
To configure USB menu settings, do the following:
1 Set the input source to USB. See "4.1 Accessing the USB Menu".
2 Press the ▲ or ▼ button to select the S tab and then press the OK button to open the Settings menu.
3 Press the I or I button to select any of the menu items and then press the OK button to enter its configuration menu:
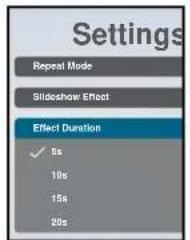
— R M Press the ▲ or ▶ button to set the playlist repeat mode to R or R
and then press the OK button to save the setting.
— S E Press the | or | button to set the slideshow effect to R , B ,
F , T , , L , R F , C , or N and then
press the OK button to save the setting.
text_image
Settings Repeat Mode Slidoshow Effect Effect Duration ✓ 5s 10s 15s 20s— E D Press the ▪ or ▪ button to set the slideshow effect duration to 5 , 10 , 15 , or 20 and then press the OK button to save the setting.
CHAPTER 5: ON SCREEN DISPLAY MENU
5.1 U OSD M
| M | N | O | |
| C | P | ||
| 1 | Display the main menu screen.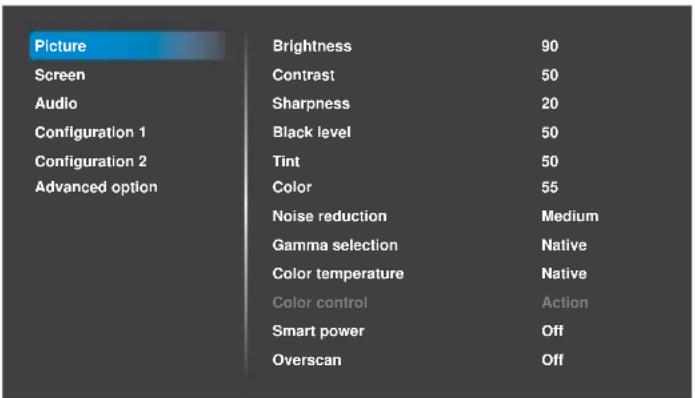 | Press theMENUbutton. | Press the▲button. |
| 2 | Enter the submenu.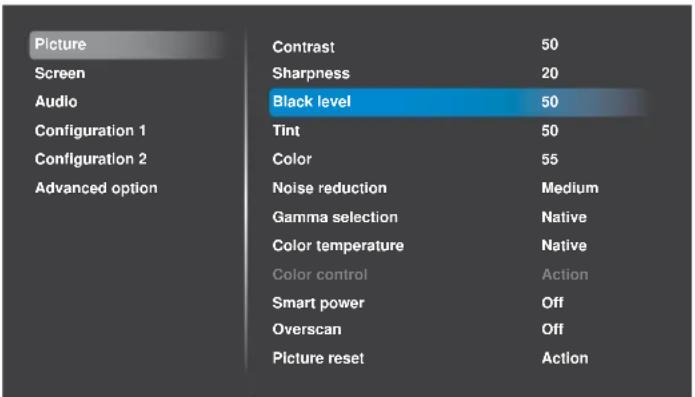 The highlighted item (blue) indicates the active submenu. The highlighted item (blue) indicates the active submenu. | 1 Press the▲or▼button to select the menu item.2 Press the + button to enter the submenu. | 1 Press the ↓ or ↓ button to select the menu item.2 Press theOKor→button to enter the submenu. |
| 3 | Adjust the settings.For example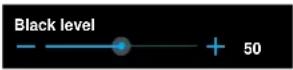 | 1 Press the▲or▼button to select the submenu item.2 Press the + button to open the submenu item.3 Press the▲or▼button to adjust the value of the menu item. | 1 Press the ↓ or ↓ button to select the submenu item.2 Press theOKbutton to open the submenu item.3 Press the→or→button to adjust the value of the menu item. |
| 4 | Exit the submenu. Press theMENUor | — button to return to the previous menu. | Press theOKor→button to return to the previous menu. |
ON SCREEN DISPLAY MENU
| M | N | O | |
| C | P | ||
| 5 | Close the OSD window. Press the MENU | button or buttonseveral times. | Press the ↑buttonor the buttonseveral times. |
When settings are modified, all changes are saved when the user does the following:
Proceeds to the another menu.
Exits the OSD menu.
Waits for the OSD menu to disappear.
N :
◆ Availability of some menu items depend on the input source signal. If the menu is not available, it is disabled and grayed out.
ON SCREEN DISPLAY MENU
5.2 OSD M T
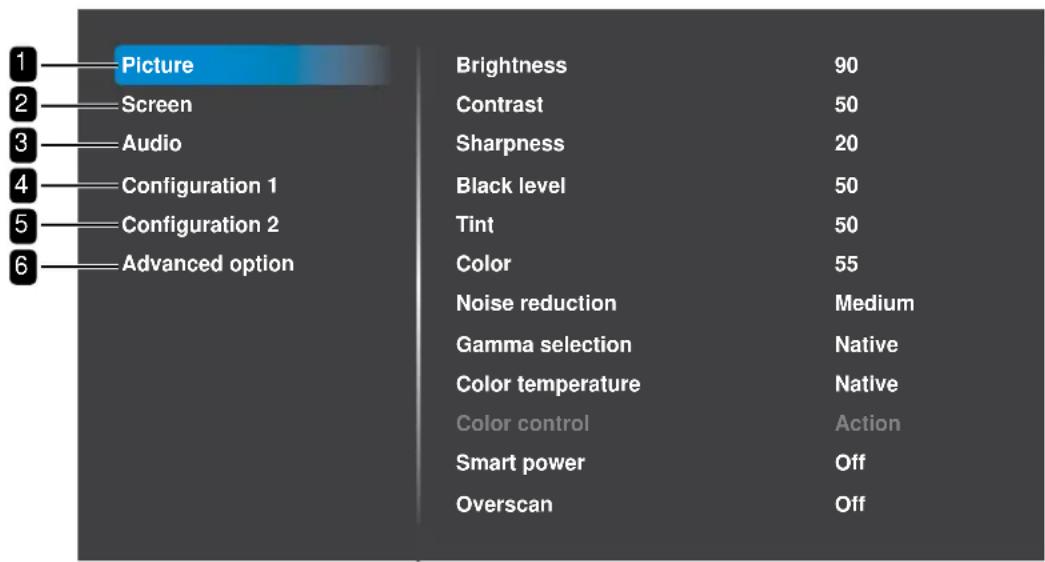
text_image
Picture Screen Audio Configuration 1 Configuration 2 Advanced option Brightness 90 Contrast 50 Sharpness 20 Black level 50 Tint 50 Color 55 Noise reduction Medium Gamma selection Native Color temperature Native Color control Action Smart power Off Overscan Off| MMSR | ||
| 1. Picture Brightness | ContrastSharpnessBlack levelTintColorNoise ReductionGamma selectionColor temperatureColor controlSmart powerOverscanPicture reset | See page 49. |
| 2. Screen H position | V positionClockClock phaseoom modeCustom o omAuto adjustScreen reset | See page 53. |
ON SCREEN DISPLAY MENU
| MMSR | ||
| 3. Audio Balance | TrebleBassVolumeAudio out (line out)Maximum volumeMinimum volumeMuteAudio sourceAudio resetAudio Out Sync | See page 56. |
| 4. Configuration1 Switch on state | Panel savingRS232 routingBoot on sourceWOLRGB RangeConfiguration1 resetFactory reset | See page 58. |
| 5. Configuration2 OSD turn off | OSD H positionOSD V positionInformation OSDLogoMonitor IDHeat statusMonitor informationHDMI VersionConfiguration2 reset | See page 62. |
| 6. Advanced option Network | IR controlPower LED lightKeyboard controlOff TimerDate and timeScheduleHDMI with One WireLanguageOSD TransparencyPower SaveOPS settingsAdvanced option reset | See page 64. |
CHAPTER 6: ADJUSTING THE LCD DISPLAY
6.1 P S
| Picture | Brightness | 90 |
| Screen | Contrast | 50 |
| Audio | Sharpness | 20 |
| Configuration 1 | Black level | 50 |
| Configuration 2 | Tint | 50 |
| Advanced option | Color | 55 |
| Noise reduction | Medium | |
| Gamma selection | Native | |
| Color temperature | Native | |
| Color control | Action | |
| Smart power | Off | |
| Overscan | Off |
| I F O | R | ||
| Brightness | Adjust the luminance of the screen image. | Press the ▲/▼ button on the control panel or the −button on the remote control to adjust the value. | 0 to 100 |
| Ori inal Settin | i h Settin | o Settin | |
 |  |  | |
| Contrast | Adjust the difference between the black level and the white level.N :This option is not available in USB mode. | Press the ▲/▼ button on the control panel or the −button on the remote control to adjust the value. | 0 to 100 |
| Ori inal Settin | i h Settin | o Settin | |
 |  |  |
ADJUSTING THE LCD DISPLAY
| I F O | R | ||
| Sharpness | Adjust the clarity and focus of the screen image.This option is not available in USB mode. | Press the ▲▼button on the control panel or the ┌button on the remote control to adjust the value. | 0 to 100 |
| Black level | Adjust the black level of the screen image. Low brightness setting makes black colour darker.N :This option is not available in USB mode. | 0 to 100 | |
| Tint | Adjust the colour tint.N :This option is not available in USB mode. | 0 to 100 | |
| Color | Adjust the color saturation of the picture.N :This option is not available in USB mode. | 0 to 100 | |
| Noise reduction | Adjust the noise reduction to help remove noise from images. This helps produce clearer and crisper images.N :This option is not available in USB mode. | 1 Press the ▲▼button on the control panel or the |button on the remote control to select the setting.2 Press the Button on the control panel or the Button on the remote control to set the value. | OffLowMediumHigh |
oise Re uction Ooise Re uction On  | |||
ADJUSTING THE LCD DISPLAY
| IF O | R | ||
| Gamma selection | Adjust the non-linear setting for picture luminance and contrast.N :This option is not available in USB mode. | 1 Press the + button on the control panel or the OKton on the remote control to open the settings.2 Press the /▲button on the control panel or the /▼button on the remote control to select the setting.3 Repeat step 1 to set the setting.4 Press the ↓button and then the + button on the remote control to select CANCEL or OK.5 Press the + button on the control panel or the OKton on the remote control to confirm the setting. | Native2.22.4S gammaD-image |
| Color temperature | Select a color temperature for the image. A lower color temperature will have a reddish tint, whilst a higher color temperature gives off a more bluish tint. | 1 Press the + button on the control panel or the OKton on the remote control to open the settings.2 Press the /▲button on the control panel or the /▼button on the remote control to select the setting.3 Repeat step 1 to set the setting.4 Press the ↓button and then the + button on the remote control to select CANCEL or OK.5 Press the + button on the control panel or the OKton on the remote control to confirm the settings. | 6500K7500K9300K10000KNativeUser 1User 2 |
ADJUSTING THE LCD DISPLAY
| IF O | R | ||
| Color control | Adjust the color tones of the image precisely by changing the User-R (Red), User-G (Green) and User-B (Blue) settings independently.N :Color control option becomes available if you set the Color temperature to U 1 or U 2.This option is not available in USB mode. | 1 Press the ▲/▼ button on the control panel or the 1/1 button on the remote control to select the setting.2 Press the Button on the control panel or the OKton on the remote control to set the value.3 Press the ▲/▼ button on the control panel or the + button on the remote control to adjust the value. | User-R (0-255) (User 1)User-G (0-255) (User 1)User-B (0-255)(User 1)2000K -10000K (User 2) |
| Smart power | Smart Power control is not relative to brightness controlInitial setting Brightness» 70 (in the range from 0-100)» Power consumption70 of maximum power consumptionSmart Power» Off No adaptation.» Medium 80 of power consumption is relative to the current settings.» High 65 of power consumption is relative to the current settings. | 1 Press the ▲/▼ button on the control panel or the 1/1 button on the remote control to select the setting.2 Press the Button on the control panel or the OKton on the remote control to set the value. | OffMediumHigh |
| Overscan | Change the display area of the image.On Display area is about 95 .Off Display area is about 100 .N :This option is not available in USB mode. | 1 Press the ▲/▼ button on the control panel or the 1/1 button on the remote control to select the setting.2 Press the Button on the control panel or the OKton on the remote control to set the value. | OffOn |
ADJUSTING THE LCD DISPLAY
| IF O | R | ||
| Picture reset | Reset all settings in the Picture menu to the factory preset values. | 1 Press the ▲/▼ button on the control panel or the −button on the remote control to select the setting.2 Press the button on the control panel or the OK button on the remote control to set the value. | CANCEL RESET |
6.2 S S
| Picture | H position | |
| Screen | V position | |
| Audio | Clock | |
| Configuration 1 | Clock phase | |
| Configuration 2 | Zoom mode | Full |
| Advanced option | Custom zoom | Action |
| Auto adjust | Action | |
| Screen reset | Action |
1 Press the MENU button on the control panel or the button on the remote control to call out the OSD window.
2 Press the ▲/▼ button on the control panel or the √ button on the remote control to select S . Then press the -button on the control panel or the ○ button on the remote control.
3 Press the ▲/▼ button on the control panel or the √ button on the remote control to select an option.
4 Press the +button on the control panel or the Button on the remote control to open the submenu item.
| I F O | R | ||
| H position | Move the image to the right or to the left.N :This option is available only if the input source is VGA. | Press the ▲/▼button on the control panel or the ≠button on the remote control to adjust the value. | 0 to 100 |
| V position | Move the image up or down.N :This option is available only if the input source is VGA. | 0 to 100 |
ADJUSTING THE LCD DISPLAY
| IF O | R | ||
| Clock | Adjust the width of the image.N :This option is available only if the input source is VGA. | Press the ▲/▼ button on the control panel or the ↕ button on the remote control to adjust the value. | 0 to 100 |
| Clock phase | Adjust to improve the focus, clarity and stability of the image.N :This option is available only if the input source is VGA. | 0 to 100 | |
| oom mode | The pictures you receive may be transmitted in 16 9 format (wide screen) or 4 3 format (conventional screen). The 16 9 pictures sometimes have a black band at the top and bottom of the screen (letterbox format). oom mode will be deactivated when Anti-Burn-inTM is activated. | 1 Press the + button on the control panel or the OKton on the remote control to open the settings.2 Press the ▲/▼ button on the control panel or the √ button on the remote control to select the setting.3 Repeat step 1 to set the setting.4 Press the ▼ button on the control panel or the ↓ button on the remote control. Then press the ▲ button on the control panel or the ↕ button on the remote control to select CANCEL or OK.5 Press the + button on the control panel or the OKton on the remote control to confirm the setting. | Full4 3Real21 9Custom |
ADJUSTING THE LCD DISPLAY
| IF O | R | ||
| Custom o om | Use this function to further customie the o om settings to suit the image you want to display.N :Custom o om option becomes available if you set the oom mode to C. | ||
| oom Expand the horio ntal and vertical sie s of the image simultaneously. | 1 Press the ▲/▼ button on the control panel or the 1/1 button on the remote control to select the setting.2 Press the Button on the control panel or the 0/1ton on the remote control to enter value adjustment menu.3 Press the ▲/▼ button on the control panel or the 1/1 button on the remote control to adjust the value. | oomH oomV oomH positionV position0 to 100 | |
| H oom Expand the horio ntal sie of the image only. | |||
| V oom Expand the vertical sie of the image only. | |||
| H position Move the horio ntal position of the image to the left or to the right. | |||
| V position Move the vertical position of the image up or down. | |||
| Auto adjust | Use this function to automatically optimie the display of VGA input image.N :This option is available only if the input source is VGA. | 1 Press the ▲/▼ button on the control panel or the 1/1 button on the remote control to select the setting.2 Press the Button on the control panel or the 0/1ton on the remote control to set the value. | CANCELOK |
| Screen reset | Reset all settings in the Screen menu to the factory preset values. | 1 Press the ▲/▼ button on the control panel or the 1/1 button on the remote control to select the setting.2 Press the Button on the control panel or the 0/1ton on the remote control to set the value. | CANCELRESET |
ADJUSTING THE LCD DISPLAY
6.3 A S
| Picture | Balance | 50 |
| Screen | Treble | 50 |
| Audio | Bass | 50 |
| Configuration 1 | Volume | 20 |
| Configuration 2 | Audio out(line out) | 20 |
| Advanced option | Maximum volume | 100 |
| Minimum volume | 0 | |
| Mute | Off | |
| Audio source | Digital | |
| Audio reset | Action | |
| Audio Out Sync | Off |
1 Press the MENU button on the control panel or the button on the remote control to call out the OSD window.
2 Press the ▲/▼ button on the control panel or the √ button on the remote control to select A . Then press the + button on the control panel or the OKiton on the remote control.
3 Press the ▲/▼ button on the control panel or the √ button on the remote control to select an option.
4 Press the +button on the control panel or the Button on the remote control to open the submenu item.
| I | F | O | R |
| Balance | Adjust to emphasise the left or right audio output balance. | Press the ▲/▼button on the control panel or the + button on the remote control to adjust the value. | 0 to 100 |
| Treble | Adjust to increase or decrease the higher-pitched sounds. | 0 to 100 | |
| Bass | Adjust to increase or decrease the lower-pitched sounds. | 0 to 100 | |
| Volume | Adjust to increase or decrease the audio output level. | 0 to 100 | |
| Audio out (line out) | Adjust to increase or decrease line out output level. | 0 to 100 | |
| Maximum volume | Adjust your own limitation for the maximum volume setting. This stops the volume from being playing too loud. | 0 to 100 | |
| Minimum volume | Adjust your own limitation for the minimum volume setting. | 0 to 100 |
ADJUSTING THE LCD DISPLAY
| I F O | R | ||
| Mute Turn the mute function on/off. | Press the MUTE button on the control panel or the × button on the remote control to set the value. | OffOn | |
| Audio source | Select the audio input source.Without video signal there is no audio output.Analog Audio from audio input.Digital Audio from HDMI audio. | 1 Press the ▲/▼button on the control panel or the √ button on the remote control to select the setting.2 Press the button on the control panel or the OK button on the remote control to set the value. | AnalogDigital |
| Audio reset | Reset all settings in the A menu to the factory preset values. | 1 Press the ▲/▼button on the control panel or the → button on the remote control to select the setting.2 Press the button on the control panel or the OK button on the remote control to set the value. | CANCELRESET |
| Audio Out Sync | Enable/disable audio out (line out) volume adjustability to sync with internal speakers. | 1 Press the ▲/▼button on the control panel or the √ button on the remote control to select the setting.2 Press the button on the control panel or the OK button on the remote control to set the value. | OffOn |
6.4 Configuration1 Settings
| Picture | Switch on state | Force on |
| Screen | Panel saving | Action |
| Audio | RS232 routing | RS232 |
| Configuration 1 | Boot on source | Action |
| Configuration 2 | WOL | Off |
| Advanced option | RGB Range | Full Range |
| Configuration1 reset | Action | |
| Factory reset | Action |
1 Press the MENU button on the control panel or the button on the remote control to call out the OSD window.
2 Press the ▲/▼ button on the control panel or the √ button on the remote control to select Configuration 1. Then press the + button on the control panel or the Ⓞ button on the remote control.
3 Press the ▲/▼ button on the control panel or the √ button on the remote control to select an option.
4 Press the +button on the control panel or the O button on the remote control to open the submenu item.
| IF O | R | ||
| Switch on state | Select the display status used for the next time you connect the power cord.Power off The display will remain off when the power cord is connected to a wall outlet.Force on The display will turn on when the power cord is connected to a wall outlet.Last status The display will return to the previous power status (on/off/standby) when removing and replacing the power cord. | 1 Press the ▲▼button on the control panel or the 1 button on the remote control to select the setting.2 Press the button on the control panel or the 2 button on the remote control to set the value. | Power offForce onLast status |
ADJUSTING THE LCD DISPLAY
| I F O | R | ||
| Panel saving | Choose to enable the panel saving functions and thus reduce the risk of “image persistence” or “ghost-imaging”. | 1 Press the ▲/▼ button on the control panel or the √/ button on the remote control to select the setting.2 Press the button on the control panel or the OK/ton on the remote control to set the value. | BrightnessANTI-BURN-IN |
| Brightness Set to O and the image brightness will be reduced to an appropriate level. The Brightness setting in the Picture menu will be unavailable when selected. | OffOn | ||
| Select the time interval for the display to slightly expand the image sie and shift the position of pixels in four directions (up, down, left, or right).N :Activating Anti-Burn-inTMwill disable H Position, V Position and oom Mode in the Screen Menu. | Press the ▲/▼ button on the control panel or the ≠ button on the remote control to adjust the value. | OffAuto10 to 900Seconds | |
| RS232-Routing S | Select the network control port. | 1 Press the ▲/▼ button on the control panel or the √/ button on the remote control to select the setting.2 Press the button on the control panel or the OK/ton on the remote control to set the value. | RS232LAN - RS232 |
| Boot on source | Set the default source at boot up. | ||
| Last Input Input source is the same as at last boot. | 1 Press the ▲/▼ button on the control panel or the ≠ button on the remote control to select L I option.2 Press the button on the control panel or the OK/ton on the remote control to set the value. | CANCELSAVE | |
ADJUSTING THE LCD DISPLAY
| IF O | R | ||
| Boot on source | Input Input can be set to USB, DisplayPort, VGA, OPS, HDMI1, HDMI2, HDMI3 or HDMI4. | 1 Press the + button on the control panel or the OKton on the remote control to uncheck the L I option.2 Press the ▲/▼ button on the control panel or the √/ button on the remote control to select the I option.3 Press the button on the control panel or the OKton on the remote control to set the value.N : If you set the input to USB then continue with setting the Playlist option in the following section (Playlist). If you set another input then follow steps 4 to 5.4 Press the ▼ button on the control panel or the ↓ button on the remote control. Then press the ▲ button on the control panel or the ← button on the remote control to select CANCEL or OK.5 Press the + button on the control panel or the OKton on the remote control to set the value. | HDMI1HDMI2HDMI3HDMI4DisplayPortVGAOPSUSB |
| Playlist Select playlist index for USB source. | 1 Repeat steps 1 to 3 in the previous (Input) section.2 Press the ▼ button on the control panel or the ↓ button on the remote control. Then press the ▲ button on the control panel or the √/ button on the remote control to select the playlist index.3 Press the + button on the control panel or the OKton on the remote control to set the value.4 Repeat steps 4 to 5 in the previous (Input) section. | 0 to 7CANCELSAVE |
ADJUSTING THE LCD DISPLAY
| IF O | R | ||
| WOL | Enable this feature to allow the display to be switched on over the network. | 1 Press the ▲/▼ button on the control panel or the √ button on the remote control to select the setting.2 Press the button on the control panel or the OK button on the remote control to set the value. | OffOn |
| RGB Range | Set the black level and white level for the RGB format.N :This option is not available in USB mode and VGA mode. | AutoFull RangeLimited Range | |
| Configuration1 reset | Reset all settings in the Configuration1 menu to the factory preset values. | 1 Press the ▲/▼ button on the control panel or the ← button on the remote control to select the setting.2 Press the button on the control panel or the OK button on the remote control to set the value. | CANCELRESET |
| Factory reset | Reset all your customie d settings to the factory preset values. | 1 Press the ▲/▼ button on the control panel or the ← button on the remote control to select the setting.2 Press the button on the control panel or the OK button on the remote control to set the value. | CANCELRESET |
6.5 Configuration2 Settings
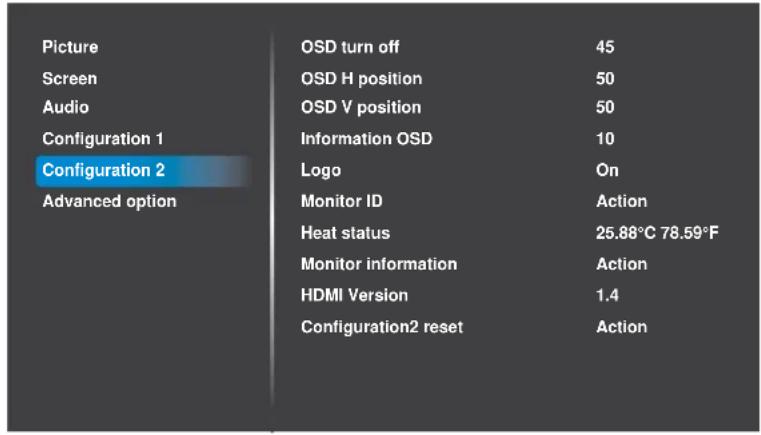 |
1 Press the MENU button on the control panel or the button on the remote control to call out the OSD window.
2 Press the ▲/▼ button on the control panel or the √ button on the remote control to select Configuration 2. Then press the + button on the control panel or the ⭕ button on the remote control.
3 Press the ▲/▼ button on the control panel or the √ button on the remote control to select an option.
4 Press the +button on the control panel or the Button on the remote control to open the submenu item.
| I F O | R | ||
| OSD turn off | Set the period of time the OSD menu stays on the screen. | Press the ▲▼button on the control panel or the ←button on the remote control to adjust the value. | Off5 to 120 |
| OSD H position | Set the OSD menu hori ontal position on the screen. | 50 | |
| OSD V position | Set the OSD menu vertical position on the screen. | 50 | |
| Information OSD | Set the period of time the information OSD is displayed on the upper left corner of the screen. The information OSD will appear on the screen when the input signal is changed. The information OSD will remain on the screen if the setting is set to OFF. | Off1 to 60 |
ADJUSTING THE LCD DISPLAY
| I F O | R | ||
| Logo | Choose to enable or disable the picture of Logo when you turn on your LCD display.N :If Logo is set to O then the OTS logo will show.If Log is set to O then the scalar OTS logo will not show.If Logo is set to U then there will be no boot logo when power on.Logo will not rotate with rotation setting/detection. | 1 Press the ▲/▼button on the control panel or the √/ button on the remote control to select the setting.2 Press the Button on the control panel or the Button on the remote control to set the value. | OffOnUser |
| Monitor ID | Adjust the ID number for controlling the display via the RS232 connection. Each display must have a unique ID number when multiple sets of this display are connected. | 1 Press the ▲/▼button on the control panel or the √/ button on the remote control to select the setting.2 Press the Button on the control panel or the Button on the remote control to set the value.3 Press the ▲/▼button on the control panel or the Button on the remote control to adjust the value. | Monitor IDMonitor Group |
| Heat status View | the thermal status of the LCD display. | ||
| Monitor information | View the information about your LCD display, including model name, serial number, operation hours, and software version. | N/A | |
| HDMI Version | Set the HDMI version to 1.4 or 2.0.N :This option is available only if the input source is HDMI1 or HDMI2. | 1 Press the ▲/▼button on the control panel or the √/ button on the remote control to select the setting.2 Press the Button on the control panel or the Button on the remote control to set the value. | 1.42.0 |
ADJUSTING THE LCD DISPLAY
| IF O | R | ||
| Configuration2 reset | Reset all settings in the Configuration2 menu to the factory preset values. | 1 Press the ▲/▼ button on the control panel or the ← button on the remote control to select the setting.2 Press the button on the control panel or the OKton on the remote control to set the value. | CANCEL RESET |
6.6 A
s
| Picture | Network | Action |
| Screen | IR control | Unlock |
| Audio | Power LED Light | On |
| Configuration 1 | Keyboard control | Unlock |
| Configuration 2 | Off timer | Off |
| Advanced option | Date and time | Action |
| Schedule | Action | |
| HDMI with One Wire | Off | |
| Language | English | |
| OSD transparency | Off | |
| Power Save | Mode 1 | |
| OPS settings | Auto | |
| Advanced option reset | Action |
| I F O | R | ||
| Network | Configure network parameters. | N/A | |
ADJUSTING THE LCD DISPLAY
| IF O | R | ||
| IR control | Select the operation mode of the remote control when multiple displays are connected via an RS232 connection.Normal All displays can be operated normally by the remote control unit.Primary Designate this display as the primary display for remote control operation. Only this display can be operated by the remote control. (In primary mode, IR key will always be processed regardless the monitor id/group settings).Secondary Designate this display as the secondary display. This display can not be operated by the remote control, and will only receive the control signal from the primary display via the RS232 connection.Lock All / Lock all but Volume / Lock all but Power / Lock all except PWR VOL Lock the remote control function of this display. To unlock, press and hold the i button on the remote control for 6 (six) seconds. | 1 Press the ▲/▼button on the control panel or the √/button on the remote control to select the setting.2 Press the button on the control panel or the OK button on the remote control to set the value. | UnlockLock AllLock All but VolumeLock All but PowerLock All except PWR VOLPrimary Secondary |
| Power LED light | Set the display LED indicator on or off. | 1 Press the ▲/▼button on the control panel or the √/button on the remote control to select the setting.2 Press the button on the control panel or the OK button on the remote control to set the value. | OnOff |
ADJUSTING THE LCD DISPLAY
| I F O | R | ||
| Keyboard control | Enable or disable the keyboard (control panel buttons) function of the LCD display.Unlock Enable the keyboard function.Lock All / Lock all but Volume / Lock all but Power / Lock all except PWR VOL Disable all the keyboard function.N :To disable the Keyboard control function, press both the +on the control panel and the ▲ button on the remote control for more than 3 seconds. | 1 Press the ▲/▼button on the control panel or the √/ button on the remote control to select the setting.2 Press the Button on the control panel or the OKton on the remote control to set the value. | UnlockLock AllLock butVolumeLock All butPowerLock all exceptPWR VOL |
| Off Timer | Switch off the display after a specified time. | Press the ▲/▼button on the control panel or the + button on the remote control to adjust the value. | Off1 to 24 Hours |
| Date and time | Adjust the current date and time for the display s internal clock.N : The NTP Server is set automatically and cannot be altered. | ||
| Auto Sync Date and time are set automatically by the web server. | 1 Press the ▲/▼button on the control panel or the + button on the remote control to select A S option.2 Press the Button on the control panel or the OKton on the remote control to set the value. | Auto Sync | |
ADJUSTING THE LCD DISPLAY
| IF O | R | ||
| Date and time | Set date Set date manually. | 1 Press the + button on the control panel or the OKtton on the remote control to uncheck the AS option.2 Press the ▲/▼ button on the control panel or the √ button on the remote control to select the S option.3 Press the Button on the control panel or the OKtton on the remote control to open the year field.4 Press the ▲/▼ button on the control panel or the √ button on the remote control to select the year.5 Press the + button on the control panel or the OKtton on the remote control to set the value.6 Press the▼ button on the control panel or the -button on the remote control to select the month field.7 Repeat steps 4 to 5 to set the month.8 Repeat steps 6 to 7 to set the day.9 Press the▼ button on the control panel or the √ button on the remote control. Then press the ▲ button on the control panel or the -button on the remote control to select CANCEL or OK. | CANCEL OK |
| Set time Set time manually. | Repeat steps 1 to 9 in the previous section (Set date) to set time. | CANCEL OK |
ADJUSTING THE LCD DISPLAY
| IF O | R | ||
| Date and time | Choose time o ne Set the time o ne in your area. | 1 Press the ▲/▼ button on the control panel or the √ button on the remote control to select the C field.2 Press the button on the control panel or the C button on the remote control to set the value.3 Press the ▲/▼ button on the control panel or the √ button on the remote control to select the time o ne.4 Press the button on the control panel or the C button on the remote control to set the time o ne. | N/A (manually set) |
| Schedule | This function allows you to program up to 7 different scheduled time intervals for this display to activate.ou can setWhich input source the display will use for each scheduled activation period.The time for the display to turn on and turn off.The days in a week for the display to activate.N :We recommend you to set up current date and time in the Date and time menu before using this function.After changing the Date and time option in the Advanced option menu, you need to set this Schedule again. | ||
| After all the schedule parameters are set, you need to save the schedule. | Press the ▼ button on the control panel or the √ button on the remote control to access the BACK or SA E option. Then press the ▲/▼ button on the control panel or the —/→button on the remote control to select BACK or SA E. | BACK SAVE | |
ADJUSTING THE LCD DISPLAY
| I F O | R | ||
| Schedule | Schedule list Select the schedule from the list that you want to configure. | 1 Press the +button on the control panel or the OKton on the remote control twice to access the S option.2 Press the ▲/▼button on the control panel or the √/button on the remote control to select the schedule list from S 1 to S 7.3 Press the +button on the control panel or the OKton on the remote control to set the schedule list.4 Press the ▼button on the control panel or the √/button on the remote control. Then press the ▲button on the control panel or the +button on the remote control to select CANCEL or OK. | Schedule list 1Schedule list 2Schedule list 3Schedule list 4Schedule list 5Schedule list 6Schedule list 7 CANCEL OK |
| Enable Enable or disable the schedule. | 1 Press the ▲/▼button on the control panel or the √/button on the remote control to select the setting.2 Press the button on the control panel or the OKton on the remote control to set the setting.3 Press the ▲/▼button on the control panel or the √/button on the remote control to select the option.4 Press the +button on the control panel or the OKton on the remote control to set the option. | Off On |
ADJUSTING THE LCD DISPLAY
| IF O | R | ||
| Schedule | Start time Set time when the schedule is turned on. | 1 Press the ▲/▼ button on the control panel or the 1/1 button on the remote control to select the S option.2 Press the Button on the control panel or the 0/1 button on the remote control to open the start time field.3 Press the ▲/▼ button on the control panel or the 1/1 button on the remote control to select the hours.4 Press the + button on the control panel or the OK button on the remote control to set the hours.5 Press the ▼ button on the control panel or the 1 button on the remote control. Then press the ▲/▼ button on the control panel or the + button on the remote control to select CANCEL or OK.6 Press the ▼ button on the control panel or the -button on the remote control to select the minutes field and repeat steps 2 to 5 to set the minutes. | CANCEL OK |
| End time Set time when the schedule is turned off. | Repeat steps 1 to 6 in the previous section (Start time) to set end time. | CANCEL OK |
ADJUSTING THE LCD DISPLAY
| I F O R | |||
| Schedule | Input Set the input source. | 1 Press the ▲/▼ button on the control panel or the √/ button on the remote control to select the I option.2 Press the button on the control panel or the OK/ton on the remote control twice to open the input field.3 Press the ▲/▼ button on the control panel or the √/ button on the remote control to select the input source.4 Press the + button on the control panel or the OK/ton on the remote control to set the input source.5 Press the ▼ button on the control panel or the ↓ button on the remote control. Then press the ▲/ button on the control panel or the ← button on the remote control to select CANCEL or OK. | HDMI1HDMI2HDMI3HDMI4DisplayPortVGAOPSUSBCANCELOK |
| Playlist If you set the input to USB then you can set the playlist option. | Repeat steps 1 to 5 in the previous section (Input) to set the playlist option from 1 to 7. | CANCELOK | |
| IF O | R | ||
| Schedule | Days of the week Select the days of the week when the schedule is active. | 1 Press the ▲/▼ button on the control panel or the 1/1 button on the remote control to select the D option.2 Press the button on the control panel or the OKiton on the remote control twice to open the days of the week field.3 Press the ▲/▼ button on the control panel or the 1/1 button on the remote control to select the day.4 Press the + button on the control panel or the OKiton on the remote control to set the day. Repeat steps 3 to 4 to set more days.5 Press the ▼ button on the control panel or the 1 button on the remote control repeatedly to access the SA E option. Then press the + button on the control panel or the OKiton on the remote control to save the settings. | SUN MON TUE WED THU FRI SAT SAVE |
| Every week Check this option to run the schedule every week. | 1 Press the ▲/▼ button on the control panel or the 1/1 button on the remote control to select the E option.2 Press the button on the control panel or the OKiton on the remote control to set the value. | N/A | |
| HDMI with One Wire | CEC control.Off Disable CEC.On Enable CEC. | 1 Press the ▲/▼ button on the control panel or the 1/1 button on the remote control to select the setting.2 Press the button on the control panel or the OKiton on the remote control to set the value. | Off On |
ADJUSTING THE LCD DISPLAY
| I F O | R | ||
| Language Set the OSD language. | 1 Press the + button on the control panel or the OKton on the remote control to select the value.2 Press the ▲/▼ button on the control panel or the 1/1 button on the remote control to select the setting.3 Press the button on the control panel or the OKton on the remote control to set the setting.4 Press the ▼ button on the control panel or the 1 button on the remote control. Then press the ▲ button on the control panel or the + button on the remote control to select CANCEL or OK. | English Deutsch简体中之Frana is ItalianoEspa olРусский Polski Trke繁體中之日本語Portugu sالعربيةDanish Swedish Finnish Norwegian Dutch CANCEL OK | |
| OSD Transparency | Adjust OSD transparency.Off Transparency is off.5-100 Transparency level is 5-100. | Press the ▲/▼ button on the control panel or the + button on the remote control to adjust the value. | Off5 to 100 |
ADJUSTING THE LCD DISPLAY
| IF O | R | ||
| Power Save | Mode 1 TCP off, WOL on, auto offMode 2 TCP off, WOL on, auto on/offMode 3 TCP on, WOL off, auto on/offMode 4 TCP on, WOL off, no auto on/offPower save modesMode 1 DC off - Power off. LED Red.Power Save - Power off, LED RedMode 2 DC off - Power off, LED Red.Power Save - Power Saving. LED Orange. Can be wake up.Mode 3 DC off - Back light off, LED Red.Power Save - Back light off, LED Orange. Can be wake up.Mode 4 DC off - Back light off, LED Red. | 1 Press the ▲/▼ button on the control panel or the √ button on the remote control to select the setting.2 Press the button on the control panel or the OK button on the remote control to set the value. | Mode 1Mode 2Mode 3Mode 4 |
| OPS settings Set | the OPS settings. | AutoAlways offAlways on | |
| Advanced option reset | Reset all settings except DT in the Advanced option menu to factory preset values. | 1 Press the ▲/▼ button on the control panel or the ← button on the remote control to select the setting.2 Press the button on the control panel or the OK button on the remote control to set the value. | CANCELRESET |
CHAPTER 7: APPENDIX
7.1 M
| M | C | S |
| N/A | The resolution or the refresh rate of the graphics card of the computer is set too high. | Change the resolution or the refresh rate of the graphics card. |
| Multi-color screen | The LCD display cannot detect the input source signal. | Check if the input source is turned ON.Check if the signal cable is properly connected.Check if any pin inside the cable connector is twisted or broken. |
| N/A | The operation using the control panel buttons has been locked by the user. | Disable the keyboard lock function in AK menu. See page 66. |
| N/A | The operation using the remote control buttons has been locked by the user. | Disable the remote control lock function in AIR menu. See page 65. |
7.2 S M F
USB M C F
| D | ||||
| T | C | C D | R | |
| MPEG1/2 | MPEG1/2 | MPEG program stream (.DAT, .VOB, .MPG, .MPEG) | V | Max Resolution 1080P 60fps Max Bit Rates 40Mbps |
| MPEG transport stream (.ts, .trp ^2 , .tp ^12 ) | ||||
| MP4 (.mp4, .mov ^2 ) | ||||
| 3GPP ^12 (.3gpp, .3gp) | ||||
| AVI (.avi) | ||||
| MKV (.mkv) | ||||
| MPEG-4 | MPEG4 | MP4 (.mp4, .mov ^2 ) | V | Max Resolution 1080P 60fps Max Bit Rates 40Mbps |
| 3GPP ^12 (.3gpp, .3gp) | ||||
| AVI (.avi) | ||||
| MKV (.mkv) | ||||
| H.263 | H.263 | FLV (.flv) | V | Max Resolution 1080P 60fps Max Bit Rates 40Mbps |
| AVI (.avi) | ||||
APPENDIX
| D | ||||
| T | C | C D R | ||
| H.264 H.264 | FLV (.flv) | V | Max Resolution 1080P 60fpsMax Bit Rates 135Mbps4k2k 30fps | |
| MP4 (.mp4, .mov ^2 ) | ||||
| 3GPP ^12 (.3gpp, .3gp) | ||||
| MPEG transport stream (.ts, .trp ^2 , .tp ^12 ) | ||||
| ASF (.asf) | ||||
| WMV (.wmv) | ||||
| AVI (.avi) | ||||
| MKV (.mkv) | ||||
| H.265 H.265 | MP4 (.mp4, .mov ^2 ) | V | Max Resolution 4K2K 60fpsMax Bit Rates 100Mbps | |
| 3GPP ^12 (.3gpp, .3gp) | ||||
| MPEG transport stream (.ts, .trp ^2 , .tp ^12 ) | ||||
| MKV (.mkv) | ||||
| GOOGLEVP8 | VP8 | MKV (.mkv) | V | Max Resolution 1080P 30fpsMax Bit Rates 20MbpsWebM (.webm) |
| MotionPEG | M PEG | AVI (.avi) | Max Resolution 1920 108030fpsMax Bit Rates 40Mbps | |
| 3GPP ^12 (.3gpp, .3gp) | ||||
| MP4 (.mp4, .mov ^2 ) | ||||
| MKV ^2 (.mkv) | ||||
N :
◆ 1 Not supported in M-65 model.
◆ 2 Not supported in M-86 model.
| A D | |||||
| T | A C | C | D | C | R |
| MPEG Audio | MPEG1/2/2.5 | MP3 | V | 2 | Bit Rate 8kbps 320KbpsSampling Rate 16KH 48KH |
| Audio Layer1/2/3 | |||||
| Windows Media Audio | WMA Version 7, 8, 9,10 pro M0, 10 Pro M1, M10 Pro M2 | Decode WMA | V | 2 | Bit Rate 8kbps 768KbpsSampling Rate 8KH 96(M10) KHNon-support LBR |
| AAC Audio | MAIN, ADIF, ATDS Header AAC-LC and AAC-HE | File Format AAC, M4A | V | 5.1 | Bit Rate N/ASampling Rate 8KH 48KH |
APPENDIX
I D
| T I C C D R | ||||
| PEG JFIF file format 1.02 | File Format PG, PEG | V | Max Resolution 7000 x 7000The limitation of max resolution depends on DRAM | |
| BMP BMP File Format BMP V | Max Resolution 15360 x 8640The limitation of max resolution depends on DRAM | |||
| PNG | PNG | File Format PNG | V | Max Resolution 15360 x 8640The limitation of max resolution depends on DRAM |
N :
Sound or video may not work if the contents have a standard bit rate/frame rate above the compatible Frame/sec listed in the table above.
- Video content with a Bit rate or Frame rate larger than the rate specified in the table above can cause choppy video during playback.
7.3 I M
GAR
| SR | A R | R R | P R | A R | S M | |
| H P | L | |||||
| VGA | 640 | 480 | 60 H | 25.175 MH | 4 3 | Video Graphic Array |
| 72 H | 31.5 MH | |||||
| 75 H | 31.5 MH | |||||
| WVGA | 720 | 400 | 70 H | 33.75 MH | 16 9 | Wide Video Graphic Array |
| SVGA | 800 | 600 | 60 H | 40 MH | 4 3 | Super VGA |
| 75 H | 49.5 MH | |||||
| GA | 1024 | 768 | 60 H | 65 MH | 4 3 | Extended Graphic Array |
| 75 H | 78.75 MH | |||||
| W GA | 1280 | 768 | 60 H | 79.5 MH | 5 3 | Wide GA |
| W GA | 1280 | 800 | 60 H | 79.5 MH | 16 10 | Wide GA |
| S GA | 1280 | 1024 | 60 H | 108 MH | 5 4 | Super GA |
| W GA | 1360 | 768 | 60 H | 85.5 MH | 16 9 | Wide GA |
| UGA^1 | 1600 | 1200 | 60 H | 162 MH | 4 3 | Ultra GA |
| HD1080 | 1920 | 1080 | 60 H | 148.5 MH | 16 9 | HD1080 |
N :
◆ 1280x768 60H can be supported but not shown in EDID table.
◆ 1 Not supported in M-65 model.
APPENDIX
SD R
| S R | A R | R R | P R | A R | |
| H P | L | ||||
| 480i | 720 480 | 29.97 H 13.5 MH | 4 3 | ||
| 480p 59.94 H 27 MH | |||||
| 576i | 720 576 | 25 H 13.5 MH | 4 3 | ||
| 576p 50 H 27 MH | |||||
HDT R
| S R | A R | R R | P R | A R | |
| H P | L | ||||
| 720p | 1280 | 720 | 50 H | 74.25 MH | 16 9 |
| 60 H | |||||
| 1080i | 1920 | 1080 | 25 H | 74.25 MH | 16 9 |
| 30 H | |||||
| 1080p | 1920 | 1080 | 50 H | 148.5 MH | 16 9 |
| 60 H | |||||
| 2160p (HDMI/DP only) | 3840 | 2160 | 30 H | 297 MH | 16 9 |
| 50 H | 594 MH | ||||
| 60 H | |||||
G
:
The PC text quality is optimum in HD 1080 mode (1920 x 1080, 60H).
our PC display screen might appear different depending on the manufacturer (and your particular version of Windows).
Check your PC instruction book for information about connecting your PC to a display.
If a vertical and horio ntal frequency-select mode exists, select 60H (vertical) and 31.5KH (horio ntal). In some cases, abnormal signals (such as stripes) might appear on the screen when the PC power is turned off (or if the PC is disconnected). If so, press the SOURCE button to enter the video mode. Also, make sure that the PC is connected.
When horio ntal synchronous signals seem irregular in RGB mode, check PC power saving mode or cable connections.
The display settings table complies to the IBM/VESA standards, and based on the analog input.
The best timing for the vertical frequency to each mode is 60H.
APPENDIX
7.4 C
C
U
D
Do not bring your hands, face or objects close to the ventilation holes of the display. The top of the display is usually very hot due to the high temperature of exhaust air being released through the ventilation holes. Burns or personal injuries may occur if any body parts are brought too close. Placing any object near the top of the display could also result in heat related damage to the object as well as the display itself.
Be sure to disconnect all cables before moving the display. Moving the display with its cables attached may damage the cables and thus cause fire or electric shock.
Disconnect the power plug from the wall outlet as a safety precaution before carrying out any type of cleaning or maintenance procedure.
F
P
C
|
The front of the display has been specially treated. Wipe the surface gently using only a cleaning cloth or a soft, lint-free cloth.
If the surface becomes dirty, soak a soft, lint-free cloth in a mild detergent solution. Wring the cloth to remove excess liquid. Wipe the surface of the display to remove dirt. Then use a dry cloth of the same type to dry.
Do not scratch or hit the surface of the panel with fingers or hard objects of any kind.
Do not use volatile substances such as insert sprays, solvents and thinners.
C
C
|
If the cabinet becomes dirty, wipe the cabinet with a soft, dry cloth.
If the cabinet is extremely dirty, soak a lint-free cloth in a mild detergent solution. Wring the cloth to remove as much moisture as possible. Wipe the cabinet. Use another dry cloth to wipe over until the surface is dry.
Do not allow any water or detergent to come into contact with the surface of the display. If water or moisture gets inside the unit, operating problems, electrical and shock haa rds may result.
Do not scratch or hit the cabinet with fingers or hard objects of any kind.
Do not use volatile substances such as insert sprays, solvents and thinners on the cabinet.
Do not place anything made from rubber or PVC near the cabinet for any extended periods of time.
7.5 T
| S P C R | ||
| No picture is displayed The power cord has been disconnected.The main power switch on the back of the display is not switched on.The selected input has no connection.The display is in standby mode. | 1 Plug in the power cord.2 Make sure the power switch is switched on.3 Connect a signal connection to the display. | |
| Interference displayed on the display or audible noise is heard | Caused by surrounding electrical appliances or fluorescent lights. | Move the display to another location to see is the interference is reduced. |
| Colour is abnormal The signal cable is not connected properly. | Make sure that the signal cable is attached firmly to the back of the display. | |
| Picture is distorted with abnormal patterns | The signal cable is not connected properly.The input signal is beyond the capabilities of the display. | Make sure that the signal cable is attached firmly.Check the video signal source to see if it is beyond the range of the display. Please verify its specifications with this display's specification section. |
| Display image doesn't fill up the full sie of the screen | The picture format is not set correctly. | Press the button and select a suitable picture format. |
| Can hear sound, but no picture Improperly connected source signal cable. | Make sure that both video inputs and sound inputs are correctly connected. | |
| Can see picture but no sound is heard | Improperly connected source signal cable.Volume is turned all the way down.MUTE function is turned on.No external speaker connected. | Make sure that both video and sound inputs are correctly connected.Press the +or -button to hear the sound.Switch the MUTE function off by using the × button.Connect the external speakers and adjust the volume to a suitable level. |
| Some picture elements do not light up | Some pixels of the display may not turn on. | This display is manufactured using an extremely high level of precision technology however, sometimes some pixels of the display may not display. This is not a malfunction. |
| After-Images can still be seen on the display after the display is powered off. (Examples of still pictures include logos, video games, computer images, and images displayed in 4 3 normal mode) | A still picture is displayed for an over extended period of time. | Do not allow a still image to be displayed for an extended period of time as this can cause a permanent after-image to remain on the display. |
APPENDIX
7.6 T
LCD D
To transport the LCD display for repair or shipment, place the display in its original packaging carton.
M 65
1 Place the LCD display inside the supplied protective bag.
2 Place the lower foam cushion (a) inside the lower box.
3 Place the LCD display (b) down in the lower box.
4 Place the upper foam cushion (c) on top of the LCD display.
5 Place the accessories box on the designated area (if necessary).
6 Place the upper box on LCD display.
7 Secure the upper box to the lower box with the supplied locks (d).
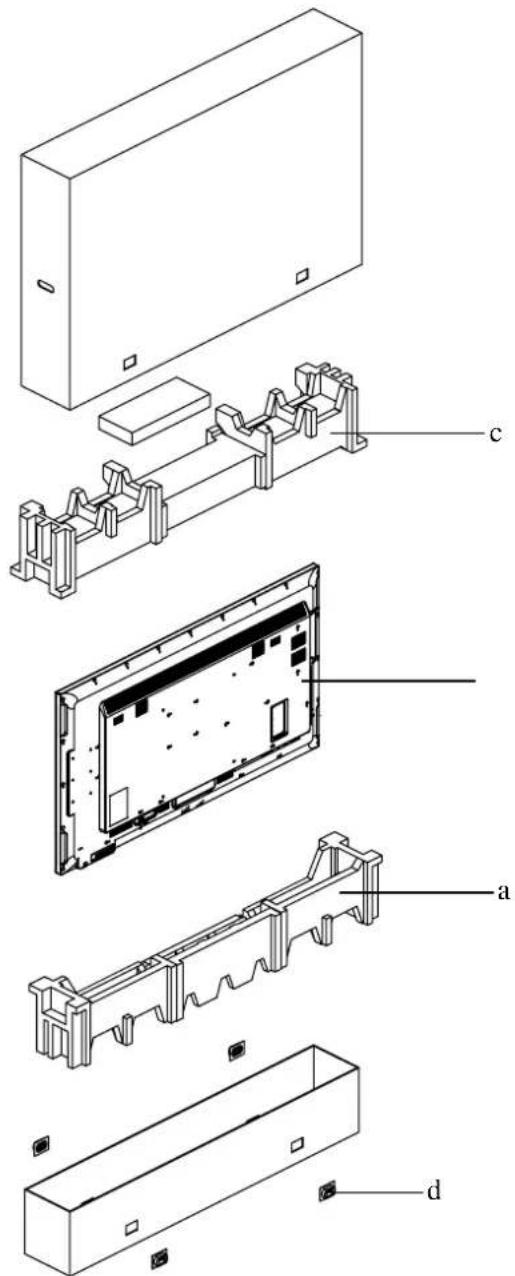
text_image
Technical diagram of an electronic device with labeled components including casing, panel, and housing sectionsAPPENDIX
M 75
1 Place the LCD display inside the supplied protective bag.
2 Place the lower foam cushion (a) inside the lower box.
3 Place the LCD display (b) down in the lower box.
4 Place the upper foam cushion (c) on top of the LCD display.
5 Place the accessories box on the designated area (if necessary).
6 Place the upper box on LCD display.
7 Secure the upper box to the lower box with the supplied locks (d).
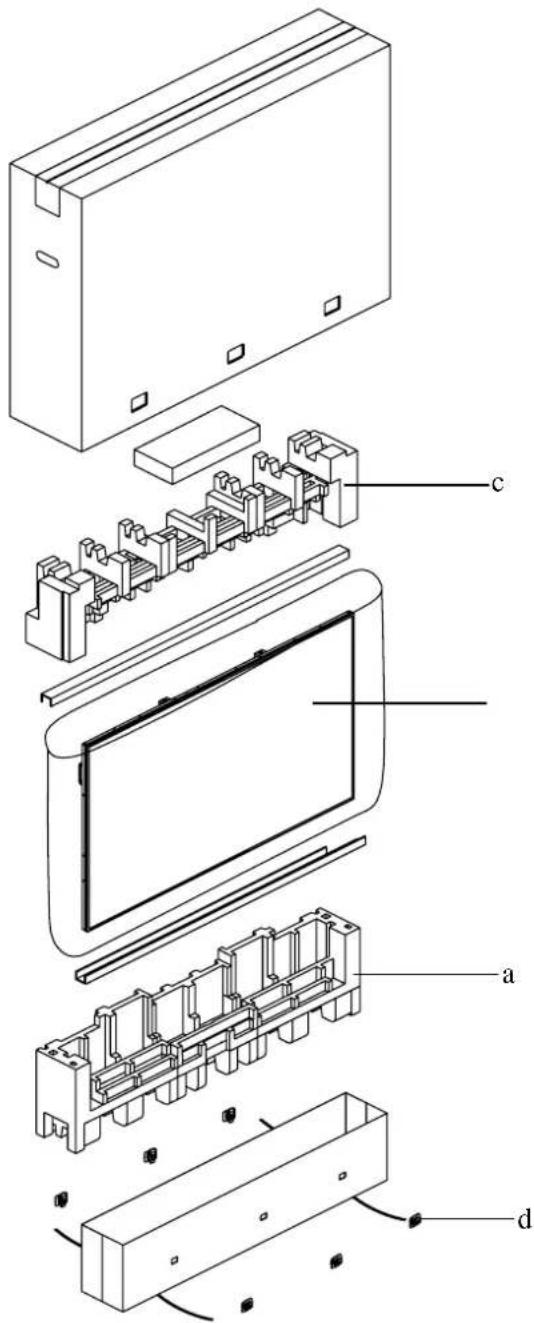
text_image
Exploded view diagram of a device showing internal components labeled a, c, and dAPPENDIX
M 86
1 Place the LCD display inside the supplied protective bag.
2 Place the lower foam cushions (a) inside the lower box.
3 Place the LCD display (b) down in the lower box. Then place the thin foam cushion in front of the screen.
4 Place the upper foam cushions (c) on top of the LCD display.
5 Place the accessories box on the designated area (if necessary).
6 Place the upper box on LCD display.
7 Secure the upper box to the lower box with the supplied locks (d).
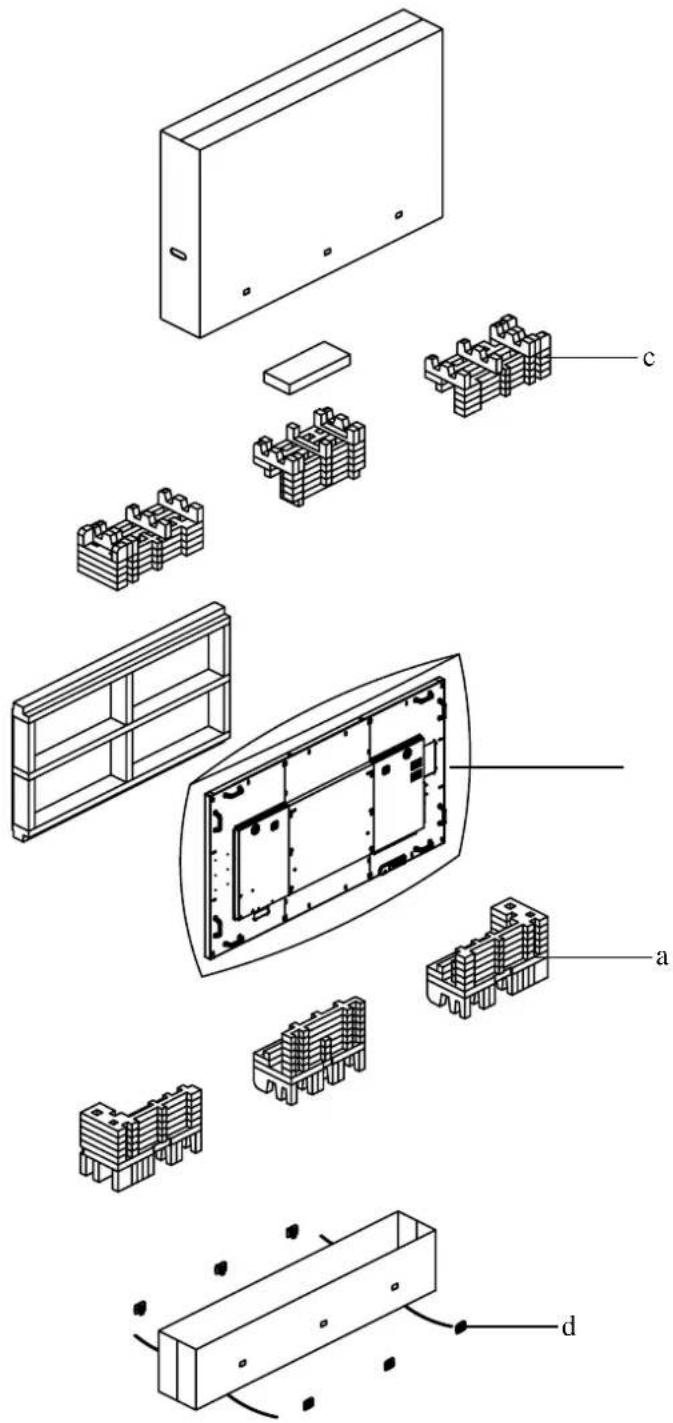
text_image
Exploded view diagram of an electronic component with labeled parts (a, c, d) and internal structureCHAPTER 8: SPECIFICATIONS
8.1 Display Specifications
| M 65 M 75 M 86 | ||||
| Panel Panel Type LED | -Backlit TFT LCD (VA | Technology) | LED-Backlit TFT LCD (IPS Technology) | LED-Backlit TFT LCD (IPS Technology) |
| Panel Size 64.5" 74.5" | 85.6" | |||
| Max. Resolution UHD 3 | 340 x 2160 UHD 3 | 340 x 2160 UHD 3 | 340 x 2160 | |
| Pixel Pitch | 0.372 mm | 0.429 mm | 0.494 mm | |
| Brightness | 350 cd/m2 | 410 cd/m2 | 410 cd/m2 | |
| Contrast Ratio | 4000:1 | 1200:1 | 1200:1 | |
| Viewing Angle (H/V) | 178°/178° | 178°/178° | 178°/178° | |
| Display Colour | 1.07B | 1.07B | 1.07B | |
| Response Time | 5 ms | 5 ms | 5 ms | |
| Surface Treatment | Anti-Glare Treatment (Haze 2%), 3H Hard Coating | Anti-Glare Treatment (Haze 2%), 2H Hard Coating | Anti-Glare Treatment (Haze 3%), 2H Hard Coating | |
| Frequency (H/V) | H Freq. | 31 kHz-92 kHz | 31 kHz-92 kHz | 31 kHz-92 kHz |
| V Freq. | 48 Hz-85 Hz | 48 Hz-85 Hz | 48 Hz-85 Hz | |
| Input | VGA | 15-Pin D-Sub | 15-Pin D-Sub | 15-Pin D-Sub |
| HDMI | 2.0 x 4 | 2.0 x 4 | 2.0 x 4 | |
| DisplayPort | 1.2 x 1 | 1.2 x 1 | 1.2 x 1 | |
| External Control | IR in/out | 3.5 mm Phone Jack | 3.5 mm Phone Jack | 3.5 mm Phone Jack |
| RS232 in/out | 2.5 mm Phone Jack | 2.5 mm Phone Jack | 2.5 mm Phone Jack | |
| LAN | RJ45 x 1 | RJ45 x 1 | RJ45 x 1 | |
| Other Connectivity | USB | 2.0 x 1 (Service Port / Media Playback)2.0 x 1 (Media Playback)3.0 x 1 (Media Playback)USB power outlet x 1 (5V2A) | 2.0 x 1 (Service Port / Media Playback)2.0 x 1 (Media Playback)3.0 x 1 (Media Playback)USB power outlet x 1 (5V2A) | 2.0 x 1 (Service Port / Media Playback)2.0 x 1 (Media Playback)3.0 x 1 (Media Playback)USB power outlet x 1 (5V2A) |
| OPS Slot | es | es | es | |
| Micro SD Card Slot | es | es | es | |
| Audio Audio In | Stereo Audio Jack (3.5 mm) x 1 | Stereo Audio Jack (3.5 mm) x 1 | Stereo Audio Jack (3.5 mm) x 1 | |
| Audio Out | Stereo Audio Jack (RCA) x 1 | Stereo Audio Jack (RCA) x 1 | Stereo Audio Jack (RCA) x 1 | |
| Internal Speaker | 10W x 2 | 10W x 2 | 10W x 2 | |
| Power | Power Supply | Internal | Internal | Internal |
| Power Requirements | AC 100-240V, 50/60 Hz | AC 100-240V, 50/60 Hz | AC 100-240V, 50/60 Hz | |
| On Mode | 186W (On) | 237W (On) | 302W (On) | |
| Stand-by Mode | < 0.5W | < 0.5W | < 0.5W | |
| Off Mode | < 0.5W | < 0.5W | < 0.5W | |
| Operating Conditions | Temperature | 0°C-40°C (32°F-104°F) | 0°C-40°C (32°F-104°F) | 0°C-40°C (32°F-104°F) |
| Humidity | 20%-80% (non-condensing) | 20%-80% (non-condensing) | 20%-80% (non-condensing) | |
| Storage Conditions | Temperature | -20°C-60°C (-4°F-140°F) | -20°C-60°C (-4°F-140°F) | -20°C-60°C (-4°F-140°F) |
| Humidity | 10%-90% (non-condensing) | 10%-90% (non-condensing) | 10%-90% (non-condensing) | |
| Mounting | VESA FPMPMI | Yes (400 x 400 mm) | Yes (600 x 400 mm) | Yes (600 x 400 mm) |
| Dimensions | w/o base (W x H x D) | 1458.7 x 834.7 x 81.6 mm (57.4" x 32.9" x 3.2") | 1676.6 x 955.0 x 73.8 mm (66.0" x 37.6" x 2.9") | 1927.9 x 1098.9 x 85.9 mm (75.9" x 43.3" x 3.4") |
| Packaging (W x H x D) | 1655.0 x 1078.0 x 280.0 mm (65.2" x 42.4" x 8.2") | 1832.0 x 1283.0 x 280.0 mm (72.1" x 50.5" x 8.2") | 2224.0 x 1427.0 x 373.0 mm (87.6" x 56.2" x 14.7") | |
| Weight | w/o base | 24.8 kg (54.7 lb) | 53.0 kg (116.8 lb) | 63.8 kg (140.7 lb) |
| Packaging | 35.2 kg (77.6 lb) 65.5 kg (144.4 lb) | 93.0 kg (205.0 lb) | ||
N :
◆ All specifications are subject to change without prior notice.
8.2 Display Dimensions
M 65
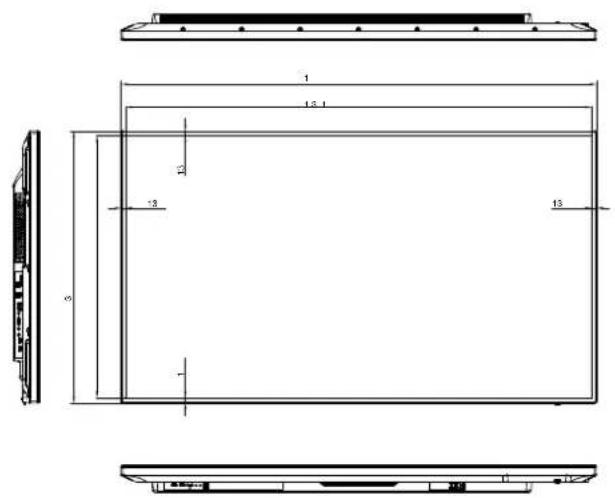
text_image
1 13.1 12 -3 13 5 1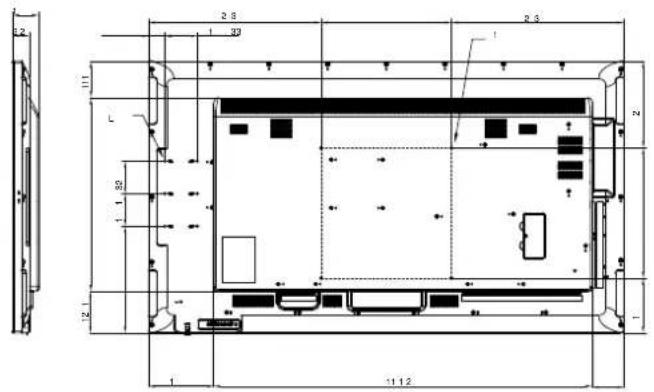
text_image
2.3 1 30 2.3 111 L 30 12 1112M 75
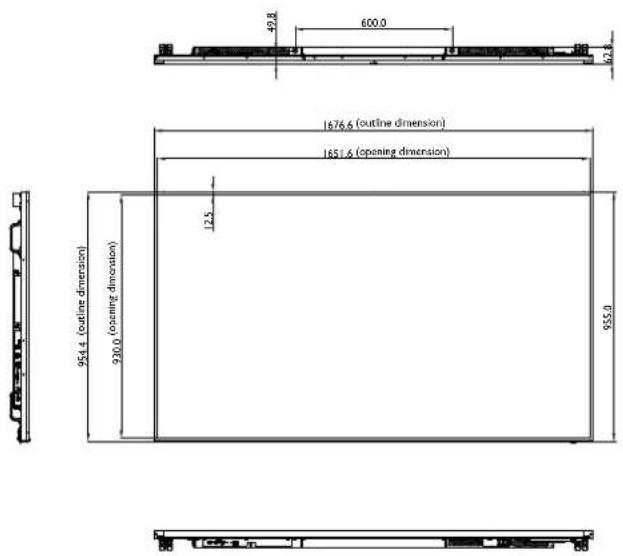
text_image
49.8 600.0 12.3 1676.6 (outline dimension) 1651.6 (opening dimension) 12.5 954.4 (outline dimension) 390.0 (opening dimension) 955.0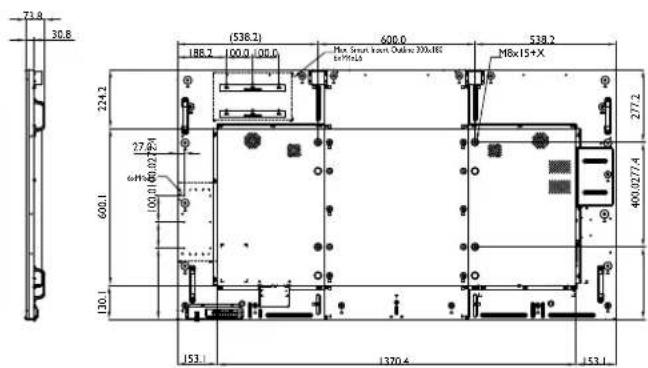
text_image
73.9 36.8 (538.2) 188.2 00.0 100.0 Max Smart Mount Outlet 33Xx165 or 74x15 600.0 538.2 M8x15+X 224.2 277.2 600.1 600.0 277.2 400.02774 130.1 153.1 1370.4 153.1SPECIFICATIONS
M 86
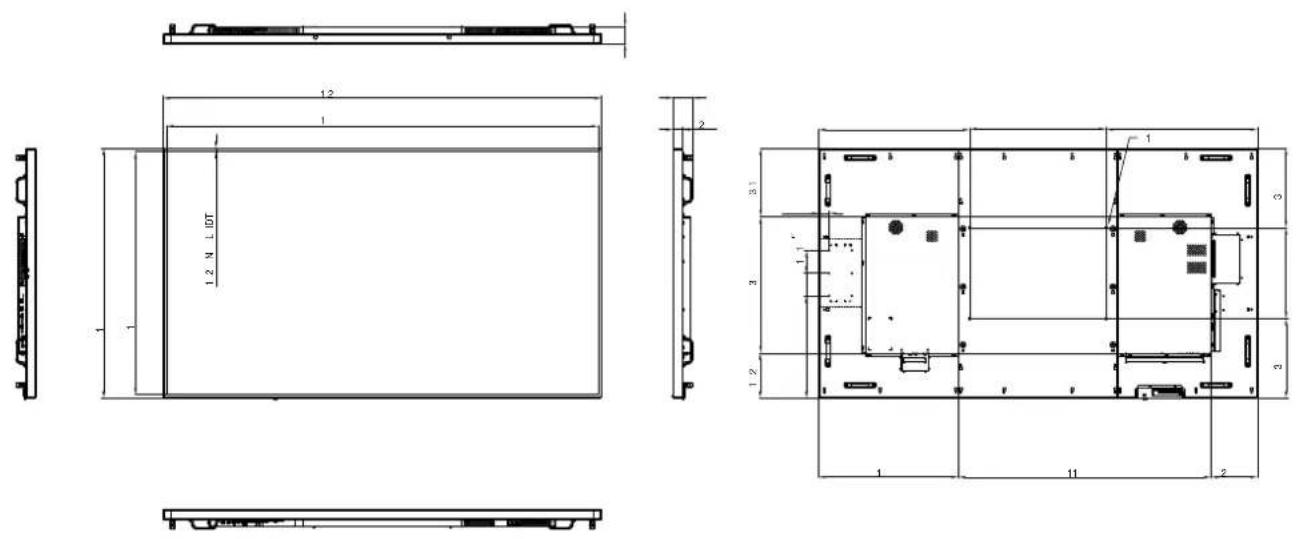
AGN
Company Address: 5F-1, No. 3-1, Park Street, Nangang District, Taipei, 11503, Taiwan.
Copyright © 2019 AG Neovo. All rights reserved. QM8600/QM7500/QM65A0_UM_V013