
134 - Mobile Phone TIPTEL - Free user manual and instructions
Find the device manual for free 134 TIPTEL in PDF.


| Product Type | Analog feature phone with caller ID |
| Display | LCD with 14-digit number display, time/date, call counter |
| Phonebook Capacity | 50 names and numbers |
| Speed Dial (Indirect Memory) | 10 locations (0-9) |
| Redial | Last number redial |
| Call Timer | Minute-second format, counts up during call |
| Caller ID | Requires subscription; displays number, name, time and date |
| Recall | 100/300 ms switchable for PBX features |
| Handsfree | Speakerphone with adjustable volume |
| Ringer Volume | Low, High, Off (switch) |
| Speaker Volume | Adjustable via VOLUME switch |
| Power Source | 4 x AAA batteries (for memory backup and display) or DC 9V adapter (200 mA min) |
| Battery Low Indicator | Icon on display |
| Connection | RJ11 line cord; RJ11 to handset |
| Wall Mountable | Yes, with included bracket (83 mm hole spacing) |
| Languages | English, others selectable during setup |
| Time/Date Setting | Adjustable via menu |
| Cleaning Instructions | Use only soft, slightly damp or antistatic cloth; no chemicals |
| Warranty | 2 years (within EC) |
| Regulatory | CE approved for analog PSTN in EC |
Frequently Asked Questions - 134 TIPTEL
User questions about 134 TIPTEL
0 question about this device. Answer the ones you know or ask your own.
Ask a new question about this device
Download the instructions for your Mobile Phone in PDF format for free! Find your manual 134 - TIPTEL and take your electronic device back in hand. On this page are published all the documents necessary for the use of your device. 134 by TIPTEL.
USER MANUAL 134 TIPTEL
Service Service Service
Analogue feature phone with caller ID
tiptel 134
en
Safety instructions
When using your telephone equipment, basic safety precautions should always be followed to reduce the risk of fire, electric shock and injury to persons, including the following:
- Read and understand all instructions.
- Follow all warnings and instructions marked on the product.
- Unplug this product from the wall outlet before cleaning. Do not use liquid cleansers or aerosol cleansers. Use a damp cloth for cleaning.
- Do not use this product near water, for example, near a bath tub, wash bowl, kitchen sink, or laundry tub, in a wet basement, or near a swimming pool.
- Do not place this product on an unstable cart, stand, or table. This may cause serious damage to the product if dropped..
- Do not allow anything to rest on the telephone cord. Do not locate this product where the cord will be abused by persons walking on it.
- Never push objects of any kind into this product through cabinet slots as they may touch dangerous voltage points or short out parts that could result in a risk of fire or electric shock. Never spill liquid of any kind on the product.
- To reduce the risk of electric shock, do not disassemble this product, but take it to a qualified serviceman when service or repair work is voltages or other risks. Incorrect reassembly can cause electric shock when the appliance is subsequently used.
- Unplug this product from the wall outlet and refer servicing to qualified service personnel under the following conditions:
A. If liquid had been spilled into the product.
B. If the product does not operate normally by following the operating instructions. Adjust only the controls, that are covered by the operating instructions because improper adjustment of other controls may result in damage and will often require extensive work by a qualified technician to restore the product to normal operation.
C. If the product has been dropped or the cabinet has been damaged.
D. If the product exhibits a distinct change in performance.
- Avoid using a telephone (other than a cordless type) during an electrical storm. There may be a remote risk of electric shock from lighting.
- Do not use the telephone in the vicinity of a gas leak.
- Only attach accessories authorised by Tiptel for this device.
Location of controls

- Hook switch
- Handset holder
- Call back button
- Erase button
- Store button
- Call ID button
- Phone book button
-
Loudspeaker
-
New call indicator
- Up/Down button
- Start short dial
- Recall
- Redial button
- Keypad
- Hands-free button
- Hands-free indicator
SETTING UP
Scope of delivery
Phone with handset incl. coil cord
Line cord RJ11 – RJ11
Wall mount bracket, manual, 4 x AAA batteries
Installing Batteries
Note: Before installing or changing the batteries make sure that the telephone is not connected to the telephone network.
To open the battery door and install the batteries, follow the procedure below:
- Open the battery case on the bottom of the unit by using the tip of a pen to lift the latch.
- Install the 4 AAA batteries into the battery compartment observing the correct polarity.
- Close the battery compartment.
Low Battery Alert
This unit will alert you when the batteries need replacement. When the battery power becomes low the battery low icon (☐) will be lit on the display. When you need to replace batteries in the future always use high quality AAA batteries. The batteries are needed for memory backup.
Connecting the Phone
- Connect the coiled cord to the jack in the handset and the side of the base.
- In case you bought an AC adapter connect one end of the adaptor to the DC 9V jack on the rear of the unit, and the other end to electric wall plate.
Attention: All functions using the display are not available without batteries or an AC adapter. Storing and use of the short dial memory works in off-hook mode only. Hands-free mode may be used if you lift the handset shortly after first connecting the phone to the telephone line. Thus, enough power is provided to run the loudspeaker.
Use of batteries or an AC power adapter (DC 9V, 200 mA min, take care of the polarity) is recommended.
Setting up your display
DO NOT CONNECT the line cord to the wall outlet until the display setup has been completed. Batteries or AC power adapter need to be placed.
Set the Language
The LCD shows flashing "ENGLISH". If your display does not appear this way, press and hold ▲ button for 4 seconds.
Press ▲ or ▼ button if you want to select other languages. When the desired language is displayed, press X button to confirm.
Set the LCD Contrast
If ENGLISH is selected, the LCD shows "LCD CONTRAST" and flashing '2'.
Press ▲ or ▼ button to adjust from 1 to 4 levels contrast of LCD.
Press X button to confirm.
Set the Time/Date
If LCD contrast is set, the LCD shows "SET TIME/DATE".
- Press ▲ or ▼ button to select the hour digits.
- Press X button to confirm and go to the next entry.
- Press ▲ or ▼ button to select the minute digits.
- Press X to confirm and go to the next entry.
- Press ▲ or ▼ button to select the date digits.
- Press X to confirm and go to the next entry.
- Press ▲ or ▼ button to select the month digits.
- Press X button to confirm.
The LCD shows "TOTAL: 00 NEW: 00", which means both the total call and new call counter are zero. Or, press and hold ▲ button for 4 seconds to repeat display setup.
Now the telephone is set up, connect the line cord to the telephone wall outlet.
Ringer Volume Adjustment
The ringer can be adjusted from Low to a High level (switch A). If you don't want to be disturbed, slide the RINGER switch to the
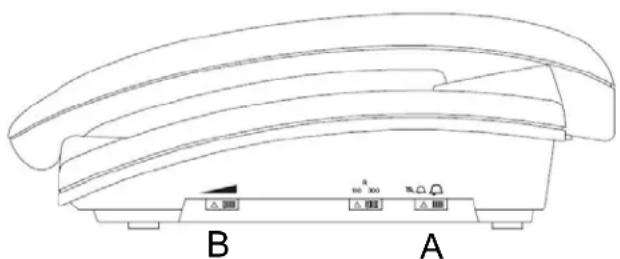
OFF position. You can still make outgoing calls without being disturbed by incoming calls.
Speaker Volume Control
When using the speakerphone, the speaker volume can be adjusted using the VOLUME switch (B).
Wall mounting the Phone
- Drill two holes in the wall 83mm vertically apart.
- Insert the screws using wall plugs. Leave approx. 5mm of the screw head protruding from the wall to hold the base securely in place.
- Slide the wall mount bracket on the back of the base, until it clicks.
- The phone can now be mounted to the wall.
To release the phone from the bracket, you need to push the lip A while sliding the holder down.

Telephone Operation
Making a call using the handset or hands-free feature
The telephone call used like any conventional telephone and, in addition, has some useful special features, which make phoning considerably easier for you. You have two ways of making a call:
A: Making a call using the handset
- Lift the handset and wait until you hear a dial tone.
-
Now dial the required telephone number. The number dialed will be shown in the display. The display can show a telephone number with a maximum of 14 digits. If the number dialed is longer than this, only the last 14 digits will be displayed.
-
To end the call, simply replace the handset. If you want to change during a call from the handset to the hands-free, press the button and replace the handset on the rest.
B: Making a call using the hands-free facility
- Press the 🔔 button. The Speakerphone LED will come on and the display will show the 🔔 symbol. You will hear the dial tone over the in-built loudspeaker.
- Dial the required telephone number. The display shows the number dialed. The display can show a telephone number with a maximum of 14 digits. If the number dialed is longer than this, only the last 14 digits will be displayed.
If the other party accepts the call, his voice will be heard over the loudspeaker. When using the hands-free facility always speak loudly and clearly towards the telephone.
The volume can be adjusted using the VOLUME switch. If you want to change from the hands-free facility to the handset, simply lift the handset.
- To end the call, press the 🔔 button again or replace the handset.
Entering numbers before dialing
IMPORTANT: Needs batteries or AC power adapter. This feature is only available in idle mode (icon is on). If icon is on, press the button once to enter idle mode. If under phone book mode, pressing the number keys will search the number.
You can also enter the required telephone number while the handset is on the hook and before the 🔔 button has been pressed without this being dialed directly. When doing so, you have the option to correct the number entered.
- Enter the required telephone number while the handset is on hook and before the 🔔 button has been pressed.
- Delete the incorrect number with the X button, and enter the correct number.
- To dial the number, pick up the handset or press 📋 button.
Receiving a Call
When you receive a call, the display will show CALL# and the caller's telephone number, if you want to talk to the caller:
- Pick up the handset or press 📋 button to answer the call.
- At the end of the call, return the handset to the cradle or press button again.
Redial
Automatically redials last number called, if the number was busy or unanswered.
- Press the ● button. The last number will be displayed.
Note: If you don't want to dial the displayed number, press 📄 button and the telephone will return to normal mode.
- To redial the displayed number:
a. Press the ↗ button. The hands-free facility will be switched on automatically. Or,
b. Pick up the handset. Or,
c. Press 🖼 button.
Recall
The button R is used when connected to certain switchboards, e.g. to transfer calls, and for some Calling Features or those services available via your network provider. Be aware of the correct timing.
The Recall 100/300ms switch is located on the right side of the phone.
Memory Dialing
You can store up to 10 numbers in indirect memory and dial those numbers quickly.
Storing a number in memory
- Press ➕ button. The LCD shows "STORE NUMBER".
- Enter the number (up to 22 digits max.) you wish to store in the memory.
- Press → button again.
- Enter the required name with a maximum of 16 letters. The next section will tell you how to enter names.
- Press ➕ button. The display shows "LOCATION?".
- To store a number in indirect memory, enter the desired memory location number (0, 1 ...9) on the keypad.
- The display will show "SAVED!".
How to enter name and characters
The number keys are also printed with letters for entering the name. By repeatedly pressing the appropriate button, upper case letters as
well as numbers and special characters can be entered.
Example: You wish to enter the name "Peter".
Press one after another: 1 x button 7; 2 x button 3; 1 x button 8; 2 x button 3; 3 x button 7;
To enter a space, press the 0 button once.
To enter the same letter twice, press the appropriate button and wait for a short time, the cursor will automatically jump one place further and you can enter the same letter again.
Incorrect entries can be deleted with the X button. To do this, move the cursor to the next position of the incorrect entries using ▲ and ▼ buttons and then press the X button.
Overview
| Button 1 | 1 , ; . ' " ? ! : |
| Button 2 | A B C 2 Å Ä A E å ä Γ |
| Button 3 | D E F 3 Δ ë |
| Button 4 | G H I 4 i Θ |
| Button 5 | J K L 5 Ł ∧ |
| Button 6 | M N O 6 ň Ö ∅ Ξ ö |
| Button 7 | P Q R S 7 Π Σ |
| Button 8 | T U V 8 Ü ü |
| Button 9 | W X Y Z 9 ΦΨ Ω |
| Button 0 | Space 0 @ $ \ |
| Button * | *_ / % & | |
| Button # | # + - = ÷ ( ) < > |
Dialing a stored Number
With the handset off hook:
- Pick up the handset or press 📋 button and wait for a dial tone.
- To dial a number stored in indirect memory, press → button, the LCD shows "MEMORY->-". Press the memory location number (0, 1 ...9).
- The number and name stored in that location will be displayed and the number will be dialed.
With the handset on hook:
- To dial a number stored in indirect memory, press → button, the LCD shows "MEMORY->-". Press the memory location number (0, 1 ...9).
- The number and name stored in that location will be displayed.
- To redial the displayed number:
a. Press the ↗ button. The hands-free facility will be switched on automatically. Or,
b. Pick up the handset. Or,
c. Press 🖼 button.
Call Timer
When you press 📋 button or pick up the handset to get dial tone, the timer '00:00' appears on the display and starts counting up until you hang up the phone. The timer shows by format "minute-second".
THE PHONE BOOK
IMPORTANT: The phonebook features are only available in phone book mode, when icon is on. If the icon is on, press button once. You can store 50 telephone numbers with associated names in the phone book. When 50 numbers have been stored, the display will show the message "MEMORY FULL". The next time an attempt is made to store a number, first a stored number must be deleted.
To Store Telephone Numbers & Names in the Phone Book
- Press → button. The display will show "SAVE?".
- Press → button again.
- Enter the required telephone number with a maximum of 22 digits using the key pad.
- Press → button.
- Enter the required name with a maximum of 16 letters. Refer to "How to enter name and characters" section to enter names.
- Press ➕ button. The display will show "SAVED!".
Making a call using the phone book
If you have stored numbers in the phone book, you can dial these numbers easily.
- Enter the initial letter of the name of the person you wish to call
using the key pad. After a short time, the display will show the first stored telephone number with this initial letter. You can now search for further numbers under this letter by pressing ▲ or ▼ button. Press the ↗ button to dial out the displayed number.
Note: You can also search for a number directly using ▲ or ▼ button without entering an initial letter.
When the end of the list has been reached, the message “END OF LIST” will appear in the display.
Changing numbers in the phone book
-
To search a number from the phone book, enter the initial letter of the name of the person you wish to call using the number pad. After a short time, the display will show the first stored telephone number with this initial letter. You can now search for further numbers under this letter by pressing ▲ or ▼ button.
-
Now press and hold the ➕ button for two seconds. The display will show the message "EDIT?"
-
Press the ➕ button again.
-
You can delete the whole of the number by repeatedly pressing the X button. Alternatively, move the cursor to the required position by pressing ▲ or ▼ button and dial the number to replace this position onwards.
-
Now confirm with the ➕ button. The name can now be changed.
-
You can delete the whole of the name by repeatedly pressing the X button. Alternatively, move the cursor to the required position by pressing ▲ or ▼ button and re-enter the phone name from this position onwards.
-
Confirm the change with the ➕ button.
Note: If you want to quit the phone book without making a change, press 📁 button once.
Deleting individual numbers from the phone book
- To dial a number from the phone book, enter the initial letter of the name of the person you wish to call using the number pad. After a short time, the display will show the first stored telephone number with this initial letter. You can now search for further numbers
under this letter by pressing ▲or ▼button.
- Now press the X button once. The display will show the message "DELETE?".
- Now press the X button for 2 seconds. The telephone number will be deleted and the display will now show another number from the phone book.
- After 60 seconds the normal display will be shown once more.
Deleting the entire phone book
- Press ▲ or ▼ button until you see a number in the display.
- Press and hold the X button until the message "DELETE ALL?" appears in the display.
- Now press and hold the X button again for 2 seconds until the message "EMPTY" appears in the display. After 2 seconds the normal display will be shown once more.
CALLER ID OPERATION
If you subscribe to your telephone operators Caller ID service, the incoming callers number will be displayed on the screen and stored in the call log. (Please consult your telephone service provider for details, service charges may apply)
IMPORTANT: To use Caller ID features, you must be in idle mode (% icon is on). If 📄 icon is on, press 🌐 button once.
Receive Caller ID
- If an incorrect, invalid or incomplete Caller ID signal is received, the LCD shows "NO NUMBER".
- If only the caller's phone number is received, the LCD shows the caller's phone number with the time and date it was received. The icon turns on and New Call LED blinks.
Note: If you receive a call from a number stored in phone book, the name stored in phone book will be displayed.
- If both the caller's name and phone number are received, the LCD shows the caller's name and phone number, with the time and date it was received. The icon turns on and New Call LED blinks.
Note: If you receive a call from a number stored in phone book, the name from the network will be override and the name stored in phone book will be displayed.
- If no key is pressed, the LCD will show the ‘Answer- Ready’ mode, after 60 seconds, the display shows the total call counter, new call counter, current time and date.
View the Caller ID Memory
If you have new calls (icon and New Call LED is lit). Press ▲ button to view the oldest calls, or press ▼ button to view the most recent calls. Reach the end of all data, 'END OF LIST' will be displayed.
Notes:
- The New Call LED will blink until all the new Caller ID data has been reviewed.
- If the icon is turned on, you have received multiple NEW calls from the same number.
- If you receive a call from a number stored in (previously reviewed) memory, the data in memory will be replaced with the new call's time and date and the icon will be turned on.
Storing telephone numbers from the caller list in the phone book
-
Select the telephone number from the caller list that you want to put into the phone book by press ▲ or ▼ button.
-
Press the ➕ button. The display shows the message "COPY NUMBER?".
-
Confirm with ➕ button. The number has now been stored in the phone book and a name can also be assigned to it.
Erase specific Caller IDs
Pressing ▲ or ▼ button for the Caller ID memory location to be reviewed. To clear a single Caller ID memory location, press X button, the display shows "DELETE?". Press the X button for 2 seconds.
The data for that call will be erased, and the CALL# and Caller ID information will be updated.
Erase the Caller ID Memory
After all new message have been reviewed, press and hold X button for 4 seconds. The message “DELETE ALL?” will appear to confirm your action. Press and hold X button for 2 seconds to clear all the information, then the message “NO CALL” appear.
Both the total call and new call counters will become zero, and the current time and date will be displayed.
NOTE: All new calls must be reviewed before clearing the entire memory.
Call Back (Redial) from the Caller ID Memory
With the handset off hook:
- Pick up the handset or press 📋 button and wait for a dial tone.
- Press ▲ or ▼ button to find the Caller ID memory location to be redialed.
- Press ↗ button and the telephone automatically dials the displayed number.
With the handset on hook:
- With the telephone on hook, press ▲ or ▼ button to find the Caller ID memory location to be redialed.
- To redial the displayed number: Press the ↗ button. The hands-free facility will be switched on automatically.
Annex
Service
You have purchased a modern product of Tiptel. The high-tech manufacturing facilities grant a continuous level of the highest quality. This is even underlined by our certification according to DIN EN ISO 9001. If, however, problems occur or you have questions on operating the device, please contact your local dealer.
Guarantee
Please contact your local dealer or importer for details of guarantee for non EC countries. Within the European Community the following guarantee regulation applies: Your contact for services arising from guarantee obligations is the authorised dealer where you bought the device. Tiptel will grant a guarantee of 2 years from the date of handover for the material and for the manufacturing of the telecommunications terminal unit. Initially, the purchaser shall have only the right of subsequent performance. Subsequent performance entails either repair or the supply of an alternative product. Exchanged devices or parts shall become the property of the authorised dealer. If the subsequent performance fails, the purchaser can either demand a reduction in the purchase price or withdraw from the contract. The purchaser shall notify the dealer immediately of any defects found. Proof of the guarantee entitlement shall be furnished by standard proof of purchase (receipt or invoice).
The guarantee entitlement shall expire if the purchaser or an unauthorised third party interferes with the device. Damage caused by inappropriate handling, operation, storage or by force majeure or other external influences shall not be covered by the guarantee. The guarantee shall not cover any consumable material (e.g. batteries) or defects that only slightly impair the value or the usability of the device. Claims for damage caused by transport shall be asserted to the delivery company.
Notes on settlement:
Repairs can only be conducted by the Tiptel Service. A warranty repair does not prolong the warranty period – neither for the replaced parts nor for the device. This guarantee is not transferable and shall
expire if the device is sold on to another party. It shall also expire if the device is interfered with by third parties or if the serial number on the device has been removed or made illegible.
The General Terms and Conditions of Tiptel, which are part of the contract for a dealer, shall also apply. In the event of a complaint, the defective product shall be sent to the relevant Tiptel subsidiary, the importer or dealer along with a description of the defect and the proof of purchase.
Maintenance / Cleaning
The telephone is maintenance-free. Clean the housing surface only with a soft, slightly moist cloth or an antistatic cloth. Never use a dry cloth (electrostatic charge can lead to defects of the electronic). Do not use any chemicals, cleaning products or abrasives.
CE Sign
This device is approved for the connection and use within the analogue public telephone networks in all EC countries – according to the European Requirements. Due to technical deviations in individual countries, we cannot grant an unlimited guarantee for the successful operation at all types of telephone accesses.
Tiptel hereby declares that the device complies with all fundamental requirements of the European directive 1999/5/EC. This conformity is confirmed by the CE sign on the device.
Further details on the declaration of conformity can be found under the following internet address:
http://www.tiptel.com
Gebruiksaanwijzing
(NL/B)
In gebruik nemen
Bellen


- ANALOGUE FEATURE PHONE WITH CALLER ID
- TIPTEL 134
- SAFETY INSTRUCTIONS
- LOCATION OF CONTROLS
- SETTING UP
- SCOPE OF DELIVERY
- INSTALLING BATTERIES
- LOW BATTERY ALERT
- CONNECTING THE PHONE
- SETTING UP YOUR DISPLAY
- SET THE LANGUAGE
- SET THE LCD CONTRAST
- SET THE TIME/DATE
- RINGER VOLUME ADJUSTMENT
- SPEAKER VOLUME CONTROL
- WALL MOUNTING THE PHONE
- TELEPHONE OPERATION
- MAKING A CALL USING THE HANDSET OR HANDS-FREE FEATURE
- A: MAKING A CALL USING THE HANDSET
- B: MAKING A CALL USING THE HANDS-FREE FACILITY
- ENTERING NUMBERS BEFORE DIALING
- RECEIVING A CALL
- REDIAL
- RECALL
- MEMORY DIALING
- STORING A NUMBER IN MEMORY
- HOW TO ENTER NAME AND CHARACTERS
- EXAMPLE: YOU WISH TO ENTER THE NAME "PETER
- OVERVIEW
- DIALING A STORED NUMBER
- WITH THE HANDSET OFF HOOK
- WITH THE HANDSET ON HOOK
- CALL TIMER
- THE PHONE BOOK
- TO STORE TELEPHONE NUMBERS & NAMES IN THE PHONE BOOK
- MAKING A CALL USING THE PHONE BOOK
- CHANGING NUMBERS IN THE PHONE BOOK
- DELETING INDIVIDUAL NUMBERS FROM THE PHONE BOOK
- DELETING THE ENTIRE PHONE BOOK
- CALLER ID OPERATION
- RECEIVE CALLER ID
- VIEW THE CALLER ID MEMORY
- NOTES
- STORING TELEPHONE NUMBERS FROM THE CALLER LIST IN THE PHONE BOOK
- ERASE SPECIFIC CALLER IDS
- ERASE THE CALLER ID MEMORY
- CALL BACK (REDIAL) FROM THE CALLER ID MEMORY
- ANNEX
- SERVICE
- GUARANTEE
- MAINTENANCE / CLEANING
- CE SIGN
- GEBRUIKSAANWIJZING
- (NL/B)
- IN GEBRUIK NEMEN
- BELLEN
Brand : TIPTEL
Model : 134
Category : Mobile Phone