
RC 800 - Contact grill Rommelsbacher - Free user manual and instructions
Find the device manual for free RC 800 Rommelsbacher in PDF.


| Product Type | Contact Grill & Raclette |
| Model | RC 800 |
| Brand | Rommelsbacher |
| Power Consumption | 730 W per unit |
| Voltage | 230 V ~ 50 Hz |
| Protection Class | I |
| Number of Raclette Pans | 4 |
| Grill Plate Material | Non-stick coating (Xylan Plus) |
| Temperature Control | Stepless adjustable (MIN-MAX) |
| Preheating Time | Approx. 10 minutes at MAX setting |
| Max. Number of Units Connected | 3 appliances per power cord |
| Joining Element | Yes, for side-by-side fixing |
| Parking Level | Yes, for empty pans |
| Dimensions (approx.) | 30 x 25 x 10 cm |
| Weight (approx.) | 2.8 kg |
| Cable Length | 1.5 m |
| Intended Use | Domestic only |
| Non-stick Coating Care | No dishwasher, no metal utensils |
| Cleaning | Hand wash with mild detergent |
| Safety Features | Thermostatic regulation, auto shut-off by unplugging |
| Accessories Included | 4 pans, 4 small spatulas, power cord, connection cord |
Frequently Asked Questions - RC 800 Rommelsbacher
User questions about RC 800 Rommelsbacher
0 question about this device. Answer the ones you know or ask your own.
Ask a new question about this device
Download the instructions for your Contact grill in PDF format for free! Find your manual RC 800 - Rommelsbacher and take your electronic device back in hand. On this page are published all the documents necessary for the use of your device. RC 800 by Rommelsbacher.
USER MANUAL RC 800 Rommelsbacher
natural_image
Abstract geometric pattern with vertical lines inside a circle (no text or symbols)ROMMELSBACHER
natural_image
Black-and-white photo of a French grater with various dishes and kitchen utensils, no visible text or symbols.RC 800 / RC 1600 Set: 2x RC 800
Raclette
GB instruction manual....17
Product description ....3
Introduction......17
Intended use ....17
Technical data....17
Scope of supply....17
Packing material ....17
Disposal/recycling 17
For your safety ....18
General safety advices....18
Safety advices for using the appliance ....19
Possible combinations....20
Non-stick coating....20
Prior to initial use ....21
How to operate the appliance ....21
1.) Preparing the appliance for use ....21
2.) Switching on and preheating....21
3.) Grilling and Raclette .....22
4.) Switching off....22
5.) Using two or three appliances at one power cord....23
6.) Connecting appliances with the joining element....24
Cleaning and maintenance ....24
natural_image
Pure electrical circuit lines without any symbolsnatural_image
Hand inserting a cable into a device panel with an arrow indicating the cable attachment (no text or symbols visible)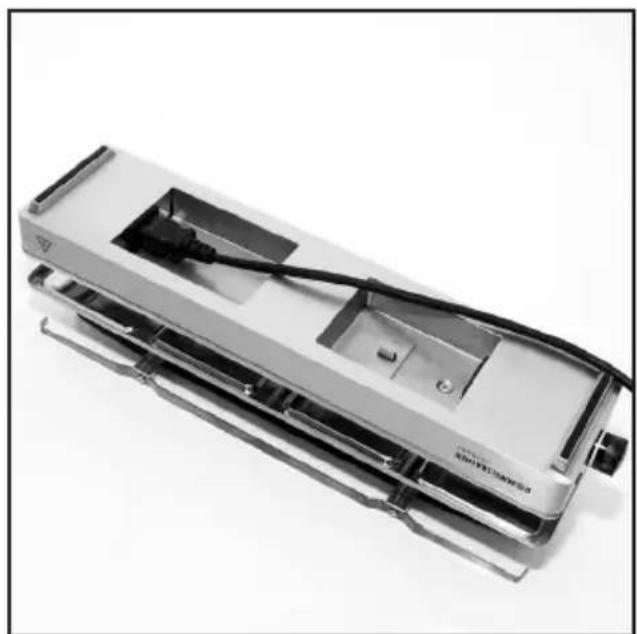
natural_image
Exterior view of a modern office building (no signage)natural_image
Stacked industrial grates with black components and a brand logo (no readable text or symbols beyond branding)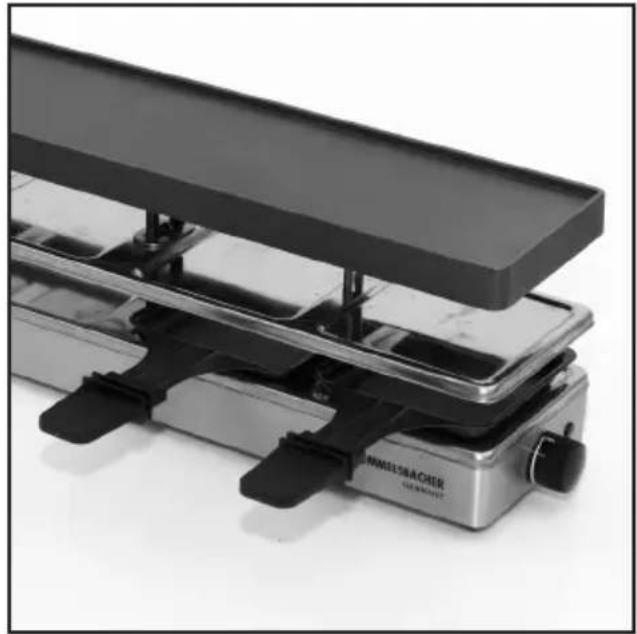
natural_image
Stacked metallic mechanical components with black clamps, no visible text or symbolsnatural_image
Hand using a tool to adjust or install electronic components on a device casing (no visible text or symbols)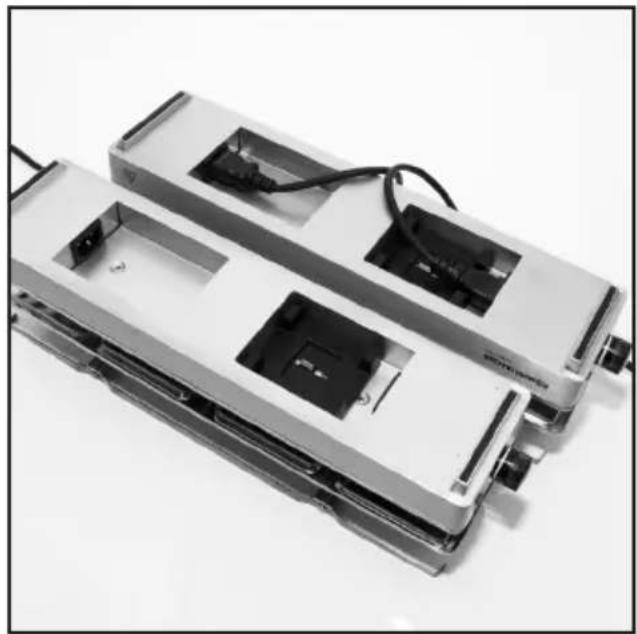
natural_image
Two electronic device modules with visible internal components and wiring, no text or symbols present.natural_image
Hand inserting a component into an electronic device chassis (no visible text or symbols)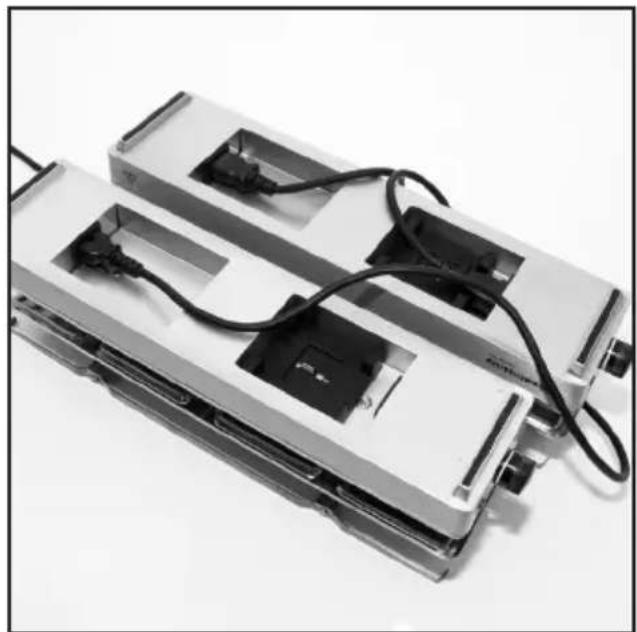
natural_image
Black-and-white photo of a multi-chamber electronic device with visible circuitry and wiring (no text or symbols)natural_image
Close-up of a hand inserting a plastic into a multi-chamber electronic device casing (no text or symbols visible)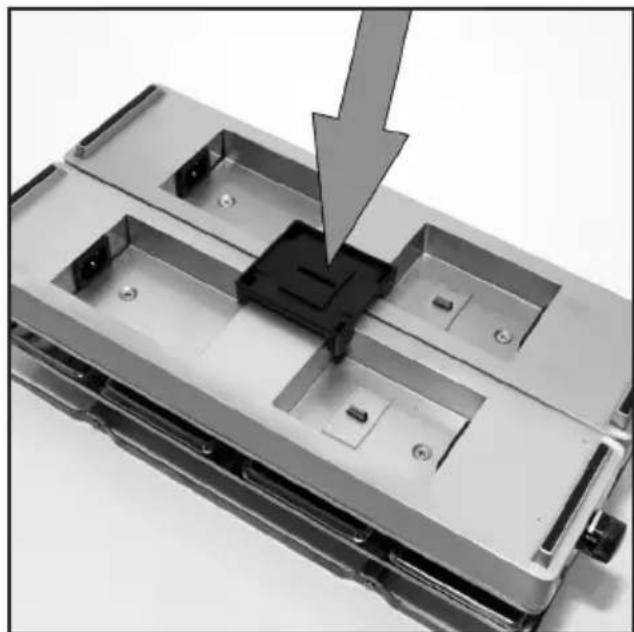
natural_image
Close-up of a mechanical component with a black plastic housing and a gray arrow indicating a downward force or adjustment (no text or symbols visible)We are happy that you have decided for this superior Raclette grill and thank you for your confidence. Its easy operation and the fl exible ways of use will excite you for sure. Before you start, please read the following notes carefully and observe them. Keep this instruction manual safely. Hand out all documents to third persons when passing on the appliance. Thank you very much.
Intended use
The appliance is designed for domestic use only and meant for preparing food in your kitchen, at table etc. Other uses or modifications of the appliance are not intended and harbour considerable risks of accident. For damage arising from not intended use, the manufacturer does not assume liability. The appliance is not designed for commercial use.
Technical data
Only connect the appliance to an isolated ground receptacle installed according to regulations. The rated voltage must comply with the details on the rating label. Only connect to alternating current!
Nominal voltage: 230 V\~ 50 Hz
Nominal power (per appliance) ca.: 730 W
Protection class: 1
Operation as a set: maximum 3 appliances connected to 1 power cord
Scope of supply
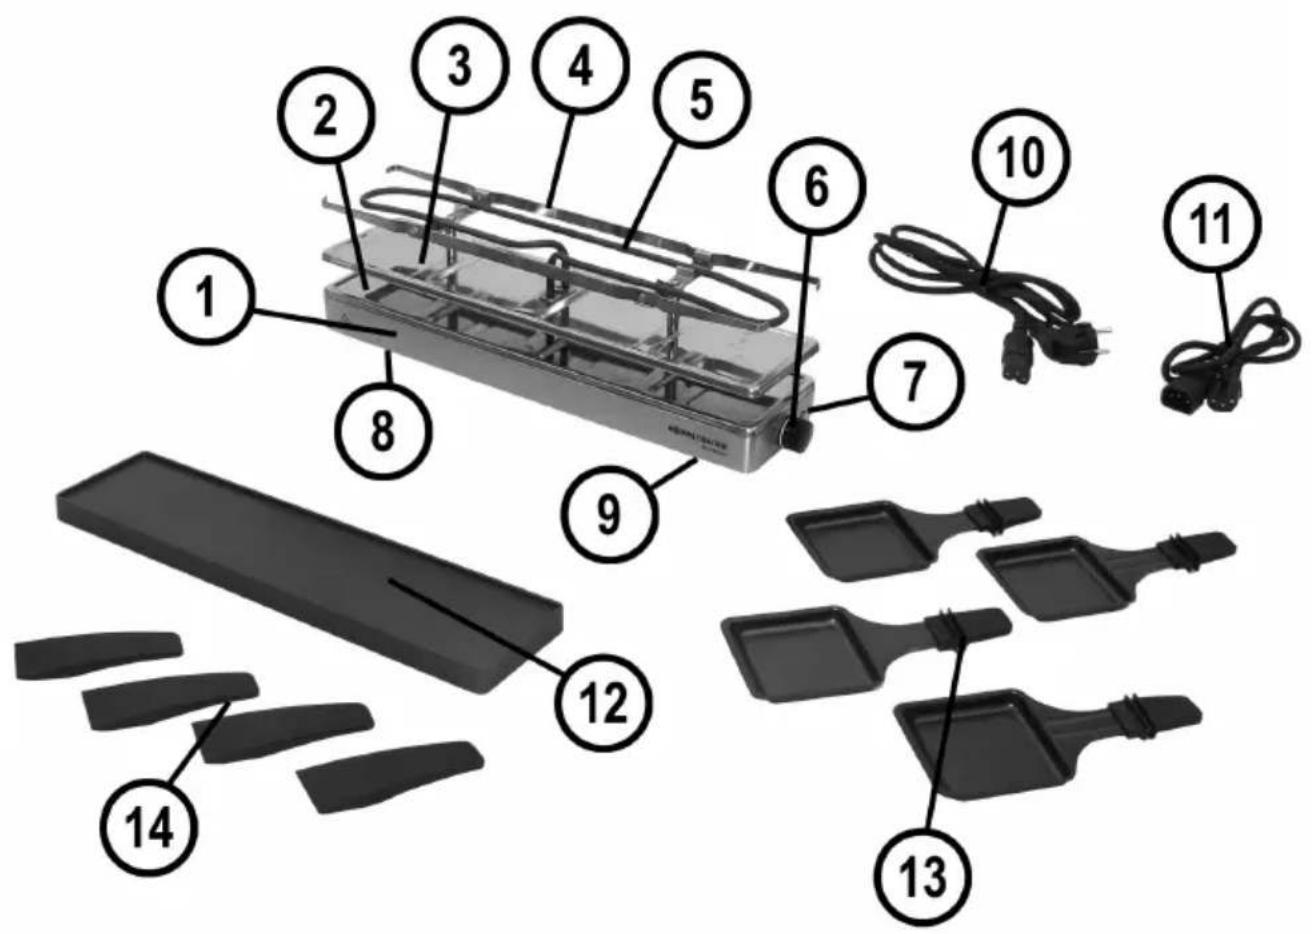
Check the scope of supply for completeness as well as the intactness of the product and all components immediately after unpacking (see product description on page 3).
Packing material
Do not simply throw the packing material away but recycle it.
Deliver paper, cardboard and corrugated cardboard packing to collecting facilities.
Also put plastic packing material and foils into the intended collecting basins.




In the examples for the plastic marking: PE stands for polyethylene, the code figure 02 for PE-HD, 04 for PE-LD, PP for polypropylene, PS for polystyrene.
Disposal/recycling
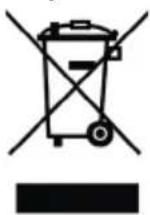
According to the Waste Electrical and Electronic Equipment Directive, this product must not be disposed of with your normal domestic waste at the end of its life-span. Therefore, please deliver it at no charge to your appropriately licensed local collecting facilities (e.g. recycling yard) concerned with the recycling of electrical and electronic equipment. Please approach your local authorities for how to dispose of the product.

WARNING: Read all safety advices and instructions. Non-observance of the safety advices and instructions may cause electric shock, fire and/or bad injuries.
General safety advices:
• Always keep children under 8 away from the product and the power cord.
- Children from the age of 8 must be supervised when cleaning or maintaining the appliance.
- Children from the age of 8 and persons not having the knowledge or experience in operating the appliance or having handicaps of physical, sensorial or mental nature must not operate the appliance without supervision or instruction by a person, responsible for their safety.
- Never leave the appliance unattended during operation.
- Children should be supervised in order to ensure that they do not play with the appliance.
- Packing material like e. g. foil bags should be kept away from children.
- Do not operate this unit with an external timer or a separate telecontrol system.
- Prior to each use, check the appliance and the attachments for soundness, it must not be operated if it has been dropped or shows visible damage. In these cases, the power supply must be disconnected and the appliance has to be checked by a specialist.
- When laying the power cord / connection cord, make sure that no one can get entangled or stumble over it in order to avoid that the appliance is pulled down accidentally.
- Keep the power cord / connection cord away from hot surfaces, sharp edges and mechanical forces. Check the power cord / connection cord regularly for damage and deteriorations. Damaged or entangled cords increase the risk of an electric shock.
- For disconnecting the appliance, only pull at the plug and never at the cord!
- Never immerse the appliance, power cord / connection cord and power plug in water for cleaning.
- Do not store the appliance outside or in wet rooms.
- This electrical appliance complies with the relevant safety standards. In case of signs of damage to the appliance or the power cord / connection cord, unplug the appliance immediately. Repairs may be executed by authorised specialist shops only. Improper repairs may result in considerable dangers for the user.
- Improper use and disregard of the instruction manual void all warranty claims.
Safety advices for using the appliance:

WARNING: Hazard of injury and burns!
Casing surfaces, grill plate and other components are getting hot during use and firstly stay hot after switch-off!
Thus, act with caution:
- We recommend using pot cloths and appropriate grill cutlery!
- Do not use the appliance as depositing rack or working top as it will get hot during operation! As protection against fire, do generally not put objects made of paper, plastic, fabric or other inflammable material on hot surfaces!
- Do not cover the grill plate/heating elements with aluminium foil!
• Overheated fats and oils can inflame. Therefore, food containing fats and oils may only be prepared under supervision! - Attention! Hazard of fire! When filling the pans, mind that the food must not touch the heating element! Bread toasted too long can also inflame!
- Only use the original pans for gratinating!
- Do not transport the appliance when hot. Appliance and accessories must have cooled completely before cleaning or moving them!
- Observe the following when setting up the appliance:
- Place the appliance on a heat-resistant, stable and even surface (no varni-shed surfaces, no tablecloths etc.).
- Place it beyond children’s reach.
- Leave a ventilation distance of at least 20 cm to all sides and 1 m above the appliance to avoid damage by heat or fat splatters and to grant an unobstructed work area. Unhindered air supply has to be ensured.
- Do not operate the appliance in the vicinity of sources of heat (oven, gas flame etc.) or in explosive environments, where inflammable liquids or gases are located.
- Do not operate more than 3 appliances at the same power cord.
- Never operate the Raclette near or below curtains, wall cupboards or other inflammable materials.
Attention! Hazard of fire! This appliance is not qualified for installation.
- Do not use the appliance as room heater.
- Pull the power plug after each use for safe switch-off.
Possible combinations
The appliance (RC 800) is equipped with 4 Raclette pans.
The set (RC 1600) is delivered as a set of 2 (2x RC 800) and is, therefore, flexibly upgradeable to 8 Raclette pans. By purchasing another RC 800 appliance, the set can be upgraded to a combination of 3 units or 12 Raclette pans respectively.
Please have a look at the possible combinations, which allow for a very flexible use:
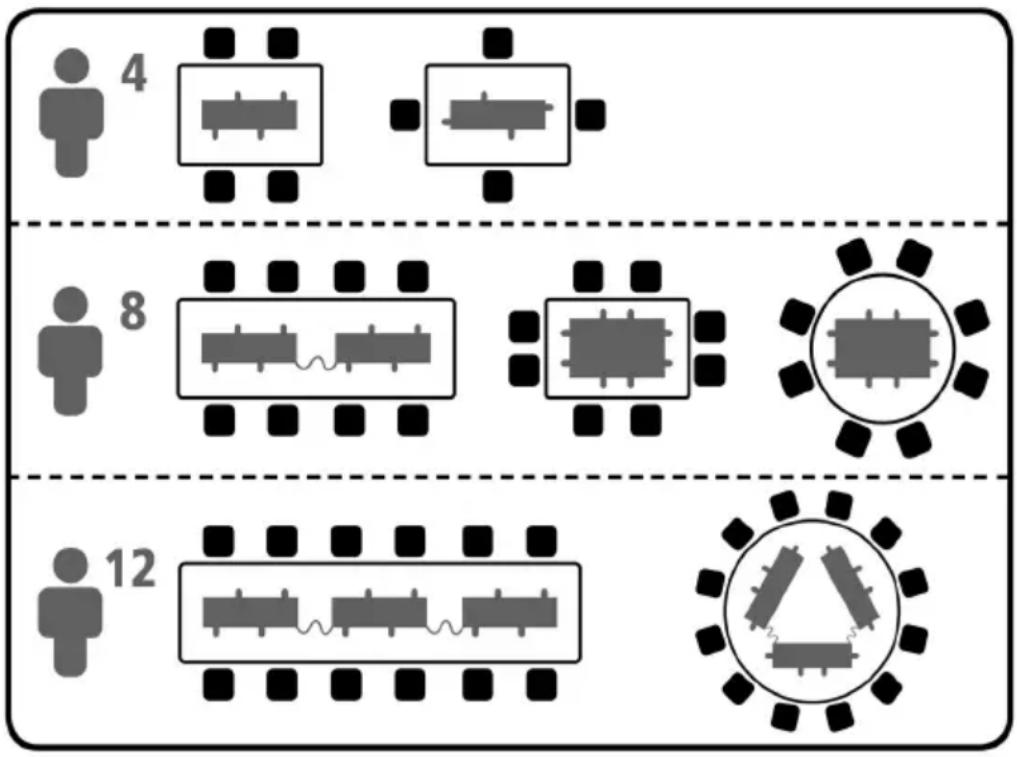
Danger of overheating!
Never operate in this
combination!

natural_image
Pure electrical circuit lines without any symbolsNon-stick coating
The grill plate and the pans are covered with a high-quality "Xylan Plus" non-stick coating. This layer is especially easy to clean and prevents the food from sticking to the surfaces. To guarantee a long-lasting non-stick effect, the grill plate and the pans should not be cleaned in the dishwasher.
Attention: Do not scratch or cut on the non-stick coated surfaces. Overheated and/or scratched pans or grill plates are not covered by the warranty.
Prior to initial use
- Wipe the casing with a damp cloth and dry it thoroughly.
- Clean the pans, the small spatulas and the grill plate with warm water and a mild detergent before using them for the first time.
- Prior to initial use, the protective coating of the heating elements must be burnt in. To do so, heat up the appliance – without pans! – for approx. 10 minutes at maximum setting. Please do not be bothered by the slight, harmless smoke and smell, which will appear for a short while. See for a good aeration of the room during that time.
How to operate the appliance
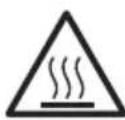
WARNING: Hazard of injury and burns!
Casing surfaces, grill plate and other components are getting hot during use and firstly stay hot after switch-off!
1.) Preparing the appliance for use
natural_image
Hand inserting a component into an electronic device with cables (no visible text or symbols)
natural_image
Exterior view of a modern office building (no signage)• Take the grill plate off.
- Turn the appliance and put it upside down on a scratch-resistant surface.
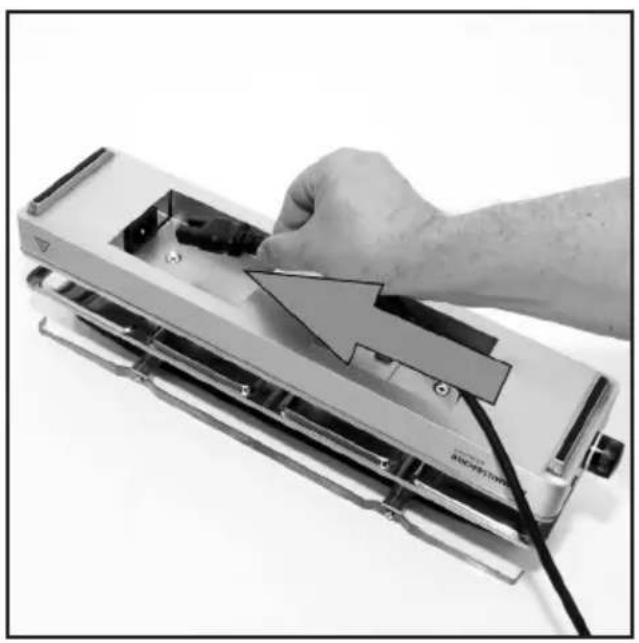
- Plug the power cord into the relating port at the opposite side of the temperature control. Press on firmly.
- Then flip the appliance over again.
2.) Switching on and preheating
- Connect the power cord to a suitable power outlet. Mind to first connect the power cord to the appliance before connecting the power plug with the mains.
- Turn the temperature control clockwise to the right up to "MAX" position.
The appliance is heating now and the temperature pilot lamp glows.
• Heat up the appliance for at least 10 minutes.
3.) Grilling and Raclette
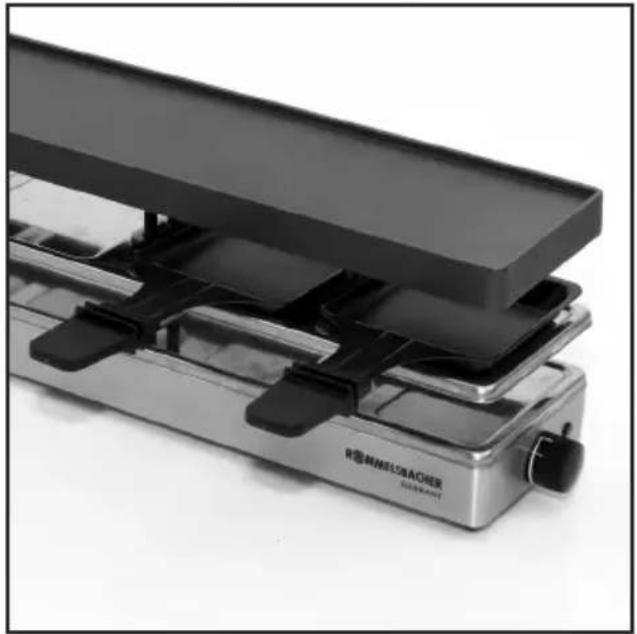
Raclette level (au gratin) Parking level
natural_image
Stacked industrial grates with black clamps and a brand logo (no readable text or symbols beyond branding)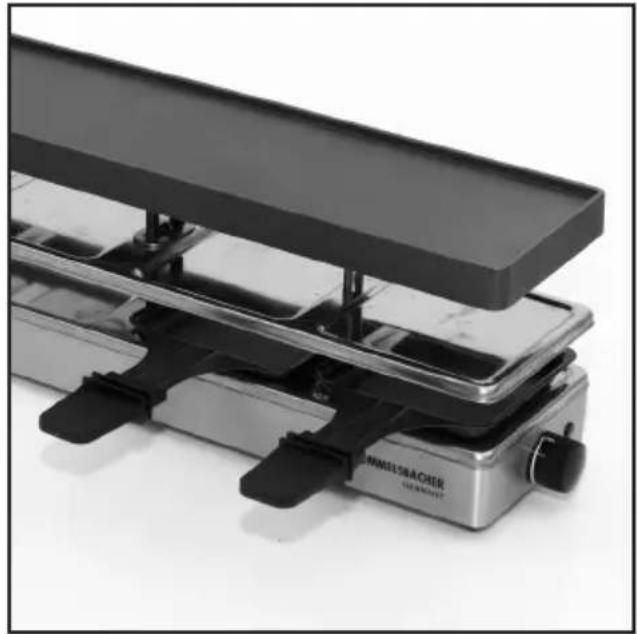
natural_image
Stacked metallic mechanical components with black clamps, no visible text or symbols- After preheating the appliance, insert the filled pans only up to the provided stop (impression on the raclette level).

ATTENTION HOT! Do not touch the edge of the hot grill plate when inserting the pans!
- The temperature is steplessly variable. For regulating the temperature according to your requirements, turn the control button in-between "MIN" and "MAX" setting, in order to set the desired temperature level.
- The lamp glows red during heating cycle and goes out as soon as the set temperature is reached.
- The on/off cycling of the pilot lamp during operation evidences the thermostatic temperature regulation.
ATTENTION: This means that the pilot lamp will temporarily not glow although the appliance is still switched on. Therefore, please verify to switch the control knob back to "MIN" position after use.
- Always insert those pans not in use into the parking level. This will protect the non-stick coating from being overheated.
ATTENTION: Never heat-up empty pans or put empty pans in the Raclette level, because overheating may cause a damage to the non-stick coating.
TIP: Use the small spatulas to move the food in the pans or to push out the melted cheese. You may also use other utensils made of wood or plastic. Avoid, however, that they are too long in contact with the hot parts. Never use metal cooking utensils as those might damage the non-stick coating.
4.) Switching off
- To switch off, turn the temperature control to „MIN“ and pull the mains plug. ATTENTION: TO ENSURE A SAFE SWITCH-OFF, DISCONNECT THE APPLIANCE FROM THE MAINS AFTER EACH USE BY PULLING THE MAINS PLUG.
5.) Using two or three appliances at one power cord
NOTE: When several appliances are operated with one power cord, each appliance can be used and controlled independently. Three appliances maximum can be combined and used with one power cord.
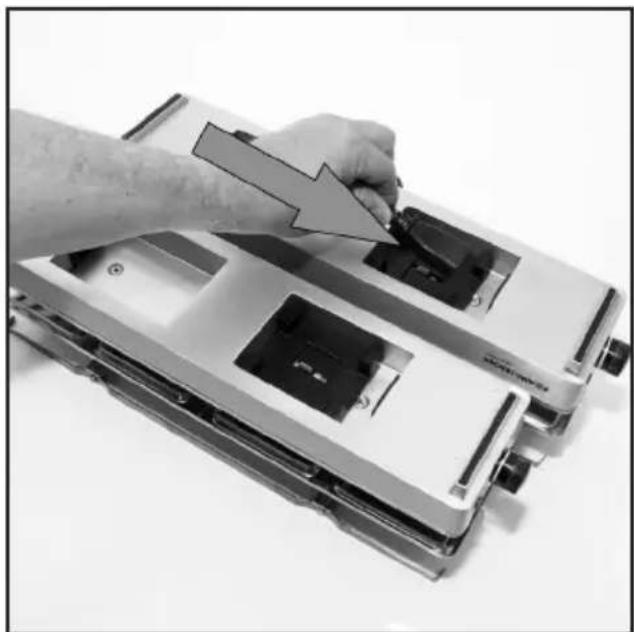
natural_image
Hand inserting a component into a device housing (no visible text or symbols)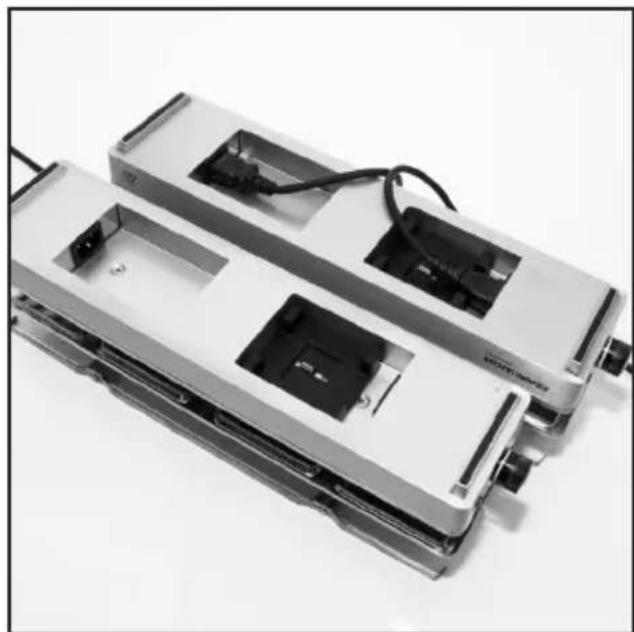
natural_image
Two electronic devices with internal components and wiring, no visible text or symbols- Before connecting the appliances, ensure that the power plug is disconnected from the mains!
• Take the appliance which is already equipped with the power cord. - Then plug the connection cord into the relating port at the side where the temperature control is located. Press on firmly.
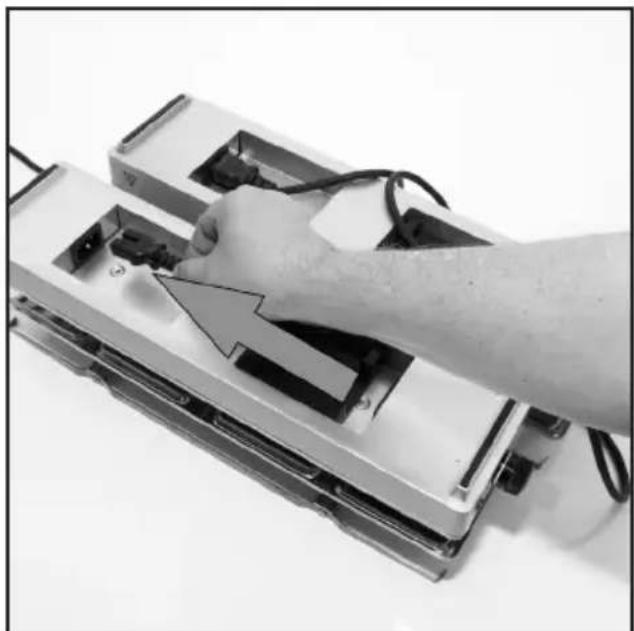
natural_image
Hand inserting a component into an electronic device chassis (no visible text or symbols)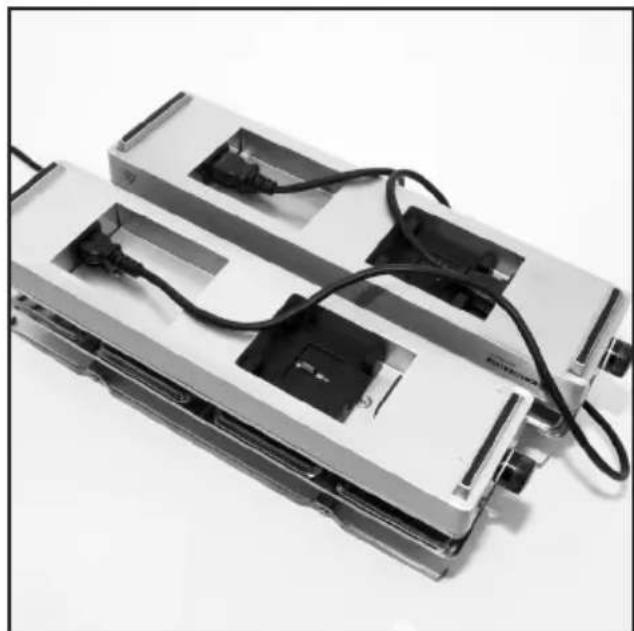
natural_image
Black-and-white photo of a mechanical device with attached cables and connectors (no visible text or symbols)- Take the appliance without cord and plug the open end of the connection cord to the provided port at the opposite side of the temperature control. Press on firmly.
- Then flip both appliances over again.
- Connect the power cord to a suitable power outlet. Mind to first connect the power cord with the appliance before connecting the power plug with the mains.
6.) Connecting appliances with the joining element
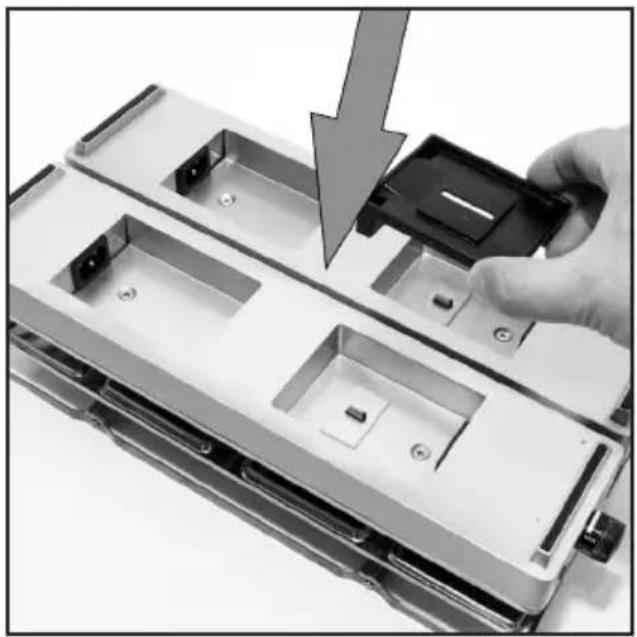
NOTE: There is a joining element on the underside of the appliance, which can be used to join and fix several appliances side by side.
natural_image
Close-up of a hand inserting a plastic into an electronic device casing with a downward arrow indicating the process (no text or symbols visible)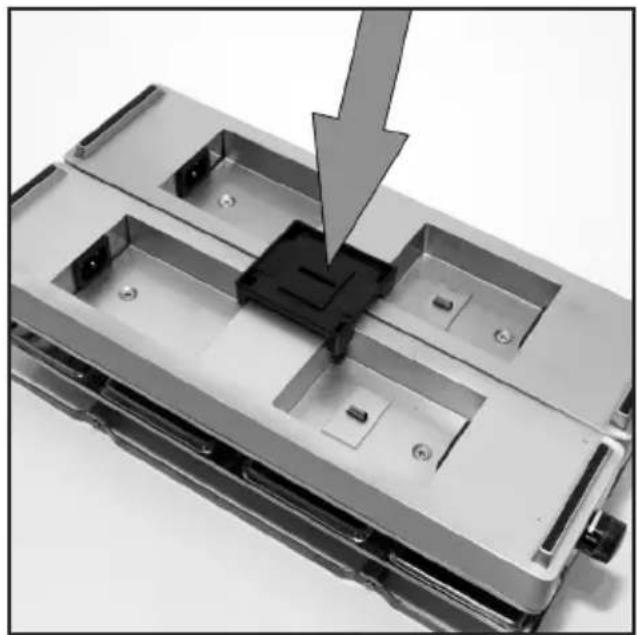
natural_image
Close-up of a mechanical component with a black plastic housing and a gray arrow indicating a process or assembly (no text or symbols visible)- Before joining the appliances, make sure that the power cord is disconnected from the mains!
- Turn the appliances upside down and place them – side by side – on a scratch-proof surface.
- Unclip the joining element from its place and take it out.
- To fix the appliances, place the joining element in the cavities of both appliances. Press it on.
- Now connect the appliances with the enclosed cords according to the instructions as prescribed above.
- Flip over the appliances again.
- Put the grill plate in its position. Mind a correct sitting of the plate.
- Insert the pans in the parking level.
Cleaning and maintenance

- Before cleaning, always unplug the appliance and let all parts cool down.
-
Never immerse base, power cord, connection cord and plugs in water or clean them under running water!
-
Clean the grill plate, pans and small spatulas in lukewarm water with some dishwashing detergent.
- Soak severe soiling firstly with some oil.
NOTE: Do not put them in the dishwasher, because dishwasher salt might damage the coating.
- Wipe the heating element with a damp cloth only.
-
Make sure no water or steam may infiltrate the appliance from below either.
-
Never use abrasives, solvents or sharp objects!
- Do not use steel wool or metal sponges!
- Do not use oven cleaners!
- Do not treat the appliance or accessory parts with a steam cleaner!
Tips and notes
- When using the grill plate for the first time, grease it with some oil first. For next use, no grease is required.
- Make sure the food does not get in contact with the heating element as otherwise the food might burn.
- Only season cheese after melting as spices burn at high temperatures and generate unpleasant smoke as well as an unpleasant taste.
- If possible, the food to be grilled should be taken out of the fridge 12 hour before you start grilling. It will roast more quickly and you avoid thicker meat staying cold inside.
- Oil lean meat slightly before grilling. The best results are achieved with small and tender pieces of meat. Do not pierce when turning, so that no juice is lost.
- For achieving a nice browning, sear the meat shortly. The meat is done when the juice coming out is clear.
- Spices and marinades might generate smoke when grilling. To avoid this you may use non-seasoned/non-marinated raw meat and rather offer seasoning mixtures and barbecue sauces as side dish.
- Spice the meat before, but salt it after grilling. This will keep its juice inside.
- Pierce the casings of sausages to prevent them from bursting.
- As side dishes, we recommend crispy bread, fresh salads and cooked potatoes.

- ROMMELSBACHER
- Intended use
- Technical data
- Scope of supply
- Packing material
- Disposal/recycling
- WARNING: Read all safety advices and instructions. Non-observance of the safety advices and instructions may cause electric shock, fire and/or bad injuries.
- General safety advices:
- Safety advices for using the appliance:
- WARNING: Hazard of injury and burns!
- Casing surfaces, grill plate and other components are getting hot during use and firstly stay hot after switch-off!
- Thus, act with caution:
- Possible combinations
- Non-stick coating
- Prior to initial use
- How to operate the appliance
- 1.) Preparing the appliance for use
- 2.) Switching on and preheating
- 3.) Grilling and Raclette
- 4.) Switching off
- 5.) Using two or three appliances at one power cord
- 6.) Connecting appliances with the joining element
- Cleaning and maintenance
- Tips and notes
Brand : Rommelsbacher
Model : RC 800
Category : Contact grill