CBD6600V - Dishwasher Elis & Elsa - Free user manual and instructions
Find the device manual for free CBD6600V Elis & Elsa in PDF.


User questions about CBD6600V Elis & Elsa
0 question about this device. Answer the ones you know or ask your own.
Ask a new question about this device
Download the instructions for your Dishwasher in PDF format for free! Find your manual CBD6600V - Elis & Elsa and take your electronic device back in hand. On this page are published all the documents necessary for the use of your device. CBD6600V by Elis & Elsa.
USER MANUAL CBD6600V Elis & Elsa
natural_image
Cutaway view of a white kitchen appliance showing multiple circular compartments and a rack-mounted unit (no text or symbols visible)SE Bruksanvisning s.2
GB User manual p.24
NO Bruksanvisning s.46
Before using this product, please read the user manual carefully. Save the user manual for future reference.
Les bruksanvisningen nøye før du tar i bruk produktet. Ta vare på bruksanvisningen for fremtidig bruk.

GRATULERAR TILL DIN NYA ELIS & ELSA BÄNKDISKMASKIN!
natural_image
Line drawing of a hand holding a faucet and a valve (no text or symbols)natural_image
Technical line drawing of a mechanical assembly with a magnified inset showing a screwdriver inserted into a threaded component (no text or symbols present)natural_image
Technical line drawing of a mechanical assembly with a hand operating a component (no text or symbols visible)ÖPPNA
text_image
2h 4h 8h PSteg 2: Välj en viss saltdosering
text_image
Illustration showing a hand holding a card with a scroll, featuring a small symbol and directional arrow indicating rotation or movement.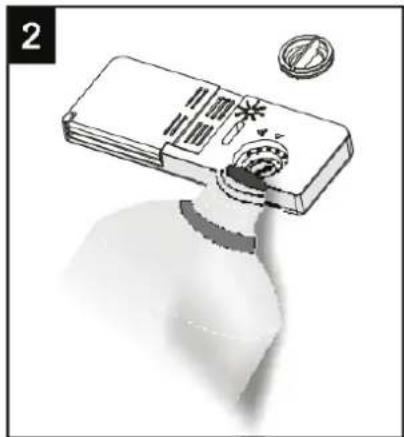
natural_image
Illustration of a bottle with a lid and a small sphere above it, no text or symbols present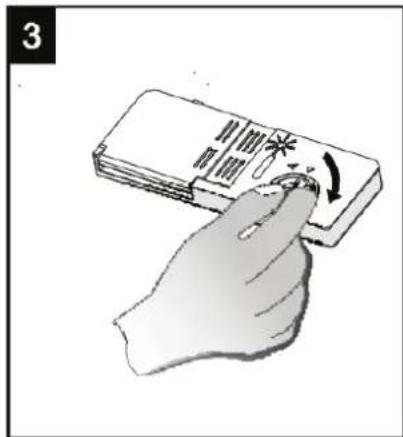
text_image
3natural_image
Isometric technical line drawing of a mechanical component or housing (no text or symbols)natural_image
Technical line drawing of a mechanical assembly with no visible text or symbolstext_image
550mm 438mm 500mm 812mmMATERIALÅTERVINNING
Materialåtervinning
Read the user manual thoroughly!
Before you start using your dishwasher, please read the entire user manual carefully. This will help you use and maintain the dishwasher.
- Save the user manual for future reference.
- Please also pass it on to any future owner of the dishwasher.
This manual contains sections on safety, use, installation, troubleshooting, etc.
Before ringing a service unit!
- The section on troubleshooting helps you solve a number of common problems yourself.
- If you cannot solve a problem yourself, please contact a service engineer.
Important! The product is subject to constant development and updating by the manufacturer. For this reason, technical data may change without prior warning. Please ensure that the manufacturer or retailer has supplied you with the user manual.
CONTENTS
Safety information 25
Quick guide 26
Installation instructions....27
Machine location 27
Electrical connection....27
Water connection....27
Connecting drain hoses 28
Starting the dishwasher 29
Use 30
The control panel 30
Dishwasher functions.... 30
Before using the machine for the first time.... 31
A. Fill the salt dispenser.... 31
B. Fill the rinse-aid dispenser 32
C. Detergent 34
Loading the dishwasher rack.... 35
Things to check before and after loading the dishwasher rack.... 36
Loading the rack.... 36
Cutlery basket.... 37
Starting a wash cycle 37
Wash cycle table.... 37
Starting the machine 38
Changing a cycle.... 38
At the end of the wash cycle 38
Maintenance and cleaning 39
Filter system.... 39
Taking care of your dishwasher.... 40
Troubleshooting 42
Technical data 44
Materials recycling 45
IMPORTANT SAFETY INFORMATION
WARNING!
When you use the dishwasher, follow the precautions below:
- This machine is designed for indoor domestic use only
- To avoid electric shocks, remove the plug from the power outlet before any cleaning or maintenance.
- For cleaning, use a soft cloth moistened with a mild cleaning agent. Dry the machine with a dry cloth.
Earthing instructions
- This machine must be directly connected to an earthed power outlet. The machine's cable has an earth wire and an earthed plug.
- There is a risk of electric shock if the machine's earth wire is incorrectly connected.
- If you are unsure whether the power outlet is earthed, check with a qualified electrician or service technician.
- Do not modify the plug that comes with the machine. This applies even if the plug does not fit the power outlet.
- Do not use the dishwasher if all the outer panels are not securely in place.
- If the dishwasher is in use, open its door very carefully. There is a risk of water running out.
- Do not place any heavy objects on the door.
- When loading the machine:
1) Place sharp objects where there is no risk of them damaging the door seal.
2) WARNING! Knives and other utensils with sharp points must be placed tip downwards in the basket or laid horizontally.
- At the end of the wash cycle, check that the detergent compartment is empty.
- Do not wash any plastic object if it does not have a dishwasher safe symbol or equivalent.
- If a plastic object is not marked in this way, refer to the manufacturer's recommendations.
- Use only detergents and rinse aids that are intended for automatic dishwashers.
- Never use soap, washing powder or hand dishwashing detergent in the dishwasher.
- Supervise children and ensure that they cannot play with the machine.
- If the cable is damaged, it must be replaced by the manufacturer, the manufacturer's service representative or a similarly qualified person. This is to prevent the possibility of danger.
- The cable must not be subjected to severe bending or pinching.
- New hoses must be used to connect the machine to the water supply. Old hoses must not be reused.
- A maximum of 6 place settings can be washed at the same time.
- The maximum permitted incoming water pressure is 1 MPa.
- The minimum permitted incoming water pressure is 0.04 MPa.
For detailed instructions, read the corresponding section in the user manual.
| Turn the machine on | To turn the machine on, press the power switch. Open the door. | |
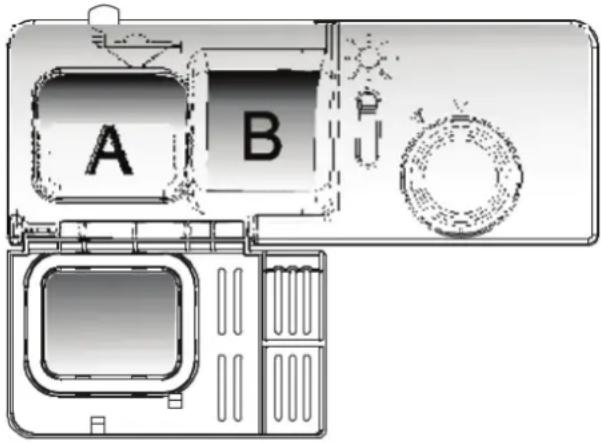
| Fill the detergent compartment | Compartment A:All wash cycles.Compartment B:Only cycles with a pre-wash. (Follow the user manual!) | 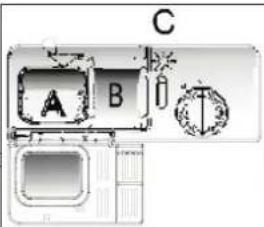 |
| Check the rinse-aid level | Mechanical indicator C. | |
| Check the dishwasher salt level. | (Models with a water-softening system only.)By keeping count of the number of cycles the dishwasher has run, you can judge when you need to top up with salt. | 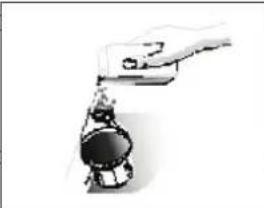 |
| Load the rack | Scrape the washing-up free of coarse leftover food. Soften burnt-on leftovers in pots and pans and then load the rack.See the instructions for loading the dishwasher. | |
| Select a cycle | Close the door. Keep clicking the cycle button until the cycle you want is indicated. (See the "Use" section.) | |
| Run the dishwasher | Turn the tap on and press the Start/Pause button. The machine will start after around 10 seconds. | |

| Warning!Open the door carefully. Hot steam can rush out when you open the door! | ||
| • Add forgotten washing-up to the dishwasher |  | 1. Press the Start/Pause button to stop the machine.2. Open the door.3. Put in any extra washing-up.4. Close the door and then press the Start/Pause button. The dishwasher restarts after 10 seconds. |
 | ||
| • If the machine stops during a wash cycle | | • If the machine stops during a wash cycle, select the wash cycle you want to run on restarting the machine and start the cycle in the usual way. |
| Stop the machine |  | When the wash cycle has finished, the machine beeps 8 times and then stops. Use the power button to turn the machine off. If you do not do this, the machine turns off automatically after 30 minutes. |
 | ||
| Turn the tap off, empty the load. |  | Warning! To avoid handling hot washing-up, wait a while (around 15 minutes) before emptying the dishwasher. |
Warning!
INSTALLATION INSTRUCTIONS
Important! The water and electrical supplies should be installed by qualified technicians.
WARNING! Before you install the dishwasher, take the plug out of the power outlet.
PREPARATIONS FOR INSTALLATION
The dishwasher should be located close to existing mains systems (water, drainage and electricity).
To facilitate the routing of the drain hose, it is a good idea to place the dishwasher close to a kitchen sink.
MACHINE LOCATION
Place the machine in the desired position. The back of the machine should be in contact with the wall and the sides with adjacent walls or cabinet bodies. The dishwasher comes with hoses for water supply and drainage.
Depending on the machine's location, these can be connected to the right or the left side of the machine.
ELECTRICAL CONNECTION
WARNING!
For personal safety:
- Do no connect the machine via an extension cable or an adapter.
- Under no circumstances whatsoever must the earth connection be broken or removed.
Electrical requirements
Ensure that the machine uses the same voltage as that supplied by the mains (check the rating plate). Put the plug into a power outlet. Ensure that the power outlet is protected by a time-delay fuse or a 10 A circuit breaker. The machine should be connected to an individual fuse-protected group. Before use, ensure that the earthing is correct.
Electrical connection
The plug must only be used in an earthed power outlet. If the power outlet to which you wish to connect the machine is not suitable for the machine's plug, get an electrician to replace the outlet. Do not use an adapter or any other solution. These can cause overheating and fires.
WATER CONNECTION
Cold water connection
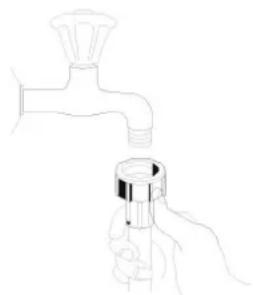
Connect the cold water hose to a threaded 34 " connection and route the hose securely. If the mains supply is new or has not been used for a long time, first let the water run a while until it is clear and free from impurities. If this precaution is not followed, there is a risk that the water inlet will become blocked by impurities.
This can damage the machine.
natural_image
Line drawing of a hand holding a faucet and a cap (no text or symbols)Note! If the supplied hose does not fit your tap, buy an adapter from your local plumbing suppliers.
CONNECTING DRAIN HOSES
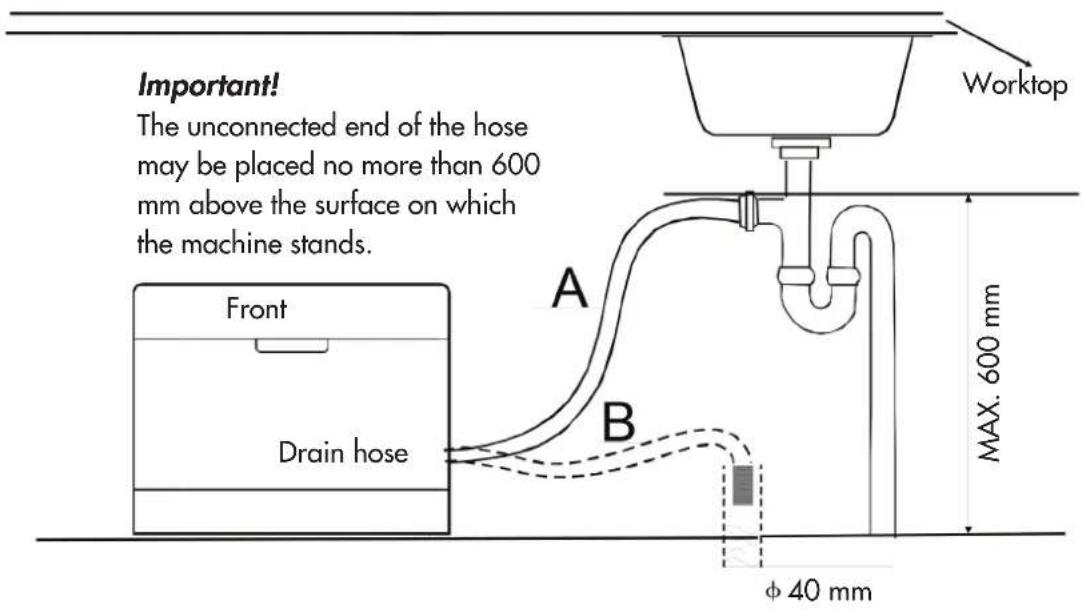
Insert the drain hose into a drain pipe (diameter must be at least 4 cm) or run it into a kitchen sink. Take care not to subject it to severe bending or pinching. The unconnected end of the hose may be placed no more than 60 cm above the surface on which the machine stands. It must not be immersed in water (this could lead to a backflow).
LOCATE THE DRAIN HOSE AS PER METHOD A OR METHOD B
text_image
Important! The unconnected end of the hose may be placed no more than 600 mm above the surface on which the machine stands. Front Drain hose A B Worktop MAX. 600 mm φ 40 mm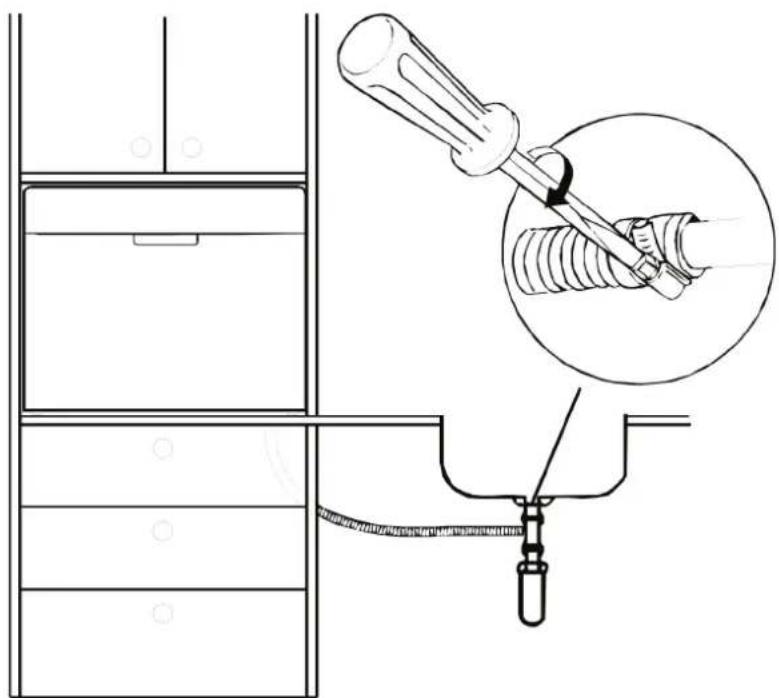
natural_image
Technical line drawing of a mechanical assembly with a magnified inset showing a screwdriver inserted into a threaded component (no text or symbols present)How to empty excess water from hoses
The drain hose should be located 40 – 100 cm above the floor and should not have any extensions added. Otherwise, the machine cannot properly drain off dirty water.
Water connection
Connect the drain hose. To avoid leaks, the drain hose must be fitted correctly.
Ensure that the drain hose is not bent or pinched.
Extension hose
If you unexpectedly need to extend the drain hose, use a hose of the same type.
STARTING THE DISHWASHER
Before starting the dishwasher, check the following:
- The dishwasher is horizontal and firmly secured.
- The inlet valve is open.
- The supply hose's connections are firmly tightened and do not leak.
- The cable is securely connected.
- The power is switched on.
- There are no creases in the supply and drain hoses.
- All packaging and documentation has been taken out of the machine.
Important! After installation, keep the user manual!
The information in the user manual is very helpful for correct use.
USE
THE CONTROL PANEL
IMPORTANT!
For the dishwasher to function optimally, read the user manual thoroughly before using the machine for the first time.
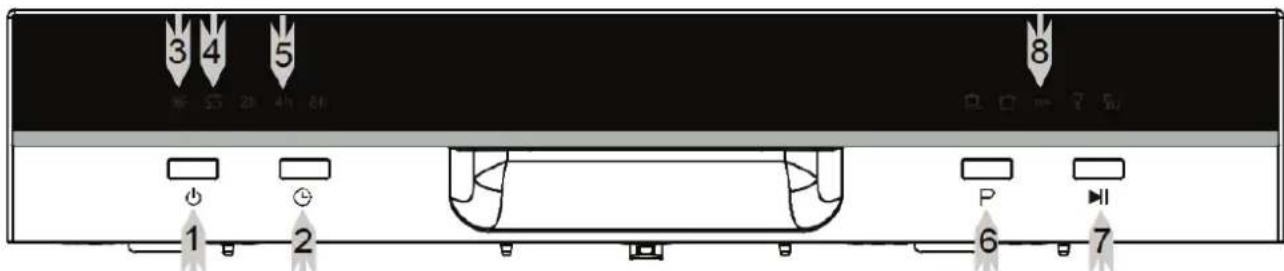
text_image
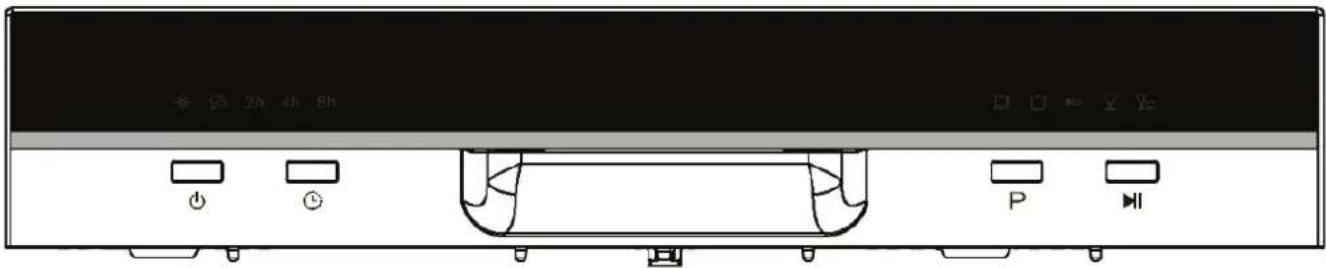
3 4 5 1 2 8 P 71 Power button: For turning power on/off.
2 Delay button: Used to delay the start of the wash cycle.
3 Rinse-aid warning light: Comes on when the rinse-aid dispenser needs filling.
4 Salt warning light: Comes on when salt needs topping up.
5 Delay time: 2, 4, 6 or 8 hours can be selected.
(6 h: the 2 h and 4 h symbols shine simultaneously.)
6 Wash cycle selector: To select a wash cycle, press this button.
7 Start/Pause button: To start or pause the dishwasher, press this button.
8 Cycle indication light.
text_image
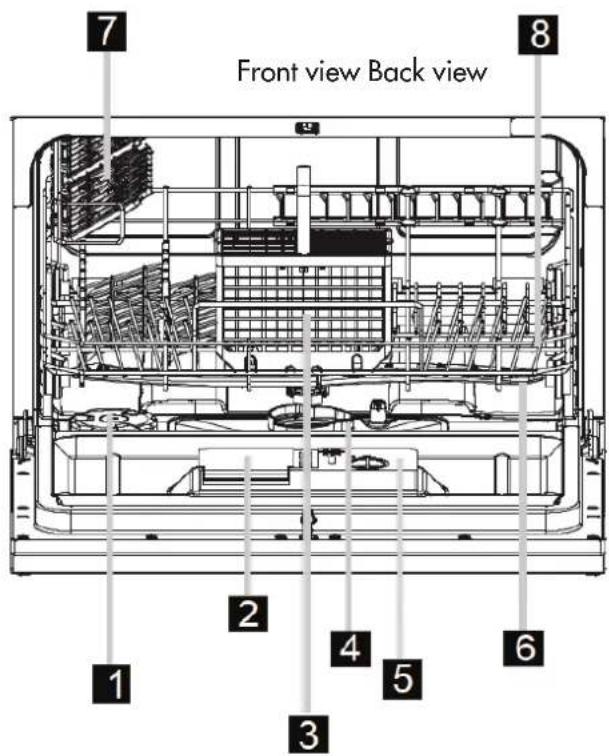
Front view Back view 1 2 3 4 5 6 7 8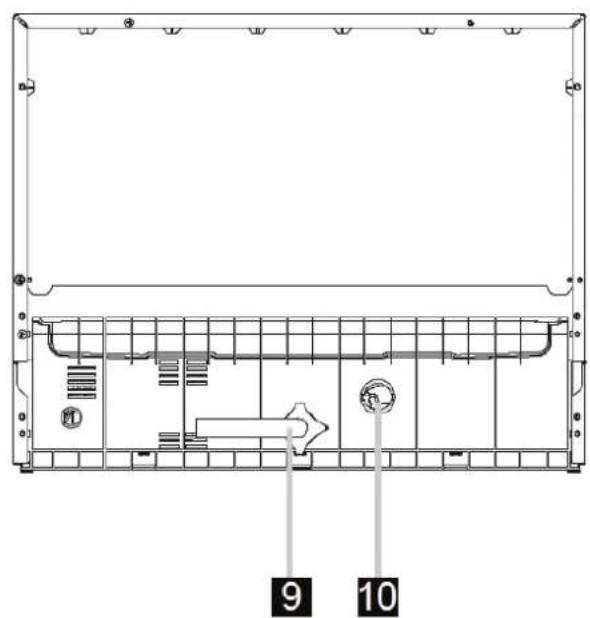
text_image
9 10DISHWASHER FUNCTIONS
1 Salt dispenser
2 Detergent compartment
3 Cutlery basket
4 Filter unit
5 Rinse-aid dispenser
6 Spray arm
7 Cup shelf
8 Rack
9 Water supply connection
10 Drain connection
BEFORE USING THE MACHINE FOR THE FIRST TIME
A. FILL THE SALT DISPENSER
Always use salt that is intended for dishwashers.
The salt dispenser is under the rack and is filled as follows:
Important!
- Use only salt that is specifically intended for dishwashers! All other types of salt that are not specifically intended for use in dishwashers (table salt in particular), will damage the salt dispenser. The manufacturer gives no warranty in respect of damage caused by the use of unsuitable salt and accepts no liability for any damage in this respect.
- Fill with salt only immediately before starting a complete wash cycle. This prevents the possibility of corrosion owing to grains of salt or salty water resting in the bottom of the machine for any length period.

text_image
1 Open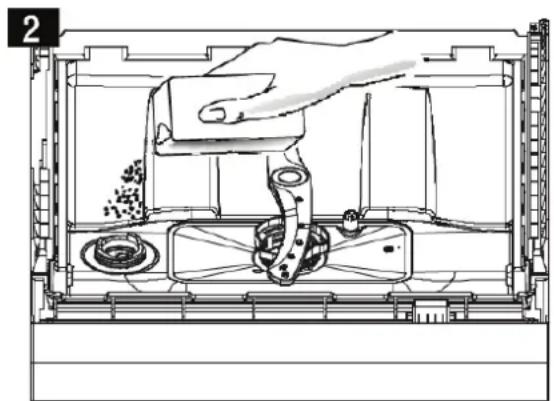
natural_image
Cross-sectional diagram of a mechanical device showing internal components and a hand operating a component (no text or symbols visible)OPEN
A Remove the rack and unscrew the lid of the salt dispenser (fig. 1).
B Before the first wash, pour 1 litre of water into the machine's salt dispenser.
C Place the supplied funnel in the hole and pour in around 1 kg of salt.
It is normal for a little water to run out of the salt dispenser (fig. 2).
D After filling the dispenser, screw the lid clockwise firmly back on.
E The salt warning light normally goes out within 2 – 6 days of filling the salt dispenser with salt.
F Start a wash cycle immediately after filling the salt dispenser with salt (feel free to select a quick cycle).
The filter system, pump or other important parts of the machine can otherwise be damaged by salty water.
The warranty does not apply in such cases.
Important!
- The salt dispenser may only be filled if the salt warning light on the control panel is lit. Depending on how quickly the salt dissolves, the salt warning light may stay on for some time after the salt dispenser has been filled. If there is no salt warning light on the control panel (some models), you can judge when you need to top up with salt by keeping count of the number of cycles the dishwasher has run.
- If salt is spilled in the machine, run a rinse cycle or quick cycle to remove the excess salt.
ADJUSTING THE SALT DOSE
Step 1: Activate salt dose adjustment
Within 60 seconds of switching on the power, close the door. Press the Start/Pause button and hold it down for 5 seconds. This puts the machine into "setting mode".
text_image
2h 4h 8h PStep 2: Selecting a salt dose
To select the correct dose for your water type, press the Start/Pause button repeatedly. Doses are shown in the following order: H1 → H2 → H3 → H4 → H5 → H6.
Step 3: End salt dose adjustment
If you do not do anything for five seconds, the machine switches from settings mode to stand-by mode. There are 6 possible salt doses. Select as per the table below:
| Water hardness | Salt dose setting Shown on the display | ||
| dH^1) | mmol/ I^2) | ||
| 0-5 0-0,9 1 H1: Quick | |||
| 6-11 1,0-2,0 | 2 | ||
| 12-17 2,1-3,0 3 | H3: Glass and Quick | ||
| 18-22 3,1-4,0 4 * H4: ECO | |||
| 23-34 4,1-6,1 5 H5: ECO and Quick | |||
| 35-45 6,2-8,0 6 H6: ECO and Glass | |||
Important!
1) German unit of water hardness.
2) Millimol per litre – international unit of water hardness.
*) Factory setting.
To find out the hardness of your water, contact your local water supplier.
B. FILL THE RINSE-AID DISPENSER
Rinse-aid dispenser
Rinse aid is released in the final rinse to prevent water droplets forming on the washing-up. Droplets that dry out can leave marks and streaks. As it helps water to run off the washing-up, rinse aid also improves drying. The dishwasher is designed to use liquid rinse aid. The rinse-aid dispenser is inside the door at the same height as the detergent compartment. To fill the dispenser, open the door and pour rinse aid into the dispenser until the level indicator is completely black.
The rinse-aid dispenser holds 110 ml.
Rinse-aid function
Rinse aid is added automatically in the final rinse. This ensures thorough rinsing and prevents marks and streaks left by drying.
Important!
Use only rinse aid that is intended for dishwashers. Never fill the rinse-aid dispenser with any other substance (e.g. dishwasher cleaning agents or liquid detergents). This would damage the machine.
When to fill the rinse-aid dispenser
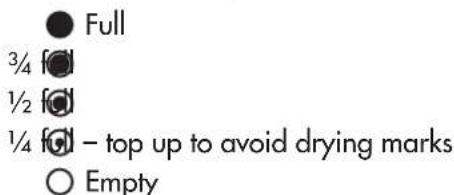
If there is no rinse-aid warning light on the control panel, you can judge how much rinse aid is in the dispenser via the optical level indicator next to the lid. When the rinse-aid dispenser is full, the entire indicator window is black. As the rinse-aid level falls, the black bar becomes smaller. You should never let the rinse-aid level fall below 14 of its maximum.
As the rinse-aid level falls, the black bar becomes smaller (as illustrated below).
text_image
● Full 3¼ fcl 1½ fcl 1¼ fcl – top up to avoid drying marks ○ Empty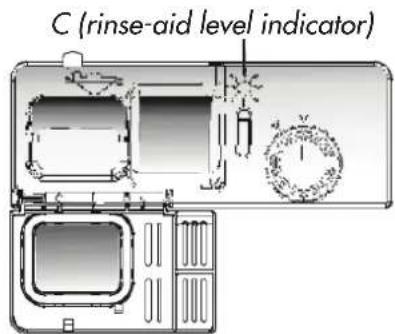
text_image
C (rinse-aid level indicator)How to fill the rinse-aid dispenser
text_image
1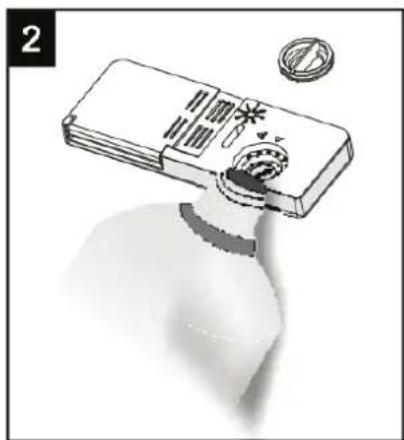
natural_image
Illustration of a hand holding a bottle with a lid and a small circular object above (no text or symbols)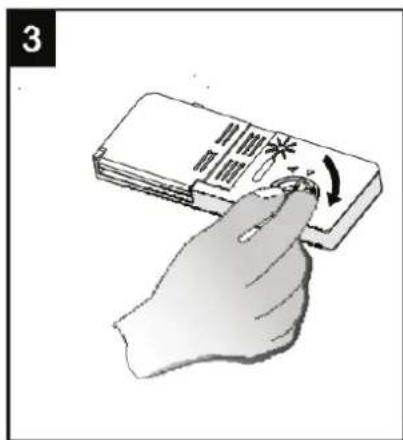
text_image
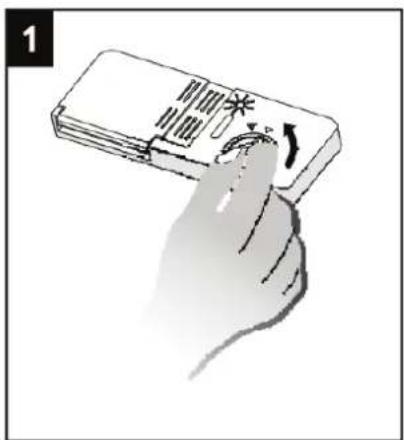
31 To open the dispenser, turn the lid to the open position (left arrow). Remove the lid.
2 So that it does not run over, pour the rinse aid carefully into the dispenser.
3 Replace the lid by aligning it with the left arrow and turning it to the closed position (right arrow).
Important! Use an absorbent cloth to dry up any spilled rinse aid. This avoids foaming in the next wash. Do not forget to replace the lid before closing the door. Adjust the rinse-aid dispenser.
Rinse-aid adjustment dial
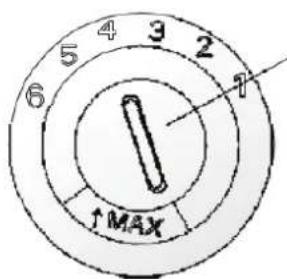
The rinse-aid dispenser has four or six positions. Always start by selecting position "4". If you get drying marks, or if the washing-up dries poorly, increase the rinse-aid dose by removing the lid and turning the dial
text_image
4 3 2 5 6 7 ↑MAXto "5". If the washing-up still does not dry properly, or if there are marks, keep turning the dial to the next highest position until the washing-up dries without marks. The recommended setting is "4". (The factory setting is "4".)
Important!
Increase the dose if there are water or lime marks on the washing-up after washing. Reduce the dose if there are sticky, whitish marks on crockery or a bluish film on glassware or knife blades.
C. DETERGENT
Detergents contain chemicals that dissolve dirt and thus help particles to be carried out of the dishwasher. Most dishwasher detergents in general retail outlets are suitable for this purpose.
Newer, powder detergents are usually phosphate-free. Phosphate's water-softening effect is thus absent. We here recommend filling the salt dispenser with salt even if the water hardness is only 6 dH. If phosphate-free detergent is used and the water is hard, white marks may be left on plates and glassware. In such cases, you can use more detergent to get better results. Detergents without chlorine have limited stain-removing power. Severe and coloured stains are not completely removed. In such cases, you can select a higher temperature cycle.
CONCENTRATED DETERGENTS
According to their chemical composition, detergents can be divided into two basic types:
- Conventional alkaline detergents with caustic components.
- Low-alkaline detergents with natural enzymes.
DISHWASHING TABLETS
Different brands of dishwashing tablets dissolve at different speeds. Consequently, in short cycles, some dishwashing tablets do not fully dissolve and exert their full effect. Thus, so that all traces of detergent are fully removed, select a long cycle when you use dishwashing tablets.
Important! Dishwashing tablets must only be used in models with a 3-in-1 function or a 3-in-1 cycle.
DETERGENT COMPARTMENT
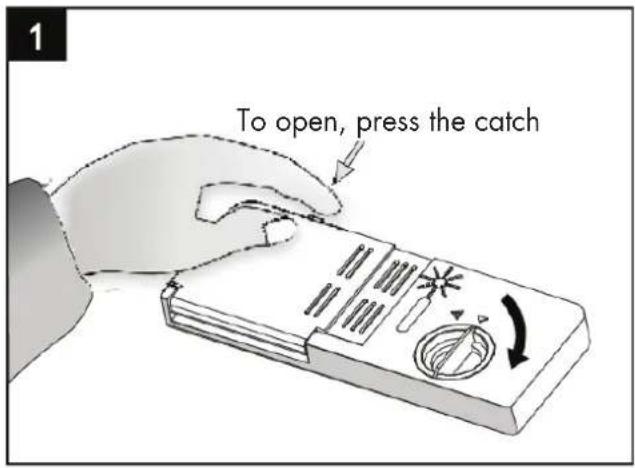
The detergent compartment must be filled at the start of each wash cycle (in accordance with the instructions in the wash cycle table). This dishwasher uses less detergent and rinse aid than conventional dishwashers do. In general, only one tablespoon of detergent is required for a standard wash. More detergent is required when the washing-up is very dirty. Always add the detergent immediately before starting the dishwasher. Otherwise, it can become moist and not dissolve correctly.
text_image
To open, press the catch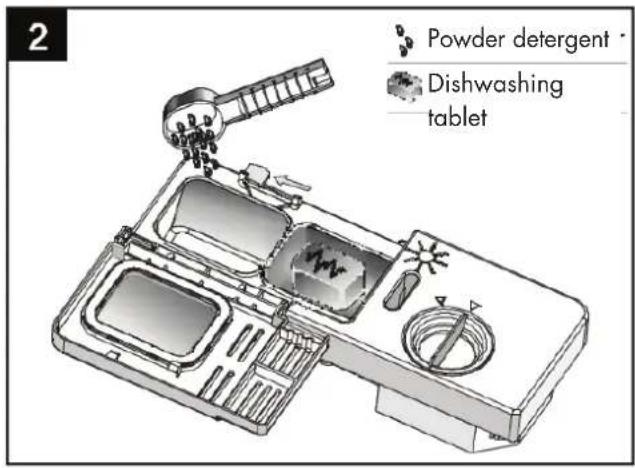
text_image
Powder detergent Dishwashing tabletImportant!
- If the lid is closed: press the catch. The lid then springs up.
• Always add the detergent immediately before starting the machine. - Use only detergent that is intended for dishwashers.
WARNING!
Dishwasher detergent is caustic!
Be sure to keep it out of the reach of children.
Correct use of detergent
Use only detergent specifically intended for use in dishwashers. Keep detergents fresh and dry. Do not put powder detergents in the detergent compartment until immediately before starting the machine.
FILLING WITH DETERGENT
Fill the detergent compartment with detergent. Dosing levels are marked as shown on the right:
A Detergent for the main wash is added here.
B Detergent for a pre-wash is added here.
Follow the detergent manufacturer's dosage and storage instructions. These are stated on the packaging.
Shut the lid and press until it locks in the closed position. If the washing-up is very dirty, add detergent to the pre-wash compartment also. This detergent is used in the pre-wash phase.
Important!
- Note that detergent requirements can vary with how dirty the washing-up is and the hardness of the water.
- Follow the detergent manufacturer's recommendations on the packaging.
text_image
A BLOADING THE DISHWASHER RACK
RECOMMENDATION
Choose kitchen utensils marked with a dishwasher safe symbol (or equivalent).
- Use a mild detergent that is described as "gentle".
For delicate washing-up, select a low-temperature cycle.
THE FOLLOWING TYPES OF WASHING-UP ARE NOT SUITABLE FOR MACHINE WASHING:
- Cutlery with wood, china or mother-of-pearl handles.
- Plastic utensils that are not heat-resistant.
- Old cutlery that has bonded components that are not temperature-tolerant.
- Cutlery or chinaware objects that are composites.
- Tin and copper objects.
- Crystalware.
• Steel objects that can rust. - Wood trays and cutting boards.
- Objects made from synthetic fibres are not particularly suitable for machine washing.
- Certain types of glass can become dull after a large number of machine washes.
• Silver and aluminium objects tend to become discoloured with machine washing. - Glazed objects can fade if machine washed frequently.
THINGS TO CHECK BEFORE AND AFTER LOADING THE DISHWASHER RACK
For best washing results, follow these instructions for loading the rack.
Functions and rack and cutlery basket appearance can vary between different models.
Scrape off coarse leftover food. Soften burnt-on leftovers in pots and pans. The washing-up does not need to be rinsed under running water.
Place the washing-up in the dishwasher as follows:
1 Turn cups, glasses, cooking pots, frying pan, etc. so that their openings face downwards.
2 Curved objects and objects with recesses/cut-outs should be placed so that water can run off them.
3 All objects must be located securely so that they cannot topple over.
4 All objects must be located so that the spray arm can rotate freely during washing.
Important! As they can easily fall out of the rack/basket, very small objects should not be washed in the dishwasher.
- Chinaware and cutlery must not be placed inside other objects or cover each other.
• To avoid damage, glass objects must not be placed in contact with each other. - Knives with long blades must not be placed standing up.
- Long and/or sharp objects (e.g. carving knives) must be laid horizontally in the rack.
- Avoid overloading the dishwasher. This is important for good washing results and to keep down energy consumption.
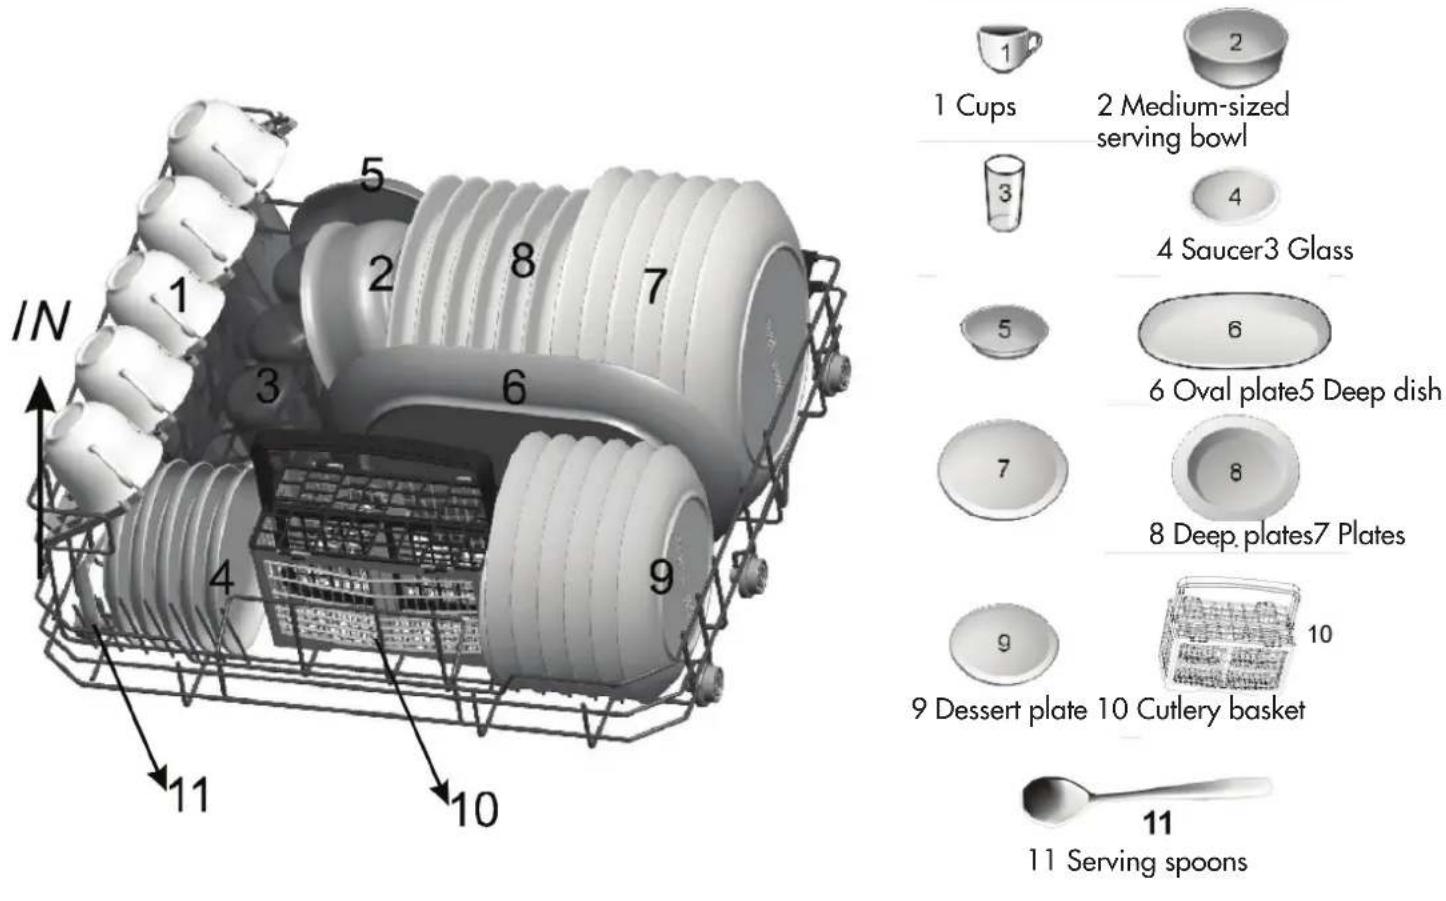
LOADING THE RACK
Place chinaware and cooking vessels where they cannot be moved by the waterjets.
text_image
IN 1 2 Medium-sized serving bowl 3 4 Saucer3 Glass 5 6 Oval plate5 Deep dish 7 8 Deep plates7 Plates 9 10 9 Dessert plate 10 Cutlery basket 11 Serving spoons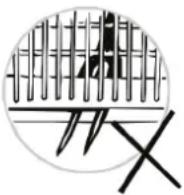
CUTLERY BASKET
Do not allow any cutlery to stick out of the bottom of the basket.
Always place sharp objects point downwards!
For personal safety and best washing results, put cutlery in the cutlery basket as follows:
- Do not let items of cutlery get caught on each other.
- Place most cutlery with the handle downwards.
• However, place knives and other dangerous objects with the handle upwards.
STARTING A WASH CYCLE
WASH CYCLE TABLE
| Cycle Cycle | information Cycle phases Washing- | up liquid pre-wash/ main wash | Wash time (min.) | En- ergy (kWh) | Water (l) | Rinse aid | |
| Intensive For very dirty washing and normally soiled cooking pots, frying pans, plates, etc. with dried-on leftovers. | Pre-wash (50°C) Wash (70°C) Rinse Rinse Rinse (70°C) Drying | 3/15 g (or 3-in-1) | 140 0,9 | 10 • | |||
| Normal For normally soiled washing such as cooking pots, plates, glasses and slightly soiled frying pans. | Pre-wash Wash (60°C) Rinse Rinse (70°C) Drying | 3/15 g (or 3-in-1) | 120 0,7 | 8 • | |||
| ECO (*EN 50242) ECO | This is the standard cycle. It is suitable for normally soiled chinaware and, as regards the combination of energy and water consumption, is the most efficient cycle for this type of chinaware. | Pre-wash Wash (50°C) Rinse Rinse (70°C) Drying | 3/15 g (or 3-in-1) | 180 0,61 | 6, 5 | • | |
| Glass For slightly soiled washing such as glassware, crystal- ware and fine china. | Wash (45°C) Rinse Rinse (60°C) Drying | 18 g (or 3-in-1) | 75 | 0, 5 | 7 • | ||
| Quick A short wash cycle for slightly soiled washing and quick washing. | Wash (40°C) Rinse Rinse (40°C) | 15 g | 30 | 0,23 | 6 |
To satisfy standard performance criteria (i.e. EN 50242), ensure that the economy wash cycle is used for testing.
STARTING THE MACHINE
Starting a wash cycle...
Pull out the rack (see the "Loading the dishwasher rack" section).
Add detergent.
Put the plug into a power outlet. The machine requires a 220 - 240 V AC, 50 Hz, supply
(The power outlet must have a 10 A fuse, 250 V AC.)
Ensure that the water supply is at full pressure.
Press the cycle button repeatedly to step through the wash cycles in the following order:
ECO -> Glass -> Quick -> Intensive -> Normal
When a cycle has been selected, the corresponding indication light comes on. Next, press the Start/Pause button. The dishwasher then starts.
Important! When you press the Start/Pause button to pause washing, the cycle light stops flashing and the dishwasher gives a beep every minute until you press the Start/Pause button to restart.
CHANGING A CYCLE
Condition: You can change wash cycle on the condition that the first selected cycle has only been running a short time. Otherwise, detergent may already have been released and the water drained from the machine. In such cases, the detergent compartment must be refilled (see the "Filling the detergent compartment" section).
To pause the machine with the door closed, press the Start/Pause button. Hold the Start/Pause button down for over three seconds to put the machine into stand-by mode. You can then select another cycle and restart the machine (see the "Starting a wash cycle..." section).
Important! If you open the door during washing, the machine will pause. When you then close the door and press the Start/Pause button, the machine resumes the selected cycle after 10 seconds.
The cycle lights show the current dishwasher phase:
a) One of the cycle lights is on with a steady light --- stand-by or pause.
b) One of the cycle lights is flashing --- washing is in progress.
At the end of the wash cycle
When the wash cycle has ended, the beeper sounds for 8 seconds and the machine then stops.
- Turn the dishwasher off
-
To turn the dishwasher off, press the ON/OFF button.
-
Turn the tap off!
- Open the door carefully.
Hot chinaware is sensitive to knocks. Before unloading the machine, let the washing-up cool for around 15 minutes.
- Unload the dishwasher
It is normal for the inside of the dishwasher to be wet.
WARNING!
Do not open the door while washing is in progress. Escaping water can cause burns.
MAINTENANCE AND CLEANING
FILTER SYSTEM
The filter stops large pieces of food and other solid objects getting into the pump.
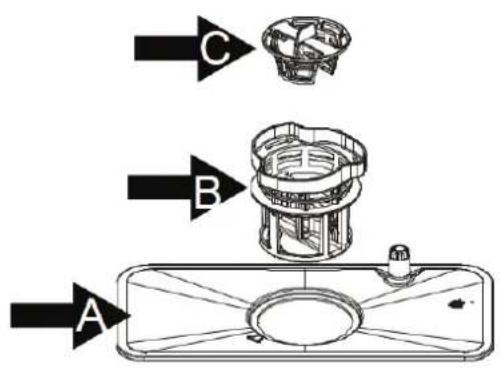
The filter system comprises a coarse filter, a flat filter (main filter) and a microfilter (fine filter).
text_image
C B AMain filter A
Leftover food and dirt particles that get caught in this filter are split up finely by a special jet from the spray arm. They are then rinsed away via the drain hose.
Fine filter B
This filter holds dirt particles and leftover food in the sump so that they do not get back onto the washing-up.
Coarse filter C
Large particles (e.g. pieces of bone, broken glass, etc.) that could block the drain outlet are caught in the coarse filter. To remove objects that have been caught in the coarse filter, grasp the grips above the filter and lift.
Filter unit
The filter efficiently removes leftover food from the washing water so that it can be reused in the wash cycle. For optimum functionality and washing results, the filter unit must be cleaned regularly. It is thus advisable to clear the filter of coarse particles before each wash cycle. To do this, rinse the filter and filter body under running water. To remove the filter unit, pull the handle upwards.
WARNING! Never run the dishwasher without the filter in place. Incorrect filter installation can reduce machine functionality and damage plates and cutlery.
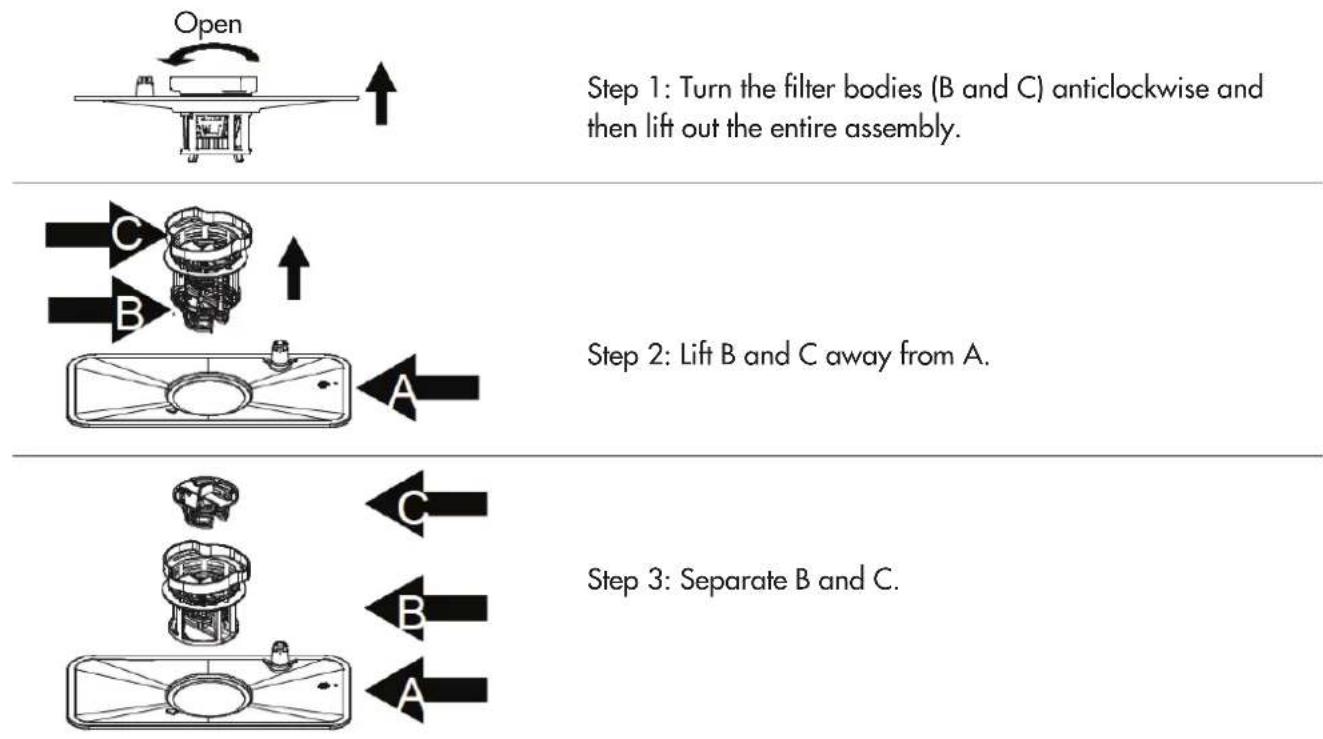
flowchart
graph TD
    A["Open"] --> B["Step 1: Turn the filter bodies (B and C) anticlockwise and then lift out the entire assembly."]
    B --> C["Step 2: Lift B and C away from A."]
    C --> D["Step 3: Separate B and C."]
Important! To remove the filter unit, carry out the steps in the order step 1 to step 3. To replace the filter unit, carry out the steps in the order step 3 to step 1.
Note!
The entire filter unit should be cleaned once a week.
Filter cleaning
Use a dish brush to clean the coarse filter and the fine filter. Assemble the filter unit's parts as shown in the figures on the previous page. Put the filter unit in place in the dishwasher and then press it downwards.
TAKING CARE OF YOUR DISHWASHER
The control panel can be cleaned with a slightly damp cloth. After cleaning, wipe the panel thoroughly dry. The outside of the dishwasher can be treated with a good quality wax polish.
Never use sharp objects, scourers or strong cleaning agents on any part of the dishwasher.
natural_image
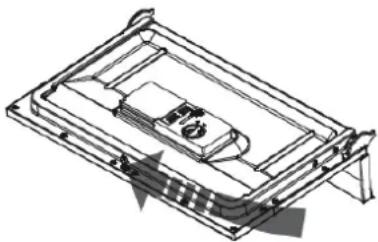
Isometric technical line drawing of a mechanical component or housing (no text or symbols)To clean the seal around the door, use only a soft, warm, damp cloth. To avoid moisture penetrating the locking mechanism and the electrical components, do not use cleaning agents in the form of sprays.
WARNING!
- Never use a spray to clean the door. Moisture can penetrate and damage the locking mechanism and the electrical components.
- Do not use abrasive cleaning products or paper towels as they can leave scratches or marks on stainless steel surfaces.
Frost protection
Avoid locating the dishwasher where temperatures can fall below 0^ C. If the machine is to be left in an unheated space over the winter, you should:
- Pull out the plug.
- Turn off the tap and disconnect the supply hose from the machine's water valve.
- Drain any water from the supply hose and water valve (use a cooking pot to catch the water).
- Reconnect the supply hose to the water valve.
- Remove the filter unit and use a sponge to suck the water out of the sump.
Important! If the machine is not working because of frost, contact an authorised service technician.
Cleaning the spray arm
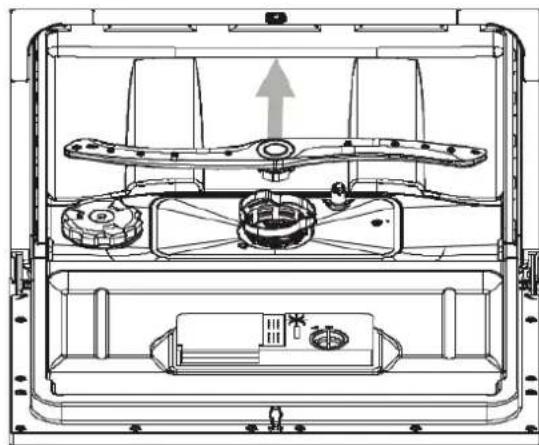
The spray arm can be easily removed for periodic cleaning of the nozzles so that they do not become clogged. Clean them under running water and then put them back in their seats. Check that arm rotation is not impeded in any way.
natural_image
Technical line drawing of a mechanical assembly with no visible text or symbolsHow to keep your dishwasher in good condition
- After each wash cycle After each wash cycle turn the water supply tap off and leave the door slightly open so that any moisture and odour can be aired away.
- Remove the plug from the power outlet. Before any cleaning or maintenance, always remove the plug from the power outlet.
- Do not use any solvents or abrasive cleaning products. To clean the dishwasher's outside and its rubber components, do not use solvents or abrasive cleaning products.
Use only a cloth with warm water and hand dishwashing detergent.
To remove marks and coatings on the inside of the dishwasher, use a cloth moistened with water and a little vinegar or a cleaning product specifically intended for dishwashers.
- When the dishwasher is not to be used for a long time We recommend that you run a wash cycle with the dishwasher empty. After that, remove the plug from the power outlet, turn off the tap and leave the door slightly open. This increases the door seal's service life and prevents nasty odours inside the machine.
- Moving the machine If the machine has to be moved, try to keep it vertical. If absolutely necessary, it can be laid down on its back.
- Seals One of the things that causes odours in dishwashers is leftover food trapped in seals. Regular cleaning with a damp sponge prevents this happening.
Before ringing a service technician, follow the troubleshooting guide.
| TECHNICAL PROBLEMS | ||
| Problem Possible cause Solution | ||
| The dishwasher does not start. The door is not fully closed. Close the door. | ||
| The machine is not connected to a power outlet. | Put the plug in a power outlet. | |
| The machine is not turned on. Press the ON button and select a cycle. | ||
| The drain pump is not working properly. | Overflow protection has been triggered. | · Disconnect the machine from the electricity mains.· Disconnect from the water supply.· Ring a qualified technician. |
| GENERAL PROBLEMS | ||
| Problem Possible cause Solution | ||
| There is still dishwasher detergent in the compartment when the cycle has finished. | The detergent compartment was still damp when the detergent was added. | Before adding detergent, ensure the compartment is dry. |
| The detergent compartment lid does not close properly. | Detergent residues are clogging the catch. | Clean the catch. |
| Knocking sounds in the dishwasher | A spray arm is knocking against an object in the rack. | Pause the cycle and reposition any objects that are interfering with spray arm movement. See the “Loading the dishwasher” section. |
| There are marks on glassware and cutlery. | The rinse-aid dose is too high. Move the rinse-aid dispenser's dial to a lower setting. | |
| Plates, cutlery and glassware are not dry. | The rinse-aid dose may be too low or the dispenser may be almost empty. | Fill the dispenser, adjust the rinse-aid dose to a higher setting or change the brand of rinse aid. |
| The chinaware was taken out of the dishwasher too soon. | Let the chinaware stand in the dishwasher until a loud noise is heard. | |
General problems (cont.)
| A white coating is visible on cutlery and chinaware, glassware is becoming clouded (film can be wiped off). | The rinse-aid dose is too low. Fill the dispenser, adjust the rinse-aid dose to a higher setting or change the brand of rinse aid. |
| There is not enough salt in the dispenser. | |
| The salt dispenser's lid has not been screwed on correctly. | |
| The wrong detergent has been used. | |
| The salt dose is too low. Select a higher salt dose. | |
| Glassware is dull and discoloured (film cannot be wiped off). | The glassware is not dishwasher safe. The surfaces have been affected. |
| Tea or lipstick stains have not been completely removed. | The wash temperature of the selected cycle is too low. |
| The stain-removing effect of the detergent is too little. | |
| Forgot to rinse away stains or wipe them off with a napkin before washing. |
| FAULT CODE | ||
| Code Meaning Possible causes | ||
| The Quick cycle light flashes quickly. | Abnormally long filling time. The tap has not been turned on, the flow or the water pressure is too low. | |
| The ECO light flashes quickly. Water leak. The machine has a leak somewhere. | ||
| TECHNICAL DATA | ||
| Article number 43-001 | ||
| Model number CBD6600V | ||
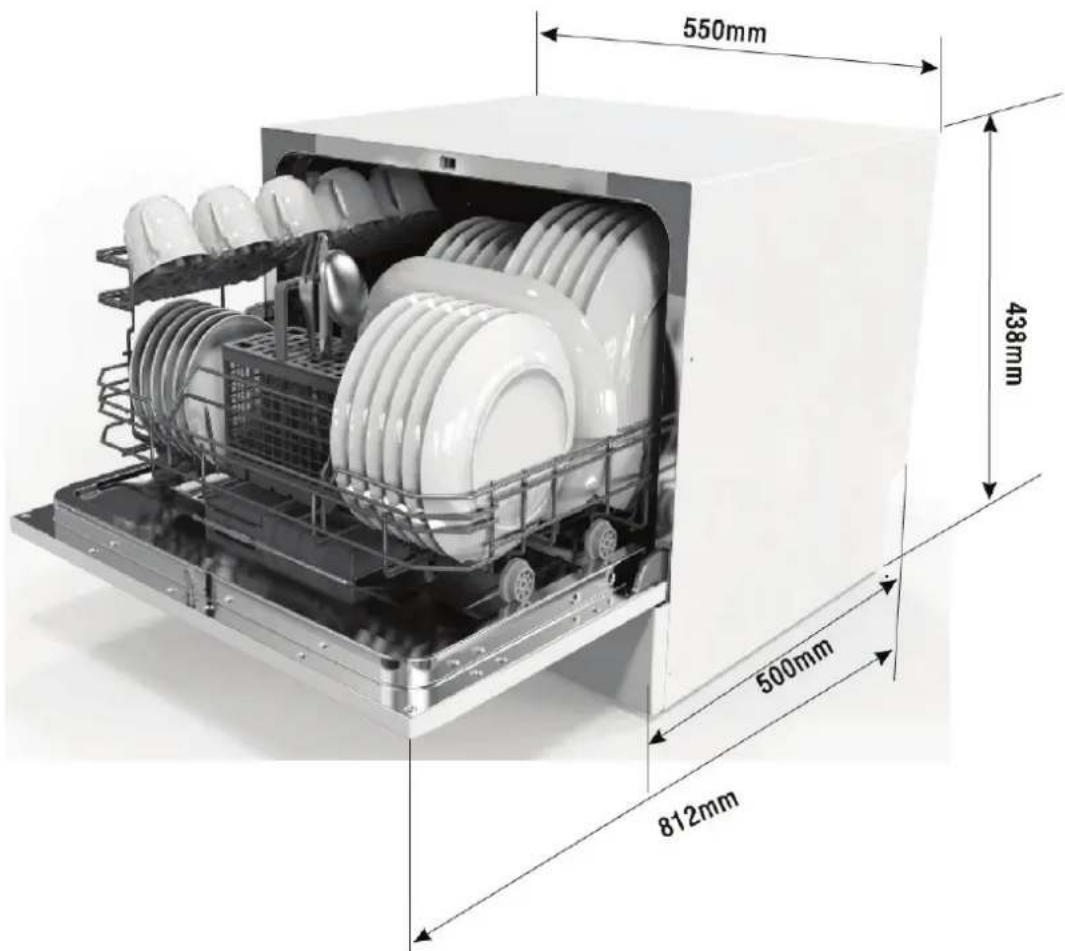
| Dimensions 550 mm (W) x 500 mm (D) x 438 mm (H) | ||
| Capacity 6 place settings | ||
| Energy efficiency class A+ | ||
| Energy consumption in OFF mode 0.45 W | ||
| Power consumption in stand-by mode 0.45 W | ||
| Annual energy consumption 174 kWh (based on 280 standard wash cycles with filling of cold water and consumption in low-energy modes). Actual energy consumption depends on how the product is used. | ||
| Energy consumption of a standard wash cycle | 0.61 kWh | |
| Length of standard wash cycle 180 min. | ||
| Standard wash cycle ECO | This is the cycle used to give the information on the energy label. It is suitable for washing normally soiled loads. As regards the combination of energy and water consumption, it is the most efficient cycle for this sort of load. | |
| Drying efficiency class The drying efficiency | class is A (on a scale where A is the most and G the least efficient). | |
| Annual water consumption 1,820 litres (based on 280 standard wash cycles). Actual water consumption depends on how the product is used. | ||
| Required water pressure 0.04 - 1.00 MPa | ||
| Power consumption | 1,170 - 1,380 W | |
| Noise level | 49 dB(A) re 1 pW | |
| Rated voltage | 220 - 240 V, ~50 Hz | |
| Protection level (water ingress) | IPX1 | |
| Fitting | Freestanding | |
text_image
550mm 438mm 500mm 812mmMATERIALS RECYCLING
Materials recycling
- Dispose of the dishwasher's packaging correctly.
- All the packaging materials can be recycled.
- Plastic parts are marked with standard international abbreviations:
PE = polyethylene (e.g. protective wrapping).
PS = polystyrene (e.g. shock-absorbing material).
POM = polyoxymethylene (e.g. plastic clamps).
PP = polypropylene (e.g. the salt dispenser).
ABS = acrylonitrile-butadiene-styrene (e.g. the control panel).
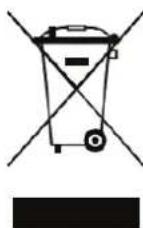
WARNING!
• Packaging materials can be hazardous for children!
- To dispose of packaging materials and worn-out appliances, go to a recycling station. Cut the power cable off and make the door lock inoperative.
- Cardboard packaging materials are made from recycled paper and should be disposed of via paper recycling.
- By ensuring that the product is disposed of correctly, you are contributing to preventing the negative impact on the environment.
- For more detailed information on recycling this product, contact your local authority's waste management department.
- MATERIALS RECYCLING: Do not dispose of this product as household (i.e. unsorted) waste. The product must be processed as special waste.
GRATULERER MED DIN NYE ELIS & ELSA BENKOPPVASKMASKIN!
natural_image
Line drawing of a hand holding a faucet with a handle (no text or symbols)natural_image
Technical line drawing of a mechanical assembly with a magnified inset showing a screwdriver inserted into a threaded component (no text or symbols present)natural_image
Technical line drawing of a mechanical assembly with a hand operating a component (no text or symbols visible)ÅPNE
text_image
2h 4h 8h PTrinn 2: Velg saltdosering
text_image
Illustration of a hand holding a card with a scroll, showing a finger pointing to the card's page.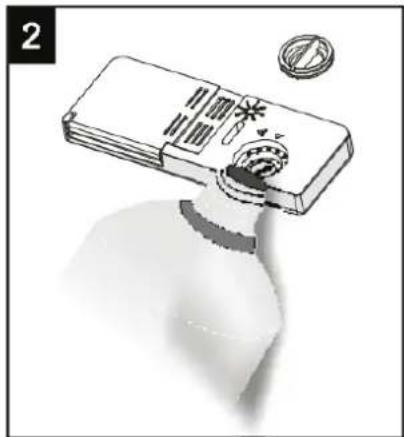
natural_image
Illustration of a bottle with a lid and a small inset showing a magnified view (no text or symbols)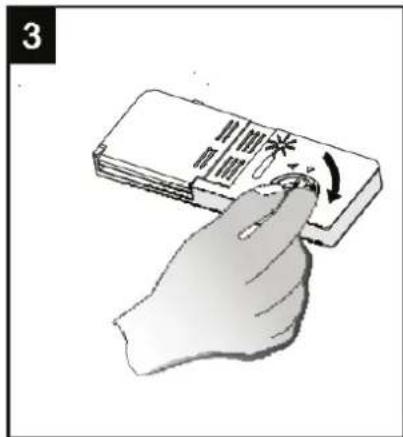
text_image
3text_image
2 Oppvaskpulver OppvasktablettObs!
∅KO -> glass -> hurtigvask -> kraftig -> normal
Når du har valgt program, lyser den tilsvarende indikatorlampen. Trykk deretter på start/pause-knappen. Oppvaskmaskinen starter.
VEDLIKEHOLD AV OPPVASKMASKINEN
natural_image
Isometric technical line drawing of a mechanical component or housing (no text or symbols)natural_image
Technical line drawing of a mechanical assembly with no visible text or symbolsSlik holder du oppvaskmaskinen i god stand
Generelle problemer, forts.
text_image
550mm 438mm 500mm 812mmMATERIALGJENVINNING
Materialgjenvinning