BO109SIXR01AD - Oven ARDA - Free user manual and instructions
Find the device manual for free BO109SIXR01AD ARDA in PDF.


User questions about BO109SIXR01AD ARDA
0 question about this device. Answer the ones you know or ask your own.
Ask a new question about this device
Download the instructions for your Oven in PDF format for free! Find your manual BO109SIXR01AD - ARDA and take your electronic device back in hand. On this page are published all the documents necessary for the use of your device. BO109SIXR01AD by ARDA.
USER MANUAL BO109SIXR01AD ARDA
1.1 电源安全事项 Electrical safety
1.2 操作安全事项 Safety during operation
1.3 儿童安全事项 Child safety
1.4 清理安全事项 Cleaning Safety
2. 结构和操作界面 Structure and operating principle
5/22
text_image
Technical diagram showing steps to process a machine or device with labeled components and directional arrows indicating movement.
natural_image
Two technical line drawings of a mechanical or architectural component, possibly a cabinet or enclosure, with no visible text or symbols.连接电源
text_image
Technical diagram showing a mechanical assembly with a magnified inset and a close-up of a component labeled 'C'.将电源线连接到电源
Important instructions
This Owner's Manual contains important information on safety and instructions intended to assist you in the operation and maintenance of your appliance.
Please take the time to read this Owner's Manual before using your oven and keep this book for future reference.
The following symbols are used in the text of this Owner's Manual

1. Safety Instructions
Installation of this oven must be performed only by a licensed electrician. The installer is responsible for connecting the appliance to the mains power supply in observance of the relevant safety recommendations.
1.1 Electrical safety
If the oven has been damaged in transport, do not connect it.
- Appliance must be connected to the mains power supply only by a specially licensed electrician.
- In the event of a fault or damage to the appliance, do not attempt to operate it.
- Repairs should be performed by a licensed technician only. Improper repair may result in considerable danger to you and others. If your oven needs repair, contact a Service Centre or your dealer.
- If the supply cord is defective, it must be replaced by a special cord or assembly available from the manufacturer or an authorized service agent.
• Electrical leads and cables should not be allowed to touch the oven. - The oven should be connected to the mains power supply by means of an approved circuit breaker or fuse. Never use multiple plug adapters or extension leads.
- The rating plate is located on the right side of the door.
- The power supply of the appliance should be turned off when it is being repaired or cleaned.
• Take care when connecting electrical appliances to sockets near the oven.
WARNING
The appliance should be powered down before replacing the lamp to avoid the possibility of electric shock. During oven operation, the Interior surfaces become very hot.
1.2 Safety during operation
- This oven has been designed only for the cooking of household foods.
- During use, the oven interior surfaces become hot enough to cause burns. Do not touch heating elements or interior surfaces of the oven until they have had time to cool.
- Never store flammable materials in the oven.
- The oven surfaces become hot when the appliance is operated at a high temperature for an extended period of time.
- When cooking, take care when opening the oven door as hot air and steam can escape rapidly.
- When cooking dishes that contain alcohol, the alcohol may evaporate due to the high temperatures and the vapour can catch fire if it comes into contact with a hot part of the oven.
- For your safety, do not use high-pressure water cleaners or steam jet cleaners.
- Frozen foods such as pizzas should be cooked on the wire grill. If the baking tray is used, it may become deformed due to the great variation in temperatures.
- Do not pour water into the oven bottom when it is hot. This could cause damage to the enamel surface.
• The oven door must be closed during cooking. - Do not line the oven bottom with aluminium foil and do not place any baking trays or tins on it. The aluminium foil blocks the heat, which may result in damage to the enamel surfaces and cause poor cooking results.
- Fruit juices will leave stains, which can become indelible on the enamel surfaces of the oven. When cooking very moist cakes, use the deep pan.
- Does not rest bake ware on the open oven door.
- This appliance is not intended for use by young children or infirm persons without the adequate supervision of a responsible person ensuring that they are using the appliance safely.
- Only use the temperature probe recommended for this oven.
- Ensure that the appliance is switched off before replacing the lamp to avoid the possibility of electric shock.
- If a cooking time is not entered, the oven will shut itself off after the lengths of time indicated below.
Child safety
- Always place oven racks in desired location while oven is cool. If a rack must be moved while oven is hot, do not let potholder contact the heating elements.
- Always use dry potholders. Moist or damp potholders on hot surfaces may result in burns from steam. Do not let potholder touch hot heating elements. Do not use a towel or other bulky cloth.
WARNING
Accessible parts may become hot during use. You children should be kept away.
- Secure all loose garments, etc. before beginning. Tie long hair so that it does not hang loose, and do not wear loose fitting clothing or hanging garments, such as ties, scarves, jewelry, or dangling sleeves.
- When children become old enough to use the appliance, it is the legal responsibility of the parents or legal guardians to ensure that they are instructed in safe operation of the appliance by qualified persons.
- Do not allow anyone to climb, stand, lean, sit, or hang on any part of an appliance, especially a door, warming drawer or storage drawer. This can damage the appliance, and the unit may tip over, potentially causing severe injury.
WARNING
The appliance and its accessible surface parts become hot during use. Care shall be taken to avoid touching heating elements. Do not allow children less than 8 years of age to use this appliance unless closely supervised by an adult. Children and pets should not be left alone or unattended in the area where the appliance is in use. They should never be allowed to play in its vicinity, whether or not the appliance is in use.
- This appliance can be used by children age form 8 years and above and persons with reduced physical, sensory or mental capabilities or lack of experience and knowledge if they have been given supervision or instruction concerning use of the appliance in a safe way and understand the hazards involved. children shall not play with appliance. Clean and user maintenance shall not be made by children without supervision.
1.3 Cleaning Safety
CAUTION:
Items of interest to children should not be stored in an appliance, in cabinets above an appliance or on the backsplash. Children climbing on an appliance to reach items could be seriously injured.
Do not clean the appliance while it is still hot. Some cleaners produce noxious fumes when applied to a hot surface. Wet cloths or sponges can cause burns from steam.
Oven exterior
- For cleaning both the interior and exterior of the oven, use a cloth and a mild cleaning agent or warm soapy water.
• Dry with kitchen paper or a dry towel. - Do not use scourers, caustic cleaners or abrasive products.
- Do not use steel wool, scouring pads or abrasives. They may damage the finish.
- Wipe the plate gently with a soft cloth or microfiber cloth and a mild window cleaning detergent.
Stainless steel oven fronts
Aluminium oven fronts
WARNING
Make sure the oven is cool before cleaning.
Oven Interior
- Do not hand - clean the door seal.
- Do not use coarse scouring pads or cleaning sponges.
- To avoid damaging the enameled oven surfaces, use commercially available oven cleaners.
- To remove stubborn soil, use a special oven cleaner.i
Oven door glass
The oven door is equipped with three sheets of glass placed against each other. The Inner & middle sheets can be removed for cleaning.
WARNING
- Whenever the door is separated from the oven, the clips should be flipped open.
- Do not use harsh abrasive cleaners or sharp metal scrapers to clean the oven door glass since they can cascratch the surface, which may resulting in shattering of the glass.
- When the door is mounted, removing some of the parts (the door glass or some other part) from the door may result in injury.
Attention
The glass may break if you use excessive force especially at the edges of the front sheet.
Accessories
Wash all bakeware and accessories after each use and dry with a kitchen towel. To clean easily, soak in warm soapy water for about 30 minutes.
Catalytic enamel surface
The removable cover casing is coated with a dark gray catalytic enamel that can become coated with oil and fat distributed by circulating air during convection heating. These deposits will burn off at oven temperatures of 200 °C and higher, for example, when baking or roasting.
Higher temperatures will result in faster burning. The oven and accessories should be cleaned after each use. Otherwise further baking and roasting will cause the deposits to bake on even harder and cleaning may become difficult and in extreme cases impossible.
Cleaning by hand
Make sure the oven is cool before cleaning.
- The catalytic enameled cover casing should be cleaned using a solution of hot water and washing-up liquid applied with a soft nylon brush.
Do not use abrasive cleaning agents, hard brushes, scouring pads or cloths, steel wool, knives or other abrasive materials. Do not use oven spray on catalytic enamel as the chemicals used in oven sprays will damage catalytic enamel and render it ineffective.
If using oven sprays on the interior oven surfaces, the catalytic cover casing must first be removed from the oven.
Cleaning with high temperatures
Before cleaning the catalytic cover casing with high temperatures, make sure that all interior oven surfaces have been cleaned as described above.
Otherwise, the high temperatures can bake deposits onto the interior oven surfaces and make them impossible to remove.
If, after manual cleaning, the oven is still heavily soiled, heating it to a high temperature will help remove soiling caused by oil and grease splashes. Note that deposits of spices, syrups and similar substances are not removed by this process. These should be removed by hand with a mild solution of hot water and washing-up liquid applied with a soft brush.
- Remove all accessories from the oven.
- Set the oven to conventional function.
- Set the heat to 250^ C .
- Run the oven for approximately 1 hour. The length of time will depend on the degree of soiling.
It is a good idea to set the finish time for the process using the end time setting, in case you forget to switch the oven off at the end.
Any remaining soil will gradually disappear with each subsequent use of the oven at high temperatures.
Disposal Instructions
Disposing of the packaging material
- The material used to package this appliance is recyclable.
- Dispose of the packaging materials in the appropriate container at your local waste disposal facility Disposing of old appliances
WARNING
Before disposing of old appliances, make them inoperable so that they cannot be a source of danger.
To do this, disconnect the appliance from the mains supply and remove the mains lead.
To protect the environment, it is important that old appliances are disposed of in the correct manner.
- The appliance must not be disposed of with household rubbish.
- You can obtain information about collection dates and public refuse disposal sites from your local refuse department or council.
2. Structure and operating principle
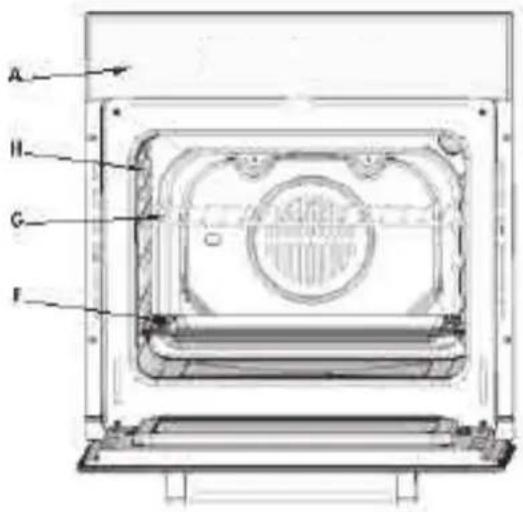
2.1 Machine Control Oven
text_image
A H G F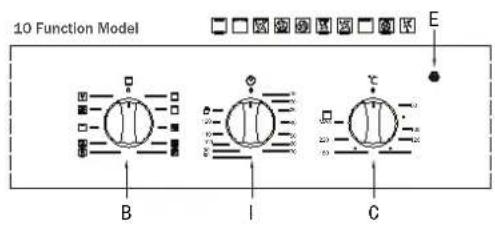
text_image
10 Function Model B I C E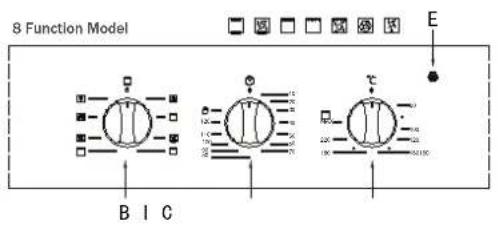
text_image
8 Function Model B I C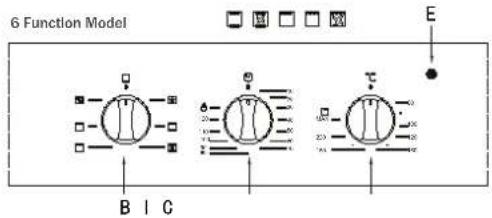
text_image
6 Function Model B I C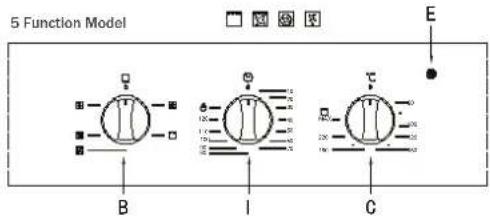
text_image
5 Function Model A B C E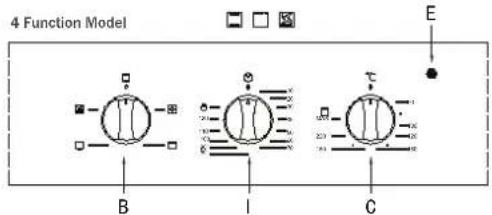
flowchart
graph TD
    B["Stage B"] --> A["Input"]
    A --> B
    B --> C["Stage C"]
    C --> D["Input"]
    D --> E["Output"]
    style B fill:#f9f,stroke:#333
    style C fill:#f9f,stroke:#333
    style D fill:#ccf,stroke:#333
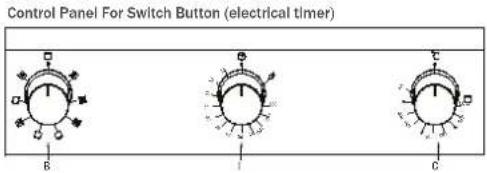
text_image
Control Panel For Switch Button (electrical timer) A B C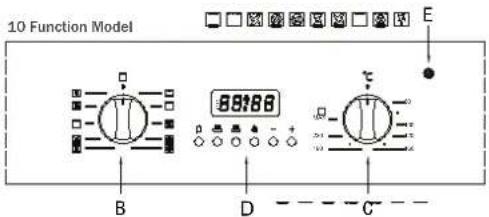
text_image
10 Function Model B D C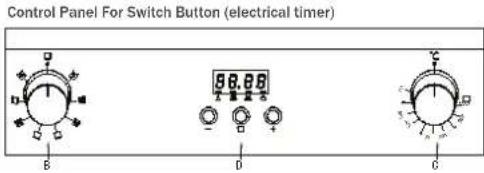
text_image
Control Panel For Switch Button (electrical timer) B D C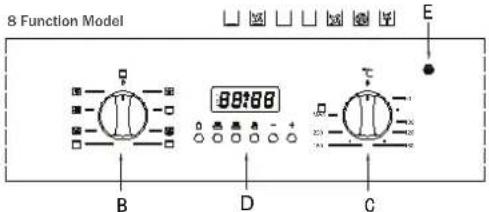
text_image
8 Function Model B D C E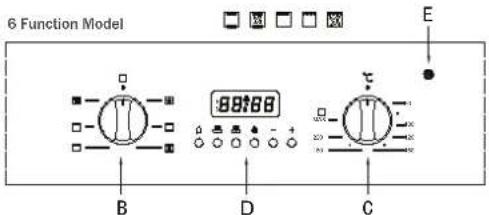
text_image
6 Function Model B D C 80168 EA. Control Panel
B. Cooking mode selection knob
C. Cooking temperature selection knob
D. Electronic programmer-Allows you to programme the desired cooking by selecting the cooking time and the end cooking time. It can also be used as a timer (only available on certain models)
E. Oven indication light (only available on certain models) -When lit, it indicates the ovens is heating up to the temperature set
F. Dripping Pan or Baking Sheet
G. Oven Rack
H. Guides for sliding the racks or dripping in and out
I. End Cooking Time Knob
2.2 Switch control with electrical timer oven
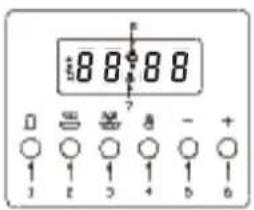
text_image
888 ? - + 1 2 3 4 5 6- Timer
- End cooking time setting
- Carrying forward button
- Timer indicator
- Clock
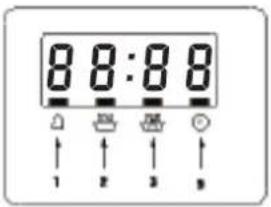
text_image
8 8:8 8 1 2 3 4- Cooking time setting
- Manual operation setting
- Carrying backward button
- Cook indicator
2.3 Sensor touch control oven panel
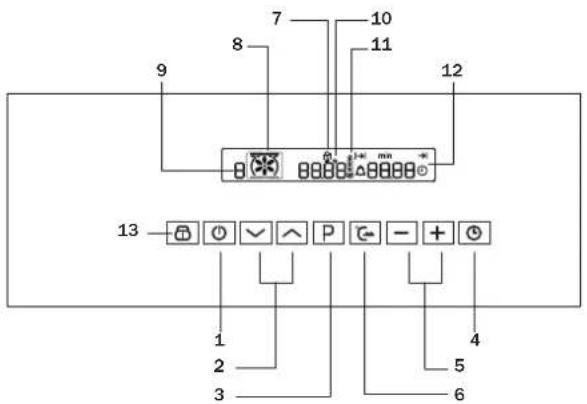
text_image
9 8 7 10 11 12 8 0 + mm - 13 1 2 3 4 5 6- On/Off Button
- Memory Button
- Selection Button
- Child safety device
- Memory: P /Test: D
- Thermometer symbol
-
Child Lock
-
Function Button
- Clock Button
- Speedcook Button
- Mode Display
- Temperature
- Clock function /Operating time
2.4 A ^3 Multifunction Oven (Sensor touch control)
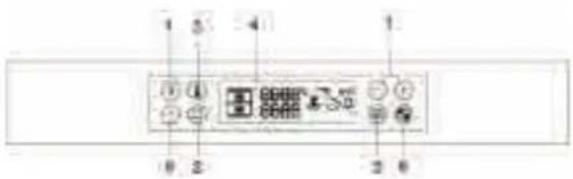
text_image
1 2 3 4 1 2 3 4- On/Off Button
- Temperature Button
- Time Button
-
Time / Temp/ Function Adjust Button
-
Function Button
- Window Display
- Upper and Lower Exchange Button
- Light Button
2.5 A ^3 Multifunction Oven (Knob and Sensor touch control)
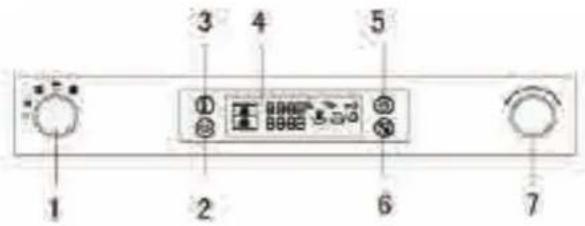
text_image
1 2 3 4 5 6 7- Divider Select Knob
- Temperature Button
- Time Button
-
Time / Temp/ Function Control Knob
-
Function Button
- Window Display
- Upper and Lower Exchange Button

There are five positions for divider select knob. "Off" is the start position and you have four function choices by turning this knob.
3.Accessories
3.1 Standard Accessories
The following accessories are provided with your oven.
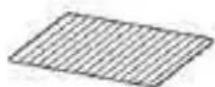
-
Wire grill for dishes, cake tins, roast- ing and grilling trays.
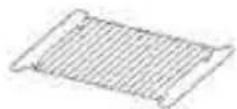
-
Wire roast for roasting.
-
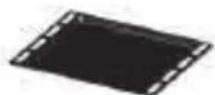
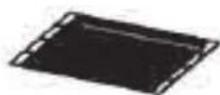
Baking tray for cakes and biscuits.
-
Deep pan and roasting or collecting meat juices or fat drippings.
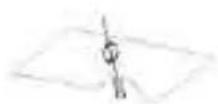
- Rotisserie spit comprises a spit, 2 prongs, a removable handle and a cradle, which fits into the 3rd shelf from the bottom. To use the rotisserie, fit the spit into the hole in the rear wall of the oven's interior. Place the deep pan on level 1 when using the spit.
6.Cramp
3.2 Special Accessories
- Divider for the upper, lower and twin mode. Use inserted in level 3. There is a divider-sensing switch on the rear wall of the cooking compartment. Insert into the back completely.

If you hear two beeps after inserting the divider, that means you can use divider function. When you take off the divider, two beeps means this function can not be used.

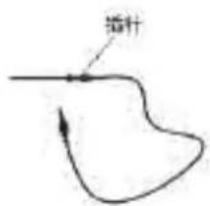
- Probe (an optional choice for customers):
This function just can be used in single mode. (These modes can't use it ☐ ☐ ☐)
text_image
插针4.Functions
The features of this oven include the following functions
4.1 Bake cooking
Your roasts and baking will always achieve mouth-watering results with true fan cooking. Our true fan cooking system gently circulates hot air through the oven cavity, allowing you to cook sweet and savoury at the same time with no transfer of flavour and taste. As the oven heats upfaster, lower temperatures and shorter cooking times are used to achieve those delicious results.
4.2 Multi cooking
Our new exclusive multi hot air cooking technology in our oven range ensures precise heat circulation and exact temperature control. The result is perfect cooking in every corner. On any shelf. In any position.
4.3 Defrosting
Defrost your frozen food gently
In half the usual time. Air is gently circulated around the oven cavity quickly, defrosting your food hygienically.
4.4 Full surface grilling
Fully controllable economy grill, suitable for smaller quantities.
4.5 Convectional top and bottom ☐
No need to alter your cooking style for your favourite traditional recipe. Top and bottom elements heat the oven providing traditional cooking on one shelf position, which is ideal for baking breads or fruitcakes.
4.6 Fan assisted grilling
This clever function gives an authentic spit roast effect without the mess. Heat from the top elements is circulated by the fan, sealing and crisping the food whether it's the joint or the roast potatoes.
4.7 Pizza setting
Great baking results with today's modern cookware, ensuring bases are properly cooked. Designed to ensure pastry bases, quiches and pizzas are cooked to your taste.
4.8 Delicate cooking
Oven is heated by the bottom element only. Foods are gently reheated, ideal for pies and pastries as it keeps the pastry crisp. This function is also ideal for plate arming.
4.9 Top heat
Oven is heated by top element only. Ideal for the Shepherd's Pie, or lasagne that just require gentle browning.
4.10 Fast Cooking

No waiting for your oven to reach full heat, eliminating the need for preheating, great for those quick convenience meals.
Allows you to create your light and fluffy fatless sponges and baked soufflés to perfection. Moisture is retained within the oven thus achieving light fluffy results whilst using the oven in a more economical way. Additional options (selected models) Regenerate Steam is used to gently heat food up and keep it warm. Dough proving Creates the perfect environment to assist bread baking by proving your yeast mixture correctly. Bread baking Optimum temperature and environment for baking yeast mixtures. Using radiant heat and steam to bake a variety of loaves to your taste. Preserving and drying Suitable for drying foods like herbs, mushrooms and chillies.
4.12 Eco roasting
Economical setting for roasting large joints or poultry. Simply select the appropriate cooking time depending on the weight of the food and the oven automatically switches off once the cooking is complete.
4.13 Conventional ( A^3 Oven) ☐
Suggested temperature: 200 °C
The conventional function is ideal for baking and roasting foods arranged on one rack. Both the top and bottom heating elements operate to maintain the oven temperature. Before starting to cook you should preheat the oven.(You can preheat the oven in the current mode, "Conventional", or in "Top-heat + Convection"mode)
4.14 Top Heat + Convection (A³ Oven)

Suggested temperature: 190 °C
This setting should be used when cooking cakes placed on one shelf and biscuits that must be well browned or crispy on the bottom. It is also good for pizzas, quiches lorraine and cheesecakes. The top heating element is in operation and the fan operates to constantly circulate the hot air. Before starting to cook you should preheat the oven.(You can preheat the oven in the current mode "Top-heat +Convection")
4.15 Convection (A³ Oven)
Suggested temperature: 170 °C
This function bakes foods placed on up to three shelves and is also appropriate for roasting. Cooking is achieved by the heating element on the rear wall and the fan distributes the heat.
Before starting to cook you should preheat the oven.(You can preheat the oven in the current mode, "Convection heat", or in "Top-heat + Convection" mode)
4.16 Large Grill (A³ Oven)

Suggested temperature: 240 °C
The large grill function grills large quantities of flat foods, such as steaks, schnitzels and fish. It is also suitable for toasting. Both the top outside element and the top inside element are on in this mode. Before starting to cook you should preheat the oven. (You can preheat the oven in the current mode, "Large Grill", or in "Top-heat +Convection" mode)
4.17 Small Grill (A ^3 Oven)
Suggested temperature: 240 °C
This setting is for grilling smaller amounts of flat foods, such as steaks, schnitzels, fish and toast, placed in the middle of the tray. Only the top inside element are on in this mode.
Before starting to cook you should preheat the oven.
(You can preheat the oven in the current mode, "Small Grill", or in "Top-heat +Convection" mode)
4.18 Bottom Heat + Convection ( A^3 Oven)

Suggested temperature: 190 °C
The Bottom Heat + Convection mode is for recipes calling for a moist topping and a crisp base, as with foods like pizzas, quiches lorraine, German-style open fruitcakes and cheese-cakes.
Before starting to cook you should preheat the oven.
(You can preheat the oven in the current mode, "Bottom-heat + Convection", or in "Top-heat + Convection" mode)
4.19 Twin Convection (A³ Oven)
In the models of ovens where the Twin Convection function is, one can cook 2 dishes with 2
different modes at the same time, using the divider.
For example, you can cook apple pie putting it in lower part of the oven with meat steak putting it in the upper part of the oven.
Before starting to cook you should preheat the oven.
You can preheat the oven in any mode you choose as current or in "Top Heat + Convection" Mode
4.20 Probe (A³ Oven)
An optional choice for customers) : This function just can be used in single mode.
(These modes can't use it □ □ + )
5. Operation guide
5.1 standard oven
End Cooking Time Knob (I) (only available on certain models)
This model is equipped with a timer to control when the oven shuts off during cooking. Position of timer knob "I": Between 10 minutes and 120 minutes.
At the end of the programmed length of time, the timer will sound and automatically turn off the oven.
6-keys timer procedure baking mode (only available on certain models)
Digital clock
Showing time:(0:00-24:00) and minutes.
The screen shows 3 glittery number and "AUTO"If the power is on.
In order to set the correct time, press the 🎨 button first, then + or - button to carry forward or backward the figure until the exact time shows. Manual operation setting
Press the 🔊 button to remove the flashing of "AUTO".
If "AUTO" is flashing (automatic or semi automatic program has been set), press button to remove "AUTO" and then the manual operation process is on.
Automatic setting (set the time of full automatic starting and ending)
-
Press button, set roast time;
-
Press button, set roast finish time;
-
Set temperatures and roast modes by turning the thermostat knob and selector knob.
After the above setting, "AUTO" will be glittering, which means the roast process of the oven is set.
For example: if roast time takes 45 minutes and expect it will end at 14:00.
Press 📄, the roast time is to be 45 minutes;
Press , the roast is set to end at 14:00.
After the above setting, the screen shows the real time(hour、minute)and flashing"AUTO",it means the set roast process is memorized automatically.
When the clock turns to be 13:15(or between 13:14-13:15), the oven will start automatically.
In the roast time, and "AUTO" will be always flashing.
When the clock turns to be 14, the roast has been finished automatically. The alarm will ring and "AUTO" will flash, press the button and the ringing will stop.
Semi-automatic setting (set the time of automatic starting and ending)
Set the time limit of roast (10 hours maximum):
Press the 📄 button to set the time of roast;
The oven starts immediately, and "AUTO" will flash. After the roast is finished, the roast operation process will be shut automatically.
Then "AUTO" flashes, the alarm rings. The ringing will stop after the button is pressed.
B. Set the time of ending (23 hours 59 minutes maximum):
Press the 🔒 button to set the time of ending;
The oven starts immediately, and "AUTO" will flash. When the set time of ending is reached, the roast process will shut automatically.
Then "AUTO" flashes, the alarm rings. The ringing will stop after the button is Pressed.
When the related button is pressed, the set roast process will be displayed. Whenever the 📄 button is pressed, and set backward the time to "0", the set roast process will be cancelled. When ⚙ button is pressed again, the oven will revert to the manual operation process.
Timer
23 hours 59 minutes can be set as maximum.
To set the time, press the 🔒 button, and then + or - button, until the required time is shown on the screen. After the setting, the correct time (hour, minute) and the 🔒 button will show on the screen. When the 🔒 button is pressed the time displaced will be seen. When the set time is reached, disappears and the alarm will ring again. To stop the alarm, press the 🔒 button.
Notice: After pressing the related button, setting is supposed to be done in 5 seconds. In case of blackout, the set process as well as the real time (hour, minute) will disappear. After the power is on again, three "O" and "AUTO" shows on the screen, the oven will automatically reset.
3-keys timer procedure baking mode (only available on certain models)
Adjust the clock after switch on:
Once it connected with electrical power, the display will show "12:00" with the square symbol above " √";
Press the “+” or “-” button will increase or decrease the number until it reaches the right time; after 5 seconds it will start automatically or you can press the function button to make it work.
Automatic setting (set the time of full automatic starting and ending)
-
Press the function button repeatedly until the square symbol above the “☐” flashes, and press “+” or “-” button to set the time frame baking for;
-
Press the function button repeatedly until the square symbol above the “±” flashes, and press “+” or “-” button to set the time to switch off;
-
Adjusting the constant temperature button and choosing button to set temperature and baking method.
After these setting, the symbols above the “☐” and “☐” will flash, it indicates the baking procedure of oven has been set.
For example: If the food is required to bake for 45 minutes, and it is supposed to stop at 14:00.
Press the function button repeatedly until the square symbol above "■" flashes, and set the time of baking to 45 minutes;
Press the function button repeatedly until the square symbol above " ± " flashed, and set the end time of baking at 14:00.
After these setting, the proper clock (hour, minute) and the square symbol will show on the display, it indicates the setting of baking procedure has been remembered automatically.
When the clock shows at 13:15 (between 14 -15min), the oven will switch on automatically.
During the baking time frame, the square symbol will keep flashing.
When the clock shows14:00, baking will switch off automatically. The alarm will ring, the square symbol will flash. To stop the ringing press any button.
Semi-automatic setting (set the time of automatic starting and ending)
A. setting the time frame of baking (10 hours longest)
Press the function button repeatedly until the square symbol above “☐”, and set the time frame of baking;
Switch on the oven immediately, the square symbol above “☐” begins to flash. When the baking is done the square symbol above “☐” will flash, and alarm ring, To stop the ringing press any button.
B. setting the end time off baking (23 hours and 59 minutes longest)
Press the function button repeatedly until the square symbol above “✗” flashes, and set the end time of baking;
Switch on the oven immediately, the square symbol above “ ≡ ” begins to flash. When it reaches the time set, baking procedure will switch off automatically. The square symbol above “ ≡ ” flashes, the alarm will ring, the square symbol will flash. To stop the ringing press any button.
The set baking procedure could be seen by pressing any function button repeatedly at any time, only if the time frame of baking is at "0" position. By adjusting the end time of baking to the current time, the set baking procedure can be cancelled.
Timer
The longest time frame can be set is 23 hours and 59 minutes. For setting time, press the function button repeatedly until the square symbol above “☐” flashes, and press “+” or “-” button until the time supposed shows on the display. After setting, the proper time (hour, minute) and the square symbol above the “☐” begins to flash. In addition, the time countdown begins to work. When it reaches the set time, the square symbol above the “☐” flashes, and the alarm will ring, the square symbol will flash. To stop the ringing press any button.
Notice: press the relevant button, the setting must be carried out in 5 seconds; if electricity failure suddenly, all the set procedure and the proper clock time (hour, minute) will disappear. After electrical power is on again, "12:00" and the square symbol above " ∙ " will show on the display, you need to set it again
The oven light
Set knob "B" to the ☐ symbol to turn it on .It lights the oven and stays on when any of the electrical heating elements in the oven come on.
Cooling ventilation
In order to cool down the exterior of the appliance, this model is equipped with a cooling fan, which comes on automatically when the oven is hot.
When the fan is on, a normal flow of air can be heard exiting between the oven door and the control panel.
Note: When cooking is done, the fan stays on until the oven cools down sufficiently.
5.2 A ^3 multifunction oven
Setting the divider mode
For upper, twin and lower modes, insert the divider at the "OFF" position of Divider Select Knob. For single mode, remove the divider at the "OFF" position. And then turn the Divider Select Knob to select the mode you want. For further details, see the table below. (The words in the brackets mean operation method for the sensor touch models)
1 (Switch on the oven by touch "On/Off" Button) Turn the Divider Select Knob (Short touch the Function Button) to select the desired partition.
2 Press the Function Button and hold for about 3 seconds.
3 Turn the Time / Temp/ Function Control Knob (Touch the Time / Temp/ Function Adjust Button"+"or"-") to select the desired oven function. If
3 seconds have elapsed and there are no further adjustments, the oven will begin automatically in the selected mode and function.
have elapsed and there are no further adjustments, the oven will begin automatically in the selected mode and function.
| Divider | Marking Oven Function Insert Divider Usage Information | |||
| OFF OFF | ||||
| Upper Mode |  | 1.Convection2.Top Heat+ Convection3.Large Grill | Yes | This mode saves energy and time when cooking small amounts of food. |
| Twin Mode |  | Both Upper and Lower Partition Function | Yes | You can cook two dishes at two different temperatures at the same time. |
| Lower Mode |  | 1.Convection2.Bottom Heat+3.Convection | Yes | This mode saves energy and time when cooking small amounts of food. |
| Single Mode |  | 1.Convection2.Top Heat+ Convection3.Convectional4.Large Grill5.Small Grill6.Bottom Heat+Convection7.Defrostling | No | |
Upper mode
The divider should be inserted.
Convection
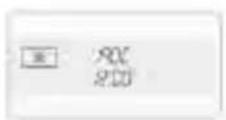
Top Heat + Convection

Large Grill
Lower mode
The divider should be inserted.
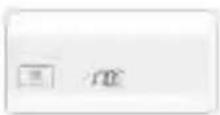
Convection
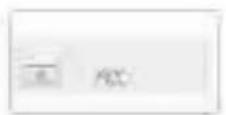
Bottom Heat + Convection
Twin mode
The upper and lower modes operate at the same time. It is possible to set which mode activates first. When one of the dishes has finished cooking in twin mode and you would like to change the cooking time or temperature of the other partition, turn the Divider Select Knob (Function Button) to select the mode (upper or lower) that you would like to continue operating (then touch the Time Button and the Temperature Button to select the cooking time or temperature.) . Divider should be Inserted.
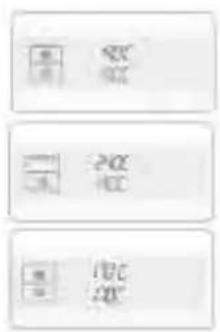
text_image
Three vertically stacked rectangular panels with icons and text labels, likely representing UI elements or status indicators.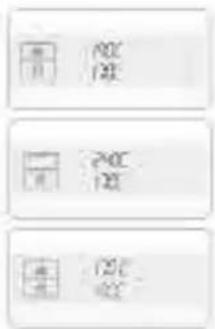
text_image
Three vertically stacked icons with Chinese characters, likely representing UI elements or status indicators.Single mode
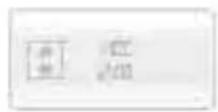
Convection
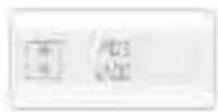
Top Heat + Convection
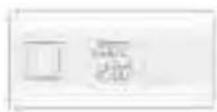
Conventional
Large Grill
Small Grill
Bottom Heat + Convection
Defrosting
Setting the oven temperature
In single, upper and lower modes
1 Press the Temperature Button and hold for about 2 seconds, the temperature will flash.
2 Turn the Time / Temp/Function Control Knob (Touch the Time / Temp/Function Adjust Button "+" or "-" to adjust the temperature in increments of 5 °C.
| Single Mode(Large & Small Grill) | 40°C-250°C |
| Upper Mode | 40°C-250°C |
| Lower Mode | 40°C-250°C |

The temperature may be adjusted during cooking.
In twin mode
1 Press the Temperature Button and hold for about 2 seconds, the temperature will flash(upper or lower mode).
2 Turn the Time / Temp Control Knob (Touch the Time / Temp/Function Adjust Button "+" or "-" to adjust the temperature in increments of 5 °C.
3 Press the upper and lower exchange Button, the temperture will flash (lower or upper mode).
4. Turn the Time / Temp Control Knob (Touch the Time / Temp/Function Adjust Button "+" or "-" to adjust the temperature in increments of 5 °C.
| Upper Mode(Large & Grill) | 160°C-250°C |
| Lower Mode | 160°C-250°C |

The temperature may be adjusted during cooking
Switching the oven off
To switch the oven off, turn the Divider Select Knob to the "Off" position (touch the On/Off Button).
End time
You can set the end time during cooking.
In single, upper and lower modes
-
Press the Time Button ⚙ several times until the end time icon and the three digits on the display begin to flash.
-
Turn the Time / Temp / Function Control Knob (Touch the Time / Temp / Function Adjust Button "+" or "-" to set the desired end time.
-
The oven operates with the selected end time automatically after press the Time Button ☐ or wait for about 3 seconds.

(1) During cooking, you can adjust the previously set end time with the Time Button and Time / Temp / Function Control Knob (Time / Temp / Function Adjust Button) for better results.
(2) You can not set cook time during the function with probe.
In twin mode
End times for the upper and lower modes can be selected using the Time Button, the upper and lower exchange button and the Time / Temp / Function Control Knob (Time / Temp / Function Adjust Button).
-
Press the Time Button ● several times until the end time icon and the three digits on the display begin to flash (upper or lower).
-
Turn the Time / Temp / Function Control Knob Touch the Time / Temp / Function Adjust Button "+" or "-" to set the desired end time.
-
Press the upper and lower exchange button ☐, the end time icon and the three digits on the display begin to flash (lower or upper).
-
Turn the Time / Temp / Function Control Knob (Touch the Time / Temp / Function Adjust Button "+" or "-" to set the desired end time.
-
The oven operates with the selected end time automatically after press the Time Button or wait for about 3 seconds.

During cooking, you can adjust the previously set end time with the Time Button and Time / Temp / Function Control Knob (Time Button and Time / Temp / Function Adjust Button) for better results.
Cook time
You can set the cook time during cooking.
In single, upper and lower modes
-
Press the Time Button several times until the end time icon and the three digits on the display begin to flash.
-
Turn the Time / Temp/Function Control Knob (Touch the Time / Temp/Function Adjust Button "+" or "-" to set the desired cook time.
-
The oven operates with the selected cook time automatically after press the Time Button or wait for about 3 seconds.

(1) During cooking, you can adjust the previously set cook time with the Time Button and Time / Temp / Function Control Knob (Time Button and Time / Temp / Function Adjust Button) for better results.
(2) You can not set cook time during the function with probe.
In twin mode
-
Press the Time Button ☐ several times until the cook time icon and the three digits on the display begin to flash (upper or lower).
-
Turn the Time / Temp/Function Control Knob (Touch the Time / Temp/Function Adjust Button "+" or "-" to set the desired end time.
-
Press the upper and lower exchange Button , the cook time icon and the three digits on the display begin to flash (lower or upper) .
-
Turn the Time / Temp/Function Control Knob (Touch the Time / Temp / Function Adjust Button "+" or "-" to set the desired cook time.
-
The oven operates with the selected cook time automatically after press the Time Button or wait for about 3 seconds.

During cooking, you can adjust the previously set cook time with the Time Button and Time / Temp / Function Control Knob (Time Button and Time / Temp / Function Adjust Button) for better results.
Delayed start
If the end time is entered after the cook time has already been set, the cook time and the end time are calculated and if necessary the oven sets a delayed start point.
- Press the Time Button ☑ . Example : Current time is 3:00 and the desired cook time is 5 hours.
- Turn the Time/Temp/Function Control Knob (Touch the Time / Temp / Function Adjust Button "+" or "-" to set the end time.
Example: You want to cook for 5 hours and finish at 8:30.
- Press the Time Button ☐. The oven is inoperable until the delayed start point.
Kitchen timer
- Press the Timer Button ⚙ several times until “ △ ” icon and the three digits on the display begin to flash.
- Turn the Time / Temp/Function Control Knob (Touch the Time / Temp / Function Adjust Button "+" or "-" to set the desired time.
- Press the Timer Button ☐ to start the kitchen timer. When the set time has elapsed, an audible signal sounds.
Child safety function
- Press the Time Button ☐ and upper and lower exchange Button ☑ (Function Button ☐) at the same time and hold for 1 seconds. 📞 icon will appear in the display.
2 Press the Time Button and upper and lower exchange Button (Function Button) at the same time and hold for 3 seconds again to unlock.
When locked, all buttons and knobs except the Divider Select Knob and the unlock button will not operate.
The lock is available whether or not the oven is in operation.
Check the tempreture
- Press the Temperature Button and Time Button at the same time to check the temperture of the upper test probe.
- Press the Temperature Button and upper and lower exchange Button (Touch the Adjust Button "+" or "-" to check the temperture of the lower test probe.
- Press the Temperature Button and function button (Time Button) to Check the temperture of probe.
6. Care & Warranty
FAQs and Troubleshooting
What should I do if the oven doesn't heat up?
Check to see if one of the following actions resolves the issue:
- The oven may not be switched on. Switch the oven on.
- The clock may not be set. Set the clock (see section "Setting the clock").
-
Check to see if the required settings have been applied.
-
A household fuse may have blown or a circuit breaker may have tripped. Replace the fuses or reset the circuit. If this happens repeatedly, call an authorised electrician.
What should I do if, even though the oven function and temperature have been set, the oven does not heat up?
There may be problems with the internal electrical connections. Call your local service centre.
What should I do if an error code appears and the oven does not heat up?
There is a fault in the internal electrical circuit connection. Call your local service centre.
What should I do if the time display is blinking?
There was a power failure. Set the clock (see section "Setting the clock").
What should I do if the oven light doesn't illuminate?
The oven light is faulty. Replace the oven light bulb (see section "Changing the lamp").
What should I do if the oven's fan is running without having been set?
Following use, the oven's fan runs until the oven has cooled down. Call your local service centre if the fan continues to run after the oven has cooled down.
What should I do after heating for some time, the oven stops heating suddenly and all the electric parts do not work?
Check to see if one of the following actions resolves the issue:
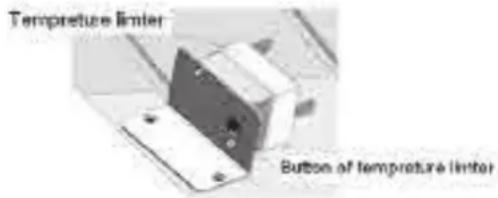
- The automatic protect system works when the temperture inside oven is very high. You should ask an professional technician to help you. Open the top cover and push the button of temperture limter with a tool, and then connect the oven to electric again.
- A household fuse may have blown or a circuit breaker may have tripped. Replace the fuses or reset the circuit. If this happens repeatedly, call an authorised electrician.
text_image
Temperature limiter Button of temperature limiter7. Installation
Only a qualified person in compliance with the instructions provided must install the appliance. The manufacturer declines all responsibility for improper installation, which may harm persons and animals and damage property.
Important: - The power supply to the appliance must be cut off before any adjustments or maintenance work is done on it;
- Air duct is supposed to use in Ventilation.
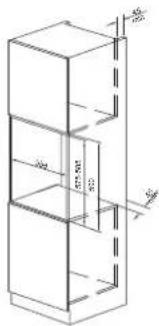
Installation of Built-in Ovens
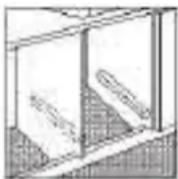
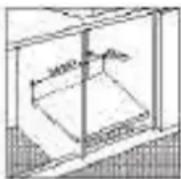
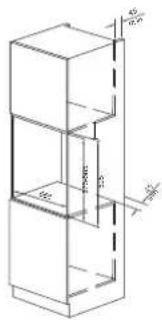
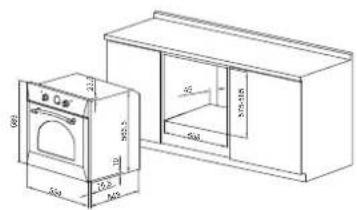
In order to ensure that the built-in appliance functions properly, the cabinet containing it must be appropriate. The figure below gives the dimensions of the cut-out for installation under the counter or in a wall cabinet unit.
N. B : Installation in compliance with the consumption declaration
In order to ensure adequate ventilation, the back panel of the cabinet unit must be removed. Installing the oven so that it rests on two strips of wood is preferable. If the oven rests on a continuous, flat surface, there must be an aperture of at least 45×560mm.
The panels of the adjacent cabinets must be made of heat-resistant material. In particular, cabinets with a veneer exterior must be assembled with glues which can withstand temperatures of up to 100 C.
In compliance with current safety standards, contact with the electrical parts of the oven must not be possible once it has been installed.
All parts, which ensure the safe operation of the appliance, must be removable only with the aid of a tool.
To fasten the oven to the cabinet, open the door of the oven and attach it by inserting the 4 wooden screws into the 4 holes located on the perimeter of the frame.
Electrical Connection
Those ovens equipped with a three-pole power supply cable are designed to operate with an alternating current. The wire for earthling the appliance is yellow-green in color.
Fitting on a Power Supply Cable
Opening the terminal board:
- Using a screwdriver,prize the bolt on the side tabs of the
terminal board cover ;
- Unscrew the bolt, pull open the cover of the terminal board.
To install the cable, proceed as follows:
- Remove the wire clamp screw and the three contact screws L-N -
- Fasten the wires beneath the screw heads using the following color scheme: Blue (N) Brown (L) Yellow-Green
- Fasten the supply cable in place with the clamp and close the cover of the terminal board.
Connecting the supply cable to the mains
Install a standardized plug corresponding to the load indicated on the data plate. When connecting the cable directly to the mains, install an omni polar circuit breaker with a minimum contact opening of 3 mm between the appliance and the mains. The omni polar circuit breaker should be sized according to the load and should comply with current regulations (the earth wire should not be interrupted by the circuit breaker).
The supply cable should be positioned so that it does not reach a temperature of more than 50°C with respect to the room temperature, anywhere along its length, or protected by insulation sleeping having an appropriate rating.
Before making the connection, check that:
- The electrical safety of this appliance can only be guaranteed if the cooker is correctly and efficiently earthed, in compliance with regulations on electrical safety. Always ensure that the earthling is efficient; if you have any doubts call in a qualified technician to check the system. The manufacturer declines all responsibility for damage resulting from a system which has not been earthed.
- Before plugging the appliance into the mains ,check that the specifications indicated on the date plate (on the appliance and /or packaging ) correspond to those of the electrical mains system of your home .
- Check that the electrical capacity of the system and sockets will support the maximum power of the appliance, as indicated on the data plate. If you have any doubts, call in a qualified technician.
- If the socket and appliance plug are not compatible, have the socket replaced with a suitable model by a qualified technician. The latter, in particular, will also have to ensure that the cross section of the socket cables are suitable for the power absorbed by the appliance. The use of adapters, multiple sockets and /or extensions, is not recommended. If their use cannot be avoided, remember to use only single or multiple adapters and extensions which comply with current safety regulations. In these cases, never exceed the maximum current capacity indicated on the single adapter or extension and the maximum power indicated on the multiple adapter. The plug and socket must be easily accessible.
text_image
Technical drawing of a washing machine with dimensional annotations in millimeters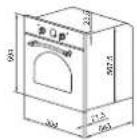
text_image
1 2.5 3 4 5 6 7 8 9 10 11 12 13 14 15 16 17 18 19 20 21 22 23 24 25 26 27 28 29 30 31 32 33 34 35 36 37 38 39 40 41 42 43 44 45 46 47 48 49 50 51 52 53 54 55 56 57 58 59 60 61 62 63 64 65 66 67 68 69 70 71 72 73 74 75 76 77 78 79 80 81 82 83 84 85 86 87 88 89 90 91 92 93 94 95 96 97 98 99 100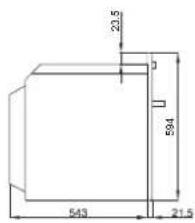
text_image
23.5 594 543 21.5B0811EIEA1AD
text_image
Technical drawing of a microwave oven and its side view with dimensional annotations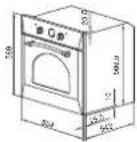
text_image
Technical drawing of a multi-layered structural component with dimension annotations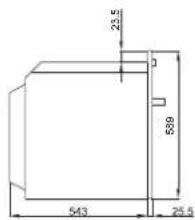
text_image
23.5 539 543 25.5
natural_image
Modern kitchen interior with white cabinetry, blue-framed refrigerator, and red vase (no visible text or symbols)Due to the continual improvements achieved though research and development, Arda reserves the right to make any changes to the specifications and features of products without prior notice. As a result, you may find differences between the products as describe in the catalogue and the product you receive.