RVP50 - Washing machine ARDA - Free user manual and instructions
Find the device manual for free RVP50 ARDA in PDF.


| Product Type | Fully automatic washing machine |
| Brand | ARDA |
| Model | RVP50 |
| Dimensions (HxWxD) | 885 x 526 x 536 mm |
| Product Weight | 32 kg |
| Rated Input Power | 360 W |
| Rated Capacity (Wash & Spin) | 6.0 kg (dry clothes) |
| Rated Voltage / Frequency | 240 V / 50 Hz |
| Max. Water Pressure | 0.6 MPa |
| Min. Water Pressure | 0.1 MPa |
| Water Level Settings | 8 levels |
| Wash Programs | Normal, Economy, Delicate, Bulky, Wool, Anti-wrinkle |
| Function Selection | Wash, Rinse, Spin, Soak combinations |
| Temperature Selection | IOT, Cold, Warm |
| Delay Start | Up to 48 hours (1-hour increments up to 24h, then 6-hr increments) |
| Child Lock | Yes (locks all buttons including Power) |
| Memory Backup | Resumes washing after power outage |
| Auto Power Off | Yes (after cycle end) |
| Unbalanced Load Adjustment | Automatic with up to 2 attempts |
| Cabinet Material | Powder coated metal |
| Base Material | Engineering plastic (corrosion resistant) |
| Lint Filter | Removable and cleanable |
| Water Inlet Hose | 2 included (assembly) |
| Drain Hose | 1 included |
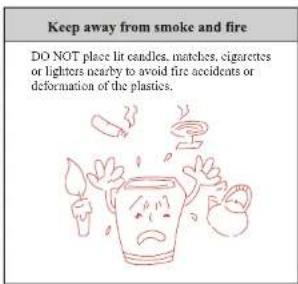
| Max Water Temperature | 50°C (to avoid plastic deformation) |
| Power Cord Connection | Y-connection; replacement by professional only |
| Grounding | Required; do not connect to neutral wire |
Frequently Asked Questions - RVP50 ARDA
User questions about RVP50 ARDA
0 question about this device. Answer the ones you know or ask your own.
Ask a new question about this device
Download the instructions for your Washing machine in PDF format for free! Find your manual RVP50 - ARDA and take your electronic device back in hand. On this page are published all the documents necessary for the use of your device. RVP50 by ARDA.
USER MANUAL RVP50 ARDA
| Size | 526X536X885 (mm) | Weight of the product | 32kg |
| Rated input power | 360W | Rated capacity of wash and spinning | 6.0kg(dry clothes) |
| Rated voltage | 240V | Maximum water pressure permitted in the water inlet | 0.6Mpa |
| Rated frequency | 50Hz | Minimum water pressure permitted in the water inlet | 0.1Mpa |
Arda®
Fully Automatic Washing Machine
Operation Manual
SERVICE CENTRES
For service please contact 1800 333 244.
MODEL: RVP50
Thank you for selecting this fully automatic washing machine
Before operating this unit, please read this operation manual completely
INDEX
Features and Accessories....2
Names of Respective Parts and Simple Installation .... 3
Simple Installation....4
- Installation of the water inlet hose .... 4
- Installation of the drain hose 5
- Power source and grounding .... 5
- Installation of the base cover 6
Simple Operation....6
Control Panel design 7
Fully Automatic Program 8
Additional Explanation 8
Operation Method 9
- Delay Time Program 9
- Confirmation of the delay and inspection 9
- Cancel the delay time or alternate the delay time. 9
- Using the cleaning solution twice....9
- Pre-Wash of dirty clothes....9
- Load Size 10
- Weight Standard of the clothes. 10
- Washing Tips 10
Method of Maintenance....11
Troubleshooting....12
Other Functions....13
Precautions....14
Specifications.... Back Page
Service centres....Back Page
FEATURES AND ACCESSORIES
FEATURES
- The unique Pulsator can spray water from the bottom, to break up tangled clothing for a more sufficient and uniform wash.
- With the Dynamic Soak, the detergent can dissolve better in the water and be fully infiltrated into the clothes, to wash off stubborn dirt.
- Simple to use and multiple wash programs: With 8 different wash programs including fully automatic, delayed washing and soak functions etc; all of your washing needs are covered.
- Low vibration and noise: utilising sun-and-planet gear technology for mechanical transmission devices, mechanical noise is reduced.
- Compact structure, durable and pleasing appearance: powder coated cabinet, the base is made from engineering plastic which is resistant to corrosion and very durable.
• Eight Water level settings. - Memory backup function which resumes washing in the event of a power outage.
| Accessories | ||
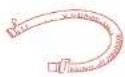 | 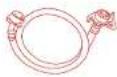 | 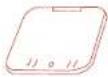 |
| Drain hose (1) | Water inlet hose assembly(2) | Base cover (1)Self-lapping screw (1) |
NAMES OF RESPECTIVE PARTS AND SIMPLE INSTALLATION
Part List
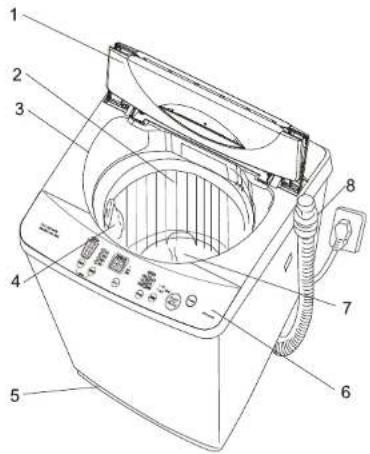
text_image
Technical diagram of a washing machine with numbered parts for identification-
Top lid
-
Washing tub
3.Top frame
-
Lint filter
-
Base
6.Operation panel
7.Pulsator
- Drain hose
Simple installation
Step 1: The washing machine should be placed in a room with a flat floor, which is convenient for water supply and drain.
Step 2: All foam packing (including the fixing frame on the base foam) should be removed, otherwise the washing machine will not work.
Step 3: Please adjust the washing machine to sit even according to the instructions below.
- Loosen the fixing pole on the adjusting foot, screw the adjustable feet in or out to level the washing machine.
- After the adjustment, the fixing pole should be screwed back and tight.
SIMPLE INSTALLATION
NOTE:
If the washing machine is not placed flat, and the angle of inclination is over 2^ , it may cause additional vibration, affect the auto unbalancing detector, or other abnormal circumstances that occur during the spinning cycle.
Remove all foam packing including the fixing frame on the base foam in Step 2.
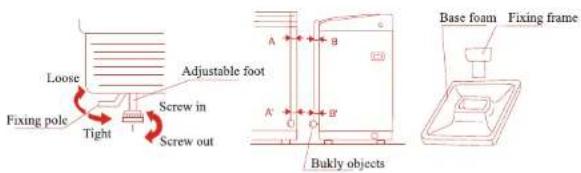
text_image
Loose Adjustable foot Fixing pole Tight Screw in Screw out A B A' B' Bukly objects Base foam Fixing frameInstallation of the water inlet hose
- Loosen the locking ring, but do not let the locking ring drop off (if supplied).
- Put the universal connector onto the tap mouth and screw tight all four screws (if supplied).
- Screw tight the locking ring.
- Pull the skirt of one end of the water inlet hose downwards, and then plug in the universal connector.
- Pull downward on the water inlet hose to confirm it is secured.
- Connect the other end of the water inlet hose to the water inlet connection of the washing machine,
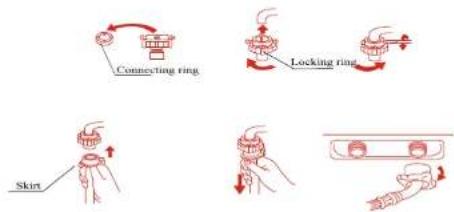
text_image
Connecting ring Locking ring SkirtSIMPLE INSTALLATION

NOTE:
After installation, prior to starting washing machine, first open the water tap to let the water flow into the water inlet hose to check whether there is any leakage from the connectors on both ends.
Step 5: Installation of the drain hose
- Fit drain hose into the leading skirt of drain hose in the bottom of the washing machine and secure with fixing ring.
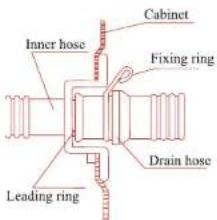
text_image
Cabinet Inner hose Fixing ring Drain hose Leading ring- It is recommended that you place the drain hose permanently into a nearby drainage source.

NOTE: If the drain hose is blocked, drain faults will occur.
Step 6: Power source and grounding
The washing machine employs alternative current with the rated voltage and frequency (240V, 50HZ). The method of connection of the socket is shown following:
SIMPLE INSTALLATION AND SIMPLE OPERATION

NOTE:
The socket and the grounding wire must be installed by an electrician to prevent incorrect installation or use of the socket, and to guarantee the safety of use of electricity. The power wire of the washing machine employs Y connection and the replacement of the power wire should be carried out by authorised professionals.
DO NOT connect the ground wire with the neutral wire, otherwise the cabinet will be positively charged, which is likely to cause danger of electric shock.
Step 7: Installation of the base cover
- Slant the washing machine at a 45^ angle in the direction of the arrows shown. Insert the base cover into the upper slot of the base from the rear of the washing machine.
- Then secure with a self-tapping screw.
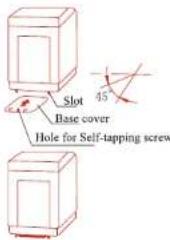
text_image
Slot Base cover Hole for Self-tapping screw 45°Simple operation
Preparation before use:
- Place the drain hose into the drain.
- Connect the water inlet hose and open the tap.
- Put the power plug into the socket.
- Remove any coins and other sundries in clothes, and shake off mud and sand.
- Determine the water level. Press "Water level" button to select the water level.
- Press "Power" switch button.
- Press "Start/Pause" button. The washing machine will begin operation on the automatic program as standard

NOTE:
If you would like to set other programs, please refer to sections "Fully automatic program" and "Self-program". Select the desired program according to your needs.
CONTROL PANEL DESIGN
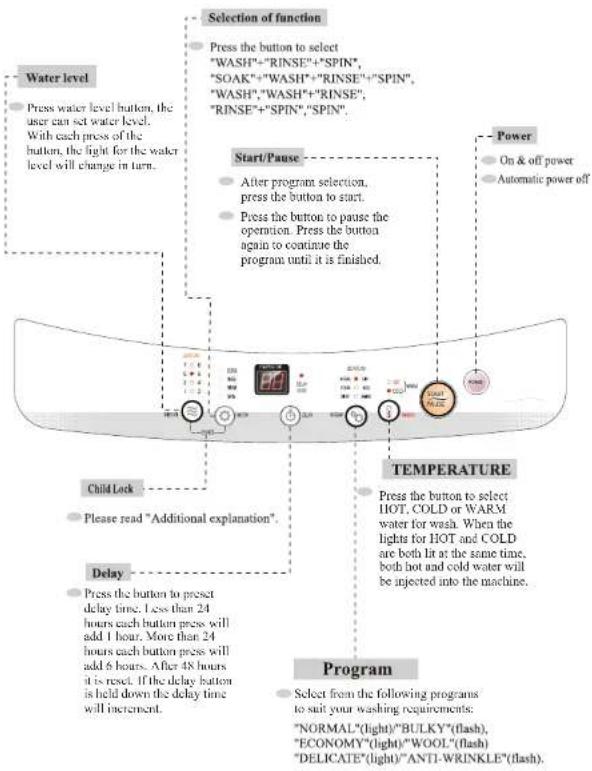
text_image
Selection of function Press the button to select "WASH"+"RINSE"+"SPIN", "SOAK"+"WASH"+"RINSE"+"SPIN", "WASH","WASH"+"RINSE", "RINSE"+"SPIN", "SPIN". Water level Press water level button, the user can set water level. With each press of the button, the light for the water level will change in turn. Start/Pause After program selection, press the button to start. Press the button to pause the operation. Press the button again to continue the program until it is finished. Power On & off power Automatic power off TEMPERATURE Press the button to select IOT, COLD or WARM water for wash. When the lights for HOT and COLD are both lit at the same time, both hot and cold water will be injected into the machine. Child Lock Please read "Additional explanation". Delay Press the button to preset delay time. Less than 24 hours each button press will add 1 hour. More than 24 hours each button press will add 6 hours. After 48 hours it is reset. If the delay button is held down the delay time will increment. Program Select from the following programs to suit your washing requirements: "NORMAL"(light)"BULKY"(flash), "ECONOMY"(light)"WOOL"(flash) "DELICATE"(light)"ANTI-WRINKLE"(flash).* We reserve the right to change design and specifications without notice.

In order to protect the onboard controller, wait at least 30 seconds between switching on and off the power.
FULLY AUTOMATIC PROGRAM
Fully Automatic Program
| Program | Wash | Rinse | Spin (minutes) | Total time (minutes) |
| Normal | Wash 12 minutes | 2 Times | 6 | About 41 |
| Economy | Wash 2 minutes | 1 Times + 1 Times (Spray rinse) | 1 | 10 |
| Delicate | Wash 10 minutes | 2 Times | 2 | 33 |
| Bulky | Wash 15 minutes | 2 Times | 7 | 47 |
| Wool | Wash 15 minutes | 2 Times | Only Drain | 34 |
| Anti-wrinkle | Wash 8 minutes | 2 Times | Only Drain | 27 |

NOTE:
The total time includes the fill time and drain time. The washing times can also be affected by the pressure of the tap water and the drain speed.
If the power is cut during operation, when the power is restored, the machine will start at the beginning of the process before the power failed. If you don't want the washing machine to start from the last process before the power failed, press the power button.
Additional explanation
- "CHILD LOCK" function: After starting, press the "FUNCTION" and "WATER LEVEL" buttons at the same time. The "CHILD LOCK" function will be set and all buttons will be locked and cannot be selected (including the "POWER" button). "CL" will be displayed on the indicator every 5 seconds. To remove the "CHILD LOCK", press the "FUNCTION" and "WATER LEVEL" button at the same time again to unlock.
- During the "SOAK" process, the washer does not stop completely. It will wash in intervals to let the washing mix evenly with the detergent.
OPERATION METHOD
Operation method
Delay time program
Delay time means the beginning time of the washing cycle.
- Switch the power ON.
- Open the tap and place the drain hose into the drain.
- Put the items intended to be washed and detergent into the machine.
- Select the water level according to the quantity of clothes.
- Select the desired functions and program.
- Press the "DELAY" button to select the beginning time of the washing cycle.
- Close the lid and press "START/PAUSE" button.
Confirmation of the delay and inspection
• After the delay function is started, the corresponding light will flash and all other lights will be turned off.
- To review the set functions and program, hold the "Delay" button. Release the button to automatically go back to delay status.
Cancel the delay time, or change the delay time
- Press the "POWER" button to cancel the delay time.
- To change the delay time, cancel the delay time, and then press the "Delay" button to reset.
Using the cleaning solution twice
- Put the first batch of washing and detergent into the machine and press the "Wash" or "Function" button to set the single "Wash" to run.
- Once the washing cycle is complete, you will hear a buzzing sound. Remove the first batch of washing from the machine.
- Put the second batch of washing into the machine and run "Wash", "Rinse", "Spin".
- Once the cycle is complete, you will hear a buzzing sound. Remove the second batch of washing from the machine.
- Put the first batch of washing back into the machine and press "Function" button to run "Rinse" and "Spin".
Pre-Wash of dirty clothes
- Select either "Rinse" or "Spin" program to perform a pre-wash for clothes that are seriously stained. Then add washing powder and select the full program to wash.
NOTE:
Please ensure the water temperature is below 50°C.
If the water level is less than the set "Water level", the machine will add water automatically.
OPERATION METHOD
● Load size and the detergent
| Water level | Water volume | Weight of washing | Washing powder |
| 8 | About 53L | 5.2~6.0kg | About 70g |
| 7 | About 48L | 4.4~5.2kg | About 66g |
| 6 | About 43L | 3.6~4.4kg | About 60g |
| 5 | About 38L | 2.8~3.6kg | About 52g |
| 4 | About 34L | 2.0~2.8kg | About 44g |
| 3 | About 30L | 1.2~2.0kg | About 36g |
| 2 | About 25L | 0.8~1.2kg | About 28g |
| 1 | About 17L | <0.8kg | About 20g |
NOTE:
• The recommended type of detergent for use with this machine is low and mid foam.
- The volume of detergent will vary depending on type and brand. Read the instructions provided with the detergent.
• Water volume required will differ depending on the type of clothes being washed. If you are not happy with the results of the wash, adjust the amount of clothes being washed and the water level.
• The water volumes listed above are based on the volume of average clothes.
● Weight standard of the clothes
 Overall about 800g Overall about 800g |  Pyjamar (cotton)about 500g Pyjamar (cotton)about 500g |  Long sleeves shirt(blended) about 200g Long sleeves shirt(blended) about 200g |  Short sleeves shirt(cotton) about 130g Short sleeves shirt(cotton) about 130g |
 Bedsheet (cotton)about 500g Bedsheet (cotton)about 500g |  Bath towel (cotton)about 300g Bath towel (cotton)about 300g |  Underwear (cotton)about 50g Underwear (cotton)about 50g |  Socks (blended)about 30g Socks (blended)about 30g |
Overall about 800g
'Yjamaris (cotton) about 500g
Long sleeves shirt (blended) about 200g
Short sleeves shirt (cotton) about 130g
Bedsheet (cotton) about 500g
Bath towel (cotton) about 300g
Underwear (cotton) about 50g
Socks (blended) about 50g
- Washing tips
- Put delicate and light clothes into mesh bag before washing.
- Put bulky clothes at the bottom of the tub.
- If clothes have detail which can be easily damaged on the outside, turn them inside-out before washing.
• Tie up webbed clothing before washing. - If clothes have a zipper, close the zip before washing.
- Remove mud from clothes before washing.
- You can add some washing powder to especially dirty places before washing.
METHOD OF MAINTENANCE
The following cases are not considered faults
- Additional water is added at the time of washing or rinse. This is due to the washer sensing inadequate water level and re-adjusts automatically.
- Intermittent spinning at the beginning of a cycle is performed to achieve better spinning effects.
- In the course of the spin cycle, the program will return to the wash program. This is designed to rectify the unbalanced distribution of load in the spin tub.

NOTE:
Please ensure the water temperature is below 50°C.
If the water level is less than the set "Water level", the machine will add water automatically.
Method Of Maintenance
| After the whole washing program Maintenance of Shell | |
| The washing machine will make a beeping sound at the completion of any program to remind you to take out the load or continue with another operation.When washing is complete, shut off the tap and pull our the ping. | Use a soft cloth to wipe off the water and dirt on the surface after each use of the washing machine.DO NOT use detergent, propellant and other chemicals to clean the washing machine as it may cause damage to the surface. |
| Cleaning the water inlet Cleaning of the lint filter | |
| After a long period of use, the water inlet mesh screen maybe become blocked and should be cleaned according to the following steps:Switch on the power, then shut off the tap.Let the machine run for 5 seconds so that water flows into the tub through the water inlet hose.Then turn off the power.Unscrew the water inlet hose and clean the mesh screen. Refit the water inlet assembly. | After using the washing machine, clean the lint filter according to the following steps:Remove the lint filter.Wash it clean in water.Restore and refix the filter.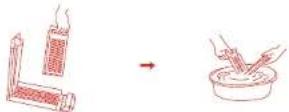 |
TROUBLE SHOOTING
| Problem Cause Solution | ||
| No indication in controller | The power plug is not plugged tight. The power switch is not switched on. Press "START/PAUSE" button. Power Outage Wait for power supply to return. | Re-plug the power plug. Check the power socket, or change other socket. Press "START/PAUSE" button. return. |
| The inlet hose is leaking | The universal connector is not connected properly to the tap. The water inlet hose is not attached tightly. | Re-install the universal connector securely. The water inlet hose is not attached tightly. |
| Does not drain | The drain hose is kinked or jammed. | Check that there are no kinks or obstructions in the drain hose. |
| Does not add water | Water has stopped. Tap is closed. Water inlet is blocked. | Wait for water to flow. Open the tap Clean the water inlet screen according to the method in the Maintenance Guide. |
| Spinning stops and water added during the course of spin. | Washing is placed unevenly. | This is automatic rectification for spinning in the washing program. There is too much or too little water, or the washing is not placed evenly and the spinning has become unbalanced. If the washing machine is still operating abnormally after checking the above mentioned points, turn off, pull out the power plug and contact your local service agent or authorized person. |
| Does not spin | Lid open | Close the upper lid. |
| Intermittent spinning | Required to obtain better spinning effect. | Considered normal operation. |
| Before first use, water exits in the drain hose. | Remaining water due to testing or experiment in the factory. | Considered normal operation. |

NOTE:
- If there is still abnormalities after checking the above mentioned points, please pull out the plug. DO NOT attempt to repair the appliance yourself. Contact your local service agent or an authorised person for help.
OTHER FUNCTIONS
- Fault Indication Alarm
| Fault Indication | Cause of fault | Fault Code | Alarm | Solution of alarm |
| Water alarm | Entering water less than 16 minutes, reset water level. | E1 | The appliance will beep for 10 seconds. If the fault is not rectified, it will continue to beep for 10 seconds every 16 minutes. | Open the lid to deal with faults, then close the lid to solve the alarm. |
| Open lid alarm | Lid has been opened during delay time function or whilst washer is spinning | E2 | ||
| Unbalanced cycle alarm | Cycle remains unbalanced after second adjustment attempt. | E3 | ||
| Drain alarm | Draining is not complete after 4 minutes. | E4 |
• Automatic Power-Off Function
- After the end of wash, the buzzer will sound 6 times and the power will automatically shut off.
• Function for adjusting an unbalanced cycle
-
If clothes are placed unevenly into the washer, it will result in increased vibration during the cycle. The washing machine features a function for adjusting an unbalanced cycle. The washing machine has a system which inspects vibration during operation. If the washer detects increased vibration, it will automatically start the adjusting program to adjust the balance of the clothes.
-
The washing machine will attempt to adjust the balance of the cycle twice. If the cycle is still unbalanced, an alarm will sound.
PRECAUTIONS
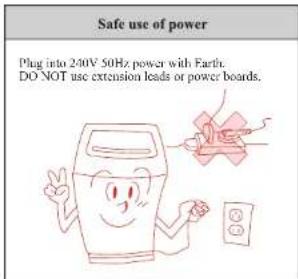
text_image
Safe use of power Plug into 240V 50Hz power with Earth. DO NOT use extension leads or power boards.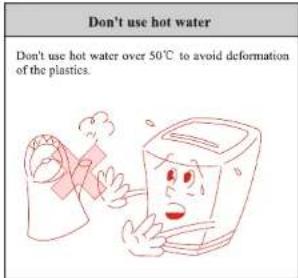
text_image
Don't use hot water Don't use hot water over 50°C to avoid deformation of the plastics.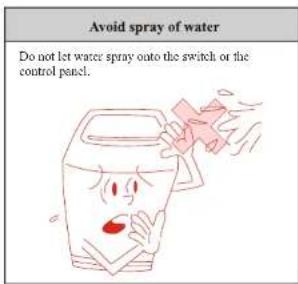
text_image
Avoid spray of water Do not let water spray onto the switch or the control panel.
text_image
Keep away from dampness Don't place the washing machine in extreme damp surroundings, as dampness may weaken the insulation of the machine, which may cause faults.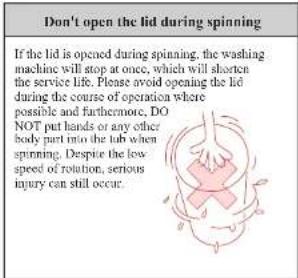
text_image
Don't open the lid during spinning If the lid is opened during spinning, the washing machine will stop at once, which will shorten the service life. Please avoid opening the lid during the course of operation where possible and furthermore, DO NOT put hands or any other body part into the lub when spinning. Despite the less speed of rotation, serious injury can still occur.