
LC32K0D3D - Television AOC - Free user manual and instructions
Find the device manual for free LC32K0D3D AOC in PDF.


| Product Type | LCD Television |
| Brand | AOC |
| Model | LC32K0D3D |
| Screen Size | 32 inches (diagonal) |
| Resolution | 1920 x 1080 (Full HD) |
| Brightness | 450 cd/m² |
| Viewing Angle | 178° (H) / 178° (V) |
| Audio System | PAL/SECAM/DVBT/DVBC |
| Speaker Output | 10W x 2 |
| Power Consumption (Typical) | ≤115 W |
| Standby Power Consumption | ≤0.5 W |
| Input Voltage | 220-240 V, 50/60 Hz |
| Dimensions (with stand) | 779 x 553 x 251 mm |
| Dimensions (without stand) | 779 x 553 x 98 mm |
| Net Weight | 12 kg |
| Wall Mount Hole Spacing | 200 x 200 mm |
| Connectivity | HDMI x2, SCART x2, Component, PC IN (D-SUB), USB, AV, SPDIF, Headphone |
| Cleaning Instructions | Use a dry soft cloth. For stubborn stains, use a cloth lightly dampened with mild soap and water. Do not use strong solvents. |
| Safety Features | Polarized plug, anti-tip stabilization, ventilation slots, automatic power off, sleep timer, child lock |
| Spare Parts & Repairability | Use only manufacturer-specified replacement parts. Contact qualified service personnel for repairs. |
Frequently Asked Questions - LC32K0D3D AOC
User questions about LC32K0D3D AOC
0 question about this device. Answer the ones you know or ask your own.
Ask a new question about this device
Download the instructions for your Television in PDF format for free! Find your manual LC32K0D3D - AOC and take your electronic device back in hand. On this page are published all the documents necessary for the use of your device. LC32K0D3D by AOC.
USER MANUAL LC32K0D3D AOC
natural_image
Line drawing of a flat-screen monitor with abstract wave patterns on screen (no text or symbols)LE19K097
LE22K097
LE24K097
LC32K0D3D
LC42K0D3D
LE32K0D7D
LE42K0D7D

Full HD
1080P

Ultra
Slim

HD
ready
HDMI ^TM
HIGH-DEFINITION MULTIMEDIA INTERFACE
This manual provides as an operational guide to user. All statements, technical information, and recommendations in this manual and in any guides or related documents are believed reliable, but the accuracy and completeness thereof are not guaranteed or warranted, and they are not intended to be, nor should they be understood to be, representations or warranties concerning the products described.
Table of Contents
IMPORTANT INFORMATION....3
WARNING 3
CAUTION 3
NOTIFICATION ....3
IMPORTANT SAFETY INFORMATION....3
USAGE INSTRUCTIONS....4
Installation 4
AC Power Cable 5
LCD Screen....5
Wiring 5
Electric Shock 5
Lightning Storms 6
When Not in Use 6
Overloading 6
Optional Equipment 6
Small Accessories 6
Antennas 6
Batteries 6
Cleaning 6
Magnetic Influence 7
Sound 7
Carrying the TV 7
Ventilation....7
Moisture 8
Volume Adjustment 8
Servicing....8
CONTENTS IN THE BOX 9
CONTROLS & CONNECTIONS: 9
SET-UP 11
Inserting Batteries into the Remote control 11
Attaching the Base 11
Wall-Mounting 11
PC INPUT SIGNAL REFERENCE CHART 12
VIDEO INPUT SIGNAL REFERENCE CHART 12
USING AOC TV....13
Turning the TV On and Off....14
Initial Setting....14
Switching Input Source....16
Adjust Picture Setting....16
Adjust Sound Setting 17
OSD Manual Setting 18
Feature Setup....19
TROUBLESHOOTING 20
DIMENSIONS & SPECIFICATIONS 21
Important Information
WARNING
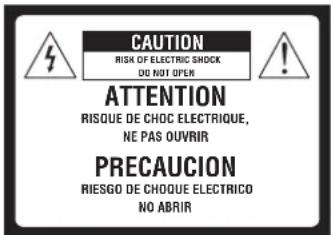

This symbol is intended to alert the user to the presence of insinuated “dangerous voltage” within the TV’s enclosure that may be of sufficient magnitude to constitute a risk of electric shock to persons.

This symbol is intended to alert the user to the presence of important operating and maintenance (servicing) instructions in the literature accompanying the TV.
To reduce the risk of fire or electric shock, do not expose this TV to rain or moisture, the TV shall not be exposed to dripping or splashing and no objects filled with liquids, such as vases, shall be placed on the TV.
CAUTION
To prevent electric shock, do not use this polarized AC plug with an extension cord, receptacle or other outlet unless the blades can be fully inserted to prevent blade exposure.
Use the Wall-Mount bracket or TV stand which was recommended by AOC, and please consult your dealer for detailed information.
Use with other Wall-Mount Bracket or TV stand may cause instability and possibly result in injury.
These servicing instructions are for use by qualified service personnel only. To reduce the risks of electric shock do not perform any servicing other than that contained in the operating instructions unless you are qualified to do so.
Disposal of Waste Equipment by Users in Private Household in the European Union

This symbol on the product or on its packaging indicates that this product must not be disposed of with your other household waste. Instead, it is your responsibility to dispose of your waste equipment by handing it over to a designated collection point for the recycling of waste electrical and electronic equipment. The separate collection and recycling of your waste equipment at the time of disposal will help to conserve natural resources and ensure that it is recycled in a manner that protects human health and the environment. For more information about where you can drop off your waste equipment for recycling, please contact your local city office, your household waste disposal service or the shop where you purchased the product.
CE marking
The shipped version of this device complies with the requirements of EEC directives 2004/108/EC "Electromagnetic compatibility" and 2006/95/EC "Low voltage directive".

Declaration of RoHS Compliance
This product has been designed and manufactured in compliance with Directive 2002/95/EC of the European Parliament and the Council on restriction of the use of certain hazardous substances in electrical and electronic equipment (RoHS Directive) and is deemed to comply with the maximum concentration values issued by the European Technical Adaptation Committee (TAC) as shown below:
| Substance | Proposed Maximum Concentration | Actual Concentration |
| Lead (Pb) 0.1% < 0.1% | ||
| Mercury (Hg) 0.1% < 0.1% | ||
| Cadmium (Cd) 0.01% < 0.01% | ||
| Hexavalent Chromium (Cr6+) | 0.1% < 0.1% | |
| Polybrominated biphenyls(PBB) | 0.1% < 0.1% | |
| Polybrominated biphenyl ethers (PBDE) | 0.1% < 0.1% |
Certain components of products as stated above are exempted under the Annex of the RoHS Directives as noted below:
Examples of exempted components are:
- Mercury in compact fluorescent lamps not exceeding 5 mg per lamp and in other lamps not specifically mentioned in the Annex of RoHS Directive.
- Lead in glass of cathode ray tubes, electronic components, fluorescent tubes, and electronic ceramic parts (e.g. piezoelectronic devices).
- Lead in high temperature type solders (i.e. lead-based alloys containing 85% by weight or more lead).
- Lead as an allotting element in steel containing up to 0.35% lead by weight, aluminium containing up to 0.4% lead by weight and as a cooper alloy containing up to 4% lead by weight.
NOTIFICATION
Radio Frequency Interference Statement Warning:
These limits are designed to provide reasonable protection against harmful interference in a residential installation. This equipment generates uses and can radiate radio frequency energy and, if not installed and used in accordance with the instructions, may cause harmful interference to radio communications.
However, there is no guarantee that interference will not occur in a particular installation. If this equipment does cause harmful interference to radio or television reception, which can be determined by turning the equipment off and on, the user is encouraged to try to correct the interference by one or more of the following measures:
• Reorient or relocate the receiving antenna.
- Increase the separation between the equipment and receiver.
- Connect the equipment into an outlet on a circuit different from that to which the receiver is connected.
- Consult the dealer or an experienced radio/ TV technician for help.
For details concerning safety precautions, see "Important Safety Instructions" and "Important Usage Instructions" below.
Important Safety Information
1) Read these instructions.
2) Keep these instructions.
3) Heed all warnings.
4) Follow all instructions.
5) Do not use this apparatus near water.
6) Clean only with a dry cloth.
7) Do not block any of the ventilation openings. Install in accordance with the manufacturers instructions.
8 ) Do not install near any heat sources such as radiators, heat registers, stoves, or other apparatus (including amplifiers) that produce heat.
9) Do not defeat the safety purpose of the polarized or grounding type plug. A polarized plug has two blades with one wider than the other. A grounding type plug has two blades and third grounding prong. The wide blade or third prong is provided for your safety. When the provided plug does not fit into your outlet,
10) Protect the power cord from being walked on or pinched particularly at plugs, convenience receptacles, and the point where they exit from the apparatus.
11) Only use attachments/accessories specified by the manufacturer.
12) Use only with a cart, stand, tripod, bracket, or table specified by the manufacturer, or sold with the apparatus. When a cart is used, use caution when moving the cart/apparatus combination to avoid injury from tip-over.

13) Unplug this apparatus during lightning storms or when unused for long periods of time.
14) Refer all servicing to qualified service personnel. Servicing is required when the apparatus has been damaged in any way, such as power-supply cord or plug is damaged, liquid has been spilled or objects have fallen into apparatus, the apparatus has been exposed to rain or moisture, does not operate normally, or has been dropped.
15) If any liquid or solid object should fall inside the cabinet, unplug the TV immediately and have it checked by qualified service personnel before operating it further.
16) Avoid operating the TV at temperatures below 32°F (0°C).
17) If the TV is transported directly from a cold to a warm location, or if the room temperature changes suddenly, the picture may be blurred or show poor color due to moisture condensation. In this case, please wait a few hours to let the moisture evaporate before turning on the TV.
18) The apparatus must be connected to a mains socket outlet with a protected earthed connection.
19) The mains plug or appliance coupler is used as the disconnect device, the disconnect device shall remain readily operable.
20) When purchased or used in different countries, use an appropriate power cable which is compliant with local laws and regulations.
21) No naked flame sources, such as lighted candles, should be placed on the apparatus.
22) The device is not intended for use at visual display work places acc. BildscharbV.
srs
TruSurround HD
is a trademark of SRS Labs, Inc.
TruSurround HD technology is incorporated under license from SRS Labs, Inc.
SRS TruSurround HD ^™ creates an immersive, feature-rich surround sound experience from two speakers, complete with rich bass, high frequency detail and clear dialog.
Usage Instructions
Installation
Placement
It is recommended to watch the TV at a distance of 3 -7 times which of the screen height, and in moderate brightness. Watching the TV for too long or in a dark room may cause eye fatigue. To obtain a clear picture, do not expose the screen to direct illumination or direct sunlight. It is recommended to use spot lighting directed down from the ceiling or to cover the windows that face the screen with opaque drapery. It is desirable to install the TV in a room where the floor and walls are not of a reflective material.

To prevent the TV from toppling over and causing injury, take measurement to secure the TV to a wall or stand.
The TV should be installed near an easily accessible AC power outlet.
Observe the following in placing the TV. Otherwise the TV may fall from the stand or Wall-Mount, causing damage or serious injury.
- Place the TV on a stable, level surface.
- Do not hang anything on the TV. Do not allow children to climb on the TV.
- Do not install the TV in places subject to extreme temperatures, such as in direct sunlight, near a radiator, or near a heating vent or exposed to direct air conditioning.
- Never place the TV in hot, oily, humidor excessively dusty places.
- Do not install the TV where insects may enter.
- Do not install the TV where it may be exposed to mechanical vibration.
- Do not install the TV in a location where it may protrude, such as on or behind a pillar, or where you might bump your head on it. Otherwise, it may result in injury.
Outdoor Use
Do not install this TV outdoors. If the TV is exposed to rain, it may result in a fire or an electric shock. Do not expose the TV to direct sunlight, it may heat up and become damaged.
Wall-Mount
Wall-Mount installation requires the use of a Wall-Mount Bracket. When installing or removing the TV, using a Wall-Mount Bracket, be sure to use qualified contractors. If not properly secured during installation or removal from the Wall-Mount Bracket, the TV may fall and cause serious injury.
For use only with UL Listed Wall Mount Bracket with suitable weight/load.
Observe the following when installing the TV using a Wall-Mount bracket.
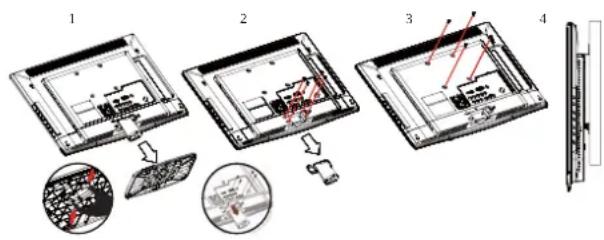
- Be sure to follow the operating instructions supplied with the Wall-Mount bracket when installing the TV.
- Be sure to attach the brackets supplied with the Wall-Mount bracket.
- Don't hang the TV from the ceiling. It may fall and cause serious injury.
AC Power Cable
- Use the AC power cord specified by AOC and suitable for the voltage where you use it.
- The plug is designed, for safety purposes, to fit into the wall outlet only one way. If you are unable to insert the plug fully into the outlet, contact your dealer.
- If you will not be using the TV for several days, disconnect the power by pulling the plug itself. Never pull on the cord.
- When disconnecting AC power cord, the power cord should be easily accessible for disconnection.
TV should be installed near an easily accessible power outlet. Do not use a poor fitting outlet. Insert the plug fully into the outlet. If it is loose, it may cause arcing and result in a fire. Contact your electrician to have the outlet changed.
Observe the followings to prevent the AC power cord from being damaged. If the AC power cord is damaged, it may result in a fire or an electric shock. Stop using it and ask your dealer or AOC service center to exchange it.
- Do not place the TV where the power cord is subject to wear or abuse.
- Do not pinch, bend, or twist the cord excessively. The core lines may be bared and cut, causing a short-circuit, and resulting in a fire or an electric shock.

- Do not convert or damage the power cord.
- Do not allow anything to rest on or roll over the power cord.
- Do not move the TV with the power cord plugged in.
- Keep the power cord away from heat sources.
• To unplug power cord, disconnect it from the wall outlet first. - Be sure to grasp the plug when disconnecting the power cord.
- Do not pull the power cord.
- Do not use the supplied AC power cord on any other equipment.
• Use only an original AOC AC power cord, not other brands.
LCD Screen
- Although the LCD screen is made with high-precision technology and has effective pixels of 99.99% or more, black dots or bright points of light (red, blue, or green) may appear constantly on the LCD screen. This is a structural property of the LCD panel and is not a malfunction.
-
The LCD screen is made with high-precision technology and to achieve a high level of performance and picture quality, this TV's backlight setting is set to maximize the brightness of the TV. However, uneven brightness may be observed when the LCD TV is viewed in a dark ambient without an input source or a blank screen. This condition is normal and not a malfunction of the TV. Changing the Picture mode, Backlight setting, enabling the Light Sensor, or turning on the Power management will improve this condition. In order to ensure long performance of your set and reduce the risk of screen burning, please observe the following precautions: 1) Does not display still image (still computer and video game images, logos, pictures, text and imagesdisplayed in 4:3) for extended periods of time; 2) Use a screen saver when using a computer.
-
Do not expose the LCD screen surface to direct sunlight. Doing so may damage the LCD panel.
- Do not push or scratch the LCD screen, or place objects on top of the TV. The image may be uneven or the LCD panel may be damaged.
- If the TV is used in a cold place, a smear may occur in the picture or the picture may become dark. This does not indicate a failure. These phenomena improve as the temperature rises.
- Ghosting may occur when still pictures are displayed continuously. It should disappear after a few moments.
- The screen and cabinet get warm when the TV is in use. This is not a malfunction.
- Avoid spraying insect repellent with volatile material on the screen.
- Avoid prolonged contact with rubber or plastic material.
Broken Pieces
Do not throw anything at the TV. The screen glass may break by the impact and cause serious injury.
If the surface of the TV cracks, do not touch it until you have unplugged the AC power cord. Otherwise electric shock may result.

Handling of broken glass and liquid crystal leakage
If the LCD panel gets damaged, crystalline liquid leakage may occur, or scattered broken glass may result. Do not touch broken glass or crystalline liquid which is toxic, with bare hands as cuts, poisoning or skin irritation may occur. Also, do not let glass fragments or leaked crystalline liquid get into your eyes or mouth. Should either contact your eyes or mouth, rinse the contacted area thoroughly with water and consult your doctor.
Wiring
When connecting cables, be sure to unplug the AC power cord for your safety. Take care not to catch your feet on the cables. It may damage the TV set.

Electric Shock
Do not touch the AC power cord or the TV with a wet hand. If you plug/unplug the AC power cord from the TV with a wet hand, it may cause electric shock.

Lightning Storms
For added protection for this TV during a lightning storm, or when it is left unattended and unused for long periods of time, unplug it from the wall outlet and disconnect the antenna. This will prevent damage to the TV due to lightning and power line surges.

When Not in Use
If you will not be using the TV set for several days, the TV set should be disconnected from the AC power outlet for environmental and safety reasons. The TV set is not disconnected from the AC power source when the TV set is switched off. To disconnect the TV set completely, pull the plug from the AC power outlet.

Overloading
This TV set is designed to operate on a 220\~240 V AC supply only. Take care not to connect too many appliances to the same AC power outlet as this could result in a fire or an electric shock.

Optional Equipment
Do not install optional equipment too close to the TV set. Keep optional equipment at least 11.875 inches (30 cm) away from the TV set. If a VCR is installed in front of the TV set or beside the TV set, the picture may become distorted. Picture distortion and/or noisy sound may occur if the TV set is positioned in close proximity to any equipment emitting electromagnetic radiation.

Small Accessories
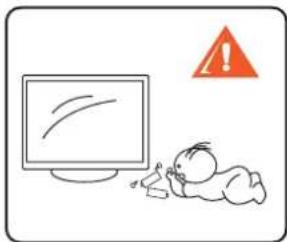
Keep small accessories out of children's reach.
natural_image
Illustration of a baby crawling under a computer monitor with a warning symbol (no text or labels)Antennas
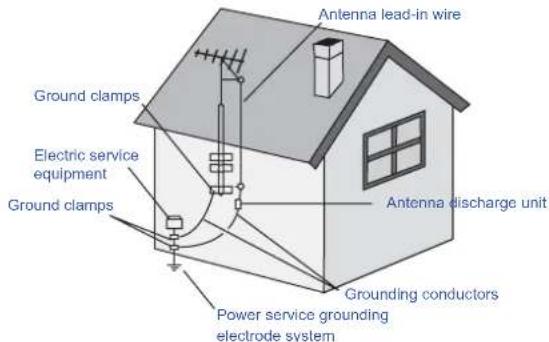
Outdoor antenna grounding
If you want to connect an outdoor antenna, please assure that it is grounded to avoid bolt damages. Please notice the regulation EN 50083-1 !!
Please avoid water drops or spray water, also don't put liquid filled cases (e.g. vases) next to the unit.
A permanent high volume for headphones or earphones may cause ear and eardrum damages. Please avoid turning up the volume too loud. The adjustment of the equalizer to the maximum also increases the volume.
Don't put things with open fire/flames, like e.g. candles, next to the unit.
Antenna lead-in wire
Batteries
• Do not dispose of batteries in a fire.
- Do not short circuit, disassemble or overheat the batteries.
- Danger of explosion if battery is incorrectly replaced. Replace only with the same or equivalent type.
- The batteries (batteries installed) shall not be exposed to excessive heat such as sunshine, fire or the like.
Disposal of used batteries
To preserve our environment, dispose of used batteries according to your local laws or regulations.

Cleaning
Cleaning the AC power plug
Unplug the AC power plug and clean it regularly. If the plug is covered with dust and it picks up moisture, its insulation may deteriorate and result in a fire.
Cleaning the screen surface/ cabinet of the TV set
• Unplug the AC power cord to avoid electric shock when cleaning.
- Clean the cabinet of the TV with a dry soft cloth. To remove dust from the screen, wipe it gently with a soft cloth. Stubborn stains
- may be removed with a cloth slightly dampened with a solution of mild soap and warm water. Never use strong solvents such as thinner or benzine for cleaning.
- If using a chemically pretreated cloth, please follow the instruction provided on the package.
- The ventilation holes can accumulate dust over time. To ensure proper ventilation, we recommend removing the dust periodically (once a month) using a vacuum cleaner.

Magnetic Influence
This TV contains a strong magnet in the speaker unit that generates a magnetic field. Keep any items susceptible to magnetic fields away from the speaker.

Sound
If a snapping or popping sound from the TV is continuous or frequent while the TV is operating, unplug the TV and consult your dealer or service technician. It is normal for some TV's to make occasional snapping or popping sounds, particularly when being turned on or off.

Carrying the TV
Carry the TV in the specified manner
To avoid dropping the TV and causing serious injury, be sure to follow these guidelines:
• Before carrying the TV, disconnect all cables.
• Carrying the large size TV requires two or more people.
- When you carry the TV, place your hand as illustrated and hold it securely. Do not put stress on the LCD panel.

natural_image
Two silhouettes of people holding a computer monitor (no text or symbols visible)- When lifting or moving the TV, hold it firmly from the bottom. Place your palm directly under the panel.

natural_image
Simple line drawing of a person sitting on a computer monitor (no text or symbols)- When carrying, do not subject the TV to shocks or vibration, or excessive force.
Ventilation
The slots and openings in the TV are provided for necessary ventilation. To ensure reliable operation of the TV and to protect it from overheating, these slots and openings must never be blocked or covered.
Unless proper ventilation is provided, the TV may gather dust and get dirty. For proper ventilation, observe the following:
- Do not install the TV face up, down or sideways.
- Do not install the TV turned over or upside down.
• Never cover the slots and openings with a cloth or other materials. - Never block the slots and openings by placing the TV on a bed, sofa, rug or other similar surface.
- Never place the TV in a confined space, such as a bookcase or built-in cabinet, unless proper ventilation is provided.
Leave some space around the TV set as shown below. Otherwise, air-circulation may be inadequate and will cause overheating, which may cause a fire or damage to the TV set.
Install on the wall
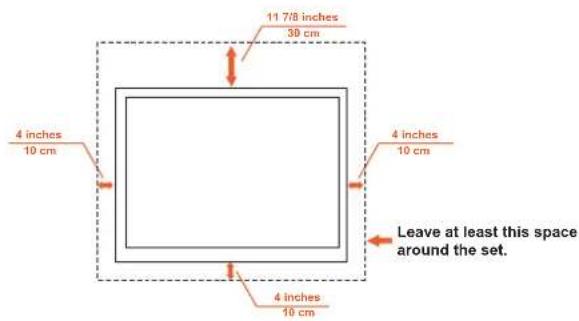
Installed with stand


Never install the TV set where Air circulation is blocked.
Objects and ventilation holes
Never push objects of any kind into the TV through the cabinet slots as they may touch dangerous voltage points or short out parts that could result in a fire or an electric shock. Do not place any objects on the TV.
Moisture
Moisture and flammable objects
- The TV must not be exposed to dripping or splashing. Do not place objects filled with liquids, such as vases, on the TV.
- Do not use power-line operated TV sets near water— for example, near a bathtub, washbowl, kitchen sink, or laundry tub, in a wet basement, or near a swimming pool, etc. It may result in a fire or an electric shock.
- Do not let this TV get wet. Never spill liquid of any kind on the TV. If any liquid or solid object does fall through, do not operate the TV. It may result in electric shock or damage to the TV. Have it checked immediately by qualified personnel.
• To prevent fire, keep flammable objects or open flame (e.g. candles) away from the TV.

natural_image
Illustration of a computer monitor with a water feature and a warning sign (no text or symbols on the diagram itself)Volume Adjustment
Adjust the volume so as not to trouble your neighbors. Sound carries very easily at night. Therefore, closing the windows or using headphones is suggested.
When using headphones, adjust the volume so as to avoid excessive levels, as hearing damage may result.
Servicing
Do not attempt to service the TV by yourself since opening the cabinet may expose you to dangerous voltage or other hazards. Refer all servicing to qualified service personnel.

natural_image
Illustration of a device with a lightning bolt and warning symbol (no text or labels)Replacement Parts
When replacement parts are required, be sure the service technician certifies in writing that he/she has used replacement parts specified by the manufacturer that have the same characteristics as the original parts.
Unauthorized substitutions may result in a fire, an electric shock or other hazards.
Safety Check
Upon completion of any service or repairs to the TV, ask the service technician to perform routine safety checks (as specified by the manufacturer) to determine that the TV is in safe operating condition, and to so certify. Ask a qualified service technician to dispose of the TV.
Thank you for purchasing this AOC high-definition television. The quality of the image you see on your AOC TV is only as good as the quality of the signal it receives.
Mobile telephone warning
To avoid disturbances in picture and sound, malfunctioning of your TV or even damage to the TV, keep away your mobile telephone from the TV.
End of life directive
We are paying a lot of attention to produce environmental friendly in green focal areas.
Your new receiver contains materials, which can be recycled and reused.
At the end of its life, specialized companies can dismantle the discarded receiver to concentrate the reusable materials and to minimize the amount of materials to be disposed of.
Please ensure you dispose of your old receiver according to local regulations.
Contents in the Box
After unpack the TV box, please check the TV and all accessories are well presented and undamaged.
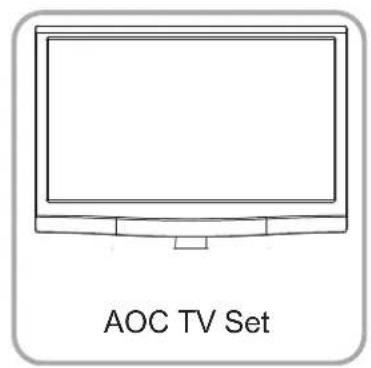
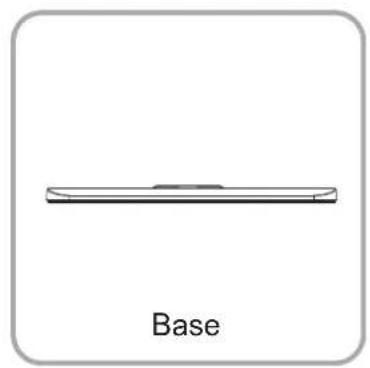

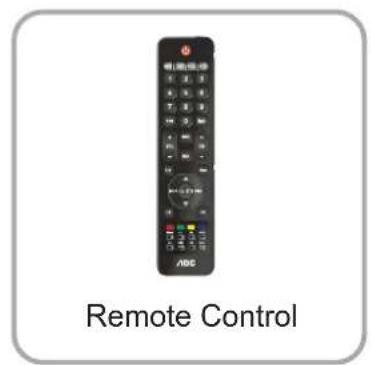



Controls & Connections:

| Volume + Volume - Channel ▲ Channel ▼ Menu Input Power | 1. VOL + Press to increase the sound volume level. |
| 2. VOL - Press to decrease the sound volume level. | |
| 3. CH ▲ Press to select the next higher program number. | |
| 4. CH ▼ Press to select the next lower program number. | |
| 5. MENU Press to open or exit the OSD (on-screen display) menu. | |
| 6. INPUT Press to select the input source. | |
| 7. Power Press to turn on / off (standby) the TV set. (Press to turn on TV after the power on status, LED had changed to Blue.) |
• LE19K097/LE22K097/LE24K097

• LC32K0D3D/LC42K0D3D
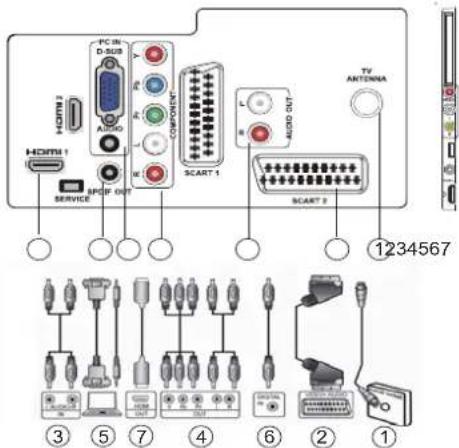
• LE32K0D7D/LE42K0D7D


| Item Description | |
| Headphone Jack | Connects to your headphones. If your headphones do not match the jack, use a suitable plug adapter (not supplied). While headphones are connected, the TV speakers are muted. |
| SPDIF(Coaxial Digital Audio Out) | Connect an external sound system with optical cable to the SPDIF out jack on the back of your TV to the SPDIF IN jack and to the amplifier or receiver. |
| AV IN 1(AV/S-VIDEO)/L-AUDIO-R | Connects to the COMPOSITE VIDEO output or S-Video output jack from your video equipment that has COMPOSITE or S-Video VIDEO, and audio (L/R) jacks can connect audio source to your TV. When connected, S-Video will take priority over Composite video (Yellow jack). |
| USB/Service Insert USB storage device to the USB port to view photos or listen to music. | |
| HDMI IN 1/2 | HDMI (High-Definition Multimedia Interface) provides an uncompressed, all-digital audio/video interface between this TV and any HDMI-equipped audio/video equipment, such as a set-top box, DVD player, Blu-ray Disc player, A/V receiver as well as PC. HDMI supports enhanced, or high-definition video, plus digital audio.If the equipment has a DVI jack and not an HDMI jack, connect the DVI jack to the HDMI IN (with DVI-to-HDMI cable or adapter) jack, and connect the audio jack to the PC AUDIO IN jacks of HDMI IN.DVI-to-HDMI cable DVI-to-HDMI adapterHDMI connection is necessary to view 480i, 480p, 720p, 1080i and 1080p formats.Be sure to use only an HDMI cable that bears the HDMI logo. (We do not supply DVI-HDMI cable and DVI-HDMI adapter and HD15-HD15 cable.) |
| PC IN (RGB/AUDIO) | Connects to a personal computer's video output connector using HD15-HD15 cable (analog RGB). Can also be connected to other analog RGB equipment. See "PC Input Signal Reference Chart" on page 15 for the signals that can be displayed.For some Apple Macintosh computers, it may be necessary to use an adapter (not supplied). If this is the case, connect the adapter to the computer before connecting the HD15-HD15 cable.If the picture is noisy, flickering or not clear, adjust Phase and Pitch of Screen settings. |
| Component IN 1/(1080p/1080i/720p/480p/480i)/L-AUDIO-R | Connects to your TV's component video (YPbPr) and audio (L/R) jacks. Component video provides better picture quality than the S-VIDEO or the composite video connections. Component video (YPbPr) connection is necessary to view 480i, 480p, 720p, 1080i and 1080p formats. |
| VHF/UHF/Cable Input | RF (Radio Frequency or modulated signal design used as the carrier for television broadcasts.) input that connects to your Cable or VHF/UHF antenna. |
* SPDIF
Sony/Philips Digital Interconnect Format. S/PDIF is mostly used to transmit compressed multichannel audio from a media player to an amplifier/receiver.
Set-Up
Inserting Batteries into the Remote control
Insert two size AAA batteries (supplied) to the diagram inside the battery compartment of the remote control.

natural_image
Diagram showing three battery cells with red arrows indicating direction, no text or symbols presentAttaching the Base
IMPORTANT: The Base of the AOC LCD TV must be assembled prior to usage.
- Place the TV set facing down on a soft and flat surface (blanket, foam, cloth, etc.) to prevent any damage to TV set.
- Carefully align and insert the Base to the stand
- Insert the screws to the bottom of the base and use them to tighten the base to the stand.
- Please refer to the "Important Usage instructions" in the above.

Wall-Mounting
Please install on a wall by using a Wall-Mount Bracket (sold separately). Before mounting the TV on a wall, the Table-Top Stand must be removed from the TV. Follow the simple steps below to remove the Table-Top Stand:
- Disconnect all the cables from the TV.
- Gently lay the TV, face down, onto a level and stable surface covered with a thick and soft cloth. Make sure the Table-Top Stand is hanging over the edge.
- Remove the screws as shown in the illustration for your model and pull the Table-Top Stand out.
- Do not remove any other screws from the TV.
- Do not remove the Table-Top Stand for any reason other than to Wall-Mount the TV.
- Be sure to store the removed screws and Table-Top Stand in a safe place until you are ready to reattach the Table-Top Stand. Keep the screws away from small children.
- For bracket installation, refer to the instruction guide provided by the Wall-Mount Bracket model for your TV. Sufficient expertise is required in installing this TV, especially to determine the strength of the wall for withstanding the TV's weight.
- For product protection and safety reasons, AOC strongly recommends that you use the Wall-Mount Bracket model designed for your TV and the Wall-Mounting of your TV should be performed by AOC dealer or licensed contractor.

Note: 200 mm x 200 mm wall mount bracket & M4 screws are not included. Please contact your local distributor.
PC Input Signal Reference Chart
After connecting the PC to the TV, set the output signal from the PC according to the chart below.
| Presetting PC Mode | |||
| Standard | Resolution | Refresh Rate (Hz) | |
| VESA 640 x 480 60 | |||
| VESA 800 x 600 60 | |||
| VESA 1024 x 768 60 | |||
| VESA 1360 x 768 60 | |||
| VESA 1920 x 1080(FHD Model) 60 | |||
Video Input Signal Reference Chart
After connecting the video input to the TV, set the output signal from the video input according to the chart below.
| Presetting Video Mode | |||
| Standard | Resolution | Refresh Rate (Hz) | |
| SD 480i 60 | |||
| SD 480P 60 | |||
| SD 576i 50 | |||
| SD 576P 50 | |||
| HD 720P 50 | |||
| HD 720P 60 | |||
| HD 1080i 50 | |||
| HD 1080i 60 | |||
| FHD | 1080p | 50 | |
| FHD | 1080p | 60 | |
Standard Definition Interface
You can also enjoy traditional program by using a DVD player or VCR Player. Connect this equipment to your TV via the Composite Input or S-Video Input on the back of your TV.
Refer to the Quick Setup Guide (supplied) when connecting other equipment to your TV.
USING AOC TV
Buttons located at the right side of the TV will operate the same as these buttons on the remote control.
 | Button Description | ||
 | POWER Press to turn on and off the TV. | ||
 | Back | Press to go back to the previous TV channel or exit from the OSD when displaying menu items and settings. | |
 | 0-9 Press 0-9 to select a channel; the channel changes after two seconds. | ||
 | EPG Press this key to display electronic program guide in TV mode.. | ||
 | VOL +/- Press to adjust the volume. | ||
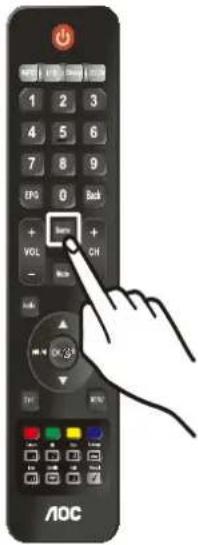
 | Source | Press to display the list of External Inputs. Press repeatedly to toggle through the inputs. | |
 | Mute Press to mute the sound. Press again or press VOL+ to restore the sound. | ||
 | CH +/- | Press to scan through channels. To scan quickly through channels, press and hold down either + or -. | |
 | ▲/▼/▼/▼ | Move left, up, down or right to select the available option or adjust the setting in OSD menu. | |
| ### | Press to confirm the selected item or setting. | ||
 | MENU | Press to display or close a list of convenient functions and menu shortcuts. The OSD (On Screen Display) menu items vary based on input and content. | |
 | ZOOM | Press repeatedly to step through the Wide Mode settings: Wide Zoom, Normal, Full, Zoom. The Wide Mode settings can be also accessed in the Screen settings. | |
 | INFO Press to add channel to Favorite List. | ||
 | Picture | Press repeatedly to cycle through the available picture modes: Vivid, Standard, Mild. The picture modes can also be accessed in the Picture settings. For details, see Picture settings on section Using TV Features.. | |
 | Audio | Press repeatedly to cycle through the available sound modes: POP, Standard, Dance, Live, and Club. The sound modes can also be accessed in the Sound settings. For details, see page 24.. | |
 | Sleep | Press repeatedly to cycle through the available sleep timer, 0~120 minutes. The Sleep Timer can also be set in the OSD settings. For details, see OSD settings on section Using TV Features. | |
 | To use the four colored buttons, you can access Teletext in the corresponding item or page color instructions. | ||
 | Teletext Press to turn On / off Teletext. | ||
 | Mix Press to mixed display TV content and television content.. | ||
 | Size | Press this button to change the font size: Full screen, Top half and Bottom half. | |
 | Subpage Press to Open the sub-page of teletext | ||
 | Index Press to back to the index page of teletext. | ||
 | Subtitle | In TV mode: Press to turn the subtitle on or off In Text mode: Press it to select the next page marked as a subtitle page and request it as the display page. | |
 | Hold | Press to freeze the current page of teletext. | |
 | Reveal | Press to show additional information of teletext. | |
Sleep
You can set a time period for which the TV will be turned off automatically.
Turning the TV On and Off
You can turn on the TV by using power switch button on the TV set or on the remote controller.
![Initial Setup Welcome to use the Wizard for Initial Setup!! Please press [OK] to start the wizard. WELCOME! OK Next](/content/2026/05/792620/images/5e1f3cabe4e7f55a612533f96df7f5e9e4133b3c34ad03e60c86ded72bf0fb48.jpg)
Initial Setting
When you first start up this AOC LCD TV set, please follow the Initial Wizard to your AOC LCD TV.
1. Selecting Language.
Select your language: English, Deutsch, Français, Italiano, Español, Português, Nederlands.
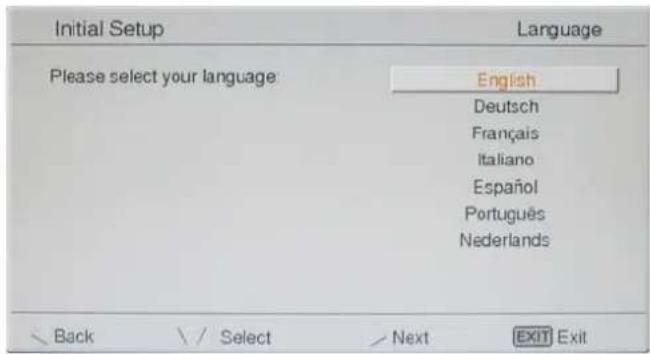

Press ▲/▼ to select "Language", and press OK.
2. Selecting your country.


Press ▲/▼ to select your country.
3. Selecting your mode.


Press ▲/▼/◄/► to select "Home or Shop" mode then press OK.
4. Selecting your scan mode.


Press ▲/▼ to select "ATV Only or ATV and DTV" then press "OK"
5. Initial Setup Completed
![Initial Setup Completed Congratulations!! Completed Initial Setup. Please press [OK] to exit the wizard. \ Back](/content/2026/05/792620/images/dad4c622490b3f84b5058d98c6c6f3cc4351782580ac6df508dd42e5c03ead34.jpg)
Switching Input Source
On AOC TV, you can cpress "Source" to choose the signal source on the display menu.

| 1 | Press Source to call out source menu. | |
| 2 | Press ▲/▼ to select input source: TV, YPbPr,AV,SCART,PC,HDMI 1. | |
| 3 | Press OK to enter. | |
Adjust Picture Setting

| 1 Press MENU to call out MENU. | ||
| 2 |  | Press ▲/▼ to select "Picture" and press OK. |
| 3 |  | Press ▲/▼ to select Video Settings: Picture Mode, Brightness, Contrast, Sharpness, Color, Tint, Color temp, Noise reduction, Adaptive Contrast, DCR, Backlight, Aspect Ratio, Preset, and press OK to enter. |
| 4 |  | Press ◀/► to adjust. |
| 5 |  | Press MENU again to exit. |
| Picture Setting Items Description | ||
| Picture Mode | Vivid For Enhances picture contrast and sharpness. | |
| Standard For standard picture settings. Recommended for home entertainment. | ||
| Eco Decrease backlight level to save the power consumption. | ||
| Movie For viewing film-based content. Most suitable for viewing in a theater-like environment. | ||
| Preset for all inputs can also be accessed by pressing Picture on the remote control to directly toggle the modes. | ||
| Brightness Brightens or darkens the picture. | ||
| Contrast Increases or decreases picture contrast. | ||
| Colour | Increases or decreases colour saturation. | |
| Sharpness | Sharpens or softens the picture. | |
| Colour temp. | Cool Gives the white colors a bluish tint. | |
| Warm Gives the white colors a reddish tint. | ||
| Standard Gives the white color a nature tint. | ||
| Advanced Control | Noise Reduction | Gives four NR effect degrees, such as: Low, Mid, High and Off. The default setting is Mid. |
| DCR | Dynamic Contrast Ratio (DCR) auto adjusts the backlight of the screen. | |
| Backlight | Backlight strength adjustment, the tuning range is 0 ~ 30. | |
Adjust Sound Setting

1 Press I  fill out MENU. fill out MENU. | ||
| 2 |  | Press ▲/▼ to select "Sound" and press OK. |
| 3 |  | Press ▲/▼ to select Audio Settings: Sound mode, Bass, Treble, Balance, Audio Source, Audio language, SPDIF, Speaker, AVL, Preset, and press OK to enter. |
| 4 |  | Press ◀/► to adjust. |
| 5 |  | Press MENU again to exit. |
| Audio Setting Items Description | |
| Sound Mode | Music: Enhances treble and bass. |
| Speech: Enhances treble and keep bass in middle. | |
| Personal: Adjust sound mode as personal favorite. | |
| Sound Mode can also be accessed by pressing Audio on the remote control. | |
| Bass Increases or decreases lower-pitched sounds. | |
| Treble Increases or decreases higher-pitched sounds. | |
| Balance Emphasizes left or right speaker balance. | |
| Audio Source | Select the audio source from Mono, Stereo, or Dual 1 & Dual 2. (This function works in ATV only.) |
| SPDIF | Digital audio output format. Select from RAW and PCM. The difference between SPDIF PCM or RAW:SPDIF PCM: It will only output as a PCM 44.1Khz digital no matter what the recording is in the media.SPDIF RAW: It will output the stream as it is digitally recorded, i.e. DTS recording as a DTS or a Dolby as a Dolby, or a native 48 or 96Khz. |
| Speaker | Choose to turn on / off the TV internal speaker. The digital audio output signals and earphone output signals will not be turned off even though the TV speaker is off. The default setting is On. |
| AVL Enable or disable Automatic Volume Level. | |
| Preset Restore the default audio settings. | |
OSD Manual Setting
Channel Search


1 Press  call out MENU. call out MENU. | ||
| 2 |  | Press ▲/▼ to select “TV” and press OK. |
| 3 |  | Press ▲/▼ to select “Channels”, and then press OK. |
| Menu Description | |
| Country | To select the relevant country. This is the country you are in, or the country whose channels you want to receive if you live near its borders. |
| Channels | Enter the channels submenu, and choose from Channel Scan, Update Scan, Single RF Scan, Analog Manual Scan, Channel Skip, Channel Sort, Channel Edit, Decoder, and Analog CH Fine Tune.Channel scanChannel Scan will re-tune the television automatically. It is recommended to run the Channel Scan periodically to ensure that all new services are added.Update scanSearch the new channels automatically that are not in the channel list.Single RF Scan (Digital Only)Enter the Single RF Scan in the Channels submenu to scan digital channels.Analog Manual ScanThe television can be tuned-in manually using Analog Manual Scan. Use the number keys to enter the Start Frequency to scan up or scan down.Channel skipTo prevent certain programs from being viewed by pressing CH + / - buttons on the remote control, the program position can be skipped.Tip: The skipped program may not be found by pressing CH + / - buttons but can be access by pressing number buttons directly.Channel sortChange the order of the Channel List.Channel EditEnter the Channel Edit in the channels submenu to edit the channel number and channel name by using the number buttons 0~9.Decoder (Analog only)Channel Decode support the Canal+ (paid television channel); however, the channel also broadcast some un-encrypted programs. These programs without encryption can be viewed free of charge.Analog CH Fine TuneSelect Analog CH Fine Tune in the Channels submenu to adjust the frequency. |
Features Setup

| 1 | Press M  T to call T to call | out MENU. |
| 2 | Press ▲/▼ to select "Feature", and press OK. | |
| 3 | Press ▲/▼ to select Setting items: Menu language, Time, Sleep timer, Transparency, Password Setting, Parental control, Closed Captions, Analog Caption, etc. and press OK to enter. | |
| 4 | Press ◀/► to adjust. | |
| 5 | Press MENU/EXIT again to exit. |
| Menu Description | |
| Menu Language To select the on-screen display menu language. | |
| Picture Format | To select the available display format from Auto, Normal, Wide, Zoom 1, or Zoom2. |
| Time | Time ZoneTo select the time zone you are in.TimeTo set the time and date or select auto synchronization.Tip: Before you want to set the time and date by your own, please make sureAuto synchronization is Off.Sleep TimerTo set the TV to turn itself off within a certain time. |
| Subtitle | Analog SubtitleTo display the transmitted subtitle on the screen. Either this text can be permanently displayed (assuming that the service is available in the broadcast) or only when mute is active.Subtitle TypeTo choose the subtitle type from normal or hearing impaired. |
| Teletext Language | Digital Teletext LanguageTo select the teletext language_DEcode Page LanguageTo set the teletext language to the regional location. |
| Common Interface This menu appears with your CI supplier information. | |
| HDMI Scan Info(HDMI only) | AutomaticSet to underscan or overscan automatically when the video signal is detected.UnderscanWhen the video signal is detected, all active pixels and lines are displayed with or without border.OverscanWhen the video signal is detected, some active pixels and lines at the edges are not displayed. |
| Reset Default To reset all TV settings to the original factory values. | |
Troubleshooting
| Condition Explanation / Solution | |
| No picture | |
| No picture Check the Power Saving | settings. |
| Cannot receive any channels | Make sure the power cord is connected securely. Turn on the power of the TV.Check antenna/cable connections. Make sure the Cable setting is correct for your TV signal source. |
| TV is locked to one channel Perform | Auto Program to add receivable channels that are not present in the TV's memory. |
| Cannot receive or select | Perform Auto Program to add receivable channels that are not present in the channels TV's memory.To receive or select cable channels, make sure that Cable in the Channel settings is set to On. To receive or select UHF channels over an antenna, make sure Cable is set to Off. |
| The TV turns off | Check if Sleep Timer is activated, or confirm the Duration setting of Timer automatically.Check PC Power Management in General Settings. |
| No picture from some video | Check the connection between the optional video equipment and the TV Sources.Press INPUT on the remote control.Select your desired input from the External Inputs list. |
| Poor picture | |
| The quality of the images is not as good as what I saw at the store | Picture quality depends on the signal content. See Quick Setup Guide (supplied) to display the best possible picture for that signal. |
| Double images or ghosts | Check antenna/cable connections.Check the antenna location and direction. |
| Only snow and noise appear on the screen | Check if the antenna is broken or bent; Check if the antenna has reached the end of its serviceable life.(3-5 years in normal use, 1-2 years at the seaside.) |
| Dotted lines or stripes | Keep the TV away from noise sources such as cars, motorcycles, or hair-dryers.If using 300 ohm twin lead, move the excess lead away from the TV or try using 75 ohm coaxial cable instead. |
| No color/Dark picture/Color is not correct/The picture is too bright | Press PICTURE to select the desired Picture Mode; Adjust the Picture Mode options in the Picture settings. |
| Noisy picture | Make sure that the antenna is connected using a 75-ohm coaxial cable.Keep the antenna cable away from other connecting cords.To avoid TV interference, make sure to use an undamaged antenna cable. |
| No sound/Noisy sound | |
| Good picture, no sound | Check the volume control. Press MUTE or VOL + so that  disappears from the screen.Disconnect your headphones.For HDMI equipment, confirm that the audio output setting of the connected equipment is set to PCM.This TV's HDMI inputs support PCM 32, 44.1 and 48 kHz, 16, 20 and 24bits. disappears from the screen.Disconnect your headphones.For HDMI equipment, confirm that the audio output setting of the connected equipment is set to PCM.This TV's HDMI inputs support PCM 32, 44.1 and 48 kHz, 16, 20 and 24bits. |
| Audio noise | Make sure that the antenna is connected using a 75-ohm coaxial cable.Keep the antenna cable away from other connecting cords.To avoid TV interference, make sure to use an undamaged antenna cable. |
| PC Input | |
| No Picture / No Signal | Confirm the PC is correctly connected to the TV with either the PC IN (with an HD15 cable) or with the HDMI IN.Ensure the output signal from the PC is one of the formats listed on page 18.Turn the PC off. Confirm the PC connection and restart the PC. Plug and play will auto-detect the TV and correctly set up PC timing.Verify PC Power Management is activated. |
| Poor Picture Adjust the resolution. | Adjust Pitch and Phase. |
| Wide Mode changes automatically | The current Wide Mode setting is automatically replaced with the 4:3Default setting when you change the channel or video input, if 4:3 Default in the Screen settings is set to other than Off. If you want to lock in Wide Mode selected with WIDE on the remote control, set 4:3Default to Off in the Screen settings.Check the Auto Wide option in the Screen settings. |
| Suddenly the picture gets smaller | The picture gets smaller during the commercials, this is due to the method the provider broadcasts their contents. When HD content channels switch to SD definition content (commercials), the picture may be small with a black border. |
| "Black box" on screen | You have selected a text option and no text is available. To turn off this feature, set the CC Display option to Off. If you were trying to select closed captioning, select CC1 instead of Text1-4. |
| Black bands appear at the edges of the screen | Some wide screen programs are filmed in aspect ratios that are greater than 16:9 (this is especially common with theatrical releases). Your TV will show these programs with black bands at the top and bottom of the screen. For more details, check the documentation that came with your DVD (or contact your program provider). Programs in 4:3 aspect ratio will have bands on left and right sides of the screen. |
| Condition Explanation / Solution | |
| PC Input | |
| Certain programs on DVD or other digital sources display a loss of detail, especially during fast-motion or dark scenes | This is due to the digital compression of the source content used by certain digital broadcasts and DVDs which may cause your TV's screen to display less detail than usual, or cause artifacts (small blocks or dots, pixilation) to appear on your screen. These signal compressions are more visible and are dependent on the clarity and resolution of the television. |
| Remote control does not operate | Check the polarity of the batteries or replace the batteries.Point the remote control at the remote control sensor located at the front of the TV.Fluorescent lamps can interfere with your remote control operation; try turning off the fluorescent lamps.Keep the remote control sensor area clear from obstacles. |
Dimensions & Specifications
| Model LE19K097 LE22K097 | LE24K097 | ||
| Screen Size 18.5" diagonal 2 | 1.5" diagonal 23.6" diagonal | ||
| Resolution 1366 x 768 1920 | x 1080 1920 x 1080 | ||
| OSD Language | Bulgarian, Croatian, Czech, Danish, Dutch, English, Finnish, French, Gaeilge, German, Greek, Hungarian, Italian, Norwegian, Polish, Portuguese, Rumanian, Russian, Serbian, Slovakian, Slovenian, Spanish, Swedish, Turkish, Latvian, Estonian, Lithuanian, Ukrainian | ||
| View Angle 160°(H)/150°(V) | |||
| Brightness 250 cd/m | ^2 | 250 cd/ m^2 | 300 cd/ m^2 |
| Video System | PAL/SECAM/DVBT | ||
| Audio System | B/G, D/K, I, LL' B/G, D/K, I, LL' B/G, D/K, I, LL' | ||
| Speaker Output 3W x 2 3W x 2 | 3W x 2 | ||
| Rear Connectors | Tuner InputPC IN: D-SUB & PC AudioComponent Video & L/R Audio InputSCARTSPDIF OutputHDMI | ||
| Side Connectors | COMMON INTERFACEAV InEarphone OutputHDMIUSB | ||
| Input Voltage | 220-240V, 50/60Hz | ||
| Power consumption | ≤30W | ≤35W | ≤35W |
| Standby Power Consumption | ≤0.5W | ||
| Set Dimension(W x H x D)(with base and stand)(mm) | 459 x 356 x 150 | 527 x 395 x 150 | 571 x 420 x 160 |
| Set Dimension(W x H x D)(w/o base and stand)(mm) | 459 x 323 x 38 | 527 x 361 x 39 | 571 x 406 x 40 |
| Net Weight (Kg) | 4 | 4 | 5.5 |
| Mounting Hole Space | 100 x 100mm | ||
| Operation Temperature | 0°C~35°C | ||
| USB Photo/Music/Video Supported Formats | Picture | JPEG | Baseline Progressive |
| Audio | MP3 | MPEG1 Layer 3 | |
| Video | MPEG1 | VOB, MPG | |
| MPEG4 | AVI, MP4 | ||
| Realmedia | RM | ||
| Model LE32K0D7D LE42K0D7D LC32K0D3D LC42K0D3D | ||||
| Screen Size 32" diagonal 42" diagonal 32" diagonal 42" diagonal | ||||
| Resolution 1920 x 1080 | ||||
| OSD Language | Bulgarian, Croatian, Czech, Danish, Dutch, English, Finnish, French, Gaeilge, German, Greek, Hungarian, Italian, Norwegian, Polish, Portuguese, Rumanian, Russian, Serbian, Slovakian, Slovenian, Spanish, Swedish, Turkish, Latvian, Estonian, Lithuanian, Ukrainian | |||
| View Angle 178°(H)/178°(V) | ||||
| Brightness 450 cd/m | ^2 | 450 cd/ m^2 | 450 cd/ m^2 | 500 cd/ m^2 |
| Video System PAL/SECAM/DVBT/DVBC | ||||
| Audio System B/G, D/K, I, LL' | B/G, D/K, I, LL' B/G, D/K, I, LL' B/G, D/K, I, LL' | |||
| Speaker Output 10W x 2 | Speaker: 8W x 2Woofer: 10W | 10W x 2 | 10W x 2 | |
| Rear Connectors | Tuner InputPC IN: D-SUB & PC AudioComponent Video & L/R Audio InputSCARTSPDIF OutputHDMI | |||
| Side Connectors | COMMON INTERFACEAV InEarphone OutputHDMIUSB | |||
| Input Voltage | 220-240V, 50/60Hz | |||
| Power consumption | ≤95W | ≤115W | ≤115W | ≤200W |
| Standby Power Consumption | ≤0.5W | |||
| Set Dimension (W x H x D)(with base and stand)(mm) | 775 x 563 x 210 | 1005 x 693 x 230 | 779 x 553 x 251 | 1011 x 698 x 278 |
| Set Dimension (W x H x D)(w/o base and stand)(mm) | 775 x 521 x 46 | 1005 x 651 x 46 | 779 x 553 x 98 | 1011 x 650 x 108 |
| Net Weight (Kg) | 10.5 | 19 | 12 | 20 |
| Wall Mount Size | 200 x 100mm | 200 x 200mm | 200 x 200mm | 400 x 200mm |
| Operation Temperature | 0°C~35°C | |||
| USB Photo/Music/Video Supported Formats | Picture | JPEG | Baseline Progressive | |
| Audio | MP3 | MPEG1 Layer 3 | 8~48 KHz8~576 Kbps Mono/Stereo | |
| Video | MPEG1 | VOB, MPG | MPEG-1 Video | |
| MPEG4 | AVI, MP4 | XVID/MPEG-4 | ||
| Realmedia RM | Real | Video 8/9/10 | ||
Caution:
AOC is not responsible if the USB storage device is not supported, nor is it responsible for damage or loss of data from the device.
Tips:
- If can't detect the connected device, it would be caused by the connected device driver not by TV failure.
- The reading speed will be variable due to the different connected devices and different storage capacities.
- Sometimes it can't detect the device because the connected device can't meet with the standard USB spec requirement (5V /500 mA).
- It can't support all the below formats due to some source files decoding issues. It's not caused by TV failure.
- USB port could be also used as software upgrade.



- Table of Contents
- IMPORTANT INFORMATION....3
- IMPORTANT SAFETY INFORMATION....3
- USAGE INSTRUCTIONS....4
- CONTENTS IN THE BOX 9
- CONTROLS & CONNECTIONS: 9
- SET-UP 11
- PC INPUT SIGNAL REFERENCE CHART 12
- VIDEO INPUT SIGNAL REFERENCE CHART 12
- USING AOC TV....13
- TROUBLESHOOTING 20
- DIMENSIONS & SPECIFICATIONS 21
- Important Information
- WARNING
- CAUTION
- Disposal of Waste Equipment by Users in Private Household in the European Union
- CE marking
- Declaration of RoHS Compliance
- NOTIFICATION
- Radio Frequency Interference Statement Warning:
- Important Safety Information
- srs
- Usage Instructions
- Installation
- AC Power Cable
- LCD Screen
- Broken Pieces
- Handling of broken glass and liquid crystal leakage
- Wiring
- Electric Shock
- Lightning Storms
- When Not in Use
- Overloading
- Optional Equipment
- Small Accessories
- Antennas
- Outdoor antenna grounding
- Batteries
- Disposal of used batteries
- Cleaning
- Cleaning the AC power plug
- Cleaning the screen surface/ cabinet of the TV set
- Magnetic Influence
- Sound
- Carrying the TV
- Carry the TV in the specified manner
- Ventilation
- Install on the wall
- Objects and ventilation holes
- Moisture
- Moisture and flammable objects
- Volume Adjustment
- Servicing
- Replacement Parts
- Safety Check
- Mobile telephone warning
- End of life directive
- Contents in the Box
- Controls & Connections:
- Set-Up
- Inserting Batteries into the Remote control
- Attaching the Base
- Wall-Mounting
- PC Input Signal Reference Chart
- Video Input Signal Reference Chart
- Standard Definition Interface
- USING AOC TV
- Sleep
- Turning the TV On and Off
- Initial Setting
- Selecting Language.
- Selecting your country.
- Selecting your mode.
- Selecting your scan mode.
- Initial Setup Completed
- Switching Input Source
- Adjust Picture Setting
- Adjust Sound Setting
- OSD Manual Setting
- Features Setup
- Caution:
- Tips:
Brand : AOC
Model : LC32K0D3D
Category : Television