DF-710 - Digital photo frame WayteQ - Free user manual and instructions
Find the device manual for free DF-710 WayteQ in PDF.


| Product Type | Digital Photo Frame |
| Brand | WayteQ |
| Model | DF-710 |
| Screen Size | 7 inches |
| Resolution | 800 x 480 pixels |
| Display Type | TFT LCD |
| Dimensions (W x H x D) | 200 x 150 x 20 mm |
| Weight | 300 g |
| Power Supply | DC 5V, 1A via USB or AC adapter |
| Supported Memory Cards | SD, SDHC, MMC (up to 32 GB) |
| USB Port | USB 2.0 for flash drives and PC connection |
| Photo Formats | JPEG, BMP, PNG |
| Video Playback | AVI, MPEG, MOV (limited resolution) |
| Audio Playback | MP3 |
| Functions | Slideshow, Calendar, Clock, Interval settings |
| Maintenance | Clean with a soft, dry cloth; avoid liquids |
| Safety Precautions | Keep away from water and extreme temperatures |
| Spare Parts | Power adapter available separately |
| Repairability | Not user-serviceable; contact support for repairs |
| General Information | Designed for personal photo display at home or office |
Frequently Asked Questions - DF-710 WayteQ
User questions about DF-710 WayteQ
0 question about this device. Answer the ones you know or ask your own.
Ask a new question about this device
Download the instructions for your Digital photo frame in PDF format for free! Find your manual DF-710 - WayteQ and take your electronic device back in hand. On this page are published all the documents necessary for the use of your device. DF-710 by WayteQ.
USER MANUAL DF-710 WayteQ
natural_image
Digital tablet displaying a blooming yellow lily flower against a blue sky background (no text or symbols visible)Bevezetés
natural_image
Illustration of a hair dryer connected to a cable, with two framed pictures in the background (no text or symbols visible)Használati utasítás
Távvezérlő
Üzembehelyezés
natural_image
Three circular images showing a camera, a small electronic device with a chip, and a photo of a person in a mirror (no visible text or symbols)Gombok
DF1040 típusnál:
natural_image
Three icons on a blue gradient background: USB eraser, gear, and calendar (no text or symbols)natural_image
Four icons (camera, music note, film reel, file) arranged in a row against a blue gradient background, with floating water droplets (no text or symbols)natural_image
Interior view of a warehouse with stacked wooden crates and overhead metal beams (no visible text or symbols)natural_image
Illustration of four electronic devices (camera, film reel, film reel, file) arranged in a row against a blue gradient background, with no text or symbols present.natural_image
Aerial view of a greenish water body surrounded by dense foliage, captured in a park setting with no visible text or symbols.natural_image
Illustration of four electronic devices (camera, vinyl record, film reel, file) arranged in a row against a blue gradient background, with floating numbers below (no text or symbols on devices)natural_image
Illustration of four electronic devices (camera, CD/DVD, film reel, file) arranged in a row against a blue gradient background, with floating numbers below (no text or symbols on devices)DIGITAL PICTURE FRAME
USER'S MANUAL
natural_image
Black tablet displaying a blooming yellow lily flower against a blue sky background (no text or symbols visible)Introduction
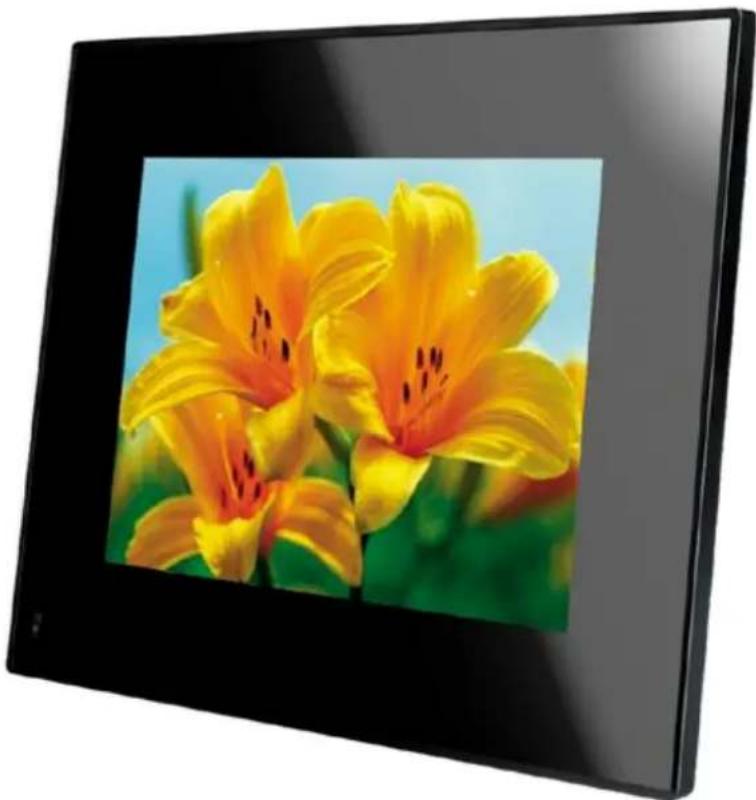
Congratulations on your purchase of WayteQ Digital Picture Frame.
Before operating the unit, please read this manual thoroughly, and retain it for future reference.
This Digital Picture Frame lets you view digital pictures directly from your camera's memory cards. You will be able to create a slideshow using multiple transition effects or display one picture at a time. No computer, digital camera or Internet connection is required.
Main Features
This Digital Picture Frame is compatible with the following popular memory card formats: SD ^™ , , MultiMediaCard ^™ , and Memory Stick ^® .
It can also read files stored on a USB Flash drive using the USB host port.
- Displays digital pictures (JPEG) without a computer
- Simply insert a compatible memory card into the Digital Picture Frame to show photos, play MP3 music or supported video files
- Instantly plays MP3 music with the integrated speakers.
- Instantly plays MPEG1, MPEG2, plays MPEG4 files(AVI/DIVX) files stored on supported memory cards*.
• Supports up to 12 Mega Pixels image files (JPEG format). - Includes a credit card style remote control
• Automatic slide show with multiple transition effects. - Plays slide show with MP3 music on the background.
- User-friendly on-screen display lets you access all controls easily.
*Video files may not play properly if stored on a low speed card.
Package Contents
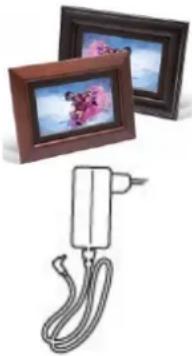
Digital Picture Frame
AC/DC Adapter
USB Cable
natural_image
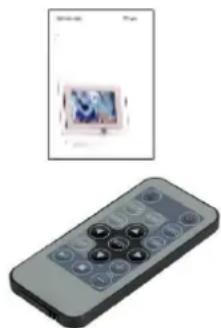
Illustration of a handheld electronic device connected to two framed pictures (no text or symbols visible)User Manual
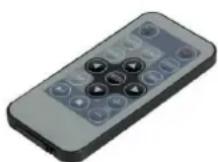
Remote control
natural_image
Exterior view of a remote control with a small image on the right (no visible text or symbols)Installing your unit
Open the package and remove the protective foam sleeve from the unit. Install the Digital Picture Frame stand as the back of the unit. Plug in the AC adapter into power outlet. Plug the other end into the unit. Insert the media into the correct slot. Turn power to ON position via the ON/OFF switch.
Connecting to a PC
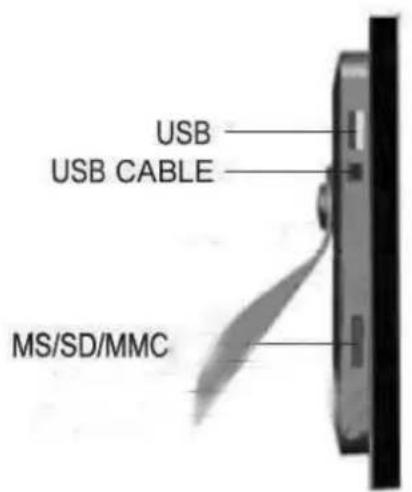
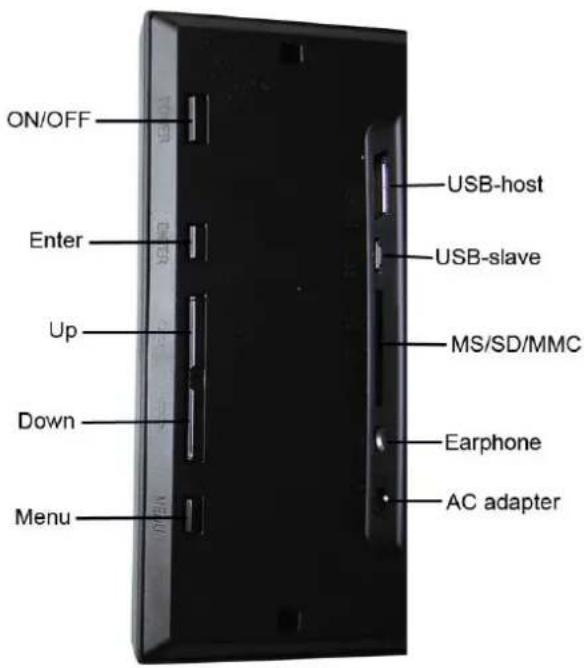
The Digital Picture Frame has a USB port for connection to a PC (USB Slave) and a second USB port for connection to other devices such as a Flash Drive, USB card reader, or a camera (USB Host). When connected to the PC you can drag-and-drop content from the PC to the memory card.
NOTE: USB Slave and USB Host can not be used at the same time.
Operation
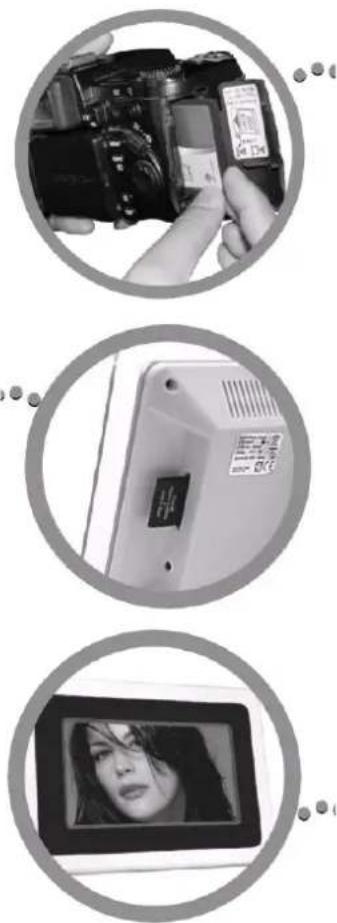
This Digital Frame is extremely easy to operate:
-
Remove memory card from camera:
-
Insert memory card into the frame with face away from the unit:
-
The slideshow will start automatically:
natural_image
Three circular images showing a DSLR camera, a small electronic device with a logo, and a person's photo frame (no visible text or symbols)Controls
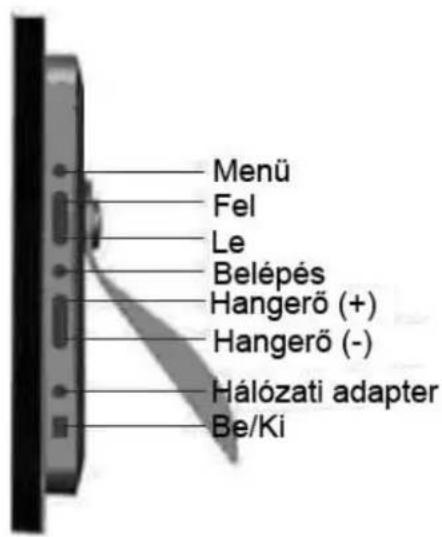
DF-1040
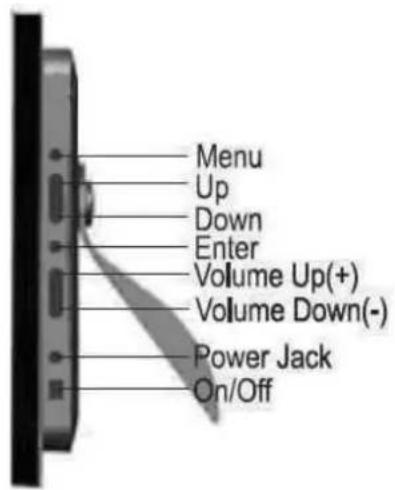
DF-710
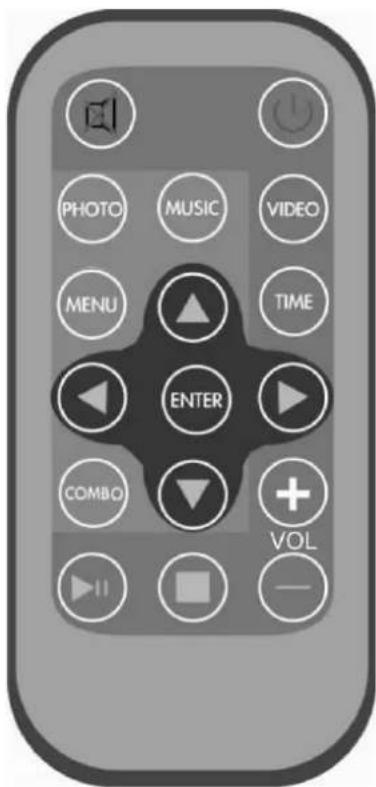
Using your Remote Control
DF-1040
| Button | Description |
| Power | Turn on/off |
| Photo | Access your photo files |
| Music | Access your music files |
| Video | Access your videos files |
| Combo | Start the slideshow |
| Time | Display the time/ Calendar |
| Mute | Mutes volume |
| Menu | Displays the main menu |
| Enter | Select highlighted item |
| VOL +/- | Adjusts volume |
| Arrows | Navigate on screen |
| ▶/II | Play/ pause |
Inserting Memory Cards
The Digital Picture Frame is compatible with the following memory cards:
Secure DigitalTM Card (SD)
MultiMediaTM Card (MMC)
Memory StickTM
Insert the memory card with the front label facing AWAY from you. Do not force the memory card into the memory slot. If you are not able to easily insert the memory card completely, you may have inserted it the wrong way.
Note:
The Digital Picture Frame will ONLY recognize digital pictures stored in JPEG format. Digital pictures stored in other formats will be ignored by the device.
Make sure you have at least one picture stored on the memory card. The frame will not function properly without a stored picture.
You also can use a USB flash drive in the exact same way as you would use a memory card. Simply copy files on the flash drive and insert it at the right side of the unit in the USB Host plug.
Main menu
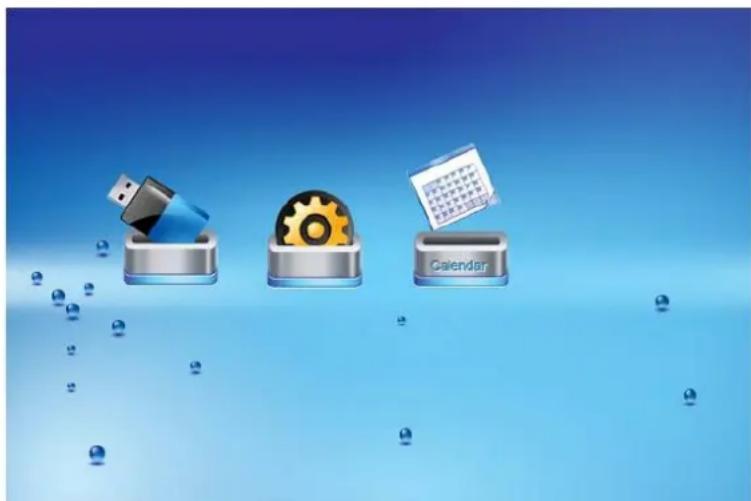
Upon turning on the Digital Picture Frame, you will go straight to the MENU screen. To set the Auto Start feature Choose the SETUP screen. Use the left/right arrow to go to the "Set up". Press Enter button to enter the options screen. Use the Up / down arrows to choose your auto start option. Press the "MENU" button to show the following menu:
natural_image
Three icons on a blue gradient background: USB, gear, and calendar with floating spheres (no text or symbols)Use the left and right arrows to move inside the menu and then press "Enter" to continue
Note: In all menus, pressing the "Menu" button will bring you back to the main menu
| Function | Description |
| Setup | Set system menu |
| Calendar | Display calendar, clock, alarm |
| SD/MMC/MS/ | Play files on SD/MMC/MS/ memory card |
| USB | Play files on USB flash drive |
NOTE: Icons of above functions shall appear automatically on MENU screen when certain memory card is inserted. Icons shall disappear when correspondent card is removed from card slot.
Viewing Pictures
Make sure you have at least one picture on your memory card or your USB flash drive. When this is done:
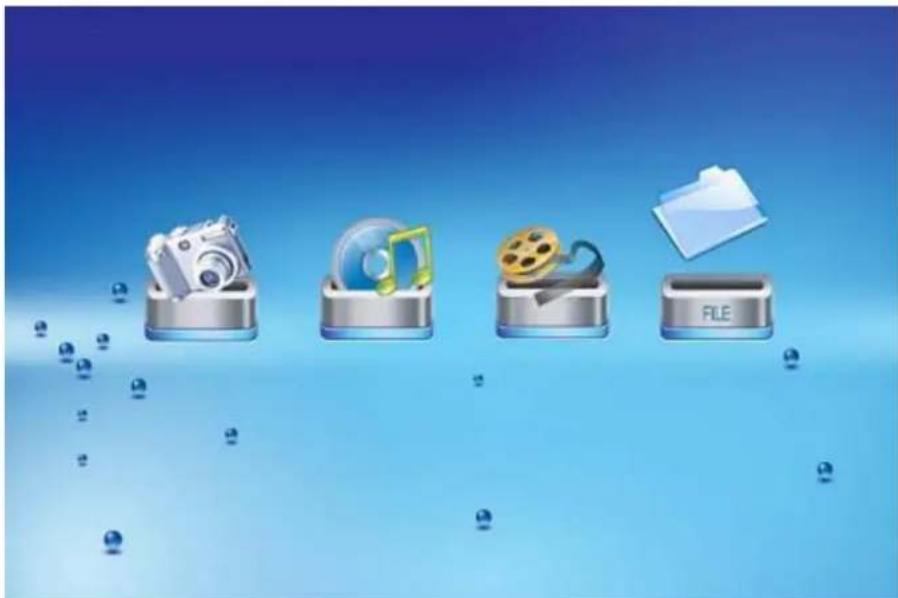
Select the desired flash media on main menu. (SD/MS/USB/NAND-Internal Memory) Select the "PHOTO" option from the menu and press "ENTER"
natural_image
Illustration of four electronic devices (camera, vinyl record, film reel, and file) arranged on a blue gradient background with floating numbers (no text or symbols)A Photo thumbnail will appear. User UP/DOWN/LEFT/RIGHT arrows can move the highlight. If the highlighted is a folder, press Enter to enter the folder.
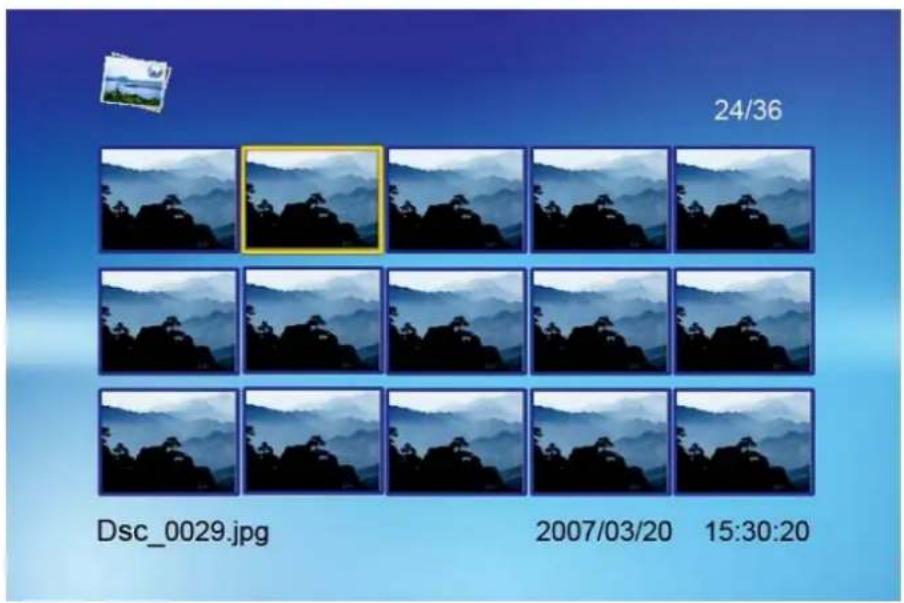
Otherwise press Enter to enter the full screen photo (pause mode) and press Play to enter into slideshow mode.
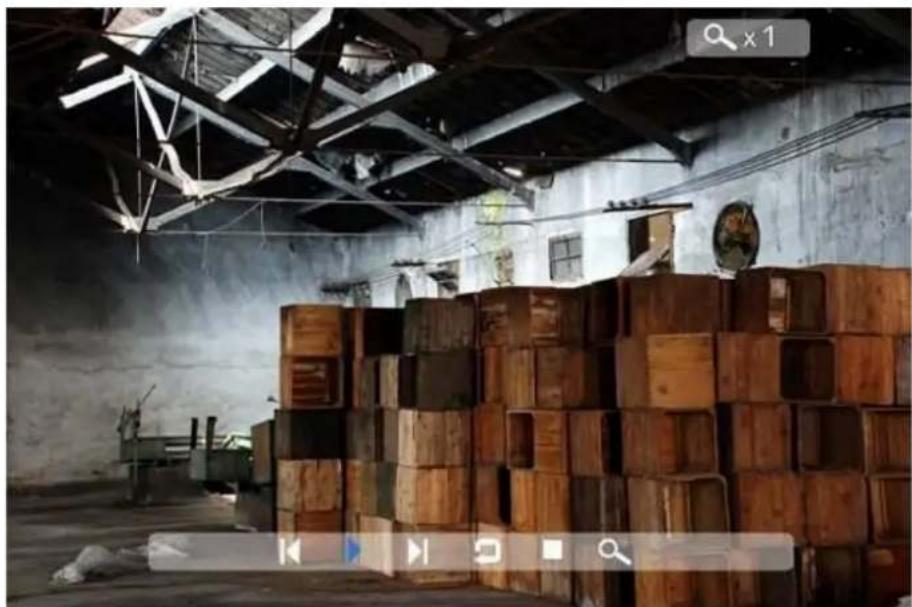
Once a slideshow is playing or a picture is being shown, press the OSD button. The following menu will appear:
natural_image
Interior view of an industrial warehouse with stacked wooden crates and overhead beams (no visible text or symbols)
Play previous picture in the picture list
Play or pause the current slideshow.
Play next picture in the picture list
Use the rotate function to change the picture orientation to either portrait or landscape
Stop slideshow and return to photo thumbnail.
Increase the size of the picture by 2/4/8/16/1 times.
Watching video
The Digital Picture Frame supports the following video formats:
Motion JPEG (.avi): video format used by most digital cameras
MPEG-I
MPEG-2
MPEG 4
Make sure you have at least one video on your memory card or your USB flash drive. When this is done:
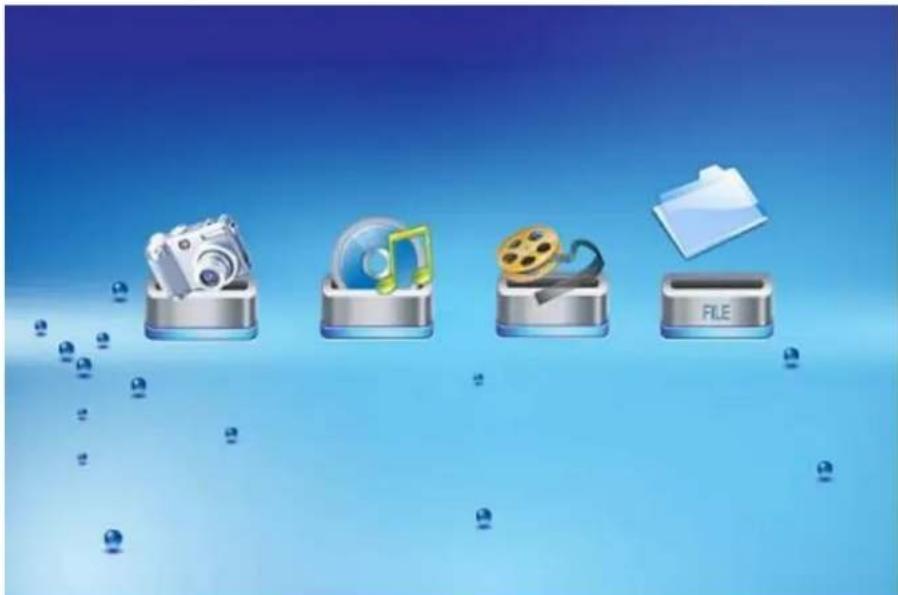
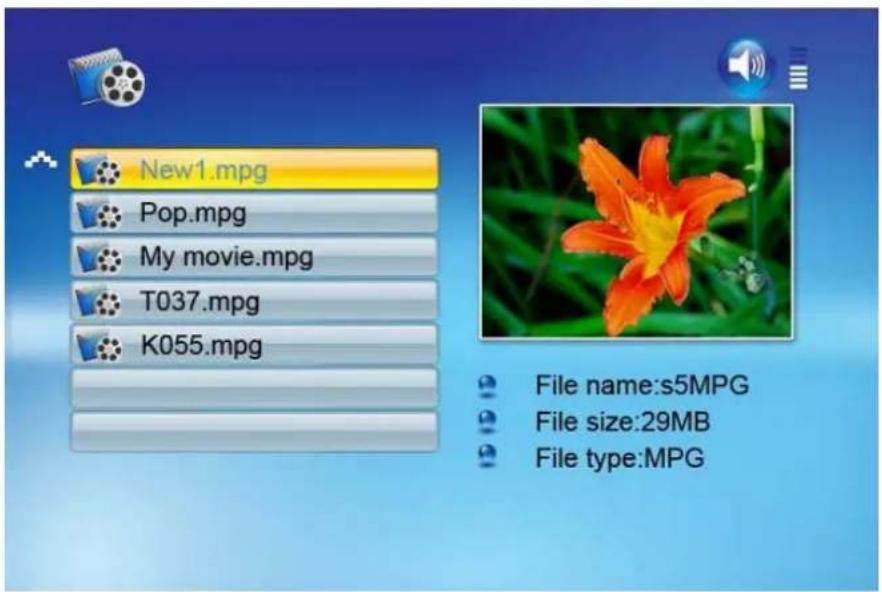
Select the desired flash media on main menu. (SD/MS/USB/NAND-Internal Memory) Select the "MOVIE" option from the menu and press "ENTER"
natural_image
Four metallic icons (camera, film reel, film reel, file) arranged in a row against a blue gradient background, with floating numbers and dots below (no text or symbols on icons)A list of all movie files will be listed on the left side of the screen. The right side consists of the movie preview window and information display of the current movie. Use Up/Down arrows to select the movie and press Enter to play.
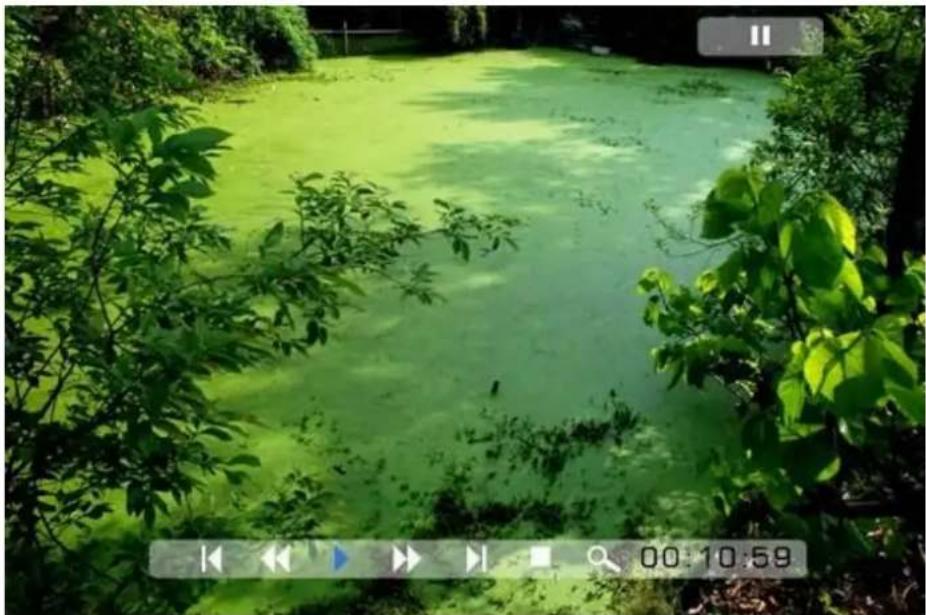
Once a movie is playing, press the ENTER button on the remote control. The following menu will appear:
natural_image
Aerial view of a greenish water body surrounded by dense foliage, captured in a park setting with a play button and time stamp (no text or symbols on the main scene)
Play previous movie in the play list
Play backward the movie by 2/3/4 times speed.
Play or Pause the movie.
Play forward the movie by 2/3/4 times speed.
Play next movie in the play list
Stop the movie and return to the playlist
Increase the size of the picture by 2/3/4/1 times
Listening to MP3 music
Make sure you have at least one MP3 file on your memory card or your USB flash drive. When this is done:
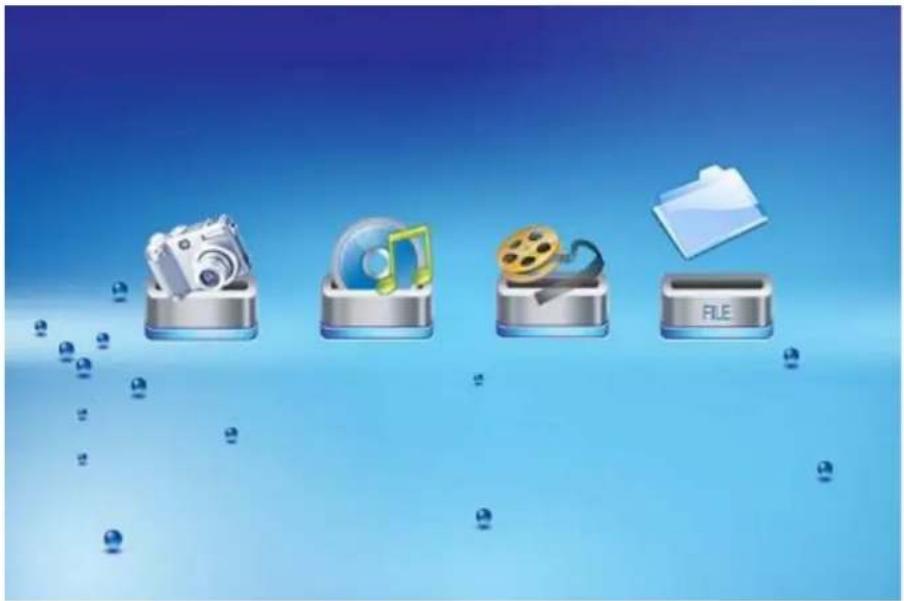
Select the desired flash media on main menu. (SD/MS/USB/NAND-Internal Memory) Select the "MUSIC" option from the menu and press "ENTER"
natural_image
Four metallic icons (camera, music note, film reel, file) arranged in a row against a blue gradient background, with floating numbers below (no text or symbols on icons)A list of music files will be listed on the left side of the screen. The right side consists of the frequency chart and information status bar. The song information area is below the status bar. Use Up/Down arrows to select the music file and press Enter to play.
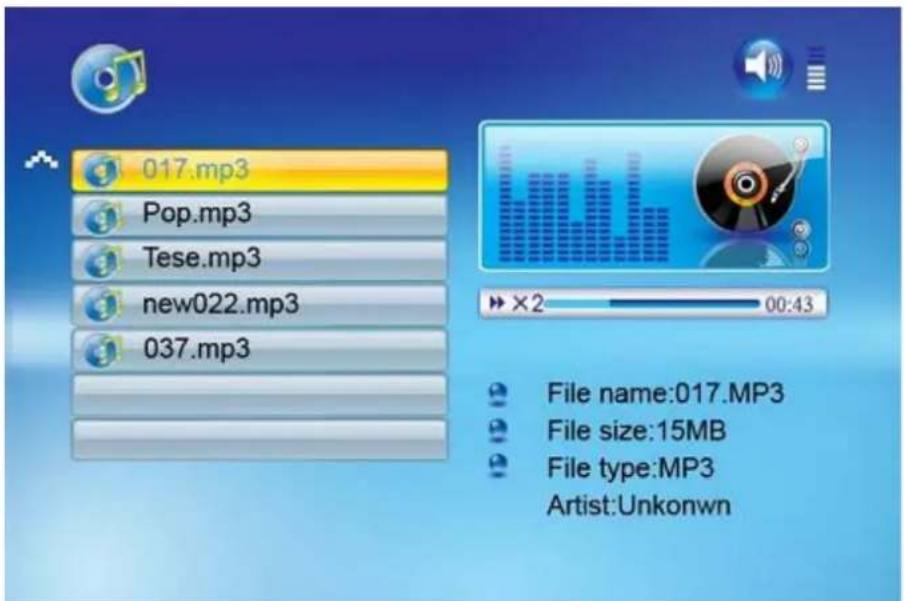
Press VOL+ to increase the volume or VOL- to decrease the volume.
Press Play/Pause button on remote control to play or pause the music file.
Press Stop button on the remote control to return to the list of music files.
File Management
Playing a slideshow with music
Ensure you have at least one picture on your memory card or your USB flash drive. Additionally, you must have one MP3 file saved on the selected memory card/USB/Internal Memory. When this is done:
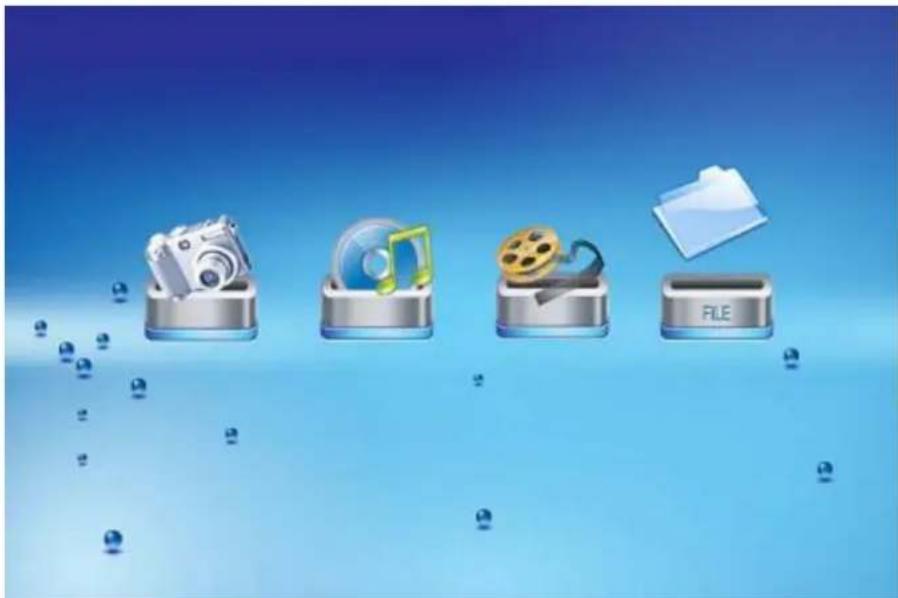
Select the desired flash media on main menu. (SD/MS/USB/NAND-Internal Memory) Select the "FILE" option from the menu and press "ENTER"
natural_image
Four metallic icons (camera, film reel, film reel, and file) arranged in a row against a blue gradient background, with no text or symbols.A list of all files on the selected memory card or internal memory will be listed on the left side of the screen. The right side consists of the file information. Use Up/Down arrows to select a picture file and press Enter to enter a full screen photo (pause mode). Press COMBO button on the remote control, an audio slideshow will begin automatically*.
*On DF-710 press ZOOM button on the remote control for audio slideshow
Copying and Deleting Files
To copy and delete files on your memory card, USB drive or internal memor
Copy
Select the desired flash media on main menu. (SD/MS/USB/NAND-Internal Memory) Select the "FILE" option from the menu and press "ENTER". A list of available files will be displayed. Use the up and down arrows to highlight your required file and press the right arrow to highlight the desired file. Repeat for all files that you want to copy. Press the "Enter" button to display the Copy and Delete menu. Select Copy function and Enter.
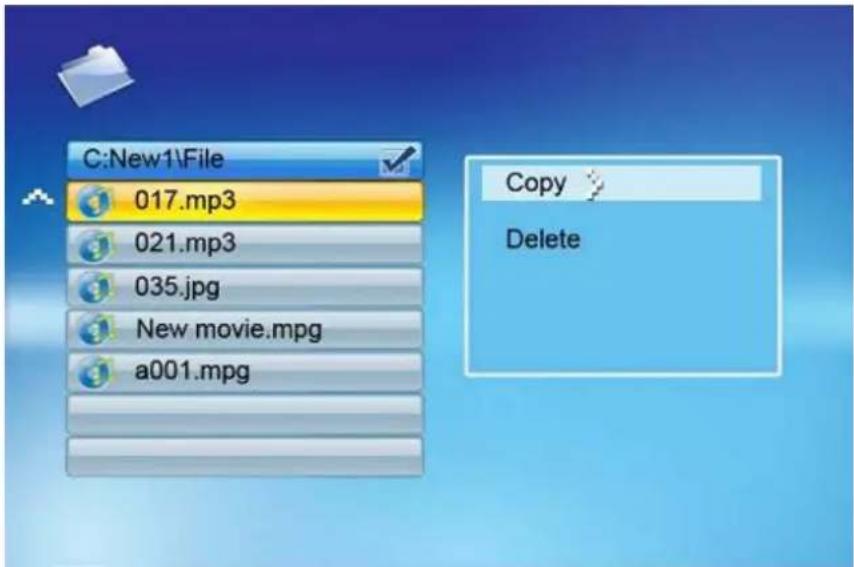
Use Up/Down arrows to select the file destination folder. Press Right button to confirm.
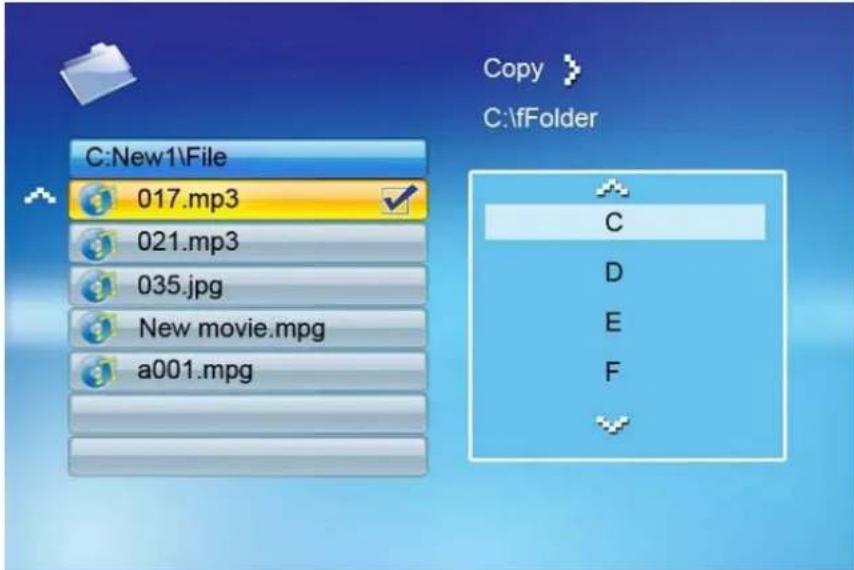
Press Enter to start copying the file.
Delete
Make steps as above at Copy. From Copy and Delete menu select Delete function and press Enter. File will be deleted.
Using the SETUP option
The following options can be changed by using the "SETUP" option from the main menu:
| Function | Description |
| Language | Includes English, French, Spanish, Deutsch, Italian, Hungary |
| Slideshow time | Slideshow duration: 3s/5s/15s/1mins/15mins/1hr |
| Slideshow mode | Off, Random, Fading, Bottom_to_top, Top_to_bottom, Left_to right, Right_to_left, Door_close, Door_open, Hori_cross, Verti_cross |
| Music Repeat Mode | Repeat one, Repeat all, Repeat off |
| Movie Repeat Mode | Repeat one, Repeat all, Repeat off |
| Display mode | Crop, Stretch, Cinema |
| Time | Year/Month/Date/Time setup |
| Alarm | Alarm Time/Alarm Music/Alarm On/off setup |
| Default | Recover the factory default setup |
Calendar/Clock Display
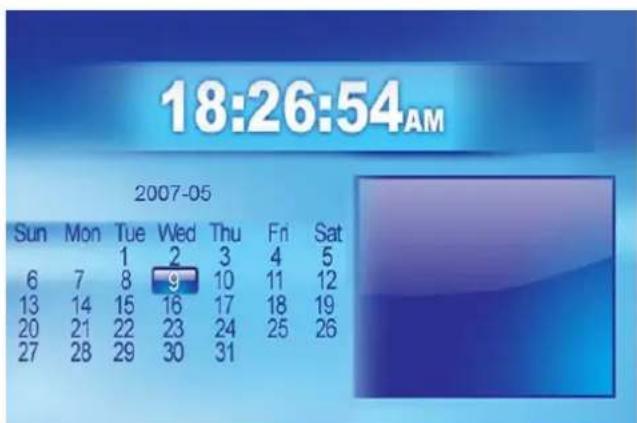
Upon turning on the Digital Picture Frame, you will go straight to the MENU screen. If you select Calendar/Clock and press Enter, you will go to Calendar/Clock screen. If the Alarm is turned on, it will also show the alarm time. A picture slideshow will begin at the picture preview window at the right part of the screen.
Troubleshooting
| Symptom | Cause | Corrective Actions |
| Digital Picture Frame doesn't power on. | The Power connector to the unit is not securely inserted. | Please be sure that the AC adaptor is properly connected to the frame. |
| Unable to insert memory card | Memory card inserted in the incorrect slot or in the incorrect direction. | Insert the correct card in the correct slot and direction. |
| Power is on but the Start-Up screen is not displayed. | System does not work normally | Restart the Digital Picture Frame. |
| No photo, videos, or music files on memory card. | Memory card is not inserted correctly. | Insert a supported memory card. |
| No sound from the speakers. | The volume may be in the lowest level; it may be in mute mode. | Confirm the volume is properly adjusted or press MUTE button to exit mute mode. |
| The files do not play. | Incompatible File Formats. | Make sure there is at least one supported file format on the memory card. |
| Can not copy or delete files. | The files or memory card are locked. | Unlock the files or memory card. |
| Remote control does not work. | No battery or weak battery in the remote control. | Insert or change the battery in the remote control. |
Specifications
| Type | DF 710/DF 1040 Digital Picture Frame |
| Size | 7/10.4 INCH |
| Resolution | 800x600 |
| Alimentation | 12 V |
| Consumption | 6 Watts |
| Working Temperature | -20 to +65 degrees |
| Response Time | 25ms |
| Display Mode | 4:3 |
| File Format | JPEG, MPEG1, MPEG2, MP3, MPEG4 |
| Photo Size | 12 Mega Pixels |
| Current | AC110—240V (50HZ—60HZ) |
| Cards | SD/MMC/MS/USB |
| USB ports | USB Host, USB Slave |
| Package Contents | Digital Picture FrameAC/DC AdapterUser GuideRemote controlUSB Cable |
Maintenance and Precaution
The Digital Picture Frame is for indoor use only.
To reduce the risk of fire or electric shock; do not expose this appliance to rain or moisture.
Do not block the ventilation holes on the back of the Picture Frame at any time.
Keep your Digital Picture Frames out of sunlight. Direct sunlight may cause damage.
Do not open the case of the Digital Picture Frame. There is a risk of electric shock, and there are no user serviceable parts inside. Opening the case will void your warranty.
Do not use the Digital Picture Frame if conditions could allow condensation to occur, or damage may result.
Your Digital Picture Frame is a complicated electronic device and cannot withstand shock from drops.
Cleaning the LCD screen
Treat the screen gently. The screen on the Digital Picture Frame is made of glass and can be scratched or broken.
If fingerprints or dust make the LCD screen dirty, we recommend using a soft, non-abrasive cloth such as a camera lens cloth to clean the LCD screen.
If you use an LCD Cleaning Kit sold on the market, apply the cleaning liquid to the cloth. Do not apply the liquid directly to your LCD screen.
- Bevezetés
- Üzembehelyezés
- Gombok
- Introduction
- Main Features
- Package Contents
- Installing your unit
- Connecting to a PC
- Operation
- Controls
- Using your Remote Control
- Inserting Memory Cards
- Note:
- Main menu
- Viewing Pictures
- Watching video
- Listening to MP3 music
- File Management
- Playing a slideshow with music
- Copying and Deleting Files
- Copy
- Delete
- Using the SETUP option
- Calendar/Clock Display
- Troubleshooting
- Specifications
- Maintenance and Precaution
- Cleaning the LCD screen
Brand : WayteQ
Model : DF-710
Category : Digital photo frame