
FO-1660M - Fax machine SHARP - Free user manual and instructions
Find the device manual for free FO-1660M SHARP in PDF.

| Product Type | Thermal Paper Fax Machine |
| Brand | SHARP |
| Model | FO-1660M |
| Dimensions (W × D × H) | 338 × 280 × 120 mm |
| Weight | 3.5 kg |
| Power Supply | 220-240 V AC, 50/60 Hz |
| Power Consumption | Standby: 10 W, Transmission: 35 W |
| Paper Type | Thermal paper roll 216 mm × 30 m |
| Transmission Speed | 15 seconds per page (standard mode) |
| Compatibility | Group 3 |
| Main Functions | Transmission, reception, copy, speed dial, error correction |
| Maintenance and Cleaning | Clean the thermal head with a cotton swab soaked in isopropyl alcohol |
| Safety | Do not open the device, unplug before maintenance, use a grounded outlet |
| Spare Parts and Reparability | Thermal paper roll, toner cartridge (if applicable), covers |
| General Information | User manual available in French, 110 pages |
Frequently Asked Questions - FO-1660M SHARP
User questions about FO-1660M SHARP
0 question about this device. Answer the ones you know or ask your own.
Ask a new question about this device
Download the instructions for your Fax machine in PDF format for free! Find your manual FO-1660M - SHARP and take your electronic device back in hand. On this page are published all the documents necessary for the use of your device. FO-1660M by SHARP.
USER MANUAL FO-1660M SHARP
- Installation
- Initial Settings
- Sending Documents
- Receiving Documents
- Making Copies
- Making Telephone Calls
- Answering Machine Connection
- Special Functions
- Optional Settings
- Printing Reports and Lists
- Maintenance
- Troubleshooting
MAINS PLUG WIRING INSTRUCTIONS
This equipment is fitted with a moulded type mains plug which incorporates a detachable fuse cover, under no circumstances should the plug be used without the fuse cover fitted.
In the unlikely event of the socket outlet in your home not being compatible with the plug supplied, cut off the mains plug and fit an appropriate type observing the wiring code below.
DANGER: The fuse from the cut-off plug should be removed and the plug should be disposed of in a safe manner. Under no circumstances should the cut-off plug be inserted into a socket outlet as a serious electric shock may occur.
If you are not sure how to do this, get help from a qualified electrician.
IMPORTANT
The wires in this mains lead are coloured in accordance with the following code:
GREEN-AND-YELLOW:
Earth
BLUE:
Neutral
BROWN:
Live
As the colours of the wires in the mains lead of this apparatus may not correspond with the coloured markings identifying the terminals in your plug, proceed as follows:
The wire which is coloured GREEN-AND-YELLOW must be connected to the terminal in the plug which is marked by the letter E, or by the safety earth symbol , or coloured green or green-and-yellow.
The wire which is coloured BLUE must be connected to the terminal which is marked with the letter N or coloured black.
The wire which is coloured BROWN must be connected to the terminal which is marked with the letter L or coloured red.
This apparatus must be protected by a 13A fuse in the mains plug or distribution board.
"WARNING: THIS APPARATUS MUST BE EARTHED"
This equipment complies with the requirements of Directives 89/336/EEC and 73/23/EEC as amended by 93/68/EEC.
89/336/EEC : EMC directive 73/23/EEC : Low voltade directive 93/68/EEC : CE Mark regulation
This equipment is not designed for making emergency telephony calls when the power fails. Alternative arrangements should be made for access to emergency services.
Quick Reference Guide
Note: Steps which are optional are enclosed in a dotted frame:
Transmitting documents
| Normal Dialling | Load document → RESOLUTION → Lift handset or press SPEAKER → Dial (press numeric keys) START Hang up |
| → Wait for reception tone → ① → ② | |
| Direct Keypad Dialling | Load document → RESOLUTION → Dial (press numeric keys) → START |
| → ③ | |
| Rapid Key Dialling | Load document → RESOLUTION → SHIFT → Press Rapid Key |
| → ④ | |
| Speed Dialling | Load document → RESOLUTION → ENTER Speed Dial number (press 2 numeric keys) → START |
| → ⑤ | |
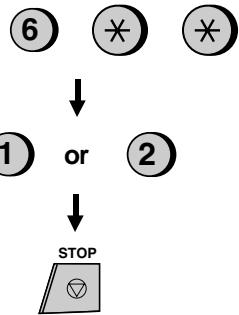
| Redialling | Load document → RESOLUTION → REDIAL → Wait for reception tone → START |
| → ⑥ |
Quick Reference Guide
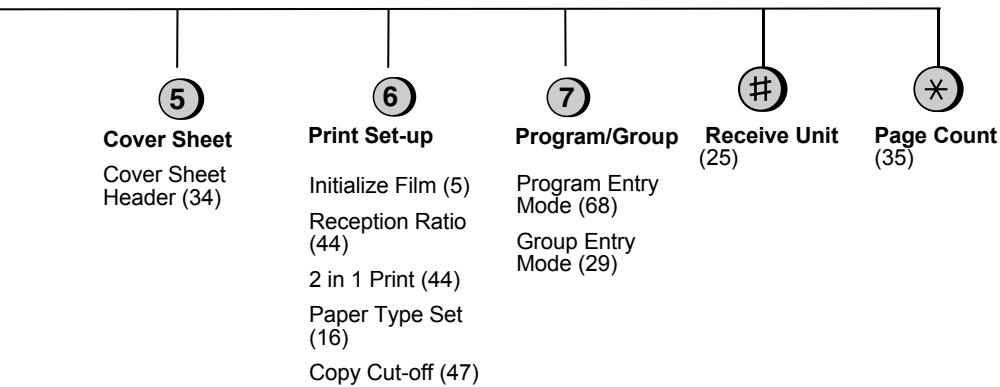
FUNCTION key menu
The following chart shows the layout of the functions and settings accessed by pressing the FUNCTION key. First press the FUNCTION key, the appropriate numeric key as shown, and then "#" or "×" until the desired setting appears.
Instructions for making each setting appear in the display. If you have any difficulty, refer to the detailed instructions on the page shown below the setting.

Introduction
Welcome to the FO-1660M and thank you for choosing Sharp! The FO-1660M is a multifunction facsimile machine that can also be used as convenient copier, scanner, and printer for your computer. Fax operations can be performed either from the operation panel of the FO-1660M, or from your computer using the provided Multifunction Interface software.
This manual gives you easy-to-follow instructions for installing the FO-1660M, connecting it to a personal computer, and performing fax operations from the operation panel of the FO-1660M. The accompanying Multifuncton Interface operation manual gives you instructions for installing the Multifunction Interface software and performing scan, print and fax operations from your computer.
If you have any questions or problems which cannot be solved by reading this manual, please contact your Sharp dealer.
Keys, switches, and labels on the machine are indicated in BOLD print.
Messages appearing in the display are indicated in CAPITAL LETTERS.
Regulatory information
This facsimile machine is only designed to operate in the country where approved.
Your Sharp FO-1660M Facsimile Transceiver is approved for connection to the Public Switched Telephone Network (PSTN), it is also approved for connection via a Private Branch Exchange (PBX), and can be used with either Loop Disconnect (LD) or Dual Tone Multi-Frequency (DTMF) signalling.
Your facsimile machine is not suitable as an extension to some payphones or for use on shared service lines.
REN
The Ringer Equivalence Number (REN) of your fax machine is 1.
The total number of instruments that can be connected to an exclusive line is determined by adding the REN values of each instrument. The total should not exceed 4.0. A telephone provided by BT is assumed to have a REN of 1 unless otherwise marked.
Satisfactory ringer operation can not be guaranteed in installations consisting of mixed apparatus types, even if the REN value does not exceed 4.
Emergency services
Emergency services (999) can be called from this apparatus. Please display on the telephone the number required to access that service, together with the number of the telephone, using the label provided.
Private branch exchange (PBX) connection
Your facsimile machine is approved for connection to the Public Telephone Network (PSTN) via compatible PBX systems. Consult your supplier for a list of suitable PBX systems. It cannot be guaranteed that this facsimile machine will operate correctly under all possible conditions of connection to compatible PBX systems.
This facsimile machine has been approved for use of the following facilities:
Simple telephone
Tone dialling (DTMF)
Loop disconnect (Pulse dialling)
Memory dialling
Loudspeaking (Call Progress Monitor)
On-hook dialling
Automatic answering
Automatic dialling
Automatic clearing
Last number radial
Time break or Earth recall
Series connection of extension telephone(s)
Any other usage will invalidate the approval of the facsimile if as a result it then ceases to comply with the standards against which approval was granted.
Series connection
When connected via series apparatus, difficulties may occasionally be experienced when making calls to the PSTN and by both parties during telephone conversations. If difficulties are experienced, contact the supplier or maintainer of the series apparatus in the first instance.
While operation may be possible initially, changes to or modernisation of the network taking place in the normal course of events may result in the facsimile equipment being connected to a network service with which it was not designed to be compatible. Failure of the facsimile / series apparatus to work under these circumstances may not be the fault of the network operator.
The voltage drop introduced by your facsimile between the PSTN and the associated apparatus at a current of 40mA d.c. is 2 volts, therefore no additional series equipment may be connected.
TextBridge® OCR by Xerox © 1994-95 Xerox Corporation. All rights reserved.
Windows is a trademark of Microsoft Corporation. All other trademarks are the property of their respective corporations.
Table of Contents
1 Installation 1
Unpacking Checklist 1
Loading the Imaging Film 2
Connections 6
Installing the Multifunction Interface Software 10
Attachments. 13
Loading Printing Paper 14
2 Initial Settings 17
Setup Guide. 17
A Look at the Operation Panel 18
Entering Your Name and Fax Number. 20
Entering Letters for Names. 21
Setting the Date and Time. 23
Selecting the Reception Mode 24
Storing Numbers for Automatic Dialling 26
Volume Adjustment 30
3 Sending Documents 31
Transmittable Documents 31
Loading the Document 32
Optional Transmission Settings 33
Dialling and Transmission 36
4 Receiving Documents 41
Making Copies 45
6 Making Telephone Calls 48
7 Answering Machine Connection 51
Preparations. 51
Using the Connection 52
Optional A.M. Connection Settings 55
8 Special Functions 57
Blocking Reception of Unwanted Faxes 57
Memory 59
Broadcasting 61
Polling (Requesting a Fax Transmission). 63
Timer Operations 66
Entering and Using Programs 68
9 Optional Settings 73
10 Printing Reports and Lists 78
11 Maintenance 84
12 Troubleshooting 86
Problems and Solutions. 86
Messages and Signals 89
Clearing Paper Jams 91
Specifications 93
Index 95
Installation
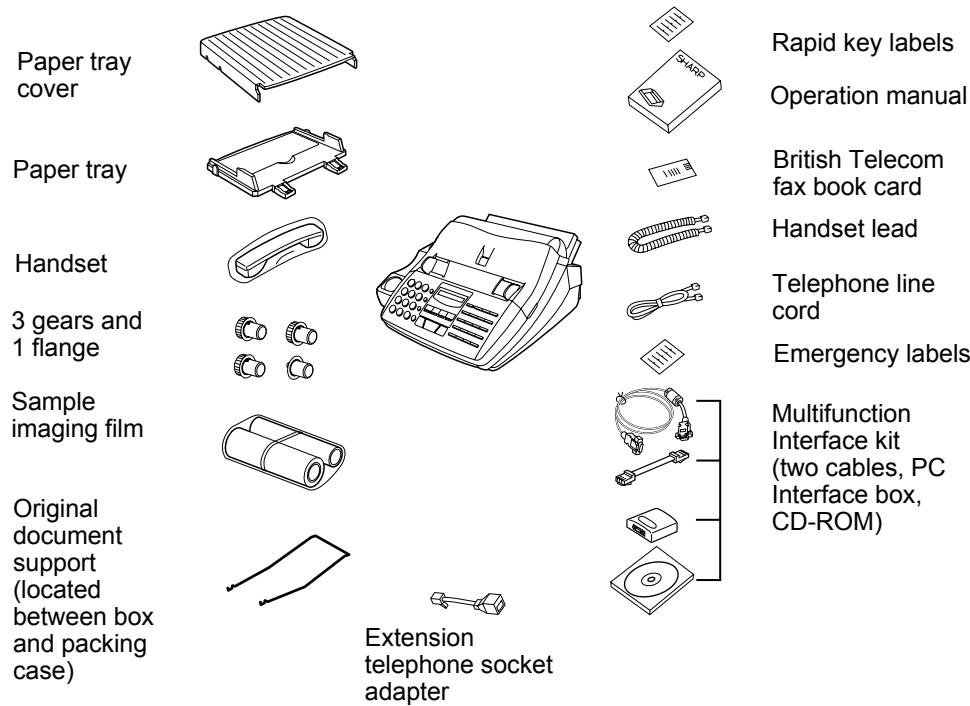
Unpacking Checklist
After unpacking your fax, make sure you have all the items shown below. If any are missing, contact your dealer.
Points to keep in mind when setting up
The fax must be installed on a level surface.
Keep the fax away from air conditioners, heaters, direct sunlight, and dust.
Provide easy access to the front, back, and sides of the fax. In particular, keep the area in front of the fax clear, or the original document may jam as it comes out after scanning.
If the machine is moved from a cold to a warm place, it is possible that condensation may form on the scanning glass, preventing proper scanning of documents for transmission. To remove the condensation, turn on the power and wait approximately two hours before using the machine.
If your area experiences a high incidence of lightning or power surges, we recommend that you install surge protectors for the power and telephone lines. Surge protectors can be purchased at most telephone specialty stores.
Chapter 1 Installation
Loading the Imaging Film
The printer unit in your fax creates printed text and images by applying heat to the imaging film, which causes ink to be transferred from the film to the page. Follow the steps below to install or replace the imaging film.
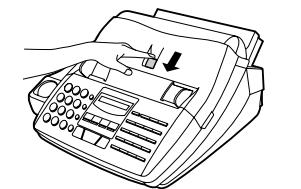
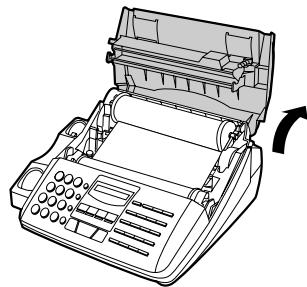
1 Press the release button marked OPEN and open the print compartment cover.
- Caution! The printing head (the strip of metal on the underside of the cover) applies heat to the imaging film. It may be hot if a document has just been printed.
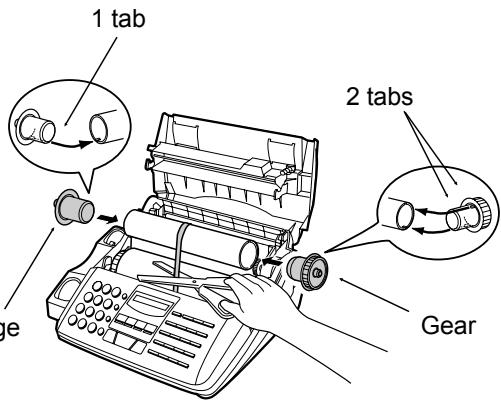
2 If you are replacing the imaging film, take the old film out of the printing compartment and remove the three (3) green gears and the green flange from the ends of the spools.
DO NOT DISCARD THE GREEN GEARs AND THE GREEN FLANGE!

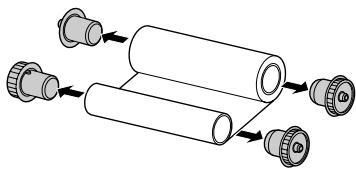
3
Take the new film out of its package, and insert two of the gears provided with the fax into the ends of the spool with film. Make sure that the two tabs on the gears fit properly into the slots in the ends of the spool.
- Do not yet remove the band which holds the spools together.
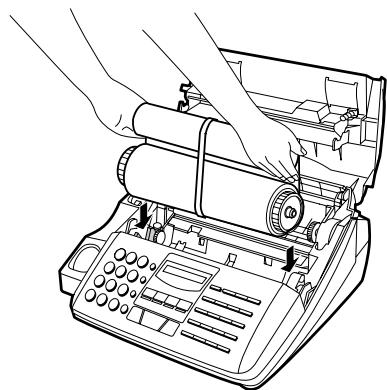
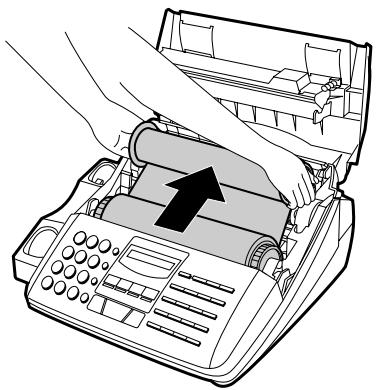
4
Hold the empty spool so that the end with only one slot is on the left, and lower the spools into the front of the printing compartment. The gears in the ends of the spool with film should fit into the slots on each side of the printing compartment.
5
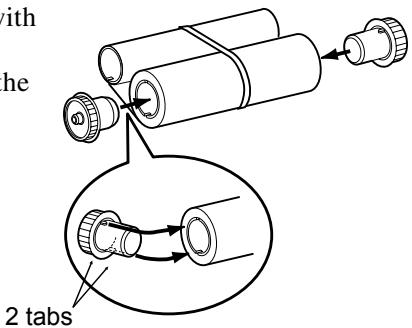
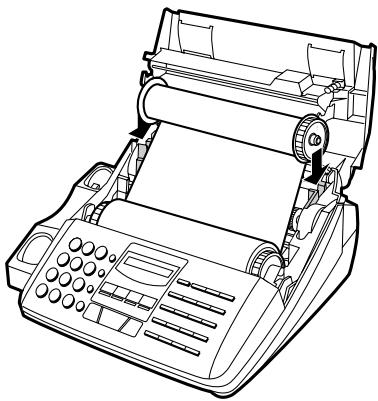
Cut the band which holds the spools together with scissors, and remove it. Insert the remaining gear into the right end of the empty spool and the flange into the left end of the empty spool. Make sure the tabs on the gear and the flange fit into the slots in the ends of the spool (the gear has two tabs and the flange has one tab).
6 Pull the empty spool toward the back of the compartment, unwinding the film as you pull.
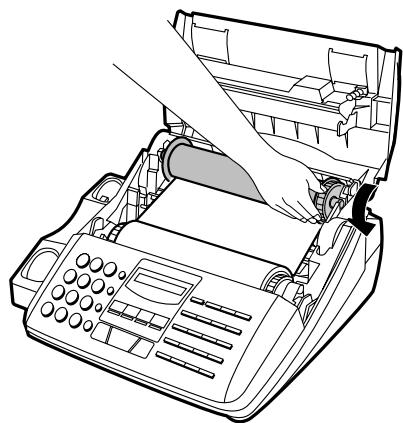
7 Insert the empty spool into the back of the compartment so that the gear and the flange fit into the slots on the sides of the compartment.
- Make sure that the green gear engages with the white gear below it.
8 Wind the film slightly (rotate the gear on the right side of the empty spool) so that there is no slack in the film. Make sure that both edges of the film wind onto the spool evenly.
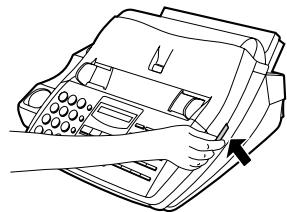
9 Close the print compartment cover, making sure it clicks into place.
- Caution! Close the cover slowly to make sure it doesn't pinch your fingers.
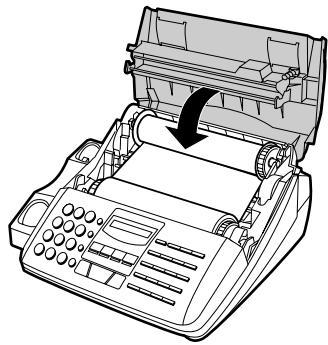
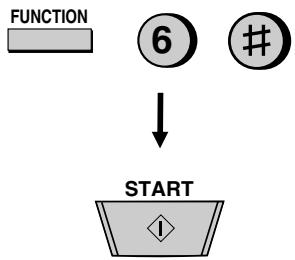
10 If you replaced the film, initialize the new film by pressing the FUNCTION key, the "6" key, and the "#" key on the operation panel. Make sure that INITIAL-IZE FILM appears in the display, and then press the START key. (Do not perform this step if you installed the initial sample roll of film.)
When to replace the imaging film
The sample roll of imaging film provided with your fax is capable of printing approximately 60 pages of A4 size paper. When it is used up, FILM END will appear in the display. Replace it with the following imaging film which is available at your dealer.
FO-15CR Imaging Film
One roll of FO-15CR imaging film is capable of printing approximately 470 pages of A4 size paper when printed continuously.
Caution!
The text of documents printed with the imaging film is visible on the used film. If confidential information has been printed, dispose of the film appropriately.
Chapter 1 Installation
Connections
Power lead
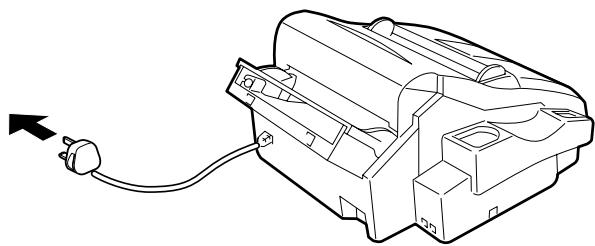
Plug the power lead into a 230V , earthed (3-prong) AC outlet.
The fax does not have a power on/off switch, so the power is turned on and off by simply plugging or unplugging the power lead.
Important: Whenever you unplug the power lead, disconnect the fax machine from the telephone network first.
Caution: The mains outlet (socket-outlet) shall be installed near the equipment and shall be easily accessible.
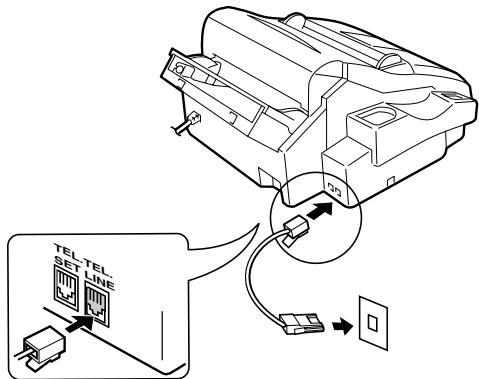
Telephone line cord
Plug one end of the telephone line into the socket on the fax marked "TEL LINE". Plug the other end into a new plan telephone wall socket.
If you do not have a new plan telephone socket, contact your local telephone supplier. Connection to the telephone network must not be hard wired.
Eire: Only the supplied cord should be used. If a longer cord is required, please consult your supplier or servicing agent.
Comments:
- Your fax is set for tone dialling. If you are on a pulse dial line, you must reset the fax for pulse dialling. This is done by resetting Option Setting 8 as described in Chapter 9, "Optional Settings".
- If you are connecting the fax to a PBX, you may need to reset the fax to the appropriate recall mode for the PBX. This is done by setting Option Setting 14 as described in Chapter 9
- If you intend to use a computer fax modem on the same phone line, you must reset Option Setting 15 to NO in order to prevent transmission and reception errors. This procedure is described in Chapter 9, "Optional Settings".
- Extension phones can be used to make and receive calls as normal with the fax connected. For details on receiving faxes from an extension phone, see Chapter 4, "Receiving Documents".
- The facsimile machine will not ring in response to incoming calls and cannot be used to make outgoing calls in the absence of mains power to the machine. For this reason it is recommended that the fax is not left as the only telephone instrument on line when in this state.
- Your fax cannot be used on a key system without the necessary adaptation of the system. Please consult the installers of the system if this is required.
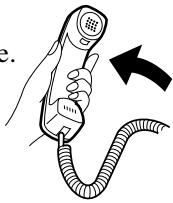
Handset
Connect the handset lead to the handset and the fax as shown.
The ends of the handset lead are identical, so they will go into either socket.
Place the handset on the handset rest.
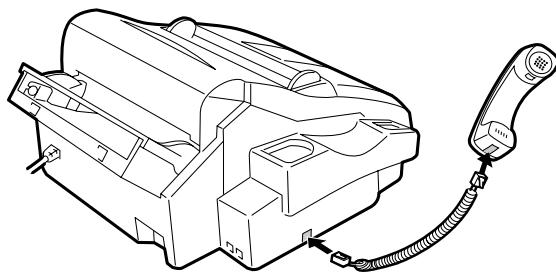
Use the handset to make ordinary phone calls, or to transmit and receive documents manually.
Chapter 1 Installation
Connecting an answering machine
If desired, you can connect an answering machine to your fax. This will allow you to receive both voice and fax messages on the same line while you are out. For details on using this feature, see Chapter 7.
To connect an answering machine, remove the seal covering the socket marked TEL. SET on the fax. Insert the modular plug of the socket adaptor into the TEL. SET socket, and then insert the plug of the answering machine line into the U.K. style socket of the adaptor.
Important: If the answering machine is not connected to the extension telephone socket on the fax as shown, the set-up will not operate properly.
Eire: Remove the seal covering the socket marked TEL. SET on the fax. Insert the plug of the answering machine line directly into the TEL. SET socket.
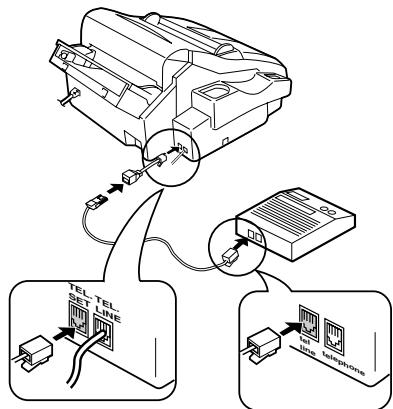
Important: When connecting an answering machine, make sure the line plug is inserted into the answering machine's telephone line socket, not its telephone socket.
Comments:
- The safety status of this socket is TNV, and is provided for the connection of approved telephone equipment only. To ensure continued safety compliance, do not connect any other equipment to this socket.
- More than one extension telephone may be connected to the same line as the fax, provided that the total REN value does not exceed 4. This includes an answering machine if connected as shown above.
Connecting the fax to your computer
The Multifunction Interface kit which comes with your fax machine allows you to use your fax as a printer and scanner, and lets you perform fax operations from your computer via the fax modem in your fax machine. Follow the steps below to connect the PC Interface box and cables.
Important:
Use only the provided interface cable and modular plug cable.
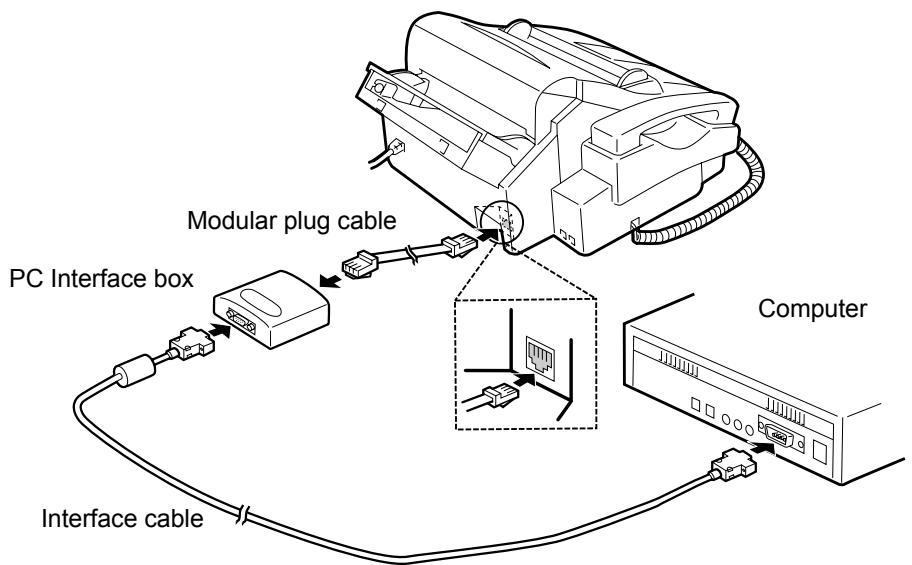
1 Make sure that your fax is unplugged and the power switch is turned off on your computer.
2 Insert the female end of the interface cable into the serial (RS232C) port on your computer. Tighten the screws with a screwdriver.
3 Insert the male end of the interface cable into the port on the PC Interface box. Tighten the screws with a screwdriver.
4 Insert one end of the modular plug cable into the socket on the PC Interface box, and the other end into the socket on your fax as shown (the ends of the cable are identical).
Comments:
- The safety status of the PC interface port is SELV and is provided only for connection to compatible computer SELV ports. Do not connect any non-SELV equipment to this port.
Installing the Multifunction Interface Software
The Multifunction Interface software allows you to perform fax operations from your computer and lets you use your fax as a scanner and printer. Install the software from your Sharp Multifunction Interface CD-ROM.
You must be running Microsoft WindowsTM 3.1 or higher, or Windows '95 to install the Sharp Multifunction Interface as a Windows application.
For general information on installation and management of Windows' applications, refer to your Microsoft Windows User's Guide.
The minimum requirements for your computer are as follows: CPU:486/25MHz (or higher) with 8MB of RAM CD-ROM speed: 2x or higher Hard Disk Space: 15MB plus additional space for scanned images and received faxes.
To install the Multifunction Interface software, follow these steps:
1 Make sure your fax is connected to your computer via the PC Interface box as described in "page 9" in this chapter.
2 Make sure your fax is powered on (plug in the power cord).
3 Run WindowsTM 3.1 or higher, or Windows '95.
4 Close any other Windows applications which may be running.
5 Insert the Sharp Multifunction Interface CD in your computer's CD-ROM drive. (Note: Some systems automatically run the software when the CD is inserted in the CD-ROM drive. If this is the case with your system, advance to step 7.
6 Windows 3.1 or higher users:
Select the Windows Program Manager.
Select the File drop-down menu and select the Run command. The command screen will appear, displaying the command line. At the command line, type the letter of your CD-ROM drive followed by Install.exe, and click OK.
Windows '95 users:
Select Start, and select Run. At the command line, type the letter of your CD-ROM drive and then click OK. Double click on the Install.EXE icon in the window that appears.
If you have previously installed the Sharp Multifunction software, an opening screen will appear. Select the Install Sharp button.
7 From the Welcome screen, select Next to continue the installation process or Cancel to stop installation. Enter the Registration and Fax Cover Page information as requested, clicking Next until all information is complete.
8 The Choose Destination Location window will appear, displaying the Destination Directory dialog box. The Destination Directory text box contains the name of the system directory and the drive where program files will be stored. The default (and recommended) name for the directory is given as Sharp. If Sharp is used as the directory name, no action is required. The default drive is displayed as "C:\". However, you may select the Browse button to choose any other drive.
9 Select the Next button to advance or select Back to return to the previous screen. Selecting the Cancel button will stop the installation process.
- A setup window will appear, and the name of the files being loaded and the percentage of completion will be displayed.
- If a prompt appears stating "Not Enough Disk Space Available", it will be necessary to select another target drive, or make space on hard drive by removing files so that the Multifunction Interface software can be properly installed.
10 A window will notify you that the Autoexec.bat and/or Config.sys and/or Alacddm.ini, and/or Win.ini have been modified. Select the OK button in each instance.
Note: The names given are the new names for the original system files (prior to installation of Sharp Multifunction Software).
Chapter 1 Installation
11 You will be prompted if you want your system to be ready to receive faxes when Windows is loaded. Respond by selecting Yes to have the Inbox automatically run when Windows is loaded.
After installation is complete, the Sharp Multifunction Interface group will be created.
12 The Installation Complete window will appear. Select Yes to restart your computer, and select Finish to complete the setup. (Note: You must reboot your system to run the Multifunction Interface software.)
All changes will now be in effect and you will be able to successfully run your Multifunction Interface software.
After your Sharp Multifunction Interface install is complete, you will return to the main installation screen. You now have the opportunity to try out the Xerox TextBridge® Pro enhanced OCR program included on your Sharp Multifunction Interface CD-ROM. Just click on the Install TextBridge Pro button for a 15-day free trial of this award winning software. If you would like to see a demo of this OCR software, click the TB Pro Demo button, or select the TB Pro Info button for more information on the OCR enhancements. If you would rather use the OCR facilities within the Multifunction Software at this stage, click EXIT.
Multifunction Interface software manual
Instructions for using your Multifunction Interface software can be found in the Multifunction Interface Software Manual on the CD. Follow the steps below to access the manual:
1 Insert the Multifunction Interface CD in your computer's CD-ROM drive. (If the opening screen of the CD appears, click EXIT to close it.)
2 In the Sharp Multifunction Interface group on your Windows desktop, double click the Operation Guide icon.
3 When the Table of Contents appears, click on the chapter or section you wish to read. To turn pages, click the arrow buttons on the toolbar at the top of the screen.
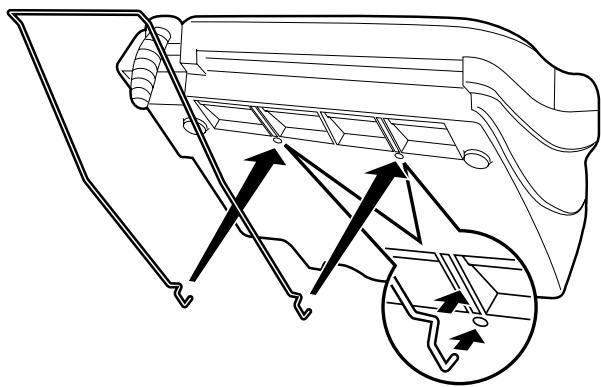
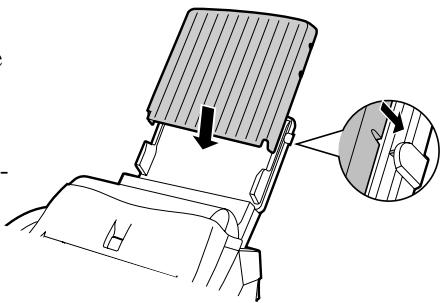
Attachments
Insert the paper tray into the back of the fax as shown.
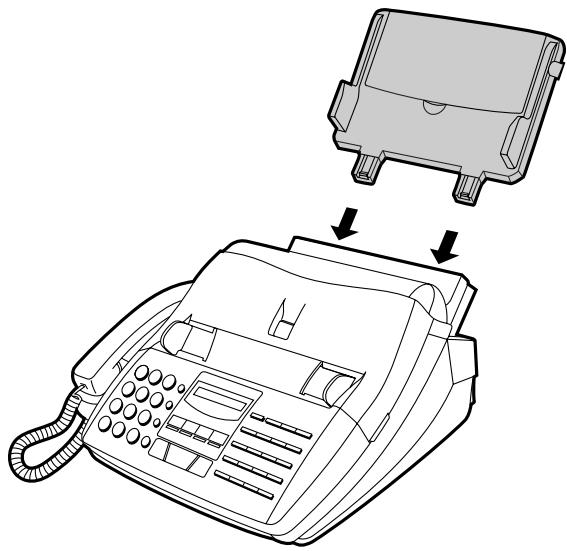
If desired, attach the original document support by inserting the ends into the holes in the bottom of the fax as shown.
Chapter 1 Installation
Loading Printing Paper
The paper tray holds the paper on which received documents and copies are printed. Up to 200 sheets of A4-size paper from 60 to 80g / m^2 can be loaded in the tray. Less sheets can be loaded when using heavier paper. The maximum allowed paper weight is 90g / m^2 .
Note: When receiving or copying documents, do not allow more than 100 pages to collect in the received document outlet. Otherwise, the outlet may become obstructed, causing paper jams.
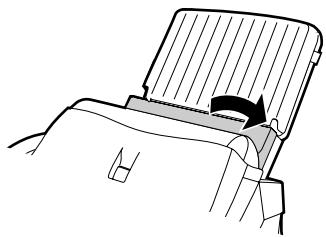
1 Remove the paper cover if it is on the paper tray.
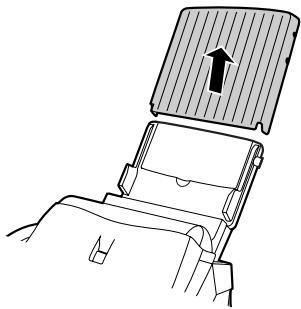
2 Fan the paper, and then tap the edge against a flat surface to even the stack.

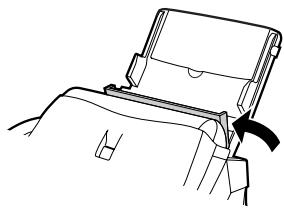
Pull the paper release plate toward you and insert the stack of paper into the tray, print side down.
- If paper remains in the tray, take it out and combine it into a single stack with the new paper before adding the new paper.
3
4
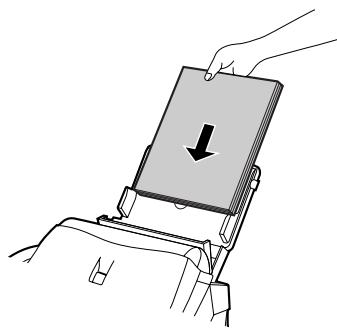
Replace the paper cover on the paper tray and then push the paper release plate back down.
- Important: Be sure to replace the paper cover before you push the paper release plate down.
5
Your fax has been set at the factory to print on regular paper. If you have loaded high quality thermal transfer paper, you must change this setting to HIGH QUALITY. Press the FUNC- TION key, the "6" key, the " ^ 心 " key two times, and then press "1" to select regular, or "2" to select high quality paper. When finished, press the STOP key. Be sure to change this setting again if you change back to regular paper.

Setup Guide
Before you can begin using your fax, there are some settings that must be made with the keys on the operation panel. Some of the settings are required for basic use of your fax, others may or may not be necessary depending on how you want to use the fax. The procedures for making the settings are described in this chapter in the order shown below.
Required settings:
Entering your name and fax/telephone number in the fax
Setting the fax to the current date and time
Selecting the reception mode
Other settings:
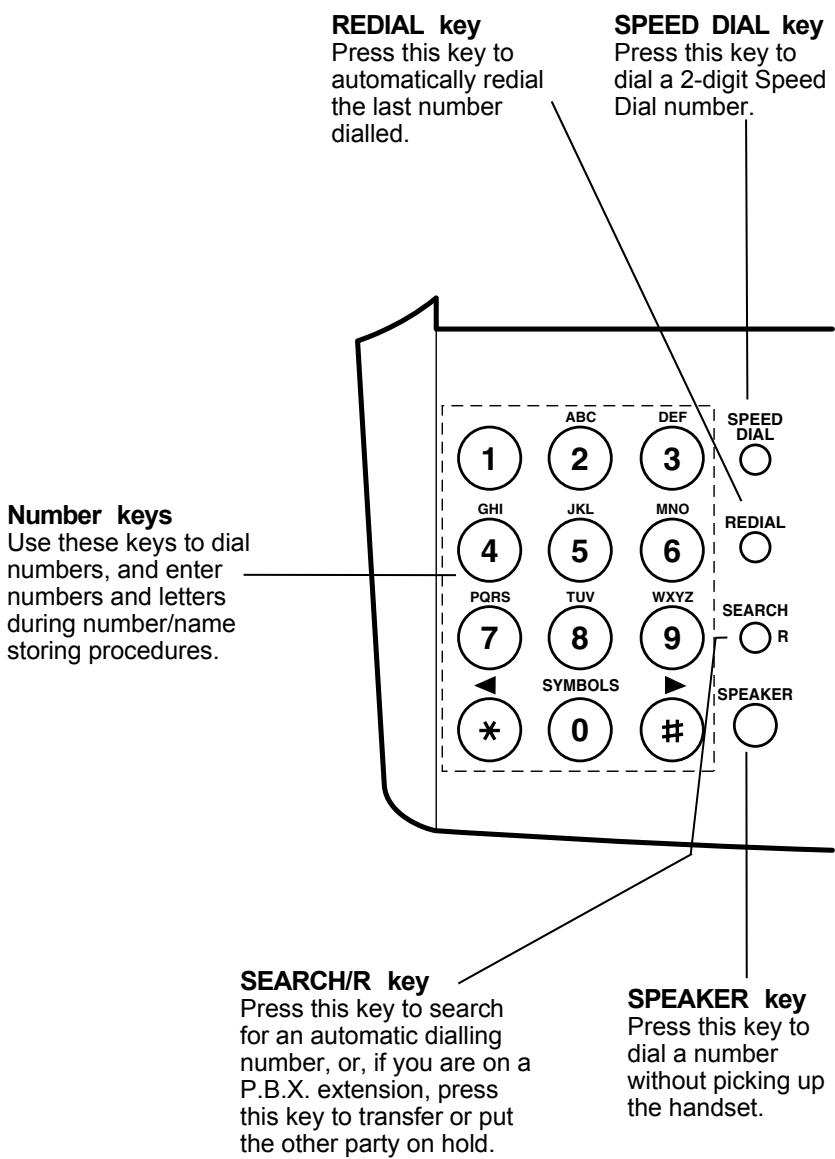
Storing numbers for automatic dialling: Automatic dialling allows you to dial a full fax or phone number by simply pressing a Rapid Key, or by pressing the SPEED DIAL key and entering a 2-digit number. To use automatic dialling, you must store the desired fax and phone numbers in the fax.
Volume adjustment: Adjustment of the volume of the speaker and ringer.
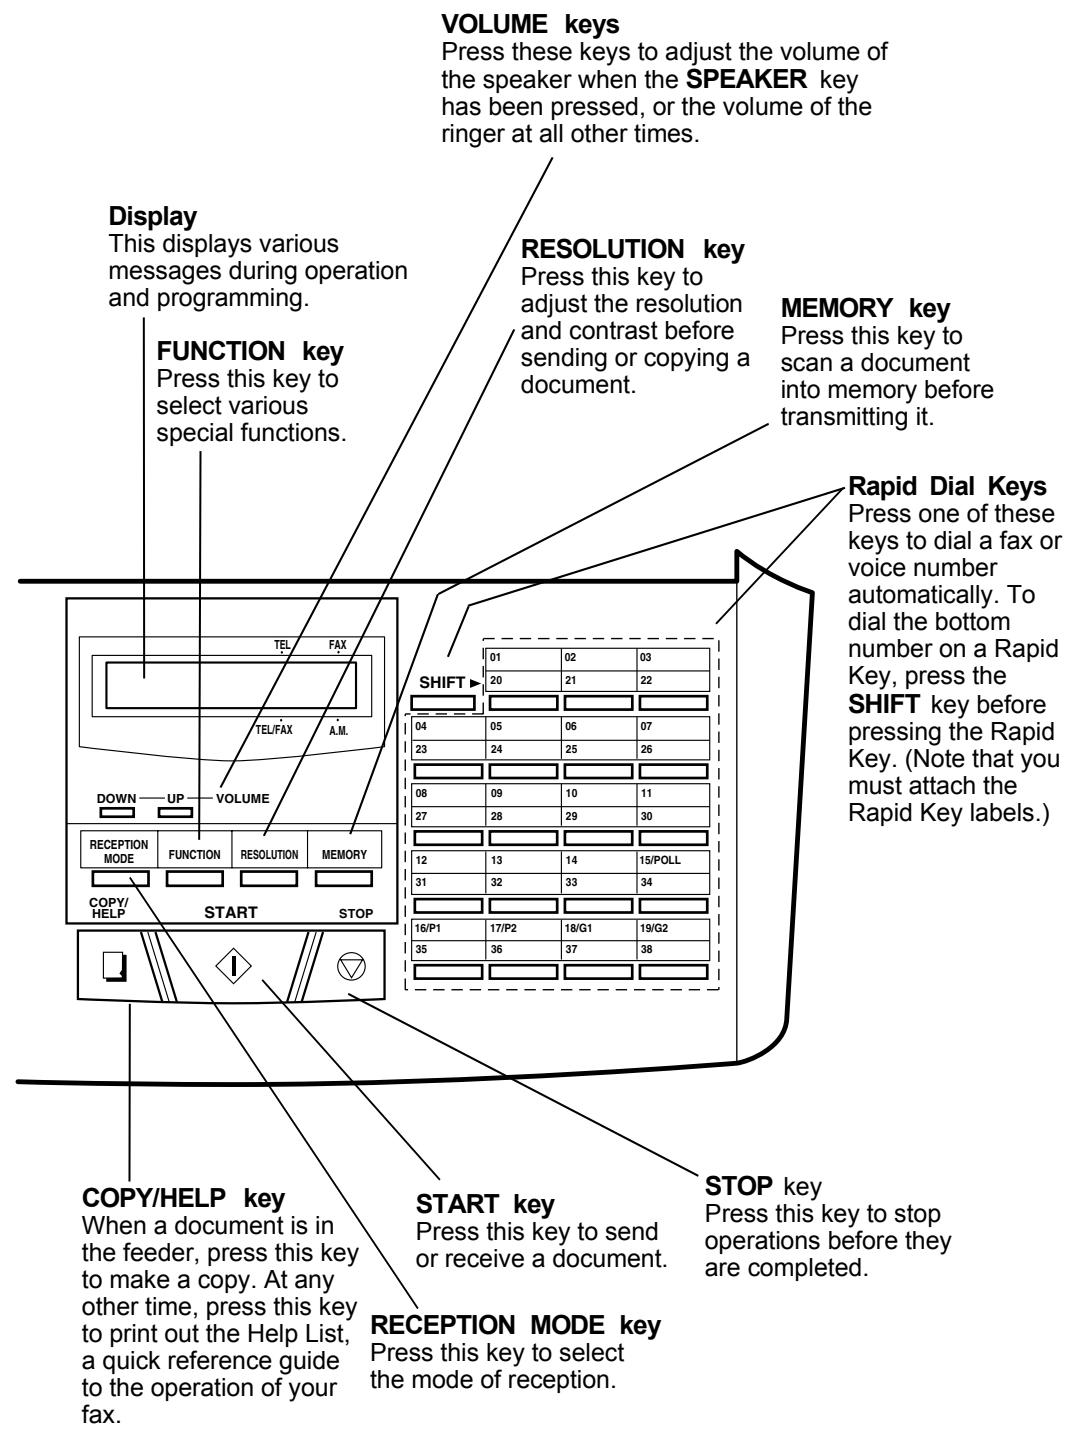
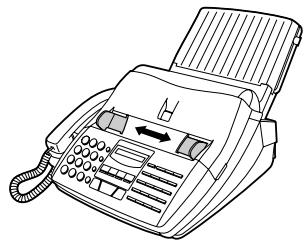
A Look at the Operation Panel
Before you make the settings, take a moment to familiarise yourself with the operation panel.
Chapter 2 Initial Settings
Entering Your Name and Fax Number
To have your name and fax/telephone number printed at the top of every page you transmit, program them by pressing the panel keys as shown below.
If you make a mistake, press the SEARCH/R key to move the cursor back to the mistake, then enter the correct number or letter. (To move the cursor forward, press the SPEAKER key.)
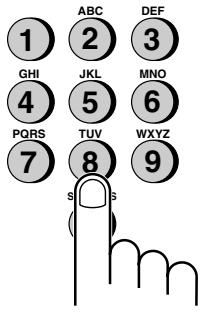
1 Press the FUNCTION key and then the "3" key. ENTRY MODE will appear in the display.
FUNCTION

3
2 Press the "#" key two times. OWN NUMBER SET will appear in the display.


3 Press the START key.

4 Enter your fax number (max. of 20 digits) by pressing the number keys. (To insert a space between digits, press the "#" key. To insert a "+" , press the " × " key.)


(Example)
5 Press the START key.

6 Note that there are letters marked above each of the number keys. Enter your name by pressing the appropriate number key for each letter several times until the letter appears in the display. (Max. of 24 characters.) For example, to enter "S" press "7" five times. See the following page for more details.
(Example: SHARP)
S:


H:


A:


R:


(Move cursor)
P:


7 Press the START key and then the STOP key.


Entering Letters for Names
Names are programmed by pressing the numeric keys. You will notice that letters are indicated above each of the number keys "2" through "9". To enter a letter (or number), press the appropriate key one or more times until the letter appears in the display (the number will appear first, followed by the letters in the order indicated above the key). The keys used for entering letters and editing are shown below.
Comments:
- To enter two letters in succession which require using the same key, press the SPEAKER key after entering the first letter to move the cursor to the right.
- To change a letter, move the cursor to that letter and enter the desired letter. The new letter will replace the old one.
Space
Press this key twice to enter a space.
Letters and numbers
To enter a letter or number, press the appropriate key repeatedly until the desired number/letter appears in the display (the number appears first, then the letters in the order shown above the key).
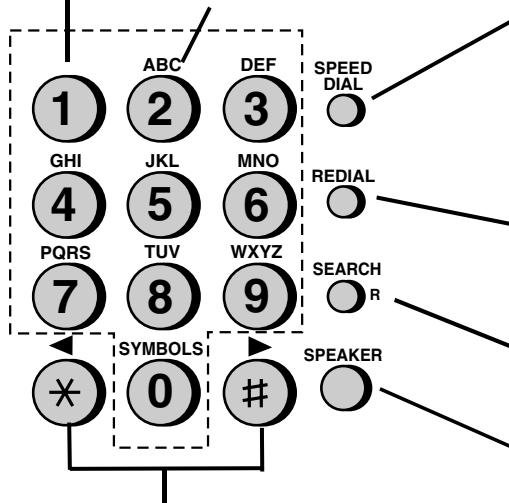
Delete
Press this key to delete the letter highlighted by the cursor (if the cursor is to the right of the last letter entered, it will backspace and delete the last letter).
Shift
Press this key once to change case (press it again to change back).
Cursor left
Press this key to move the cursor to the left.
Cursor right
Press this key to move the cursor to the right.
Symbols
Press either key repeatedly until the desired symbol appears (see the symbol list on the following page).
Chapter 2 Initial Settings
Symbol list
To enter a symbol from the list below, press the "#" key or the " × " key repeatedly until the desired symbol appears.
| # → ← * |
| . / ! " # $ % & i() * +, - :; < = >? @ [·] ^ _ ` { | } → ← |
Example
The following is an example of entering the name "ABC Co. #1".
The cursor in the display is indicated below by a rectangle:
| Step | Press these keys: | Display |
| 1 | ABC 2 2 | A |
| 2 | SPEAKER ○ | A |
| 3 | ABC 2 2 2 | A B |
| 4 | SPEAKER ○ | A B |
| 5 | ABC 2 2 2 2 | A B C |
| 6 | 1 1 | A B C |
| 7 | ABC 2 2 2 2 | A B C C |
| 8 | REDIAL 6 6 6 6 | A B C C o |
| 9 | # | A B C C o . |
| 10 | 1 1 | A B C C o . |
| 11 | # # # # # # | A B C C o . # |
| 12 | 1 | A B C C o . # 1 |
| 13 | START ◇ |
Setting the Date and Time
The date and time appear in the display and reports, and are printed at the top of every page you transmit. Set the date and time by pressing the keys on the operation panel as shown below.
To correct a mistake, press the SPEED DIAL key to move the cursor back to the mistake, and then enter the correct number.
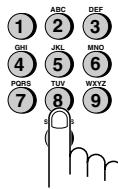
1 Press the FUNCTION key and then the "3" key. ENTRY MODE will appear in the display.
FUNCTION

(3)
2 Press the "X" key two times.
DATE & TIME SET will appear in the display.


3 Press the START key.

START
4 Enter a two-digit number for the day ("01" to "31").


(Example: the 5th)
5 Enter a two-digit number for the month ("01" for January, "02" for February, "12" for December, etc.).


(Example: January)
6 Enter the last two digits of the year.
(Note: In the year 2000, "00" will appear for the year.)


(Example: 1998)
7 Enter a two-digit number for the hour ("00" to "23") and a two-digit number for the minute ("00" to "59").


(Example: 9:25)
8 Press the START key and then the STOP key.

Selecting the Reception Mode
Your fax has four modes for receiving incoming calls and faxes:
TEL mode:
This is the most convenient mode for receiving phone calls. You can also receive faxes; however, all calls must first be answered by picking up the fax's handset or an extension phone connected to the same line.
FAX mode:
Select this mode when you only want to receive faxes on your line. The fax will automatically answer all calls and receive incoming faxes.
TEL/FAX mode:
This mode is convenient for receiving both faxes and voice calls. When a call comes in, the fax will detect whether it is a voice call (including manually dialled fax transmissions), or an automatically dialled fax. If it is a voice call, the fax will make a special ringing sound to alert you to answer. If it is an automatically dialled fax transmission, reception will begin automatically.
A.M. mode:
Select this mode when an answering machine is connected as described in "Connections" in Chapter 1 and you want the answering machine to answer all calls. This allows you to receive both voice messages and faxes while you are out.
Setting the reception mode
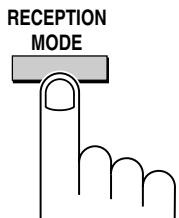
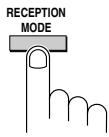
Press the RECEPTION MODE key until the arrow in the display points to the desired mode.
For more information on receiving faxes in TEL, TEL/FAX mode and FAX mode, see Chapter 4, "Receiving Documents". For more information on using A.M. mode, see Chapter 7.
Selecting the receiving unit
If you have connected the fax machine to a personal computer with the provided Multifunction Interface box, you can choose whether to have incoming faxes received by the fax machine or by your computer. The initial setting is FAX (reception by the fax machine). To change the setting, follow the steps below.
1 Press the FUNCTION key and then the "#" key. RECEIVE UNIT will appear in the display.
FUNCTION

2 Press 1 (FAX) to select the fax machine, or 2 (PC) to select your computer.

or

If you select reception to your computer, faxes will be received as follows depending on the reception mode of the fax machine:
If the fax machine is set to FAX reception mode, an incoming call will be automatically answered after the number of rings set in your fax software. The fax will be received by your computer (make sure your fax software is running). If your computer is turned off or the fax software is not running, the fax machine will receive the fax.
If the fax machine is set to TEL/FAX mode, voice calls will be signalled as usual and faxes received to your computer.
If the fax machine is set to TEL reception mode, you must first answer a call by picking up the fax's handset. If the call is an auto-dialled fax transmission (you will hear a fax tone), your computer will automatically begin reception. If the other party speaks to you and then wants to send a fax, you must initiate fax reception manually with the fax software.
If the fax machine is set to A.M. reception mode, the OGM will play before the computer begins fax reception (voice callers will be able to leave a message). If your computer is not turned on or the fax software is not running, the fax machine will receive the fax.
See the Multifunction Interface Software Manual for information on how to receive faxes with your fax software.
If you select reception to your fax machine, the reception modes will function as explained at the beginning of this section.
Note: Scanning, printing, and PC faxing can take place in all modes.
Storing Numbers for Automatic Dialling
Automatic dialling is a quick and convenient way of dialling which is performed by either pressing a Rapid Key (Rapid Key Dialling), or pressing the SPEED DIAL key and entering a 2-digit number (Speed Dialling). Automatic dialling can be used for both fax transmissions and voice calls.
To use automatic dialling, you must first store the full number in your fax and assign a 2-digit Speed Dial number to it. You can also enter a name which appears in the display when the number is dialled. Up to 99 numbers can be stored.
Speed Dial numbers from "01" to "38" can be used for both Rapid Key Dialling and Speed Dialling; Speed Dial numbers from "39" to "99" can only be used for Speed Dialling.
To allow easy identification of the Rapid Keys, attach each strip of Rapid Key labels above the appropriate row of Rapid Keys. The arrangement of the keys is shown in "A Look at the Operation Panel" in this chapter. Each time you store a number for Rapid Key Dialling, write the name of the party above the appropriate key.
Storing numbers
Comments:
-
You may need to add a pause between certain digits to allow time for connection. For example, if you are on a PBX telephone system that requires an access number to be dialled (such as "9") for an outside line, you may need to enter a pause between the access number and the number of the receiving fax machine. Pauses are entered by pressing the REDIAL key, and several can be entered in a row if necessary. The first pause entered gives a time delay of about 4 seconds, and subsequent pauses give delays of 0.9 seconds each. The total duration of pauses entered for any one fax or voice number cannot exceed 11 seconds.
-
To confirm that Automatic Dialling numbers have been stored correctly, print out the Telephone List. The procedure for doing this is described in Chapter 10, "Printing out Reports and Lists".
-
To enter letters for names or correct a mistake, see "Entering letters for names" in this chapter.
| 1 | Press the keys shown at right. FAX/TEL. # MODE will appear in the display. | FUNCTION 3 | # |
| 2 | Press "1" to select SET. | 1 | |
| 3 | Enter a two-digit number (from "01" to "99") by pressing the number keys. This will be the Speed Dial number. | 0 | 1 (Example) |
| 4 | Enter the fax or voice number by press- ing the number keys (max. of 32 digits in- cluding pauses). | 5 | 5 1 2 3 4 (Example) |
| 5 Press the START key. | START ◇ |
| 6 Enter the name of the location or party by pressing the appropriate number key for each letter several times until the letter appears in the display (max. of 20 characters). (See "Entering Letters for Names" in this chapter for more details.) If you don't want to enter a name, skip this step. | (Example: SHARP) S: ⑦ ⑦ ⑦ ⑦ ⑦ H: ④ ④ ④ A: ② ② R: ⑦ ⑦ ⑦ ⑦ SPEAKER ○ (Move cursor) P: ⑦ ⑦ |
| 7 Press the START key. | START |
| 8 Return to Step 3 to store another number, or press STOP to exit. If the number will be used for Rapid Key Dialling, you can write the name on the label above the appropriate Rapid Key. | Step 3 or | STOP |
Chapter 2 Initial Settings
Clearing numbers
| 1 | Press the keys shown at right. FAX/TEL. # MODE will appear in the display. | FUNCTION 3 # |
| 2 | Press "2" to select CLEAR. | 2 |
| 3 | Enter the Speed Dial number that you want to clear by pressing the number keys. | 0 1 (Example) |
| 4 | Press the START key. | START 1 |
| 5 | Return to Step 3 to clear another number, or press STOP to exit. | Step 3 or STOP 2 |
Making changes
To make changes in a number previously stored, repeat the storing procedure. Select the Speed Dial number for which you want to make changes in Step 3, and then change the number and/or name when they appear in the display (Steps 4 and 6, respectively).
Numbers and letters are changed as described in "Entering letters for names" in this chapter.
A lithium battery keeps automatic dialling numbers in memory
Your fax uses a lithium battery to keep automatic dialing numbers and other programmed data in memory when the power is turned off. Battery power is consumed primarily when the power is off. With the power kept continuously off, the life of the battery is about 5 years. If the battery dies, have your dealer or retailer replace it. Do not try to replace it yourself.
Storing numbers in Group Keys
Group Keys allow you to dial a group of fax numbers by simply pressing the appropriate Group Key once. They are convenient for the Broadcasting function, which is used to transmit a document to a group of fax machines.
Rapid Keys 18/G1 and 19/G2 can be programmed as Group Keys. To program or clear a Group Key, follow the steps below. Note that one key cannot be simultaneously programmed as both a Rapid Key and a Group Key.
Up to 20 fax numbers can be stored in one Group Key.
Only Speed Dial numbers can be stored in a Group Key. Full numbers cannot be stored.
A Group Key cannot be cleared if it is has been programmed into a Program Key. First clear the Program Key as described in "Entering and Using Programs" in Chapter 8, then clear the Group Key. If you need to check which Program Key the Group Key is used in, print out the Program and Group List as described in Chapter 10.
1
Press the keys shown at right.
GROUP ENTRY MODE will appear in the display.


2
Press "1" to program a Group Key, or "2" to clear a Group Key.

or

3
Press a Group Key (Rapid Key 18/G1 or 19/G2) to select it. If you are clearing the key, go to Step 5.

(Example)
4
Enter the Speed Dial numbers of the receiving machines.


(Example)
5
Press the START key.

6
Return to Step 3 to program or clear another Group Key, or press STOP to exit.
Step 3 or

Chapter 2 Initial Settings
Volume Adjustment
You can adjust the volume of the speaker and ringer using the UP and DOWN keys on the operation panel.
Speaker
The speaker has three volume levels: HIGH, MIDDLE, and LOW. To adjust the volume of the speaker, press the SPEAKER key and then press the UP or DOWN key until the desired level appears in the display. Press the SPEAKER key again to turn the speaker off.
Ringer
The ringer has four volume levels: HIGH, MIDDLE, LOW, and OFF. To adjust the volume of the ringer, press the UP or DOWN key until the desired level appears in the display (make sure the SPEAKER has not been pressed and the handset is not lifted). The fax will ring at the new volume level each time you change the level. If you select OFF, press the START key to confirm your selection.
When the ringer is off and the reception mode is set to TEL/FAX, faxes will be received quietly and telephone calls will be indicated with a low level on the ringer.
Transmittable Documents
Your fax can transmit most standard office documents. Specific guidelines are as follows:
Size and weight
The size and weight of documents which you can load in the document feeder depend on whether you load one sheet at a time or several sheets at once.
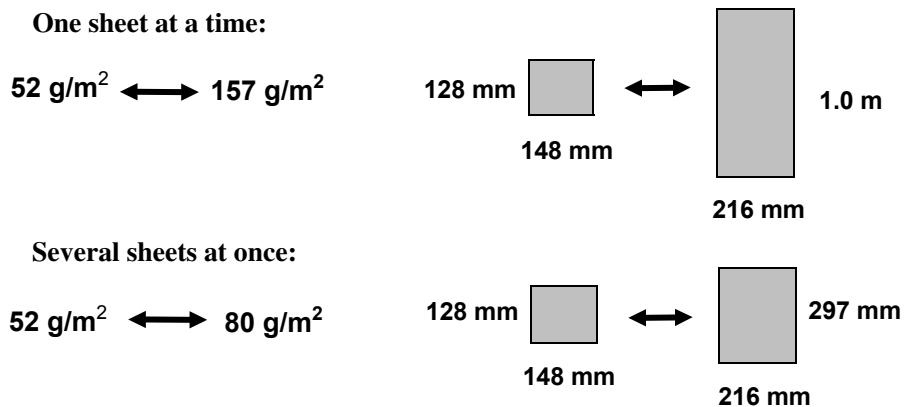
Note: The area of the document which is scanned by the fax is slightly smaller than the actual document size. The scanning width is 210mm , and the scanning length is the length of the document minus 4mm .
Other restrictions
Documents written in yellow, greenish yellow, or light blue ink cannot be transmitted, as the scanner does not recognise these colours.
Ink, glue, and correcting fluid on documents must be dry before they pass through the document feeder.
All clips, staples, and pins must be removed from documents before transmission. If these are not removed, they may damage the fax.
Documents which are patched, taped, torn, smaller than the minimum size, carbon backed, or easily smudged should be photocopied, and the copy used for transmission.
Loading the Document
Up to 20 pages can be placed in the feeder at one time. The pages will be automatically fed into the fax starting from the page on the bottom.
If you need to send or copy more than 20 pages, place the additional pages gently and carefully in the feeder just before the last page is scanned. Do not try to force them in, as this may cause double-feeding or jamming.
If your document consists of several large or thick pages which must be loaded one at a time, insert each page into the feeder as the previous page is being scanned. Insert gently to prevent double-feeding.
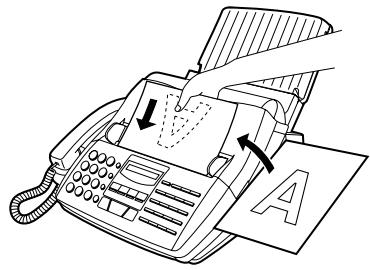
1 Adjust the document guides to the width of your document.
2 Place the document face down and push it gently into the document feeder. The top edge of the document should enter the fax first.
- The feeder will draw the leading edge of the document into the fax. READY TO SEND will appear in the display.
3 You can now either make resolution and/or contrast settings as described in the following section, or dial the other party as described in the section, "Dialling and transmission".
Important:
If you need to remove the document from the feeder before transmission or copying, first open the operation panel by pulling the front edge up (grasp it at the PANEL RELEASE mark), and then remove the document. If you try to pull the document out without opening the operation panel, you may damage the feeder mechanism.
Optional Transmission Settings
If desired, there are several transmission settings which are possible before dialling and transmitting the document.
Note: To make the settings, the document must first be loaded in the feeder.
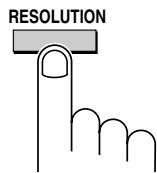
Resolution
Your fax has four resolution settings. If you do not make a setting, the fax will automatically send the document in STANDARD resolution.
STANDARD: Use STANDARD for ordinary documents. This setting gives you the fastest and most economical transmission.
FINE: Use FINE for improved reproduction, especially with documents containing small letters or fine drawings.
SUPER FINE: Use SUPER FINE when you need the highest quality of reproduction.
HALF TONE: Use HALF TONE for photographs and illustrations. The original will be reproduced in 64 shades of grey.
Note: In order to transmit in FINE or SUPER FINE resolution, the receiving fax machine must also have that resolution. If it doesn't, your fax will automatically step down to the next best available setting.
Contrast
The contrast is normally set to AUTO, which means that the fax automatically controls the contrast, but for faint documents you can change the setting to DARK.
Setting the resolution and contrast
Press the RESOLUTION key one or more times until the desired resolution and contrast settings appear in the display.
- The first time you move through the list of resolution settings, the contrast setting AUTO will appear next to each resolution setting. The second time you move through the list, the contrast setting DARK will appear.
Chapter 3 Sending Documents
Cover Sheet
You can have your fax generate a cover sheet and send it as the last page of the transmission. The cover sheet includes the date and time, the sender's name and number, and the receiver's name and number if an automatic dialling number is used. The total number of pages sent is indicated on the bottom.
Your name and number must be programmed in order for them to appear on the cover sheet. (See "Entering Your Name and Fax Number" in Chapter 2.)
To include a cover sheet with each transmission, set Option Setting 18 to YES as described in Chapter 9, "Optional Settings". Note that once Option Setting 18 is set to YES, cover sheets will be automatically included with every transmission until you change the setting to NO.
When the cover sheet function is turned on, you can also select a message which will appear as a header at the top of the cover sheet. To do so, follow the steps below. Note that the message selection is only effective for one transmission.
1 Press the keys shown at right. COVER SHEET HEAD will appear in the display.

2 Select a message by entering a number from "1" to "4" as shown below:
"1": URGENT ①
"2": IMPORTANT
"3": CONFIDENTIAL
"4": PLS. DISTRIBUTE
Example
Batch Page Numbering (Page Counter)
This setting is used to change the page numbering of the transmitted document from simple numbering ("P.1", "P.2", etc.) to batch numbering, which means that a slash and the total number of pages being sent are added after each page number (for example, "P. 1/5", "P.2/5", etc.). This allows the receiver to check for any missing pages.
If you are sending a cover sheet, do not include the cover sheet in the total number of pages. Your fax will adjust the number to include the cover sheet automatically.
If you need to cancel a batch number entry, remove the document from the feeder or press the STOP key.
If the number of pages actually transmitted does not coincide with the batch number entered, the alarm will sound and PAGE COUNT ERROR will appear in the display. "PAGE E." will also appear in the "NOTE" column of the Transaction Report if it has been set to print out.
1 Load the document. Press the keys shown at right. PAGE COUNTER SET will appear in the display.
FUNCTION


2 Enter the total number of pages ("01" to "99") by pressing the number keys.


(Example)
Chapter 3 Sending Documents
Dialling and Transmission
Once you have loaded the document and made any desired contrast/resolution settings, you are ready to dial the number of the receiving fax machine and transmit the document. There are several ways of dialling, and you can select the one which best suits your needs.
Normal Dialling
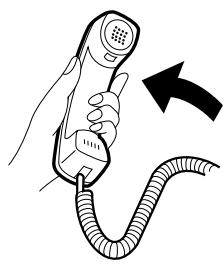
With Normal Dialling, you pick up the handset (or press the SPEAKER key) and dial as you would to make a telephone call. If the receiving machine is set to receive faxes manually (this means that the receiving party answers your call by picking up the handset and speaking, and then presses their Start key to begin fax reception), you can talk with them before sending the fax.
1 Pick up the handset or press the SPEAKER key. Listen for the dial tone.
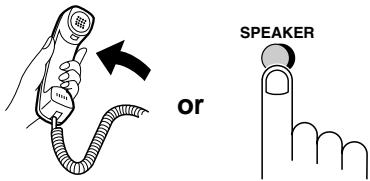
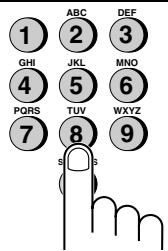
2 Dial the number of the receiving machine by pressing the numeric keys.
3 Wait for the connection. Depending on the setting of the receiving machine, you will either hear a facsimile reception tone or the other person will answer.
- If the other party answers, ask them to press their Start key (if you pressed the SPEAKER key, pick up the handset to speak with them). This causes the receiving machine to issue a reception tone.
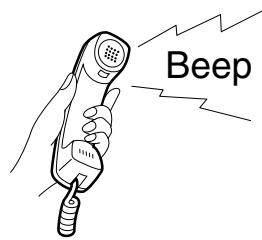
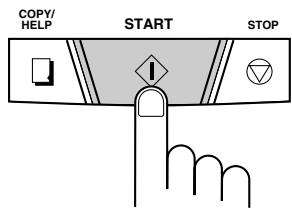
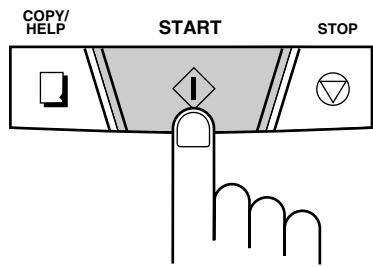
4 When you hear the reception tone, press the START key. Replace the handset if you used it.
- When transmission is completed, the fax will beep.
Direct Keypad Dialling
If you do not need to talk with the other party before sending the fax, you can just dial; it isn't necessary to pick up the handset or press the SPEAKER key.
Direct Keypad Dialling is a form of automatic dialling, so if you need to insert a pause between any digits of the number, press the REDIAL key. (For more information on pauses, see "Storing Numbers for Automatic Dialling" in Chapter 2.)
1 Enter the number of the receiving machine by pressing the numeric keys.
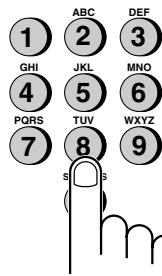
2 Check the display. If the number of the receiving machine shown is correct, press the START key.
- If it is not correct, press the STOP key to backspace and clear one digit at a time, and then re-enter the correct digit(s).
Chapter 3 Sending Documents
Rapid Key Dialling
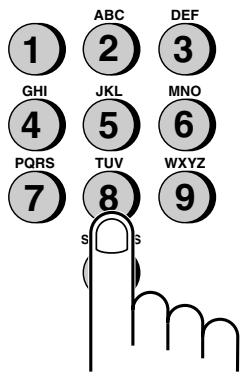
If the number you want to dial has been stored for automatic dialling as a Speed Dial number from 01 to 38 (see "Storing Numbers for Automatic Dialling" in Chapter 2), you can dial it by pressing the corresponding Rapid Key. (If the Speed Dial number is from 20 to 38, press the SHIFT key and then press the Rapid key.)
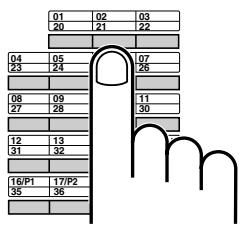
Example: To dial Speed Dial number "02", press Rapid Key 02/21.
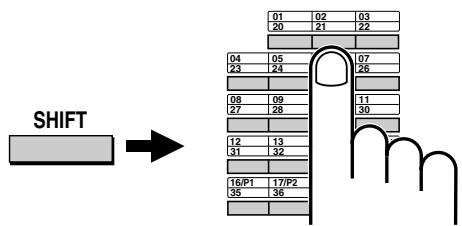
Example: To dial Speed Dial number "21", press the SHIFT key and then press Rapid Key 02/21.
The name of the receiving party will appear in the display. If no name was stored, the fax number will appear. (If the name or number is incorrect, press the STOP key.)
The document will be automatically transmitted once the connection is made.
Speed Dialling
Speed Dialling can be used to dial any number which has been stored for automatic dialling (see "Storing Numbers for Automatic Dialling" in Chapter 2).
1 Press the SPEED DIAL key and then enter the two digits of the Speed Dial number by pressing the number keys.
- To enter numbers 1 through 9, first enter 0 and then the number.
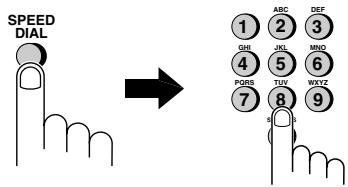
2 Check the display. If the name or number shown is correct, press the START key. (If not, press the STOP key and then repeat Step 1.)

Using the SEARCH/R key
If you don't remember the Rapid Key or Speed Dial number in which you have stored a particular fax number, you can search for the number by following the steps below. Once you have found the number, you can dial it and transmit the loaded document by simply pressing the START key.
1 Press the SEARCH/R key.

2 Enter the first letter of the stored name by pressing the appropriate number key (the key which corresponds to the required letter) one or more times until the letter appears in the display. If the name begins with a special character or number, press "1".
- If you don't remember the first letter, go to Step 3 (you will scroll through the list from the beginning).
- If a name wasn't stored for the number, press "0". This will cause numbers, not names, to appear when you scroll.
3 Press the "#" key or the " × " key to scroll through the names (numbers if you pressed "0"). Stop when the desired name appears in the display.
- If no names have been stored that begin with the entered letter, you will scroll from the next name, in alphabetical order, in the list. If no names/numbers have been stored at all, NO DATA will appear.

4 Press the START key. The document will be automatically transmitted once the connection is made.
Chapter 3 Sending Documents
Automatic redialling
If you use automatic dialling (including Direct Keypad Dialling) and the line is busy, your fax will automatically redial the number. Up to 2 redialling attempts will be made at intervals of 5 minutes.
To stop automatic redialling, press the STOP key.
If desired, you can change the number of times the fax redials with Option Setting 4, and the interval at which redialling takes place with Option Setting 3. See Chapter 9, "Optional Settings".
Using the REDIAL key
You can press the REDIAL key to radial the last number dialled. To send a document, proceed from Step 3 of Normal Dialling. Note that the speaker will be automatically activated, so you do not need to pick up the handset immediately.
Using FAX mode
When the reception mode is set to FAX (press the RECEPTION MODE key until the arrow in the display points to FAX), your fax automatically answers all calls on 1 ring and receives the incoming documents.
You can change the number of rings after which the fax answers incoming calls by changing Option Setting 2 (see "Optional settings" in Chapter 9). Any number from "1" to "5" can be selected ("1" to "3" rings in Eire).
If you pick up the handset before your fax answers, you can talk to the other party and/or receive a document as described below in "Using TEL mode". For example, with the fax set to answer on 4 rings, you can receive both voice calls and fax messages in FAX mode by answering before the fourth ring, but still have the fax answer calls automatically at times when you are unable to respond personally.
Using TEL mode
When the reception mode is set to TEL (press the RECEPTION MODE key until the arrow points to TEL), you must answer all calls (including fax transmissions) using the fax's handset or an extension phone connected to the same line.
Receiving documents on your fax machine
To receive a document on your fax machine, pick up the handset when it rings.
- If you hear a fax tone, wait until RECEIVING appears in the display, and then replace the handset.
- If the other party first talks to you and then wants to send a fax, press the START key after speaking (press your START key before the sender presses their Start key). Replace the handset.
Note: If you have set Option Setting 15 to OFF and you hear a fax tone when you pick up the handset, you must press the START key to begin reception.
Chapter 4 Receiving Documents
Receiving documents on an extension phone
If you hear a fax tone when you answer an extension phone, wait until your fax answers with a pronounced, high-pitch tone, and then hang up. Your fax will automatically receive the document.
If your fax does not respond within 5 seconds, noise on the line may be preventing it from detecting the fax tone. In this case, manually activate fax reception as described in the following paragraph.
If the other party first talks to you and then wants to send a document, press "5", "" and "'" if you are on a tone dial phone. If you are on a pulse dial phone, set the handset down (do not hang up), walk over to the fax, pick up the handset, and press the START key.
- Your fax will not accept the signal to begin reception ("5", "×", and "×") if a document is loaded in its feeder.
Comments:
-
If you have set Option Setting 15 to OFF and hear a fax tone when you answer the extension phone, you must press "5", "×", and "×" if you are on a tone dial phone, or walk over to the fax, pick up the handset, and press the START key if you are on a pulse dial only phone.
-
The code used to activate fax reception from a tone dial extension phone ("5", "×", and "×") can be changed if desired. See Option Setting 5 ("Tel/Fax Remote Number") in Chapter 9, "Optional Settings".
-
If you do not intend to use the code for activating fax reception, you can turn detection of the code off by resetting Option Setting 6. This will ensure that the fax never mistakenly attempts to begin reception if it detects a signal which it perceives to be similar to "5", "×", and "×" while you are talking on an extension phone.
Using TEL/FAX mode
When the reception mode is set to TEL/FAX (press the RECEPTION MODE key until the arrow in the display points to TEL/FAX), your fax automatically answers all calls on 1 ring. After answering, your fax monitors the line for about 5 seconds to see if a fax tone is being sent.
If your fax detects a fax tone (this means that the call is an automatically dialled fax), it will automatically begin reception of the incoming document.
If your fax doesn't detect a fax tone (this means that the call is a voice call or manually dialled fax), it will make a ringing sound (called pseudo ringing) for 15 seconds to alert you to answer. If you don't answer within this time, your fax will send a fax tone to the other machine to allow the calling party to send a fax manually if they desire.
Comments:
- Only the fax will alert you to voice calls or manually dialled faxes by pseudo ringing. An extension phone connected to the same line will not ring after the connection has been made. The handset of a parallel extension telephone can, however, be picked up to answer the call. To disable the pseudo ringing once the handset is lifted, press "#" key on the dial pad of the phone. This can only be done from a tone dial phone.
- The number of rings to answer can be adjusted by changing Option Setting 2. See Chapter 9, "Optional Settings".
- The duration of pseudo ringing can be adjusted with Option Setting 9. See Chapter 9, "Optional Settings".
- When this function is enabled, the machine may not be connected to lines listed in telephone directories issued by public network operators. Publication of the number of this machine should be accompanied with advice of the function.
Chapter 4 Receiving Documents
2 in 1 Print
To save paper, you can have the size of your incoming faxes reduced by 55% . This will allow you to receive, for example, a 2-page document on one page (note that this may not be possible if the document pages are longer than your printing paper). To turn on this function, follow the steps below.
1 Press the keys shown at right. 2 IN 1 PRINT will appear in the display.


2 Press "1" to turn on the function, or "2" to turn it off.

3 Press the STOP key.

Reception Ratio
Your fax has been set at the factory to automatically reduce the size of received documents to fit the size of the printing paper. This ensures that data on the edges of the document are not cut off. If desired, you can turn this function off and have received documents printed at full size.
Note: If a document is too long to fit on the printing paper, the remainder will be printed on a second page. In this case, the cut-off point may occur in the middle of a line.
Note: Automatic reduction may not be possible if the received document is too large, contains too many fine graphics or images, or is sent at high resolution. In this case, the remainder of the document will be printed on a second page.
1 Press the keys shown at right. RECEP-TION RATIO will appear in the display.


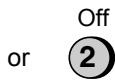
2 Press "1" to turn automatic reduction on, or "2" to turn it off.

or

3 Press the STOP key.

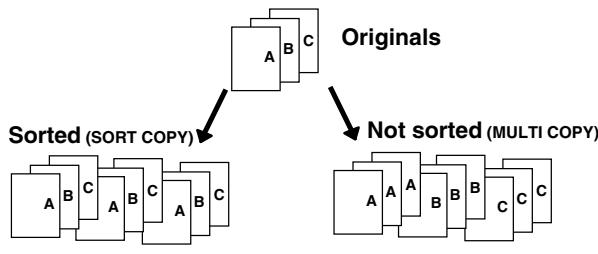
Your fax can also be used to make copies. Single and multiple copies (up to 99 per original) can be made, enabling your fax to double as an office copier.
The default resolution for copying is SUPER FINE.
If you are making multiple copies of more than one original, you can choose whether to have the copies sorted (SORT COPY) or not sorted (MULTI COPY). The following example shows how the copies are ordered in each case when 3 copies each of 3 originals are made.
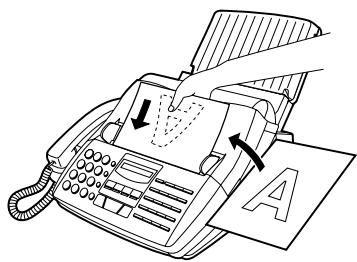
1 Load the document(s) face down.
- If desired, adjust the resolution and/or contrast with the RESOLUTION key.
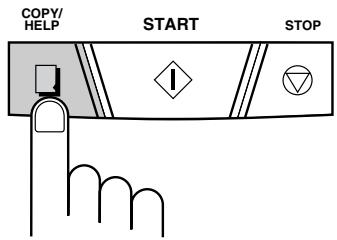
2 Press the COPY/HELP key.
- If you are only making one copy of the original (or of each original) and don't want to make a reduction or enlargement setting, press the START key twice. Copying will begin. If you are only making one copy and want to make a reduction or enlargement setting, press the START key once and go to Step 5.
Chapter 5 Making Copies
3 Press "1" (MULTI COPY) if you don't want the copies sorted, or "2" (SORT COPY) if you want them sorted.
Multi

Sort

4 Enter the desired number of copies with the numeric keys.
- If the desired number of copies is from 1 to 9, enter "0" first.
- If you don't want to make a reduction or enlargement setting, press the START key. Copying will begin.


(Example)
5 Set the amount of reduction or enlargement by entering a number from "1" to "5" as shown below. Copying will begin.
1: AUTO (automatic size adjustment to match the size of the printing paper)
2: 50%
3: 100% (no reduction or enlargement)
4: 125%
5: 135%

(Example)
Note: If you place a large number of originals in the feeder, the memory may become full before all of them can be scanned (MEMORY IS FULL will appear in the display). If this happens, press the START key to copy the originals which have been scanned, and then repeat the copy procedure for the remaining originals, including the original which was being scanned when the memory became full.
Copy Cut-off
When making a copy, your fax has been set at the factory to not print the remaining part of a document if the document is longer than the printing paper. If you want your fax to always print the remaining part of the document on a second page, follow the steps below.
1 Press the keys shown at right.
COPY CUT-OFF will appear in the display.
FUNCTION


2 Press "1" to turn copy cut-off on (the remaining part of the document will not be printed), or "2" to turn it off (the remaining part will be printed on a second page).

or

3 Press the STOP key.


Your fax can be used like a regular telephone to make and receive voice calls.
To make or receive a phone call, the power must be on.
1 Pick up the handset or press the SPEAKER key. Listen for the dial tone.
or

SPEAKER
2 Dial the number using one of the following methods:
- Normal Dialling: Enter the full telephone number with the numeric keys.
- Rapid Key Dialling: Press the appropriate Rapid Key.
- Speed Dialling: Press the SPEED DIAL key, and enter the 2-digit Speed Dial number with the numeric keys.
3 Speak with the other party when they answer.
- If you pressed the SPEAKER key, pick up the handset to talk.
Using the SEARCH/R key
You can use the SEARCH/R key to search for a Rapid Key or Speed Dial number. First search for the number as described in "Using the SEARCH/R key" in "Dialling and Transmission" in Chapter 3, then pick up the handset or press the SPEAKER key. The number will be dialled automatically (do not press the START key).
Redial
The last number called can be redialled by pressing the REDIAL key (it is not necessary to pick up the handset or press the SPEAKER key). When the other party answers, pick up the handset to talk.
Issuing tone signals
If you are on a pulse dial line, you can use the "×" key to temporarily issue tone signals when you press the numeric keys. This allows you to use certain telephone services which require entering tone signals.
When you need to enter one or more tone signals, press the "×" key and then press the appropriate numeric keys.
To change back to pulse mode, simply hang up (the dialling mode automatically changes back to the setting of Option Setting 8 when you hang up).
PBX operations and public network services
If your fax is connected to a PBX, you can use it to perform the following operations:
Making enquiry calls: During a call, you can put the other party on hold, make a further call to a third party, and then go back to your original caller.
Transferring calls: You can transfer a call to another number on the same PBX without operator assistance.
Your fax is also fully compatible with British Telecom Network Services and Telecom Eireann Phone Plus Services and can be used in conjunction with any facility that requires a recall command.
Chapter 6 Making Voice Calls
Note: To perform PBX operations, Option Setting 14 must be set to the appropriate recall mode for your PBX (see Chapter 9, "Optional Settings"). Check your PBX manual or consult your supplier for the correct recall mode. If you are using British Telecom Network Services or Telecomm Eireann Phone Plus Services, Option Setting 14 must be set to time-break recall. (This is the initial factory setting).
Making enquiry calls
1 During the telephone conversation, press the SEARCH/R key. This puts the other party on hold.

2 When you hear the dial tone, dial the number of the third party for the enquiry call.
3 When you have finished the enquiry call, you will be automatically returned to the original caller as soon as the third party hangs up.
Transferring calls
1 During the telephone conversation, press the SEARCH/R key. This puts the other party on hold.

2 When you hear the dial tone, dial the number to which you want to transfer the call. When the other party answers, hang up, and the call will be transferred.

Answering Machine Connection
Preparations
If you have connected an answering machine to your fax as described in "Connections" in Chapter 1, you can receive both voice messages and fax transmissions on the same line while you are out. To use the connection, first change the outgoing message of your answering machine, and then set the reception mode of your fax to A.M. when you go out.
Changing the outgoing message
The outgoing message (OGM) of your answering machine should be changed to inform callers who want to send a fax to press their Start key. For example, your message might go as follows:
"Hello. You've reached the ABC company. No one is available to take your call right now. Please leave a message after the beep or press your facsimile Start key to send a fax. Thank you for calling."
Comments:
- It is advisable to keep the length of the message under 10 seconds. If it is too long, you may have difficulty receiving faxes sent by automatic dialling.
- Your callers can even leave a voice message and send a fax message on the same call. Modify your outgoing message to explain that they can first leave a voice message, and then press their Start key to send a fax.
Using the Connection
1 Set the reception mode of your fax to A.M. by pressing the RECEPTION MODE key.
2 Set your answering machine to auto answer.
- Your answering machine must be set to answer on a maximum of two rings. If not, you may not be able to receive faxes sent by automatic dialling.
- If your answering machine has a toll saver function, make sure that it will answer by the fourth ring.
Note: If your answering machine has a remote retrieval function, make sure the code used to activate remote retrieval is different from the code used to activate fax reception with an extension telephone (see Chapter 4, "Receiving Documents"). If they are the same, entering the code from an outside telephone to retrieve messages will cause the fax machine to be activated.
How the answering machine mode operates
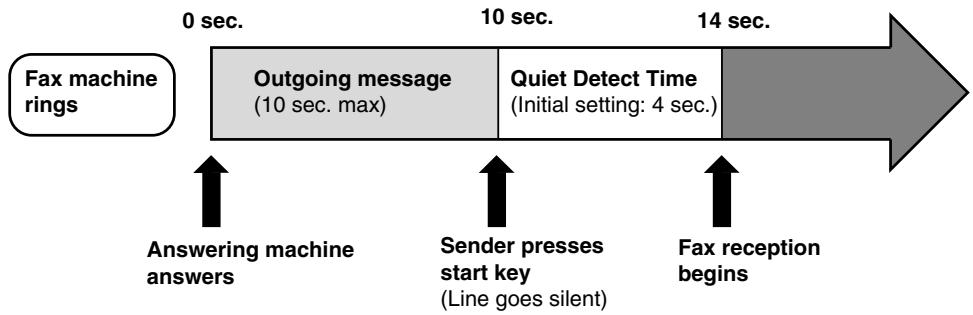
While you are out, all of your incoming calls will be answered by your answering machine and its outgoing message will play. Voice callers can leave a message. During this time, your fax machine will quietly monitor the line. If your fax machine detects a fax tone or a duration of silence equal to four seconds (called "Quiet Detect Time"), it will take over the line and begin reception.
Your fax machine listens for a duration of silence because some transmitting machines do not send a fax tone when the fax is sent manually (this means that the person faxing uses the handset to dial and then presses their Start key after listening to your outgoing message). Pressing the Start key in this case causes the line to go silent. The timing for fax reception is shown below.
If the connection is not good or there is noise on the line, the answering machine and/or fax machine may not respond properly.
The call counter on your answering machine may indicate that voice messages were received, when only fax messages were received.
Note: To prevent the fax from taking over the line and beginning reception if you call in from an external phone or answer on an extension phone, press any three keys (other than the code to activate fax reception, "5", "×", and "×") on the dial pad of the phone. This can only be performed from a phone capable of tone dialling.
Chapter 7 Answering Machine Connection
If it doesn't work
If the connection doesn't operate properly, first make sure that the answering machine is properly connected to the fax. One end of the answering machine line should be inserted in the "TEL. SET" socket on the fax (or another wall line socket), and the other end in the answering machine's telephone line socket.
If the connections are correct and A.M. mode still doesn't operate properly, the timing with which the answering machine and the fax operate are probably not well synchronized. Some common synchronization problems and their solutions are described below.
Are callers who want to leave a voice message being interrupted by the fax before they can do so?
The fax is set to take over the line and begin reception if it detects a specified duration of silence (called "Quiet Detect Time"). If your outgoing message contains a pause or the caller pauses while leaving a message, and the pause is longer than the specified duration, the fax will interrupt.
It is best to shorten or eliminate such pauses, but if necessary you can also try lengthening the Quiet Detect Time setting. This procedure is described in "Optional Settings" at the end of this chapter.
Are callers who want to send a fax manually having trouble doing so after your answering machine's outgoing message plays?
If so, the answering machine may be disconnecting the line (hanging up) before your fax has a chance to take over the line and begin reception. You can make your fax activate sooner by shortening the Quiet Detect Time setting. This procedure is described in "Optional Settings" at the end of this chapter.
Are you having trouble receiving documents sent by automatic dialling?
Make sure that your answering machine's outgoing message is less than 10 seconds long, and that your answering machine is set to answer on between 2 and 4 rings.
Inserting a short pause (about 4 seconds) at the beginning of your answering machine's outgoing message might also help, as this gives your fax a chance to clearly hear and detect the fax "calling" tone which the transmitting fax sends in the case of automatic dialing.
Optional A.M. Connection Settings
If necessary, you can use the following settings to improve the response of the answering machine connection to incoming calls.
Quiet Detect Time
This function causes the fax machine to take over the line and begin reception if a certain duration of silence is detected after the answering machine answers.
Time selections for the period of silence are 1 to 10 seconds. Quiet Detect Time has been set to 4 seconds at the factory. This gives the best performance with most answering machines; however, you may need to adjust this setting depending on the disconnect time of your answering machine.
Some answering machines may have unusually fast disconnect times (equal to or very slightly less than 4 seconds), which means that the answering machine may disconnect the line before fax reception can begin. In this case, try a Quiet Detect Time setting of about 3 seconds.
If the fax machine is interrupting callers before they can leave a message, try a longer Quiet Detect Time setting. If your outgoing message includes a period of silence, make sure that the setting is longer than that period of silence, or re-record your outgoing message to shorten the silence.
To change the Quiet Detect Time setting, reset Option Setting 10 as described in Chapter 9, "Optional Settings".
Note: Quiet Detect Time can be turned off by entering "00" for the time. Note, however, that the fax machine will not be able to receive faxes sent manually by Normal Dialling.
If it still doesn't work...
With certain answering machines, it may not be possible to find a Quiet Detect Time setting which will allow both fax reception and uninterrupted voice message recording. In this case, callers on tone dial lines can still send faxes by pressing "5", "×", and "×" on their fax. This is the code for activating fax reception which can be changed by resetting Option Setting 5.
To use this method, turn off Quiet Detect Time by resetting Option Setting 10 to "00", and then change your outgoing message to inform callers on tone dial lines that they can send a fax by pressing "5", "×", "×", and then their Start key.
Chapter 7 Answering Machine Connection
Select Auto Receive
When this function is turned on, your fax will answer the call after 5 rings if the answering machine for some reason fails to answer before that time. This ensures that you will receive fax messages even if the answering machine's tape fills up or the answering machine is not turned on.
This function has been turned off at the factory. If you want to turn it on, reset Option Setting 13 as described in Chapter 9, "Optional Settings".
Note: When this function is turned on, make sure that the answering machine is set to answer on 4 rings or less. If it isn't, the fax will always answer first, preventing callers from leaving voice messages.
Quiet Detect Start Timing
This setting can be used to delay the start of the Quiet Detect Time function. For example, if you want to insert a pause at the beginning of your answering machine's outgoing message to ensure clear detection of fax signals, you can use this setting to delay the start of silence detection so that the pause will not cause the fax to take over the line.
Quiet Detect Start Timing has been turned off at the factory. If you want to use this function, turn it on by resetting Option Setting 11 to the desired delay time (1 to 15 seconds). This procedure is described in Chapter 9, "Optional Settings". As a general guide, the delay time should be slightly longer than the pause before the outgoing message.
Off Hook Hold
This setting can be used to make the fax automatically take over the line and attempt reception after a set number of seconds.
For normal operation, we recommend that you do not turn this function on; however, if you are having trouble receiving faxes in A.M. mode, you can try various time settings to see if it helps. Turn the function on by resetting Option Setting 12 to the desired number of seconds (1 to 255 seconds). This procedure is described in Chapter 9, "Optional Settings".
Hint: This setting is useful in situations where you only want to receive fax transmissions (no voice messages), but still want to use the answering machine to play an outgoing message. In this case, if your outgoing message was, for example, 14 seconds, you would set the time to 15 seconds.
Blocking Reception of Unwanted Faxes
The Anti Junk Fax function allows you to block reception of faxes from parties which you specify. This saves paper by not printing out unwanted "junk" faxes.
To use this function, first turn it on by setting Option Setting 16 to YES as described in Chapter 9, and then enter the fax numbers from which you do not want to receive faxes as shown below.
Comments:
- Up to 5 numbers can be entered in the Anti Junk Number List.
- To clear a number from the Anti Junk Number List, you need to know the 1-digit number which identifies it. If you have forgotten this number, print out the Anti Junk Number List as described in Chapter 10.
1
Press the keys shown at right.
JUNK FAX # MODE will appear in the display.

(3)

2
Press "1" to store a number in the Antic Junk Number List, or "2" to clear a number from the list.
(1)
or

3
Storing: Enter a 1-digit number from
"1" to "5". This number identifies the fax number you will store in the next step.
Clearing: Enter the number which identifies the fax number you want to clear, and go to Step 5.
①
(Example)
Chapter 1 Special Functions
4 Enter the fax number (max. of 20 digits).


(Example)
5 Press the START key.

START
6 Return to Step 3 to enter (or clear) another number, or press STOP to exit.
Step 3 or

Memory
Your fax has a memory which can be used to temporarily store both incoming and outgoing documents.
Approximately 37 pages of average content (based on ITU-T Test Chart #1 at standard resolution) can be held in memory if they are all going to be transmitted (25 pages if Option Setting 20, Error Correction Mode, is set to YES), or 30 pages if they are all received (27 pages if Option Setting 20 is set to YES). Less can be held if any were scanned using fine or halftone resolution.
Sending documents from memory
With this function, the original document is scanned immediately, stored in memory, and then transmitted once the connection to the receiving machine is made. This is convenient when transmitting to places where the line is often busy, as it saves you from waiting to pick up the original document and frees the feeder for other operations. After transmission, the document will be cleared from memory.
Only one memory transmission can be set at a time.
The amount of memory currently occupied appears as a percentage in the display while the document is being scanned.
1 Load the document(s).
- Set the resolution and/or contrast if desired.
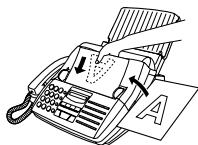
2 Press the MEMORY key and then "1".

①
3 Enter the number of the receiving machine using one of the following methods:
- Press a Rapid Key.
- Press the SPEED DIAL key and enter a Speed Dial number.
- Enter a full telephone number by pressing the number keys.

(Example)
4
Press the START key if you entered a Speed Dial number or a full number.
- The document will be scanned and stored in memory. Your fax will then dial the receiving machine and transmit the document (redialling will be done automatically if necessary).
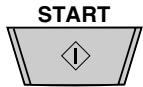
If the memory becomes full...
If the memory becomes full while the document is being scanned, MEMORY IS FULL will appear in the display.
Press the START key if you want to transmit the pages which have been stored up to that point in memory. The remaining pages will be ejected from the feeder. After transmission, the memory will be cleared and you can transmit the remaining pages. You will also need to transmit the page which was being scanned when the memory filled up.
Press the STOP key if you want to cancel the entire transmission.
Substitute reception into memory
This is a back-up function which is automatically activated if your fax runs out of paper, the printing ribbon needs replacement, or the paper jams.
When you have received a document in memory, FAX RX IN MEMORY will appear in the display, alternating with OUT OF PAPER, FILM END, or PAPER JAM. When you add paper, replace the imaging film, or clear the jam, the stored documents will automatically print out.
If you received documents in memory because the fax ran out of paper, be sure to add paper which is the same size as the paper previously used. If not, the document print-out size may not match the size of the printing paper.
Caution!
- When documents are stored in memory, do not turn the power off. This will erase all of the contents.
- If documents received in memory are lost due to a power failure or other interruption of the power supply, a "CLEAR REPORT" will be printed out when the power is restored. This gives information about the receptions lost, including the fax numbers of the transmitting machines if they are available.
Broadcasting
This function allows you to send the same document to as many as 20 different locations with just one operation. First store the document in memory, then enter the numbers of the receiving machines. The document will be transmitted to each location.
You can only use Rapid Keys or Speed Dial numbers to dial the numbers of the receiving machines.
1 Load the document(s).
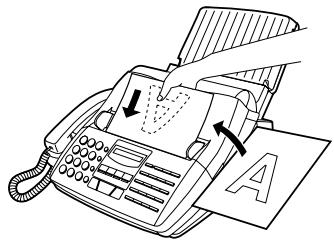
2 Press the MEMORY key and then "2".

3 Dial the receiving machines (maximum of 20) using one or both of the following methods:
- Enter one or more Speed Dial numbers by pressing the numeric keys.
- Press one or more Rapid Keys.

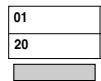
(Example)
4 Press the START key.
- Set the resolution and/or contrast if desired.
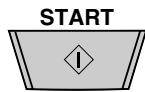
5 Press the START key. Transmission will begin.
- A Transaction Report is automatically printed out after Broadcasting is completed. Check the "Note" column of the report to see if any of the locations are marked "Busy" or have a communication error code. If so, send the document to those locations again.
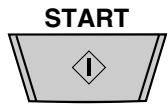
Broadcasting using a Group Key
If the fax machines to which you want to broadcast have all been programmed into one Group Key, you can perform the broadcasting operation using the following simplified procedure:
1 Load the document(s).
- Make any desired transmission settings (resolution, contrast, etc.).
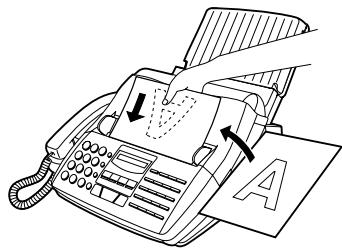
2 Press the appropriate Group Key. Transmission will begin.
(Example)
Polling (Requesting a Fax Transmission)
Polling allows you to request another fax machine to send a document to your fax machine. In other words, the receiving fax machine, not the transmitting fax machine, initiates the transmission. You can use your fax to both poll and be polled by others.
To use the polling function, you must first reset Rapid Key 15/POLL for use as a polling key. This is done by resetting Option Setting 17, as described in Chapter 9, "Optional Settings". (Note that when Rapid Key 15/POLL is set as a polling key, it cannot be used for Rapid Key Dialling.)
Requesting transmission
Note: Rapid Dial Keys cannot be used for polling. To dial a Rapid Dial location, press the SPEED DIAL key and then enter the 2-digit number corresponding to the Rapid Key.
1 Dial the fax machine you want to poll using one of the following methods:
- Pick up the handset (or press the SPEAKER key) and dial the full number. Wait for the fax answerback tone.
- Press the SPEED DIAL key and enter a 2-digit Speed Dial number.
- Enter the full number using the numeric keys.


(Example)
2 Press Rapid Key 15/POLL.
- If you used the handset, replace it when POLLING appears in the display. Reception will begin.
| 15/POLL |
| 34 |
Chapter 8 Special Functions
Being polled (polling standby)
To let another fax machine poll your fax, simply set the reception mode to FAX, and load the document(s) to be sent.
Transmission will take place when the other fax machine calls your fax and activates polling. Automatic reception is possible whilst your fax is on polling standby.
Polling security
Polling Security allows you to prevent unauthorized polling of your fax. When this function is turned on, polling will only take place when the fax number of the polling fax machine has been entered in your fax's list of permitted fax numbers (called "passwd numbers"). The number of the polling fax must also be correctly programmed into itself for identification.
To use Polling Security, follow the steps below to turn the function on, and then enter permitted numbers as shown on the following page.
1 Press the keys shown at right.
ENTRY MODE will appear in the display.
FUNCTION

(2)

2 Press the "#" key three times.
SECURITY SELECT will appear in the display.


3 Press "1" to turn polling security on, or "2" to turn it off.

or

4 Press the START key and then the STOP key.


Storing and clearing fax numbers for polling permission
You can store up to 10 fax numbers in your fax's list of permitted numbers.
1 Press the keys shown at right.
ENTRY MODE will appear in the display.
FUNCTION


2 Press the "#" key four times.
PASSCODE # MODE will appear in the display.


3 Press "1" to store a number, or "2" to clear a number.

or

4 Storing: Enter a 2-digit number from "01" to "10". This number identifies the fax number you will store in the next step.
Clearing: Enter the number which identifies the fax number you want to clear, and go to Step 6.


(Example)
5 Enter the fax number (max. of 20 digits).


(Example)
6 Press the START key.
ep 4 or

7 Return to Step 4 to enter (or clear) another number, or press STOP to exit.
Timer Operations
The Timer function allows you to set a transmission and/or polling operation to be performed automatically at a time you specify. One transmission operation and one polling operation can be set at the same time, and the times they will be performed can be specified up to 24 hours in advance.
As an example, you can use this function to take advantage of off-peak telephone rates without having to be there when the operation is performed.
- Note: Only a Speed Dial number can be used to dial the receiving machine.
Setting a timer operation
1
Press the keys shown at right.
TIMER MODE will appear in the display.
FUNCTION


2
Press "#" to set a transmission operation
(SEND MODE), or " ^ 念 " to set a polling operation (POLLING MODE).

or

3
Press "1" to select SET.

4
Enter the time at which you want the op
eration to take place (2 digits for the
hour and 2 digits for the minute).


(Example: 9:25)
5
Press the START key.
START

| 6 | Enter the Speed Dial number of the re- ceiving fax machine. | 0 | 5 |
| ·If this is a polling operation, go to Step 9. | (Example) | ||
| 7 | Press the START key. | START | |
| 8 | Adjust the resolution and/or contrast Skip this step if you don't want to change settings). | RESOLUTION | |
| 9 | Press the START key and then the STOP key. If this is a transmission op- eration, load the document in the feeder sometime before the specified time of transmission. | START | STOP |
To cancel an operation
If you need to cancel an operation after it has been set, follow the steps below.
1
Press the keys shown at right.
TIMER MODE will appear in the display.
FUNCTION


2
Press "#" to cancel a transmission operation, or " ^ " to cancel a polling operation.

or

3
Press "2" to select CLEAR.

4
Press the START key and then the STOP key.

Entering and Using Programs
If you frequently perform the same operation involving the same party, you can program all the steps of the operation into one Program Key. This allows you to perform the operation by simply pressing that key.
Rapid Keys 16/P1 and 17/P2 can be used as Program Keys. However, a key cannot be used if it is already being used for Rapid Key Dialling.
Only Speed Dial numbers can be used to enter fax numbers of receiving machines in the Program Keys. Full numbers cannot be entered.
If the program is for a regular transmission or polling operation, a timer setting can be included to have the operation performed automatically at a selected time.
To clear a mistake, press the STOP key.
Initial procedure
To program an operation, first perform the following basic procedure. After you have completed it, refer to the procedure for the specific operation you want to program.
1 Press the keys shown at right. PRG. ENTRY MODE will appear in the display.


2 Press "1" to select SET.

3 Press a Program Key ("16/P1" or "17/P2") to select it.
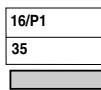
or
4 Enter a name for the program (max. of 20 characters). (See "Entering Letters for Names" in Chapter 2). Skip this step if you don't want to enter a name.


(Example)
5 Press the START key.
6 Press the "#" key or the "*" until the desired operation appears in the display. The operations will appear in the following order:
- Transmission ("SEND")
- Polling
- Broadcasting

7 Press the START key and then continue with the specific procedure for your operation (see the following pages).
Transmission
(Continued from "Initial procedure".)
8 Press "1" if you want the document to be scanned into memory and then transmitted, or "2" if you want the document to be transmitted directly from the feeder. (Note: If you select "2", you can include a timer setting in the program.)
- If you pressed "1", go to Step 11. If you pressed "2" and don't want to make a timer setting, go to Step 10.

9 Enter the time at which you want the operation to take place (2 digits for the hour and 2 digits for the minute).

(Example: 9:25)
10 Press the START key.

Chapter 8 Special Functions
11 Enter the Speed Dial number of the receiving fax machine.

(Example)
12 Press the START key.
13 If desired, set the resolution and/or contrast by pressing the RESOLUTION key (otherwise, skip this step).

14 Press the START key and then the STOP key.

Polling
(Continued from "Initial procedure".)
8 Enter the time at which you want the operation to take place (2 digits for the hour and 2 digits for the minute). If you don't want to make a timer setting, go to Step 9.

(Example: 9:25)
9 Press the START key.
10 Enter the Speed Dial number of the receiving fax machine.

(Example)
11 Press the START key and then the STOP key.

Broadcasting
(Continued from "Initial procedure".)
8 Enter the Speed Dial numbers of the receiving machines.


(Example)
9 Press the START key.

START
10 If desired, set the resolution and/or contrast by pressing the RESOLUTION key (otherwise, skip this step).

RESOLUTION
11 Press the START key and then the STOP key.

START

STOP
Clearing a Program key
To clear a Program key, follow these steps:
1 Press the keys shown at right.
PRG. ENTRY MODE will appear in the display.

FUNCTION


2 Press "2" to select CLEAR.

3 Press the Program Key you want to clear.

(Example)
4 Press the START key and then the STOP key.

START

STOP
Using a Program key
A programmed operation is performed as follows:
1 Load the document.
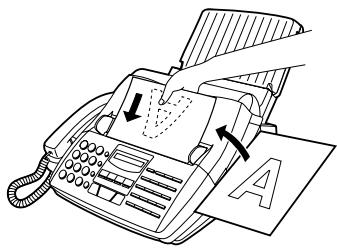
2 Press the appropriate Program Key.
(Example)
Note: A maximum of 2 timer operations can be set at any one time, including both timer operations set by pressing a Program Key and operations set as described in "Timer Operations" in this chapter.
To cancel a programmed timer operation
If a Program Key has been pressed for a timer operation and you need to cancel the operation before it is performed, follow these steps:
1 Press the Program Key.
(Example)
2 Press the START key.

A variety of optional settings are available which you can use to fine-tune your fax to better suit your needs. The settings are made by pressing the panel keys, and each setting is described in the list below.
Accessing the settings
1 Press the keys shown at left. OPTION SETTING will appear in the display.
FUNCTION


2 Move through the list of settings by pressing "#" to move forward, or "×" to move backward. The settings will appear in the order listed below.

or

3 When the desired setting appears in the display, make a selection by pressing the appropriate number key as described below. Your selection will be automatically stored.

(Example)
4 Press the STOP key.

Settings
Setting 1: FINE RESOLUTION PRIORITY
This sets the default resolution (the resolution used if a setting is not made with the RESOLUTION key) for transmitting documents. Press "1" (YES) to set it to FINE, or "2" (NO) to set it to STANDARD.
- Initial setting: "2"
Setting 2: NUMBER OF RINGS AUTO RECEPTION
This sets the number of rings your fax allows before answering an incoming call in FAX and TEL/FAX reception mode. Enter any number from "1" to "5" ("1" to "3" in Eire).
- Initial setting: "1"
Chapter 9 Optional Settings
Setting 3: RECALL INTERVAL
This sets the amount of time your fax will wait between automatic redials when the line is busy. Press "01" for 1 minute, "02" for 2 minutes, etc., up to a maximum of 15 minutes.
- Initial setting: "05"
Setting 4: RECALL TIMES
This sets the maximum number of times your fax will automatically redial if the line is busy. Enter any number from "00" to "04". (In Eire, enter any number from "01" to "03").
- Initial setting: "02"
Setting 5: TEL/FAX REMOTE NUMBER (TRANSFER CODE)
This sets the 1-digit number for activating fax reception from an extension phone. Enter any number from "0" to "9".
- Initial setting: "5"
Setting 6: REMOTE RECEPTION SELECT
This turns detection of the code for activating fax reception from an extension phone on or off. Press "1" to turn detection on, or "2" to turn detection off.
- Initial setting: "1"
Setting 7: TRANSACTION REPORT PRINT SELECT
This sets the condition for printing out a Transaction Report. Enter a number from "1" to "5" as follows:
"1" (ALWAYS PRINT): A report will be printed after each transmission, reception, or error.
"2" (ERR/TIMER/MEM): A report will be printed after an error, timer operation, or memory operation.
"3" (SEND ONLY): A report will be printed only after a transmission.
"4" (NEVER PRINT): A report will never be printed.
"5" (ERROR ONLY): A report will be printed only after an error occurs.
- Initial setting: "3"
Setting 8: DIAL MODE
This sets the mode of dialling. Press "1" if you are on a tone dial line, or "2" if you are on a pulse dial line.
- Initial setting: "1"
Note: All telephone lines accept pulse dialling but only modern types of exchange systems accept tone. To check your line type lift the receiver as if to make a telephone call and attempt dialling in the tone dial mode. If after dialling a digit you find that the dial tone has been removed from the line, you are on a tone dial line. If not, you are on a pulse dial line. Repeat the above in the pulse dial mode to confirm.
Setting 9: PSEUDO RINGING DURATION
This sets the duration of pseudo ringing when the reception mode is set to TEL/FAX. Enter a number from "1" to "4" as follows:
"1" (15 SEC.): 15 seconds
"2" (30 SEC.): 30 seconds
"3" (60 SEC.): 60 seconds
"4" (120 SEC.): 120 seconds
Ireland: Settings "3" and "4" are not available.
- Initial setting: "1"
Setting 10: QUIET DETECT TIME
This sets the duration of silence (in seconds) after which the fax will take over the line and begin reception when an answering machine is connected. Enter a number from "01" to "10", or enter "00" to turn off the function. (See Chapter 7 for more details.)
- Initial setting: "04"
Setting 11: QUIET DETECT START TIMING
This setting can be used to delay the start of the Quiet Detect Time function used for an answering machine connection. Enter a 2-digit number equal to the desired number of seconds of the delay ("01" to "15"), or enter "00" for no delay. (See Chapter 7 for more details.)
- Initial setting: "00"
Setting 12: OFF HOOK HOLD TIME
This setting can be used to make the fax automatically take over the line a set number of seconds after an answering machine connected to the fax answers. Set the number of seconds by entering a 3-digit number ("001" to "255"), or enter "000" to turn off the function. (See Chapter 7 for more details.)
- Initial setting: "000"
Setting 13: SELECT AUTO RECEIVE
Press "1" to have the fax answer a call if an answering machine connected to the fax does not answer within 5 rings. Press "2" to turn the function off. (See Chapter 7 for more details.)
- Initial setting: "2"
Setting 14: PBX RECALL
This sets the recall mode used for transferring calls on a PBX or utilising BT Network services. Refer to your PBX manual or consult your supplier for the correct setting if the factory setting is inappropriate. Enter "1" for earth recall, "2" for time break recall, or "3" for no operation.
- Initial setting: "2"
Setting 15: FAX SIGNAL RECEIVE
Your fax is set to automatically begin reception if you hear a high-pitched fax tone after answering a call. If you use a computer fax modem on the same line, you must turn this setting off in order to prevent your fax from mistakenly attempting to receive documents sent from the computer fax modem. Press "1" to turn the setting on, or "2" to turn it off.
- Initial setting: "1"
Setting 16: JUNK FAX NUMBER CHECK
Press "1" to prevent reception from fax numbers entered in the Anti Junk Fax List. Press "2" to allow reception from all numbers.
- Initial setting: "2"
Setting 17: POLLING
Press "1" if you want to use Rapid Key 15/POLL as a polling key. Press "2" if you want to use it as a regular Rapid Key.
- Initial setting: "2"
Setting 18: AUTO COVER SHEET
Press "1" (YES) to have the fax automatically generate a cover sheet and send it as the last page of each transmission. Press "2" (NO) to turn the function off.
- Initial setting: "2"
Setting 19: ACTIVITY REPORT AUTO PRINT OUT
Press "1" to have your fax automatically print out an Activity Report once every 30 operations. (The list can still be printed out on demand when desired.) Press "2" to turn automatic print-out off.
- Initial setting: "2"
Setting 20: ERROR CORRECTION MODE (ECM)
Press "1" (YES) to have any distortions in a transmission due to noise on the telephone line be corrected before print-out at the receiving end. This is only effective when the other machine has ECM as well. Press "2" (NO) to turn the function off. ECM is not available when communicating via PC.
- Initial setting: "1"
You can print out a variety of lists showing settings and information entered in the fax. You can also have the fax automatically print out a report on transactions after they are made. The lists and the report are described below.
Printing out a list
1 Press the keys shown at left. LISTING MODE will appear in the display.


2 Press the "#" key or the " × " key until the desired list appears in the display.

or

3 Press the START key.
Activity Report
This report shows information on your most recently performed send and receive operations (a combined maximum of 30 operations can appear). The report is divided into two parts: the TRANSMISSIONS ACTIVITY REPORT, which shows information on transmissions, and the RECEPTIONS ACTIVITY REPORT, which shows information on receptions.
If Option Setting 19 is set to "1", a report will be automatically printed out whenever information on 30 operations has accumulated. (A report can still be printed on demand at any time.)
All information is erased after a report is printed out. If automatic print-out is disabled and print-out has not been performed manually for 30 operations, the information on the oldest operation will be overwritten each time a new operation is performed.
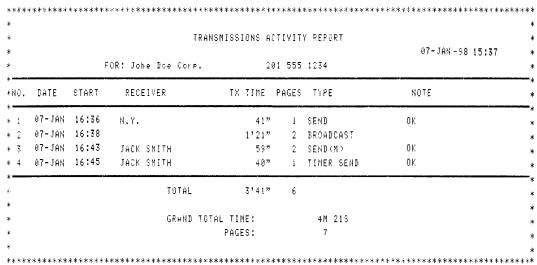
Explanation of headings
SENDER/ RECEIVER
The fax number of the other machine involved in the transaction. In the case of a transmission, the number dialled appears. In the case of a reception, the programmed ID of the sending machine appears. If this machine does not have an ID function, the communication mode will appear (for example, "G3").
PAGES
Number of pages transmitted or received.
NOTE
OK - Transmission/reception was normal.
P.FAIL - A power failure occurred.
JAM - A problem with the fax paper or document occurred.
NO PAPER - You ran out of fax paper during reception.
CANCEL - Transmission was cancelled because the STOP key was pressed, no document was in the feeder, or the other machine requested transmission using a function which your fax does not have.
COM.E-0 to COM.E-14 - A telephone line error prevented the transaction. Explanations of the error numbers are given in the following tables, however, these are primarily for use by service engineers. In general, you will want to simply try the transaction again. If necessary, check with the other party to make sure their machine is functioning properly.
Transmission errors
| E-0 | Able to recognise handshake signal, but it has errors. |
| E-1 | Cannot recognise the handshake signal from the receiver side. |
| E-2 | Line disconnected during transmission. |
| E-3 | Line disconnected after modem speed fall-back. |
| E-4 | Line disconnected during multi-page transmission. |
| E-6 | Cannot recognize the handshake signal for next page at receiver side. |
| E-7 | No response from receiver side or "disconnect signal" is received at transmitter side. |
| E-8 | Error was not corrected after the predetermined number of retries because of an error in a part of a page. |
| E-11 | Error occurred after or whilst reception by the remote (receiving) machine was revealed to be impossible. |
| E-12 | Error occurred just after fall-back. |
| E-13 | Error occurred after a response to a retransmission end command was received. |
Reception errors
| E-0 | Able to recognise handshake signal, but it has errors. |
| E-1 | Line disconnected during reception. |
| E-2 | Cannot recognise the handshake signal from the transmitter side. |
| E-3 | Cannot recognise the last handshake signal from the transmitter side. |
| E-4 | Cannot recognise the handshake signal for next page from the transmitter side in the case of mode change. |
| E-5 | Cannot recognise the handshake signal for next page from transmitter side. |
| E-7 | No response from transmitter or "disconnect signal" is received at receiver side. |
| E-8 | Error occurred upon completion of reception of all pages. |
| E-9 | Error occurred when mode was changed or transmission/reception switching was performed. |
| E-10 | Error occurred during partial page or physical page reception. |
| E-11 | Error occurred after or during inquiry from the remote (transmitting) machine as to whether reception was possible or not. |
| E-12 | Error occurred during or just after fallback. |
| E-13 | Error occurred after retransmission end command was received. |
| E-14 | Error occurred after voice communication command was received. |
Timer list
This list shows the timer operations which are currently set.
| TIMER LIST | ||
| FOR: Johe Doe Core. | 07-JAN-98 15:28 | |
| TIMER SEND | ||
| START | 17:00 | |
| RECEIVER | N.Y. | |
| RESOLUTION | FINE | :AUTO |
| TIMER POLLING | ||
| START | 10:00 | |
| SENDER | JACK SMITH | |
Telephone Number List
This list shows the fax and voice numbers which have been stored for automatic dialling.
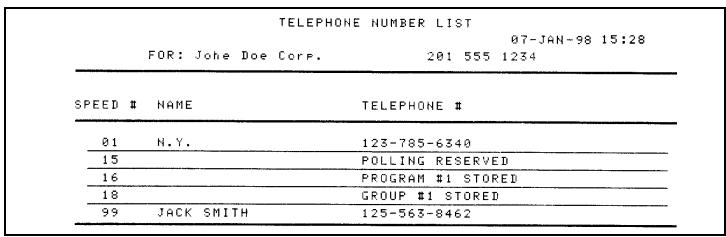
Passcode List
This list shows settings made for polling security, your name and fax/telephone number as entered in the machine, and a sample of the header printed at the top of every page you transmit (HEADER PRINT).
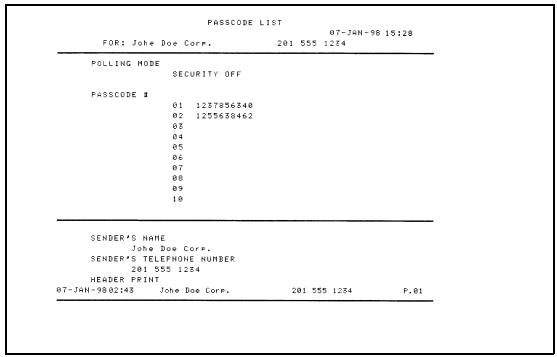
Option Setting List
This list shows the current status of the optional settings.
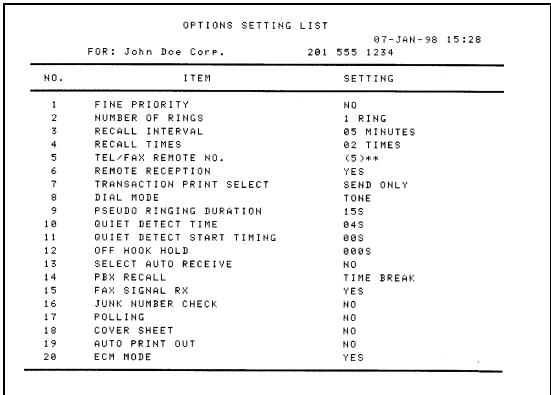
Anti Junk Number List
This list shows the fax numbers from which reception is not allowed.
| ANTI JUNK NUMBER LIST 07-JAN-98 15:28 ANTI JUNK # CHECK : NO | |
| STORED LOCATION | JUNK FAX # |
| 1 | 2015546621 |
| 2 | 2014573321 |
| 3 | 1023570251 |
Program and Group List
The top part of this list shows the programs which have been entered. The bottom part shows the fax numbers which have been stored in each Group Key.
| PROGRAM/GROUP LIST FOR: Johe Doe Corep. 07-JAN-98 15:28 FOR: Johe Doe Corep. 201 555 1234 | ||
| PROGRAM 1 | NAME | ABC Core. |
| RESERVED TIME | 17:00 | |
| TYPE | TIMER POLLING | |
| REMOTE STATION ID | S01 | |
| GROUP 1 | REMOTE STATION ID | S01,S99 |
Print Setup List
This list shows the current status of the printing settings made by pressing the FUNCTION key and the "6" key.
| PRINT SET UP LIST FOR: Joh Doe Corp. 07-JAN-98 02:47 201 555 1234 | ||
| NO. | ITEM | SETTING |
| 1 | INITIALIZE FILM | 07-JAN-98 |
| 2 | RECEPTION RATIO | AUTO |
| 3 | 2 IN 1 PRINT | NO |
| 4 | PAPER TYPE SET | REGULAR |
| 5 | COPY CUT OFF | YES |
Transaction Report
This report is printed out automatically after an operation is completed to allow you to check the result. The fax is set at the factory to print out the report after every transmission, but you can change the setting to have it printed out under a variety of other conditions. This is done by changing Option Setting 7 as described in Chapter 6.
The same headings appear in the Transaction Report as in the Activity Report. See "Activity Report" in this chapter for an explanation of the headings.
The Transaction report cannot be printed out manually.
Help List
This list is obtained by pressing the COPY/HELP key whilst no documents are loaded and contains basic information on how to perform certain functions including dialling and changing reception modes. It also provides a complete list of options available in function mode.
Maintenance
Fax print head
Clean the print head frequently to ensure optimum printing performance. To clean the print head, first unplug the power lead, open the print compartment cover (press the release marked OPEN), and remove the imaging film.
Wipe the print head, frame and roller with a soft cloth dampened with denatured alcohol.
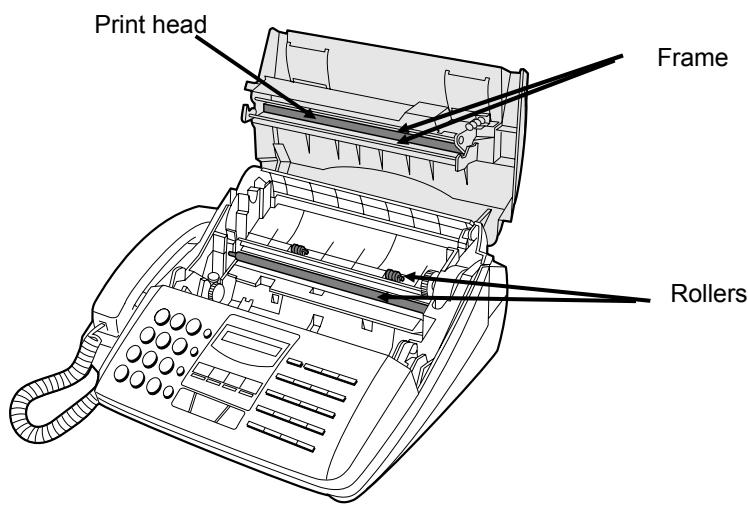
Caution!
- Do not use benzene or thinner. Avoid touching the print head with hard objects.
- The print head may be hot if your fax machine has just received a large number of documents. If this is the case, allow the print head to cool prior to cleaning.
Scanning glass and rollers
Clean the scanning glass and rollers frequently to ensure the quality of transmitted images and copies. Open the operation panel by pulling the front edge up (grasp it at the PANEL RELEASE mark), and wipe the scanning glass, white backplate, and rollers with a soft cloth.
Make sure that all dirt and stains (such as correcting fluid) are removed, as dirt and stains will cause vertical lines on transmitted images and copies.
Adhesive cellophane tape is useful for removal of debris from the rollers.
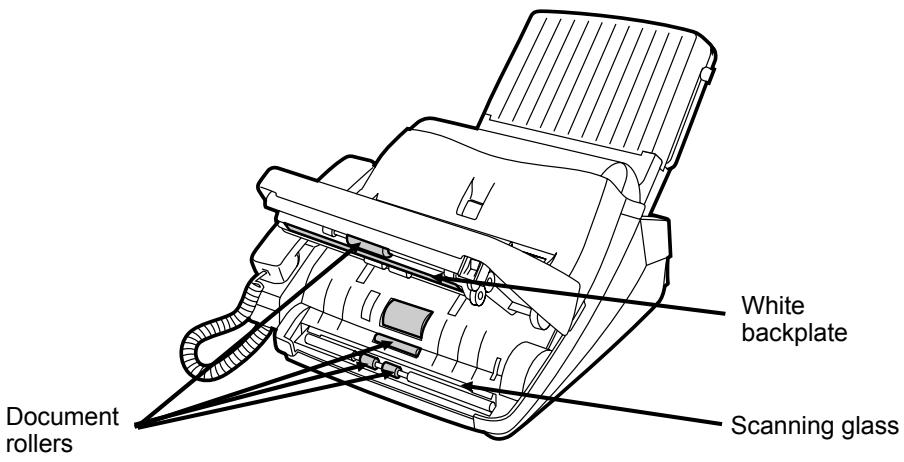
Note: The opening of the cover is shown exaggerated. The cover does not open this wide.
The housing
Wipe the external parts and surface of the machine with a dry cloth.
Caution!
- Do not use benzene or thinner. These solvents may damage or discolour the machine.
Troubleshooting
Problems and Solutions
Note: For problems with an answering machine connection, see "If it doesn't work" in Chapter 7, "Answering Machine Connection".
| Problem | Check and remedy |
| Nothing appears in the display. | ·Make sure the power cord is properly plugged into a power outlet. ·Connect another electrical appliance to the outlet to confirm that it has power. |
| The fax does not respond when you press any of its keys. | ·If a beep sound is not made when you press the keys, unplug the power cord and then plug it back in several seconds later. |
| Dialling is not possible. | ·Make sure the power cord is properly plugged into a power outlet as calls cannot be made or received when power is removed. ·Make sure that the telephone line is properly connected to both the TEL. LINE socket and the wall socket. ·Make sure that the fax is set to the correct dialling mode for your telephone line. See Option Setting 8 in Chapter 9. |
| The power is on, but no transmission takes place. | ·Make sure that the receiving machine has fax paper. ·Make sure that the telephone line cord is plugged into the "TEL. LINE" socket, and not the "TEL. SET" socket. ·If the receiving machine is in manual mode with no attendant, reception will not be possible. ·If the receiving machine is not a Sharp model, make sure it is G3 compatible. ·Check the display for error messages. ·Pick up the handset and check for a dial tone. Call the receiving machine by normal (manual) dialling, and confirm its response. |
| Automatic document feeding does not work for transmission or copying. | Check the size and weight of the document (see "Transmittable documents" in Chapter 3). |
| Nothing is printed at the receiving end. | Make sure that the document for transmission is placed face down in the feeder. Make sure that the fax paper is properly loaded at the receiving machine. |
| A distorted image is received at the other end. | Noise on the telephone line may cause distortion. Try sending the document again. Make a copy of the document on your fax. If the copy is also distorted, your fax may have a problem. If the problem persists, call for service. |
| The power is on, but no reception takes place. | Make sure that the telephone line cord is plugged into the "TEL LINE" socket, and not the "TEL. SET" socket. |
| The printing paper does not come out. | The printing paper may be jammed. See "Clearing Jammed Printing Paper" in this chapter. Make sure that the printing paper is properly loaded in your machine. |
| The printing paper comes out blank when you try to receive a document. | Make sure that the document is loaded properly in the feeder of the transmitting machine. Make a copy to confirm the printing ability of your machine. |
| The received document is faint. | Ask the other party to send higher contrast documents. If the contrast is still too low, your fax may have a problem. Make a copy to check it. |
| Received images are distorted. | Noise on the telephone line may cause distortion. Have the other party try sending the document again. The print head may be dirty. See "Fax print head" in Chapter 11. Make a copy of another document on your fax. If the copy is also distorted, your fax may have a problem. If the problem persists, call for service. |
Chapter 12 Troubleshooting
| Reception/copying is interrupted. | ·If reception or copying has been done continuously for a long time, the print head may have become overheated. Turn off the power and let it cool down. |
| Voice calls taken on an extension phone are interrupted by the fax. | ·The fax may interrupt during a voice call if reception mode is set to A.M. To prevent interruption on a tone dial extension phone, press any three keys on the extension phone after answering. (Note: Do not enter the code to activate fax reception.) |
| No reception occurs when polling is attempted. | ·Make sure you have not run out of printing paper. ·Make sure the transmitting machine is in automatic reception mode. ·If the transmitting machine has polling security, make sure that your fax number has been entered both in your fax and in the transmitting machine. |
Messages and Signals
Display messages
| COVER OPEN | The printing compartment cover is open. Close it. |
| DOCUMENT JAMMED | The original document is jammed. See the following section, "Clearing Paper Jams". |
| FAX RX IN MEMORY | A fax has been received in memory because the imaging film needs replacement, you have run out of printing paper, or the paper is jammed. The fax will print out automatically when the problem is fixed. |
| FILM END | The imaging film may need replacement. Check the film and replace it if necessary. |
| FUNCTION MODE | The FUNCTION key has been pressed. |
| LINE ERROR | Transmission or reception was not successful. Press STOP to clear the message, and then try again. |
| LINE IS IN USE | An extension phone connected to the fax is being used. Do not lift the faxis handset or attempt transmission at this time, as this will interrupt the conversation on the extension phone. |
| MEMORY IS FULL | The memory is full. See "Memory" in Chapter 8. |
| MEMORY PRINTING | The fax is preparing or printing out a document from memory. |
| ON HOOK DIAL | The SPEAKER key has been pressed and the fax is waiting for you to dial. |
| OUT OF PAPER | You are out of printing paper. |
| OVER HEAT | The print head has overheated. Operation may be continued once it cools. |
| PAPER JAMMED | The printing paper is jammed. See the following section, "Clearing Paper Jams". |
Chapter 12 Troubleshooting
Audible signals
| Continuous tone | 3 seconds | Indicates the end of transmission, reception, or copying. |
| Intermittent tone (3 bleeps) | 5 seconds (1 second on, 1 second off) | Indicates incomplete transmission, reception, or copying. |
| Rapid intermittent tone | 35 seconds (0.7 seconds on, 0.3 seconds off) | Indicates that the handset is off hook. |
Clearing Paper Jams
Clearing a jammed document
If a document doesn't feed properly during transmission or copying, or DOCUMENT JAMMED appears in the display, first try pressing the START key. If the document doesn't feed out, open the operation panel (grasp the front edge at the "PANEL RELEASE" mark and pull up) and pull it out gently.
Clearing jammed fax paper
1 Press the release marked OPEN and open the print compartment cover.
- Caution! The printing head (the strip of metal on the underside of the frame) applies heat to the printing film. It may be hot if a document has just been printed.
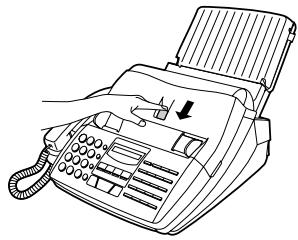
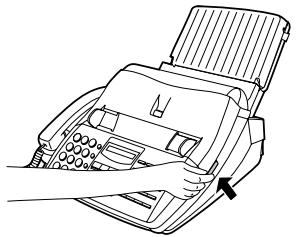
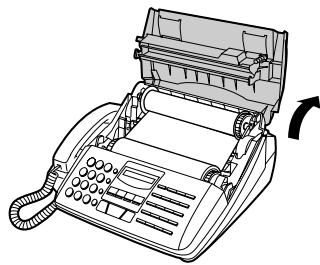
2 Remove the imaging film from the printing compartment and set it on a sheet of paper.
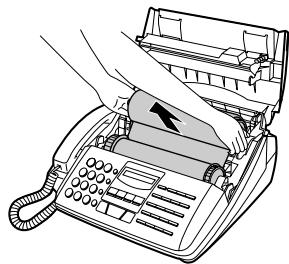
Chapter 12 Troubleshooting
3 Gently pull the jammed paper out of the printing compartment.
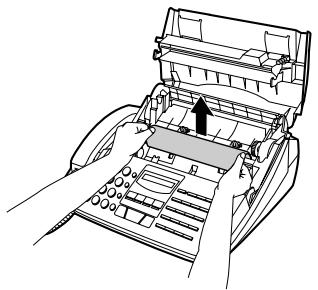
4 Replace the imaging film, making sure that the flange goes into the rear slot on the left side of the printing compartment. Also, make sure that the right, rear gear engages with the gear below it.
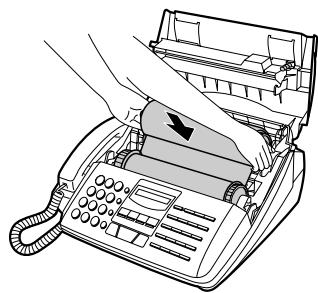
5 Wind the film slightly (rotate the gear on the right side of the rear spool) so that there is no slack in the film. Make sure that both edges of the film wind onto the spool evenly.

6 Close the print compartment cover, making sure it clicks into place.
- Caution! Close the cover slowly to make sure it doesn't pinch your fingers.
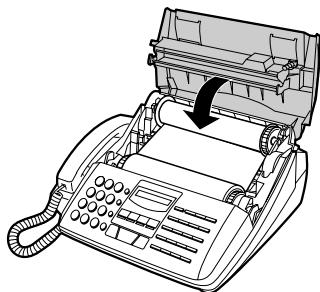
Specifications
| Applicable telephone line: | Public switched telephone network/PBX |
| Compatibility: | ITU-T (CCITT) G3 mode |
| Configuration: | Half-duplex, desktop transceiver |
| Memory size*: | 512 KB (approx. 30 average pages with ECM function off) 1 MB add-on available as option |
| Compression scheme: | MH, MR, MMR (FAX mode), MH (PC mode) |
| Scanning method: | Flat-bed, solid-state CCD |
| Resolution: | Horizontal: 8 lines/mm Vertical: Standard — 3.85 lines/mm Fine /Halftone — 7.7 lines/mm Super fine — 15.4 lines/mm |
| Recording system: | Thermal transfer recording |
| Display: | 7 x 5 dots, 1 line by 16-digit display |
| Reception modes: | FAX, TEL, TEL/FAX, A.M. |
| Modem speed: | 14400 bps with automatic fallback to 12000, 9600, 7200, 4800, or 2400 bps |
| Transmission time*: | Approx. 6 seconds |
| Effective recording width: | 204 mm |
| Input document size: | Automatic feeding: Width — 148 to 216 mm Length — 128 to 297 mm Manual feeding: Width — 148 to 216 mm Length — 128 to 1000 mm |
| Effective scanning width: | 210 mm max. |
| Automatic document feeder: | 20 sheets max. |
| Halftone (grey scale): | 64 levels |
- Based on ITU-T Test Chart #1 at standard resolution in Sharp special mode, excluding time for protocol signals (i.e., ITU-T phase C time only).
Specifications
| Contrast control: | Automatic/Dark selectable |
| Copy function: | Single/Multi-copy/Sort-copy (99 copies/page) |
| Telephone function: | Standard (cannot be used if power fails) |
| Power requirements: | 230 V AC, 50 Hz |
| Operating environment: | 5 - 35°C, 20 to 80% RH |
| Power consumption: | Stand-by: 5 W Maximum: 95 W |
| Dimensions: | Width: 365 mm Depth: 353 mm Height: 193 mm (Without attachments) |
| Weight: | Approx. 4.7 kg |
As a part of our policy of continuous improvement, SHARP reserves the right to make design and specification changes for product improvement without prior notice. The performance specification figures indicated are nominal values of production units. There may be some deviations from these values in individual units.
Index
A
A.M.reception mode,24,52
Activity Report, 78
Automatic printing, 77
Answering machine connection
Connecting, 8
Off Hook Hold, 56, 76
Problems, 54
Quiet Detect Start Timing, 56, 75
Quiet Detect Time, 53, 55, 75
Select Auto Receive, 56, 76
Tone dial fax activation, 55
Anti Junk Fax, 57, 76
AntiJunkNumberList,82
Audible signals, 90
Auto cover sheet, 77
Automatic dialling, 26, 38
B
Batch Page Numbering, 35
Broadcasting, 61
C
Cleaning, 84 - 85
Computer, connecting to, 9
Contrast, 33
Copies, 45
Copy Cut-off setting, 47
Copy/Help key, 19, 45
Cover Sheet, 34, 77
D
Date, setting, 23
Dial mode, 74
Dialling
Direct Keypad, 37
Normal, 36, 48
Rapid Key, 38, 48
Search, 39, 49
Speed, 38, 48
Direct Keypad Dialling, 37
Display, 19
Display messages, 89
Documentfeeder,32
Document guides, 32
Document restrictions, 31
Document rollers, 85
Document sizes, 31
Document, maximum scanning size, 31
Downkey,19
E
Error Correction Mode, 77
Extension telephone, using, 42
F
FAX reception mode, 24, 41
Fine Resolution Priority, 73
Function key, 19
G
Group Keys
Storing, 29
Using, 62
H
Halftone, 33
Handset, 7
Housing, cleaning, 85
1
Imaging film
Loading, 2
Replacing, 5
Initialize Film setting, 5
J
Jams,clearing,91
Junk fax number check, 76
L
Letters, entering, 21
Loading printing paper, 14
Loading the document, 32
M
Memory, 59
Reception, 60
Transmission, 59
Memory key, 19, 59, 61
Multifunction Interface software, installing, 10
Multifunction Interface, connecting, 9
N
Network Services, 49
Normal dialling, 36, 48
Number keys, 18
Number of rings in FAX and TEL/FAX
answer mode, 73
0
Option Setting List, 81
P
Paper jams,clearing,91
Paper Type setting, 16
Passcode List,81
Pauses,auto-dial,26
PBX operations,49
PBX setting (recal mode),76
Phone Plus Services,49
Polling,63-65
Print head,cleaning,84
Print Setup List,83
Program and Group List,82
Programs,68
Pseudo ring duration,75
R
Rapid Dial Keys, 19
Rapid Key Dialling, 38, 48
Recall interval setting, 74
Recall times, 74
Receive Unit setting, 25
Reception mode A.M. mode, 24, 52 FAX mode, 24, 41 Setting, 24 TEL mode, 24, 41 TEL/FAX mode, 24, 43
Reception mode key, 19
Reception Ratio setting, 44
Redial key, 18, 40, 49
Redialling, 40, 49
Resolution, 33
Resolution key, 19, 33
Ringing volume, 30
Rollers, cleaning, 85
s
Scanning glass, cleaning, 85
Search Dialling, 39, 49
SEARCH/R key, 18, 49
Sender's name and number, entering, 20
Speaker key, 18, 30, 36, 48
Speaker volume, 30
Speed Dial key, 18, 38, 48
Speed Dialling, 38, 48
Start key, 19
Stop key, 19
Storing numbers for automatic dialling, 26
T
TEL reception mode, 24, 41
TEL/FAX reception mode, 24, 43
Tel/Fax Remote Number, 74
Telephone Number List, 81
Telephone, using as, 48
Time, setting, 23
TimerList,80
Timer operations, 66
Transaction Report, 83
Transaction Report Print Select, 74
Two-in-one printing, 44
U
Upkey,19
V
Volume keys, 30
SOFTWARE LICENCE AND LIMITED WARRANTY
The headings in this document are used for convenience only and shall not affect its interpretation.
- INTRODUCTION. This document is an agreement between you, the end user of the software supplied with the product you have just obtained (which is later referred to as "the machine"), and SHARP CORPORATION (this document is later called "the agreement" and Sharp Corporation is later called "Sharp"). The agreement sets out the terms of the licence for the software referred to above (which is later called "the software"). This agreement constitutes the complete understanding between you and SHARP. By opening the sealed software package, you acknowledge that you have read this agreement and that you agree to become bound by the terms of this agreement. If you do not agree to the terms of this agreement, please do not open the software package but promptly return it, together with the other items (including written materials, binders or other containers that are part of the machine), to the place where you purchased it and you will be given a full refund.
- GRANT OF LICENCE. You are granted a non-exclusive licence to use and display this copy of the software on one single machine appliance at a single location. If the machine appliance is used by more than one user than this licence covers all the users of that single appliance at a single location.
- OWNERSHIP OF THE SOFTWARE. Copyright in the software is owned by SHARP or, if appropriate, by SHARPIs licensors, which means that you own the magnetic or other physical media on which the software is originally or subsequently recorded or fixed, but SHARP retains title and ownership of the material recorded on that physical media irrespective of the form of the media in or on which the original and other copies may exist. This agreement is not a sale of the original software or any copy of that software.
- RESTRICTIONS ON USE: Except to the extent permitted by the UK copyright laws you may not decompile, disassemble, reverse engineer, copy or modify the software or to create derivative works based on the software. You are not permitted to copy, translate, modify or adapt the accompanying written material or to distribute copies of such material or the software to others. Your failure to abide by these restrictions will constitute copyright infringement and you may be held legally responsible for it to SHARP or its licensors, as appropriate. Subject to these restrictions, you are permitted to make one (1) copy of the software for back-up purposes in which case you must reproduce and include in the back-up copy the copyright notice displayed in the software and on the packaging. Please note that the fonts supplied with the machine and
fonts created by SHARP are deemed to be a part of the software.
- RESTRICTIONS ON TRANSFER. This software is licensed only to you and may not be transferred to anyone else without the prior written consent of SHARP. Any authorised transferee of the software shall be bound by the terms and conditions of this agreement. If you transfer the software to anyone else in the manner permitted in this agreement, you must delete it from your [name of product] appliance and all program and back-up copies must be handed over to the new user and the ones not handed over destroyed.
- TERMINATION. This agreement is effective until terminated. The termination may occur automatically without notice from SHARP to you if you fail to comply with any provisions of this agreement. Upon termination you must destroy the written materials, program files and back-up copies of the software or return them to SHARP.
- UPDATE POLICY. From time to time SHARP may create updated versions of the software. At its option, SHARP can make such updated versions available to you, or your authorised transferees, if your or your transferees paid the update fee (if applicable) and returned the Registration Card to SHARP.
- LIMITED WARRANTY. SHARP warrants that the software will perform substantially in accordance with the accompanying product manuals for a period of ninety (90) days from the date shown on your receipt. SHARP also warrants that the physical media on which the software is stored will be free from defects in material and workmanship under the normal use and service for a period of one (1) year from the date shown on your receipt. Any implied warranties as to the software or the storage media are limited to ninety (90) days and one (1) year, respectively, or the shortest period permitted by law whichever is the greater.
-
CUSTOMER REMEDIES. The entire liability of SHARP and your exclusive remedy shall be, at the option of SHARP, either the return of appropriate portion the price paid by you for the machine or repair/replacement of the software and the storage media, which do not meet the Limited Warranty referred to above and which are returned to SHARP with a copy of the receipt. If failure in respect of the software or the storage media results from accident, abuse, misappropriation or improper usage, the Limited Warranty shall be void. Any replacement software will be warranted for the remainder of the original Limited Warranty period but will not be longer than thirty (30) days.
-
EXCLUSION OF OTHER WARRANTY. Except as expressly provided in point 8 above and to the maximum extent permitted by law, SHARP excludes all other warranties, either express or implied, including but not limited to implied warranties of satisfactory quality and fitness for purpose, with respect to the software, the accompanying written materials and any accompanying hardware. SHARP does not warrant, guarantee or make any representations regarding the use, or the results of the use, of the software or the accompanying written materials in terms of correctness, accuracy, reliability or otherwise; the entire risk as to the results and performance of the software is assumed by you. No oral or written information or advice given by SHARP, its dealers, distributors, agents or employees shall create a warranty or in any way increase the scope of the Limited Warranty and you may not rely on any such information or advise.
THIS AGREEMENT DOES NOT AFFECT OR PREJUDICE THE STATUTORY RIGHTS OF A CONSUMER BEING A PERSON ACQUIRING THE SOFTWARE OTHERWISE THAN IN THE COURSE OF BUSINESS.
The exclusions and limitations set out in this agreement do not apply to death and personal injury resulting from negligence.
- DISCLAIMER OF LIABILITY. To the maximum extent permitted by law, SHARP or anyone who has been involved in the creation production or delivery of the software and the machine shall not be liable for any direct, indirect, consequential or incidental damages (including, without limitation, loss occasioned by interruption to business, loss of business profits or business information, or other pecuniary loss) arising out of the use or inability to use the software. The entire liability of SHARP under any provision of this agreement shall be limited to the amount of money paid by you for the machine.
- LAW AND JURISDICTION. This agreement shall be governed by the laws of England and any dispute arising out of this agreement or the usage of the software shall be resolved in English courts.
If you have any questions arising out of this agreement, please write to Sharp Electronics (UK) Limited, Sharp House, Thorp Road, Manchester M40 5BE.
SHARP®
SHARP ELECTRONICS (U.K.) LTD.
Sharp House, Thorp Road, Newton Heath, Manchester, M40 5BE
SHARP CORPORATION