
Tablet Management Desktop 16 - Uncategorized Ergotron - Free user manual and instructions
Find the device manual for free Tablet Management Desktop 16 Ergotron in PDF.


User questions about Tablet Management Desktop 16 Ergotron
0 question about this device. Answer the ones you know or ask your own.
Ask a new question about this device
Download the instructions for your Uncategorized in PDF format for free! Find your manual Tablet Management Desktop 16 - Ergotron and take your electronic device back in hand. On this page are published all the documents necessary for the use of your device. Tablet Management Desktop 16 by Ergotron.
USER MANUAL Tablet Management Desktop 16 Ergotron
natural_image
Line drawing of an ERGOTRON industrial device with control panel and door (no text or symbols on the device itself)
www.ergotron.com
USA 1-800-888-8458
Europe +31 (0)33-45 45 600
China 400-120-3051
Table of Contents
Hazard Symbols Review 2
Components & Tools....2
Features 2
Optional Security Mount....3
Charging Set up 4
Tablet Charging....8
LED and Syncing....9-10
Cleaning and Maintenance....11
Specifications....12
Service and Warranty Information 12
Safety Hazard Review
These symbols alert users of a safety condition that demands attention. All Tablet Management Desktop 16 users should be able to recognize and understand the significance of the following Safety Hazards if encountered on the Desktop 16 or within Desktop 16 documentation. Children who are not able to recognize and respond appropriately to Safety Alerts should not use the Desktop 16 without adult supervision!
| Symbol Signal Word Level of Hazard | ||
 | NOTE | A NOTE indicates important information that helps you make better use of your Desktop 16. |
 | CAUTION | A CAUTION indicates either potential damage to hardware or loss of data and tells you how to avoid the problem. |
 | WARNING | A WARNING indicates either potential for property damage, personal injury, or death. |
 | ELECTRICAL | An Electrical indicates an impending electrical hazard which, if not avoided, may result in personal injury, fi re and/or death. |
Components
One Tablet Management Desktop Unit
2 Keys, Power Cord, USB Cable
Security Mounting Kit: M6 security screw (Quantity 2), washer (Quantity 2), and security wrench
NOTE: Apple Lightning cables not included.
Tools
Electric Drill and 1/4" or 17/64" (6.5 mm) Drill Bit
Measuring Tool, Pencil
Phillips Screwdriver
Features
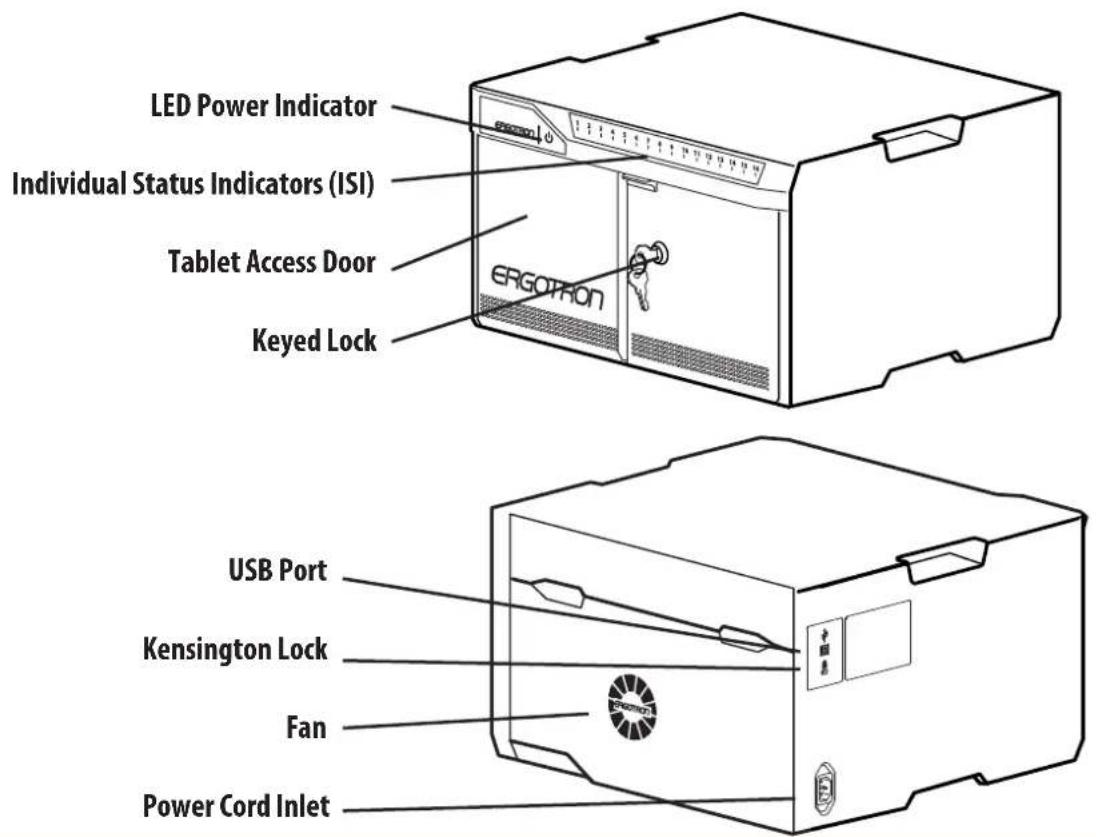
text_image
LED Power Indicator Individual Status Indicators (ISI) Tablet Access Door ERGOTRON Keyed Lock USB Port Kensington Lock Fan Power Cord InletSecurity Mounting Kit Option
For mounting the Desktop 16 to a work surface (desktop, countertop, table, etc.)
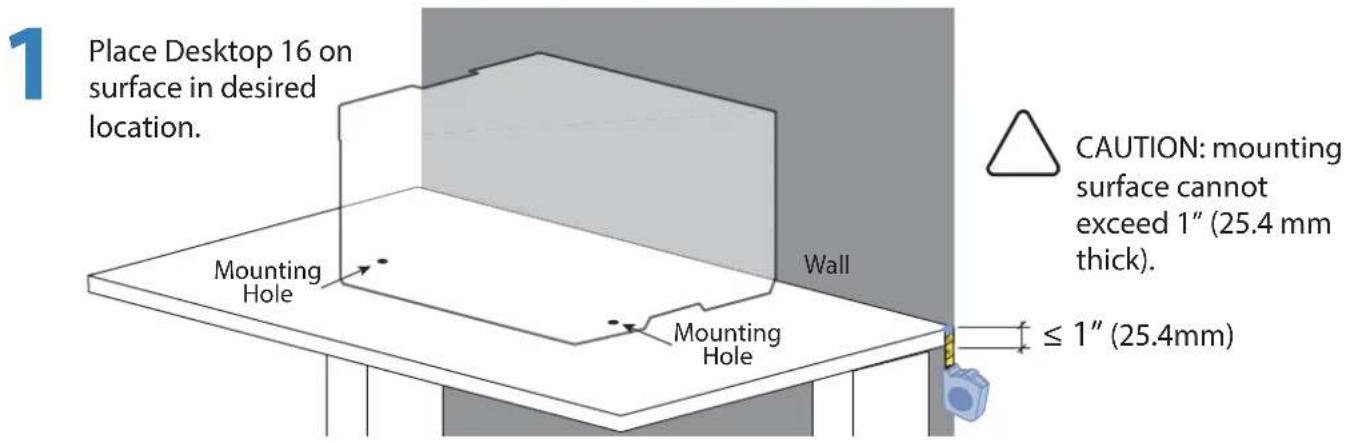
text_image
1 Place Desktop 16 on surface in desired location. Mounting Hole Wall Mounting Hole CAUTION: mounting surface cannot exceed 1" (25.4 mm thick). ≤ 1" (25.4mm)2 Remove the Desktop 16. Use a pencil to mark the mounting hole locations: 11.5" (292 mm) from the wall and 17.3" (440 mm) apart.
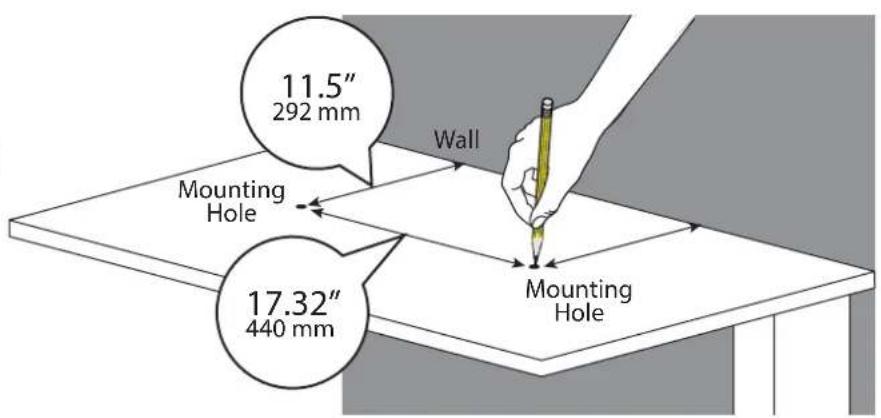
text_image
11.5" 292 mm Mounting Hole 17.32" 440 mm Wall Mounting Hole3 Drill two mounting holes using a 0.266 OD drill bit.
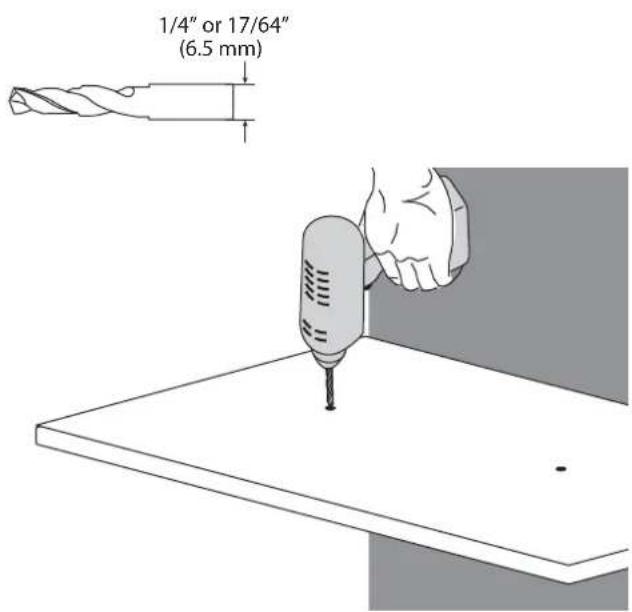
text_image
1/4" or 17/64" (6.5 mm)4 Use the security wrench to insert provided M6 screws and washers.
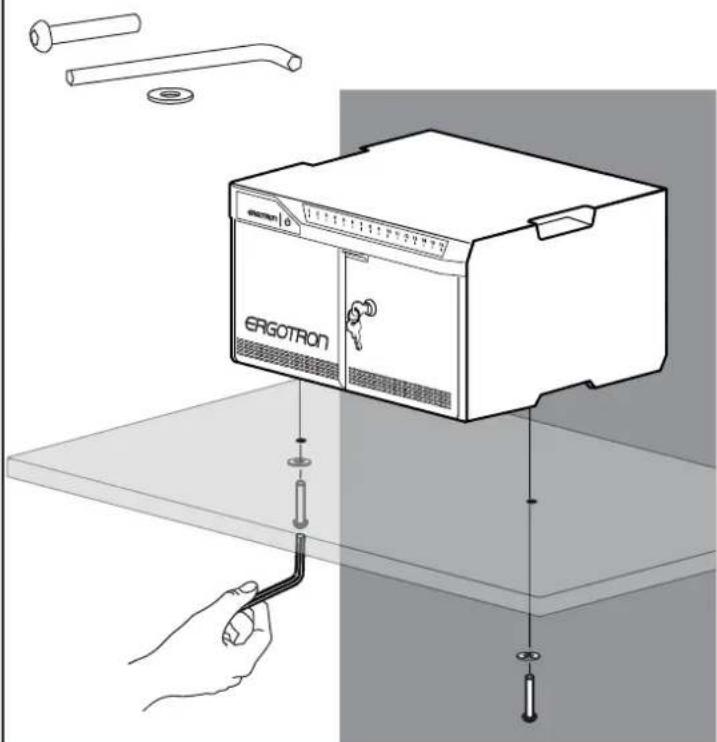
text_image
ERGOTRON ERGOTRONCharging Set-up
1 Make sure the Desktop 16 power cord is disconnected from wall power supply before proceeding.
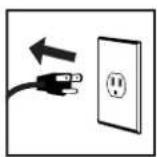
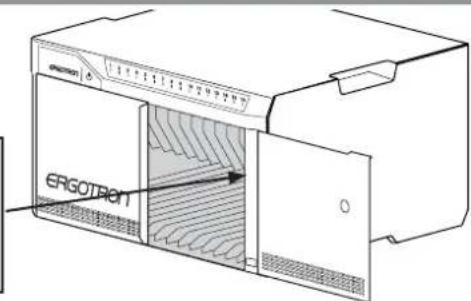
Unlock the Desktop 16 and open the doors.

NOTE: the Desktop 16 power cord acts as the connect/disconnect device switching power off and on.
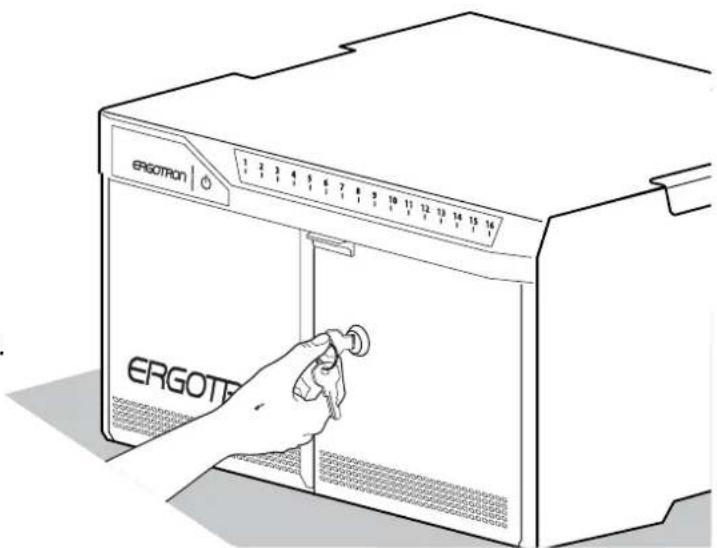
natural_image
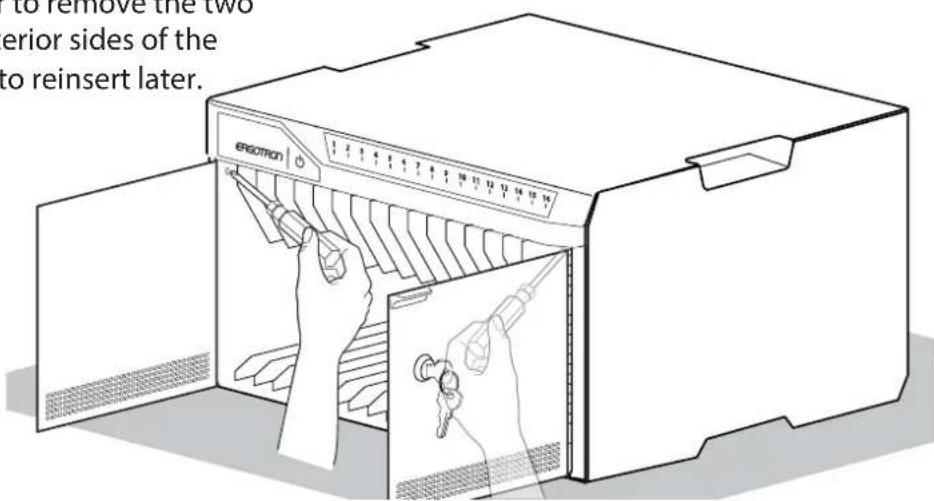
Line drawing of a hand inserting a button into an ERGOTRON microwave oven (no text or symbols on the device itself)2 Use a Phillips screwdriver to remove the two screws located on the interior sides of the Desktop 16; save screws to reinsert later.
text_image
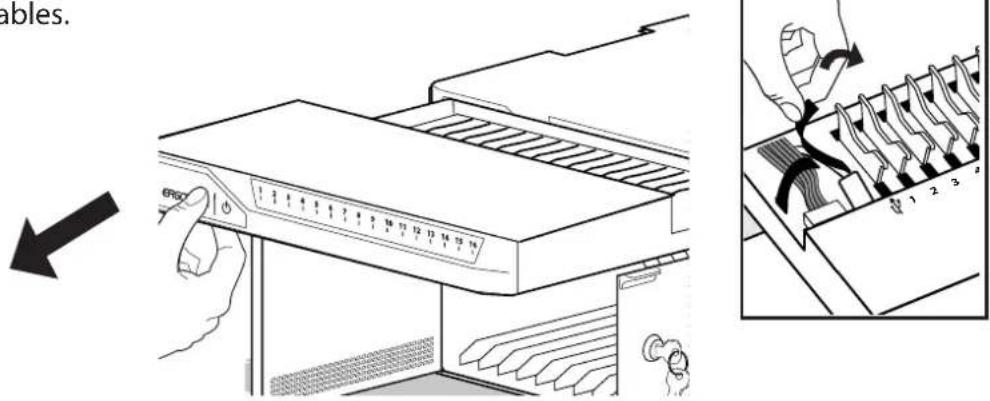
to remove the two erior sides of the to reinsert later. Eraotron3 Partially slide out the Desktop 16 drawer. You'll need to unplug two cables before sliding the drawer completely out. Open the strap to access the two cables.
text_image
ables. ERGO 1 2 3 4 5 6 7 8 9 10 11 12 13 14 15 16 1 2 3 4 5 6 7 8 9 10 11 12 13 14 15 16 1 2 3 4 5 6 7 8 9 10 11 12 13 14 15 16Charging Set-up
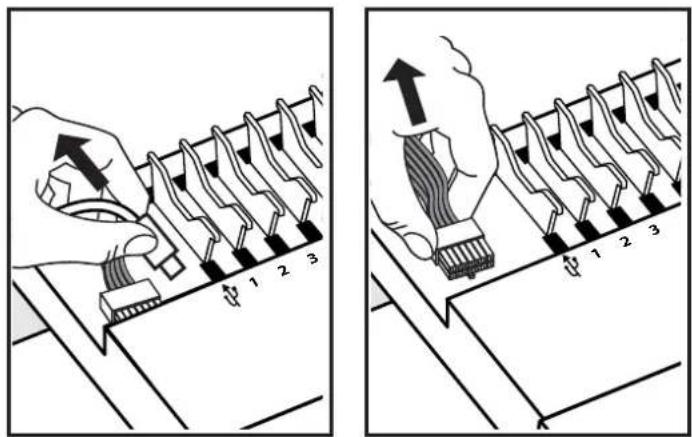
4 Unplug the USB and DC power cables (push up on the lever under the DC connector to release). The drawer can now be removed.
text_image
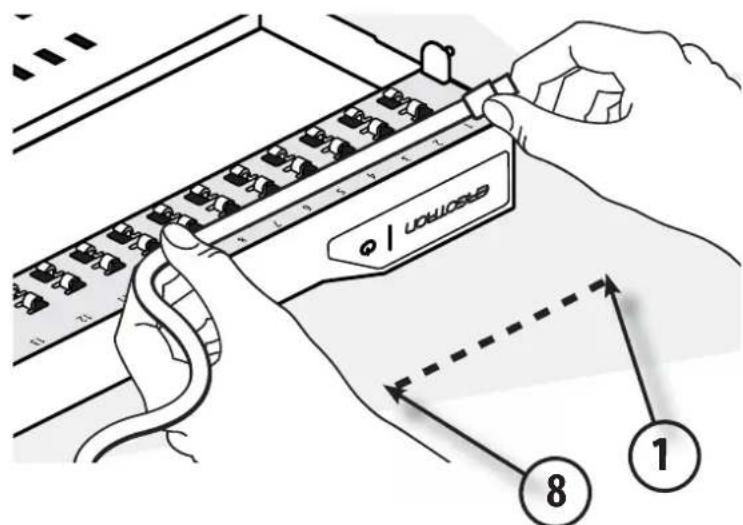
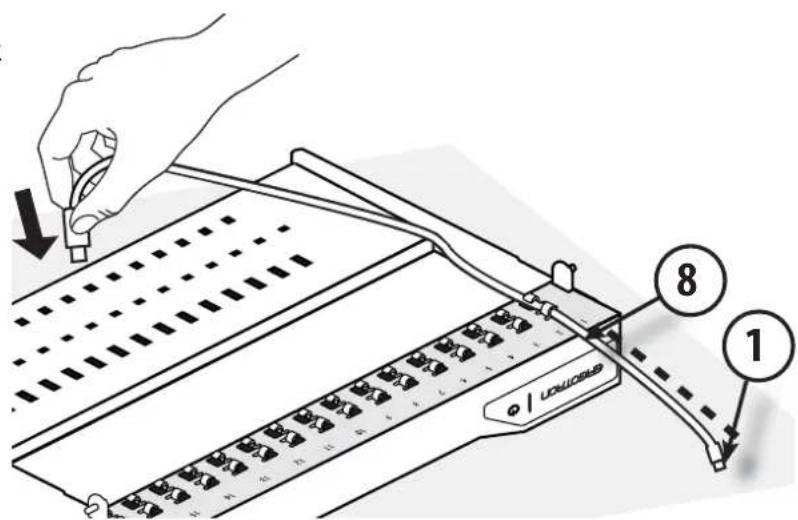
Diagram illustrating two steps of a mechanical or electrical component handling, with numbered parts and directional arrows indicating movement.5 Place the drawer up-side-down on the Desktop 16 top. Line up a tablet USB cable along numbers 1 to 8 on the drawer as a way to measure out slack (represented by dashed line).
Both the 30 pin and Lightning cable designs are compatible with the Tablet Management Desktop unit. Please use the cable which is appropriate for your Apple device.
text_image
LOWLOSS 8 16 Route the tablet USB cable through the slots to the back of the drawer maintaining the slack measured in previous step.
text_image
Diagram showing a hand using a tool to interact with a device labeled 'LOADS' and numbered parts 1 and 8.Charging Set-up
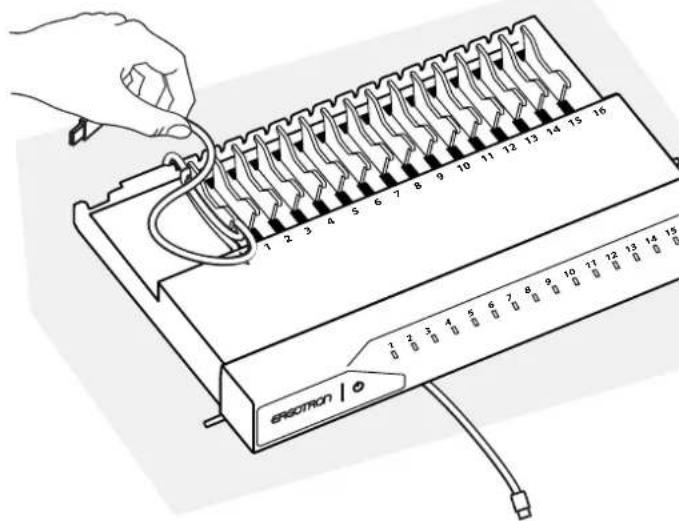
7 Turn over the drawer. Wrap the excess USB cable around the cable organizer.
text_image
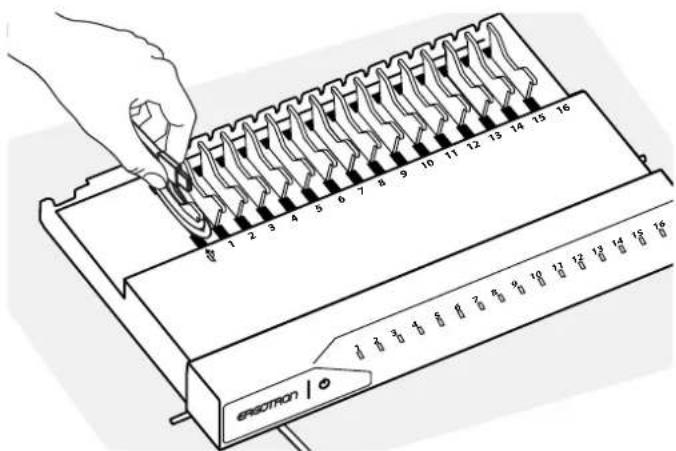
EROTRON 1 2 3 4 5 6 7 8 9 10 11 12 13 14 15 16 1 2 3 4 5 6 7 8 9 10 11 12 13 14 158 Connect the USB cable to the corresponding USB port. Repeat USB cabling steps 5 through 8 for the rest of the iPad devices going into the Desktop 16.
text_image
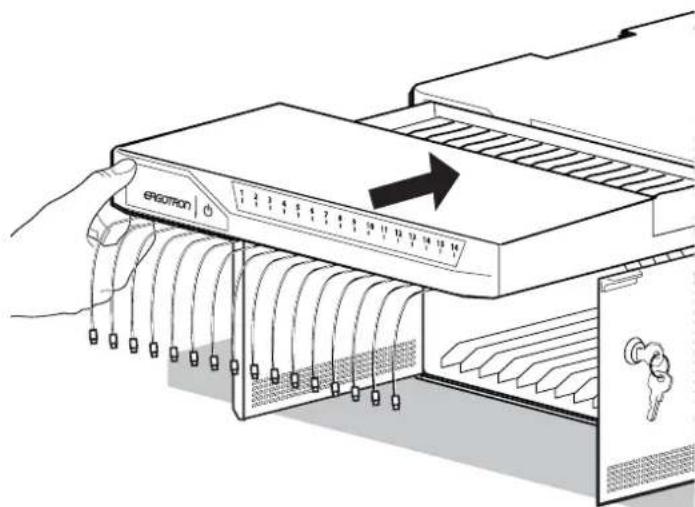
electron 1 2 3 4 5 6 7 8 9 10 11 12 13 14 15 169 Slide the drawer partially into the Desktop 16. Reconnect the USB and DC cables and wrap the straps around the cables.
text_image
ERGOTOM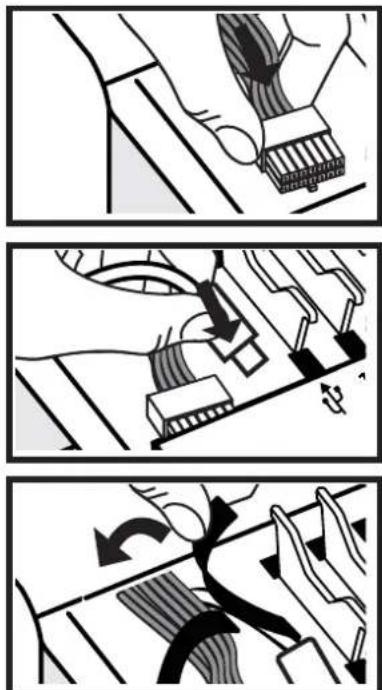
text_image
Three-panel diagram illustrating a mechanical or electrical process with labeled components and directional arrows indicating motion.Charging Set-up
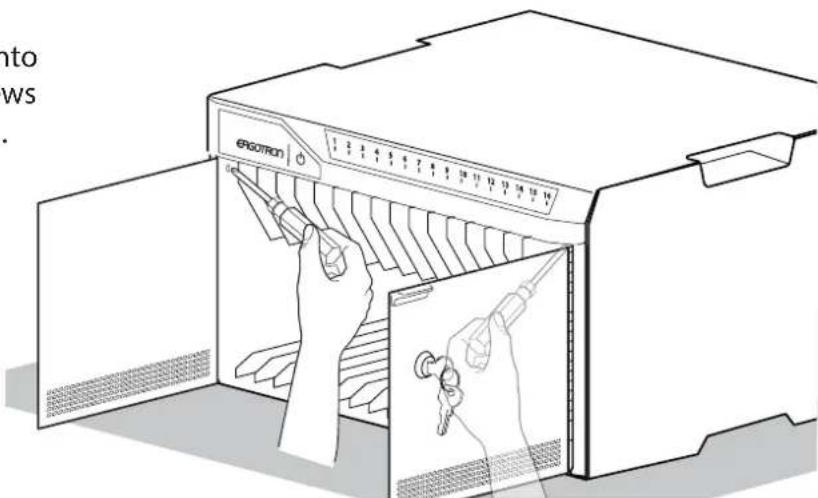
10
Slide the drawer completely into the Desktop 16. Insert the screws removed in step 2 and tighten.
text_image
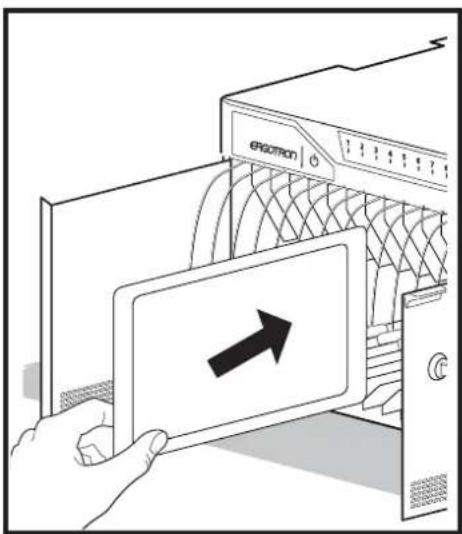
ento ws .11
Insert iPad devices into Desktop 16. Connect the tablet USB charging cables to the iPad devices.
text_image
Diagram showing a hand inserting a device into an ECGRON device with an arrow indicating direction, likely illustrating a process or installation.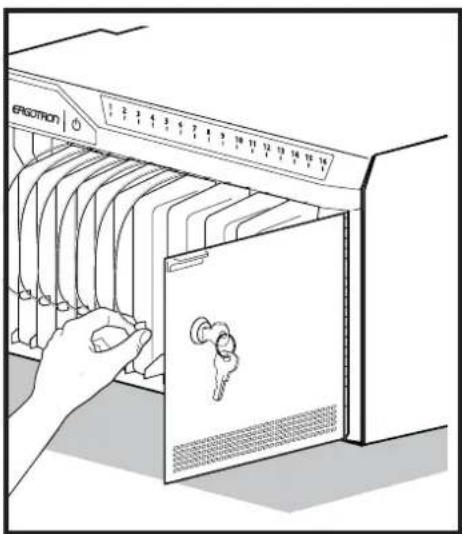
natural_image
Illustration of a hand inserting a key into an ECGM device (no text or symbols visible)Tablet Charging
5
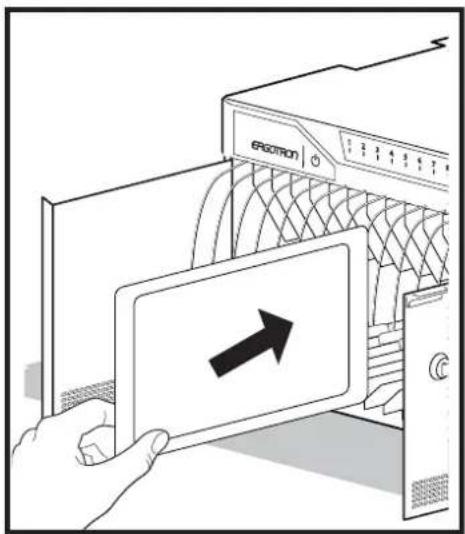
Insert iPad devices into Desktop 16. Connect the tablet USB charging cables to the iPad devices.
text_image
EACRON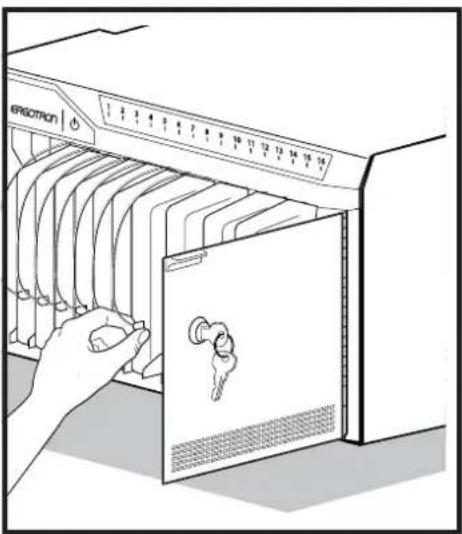
natural_image
Illustration of a hand inserting a device into an electronic device labeled 'resotron', showing internal rack and keyhole (no text or symbols beyond labels)6
natural_image
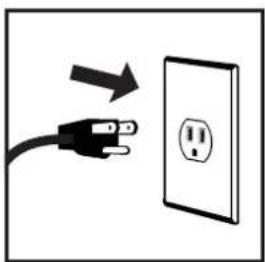
Simple line drawing of an electrical outlet with a plug and cable, no text or symbols presentTo begin charging the tablets, plug in the Desktop 16 power cord from the Desktop 16 into the wall outlet.
The power cord is used to turn the Desktop 16 power on and off. Charging occurs whenever the power cord is connected UNLESS a Macintosh® or PC notebook USB cable is connected to the Desktop 16 for syncing.

NOTE: the Desktop 16 power cord acts as the connect/disconnect device switching power on and off.
LED - Indicators
Power Indicator – communicates sync and charge status with the following signals:

Off = No power to the Desktop 16.

n - solid = iPad devices are charging.

n - slow blink = Computer is plugged into auxiliary USB outlet and iPad devices are ready to sync or are syncing.

n - fast blink = Fault Status. Please make sure all cables are seated correctly within cable drawer and Desktop 16 is operating within specified operating temperature. Contact Ergotron Customer Support
if problem continues.
Individual Status Indicators (ISI) – sequentially numbered LEDs corresponding to each tablet in the Desktop 16:
Green = Fully charged.
Amber = Charging in progress.

NOTE: if Desktop 16 is syncing all ISIs will be green.
Tablet Syncing

NOTE: Complete the Tablet Charging instructions before syncing. iPad devices should be charged at least 50% before starting the syncing process.
Syncing can be done using iTunes ^® or the Apple Configurator program available for the Macintosh ^® computer. Please reference www.Apple.com for more information.
The iPad devices will mount as USB devices when the A to B USB cable is connected to a host notebook via the USB port on the exterior of the Desktop 16.
NOTE: The devices will not charge while syncing is in process. To return to charge mode, unplug the USB cable from the USB port when syncing is complete.
If using iTunes, please see separate iTunes setup instructions available on the Ergotron website Tablet Management Desktop 16 product page.
Syncing
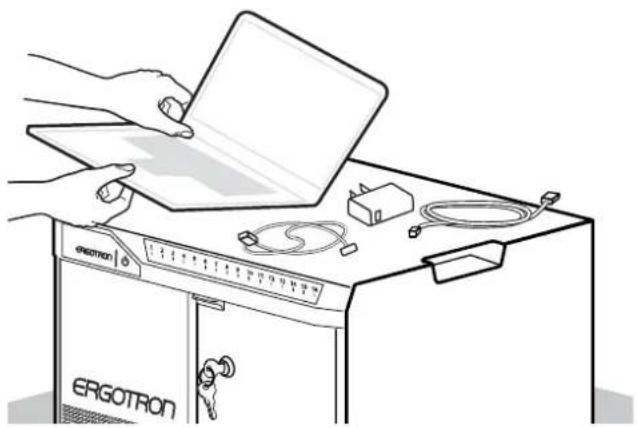
1 Place your notebook, power adaptor and a USB cable on the Desktop 16 work top.
natural_image
Line drawing of a kitchen appliance with hands holding a laptop and next to a washing machine (no text or symbols)2 Plug the USB and power adaptor cables into the notebook.
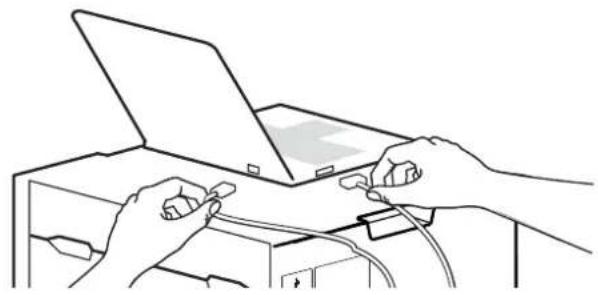
natural_image
Line drawing of two hands inserting cables into a laptop (no text or symbols)3 Connect the notebook USB cable to the port on the side of the Desktop 16.
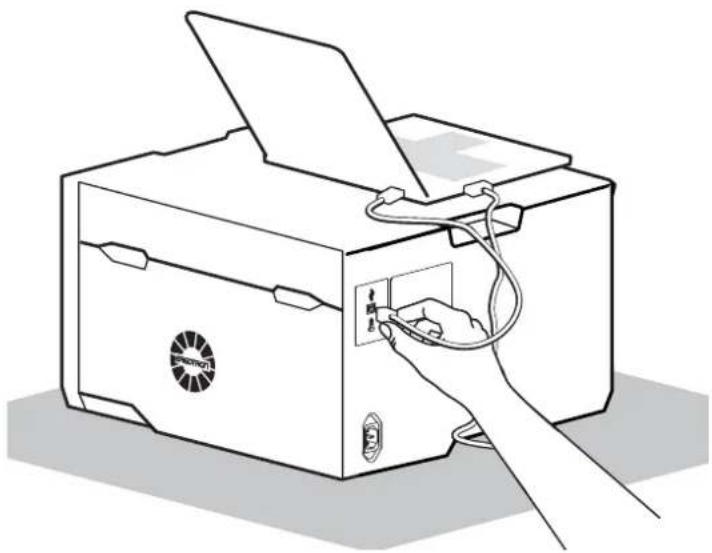
natural_image
Line drawing of a printer with cable and paper outlet, no text or symbols present4 Connect the notebook power cord to a wall outlet. Switch on the notebook power to begin syncing.
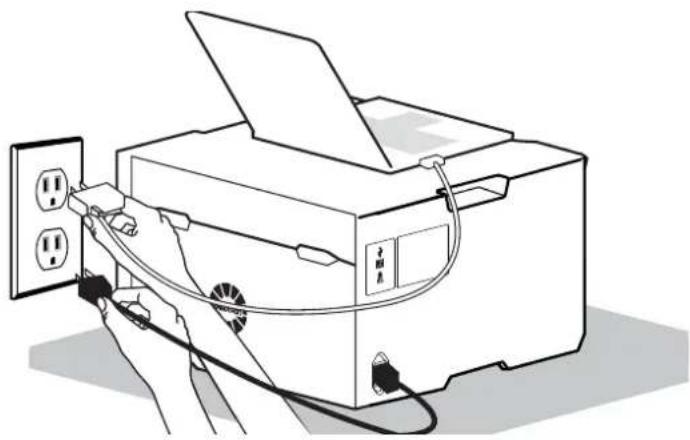
natural_image
Line drawing of a printer with cable and power outlet, no text or symbols presentCleaning and Maintenance
Desktop 16 and Equipment Electric Safety
There are specific risks associated with the use of equipment having power cables. You must be aware of, and avoid these risks when the Desktop 16 is located in close proximity to children.

WARNING: Failure to observe the following Electrical Safety notices can in fire or death by electric shock.

Electrical cables can be hazardous. Misuse can result in fire or death by cal shock.
• Double Pole / Neutral Fusing
- Inspect power cables thoroughly before each use.
- Do not use cables that are damaged.
- Insert the plug completely into the outlet.
- Grasp the plug to remove from the outlet.
- Do not unplug by pulling on the cable.
- Do not use excessive force to make connections.
- Do not plug the cable into an extension cable.
- Do not remove, bend or modify any metal prongs or pins of cable.
- Do not drive, drag or place objects over the cable.
- Do not walk on the cable.
- Avoid overheating. Uncoil the cable and do not cover it with any material.
- Do not run cable through doorways, holes in ceilings, walls or floors.

Keep the Desktop 16 away from water.
- Do not use it when wet.
- Do not place the Desktop 16 in close proximity to flammable liquids or gases.

The Desktop 16 power cord acts as the connect/disconnect device switching power on and off.
text_image
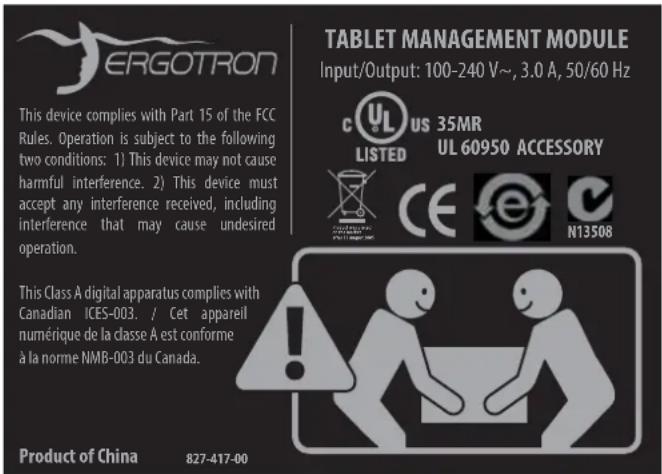
ERGOTRON This device complies with Part 15 of the FCC Rules. Operation is subject to the following two conditions: 1) This device may not cause harmful interference. 2) This device must accept any interference received, including interference that may cause undesired operation. This Class A digital apparatus complies with Canadian ICES-003. / Cet appareil numérique de la classe A est conforme à la norme NMB-003 du Canada. TABLET MANAGEMENT MODULE Input/Output: 100-240 V~, 3.0 A, 50/60 Hz c US 35MR LISTED UL 60950 ACCESSORY CE e N13508 Product of China 827-417-00Desktop 16 Use Safety
There are specific risks associated with the use of Desktop 16 when moving or stationary (for charging or storage). You must be aware of, and avoid these risks when the Desktop 16 is located in close proximity to children.

WARNING: Failure to observe the following Desktop 16 Use Safety notices result in serious personal injury or equipment damage.

Do not allow children to move the Desktop 16.
- Do not allow anyone to sit, stand, or climb on the Desktop 16.
- Do not block the fans and vent openings. To prevent overheating, leave at least 102 mm (4-inch) clearance around fans and vents.
- Regularly inspect and clean the vent openings to eliminate dust accumulation and keep the fans running at optimal performance levels.

The Desktop 16 is designed to be used indoors only.
- Do not use the Desktop 16 to transport or store equipment other than what has been noted in this guide.
- Do not use the Desktop 16 to store liquids or cleaning supplies.
- Do not place heavy objects on the Desktop 16 surface.
– The maximum weight capacity of the top surface is 25 lb (11.3 kg).

Moving the Desktop 16
Before moving the Desktop 16:
- Disconnect the power cable from the wall.
- Close and lock the doors.
- Remove notebook and other items from the top work surface.

- Two people are required to lift the Desktop 16; use caution when lifting desktop 16 to prevent muscle strain.

Desktop 16 Placement
Observe these safety alerts for times when the Desktop 16 is stationary:
- Do not place Desktop 16 on an object or surface that cannot support its weight: 28.5 lbs (13 kg).
- Do not run cables through doorways, holes in ceilings, walls, or floors.
- Do not run cables across hallways, classrooms, or other areas where they will be walked on.
- Do not leave Desktop 16 unattended in areas where children have access.
- Keep Desktop 16 doors closed and locked whenever it is unattended or parked for charging or storage.

This device complies with Part 15 of the FCC Rules. Operation is subject to the following two conditions: 1) This device may not cause harmful interference. 2) This device must accept any interference received, including interference that may cause undesired operation.
text_image
with eil !Specifications
This device complies with Part 15 of the FCC Rules. Operation is subject to the following two conditions: 1) This device may not cause harmful interference. 2) This device must accept any interference received, including interference that may cause undesired operation. This Class A digital apparatus complies with Canadian ICES-003. / Cet appareil numérique de la classe A est conforme à la norme NMB-003 du Canada.
18.3 W x 16.2 D x 10.4 in H
(46.5 x 41 x 26.4 cm)
Desktop 16 weight (w/o equipment)
28.5 lb (13 kg)
Desktop 16 Rated weight capacity
Top Work Surface 25 lb (11.3 kg)
Accomodates maximum tablet size
Individual tablet dimensions (including cover):
up to 10.8 H x 7.7 W x 0.95 in D (27.4 x 19.6 x 1.3 cm)
Individual tablet weight: up to 2.2 lb (1 kg)
LED status indicators (ISI)
Lights indicate power status and syncing activity
Desktop 16 16 LED lights
Cooling/ventilation
One 12-volt DC continuous operation fan
Shipping dimensions
21.2 W x 18.6 D x 12.8 in H (53.8 x 47.3 x 32.5 cm)
Shipping weight
33.5 lb (15.0 kg)
Power System
100-240 V\~, 3.0A, 50/60 Hz
Environmental
Temperature range:
Operating 0° to 30°C (32° to 86°F)
Storage -40° to 60°C (-40° to 140°F)
Relative humidity (maximum):
Operating 10%–90% (non condensing)
Storage 5%–95% (non condensing)
Altitude (maximum): 2000 m (6,562 ft)
Compatibility:
Made for
Service and Warranty
For Service on the Ergotron Tablet Managing Desktop 16 for iPad
Visit www.ergotron.com

NOTE: When contacting customer service, reference the serial number.
www.ergotron.com
MADE IN CN
12-345-678

1234567-1234
text_image
ERGOTRENERGOTRON®
While Ergotron, Inc. makes every effort to provide accurate and complete information on the installation and use of its products, it will not be held liable for any editorial errors or omissions (including those made in the process of translation from English to another language), or for incidental, special or consequential damages of any nature resulting from furnishing this instruction and performance of equipment in connection with this instruction. Ergotron, Inc. reserves the right to make changes in the product design and/or product documentation without notification to its users. For the most current product information, or to know if this document is available in languages other than those herein, please contact Ergotron. No part of this publication may be reproduced, stored in a retrieval system, or transmitted in any form or by any means, electronic, mechanical, photocopying, recording or otherwise without the prior written consent of Ergotron, Inc., 1181 Trapp Road, Eagan, Minnesota, 55121, USA Patents Pending and Patented U.S. & Foreign. Ergotron is a registered trademark of Ergotron, Inc.
© 2016 Ergotron, Inc. All rights reserved.
Americas Sales and
Corporate Headquarters
EMEA Sales
St. Paul, MN USA
(800) 888-8458
+1-651-681-7600
www.ergotron.com
sales@ergotron.com
Amersfoort, The Netherlands
+31 33 45 45 600
www.ergotron.com
info.eu@ergotron.com
APAC Sales
Tokyo, Japan
www.ergotron.com
apaccustomerservice@ergotron.com
Worldwide OEM Sales
www.ergotron.com
info.oem@ergotron.com