Steam Iron 95986 - Iron Easy Home - Free user manual and instructions
Find the device manual for free Steam Iron 95986 Easy Home in PDF.


| Product Type | Steam Iron |
| Brand | Easy Home |
| Model | Steam Iron 95986 |
| Power Consumption | 1500 W |
| Voltage | 120 V / 60 Hz |
| Water Tank Capacity | 250 ml |
| Soleplate Material | Stainless Steel |
| Steam Output | Continuous steam up to 30 g/min |
| Steam Burst | Up to 150 g/min |
| Spray Function | Yes |
| Anti-Drip System | Yes |
| Self-Clean Function | Yes |
| Automatic Shut-Off | Yes, after 8 minutes of inactivity |
| Vertical Steaming | Yes |
| Cord Length | 1.8 m |
| Dimensions (L x W x H) | 28 x 12 x 15 cm |
| Weight | 1.2 kg |
| Warranty | 2 years |
Frequently Asked Questions - Steam Iron 95986 Easy Home
User questions about Steam Iron 95986 Easy Home
0 question about this device. Answer the ones you know or ask your own.
Ask a new question about this device
Download the instructions for your Iron in PDF format for free! Find your manual Steam Iron 95986 - Easy Home and take your electronic device back in hand. On this page are published all the documents necessary for the use of your device. Steam Iron 95986 by Easy Home.
USER MANUAL Steam Iron 95986 Easy Home
natural_image
Black and white electric iron with 'EASY HOME' branding, no visible text or symbols on body
natural_image
EASY ROVE iron with blue and white casing, no visible text or symbols on the device itself
text_image
CERT! FED hanse control mhansecontrol.com User-friendly Manual ID: #07177English......06
Español ..... 27
Contents
Overview ....3
Use....4
Package contents/device parts......6
General information....7
Reading and storing the user manual ......7
Explanation of symbols 7
Quick Start Guide......8
Safety....10
Proper use....10
Safety notes....10
First use....15
Checking the steam iron and package contents......15
Basic cleaning....16
Preparations for first use 16
Adding water....16
Operations....17
Setting the temperature....17
Steam ironing 19
Using the steam shot function....19
Using the vertical steam shot function 20
Dry ironing 20
Spray function 20
After each use....21
Additional functions....21
Cleaning and maintenance....22
General cleaning....22
Self-cleaning function 23
Storage 23
Troubleshooting....23
Technical data 25
Disposal....26
Disposing of the packaging 26
Disposing of the steam iron 26
text_image
A 1 2 3 4 5 6 7 8 9 10 11 12 13 14 EASY HOME max min - 4oz - - 4oz - - 2oz - 15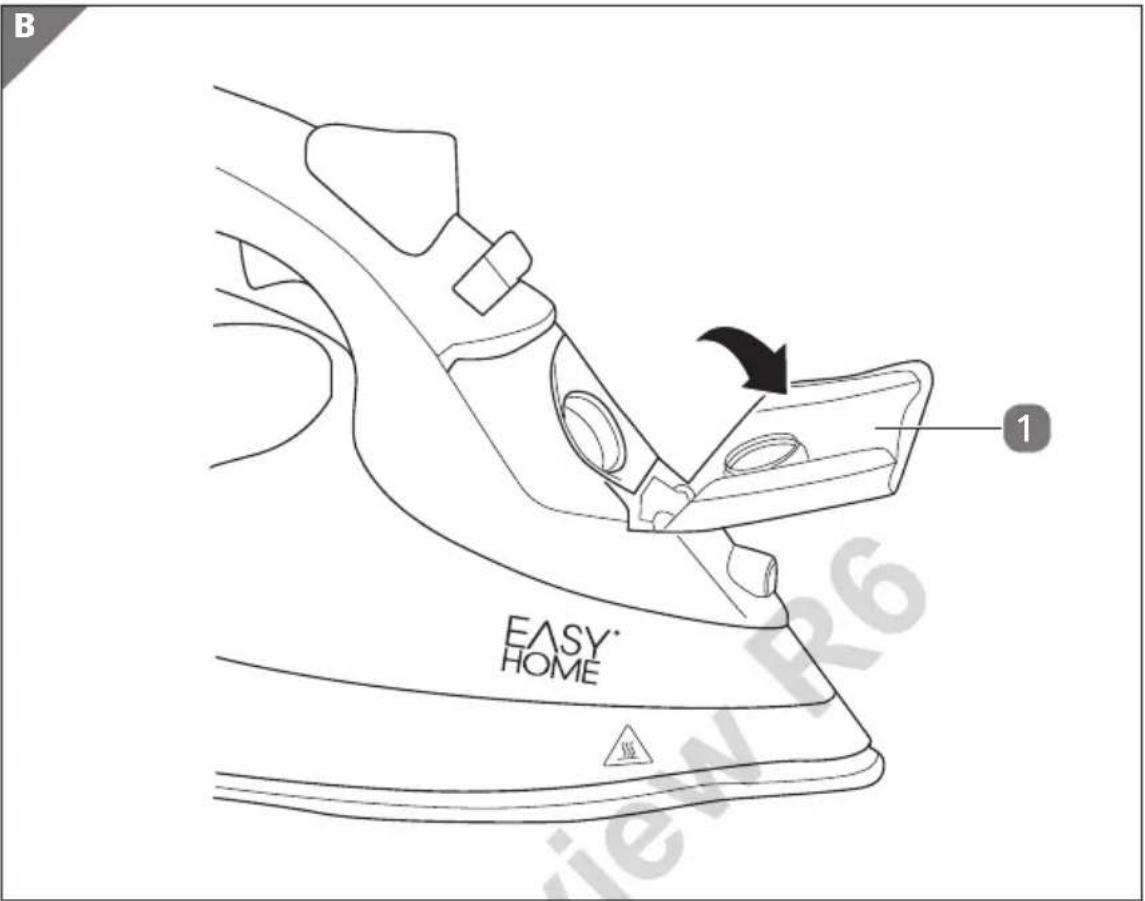
text_image
B EASY HOME 1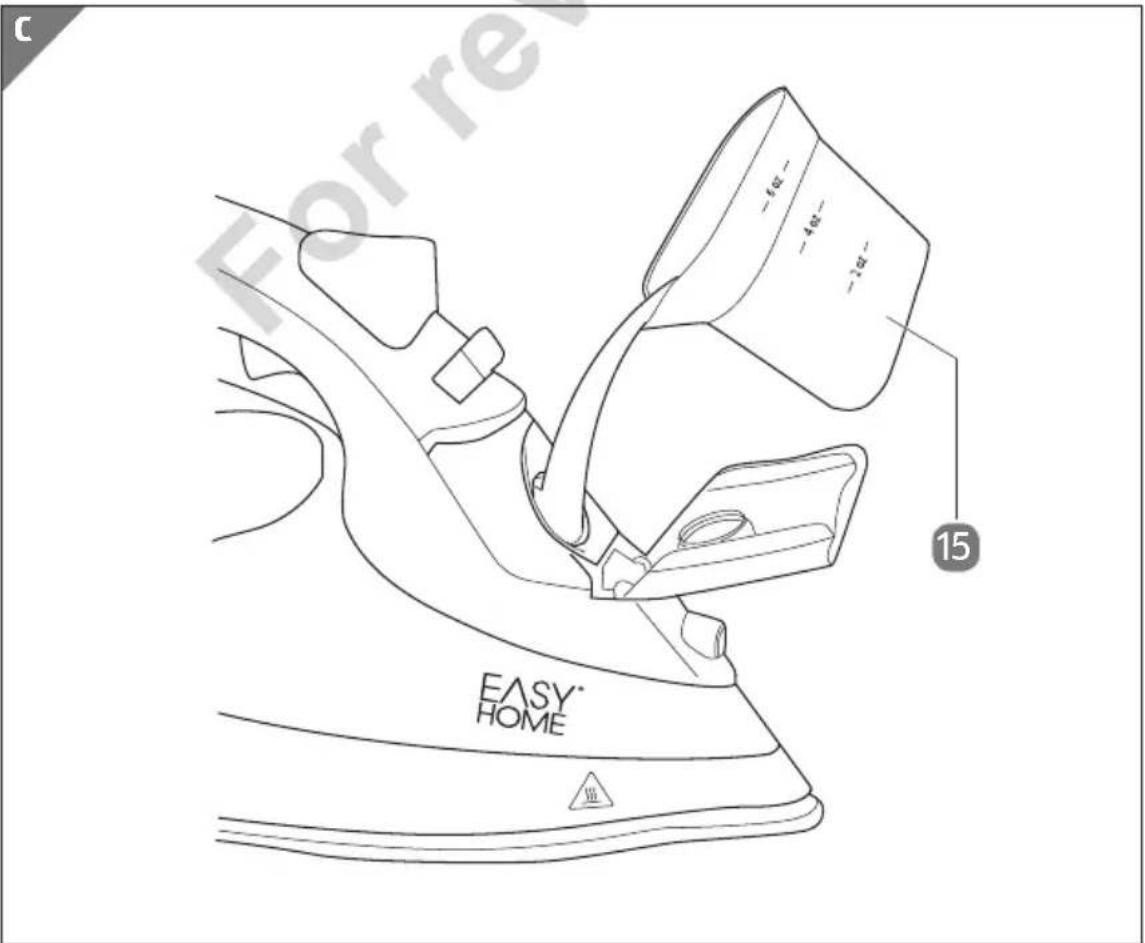
text_image
C -4Ω -4Ω -2Ω 15 EASY® HOME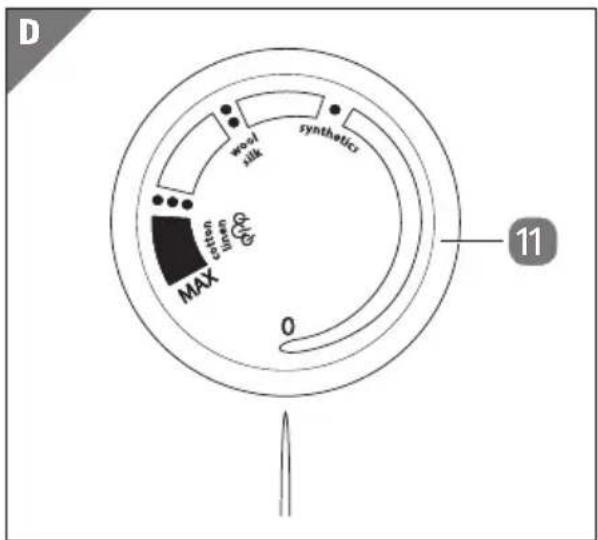
text_image
D wool silk synthetica MAX cotton linen 0 11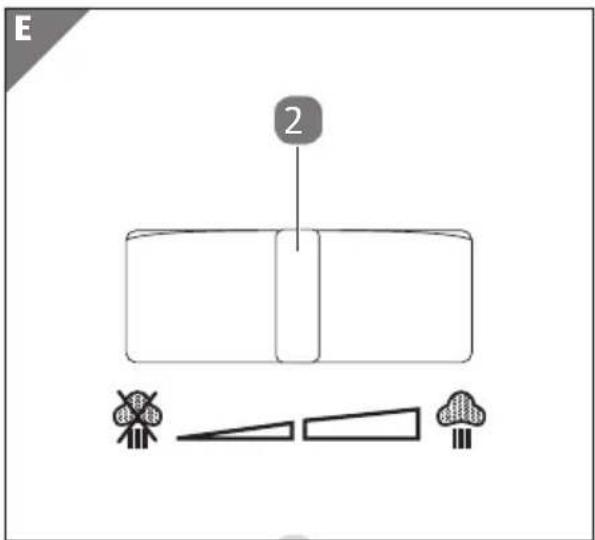
text_image
E 2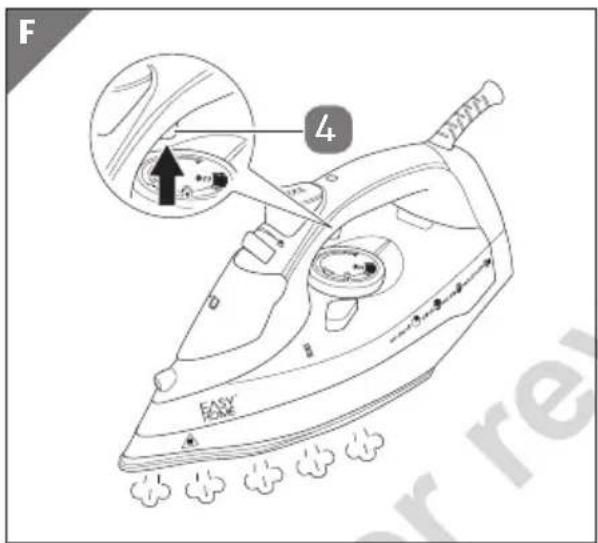
text_image
F 4 EASY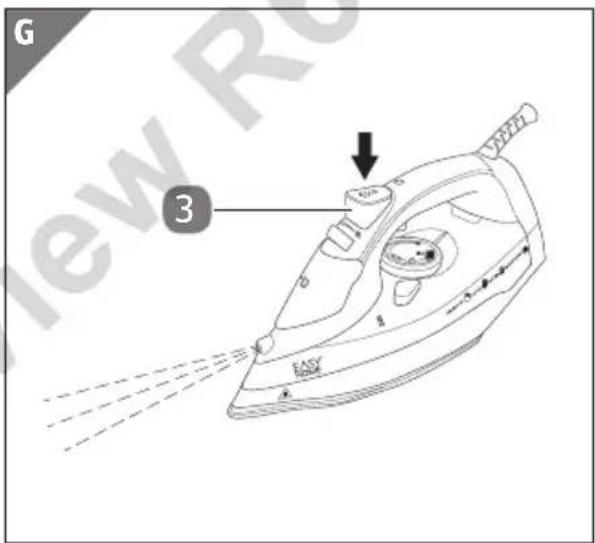
text_image
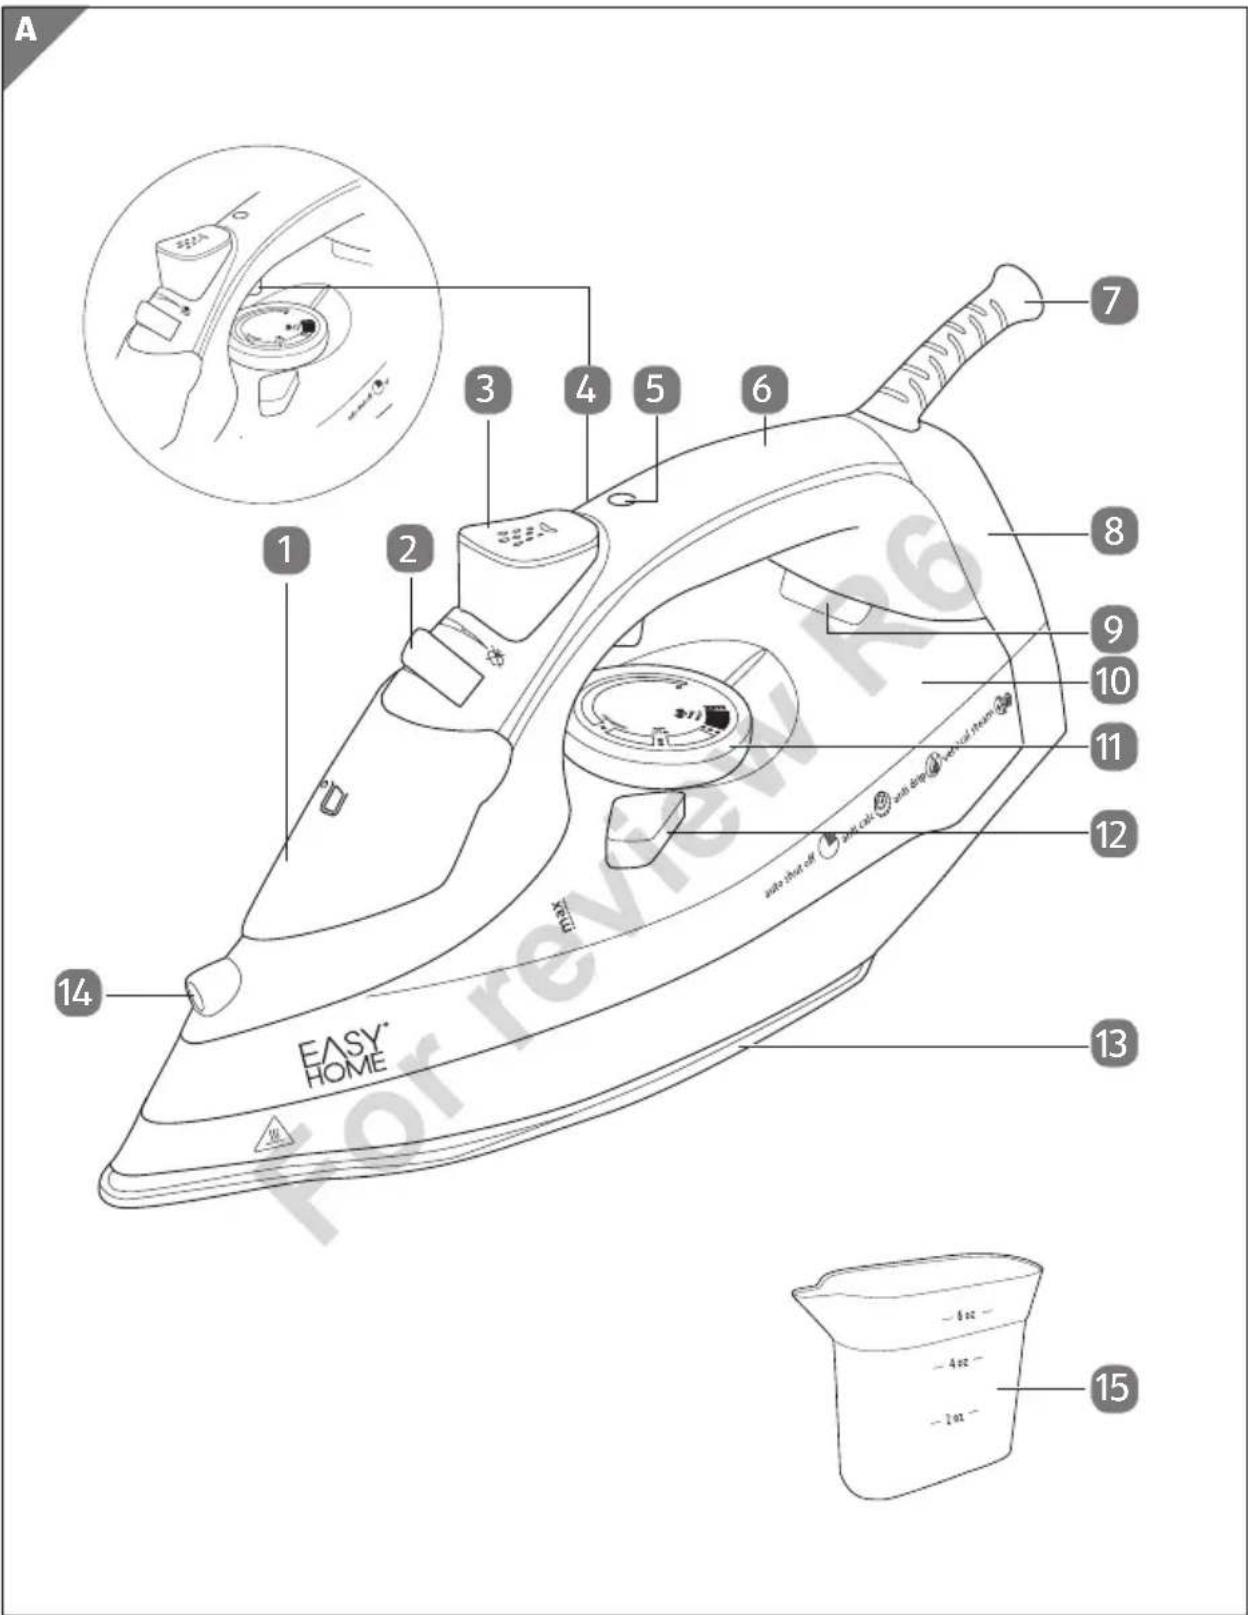
G 3 EASYPackage contents/device parts
1 Water tank lid
2 Steam control dial
3 Spray button
4 Steam button
5 Power LED
6 Handle
7 Power cord and plug
8 Pedestal
9 Operating control light
10 Water tank
11 Temperature control dial
12 Self-clean button
13 Soleplate
14 Spray nozzle
15 Measuring cup
General information
Reading and storing the user manual

This user manual accompanies this steam iron and contains important information on setup and handling.
Before using the steam iron, read the user manual carefully. This particularly applies to the safety notes. Failure to do so may result in personal injury or damage to the steam iron. The steam iron is not a toy for children.
Store the user manual for further use. Make sure to include this user manual when passing the steam iron on to third parties.
Explanation of symbols
The following symbols and signal words are used in this user manual, on the steam iron or on the packaging.
text_image
WARNING!This signal symbol/word designates a hazard with moderate risk, which may result in death or severe injury if not avoided.
text_image
CAUTION!This signal symbol/word designates a hazard with low risk, which may result in minor or moderate injury if not avoided.
NOTICE!
This signal word warns of possible damage to property.

This symbol provides you with useful additional information on handling and use.
Disconnect the steam iron from the power supply. Pull the plug out of the power outlet and let the steam iron cool off before cleaning it.

Burn hazard! Warning of a hot surface!

ETL Listed Mark

The ETL Listed Mark is proof that your product has been independently tested and meets the applicable published standard.
QUICK START GUIDE!
Five simple steps for successful steam ironing
natural_image
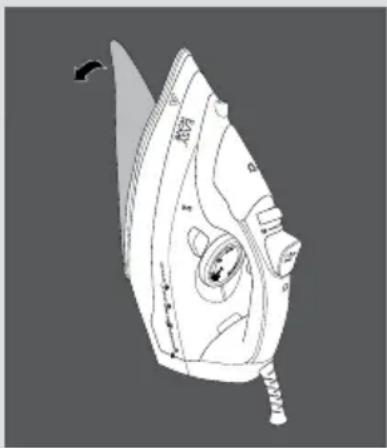
Line drawing of a steam iron with internal components and mounting feet (no text or symbols)1. Removing the protective cover
- Peel the protective cover off the soleplate 13.
- Wipe down the soleplate with a soft, damp cloth.
natural_image
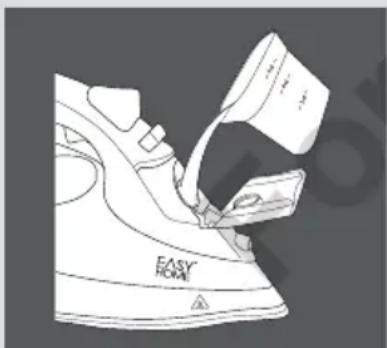
Line drawing of a steam iron with a handle and base plate (no text or symbols)2. Adding water
- Hold the steam iron at a slight angle and lift the water tank lid 1.
- Use the enclosed measuring cup 15 to fill the water tank 10 with tap water.
- Close the water tank lid. It will "click" when securely closed.
natural_image
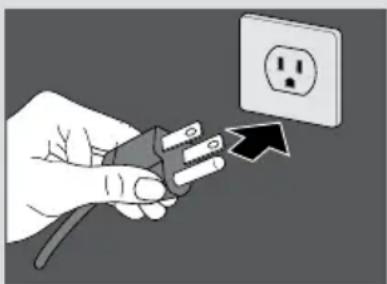
Hand holding a plug with an open electrical outlet, showing a black arrow pointing to the outlet (no text or symbols present)3. Plugging in the steam iron
- Plug steam iron into a properly installed power outlet. The power LED 5 will illuminate.
natural_image
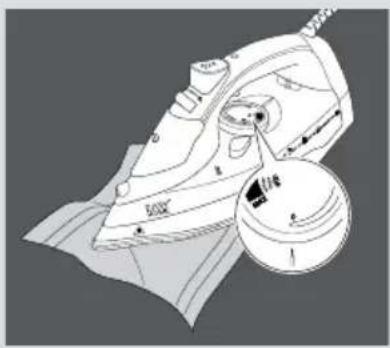
Line drawing of a steam iron with a cloth cover and handle, no text or symbols present4. Heating up the steam iron
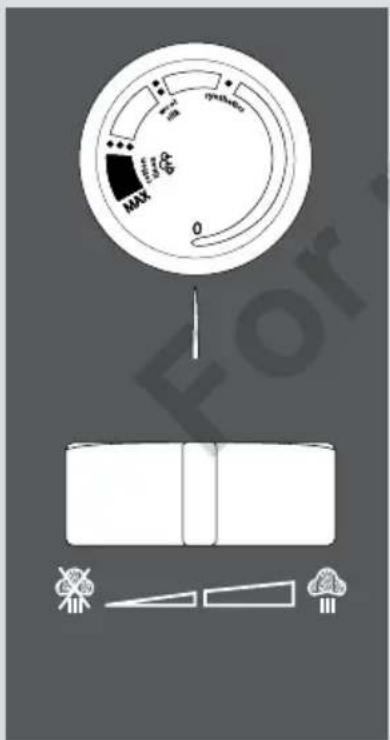
- Set the temperature control dial to MAX.
- Set the steam control dial 2 to the position.
- Let the steam iron heat up for about two minutes. The operating control light 9 will light up while the iron is heating up. It will go out as soon as the maximum temperature is reached.
- Iron over an old, clean cloth.
- When heating the steam iron for the first time, smoke or odor may be produced as production residue is burned off.
text_image
MAX 05. Steam ironing
- Set the temperature control dial 11 to a position between ●● and MAX.
• Always note the information on the care label of your garment. - Set the steam control dial 2 to a position between ⚙ and ⚙ depending on the required temperature and amount of steam.
- Lay the garment to be ironed on the ironing board and iron it. Steam will be emitted as soon as the soleplate is flat on the fabric.
- As soon as you place the steam iron on its pedestal 8, the steam iron will stop steaming.
Read all safety notes in this user manual before use.
It is imperative that you observe all safety notes in the user manual.
Safety
Proper use
The steam iron is exclusively designed for ironing heat-resistant clothing and fabric on a heat-proof surface. The clothing and fabric intended for ironing must be properly labeled. The steam iron is only intended for private use and is not suitable for commercial purposes.
Only use the steam iron as described in this user manual. Any other use is considered improper and may result in damage to property. The steam iron is not a children's toy.
The manufacturer or vendor cannot be held liable for damages incurred through improper or incorrect use.
Safety notes
WARNING!
Risk of electric shock!
A faulty electrical installation, excessive line voltage or incorrect operation may result in an electric shock.
- Only plug in the steam iron if the line voltage of the outlet corresponds to the data on the steam iron's plug. Do not use outlets that do not have sufficient capacitance.
- Only plug the steam iron into an easily accessible outlet so that you can quickly remove it from the power supply in the event of a problem.
- Avoid simultaneously connecting other electrical devices with a high power consumption to the same outlet or extension board.
- If an extension cord is absolutely necessary, then ensure it has an ampere rating equal to, or greater than, the maximum rating of the steam iron. Using an extension cord with less amperage may result in a risk of fire or electric shock due to overheating.
- Do not let the power cord hang down to ensure that children or pets are not able to pull on it or get tangled in it.
- Do not operate the steam iron if it exhibits visible damages
or if the power cord or plug is defective.
- If the power cord of the steam iron is damaged, do not use it. Have the manufacturer, its customer service team or an authorized professional or authorized specialist workshop repair it. Contact the manufacturer via the address on the warranty card.
- Do not open the housing; instead, have an authorized qualified professional perform repairs. Liability and warranty claims are waived in the event of repairs performed by the user, improper connection or incorrect operation. Contact the manufacturer via the address on the warranty card.
- Only parts that comply with the original device data may be used for repairs. This steam iron contains electrical and mechanical parts which are essential for providing protection against sources of danger.
- Never insert any object into the housing.
- The steam iron must not be operated with an external timer or separate remote control system.
- Do not immerse the steam iron, power supply unit or power cord in water or other liquids.
- Never touch the plug with wet or damp hands.
- Do not pull the plug out of the outlet by the cord; instead, always pull it out using the plug itself.
- Never move, pull, or carry the steam iron by its power cord.
- Keep the steam iron, the power supply unit and power cord away from open flames and hot surfaces.
- Lay the power cord so that it does not pose a tripping hazard.
- Do not kink the power cord and do not lay it over sharp edges.
- Only use the steam iron indoors. Do not use the steam iron in damp rooms or in the rain.
- Never store the steam iron such that there is a risk of it falling into a tub or sink.
- Never reach to retrieve an electrical appliance if it has fallen into water. In such a case, immediately unplug the appliance.
- Always switch off the steam iron before plugging it into a power outlet and before unplugging it, and when you are not using it, when you intend to clean it, when you add or drain water, in the event of a malfunction, or in the event of a storm.
WARNING!
Risk of short circuit!
Water that has penetrated the housing may cause a short circuit and an electric shock. You may injure yourself if you come into contact with the steam iron.
- Before you fill or empty the water tank, pull the plug out of the outlet.
- Do not use a steam or high-pressure cleaner to clean the steam iron.
WARNING!
Danger for children and persons with impaired physical, sensory or mental capacities (e.g., partially disabled persons, older persons with reduced physical and mental capacities) or lack of experience and knowledge (e.g., older children).
- If they are supervised or have been instructed in how to safely use the steam iron and have understood the risks associated with operating it, this steam iron may be used by children ages eight and over as well as persons with impaired physical, sensory or mental capacities or those lacking experience and knowledge. Children may not play with the steam iron. Cleaning and user maintenance must not be performed by unsupervised children.
- Keep children under the age of eight away from the steam iron and power cord at all times.
- Do not leave the steam iron unattended while in operation.
- Make sure that children do not play with the plastic wrapping. They may get caught in it when playing and suffocate.

WARNING!
Danger of explosion!
The steam iron becomes very hot when in use and may ignite flammable liquids and vapors in the immediate vicinity.
- Keep flammable liquids and vapors away from the steam iron.

WARNING!
Burn/fire hazard!
The soleplate may inflict burns if you come into direct contact with it.
- Never leave the steam iron unattended when it is connected to the power outlet.
- Always remain attentive when ironing.
- Make sure that there is no risk of other persons, especially children, or pets burning themselves on the steam iron.
- Do not iron garments while they are being worn.
- Do not point the steam at another person or at animals.
- Always iron on a solid, stable base to prevent the steam iron from falling.
- Let the steam iron cool off completely before cleaning or storing it.

WARNING!
Scalding hazard!
If you come into contact with the hot steam, you may scald yourself.
- Never turn the hot steam iron so that the hot soleplate is pointing up, otherwise water may leak out of the water tank.
- Do not use the hot steam for clothing when it is being worn!
- Avoid direct contact with the hot steam.
- If the steam iron is turned upside during or immediately after use, be very careful as any hot water remaining in the water tank may leak out of the water tank.

CAUTION!
Health hazard!
The water in the water tank is not suitable for drinking; it may be contaminated. Drinking the water may make you ill.
- Do not drink the water in the water tank.
NOTICE!
Risk of damage!
If you do not use the steam iron properly, you may damage it.
- Always pull the power plug and not the power cord to disconnect the steam iron from the power outlet.
- Never use the power cord as a carrying strap.
- When setting the steam iron, do not exceed the ironing level indicated by the care label on your garment. An incorrect ironing temperature may damage your clothes.
- Fill the water tank only with water.
-
Use an ironing cloth if you use the steam function for fabrics made of fine synthetic fiber.
-
Do not use any solvent-based, aggressive or abrasive cleaners or cleaning utensils (e.g., scouring pads or similar) on the steam iron. They may scratch the surfaces.
- Do not iron metallic objects, such as buttons, zippers, etc.
- Stop using the steam iron if it has fallen over or fallen off its pedestal or the ironing board, and/or it exhibits visible damage, e.g., water is leaking although the water tank lid is firmly closed.
- Place the steam iron on an easily accessible, level, dry, heat-resistant and stable work surface. Do not place the steam iron on the edge of the work surface.
- Avoid the build-up of heat by not placing the steam iron directly up against a wall or under cupboards or similar. The steam that is emitted can damage furniture and wall decor.
- Never place the steam iron on or near hot surfaces (e.g., hotplates).
- Ensure the power cord does not come into contact with heat-generating sources (e.g., hotplates).
- Never expose the steam iron to high temperatures (e.g., heaters, etc.) or to the effects of the weather (e.g., rain).
- Stop using the steam iron if its plastic housing and components exhibit cracks or breaks or are deformed. Only replace damaged parts with corresponding original spare parts.
First use
Checking the steam iron and package contents
NOTICE!
Risk of damage!
If you are not cautious when opening the packaging with a sharp knife or other pointed object, you may quickly damage the steam iron.
- For this reason, be very careful when opening it.
- Take the steam iron out of the packaging.
- Check to make sure all parts are included (see Fig. A).
- Check whether the steam iron or individual parts are damaged. If this is the case, do not use the steam iron. Contact the manufacturer via the service address indicated on the warranty card.
Basic cleaning
- Remove the packaging material and all protective foils.
- Clean all parts of the steam iron before first use as described in the chapter „Cleaning and maintenance.”
Preparations for first use

When heating up the steam iron for the first time, smoke or odor may be produced as production residue is burned off. This is normal and not a cause for concern.
- Peel off the protective cover from the soleplate 13 and wipe down the soleplate with a soft, damp cloth.
- Stand the steam iron on its pedestal 8.
- Plug the steam iron into a properly installed power outlet and turn the temperature control dial 11 to MAX.
- Let the steam iron heat up for approximately two minutes and iron over an old clean piece of cloth.
- Remove the power plug from the power outlet and let the steam iron cool down.
Adding water

WARNING!
Risk of short circuit!
Water that has penetrated the housing may cause a short circuit and an electric shock. You may injure yourself if you come into contact with the steam iron.
- Remove the power plug from the power outlet before filling the water tank with water, and before emptying the water tank.

Do not use any distilled or demineralized water or chemical additives. These substances will hinder the anti-limescale function.
- Hold the steam iron at a slight angle and lift the water tank lid 1 to open it (see Fig. B).
- Use the enclosed measuring cup 15 to fill the water tank 10 with tap water. Make sure you do not fill the water tank passed the MAX mark (see Fig. C).
- Close the water tank lid. It will "click" when it is securely closed.
- Wipe up any water that has spilled.
Operations
WARNING!
Burn hazard!
Clothing can become very hot during and after ironing, and may cause burns.
- To avoid risk of burns, do not touch the clothes immediately after ironing.
Setting the temperature
NOTICE!
Risk of damage!
If you adjust the temperature during use, you may damage your clothing if you use the iron immediately afterwards.
- Wait approximately two minutes before continuing with the ironing to avoid damaging your clothing.
The temperature will remain constant while the steam iron is in use.
Refer to the table below for a temperature settings guide for different types of fabric. Always pay attention to the information on the care label of your clothing.
| Fabric type Steam ironing Temperature setting | ||
| Synthetics: acetate, acrylic, viscose, polyamide (nylon), polyester (rayon) | No | ● |
| Silk, wool No | ●● | |
| Cotton, linen, denim | Yes | ●●● ~ MAX |
| Velvet, velveteen, cotton velvet Yes | ●●●MAX | |
-
Set the steam iron on its pedestal 8.
Turn the temperature control dial 11 to 0 (see Fig. D). -
Plug in the steam iron. The power LED 5 will illuminate.
-
Turn the temperature control dial to the setting that corresponds with the care label on your clothing. The set temperature will be reached after approximately two minutes. The operating control light 9 will light up while the iron is heating up.
-
When the operating control light goes out, the steam iron is ready for use.

- Do not overfill the washing machine. Your clothes will be less prone to wrinkling as a result.
- Iron delicate fabrics while they are still damp.
- Before ironing, sort clothes by fabric type or temperature setting.
- Begin with fabrics that need to be ironed at low temperatures. This will save time as the iron heats up faster than it cools down, and will also prevent damage to clothing and burn marks.
- With blended fabrics (e.g., 40% cotton, 60% synthetics), always use the lower temperature for the more delicate fabric.
- If you are unsure of the fabric's composition, always start by ironing an inconspicuous area of the garment using a low temperature. If there is no damage, and if it is necessary, increase the temperature incrementally.
Use a press cloth if in doubt, and/or also turn your clothes inside out before ironing.
- Always iron garments with prints, embroidery, lace, sequins, or similar appliqués inside out and at the lowest temperature.
- Place the garment as flatly as possible on the ironing board. Move the iron back and forth evenly over the fabric. Do not pause on one spot for too long to avoid burn marks.
- For velvet and velveteen, steam ironing is suggested. Never iron completely dry. Hold the steam iron so that it is hovering slightly above the fabric (see chapter “Vertical steam ironing”).
Steam ironing
WARNING!
Scalding hazard!
The steam produced by the steam iron is very hot and may cause scalding if not avoided.
- Do not point the vapor stream at any person or animal.
- Keep your hands and all parts of the body away from the garment while using the steam shot function.
NOTICE!
Risk of damage!
Make sure the water tank is filled with water before using the steam ironing functions, otherwise you may damage the steam iron.
- Top up the water in the water tank to the MAX mark before and after each use.
- If applicable, fill the water tank 10 with water as described in the chapter "Adding water."
- Turn the temperature control dial 11 to a position between ●● and MAX (see Fig. D).
- Set the steam control dial 2 to a position between ⚙ and ⚣ depending on the selected temperature and required amount of steam.
- Lay the garment as flatly as possible on the ironing board.
- Steam will be emitted the moment the steam iron is placed on the fabric. Move the iron back and forth evenly over the fabric. Do not pause on one spot for too long to avoid burn marks.
- When you place the steam iron on its pedestal 8, it will stop emitting steam.
Using the steam shot function
An extra burst of steam can be obtained with the steam shot function. This is useful for freshening up and smoothing hanging fabrics, e.g., curtains. The steam shot function is also useful for stubborn creases in stiffer or stubborn fabrics, e.g., denim and linen.
-
Select a high temperature for steam ironing ( ● ● up to MAX). Put the iron on its pedestal 8 and wait for the operating control light 9 to go out.
-
Position the curtains or fabric so that they can be ironed while hanging.
- Push the steam button 4 to release a burst of steam. Steam will be emitted from the soleplate 13 (see Fig. F).

- Steam can only be produced at the higher temperature settings, which start from ●●●
- Depending on the fabric blend, thickness and creasing characteristics, the required amount of steam may vary considerably. More steam is needed to iron easily-creased fabric, e.g., linen, than for thin cottons.
- Never push the steam button several times in a row. Wait a few seconds between each press.
Using the vertical steam shot function
The vertical steam shot function is ideal for straightening creased hanging fabrics, like curtains, and for steam ironing temperamental fabrics on hangers, like velvet.
- Operate the steam iron as described in the chapter "Preparations for first use."
- Set the temperature control dial 11 to the desired temperature (see Fig. D).
- Set the steam control dial 2 to the position (maximum steam).
- Hold the steam iron so that it is hovering slightly above the fabric. Glide the steam iron over the fabric without touching the fabric.
Dry ironing
- Operate the steam iron as described in the chapter "Preparations for first use."
- Set the temperature control dial 11 to the desired temperature (see Fig. D).
- Set the steam control dial 2 to the position (no steam).
- Iron your clothing or other desired fabrics.
Spray function
You can use the spray function to dampen garments with stubborn creases to remove them more easily. The spray function can be used during both steam-ironing and dry-ironing.
- Iron your clothing, or fabrics, as described in the chapters "Dry ironing" or "Steam ironing."
- Press the spray button 3 as needed. Water will spray from the spray nozzle 14.
- Release the spray button to stop using the spray function.
After each use
- Set the temperature control dial 11 to the 0 position.
- Place the steam iron on its pedestal 8 and unplug the steam iron from the power outlet.
- If water still remains in the water tank 10, open the water tank lid 1 and empty the water from the water tank.
Additional functions
Anti-drip function
This function is always engaged and prevents water from leaking out of the steam vents and staining clothes during ironing.
Anti-calc function
The steam iron is equipped with a special resin filter located in the water tank. It prevents limescale desposits on the soleplate.
Do not use distilled or demineralised water or chemical additives. This will hinder the anti-calc function.
To de-scale the steam iron, see chapter "Self-cleaning function."
Automatic shut-off function
The steam iron will automatically switch off if it has not been used for a certain length of time.
- Horizontal position: If the steam iron is resting on its soleplate and is not moved for approximately 20–25 seconds, the steam iron will switch off.
- Vertical position: If the iron is resting on its pedestal and is not moved for approximately 8 minutes, the steam iron will switch off.

If the automatic switch-off function has been triggered, the steam iron will beep and the power LED 5 will flash.
As soon as the steam iron is moved again, the automatic switch-off function is deactivated and the steam iron is ready for use once more.
Cleaning and maintenance

WARNING!
Burn hazard!
The soleplate will get very hot and hot steam will be emitted during operation!
- Always let the steam iron cool off completely before cleaning.
- Do not lean over the steam iron while hot steam is rising.
NOTICE!
Risk of short circuit!
Water that has penetrated the housing may cause a short circuit.
- Make sure that no water penetrates the housing.
- Never immerse the steam iron in water.
NOTICE!
Risk of damage!
If you use unsuitable cleaning agents or utensils, you may damage the surface of the steam iron.
- Do not use any aggressive abrasive, solvent-based, acid-based or chlorine-based cleaners.
- Do not use any brushes with metal or nylon bristles, sharp or metallic cleaning utensils such as knives, hard scrapers or similar.
General cleaning
- Unplug the steam iron from the power outlet before cleaning.
- Let the steam iron cool off completely.
- Use a soft, damp cloth to wipe off the steam iron. Then let all parts dry completely.
- If you do not use the steam iron for a prolonged period, store it in the original packaging to protect it against dust.
Self-cleaning function
This function cleans the inside of the soleplate 13. It is recommended to activate the self-cleaning function approximately every two weeks.
- Fill the water tank 10 to the MAX mark as described in the chapter "Adding water" and set the steam control dial 2 to the position (no steam).
- Plug in the steam iron and set the temperature control dial 11 to MAX. Wait about two minutes until the steam iron reaches the maximum temperature.
- Set the temperature control dial to 0 and unplug the steam iron from the power outlet.
- Hold the steam iron horizontally over a sink, then push and hold down the self-clean button 12 until the water tank is empty.
Storage
- Make sure the steam iron has cooled off completely and the water tank is empty.
- Wind the power cord loosely around the steam iron, making sure the cord does not touch the soleplate 13.
- Store the steam iron out of the reach of children in a dry, well-ventilated area.
- If you do not use the steam iron for a prolonged period, store it in the original packaging to protect it against dust.
Troubleshooting
| Issue Possible cause Suggested solution | ||
| The soleplate does not heat up although the steam iron is on. | Loose connection or not connected to the power outlet. | Check the steam iron is plugged into the power outlet. |
| The temperature control dial is set to 0. | Select a suitable temperature. | |
| The steam iron does not produce any steam. | Not enough water in the water tank. | Fill the water tank. |
| The steam control dial has not been set to steam production ( Aircraft). | Set the steam control dial between minimum and maximum steam production. | |
| The selected temperature is lower than the required setting for the steam function. | Select the correct temperature for steam ironing (●●up to MAX). | |
| The steam shot function is not working. | The steam shot function was used several times in a row within a short period of time. | Set the steam iron down horizontally and wait for a moment before you use the steam shot function. |
| The steam iron is not hot enough. | Select the correct temperature for steam ironing (●●up to MAX). Set the steam on its pedestal and wait until the operating control light goes out. | |
| Water leaks out of the soleplate while ironing. | The steam iron is not hot enough. | Select the correct temperature for steam ironing (●●up to MAX). Place the iron on its pedestal and wait until the operating control light goes out. |
| White particles and dirt come out of the sole-plate when ironing. | You have used hard water and limescale has formed in the water tank as a result. | Use the self-cleaning function (self clean) to clean the inside of the soleplate. Iron an old towel to make sure that any residue in the iron is not transferred to clothes. If necessary, wipe the soleplate with a soft, damp cloth. |
| Water leaks out of the soleplate while it is cooling or after being stored. | The iron was set horizontally with water still in the water tank. | Empty the water tank and set the steam control dial to 📋 before storing the iron. |
| When ironing, a brown liquid leaks out of the soleplate and leaves streaks on the clothes. | A chemical decalcifier may have been used. | Do not use a chemical decalcifier. |
| Fabric fibers have accumulated and melted onto the soleplate. | Clean the soleplate with a soft, damp cloth. | |
| Clothes may not have been rinsed properly or they are new and have not been washed before being ironed. | Thoroughly rinse clothes once more. | |
Technical data
Model: 95986
Product code: 95986
Power supply: 120 V\~, 60 Hz
Power: 1,400 W
Water tank capacity: 0.0845 gallons (approx. 320 ml)
Vertical steam shot volume: 0.035 lbs/min (+/- 0.009 lbs/min)
16 g/min (+/-4 g/min)
Weight: approx. 2.2 lbs (approx. 1 kg)
Dimension: 11.22 in × 4.92 in × 5.71 in
(28.5 cm × 12.5 cm × 14.5 cm)
Material of housing: Plastic (PP+PC)
Material of sole plate: Stainless steel (SUS430)
Cable length with power plug: 74.8 in (approx. 190 cm)
Cable joint: 360° swivel joint
Disposal
Disposing of the packaging
- Sort the packaging before you dispose of it. Dispose of paperboard and cardboard with the recycled paper service and wrappings with the appropriate collection service.
Disposing of the steam iron
- Should the steam iron no longer be capable of being used at some point in time, dispose of it in accordance with the regulations in force in your city or state.
- Please ensure your recycling information applies to local regulations and the EPA recommendations (www.epa.gov).
Contenido
Conjunto 3
Uso ....4
natural_image
Line drawing of a steam iron with internal components and mounting feet (no text or symbols)natural_image
Line drawing of a fast iron iron (£) with a strap and handle, showing part of the base plate (no text or symbols)2. Echar agua
natural_image
Hand holding a plug with an arrow pointing to an electrical outlet (no text or symbols visible)natural_image
Line drawing of a steam iron with a circular component on the side (no text or symbols)4. Calentar la plancha de vapor
Dimensiones: 11.22 in × 4.92 in × 5.71 in
$$ (2 8. 5 \mathrm{cm} \times 1 2. 5 \mathrm{cm} \times 1 4. 5 \mathrm{cm}) $$
aprox. 74.8 in (aprox. 190 cm)
Cable: salida de cable giratorea