SL-02 - Radio Intek - Free user manual and instructions
Find the device manual for free SL-02 Intek in PDF.


User questions about SL-02 Intek
0 question about this device. Answer the ones you know or ask your own.
Ask a new question about this device
Download the instructions for your Radio in PDF format for free! Find your manual SL-02 - Intek and take your electronic device back in hand. On this page are published all the documents necessary for the use of your device. SL-02 by Intek.
USER MANUAL SL-02 Intek
Contents of Package 3
Controls and Indicators 3-5
Battery Installation....6
Battery Operation / Battery Charging 7
Operation....7-13
Specifications.... 13
Optional Accessories 13
Important Informations....14
Declaration of Conformity....15
User Information 15
Notes 16
IMPORTANT!
It is recommended to carefully read this instruction manual throughout, before using the radios. This also in order to prevent you from using the radios out of the limits stated by the regulations.
IMPORTANT!
The maximum operating range will vary depending on terrain and environment. Range will be usually greater in open fields. While range is usually shorter within and around buildings or large structures. This unit may not ensure privacy of communication.
Introduction
Congratulations!
Congratulations on your selection and purchase of this high quality product. With proper care and adherence to the set-up and user instructions in this Owner's Manual, this unit will let you enjoy years of trouble-free service.
We are committed to providing quality products that fit your needs, however we would like to receive any comments or suggestions that you might have on this product, which will help us in continuous improvement of the quality.
Applications
The SL-02 is a lightweight, pocket size, compact and very slim design two-way communication device, operating on the PMR 446 MHz and on the LPD 433 MHz European bands. Radio must be operated on the band (PMR446 or LPD433) and on the channels allowed in the country where the product is been used, in accordance with the local regulations. It can be used to provide immediate, high quality, cost free 2-way communication, for both business or personal use, it is the ideal communication tool for many applications, like :
• Industry Sport & Leisure
• Construction Sites Sporting Events, Concerts, Meetings •
• Shops, Stores & Shopping Malls Bike & Motorcycle Riding •
• Warehouses & Buildings Kids and old persons Control •
• Hotels & Resorts Camping and Hiking
• Safety & Emergency Indoor & Outdoor Activities
• Baby Monitor Sailing and Sports Flight •
Features and Benefits
The radio includes a number of advanced features, nevertheless its operation is user firendly and you may get familiar with it, after few minutes of use.
Please refer to the following list of the main feautres in this two-way radio :
• 8 PMR Channels + 69 LPD Channels
38 CTCSS Codes
• Roger Beep Tone
• Keypad Program Tone
- Keypad Lock
• Up to 10 km range on PMR446 channels, depending on the environment
• Auto Squelch
- Auto Monitor
• Auto Power Save Circuit
• VOX (Baby Room Monitor) / Handsfree Use
• Adjustable Hi-LO Transmitter Power (PMR band)
- Channel Scan
• Channel / CTCSS Tone Memory
Introduction - Contents of Package - Controls and Indicators
• 3 Selectable Call Tone Melodies
• Last Used Channel Memory
TX LED Indicator
LCD Display
• Battery Status / Charge Indicator
• External Earset-Microphone Jack
• Wall Charger Jack
• Vibrator Alert (for silent use)
• Lithium Ion Battery Pack (720 mAh) Included
Contents of Package
Please carefully check that the package contains the following items:
2 x Main Unit (Radio)
2 x Li-Ion 720mAh Battery Pack (already installed into the radio)
2 x 230VAC Wall Charger
2 x Earset-Microphone
2 x Necklace
1 x User Manual (this one)
CONTROLS AND INDICATORS
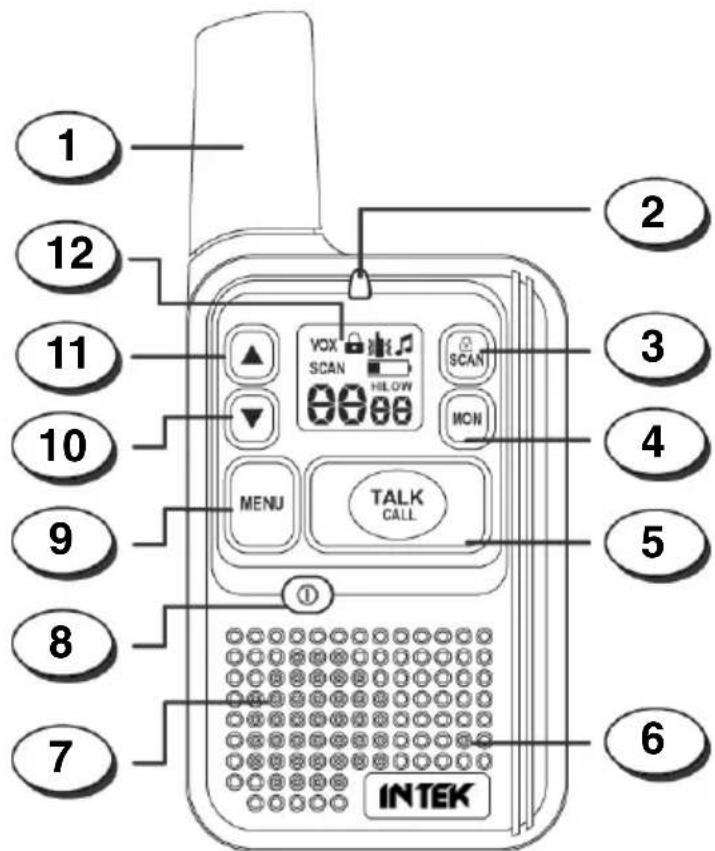
Front Panel
text_image
1 2 3 4 5 6 7 8 9 10 11 12 VOX SCAN HLOW SCAN MON MENU TALK CALL INTEKControls and Indicators
1. Antenna
High efficiency antenna.
2. TX LED indicator
This green LED Indicator is lighted when radio is in transmit mode.
3. SCAN / LOCK Key
SCAN
Shortly press the SCAN / LOCK (3) key to start the channels scanning (refer to AUTOMATIC CHANNEL SCANNING at page 12).
KEYPAD LOCK
Press and hold the SCAN (3) key for about 5 seconds to enable the keypad LOCK function. Press and hold this key again to disable the keypad LOCK function (refer to KEYPAD LOCK at page 12).
4. MON Key
Press the MON key (4) to activate the Monitor function. This function opens Squelch in order to listen to the background noise and weak signals.
5. TALK / CALL Key
TALK
Press the TALK / CALL (5) key to transmit and hold it during transmission. The LED Indicator (2) will be lighted during transmission. Release the TALK / CALL Key (5) at the end of your transmission to return to the receive mode.
WARNING ! Do not touch the antenna during transmission.
CALL
Press the TALK / CALL Key (5) twice in rapid action to transmit Call Tone.
6. Built-in Microphone
Built-in microphone.
7. Built-in Speaker
Built-in front speaker.
8. ON-OFF Key
Press and hold this key to switch ON or OFF the radio.
9. MENU Key
Press the MENU Key (9) key enable and program the various functions of the radio. Pressing the MENU Key (9) key will scroll the various functions.
10. DOWN Key
The DOWN Key (10) is used to decrease the volume level (from level 8 to level 1) and toggle setting in Menu mode.
11. UP Key
The UP Key (11) is used to increase the volume level (from level 1 to level 8) and toggle setting in Menu mode.
12. LCD Display
The LCD Display indicates simultaneously all the programmed settings and all the enabled functions.
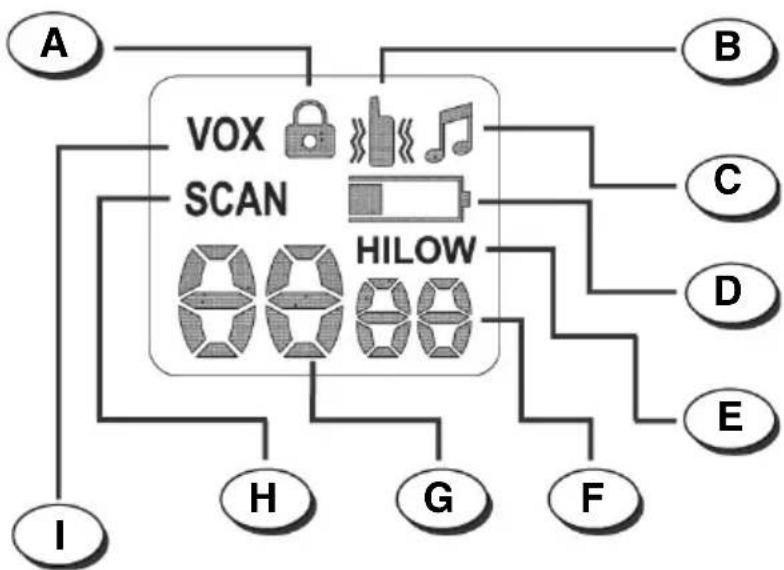
LCD Display
flowchart
graph TD
    A["A"] --> VOX["VOX"]
    B["B"] --> VOX
    C["C"] --> HILOW["HILOW"]
    D["D"] --> HILOW
    E["E"] --> HILOW
    F["F"] --> HILOW
    G["G"] --> HILOW
    H["H"] --> HILOW
    I["I"] --> HILOW
    VOX["VOX"] --> SCAN["SCAN"]
    SCAN["SCAN"] --> HILOW["HILOW"]
A. LOCK Icon
The LOCK Icon (A) is lighted when the Keypad Lock function has been enabled.
B. VIBRATE MODE Icon
This icon is lighted when the unit is in Vibrate-Alert mode. (Please refer to VIBRATE ALERT SETTING at page 12).
C. Roger Beep Icon
The Roger Beep Icon (D) is lighted when the Roger Beep function is enabled.
D. Low Battery Level Icon
It indicates when battery level is low or during the battery charging.
E. HI / LOW Power Indicator
Indicates when the unit is High Power mode (HI), or in Low Power mode (LOW). Transmitter power is adjustable only on the 8 PMR channels.
F. CTCSS Code Number
It shows the selected CTCSS Code Number.
G. Channel Number
It shows the selected channel, from P1 to P8 (PMR channels) and from 1 to 69 (LPD channels).
H. SCAN Icon
The SCAN icon (H) is lighted when the SCAN function has been enabled, in order to automatically search busy channels. (Please refer to AUTOMATIC CHANNEL SCANNING at page 12).
I. VOX Icon
The VOX Icon (I) is lighted when the VOX (handsfree use) function is enabled. (Please refer to VOX FUNCTION at page 11).
Battery Installation
Battery Installation
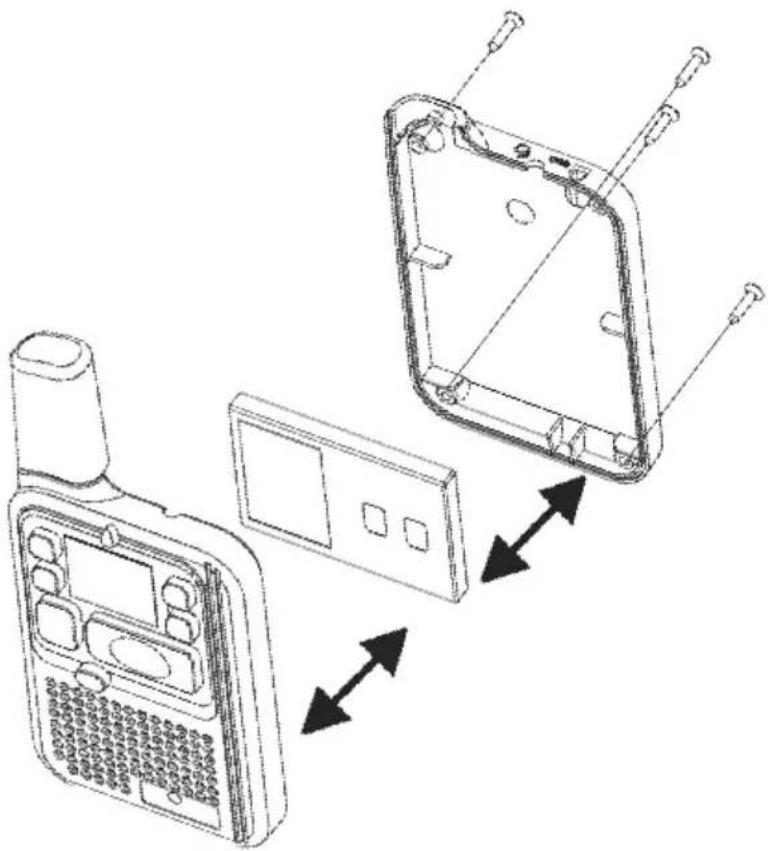
The radio is powered by a Lithium-Ion Battery. The battery is already installed in the unit, but, if replacement is needed, please refer to the following procedure:
- Release the Cabinet Back Cover located on the rear side of the unit, by removing four (4) pieces of Screws and remove the Battery Pack from the Battery Compartment.
- Install the new Lithium-Ion Battery into the Battery Compartment. Be certain to follow the correct battery orientation in the compartment. Installing the batteries incorrectly will prevent the unit from operating. Use only the original Battery Pack.
- Replace the Cabinet Back Cover and lock it into position, by replacing the four (4) Screws removed previously. Do not overtighten the screws to avoid damaging the plastic cabinet.
natural_image
Line drawing of a device's front panel and internal components with directional arrows indicating assembly or movement (no text or symbols)CAUTION :
To reduce the risk of fire or personal injury, use only the battery listed in this user manual. The radio has a built in Power Saver feature for maximum battery life. Anyway, when the radio is not being used, conserve battery power by pressing the ON/OFF Key (8) to OFF.
Battery Level and Low Battery Operation
The unit has a Low Battery Level icon (D) which will appear when it detects a low battery level. You should recharge the battery at this time. The Low Battery Level icon (D) will not appear on the LCD display (12) unless the unit detects that the battery is low.
When the unit has a Low Battery Level, then the PTT operation will be disabled and the unit will emit an Error Tone if the TALK/CALL Key (5) is pressed.
When the Low Battery icon (D) appears, then the TALK/CALL Key (5) and MENU Key (9) will be disabled.
If the unit is not charged within 5 minutes, then it will shut down until it is recharged.
Battery Charging
The radio comes with a 230VAC Adaptor Charger, which must be used to recharge the Lithium-Ion battery pack.
To charge the battery proceed as follow :
-
Locate the Headset / Charger Jack Cover on the top side of the unit.
-
Connect the A/C Adaptor Charger into an A/C wall outlet.
-
Insert the A/C Adaptor Charger plug into the Headset / Charge Jack.
During battery charging, the Low Battery Level icon (D) will appear on the LCD display (12) and it will disappear once the battery is fully charged.
NOTE: Charge the battery for approximately 12 hours before initial use.

text_image
HEADSET /CHARGER JACKOPERATION
Using the Radio
- Switch on the radio by pressing and holding the ON/OFF key (8) for around 2 seconds. To switch off the radio, press and hold the ON/OFF key (8) for around 3 seconds.
- Check the battery condition on the LCD display (12).
- Adjust the volume to a comfortable level by pressing the UP (11) or DOWN (10) keys (default).
Transmitting and Receiving
To use the radio to communicate with others :
- The radio is continuously in RECEIVE mode when the unit is ON.
- Press and hold the TALK/CALL key (5) and speak as you normally would, holding the microphone (6) about 20 cm away from your mouth. While transmitting, the TX LED (2) located at the top side of the unit lights up. To avoid cutting off the first part of your transmission, do not speak immediately after pressing the TALK/CALL key (5); first pause briefly, then speak.
- When you have finished speaking, release the TALK/CALL key (5). You are now ready to receive incoming transmission.
Operation
To communicate between two or more radios, both the channel number and the CTCSS code selections must be the same for all units.
Transmitting a Call Alert Tone
To transmitt a Call Alert Tone, press the TALK/CALL key (5) twice in rapid action. The Call Alert Tone will be automatically transmitted for a fixed length of time.
During transmission, the TX LED (2) lights up and a Call Alert Tone is also locally generated for confirmation of operation. The radio will return to standby mode following completion of the Call Tone sequence.
Adjusting the Speaker Volume
To adjust the receiving Volume, proceed as follows :
- Press the UP Key (11) to increase the Speaker Volume.
- Press the DOWN Key (10) to decrease the Speaker Volume.
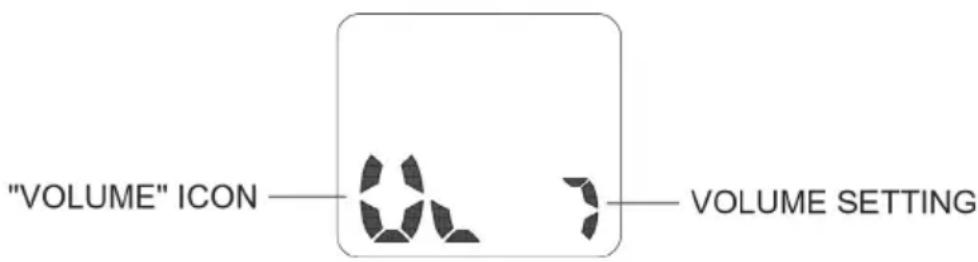
- The current level setting from 1 to 8 indicates the Speaker Volume level. The default Speaker Volume is 4. This will normally not appear on the LCD Display (12) and will only appear when the UP (11) or DOWN (10) keys are pressed. The Volume setting will be displayed as follow :
text_image
"VOLUME" ICON —— 62 ? —— VOLUME SETTINGSetting the Monitor Function
Pressing the MON Key (4) will let you hear the background noise, so you can adjust the volume level of the radio when not receiving a signal. The Monitor function may also be used to check any activity on the current channel before transmitting. To exit the Monitor function, press again the MON Key (4).
MENU OPERATION
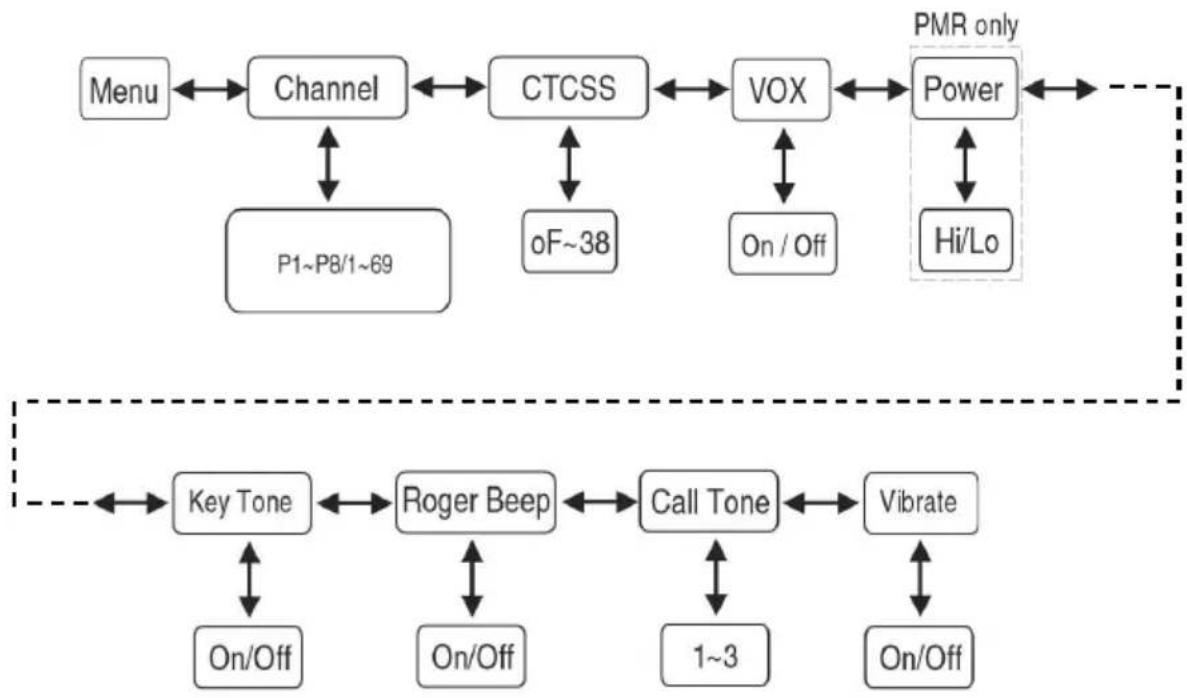
Navigating through the Menu
To access the several advanced features, the radio has a convenient Menu program.
- To enter the Menu Mode/Program, press the MENU key (9) briefly. A key beep will be locally generated when the Menu Mode is engaged.
- Additional presses of the MENU key (9) for no longer than 1 second will advance you through the menu until exiting to Radio mode. A short key beep tone is generated at each key press.
- Menu mode exits to standby mode when the MENU key (9) is pressed while the final menu selection is active.
- Menu mode will automatically time out to standby mode 10 seconds after the last user programming key is pressed.
- Menu mode can be also automatically cancelled by pressing the TALK/CALL key (5).
flowchart
graph TD
    A["Menu"] <--> B["Channel"]
    B <--> C["CTCSS"]
    C <--> D["VOX"]
    D <--> E["Power"]
    E <--> F["PMR only"]
    B <--> G["P1~P8/1~69"]
    C <--> H["oF~38"]
    D <--> I["On / Off"]
    E <--> J["Hi/Lo"]
    K["Key Tone"] <--> L["Roger Beep"]
    L <--> M["Call Tone"]
    M <--> N["Vibrate"]
    K <--> O["On/Off"]
    L <--> P["On/Off"]
    M <--> Q["1~3"]
    N <--> R["On/Off"]
Channel Selection
The radio has 8 PMR channels (P1-P8) + 69 LPD channels (1-69). To choose the desired channel, please proceed as follows :
- Press the MENU key (9) for at least one second. The channel number (G) will flash on the LCD Display (12).
- Press the UP Key (11) or DOWN key (10) to select the desired channel. Auto-repeat is engaged by pressing and holding either the UP (11) or DOWN (10) keys. You'll hear a standard key beep with each channel change.
- To exit the Menu Mode, press TALK/CALL key (5).
Operation
PMR Channels
| FREQ. CH FREQ. CH FREQ. CH FREQ. CH | |||||||
| 446.00625 | P1 | 446.03125 | P3 | 446.05625 | P5 | 446.08125 | P7 |
| 446.01875 | P2 | 446.04375 | P4 | 446.06875 | P6 | 446.09375 | P8 |
LPD Channels
| FREQ. CH FREQ. CH FREQ. CH FREQ. CH | |||
| 433.07500 1 | 433.52500 19 | 433.97500 37 | 434.42500 55 |
| 433.10000 2 | 433.55000 20 | 434.00000 38 | 434.45000 56 |
| 433.12500 3 | 433.57500 21 | 434.02500 39 | 434.47500 57 |
| 433.15000 4 | 433.60000 22 | 434.05000 40 | 434.50000 58 |
| 433.17500 5 | 433.62500 23 | 434.07500 41 | 434.52500 59 |
| 433.20000 6 | 433.65000 24 | 434.10000 42 | 434.55000 60 |
| 433.22500 7 | 433.67500 25 | 434.12500 43 | 434.57500 61 |
| 433.25000 8 | 433.70000 26 | 434.15000 44 | 434.60000 62 |
| 433.27500 9 | 433.72500 27 | 434.17500 45 | 434.62500 63 |
| 433.30000 10 | 433.75000 28 | 434.20000 46 | 434.65000 64 |
| 433.32500 11 | 433.77500 29 | 434.22500 47 | 434.67500 65 |
| 433.35000 12 | 433.80000 30 | 434.25000 48 | 434.70000 66 |
| 433.37500 13 | 433.82500 31 | 434.27500 49 | 434.72500 67 |
| 433.40000 14 | 433.85000 32 | 434.30000 50 | 434.75000 68 |
| 433.42500 15 | 433.87500 33 | 434.32500 51 | 434.77500 69 |
| 433.45000 16 | 433.90000 34 | 434.35000 52 | - - |
| 433.47500 17 | 433.92500 35 | 434.37500 53 | - - |
| 433.50000 18 | 433.95000 36 | 434.40000 54 | - - |
CTCSS Code Selection
The radio has 38 CTCSS private codes available. Different CTCSS tones may be associated to different channels. To choose the desired CTCSS code, please proceed as follows :
- Enter to Menu mode. Advance through the Menu until the CTCSS Code Number (F) will flash on the LCD Display (12).
- Press the UP Key (11) or DOWN key (10) to select the desired CTCSS Code Number. Auto-repeat is engaged by pressing and holding either the UP (11) or DOWN (10) keys. You'll hear a standard key beep with each CTCSS Code change.
- To exit the Menu, press the TALK/CALL key (5).
| CTCSS - TONE FREQUENCY CHART | |||||||||
| No | Freq. (Hz) | No | Freq. (Hz) | No | Freq. (Hz) | No | Freq. (Hz) | No | Freq. (Hz) |
| OF | CTCSS OFF | 08 | 88,5 | 16 | 114,8 | 24 | 151,4 | 32 | 203,5 |
| 01 | 67,0 | 09 | 91,5 | 17 | 118,8 | 25 | 156,7 | 33 | 210,7 |
| 02 | 71,9 | 10 | 94,8 | 18 | 123,0 | 26 | 162,2 | 34 | 218,1 |
| 03 | 74,4 | 11 | 97,4 | 19 | 127,3 | 27 | 167,9 | 35 | 225,7 |
| 04 | 77,0 | 12 | 100,0 | 20 | 131,8 | 28 | 173,8 | 36 | 233,6 |
| 05 | 79,7 | 13 | 103,5 | 21 | 136,5 | 29 | 179,9 | 37 | 241,8 |
| 06 | 82,5 | 14 | 107,2 | 22 | 141,3 | 30 | 186,2 | 38 | 250,3 |
| 07 | 85,4 | 15 | 110,9 | 23 | 146,2 | 31 | 192,8 | - | - |
Operation
Selecting a CTCSS code of OF will disable the CTCSS feature. To communicate between two or more radios, both the channel and CTCSS code selections must be the same. To communicate with other models and brands of radios, the actual radio frequency and CTCSS frequency must be matched. The frequency chart and CTCSS Code chart are included to help with this selection.
Notice : there are different systems to generate the CTCSS sub audible tones (tone coding method, time coding method, etc.) and therefore it might be occasionally possible to have CTCSS compatibility problems among radios from different manufacturers. In this case, it is suggested to use CTCSS tones with higher tone frequencies (tones # 11 to 38). It is anyway generally recommendable to use the CTCSS function among radios of the same type.
VOX (Handsfree use) Function
Your radio is equipped with a user selectable Voice Operated Transmitter function (VOX), that is used for automatic voice transmission (handsfree use or baby room monitor use). In this mode, transmission is automatically initiated by speaking into the microphone (6) and there is no need to push the TALK/CALL Key (5). To enable the VOX function, please proceed as follows:
- Enter the Menu mode. Advance through the Menu until the VOX icon (I) appears on the LCD display (12).
- Press the UP Key (11) or DOWN Key (10) to toggle between on (VOX function enabled) and oF (VOX function disabled) function of the VOX. When VOX feature is on, the VOX icon (I) will appear on the LCD displa (12).
- To exit the Menu, press the TALK/CALL key (5).
To get the full advantage of the convenience of a hands-free transmission and the privacy of conversation, you can purchase an external Ear Bud with Microphone to be used in conjunction with the VOX feature of your radio. Please do not use accessories other than the original ones (ESM-10 or ESM-20). The packaging already contains the external earset-microphones as a standard part.
To use the Ear Bud :
- Set your radio to VOX Mode.
- Insert the Ear Bud Jack into the Headset Jack.
- Wear the Ear Bud and adjust the Microphone location.
Transmitter RF Power Setting
Your radio has a HI/LOW Power selection function to set the TX Power for PMR Band. This function is very convenient to reduce the current drain and extend battery life when communicating within short distance. To select the output power on the PMR Band please proceed as follow:
- Enter to Menu mode. Advance through the Menu until the Pr icon (F) appears on the LCD Display (12).
- Press the UP Key (11) or DOWN Key (10) to set the Power to HI (E) or LOW (E).
- To exit the Menu, press TALK/CALL key (5).
Note : this function is available only on the 8 PMR channels.
Keypad Program Tone Setting
When a key is pressed, a beep tone is heard to confirm your command. The user may enable or disable this keypad program tone.
- Enter to Menu mode. Advance through the Menu until the bP icon (G) appears on the LCD display (12).
- Press the UP Key (11) or DOWN Key (10) to toggle between on (Key Program Tone enabled) and oF (Key Program Tone disabled).
- To exit the Menu, press TALK/CALL key (5).
Operation
Roger Beep Tone Setting
The radio is equipped with a user selectable Roger Beep Tone feature, which enables you to send a Beep Tone at the end of each transmission after every release of the TALK/CALL Key (5). This will prompt any receiving unit that your transmission has ended. To enable or disable this function, please proceed as follows:
- Enter to Menu mode. Advance through the Menu until the Roger Beep icon (C) appears on the LCD display (12).
- Press the UP Key (11) or DOWN Key (10) to toggle between on (Roger Beep enabled) and oF (Roger Beep disabled).
- To exit the Menu, press TALK/CALL key (5).
Call Tone Setting
The radio is equipped with 3 user selectable Call tone melodies. To set the desired Call tone melody, please proceed as follows :
- Enter to Menu mode. Advance through the Menu until the CA icon (G) appears on the LCD display (12).
- Press the UP Key (11) or DOWN Key (10) to toggle between 1\~3 choices of Call Tone pattern.
- To exit the Menu, press TALK/CALL Key (5).
Vibrate Alert Setting
Your radio is equipped with a Vibrate alert for silent operation of the radio. The radio will vibrate when receiving a call tone transmission instead of emitting a call tone sound. To set the unit at Vibrate alert mode :
- Enter to Menu mode. Advance through the Menu until the Vibrate Mode icon (B) appears on the LCD display (12).
- Press the UP Key (11) or DOWN Key (10) to toggle between on (Vibrate Alert enabled) and oF (Vibrate Alert disabled).
- To exit the Menu, press TALK/CALL key (5).
Automatic Channel Scanning
This function allows automatic scanning of all channels and programmed memories. To start the automatic scan function proceed as follows :
-
Press the SCAN/LOCK key (3). Once engaged, the unit will automatically start to rapidly scan the whole channels of the radio for any activity.
The unit will pause on the first active channel found for about 4-5 seconds, before resuming Scan function. If the TALK/CALL Key (5) is pressed while on an active channel, the radio will stop scanning and will resume scanning after about 14 seconds if no transmission is further received.
If the TALK/CALL Key (5) is pressed while scanning, the radio will return to its original channel. -
To exit the Scan mode, press again the SCAN/LOCK key (3).
Keypad Lock
To avoid entering unwanted command, press and hold the SCAN/LOCK (3) key for about 5 seconds. The LOCK icon (A) will appear on the LCD display (12). When the Keylock function is enabled, the UP (11), DOWN (10), SCAN (3) and MENU (9) keys will be disabled. When the keypad is locked, you will still be able to turn the radio OFF and ON, Monitor, transmit, receive and send a CALL tone. To unlock the Keypad, press again the SCAN/LOCK (3) key for about 5 seconds.
Auto Squelch
Your radio is equipped with an automatic Squelch system that automatically cuts off weak transmissions and unwanted noise due to terrain conditions and range limitations. By pressing the MON Key (4), the Squelch function will be disabled and you will hear the background noise or any weak signal. To resume the automatic Squelch, just press the MON Key (4) again.
Automatic Power Save Setting
The radio has a unique Automatic Power Save circuit designed to dramatically extend battery life. If it senses no transmission within 5 seconds, it automatically switches to the Power Save mode. The Radio can still receive transmissions in this mode.
SPECIFICATIONS
Channels 8 PMR Channels + 69 LPD Channels with 38 CTCSS Codes
Operating Frequency UHF 446.00625 - 446.09375 MHz (PMR Band)
UHF 433.07500 - 434.77500 MHz (LPD Band)
Power Source 7.2V (Lithium-Ion Battery Pack)
Output Power 0.5W ERP High / 0.05W ERP Low (PMR BAND)
0.01W ERP maximum (LPD Band)
Dimensions H120 (antenna included) x L54 X D14.6 mm
Weight gr. 76 (Battery Pack included)
Damaged Antenna
Do not use any radio that has a damaged Antenna. If a damaged antenna comes in contact with the skin, a minor burn may occur.
Battery Operation - Important Information
Only use battery which is indicated in the manual. Using another type of battery can substantially reduce play time or damage the radio. A battery pack may last for about 1,000 charge/discharge cycles. Should it be necessary to replace it, battery must be replaced only with the original type.
Dispose of battery in the proper manner, according to federal, state and local regulations that apply in your area.
Battery may leak electrolyte if mixed with a different battery type, if inserted incorrectly, if disposed of in fire, or if an attempt is made to charge a battery not intended to be charged.
Discard leaky batteries immediately. Leaking batteries can cause skin burns or other personal injury.
OPTIONAL ACCESSORIES
ESM-10 External Earset-Microphone with Tie Clip
ESM-20 External Earset- Flexible Boom Microphone with Tie Clip
SM-007-B1 External Transparent Earset-Microphone for Security use.
TH-1000 Soft Carrying Case with PVC transparent window
Important Informations
Important!
Changes or modifications to this product could void your authority to operate this unit. Your radio is produced and factory set to transmit a regulated signal on an assigned frequency. It is against the law to alter or adjust the settings inside the radio to exceed those limitations. Any adjustment to your radio must be made by a qualified authorized technician or service.
To be safe and sure :
Never open the cabinet of your radio.
Never change or replace anything in your radio (except the battery).
Your radio might cause TV or radio interference even when it is operating properly. To determine whether your radio is causing the interference, turn it off. If the interference goes away, your radio is causing it. Try to eliminate the interference by moving your radio away from the receiver. If you cannot eliminate the interference, stop using the radio.
Hazardous Environments :
Do not operate the radio in hazardous environments.
Care and Safety :
To clean the radio, use a soft cloth dampened with water. Do not use cleaners or solvents because they can harm the body of the unit and leak inside, causing permanent damage. Use a dry, lint-free cloth to clean the battery contacts.
Do not submerge the unit in water or use it on a wet environment. If the unit gets wet, turn it off and remove the battery immediately. Dry the battery and the battery compartment with a soft cloth to minimize potential water damage. Leave the battery compartment cover off overnight to ensure complete drying. Do not use the radio until it is completely dry.
Notice ! Use of Multi-Standard Transceivers
This transceiver is a Multi-Standard (DUAL BAND) device and it may be used in all the European countries and in some other countries as well, but only on the channels (frequencies) allowed by the local regulations in each country.
PMR446 (8 channels) : Austria, Belgium, Czech Rep., Denmark, Finland, France, Germany, Greece, Island, Ireland, Italy, Luxembourg, Norway, Holland, Poland, Portugal, Spain, Sweden, Switzerland, UK, Turkey
LPD433 (69 channels) : Austria, France, Germany, Greece, Norway, Holland, Russia, Sweden, Italy (20 channels)
Notice :
The contents of this manual have been carefully checked, however we do not take any responsibility for any possible errors & omissions. No part of this manual can be reproduced, distributed or used in any way, unless it is authorised by the manufacturer.
EC Certificate of Conformity
(to EC Directive 2006/95, 2004/108, 99/5)
DECLARATION OF CONFORMITY
With the present declaration, we certify that the following products :
INTEK SL-02
comply with all the technical regulations applicable to the above mentioned products in accordance with the EC Directives 2006/95/EC, 2004/108/EC, 99/5/EC.
Type of product : LPD / PMR 446 Transceiver
Details of applied standards : EN 300 220-1-2-3, EN 301 489-1-3, EN 60065
EN 300 296-2, EN 301 489-5, EN 60065
Manufacturer : INTEK S.R.L.
16 Via G. Marconi
20090 Segrate (Mi)
Tel. 02-26950451 / Fax 02-26952185
E-Mail intek.com@intek-com.it
Contact Reference : Armando Zanni
Tel. 02-26950451 / Fax 02-26952185
E-Mail intek.com@intek-com.it
Segrate, 02/07/2009 dr. Vittorio Zanetti (General Manager)
User Information
in accordance with art. 13 of the Legislative Decree of 25th July 2005, no. 15 "Implementation of Directives 2002/95/EC, 2002/96/EC and 2003/108/EC, relative to reduction of the use of hazardous substances in electrical and electronic equipment, in addition to waste disposal".
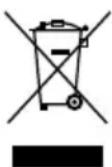
The crossed bin symbol shown on the equipment indicates that at the end of its working life the product must be collected separately from other waste.
The user must therefore take the above equipment to the appropriate differentiated collection centres for electronic and electro technical waste, or return it to the dealer when purchasing a new appliance of equivalent type, in a ratio of one to one.
Appropriate differentiated waste collection for subsequent recycling, treatment and environment-friendly disposal of the discarded equipment helps to prevent possible negative environmental and health effects and encourages recycling of the component materials of the equipment.
Illegal disposal of the product by the user will be punished by application of the administrative fines provided for by the legislative decree no. 22/1997 (article 50 and following of the legislative decree no. 22/1997).
Notes
Indice
Indice 17
Introduzione 18-19