
HM-Sen-RD-O - Uncategorized Homematic IP - Free user manual and instructions
Find the device manual for free HM-Sen-RD-O Homematic IP in PDF.


User questions about HM-Sen-RD-O Homematic IP
0 question about this device. Answer the ones you know or ask your own.
Ask a new question about this device
Download the instructions for your Uncategorized in PDF format for free! Find your manual HM-Sen-RD-O - Homematic IP and take your electronic device back in hand. On this page are published all the documents necessary for the use of your device. HM-Sen-RD-O by Homematic IP.
USER MANUAL HM-Sen-RD-O Homematic IP
text_image
HomeMaticPrinted in Hong Kong
1st English edition 03/2013
Documentation © 2013 eQ-3 Ltd., Hong Kong
All rights reserved. This manual may not be reproduced in any format, either in whole or in part, nor may it be duplicated or edited by electronic, mechanical or chemical means, without the written consent of the publisher.
Typographical and printing errors cannot be excluded. However, the information contained in this manual is reviewed on a regular basis and any necessary corrections will be implemented in the next edition. We accept no liability for technical or typographical errors or the consequences thereof.
All trademarks and industrial property rights are acknowledged. Printed in Hong Kong.
Changes may be made without prior notice as a result of technical advances.
130220/V 2.0
Table of contents
1 Information about this manual 20
2 Hazard information....20
3 Function 21
4 General system information about HomeMatic ..... 22
5 General information about radio operation ..... 22
6 Installation and start-up 23
6.1 General notes on installation 23
6.2 Mounting and connection 23
6.3 Teaching-in, configuration, sealing device .....27
7 Operation....30
8 Resetting to the as-delivered condition ..... 31
9 Device LED feedback....31
10 Response to power recovery .....32
11 Maintenance and cleaning 33
12 Technical data 33
1 Information about this manual
Read this manual carefully before beginning operation with your HomeMatic components.
Keep the manual handy for later consultation!
If you hand over the device to other persons for use, please hand over the operating manual as well.
Symbols used:

Attention! This indicates a hazard.

Note. This section contains important additional information.
2 Hazard information

The device may only be operated in tightly closed condition to avoid ingress of water and short circuits.

The device must be mounted in such a way that it cannot fall down or cause damage.
3 Function
The HomeMatic Wireless Rain Sensor immediately detects rain and snow. Due to a low detection threshold and a large sensor area the device easily detects rain. Thus, switching commands will be send immediately to taught-in HomeMatic devices. The HomeMatic Rain Sensor can be used for example in connection with a shutter actuator to enable automatic retraction of canopies in the event of rain.
An integrated sensor heating accelerates drying of the sensor area which prevents freezing or dew formation. However, unintended switching signals are being avoided.
In connection with the HomeMatic CCU an individual filter time can be set. The filter time is defined by a period of time during which rain has to be detected before a switching command will be send to a taught-in device. Thus, it will be avoided that already short contact with humidity (e.g. water splashes) will trigger an action.
Single operations, such as teach-in mode, factory reset, sending of commands, are displayed by a Duo LED (red, green, orange). Rain detection will be displayed by a second LED (green).
The rain sensor is suitable for outdoor installation. The device is equipped with brackets for wall and mast mounting.
The device must be operated with a DC voltage of between 7.5 and 30 V.
4 General system information about HomeMatic
This device is part of the HomeMatic home control system and works with the bidirectional BidCoS® wireless protocol. All devices are delivered in a standard configuration. The functionality of the device can also be configured with a programming device and software. The additional functions that can be made available in this way and the supplementary functions provided by the HomeMatic system when it is combined with other components are described in the separate Configuration Instructions and in the HomeMatic System Manual.
All current technical documents and updates are provided at www.HomeMatic.com.
5 General information about radio operation
Radio transmission is performed on a non-exclusive transmission path, which means that there is a possibility of interference occurring. Interference can also be caused by switching operations, electrical motors or defective electrical devices.

The range of transmission within buildings can differ greatly from that available in the open air. Besides the transmitting power and the reception characteristics of the receiver, environmental factors such as humidity in the vicinity have an important role to play, as do on-site structural/screening conditions.
eQ-3 Entwicklung GmbH hereby declares that this device complies with the essential requirements and other relevant regulations of Directive 1999/5/EC. You can find the full declaration of conformity at www.HomeMatic.com.
6 Installation and start-up
6.1 General notes on installation

The device has to be mounted at a location where rainfall can be detected by the sensor area („free view to the sky“), e.g. on a wall without roof overhand or a free-standing mast. Please also consider to mount the device close to a power supply.

Especially if the device is mounted near the ground please consider to select a mounting location where the sensor area will not be polluted by whirled up dust.

The rain sensor, connecting cables and the power supply unit have to be mounted out of the reach of children and animals.

When mounting the rain sensor, please ensure that it is not installed directly on or in the vicinity of large metal objects, as this would reduce the wireless range.
6.2 Mounting and connection
The rain sensor is equipped with an assembly bracket that enables mounting on a horizontal surface (stand) or a vertical surface (wall mount). For mounting the device on a mast or railing, an additional mast clamp is supplied. The clamp can be easily fixed to the assembly bracket.
The figures below show the different mounting possibilities. The LED window (A) always has to be positioned upwards to the left and the cable bushing (B) at the bottom.
Mounting possibilities
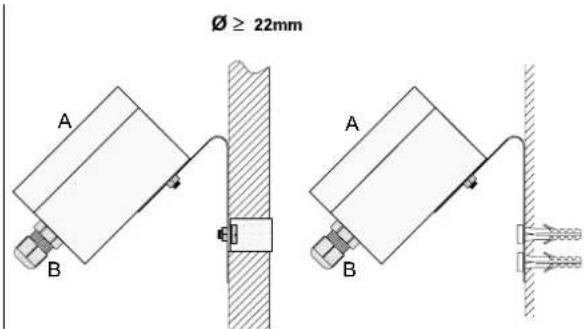
text_image
Ø ≥ 22mm A B A BMast mounting Wall mounting

text_image
A B Mounting onMounting on horizontal surface
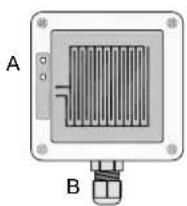
Mounting position: cable bushing at the bottom, LED window left
Power supply
The power is supplied by an external power supply unit with a DC voltage of between 7.5 and 30 V. The device has a maximum current consumption of 250 mA. Thus, e.g. a plug-in main adapter or a water resistant outdoor transformer with DC output socket may be used. Plug-in main adapters may only be used in dry interiors.
- Wire a water resistant line (max. diameter of 5 mm) from the location of the power supply unit to the location of the rain sensor and fix them to the building (e.g. with nail clamps). It is of particular importance that the cables close to the rain sensor are fixed properly to avoid any tensile load of the cable bushing.
- Unscrew the cable bushing of the rain sensor and remove the housing cover by releasing the four housing screws.
- Feed the power supply cable trough the cable bushing into the housing, strip 5 mm from the end of the cables and connect the cable to KL 1 using the correct polarity.
Connection, control and display elements
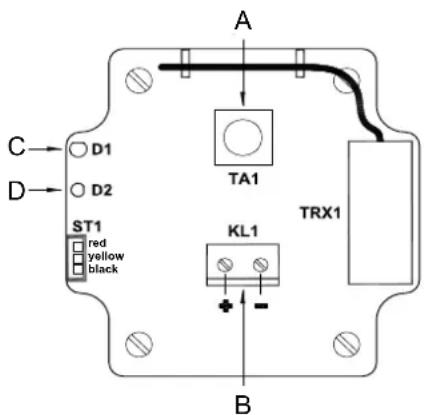
text_image
A TA1 TRX1 C→○D1 D→○D2 ST1 red yellow black KL1 BA Configuration button
B Power supply
C Rain status display (green)
D Device LED (red-orange-green)
6.3 Teaching-in, configuration, sealing device

Please read this entire section before starting the teach-in procedure!
To integrate the rain sensor into your HomeMatic system and enable it to communicate with other HomeMatic devices, you must teach it in first. You can teach-in the rain sensor directly to other HomeMatic devices or to the HomeMatic central control unit
6.3.1. Teaching-in to HomeMatic devices
If you would like to teach-in the rain sensor to one or more Home-Matic devices, you must put the devices to be linked into teach-in mode and select the required teach-in channel. To do this, proceed as follows:
- Switch on the power supply of your rain sensor.
- To teach-in the device, press and hold down the configuration button shortly (<4s). The device LED will flash orange continuously to indicate that teach-in mode is active.
- The device LED lights up green to indicate that teaching-in has been successful.
- After teaching-in, seal the device by replacing the housing cover (LED window to the left!) and use the four screws to screw the cover back on.
- Please make sure that the neoprene seal is fixed properly around the housing groove of the cover.
- If no teach-in operations are carried out, teach-in mode will be exited automatically after 20 seconds. The device LED will stop flashing.
6.3.2 Teaching in to a HomeMatic central control unit
Your device can be conveniently
• controlled and configured,
- connected directly to other devices or
• used in central control programs
by using the HomeMatic software „WebUI“. Therefore, your rain sensor has to be taught-in to the HomeMatic central control unit first. New devices are taught-in to the central control unit via the HomeMatic „WebUI“.

A soon as a component has been taught-in to a central control unit, it can only be connected to other components via this unit.
Each component can only be taught in at one central control unit.
During teach-in, please make sure you maintain a distance of at least 50 cm between the HomeMatic devices and the central control unit.
To teach-in your device to the central control unit, proceed as follows:
- Open the „WebUI“ user interface in your browser. Click the „Teach in devices“ button on the right-hand side of the screen.
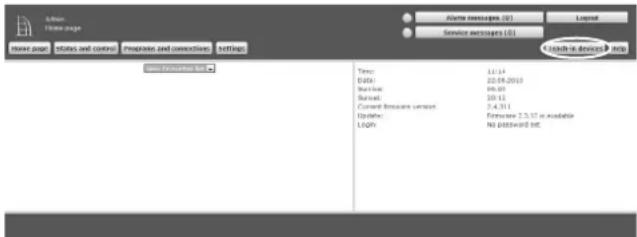
text_image
File: Home page Browse pages: status and control: programs and connections: Settings Name: 11.14 Date: 22.09.2012 Balance: 99.03 Period: 20.12 Current license version: 7.4.301 Update: Remote 2.5.17 is available LOG: No postward log- To activate teach-in mode, click „BidCoS-RF teach-in mode“.
- Teach-in mode remains activated for 60 seconds. An information box shows how much teach-in time remains.
- Meanwhile, please activate the teach-in mode of your rain sensor as well (see sec. 6.3.1).
- After a short time, the newly taught-in device will appear in the inbox of your software interface. The button „Inbox (x new devices)“ indicates how many new devices have been taught-in successfully.
- If required, you can teach-in additional devices by repeating the steps described above for each device.
- Now configure the newly taught-in devices in the inbox as described in the next section.
6.3.3 Configure device
- Once you have taught-in your device to the HomeMatic central control unit, it will be moved to the inbox. Here, you must configure the device and its associated channels in order to make them available for operating and configuration tasks. Give the device a name and assign it to a room. You can also make individual parameter settings.
- Now you can use the „WebUI“ user interface to control your device, configure it, connect it directly with other devices, or use it in central control unit programs. Please refer to the „WebUI“ operating manual for more details (you can find this in the „Downloads“ area of the website www.homematic.com).
7 Operation
Direct operation of the device is not possible and can only be carried out via taught-in devices or the HomeMatic CCU.
If rain is detected it will be indicated by the green device LED for rain status display. The LED will light up for as long as rain will be detected.
If the device is directly taught-in to an actuator the device LED will flash green if a switching command is triggered.
In case of programming of actuators please note that the rain sensor only triggers switch-on commands. If the rain stops no switch-off command will be send.
If the device is operated in connection with the HomeMatic CCU or the configuration adapter, connections with other devices and programs can be set up.
For the rain detection, an additional filter time for the detection can be set up.
The heating of the rain sensor can be controlled in programs via CCU commands. However, for operational safety reasons the heating will always be switched on when power is recovered after power failure.
In case of a direct actuator connection the sensor heating will be switched on permanently.
8 Resetting to the as-delivered condition
The factory settings of the rain sensor can be restored manually. Restoring the initial state deletes all settings and information about taught-in devices.
- To restore the factory settings of the rain sensor, press and hold down the configuration button for at least 4s. The device LED starts to slowly flash red.
- If required, you can stop the process by briefly pressing the configuration button again or by waiting 20s without operating the device. In both cases, the flashing of the device LED will stop.
- To restore the factory settings of the device, now press and hold down the configuration button for a least 4s again. Rapid flashing of the device LED indicates that the factory settings are being restored.
- When the configuration button is released restoring will be indicated by the device LED flashing red for 3s.
9 Device LED feedback
Various error states of the device are indicated by the device LED flashing:
| Flashing sequence Status | |
| 1 x long, 1 x short red T | transmit limit (duty cycle*) reached |
| 1 x long, 2 x short red D | device defect, please contact service department |
\* Duty Cycle
The duty cycle is a legally regulated limit of the transmission time of devices in the 868 MHz range. The aim of this regulation is to safeguard the operation of all devices working in the 868 MHz range.
In the 868 MHz frequency range we use, the maximum transmission time of any device is 1% of an hour (i.e. 36 seconds in an hour). Devices must cease transmission when they reach the 1% limit until this time restriction comes to an end.
HomeMatic devices are designed and produced with 100% conformity to standards. During normal operation, the duty cycle is not usually reached. However, repeated and wireless-intensive teach-in processes mean that it can be in isolated instances during start-up or initial installation of a system. This can happen for example when setting and testing the detection range of taught-in motion sensors.
If the duty cycle limit is exceeded, the device may stop working for a brief period and will be indicated by one long and one short red flash of the device LED.
Calculation of the current duty cycle value in the device will be dynamically. The device will start working correctly again after a short period (max. 1 hour).
10 Response to power recovery
When the operating voltage is switched on (recovery of mains voltage), the device checks its components. The LED will flash if an error is detected during this check. This is repeated continuously and the device does not perform its function.
If the test is completed without errors, the device transmits a wireless telegram containing its status information. To prevent all HomeMatic devices from transmitting at the same time when power is recovered (after a mains power failure or a disconnection, for example), there is a random delay before the device transmits. During this time, the device LED flashes (as in teach-in mode). If the delay is very short, this flashing may be almost imperceptible. When power is recovered the sensor heating will always be switched on.
11 Maintenance and cleaning
The product does not require any maintenance. Enlist the help of an expert to carry out any repairs.
Use a dry linen cloth to clean the device. If the device is particularly dirty, you can slightly dampen the cloth to clean it. Do not use any detergents containing solvents for cleaning purposes.
Please clean the contacts of the sensor PCB with a light, not material-removing polish agent at regular intervals (according to the air and rainfall pollution every 3 to 6 months).
12 Technical data
Short name: HM-Sen-RD-O
Protocol:
Radio frequency: 868.3 MHz
Typ. Open air range: Up to 100 m
Receiver class: SRD Class 2
Supply voltage: 7.5 - 30 VDC
Current consumption: 250 mA (max.)
Heating power sensor: Approx. 1 W
Power consumption in standby: 0.4 W (without sensor heating)
Degree of protection: IP44
Operating temperature: -20°C to +55°C
Storage temperature: -40^ to +85^
Dimensions (W x H x D): 80 x 82 x 55 mm
Weight: 266 g
Instructions for disposal:

Do not dispose of the device with regular domestic waste. Electronic equipment must be disposed of at local collection points for waste electronic equipment in compliance with the Waste Electrical and Electronic Equipment Directive.

The CE sign is a free trading sign addressed exclusively to the authorities and does not include any warranty of any properties.

text_image
eQBeQ-3 AG
Maiburger Straße 29
D-26789 Leer
www.eQ-3.de